
Rachael Ray's Blog, page 50
September 1, 2013
Late Summer Bounty: Peach, Vanilla and Basil Popsicles
This time of year fresh produce is bountiful and beautiful. I always have mixed feeling when I stroll the farmers market or the produce aisles at the supermarket because all of the peaches, plums, corn and nectarines remind me that summer is coming to an end. I scramble to buy and eat as much of it as I can in an attempt to savor every last bit of summer.
There’s just something about this last summer hurrah that always gets me excited to try new recipes and create new flavor combinations. This week, peaches were calling my name. Since peaches are extra sweet and at their peak of ripeness right now, I wanted to showcase them as close to their natural state as possible. Purees are always a good way to use up fruit that is super ripe and even slightly bruised. A lot of the time I make fruit purees and freeze them in ice trays for later use in sweet or savory sauces but this week I decided to give the entire family a treat by making popsicles.
My garden is overflowing with basil right now so I figured I’d toss some into the food processor along with the peaches and a hint of vanilla extract to turn a simple popsicle into something spectacular. This flavor combo may seem a little strange, but I assure you the sweetness of the fresh basil adds a wonderful background flavor to the peach popsicle. These treats are unexpected and fun— the perfect way to savor the last few moments of summer. Enjoy!
Peach, Vanilla, Basil Popsicles
Makes 4 (6 ounce popsicles)
Ingredients:
4 large peaches, de-toned and cut into large chunks
2 tablespoons sugar (optional)
1 teaspoon pure vanilla extract
1/4 cup fresh basil leaves
Instructions:
1. Place the first three ingredients into the bowl of a food procesor. Process until completely smooth, about 5 minutes. Add in the basil and pulse until basil is broken down into tiny pieces but not completely pureed (this makes for a prettier presentation), about 30 pulses.


2. Pour peach puree into molds and freeze for at least 6 hours. Enjoy!


August 31, 2013
Graduation Day From Grilling U: Grilled Prime Rib for Labor Day
The last gasp of summer is upon us: three days of enforced jollity, beers that warm too fast in the summer sun, and parties where you only know four people. We’ve all been there. But there is one good place to be at any warm-weather holiday party, and that is at command center, right in front of the grill. I think a lot about grilling in terms of meat, or my obsession with live fires, or in terms of how to cook things nobody pays attention to or cares about exactly right. But everyone agrees that, whatever you think of grilling, people tend to gravitate toward the fire, drawn like moths to their salty doom. So you are at the helm. What do you make?
It’s not an easy choice. Burgers are too hard, too humble, and require far too much attention. Steak, or at least the kind of steak that you wouldn’t be embarrassed to feed people, is outrageously expensive. If you have more than four or five people coming over, there’s no way to pull it off. You might as well just chopper in lobster from Maine. Chicken has a tendency to flare and blister, and god forbid if anyone ever gets a piece that’s underdone. Run for the hills. A whole suckling pig is probably the most mind-blowing of home grilling dishes, but it takes special ordering and advanced skills.
What you really want for your Labor Day barbecue is a whole, bone-on prime rib. A good one will be over $100, and even in more in terms of expectations. It’s one thing to cook a great pork blade chop; nobody expects that to be good. But prime rib is another story. The funny thing is that, for all the roast’s unwieldiness, it’s actually far more forgiving than any number of cheaper cuts. Prime rib on the grill isn’t an easy cook; it’s a ridiculously easy cook.
Here’s how to make it.
The Prep
Get a Prime rib roast. Don’t assume that “prime rib” is actually USDA prime; it almost certainly isn’t unless they tell you otherwise. It doesn’t need to be dry-aged or anything like that. They will likely want to sell you the full 8-bone roast. That is too much. Get a three or four bone roast – five at the very most. Three bones will feed 3 gluttons, four hearty eaters or five regular people; figure accordingly.
Finely mince fresh rosemary, thyme, oregano, parsley, and whatever else you feel like. Rub the roast with olive oil. Rub the herbs into it (except on the bones, obviously.) Salt liberally on all sides with kosher salt. Pepper is optional.
The Fire
Build a two-zone fire – that is to say, one with hot coals on one side and no coals on the other. Coaling is really the most challenging part of this cook, but it’s not really so much challenging as awkward and aggravating. Every 45 minutes to an hour you will need to add fresh hot coals in. That means taking the roast off, setting it on a cutting board or platter, removing the grill – which is way hot – and dumping a chimney full of coal, and then replacing. This will slow down the cooking, but there is no way around it. If at all possible, try to get some wood chunks; they will add to the flavor of the beef immeasurably.
Since the roast will be periodically exposed to the air, naked as the day it was born, for this purpose, you should take advantage of its indecency to slather it with some kind of liquid. It doesn’t really need it; its generous fat cap will keep it plenty juicy, almost frying it as it cooks; but that’s no reason not to paint on a glaze. Cut your favorite barbecue sauce 50/50 with beer or apple cider, and have at it.
The Cook
Brown the roast nicely on all sides over the coals. Move it to the cold side; the bones should face the fire; they are a kind of heat shield for the meat.
Set it on the cold side. Close the lid and open the vents.
Go away until it’s time to add coals. Depending on the size of your roast, it should take anywhere from two to three hours. You won’t know for sure how it’s doing without taking its temperature, so have a meat thermometer handy. I pull the roast when the center is at 130 degrees. That means a deep pink in the center, even after sitting, with plenty of pale pink meat on both sides; something for everyone.
Set the roast aside for twenty minutes or so. Show it to everybody at the table; then go back and carve it up.
The Carve
The rib bones are barely attached, if the butcher knew his business. Cut them right away. You now have a boneless cylinder of crusty, fragrant, juicy prime beef. For an easy, simple service, just slice it up into thickish (1″) pieces, and be sure to wipe them in the cutting board juices. Sprinkle with any leftover herbs, and a goodly pinch of kosher salt. Serve. Accept the homage of all present.
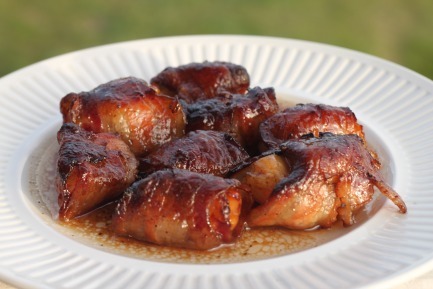
5 Must-Try Bacon Dishes
Did you know that today is International Bacon Day? In honor of the holiday we’re rounding up some of our favorite recipes with… you guessed it: BACON!
Here are five quick and simple recipes worth trying out this weekend. Oh, and happy bacon day!
1 - Rachael Ray’s Tex-Mex Bacon Cheeseburgers with Chipotle Ketchup (above)
Looking for an awesome burger recipe this Labor Day weekend? This is a must-try!
2 - Bacon Burger Mac ‘n Cheese
This creation marries two of our favorite things. Bet you’ve never had mustard, relish and pickles in your mac and cheese before.
3 - Dark Chocolate Chip Bacon Pancakes
Surprise your family this weekend with this unexpected chocolate and bacon combo.

This delicious grilled cheese is filled with bacon and tomato jam and stacked with bacon, tomatoes, chives and cheese.
5 - Balsamic Soaked Bacon-Wrapped Scallops
This is a great appetizer because it’s decadent, delicious and super simple to prepare.
Are you cooking up some bacon this weekend? Tell us all about what you’ve got planned in the comments.
Images by Lizbeth Axell
August 30, 2013
How To: Butterfly A Whole Chicken
We all love a roast chicken. It’s comforting, delicious and just so quintessentially tastes like home. It also takes a time commitment to cook all the way through – time that I don’t always have. Next time you’re craving that “Sunday Dinner” meal on a weeknight, refer to a butchering technique that chefs call spatchcocking.
To spatchcock (some say spattlecock) a chicken is to remove the sternum and backbone of the bird so that it can lay flat. Once flat, it can be cooked in about half the time it would take to roast the bird whole. Butterflying a whole chicken is a great time-saving technique that only takes a few minutes to do once you get the hang of it. It also makes for a beautiful presentation when served whole on a platter. Follow the simple steps shown below and give it a try next time you’re entertaining or craving a bit of weeknight comfort.

STEP 1: PREPARE THE BIRD
Grab whatever size chicken you would normally roast and remove the neck and giblets from it. Get a sharp paring knife and a pair of kitchen scissors and get ready to butterfly your first whole chicken!
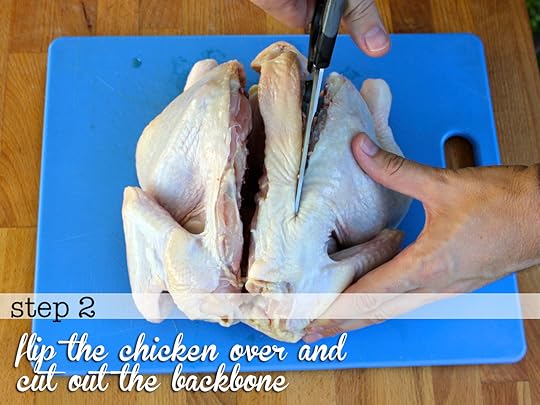
STEP 2: REMOVE THE BACKBONE
Place the chicken on a cutting board breast-side-down. Working from the cavity opening up to the neck, cut down each side of the back bone with a pair of kitchen shears. Discard the backbone.
Grab the chicken with one breast in each hand and open it like a book, exposing the cavity of the bird. The breast bones should crack a bit – that’s totally normal.
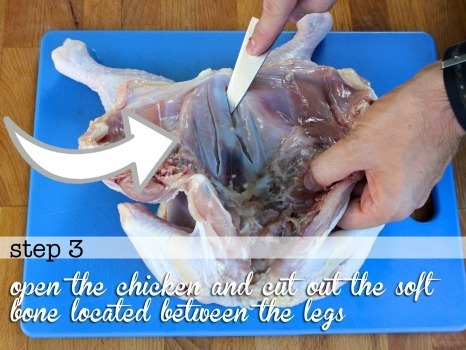
STEP 3: CUT OUT THE SOFT BREAST BONE
Running from the middle of the bird down between the two legs is a soft bone – this is the breast bone. It’s a triangular shape that is firm towards the middle of the bird and becomes softer cartilage as it tapers down between the legs. To remove it, use a paring knife to cut down either side of it.
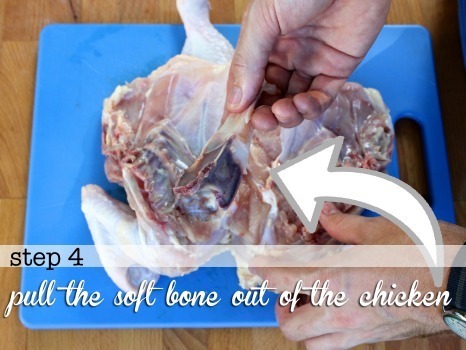
STEP 4: REMOVE THE SOFT BREAST BONE
Once you’ve cut it free, use your fingers to simply pull out the breast bone. Discard the bone.
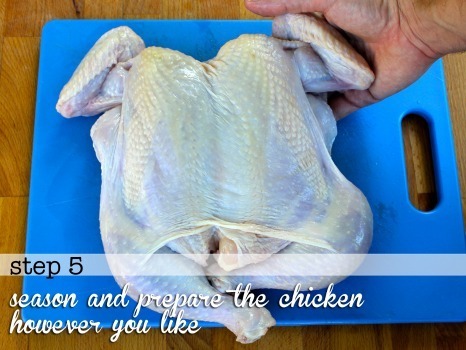
STEP 5: GET TO COOKING!
That’s it, you’re done! You’ve spatchcocked your first chicken! From this point, the chicken can cook flat either on a grill or you can sear it in a large skillet and then finish roasting it in the oven. Either way, it will cook through in about half the time roasting a whole bird would.
Patrick W. Decker’s life revolves around food. Always has, probably always will. As a graduate of The Culinary Institute of America and past member of the culinary teams for Food Network stars Rachael Ray, Sandra Lee, Marc Forgione, Bobby Deen and Paula Deen, he now works as a food stylist and producer in NYC by day and a food writer and recipe developer at his home in New York’s Hudson Valley by night. You can see what he’s up to by following him on Instagram at @patrickwdecker or visiting his website at patrickwdecker.com .
10 New Ways to Use Tennis Balls and Racquets at Home
Once an aspiring tennis player, I always enjoyed the thrill of hitting an ace. Those days are long gone and clearly I never became a Serena or Venus Williams, Billy Jean King or Chris Evert. Instead I’ve traded in my love of tennis for finding unusual ways to use its most important equipment… ye ole tennis ball and racquet. So as I watch the 132nd US Open and remain in awe of the incredible talent and my lack thereof, I thought I’d serve up 10 of my favorite uses for them.
1. Fluffs: Toss a ball in your dryer before turning it on to fluff comforters and reduce static cling…. WARNING: depending on how much laundry is in there, the sound may cause a headache!
2. Buffs: Throw one into your laundry the next time you’re washing your shower curtain along with a cupful of vinegar. The ball acts as a scrub to remove scum ‘n mildew and the white vinegar will kill any mold. LOVE THAT!!!
3. Scuffs: I love my stilettos but they can leave scuff marks on my kitchen floor. Simply cut an X in a tennis ball and place on the handle of your broom. Then simply flip and rub those scuffs out. Dancing as you do so is optional!
4. Sucks: Bounce one into your pool every few days to absorb the oils from suntan lotion.
5. Repels: Cover one in Vaseline and hang it on a bush or tree to keep flies away.
6. Traps: Cut a ball in half and fill with beer to trap slugs.
7. Massages: Put three in a sock and tie the end. Then put it betwixt your back and a wall to massage your back. I still prefer a good set of paws massaging me but this is a simple alternative.
8. Saves: Cut a slit large enough to insert any loose change. Keep one in the laundry room for all that laundered money! Can also have your kiddies craft one into a Ducky or Piggy (use pink balls) for their own savings!
9. Cleans: Cover racquet head with old cloth or micro-fiber. Secure with a scrunchie and spray with your fave household cleaner to get to hard to reach spots like under your refrigerator, between cabinets, etc.
10. Swatter: No, not for flies since the racquet’s holes are too big (unless the flies in your area are on steroids, and in that case MOVE!!). Use it to swat sand out of towels and blankets from the beach.
Bonus: Don’t forget your good ole tennis can. Use them to store and organize pens and pencils, small toys, silverware, paper clips and more!
Image courtesy of PetteriO
August 29, 2013
Lunch is not a democracy!
Ready for a little parental guidance that will help you stay sane while serving time in the lunch box trenches? Remember this:
Lunch isn’t a democracy. At best it is a benevolent dictatorship.
Face it, lunch packing is a pain in the butt. Between the shopping and the prepping and the packing, there is little about it that is convenient or fun.
Even if you have an angel of a child who gleefully gulps down anything you care to toss in a brown bag, lunch packing can be an onerous part of the morning rush.
Now complicate things with a picky eater – No crusts! No vegetables! Nothing can touch! Only white and blue foods! – and it’s easy to despise this task.
So what’s a harried parent to do as the kids head back to school? Turn to Dr. Google and you’re bound to get ample advice, much of it centered around letting the kid guide the ship.
It’s a nice idea. Because truth is, if kids feel they can influence the process, they are more likely to embrace whatever lands in their lunch boxes.
But it’s also the sort of idea that works best in those fairy tale cookbooks that assume children are always agreeable and decisive, and parents somehow have time to carve cheese into cartoon characters and mold rice into 3D animals.
My life just isn’t quite so precious.
The trouble with the “involve your kids” advice is that it is so easily followed out the window.
Suddenly, you find yourself battling at the grocery store over why this or that is or isn’t acceptable. And the battles kick up again each morning as the kids hem and haw over what pleases their royal tummies that day.
No thanks. At that point, we’ve ceded control over this to the kids. And that never ends well for anyone involved.
So let’s break it down with some sensible ways parents can reap the benefits of involving their kids in their lunches, but still retain control (and their sanity).
THE SHOPPING
I don’t have a problem with letting kids help with the shopping. Or even in making decisions about what goes in the cart. But this isn’t a free-for-all.
Because remember, grocery stores are designed to tempt kids with sugary junk. Food companies pay serious cash to get their brightly colored boxes placed at eye level for kids. It’s intended to make your job harder.
So while it’s fine to give kids choices while shopping, you also need to set clear parameters.
As in, this is not a “Go pick what you want for lunch.” Rather, it is a, “Pick two of these three vegetables.” And “Which whole-grain cracker do you want?”
THE PACKING
I never let my son decide what goes in his lunch box on any give day.
Let me repeat that. I never let my son decide what goes in his lunch box.
And neither should you.
Once you invite debate about lunch, you’ve opened yourself up to a lovely morning of knock-down, dragged out haggling over what goes in the box.
Because none of us has anything better to do in the morning, right?
That’s why I say, what I pack each day isn’t up to him.
I might sometimes ask, “Do you want this or that?” But even that level of discretion is limited.
I will sometimes warn my son about the contents of his lunch box. If, for example, I packed something I know he won’t be thrilled with, I’ll let him know, but also tell him about the thing I packed that he will look forward to. Neither he nor I like surprises, so this just seems fair.
Why not let kids decide? Not because I enjoy being a cruel dictator who quashes his son’s free will (though there are days when that joy gets me through the morning).
I try hard to pack things I know he will enjoy. But I also try hard to balance that with the things I know he needs to eat more of.
I leave him out of the equation because I often have good reasons for wanting to pack one thing over another.
Maybe I’m trying to use up leftovers before they spoil. Maybe I don’t have time to make something more complicated. Maybe I know that his diet for the past couple days has been sketchy and today really ought to focus on healthy choices.
Kids aren’t – and shouldn’t – take any of these things into account. That’s our job.
Which is why I say, lunch is not a democracy.
J.M. Hirsch is the national food editor for The Associated Press. He blogs about the trials and tribulations of his son’s lunches at LunchBoxBlues.com. His upcoming cookbook, Beating the Lunch Box Blues, will be the first to be released by Rachael’s new publishing venture, Rachael Ray Books. Hirsch’s previous books include High Flavor, Low Labor: Reinventing Weeknight Cooking and Venturesome Vegan Cooking. He lives in New Hampshire with his son, wife, and too many cats.
August 26, 2013
The Magic of Marrow
Imagine a kind of magic elixir, a perfume that is undetectable, invisible, and imparts an irresistible attraction to its wearer. A kind of love potion, if you will. Well such a thing exists! But sadly, it only works on meat. But that doesn’t meat you shouldn’t use it, or that you should fall for the hype when somebody else is using it.
I am here to tell you about marrow.
Marrow is on menus everywhere these days; it’s the little black dress of gastronomic fashion. It sounds simultaneously crude and virtuosic, virile but also super-refined. Really, all it is is fat. I understand little of its function in the body, which has something to do with the production of white blood cells - which makes no sense, because why would blood cells come out of a bone? - but anyway, it looks and tastes like fat. The one difference is a certain unmistakeable slickness it leaves; like a creepy uncle, it leaves an unmistakable flavor behind that you just can’t seem to wash off. It’s so fatty that it makes regular fat seem like meat. One jigger buzzed in to a sauce, make it seem fit for the crowned heads of Europe; two can change spa food to something that might have grossed out Elvis.
Which is why they are so useful with steak. Slick even the most unexceptional Food Lion steak with a little marrow pomade, and put it on a big platter all fanned out, and you can charge practically anything you want for it at a steakhouse. This trick works at home, too. Recently, I seared up some just-average steaks on my Weber grill, cooking them hard and fast, as I am wont to do. With a better steak, I would go the Adam Perry Lang “board dressing” route, bathing them in a mashup of beef juice, olive oil, fresh herbs, garlic, and onions. But for meat this weak stronger medicine was needed. I busted some marrow bones out of the freezer where they had been patiently waiting, and cooked them up in a hot oven while I was building up my fire. I added some onions, too, not because I wanted to eat greasy beef onions - although I do - but because a slight sweetness is very much needed in this industrial-strength lubricant. I also threw some five or six cracked, peeled garlic cloves in there too. But that’s just me.
The key to using marrow correctly, and I can’t stress this too much, is: marrow is a liquid. Nobody wants to eat actual marrow at the table; even I, the poster boy for tallow addiction, can’t bear it. Every great use of marrow I’ve ever seen has been behind the scenes, adding authority and body to other things. Marc Forgione created a marrow maitre’d butter for Meatopia whose shock waves reverberated across steakhouse nation; Michael White’s fusilli with octopus and marrow is probably the single most celebrated new pasta dish to come out in my lifetime. Neither of these dishes involves spooning the stuff directly out of a broken bone. To me, that’s just nasty.
Marrow: Get five or six cross-cut shin bones from your butcher. If you just call them “marrow bones” he will know what you mean, even though the term is a medically unsound one. Cut up a large onion, put it in a big roasting pan or cast-iron skillet, and rest the bones on top of that. Put it in a hot oven until most of the marrow melts. That’s it. You now have a culinary superweapon. Use it wisely.
Cooking Up Tomatoes with a Southern Twist, + a Recipe for Sungold Tomato Sauce
Here we are at the height of tomato season, and fast approaching one of the biggest holiday weekends of the year. I know I’ll be including tomatoes in my Labor Day cookout-sliced tomatoes for burgers come to mind-but I found some surprising new ways to prepare this celebrated summer ingredient in a new cookbook called, appropriately, Tomatoes, by Miriam Rubin (University of North Carolina Press, 2013). This compact book is from the Savor the South series, and it takes a deliciously Southern approach to tomato cookery. Excuse me, Tomato Cobbler? Yum! The array of luscious recipes that Rubin has gathered in her book got me excited, so I asked her to tell me more about cooking with one of our most beloved ingredients, the tomato.

In the book, you talk about how and when a tomato “becomes Southern.” What does this mean?
There are certain heirloom tomatoes that grow well in the south, such as Cherokee Purple and German Johnson, for starters. But what it really means is that they are given a southern touch, stewed with okra, dredged in cornmeal and fried, simmered with bacon drippings and thickened with flour for tomato gravy, but most iconically (and so deliciously), slathered with mayonnaise (the brand is a matter of much dispute) salted well and slapped between two slices of soft white bread. Then eaten over the kitchen sink, because it’s drippy!
There is a chapter in the book called Main Dishes, Pies, Casseroles, and Cobblers. Wow! The idea of crusty, flaky baked goods made with tomatoes is irresistible. Is this a particularly Southern way of using tomatoes? What in the name of deliciousness is a “tomato cobbler?”
Well, we can assume that something wonderful, such as a pork tenderloin and green tomato stew is made even better when put under a biscuit, and when I think biscuit I think south, where quickly made breads and pastry toppings are an art form. There’s a recipe I adapted from one by Edna Lewis: Baked Tomatoes with Crusty Bread that’s a riff on a church supper favorite. My Tomato Cobbler is a vegetarian main dish of simmered tomatoes and frying peppers with a soft cobbler topping made from corn kernels and cornmeal. It’s pretty wonderful to eat and gorgeous to look at.

In the book, you include some historical tidbits about tomatoes. Can you explain how they came to North America?
Tomatoes came from South America, traveled to Central America where they were eaten by the Mayans and other Mesoamerican peoples who also cultivated them. The Spanish carried them to Europe after the Conquest, and then they spread to Italy and the Mediterranean. Tomatoes returned to the United States with settlers, explorers and colonists and in the pockets of immigrants, and, it is assumed, traveled up from the Caribbean.
Many of us get stuck cooking tomatoes the same way year after year. How can people expand their tomato repertoire?
Well, in the book I offer recipes from soups to salads to casseroles; there’s a cake, a savory and a sweet pie and preserves. So there’s lots to choose from. Sauces are not just a red tomato sauce, but a Sungold Tomato Sauce, a Green Tomato Pasta Sauce from Abruzzo, and a Jalapeno Tomato Gravy. If you grow your own tomatoes or are interested in putting some by, there are plenty of choices for saving the harvest.
And even if you don’t “grow your own” or want to preserve the season’s bounty, there are lots of new and classic ways to prepare and adore this favorite fruit. Yes, it’s a fruit, that’s most-often used as a vegetable.
Your book is part of the Savor the South series. What is the series all about?
These are single-subject books, each focusing on an iconic Southern ingredient. My topic, gloriously, is tomatoes, which I grow and have written about in my cooking and gardening column, “Miriam’s Garden” which runs seasonally in the Pittsburgh Post-Gazette. Other books in the series are on Pecans, Peaches, Okra, Biscuits, Buttermilk and Bourbon.
But the recipes in all our books are not just southern, they span the globe. I include a recipe for Matbucha, a popular tomato dip/salad that’s served throughout Israel. I have my twist on Italian Caprese salad, and a yummy roasted tomato tapenade as well.
You keep a vast vegetable garden at your home in Pennsylvania. Did you test these recipes using your own tomatoes?
I grew nearly every tomato myself. There’s nothing like your own tomatoes, the freshest, vine-ripened most fragrant and juicy! When the season started to slow down, I “borrowed” tomatoes from my neighbors and a local farm. So all grown within 5 miles of here, and most right out the side door and through the garden gate!

Could you share one of your favorite tomato recipes with us?
The recipe I’m sharing is a fun one! Sungold Tomato Sauce. It’s sweet and spicy with a touch of mint and I love it on small whole-wheat pasta. If you can’t get enough Sungolds, you can also add some larger yellow or orange tomatoes. But what you need is that pop of sweet-tart flavor that’s the trademark of a Sungold.
Sungold Tomato Sauce
From TOMATOES: a Savor the South® cookbook by Miriam Rubin. Copyright © 2013 by Miriam Rubin. Used by permission of the University of North Carolina Press. www.uncpress.unc.edu
Sungold cherry tomatoes, the tangerine-hued, juicy-sweet pops of flavor, are tops on everyone’s list. They’re also easy to grow, but be sure you have the space because the prolific plant can reach over six feet tall. My newspaper editor’s young son, Jesse, loves them, and like a deer, he will eat a plant bare. This sauce is on the thin side, so it is best tossed with a spoonable pasta, such as elbows or orzo, and served in bowls. Whole wheat pasta is especially good. Maybe cook some tiny peas or thin pieces of asparagus with the pasta for a minute before it’s drained.
Makes 4-5 servings, enough for 1 pound of pasta
3 tablespoons olive oil
3 large garlic cloves, minced
1⁄2 teaspoon dried oregano
1⁄2 teaspoon crushed red pepper flakes
4 cups halved Sungold cherry tomatoes
8 small, crisp yellow tomatoes, such as Yellow Perfection or yellow pear tomatoes (1 pound), halved or quartered (about 3 cups)
3⁄4 teaspoon kosher salt
1⁄4 cup chopped flat-leaf parsley
2 tablespoons chopped mint
Heat the olive oil in a large, deep, heavy skillet over medium-high heat. Add the garlic, oregano, and crushed red pepper and cook, stirring, until the garlic is fragrant, 2-3 minutes. Add the Sungold tomatoes, yellow tomatoes, and salt; bring to a boil. Reduce the heat slightly. Cook, stirring and mashing the tomatoes with a spoon, until they are very soft and have cooked down, about 10 minutes.
Put the sauce through a food mill suspended over a narrow pot or press it through a fine-mesh strainer, leaving only the skins and seeds behind. Reheat to serve, stir in the parsley and mint, and taste for seasoning.
Photos: Miriam Rubin.
August 23, 2013
How To: Infuse Your Own Spirits
I love a good flavored spirit: citrus vodkas, pineapple & chili tequilas, even the occasional cucumber gin. I’m not sure where along the way we veered into the murky waters of making our cocktails taste like birthday cake or gummy fish candy by way of some chemical flavorings, but don’t worry - I’m here to help get us safely back to center.
As you sip & savor the remaining summer nights ahead, breathe some refreshment into your cocktails by infusing your own spirits with some of these classic, all-natural flavors.
THE GROUND RULES
First things first – there’s not really much at all to go wrong here, so don’t worry about anything not turning out. Basically by putting these ingredients in with the spirit and letting them sit for a few days, they’ll take on that ingredient’s flavor. Within reason (and depending on the strength of the ingredient’s flavor), the longer you leave it in there, the more flavor it will impart.
When selecting your spirit at the store, you don’t have to reach for the top shelf stuff. Do make sure, though, that you’re using a brand of spirit that you’d like to drink on its own.
A good rule of thumb is to start with 3 days of marinating time in a covered container in the refrigerator. Taste it after three days and feel free to leave it longer if you want more flavor. Once infused, strain the flavorings out and the spirits will keep covered in the refrigerator for up to 1 month.
VODKA
Vodka is the ideal spirit to infuse because it’s inherently very mild if not completely flavorless. It will take on almost any flavor you want to infuse it with, hence why it’s so often seen with flavorings on store shelves. These two ideas are only the tip of the iceberg for what you can use here.
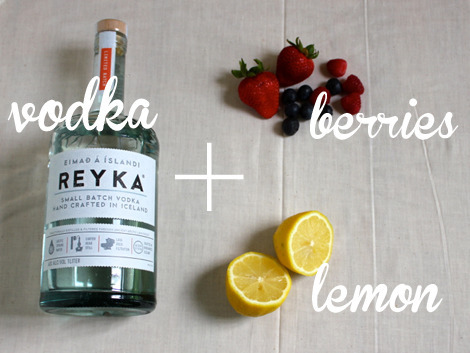
Berries Mash 2 cups of mixed berries in the bottom of a large pitcher and pour a 750 mL bottle of vodka over them (save the bottle). Cover the pitcher with plastic wrap and steep in the refrigerator for 3 days (up to 5 days if desired). Strain the vodka back into its bottle (discarding the berry pulp) and serve with your favorite mixer or cocktail recipe.
Lemon Mash 2 thinly sliced lemons in the bottom of a large pitcher and pour a 750 mL bottle of vodka over them (save the bottle). Cover the pitcher with plastic wrap and steep in the refrigerator for 3 days (up to 5 days if desired). Strain the vodka back into its bottle (discarding the lemon pulp) and serve with your favorite mixer or cocktail recipe.
GIN
Gin’s botanical flavorings vary with each brand and generally lend themselves very well to “green” flavors – lime, cucumber, herbs, etc. Try these brighter flavors for the summer time and experiment with a heartier flavor like allspice or star anise this fall and winter.

Cucumber Pour a 750 mL bottle of gin into a large pitcher (save the bottle) and add in 1 large thinly sliced cucumber. Cover the pitcher with plastic wrap and steep in the refrigerator for 3 days (up to 5 days if desired). Strain the gin back into its bottle (discarding the cucumbers) and serve with your favorite mixer or cocktail recipe.
Cilantro Pour a 750 mL bottle of gin into a large pitcher (save the bottle) and add in 1 large bunch of washed cilantro stems and leaves. Cover the pitcher with plastic wrap and steep in the refrigerator for 3 days (up to 5 days if desired). Strain the gin back into its bottle (discarding the cilantro) and serve with your favorite mixer or cocktail recipe.
RUM
In the warmer months I tend to reach for a clear rum. If you’re a fan of a slightly more hearty cocktail, reach for a dark or even spiced rum. The fruits I suggested here are brighter flavors, so you can bring out the spice notes of a darker rum using cherries, plums or even black peppercorns.
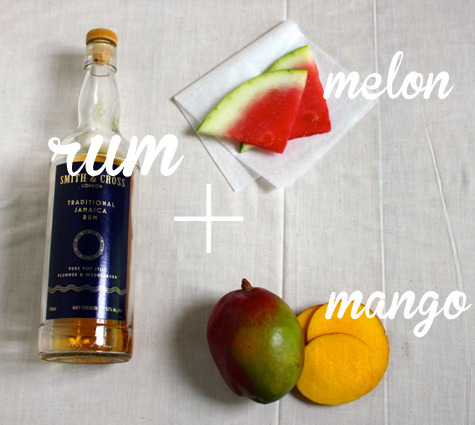
Melon Pour a 750 mL bottle of rum into a large pitcher (save the bottle) and add in 3 cups of peeled, chopped melon (such as watermelon or cantaloupe). Cover the pitcher with plastic wrap and steep in the refrigerator for 3 days (up to 5 days if desired). Strain the rum back into its bottle (discarding the cucumbers) and serve with your favorite mixer or cocktail recipe.
Mango Pour a 750 mL bottle of rum into a large pitcher (save the bottle) and add in 2 cups of peeled, chopped mango (from about 2 mangos). Cover the pitcher with plastic wrap and steep in the refrigerator for 3 days (up to 5 days if desired). Strain the rum back into its bottle (discarding the mango) and serve with your favorite mixer or cocktail recipe.
TEQUILA
Saving the best for last, it’s my favorite summer spirit – tequila! While I’m a silver purist through and through – I prefer the grassy agave flavor – gold tequilas certainly have their place at the table too. Tequila is the place to go bold! Try infusing grilled fruits, chiles, maybe even smoked bacon or chorizo (both cooked, of course). Why not, after all? You only live once.

Mint Pour a 750 mL bottle of tequila into a large pitcher (save the bottle) and add in 1 large bunch of washed mint stems and leaves. Cover the pitcher with plastic wrap and steep in the refrigerator for 3 days (up to 5 days if desired). Strain the tequila back into its bottle (discarding the mint) and serve with your favorite mixer or cocktail recipe.
Chiles Pour a 750 mL bottle of rum into a large pitcher (save the bottle) and add in 2 thinly sliced jalapenos with the seeds. Cover the pitcher with plastic wrap and steep in the refrigerator for 2 days (up to 5 days if desired – proceed with caution). Strain the tequila back into its bottle (discarding the chiles and seeds) and serve with your favorite mixer or cocktail recipe.
Patrick W. Decker’s life revolves around food. Always has, probably always will. As a graduate of The Culinary Institute of America and past member of the culinary teams for Food Network stars Rachael Ray, Sandra Lee, Marc Forgione, Bobby Deen and Paula Deen, he now works as a food stylist and producer in NYC by day and a food writer and recipe developer at his home in New York’s Hudson Valley by night. You can see what he’s up to by following him on Instagram at @patrickwdecker or visiting his website at patrickwdecker.com .
August 22, 2013
Easiest Appetizer: Grape Puff Pastry Bites
I’m always looking for easy appetizers that are unexpected and super tasty. I’m not a big believer in tons of appetizers for a standard dinner party but one or two well chosen apps are a great way to welcome your guests and get them excited about the meal to come.
Recently I found myself with some extra puff pastry after making pigs in a blanket (a party staple) for my son’s 5th birthday. I hate throwing anything away so I decided to wrap it around some grapes and roll it into some sugar for a sweet little appetizer that balanced out the savory ones beautifully. They turned out great and are definitely something I will make over and over again. It was so super simple, I even had my 5-year old in on the action. He absolutely loved rolling the grapes in the pastry and then the sugar. Any recipe that’s also an activity for the kids is a keeper in my book. Enjoy!!
Grape Puff Pastry Bites
Makes approximately 50-75 apps (depending on size of grapes)
Ingredients:
1 sheet frozen puff pastry, thawed (You can also use store-bought crescent dough)
50-75 seedless grapes
3/4 cups coarse sanding sugar
Instructions:
1. Preheat oven to 400 degrees. Line a baking sheet with silicone liner or parchment sprayed with non-stick cooking spray.

2. Unfold puff pastry and cut into 3 equal pieces along the fold. Roll each sheet out slightly. Cut small triangles or strips out of each of the pieces. Wrap each grape completely with puff pastry and roll in sanding sugar and place on prepared baking sheet. Bake until rounds are golden, about 20 to 25 minutes. Transfer to a rack to cool slightly, about 5 minutes.


Rachael Ray's Blog

- Rachael Ray's profile
- 296 followers

