
Rachael Ray's Blog, page 54
July 22, 2013
Blueberry Buckle
This weekend, after a week of unbearable heat, my daughter decided she wanted to cook some things on her own, as in with no help at all from me. We can’t go outside for longer than a few minutes. Even a simple walk to the mailbox results in a face covered in sweat and soaked t-shirts-it’s that hot.
I gave my daughter a few ideas for fun things to make, based on her interests and likes and things I thought my be novel for her. We chose Chocolate Cupcakes with a Vanilla Buttercream Frosting (which she died green), Homemade Bagels, based on the recent post at Food52.com and Blueberry Buckle. The results were as follows-
Cupcakes were a great choice because they were super easy and she could taste the batter as she prepared the recipe, a right of any child in the kitchen. Dying the frosting was fun for her and when it came time to actually frost, she went ahead and used a pastry bag with a tip and made her own creative designs. she was proud of these cakes and they were delicious.
The bagels were more difficult and eventually became my recipe. Although super easy, there were many steps and waiting periods and she just lost interest after a while. Plus, I kind of suspected something didn’t look right as the dough was in its overnight rise period and I wanted to intervene so she didn’t feel let down. Turned out the yeast she used was not the proper kind and they became dense, chewy, knots of dough…which incidentally she still loved!
On to the Buckle. This was my favorite recipe because it made use of the pounds of blueberries we had recently bought (I froze some in batches which is a good tip btw if you can get fruit in season or on sale and want to preserve it). I asked her to use whole wheat flour instead of white to give it that extra texture and make it a little healthier and we skipped the Streusel topping and instead simply sprinkled cinnamon and turbinado sugar. I know it defeats the point of a Buckle in some ways, as I found it earned its name because as it bakes the weight of the fruit buckles the dough and you get pools of sugar and butter throughout the cake. Well, to be honest, I was low on butter or we may have done this to make it authentic, but I also didn’t mind not having pools of sugar and butter and maybe seeing if it could just be a delicious cake on its own. I also felt like no blueberry baked good was complete without lemon zest and almonds so I sprinkled a mixture of zest and ground almonds over the top along with the cinnamon and sugar.
Easy to assemble and fun for a child, the Buckle wins in my book.
Blueberry-Peach Almond Buckle
For The Topping
1/3 cup Turbinado sugar
1 teaspoon cinnamon
1 teaspoon lemon zest
1/4 cup ground almonds or hazelnuts
For the Batter
2 cups All-Purpose Flour
2 teaspoons baking powder
1/2 teaspoon salt
3/4 cup granulated sugar
1/4 cup butter or margarine
1 large egg
1 teaspoon vanilla
1/2 cup milk
1 1/2 cups blueberries + 1/2 cup sliced or chopped peaches, pitted
Preparation
Preheat your oven to 350°F.
Spray a pie plate or round cake pan with Baking spray (the kind with flour in it).
Mix the flour, baking powder and salt together in a medium sized mixing bowl. In a large bowl cream together the sugar, butter, egg and vanilla. Alternately add the milk and the flour mixture to the creamed mixture, ending with flour. Stir only enough to blend. Fold in the blueberries and peaches. Pour the batter into the pan. Sprinkle the top with the ground cinnamon, sugar, nuts and lemon zest. Bake for 50-55 minutes or until the top springs back. Let sit in the pan for 20 minutes and then remove on to a serving plate.
Rosemary Maggiore is our Last Minute Lady. A single mom of two kids plus a full time job (she runs this website!) keep her busy and usually pushing things to the last minute. Somehow she manages to keep her cool and her sanity while she enjoys good food, wine, friends and most importantly, family.
For more Ro, see:
Follow me on Twitter at @roemaggiore or on Instagram at #romaggiore


Buttermilk, Chocolate Chip Waffles
I find myself constantly coming up with new waffle recipes. My family is obsessed with them and let’s face it, homemade waffles are so much better than frozen. I love playing around with flavors and proportions to come up with new tastes and textures.
I have 2 and 4 year old boys and they are both chocolate chip obsessed. I find it funny that up until now I’ve never made chocolate chip waffles before. We make a lot of chocolate chip pancakes, but for some reason they never managed to make it into our waffles. I decided to use buttermilk for this recipe because I really enjoy the sleight tang it imparts into pancake and waffle batter.
This waffle is the perfect balance of crispy on the outside and soft on the inside. It definitely has a melt in your mouth quality and will make the perfect addition to your breakfast and brunch repertoire.
Buttermilk, Chocolate Chip Waffles
Makes 6 large waffles
Ingredients:
2 cups all-purpose flour
1 teaspoon baking powder
1/2 teaspoon salt
1 teaspoon baking soda
2 eggs, beaten
2 cups buttermilk
1 teaspoon vanilla extract
4 tablespoons butter, melted
3/4 cup mini semi sweet chocolate chips
*maple syrup and powder sugar, for topping
Instructions:
1. Preheat your waffle maker.
2. In a mixing bowl, add flour, baking powder, salt, and baking soda. Whisk together to combine.
3. In another smaller bowl, whisk together eggs, buttermilk, vanilla and butter until well combined. Pour wet mixture into dry mixture, stir in chocolate chips and stir with a wooden spoon until just combined.
4. Grease waffle maker and pour batter into a preheated prepared waffle iron. Cook until steaming stops and waffles are crisp and golden, about 3 minutes (exact timing will depend on your particular waffle maker). top with maple syrup and powdered sugar, if desired.
Enjoy!
July 19, 2013
Throwing veggie links on the BBQ - Kebabs
I wouldn’t be the first to notice that vegetarians get short-changed during BBQ season. A slew of salads may be great but what about some BBQ action that goes beyond pieces of marinated veggies (especially when marinades slide right off)?
Last weekend, some outdoor grilling was in the cards and my father in-law is a vegetarian. Whilst we would be grilling chicken kebabs and plunging them in to refreshing yoghurt sauces, it was only fair that he should be able to do the same. I made him a vegetable kebab using some grated potatoes, cauliflower, red lentils and peas. With my free hand, in went a load of ginger, fresh chili and ground coriander seeds. I shaped them like sausage links, brushed them with oil and threw them on the BBQ. The kebabs were crusty and golden on the outside and firm and crunchy on the inside – which was important because all too often, the mixture is too loose and falls apart in your hands.

My only faux-pas last weekend was not making enough mixture. How was I to know that the meat eaters would want them too?
Recipe for Veggie Kebabs
Ingredients
2 large russet potatoes, cooked until tender, peeled and grated
1 tablespoon grated ginger
1 tablespoon red lentils, soaked for 30 minutes
½ onion, finely diced and left to drain on paper towels
2 tablespoon breadcrumbs
2 tablespoon peas, cooked and drained
1 cup cauliflower, grated
½ teaspoon coriander powder
1 jalapeño, deseeded and finely chopped (optional)
2 tbsp. chopped cilantro
Salt and pepper to taste
Method
1) Line part of the grill with foil where you will be cooking the vegetable kebabs
2) Combine all the ingredients and, refrigerate mixture until cool
3) Make breakfast sausage type links
4) Brush with oil on all sides. Set them on the foil and allow to brown on all sides
Saira Malhotra, is of British–Indian descent and is a chef, food writer and cooking instructor based in New York City. Raised in Hounslow, U.K, or rather ‘Little India’, where the air is aromatic with roasted spices, little did Saira know these moments would follow her from being a student in France and Italy to residing in NYC with her husband and kids and parlay themselves unexpectedly in to a culinary career. She is a graduate of the International Culinary Center in New York City. Come visit her at her food blog: www.passportpantry.com where she shares approachable and international recipes
July 17, 2013
Hair Dye 101: The Right Time to Start Dyeing Your Hair
One of the most frequent questions I get asked by women in the salon is whether they should dye their hair, and if yes, then what should they use. The world of hair color can be tricky to navigate, and not just for those looking to add some extra blonde highlights. Making the decision to color your hair in order to cover grays can lead to a number of questions: Should I use a permanent color? What is the difference between semi, demi, and permanent? And what should I do?!
The best advice I can give is to talk to your colorist about your wants and needs, taking into consideration your lifestyle and hair care routine. I turned to Cutler’s New York Colorist and Redken Hair color consultant, David Stanko, for some expert advice.
“Crawl, walk and run – that’s the analogy to semi, demi and permanent hair coloring treatments,” explains David. “A semi-permanent color is ready to use, without any mixing. What you see in the bottle is what you get. This category of product was extremely popular in the ‘70s and ‘80s. Way more effective coloring products are available now, such as demi-permanent colorants.”

“Demi’s can color up to 50% gray, change the tone of your hair—from brassy to brunette—or they can tone down the orange in blonde. Plus, the shine and conditioning treatment they give are a major benefit. Demi’s are often intermixed to create the right shade, plus require a dedicate developer to active the colorant. They require some smarts to pick the right shade—and not go too dark; demi’s love porosity! Demi’s are perfect for first timers and color chameleons who like to change their look frequently,”

“Permanent color is probably the most used in salons to cover gray (up to 100%), lighten or darken natural hair color, and create blondes and reds alike. Permanent color is mixed with a developer of various volumes—strengths—and it becomes permanently part of the hair strand. It lasts until it grows out or gets cut out.”
David’s best advice? “Women interested in coloring their hair for the first time may want to start with a demi-type color, then graduate to a permanent color when gray hair population increases or obvious color changes are requested.”
Drink up! 9 healthy choices (other than water)
The truth is, we all know our kids don’t need anything in their lunch box drink bottles other than water.
But we also all know that just as the same day-after-day PB&J can get pretty dull, so to can yet another bottle of plain, room temperature water.
What’s the alternative? Our kids would love to suggest plenty of them, but soda, energy and sports drinks really don’t cut it as quality lunch packing fodder.
Where is the middle ground? What can you pour into their bottles that they will be excited about and you can feel good about? Here are 9 picks for fun and delicious drink choices you can pack without guilt.
Seltzer. Obvious? Maybe. But still a healthy change from the norm. Adds nothing but fizz. Buy it in to-go bottles and cans, or use your home carbonator and pack it in water bottles with tight-fitting caps. And warn the kiddies not to shake…
Fruit. Pop just about any fruit in the blender (even grapes, mango, watermelon, whatever) with a splash of lemon juice and some water, then puree and pour into a water bottle. My son and a friend recently swooned over a blend of pineapple, banana, raspberries and a bit of water. Whatever combination you use, it ends up a refreshing, sweet treat made from 100 percent whole fruit and no added sugar. Just tell the kids to shake the bottle a bit before drinking; some fruits separate over time.
Coconut water. Big city hipsters love this stuff, and your kids might, too. It’s pretty much what it sounds like — the water you get inside coconuts. Most brands have no added sugar and some are blended with fruit juices. It’s a good middle ground for kids craving fruit juice. Many fruit juice-infused varieties have just 60 calories or fewer per 8-ounce serving.
Natural lemonade Part 1. Plenty of companies sell lemonades made with less sugar or sugar alternatives. I don’t mean artificial sweeteners. I mean things like agave syrup or maple syrup. These are a great choice for folks who are more concerned with quality of ingredients than quantity of calories.
Natural lemonade Part 2. My son asks for this all the time. I fill his bottle with water, then add a hefty splash of lemon juice and — my secret weapon — a few drops of liquid stevia. Stevia is a natural, plant based sweetener that has no calories. Some people don’t like it’s aftertaste, but my son and I find the lemon juice completely masks this. It really is delicious. And try this using seltzer water, too.
Natural lemonade Part 3. Stevia not your thing? No worries. Instead, pop the water and lemon juice in the blender, then add watermelon. Blend until smooth, maybe with an ice cube or two, then bottle. Just shake before drinking for an incredibly sweet and delicious drink.
Spritzers. Whether you buy them or make them, bubbly juices are winners. Lots of companies now sell canned and bottle drinks that are blends of seltzer water and juice, with no added sugar. Of course, it’s cheaper to make your own (and easier to create custom blends). Just remember that the “no shake rule” applies to all seltzer-based drinks.
Smoothies. They’re not just for breakfast. Blend milk or yogurt (or both) and fresh or frozen fruit, maybe a pinch of cinnamon, a tiny speck of salt (to heighten the natural sweetness), then pop it in an insulated bottle. Filling and refreshing.
Iced tea: These days it’s hard to find a bottled iced tea that has sugar, so the pickings for healthy lunch choices are good. Just consider looking for a decaffeinated version for the little ones. Or even better, use fruity herbal teas and make your own. My favorite is made from fruity rooibos tea. Brew it, chill it, then add a splash of orange juice. Delicious.
J.M. Hirsch is the national food editor for The Associated Press. He blogs about the trials and tribulations of his son’s lunches at LunchBoxBlues.com. His upcoming cookbook, Beating the Lunch Box Blues , will be the first to be released by Rachael’s new publishing venture, Rachael Ray Books. Hirsch’s previous books include High Flavor, Low Labor: Reinventing Weeknight Cooking and Venturesome Vegan Cooking. He lives in New Hampshire with his son, wife, and too many cats.
5 MONEY-SAVING TIPS TO SQUEEZE MORE OUT OF YOUR HEALTH ‘N BEAUTY AIDS
Don’t you just hate it when you know there’s more stuff left in your toothpaste or moisturizing cream tube but can’t squeeze it out? Or wonder what will happen if you use your Dailies (i.e. contacts) for two days versus one? And, fear that your store-bought eggs will hatch or are bad if you use them past their expiration date? Well my friends here are a few simple tips and tricks that can save you anywhere from a couple of dollars to hundreds and in turn get more bang, squeeze, and joy out of a the following:
TOOTHPASTE TUBES: Snip ‘n Squeeze: Simply take a pair of scissors and cut along the bottom of your toothpaste tube and squeeze. Same applies for any other tubed items you have such as moisturizing cream, foundation, Ora-jel, Prep H etc. Seal with a small, medium or large binder clip since you probably can get a couple more ‘servings’ out of them.
TP PACKAGING: Don’t Waste Em! Most of us buy the jumbo size packages of toilet paper and paper towels. And, I’ve discovered that their casings make terrific garbage bags for my office and bathroom receptacles. So next time you’ve emptied your TP or paper towels out of their casing use them instead of a store-bough garbage bag.
DAILIES: Seeing Double: After sleeping with my contacts in and finding that I could simply clean them in solution and viola they were good to go, I got to wondering if I could get one more day out of my Daily contacts. And, good news, according to my opthomoligist, we can get an extra day out of them so long as we let them ‘bathe’ overnight in cleaning solution. That my friends translates into cutting our contact expenses by 50% and using that saved moula on something like a massage or other indulgence. Love that!!
EGGS: Sink or Swim! Expiration dates on egg cartons can be deceiving since they lead us to believe that if we don’t use them by that date they’re not good. In fact, that is not necessarily the case and here’s how you can check. As you can see my carton was dated June 23rd and today is July 12th. So how’d I know they hadn’t egg-spired (forgive the pun!)? Simply fill a bowl with enough water to cover the eggs and gently place them in the bowl. If the eggs sink they’re still good, but if they sink it’s sorta good and bad…Bad news is it’s time to toss them, but the good news is you have an excuse to go out for breakfast!

STARBUCK’S COFFEE STICK STOPPERS: Spill ‘n Chill: Ok, well maybe this isn’t a health aid in the traditional sense but our cup of joe, java, brew or whatever you call it is part of our daily routines that can give us a sense of calm or energize us. And, clearly a libation at day’s end is a definite sanity saver! So, next time you get your morning fix and that little green stopper to prevent you from spilling it all over you and/or your car save it. That’s correcto. Those little sticks are a terrific way to hold the garnish for your fave libation which in my case are blue-cheese stuffed olives in my dirty martini! And, truth be known, I can’t take the credit for this one and must give a shout out to Scruffy D since he’s the one who came up with this idea

Julie Edelman aka The Accidental Housewife is the go to gal for easy; real life time, money, and energy saving tips that maintain our home, family and manicure. She appears regularly on the Today Show with Kathie Lee ‘n Hoda, Rachael Ray, and The Doctors. Julie has penned a New York Times best-selling book as well as The Ultimate Accidental Housewife: Your Guide to a Clean Enough House; contributes weekly for RachaelRay.com; is the sanity saving editor for Beautiful Design Made Simple Magazine; has a webisode series for Fox News Magazine, and hosts Julie’s Tips.
July 16, 2013
Grilling 107: Consider the Lobster
Lobster prices have never been this cheap, at least not that I can remember. I have no idea. Perhaps benthic radiation for the Fukushima meltdown has caused an immense population surge among these frightening, immense arthropods, heralding the rise of another Cloverfield monster, and our own doom. Anyway, I have been eating a lot of them. The traditional method is to boil them up in a giant pot. But I don’t do that. It’s summer, and I don’t want my apartment filled with steam. Plus boiling is the worst way to cook anything not named spaghetti. So I always look to grill the things, whenever I can, and you should too.
Lobster meat is delicate, and you really have to be careful with it. Even I, a buddha of the coals, would be hard pressed not to ruin it.. At the same time, nothing is as marvelous as soft, sweet lobster meat that has been perfumed with the aroma of wood smoke. Here’s how you achieve it.
1. Get a lobster.
2. Cut it in half lengthwise. If it is moving, this will cause it to stop. Make sure to use a big, sharp, heavy chef’s knife. You owe both to the lobster and to your dinner. Start with what looks like the top of his head and go backward. Then go forward.
3. You will now be looking at a half of a lobster, or actually two. It will look gross. That’s OK. If you want to be ambitious, scoop out some of the tomalley, the grody looking green stuff. It’s actually good, and will help make a rich, piquant butter. If you are really lucky, and the lobster is a “hen” or female, there may be a deep red egg sac which can be as small as a marble or as big as the whole tail. Save every bit of this wonderful substance, which is called “coral” and is basically lobster caviar.
4. Melt some butter. Add the coral if you have it, or the tomalley, if you don’t. Also a lot of garlic. You are making a flavored butter. This stuff shouldn’t cook so much as take a warm butter bath. If the butter starts to foam you are cooking it too hot.
5. Light a coal fire and put both halves of the lobster shell down when the the coals are good and hot. You are (slightly) cooking the meat close to the shell. After a couple of minutes flip the lobster over and grill it very quickly - no more than two to three minutes. Alternately, move the lobster halves to the cool side of the grill, close it, and let them cook gently in a smoke bath. This option is better for the texture, but you don’t get any charring or browning.
6. Pour the coral or romolley butter onto each half. Eat them.
I’m not saying this is an easy recipe. If it were, it would be lesson two, instead of lesson seven. But it’s an amazing method if you can master it, and one of the only non-meat proteins you can make that can match a steak for pure porn appeal. The first or second time you make it will likely not be perfect. But with lobsters as cheap as they are right now, that’s ok. Even imperfectly cooked, they will still be good.
July 12, 2013
Play-By-Play: Home-Made Pie Dough
I love to bake. Cooking is great and all, but I’ll take a slice of cake over a bowl of pasta any day. As the temperature has continued to climb this past week, so too has my level of craving for the perfect summer dessert: pie.
I’m so often told by people that they’re terrified of making pie dough. Seems like everyone I know has a great recipe for pie – typically endowed by a grandmother – that they make using a store-bought dough. Tragedy.
I’m here today to be your guide. Pie dough is not scary, it won’t bite you. It does, however, make all the difference between an okay pie and an “I swear, just one last piece” pie. So please, do me a favor and commit to making your own pie dough. It’ll change everything.
Pie Dough
Makes 2 crusts for an (8- or 9-inch) pie
3 cups flour
1 1/2 teaspoons salt
1/2 cup vegetable shortening, cut into small cubes
1 cup (2 sticks) unsalted butter, cut into small cubes
1/2 cup ice water, as needed
PULL IT ALL TOGETHER
If you’re one of those people that’s leery of pie dough, I feel it’s likely because you’ve been watching these cooking shows where the host talks about all the things NOT to do to dough. “Don’t work it too much, don’t talk too loud, don’t look at it funny.” “Take it easy,” I say to these people. It’s hardly brain surgery.
There is truth, however, in being aware of the temperature of the dough. The fat needs to be cold when you’re mixing the dough together. If it’s not, the dough will be greasy. Cube the fat up and put it in the freezer for 15 minutes – that should do the trick.

GET TO RUBBING
Chefs call the technique used to prepare pie dough “rubbing”. Literally, it’s as simple as rubbing the cubes of cold fat into the flour and salt to blend everything together into a shaggy mixture. This technique keeps big pieces of fat present in the dough which, once baked, are what keeps the dough nice and flaky.
You may have heard of using a pastry cutter or two knives to do this. That’s certainly acceptable, I just like to use my hands. This is the part where, once you begin, you should aim to finish somewhat quickly – remember, keep that butter cold!
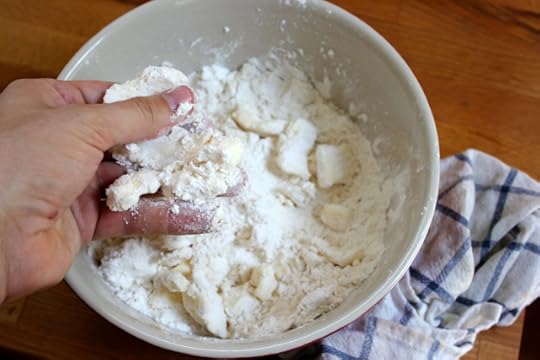
FLAKY OR MEALY?
Professional chefs will tell you that there are two kinds of pie dough: flaky and mealy. Flaky crust is used for non-liquid or cooked fillings – things like fruit pies where the filling is made with raw or cooked product. It keeps its namesake texture by keeping the pieces of fat a bit larger during rubbing. To make flaky pie dough, dial back the rubbing to keep the pieces of fat no smaller than a pea (the picture below is of a flaky dough).
Mealy dough has a less flaky texture and is what to use when making a pie with a liquid or custard filling, like pumpkin pie or quiche. Having a more dense texture for fillings like this will keep them from getting soggy and hold up better when removing a slice. To make mealy pie dough, rub the fat in completely so that the mixture resembles cornmeal.

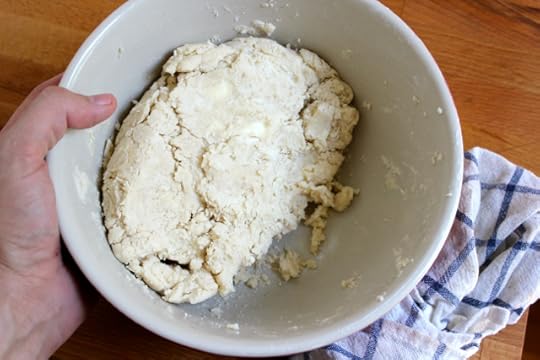
ADD WATER SPARINGLY
When it comes to adding the cold water, be sparing. Start with about half the amount that the recipes calls for. Using a fork, mix the dough together and add more water, a teaspoon or so at a time, as needed.
The goal here is to get a dough that is just hydrated enough to be gathered together into a ball. It will be a little bit sticky, but shouldn’t feel damp. It may seem like some spots of the dough are more wet than others – that’s okay. As the dough rests, the moisture will distribute and evenly hydrate the dough.
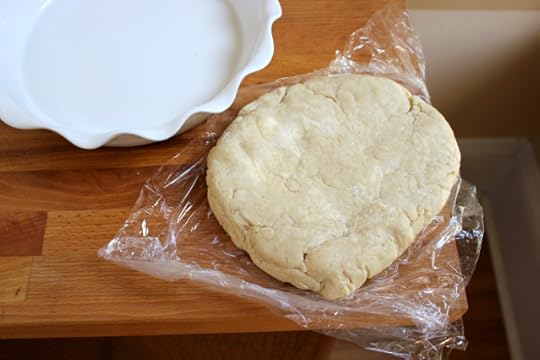
LET IT REST
Pie dough may not be complicated to make, but it does take time. Letting the dough rest is a key step in getting it ready to be rolled out and baked. Turn the dough out onto a piece of plastic wrap, press it down into a disk about 3/4-inch thick, and wrap it tightly. Refrigerate the dough until it feels firm, at least 1 hour and even up to overnight. This gives the fat time to firm up and water time to evenly hydrate the dough, setting you up for perfect dough.
That’s it – you’re done! Use the dough in your grandma’s heirloom recipe or check back in next week for my post on how to make a perfect lattice-top pie with my favorite filling: blueberry & white peach.
Patrick W. Decker’s life revolves around food. Always has, probably always will. As a graduate of The Culinary Institute of America and past member of the culinary teams for Food Network stars Rachael Ray, Sandra Lee, Bobby Deen and Paula Deen, he now works as a food stylist and producer in NYC by day and a food writer and recipe developer at his home in New York’s Hudson Valley by night. You can see what he’s up to by following him on Instagram at @patrickwdecker or visiting his website at patrickwdecker.com .
July 11, 2013
Carrots and Cumin Salad – Refreshing and Gorgeous
Last night, I drew inspiration from my spice containers and made a carrot salad tossed in cumin, cayenne and cilantro. By adding an additional brightness of olive oil, fresh garlic and fresh cilantro – this dish came to life. All it took was some thoughtfulness and minimal effort and these carrots were ‘actually present’ on last nights dinner table. Lightly sweet from the carrots, aromas pointing to the mysterious East and garlic and lemon to provide hum and zing – who could possibly say no to those?
The dish is very quick and simple to put together. However, to really get the most from it, cook the carrots until they are tender, dress them whilst they are still warm (breaking down the cell walls from boiling will help other flavors to penetrate) and let them sit at room temperature for a couple of hours.
Recipe For Carrot And Cumin Salad
Ingredients
1lb carrots, peeled and sliced in to wedges
½ tsp. ground cumin
¼ tsp. cayenne pepper
2 tbsp. fresh lemon juice and ½ the zest of 1 lemon
2 tbsp. extra virgin olive oil
1 tbsp. finely chopped cilantro
Salt to taste
Method
1) In a large pot of salty water, bowl the carrot wedges until barely tender
2) Make a dressing with the spices, lemon juice and zest, olive oil and cilantro
3) Toss the carrots gently in dressing, cover with plastic wrap and set aside for 2 hours
Saira Malhotra, is of British–Indian descent and is a chef, food writer and cooking instructor based in New York City. Raised in Hounslow, U.K, or rather ‘Little India’, where the air is aromatic with roasted spices, little did Saira know these moments would follow her from being a student in France and Italy to residing in NYC with her husband and kids and parlay themselves unexpectedly in to a culinary career. She is a graduate of the International Culinary Center in New York City. Come visit her at her food blog: www.passportpantry.com where she shares approachable and international recipes
Cherry Kefir Frozen Pops
I came up with this treat a few years ago for my first son before he got his first tooth and needed something to soothe his sore gums. This recipe is one that both kids and parents will love because it’s cold, creamy and super healthy. They are all natural, with no added sugar so, you can even serve them for breakfast on a hot summer morning. It’s like a frozen smoothie on a stick which will delight the non-breakfast lovers and picky eaters in your house.
What is Kefir?
Kefir is a creamy, cultured, probiotic drink. It’s similar to yogurt but slightly more tart. I serve Kefir to my 9 month old son on top of his oatmeal every morning. You can find Kefir in many fruit flavors but I prefer to serve the plain version to my son. Since he hasn’t gotten used to those overly sweet “fruit” flavored yogurts and Kefirs, he LOVES the tangy taste of plain version which makes a mama happy. Kefir is a great for smoothies.
Note:: If you plan on serving these treats to a young child, make sure you are with them while they are eating. As with any treat on a stick, there is always a chance of choking. You also want to be careful that your little one doesn’t bite off a big piece. Since Griffin is still an itty bitty, we share. I rub a bit of this frozen treat on his gums and I munch on the rest. He loves sharing big people food with mommy.
Cherry Kefir Frozen Pops
Makes 8-3oz popsicles
Ingredients:
1 10oz bag organic frozen cherries
2 cups organic whole milk Kefir (our fave is Lifeway Organic but you could use plain ‘ol yogurt if you can’t find Kefir)
**(optional) 2 tablespoons agave syrup or sugar if you feel you need more sweetness. Please taste first as the cherries should be sweet enough.
Instructions:
1.Put the Kefir and the cherries into a food processor and process until the cherries have broken down and the Kefir turns a light pink color.
Pour into molds (like these super cute silicone ones I used) and freeze over night.
TIPS:
Swap out the cherries for your favorite frozen fruit . Any kind of berry would be amazing !
Skip the freezer and drink the mixture as a smoothie instead.
Rachael Ray's Blog

- Rachael Ray's profile
- 296 followers

