
Rachael Ray's Blog, page 57
June 24, 2013
7 TIPS TO GET RID OF THE RED, WHITE ‘N BLUE STAINS OF SUMMER!

With the Fourth of July days away it’s time to officially celebrate summer with friends and family, coast to coast, BBQ to BBQ, and slob to slob. But fear not, the red, white, and blue stains these times thrust upon us! No, my fellow countrymen and women, relief is simple and mostly found in our kitchen cupboard, bathroom drawer, and amongst our coiffing products. So get ready to take aim, cause an eruption, and brush those stains away, because as you surely know, all stains were not created equal!
Red Stains
BBQ SAUCE- CREATE SOME FIZZ-AZZ!
If you get a bit overzealous with the BBQ sauce, and end up dousing your meats and/or clothing, here’s a quick stain remover that will bubble and remove the toil and trouble! Kids love it too ’cause it creates a fizzing reaction so have them watch! Also terrific way to unclog your drains- just use a 1:1 ratio of baking soda to white vinegar and once the bubbling stops, pour down a kettle of boiling water!). Here are the clothing stain removal steps:
Get rid of excess (if you didn’t already lick it off), and run the garment under cold water;
While the item is still damp, sprinkle baking soda on the spot, followed by a capful of white vinegar. Watch as the mixture erupts, taking your stain with it! Repeat if necessary;
To finish the process, dab (don’t rub) away the bubbly mix with a damp cloth, and launder as us.ual
CHERRY POPSICLES? SPRITZ AWAY!
Indulging in this childhood fave whether you’re a kid or a wannabe again can be drippy and ruin your fave white tee! With this tip you can remain calm, cool, and collected, even when your popsicle doesn’t. What to do when it drips:
Remove any excess with a plastic knife;
Fill a spray bottle with equal parts hydrogen peroxide and water (50-50), spritz it on the stain, and let stand for 30 minutes;
If the stain is stubborn, spray with a 3:1 white vinegar to water mixture;
Then launder as usual.
WATERMELON-TAKE AIM!
For something that is mostly water, this treat can leave quite a mark. But relief is just a coiff away:
Remove any excess watermelon;
Spray the spot with aerosol hairspray, the alcohol in the product will lift out the stain;
Then launder as usual
White Stains
SWEAT STAINS: TAKE 2 ‘N CALL ME IN THE MORNIN!
Not only are sweat stains unsightly, they can be really embarrassing! Yellowing can be caused by the aluminum in your antiperspirant, not you, and the stains are “no sweat” to deal with.
Just mix equal parts baking soda and hydrogen peroxide with a bit of water to create a paste;
Use a toothbrush to rub it in;
Let that sit for 30 minutes;
Then use the toothbrush to remove the paste;
Launder as usual
To avoid stains altogether, try aluminum-free antiperspirants available from brands like Mitchum and Dove.
SUNTAN LOTION: SOAK-UP-SUN VINEGAR
When you are spending time outside, suntan lotion is an absolute necessity, but the grease stains that come with it are not!
Remove as much lotion as possible;
Sprinkle baby powder to absorb the excess oil/moisture;
Soak the stain in white vinegar;
Wash the garment in the hottest temperature the care label will allow
BEER STAINS: BREWSKY RX
We all know that when people are drinking beer, they can sometimes get a bit sloppy. Whether it’s light or dark, low cal or original, don’t let a few spills ruin your buzz.
For regular beer
Blot, don’t rub, as much of the beer as you can ASAP;
Mix a cup of water, a tablespoon of white vinegar, and a squirt of dish detergent;
Dab the mix on the stain for five minutes;
Then blot with a clean towel until the stain comes up.
For dark beer
Combine vinegar and rubbing alcohol 1:3 and use to blot the stain;
Never use bar soap on these stains, it will only make them set.
Blue Stains
BLUEBERRIES: GOT TOOTHPASTE!
These little treats can leave a huge mark, but getting it out is not a big deal. This treatment will also work for red wine, strawberry, blackberry, and grape juice stains.
Remove the excess
Rinse the spot in cold water
Spread some white, non gel toothpaste over the stain
Scrub between your fingers
Launder as usual
And, just in case…
CELL PHONE 411
If it’s not a stain that makes you blue, but a phone that landed in the pool, there is a quick fix that doesn’t require a trip to your fave tech store. And as a bonus, there is finally a use for the silica gel packs that often come in your shoes (and a reason to buy more) or in your vitamins 
To get out excess water, spray with compressed air. DO NOT use a blowdryer
Then leave the phone in a bowl of rice or gel caps for a minimum of 2 days
Use a pastry brush or compressed air to rid any rice remains
Tip: If it was the toilet and not a pool that your phone fell into, it’s OK to disinfect with a Q-tip or damp (not dripping) cloth with rubbing alcohol. In fact, I’d probably recommend it.
Julie Edelman aka The Accidental Housewife is the go to gal for easy; real life time, money, and energy saving tips that maintain our home, family and manicure. She appears regularly on the Today Show with Kathie Lee ‘n Hoda, Rachael Ray, and The Doctors. She is a New York Times best-selling author and her next tome for the home:The Ultimate Accidental Housewife: Your Guide to a Clean Enough House is the sanity saving editor for Beautiful Design Made Simple Magazine; has a webisode series for Fox News Magazine, and hosts her site Julie’s Tips. Julie’s goal is to simplify all aspects of home-keeping as she empowers, educates and engages fellow housewives along with a smile and a daily sanity saving libation.


Use summer to teach that learning can be delicious
“Daddy, how is cheese made?”
It’s the sort of question that during the day-to-day school year grind I’d probably answer with something short, sweet and designed to shut him up.
Because in the rush of lunch duty, school, homework, activities, dinner, that silly thing I call a job… who has time to turn perfectly reasonable questions into fun and informative science experiments?
That’s what summer is for!
And the kitchen and grocery store have some great opportunities for fun and easy learning. Nothing too hard or too dull or too long. Plus, you get to eat the results!
Some of my favorites:
Head down the grocer’s international aisle and let your kid grab something neither of you has ever heard of. Take it home, Google it and learn where it’s from, what it’s used for, etc. Then use it!
Grab a bottle of soda and a pack of Mentos mints. Now get online and check out instructions (and explanations) for how to make a soda volcano!
No time or space for a vegetable garden? Put some dirt in a glass jar and press some vegetable seeds into it (up against the glass). The kids can care for them and watch as the roots develop.
Make butter! Seriously. There are many ways, but the easiest is to dump some heavy cream (about 1 cup is a good start) in a jar with a tight lid. Now get the kids to shake. And shake. And shake some more. The cream will transform first into whipped cream, then it will separate into liquid and fat — technically buttermilk and butterfat. Pour off the liquid, season the solids with salt, then smear on bread. The best butter you will ever taste.
Teach how crystals forms. Make rock candy! There are tons of instructions online. This is a great one.
And then there is my favorite — make cheese! The kids will be amazed by watching the cheese curds literally form in front of them. So-called farmer’s cheese (a soft cheese with a mild, milky flavor) is the best choice.
Head to the grocer and grab a half gallon of whole milk (don’t get ulta pasteurized — or UHT — milk, as it doesn’t work as well). You’ll also need a lemon (or about 3 tablespoons of lemon juice) and salt.
Pour the milk into a large saucepan and set over medium heat. Bring almost to a boil, then immediately remove from the heat. Season with a hefty pinch of salt, then stir in the lemon juice.
Let it rest. Within minutes, the milk will look grainy and clumpy. This is the fat and protein separating from the whey (liquid). Set a fine mesh strainer over a large bowl. If you don’t have a fine mesh strainer, use a regular strainer, but line it with cheesecloth.
Carefully pour the milk mixture into the strainer, then refrigerate while the liquid drains out. If you want it to go faster, just stir it gently every once in a while. Otherwise, the longer you leave it, the thicker the cheese.
When you’re ready to try your creation, transfer it to a bowl and season as you like. We did black pepper and thyme, then drizzled it with honey and served it with crackers.
My son loved the taste. And he got his question answered in a way he’ll never forget.
J.M. Hirsch is the national food editor for The Associated Press. He blogs about the trials and tribulations of his son’s lunches at LunchBoxBlues.com. His upcoming cookbook, Beating the Lunch Box Blues, will be the first to be released by Rachael’s new publishing venture, Rachael Ray Books. Hirsch’s previous books include High Flavor, Low Labor: Reinventing Weeknight Cooking and Venturesome Vegan Cooking. He lives in New Hampshire with his son, wife, and too many cats.
June 21, 2013
For thyroid sufferers, can healthy be harmful?
A fellow hypothyroid sufferer was telling me that her nutritionist advised her against eating raw, green leafy veggies. Everything I had learned about healthy eating suddenly seemed challenged as I ran home to Google what the heck she was talking about. If you have been following my blog, you know that I have been writing about my recent diagnosis of hypothyroidism and my quest to feel like a human being again. I am taking a generic form of Synthroid, but am still struggling to find my energy, so I have decided to learn all I can about the foods that can affect the thyroid and its ability to produce hormones properly.
I’ll start by saying that a dr from The Mayo Clinic says to disregard this information and to take your medicine regularly and to listen to your doctor. In stark contrast, there are people who believe that medication is not the answer and will only make the problem worse, forcing you to depend on the medicine for the rest of your life. There are also natural stimulants that are made from pig hormones that some people feel is more effective, but others claim is inconsistent, obviously, because it is relying on another animal’s hormonal make up.
Regarding the food, what I found repeatedly is that in fact raw, green leafy veggies like kale, arugula, broccoli and collard greens are not good for someone with my condition. I had just trained myself to love adding a few leaves of fresh kale into my smoothies or to eat a kale salad for lunch. Could this be hurting me? I may have imagined this, but it did seem like recently after I ingested a huge raw kale salad, I was exhausted. I mean, I really was, but could it be the salad? I have also read that these same veggies cooked do not offer the same problems.
Anyone have any thoughts on the matter of diet and thyroid? What works and what doesn’t?
Rosemary Maggiore is our Last Minute Lady. A single mom of two kids plus a full time job (she runs this website!) keep her busy and usually pushing things to the last minute. Somehow she manages to keep her cool and her sanity while she enjoys good food, wine, friends and most importantly, family.
For more Ro, see:
Follow me on Twitter at @roemaggiore or on Instagram at #romaggiore

No place like home – Black Pepper Chicken
For the passed four days, we have been vacationing in Chicago. The city is gorgeous and architecturally, felt like Europe on stilts. The food, Lake Michigan, Anish Kapoor’s famous Bean sculpture – what was there not to fall in love with. Part of me was wondering whether I should be checking out real estate in the area. But of course, all good things come to an end and as we made our descent in to New York, I was already thinking about dinner. The yumminess of deep dish pizzas, hot dogs, beef sandwiches and bacon everything was starting to take its toll and I was ready for my comfort food – chicken curry.
With very little desire to step in to the kitchen but getting restless with non-home cooked food, my sister-inlaw was happy to oblige. We all have our version of chicken curries and hers is certainly identifiable with a strong presence of Tellicherry black pepper (Tellicherry is a regional black pepper from India, but any coarse black pepper works well).

Mamta’s Black Pepper Chicken
Ingredients
4 chicken thighs cut in to 4 pieces
4 tablespoons of oil, canola
1 large yellow onion, finely diced
1 teaspoon ginger, grated
1 teaspoon garlic, grated
1 teaspoon cumin
½ cup of water
1 ½ teaspoon coarse black pepper
1 tomato roughly chopped
¼ cup cilantro, roughly chopped
Method
1) Heat the oil on medium-high heat. Add the cumin seeds. As the seeds start to sizzle, add the onions and cook until golden brown at the edges. Add the ginger and garlic and cook until their flavor mellows
2) Add the chicken, salt and pepper and cook until the chicken is tender. Add the water, bring to a boil and reduce to simmer. Cook for 10 minutes until the gravy thickens. Remove from heat and toss with tomatoes and cilantro
Serve with steamed rice or a lightly toasted baguette
Saira Malhotra, is of British–Indian descent and is a chef, food writer and cooking instructor based in New York City. Raised in Hounslow, U.K, or rather ‘Little India’, where the air is aromatic with roasted spices, little did Saira know these moments would follow her from being a student in France and Italy to residing in NYC with her husband and kids and parlay themselves unexpectedly in to a culinary career. She is a graduate of the International Culinary Center in New York City. Come visit her at her food blog: www.passportpantry.com where she shares approachable and international recipes
June 20, 2013
The perfect brownie - finally

I have been on a quest for the perfect brownie. I am not talking about a mint brownies, peanut butter brownies, brookies, or brownie cupcakes. No swirls, cheesecake, caramel or frosting, but a straight-up, plain bake sale brownie. I prefer a chewy brownie with the crackly coating on top - not cakey, not too sweet, heavy on the chocolate. Who knew this would be so complicated?
I have posted recipes for Dark Chocolate Brownies (good but a little cakey for me), Outrageous Brownies (good but a little sweet for my taste), The Best Brownies Ever (pure, unadulterated chocolate here, but actually most kids don’t like them because they are not as sweet. I also like a more “toothsome” texture), and Double Chocolate Brownies (good but light and cakey, not chewy).
My kids, sadly, prefer Duncan Hines mix, which I refuse to buy (I have a baking business!) but my husband will “sneak” it for them, periodically. I finally hit on my official favorite brownie recipe and the irony is that it most closely resembles our favorite DH boxed mix. Thick, chewy, toothsome, with the coveted crackly top. The recipe calls for three kinds of chocolate and is made in one bowl. I’m a believer.
Chewy Brownies
(adapted from a Cooks Illustrated recipe - click here for printable recipe)
Ingredients
1/3 cup cocoa
1/2 cup plus 2 tablespoon boiling water
2 oz. unsweetened chocolate
4 tablespoons (1/2 stick) butter, melted
1/2 cup plus 2 tablespoons vegetable oil
2 large eggs
2 large egg yolks
2 teaspoons vanilla
2 1/2 cups sugar
1 3/4 cups all purpose flour
1 teaspoon salt
1 cup chocolate chips
Directions
Preheat oven to 350 degrees F. Spray a 9 x 13 inch pan with non-stick cooking spray.
Whisk cocoa and boiling water together in a large bowl until smooth. Add unsweetened chocolate and whisk until chocolate is melted. Whisk in melted butter and oil. Mixture may look curdled at this point. Add eggs, egg yolks and vanilla. Continue to whisk until smooth. Whisk in sugar until fully incorporated. Using rubber spatula, fold in flour, salt, and chocolate chips all at once, taking care to not over mix.
Scrape batter into prepared pan and bake until toothpick inserted in center comes out with a few moist crumbs attached, about 30-40 minutes. Do not over cook. Transfer pan to wire rack and let cool completely, about 1 to 1 1/2 hours. Cut when cooled.
Plan B Mom is a mostly-stay-at-home mom of 3 who works from home but sees her main job as managing her family. When she is not taking care of her 13-year old and 11-year old girls, 9- year old son, yellow lab, and husband - she is baking, running, carpooling, or helping with homework. She tries to stay organized to keep life running smoothly - or at least catastrophes at bay. Follow her on Twitter at @PlanBMom.
June 18, 2013
School’s out… But lunch duty continues…
Because a 180-day school year isn’t enough, right?
You think you’ve served your time. Good, healthy (or at least edible) lunches five days a week from September to June. Now you’re in the clear for a few months.
Except you aren’t. Because for many parents, summer camp looms. And day camps often mean more days of lunch duty.
Sure, it’s a blast for the kids. But for parents, summer lunches bring a whole new cluster of packing problems.
Because suddenly whatever you were packing in September, December, or even May, may not work nearly so well when the temperatures soar into the 80s, 90s or beyond.
Mmm… Nothing says yummy like a PB&J simmering in the sun, right?
So let’s start with some packing basics.
First off, an insulated lunch box/bag is pretty much essential. Even if you pack nothing but dry goods — nothing that technically needs chilling — nobody wants pretzels that have steamed in a plastic bag all day.
Second, invest in some inexpensive ice packs. The rigid ones are better than the soft ones, which tend to freeze in awkward shapes. They also tend to leak when careless (read as young and tiny) hands are rough with them.
In the heat of summer, a freezer pack will keep foods crisp and tasting fresh even if they don’t require refrigeration (note the aforementioned steamed pretzels).
Third, let’s talk thermoses. For drinking, an insulated (double-walled) drinking thermos is a must. Save the single-walled water bottles for cooler weather. They tend to sweat in the heat, and that’s not good for anything else in the lunch box. And grubby summer camp hands grabbing a wet bottle… Do I even need to explain how gross they (the hands and the bottle) can get?
And this probably goes without saying, but for active kids running crazy at camp during hot weather, water really is the best beverage. Pop a few ice cubes into it and you’re good.
If the kids really want something with flavor to drink, try my “recipe” for cheater lemonade. For my son, I spike plain water with a generous squirt of bottled lemon or lime juice and a drop or two of liquid stevia (a natural no-sugar sweetener — most grocers sell it near the sugar). This also works with seltzer water, but you need to make sure your thermos can handle carbonation.
Also consider getting a thermos jar, the type with a wide mouth for holding food. No, it isn’t soup season. But if you pack yogurt or pudding, this is how you want to pack it. To keep it extra chilled, pop the thermos in the freezer for a few minutes before filling it.
Or maybe it is soup season… No reason a nice cool gazpacho couldn’t go in that thermos jar. Mix purchased tomato soup with purchased tomato salsa and you have thermos-ready gazpacho in less than a minute.
Now that you’ve got the gear, how do you fill it?
In summer, I tend to stick with classics - sandwiches of meats and cheeses, or peanut butter and banana, or a wrap with hummus and greens or cucumber. Dull? Perhaps. But they all hold up well, provide lots of energy, and are fast and easy to eat outdoors.
And if you have leftover plain pasta from dinner, here’s a great excuse to whip up a cold noodle dish. Toss leftover pasta (any shape) with peanut butter (you can substitute a nut butter alternative), a splash of hot sauce, some soy sauce and a splash of vinegar. Cold peanut noodle salad. Add chopped cold veggies for a complete meal.
Need to pack a treat? This isn’t the time for chocolate. Talk about melty mess. Stick with chopped fresh fruit. A container of watermelon or strawberry chunks is perfect for a hot day.
And if you want to pack something really special and refreshing? Make the lemonade I mentioned above, but pop it in the blender with some of those watermelon chunks. It’s amazing!
J.M. Hirsch is the national food editor for The Associated Press. He blogs about the trials and tribulations of his son’s lunches at LunchBoxBlues.com. His upcoming cookbook, Beating the Lunch Box Blues, will be the first to be released by Rachael’s new publishing venture, Rachael Ray Books. Hirsch’s previous books include High Flavor, Low Labor: Reinventing Weeknight Cooking and Venturesome Vegan Cooking. He lives in New Hampshire with his son, wife, and too many cats.
June 17, 2013
Grilling 103: Time, Temp, and The Zen of Waiting
Having talked about the tools of the trade, as well as the secret of searing, I want to get a little deeper into what I think a lot of people find most challenging about grilling: cooking big things a long time. The beauty of hot-fire cooking, for most of us, comes from watching something cook and change and get more delicious in real time; grilling a steak or pork chop, or even a hamburger, is a kind of high-speed cookery, at least if you’re doing it right. It’s essentially a time-lapse version of kitchen cooking. But what about the kind of grilling that actually takes a while? The kind that requires you to judge when the thing is done inside? That demands constant probing and shifting and testing?
That kind is harder. But you need to learn to do it.
Think about it. The average grill isn’t really that big. The largest Weber is only 22.5″ inches across. That’s less than two feed. And it’s not like all of it is available for cooking: likely you’ll have your primary heat either on one side or in the middle. So realistically, you only half 16 or 17 inches, tops. You can make at most one rack of ribs, or a couple of thick steaks, or four or five hamburgers. Now, that’s great if you are cooking for four or five people. But you’re not. If you are going to be a serious outdoor cook, you are going to host parties, and have families come over, and sooner or later you’re going to have to cook for 20 guys. (This was Peter Clemenza’s worst-case scenario in The Godfather when giving Michael Corleone cooking advice in The Godfather.)
The tools are the same. The salt is the same. The searing is the same. The only difference is time and temperature. When you are cooking any big piece of meat, whether it’s a leg of lamb, a rump roast, or even a whole baby pig, the most important activity of yours isn’t really an activity at all: it’s awareness. You need to commune with your meat, to understand where it started, and where it’s going - how fast it’s cooking and at what kind of heat. I’m not going to lie to you, though. That’s not the kind of knowledge you get without a fair amount of experience. It takes a lot of hours and a lot of embarrassment and a lot of ruined meat to learn the zen of waiting. But that said, here are a few tips that will help you get to a state of culinary clairvoyance.
* Make sure that the meat is away from direct heat. Remember, everything starts out at high heat, and finishes at low heat. If something is too big to fit on the cool side, expand the cool side. Or, failing that, put a piece of foil or something there to protect it from too much raidant heat.
* If you’re looking, you’re not cooking. This old BBQ chestnut has been overused, and there are definitely exceptions, but it contains an essential truth. Every time you lift the lid of a grill, you let all the heat out, not to mention the smoke. Therefore, don’t open it more than you have to.
* Use a remote thermometer. I sort of hate advising this. To me, using a remote thermometer, or any kind of thermometer, defeats the whole point of live fire cooking. It’s like hiking on the New Jersey Turnpike. That said, if you are cooking for a whole bunch of people, all of whom are expecting a good dinner, you need to be sure how fast your meat is cooking, and if it’s cooking at all. Get a remote like this; you plunge it into the deepest part of the meat, and an app on your phone tells you how hot the center is. I can’t tell you how much I hate saying this. I might have to go back and delete it, in fact. No! Let it stand. It needed to be said.
* This also needs to be said: I never use a thermometer. Ever. I touch meat - I push it and feel it and nudge it and poke at it. I can tell by feel if it’s done, pretty much; and the reason I learned that is because I never used a thermometer. I’m just saying.
* Another lesson to live by: rare meat can always be cooked more, but overcooked meat just sucks. Overcooking meat makes you look like a real jamoke. It ruins everybody’s meal, except for that one guy who is terrified of any trace of pink in his meat, no doubt as part of some far-reaching psychosis brought on by childhood trauma (”mother, there’s blood!”). It looks terrible, too. So, let’s say that you misjudged the meat. You cut it up, and while the outside slices were just ride, the inside ones were raw. Since you are not cutting at the table, nobody knows. Guess what? Just cut thick slices, season them, and grill them off like steaks. They aren’t as good as a sliced roast, it’s true. They’re better.
These pointers are just that: pointers. They won’t teach you the mysteries of time and temperature. Only the universe can do that. But in the meantime, they can give you the basic direction for what is probably the single toughest thing to do in all of live-fire cooking. Or, rather, the second-toughest task. The first, the art of barbecue, comes next week.
June 14, 2013
Play-by-Play: Pizza Dough
I don’t think I’d be alone in giving a resounding “YES” to a poll question gauging whether or not pizza is delicious. You can dress it up, you can dress it down, you can make it whatever you want it to be. Now, friends & fellow foodies, I invite you to take the pizza-eating experience full circle and start with a dough that you make yourself.
It’s easy, nearly effortless, and is surprisingly versatile. You can make a few batches and freeze them for use later. You can make your next pie a bit healthier by adding in whole wheat flour or ground flaxseed. Best of all, you can control the quality of what your family is eating by knowing exactly what’s going into dinner.
To make enough dough for two pizzas, you’ll need:
• 1 1/2 cups warm water
• 1 teaspoon sugar
• 1 (3/4-ounce) packet dry active yeast
• 4 1/2 cups all-purpose flour
• 1/4 cup extra virgin olive oil
• 1 teaspoon Kosher salt
• Nonstick cooking spray
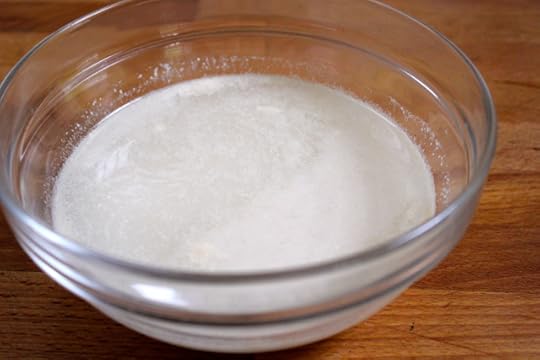
WAKE UP THE YEAST
As the name would imply, the yeast is active but has been dried for preservation. Bring it back to life by mixing it with the water and sugar. Take the water from your tap like you would to heat up a baby’s bottle – it should feel hot on the underside of your wrist, but not so hot that it’s uncomfortable.
Why the sugar, you ask? Don’t you wake up hungry after a long nap? That yeast needs food, too. Stir everybody together in a small bowl and let them hang out until some foam starts to form at the top of the bowl, 3 to 4 minutes.
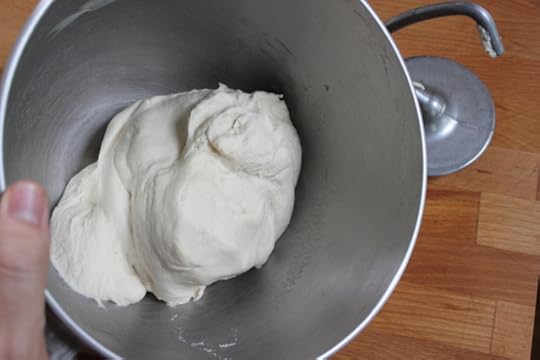
GET A LITTLE KNEADY WITH IT
In the bowl of stand mixer fitted with a hook attachment, combine the now bloomed yeast mixture with the flour, olive oil, and salt. Start slow and mix them together for about 1 minute on low speed. The mixture will look a bit shaggy, but that’s normal.

Increase the speed to medium and knead the dough until it smoothes out and forms a ball that pulls away from the sides of the bowl, 3 to 4 minutes.
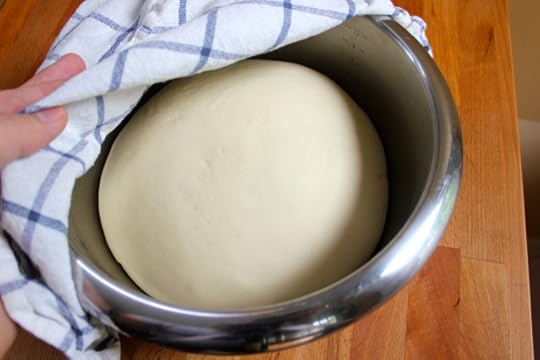
LET IT REST
After all that activity, get into a bit of Zen time. Lightly grease a large bowl with nonstick cooking spray. Transfer the dough over to the bowl and turn it around once in order to get the dough greased up on all sides. Cover the bowl loosely with a tea towel, put it in a warm draft-free spot and simply walk away. Let the dough relax until it has doubled in size, about 1 hour.

IT’S ALIVE!
After an hour or so of proofing at room temperature, you’re ready to go! Your dough should look about twice its original size and have a light, almost puffy feeling when lightly touched. To roll it out and get ready for topping, lightly dust a work surface with flour and go to town!
As I mentioned at the top of the post, adding in some ground flaxseed is a great Omega-3 boosting addition here. To make a whole wheat dough, you can substitute up to half of the all-purpose flour for whole wheat flour (don’t try and switch it all out – it won’t turn out the same). Remember, too, that this amount makes enough for two pies, so cut it in half and make up two or save one in the refrigerator for use tomorrow night.
If you want to save the dough to use later on, gently press it down to release the air that has built up inside of the dough. Transfer it to a zipper lock bag, squeeze out all of the air, and place it in the refrigerator for up to 3 days or freezer for up to 2 months. When you are ready to use refrigerated dough, let it come up to room temperature before rolling it out. When you are ready to use frozen dough, let it defrost in the refrigerator overnight before creating your next great dinner masterpiece.
Patrick W. Decker’s life revolves around food. Always has, probably always will. As a graduate of The Culinary Institute of America and past member of the culinary teams for Food Network stars Rachael Ray, Sandra Lee, Bobby Deen and Paula Deen, he now works as a food stylist and producer in NYC by day and a food writer and recipe developer at his home in New York’s Hudson Valley by night. You can see what he’s up to by following his latest posts on Instagram at @patrickwdecker or visiting his website at patrickwdecker.com.
June 13, 2013
Stop the counter surfing!
We adopted our sweet and lovable yellow lab Chloe two years ago and with her came some horrible habits (and yes, my kids like to dress her up in fake glasses). While our dear departed yellow lab Biko was a dead ringer for Marley from the so-named movie, Chloe is truly a pure-bred princess, even if she doesn’t always behave like one. We adopted Chloe from another family almost two years ago and I should have been tipped off when we went to pick her up at the family’s home and I watched her open their garbage and eat from it, in plain sight.
Other Chloe poor behavior traits: she lies/sleeps on all furniture - including couches and beds(!), snatches food out of kids’ hands (OK, Biko did that too), greets us at the door with a shoe in her mouth (without fail), and has to jump up and kiss all visitors when they enter our house, just once (marking her territory?). Typical lab in many ways.
I think Chloe’s worst habit is sneakily jumping up on the counter to grab food. She won’t even wait until we leave the kitchen sometimes - she is so quiet we won’t even notice until we see the evidence on the floor. She is non-discriminatory when it comes to what she eats - yesterday she snagged a chocolate chip cookie fresh from the oven (score), and a bag of cocktail sauce, zip lock bag and all (yuck). She is so desperate she will even jump up and eat from dishes in the sink. So unrefined.
We definitely need a dog whisperer. We have tried a few strategies to get her to stop the counter surfing, but without success. We tried filling an empty soda can with coins and we would shake it every time she jumped on the counter. She didn’t care. We tried making her lie down and stay every time she entered the kitchen - too much work. My kids of course started going down the road of rewarding her with a treat to get her down from the counter. Bad move. Now we have resorted to trying to be vigilant about putting food out of her reach and waiting until she’s older and it will be too much of an effort to jump up on the counter. I am envious of friends who can put platters of food out on a coffee table as their dog walks right on by.
Any dog owners with reformed counter surfers out there? Please share your tips!
June 12, 2013
Grilling 102: The Brown and the Black
Seeing as how last week I gave an elementary primer on grilling, with most of the attention on what your basic tools should be, I figure – why not take the next step? I’m not going to attempt to get into the culinary complexities of marinades, mops, and other advanced recipes. You have Rachael for that. But the more I think about it, the more naturally the basics of live-fire grilling organize themselves into four distinct subjects:
1: Basic Tools and Techniques. What kind of grill to use, what kind of coals, the principles of high heat and kosher salt. If you only have ten minutes to learn to grill, this is that ten minutes.
2: The Brown and the Black: searing, browning, and burning.
3: A Seminar on Smoke: drafting control, wood chips, and the principle of the two-zone fire
4. Grilling Orchestration; or, how to know what you’re doing.
So let’s concentrate on browning. Here is an image you have likely seen eight thousand times on menus, billboards, magazine ads, and on TV:

It’s the familiar grid-pattern steak, which supposedly shows you how perfectly and professionally seared your meat at Tebow’ T-Bone House will be. Except that it doesn’t. If I wanted a picture of what a grilled steak shouldn’t look like, that would be hit. Those black lines? They are burned, ruined, denatured, bitter, carbonized flesh – bad tasting and powerfully carcinogenic to boot. As for the gray stuff, when was the last time you said, “waiter, make sure my steak is nice and gray on the outside”? The answer is never. Meat should never be gray or black; it should be an even brown, a sizzling surface of brown, nutty, beefy flavors of the kind that only proper cooking can release.
The problem is that you need a lot of heat to get that color. And you need it from the fire, not from the heated grill surface. (The criss-cross pattern is almost always a sign of cooking on a gas grill, which can’t produce much direct radiant heat and which instead depends on hot metal to get the job done.) So that means starting with a wickedly hot coal or wood heat source – which in turn means waiting until the stuff is whitish-gray and no longer. You can and should encourage flare-ups, either by using fatty cuts or by rubbing your meat with olive oil.
And there’s another problem as well. Even at high heat, if a steak or chop is less than an inch thick, you are likely going to cook it all the way through if you brown it on both sides. And then you’ll still be eating gray meat, only this time on the inside. The solution is simple. Brown agressively only on the side. Once it looks right, flip it over and let the other side get a little something, just so that it has a little color; then move it off heat and let it finish with the top closed. Meat doesn’t really need to be browned aggressively on both sides; like a 747 that really only needs one jet to get home safely, you get all the flavor you need from one side. Don’t forget, a big part of that flavor is from the sizzling crust of the meat, and whatever side goes onto a plate will immediately be steamed soggy.
Here’s another tip for effective browning. Don’t move the meat at all. I know there are advanced techniques that involve flipping it constantly in order to “temper” the meat, but don’t worry about that for now. Just leave it alone. Five or six minutes will get you the mahogany surface you long for. Anyway, it’s no mystery. Just lift it up and look at it from time to time to see how it’s doing. You will definitely be surprised at how long meat can be directly be licked by fire without really getting brown.
Because, remember, you want it to get brown without cooking all the way through. So you know the advice you’ve heard about taking the meat out an hour before you cook it? Ignore it. It’s wrong. The meat should be as cold as possible when it goes on, especially if it’s not very thick. Brown on the outside, pink in the middle: that’s the default goal for every beginning cook.
Rachael Ray's Blog

- Rachael Ray's profile
- 296 followers

