
Rachael Ray's Blog, page 60
May 23, 2013
When a conversation shows up in your dinner: Potato and Egg Curry
A few weeks ago, I was on the phone with a Charlie, an industry veteran who continues to make huge impact in food television. As we spoke, the conversation went from New York to London and then to an amazing egg and potato dish prepared by a notable Indian chef. At this moment, my curiosity was in full activation. I have eaten potato and peas and egg and peas – but never potato and egg. For reasons different to mine, Charlie was just as enchanted. For him, the magic lay in the simplicity whilst for me, it was in the obvious partnership of 2 ingredients that I had never seen paired together in an Indian context.
Beyond our conversation, I had never really thought about egg and potatoes again. That was until I was faced with a barren kitchen with just a few eggs, potatoes and two starving kids to feed. In that moment, Charlie’s dish rose from buried depths of my mind. Whilst I didn’t recreate the dish he ate in London, it inspired me to make curried egg and potato. The dish pulled from traditional North Indian flavors with the classic ‘tadka’ of cumin, ginger-garlic, fried onions and deglazed with tomatoes. Within a few basic steps, this dish certainly impressed my kids palate. The tang played with sweetness and tender boiled eggs and potatoes bask in their newly acquired flavors.
In no way did this dish look like an after thought and nor should it. Brought together in fragrant gravy this dish is forgiving in it’s very preparation and provides a whole lot of soul to the person eating it.
After having made the dish, it prompted me to do a quick search on the internet to see who else was eating this. Apparently, this dish is very popular amongst many families around India and perhaps the tradition of making this happened to skip my family.
Recipe For Egg And Potato Curry
Ingredients
4 eggs, soft boiled and peeled
2 russet potatoes, boiled and peeled
1 medium onion, finely diced
1 tsp. cumin seeds
2 tbsp. oil
¼ tsp. cayenne
½ tsp. black pepper
½ tsp. turmeric
1 tbsp. ginger
1 clove of garlic, minced
1 large fresh tomatoes, diced
5 grape tomatoes (optional)
A few sprigs of fresh cilantro
Salt to taste
4 cups water or chicken stock
Method
1) Heat the oil in a deep pan (to accommodate the water). Add cumin seeds. Once the seeds begin to sizzle, add the onions and sauté until they become golden. Add the ginger and garlic and cook until they become turn brown. Season with salt, cayenne, black pepper and turmeric
2) Add the tomatoes and cook on high heat until the tomatoes are soft and the oil separates. Add the water. Bring to a boil and reduce to a simmer. Add the eggs and potatoes and allow the eggs to fully cook through. Once the gravuy has reduced by ¼ .and potatoes and eggs are tender, adjust seasoning if necessary. Remove from heat and add the grape tomatoes (they will soften slightly in the heat). Serve hot and garnished with cilantro
Saira Malhotra, is of British–Indian descent and is a chef, food writer and cooking instructor based in New York City. Raised in Hounslow, U.K, or rather ‘Little India’, where the air is aromatic with roasted spices, little did Saira know these moments would follow her from being a student in France and Italy to residing in NYC with her husband and kids and parlay themselves unexpectedly in to a culinary career. She is a graduate of the International Culinary Center in New York City. Come visit her at her food blog: www.passportpantry.com where she shares approachable and international recipes


May 22, 2013
Hey parents - what are your favorite road trip snacks?

A lot of people will be hitting the road this weekend which means break out the car vacuum - road trip snacks are in order. Skipping fast food on the highway and packing a cooler not only saves money, but everyone will feel much better when you reach your destination. Some of my family’s favorite road trip snacks are popcorn, cereal, cut up fruit and veggies, grapes, cheese sticks, and I usually make some muffins and a sweet treat like cookies or brownies. I also try and bring some usually “forbidden” foods - ie, candy (Spree and Mentos are favorites around here), marshmallows, or yes, my kids love Pringles. I am sure to have set meal times when we have a long road trip, after which snacks are allowed so it’s not an all-day snacking fest and proper meals are consumed.
Here are some other road trip snack ideas - add your ideas or family’s favorites in the comments section!
-Make your own trail mix. The night before your trip set out zip lock bags and cereal, pretzels, dried fruit, nuts, chocolate chips, even m and ms - whatever your kids like - and have your kids (and you!) mix up personalized trail mix car snacks. We also like home made granola (pictured above).
-Time-consuming snacks. Think apples, pistachios (in the shell), lollipops.
-Snacks on a budget. Try giving each of your kids a fixed amount of money - $10 - and have them shop for their own snacks - with some guidelines (ie, some healthy snacks must be part of the shopping trip).
-Beyond PB&J. A bagel and cream cheese sandwich, a graham crackers and nutella sandwich, or a waffle and PB&J sandwich all pack well and are a little more fun than your run of the mill packed school lunch fare.
What are your family’s favorite road trip snacks?
May 21, 2013
Talking to your kids about growing up
My daughter is 10 years old and attends public school. She is in fifth grade and the other day she came home with a note saying the school was going to talk to the class about “hygiene”. At first I worried they would cover topics I wasn’t ready to discuss with my 10 year old, but I called the teacher and she assured me they were first, separating the boys and girls, and second, only talking about things related to puberty. Still, some of these topics are sensitive so I wanted to make sure she was getting the right message and from the right person.
I have spoken to my daughter about the things that were to be covered, so there would be no surprises. I reviewed the video they planned to show and it actually seemed kind of spot on, and I realized this might be a good thing for her to have a nurse and a teacher to talk to as well as mom.
It was my wake up call. Time to teach her about things like washing her face and using deodorant, which, when I mentioned, she asked, “only boys use antiperspirant, right?” It made me realize just how young she really is.
I also found a book, which I consider to be pretty good, called the Care and Keeping of You, which is published by American Girl. It is a book my daughter and her friends passed around and used to ask me questions. There are things in the book that made her feel uncomfortable, but overall, I thought it provided a good tool for talking. There are many other books on the market that offer similar information in various degrees of candor.
I asked some other moms if they had had the sit down with their daughters yet to discuss their menstrual cycle and many of them said “no, not yet,” or “too soon.” I understood those feelings, yet is the school the best place for the children to hear things for the first time? Maybe for some it is, as certain topics can be uncomfortable for moms to discuss, but either way, it seemed prudent to be aware of the changes our children are going through and to formulate a plan either way.
How did you talk to your children about sensitive topics?
The girl who cried “bully.” Bullying: overused term or more frequent today?
To answer my own question, I definitely think the term “bullying” is thrown around indiscriminately these days. Examples? A child crying bully when their 4th grade classmate decides to not be their friend anymore. Bullying? I think typical behavior for ten year olds. I tell my kids if someone doesn’t want to be their friend, it’s the other kid’s loss - find someone nice to hang out with. Bullying is so overused as a term that when I reprimanded my daughter the other day, she accused me of “bullying” her. The term has become a catchall for any unwelcome behavior or conflict.
By no means am I downplaying the existence of bullying - it has been happening for years, but didn’t have a specific term, or a term popularized like it is today. It was just mean kids intimidating other kids. Typical social jockeying that goes on while growing up, often in school, wasn’t labeled “bullying.” Kids are a mean bunch, and school can be rough. I try and teach my kids how to deal with unpleasant, and sometimes downright ugly, social situations without crying “bully” - unless or until absolutely necessary. It’s definitely part of life. I try and direct them to pick good friends, avoid trouble, and stand up for kids who are picked on if necessary. It has worked for our kids so far.
When I look back on my Catholic grade school experience in the 80’s, it definitely had its ups and downs, and bullying, by today’s definition. I was both bullied (in 5th grade when all the boys in the class called me “SUB” for “stuck-up brat” for the entire year - kids are so mean) and the bully (6th and 7th grade when I was absolutely abominable, “turning” girls against other girls and other mean girl behavior). My parents were not aware of any of this until my 7th grade teacher called them in and we had a come to Jesus meeting. I think this changed the course of my life, as after this revelation, I lost most of my friends, went from popular to unpopular, became friends with really nice girls I had never taken the time to get to know, and from that time on stayed away from cliques and focused on individual friendships.
One of the most important gifts parents can give their kids is to teach and guide them to deal with tough situations, and to let them feel some disappointment. It’s part of life, and makes you stronger, even if one of the hardest things in the world is to see your kids suffer. Social media makes it even easier for kids to hurt each other now, but it’s another part of navigating relationships.
What do you think parents? Is the term bullying overused or is it more prevalent now? What advice do you give your kids?
May 20, 2013
BRING OUT THE MAYO THIS MEMORIAL DAY TO CLEAN ‘N PREEN YOUR OUTDOOR OASIS
The unofficial start of summer is just days away YEAH!!!! So it’s time to get a couple of our most visible and used areas in our outdoor oasis preened ‘n cleaned and share a few easy money saving remedies for getting rid of some of summer’s most some stains.
WHITE PICKET FENCE-BRING OUT THE MAYO
An iconic home feature that once upon a time symbolized the American dream. Nowadays the good ole wooden ones have been replaced with PVC which are much easier to clean…thank ye lord! Here are a few quick n easy tips that even Tom Sawyer might have used if he and Huck were around:
Get a power nozzle for your hose and use the mega power button so dirt wont stand a chance. BTW this is a great activity for kids so you can chill for a bit!
For stubborn stains, fill a spray bottle with either a 2:1 ratio of vinegar and water or a 3:1 ratio of clorox bleach and water. Spray it on, use a long handled microfiber mop so you don’t have to bend and watch stains disappear.
For Lawnmower scuffs and tire marks, bring out the mayo! Squirt mayo direct from the jar onto the marks and wipe with a rag.
Another great way to clean the fence without sacrificing your manicure is 30 Seconds Outdoor Cleaner (http://www.30seconds.net/) Just spray it on and let it sit there for 30 seconds, hose it off and viola your fence will look brand spanking new!
And to keep your fence pristine all summer long, apply automotive wax spray.It will stop dirt from piling up and protect it from UV rays-its like sunscreen for your fence so it doesn’t discolor.
LAWNMOWERS-HOLY MOW-LY! Cutting your grass is a necessary summer evil, but grimy lawnmowers and grass stains don’t need to be. Here’s a manicure friendly safe way to have a pristine green cutting machine:
Disconnect the spark plug so you don’t accidentally start it
Turn it on its side
Use an ice scraper to dislodge dirt and grass buildup underneath-be sure not to touch the blade!
Use a power hose to wash the remaining yuck away
For the filter, bang it on the ground or use a computer air compressor spray. You can also rinse it out with water, but make sure it is 100% dry before putting it back.
And, should you or your kiddies find ‘playing in the grass is a gas’ . . .
GRASS STAINS-GIVE THEM A SHOT OF VODKA! Using a shot of vodka you can forget all about those stains. No, not by drinking the problem away, but instead by using a toothbrush dipped in vodka to scrub at the stain until it’s just a hazy memory. Another quick trick is to use an eye dropper filled with hydrogen peroxide to spot treat your clothing. Then launder as usual.
WOODEN FURNITURE-TAKE AIM! Your wooden furniture looking a bit dull from winter’s wrath? No problem! Just take aim with your favorite cooking spray and apply. Use a clean cloth to buff and viola you’re wooden furniture will be rejuvenated and will have a healthy, protective shine. Crisco also works!
GRILL-OLA COLA! A fun summer BBQ can turn into a nightmare when trying to clean up afterwards. Let the grill cool a bit then try using a ball of aluminum foil dipped in coca-cola instead of your regular brush. This unusual trick will break down anything left on the grill and make clean up a breeze! Scary to think what cola might be doing to our insides, but that’s a topic for another day!
…and if you and yours miss your mouth or are over zealous with those condiment and you’re wearing them, there’s no need to stress out.
KETCHUP STAINS- LEMON–AID! For a ketchup stain scrape off any remaining, rinse it in cool water, then use lemon juice and the rind of the lemon as a cloth to scrub out the stain. Then launder as usual.
MUSTARD STAINS-FIX IT n FORGET IT! If mustard is the problem, remove as much as possible, then rinse in cold water. Then soak the stain in Fixident Denture Cleaner for at least 30 minutes. It will be gone in no time.
Julie Edelman aka The Accidental Housewife is the go to gal for easy; real life time, money, and energy saving tips that maintain our home, family and manicure. She appears regularly on the Today Show with Kathie Lee ‘n Hoda, Rachael Ray, and The Doctors. She is a New York Times best-selling author and her next tome for the home: The Ultimate Accidental Housewife: Your Guide to a Clean Enough House is the sanity saving editor forBeautiful Design Made Simple Magazine; has a webisode series for Fox News Magazine, and hosts her siteJulie’s Tips with her goal to empower, educate and engage fellow housewives along with a daily sanity saving libation.
Supermarket Score: Tahini
Those of us familiar with the fabulousness that is tahini may know it as that rogue jar of peanut butter-ish spread that we pull out every few weeks to make hummus. I promise you, though, that this staple of Middle Eastern and North African kitchens has a wealth of potential far beyond a run-of-the mill cracker spread.
Tahini is an Omega-3 & Omega-6 rich paste made from ground sesame seeds that can often be found in the same area of the supermarket where olives, capers, and salad dressings are shelved. Don’t be alarmed if you pick it up and it looks separated – that’s completely normal! Just like natural peanut butter, the solids will separate from the oils over time. What I like to do when first opening a new jar is give the contents a quick whiz in the blender to bring it all back together. Return it to its container and it will stay homogenous (in the refrigerator) for several weeks.
Tahini has a flavor that can be somewhat chalky on its own, so it often has a go with partners like olive oil, garlic, and lemon juice. Once cut a bit, its true nutty, earthy flavor adds depth to many more edible delicacies than a bowl of hummus or street cart pita. Check out these three new ideas for getting a bit more tahini onto your table.
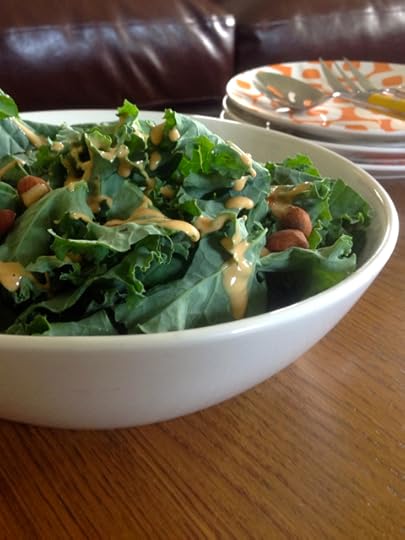
SALAD DRESSING
One of my favorite neighborhood restaurants near my house makes an amazing tahini-soy dressing. While a modest attempt at imitation, my version complements the tahini with tamari, which is all together delicious and reminiscent of a late night show duet. To make about 1 cup of dressing, in a bowl whisk together 1/2 cup tahini, 3 tablespoons tamari, 1 teaspoon sesame oil, a few squirts of sriracha, the juice of a lime, and 3 to 4 tablespoons of water. Adjust the seasoning with salt and pepper and the consistency with a bit more water as needed; store in the refrigerator for up to 10 days. This dressing is light enough for a simple romaine salad, but I like it dressed on some hearty kale with toasted almonds and chopped dates.
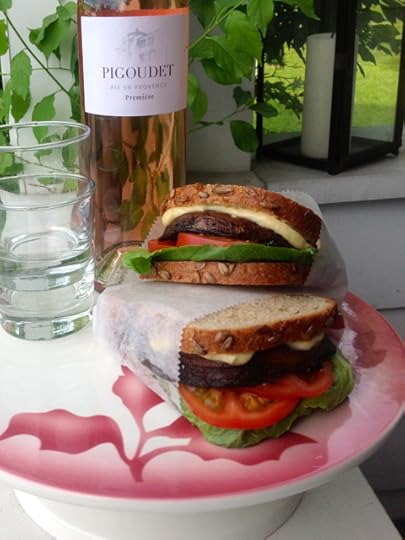
SANDWICH SPREAD
Give your standard issue sandwich spread a kick in the butt by cutting it with some tahini. Mix together equal parts mayo & tahini, stir in a few squirts of mustard, and pair it with a grilled portabella mushroom for a surprisingly satisfying meatless lunch or dinner sandwich. (As a side note, tahini reacts in a funny way to having liquid like water or oil added to it. When just a little bit is added, it will seize up at first. Keep adding the liquid slowly and you’ll see the texture thin out. As it sits it may thicken back up a bit, so add a few splashes at a time to adjust it to a spreadable consistency).
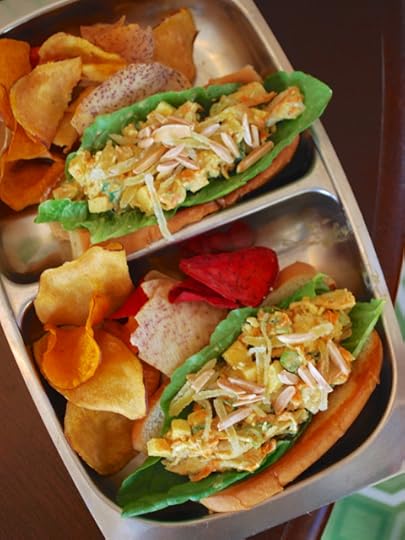
SPICED-UP CHICKEN SALAD
Spring boarding off from the sandwich spread idea, next time you’re making chicken (or even tuna) salad, cut in some tahini. Swap out about 1/4 of your dressing’s mayo or vinaigrette’s olive oil with tahini and enjoy an Omega-3 boost (and great new flavor combination) to your lunchbox. Looking for a bit of recipe inspiration? Try adding some sesame love to Rachael’s delicious Cold Chicken Curry with Toasted Almonds and Crystallized Ginger.
Patrick W. Decker’s life revolves around food. Always has, probably always will. As a graduate of The Culinary Institute of America and past member of the culinary teams for Food Network stars Rachael Ray, Sandra Lee, Bobby Deen and Paula Deen, he now works as a food stylist and producer in NYC by day and a food writer and recipe developer at his home in New York’s Hudson Valley by night. You can see what he’s up to by following his latest posts on Instagram at @patrickwdecker or visiting his website at patrickwdecker.com .
Mastering the art of the after school snack
As if lunch duty isn’t hard enough… Parents also have to master the art of the after school snack. And as most of us will attest, it’s harder than it sounds.
Snacks have to be fast and easy because the clock is ticking. Homework, chores, sports and other activities are all demanding attention from your child (and probably you). They have to be nutritious because… Well, they just do. And they have to strike the right balance of fueling your kids through the rest of the afternoon without leaving them too full for dinner.
For all those reasons, my No. 1 go-to after school snack for my son is yogurt. It’s healthy, filling (but not too filling), fast and easy (he can even get it himself), and if he’s truly starving, he can even add fruit to it.
But for days when I’m willing and able to do a little more, I’ve come up with three fun and delicious after school treats my son loves and I can (mostly) feel good about giving him.
Mango ice cream: No, not real ice cream. This is ice cream I’d be OK with my son eating for breakfast, lunch and dinner. Some days I really do let him eat it for breakfast. And snack. Here’s how it works. I keep bags of frozen mango chunks in the freezer. When he wants “ice cream,” I pop a bag of it into the food processor along with a tiny splash of orange juice or water, then process until it hits the consistency of soft serve. This usually takes about 1 to 2 minutes. That’s it. I scoop it into ice cream bowls and, if I’m feeling indulgent, let him put a few candy sprinkles on it. That’s it — a 100 percent fruit snack your kid thinks is a treat. This also works with frozen bananas. Also, if you child doesn’t finish the ice cream (as if!), don’t waste the excess. Pour it into a glass and store it in the refrigerator. Add it to a breakfast smoothie the next day.
Lemon ice slushie: This one is perfect for the end of the school year, when kids arrive home hot and tired. I put about 1 1/2 cups of ice in the blender and 2 to 3 tablespoons lemon juice. I then add a squirt of liquid stevia sweetener (a no-calorie, no-chemical, natural sweetener) and about 1 cup of seltzer water. I blend until the ice is slushie smooth, then pour into glasses and serve with a spoon. This also works with lime juice, a blend of lemon and lime, or any juice concentrate (think frozen orange juice concentrate, cherry juice concentrate, etc.). If you don’t like stevia (some people object to it’s mild aftertaste, though I find the lemon juice masks this), you certainly could use honey, maple syrup, agave syrup or sugar.
Homemade tortilla chips: Seriously. These are so much easier than they sound. And so much more delicious than anything you can buy. But because they are slightly more trouble than opening a yogurt cup (though not much), I keep these for days when we aren’t rushing out the door to karate or some other activity. Usually, I have Parker do his homework at the counter while I fry up fresh tortillas. I start by cutting whole-wheat flour tortillas into wedges. Then I heat about 1/4 inch of oil in a deep saute pan. It should be hot enough that if you set the tip of a wooden spoon in it, it bubbles a bit. Then I gently drop a couple wedges into the oil at a time and fry them for about 10 seconds, turn and cook for another 10 seconds. Use tongs to pull them out and set them on paper towels. Sprinkle with salt and eat as is or with salsa or hummus. Fried? Yes. But also whole grain and insanely delicious. I actually make giant plates of these for my son and his friends during play dates.
J.M. Hirsch is the national food editor for The Associated Press. He blogs about the trials and tribulations of his son’s lunches at LunchBoxBlues.com. His upcoming cookbook, Beating the Lunch Box Blues, will be the first to be released by Rachael’s new publishing venture, Rachael Ray Books. Hirsch’s previous books include High Flavor, Low Labor: Reinventing Weeknight Cooking and Venturesome Vegan Cooking. He lives in New Hampshire with his son, wife, and too many cats.
May 17, 2013
Lime Bars
My daughter turned 13 earlier this month and when a friend said to me “how is that possible that you have a teenager?” I looked in the mirror and was not at all surprised. I am so pleased by the person she is becoming - lovely, sensitive, funny, generous, kind. All of the work that my husband and I put in early on seems to paying off - with all three of our children. They are (usually!) fun to be around, pleasant company - I think at its simplest, that’s really the gist of parenting - raising kids who are good people.
My newly teenaged daughter loves chocolate, but she also loves my lemon squares, and I don’t make them very often, as they are not a majority favorite in my house. The other day I made these lime bars as a riff on the lemon squares and we both liked them even more.
Lime Bars
(click here for printable recipe)
Ingredients:
For the crust:
4 tablespoons melted butter, cooled
2/3 cup roasted hazelnuts
1 cup graham cracker crumbs
1/4 cup sugar
1 tablespoon lime zest (2 limes)
pinch of salt
For the filling:
2 eggs
1 can (14 ounces) sweetened condensed milk
1/2 cup fresh lime juice (4 limes)
pinch of salt
Directions:
Preheat oven to 350 degrees.
Spray an 8-inch square baking dish with non-stick cooking spray. Line with parchment paper and spray again. In a food processor, grind hazelnuts, graham cracker crumbs, sugar, salt and lime zest. Add butter and pulse briefly to combine. Press mixture into bottom and about 1 inch up sides. Bake until ightly browned - about 10 minutes. Set aside.
Make the filling: In a large bowl, whisk together eggs and condensed milk. Add lime juice and salt, whisk until smooth. Pour filling evenly over crust and bake until set - about 18-20 minutes. Cool on rack, then chill at least one hour or overnight. Cut into squares using a damp sharp knife, wiping the knife clean between each cut to cut squares cleanly. Store in refrigerator.
May 16, 2013
Yummy Arugula & Salmon with Watercress Sauce Salad!
Now that the temperature is going up it is salad season. I try to eat salads all year long but there is something about putting on a pair of short short that makes me what to ban the bread and get on the fresh band wagon. So here is one of my favorite fresh, tasty and filling salad ideas that are just perfect for the season. And because Salmon is just as tasty served room temp this one could be great for entertaining out-of-doors!
Salad
Baby arugula, 1lb
Mushrooms, 2-3 generous handfuls, sliced thinly
Cippolini onions, 3-4, coarsely chopped
1 cucumber, quartered
1 container of cherry tomatoes, halved
1/2 head of garlic, minced
Black cherry balsamic vinaigrette, 1 tbsp
Olive Oil
Salt and pepper to taste
Watercress Sauce
1 large bunch of watercress leaves, washed, coarsely chopped
1 shallot, small diced
2 tbsp plain yogurt
1 tbsp white wine
1 tbsp olive oil
Salt and pepper to taste
1 tbsp water, if needed
Salmon
1 ¼ lb – 1 ½ lb salmon, portioned
Handful of dill, finely chopped
1 lemon, thinly sliced
Olive oil
Salt and pepper to taste
Salad
1. Wash baby arugula thoroughly. Dry in salad bowl.

2. Wash mushrooms and cut in ¼” slices (remove stem first; reserve for another dish like soup. Stems are too rubbery and not as flavorful.) Set aside.


3. Wash and half cherry tomatoes. Marinate in black cherry balsamic vinaigrette.

4. Wash and quarter cucumbers. Season with salt. Add to salad.

5. Coarsely chop cippolini onions. Add to salad.

6. Refrigerate salad until ready to serve. Dress lightly with olive oil, salt, and pepper a la minute. Add goat cheese and cooked mushrooms at the table.

7. Mince garlic and saute with mushrooms on medium heat until brown and cooked through.


Watercress Sauce
1. Quickly sauté watercress leaves with diced shallots until watercress wilts. Add to blender. Puree with olive oil, white white, plain yogurt, and season with salt and pepper to taste. Reserve.

Salmon
1. Portion salmon appropriately. Drizzle with olive oil. Season generously with salt and pepper.
2. Finely cut dill and garnish over salmon.
3. Thinly cut lemons and place 1-2 pieces over salmon.
4. Cook in oven at 400* for 20-25 minutes or until salmon “flakes.” Do not overcook! Salmon should not be dry.
Assemble prepared salad with mushrooms, and goat cheese. Add dressing and season. Serve salmon with watercress sauce. Enjoy!


Find me on Facebook for more yummy ideas!
May 15, 2013
Ten Ways To Guarantee You Won’t Be A Grilling Failure
I’ve been thinking deeply about grilling. I mean deeply! I am working on a new recipe for a milk-braised pork loin that I want to finish over hot coals, with some kind of milky glaze of a kind never yet invented. I was planning on writing about it here, with a recipe at the end, when I realized that a lot of people were asking me grilling questions, and none of them were about bizarre, complicated dishes. They wanted to know how to make burgers; how to make steaks; most of all, they wanted to know how not to screw up, especially with all their friends and family looking on. So I am calling an audible. I will get around to specific guides for burgers, steaks, even roasts. But for now, I want to step in and keep you from screwing up. Call it a grilling intervention. No matter what you are making, if you follow these ten steps, you won’t botch the job; whether it’s prime beef or bulk hot dogs, you can’t go too far wrong if you:
Think it all through. Here’s what every grill disaster looks like: the meat is cooking away, or on fire, or ready to come off, and you realize you don’t have any plates. Or tongs. Or that there isn’t a table near you. If you are making cheeseburgers, you’ll need cheese, unwrapped, and enough time to let it melt. Plan what you are going to do, in what order, and have the stuff you need at hand so you don’t become panicked and distracted and upset.
Speaking of upset: nothing is worse than cooking on tilt. Keep your head. this is just a piece of meat. No matter what happens, it’s not the end of the world. Worst case scenario is that you order Chinese food. You can’t grill with your teeth clenched.
Oil and kosher salt, kosher salt and oil: it goes on everything, on both sides. If you don’t have oil, that’s OK. But if don’t have kosher salt, just put away the coals and order chinese food. Seriously.
You always want a very hot grill to start out with. If you can put your hand over it and count to three without discomfort, it’s not hot enough. If you can’t even make it to two, it may be too hot. I don’t recommend using gas grills, but sometimes it can’t be helped. If you do use a gas grill, turn it up all the way and close the lid. Eventually it will get sort of hot.
Always have a cold side and a hot side. Sear up on hot, and finish on cold. Every time, with every food, no exceptions.
If you don’t have a Weber grill, get one. Then get a Weber chimney starter. No serious griller ever uses gas. I’m sorry. It’s true though.
I love wood and I love lump hardwood charcoal, but regular Kingsford briquettes will always get the job done. As long as they don’t have starter fluid in them.
If you’re cooking, cook. Don’t wander away. Don’t watch television. Don’t take on any other assignments. Your job is to cook. Everything else is someone else’s job.
Don’t bother with thermometers unless you are cooking something bigger than a housecat. Learn to feel doneness by touch. It’s not that hard. And it’s a skill, like driving or masturbating, that will never abandon you.
Make sure everybody is ready to eat before you put the food on. I can’t stress this enough. Nothing is worse than knocking yourself out to make something right, and then finding that there are kids running around and the table isn’t set or somebody wandered off, or some moron can’t find his beer, or the salad hasn’t been set out yet. People have to be ready to receive hot food. Otherwise you might as well be microwaving. This is probably the single most common grilling mistake I know.
I’m not saying that this is everything you have to know about grilling. It’s not even a start. But if you observe these ten lessons and hew to them faithfully, I promise that you won’t go too far wrong. (And even if you do, there’s always Chinese food.)
Rachael Ray's Blog

- Rachael Ray's profile
- 296 followers

