
Rachael Ray's Blog, page 63
April 25, 2013
Supermarket Score: Buttermilk
“Supermarket Score!” is all about taking a look at the great deals and delicious meals that are hidden in commonly found supermarket items.
I’d be willing to bet that when you hear “buttermilk”, you probably think of either (A) pancakes, (B) biscuits, or (C) that mystery carton of dairy in the back of the fridge that only makes an appearance for Sunday morning pancakes and biscuits.
Buttermilk often finds its way into our baked goods because the culturing process it goes through renders it full of lactic acid, which reacts with leavening agents like baking soda to create a higher rise and more tender product. So carry on with your light & fluffy pancaking ways, Saturday morning champions!
Why let all the fun stop there, though? Buttermilk’s abilities can lend a helping hand of deliciousness to your meals any day of the week. Take these ideas for instance:
MARINADE

You may have noticed that some recipes like fried chicken and sometimes the Indian classic Tandoori chicken start by marinating the meat overnight in buttermilk. The cultures and lactic acid in the milk tenderize the meat and help it to hold onto its moisture when cooking, yielding the juicy product we all know and love. Next time you’re frying chicken – or getting ready to grill it for that matter – add in a few hours or even overnight soak in some buttermilk to keep sad, dry chicken out of this summer’s backyard barbecues.
LIGHTER MAC & CHEESE

There are a couple of different, great tricks out there to lighten up mac & cheese, so consider this one more notch in your culinary tool belt. Most buttermilks you’ll find in supermarkets are made from lowfat or fat free milk – it’s the culturing process that thickens them to a place much creamier than where they started. Swap a bit of the milk in your next cheese sauce with buttermilk to lower the fat and up the creaminess…and also make room for some bacon.
One word of caution, though – be sure to add the buttermilk AFTER the sauce has thickened up on the stovetop. Don’t boil it with the milk or you’ll curdle the mixture (keep on reading for that one).
FRESH RICOTTA CHEESE
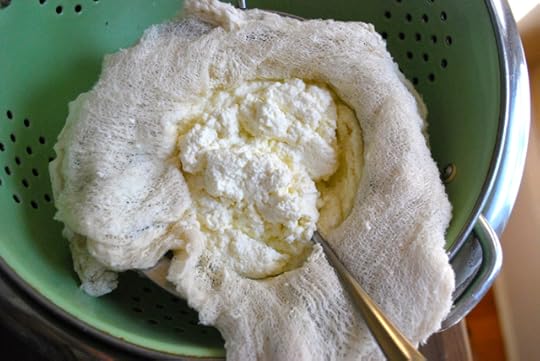
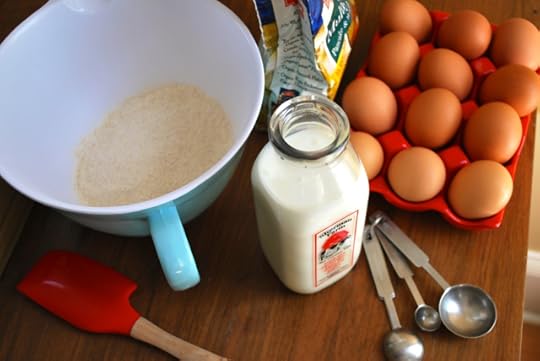
Speaking of boiling milk with an acid, that’s exactly how ricotta cheese is made – and what a culinary genius your house will think you to be when you show up with your own, homemade fresh ricotta cheese! Trust me, it’s incredibly easy and a truly impressive way to finish off a small amount of buttermilk in the bottom of a container.
Place a large pot over medium heat with 4 cups whole milk, 1 cup heavy cream, and 1 cup buttermilk. Gently bring the mixture to a boil, stirring occasionally. As it comes to a boil you’ll see curds start forming in the milk. As this happens, reduce the heat to low and simmer the mixture for 2-3 minutes (don’t stir it too much, you don’t want to break up the curds). Remove the pot from the heat and set it aside to cool, undisturbed, for 1 hour (the curds will keep forming during this time). After 1 hour, line a strainer with cheesecloth and, using a slotted spoon, gently lift the curds out of the whey and into the strainer. Let the curds drain in the cheesecloth for 15 to 45 minutes, depending on how dry you want them. The ricotta is now ready to be used or stored in the refrigerator for up to three days (makes about 2 cups).
What to do with the whey you may be asking? Save it and boil up your next batch of mashed potatoes in it. Oh buddy…
Patrick W. Decker’s life revolves around food. Always has, probably always will. As a graduate of The Culinary Institute of America and past member of the culinary teams for Food Network stars like Rachael Ray, Sandra Lee, Bobby Deen and Paula Deen, he now works as a food stylist and producer in NYC by day and a food writer and recipe developer at his home in New York’s Hudson Valley by night. You can see what he’s up to by following his latest tweets on Twitter at @patrickwdecker or visiting his website at patrickwdecker.com .


8 FAB USES FOR OUR DAILY GRINDS
As I was multi-tasking this morning drinking my second cup of coffee with my right hand and chucking the used filter ‘n its grinds with my left, I realized that I should share some unusual uses for both these items particularly being in the spirit of Earth Day. So here are some fab uses for coffee filters and what gives us that oh-so-important jolt in the morning. BTW: Use recycled filters they’re just as good and good for Mother Earth!
DEGREASER: Next time you order that greasy egg roll or bring home those fries put them in a filter to absorb the grease.
DE-SERVER: Keep those nails in tact and forget those serving dishes at your next home soiree. Use those flat filters for assorted nuts, trail mixes, cookies, candies and any other like items. And, use a plastic spoon as self-servers along with little cupcake liners for guests to put their portion into!
DECANTER: I’m renowned for cracking my cork upon opening so I use a filter to catch the cork as I pour it into a pitcher or a decanter. TIP: Do as I now do…buy screw-top bottles!
DE-LINTER: Paper towels leave lint when you clean so use a filter instead.
DIFFUSER: I prefer soft light to hide those little baggies under my eyes which seem to have found an all-too permanent home, so if sunglasses are not readily available simply put a filter over the flash which will soften the truth… I mean the light

DE-STINKER: Got foul smells in your fridge? Put a cup of used grinds in their for a day or two. Garlic-scent on your hands lasting past din din? Rub a dub a little and rinse with warm water. TIP: Put some fresh grounds on floor and let your vac sip ‘em up to get rid of musky smells.
DE-SCRATCHER: Get rid of small scratch marks on your wood furniture by mixing a paste of 1 tablespoon grinds to teaspoon water. (3:1) Gently rub paste into scratch with a soft cloth. Let sit few minutes and buff away excess.
DE-MESSER: Sprinkle grounds over ashes in your fireplace before cleaning to limit a plume of dust (love that word ‘plume’!). Let them sit there for about 15 minutes. Feel free to take a coffee break while waiting!
Julie Edelman aka The Accidental Housewife is the go to gal for easy; real life time, money, and energy saving tips that maintain our home, family and manicure. She appears regularly on the Today Show with Kathie Lee ‘n Hoda, Rachael Ray, and The Doctors. She is a New York Times best-selling author and her next tome for the home: The Ultimate Accidental Housewife: Your Guide to a Clean Enough House is the sanity saving editor for Beautiful Design Made Simple Magazine; has a webisode series for Fox News Magazine, and hosts her site Julie’s Tips with her goal to empower, educate and engage fellow housewives along with a daily sanity saving libation.
April 24, 2013
Slow-Cooked Kidney Beans Stew
When mom declares Sunday lunch as Rajma-Chawal – you know the mood she is creating for her home. Shawl is rice and sloshed over it is rajma, a kidney bean stew, that starts with a sauté and flows on to a lazy simmer. It is North India’s ultimate comfort dish and almost always eaten at Sunday lunch. Why? You might ask. Because rajma for dinner is a work out for the system to digest and to have stew for lunch any day other than Sunday is indulgent.

I have yet to meet a person (young and old alike) who dislikes rajma. But why would it meet resistance when the beans become buttery and soft surrendering themselves to the gravy they are bathed in. Ginger, garlic, sautéed onion and cumin contribute to the light and soupy gravy and together with the beans, they are poured over rice.
Kidney beans are not indigenous to India and made their way to Kashmir through sailors by way of Central America. Yet somehow the assimilation of this ingredient makes it hard to imagine a North India without it’s Sunday ritual of rajma-chawal.
When moms makes this dish, it is one of the few times they will make a dish without other sides. This bowl of comfort is served up with some rice and a rustically sliced onion sprinkled with chili powder and salt. Whilst it can be made with canned kidney beans, don’t expect the blessings of a mom to make it this way. After all, like any stock, the goodness of the beans enriches the water it is cooked in. It also adds a light starchy base to the soup, giving the soup a velvety texture.
Kidney beans require some forward planning by soaking the night before and whilst many will throw it in a pressure cooker for a more rapid result, I like to cook mine on a low simmer for a couple of hours. It is a lazy Sunday afterall and once you get it on the stove, it will gently do it’s work.

Or simply have it like a bowl of soup
Recipe For Rajma
Ingredients
Red kidney beans, 1 ½ cups soaked in double the volume of water overnight
Salt to taste
2 tbsp. grapeseed oil
1 ½ tsp. cumin
2 cups onions, finely diced
1 heaped tbsp. grated ginger
1 tsp. grated garlic
1 x 12 oz. can of crushed tomatoes
10 cups water
1/2 tsp. red chili powder
1 tsp. coriander powder
Handful of chopped cilantro
Method
1) Soak kidney beans overnight. Drain. Bring to a boil in a large pan (so the beans can swell) with10 cups of water and reduce to a gentle simmer. Cook covered for 2 hours until beans are tender
2) Heat oil in a large pan, add cumin seeds. Within a few seconds, the seeds will fizz in the pan; add the onions and sauté until they get browned from the sides. Add ginger, garlic and fresh chili and powder and continue to sauté. Add the salt and crushed tomatoes and cook until oil separates. Add the sauce to the cooked kidney beans an simmer fro another 10 minutes to let beans absorbs the flavors. Sprinkle the coriander powder and serve hot with boiled rice and garnished with fresh cilantro
Saira Malhotra, is of British–Indian descent and is a chef, food writer and cooking instructor based in New York City. Raised in Hounslow, U.K, or rather ‘Little India’, where the air is aromatic with roasted spices, little did Saira know these moments would follow her from being a student in France and Italy to residing in NYC with her husband and kids and parlay themselves unexpectedly in to a culinary career. She is a graduate of the International Culinary Center in New York City. Come visit her at her food blog: www.passportpantry.com where she shares approachable and international recipes
April 23, 2013
Texture Time
There’s one thing women want from their haircut: To look good all the time. Whether it’s on the weekend, at a formal gathering, at work, in the supermarket, or in the park, making sure your hair works to suit your lifestyle is important. The right cut can make you feel confident, prettier, and happier. But choosing the right cut is only half the battle. The other half? Learning how to style your locks so they suit your day, the occasion, your mood, and the rest of your look. My looks for Ulta are not only easy to maintain, they’re also super easy to style.

Mist hair generously from scalp to ends with Redken Layer Lift 07. Blow dry using a Denman Brush and finish with your fingers for a polished look that still has textur. Once the hair is dry use Redken Wax Blast 10 to enhance texture and pieceiness.

Apply Redken Guts 10 to damp hair. Use a flat boar bristle brush to smooth all of the hair away from the face. Blow dry directionally, taking very small sections and directing everything back, up and away. Flat iron sections around the edges to keep the look modern and piecey. Next, take a horseshoe shaped section from the top of the head to the crown (and a little below) and clip it out of the way. Smooth the sides back and secure very flat with criss-cross bobby pins. Take the crown section and round brush medium sized sections over directing the roots. Lightly backcomb the the top and crown before smoothing it back and over the pins.

The trick to making these bouncy curls look less pin-up-girl and more modern and fresh is the way the hair is curled and finished. Prepare the hair by using Redken guts 10 and blow dry with a round brush for volume. Curl the hair using a large barrel curling iron alternated with a medium barrel curling iron. Hold the end of the hair between your thumb and forefinger and smooth it around the barrel of the iron like a ribbon. Be sure to keep the ends of the hair straight by leaving them out of the curling iron. Once the hair is cool, sprinkle Redken Powder Grip into the hair and use your fingers to rough up and shape the hair into a final silhouette.
Many people assume that shorter hair means you can only have one style—down—but that’s just not the case. Take the above layered, blonde bob. It not only looks stunning straight, it can also be curled, crimped, and blown out, and changes its appearance dramatically when you play with texture. A choppy bob such as the look above can become very different when new textures are added. A little mousse can take a sleek style from office to dinner with friends simply by messing up a perfect look. A ponytail can go from day to night simply by changing its texture. Think sleek and straight in the office, and messy bed head for dinner.
So whether you’re styling curls to wear with a fun party dress and red lipstick for a well-deserved night out with the girls, pushing back your bangs for an edgy look on a trip to the farmers markets, or sleek and straight with cropped trousers and a silk blouse at the office, don’t be afraid to try experimenting with the texture, as well as the style, of your hair. Experiment, take risks, and try something new. After all, you can always change it! (And if you’d rather let a professional do it for you, head to your nearest Ulta salon).
April 22, 2013
Breakfast Time: Almond Chocolate Chip Oatmeal
It may be spring but as I see it, oatmeal is an any-time-of-the-year food. It’s super nutritious, filling and delicious. Over the years I’ve made many versions and I never seem to run out of new ways to jazz it up. I like to keep my breakfasts relatively healthy, but I also want to feel that what I’m eating is special so I’m always working on ways to keep the first meal of the day exciting and healthy at the same time.
It’s important to have a good balance of carbs and protein in the morning to help sustain you until your next meal. With that in mind, I try to add things to the oatmeal that will help keep me satisfied. Today I decided to stir a little almond butter into my cooked rolled oats and top it with some whole almonds, a few chocolate chips and a sprinkling of cocoa powder. The flavor combination is delicious and very filling. The addition of the chocolate chips is definitely a “once-in-a-while” treat but it’s the perfect way to stave off any sweet craving I’m having at the moment without going overboard. A teaspoon of semi-sweet chocolate chips is just the right amount of sweet to satisfy and make my breakfast feel decadent without any guilt at all.
Almond Chocolate Chip Oatmeal
Serves 1
Ingredients:
1/2 cup rolled oats, cooked in water according to package instructions
1 teaspoon almond butter
1 teaspoon semi-sweet chocolate chips
10-12 almonds
1/4 teaspoon cocoa powder or cinnamon
Instructions:
1. Prepare oatmeal with water according to package instructions. While oatmeal is still hot, stir in almond butte. Top with almonds, chocolate chips and a dusting of cocoa powder. Enjoy!
Monday Night Means Dessert: Monday Night Chocolate Cake

As far as Mondays go, this one is not so bad. It’s finally sunny. It’s not snowing - or hailing - both of which it did this weekend, at the end of April. I am not panicked about any specific issues relating to any of my children (at the moment - this could change at any time). Today is also a bit of a monumental day as we are getting new counters in our kitchen. We have lived in our 100+ year-old Victorian for 12 years and we are not a family that moves into a house and immediately re-does it top to bottom. Quite the contrary. We had originally budgeted for one house project per year which afforded, among other projects, extensive interior and exterior painting, refinishing hard wood floors, and some carpeting. That schedule was abandoned as our kids got older and our expenses escalated. And we needed a new roof, among other necessary home repairs, which trump “improvements” unfortunately.
I like to think of our house as charming, but dream about a bathroom with a walk-in shower with a glass door while I continue to shower with the clear liner clinging to my legs. Our kitchen counters are an 80’s slate blue linoleum, with some peeling edges secured with scotch tape. To say I am thrilled on this Monday as our new counters are being installed is an understatement - I literally live in our kitchen.
I managed to whip up a cake this morning, keeping with my Monday night dessert routine. This is the perfect Monday dessert - made in one bowl and baked in a loaf pan. You can choose to top with powdered sugar. Or whipped cream. Or ice cream. Or berries. Or all of the above. I think it would be completely acceptable to toast it with some peanut butter for a snack - or let’s be honest, breakfast.

Monday Night Chocolate Cake (adapted from a Smitten Kitchen recipe)
(Click here for printable recipe)
Ingredients
1/2 cup (1 stick) butter, softened
1 cup firmly packed brown sugar
1/2 cup granulated sugar
1 large egg
1 cup buttermilk (or 1 cup milk + 1 tablespoon fresh lemon juice, let sit for 10 minutes at room temp and shake or stir)
1 teaspoon vanilla extract
1 1/2 cups flour
3/4 cup Dutch Process or partially Dutch Processed cocoa powder (I used Hershey’s Dark)
1/4 teaspoon baking soda
1/2 teaspoon baking powder
1/2 teaspoon salt
1/2 cup chocolate chips
Powdered sugar, for dusting
Directions
Preheat the oven to 325°F. Butter and lightly flour a 9×5x3-inch loaf pan, or spray it with a butter-flour spray. In a large bowl, on the medium speed of an electric mixer, cream the butter until smooth. Add the sugars and beat until fluffy, about 3 minutes. Add the egg and beat well, then the buttermilk (or substitute) and vanilla. Sift the flour, cocoa, baking soda, baking powder and salt together right into your wet ingredients. Stir together with a spoon until well-blended but do not over mix. Scrape down the batter in the bowl, making sure the ingredients are well blended. Fold in chocolate chips - do not over mix.
Pour the batter into the prepared loaf pan. Bake for 60 to 70 minutes, or until a cake tester inserted into the center of the loaf comes out clean. Cool in pan on a rack for about 10 to 15 minutes, then turn out of pan and finish cooling on a cooling rack. Dust with powdered sugar and other toppings if desired.
Hey Arnold! lives on in my son
My 8-year old son has developed a passion for drawing. One day he just picked up a pen and paper and started drawing volumes and volumes of artwork, mostly centered around this one character, Arnold, from the cartoon Hey Arnold! Hey Arnold! was a popular show on Nickelodeon in the 1990’s, so I never knew it as I was too old when it came out. Although it doesn’t air now either, my son somehow found the show through Netflix or one of the other On Demand sources. He instantly related to this character with the football-shaped head, and would create stories and illustrations of this guy and his friends. At first, he would draw scenes from the shows he had watched and later purchased. Then Arnold was transformed into this new character my son invented, which melded together Arnold and whoever else was on his mind, sometimes a super hero, sometimes James Bond. For instance, he once drew a storyboard where Arnold finds his inner super powers and sews his own superhero costume, ala Spiderman. I was happy to indulge my son and buy him paper and pencils but I could barely keep up. Then he decided he wanted to publish his work and put together a binder full of his drawings for me to bring to work, photo copy and give away to his friends as a prized gift, sharing his most personal feelings.
My son has been through a head trauma so I was really happy to see him lose himself to something so creative and to find a new form of expression. He is also someone who, when he becomes interested in something, has to know every last detail about it. Soon he was telling me about who created the show, a man named Craig Bartlett, and how he was in the middle of writing a Hey Arnold! movie when his arrangement with Nick ended. I did a little research myself and found there were legions of people, like my son, who desperately wanted to see this movie get made. Of course these people were older, children of the 90’s, but they all saw in Arnold what my son saw- a very relatable character, acting like a typical boy. “Hey Arnold! was one of the last true cartoons” I read somewhere, which piqued my interest. Why was it so special? I went on to learn that it was one of the longest running shows on Nick and most popular. Not to diss today’s TV programming for kids, but this show aired during a time when story lines really mattered and less attention was spent on special effects and inappropriate subject matter. Kids adored Arnold, and I soon learned why.

After my son pestered me for months on how he wanted to write to Mr Bartlett to ask about the movie and share his drawings, I finally got down to looking for his address. Of course he had parted ways with Nick so I couldn’t find him through my contact there, so I poked around for weeks until I finally found a way to reach out to him and we sent him a letter. I sincerely did not think I would hear back, but lo and behold, he sent my son a personalized drawing that we now have framed in our house. It sits proudly on my son’s desk in his room and I have to say, I think it is one of our family’s prized possessions. I say this not because it is worth something of monetary value, but because of what it represents. This guy appreciated what my son had to say, was flattered and took the time to write him back. In a day where maybe getting a ReTweet is all you can expect from a celeb, it took me back to a simpler time, when fans were fans and kids were kids. And cartoons were about real life.
I just had to write this homage to Craig, because of what a good person he is and how he left an indelible mark on my son that could literally shape his future.
Too many pancakes? Nonsense!
There really is no such thing as too many pancakes. Whether you’re having them for breakfast or as breakfast-for-dinner, you always should make too many.
Because smart lunch packers know that the best midday meals are built from leftovers. And leftovers from breakfast are just as good as those from dinner.
Pancakes are particularly awesome in this way.
First, it takes the same amount of time to mix a batch of batter for eight pancakes as it does 18. Second, pancakes cook in just minutes, so the extra time at the stove is pretty minimal. Third, spare pancakes freeze well, so you can have them on hand for days or weeks to come.
Finally — and most importantly — pancakes are incredibly versatile. Sure, they are great drizzled with syrup. But that’s just the start. They also make a great alternative to traditional bread.
But first, the basics. You need a recipe for good, wholesome pancakes, and I’ve got you covered. This recipe is simple, delicious and — for your convenience - already doubled. It makes roughly 20 pancakes. Perfect for breakfast, plus plenty of leftovers.
I like to use white whole-wheat flour in my pancakes. It has the same nutrition as regular whole-wheat flour, but with the lighter texture, color and taste of all-purpose. You’ll find it alongside the other flours in the grocer’s baking aisle. But this recipe works with white flour, too.
Ingredients:
2 cups white whole-wheat flour
2 tablespoons sugar
4 teaspoons baking powder
½ teaspoon kosher salt
2 eggs
2 cups milk
3 tablespoons canola or vegetable oil
Instructions:
In a large a large bowl, whisk together the flour, sugar, baking powder and salt.
In a medium bowl, whisk together the eggs, milk and oil. Pour the wet ingredients into the dry, then stir until thoroughly blended.
Heat a non-stick skillet over medium. When the pan is hot, add the batter in ¼ cup portions, leaving room for the pancakes to spread.
Cook the pancakes for 2 to 3 minutes, then flip and brown on the second side. Repeat with the remaining batter.
Now that you’ve got your pancakes, here’s what you do with them. Aside from eat them for breakfast, of course. Start by freezing the extras. I usually pack two or three per plastic zip-close bag, being sure to press out as much air as possible. Just be sure to let the pancakes cool completely before bagging and freezing.
The most obvious way to pack them is straight up. So long as you have a wide-mouth thermos, all you need to do is nuke them until piping hot, pop them in the thermos, and add a container of syrup on the side. Talk about a comfort food lunch you can feel good about!
But it’s just as easy to get creative. I like to use pancakes in place of bread for my son’s favorite sandwiches. Peanut butter and jelly is a no-brainer. But he thinks cream cheese and strawberry jam is ever better. And don’t even get me started about Nutella.
For sandwiches like those, you don’t even need to thaw the pancakes. Just slap them together while frozen, then pack them. They’ll thaw by lunch (and help keep the rest of the meal cool).

I also use pancakes for grilled sandwiches, everything from a basic grilled American cheese to a more elaborate ham and cheddar. And if you want to really blow them away at the lunch table, slap some turkey breast, Swiss cheese and a dollop of cranberry sauce between pancakes. Serve as is or grilled.
Because most pancake recipes (including mine) aren’t particularly sweet, they work well with all sorts of savory foods. Pack a thermos full of warm chili with some pancakes on the side. At lunch, spoon chili onto a pancake and eat it taco-style.
J.M. Hirsch is the national food editor for The Associated Press. He blogs about the trials and tribulations of his son’s lunches at LunchBoxBlues.com. His upcoming cookbook, Beating the Lunch Box Blues, will be the first to be released by Rachael’s new publishing venture, Rachael Ray Books. Hirsch’s previous books include High Flavor, Low Labor: Reinventing Weeknight Cooking and Venturesome Vegan Cooking. He lives in New Hampshire with his son, wife, and too many cats.
April 19, 2013
The Lazy Man’s Guide to Braising: Spring Pork Chops
Braising seems to belong to winter in exactly the same way that grilling does to summer. And yet….I like to grill in winter. I do it all the time. And it’s not like I live in a cabin.. The nights are still cool, and even when they get warm, it’s not like I live in a cabin. A freon fortress is my summer home. So why should I give up on braising? The only difference is that I braise smaller things; things like pork chops.
My first braise of the spring was, in fact, a very large pork chop cooked with a lot of white wine. I will say here that I have never been overfond of big, thick porkchops. Or for that matter thick steaks. More than one inch of thickness and you’re no longer dealing with a slab or plane of meat; you’re dealing with a truncated cylinder, a mini-roast, and such cuts are notoriously hard to flavor. You put all kinds of things on the outside, but once sliced, you are looking at only a tiny portion of the whole with any seasoning at all. Yes, you can make a board dressing, and I do that all the time. But there is something to be said for meat that is cooked all the way through by an intensely flavorful liquid - especially something like a pork chop, that tends, at least in the case of big center-cut loin chops, to be on the tough side.
I didn’t really think about this braise, other than remember not to drink all the white wine I had. I put salt and pepper on the chop, and seared off the chop in oil and butter. So far, so good! I jacked up the heat so that a lot of brown bits would stick to the pan, too. Then I added enough wine to come halfway up the chop, threw in some sage leaves I had lying around, covered the pan, and stuck it in a slow oven. Done! Talk about the lazy man’s recipe! I know that many recipes call for stock, and fennel pollen, and all kinds of other things I don’t have lying around. But so what? When I took the chop out it was moist and rich and tender, and I had a whole pan filled with porky, sagey wine. I cooked that down, thickened it with some butter and lemon, and made something along the lines of a Francese sauce. If only I had thought to bread the thing first! Then it would have been really great.
I am fat, so I didn’t make a big pot of minute rice, or better still one of those flavored pilafs that come in a box in the dry goods aisle. That would have absorbed the sauce, and little bits of pork would have stray rice grains clinging to it. But you can’t have everything you want, not when you’re a lazy man.
Lazy Man’s Pork Chops
1. Salt and pepper those chops. Heat some butter and oil. Sear them, without moving, in an uncrowded pan, for six minutes on one side and one minute on the other. Remove from pan. Lather, rinse, repeat.
2. Put all the chops back in the pan. Pour white wine in until it rises halfway up the pork chops. Throw in some sage leaves. Add some smashed garlic! Or rosemary. Or whatever is around, herb wise.
3. Cover and remove to a slow (275 degree) oven. Cook for 15 minutes or so. Remove.
4. Take out the chops, turn the heat up under the sauce, and let some of it cook off. When it is reduced by about half. squeeze one whole large lemon in (and a little zest if you remember), along with a big chunk of butter. Over high heat, mix it all up until the sauce lightens and thickens. Pour it over the pork chops. Eat them, preferably over the sink.
April 17, 2013
Foods and Wines of Chile
I had never been to South America before last week yet had always wanted to go - I had visions of partying all night in Buenos Aires, skiing in Patagonia, dancing on the beach in Rio and exploring the wonders of Machu Picchu, the lost city. When I was invited to have a culinary tour of Chile, I jumped at the chance, realizing I knew so little about this beautiful country. I asked if I could bring fellow blogger, Evette Rios and luckily they agreed! Here are my favorite memories.
Chile is a crazy place geographically speaking, as it extends over 2,000 miles down the western coast of South America, yet is only a couple hundred miles wide. The top of the country borders Peru and the bottom reaches out to almost touch Antarctica. Its western side hugs the Pacific ocean, making it an incredible gateway country to the rest of S America, while the Eastern side is flanked by the Andes Mountains, a breathtaking border that keeps this thin country safe from disease and other unwanted intruders.
As part of my tour I learned that while copper is the largest export, naturally found in Chile, salmon is next. However, salmon has been brought to Chile from Scandinavia to be farmed in the cold Pacific waters. This, along with avocados, stone fruits, apples, prunes and nuts are exported to the United States and around the globe. Chile not only has ideal growing conditions, but when we in the US are entering Spring, in Chile, they are just wrapping up Summer. This allows for a complimentary growing season.
Chile is very dry, in fact it hasn’t rained more than a few days a year for the past six years. Luckily, grapes and olives do not need a tremendous amount of water to grow well, they really need the sun. Imagine driving along and seeing rows and rows of vineyards creeping up the sides of the Andes. It reminded me of Northern California or Tuscany, but just so much larger in scale. This point is not lost on the wine world either.
One winery we visited, L’Apostolle, is owned by the Marnier Lapostolle family, makers of Grand Marnier liqueur, the famous orange flavored spirit which is experiencing a renaissance with the Cosmo. The L’Apostolle vineyards are located in the Colchagua Valley, one of three I visited on my trip. This winery is exquisite on so many levels. It is obvious the folks who developed these vineyards knew what they were doing. They have applied their French wine making expertise and brought it to the rich soils and ideal climate of Chile. Picking the grapes only at night so as to catch them at the exact right temperature and using a gravity-based method of crushing the grapes are just two practices that set these wine experts apart. It was the only vineyard I visited where you could also rent a casita and make a vacation out of staying snug inside the winery itself, something I would highly recommend.

L’Apostolle has employed organic and biodynamic agriculture within some of the vineyards and carries the same philosophy to the foods. We were treated to a delicious lunch of course paired with wines, which included Octopus Carpaccio with tiny Cheese and Basil Empanadas fried just so, A crunchy poached Arcuana egg, organic saddle of rabbit with local prunes and a lovely dessert with apples from the property poached in their Sauvignon Blanc. Definitely worthy of their Relais & Chateaux distinction.

Evette hanging in a tree seat at L’Apostolle
Another region we visited is the Casablanca Valley, just northwest of Santiago and close to the coast. In fact at the winery we visited, Casas Del Bosque, you could smell the salty sweet ocean air and see the fog rolling in from the water. This of course adds to the composition of the soils and vines and adds a special something to the flavors of the wines. This tree, called the Hancock Tree, leans ever so slightly to the side as a result of years of afternoon breezes from the ocean.

Here is where I not only tasted the best Pinot Noir of my life, and proceeded to buy an entire case which turned into a nightmare, but I also tried Chardonnay and loved it. For those who know me, this will come as shocking news as I do not in general enjoy white wine of any sort. I suffered through the Sauv Blanc politely but when I tasted this rich and buttery Chardonnay, I went ahead and purchased a case of that as well, just to be able to have some white wine on hand that I could actually tolerate at home. The nightmare developed when I asked them to ship it for me and they stared at me like I asked them to ship to Mars. I am not sure how one has a vineyard and doesn’t make it easy for people to ship the wine back home, but this was clearly something new for them. My group leader instead suggested I bring the wine to my room and that she would arrange for a company who ships wine to come pick it up for me. I was quoted $500 for the two cases, far more than I paid for the wine! I wound up having to give away over half of what I bought and packed the rest in my suitcase. Some things are better left as a memory :).

At Casas del Bosque, we had a fun and interactive cooking session where we helped make lunch, but were mostly left to enjoy the gorgeously seared salmon, the chicken stuffed with prunes and served atop pureed walnuts (something I will try at home for sure) and the velvety lamb stuffed ravioli, which we attempted to make ourselves.

From there we drove to Valparaiso, a town I was most excited to see. It used to be the largest and in fact the only port city to the Western coast of South America before the Panama Canal existed, and while all of these vineyards and Santiago seemed so new to me, this city showed its age. So much history has passed through this town and it continues to be a major tourist destination and port city. We rode the funicular and walked the steep, cobblestone streets to check out the walls of street art-commissioned murals are all over the city which is otherwise filled with youth hostels and boutique hotels. It’s not the cleanest of cities and it is bustling, but offers sweeping views and my favorite meal of the trip. We stayed at a sweet hotel called Palacio Astoreca and dined in their restaurant, Alegre, which was phenomenal. From the freshly baked breads to the “Piruleta” of Parmesan Cheese and Coriander dust, I was intrigued. They did wonderful things with flavors. Their preparation of salmon was to barely sear it in a coal-scented oil which gave this mostly raw fish a smoked flavor. We ate a “Liquid Omellet” with tiny spoons, which although an unfortunate name in my opinion, was a delicious morsel. At the end we passed around their evocative selection of infused oils to smell and savor.

At night I couldn’t sleep for some reason, so I opened by window and just listened to the sounds of the harbor, probably one of the most relaxing sounds I know. Something about just knowing there are people out there, working and doing their thing makes me feel somehow protected. I would not do well in a remote cabin.
Jumping around a bit, back to the Colchagua region, we spent an evening with the great female chef, Pilar Rodriguez. I love Pilar. She reinvented herself at 40 by attending culinary school and becoming one of Chile’s top chefs. Her studio resides inside of the beautiful Vina Viu Manent winery and is a chef’s dream location. The rooms are big and bright and surrounded by tons of windows that look out into the vineyard, I can only imagine how inspired she is every day. She delegated a dish to each of us, with loose instructions and the help, if needed, of her assistant chefs. I was inspired to see a female chef rise to the top and become so successful in a relatively short period of time. She is highly regarded by the Chilean government and welcomes visitors to her beautiful country and studio. You can feel her pride of country and the food it is becoming increasingly famous for producing. I made a Barley Salad, which reminds me of a Farro Salad I often make at home. I took cooked barley and added diced red and green peppers, carrots, radishes, scallions and toasted walnuts. I tossed it with tons of herbs, especially parsley and an olive oil, white wine vinegar, lemon and garlic dressing. The whole meal was fun and gave us a chance to bond as a group as we together ate the meal we individually prepared. As part of the meal, Pilar also taught us the proper way to do an olive oil tasting, which was a first for me.

Me at Pilar’s studio, ready to cook!
There are so many more things I could talk about in recalling my trip to Chile, from the beautiful olive oil estate called Olisur that we visited to the empanadas I grabbed off the streets of Santiago. The fact is, I was there way too brief a time to get to know this vast country, There is so much to see and do and I cannot wait to go back. Next time I will fight my way in to first class and fly direct as my only complaint is how far it is from New York. But hey, if a bottle of wine can make the trip, so can I!
Rachael Ray's Blog

- Rachael Ray's profile
- 296 followers

