
Rachael Ray's Blog, page 62
May 7, 2013
Cooking Light: Super Versatile Lemon Caper Sauce
A few months ago I made the commitment to myself to eat healthier and exercise more. I am proud to say I’ve been doing great! It is never easy to take care of yourself when you also have a family to care for, but I reached the point where I knew it was essential to take charge of my own life and work on “me” for a change. And let’s face it, if mama ain’t happy, ain’t no one gonna be happy, amiright?
I’m happy to say that I’ve lost a few LBS and am feeling great thanks to weight training and a vow to eat cleaner, which means sticking to higher protein, good carbs and no processed foods at all. I feel great but after three months, I’m starting to tire a little of my regular grilled proteins (mainly chicken and fish). I want to keep my momentum up so I know that making my food more exciting is paramount to my continued success. And after all, I cook and eat for a living so boring food is never an option for me. I’m having fun with making my lighter meals delicious and yes, even drool worthy by amping up the flavor without adding excessive fat. I only cook with olive oil or coconut oil when I use fat and am really loving experimenting.
Recently I tossed together this easy Lemon Caper Sauce. I must admit, it has been ROCKING MY WORLD!!!! The flavor is bright and refreshing and it’s just so perfect for warmer weather grilling. It goes beautifully over grilled chicken and fish and gives you just enough pizazz to make your meal feel special without any guilt. Give this recipe a try. Add flavor without excess fat and enjoy every moment of heathy eating success. I know I will!
Lemon Caper Sauce
Ingredients:
1 teaspoon coconut oil or olive oil
1 clove garlic, minced
1/3 cup low sodium chicken stock
Juice of 1 lemon
1 1/2 tablespoons capers
1 tablespoon chopped fresh parsley
1 small tomato, diced small
Instructions:
1. Place coconut oil into a small saucepan set over medium heat.

2. Add in garlic and cook for 1 minute. Stir in chicken stock, lemon juice, and capers. Cook until reduced to 1/4 cup (about 2 minutes).

3. Stir in parsley and tomato. Spoon sauce over your favorite grilled chicken or fish.


May 6, 2013
Ramen in Wicker Park… and a Brewpub
Half the fun of discovering a new restaurant is sharing it with people you know will enjoy it. As Rachael Ray’s resident restaurant guru, here’s an inside look at what I report back to Rach about some of my favorite restaurant finds and food experiences!
From: Kappy
To: RR
Sent: Monday, May 6, 2013 1:32pm
Subject: Ramen in Wicker Park… and a Brewpub
Dear RR -
I know that you and I both love a good, hot bowl of soup on a cold day or night, but me… ramen is my jam! I’m not a snob about it, but I sure do love a flavorful broth with great noodles! Oiistar is a new place in the Wicker Park neighborhood of Chicago, not far from my apartment. Chef Se Jin “Sunny” Yim, the owner/chef and a Le Cordon Bleu Chicago grad, has put some serious time and effort into his ramen, even going so far as to travel to Japan to work with a ramen master. He actually cooks his pork broth for 18 hours, and also transforms the water that he cooks his noodles in to resemble that of Japan. You might notice some French and Italian inspiration simmered in there, too… I’ve been a couple times and plan to go back for more, but in the meantime, here’s what I’ve had so far:
- Oii Salad - while it admittedly didn’t blow me out of the water, I love starting with a good green salad at a Japanese place. This one incorporates dill and parmigiano, which was a pleasant surprise.

- Duck Buns - Bingo! Served with Golden Raisin Jalapeno Chutney, these are definitely one of my favorite items on the menu.
- Pork Belly Buns - straightforward, served with cucumber and Oiistar’s signature sauce; very good, but don’t miss the duck!
- Grilled Spicy Pork Ribs - served with garlic and onion chips and lemon crème fraiche, these are pretty darn spicy…and pretty darn good!

- French Kimchi Soup - served with Andouille sausage, pork belly and provolone cheese melted over the top, this soup is definitely different than anything I’ve seen; I loved the idea of swapping out the caramelized onions for kimchi.
- Pozelmen Ramen - one of Chef Sunny’s four signature ramen dishes, this one has thin sliced pork loin in it and some ground chipotle pepper, lending some smoke and spice; definitely my favorite out of the two I’ve tried .
- Oiimen Ramen - this version features thin sliced pork loin as well, along with egg, spicy oil and some ‘shrooms; it’s what they would call the “basic” ramen of the bunch, but expect a peppery kick. Don’t say I didn’t warn you!
- Crème Brulee - this is served in a little espresso cup and has espresso flavored “caviar” and some almonds on top; it’s the perfect size for having just a little dessert
I must add that there’s a “Veggiemen” ramen on the menu. Please do yourself a favor and, if you don’t order it, ask for a sample of the broth. In a word, it’s wild. In Japan, they often put apple or pineapple to give a slight sweetness to the vegetable broths. Let me know if you can tell what Sunny puts in his…
On a total different note, when I was living in New York, it wasn’t too hard to find a solid brewpub. Now that I’m in Chicago, a lot of people I know here dig on Haymarket in the West Loop. I can appreciate a good, straightforward brewpub, so I decided it was time to pay a visit and rallied Katy and my friend Ryan to come with me. We ordered a few items for the table and picked around. Here’s the rundown:
- BBQ, Bacon and Cheddar Chicken Sandwich - this is actually a burger on the menu, but I peeked over to what one of the employees was eating and she pulled a little switcheroo…and so did we! It’s served with house-cured bacon, Memphis BBQ sauce, and Widmer’s cheddar. Order this.
- Grilled Broccolini - simple, but a little something different when you just want something green.
- Flatbread of the Day - today’s was a garlic béchamel sauce with some greens and cheese melted over the top.
- Sweet Potato Tots - …because we could.
- Pretzel & Mustard - a basic, good-quality soft pretzel served with spicy cheese sauce and spicy mustard, both made in-house.
And, oh yes, don’t miss their brews. We tried the Girl and the Goatee, a collaboration with neighbor Stephanie Izard from Girl & the Goat and her fiancé, Gary, but you’ll find at least ten house-brewed varieties on tap.
And that’s what’s on my plate!
~ Kappy
Oiistar
1385 N. Milwaukee Ave
Chicago, IL 60622
(773) 697-4974
www.oiistar.com
Haymarket Pub & Brewery
737 West Randolph Street
Chicago, IL 60661
(312) 638-0700
www.HaymarketBrewing.com
Andrew “Kappy” Kaplan loves food. A professionally trained chef, by day he runs Yum-o!, Rachael Ray’s charity focused on kids and cooking, and keeps special projects running smoothly for her. By night he hops course to course, place to place, all across the country. He’s Rach’s own personal dining guide! You can also follow Kappy on Twitter to see what’s On Kappy’s Plate in real-time!
Banana sushi? Why not?
With the help of nothing more than a large whole-wheat tortilla, I can turn just about anything into lunch box-friendly sushi.
Well, perhaps “sushi” overstates it a bit. But I can create sushi-like bites that are easy to pack, fun and nutritious. And so can you. And the best part — no raw seafood needed.
The first time I tried this was with a banana. I’d planned to make my son a peanut butter and banana wrap for lunch. So I smeared peanut butter over one side of a tortilla, popped a banana onto it and rolled it up.
Trouble was, it didn’t fit in the containers I usually pack his lunch in. So I cut it in half. When I looked at the cross-section, I realized that if I kept cutting I’d create maki sushi-style pieces.
Since then, I’ve done the same trick with cold cuts, leftover steak, cheese and leafy greens, you name it.
But there are a few tips I can pass along that will make this easier.
First, be sure to use large flour tortillas. Anything smaller than an 8- or 9-inch tortilla won’t roll well once it has fillings added to it.
Second, your fillings should be firm, but pliable. A banana is a great example. Meats also work well. Veggies are fine, but avoid anything finely chopped or in very small pieces (the slices won’t hold together). The fillings also should be on the drier side.
Third, glue everything together. I always start by spreading a thin layer of some sort of condiment, soft cheese or nut butter over one side of the tortilla (go all the way to the edges). This helps keep the fillings in place, as well as seals it shut when you roll it up. An ideal food glue should be thick. Mayonnaise or mustard are good, as is cream cheese and peanut butter (or it’s various nut-free relatives). But most salad dressings are too watery. And don’t be tempted by honey. I tried it. It drips. What a mess.
Fourth, don’t be afraid to manhandle the ingredients while rolling them. Grip the roll firmly as you roll it up. You want it tightly wrapped, as this holds it together when you slice it.
Fifth, as you finish rolling it, you might need smear a bit more of your “glue” on the final edge, just to make sure everything stays rolled up.
Finally, when slicing start by trimming off the floppy bits at each end (the cook gets to eat these). Then cut the roll into 1-inch slices and pack them standing cut-side up.
Now get creative. You could make pizza “sushi.” Just spread tomato paste (season it if you like) as your glue over a tortilla. Now layer sliced cheese and thinly pepperoni. Roll it up, slice it and accompany it with a thermos of warm marinara as a dipping sauce.
My son’s favorite is a carnivore’s delight. I start by spreading a bit of cream cheese over a tortilla, then topping it with sliced turkey breast, ham and bacon. Meat lover’s sushi!
Would love to hear what creative “sushi” you create.
J.M. Hirsch is the national food editor for The Associated Press. He blogs about the trials and tribulations of his son’s lunches at LunchBoxBlues.com. His upcoming cookbook, Beating the Lunch Box Blues, will be the first to be released by Rachael’s new publishing venture, Rachael Ray Books. Hirsch’s previous books include High Flavor, Low Labor: Reinventing Weeknight Cooking and Venturesome Vegan Cooking. He lives in New Hampshire with his son, wife, and too many cats.
May 3, 2013
RIDDING STUFF THAT BUGS US: THE MOTH
With warmer weather in sight, we’re breaking out our cottons, lace and flip flops and packing away our cashmeres, wools and boots. YEAH! But before you do that, I just wanted to share some tips to insure when cooler months return and you break out your fall and winter clothing from their summer hibernation, you don’t also find your fave cardigan sporting new holes courtesy of those flaky little pests AKA Moths!
First a few facts about ‘em. They:
o HANG: in humid, dark corners and folds
o COCOON: which enables them to blend into fabrics making then hard to spot
o EAT: wool, fur, down, dander (i.e. dead skin from ye and Fido)
o PROCREATE: they’re love machines and love to mate
Regardless, the point is moths breed as often as they can which means some ‘birth control’ is in order…need proof? Well here’s an interesting stat:
One female moth laying eggs can set the stage for future generations to lay 20 million eggs in just one year’s time
We will now run, not walk to learn how we can stop their mating madness:
SEAL STUFF: Keep clothing you’re packing away for the summer, or not using, in plastic sealed storage coverings and containers to prevent our little studs from finding a place to nest.
SUCK THEM UP: Vacuum regularly to get rid of dander and other stuff they like to eat.
GO LAVENDER -Lavender naturally repels moths though it doesn’t kill their eggs or larvae. Hang them from rods or place them in drawers.
HANG A BUNDLE OF CHALK—Chalk will help draw out the moisture in your closet, which will make it less attractive to these pests. Just keep it away from everything so it doesn’t get your stuff covered with its dust.
STUFF SHOES- Put some crumbled up newspaper into sneaks and any shoes that your feetsies perspire in to absorb the moisture, which will again make it less appealing a place for our moths to reside.
DEHUMIDIFY: If possible, keep a dehumidifier in or near your closet
LIGHT’S ON: Keep a light on-This sort of contradicts our eco-friendly efforts, but since they don’t like light it will help keep them away–Please remember to use only eco-friendly CFL bulbs!
FORGET VINTAGE: Don’t buy vintage clothing from re-sale shops or garage sales since the likelihood is they haven’t seen the light of day for years and are home to our sex magnets.
You can also try:
CEDAR BLOCKS—Seems they’ve got some kind of oil that kill the larvae which is what destroys our clothes. It will not kill the moth or their eggs however—I don’t know about you but I think I need a refresher course in bug science?
PHEROMONE TRAPS –Ok, we all know they’re ‘love machines’ so the pheromones—which are a natural occurring chemical that triggers sexual response-speak to our studs nympho-maniac tendencies and cause them to come to mama or rather to the trap!
Julie Edelman aka The Accidental Housewife is the go to gal for easy; real life time, money, and energy saving tips that maintain our home, family and manicure. She appears regularly on the Today Show with Kathie Lee ‘n Hoda, Rachael Ray, and The Doctors. She is a New York Times best-selling author and her next tome for the home: The Ultimate Accidental Housewife: Your Guide to a Clean Enough House is the sanity saving editor forBeautiful Design Made Simple Magazine; has a webisode series for Fox News Magazine, and hosts her siteJulie’s Tips with her goal to empower, educate and engage fellow housewives along with a daily sanity saving libation.
Tariwala Alu – Potatoes in an abundance of gravy
Four large russets. Is that is what my kitchen is being reduced to at this present moment, I thought? I looked in the refrigerator one last time, bit this was really it. It is on days like this, that I am particularly thankful for a well-stocked pantry. My mother had trained me well. With a full range of spices and canned tomatoes, there was no way dinner would be an after thought.
One of the dishes I loved growing-up, was ‘tariwala alu’ – potatoes cooked in a bold gravy of tomatoes and mustard seeds. The dish uses a lot of spices from the South, with ingredients like curry leaves and black mustard seeds – benign looking black seeds that pop like fire crackers in hot oil and release a fire cracking flavor to match.
This dish is simple to rustle up. Whole potatoes are boiled until tender, cooled and skinned (An important sequence to follow. if I peeled and then boiled my potatoes, my wrists would definitely get slapped for being wasteful and losing some good vitamins). Whilst the potatoes are being prepped, the tomato sauce simmers with a lot of aromatics- ginger, chili and garlic and then the 2 components are ready for their introduction. To set them up in good stead, it is important not to cut the potatoes into pieces, but to actually break them by hand, and crushing a few pieces whilst you’re at it. Breaking the potatoes and mashing in places allows the sauce to thicken a little and gives it a wonderful two-toned texture – smooth in places and chunky in others.
As I watched my kids devour the dish, the way I used to, poured over some steamed white rice,– a smile spread across my face – the apple does not fall far from the tree.
Recipe for Tariwala Alu
Ingredients
4 large russet potatoes, boiled, skinned and broken in to 2” pieces
1 tsp. black mustard seeds
1 tsp. turmeric
2 dried red chilies
1 tsp. coriander powder
salt and pepper
15 curry leaves (available at the Indian stores)
1 tbsp. grated ginger and garlic mixture
1 x 2oz can of crushed tomatoes
2 tbsp. beaten whole milk yoghurt
4 cups of water
Cilantro to garnish
1 tbsp. lemon juice
1 tsp. sugar
Method
1) Heat oil, add mustard seeds, when they start popping, add the curry leaves and ginger and garlic
2) Add the turmeric, salt and pepper, followed by the crushed tomatoes and cook until oil separates. Beat in the yoghurt until it is uniformly incorporated. The yoghurt will break – and it SHOULD. Add the water and potatoes and bring to a boil. Reduce to a simmer and cook for about 15 minutes until the sauce thickens. Add the lemon juice and sugar and cook until dissolved
3) Sprinkle with coriander powder and cilantro leaves and serve hot with rice or toast
Saira Malhotra, is of British–Indian descent and is a chef, food writer and cooking instructor based in New York City. Raised in Hounslow, U.K, or rather ‘Little India’, where the air is aromatic with roasted spices, little did Saira know these moments would follow her from being a student in France and Italy to residing in NYC with her husband and kids and parlay themselves unexpectedly in to a culinary career. She is a graduate of the International Culinary Center in New York City. Come visit her at her food blog: www.passportpantry.com where she shares approachable and international recipes
May 2, 2013
Play-By-Play: Fresh Ricotta Cheese
Last week, I posted a “Supermarket Score” blog with some new ideas for using up buttermilk. One idea in particular – the homemade ricotta cheese – elicited some facebook comments and emails from some of my friends. They were intrigued, but wanted to know more. “It can’t be that simple to make at home!” some said. “How do I know if I’m doing it right?” said others.
Be not intimidated! I’ve got a Play-By-Play coming your way to walk you through the whole thing so that you, too, can show off your own homemade ricotta cheese to your friends and family.
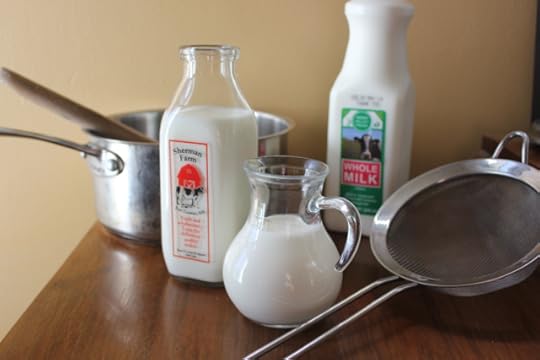
GATHER YOUR EQUIPMENT & INGREDIENTS
To make about 1 3/4 cups of fresh ricotta, you’ll need:
· A medium saucepot
· A fine-mesh strainer
· 2 (10-inch) squares of cheesecloth
· A slotted spoon or small strainer
Along with:
· 4 cups whole milk
· 1 cup heavy cream
· 1 cup buttermilk
· Pinch salt
HEAT THE MILK
Heating the dairy is what enables the compounds in the buttermilk to culture the other dairy into cheese. Combine all of the ingredients in the pot and place it over medium heat. Don’t rush the boil here, let it come up nice and slowly, stirring it often. As it begins to heat up, you’ll notice that the milk will start to look “curdled” and separate – that’s exactly what you want.

Once the milk is just about at a boil, the curdling with continue and the lumps will get larger. At this point, reduce the heat to very low and leave the pot alone for 2 minutes – stirring with only break up the curds, so resist the temptation!
LET IT DO ITS THING
After 2 minutes on very low heat, remove the pot from the stove and cover it with a tea towel. Let the milk sit at room temperature, undisturbed, for 1 hour.
Meanwhile, line a fine mesh strainer with a double layer of cheesecloth, allowing any excess to hang over the edge, and place it over a large bowl.

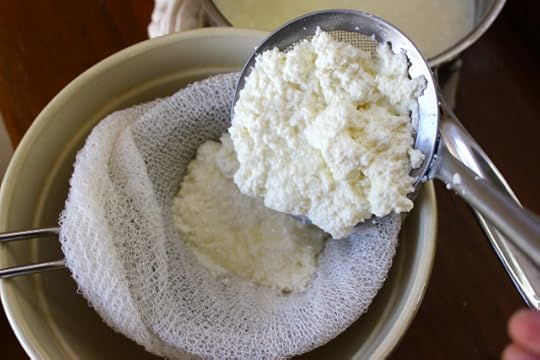
STRAIN IT
At this point, after having rested for 1 hour, visibly large curds will have formed.

Using a small handheld strainer or slotted spoon, carefully transfer the curds to the prepared strainer to let them drain. Pouring the curds out at this point will break them up, so maintain their consistency by using the spoon to gently transfer them. Once most of the curds are moved over, slowly pour the whey through the strainer as well. Fold the overhanging edges of cheesecloth over top of the ricotta.
DRAIN IT & SERVE IT
Let the ricotta drain at room temperature for at least 30 minutes (for a drier cheese, place it in the refrigerator and allow it to drain overnight). Your fresh ricotta is now ready to be served! Trust me - few things in life are more satisfying than warm, freshly made ricotta with some extra virgin olive oil and sea salt.
Store it in an airtight container in the refrigerator for up to 5 days.

WAIT, WAIT – THE WHEY!
No need to throw out all of that flavor! (Not to mention the vitamins, minerals, and enzymes it still has) Use the whey that drains off from the cheese to boil up your next batch of mashed potatoes or make a pot of morning oatmeal. It also works just like water or milk when mixing up batters like waffles, pancakes, or brownies.

Patrick W. Decker’s life revolves around food. Always has, probably always will. As a graduate of The Culinary Institute of America and past member of the culinary teams for Food Network stars like Rachael Ray, Sandra Lee, Bobby Deen and Paula Deen, he now works as a food stylist and producer in NYC by day and a food writer and recipe developer at his home in New York’s Hudson Valley by night. You can see what he’s up to by following his latest tweets on Twitter at @patrickwdecker or visiting his website at patrickwdecker.com .
May 1, 2013
Chewing My Smoothies: Almond, Cocoa, Banana Blast

Last week I gave you the recipe for my new morning obsession: Almond, Chocolate Chip Oatmeal. This week, I want to share my newest breakfast love with you: Almond, Cocoa, Banana Blast. Are you seeing a pattern here? It’s no secret I love sweets and, well, I will sneak chocolate and almonds into anything I can so it should be no surprise that this recipe has a little cocoa powder in it.
Anyway…a few months ago I became fascinated with the concept of smoothies you can “chew”. Sounds funny, I know! But I was never all that satisfied using a smoothie as a meal or snack because, well, I like to chew! I find the process of chewing very satisfying and the thought of simply sipping my meal just feels a little dull to me. That is, until I discovered the concept of chewing my smoothie. In the raw food world, chewing your smoothie or green drinks supposedly aids in digestion. This is because the act of chewing produces saliva. Saliva contains enzymes that are an essential part of good digestion. By sipping your smoothie, you aren’t adding any saliva to the mix, so you’re not effectively digesting your smoothie.
After learning about this concept I started making my smoothies a little chunkier and using a larger straw. I add mix-ins like whole nuts and rolled oats to make the smoothie more “chewable” and then I blend all of the ingredients (minus what I want to be chunkier) to a smooth consistency. I add the oats or nuts at the end and simply pulse the mixture until its broken down slightly, leaving a perfectly chewable and delicious smoothie. It’s super satisfying.
Do you chew your green drinks or smoothies? if so, what’s your go-to recipe?

Almond, Cocoa, Banana Blast
Makes 1 smoothie
Ingredients:
1/2 cup plain or vanilla almond milk, soy, non-fat cows milk or water
1/2 cup non-fat greek yogurt
1 banana
1/2 cup ice
*optional -2 teaspoons honey or agave
1 teaspoon cocoa powder
1 tablespoon whole almonds
Instructions:
1. In a blender combine almond milk, yogurt, banana, ice, honey and cocoa powder. Blend until smooth, about 1 minute. Add in almonds and pulse 20-30 times or until they break down a bit. Serve immediately.
Chef Paul’s Ratatouille Is Exactly What A Guy Like Me Needs to Eat More Of.
I always took pride in the fact of my indifference to vegetables. If it didn’t have parents, I didn’t want to eat it. My hostillity to the whole plant kingdom was famous. But getting old and fat has weakened my resolve. And the sudden appearance, so sudden and unexpected, of some intensely gratifying vegetable dishes, has also eased my process of gender transformation.
One person I have to thank for this is my friend Paul Denamiel. Paul is one of the last persons I would have ever expected to help me transition into a part-time plant eater. For one thing, Paul is the chef of Le Rivage, an old-school French restaurant where I have eaten often, and heartily, and never on salad. A typical Le Rivage meal might involve lamb chops, steak au poirve, country pate, and - the closest thing to a vegetable - a rich, buttery quiche loaded up with bacon. When Paul opened Little Prince, a stylish French bistro in SoHo, I expected to go there and eat more, even better meat dishes. And so I did. I ate an amazing French onion soup burger, a veritiable orgy of animal fats braced by mustard, various steaks and chops; a very fine, very thick piece of grilled swordfish; and then, almost in passing, I tried Paul’s ratatouille.
Everyone remembers the scene, in Disney’s Ratatouille, where the fearsome restaurant critic Anton Ego tries the titular dish and immediately flashes back to his long-forgotten youth. This didn’t happen to me. For all I can remember, this might have been the third one I ever ate. But it was intense, gratifying, rich, and delivered the kind of concentrated flavor that I associated with the best parts o the meats I love: the crescent edge of pork chops, say, or the salty, unctous skins of slow-roasted plump chickens. This ramiken, with its cascading discs of tomato, zuccchini, and eggplant, should have been bland, lame, effeimintate, and uninteresting. But somehow it had an enormous umami oomph, and the rich mouthfeel I tend to associate with butter. Did it have butter? Was in somehow confited in beef tallow? Why was this so good?
Paul laughed at me. “You think all I can cook is steak, Oz? Just because that’s all you eat doesn’t meat that’s all I can make.” He at this point walked me through what was so good about this dish, which I am endeavoring, without much success, to make at home. For one thing, the vegetables are done to the exact point of tenderness at which they become soft, but not mushy; there’s an al dente quality to them that is so different from the repulsive, mushy character of so many eggplant dishes. And then, in opposoting to standard ratatouille practice, Paul omits the onions and peppers, which lightens it up. The biggest thing, I would have to say, is the intensity of the oven-dried tomatoes and tomato concasse which underlay the whole dish, and which gives it that amazing, almost meat-like richness and intensity. Anyway, I was able to prevail on Chef Paul for the recipe, which I present to you unedited. It’s a long one, and a lot of work, but you can eat this as a main dish for a light dinner. (You may want to skip the egg, though.)
RATATOUILLE
Executive Chef Paul Denamiel of Le Rivage and Little Prince
6 to 8 servings
For the Tomato Concasse:
4 large plum tomatoes
1 shallot cut into a small dice
2 sprigs of fresh thyme
2 TBS olive oil
salt and pepper to taste
For the Vegetables:
1 cup plus 2 tablespoons extra-virgin olive oil
2 lb Japanese eggplant, cut into 1/4 inch thick rounds
4 medium zucchini (2 lb) cut into 1/4 inch thick rounds
4 medium yellow squash (2 lb) cut into 1/4 inch thick rounds
4 large large plum tomatoes cut into 1/4 inch thick rounds and oven dried
1 cup chopped fresh flat-leaf parsley
Salt and black pepper to taste
PROCEDURE
For the Oven Dried Tomatoes
Preheat oven to 350 degrees.
On a cookie sheet lined with parchment, drizzle olive oil and then place a single layer of tomato rounds on parchment. Drizzle the top of tomatoes with olive oil and season with salt and pepper.
Place tomatoes in oven for 30 to 40 minutes or until moisture is evaporated and tomatoes are a deeper red color.
For the Tomato Concasse
Cut an X in bottom of each tomato with a sharp paring knife and blanch together in a 4-quart pot of boiling water 1 minute. Remove tomatoes from boiling water with a slotted spoon and then transfer them to an ice water bath. Rest them for 1 minute.
Remove tomatoes from the ice water bath, place on a cutting board and with a pairing knife peel off skin, beginning from scored end.
Cut tomatoes in half, remove and discard seeds. Coarsely chop tomatoes and set aside.
In a medium sauce pot over medium heat, sweat the shallots with 2 TBS olive oil. Make sure that shallots do not brown or burn as this will make the tomato concasse bitter. Add the tomatoes and the sprigs of fresh thyme to the shallot. Simmer, partially covered, stirring occasionally, until tomatoes become soft and most of the moisture is evaporated. This may take about 20 minutes.
For the Vegetables
While sauce is simmering, toss eggplant with 1/2 teaspoon salt in a large colander and let stand in sink 30 minutes. After 30 minutes place the pieces of eggplant rounds on paper towels one layer at a time. Place another paper towel on top of the eggplant rounds and lightly press them down. This removes the excess water and bitterness.
Place the zucchini rounds, squash rounds, oven dried plum tomatoes rounds and tomato concasse in individual bowls to be ready for assembly. Drizzle olive oil over each of the vegetable rounds and toss with chopped parsley, salt and pepper.
For Assembly
Using olive oil, lightly oil the bottom of a medium round ceramic casserole pan. You can use cast iron or glass as well.
Spread the tomato concasse on the bottom on the casserole pan evenly. Starting on the outer rim, alternately, layer each of the vegetable rounds. As you layer them in the casserole pan make sure they are close and tight together, nicely fanning them around the pan.
When casserole pan is completely full, drizzle a little more olive oil on top and bake in a 350 degree oven for 30 to 40 minutes or until vegetables are tender.
For Service
Cut a nice slice and place on a 6 inch round plate and serve with a soft poached egg on top; garnish with fresh chopped parsley.
April 30, 2013
How To Barbecue A Whole Ewe: An Ovine Extravaganza
I got a call from Robbie Richter the other day. Robbie Richter is a New York barbecuer, and probably my oldest friend in meat. I’ve cooked with him, and drunk with him, and argued with him about the use of water pans, for ten years. His brother is my doctor. Now, after all these years, he is leaving for LA so we decided to cook one last blowout meal together. And we did. There were beef shortrib tacos, with a sriracha / kewpie mayo and a piquant Korean bbq sauce, and kim chee, and fresh cilantro; there was a jamaican jerk pork belly, which Robbie finished on the grill; there were some fantastic mojo-marinated chicken thighs.
And there was a whole 2 year old Tamarack ewe.
A ewe, in case your wondering, is a fertile female sheep. It’s a grown up animal, not a baby, and that gives it a very different taste, in every sense. Animals taste more like themselves as they grow and develop; their bodies are as unformed as their personalities when they are little. And I don’t know about you, but I feel a lot better about eating an animal that has had a chance to live a little before being ripped out of the world. And this was not a factory animal, either: it was raised in a wonderful, loving environment in the verdant pastures of rural Vermont, watched carefully over by Ben Machin, its owner. Machin breeds one of the oldest and rarest kinds of lambs, and he was good enough to donate an animal to us for this special night. So it was on us to do something very special with it.
First, we brined it. We used a standard salt brine, three parts salt to one part sugar, and some herbs and peppers mixed in, really, just for the hell of it. We let the animal soak in that bath for nearly 48 hours. In case you are wondering, it’s no easy thing to find a waterproof crate that can hold an 85 pound animal. We managed though, and seven hours before the dinner, we were able to get the ewe slathered up with a turmeric-based rub that we hoped would give the outside bark of the animal a kind of aromatic pinquancy. There was also plenty of salt, cardamom, ginger, curry, and chile powder, but it was the turmeric that gave the rub its color and its dominant flavor. Cooking would be easy - six or seven hours at 225 degrees and a continuous bath of oak fumes seemed about right - but it was necessary to take certain precautions before putting it into the smoker. This wasn’t just a piece of meat you buy in the store; it was a whole animal, that had lived a (sort of) full life, and had been donated by a dedicated farmer who knew every one of his animals. So we couldn’t screw it up. We set the animal belly down, cut the shanks and neck off to fit, and bound the thing to the smoker rack with the care and attention to detail of a Japanese rope fetishist. There was no way this ewe was going to fall off its rack; and there was no way we were going to overcook it.

Just look at that rub.
But we almost did. The plan was to serve some of the bigger pieces as straight smoked lamb, and to pick the rest of the carcass, and to mix it in as part of the Uzbek dish known as plov (their version of pilaf.) We rendered some of the lamb kidney fat and softened an immense amount of carrots and onions in it, finally adding the rice and some lamb braising liquid I was able to scam off Anup Joshi, the chef de cuisine at Tertulia. Anup showed up and helped us finish the lamb, and it was almost too late. We spent so much time getting the plov ready that we almost overcooked it. We pulled it out, inserting a meat thermometer into the deep thigh and finding it an alarming 160 degrees.
But when it has cooled a little, we paraded it around the room, inspiring the awe and excitement that a well-cooked whole animal alone can generate. I thought of Ben Machin up there in Vermont, and with what care he had maintained and protected this ewe for two years, and then slaughtered it and sent it down for me for this dinner. I thought of the green grass of Vermont, and how I was about to taste it through the prism of an animal that had eaten it, all day, every day, for its entire life. And I thought about how many animals I had cooked with Robbie, and how special every one of them was. The lamb was amazing, not only in its flavor, but in its very presence and all the emotions and reflections it called into being. There is nothing like cooking a whole animal to make a man feel whole.
April 29, 2013
Got leftover pasta? You’ve got the makings of killer salads!
Want to know the fastest and easiest way to get more creative with the lunches you pack? Stop thinking of them as lunches. Seriously.
The reason so many of us falter for lunch box inspiration is because we get trapped by our own preconceived notions of what lunch foods — particularly packed lunch foods — are supposed to be.
So after we’ve exhausted our handful of go-to sandwiches and salads, we find ourselves in a lunch rut.
But once you abandon ideas of what lunch is “supposed” to be, you open up all sort of possibilities.
Suddenly, pulled pork sliders (made from leftover roasted pork and a bottle of barbecue sauce) is an easy option. So is fried chicken and waffles (frozen whole-grain waffles and leftover chicken). Gazpacho packs easily. So does cold leftover pasta carbonara (consider it an Italian take on Asian peanut noodles).
The point is, lunch is just another meal and anything goes.
And that’s why whenever I make pasta for dinner, I always cook more than I need. If you’re willing to think outside the (lunch) box, it’s a fast and easy way to make awesome lunches.
Tossed with a bit of olive oil (to prevent it from sticking), leftover pasta can be refrigerated for several days. So what do you do with it? Here’s 10 easy ways to use it to jazz up your salads:
Turn the pasta (think penne or elbows) into croutons. Heat a bit of oil in a skillet, then add the cooked pasta and saute until lightly browned. Add them as you would any crouton to any salad (chicken Caesar would be something awesome).
Think traditional pasta sauce ingredients, but rethink them as a salad. Sliced oil-packed sun-dried tomatoes, marinated mushrooms and herbed olives tossed with leftover pasta and some chopped fresh basil is a pretty fine salad.
Make panzanella (bread and tomato salad), but use pasta instead of bread. Gobs of sliced tomatoes, garlic, olive oil, fresh basil and pasta.
Toss cold leftover pasta with a little low-fat sour cream, a splash of hot sauce, some thawed frozen peas and sliced smoked salmon for the taste of a bagel, lox and cream cheese, but as a salad.
Combine canned tuna with pasta, a bit of mayo and whatever seasonings you like, perhaps a bit of grated Parmesan. Spoon it into a whole-wheat tortilla with greens for a tuna salad wrap.
Get herby. Buy a mess of fresh herbs — cilantro, basil, parsley, mint, thyme and anything else you like — and finely chop them. Toss with olive oil, salt and pepper, then toss with cold pasta. Now add any leftover roasted or fresh veggies.
Make a hummus pasta salad by tossing leftover pasta with all of the components of hummus — canned chickpeas, lemon juice, tahini, chopped garlic, salt, pepper, olive oil and a sprinkle of paprika. Serve on a bed of greens.
Toss pasta with vinaigrette, chopped hard-boiled eggs, chopped celery and chopped red bell pepper.
Blend peanut butter with vinegar, soy sauce and a splash of hot sauce. Toss the pasta with the peanut sauce, then add leftover roasted or fresh broccoli florets for peanut noodle salad. If you like, sprinkle with chopped peanuts.
Make a guacamole salad. Toss pasta with chopped avocado, lime juice, cilantro, chopped tomatoes and — if you want protein — shredded cooked chicken.
J.M. Hirsch is the national food editor for The Associated Press. He blogs about the trials and tribulations of his son’s lunches at LunchBoxBlues.com. His upcoming cookbook, Beating the Lunch Box Blues, will be the first to be released by Rachael’s new publishing venture, Rachael Ray Books. Hirsch’s previous books include High Flavor, Low Labor: Reinventing Weeknight Cooking and Venturesome Vegan Cooking. He lives in New Hampshire with his son, wife, and too many cats.
Rachael Ray's Blog

- Rachael Ray's profile
- 296 followers

