Rachael Ray's Blog, page 67
March 19, 2013
SPRING CLEANIN’ ‘N PREENING HIDDEN HEALTH HOT SPOTS
Tra la tra la Spring is almost in the air! And, for many of us it marks the start of our doing our annual spring cleaning chores that bore. And, yes we’ll do the normal must do’s like washing our windows since looking through them after winter’s wrath causes us to think we need stronger eyeglasses and we’ll vacuum all our drapes, sofas etc which will give our arms a terrific workout. However, it’s the stuff we’ll miss that we really need to tend to since they harbor bacteria, mold ‘n mildew, dust mites and their doo which can cause us health issues and worsen allergies and asthma. So where are these spots…and how can we deal with them? Read on….
And thanks to Jessie’s Blog for the terrific illustration!
TOOTHBRUSH HOLDERS: Bacteria, mold ‘n mildew
We know to change our toothbrushes regularly but overlook where we keep them! Toothbrush holders are havens for those broad-jumping germs that take flight every time we flush our family throne. So clean them by using another fave mouth-cleaning product: Pour enough of your fave antiseptic mouthwash into a bowl so that It can cover it. Let sit for 10-15 minutes then use a toothbrush-preferably an old, unused one to get in the nooks and viola…all clean!
SHOWER HEADS: Mold n’ mildew, mineral build-up
Wrap the showerhead in a cloth drenched with white vinegar which is a natural sanitizer. Place a plastic bag around it and secure it with one of your butterfly hair clips or a scrungie. Leave overnight!
REFRIGERATOR: DRIP PANS/RUBBER GASKETS: Mold ‘n Mildew
The drip pans under your fridge are a place mold likes to take up residence, so be sure to empty it regularly- it’s also a fave watering hole for roaches! Clean the drip pan with vodka and a scrub brush. Use the cheap stuff! Dilute with water 3:1 in a spray bottle-2:1 or 100% pure vodka is fine too. Then wipe with damp microfiber cloth to remove remaining yuk! Martinis on me if you don’t notice a difference!
Moisture can also form on those rubber gaskets along your fridge’s door. Simply put some vodka (the cheap kind!) in a spray bottle and spray away. Use an old toothbrush to get in the nooks and wipe with a clean, dry cloth.
STUFFED ANIMALS: Dust mites and doo
Dust mites are pretty much everywhere including your child’s (or your!) stuffed animal since they feed off your dead skin. Simply put a cup of baking soda in a large plastic bag and then the stuffed animal. Seal ‘n shake. This will loosen the mites and doo. You can also place your stuffed animal in a freezer overnight or outside if it’s below 32 degrees.
FAKE PLANTS: Dust, pet dander
They need our TLC (tender loving cleaning!) too since dust, pet hairs, and their dander find their way onto them. Pour a cup of salt into a paper bag and place the plant upside down inside. Shake ‘n flakes should fall away. Use a pastry brush to remove any excess salt.
REAL PLANTS: Dust, mold ‘n mildew
Go bananas…well actually banana peels! Use the inside of a peel to dust and shine.
Be sure not to overwater your plants but if you do and you begin to see mold on pan remove with vinegar.
BOOKS: Mold ‘n mildew, Book lice
Many of us keep books in places where moisture can be found and that can result in mold. Mold in turn are a book lice’s fave food so you wind up having them as well. To help prevent that you can sprinkle pages with baby powder and keep/place those silica gel packets that come in shoe boxes (and give cause for us to buy more shoes!) behind the books wherever you think there is moisture. You can also place them in drawers, cabinets, etc. just be sure to keep them well out of the reach of your children and pets!
VACUUM CLEANERS: 50% fetal bacteria; 13% ecoli
According to study at University of Arizona 50% of vacuum brushes have bacteria caused from sucking up dust and the doo those yucky dust mites deposit. Spray your brushes with a disinfectant spay and/or wipe the inside with an alcohol-based disinfecting wipe. While you have the vacuum out, suck up some dried coffee grounds to keep your vacuum smelling good. Then sit back and enjoy the java and job-a well done! BTW if you’re spraying with a sanitizer you need to leave it on for at least 10-15 minutes to work!
Five Ways to Beat Winter Dryness
Winter’s almost over, but that doesn’t mean that the last few weeks won’t cause damage to your skin, hair, and nails. The best way to beat winter dryness (and ensure you’re looking your best for Spring) is to start taking action now. As with anything, looking good takes regular maintenance. Here are five ways to ensure your skin, hair, and nails are in top condition.

1. Make Cuticle Oil Your Best Friend
Are your nails brittle and weak, maybe even prone to breaking or flaking off? Chances are that they’re dry. Our hands are exposed to all the elements, and the best way to maintain healthy nails is to apply cuticle oil every night before you go to sleep. Rub one to two drops into your cuticles, and all over your nails.
2. Exfoliate!
Dry skin not only makes us feel horrible, it can cause itching and clogged pores. We often forget to exfoliate in winter (it does seem more like a summer ritual), but getting rid of the dead skin cells on your body before moisturizing is important.
3. Use a Hair Mask
Winter winds, indoor heating, and lack of hydration all cause your hair to become brittle and weak. Adding a hair mask to your weekly regimen is a great way to hydrate your locks.
4. Switch to a Thicker Moisturizer
It’s important to moisturize, but have you ever considered the type of moisturizer you’re using? A light lotion is fine during summer, but winter calls for a thicker formula.
5. You Are What You Eat
Although some people don’t realize it, you truly are what you eat. Imagine that your skin is your stomach turned inside out. If you put unhealthy foods into your body, their effect is going to appear on your skin. During winter your body needs extra care, so add more omega-3 (healthy fat) rich foods to your diet, such as avocado, fish (salmon is great), leafy green vegetables, and lots of water.
March 17, 2013
Brown Your Beans!
The other day, I made a happy discovery. I found the secret for transforming humdrum white beans into a rich, deeply flavored ingredient.
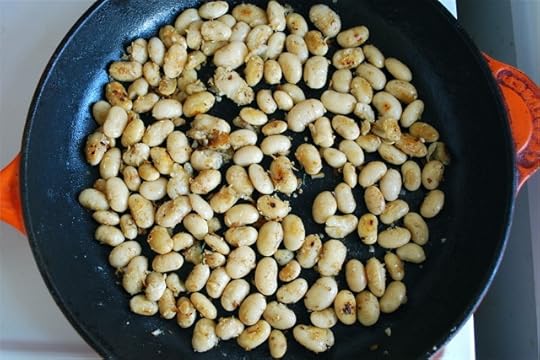
What happened was, one night when I needed a quick dinner, I spied a can of white beans in the cupboard. I’ve always found white beans kind of flavorless, but the pickings were slim, so I opened the can and gave the beans a good rinse. I heated a skillet over medium-high heat, added a glug of olive oil, and in went the beans. I walked away and got distracted, and when I came back five minutes later, the beans had developed a golden crust on the bottom.
I thought that browning the beans meant they would be burnt and tough, but they had a crispy texture and a good, almost meaty taste. I stirred the beans and did my best to turn them so the other side would face down, and then I purposely repeated my mistake. And voila, I had the tastiest white beans I’ve ever eaten!
It seems that the browning process helps to caramelize the beans, the same way that caramelization brings out the sugars and flavor in onions. The browning also gives white beans what is in my opinion some much-needed texture, so they’re dotted with crisp, gold patches that make for a pleasant crunch.
Here’s a simple recipe for browned white beans. Make these as a side dish, or serve them over grains with a dollop of yogurt for a light, healthy main course. I like making these with a large variety of white bean, such as the gigante or large butter bean, because they’re easy to flip so you can brown both sides. The beans should be mostly dry when you’re ready to start cooking.
Crispy Browned White Beans
Ingredients
2 tablespoons extra virgin olive oil
1/2 clove garlic, minced
2 anchovies, chopped
2 T lemon juice
2 tablespoons grapeseed or canola oil
1 can white beans, drained and rinsed
3 T minced parsley
Salt and pepper
Instructions
In a small bowl, combine the olive oil with the garlic, anchovies, and lemon juice. Add half a teaspoon of salt, and whisk to combine.
Heat a skillet over medium-high heat, and add the grapeseed oil. Add the white beans, and spread them in a single layer. Let the beans cook undisturbed for five minutes, then check to see if the bottoms are brown. When the beans look brown and crisp, carefully flip them and repeat on the second side. Watch the pan, as you may need to adjust the heat, or add a little more oil.
When the beans are browned on both sides, season them lightly with salt, and transfer to a medium bowl. Pour the olive oil mixture over the top, add the parsley, and toss well. Season to taste with salt and pepper.
Louisa Shafia is the author, most recently, of The New Persian Kitchen, a book of healthy Mediterranean and Silk Road-inspired recipes. See Louisa’s cooking videos and her schedule of upcoming events at lucidfood.com.
The Lazy Man’s Guide to Braising, II: Country Pork Ribs in Belgian Abbey Ale
“Country ribs,” as they call them at my terrible local grocery store, don’t really exist. All they really are are cut up blade pork chops, the weird pieces at the far end of the loin near the shoulder. Nobody really knew what to do with them, so they basically just said, “the hell with it. Let’s just cut them into pieces and pretend they’re ribs.”
Like real ribs, though, they have a lot of bone in them, and bone is a good thing when it comes time to braise things. One reason is the taste: bone tastes good. The essence of any kind of stew is stock, and stock is mostly bones. I don’t know about you, but I don’t have a vat of homemade pork demi-glace lying around, or dark pork stock. I have country ribs that I got for $2.75 at C-Town. So those bones are about all I have to give porky depth of flavor to my stew. (Well, that and some chunks of bacon.) The other reason bones are so useful in a stew is that they tend to keep the meat they are attached to from overheating. People always think that if you cook meat in liquid, then it will naturally be juicy, but I’ve had a hell of a lot more overcooked short ribs than I have overcooked steaks or chops.
So you brown up the chops, hitting them as hard as you can without filling your house with smoke, and then you add some wine, or beer, or stock, or whatever else you have handy. (Since, as I say, I never have pork stock in the house, I don’t use chicken or beef stock. That would be miscegany.) I like braising things in dark beer, personally, especially the dark, thick, sweet Belgian ales, which are halfway to stew before you even open them. They have a sweetness that in tinged with bitter, and an acid that helps cut through all the fat in this. I added a whole bottle to the country ribs, threw in a couple of sprigs of thyme, a cut-up carrot, a few mashed cloves of garlic, and called it a day. I put the whole thing into the oven and went to go watch Caddyshack. By the time it was over, my ribs were done.
Or almost done. Nobody wants to eat bony hot meat, swimming in fat and beer. Or at least, nobody but me. I was making this for my wife Danit and her friend, and so I did the gentlemanly thing and took the
“ribs” out, letting them sit for a couple of minutes while I let some of the beer boil off. I planned on making a sauce with that liquid. I mean, why not? So I cut the bones off, cut up the meat, and put it on a big platter. I put carrots next to it, essentially as a garnish. And then once the liquid had reduced by about half, I worked a big chunk of butter into it over high heat, thickening up that dark sauce and eventually pouring it over the pork ribs. Now, if I had been smart, I would have put aside some thyme or something to sprinkle over the sauced ribs; the beer have given them a deep mahogany sheen, and little bits of fresh herb-looking green bits would have truly given it a touch of class.
Still, the dish was great - porky and rich, with a velvet softness and just an amazing acidic edge from the beer. The butter brought it all together, as butter always does, and I even had the self-control to cook some minute rice to serve it over. The whole dinner cost me something like $6, not counting the beer, and for the most part, it cooked itself. What more could you ask of a winter dinner?
2 lbs pork country ribs
2 cloves garlic, smashed
2 sprigs thyme
olive oil
butter
tomato paste
1 large bottle Belgian abbey-style ale
A carrot (or two), hacked into big pieces
Some parsley
1. Brown the country ribs in the olive oil. Take them out.
2. push some tomato paste around at the bottom. It’ll start to burn right away. That’s OK. As soon as it does, throw the meat in, the beer, the garlic, the carrot(s) and the thyme.
3. Cover it and put it in a 300-degree oven for an hour or so.
4. Take the ribs out and the other stuff out. Let them sit there. Put the pot on a fire and let the meat-beer reduce. While that’s going on, the meat off the bones.
5. When there isn’t much meat-beer left, throw in a big chunk of butter and a little more fresh thyme if you happen to have some. Whisk it around until the sauce lightens and thickens. Pour it over the ribs and throw some chopped parsley on top. Eat it.
March 12, 2013
When Guests Make Dinner – Pizza Party
Yesterday afternoon, we had an impromptu invite from our friends Shilpa and Jayesh for Sunday dinner. We were at the cusp of a new week and decided to head over early, giving Monday a chance to start off the right way. When we got there, the kitchen table was filled with lots of little bowls. Sliced mushrooms, chopped chilies, finely-diced capsicums, onions, cilantro and market fresh mozzarella. Perhaps a late night ahead since dinner was not ready? I was starting to feel a bit anxious and chugged back some of my crisp white.
Within a few minutes, Shilpa called us to the kitchen saying that dinner was ready. We walked in with the kitchen status not seeming to have shifted much. She then handed us all pizza trays and told us, the oven was ready for our pizzas.
Shilpa
What fun! We were going to make our own pizzas for dinner. All those little bowls were filled with finely cut pizza toppings and there was an intensely jammy sauce of fresh tomatoes, garlic, olive oil and oregano. I could set up my own pizza with as much green chili as I wanted and not worry about my husband complaining that he’s on fire – after all, he could make his own however he liked. And what a pizza base! This was no doughy, tooth pulling pizza. Shilpa used a base that was like a sheet of paper. It was made from barley and once cooked, the pizza could be cut in to slices or rolled-up in to a flute. Simply delicious and not to mention, much healthier. If you are looking for a thin base that gets crisp on contact with the oven, then I cannot recommend Mountain Bread’s Barely Wrap highly enough but should you want something a little heavier and not so thin, StoneFire Naan bread works really well too for individual pizzas.
Barley Crust Pizza
Our kids had their own little pizza fest in progress and they could be left alone to actually finish their meal without fuss. Needless to say, it was win-win all around. The evening was perfectly easy, the way Sunday nights should be and hopefully established the tone for the week ahead.
Little Bunnies
Recipe for Pizza Party
Ingredients
4 individual pizza bases (Mountain Bread’s Barely Wrap)
1 medium-sized onion, diced finely
1 green or red pepper, diced finely
1 cup mushrooms, sliced
2 green chilies or jalapenos diced finely
Any fresh green herbs (cilantro, basil, parsley, dill)
1 tbsp. olive oil
Pizza Sauce
8 vine-ripe fresh tomatoes, de-skinned and diced
2 cloves of fresh garlic, finely sliced
1 tbsp. olive oil
½ tsp. dried red chili flakes
Salt and pepper to taste
Method
Heat oven to 400 degrees
1) Pizza Sauce: Warm the garlic in the olive oil to sweat lightly. Add tomatoes and salt, pepper and oregano and cook until moisture has evaporated and sauce is dense
2) Brush a little olive oil on the pizza base, spread with the sauce, toppings and cheese
3) Bake in the oven for about 7-10 minutes until base is crisp and cheese has melted. Allow to rest for a couple of minutes before slicing or folding
Saira Malhotra, is of British–Indian descent and is a chef, food writer and cooking instructor based in New York City. Raised in Hounslow, U.K, or rather ‘Little India’, where the air is aromatic with roasted spices, little did Saira know these moments would follow her from being a student in France and Italy to residing in NYC with her husband and kids and parlay themselves unexpectedly in to a culinary career. She is a graduate of the International Culinary Center in New York City. Come visit her at her food blog: www.passportpantry.com where she shares approachable and international recipes
March 10, 2013
Ask Mr. Recipe: What Are the Six Spices a Person Needs?
Aaron Issacson, known to the world as Mr. Recipe, is New York City’s greatest spice importer, and a well-known expert on spices and seasonings. Since my own knowledge of spices basically begins and ends with salt, I thought I might provide a service to Rachael Ray readers by asking him a few simple questions on the subject. In the first installment of what is sure to become a very annoying series, I asked Mr. Recipe what spices a person should keep in his or her kitchen.
Look, Mr. Recipe. When you get your first apartment somebody always gives you a rack of two dozen little bottles, 20 of which you never open. I don’t even know what mace is! Do I really need all those spices? Tell me the truth.
No! They are usually just cheap, stale powders in any case. Mr. Recipe would never suggest someone use spices like that. No, it would be better to have a few very high-quality spices that you use well. You should have enough spices to make your own spice blend, say. A signature spice.
That’s all well and good, Mr. Recipe, but the average person has no more use for his own spice blend than he has for a suit of armor. Let me ask you this. If you had to pick six spices to have in your kitchen, what would they be?
Are we counting salt? Because I would have three kinds of sea salt that I think everyone needs: fleur de sel, Malden salt…..
No, no, Mr. Recipe. Half of them can’t be salt!. Only a weirdo keeps that much salt around anyway. Pick one.
I have a volcanic salt that is 500,000,000 years old. It has a splendid minerality to it. That’s a great one.
OK, so salt. I am going to go out on a limb and guess that you have a strong opinion about pepper, too. Let’s get that out of the way.
You’re so impatient, Josh! I always tell people that they need to have not just one but all three kinds of pepper. You can’t imagine how important pepper is, Josh! My double-husk extra bold black telecherry pepper is the best black pepper in the world, but I wouldn’t only have that by itself. It’s very aggressive. I keep white pepper too, which has a kind of creamy, mild taste; it’s what I would use for chicken or fish. Or even a salad! People forget that salads need seasoning too. Finally, my green pepper has a kind of fruity taste; their taste isn’t as strong, so they are great for crusts, curries, and other times you want to use more pepper in terms of volume.
Ok, Mr. Recipe. I hear you. Salt and pepper then. Now let’s move on to our six spices.
Well…one would be aleppo pepper, from Syria. It’s very delicious; it’s chile, but not really hot; it adds adds such a depth of flavor. I carry 87 different kinds of chiles, and that one is my favorite, Josh. Another I can’t live without is cinnamon. I use it in a lot of savory things as well. Now there are two different kinds of cinnamon. There’s indonesian cinnamon, the familial sweet kind from the McCormick bottle; and then there is Vietnamese cinnamon, which is sweet and spicy. I find that more interesting and delicious. And then….nutmeg.
Really? Nutmeg?
You’d be amazed at what a difference a little bit of nutmeg can make, Josh! Especially when you make a pasta. Don’t buy it ground; get whole nutmeg and microplane or grate a little into your pasta, either as a condiment or into the sauce as it cooks. Just a few grates into that dish will make a huge difference. Always add nutmeg to tomato sauce! A little bit - you don’t know what it is, but it’s there; it changes the whole complexion of the dish.
What else?
It’s very, very important that people have oregano. Oregano is amazing! I use Sicilian oregano on the branch. And what a difference it can make on a plain chicken dish! It’s herbacious and lively but not too aggressive! Again, I use it both at the table and also when I’m cooking. That’s important, josh; that’s how you get depth of flavor. Chefs will tell you about “layering” flavor and different uses of the same spice are a good example.
So aleppo pepper, cinnamon, nutmeg, oregano….you have two more.
I love french thyme. I think that’s one that you really can’t do without. It’s earthy, rich, herbaceous. You must know, Josh, that no chef would dream of cooking a steak without a sprig of good thyme and some garlic.
Is garlic the last spice, Mr. Recipe?
No! How could I leave out vanilla? That’s my favorite spice in all the world. Did you know that there are 256 different organic compounds in vanilla?
Really? I don’t know Mr. Recipe. Vanilla? It’s not like I’m planning on making ice cream or cookies or whatever. Are you sure about this?
Vanilla is amazing! I use it in salad dressing, in sauces. There are so many uses for vanilla that you haven’t thought of that I can’t begin to describe them all. When you add really good vanilla to any number of savory dishes, you don’t taste vanilla; you taste deliciousness. I put it in macaroni and cheese, in bechamels, in my lasagna, baked chicken. It is my secret weapon!
So those six?
Yes, but don’t forget about the pepper!
March 8, 2013
7 SIMPLE SPRING ORGANIZING TIPS USING EVERYDAY LEFTOVERS
I love to find ways to repurpose things that I might usually throw out since they can save me money and a few can even turn into an after school or rainy day activity for the kiddies, which means free time for yours truly. Here are a few ways to use a few of these ‘leftovers’ to organize jewelry, your children’s artwork, bathroom and with spring cleaning in the air, get a jump on your closet and waistline as well!
JEWELRY
1. Cork It: Champagne and wine corks accumulate fairly quickly in my abode so rather then chuck them I put them to good use by sticking post earrings with their backs and decorative pins on them. BTW if you lose an earring back just snip off a thin piece of red eraser from the tip of a pencil…works like a charm! Also a terrific way to organize your spring garden herbs…thanks my Pinterest Pal Kristy!
2. Straw Pull: Leftover straws from your child’s birthday party? Use them to organize your chain jewelry. Cut them to a length long enough to thread the chain, close the clasp and voilà, you’ll never have to detangle a chain again!
3. Cart ‘em: Use clean egg cartons to store rings and other small jewelry items.
ART WORK
4. You Tube: In every child there is a little Picasso or Rembrandt waiting to come out. If your child is a prolific artist who insists that you save early works for a (much) later retrospective, you can save and organize their art by rolling and placing inside a paper towel or leftover gift-wrapping tube. Get your kids busy by having them decorate the outside of the tubes with their names, dates and stickers.
5. Pizza Pizza: Another great way to store your kid’s art or special book reports is to ask for extra pizza boxes the next time you serve some up vs cook din din. To learn more about the importance of art in your child’s development go to http://aplaceofourown.org/question_detail.php?id=235
AROUND THE HOUSE
6. Bucket List: Grab that extra wine bucket collecting dust and transform it into an bathroom organizing juggernaut by sticking double sided Velcro on the outside. Next apply little pieces of Velcro to your makeup and makeup brushes, shavers, tweezers, hair spray, combs, tooth brushes and adhere them to the side of the bucket. Drop all your hair styling tools inside the bucket and turn your overstuffed bathroom drawer or vanity from bad to fab!
Bag It: Spring cleaning is just around the corner and no better place to begin then in our closets. Use those old shopping bags (which BTW I collect like Carrie Bradshaw/Sex In the City collected Manola Blahniks!) and label them- DONATE, DISCARD AND DROP-FIVE. Line them up in your closet and go through it and choose clothes to DISCARD, DONATE (there are some great charities and thrift shops out there always looking for donations including Dress for Success which provides clothes to under-privileged women to get them back into the workforce) and DROP FIVE, my fave to meet my Spring resolution! To learn more about Dress for Success, visit http://www.dressforsuccess.org/
March 7, 2013
Half the fun of discovering a new restaurant is sharing i...
Half the fun of discovering a new restaurant is sharing it with people you know will enjoy it. As Rachael Ray’s resident restaurant guru, here’s an inside look at what I report back to Rach about some of my favorite restaurant finds and food experiences!
From: Kappy
To: RR
Sent: Thursday, March 7, 2013 12:52pm
Subject: Back to the City of Brotherly Love
Hey RR -
Despite our recent runs at QVC toward the end of this year, I still had many places to try in Philly. This visit, I arrived early for lunch, tried a few places, and then headed straight into drinks (and bites) and dinner. I landed, got my rental car, and headed to the Rival Bros. Coffee Truck (pictured above). Rival Bros. is a small batch coffee roaster putting out a distinctive product. I ordered my latte, drove to a café and posted up to do some work for the afternoon.
When hunger struck, I headed to John for a roast pork sandwich.  I’ve had Philly’s roast pork sandwich a couple times, but I hadn’t had one at John’s. As you know, roast pork is the sandwich the locals eat… it’s not all about the cheesesteaks. John’s is no joke. It’s a tiny place with some character. The sandwich is pretty straightforward: spiced up roast pork, sliced thin and sitting in an au jus, à la Chicago’s Italian Beef sandwiches, and offered small size or large. They slap it on a baguette-like roll and you can top it with sharp provolone, broccoli rabe or a few other topping options. While it looked really simple, this sandwich is one of my favorite sandwiches I’ve had in Philly. I sat in the car, ate half of my small size sandwich (they make a large, too), and headed to the next stop.

I arrived at a tiny storefront of a sandwich shop, Paesano’s. I sat at the counter, as that is all they have (about 8 seats) and ordered the Giardina Sandwich with breaded eggplant, tomato sauce, roasted fennel, caramelized onions and pesto, all on Philly’s famed sesame seeded hoagie roll. Paesano’s is the hole-in-the-wall sandwich shop with really great sandwiches that I’m always on the lookout for whenever I travel. 
I drove through the city and picked up a bunch of cookies from Insomnia Cookies before heading to a friend’s to work for the rest of the afternoon: snickerdoodle, s’mores, oatmeal raisin…The cookies were pretty good, but next time I’m going for their ice cream sandwich. 
After the work day was done, it was off to Ranstead Room for a cocktail, and I couldn’t pass up some light bites. Ranstead Room is a small, unassuming bar behind El Rey Restaurant, one of Stephen Starr’s many places in Philly and beyond. My friend and I enjoyed a cocktail and picked at their amazing chips and guacamole and a nice cheese and meat plate. Don’t miss their popcorn spiced with a Jamaican marita seasoning. 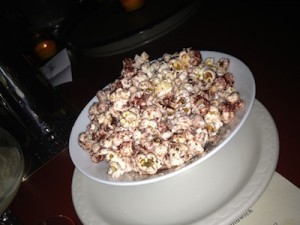 If you’re looking for a well-mixed cocktail in a cool, quaint atmosphere, check it out.
From there, we headed to dinner at Vernick Food & Drink. I’d heard some really good things so I was happy to finally have the opportunity to go. We got an enviable seat at the counter in front of the kitchen and went to town, starting with a little taste (espresso cup) of tomato soup with a spiced cream. We followed it up with a really light goat cheese custard with a touch of red wine vinegar on top.  One of my all time favorite dishes is Mario Batali’s Parmigiano Sformato and this reminded me of that, but of course with goat cheese. We then picked at a Scallops Crudo app dotted with a cranberry vinaigrette, some ginger and tarragon - a unique blend of flavors and really tasty; one of those things we didn’t want them to take away from the table even though we had finished it.
 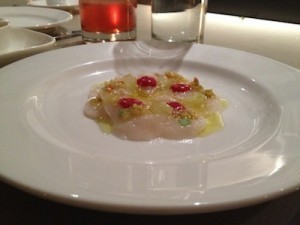 We also tried the Brussels sprouts salad with apple and a satisfying side of the fried potatoes with padron peppers. And we didn’t stop there! My favorite thing may have been the mushroom toast on sourdough, though the whole wheat garganelli with shiitakes definitely gave it a run for the money. Our last side was the black pepper roasted cauliflower, featuring a creatively presented blend of different varieties of cauliflower. We had to find room for their individual Blueberry Pies with vanilla ice cream that were off the hook! So off the hook, we felt guilty eating it all…so my friend whose name may or may not be Caroline had it wrapped and put it in her purse for the morning! (Sorry to blow your cover, Caroline!)
And that’s what’s on my plate!
~ Kappy
Rival Bros. Coffee House
www.rivalbros.com/the-truck
Twitter: @RivalBrosCoffee
John’s
14 Snyder Avenue
Philadelphia, PA 19148
(215) 463-1951
www.JohnsRoastPork.com
Paesano’s
152 W. Girard Ave
Philadelphia, PA 19123
(267) 886-9556
www.PaesanosPhillyStyle.com
Insomnia Cookies
108 South 16th Street
Philadelphia, PA
(215) 563-7426
www.InsomniaCookies.com
Ranstead Room
2013 Ranstead Street
Philadelphia, PA 19103
(215) 563-3330
www.ElReyRestaurant.com
Vernick Food & Drink
2031 Walnut Street
Philadelphia, PA 19103
(267) 639-6644
www.VernickPhilly.com
Andrew “Kappy” Kaplan loves food. A professionally trained chef, by day he runs Yum-o!, Rachael Ray’s charity focused on kids and cooking, and keeps special projects running smoothly for her. By night he hops course to course, place to place, all across the country. He’s Rach’s own personal dining guide! You can also follow Kappy on Twitter to see what’s On Kappy’s Plate in real-time!
Knox Blocks - a blast from the past
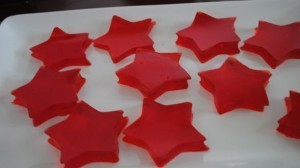
We were recently at a friend’s house for dinner and when we walked in a platter of heart-shaped Jello cutouts were on the counter, beautifully displayed. My kids went bananas - they have only had Jello of the store-bought cup variety at our house - they had never seen these before (You would have thought it was a platter of caviar. Not that most kids like caviar. At least not my kids. They haven’t had caviar. I digress. Maybe a platter of hot fudge sundaes). I remember having something similar at a friend’s house when I was little but her mother called them Knox Blocks and they were cut in squares, not cookie-cutter shaped.
We made some at home this week and my kids thoroughly enjoyed cutting out the shapes - they are very sturdy - and gobbled them up. Festive options are endless - shamrocks for St. Patrick’s Day, hearts for Valentine’s Day, etc. They would make a good school birthday treat as well. I made mine with Jello but the Knox Gelatin box has a recipe using fruit juice instead of Jello which I may try next.
Knox Blocks
Ingredients:
2 6-ounce packages of Jello
5 packets of gelatin
5 cups boiling water
Directions:
Mix Jello powder and gelatin in a large bowl. Add boiling water and stir until the powder is dissolved. Carefully pour into a 17 x 11 pan and (again) carefully transfer to the refrigerator to cool. Let cool a minimum of 3 hours or until firm and cut into shapes. Store in an airtight container in the refrigerator.
March 6, 2013
A Winning Crudité Platter, Silk Road-Style
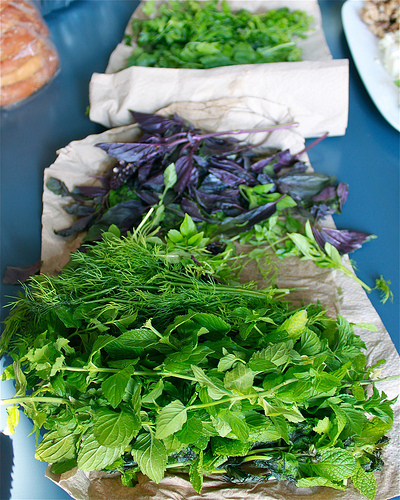
Go to any Persian restaurant, or to the home of an Iranian family for dinner, and you will be served a plate at the beginning of the meal that is alive with color and the aroma of herbs. This platter of “edible herbs,” or in Persian, the sabzi khordan plate, is made up of fresh herbs, bread, cheese, and a few other doodads, and it’s a no-fail party food that couldn’t be easier to prepare.
The edible herb platter will be on the table throughout the meal, or, it can be a meal in itself. All of the fresh elements on the plate look beautiful together, but this isn’t fancy food, and in fact everything on it should be eaten with your hands.
The herb platter is made up of a few different elements. First and foremost, there are the herbs, which are served whole. You can use any herbs you like, as long as they taste good raw. Good choices include mint, basil, parsley, cilantro, and tarragon. Fresh scallions are traditionally served stem-on, but I like to snip off the stems and slice the scallions in half lengthwise.
Bread is an essential part of the platter, as it’s what allows you to pick up everything else and bring it to your mouth! Lavash bread is a perfect choice, as it’s pliable and can be torn into small pieces. Pita bread works well, too. Because it’s hard to fit everything on one platter, especially if you’re feeding a lot of people, I like to put the bread in a separate bowl or basket.
Rich, salty feta cheese adds an element of fat and flavor to the platter. You can simply take it out of the packaging and place it on the platter with a knife for slicing. For a heavenly taste, take a minute to toast a tablespoon of whole spices like coriander, cumin, and black peppercorns, combine them with a few tablespoons of olive oil, and pour this aromatic mixture over the cheese.
Other traditional elements of the sabzi khordan platter include bright red radishes, which I like to cut in quarters, and walnuts that have been soaked in warm, salty water. The purpose of soaking the walnuts is to leach out the bitterness and make them more digestible. To do this, place the walnuts in a bowl, and pour in boiling water to cover. Sprinkle in salt until the water tastes briny, then soak for anywhere from an hour to overnight. When you’re ready to serve, drain the walnuts.
You can round out the platter with foods like olives, hard sausage, hummus, and colorful sprouts. Lay out your edible herb platter along with a stack of small plates and napkins, and you’re all set. Now that you’ve gotten all of the elements together, you’re ready to eat, so tear off a piece of bread and spread it with some feta, then tuck in a pinch of herbs, some walnuts, and a radish or two, then fold and eat! You can serve the platter alongside other food, or serve it on its own.
Louisa Shafia is the author, most recently, of The New Persian Kitchen, a book of healthy Mediterranean and Silk Road-inspired recipes. See Louisa’s cooking videos and her schedule of upcoming events at lucidfood.com.
Rachael Ray's Blog
- Rachael Ray's profile
- 296 followers


