Rachael Ray's Blog, page 68
March 4, 2013
Turn a Vintage Tea Cup into a Candle!
Having dinner by candle light, or just lighting a few candles in the evening for some nice mood lighting is so beautiful and romantic. However, there’s always that little bit of candle that needs to be removed before it melts into the sconce or candle holder. If you save those nubs they can be reused and made into a brand new candle.
Materials
About a dozen used candle nubs
Tea cup and saucer
Metal bowl
Pot of boiling water
Plastic fork
Bamboo skewer
Find an old tea cup or a small ceramic bowl. This tea cup came from a thrift store and wasn’t in perfect condition, but it had a nice graphic pine cone on it.
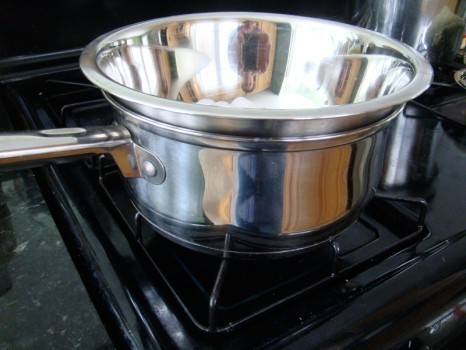
Fill a medium-sized sauce pan with an inch or two of water, and place a metal bowl on top to make a double boiler. Use a bowl reserved for craft projects. You probably won’t want to use it for food afterward since it’s really difficult to remove all the wax.
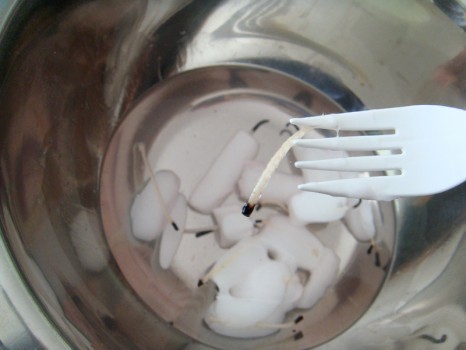
As the candles begin to melt, remove the wicks with a plastic fork.
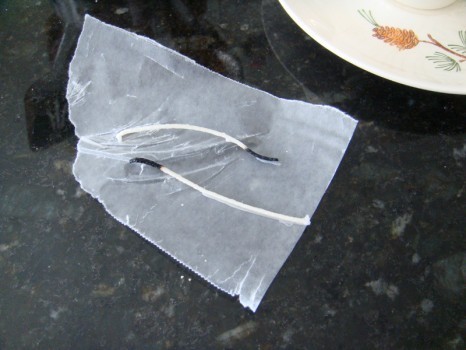
Save the longer wicks to reuse in the new candle.
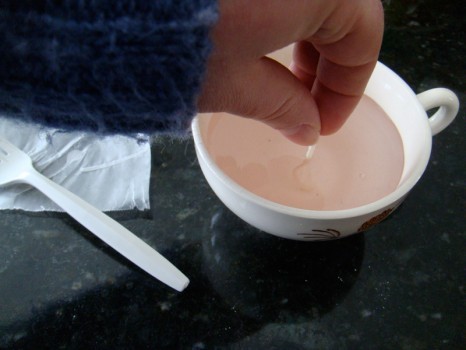
Pour the melted wax into the tea cup. Break the burnt end of the wick off and make sure it’s long enough to reach the bottom of the cup. The wick will need to be about an inch above the wax.
Dip the wick’s end into the hot wax and wrap it around the center of a bamboo skewer. Lay the skewer across the top of the cup to keep the wick in place while the wax dries.
Once the wax is dry and hard cut the excess wick.
March 1, 2013
Half the fun of discovering a new restaurant is sharing i...
Half the fun of discovering a new restaurant is sharing it with people you know will enjoy it. As Rachael Ray’s resident restaurant guru, here’s an inside look at what I report back to Rach about some of my favorite restaurant finds and food experiences!
From: Kappy
To: RR
Sent: Friday, March 1, 2013 3:34pm
Subject: Bring a Friend OR Dinner for (at Least) Two
Hey RR -
I’ve wanted to share a few more Chicago places with you - some new, some not so new - that have gots the goods. Make sure that you bring a friend (or three) with you, as you’ll want to sample these menus up, down and sideways.
First up is Belly Q. Bill Kim is easily one of my favorite chefs in Chicago. He is Korean and his wife is Puerto Rican and he finds this smooth line of melding the two cuisines together, when appropriate. Bill has a couple of other places, Urban Belly and Belly Shack, but Belly Q is his newest venture with Michael Jordan’s restaurant group. (Yes, that Michael Jordan.) It’s a new, modern spin on a Korean BBQ joint. I’ve had way more than half of the menu in the few times I’ve been, and I can tell you that you’ll want to go with a few people and try a lot. Don’t miss the Thai Style Fried Chicken (pictured above), the Double Smoked Bacon and Kimchi Pancake, the Almond Caesar Salad, the hot pots, the small bites, the smoked section…they’re all good! Oh yes, he even makes a coconut water-based soft serve ice cream. They’re now open for lunch…soon opening for brunch… and have a to-go area with faster food such as buns and salads and whatnot. If you like flavorful food that’s a departure from the mainstream, Belly Q is your destination.
And Ada Street…oh, Ada Street. Morton and Kornick are at it again - these two know how to run a place. Ada Street is hidden just north of North Avenue and just east of Elston (don’t worry, you’ll find it). It’s pretty casual - a super cool space that used to be a factory of sorts and has a sweet patio with a ping pong table for when it’s nice outside. It’s cozy with delicious, seasonal food (I’m not a fan of that word, “seasonal,” but that’s exactly what it is). Katy and I sat at the bar and went to town. We ordered simply blanched green beans sautéed with shallots; a fantastic lamb-filled arancini over a spicy yogurt sauce; a lovely and different grilled peach, ricotta and soppressata salad; a little taste of a pea soup (served in a little cup - it was perfect) that Katy tried to steal from me; and a roasted squash with Fresno peppers and mint salad. The panna cotta with strawberry rhubarb and lemon shortbread crumble on top we had for dessert was insanely good and we practically raced to finish it, we both liked it so much! You’ll appreciate the neat little touches and combinations of flavors added to the otherwise approachable items on the menu.
I was a little ticked off that I never made it to Terragusto when it was open, and I know that many industry folk were upset to see it go. Supposedly Chef Theo Gilbert made some mean pastas. But when I heard about his newest (okay, not exactly that new anymore) venture opening up down the street from my apartment, I was psyched to give it a try. Ripasso is a little Italian restaurant with a selection of small plates, uber-seasonal (as if seasonal could be more seasonal) antipasti and a stellar lineup of pastas. The first pasta that you need to try is the pappardelle, served in a creamy four-meat sauce with parmigiano and scented with truffle.  Trust me, this dish will have you craving it again for days and weeks to come. Yet I love going back, because they always have new pasta dishes on the menu to try. Once again, bring a friend. I’ll leave it at that.
And that’s what’s on my plate!
~ Kappy
Belly Q
1400 West Randolph Street
Chicago, IL 60607
(312) 563-1010
www.bellyqchicago.com
Ada Street
1664 North Ada Street
Chicago, IL 60642
(773) 697-7069
www.adastreetchicago.com
Ripasso
1619 North Damen Avenue
Chicago, IL 60622
(773) 342-8799
www.ripassochicago.com
Andrew “Kappy” Kaplan loves food. A professionally trained chef, by day he runs Yum-o!, Rachael Ray’s charity focused on kids and cooking, and keeps special projects running smoothly for her. By night he hops course to course, place to place, all across the country. He’s Rach’s own personal dining guide! You can also follow Kappy on Twitter to see what’s On Kappy’s Plate in real-time!
Laundry 101: A Frat House Laundry Makeover
‘ n
Just Enough K.I.S.S. Tips ‘n Tools
When Rachael asked me to go visit 7 frat guys in their frat house to help them sort out their laundry I was imagining scenes from Animal House! So I reached for my haz-mat suit and GPS to navigate my way upon entry through the piles of dirty laundry that were everywhere! But, within a few hours all was well: I surprised them courtesy of Rachael and GE with a state of the art washer and dryer and shared some of my handy dandy tres simple laundry tips that even my college freshman has mastered….Here they are to help us all lighten the load regardless if you’re living in a frat house or your home sweet home!
WASHING DO’S
o STOCK UP: Have enough undies/socks for 2 weeks
o Don’t lose them in laundry machine’s black hole- use these sock keys
o PUT ON SCHED: Make it part of a routine between ‘activities’.-Video games. Laundry. Study. Dry. Eat. Study. Party.
o TREAT STAINS PRONTO (which these guys won’t but the GE washer has a ‘Stain Removal Guide which made some common stains mindless to deal with)
o SEPARATE: Darks and lights and forget whites since that was too much for these frat guys to think about. However, if you’re an accidental housewife like me, definitely do a separate white only wash with bleach to avoid them looking dingy.
o BTW: Towels actually act as a scrubber so no need to do them separately
o CHECK FOR LEFTOVERS-Your bud may have left his chapstick or his girlfriend’s lipstick in his pocket which could turn your nice white tee a lovely shade of red so be sure to check pockets!
o LOAD ‘EM: Do larger loads vs. small but check capacity-mindless way to save energy!
o FILL ‘ER UP CORRECTLY: Be sure to use the right amount and believe it or not a shot glass is about the right amount. Love the GE Washer since it had a button with GE SMARTDISPENSE which lets you fill er up with two months worth of detergent and just releases as necessary per load…LOVE THAT!
o HOT VS. COLD WATER? Believe it or not cold water can clean most of your laundry just as well as hot. And, it will save you money since it helps your clothes last longer and using cold or cool water will keep your energy bills lower. BUT…. it won’t kill the bacteria, mold, dust mites etc so go hot for the following since these items harbor those unhealthy microbes:
§ BEDDING SHOULD BE WASHED IN HOT WATER TO get rid/kill dust mites and their doo which causes allergies (put a zip-lock mattress encasement on beds to insure those mites don’t get through)
§ UNDERGARMENTS
§ TOWELS
o SET CELL PHONE ALARM:
o Reduces chance for mold ‘n mildew to multiply as wet laundry waits for you
o Minimizes wrinkling (idiot proof with GE CleanSpeak)
DRYING DO’S
o Check lint trap is clean so dryer works at optimum
o Use dryer sheets or tennis balls to fluff ‘n prevent static cling
o Take out pronto so there are no wrinkles
o Keep hangers near so you don’t have to fold and can just hang shirts, jeans, etc
o Dry consecutively - if more then one load…reduces drying time and saves energy
MUST HAVES:
o LAUNDRY BAG:
o Easy to carry/Mesh/ventilated on a metal stand if possible with draw string and a ‘basketball hoop’ over it J so makes it a game/incentive to limit clothes laying on floor/obstructing passagewaysJ.
§ Seriously, mesh allows dirty laundry to breath/dry out so bacteria, mold ‘n mildew don’t multiply and find a home from sweaty socks, work out stuff,
§ Attach a sprinkle can of baking soda for odor and moisture absorption
o TIP FROM MY SON: use a garbage bag with odor eater like Febreze
o DETERGENT:
o Pick a Multi-tasker: Nowadays sorta like going to Baskin Robbins with so many flavors, Look for:
§ Basic detergent/soap-liquid
§ Stain lifters and brighteners
§ Bleach alternative (so don’t turn your dark plaid boxers a lovely shade of pink accidentally)
o Odor eliminator _(baking soda ingredient)/scented
§ Can add scent boosters like Downey Unstopables’ Downey Unstopables which keep laundry smelling good for 2-4 weeks but for college guys probably an extra step that they’ll never do J
§ Sensitive skin -some peeps get skin irritations
§ Softener
o Right formulation: HD if HD machine more concentrated
MISCELLANEOUS:
o TREAT STAINS PRONTO -don’t put them into a dryer until completely out or they will become permanent embellishments! Check out the video for more tips too!
o READ ‘N HEED: Check Care labels-they may be impossible to read but oh so important. Most important is if it says “Dry Clean Only’ which is my fave since it means I don’t have to wash it! Second, if you see an X that’s a red flag that speaks to things such as No Bleach, No Hot Water and so forth! but god knows not gonna look
o THIS LIL PIGGY: Keep piggy bank nearby for all the ‘laundered money’ that can put towards some me time activity like a manicure, massage or nite out with the gals (or in their case next Frat party!)
For more tips from The Accidental Housewife visit Julie’s tips - See more at: http://www.rachaelray.com/blogs/index...
For more tips from The Accidental Housewife visit Julie’s tips - See more at: http://www.rachaelray.com/blogs/index...
For more tips from The Accidental Housewife visit Julie’s tips - See more at: http://www.rachaelray.com/blogs/index...
For more of Julie’s Tips, visit her website
Watch Julie on The Rachael Ray Show!
http://bit.ly/UEHPw4
http://bit.ly/15W4Elq
February 28, 2013
Reinterpretation of an Old Classic
Some hairstyles are like a little black dress, they never go out of style. One such look is the classic French Roll (also known as the French Twist). From Audrey Hepburn in Breakfast at Tiffany’s to Catherine Deneuve, the French roll is beloved for its chic look and easy to achieve style. It’s worn by dozens of actresses on the red carpet and this season was a featured trend at New York Fashion Week. The best part about the roll is its diversity.
At Betsey Johnson I created a roll of extravagant proportions, extending the roll upwards with plenty of volume.
At Louise Goldin Anthony Turner kept the look sleek and simple, while at Clover Canyon Linh Nguyen used an Alice band to create an almost beehive effect.
So what to pair with the hairstyle of the season? A beautiful makeup look of course! While you can wear your French roll with jeans and a T-shirt or a pencil skirt and floaty blouse, there’s also a makeup look that can work no matter the occasion. Whether you’re heading out on a first date or having brunch with friends, nothing beats a cat eye. And the best part? All you need is some black eye liner and plenty of practice. While a bold lip may make some uncomfortable, a cat eye is a great way to make your eyes appear larger and adds some oomph to your look. Just look at Brigitte Bardot!
Sunday Brunch With The Neighbors - Chorizo, Egg And Toast Cups
This weekend my neighbors are coming over for brunch. Whilst eggs are quick and not unreasonably demanding, they require a lot of live action cooking – as in right there and then. Not the kind of performance I am down with on a Sunday morning. Also, people get fussy with eggs - egg whites only, sunny-side up, no color, yes color, the demands just keep coming. This weekend, I am taking these choices off the table. The eggs will be cooking in the oven as they walk in, leaving me time to catch-up with them over a lazy Sunday morning playlist and clicking some random shots of us when we aren’t on our way out of the door chasing routine.
Felipe Neves
I decided to make eggs on toast in baked chorizo cups – a twist on the classic bacon and eggs. Ofcourse, I had to put it to the test first. I lined a cupcake tin with pre-sliced thins of chorizo inserted with toast rounds and cracked egg. All it now needed to do was bake as I put on the coffee.
In 20 minutes my eggs, coddled in the crisp organza-like chorizo, were ready. They looked so cozy, as if they were still in bed (probably a reflection of where I thought I should be). The salty and smoky presence of the chorizo was perfect with the lightly set eggs and hidden toast. Of course, I made a few more toast rounds to lap up the loppy goodness. If you can’t find pre-sliced chorizo (because it should be wafer thin), you can always switch with prosciutto or bacon – they are similar in texture and add that salty kick.
Ingredients
Cupcake pan
Cooking spray
8 slices of chorizo (to cover the bottom and sides of pan – if they are small disks, you will need more)
4 eggs
4 slices of bread
Butter
Freshly ground pepper
Method
Set the oven to 400 degrees
1) Cut circles that will fit in to the cupcake pan using cookie cutter or the rim of a glass
2) Spread butter on both sides of the bread and toast on a frying pan until golden on each side
3) Spray each mold with cooking spray and line the bottom and sides of the pan with chorizo slices. Press down the toast in to the cup and crack an egg in to each cup
4) Bake at 400 degrees for about 12-15 minutes until the whites are set
5) Carefully slide cups out of the mold and serve with toast rounds
Saira Malhotra, is of British–Indian descent and is a chef, food writer and cooking instructor based in New York City. Raised in Hounslow, U.K, or rather ‘Little India’, where the air is aromatic with roasted spices, little did Saira know these moments would follow her from being a student in France and Italy to residing in NYC with her husband and kids and parlay themselves unexpectedly in to a culinary career. She is a graduate of the International Culinary Center in New York City. Come visit her at her food blog: www.passportpantry.com where she shares approachable and international recipes
Chocolate Peanut Butter Cupcakes
March is tomorrow, perhaps my least favorite month. You think the winter is over, but oh no. It seems to go on, and on, and on. I am ready to put my boots away, yet I am fooling myself, I will most likely be pulling them out in April. I wanted the snow in January, yet it was no where to be found, it was waiting for March. I tend to do a lot of baking in the ho-hum days of March, and these chocolate cupcakes with peanut butter frosting will brighten any gray March day. I am a fan of any chocolate+peanut butter dessert, and these cupcakes are moist and chocolate-y with a rich and creamy peanut butter frosting that would be great spread on brownies or a layer cake - or enjoyed with a spoon from a bowl (mmmmmm).
Chocolate Peanut Butter Cupcakes (adapted from a recipe by Ina Garten)
(click here for printable recipe)
Ingredients
For the cupcakes:
12 tablespoons (1 1/2 sticks) butter, at room temperature
2/3 cup sugar
2/3 cup brown sugar
2 eggs
2 teaspoons vanilla
1 cup buttermilk (or 1 cup milk with 1 tablespoon lemon juice, allowed to sit at rom temp for 15 minutes, then shaken vigorously)
1/2 cup plain non-fat Greek yogurt
2 tablespoons brewed coffee (or buttermilk or substitute if you don;t have coffee)
1 3/4 cups flour
1 cup unsweetened cocoa powder
1 1/2 teaspoons baking soda
1/2 teaspoon salt
For the frosting:
1 cup confectioners’ sugar
1 cup creamy peanut butter
5 tablespoons butter, at room temperature
1 teaspoon pure vanilla extract
1/4 teaspoon kosher salt
1/3 cup half and half
Directions
Make the cupcakes: Preheat the oven to 350 degrees F. Line cupcake pans with paper liners. In the bowl of an electric mixer fitted with a paddle attachment, cream the butter and sugars on high speed until light and fluffy, approximately 5 minutes. Lower the speed to medium, add the eggs 1 at a time, then add the vanilla and mix well. In a separate bowl, whisk together the buttermilk, yogurt, and coffee (or additional buttermilk). In another bowl, whisk together the flour, cocoa, baking soda, and salt. On low speed, add the buttermilk mixture and the flour mixture alternately in thirds to the mixer bowl, beginning with the buttermilk mixture and ending with the flour mixture. Mix only until blended - do not over mix. Fold the batter with a rubber spatula to be sure it’s completely blended. Divide the batter among the cupcake pans (1 rounded standard ice cream scoop per cup is the right amount). Bake in the middle of the oven for 18 to 25 minutes, until a toothpick comes out clean. Cool for 10 minutes, remove from the pans, and allow to cool completely before frosting.
Make the frosting: Place the confectioners’ sugar, peanut butter, butter, vanilla, and salt in the bowl of an electric mixer fitted with a paddle attachment. Mix on medium-low speed until creamy, scraping down the bowl with a rubber spatula as you work. Add the half and half and beat on high speed until the mixture is light and smooth. Frost cupcakes. Store in an airtight container for up to 3 days at room temp.
Yes, Entertaining Can Be Easy!
I know, I know. The words “Easy Entertaining” can seem like an oxymoron, especially after you have kids but I assure you, if you stick to a few simple rules, throwing a fabulous fete is totally within reach. Parties don’t have to be overly complicated and fussy to be fantastic. The truth is, the less stressed you are, the better it will all turn out so just chillax and heed my advice.
-Semi-Homemade Is OK: Food and drinks should be the top of any party list and whether you are having a formal dinner or a simple appetizer/cocktail event remember, you do not have to make everything from scratch or not at all. Getting a little help from the store is always a good thing. Mixing store bought goodies with homemade noshes is a fabulous way to take some of the pressure off. Buy pre-cut veggies, fruit and cheeses. Many supermarkets also have great store-made soups and quiches which make great first and courses. And if you don’t like to cook, there is nothing wrong with catering. Knowing how to buy well is just as good as knowing how to cook well. Remember, this is your party, do what works for you, especially if you have small kids to worry about or it’s a last minute shin-dig.
-Themes Can Be Your Friend: It’s true, a theme can be fussy, but it totally doesn’t have to be. Having a theme for your event can actually help you keep your party in check in the organization department. A theme makes an event seem more special. Example: An All Dessert Party, A Comfort Food Party, A Latin Night etc…You don’t have to go all out crazy with the details but gearing your event towards one style of food or coarse is a great way to make it special. Themes take the guess work out of what to serve and how to get it to work together and in the end, it really makes parties so much easier to plan. See sample menu below…
Easy Italian Themed Soiree:
Apps:
OR
Salad:
Main:
Dessert:
-This Ain’t Cheers: Forget stocking a bar. If you you don’t normally have a fully stocked bar (not many people do), there’s no reason to run out and buy tons of alcohol just for a one day event. A fully stocked bar can be expensive and it takes up precious space in your home. Stick with beer, wine, sparkling water, juice and a signature cocktail. If you select one cocktail ahead of time, you can buy only those ingredients and serve a fabulous beverage that your guests will go crazy over.
- On Your Mark, Get Set…: Ever feel like you are in a relay race moments before your guests arrive? Take that last minute pressure off by setting the table and decorating the night before. This tip is so, so, so, helpful. No one has the time or patience to do these things last minute and having them done the night before means one less thing to worry about in the AM, leaving you time to focus on last minute details, like, ummm, maybe putting make-up on or changing out of your sweats (I know this is not just me!).
February 27, 2013
My Daughters’ Bedroom Dilemna - Parents, What would you do?
Disclaimer - If you are not a parent this is tedious post - please don’t fault me:-). We are currently experiencing a serious battle in our house and I am reminded again of how foolish I was to think the hard part of raising my three kids was the baby/toddler stage. Ha. As a quick reminder, my kids are 12 (daughter), soon-to-be 11 (daughter), and 9 (son). My two girls are complete opposites in nearly every way, yet still very close and basically best friends. We moved to a bigger house when I was pregnant with my younger daughter because we wanted our kids to have their own rooms. Another decision we made was to give our younger daughter the biggest (kid) bedroom, as she would be the middle child and I thought since the oldest usually got everything first, biggest, best, we would give her the best room (when I think about this, this was obviously my decision and my husband let me run with it. The logic may be somewhat flawed. ). The gods laughed again (for a while) as our girls have chosen to sleep together in my older daughter’s room (smaller) for the past 6 years. The mack-daddy room has remained pretty much unused, with the exception of sleepovers.
So the years pass, my girls are happily voluntarily sharing the cozy bedroom, and about three months ago my older daughter, who will be 13 in May, decided she wanted to sleep in her room on her own, and she also has been dying for a queen-sized bed. We decided for her 13th birthday she would get the new bed and essentially make it impossible for her sister to sleep with her, which is absolutely fine - she should have her own space if she wants it. My younger daughter abhors change but she had some warning so we thought all would be fine with the big switch. As we got closer, my younger daughter was getting more and more nervous, and finally articulated that she didn’t want to sleep in her own room because (among other reasons) it was too big and her sister’s room was cozier.
Last night we came up with the brainstorm of the girls switching bedrooms. My older soon-to-be teen daughter could have the big room with the new big bed, and my younger daughter could have the cozy room she was familiar with. Everyone is excited - my older daughter over the moon. Fast forward to bedtime last night, when my younger daughter, as she contemplates moving her things from her room and making the big change soon…..CHANGES HER MIND (I hate all caps but this decision warrants it).
My older daughter cried herself to sleep (her heart was set on the new luxurious room), my younger daughter is upset her sister is upset with her. My husband and I have said it is my younger daughter’s room, so she can decide to keep it, but in the back of my mind I think my older daughter really would appreciate the room more and I could force the switch.
Parents, what would you do?
February 26, 2013
Soup To Satisfy For Dinner – Cumin And Corn Chowder Topped With Shrimp
Some people are soup crazy. It could account for two thirds of what they eat in a day. I was never one of those. In our family, us girls are called ‘the solid sort’ (well-rounded around the edges if you know what I mean), and solid girls need solid fare – roast chickens, mashed-potatoes, sautéed veggies, curries and rice. I was just never one to fill myself on aromatized water with bits floating around.
That was until I moved to the USA and made my acquaintance with The Chowder. It was a soup made for people like me who are looking for mouth-feel, something to chew in to and a soup that can actually take-on a hungry appetite.
Hearty and chunky
This week, I made a corn chowder using fresh corn. To give it depth in flavor, there is cumin which gets an added boost from the rehydrated chipotle pepper. But to give it depth in texture (a simple step that often gets skipped), reserve a couple of tablespoons of corn of soup to use as a soup topping along with the shrimp before serving. Such layering of ingredients make the soup look-like a pop-up card and not just a flat muggy river.
Corn Chowder In The Making
Ingredients
2 celery sticks, sliced in to ½ cm thick pieces
2 shallots, finely diced
3 garlic cloves, finely diced
1 cup butternut squash, cubed
2 cartons of chicken stock
3 cobs of corn with kernels removed (reserving both)
1 dried chipotle pepper (soak in water to hydrate for 10 minutes)
Salt and pepper to taste
1 TBSP. plain flour mixed with ¼ cup water
½ a cup of shrimps
1 level tsp. cumin powder
½ tsp. cayenne pepper
¼ cup of sour cream
Method
1) Sweat the celery, shallots and garlic until soft. Season with salt and pepper and cumin powder
2) Squeeze the excess water out of the chipotle pepper, chop up in to small pieces. Add the chipotle and butternut squash to the pan. Add the stock, along with the cobs (a lot of flavor and goodness) and simmer for 10 minutes until the butternut squash has softened
3) In a separate pan, lightly blacken the corn kernels with small oil
4) Add the corn kernels (reserving a couple of tbsp.) and cook for another 4 minutes. Remove the cobs. Pour in the flour mixture in a steam stream and allow the soup to get a little thicker. Blend half the soup.
5) Soup topping: Saute corn and shrimp in salt and cayenne. Pile a small heal in the center of each bowl. Serve with a teaspoon of sour cream
Saira Malhotra, is of British–Indian descent and is a chef, food writer and cooking instructor based in New York City. Raised in Hounslow, U.K, or rather ‘Little India’, where the air is aromatic with roasted spices, little did Saira know these moments would follow her from being a student in France and Italy to residing in NYC with her husband and kids and parlay themselves unexpectedly in to a culinary career. She is a graduate of the International Culinary Center in New York City. Come visit her at her food blog: www.passportpantry.com where she shares approachable and international recipes
February 25, 2013
Marc Murphy’s Ozersky-Winning “Smokin’ Good Burger” and the Secret Weapon of Salt
As you may have heard, the Burger Bash was this past weekend. I got to see Rachael, although, sadly, not as much as I would have liked. We were both there for a purpose, and that purpose was to eat hamburgers. The Burger Bash is something like the TED conference for burger geeks. You get to see all the latest twists and tweaks on our great national sandwich. Most of these are, predictably, bad. As in Nature, most mutations are harmful, and don’t get passed on. But every year Shake Shack shows up and presents us with a perfect hamburger, one that’s immune even to the dopey stuff they sometimes put on it. (This year was country ham - a catastrophic choice, as I could have told them.)
I love Shake Shack. It is the most successful high-end hamburger the world has ever seen. There are Shake Shacks now amid the sands of distant Arabia and on the strands of Merry Olde London. And, yes, the Pat LaFrieda secret burger blend has a lot to do with it, as does the NASA-like commitment to quality control and the use of the all-important “smashing” technique. But the secret weapon of Shake Shack is salt.
The Shake Shack, you see, uses twice as much salt as any other hamburger. That’s what makes it so compulsively eatable, and why it seems to “pop” in your mouth. Salt is basically cocaine for the palate: it conjures a momentary and unearned surge of pleasure. And like cocaine, it’s addictive. The people in that long line at Shake Shack might as well be junkies waiting for a fix.
Shake Shack didn’t get my vote, though. Landmarc did. Landmarc is a big, relatively popular, but generally undistguished restaurant did, and do you want to guess what their secret weapon was? Salt. But they brought another dimension to the burger by using smoked salt. Now, it wouldn’t have worked had the burger not been brown and charred outside, and a deep, juicy pink inside, and served on a soft bun that didn’t get in the way. But the x-factor was the seasoning. (The smoky slaw and aioli added oomph as well, but were less essential, I thought.)
I can’t put this strongly enough. You can’t have a great hamburger that isn’t aggressively salted. But salt doesn’t have to mean just kosher salt or sea salt. There are a panopoly of flavored salts, many of which are ridiculous, but some which go as naturally with charred ground beef as peaches do with cream. My favorite brands are TK, TK, and TK. But you can also use volcanic salts, which frequently give you some of that mineral flavor and depth that the smoking brings. The advantage for me of some of these specialty salts comes in their rocky form; you can put them in a pepper mill and set it on coarse. Then those flakes can really give a crunchy texture to the burger. (The same applies to pepper; nevery use finely ground pepper on the surface of meat if you can avoid it.)
Marc Murphy’s Ozersky-Winning “Smokin’ Good Burger”
(I have substituted store-bought squishy buns for the house-made jalapeno cheese
Burgers
Makes 4 burgers
4 8 oz burger patties, 80/20 (ground chuck)
8 slices pepperjack cheese
2 Cups smoked slaw (see recipe)
8 tbl smoked aioli (see recipe)
½ cup bread and butter pickles
1 tbl butter
2 tbl smoked salt from La boite (lior lev Sercarz)
1 tbl fresh cracked black pepper
1 tbl olive oil
- Season the burgers with the smoked salt and fresh cracked black pepper and olive oil. Cook on a high heat grill for 3 minutes on each side until medium rare. Place two slices of pepperjack cheese on top and melt. Toast the buns and brush with melted butter. On the bottom of the bun place 2 tbl of smoked aioli and bread and butter pickles. Place the burger on top and finish with the smoked slaw. EAT!
BUNS
Makes 12
1 ½ cup warm water
1 oz fresh yeast
¼ cup sugar
1 oz melted butter
2 cups roasted sweet potato puree
1 oz salt
¼ cup chopped pickled jalapenos
5 cups flour
in a metal mixing bowl add the warm water, sugar and yeast. Let activate, about 4 minutes or until it starts to get foamy. Add the melted butter, sweet potato puree, salt, chopped jalapenos and flour. Mix all together in a mixer using a dough hook, mix for about 4 minutes until all ingredients are incorporated. Remove from bowl and kneed for 2 minutes. Let proof for one hour until dough has doubled in size. Portion dough into 5 oz portions and shape, let proof for another 45 minutes. Brush with egg wash and bake in a 350 degree oven for 16-18 minutes.
Smoked slaw
Makes 8 cups
½ head red cabbage
½ head white cabbage
½ head napa cabbage
2 red onions, sliced, grilled and smoked
3 jalapenos, grilled and smoked
1 large carrot, julienned
½ cup water
1 cup red wine vinegar
1 tbl mustard seeds, toasted
¼ cup sugar
¼ cup salt
Grill the sliced onions and jalapenos for about 2 minutes on each side. Remove the seeds and skin of the jalapenos and julienne, chop the red onions. Add to the sliced cabbage and julienned carrots. In a small sauce pot add water, vinegar, sugar, salt, toasted mustard seeds and bring to a boil, strain. Pour the hot liquid over the slaw and mix well. Cover with plastic wrap and let sit. You should do this a day ahead to develop all the flavors and let the ‘smoke’ flavor carry over to the other ingredients.
Smoked aioli
Makes 2 cups
20 cloves garlic
2 cups olive oil
1 ½ cup mayonnaise
2 tbl Dijon mustard
salt and pepper
Smoke the garlic, use hickory or apple for additional flavor. Smoke the garlic for about 25 minutes or until the garlic is deep brown in color. Once the garlic has smoked add to a pot and cover with olive oil, cook over medium low heat for 20 minutes until the garlic is soft. Remove the garlic from the oil, reserve the oil. Puree the smoked garlic in a blender with some of the olive oil, puree until smooth. Add to mayonnaise and Dijon mustard, season with salt and pepper and mix together.
Rachael Ray's Blog
- Rachael Ray's profile
- 296 followers


