Rachael Ray's Blog, page 69
February 21, 2013
10 Manicure-friendly Tips ‘n Tricks to Put the E in Easy Entertaining
E is for Entertaining and should also be for Easy ways to do it so we can Enjoy the time during our get-together! And, though some of us may be the type whom tends to every detail my approach is to not sweat them and that less is more. Thus, through trial and lots of error, I’ve learned that the trick to not being constantly on the go and worried at your own event is in the pre-entertaining prep and set up. So here my friends are 10 tried ‘n true time, mani-and sanity saving tips and tricks to help you Enjoy your next soiree!
JULIE’S TIPS:
o Assign each guest a ‘to bring’ item to limit your prep
o Designate one bathroom for guest use
o Close off all other bathrooms and rooms that you don’t want guests to enter. (Do Not Cross tape is optional- LOL )
o Use the “D” word as in Disposable:
§ Dishware, glasses and utensils
§ Serving:
Use colorful or foil lined mini-cupcake liners for single-serve warm items such as ‘pigs in the blanket’, mini quiches, and meatballs
Use coffee filters and fill with items such as assorted nuts, trail mix, or use as a discard for tail shells from shrimp (which btw if you’re serving these I’ll be there!)
Carve out assorted sized melons, breads, apples, pears, etc and fill them with dips, sauces, salads, fruit pieces, etc. Simply toss when through…
§ Table coverings
Use decorative cloth-like paper
For a themed or casual event repurpose sections of the Sunday Paper i.e. comics or sports section which can also be used as a ‘conversation starter’ or game should the party need some ‘energy.
Serve virtually stain-free foods that won’t leave impossible stains to clean up such as:
Pre-cut cheese cubes and pepperoni slices
Light-colored dips: i.e. hummus, yogurt; spinach-artichoke, veggie sour cream etc.
Set up a self help bar and/or
§ Use your top-load washing machine as an auxillary cooler,
Fill with ice and single serve drinks i.e. beer, wine coolers, juice paks, soda etc
When party’s over, let ice melt then put on rinse cycle
And last but definitely not least!!!
Display ‘Get Well’ cards in strategic locations as an excuse why your home may not be quite as orderly as usual.
Serve a ‘house-welcoming’ cocktail upon entry. These will put everyone in a cheery mood, blur their senses so your home looks clean, neat and all your food tastes great! Ha ha ha!
For more tips from The Accidental Housewife visit Julie’s tips
The Perfect ‘Pick-Me-Up’ - Shrimp On Toast
Last night, my day’s lack of integrity caught up with me. My sluggish vibes took over my writing assignments and even the day was calling it ‘a day’. To top it off, I was about to dial a pizza for dinner but then realized that I was giving myself just one more reason to beat myself –up tomorrow. I got up to cook.
Foraging around in my fridge and freezer, there was very little but frozen shrimp and some rock solid brioche slices. My husband always teases me for being miserly when I freeze left over bread (lessons from my grandmother and later from my mother-in-law)– well, here’s my ‘told you so’ moment, you really just never know when these ingredients would come as saviors on a sparse day. I decided to make butter-toasted brioche with shrimp patties smooshed over the top.
Shrimp Patty
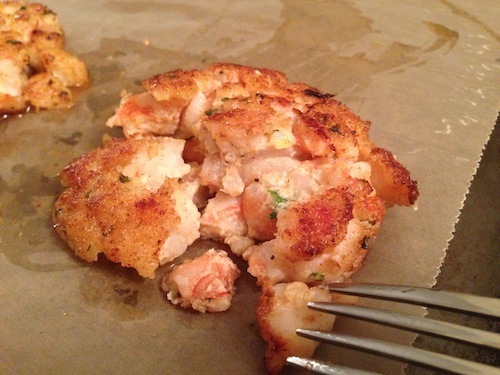
Just the vision of this dish got me over that hump I was experiencing. This was an exciting dish born out of a guilt-driven moment and all of a sudden, I could see nothing but opportunity in my refrigerator to make this taste great!! In to my shrimp mixture went a splash of lemon juice, some micro-plane grated lemon zest and ginger, green chilies, cilantro and a touch of cumin. The hot toast was then blobbed with coriander-spiked mayo, shrimp patties broken over the top and a hit of some tomato chutney I had in the fridge.
All I can tell you is that the lychee-sweet shrimp (lightly caramelized on the outside and steamed from the inside) on toasty-yet snuggly eggy-bread with hits of chili and creaminess, will pull anyone out of a momentary low.
Shrimp Patties
1 ½ lbs. medium shrimp, shelled, deveined, and chopped in to small pieces
1/4 cup mayonnaise
¼ grated onion
1 tsp. fresh squeezed lemon juice
¼ tsp. green chili, minced
¼ cup cilantro, finely cut
Zest of 1 lemon
Salt and freshly ground black pepper
1 cup dry bread crumbs for dredging and 1 tbsp. for burger mixture
4 slices of Brioche bread
Butter (to butter brioche bread)
Coriander Mayo
Pinch of coriander powder
2 tbsp. mayo
½ tsp. lemon juice
Salt and pepper to taste
Method
Shrimp Patties
1) Combine shrimp, mayonnaise, grated onion, 1 tsp. fresh squeezed lemon juice
green chili, cilantro, finely cut, lemon zest, breadcrumbs and salt and freshly ground black pepper
2) Heat the oil on medium/high in a non-stick pan
3) Spread 1 cup of breadcrumbs on a plate. Divide the shrimp mixture in to 4 balls and press down in the breadcrumbs to form patties. Coat the other side.
4) Fry until golden. Cover the pan with a lid when cooking the second side to cook the shrimp through
Coriander Mayo
Combine the coriander powder, mayo, lemon juice and salt and pepper.
Assembly
Butter the sliced brioche loaf and toast on a pan on both sides, spread lightly with coriander mayo and serve with burger (as a patty or a little crumbled and deconstructed)
Saira Malhotra, is of British–Indian descent and is a chef, food writer and cooking instructor based in New York City. Raised in Hounslow, U.K, or rather ‘Little India’, where the air is aromatic with roasted spices, little did Saira know these moments would follow her from being a student in France and Italy to residing in NYC with her husband and kids and parlay themselves unexpectedly in to a culinary career. She is a graduate of the International Culinary Center in New York City. Come visit her at her food blog: www.passportpantry.com where she shares approachable and international recipes
Quick and easy french toast casserole plus 5 uses for stale bread
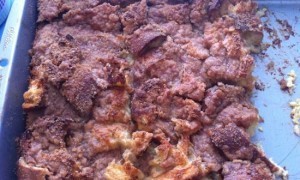
I was at this amazing new-ish bakery recently and couldn’t resist buying a few loaves of their beautiful bread, which was on the pricey side ($5.50 per loaf). I sliced and froze a loaf of sourdough (my husband’s favorite), and heated and served two loaves for dinner that Saturday night. Nearly one loaf had gone uneaten, and it had already been sliced and heated, so I couldn’t freeze it. I made this french toast casserole, which was crazy good. I liked the consistency, which was less soggy and more on the dry side than similar dishes I have made, not too sweet, and the crust softened up beautifully. Also, I heated the leftovers in the oven (not microwave - covered in foil so it wouldn’t dry out) the next morning which was a surprise special breakfast for my kids to kick off the school week.
If you are left with stale bread, here are some other quick uses:
Make bread crumbs: Slice, toast, and pulse in food processor. I freeze these in a zip lock and pull out as needed. Great used to top mac and cheese and other casseroles - no need to thaw.
Make croutons: Cube bread, toss with a little olive oil, salt, and pepper, and bake in oven at 350 degrees until lightly browned and crisp. Use in salads and to top soups.
Garlic Bread!: My grandmother’s recipe: Split the loaf down the middle. Combine one stick of softened butter, 3 cloves minced garlic, pinch each of salt and paprika. Spread evenly on each half loaf and sprinkle grated parmesan and additional paprika on top. Pre-slice and bake at 325 degrees F for 15-20 minutes, until golden brown.
Toast it: Toast is basically stale bread anyway - you can definitely get away with it for a few days.
Grilled Sandwiches: See toast.
Quick and Easy French Toast Casserole
Ingredients (click here for printable recipe)
1 loaf stale bread (I used a French batard but Italian, sourdough, cinammon or good old sandwich white or wheat would be good)
6 eggs
1 3/4 cups milk
1/2 cup half and half or cream
3/4 cups sugar
2 tablespoons vanilla
1/2 cup flour
1/2 cup firmly packed brown sugar
1 teaspoon cinnamon
1/2 teaspoon salt
1 stick butter, cubed
Directions
Preheat the oven to 350 degrees F. Spray a 9 x 13 inch baking pan with non-stick cooking spray. Tear the bread into chunks and place them in the greased pan. Mix together eggs, milk, half and half or cream, sugar, and vanilla and pour the mixture evenly over the bread. In another bowl, mix together the flour, brown sugar, cinnamon, and salt. Add the butter and mix until the batter comes somewhat together. Sprinkle the flour/sugar mixture evenly over the top of the bread mixture. Bake for 45 - 60 minutes, until golden brown. Store leftovers in fridge, tightly covered.
February 20, 2013
New York Fashion Week: Six of Our Favorite Hair and Makeup Looks
Designer: Tadashi Shoji
Photographer: Jane Kratochvil
There’s nothing we love more than a creative hair look, and Rodney Cutler’s romantic side braid and roll combination was especially beautiful. Inspired by a girl running through the woods, it’s an easy style for anyone to achieve at home.
Designer: Diane Von Furstenberg
Photographer: Lucia Cannonieri
It may be freezing in New York, but that didn’t stop Diane Von Furstenberg’s make up artist James Kaliardos from wishing for warmer days. The iconic designer sent models down the runway with a spring-inspired hot pink lip, a refreshing change from the mulberry mouths that have been dictating trends lately.
Designer: La Perla
Photographer: Adam Lerner
Who said lingerie had to be paired with Victoria’s Secret style waves? At La Perla, models sported bold red lips and elegant French rolls. To make it more interesting, Heather Packer’s French rolls were created on either side of the head (rather than one in the back), and were inspired by 1930’s Spain. Ensure your rolls have plenty of volume by applying Redken Rootful 06 Lifting Spray [http://www.redken.com/products/styling/volume/rootful-06-root-lifting-spray] before starting.
Designer: Jason Wu
Makeup artist Diane Kendal is known for her flawless beauty looks, and the blue/lilac, velvet-y looking eye she created for Jason Wu’s show was definitely a show stopper. In fact, Wu had Kendal match the shade to a fabric swatch from his collection. Keep your eyes out for the hue, which is part of Wu’s new collection for Lancôme.
Designer: Rita Vinieris
Photographer: David Gibson
For Rita Vinieris’ first evening wear show, Franco della Grazia created a stylish, elegant low bun was the perfect look. The trick to keeping it modern? Smooth back your hair into a ponytail before twisting it into a bun, but don’t slick it. And to ensure it all stays in place? Spray some hairspray on your ponytail before the twist.
Designer: Alice & Olivia
There’s nothing better than a little glamour during fashion week, and the gilded gold lids and deep mulberry stained mouth at Alice & Olivia was just that. Makeup artist Sarah Lucero created the iridescent shadow by tapping (real!) gold leaf onto model’s lids with her fingers, and coated lips in a deep, wine colored lip gloss that’s launching in Stila’s new fall collection.
February 19, 2013
The Clean Plates Cookbook
Have you ever wished that when you went out to dinner, or visited a new town, you knew where to find a restaurant that served healthy food? Well that’s the information that the Clean Plates website provides, and now they’ve published The Clean Plates Cookbook, full of healthy recipes — many of which are contributed by their favorite restaurant chefs.
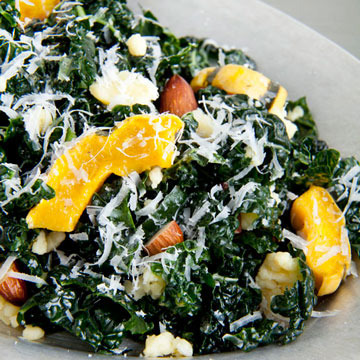
Above: Kale Salad recipe, by chef Hadley Schmitt of New York’s Northern Spy Food Co. restaurant, from The Clean Plates Cookbook
Most healthy cookbooks have an outlook on eating that relies on one exclusive theory, such as veganism, raw food, the Paleo diet, etc. But the author of The Clean Plates Cookbook, Jared Koch, is a nutritionist, and he has a different idea. In his work, Koch sees people with all kinds of different nutritional needs, so he believes in “bio-individuality,” the idea that everyone has unique food needs based on their genetic make-up, lifestyle, gender, age, etc. The guiding principle of the book is that “there’s more than one way to eat right.”
Above: Raw Cauliflower Tabbouleh recipe by M Café in Los Angeles, from The Clean Plates Cookbook
The recipes in the cookbook reflect this broad idea of what it means to eat nourishing food. Recipes include such surprisingly indulgent-sounding recipes as Glazed Spare Ribs, Roasted Eggplant and Peppers with Parmesan Polenta, Classic Pasta with Red Sauce, and even Big Beef Burgers with Grilled Onions and (Sometimes) Blue Cheese!
The recipes are only part of The Clean Plates Cookbook. The book also includes practical advice on figuring out your body type and what foods are good for you, balancing the amount of meat and animal products in your diet, and positive ways of thinking that will help you make better food choices.
The Clean Plates Cookbook has lots of simple ways to cook all kinds of vegetables, including corn, collard greens, endives, and artichokes. One recipe that caught my eye is the Home- Fermented Sauerkraut, which requires nothing more than sea salt and green cabbage. Just like yogurt, sauerkraut is full of good bacteria that help to keep your digestive system in good shape. I’ve been wanting to make my own sauerkraut for years, and this recipe is simple enough that I’m finally going to try it.
Recipe: Home-Fermented Sauerkraut
Recipe adapted from THE CLEAN PLATES COOKBOOK © 2012 by Jared Koch with Jill Silverman Hough, Running Press, a member of the Perseus Books Group.
Advice from Jared Koch: Be sure that all your equipment-utensils, containers, dish towels, hands-is scrupulously clean at every point in the process, including your tasting of the sauerkraut during the fermentation process. Also, use fine sea salt in this recipe, because iodized table salts have additives that can affect the fermentation process.
Ingredients
Makes 4 to 5 cups
10 teaspoons fine sea salt, divided
2 pounds green cabbage, cored and shredded finely
Instructions
In a bowl or measuring cup, combine 5 teaspoons of the salt with 4 cups of lukewarm water, stirring to dissolve the salt. Set aside to cool to room temperature. Meanwhile, in a large mixing bowl, combine the cabbage, remaining 5 teaspoons of salt, stirring to thoroughly combine. Transfer to a large, nonreactive container, packing it down. Let stand for 15 minutes, so the cabbage can release some of its juices.
Check to see if the juices are enough to cover the cabbage. If not, add enough of the salt water mixture to cover. Cover the top of the cabbage with a double layer of cheesecloth, tucking it in at the edges. Set a plastic, glass, or ceramic plate on top of the cabbage, ideally one that fits just inside the container, to keep the cabbage submerged. Place something heavy on top of the plate, such as a bowl or a lidded jar filled with water.
Cover the entire setup loosely with a clean kitchen towel and set it aside in a cool place (no warmer than 75°F) for 3 to 6 weeks, checking the sauerkraut a few times a week to skim any foam from the surface and rinse the plate. When the bubbling stops, the fermentation is complete and the sauerkraut is done, although you can taste it any time during the process, and if it’s done to your liking, it’s done.
Transfer the sauerkraut to an airtight container and store it in the refrigerator.
Think like a Chef –Setting Yourself Up For A Week Of Success
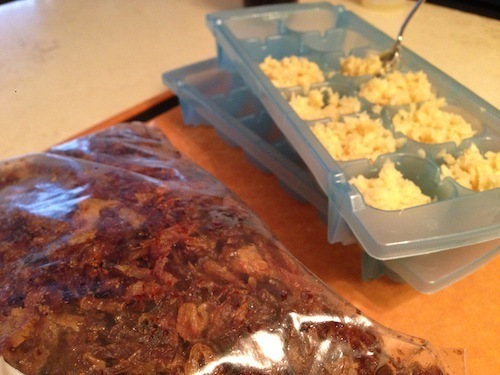
Once a week in my home, I would walk in to see my mother undertake what I would call the ‘onion marathon’. One counter hosted a super-sized sack of vidalia onions, a bucket filled with onions scraps, another containing peeled whole onions and a third containing fine-diced onions. These diced onions waited in line for their ultimate end – to be thrown in to a vat and sautéed until richly caramelized. They were cooled and then frozen.
Then there was the ginger and garlic. This is where my grandmother perched herself as she scraped away the skin of several pounds of ginger with a spoon – a peeler’s wasteful ways just would not do! These were then separately broken down in a food processor with some water and pressed down in to an ice-cube tray for freezing.
My child’s eyes saw these random ingredients as the ‘bad-guys’ of my Saturday morning – making me wait for mummy to finish. Years later, it now all makes sense. How else could mom make three dishes after work within minutes? It also lent itself to her spontaneous ways. If someone stopped by for a mid-week dinner, she was ready. In would go a heaped tablespoon of the pre-browned onions, along with the ginger and garlic and presto, the base of the dish was pretty much ready. Spending a few hours prepping at the weekend had a huge pay-off for the upcoming week.
A couple of years ago, at culinary school, we were taught with a similar discipline and gave it a fancy name ‘mis-en place’. When chefs put a meal together, that is not the time to start chopping and cooking an onion – that’s the time to assemble prepped ingredients and bring it together in a cohesive dish – and this includes even the illustrious of places.
It goes without saying that this was one of my mother’s ways I brought in to my own home. Open my freezer and there will be containers filled with home-made broth to add to meat sauces and pot roasts, cubes of garlic and ginger for my Asian and middle Eastern flavors and cubes of fresh pureed tomatoes for curries and soups.
Recipe For Caramelized onions – for pastas, soups, gravies, savory pie fillings, burger toppings
Ingredients For Caramelized Onions:
10 pounds brown onions (about 12 large yellow)
1 cup oil
½ a stick of butter
1 ½ TBSP. salt
Method for Caramelized Onions
1) Cut off top and tails, peel and finely slice onions (depending on the dish, you can always puree the caramelized onions as you need them)
2) Add oil and butter to the pan along with the onions. Cook until onions re tender and golden
Recipe For Grated Ginger – For noodles, pan fried chicken, sautéed veggies and curries
Ingredients For Grated Ginger
2lb ginger
2 TBSP. Water
Method For Grated Ginger
1) Wash the ginger to remove any soil (if you have a brush, even better)
2) Using the front of the front head of the spoon, scrape down the ginger (it’s ok to leave some skin on for extra flavor and goodness)
3) Cut in to 1” pieces. Work in half batches and pulse in food processor with ½ the water. Fill in ice cube trays, wrap well with plastic wrap and freeze. Once frozen, pop them out in to plastic freezer bags
*Note: Keeps for several months and in refrigerator for up to a week
Recipe For Grated Garlic – For Pasta sauces, savory pies, curries, soups and stews,
Ingredients For Grated garlic
1lb garlic
2 TBSP. Water
Method For Grated Ginger
1) Peel garlic
2) Work in half batches and pulse in food processor with ½ the water. Fill in ice cube trays, wrap well with plastic wrap and freeze. Once frozen, pop them out in to plastic freezer bags
*Note: Keeps for several months and in refrigerator for up to a week
Recipe For Crushed Tomato – For Sauces, Soups and Casseroles, Sautéed Dishes
Ingredients For Crushed Tomato
12 red and ripe tomatoes Beef Steak Tomatoes
1 tsp. Salt
Method For Crushed Tomatoes
1) Set aside a large pot of salted water to boil
2) Core the Stem and make light incision half way down the side of the tomatoes. Plunge in boiling water for 10 seconds and refresh in iced water. Peel the skin from the incision down. Crush until pureed in a food processor
3) Fill them in ice cube trays and freeze. Pop tomato cubes out and place in plastic freezer bags
*Note: Keeps for several months and in refrigerator for up to a week
Saira Malhotra, is of British–Indian descent and is a chef, food writer and cooking instructor based in New York City. Raised in Hounslow, U.K, or rather ‘Little India’, where the air is aromatic with roasted spices, little did Saira know these moments would follow her from being a student in France and Italy to residing in NYC with her husband and kids and parlay themselves unexpectedly in to a culinary career. She is a graduate of the International Culinary Center in New York City. Come visit her at her food blog: www.passportpantry.com where she shares approachable and international recipes
Reuse your Valentines Day Cards!
Valentine’s Day cards are a thoughtful gesture from a loved one, or friend. However, once the holiday is over they really aren’t very useful. They can be stored away to look at many years later, or, sadly, they can end up in the recycle bin. There is a third option though: they can be made into something that can be cherished for years to come. Here are two ways to do just that.
Valentine Card Mat
Materials:
Valentine card
Utility or craft knife, or scissors
Artists’ tape
Bone folder (optional)
Frame
Remove the back of the card. Cut a section on the front of the card to accommodate a photo.
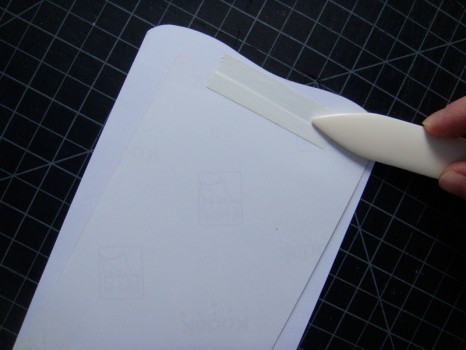
Using a photo that will fit in the cut-out space, place a piece of tape at the top of the photo, sticky side up.
Position the card over the photo, so it goes right where you want it. Press down on the card where the tape is to secure.
Flip the card and photo over to secure the tape even more. If you have one, use a bone folder. Otherwise, just press down on the tape with your finger.
If the frame has a mat, follow the same procedure.
Place the photo, card, frame and mat into the frame and display.
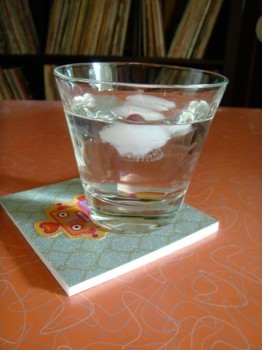
Valentine Card Coasters
This is a great project to do with all those kids’ valentines children exchange at school. They’re usually small and have cute characters that aren’t necessarily Valentine specific once taken out of context. Plus, if the whole class exchanges them, chances are, your child ends up with a ton to choose from.
Materials:
Kids’ Valentines
Foam core or mat board
Fancy paper
Glossy decoupage glue or acrylic gel medium
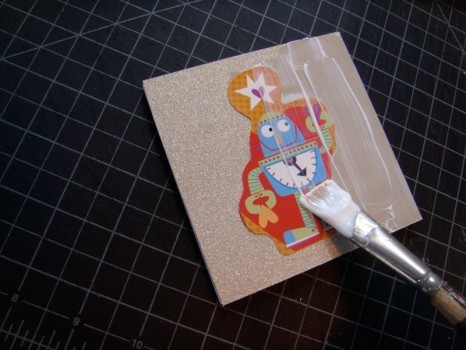
Cut squares or circles of foam core or mat board to make the base of the coaster. Make sure it’s a size that will accommodate the graphic. I used 4″ x 4″ foam core. Cut the fancy paper into the same size. Then, cut the characters out of the Valentines removing any of the Valentine verbiage.
Glue the paper to the base, and glue the card character to the paper. Then paint over with more glue. It’s best to do at least two top coats so a wet glass won’t soak through. Let the glue dry completely before using.
Find me on Facebook!
February 18, 2013
The Lazy Man’s Guide To Braising, Part I: Chicken with Red Wine Vinegar
As a cook, I don’t have much use for spring, being indifferent as I am to vegetables in all their many forms. (I prefer to only eat things with parents.) And fall, being the time of year when all the restaurants open, doesn’t do much for me either. No, winter and summer are big cooking seasons in the Ozersky household: the latter for grilling and the former for the big, deep, fatty braises that so please and clog my heart.
I am obsessed with braising. For one thing, it conforms to my natural rhythms. A burst of frenzied exertion, followed by several hours on the couch. It cooks while I sleep, and when it’s done, I turn it off and go back to watching television again. The thing is really only good when it’s lukewarm, and any man that made braised short ribs or lamb shanks because he was hungry would soon become apoplectic with frustration and hunger. No, you make the braise when you are full, or when you know that there is a pizza on the way. That way you can take your time.
Last night’s braise was my third in four days, and maybe the best of the lot. I picked up four Bell & Evans chicken quarters at the supermarket, thinking that I might roast them in a hot oven with 99X powder and some egg batter. Why not? But then the fricasee fever came over me, and when I got home,
I started looking around for things to cook it in. Two days earlier, I had used that bottle of Belgian abbey ale that had been sitting around, so I started rooting through the cupboard and found a whole bottle of red wine vinegar. That’ll do! was my thought. I had some mushrooms lying around decomposing in my rarely-touched vegetable draw, an old bunch of fresh thyme, and a beat-up old tomato. Of such things can you make a great dish, if you are lazy and have nothing better to do that sit around waiting for it to cook.
So: in went the chicken, long enough to get nice and brown; in went some garlic and mushrooms and tomato, which I stirred around over the craggy burned bits at the bottom of the pan; then in went the whole bottle of vinegar, and some chicken stock with it, and then the chicken and the thyme, and when it boiled, I turned it down, put on the lid, and forgot about it for about 45 minutes or so. Then I turned it off, and forgot it about it again.
When it was done, which is to say lukewarm, I took out the meat and the much rooms, picked the meat off the bones, threw the latter away, and poured off most of the delicious greasy liquid left in the pan. I reduced it and added butter and stirred it up into a thick sauce, and poured that over the pulled chicken. I was actually shocked that such a half-assed dish could be so good, and regretted only not having made a big pot of rice or couscous to serve this over. (Because, you know, I’m not fat enough.) The fricasee was proof that if you are lazy enough, and a have a bottle of something acidic, you too can make a rich and nourishing winter dinner. Who knows? If you wanted you could even throw some carrots in there. But that’s not my way.
Chicken in Red Wine Vinegar
4 chicken quarters (tomahawks)
2 tbsp olive oil
four sprigs fresh thyme
one sprig of rosemary or marjoram
1 12 oz bottle best-quality red wine vinegar
two tomatoes, canned or fresh, coarsely cut up and cored
½ cup cremini mushrooms, sliced
¼ pound high-quality pork or lamb sausage
2 cloves garlic, one minced and one whole
salt and pepper
2 tbsp butter
In a heavy dutch oven, heat up the olive oil.
Salt and pepper the chicken well on both sides. Brown well, taking care not to crowd the things. They need air around them so the steam can escape. When they are browned take them out. (They will still be raw)
Chop up one clove of garlic, the tomatoes and most of the mushrooms into the pan, mix it around and let it brown a little. Return the chicken to the pan.
Add the vinegar. Step back! A big plume of vinegar fumes will billow upward and hit you in the face.
Throw in the herbs and the other clove of garlic. Turn the heat down, and cover. Let cook on low for 45 minutes.
When you come back, take the chicken out, and most of the other stuff. Discard the herbs and cook down the vinegar. While it does that, pull the chicken off the bones. Add the remaining mushrooms.
When the vinegar has cooked down to about half a cup or so, throw in the butter and stir vigorously on heat. It’ll form a rich sauce which you can them pour over the chicken. If you want to make it look really nice, sprinkle some parsley or something on top. Done! Now go back to the couch with it.
February 17, 2013
Mung! Why You Should Eat These Tiny Beans from India
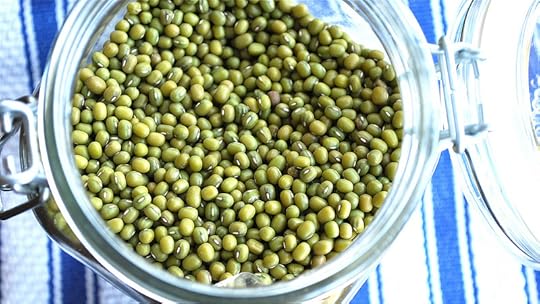
I discovered mung beans while researching my upcoming Persian cookbook. These grass-colored beans with a white speck at the center are a staple in Iran, India, and China, but here in The United States, most people have never tasted them. I think it’s time for mung beans to take center stage!
Mung beans make a great addition to your pantry, and here’s the main reason: they cook much faster than most other beans! Boil whole mung beans in water and they’re ready to eat in about 45 minutes. Split mung beans, which have the outer skin removed and are yellow, take only 20-30 minutes to cook. That means that you can throw a handful of grains like quinoa, rice, or rolled oats in with the beans, take your time chopping up vegetables like carrots, broccoli, and kale, and then throw them into the pot for the last 10 minutes of cooking. Voila, you have a flavorful, nutritionally balanced soup, and you probably had time for a glass of wine and a phone call, too.
Besides cooking quickly, mung beans have a well-rounded, comforting taste, that’s reminiscent of potatoes. They’re complemented by a little minced garlic and onion, and a dash of Indian spice like turmeric, cumin, or curry powder. You can take mung beans in a different direction by adding Persian herbs like dried mint, dill weed, and cilantro. Or, do as the Chinese, Filipinos, and some Indians do, and use mung beans in dessert. Sweetened with honey, and flavored with coconut milk and ginger, mung beans make a delightful porridge.
Besides their adaptability and short cooking time, mung beans are high in fiber, low in saturated fat, and are packed with protein. Mung beans also contain a wealth of vitamins and minerals including B-6, iron, and potassium. You can find mung beans in natural food stores as well as Indian and Chinese markets.
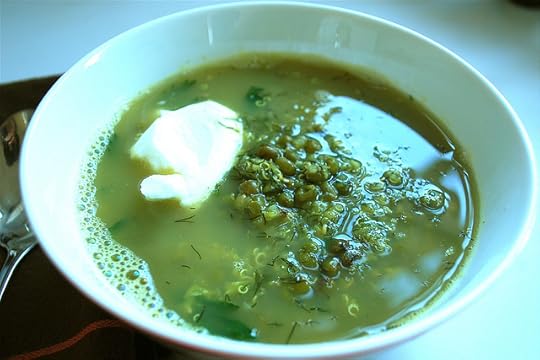
Here’s a simple recipe for mung bean soup that’s perfect for cold weather.
Mung Bean and Quinoa Soup
Serves 2
1/2 cup whole green mung beans
1/2 cup quinoa
2 tablespoons cooking oil
1/2 onion, minced
2 cloves garlic, minced
2 teaspoons ground turmeric
2 teaspoons dried dill weed
4 cups chicken stock, vegetable stock, or water
2 large handfuls chopped leafy greens, such as kale or spinach
1/2 of a juicy lime or lemon
2 heaping tablespoons plain yogurt
Salt
Pick through the mung beans and quinoa and rinse them under cold water.
Heat the oil in a pot over medium heat and add the onions. Cook until translucent, about 5 minutes. Stir in the garlic, mung beans, quinoa, turmeric, and dill, and cook for a few minutes until heated through. Add the stock and bring to a boil, then cover and cook at a very gentle boil, stirring occasionally, for 40 minutes. The beans should be starting to split open.
Add the greens to the pot and return to a boil, them reduce the heat and simmer, covered, for 10 minutes, until the greens are tender. Add salt and season to taste. Ladle the soup into bowls and squeeze in equal amounts of lemon or lime juice. Top each bowl with a tablespoon of yogurt, and serve.
February 15, 2013
Tucson, AZ - Wildcat Country
Half the fun of discovering a new restaurant is sharing it with people you know will enjoy it. As Rachael Ray’s resident restaurant guru, here’s an inside look at what I report back to Rach about some of my favorite restaurant finds and food experiences!
From: Kappy
To: RR
Sent: Friday, February 15, 2013 3:19pm
Subject: Wildcat Country Food - Tucson, AZ
Hi Rachael -
I was recently in Arizona - Tucson to be exact - for a good friend’s wedding. I haven’t really spent much time there besides driving through on my way from Miami to L.A., so I didn’t know what to expect, food-wise at least. We’ve known our friends for about eight years, so I’ve been hearing about all of their hometown favorites for quite awhile and was excited to taste for myself. But it wasn’t necessarily about trying the best food, but rather the food they grew up with, loved and missed since moving out of Arizona.
The first night there we had a great dinner catered in from a Tex-Mex-style bistro called Zivaz. Unfortunately, I didn’t get to go to the restaurant, but if the catering was any indication of the food, I can safely recommend it. We had everything from guac and salsas to fajitas, chilaquiles, chimichangas and more. 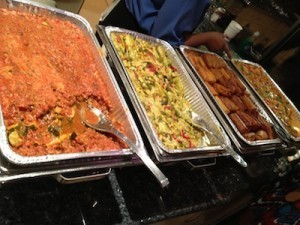 I was told the actual restaurant is on the casual side: you order at the counter, sit down and they bring you your food, but the quality, freshness, and family recipes are all apparent.
Almost straight off the plane, I went to Eegee’s. I’m guessing that no one will really know Eegee’s unless they are from Tucson or have spent time there. Eegee’s is simiar to an A&W Stand, or a smaller Sonic. My friend Jeremy gets their…ice, I guess I’ll call it? It’s a thick slush, for lack of a better way to describe it, but Tucsonians just call it an Eegee.  I ordered half strawberry and half lemonade. They always have these two flavors, and then there is always an additional flavor of the day. That day it was blackberry, which was quite good, but I stuck with the originals. There are many Eegee’s around town, so check it out if you’re hot and in Arizona (and the chances of you being hot in Arizona are of course quite good).
Next stop was for a Cheese Crisp - yes, a cheese crisp. Picture a 12-14 inch thin tortilla (made with lard, as they do in AZ) sprinkled with Monterey Jack cheese and baked until bubbly and crispy in the oven - a Mexican pizza, if you will (pictured above). We went to a place called Rosa’s in a little strip mall for this, and topped ours with guacamole.  It was definitely unique, considering the only similar thing I’ve had is a Mexican pizza from Taco Bell about 15 years ago, but we don’t have to talk about that.
After that, it was off to try a Sonoran Hot Dog at BK Carne Asada & Hot Dogs, since we were in the Sonoran Mountains after all. There are many places that sell them, but BK is one of a select few that people will tell you is “the best.” I was vaguely familiar with this type of dog, as Big Star in Chicago serves their version of one and it’s quite good. The BK version is a bacon-wrapped hot dog served on a bakery-style hot dog bun - BK’s bun is a super light bun that almost wraps itself around the hot dog - with beans, a little mayo, chopped tomatoes and onion. While I’m sure the locals may beg to differ, along the lines of the Mexican pizza I spoke about earlier…it’s a Mexican hot dog. 
Last stop: In-N-Out Burger for an Animal Style Burger. Enough said!
And that’s what’s on my plate!
~ Kappy
Zivaz
4590 E. Broadway
Tucson, AZ 85711
(520) 325-1234
www.zivaz.com
Eeggee’s
Locations throughout Tucson
www.eegees.com
Rosa’s
1750 E. Ft. Lowell Road
Tucson, AZ
(520) 325-0362
www.rosasmexicanfoodaz.com
BK Carne Asada & Hot Dogs
2680 N. First Avenue
Tuscon, AZ 85719
(520) 207-2254
See website for additional location
www.bktacos.com
Andrew “Kappy” Kaplan loves food. A professionally trained chef, by day he runs Yum-o!, Rachael Ray’s charity focused on kids and cooking, and keeps special projects running smoothly for her. By night he hops course to course, place to place, all across the country. He’s Rach’s own personal dining guide! You can also follow Kappy on Twitter to see what’s On Kappy’s Plate in real-time!
Rachael Ray's Blog
- Rachael Ray's profile
- 296 followers


