Rachael Ray's Blog, page 55
July 9, 2013
Give your kid ice cream for breakfast? Yes!
Last week, I told you mini chocolate chips were a healthy choice for kids. This week, I’m urging you to give them ice cream for breakfast.
It’s really not as crazy as it sounds. Especially the way I make ice cream.
When I suggested chocolate chips, it was as an enticement. Sprinkle a tiny amount of chocolate over otherwise good-for-you foods, and you’ll usually get a lot more buy-in from the kids. Yogurt is a prime suspect for this.
The beauty of this week’s suggestion is that it needs no such enticement. It’s ice cream!
Well, sort of.
Here’s the deal. I make ice cream out of frozen fruit. And it’s so much better than it sounds.
You might have heard about this, as it was kind of trendy a few years ago. Some company even sold a special machine that churned frozen fruit into soft serve.
But you don’t need a fancy machine. And who cares if it’s no longer trendy. It’s a delicious, healthy and - in this summer heat - wonderfully cool and refreshing treat you can feel good about giving your kids any time of day.
Here’s how it works. Grab some frozen fruit (I use about half a 12-ounce bag per serving). Pop it in a food processor with a tiny pinch of salt (it heightens the flavors) and a splash (no more than 1/4 cup) of juice or water (just enough to keep things moist at the start). Puree until it reaches soft serve consistency, usually about 2 minutes. Scoop it and enjoy.
So those are the basics. And really any frozen fruit works. You can freeze your own, of course. And that certainly is the most economical. But truth is, I usually keep purchased bags of my son’s favorite fruits in the freezer for whenever the ice cream mood strikes.
Here are some simple guidelines that will help you crank out truly amazing fruit ice creams.
Size matters. Unless you have a seriously strong food processor, the frozen fruit should be in small chunks. Strawberries, for example, should be halved before being frozen.
Start and stop. You may need to open the processor a few times and stir to make sure all the fruit chunks are getting pulverized.
Go bananas. All fruit makes good ice cream, but bananas make the best. The flavor is amazing, and the texture is velvety smooth and rich. I buy bunches of bananas when they are a little brown and a lot cheap, then peel them, break them into chunks and freeze them in a big bag. You also can add a few chunks of banana to other fruits for an ice cream blend. Blueberries, for example, can have an icy texture on their own, but are crazy good with a little banana added.
Avoid too many seeds. Raspberries and blackberries make delicious ice cream, but their seeds add up fast. So consider using these fruits as part of a blend.
Season, don’t sweeten. Resist the urge to add sugar, honey or another sweetener. You really don’t need it. Instead, try a pinch of cinnamon or nutmeg, or a splash of vanilla extract. And switch around the juice you use to play with flavors. Orange, lemon, lime, pomegranate, cherry, even grape (with blueberries).
Cone it and sprinkle it. Since this ice cream is pure, unsweetened fruit, I don’t hesitate to serve it to my son for breakfast or snack. I also don’t hesitate to indulge and let him put it in a cone or add a few sprinkles to the top. After all, the kid is eating nearly a half pound of fruit.
My top fruits? Banana is the best, but mango is a close second. Peaches are great, as is a blend of blueberry and banana. Pineapple is terrific with banana, too.
What about lunch? Believe it or not, I’ve packed mango ice cream for my son’s lunch. And it worked. Here’s how. I started by setting his thermos in the freezer for 30 minutes. Just before I was ready to pack his lunch, I made the ice cream. Then I scooped it into the chilled thermos and screwed on the top. For extra insurance, I set an ice pack directly up against the thermos. My son LOVED it. Ice cream. In his lunch. It really gets no better than that. And I could feel good about it.
J.M. Hirsch is the national food editor for The Associated Press. He blogs about the trials and tribulations of his son’s lunches at LunchBoxBlues.com. His upcoming cookbook, Beating the Lunch Box Blues , will be the first to be released by Rachael’s new publishing venture, Rachael Ray Books. Hirsch’s previous books include High Flavor, Low Labor: Reinventing Weeknight Cooking and Venturesome Vegan Cooking. He lives in New Hampshire with his son, wife, and too many cats.
July 6, 2013
Grilling 106: How To Make The Perfect Hamburger
I’ve covered a lot of things so far, but it’s obvious to everybody that I have been missing the point. Hamburgers are why people buy grills. You know it, and I know it. It’s not like it’s any secret. I’ve devoted my life to glorifying the hamburger, to spreading its evangel, to paying it the minute and slavish attention that it deserves. But I haven’t gotten to it in this series, and there’s a reason.
Hamburgers are hard to make well on a grill.
Now, you may be saying, “are you high, Ozersky? I have made hamburgers on the grill a million times!” And that may be so. But that doesn’t mean you made them well. Unlike steaks, say, or chicken, hamburgers overcook very, very fast on a grill; and they are suprisingly hard to brown well. This combination makes great ones a challenge. I’m going to give you a surefire method for magnificent grilled hamburgers, hamburgers so mouthwatering and lush and crusty that you may never want to eat again. But first, we need to get some basics out of the way.
Get good hamburger. This should be obvious, but it isn’t, for the simple reason that pretty much all hamburger looks the same. But here’s what doesn’t look the same: a package of fresh 80/20 ground beef bought that day at a good supermarket, and a box of frozen “hamburger” patties. The former is made from fresh shoulder beef; the latter is composed of ground bungholes, ear wax, and ammonia. There’s a reason it’s called “hamburger” instead of ground beef. Of course, if you want to go that extra step, just have the guy at the meat counter grind up some short ribs and brisket, or short ribs and chuck roll, or if you are some kind of gastrocrat for whom money is no object, have him grind up a dry-aged ribeye steak. But fresh ground chuck will be a great place to start.
Cook over coal or wood. There is no getting around this. I don’t care how much you paid for your gas grill, or how many BTUs it puts out, or how many special secret wood-chip compartments it has. If you are going to use a gas grill you might as well just bake it in the oven. I have never seen a great, or even a good, hamburger come off a gas grill. I’m sorry. I just haven’t.
Get everything ready in advance, plan out what you’re doing, and keep your eye on the ball. This goes without saying. Or I guess maybe it doesn’t. It’s worth repeating every day, like the Rifleman’s Creed.
With that out of the way, here’s my recipe for the perfect grilled burger.
Perfect Wood-Grilled Hamburgers
2 lbs 80/20 or equivalent ground beef
4 thick slices of deli-counter white American cheese
4 white, seedless, enriched squishy buns, the cheapest and puffiest you can find
4 1″ slices of red onion, oiled and salted
Kosher salt
Freshly ground white pepper
1 cup hickory wood chips, dry
1 cup hickory wood chips, wet
1 10 lb bag lump hardwood charcoal or standard “blue bag” Kingsford charcoal
serves 4. Onion is optional. (Not really.)
1A. Read this whole recipe all the way through. You need to know in advance what you need to do. (See above.)
1. Build a two-zone fire. One side should have a lot of very hot coals, spread evenly and burning at maximum intensity (they should appear an even gray, and it should be impossible for you to hold your hand over them for more than one full second.) The other side should be totally clear of coal.
2. While the coals are catching, form your hamburgers. They should be loose, disc-shaped, and approximately the thickness of a Snickers bar. If you like a medium rare burger, it should be about as thick as a Twinkie. They should also be fresh from the coldest part of the refrigerator. Sprinkle both sides liberally and evenly with kosher salt and coarse ground white pepper. Set aside. Arrange your split white buns and cheese slices for easy access. This is all going to happen pretty fast.
3. If you want to have a thick grilled onion on the burger - and you do - now is the time to sear it, about 2-3 minutes on each side. They should look a little shriveled and have clear, dark grill marks on both sides. Remove them. Now lift up the grate and throw a handful of wet and a handful of dry chips on the fire. This will give you both wood smoke and wood fire flavors, in addition to an extra burst of combustive heat. Put the grill back on.
4. Put the hamburgers over the fire with space in between them, and all over equal heat. If you don’t have equal heat you will have to move them around, which is viable, but hard, and you don’t need this to be harder than it is. Make sure you have an even heat source.
5. The hamburgers will sizzle and pop and drip fat, which will cause flare-ups. Don’t be alarmed. The whole idea here is to max out the sear with minimal cooking inside. The hard part is getting them beautiful and brown and mahogany, and not black and carbonized and hideous and inedible. The latter takes longer to happen then you may think. But not much longer. When it doubt, lift up the burger and look. It shouldn’t take any longer than 4-5 minutes if your fire is hot enough.
6. Flip the hamburgers and let them cook on the hot fire for another minute or so. Now remove them to the cold side. Throw another handful of wet chips onto the coals. Cover. You have stopped grilling hamburgers. Now you are smoking them. Set the vents at half open; a steady stream of smoke should be coming out of them. Less air = more smoke, less heat.
7. This is another tricky part. You want the burgers in there to cook, but not overcook. In general, you are looking at 5-7 minutes maximum. Err on the side of rareness, because they are going to cook another minute or so with the cheese on top. Which leads us to the next step.
8. Put these cheese on top. Put the onion on top of the cheese. Add another handful of wet chips on the hot side. (It isn’t necessary to remove the grill; most will fall through and the ones that don’t will still smoulder.) Cover for another minute or so, enough for the cheese to soften but not liquefy. If you want the buns warmed or even slightly toasted, now is the time to add them to the cold side or near the heat, depending on what you’re looking for.
9. Put the hamburgers on the buns and eat them without any condiments whatsoever.
That’s it. The white pepper gives a secret under current of sneaky, creamy heat, and never becomes acrid as it burns, unlike black pepper. Smoke and wood and the meat’s own natural fats do all the rest. I screwed this up the first few times I did it; usually by overcooking the meat, but sometimes by undercooking it. Whatever. All cooking is a learning curve. But if you want further instruction, I’ve demonstated this method many times, including here and here. Go and do likewise! The perfect hamburger awaits you.
Now that my kind of BBQ – Japanese Yakitori!
Yesterday, Taeko Takigami, friend and founder of Com Culture, invited me to her event at The Soho House on Japanese Yakitori. Chef Tadashi Ono, veteran of both French and Japanese cuisine, captivated the evening as he rotated skewered meats on a hot grill and thread cherry tomatoes and shishito peppers on to wooden sticks. As I walked in to the class, albeit late, the smell of sizzle and smokiness like a summers BBQ party, was accompanied by a couple of mysterious aromas.
As I watched Chef Tadashi build marinades, weave meats, cook and dip them half way through in the marinade before finishing them on the grill, I realized that I could do this over the July 4th weekend. The skewered meats, with sporadic blackening and a coating of the lacquered marinade gave them an element of intrigue from a flavor and texture perspective – slightly sticky sweet, slightly charred-crunchy. Of course, no BBQ is complete without carbs. Chef Tadashi tightly shaped balls of rice, flattening them slightly and then cooked them on the grill for that added smoky searing.
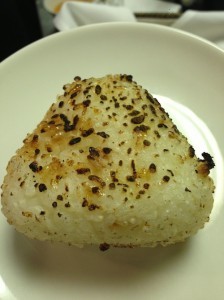
Onigri - Seared Rice Patties
There were a couple of extra ingredients that I didn’t have in my regular pantry, such as, mirin and miso, but given their popularity, they wouldn’t be hard to source. It would be totally worth it.
Chef Tadashi shared a couple of tips and tricks that sets these dishes apart:
- Cut chicken thighs along the grain to help seal in juices as it cooks
- Dipping the meat in marinade half way through cooking allows the marinade to stick to the meat
- If using ground meat instead of chicken thighs, cook 30% of the meat and then combine it back with the remaining raw meat – this allows for added succulence
Recipes:
Chicken Yakitori
Yakitori sauce
Ingredients:
2 cup soy sauce
1 cup mirin (rice wine that has a thicker consistency and available at your local Asian supermarket as well as many main stream supermarkets
1 cup soy sauce
1 cup brown sugar
1 pound chicken bone (optional)
Preparation:
1) Brown chicken bones in a saucepan. Add soy sauce, mirin, sake
2) Set to medium heat and bring it to a boil. Lower the heat to simmer and reduce the sauce by one third the volume. Remove the bones and add brown sugar
Yakitori skewer – Makes 10 skewers
Ingredients:
1 pound chicken thighs, cut in 1/2 inch pieces
4 pieces of cut chicken for 1 skewer.
1/4 cup yakitori sauce
Preparation:
1) Put the skewers on the grill, rotating to cook through
2) Dip skewers in to yakitori sauce. Put back the skewers on to grill again and cook until brown
3) Dip the skewers in to the sauce again and serve
Grilled rice ball (Yaki Onigiri)
Ingredients
4 cups cooked Japanese short grain rice
1/4 cup Yakitori Sauce
Preparation:
1) Make 1 cup of the rice in to a triangular ball, shaped by hand
2) Make 4 balls and set on to the grill until there is slight charring
3) Brush the Yakitori sauce on to the rice ball and continue to grill until brown
Saira Malhotra, is of British–Indian descent and is a chef, food writer and cooking instructor based in New York City. Raised in Hounslow, U.K, or rather ‘Little India’, where the air is aromatic with roasted spices, little did Saira know these moments would follow her from being a student in France and Italy to residing in NYC with her husband and kids and parlay themselves unexpectedly in to a culinary career. She is a graduate of the International Culinary Center in New York City. Come visit her at her food blog: www.passportpantry.com where she shares approachable and international recipes
July 3, 2013
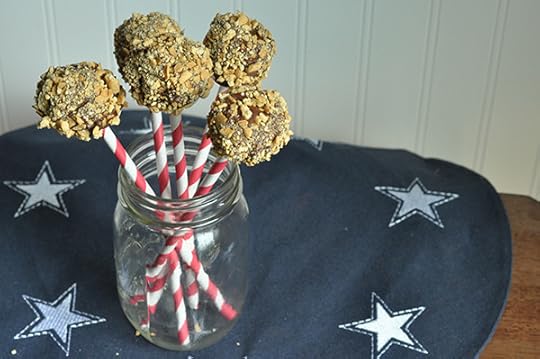
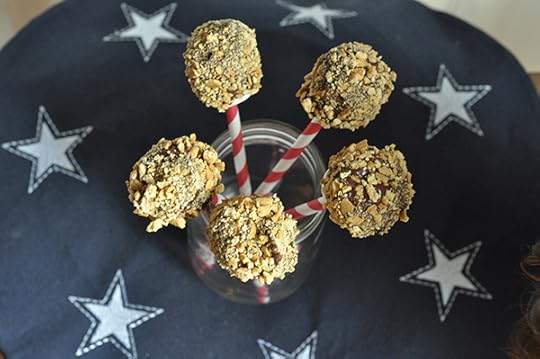
Last Minute No-Bake July 4th Dessert: Marshmallow S’mores Pops
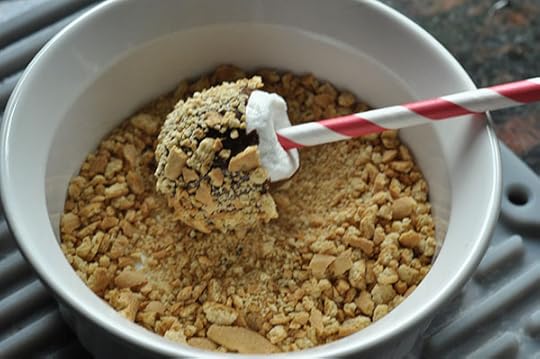
Still searching for that perfect July 4th dessert? look no further than these easy, peasy no-bake Marshmallow S’mores Pops. They come together in minutes and actually make a great activity to do with the kiddos. You can keep it traditional with the graham cracker crumbs or get more festive with red, white and blue sprinkles. Any candy coating will do and the possibilities are limitless. Set up a little toppings bar with different options and have your guests build their own Marshmallow pops. Happy July 4th everyone! Remember to enjoy the time with family and friends and good food.
Marshmallow S’mores Pops
Makes 8 pops
Ingredients:
1 cup semi-sweet chocolate chips
1 cup graham cracker crumbs
8 straws
Instructions:
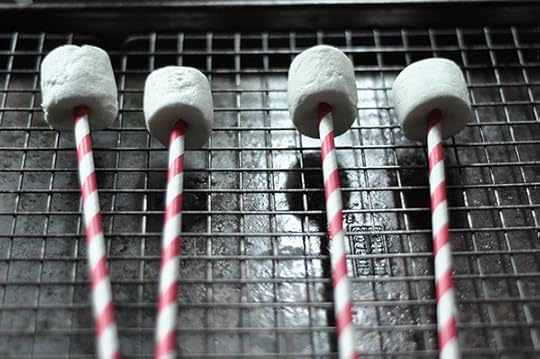
1. Insert straw into each marshmallow and set aside.
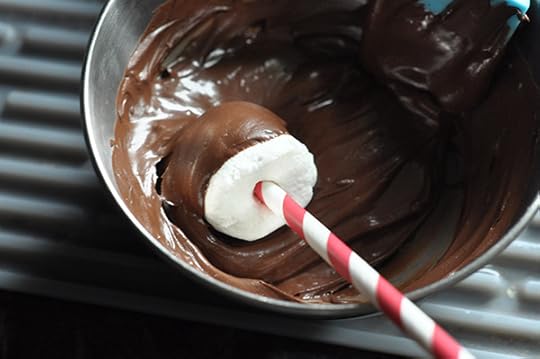
2. Place chocolate chips into the bowl of a double boiler until melted and smooth. Dip each marshmallow into melted chocolate and roll in graham crackers.
3. Place on a wire rack in the refrigerator to harder. Enjoy!
10 SANITY SAVIN’ TIPS TO GIVE SAND THE BRUSH OFF!
Aaahhh, love lying in the sand- it’s so soft ‘n comfy and fun to play in. Problem is it’s also a PITA since it creeps into every nook and cranny of our food, electronics and our feetsies, not to mention scratch our floors and get stuck in our carpet fibers. Well fear not, here are some simple ways to leave the sand where it belongs, unless you enjoy sleeping with those gritty granuals and constantly vacuuming and sweepin.
And for your viewing pleasure here’s my recent Today Show segment http://on.today.com/19yJQot http://on.today.com/19yJQot with my fab gal pals Kathie Lee ‘n Hoda whom helped me give sand the ‘brush off:
QUICKIE SAND-BUSTER PRE-TRIP TIPS
TRANSPORT: Line seats with towels or old sheet so all you have to do is simply shake out
Bring a large garbage bag to put wet towels into after you shake them out so you don’t trek it throughout house and can bring directly to laundry room
BEACH SEATING: Bring beach chairs or mats versus towels which are easy to shake out/wash off in ocean
SAND-PROOF FOOD: Re-purpose Pringle containers for easy chomping and chucking so nuttin’ to bring home! Fill with:
· Carrot/celery sticks/breadsticks/low fat cheese sticks
· Frozen grapes and peach slices that you freeze nite before
· Sushi-style bite-sized sandwiches: Make a wrap of P & J, ham & cheese, or whatever your child’s fave sandwich is. Roll it up and slice. This way if they drop one in the sand whole sandwich is ruined! Place wax paper between each or use mini cupcake holders or tin foil to separate in can
Or make it tres simple and sand-proof: Buy food at the beach !
SANITY SAVING SAND TRAP BUSTERS
ELECTRONICS : iPad, Kindle:
ZIP ‘EM:
If you apply suntan lotion use handy dandy baby wipes to clean your hands off so don’t smudge screen nor have sand stick to it
Place IPAD or Kindle into a freezer-sized Ziplock gallon bag with ‘slider’. Make a small hole for your headphones if using them and connect BEFORE you get to the beach.
TAP, BRUSH OR BLOW:
If sand gets in don’t plug in anything i.e. headphones, chargers etc unless you wish to buy a new one since warranties don’t cover ‘accidental beach’ faux pas J
Sand in speaker part: Tap ‘n shake gently
Use toothbrush to get into small areas (preferably not the one you used in morning!) since it’s soft and won’t scratch anything
Alt: Blow-dry on cool/low setting to blow out and not push in. You can also try using a can of compressed air as you do for your computer keyboard.
TOYS:
MESH IS BEST: Put all toys in a mesh bag so you can wash out easily and they can dry thoroughly to avoid mold ‘n mildew from forming
SEA SHELLS
SHAKE, SHAKE, SHAKE: Kids love to collect them but often half of their collected treasure is sand. So bring a colander from home to rinse and shake out the sand or I love these Dacron sail cloth bags from Hayden Reis that are tres chic and naturally let the sand fall out!
KIDS
And our numero uno sand trap is our kiddies and us! Here are some simple sanity saving ways to give sand the ‘brush off’:
o SHOWER OR TOWEL-Many beaches have an outdoor shower near the entrance/exits so rinse off as much sand as you can! If not use a clean, dry towel to rub a dub off!
o BABY IT!: Use baby powder to get rid of dry sand. It absorbs any moisture left making it easy to remove…Be sure to sprinkle some between your toes and use a small soft brush to help remove. Put a bunch in your hands and work through your hair as well then shake out.
o Check out these handy dandy convenient ‘n cute Powder Pouches which look and work great plus are giving a percentage of sales to help Hurricane Sandy victims.
o BTW: Baking soda also works in a pinch
Happy Fourth ‘n summer…Here’s to spreading the glove ‘n not the sand!
Julie Edelman aka The Accidental Housewife is the go to gal for easy; real life time, money, and energy saving tips that maintain our home, family and manicure. She appears regularly on the Today Show with Kathie Lee ‘n Hoda, Rachael Ray, and The Doctors. Julie has penned a New York Times best-selling book as well as The Ultimate Accidental Housewife: Your Guide to a Clean Enough House; contributes weekly for RachaelRay.com; is the sanity saving editor for Beautiful Design Made Simple Magazine; has a webisode series for Fox News Magazine, and hosts Julie’s Tips.
July 2, 2013
4th of July Party Ideas- Easy Peasy!
Summertime is always the busiest time of year. It seems like something is happening every week: weddings, backyard bbq’s, family reunions… you name it. Here are some last minute party ideas that will make your 4th of July party festive, and will fit right in to your busy schedule.
Ice Buckets
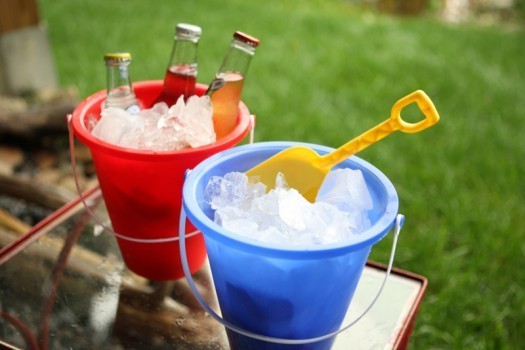
Pick up some red and blue beach pails and fill them with ice for instant drink coolers and ice buckets. Fill them with chips or popcorn too. They’re colorful, cute, inexpensive, and you can find them just about anywhere this time of year.
S’mores Kits
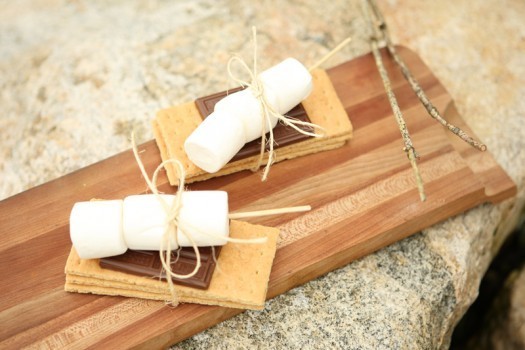
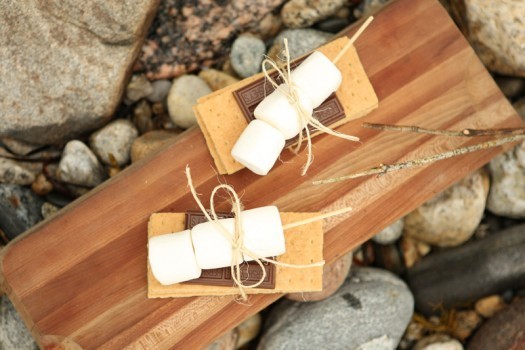
When you don’t have time to bake dessert, make some s’mores kits instead. Simply cut a bamboo skewer in half and attach three marshmallows. Stack them on graham crackers and chocolate and tie them up with some string. Cut a few straight sticks from the backyard and you’ll have an instant dessert. Your guests will have lots of fun roasting the marshmallows around the fire pit or bonfire too.
Sparkler Centerpiece
Light up your party with a festive sparkler centerpiece. Just make your arrangement in a small vase or glass, and insert a sparkler into the center of one of the flowers. Light when the sun starts to go down.
Drink and Dessert Toppers
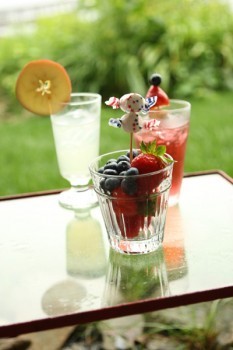
Add red white and blue to your drinks and desserts with fruit or candy and a bamboo skewer. For red add strawberries or raspberries. For white use banana or apple slices (tip: to keep the apple from browning squeeze a lemon into a bowl of water and toss the cut up apples in it). Use blueberries for blue. Slice an apple sideways for the star shape, or skewer some festively wrapped taffy and top your dessert.
Evette Rios is a Puerto Rican lifestyle expert, writer, television host and native New Yorker. She is one of the stars of ABC’s The Chew, where she serves as field correspondent and roving reporter, covering events and dishing on new ways of using ordinary household items. She has also been a contributing design expert on Rachael Ray, where she’s known for hands-on advice, innovative crafts and dramatic room revisions. She is also National Spokesperson for Goodwill International. Learn more about Evette at http://evetterios.com.
July 4th Memories
My uncle Chuck was not only a firefighter, but he was the Battalion Chief, and he was always concerned with our safety as children. He was such a good person, and sadly we lost him to brain cancer a few years ago. He gave his life to his work, literally, and he really cared about his role as a firefighter. He was always reminding us to change our fire alarm batteries every few months and not to play with matches. One time, when I was an adult, he even saved my daughter’s life when she was having a mild asthma attack and he happened to have a nebulizer mask that she could use to take her medicine.
And yet, somehow we spent every 4th of July at my aunt and uncle’s house, gathering together for my cousin’s birthday and for fireworks. Not fireworks that we watched from afar, but fireworks that we had on the street. We kids were only allowed to hold sparklers and wave them around until they died out, but the real fireworks were handled by some adults. To be honest, I am not sure who ran the fireworks show and where they got them, but back then I think they were allowed. Today I would have no idea where to buy fireworks unless we drove to another state.
As fun as it was, and if you have them or anything like them this holiday, you have to practice safety. Kids can not be allowed anywhere near the fireworks. Unfortunately, a girl in my grade school hurt her hand badly by messing with some sort of firecracker than wound up costing her a finger. Thank God it wasn’t an eye or worse.
I don’t mean for this post to sound preachy, but this is such a special time. A time for kids to be kids and enjoy their time off from school. A time for we as Americans to appreciate our freedom and independence and celebrate those who helped us and help us to maintain this status. And a time for food, family and friends. So kick back, fire up the grill, have a tall cold one and eat a big fat burger but don’t let your kids play with matches, as Uncle Chuck would say.
10 lunch box treats you can feel good (OK, better) about
Some days it is harder than others to remind myself that my son isn’t just a nutritional equation.
Because as parents, we are bombarded with advice, tips, techniques, rules and — let’s not forget — guilt about what we should and should not be feeding our children.
All of which makes it tempting to reduce parenting — at least the culinary component of parenting — to an equation. Feed them enough greens or whole grains or red veggies — or is orange better? — add a dash of exotic seasonings and as few treats as possible, and you’re all but guaranteed a perfectly nourished child with an impeccable palate.
If only any aspect of parenting was that simple…
Of course it isn’t. And as we all know all too well, parenting isn’t about chasing perfection. Even though we all beat ourselves up for never attaining it.
Parenting is about teaching broad lessons and having fun and enjoying life and each other. Easy to say, so very hard to do.
So with that in mind, I share my list of compromises — or what I call peace keeping foods. These are the “treats” I slip into my son’s lunch that he really considers treats, yet I can still feel good about.
No, it doesn’t include kale chips. I know there are plenty of parents who rave about how their precocious darlings think kale chips or beet dip are “just like” ice cream and Snickers!
Good for them. For the rest of us, there are these:
Popcorn. Seriously. Even if it’s drenched in butter or dusted with powdered “cheese,” popcorn is still a whole grain. So you have that going for you. And it’s yummy warm or room temp, so it’s easy to pack.
Pretzels. Grab a bag of spelt or other whole-grain pretzels, then pair them with a container of no-sugar jam or hummus for dipping. Protein (or fruit-like substance) and whole grains. All good.
Rice cakes. Remember those horrible things from the ’80s? They don’t exist anymore. Today’s rice cakes are whole grain and tasty. Grab some cinnamon-sugar or caramel varieties for a sweet treat.
Jerky. As a treat? Why not? My kid considers anything meaty a treat (mostly because it’s the antithesis of vegetables, but whatever). Grab some sweet barbecue or teriyaki; it’s a lean, filling protein.
Smoothies. Grocers sell all sorts of them these days. Some are loaded with sugar (so read the labels!), but they also have tons of fiber and fruit, maybe even veggies.
Bars. These take some research if you want a variety without tons of fat and sugar. But if you read labels, you can find some packed with protein and fiber from seeds and nuts and unsweetened fruit.
Pudding. Really. Pudding is milk and sugar. The dairy is good for them and the sugar… Well, that’s just the price of admission with this treat. As long as it’s not an all-day, every-day treat, it’s all good.
Gelatin. I’m not a fan of the sugar-free stuff. Artificial sweeteners and all. But inexpensive plain gelatin is easily mixed with unsweetened fruit juice (most packages have the recipe) for an easy-to-pack treat.
Tortilla chips. Even the fried ones. Look, corn is a whole grain, even when it’s cooked in oil and doused with salt. It’s also yummy and might entice kids to eat avocado or veg-rich salsa. It’s all good.
Chocolate chips. No, not by themselves. Use them as the selling point for a “parfait.” In a container with a tight-fitting lid, layer crushed graham crackers, fresh fruit (raspberries, blueberries, sliced strawberries, blackberries, whatever) and yogurt. Then top with a sprinkle of chocolate chips. It won’t take many to impress a kid. But just a few will get them to eat all those other good-for-them foods.
J.M. Hirsch is the national food editor for The Associated Press. He blogs about the trials and tribulations of his son’s lunches at LunchBoxBlues.com. His upcoming cookbook, Beating the Lunch Box Blues , will be the first to be released by Rachael’s new publishing venture, Rachael Ray Books. Hirsch’s previous books include High Flavor, Low Labor: Reinventing Weeknight Cooking and Venturesome Vegan Cooking. He lives in New Hampshire with his son, wife, and too many cats.
July 1, 2013
Children’s Etiquette Classes
One day in the not too distant past, I was watching as my 10-year old daughter shoveled food in her mouth and asked to be excused from the table within 10 seconds of sitting down to dinner. She probably asked me this, come to think of it, with her mouth full of food. It dawned on me that no matter how many times I correct her behavior or try to teach her good manners, she is going to do what she wants to do anyway. Is it because she doesn’t listen to me? Or is it because she is young and needs time to mature? Hopefully she truly acts on her best behavior except when she is home and in front of me.
Either way, I decided it was time for an intervention and I called a nearby Charm School. Instead of sending her to school, because it was too far away, I had the instructor come to my house one day. I invited 6 other girls to attend a 3 hour session on Basic Manners and Dining. I suggested I prepare a lunch so the teacher could have an actual meal with the girls while teaching them everything from how to set a table properly to how to eat a bowl of soup to where to put your silverware when you are done eating.
I eavesdropped the whole time from the kitchen where I prepared cold Vichyssoise (it was too hot for warm soup), breaded chicken cutlets, green beans and cucumber-cream cheese tea sandwiches, with chocolate pudding for dessert. I wanted to prepare a variety of foods so the girls could learn how to use the various utensils.
I overheard them discuss topics such as: how to be a good friend, how to carry on a conversation, how to introduce people and so on. The things the teacher was saying to the girls sounded so obvious, yet reminded me how easy it is to forget the basic principles of being a good person. It made me think about how many times a day I witness grown adults being catty and gossipy, saying mean-spirited things behind peoples’ backs, complaining and acting generally selfishly. I thought to myself, dear Lord, we could ALL use a little etiquette reminder! Some things that really stood out to me:
Be a good friend and stand by your friends no matter what. If they say the wrong thing, tell them, but don’t walk away-these are your peeps.
Listen when someone is speaking to you and look them in the eye. Don’t look away, distracted, as you think about something else or what you’re going to say next.
Don’t try to one up other people all the time. If someone is telling you something, ask more questions about them, making them feel important and showing them you are interested in what they are saying.
If you are at a friend’s house for dinner and you are served something you don’t like, just take it anyway, have a bite and then eat no more. There is no need to make a big announcement about how you don’t like this or that.
On the bus or subway, or in any public place, get up and give an elderly or pregnant person your seat. Note-you’d be surprised how many people do not do this simple act of kindness. When I was pregnant and commuting to NYC via the subway, no one ever stood up to give me their seat!
The list goes on and the exercises she did with the kids was fantastic. If you live anywhere near NYC, I highly recommend the New York School of Etiquette and am planning on bringing them in to be part of our school’s curriculum next year. In the meantime, boys, hold the door for girls, keep your napkin on your lap and chew with your mouth closed!
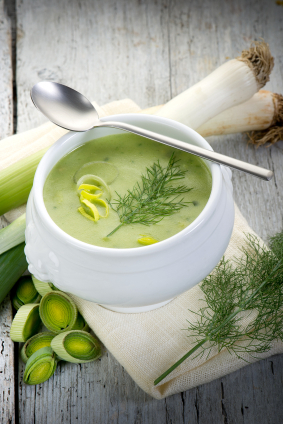
Vichyssoise Soup
This soup is classically French, but is just as popular in the US. It can be eaten cold, and traditionally is, but there is no reason not to heat it up if you prefer.
Ingredients:
10 small white creamer potatoes
2 large leeks
1 medium onion
2 tablespoons butter
2 cups chicken stock
2 tablespoons cream or whole milk
1 tablespoon sour cream
a pinch of fresh nutmeg
salt and pepper to taste
Preparation:
Cut potatoes in half unless they are really small. Slice the leeks up to the point where it starts to get dark green. Discard the dark green part. Rinse the chopped leeks by putting them in a bowl of water and lifting them out with a slotted spoon so the dirt remains behind. Chop the onion.
Heat a medium-large, heavy bottomed pot on the stove and add the butter. When it starts to melt, add the potatoes, leeks and onions and saute over medium heat for about 7 minutes. Add the stock and simmer until the potatoes are soft and thoroughly cooked, about 25 minutes. Add the cream or milk, the sour cream and the seasonings and remove from heat. In a blender or food processor, puree the soup for a good 4-5 minutes to allow air into the soup. This will make a really creamy and airy, yet rich soup, full of flavor and succulent texture.
Serve soup with chopped chives or dill sprinkled on top if desired.
Rosemary Maggiore is our Last Minute Lady. A single mom of two kids plus a full time job (she runs this website!) keep her busy and usually pushing things to the last minute. Somehow she manages to keep her cool and her sanity while she enjoys good food, wine, friends and most importantly, family.
For more Ro, see:
Follow me on Twitter at @roemaggiore or on Instagram at #romaggiore
Easy Weeknight Dinner: Roasted Chicken Thighs With Pesto
Is basil taking over your garden or window box? Now’s definitely the time to stockpile that freezer with the good stuff. And by “good stuff” I mean Pesto Sauce, people. Pesto is in the fast food category at our house. Stash a bunch of it in the freezer and you have a wealth of easy but flavorful meals waiting to be made at a moment’s notice.
I’ve told you before just how much homemade Pesto rocks and I’ve even given shared a creamy variation on the classic pasta sauce with you. But today my friends, I give you yet another tasty recipe using Pesto: Roasted Chicken Thighs with Pesto. That’s right! Pesto makes an excellent chicken coating and the recipe couldn’t be simpler. Just make up a batch of your favorite Pesto, slather it under the skin of some chicken thighs (or your favorite part of the chicken), bake and eat. Don’t want to make your own Pesto Sauce? Use store-bought and you have yourself one easy and crazy delicious weeknight meal.
This dish is flavor packed and so gorgeous when it comes out of the oven. The chicken remains incredibly moist and the Pesto is sort of a flavorful surprise hiding underneath that crispy skin. Best of all, it’s the kind of recipe that is easy enough for a weeknight meal but gorgeous enough to entertain with—LOVE THAT!
Roasted Chicken Thighs With Pesto
Serves 4
Ingredients:
2 cups basil leaves, washed and patted dry
1 clove garlic
1/3 cup almonds
1/3 cup Romano cheese (Parmigiano Reggiano works well too)
1/2 teaspoon salt
1/2 teaspoon black pepper
Juice and zest of one small lemon
1/3 cup olive oil
8 chicken thighs, rinsed and patted dry
Instructions:
1. Preheat oven to 400 degrees. Line a baking sheet with aluminum foil (for easy clean-up).
2. Combine basil, garlic, almonds, cheese, salt, pepper, lemon zest and juice and pulse until coarsely chopped. Turn machine on and stream olive oil in using the feed tube of the processor. Process until fully incorporated and smooth.
3. Place chicken thighs onto prepared baking sheet skin side up. Using your fingers, loosen the skin from the meat and rub about a tablespoon of pesto sauce under the skin of each piece of chicken. Season the skin of each piece of chicken with salt and pepper. Place baking sheet into the oven and bake for 50-60 minutes. Enjoy!
Rachael Ray's Blog
- Rachael Ray's profile
- 296 followers


