
Rachael Ray's Blog, page 53
July 30, 2013
Summer Reading: Less Stuff = Richer Life in The Good Life Lab
In her new book, The Good Life Lab, author Wendy Jehanara Tremayne documents how she went from being a high-powered public relations whiz in New York City to living in small-town New Mexico in a revamped shipping container. Ironic as it may seem, the story is a happy and inspiring one.

Have you ever felt so fed up with the materialism of the modern world that you wanted to opt out and go back to a simpler way of living? That’s exactly what Tremayne and her boyfriend, Mikey Sklar, ended up doing, in an effort to get in touch with what’s important in life. She and Sklar learn how to power their cars using old fry oil, build housing structures out of waste material, keep beehives, and grow most of their own food, among many other impressive feats. The photos throughout the book show off the comfortable and surprisingly attractive home that they build for themselves. They continue to document their projects on their blog, Holy Scrap.

Whether or not you’ve ever considered getting “off the grid,” as the author did, the story makes for a great read. Tremayne is a gifted storyteller, and I couldn’t wait to find out from one chapter to the next how she slowly comes to realize that she wants out of what many people would think of as “the good life,” and figures out her own guidelines for what constitutes living well. In the following passage, she and Sklar go to look at an apartment for sale in Brooklyn, and realize that they can’t continue with their old way of life:
Ron, the building manager, pulled up in his new-model Volvo. We climbed through the dangerously unfinished building and walked on planks that bridged a three-story-high gap in the floor. “$750,000,” he said, though we had not asked…For an extra $50,000 cash, I can throw in a parking space.” I saw a clear and distinct image of Mikey and me wearing matching metal shackles attached to long chains, ted to desks inside the cubicles that fill the city’s skyscrapers. I turned to Mikey and said, “Let’s go.” We both knew that I meant, “Let’s get out of New York.”—Excerpted from The Good Life Lab, by Wendy Jehanara Tremayne

After that, the couple hits the road, trying to find the right place to make a new home. They find their way to a funky artist town in New Mexico (Truth or Consequences, NM, population 6.451), populated by other refugees from what Wendy calls the “default world.” Through trial-and-error and the help of a quirky cast of characters, they build a satisfying new life for themselves based on self-sufficiency, scavenging, and an ethos of sharing.

In her new life, Tremayne learns how to make raw cheese and yogurt, ferment wine, and use indigenous plants for food, medicine, and cosmetics. Nuts are one of the local foods that she forages, specifically pecans and pine nuts. In the book’s recipe section, Tremayne suggests nut milk as a delicious, protein-rich alternative to cow’s milk. Below is her basic recipe for nut milk. Like the recipe, the book is filled with practical ideas for hands-on living whether your home base is the city, the ‘burbs, or out on the frontier.
Recipe: Nut Milk
Reprinted with permission from The Good Life Lab by Wendy Tremayne, copyright © 2013. Published by Storey Publishing.
1. Fill 1/3 of a lidded glass jar with raw nuts or coiconut shavings. Fill the rest of the jar with water and place the lid on.
2. Soak the nuts or shavings overnight.
3. In the morning, strain and discard the water they soaked in. rinse the nuts a few times with fresh water.
4. Mix the nuts or shavings with hot water so that the ratio is 1 part nuts to 2 parts water. Blend in a blender on high; strain; store in the refrigerator.
Author’s Note: Instead of throwing away the strained coconut or nut pulp, try spicing it in a frying pan and using it to replace cheese and meat fillings in raviolis.
All photos by Wendy Jehanara Tremayne and Mikey Sklar.


July 29, 2013
Lunch packing made easy, one grain of rice at a time
I’m a big believer in cooking once, eating twice. Or more.
Planned leftovers really are what keep me sane while serving time in the lunch box trenches. As much as possible, I turn the remnants of last night’s dinner into the building blocks of today’s lunch.
And while most dinners can be repurposed somehow, someway, there are some foods that are so versatile they practically demand that you make too much of them, just to have the leftovers to work with. For my must-have list of leftovers check out this earlier post.
But I somehow forgot to include on that list one of the most useful leftovers of all — rice.
Rice is right up there with pasta in terms of ease of making too much. Cooking up 1 cup of rice for dinner? It takes no more time or effort to make 2 cups. And once you’ve got that extra cooked rice, there’s so much you can do with it.
Let’s start with the cooking. It’s easy. In fact, if you are lucky enough to own a rice cooker, it’s pathetically simple. Dump in the rice and water (or broth for more flavor), hit the button and walk away. Most models even automatically shut off and keep the rice warm until you’re ready for it.
No rice cooker? It’s still easy. For brown rice, it’s a basic 1:2 ratio of rice to water. Starting with 1 cup of uncooked brown rice? You’ll need 2 cups of water. To cook, combine the rice and water in a medium saucepan and bring to a boil. Cover, reduce heat to the lowest setting, then walk away for 30 minutes. Turn off the heat and let stand for another 10 minutes. Done.
For white rice, the method is the same, but the ratio is 1:1.5 — as in, every 1 cup of uncooked rice will need 1 1/2 cups of water. Bring to a boil, cover, reduce the heat and cook for 15 minutes, then let stand off the heat for 10 minutes.
Now that you’ve made the rice, what should you do with it?
Stir-fry: Sounds like too much trouble for lunch, right? Not even close. Let’s say you fried an egg or made pancakes for breakfast. Don’t wash that skillet just yet. Mist it with a bit of cooking spray, then dump in whatever veggies you got. Anything. Leftover roasted veggies? That will work. Nothing but bagged shredded carrots or broccoli florets or even just an onion? Go with it. After a couple of minutes, dump in your rice. When the rice is hot, crack an egg into it and mix like crazy. Once the egg is cooked, add a splash of soy sauce. Done. It took less than 5 minutes and didn’t dirty any extra pans. Now just pop it piping hot into a thermos.
Rice and beans: There’s a good reason much of the world lives on this combination. It’s healthy and can be totally delicious (and easy). I like to do it barbecue-style. All I do is combine canned beans (navy or kidney are nice), leftover rice and some bottled barbecue sauce. Heat, pack and enjoy.
Rice and edamame: Or take the rice and beans thing in an Asian direction. Combine rice with shelled frozen edamame and a splash each of soy sauce and toasted sesame oil. Packed cold (the edamame will thaw by lunch) it’s a cool rice salad. Or heat it up for a delicious sesame rice and beans. Either version is good with a little chopped scallion, too.
Rice salad: Speaking of rice salad, try a fruity version, too. Combine cooked and cooled rice with diced mango, apricots, slice grapes, diced apples or pears, chopped pineapple, whatever. Add some chopped scallion, a little lemon juice and olive oil, then toss and season with salt and pepper. Some dried fruit sprinkled on top — like cranberries or cherries — is a nice contrast.
Peanut rice and chicken: Toss leftover rice with leftover cooked chicken (or meat from a rotisserie chicken). Toss with bottled (or homemade if you have time) peanut sauce, then pack hot or cold.
Pesto rice and chicken: Same as peanut rice and chicken, except you use — wait for it — pesto instead of the peanut sauce. This one also is good hot or cold.
Veggie rice cakes: In a bowl mix leftover rice, any finely chopped cooked veggies you have handy, any finely chopped cooked meats laying around, an egg or two, a bit of flour and some salt and pepper. Mix, form into patties, then fry in the same skillet you cooked your breakfast. Great as is or on a bun.
J.M. Hirsch is the national food editor for The Associated Press. He blogs about the trials and tribulations of his son’s lunches at LunchBoxBlues.com. His upcoming cookbook, Beating the Lunch Box Blues , will be the first to be released by Rachael’s new publishing venture, Rachael Ray Books. Hirsch’s previous books include High Flavor, Low Labor: Reinventing Weeknight Cooking and Venturesome Vegan Cooking. He lives in New Hampshire with his son, wife, and too many cats.
July 26, 2013
Grilling 108: Beyond The Black Kettle
Grilling is done best when done most simply. I counsel novices to cook on Weber grills of the convention “kettle” kind, because they are cheap and simple and have no moving parts. You have no choice but to work with wood and coal and heat yourself, because there are no elaborate mechanisms to do it for you. So good. That’s fine. But let’s say you’ve mastered the basic skill of cooking meat over coal. Let’s say that you aspire to something higher, something deeper, something that will bring to a higher plane in the zen of grilling.
If so, there are only two ways to go. One is to commit entirely to a primitive naturalism, an animistic religion deeply rooted to earth and soil and light and fire, the stuff of primal man and Jungian archetypes. A kind of culinary shinto. This is a noble but arduous path, Shaolin monk-type stuff, and not for everyone. If you feel this calling, I would suggest getting two books: Seven Fires, by Francis Mallman, and Smoke: The New Firewood Cookery, by Tim Byres. (I wrote the introduction for the latter book, if that is any added inducement.)
The other way to go is to the store, credit card in hand, to buy some better equipment and better fuel. The Weber, for all its sacred simplicity, is fundamentally flawed. While its design can hardly be improved upon, its size is limited, it gets very clogged and dirty very quickly, and most importantly, its thin steel provides almost no insulation for the food you are cooking. That’s why I stress it as a grilling tool: if all you need is a way to cook thick steaks over hot fire, it’s ideal, and even has the added benefit of a tight-fitting curved lid that gives even ambient heat to food once it’s off the fire. But the second you lift the lid you lose all the heat, and even if you don’t lift the lid, if you are cooking in the rain, or in cold weather, or have fuel that has burned down, you are out of luck.
And it’s at that point that you turn to a ceramic cooker like The Big Green Egg or Komodo. These things weigh a million pounds and cost ten times the amount of a Weber. But the reason is obvious: they are solid, well-built, and massively well-insulated. When you close the lid of one of these things, you can come back five hours later and it will be more or less as hot as when you closed it. You don’t have the kind of real-time response, that you would with a Weber, and there aren’t the same kind of airflow control, but in terms of getting and keeping heat they are unbeatable. You can even load in some unlit coals and put a few hot ones on top, and the fuel will burn steadily for house.
I resisted them for a long time, because people liked them for the worst possible reason: because they didn’t like grilling, and sought a way to do less of it. I find this attitude abominable. But if you are a true griller, and the love of wood and fire and meat burns deep inside you, you might want to consider acquiring one of these things. They are very, very good for barbcue too - but that is another series.
Grilling 107: Beyond The Black Kettle
Grilling is done best when done most simply. I counsel novices to cook on Weber grills of the convention “kettle” kind, because they are cheap and simple and have no moving parts. You have no choice but to work with wood and coal and heat yourself, because there are no elaborate mechanisms to do it for you. So good. That’s fine. But let’s say you’ve mastered the basic skill of cooking meat over coal. Let’s say that you aspire to something higher, something deeper, something that will bring to a higher plane in the zen of grilling.
If so, there are only two ways to go. One is to commit entirely to a primitive naturalism, an animistic religion deeply rooted to earth and soil and light and fire, the stuff of primal man and Jungian archetypes. A kind of culinary shinto. This is a noble but arduous path, Shaolin monk-type stuff, and not for everyone. If you feel this calling, I would suggest getting two books: Seven Fires, by Francis Mallman, and Smoke: The New Firewood Cookery, by Tim Byres. (I wrote the introduction for the latter book, if that is any added inducement.)
The other way to go is to the store, credit card in hand, to buy some better equipment and better fuel. The Weber, for all its sacred simplicity, is fundamentally flawed. While its design can hardly be improved upon, its size is limited, it gets very clogged and dirty very quickly, and most importantly, its thin steel provides almost no insulation for the food you are cooking. That’s why I stress it as a grilling tool: if all you need is a way to cook thick steaks over hot fire, it’s ideal, and even has the added benefit of a tight-fitting curved lid that gives even ambient heat to food once it’s off the fire. But the second you lift the lid you lose all the heat, and even if you don’t lift the lid, if you are cooking in the rain, or in cold weather, or have fuel that has burned down, you are out of luck.
And it’s at that point that you turn to a ceramic cooker like The Big Green Egg or Komodo. These things weigh a million pounds and cost ten times the amount of a Weber. But the reason is obvious: they are solid, well-built, and massively well-insulated. When you close the lid of one of these things, you can come back five hours later and it will be more or less as hot as when you closed it. You don’t have the kind of real-time response, that you would with a Weber, and there aren’t the same kind of airflow control, but in terms of getting and keeping heat they are unbeatable. You can even load in some unlit coals and put a few hot ones on top, and the fuel will burn steadily for house.
I resisted them for a long time, because people liked them for the worst possible reason: because they didn’t like grilling, and sought a way to do less of it. I find this attitude abominable. But if you are a true griller, and the love of wood and fire and meat burns deep inside you, you might want to consider acquiring one of these things. They are very, very good for barbcue too - but that is another series.
July 25, 2013
Summer in a Glass
It’s been so insanely hot here in New York State that I have found myself not wanting to drink anything even room temp, not even red wine with dinner, which is a first for me. I don’t really like white wine and find beer a little heavy, so what to drink when I feel like a cold and refreshing cocktail? Here are some ideas I have discovered that are quite pleasing.
Huckleberry Vodka and Lemonade
I have no idea what a Huckleberry is, but I can tell you this vodka, made by 44 North, is amazing. Vodkas can be made from a variety of things and this one happens to be made in Idaho from Idaho potatoes and Idaho spring water with the essence of Idaho mountain huckleberries. This all may sound silly, especially since vodka is not supposed to have any flavor, but seriously, it is delicious and makes you realize how bad mass market vodka can taste. What I do with this one is squeeze a half of lemon into a glass, add some ice and the desired amount of vodka and top it with seltzer water and if I feel the need, a little honey to make it sweeter. I love this drink and only wish I could find the vodka more easily.

Cynar and Lemon
I happen to like bitter spirits like Campari and Amaro. I discovered Cynar a few years ago when my friend Joey Campanale, owner of Anfora wine bar in NYC, introduced it to me. It is made from artichoke roots, but it doesn’t taste like it. It does have a dark, earthy and bitter flavor which I love when served over ice with an entire lemon squeezed.

Aperol Spritz
The other drink Joey served me once when i said I didn’t want anything too heavy and I didn’t want to get any kind of buzz was an Aperol Spritz. Aperol, also of the Campari group, is a lighter version and can be easily mixed with seltzer, white wine, Proseco or orange juice. It’s a great, light afternoon taste.
I am lucky to be working with Joey on his first book, due out in November 2014, which will showcase some of his cocktails and favorite pre and post dinner liqueurs. For now, enjoy these new flavors with your summer meals!
Now, of course, if you aren’t in the mood for any of the above or you can’t find them in your nearby stores, you can always go for an ice cold beer. I started Weight Watchers this summer and ended it two weeks later when I saw it wasn’t working at all for me. But I did discover Michelob Ultra, which is only 3 WW points. It may not be the king of beers or even a prince, but if you are looking for a really low cal, light and refreshing beer, this one isn’t bad at all. Spoken like a true lady…
Rosemary Maggiore is our Last Minute Lady. A single mom of two kids plus a full time job (she runs this website!) keep her busy and usually pushing things to the last minute. Somehow she manages to keep her cool and her sanity while she enjoys good food, wine, friends and most importantly, family.
For more Ro, see:
Follow me on Twitter at @roemaggiore or on Instagram at #romaggiore

Halibut and Potato Curry - Wardrobe Fish The Exotic Way
In desperate need to cool down, we packed our bags and headed an hour and half from the city to Mohonk Mountain House. Trees and mountains towered over us offering up the best cooling system mother nature offers, the lake provided for some lazy afternoon boating and the swimming pool felt like it was built in a tree house.

Photo Courtesy Of Mohonk Mountain House
After a day of hiking, swimming, my appetite would get ahead of me. And what awaited like a loving mother, was a spread of dishes. Mohonk Mountain sources it’s ingredients from neighboring farms and my palate got to gage why eating locally makes all the difference. But Executive Chef Palmeri is not one to rely on good ingredients to do all the talking. The dishes hint at his story, his travels and his culinary adventures. Need some extra heat at your table and out comes a plate with not just jalapenos but also thai birds eye chili. What’s that mysterious smokiness in the sautéed potatoes? Hmm, perhaps cumin.

Chef Palmeri shared the recipe for his halibut curry. It was delicate and subtle enough to appreciate all those beautiful ingredients with a suggestion at something exotic.
Chef Palmeri’s Halibut Curry
Potato Curry
2 large Okinawa purple potatoes (or substitute with sweet potato)
1 tablespoon oil
¼ cup Curry leaves (if you can’t find curry leaves at your local ethnic store, substitute with curry ½ tsp. curry powder and leave out asafetida and turmeric)
1 tablespoon green onions
Pinch of asafetida
1/2 teaspoon cumin seeds
1/2 teaspoon mustard seeds
1/2 teaspoon turmeric
1 finely chopped green chili (adjust to taste)
½ ea. Julienned onion
1/2 teaspoon salt (adjust to taste)
¼ cup Green peas
1 teaspoon lemon juice
2 heads Blanched cauliflower – chopped
1 tablespoon chopped cilantro
1 cup Vegetable broth
Halibut
1 ea. 7 oz piece of Alaskan halibut
1 tablespoon oil
Cilantro for garnish
Salt and white pepper as needed
Method
Potato Curry
1) Boiled the potatoes until they are soft and let cool.
2) Peel and chop the potatoes in small pieces.
3) Heat the oil in a frying pan on medium high. Test the heat by adding one cumin seed to the oil. If it cracks right away, the oil is ready.
4) Add the cumin seeds, mustard seeds and asafetida. As the seeds crack, add turmeric, green chili, curry leaves, sliced onions and salt.
5) Stir-fry for a few minutes, add the cauliflower lemon juice, cilantro and peas.
Add vegetable broth and let reduce to the proper consistency
Halibut
1) Heat oil in sauté pan
2) Season fish with salt and white pepper, sear and cook until desired doneness
3) Serve halibut over the potato curry
Saira Malhotra, is of British–Indian descent and is a chef, food writer and cooking instructor based in New York City. Raised in Hounslow, U.K, or rather ‘Little India’, where the air is aromatic with roasted spices, little did Saira know these moments would follow her from being a student in France and Italy to residing in NYC with her husband and kids and parlay themselves unexpectedly in to a culinary career. She is a graduate of the International Culinary Center in New York City. Come visit her at her food blog: www.passportpantry.com where she shares approachable and international recipes
July 24, 2013
The Updated BLT, the BLS, Bacon, Lettuce SOFRITO!
To be honest I barely eat any meat, it was a decision I made years ago, in junior high school and since then I really haven’t turned back. Professionally I eat whatever is put in front of me, but when I am in the kitchen, I stick to veggie dishes. But if there is one meat that I would and have gone back for, its bacon. Ay dios mio! El tocino! Is there anything more delicious? I have even met some pretty hard core vegetarians that only break their routine for bacon, so I know I am not alone. So here is my twist on the delicious BLT, the classic American sandwich. I am calling it the BLS (Bacon, Lettuce and Sofrito), because who needs the tomato when you have sofrito!
Bacon, Lettuce, Sofrito (BLS)
A large handful of cilantro leaves
A large handful of culantro leaves
½ Spanish onion, diced
¾ red bell peppers, seeded and chopped
½ green bell peppers, seed and chopped
2 ajies dulces peppers, chopped
3-4 cloves, peeled, chopped
Salt and pepper to taste
Bacon slabs
Lettuce (Mesclun)
White Bread (White bread is best so as not to overwhelm all the other competing flavors)
1-2 ripe (sweet) plantains
Spicy Mayo
Canola oil or any neutral flavor oil (for frying) ~ 2/3 cups


Spicy Mayo
1. Mix 1 tsp cayenne pepper with ½ cup mayo.
Directions
1. Chop first seven ingredients cilantro, culantro leaves, Spanish onion, red bell peppers, green bell peppers, ajies dulces peppers, and garlic. Pulse in a food processor until small-diced. Add salt and pepper to taste.

2. Pan fry slabs of bacon to desired crispiness (you may not need to use oil to fry bacon, as it already has enough natural oils.)
3. Cut plantains on a bias (1/2 inch thick slices)

4. Pour oil in pan to cover a little less than half the thickness of plantains in pan.
5. Heat oil until water sizzles when dropped into oil.
6. Add plantains in batches to pan. Fry briefly until lightly golden. Reduce heat and cook until caramelized or as desired (turning plantains as needed).

7. Assemble sandwich with lettuce, plantains, bacon, sofrito, and spicy mayo.

Evette Rios is a Puerto Rican lifestyle expert, writer, television host and native New Yorker. She is one of the stars of ABC’s The Chew, where she serves as field correspondent and roving reporter, covering events and dishing on new ways of using ordinary household items. She has also been a contributing design expert on Rachael Ray, where she’s known for hands-on advice, innovative crafts and dramatic room revisions. She is also National Spokesperson for Goodwill International. Learn more about Evette at http://evetterios.com.
July 23, 2013
Strategic leftovers? 8 ways to stay sane while packing lunch
America has its strategic oil reserve. Canada has it’s strategic maple syrup reserve. And smart parents keep their wits about them by maintaining strategic reserves of dinner leftovers.
Because let’s be honest… Packing lunches — whether for your kids or yourself — can be a soul-sapping day-after-day drudgery. And there aren’t a whole lot of ways around it.
Sure, you could buy those lunch “kits” aimed at kids sold at the grocery store. But America’s kids don’t exactly need more processed food. Particularly that sort of trash masquerading as lunch.
Still, my desire to pack healthy, satisfying lunches that my son will love doesn’t mean I have a ton of time or energy to put into making that happen.
Hence, strategic leftovers. This is what keeps me sane while doing time in the lunch box trenches.
My theory is simple. Every night some sort of dinner needs to get on the table. If I intentionally make too much of that dinner — which rarely requires any extra work — those leftovers make fine building blocks for the next day’s lunch.
Even if I don’t know how I will use the leftover whatever the next day, it sure makes my morning packing routine go more smoothly when I at least have something to work with.
Obviously, any leftovers are fair game. Making chili or lasagna or pizza? No need to overthink it. Reheat the leftovers, pop them in a thermos and call it a day.
But there are some leftovers that work particularly well in a blank slate sort of way. These are the foods that when I’m making for dinner, I always make too much of.
Baked or roasted potatoes: In the morning, heat up the leftovers and pop them in a thermos. Just top them with canned baked beans. Or pack some veggies, sour cream, cheese and salsa on the side.
Pasta: Shape and size don’t matter. Heat leftovers and toss with Parmesan for an easy Alfredo. Or toss with bottled peanut sauce and chopped veggies for cold peanut noodles. Or make pasta salad.
Chicken: Tossing a couple extra breasts on the grill (or roasting a slightly larger bird) takes no extra effort. But the meat can be used in wraps, salads, soups, whatever. Try this: shred leftover chicken, toss with bottled barbecue sauce, then pack hot and accompany with buns. Barbecue pulled chicken sliders!
Bacon: Health food? Not really. But I know that a bit of crumbled bacon over the top of a salad seriously ups its appeal for my kid. And if I’m already frying some for breakfast, another slice won’t kill us.
Vegetables: Whether you are roasting, steaming or stir-frying them, extra veggies are easy to love. The leftovers can be tossed in salads, used in wraps, or tossed with leftover pasta. They even can be packed straight up and used for dipping with hummus. Way tastier than raw.
Pancakes and waffles: The leftover approach works at breakfast, too. Making pancakes? Make too many, then use the extra as “bread” for a PB&J or grill cheese.
Chili and stews: This is so easy, it’s stupid. In them morning, pop a potato in the microwave. When it’s “baked,” toss it in a thermos, then top with leftover chili or beef stew. Done. Cheese on the side is nice.
Salad: Set aside some of the dinner salad before adding the dressing. Pack as is (with dressing on the side) or use it as filling for a veggie wrap.
J.M. Hirsch is the national food editor for The Associated Press. He blogs about the trials and tribulations of his son’s lunches at LunchBoxBlues.com. His upcoming cookbook, Beating the Lunch Box Blues , will be the first to be released by Rachael’s new publishing venture, Rachael Ray Books. Hirsch’s previous books include High Flavor, Low Labor: Reinventing Weeknight Cooking and Venturesome Vegan Cooking. He lives in New Hampshire with his son, wife, and too many cats.
July 22, 2013
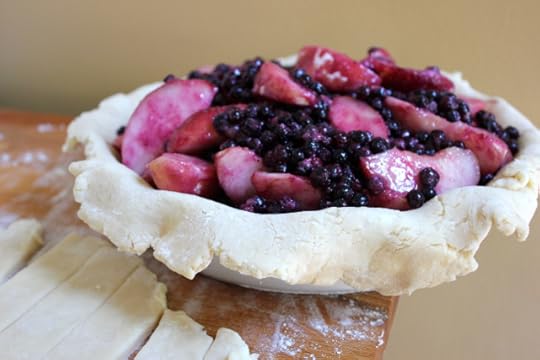
Play-By-Play: Lattice Top Pie
Last week I posted a walkthrough to get all you bakers through home-made pie dough unscathed. Not one to only bring you halfway to the finish line, this week I’m going to show you how to assemble a photo worthy lattice top pie with that same beautiful dough we made last week.
What you’ll need for this:
All-purpose flour, for dusting
Rolling pin
8- or 9-inch pie dish (In my opinion, the deeper the better)
Pizza wheel or knife
Optional: heavy cream and raw sugar, to decorate
ROLL YOUR DOUGH OUT
As I wrote about last week, cold dough is the secret to successful dough. Trying to roll the prepared dough out while it’s warm or has yet to have a chance to rest will result in a greasy, sticky mess – and this a successful pie does not make.
Lightly dust a work surface and rolling pin with some all-purpose flour (If you’re using the recipe I posted last week, which makes enough for two rounds of dough, cut your block of dough in half and work with it in batches). Working gently at first, begin to roll the dough out, frequently giving it an eighth turn to encourage it to roll out in an even, round shape. Roll the dough out to a thickness just shy of 1/4-inch. Line your pie dish with the dough, pressing it gently down into the edges of the dish and encouraging the excess to hang over the edge by about an inch. Fill the dough with your prepared filling and set it aside.
Repeat dusting the work surface and rolling out the other piece of dough to the same thickness.
CUT THE DOUGH INTO STRIPS AND LAY DOWN A FOUNDATION
Using the pizza wheel or a knife, cut the round of dough into strips that are about 3/4-inch wide – don’t worry about being too perfect here, just eyeball it.
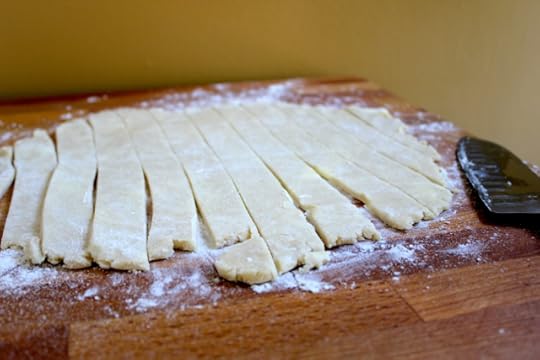
Take a long strip from the center of the dough and lay it just off center over the filling, hanging the ends over the edge of the pie plate. Continue with three to five more strips from the pile (eyeball what looks like will fit – there’s no exact number that’s correct) and cover the filling by laying them parallel to the first strip, leaving about 3/4-inch between each.

CREATE A LATTICE
Rotate the pie dish so that the strips are perpendicular to you. Fold every other strip back halfway and then lay a strip across the center of the pie, covering the strips that are still laying flat. Fold the curled pieces back into place, covering the strip that was just laid down, and then fold the alternate pieces back. Lay another strip down (leaving about 3/4-inch between them) and repeat. Once you’ve gotten to the edge of the pie on one side, work on the other, going from the middle outward.
By alternating laying these pieces down, you’re building a woven pattern on top of the pie without having to actually weave them together as individual strips.


SEAL UP THE EDGES & DECORATE AS DESIRED
Trim the bottom crust and overhanging strips so that they’re about 1-inch wide. Fold the bottom crust up over the strips, pinching them shut and creating a ridged edge. Crimp the edges as desired and give your pie a professional chef’s touch by brushing the surface with heavy cream and dusting it with raw sugar.


At this point your pie is assembled and ready! Since you’ve been working with the dough so much, place the pie in the freezer for 15 minutes before baking it. It may seem contradictory to freeze something before baking it, but giving dough a chance to chill and firm up will produce a better crust than trying to bake it while warm and soft.
-*-*-*-*-*-*-*-*-*-*-*-*-*-*-*-*-*-*-*-*-*-*-*-*-*-*-*-*
Blueberry-White Peach Pie
Makes 1 (8- or 9-inch) pie, 8 to 10 servings
16 ounces frozen wild blueberries (do not thaw)
6 white peaches, pitted and cut into wedges
1 1/4 cups sugar
1/4 cup cornstarch
1/2 teaspoon ground cinnamon
1/4 teaspoon ground nutmeg
Pinch kosher salt
Zest and juice of 1 lemon
1 teaspoon vanilla extract or 1 vanilla bean, seeds scraped
1/2 cup all-purpose flour, as needed for dusting
2 discs flaky pie dough (for an 8- or 9-inch pie plate) [Get the recipe HERE]
3 tablespoons heavy cream
3 tablespoons raw sugar
Place rack in the middle of an oven and preheat to 400 degrees F. Gather a deep 8- or 9-inch pie plate, line a baking sheet with parchment paper and reserve both.
In a large mixing bowl toss together the blueberries, peaches, sugar, cornstarch, cinnamon, nutmeg, salt, lemon zest, lemon juice and vanilla extract or seeds. Set aside.
Lightly dust a work surface and rolling pin with flour. Roll one of the pie discs out to a thickness of 1/4-inch. Line the pie plate with the dough, pressing the edges gently into the corners and letting the excess hang over the edge. Transfer the prepared filling to the lined pie dish and mound it evenly. Set aside.
Dust the work surface and rolling pin once more with flour and roll out the second piece of dough to a thickness of 1/4-inch. Cover the filling with the dough as desired - either by placing the dough on whole and cutting a few vents in it or cutting the dough into strips and forming a lattice – letting any excess dough hang over the edge of the pie dish.
Trim the dough hanging over the edge of the pie plate to a width of about 1-inch. Working around the perimeter of the pie dish, roll the bottom overhanging piece of dough over the top, pinching it together and forming a ridge around the pie. Crimp the crust lip as desired. Lightly brush the top piece of dough and crust edge with the heavy cream and sprinkle the raw sugar evenly over top. Place the whole pie into the freezer for 15 minutes.
Bake the pie on the lined baking sheet until the crust is deep golden brown and filling bubbles and has thickened, 75 to 90 minutes. Let the pie cool at least 2 hours before serving warm or at room temperature.
Patrick W. Decker’s life revolves around food. Always has, probably always will. As a graduate of The Culinary Institute of America and past member of the culinary teams for Food Network stars Rachael Ray, Sandra Lee, Marc Forgione, Bobby Deen and Paula Deen, he now works as a food stylist and producer in NYC by day and a food writer and recipe developer at his home in New York’s Hudson Valley by night. You can see what he’s up to by following him on Instagram at @patrickwdecker or visiting his website at patrickwdecker.com .
Whoops she did it again - how to clean your rug when your dog doesn’t make it outside

Accidents happen. Even to the best of dogs. Whether it’s due to illness, old age or he’s been in the house just a little too long, every dog has an accident once in a while (at least in my experience). And there is no mistaking the smell of dog urine on a rug - ugh. The key to getting rid of the smell - and the stain - is to take care of it as soon as possible. If you miss it immediately for some reason, you can definitely use your nose to locate the spot - this is an odor that does not go away.
In the past I had used a rug cleaner that I bought at the store or white vinegar, but the smell lingered. I came across this stain/odor removal method online and I have implemented it twice recently (unfortunately) - it works like a charm. Odor gone, the room smells fresh and clean. Plus, the dog won’t go back to the spot as the vinegar neurtralizes the urine’s odor.
Here are the steps to remove dog urine from a rug (NOTE: always test a small area of your carpet before diving in to this project to make sure your rug won’t discolor - I haven’t had a problem but you never know):
1.) If the area is still wet you should first attempt to absorb the dog urine. Leaving it there to dry out will only encourage bacterial growth which causes the smell. Place several layers of paper towel over the wet urine area and tread on it so as to soak up as much of the dog urine as you possibly can. You may have to repeat this several times until no more dog urine can be soaked up.
2.) Mix a solution of fifty percent white vinegar and fifty percent water. You must use a liberal amount of this solution to reach the carpet fibers deep down. Work the solution into the carpet with a soft brush (or your fingers) to ensure it penetrates the carpet fibers below. Then blot the area using the paper towel method above to absorb the vinegar mixture. The vinegar will neutralize the ammonia in the dog urine.
3.) When the area has dried or almost dried sprinkle a good handful of baking soda over the soiled area.
4.) Mix half a cup of liquid Oxy Clean with a teaspoon of plain dish soap. Adjust quantities according to how large an area of carpet you are dealing with. Slowly pour over the baking soda and work the mixture well into the carpet with your fingers (put on some rubber gloves) or use a brush.
5.) Allow the area to dry completely. Once the area is thoroughly dry, vacuum up the baking soda. A fan or heater can assist drying. Use a hard bristled brush to loosen up the baking soda if necessary.
Rachael Ray's Blog

- Rachael Ray's profile
- 296 followers

