
Adam D. Roberts's Blog, page 9
October 9, 2020
French Green Lentils with Bacon, Red Wine, and Mushrooms

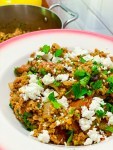
Speaking of being shattered, did I tell you that I shattered my favorite Italian pasta bowl a few weeks ago? Well, someone suggested I go on Replacements.com to find its doppelgänger. I looked at the name of the designer, Richard Ginori, and didn’t find my beloved bowl, but I found so many cool ones, including the one you see above. So I ordered that, and a Pinocchio bowl (you can see it on my Instagram) and last night I decided to cook something to go into it.
One day I’m going to tell you about all of the plates that I buy on Etsy and Ebay. It started a few years ago, after I finished my first TV job, and I was feeling a little flush with cash and instead of buying a new car or a gold watch, I bought a vintage pasta bowl from Italy. That led to the French bread plates with the orange rims, the dessert plates with hot air balloons on them, and then a set of Italian clown plates that arrived shattered. I was shattered too.
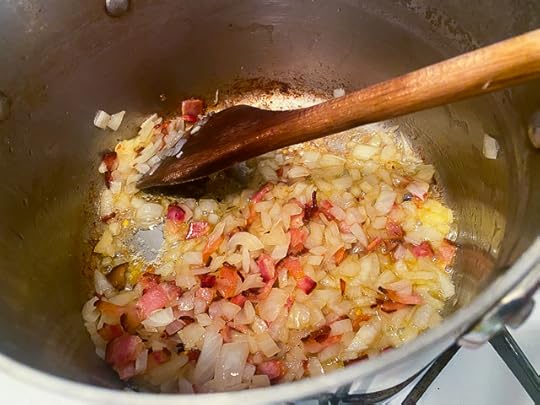
Lentils don’t really get anyone that excited unless you add the “b” word, that word being “bacon.” Bacon is a good thing to keep in your fridge for moments like these, when you don’t really have a protein to make for dinner, but you do have some dried goods and some mushrooms laying around. This dinner started by rendering the bacon and then adding some onion and sliced garlic.

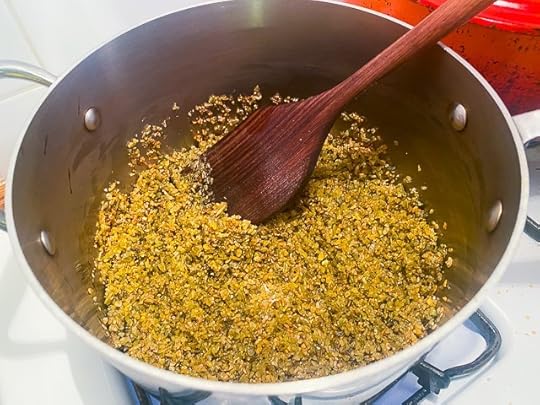
Red wine goes in to deglaze the bottom of the pan and to lend some acidity. You let that cook away (did I mention that you have to cook the lentils first in boiling water for 25 minutes? I’m sorry, I owe you a huge apology) until it evaporates and then you can deal with your mushrooms.

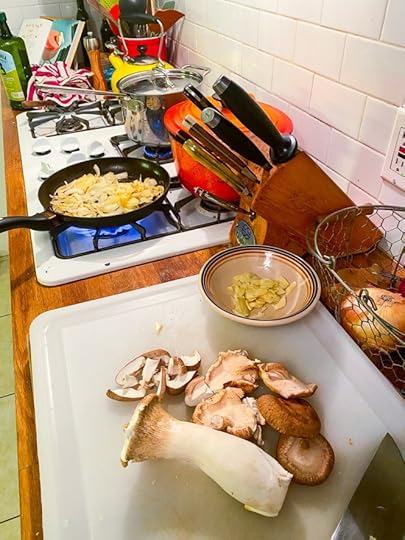
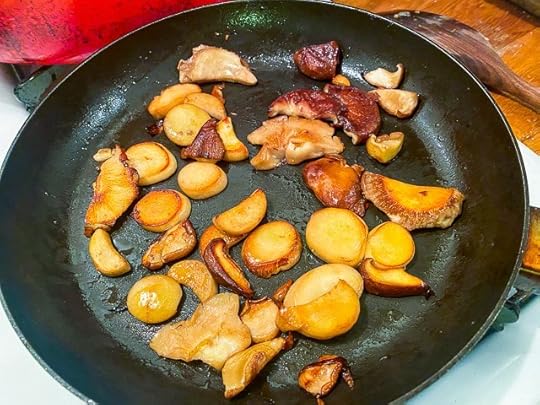
My friend Jonathan, a vegetarian, thinks he hates mushrooms but I told him he probably hates slimy, mushy mushrooms; that I could change his mind if he let me sear mushrooms for him in a hot pan. Searing mushrooms is one of my favorite things to do in the kitchen: just get olive oil or butter very hot in a non-stick skillet, add the mushrooms (button mushrooms here, halved), a little salt, and fire away. I just keep cooking and cooking until they look irresistible, then cook a little more.
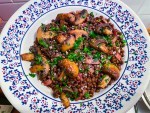
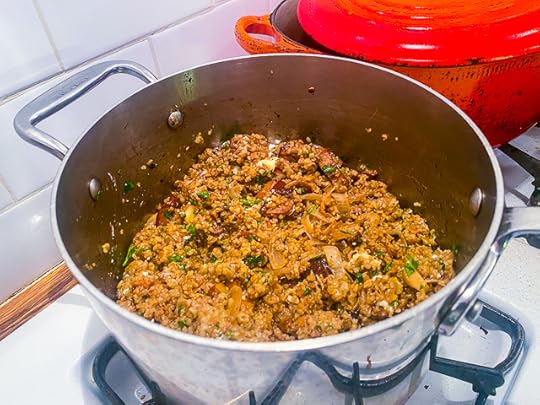
To plate, spoon the lentils into your Etsy bowl, top with the mushrooms, and sprinkle everything with a little parsley and Parmesan.

Welcome to the family, new bowl.
French Green Lentils with Bacon, Red Wine, and Mushrooms
A quick, weeknight dinner that's a little bit healthy, a little bit naughty, and very filling.
Servings 2 people
Ingredients1 cup dry French green lentils, rinsed1 yellow onion, halved; keep one half whole, chop the other half2 bay leavesKosher salt Olive oil4 strips good bacon (I like Neuske's Applewood smoked), cut into lardons4 cloves garlic, sliced thinlyPinch red pepper flakes1/2 cup red wine (whatever you're drinking)1 cup button mushrooms, halvedFinely chopped Italian parsleyParmesan cheese (for sprinkling)
InstructionsStart by cooking your lentils. Bring a pot of water to a boil, add your lentils, the not-chopped half of the onion, the bay leaves and a big pinch of salt. Cook for 25 minutes, then check for doneness. (The lentils should be totally cooked through and a little bit creamy.) Strain, conserving the lentil cooking liquid. Remove the cooked onion and the bay leaves.In that same pot, add a splash of olive oil and the bacon. Turn the heat to medium/high and begin rendering the bacon fat; don't go too fast, or it'll get dark before all of the fat renders. When the bacon looks deep golden brown and there's lots of fat in the pan, add the chopped onion and a pinch of salt. Cook until the onion softens, then add the garlic and the red chili flakes (to taste), cooking until the garlic starts to brown.Add the red wine and use it to pick up the brown bits on the bottom of the pan. When the wine evaporates, add the lentils back in, a big splash of the cooking water (about a cup), and a big pinch of salt. Cook until the liquid is almost entirely evaporated, then set aside.In a non-stick skillet, heat 1/4 cup of olive oil on high heat and, when very hot, add the mushrooms and a pinch of salt. Cook the mushrooms, stirring occasionally, until deep golden brown on all sides. Off the heat, add some of the chopped parsley.To plate: spoon the lentils into a bowl and top with the mushrooms, more parsley, and a sprinkling of Parmesan cheese.
Related Posts:
One Bag of Lentils, Two Dinners
Stewed Lentils with Bacon and Herbs (Anne Burrell, Food Network)
Lentils with Pancetta and Cream (Florence Fabricant, NYT)
The post French Green Lentils with Bacon, Red Wine, and Mushrooms appeared first on The Amateur Gourmet.


October 7, 2020
Spiced Pork Chops with Delicata Squash and Apple Chutney

Making new friends is always a treat but difficult to do when you’re supposed to avoid social gatherings and remain six feet apart while masked. Luckily, I made two new friends last year when the food writer Ben Mims and his partner J made the same move that we made back in 2011 from New York to L.A.
Ben moved here to write for the L.A. Times (his recipes are top notch; I made his tamarind lamb shanks last night and they were dreamy); we met for dinner at a steakhouse on Hollywood and Vine and he told hilarious stories about growing up in Mississippi, then told even funnier stories on my podcast Lunch Therapy.
Ben and J had a small holiday gathering last December and it was there that I met another food writer that I’ve long admired, Nik Sharma, who had just moved here from San Francisco with his husband, Michael. Of course, I pressured him to come on my podcast too (I’m a podcast bully), more recently my Instagram live, where we made a plan to go with Ben to the Hollywood Farmer’s Market this past Sunday.

Such a formidable trio the market hasn’t seen in ages!
Ben acted as the market tour guide, pointing out the best place to get lettuce and berries and, for our purposes today, he pointed out a great place to procure pork, called Peads and Barnetts.

The pork chops that I got here, as you’ll see in a moment, were such beautiful specimens — marbled with fat, on the bone — even a first-time pork chop chef would have a hard time screwing them up.
I also spied Delicata squash at the market and I brought a few of those home with me too (paying for them first, of course!).

Finally, I bought a few apples (Ben recommended the Crispin) and suddenly a vision of a dinner started to appear; an autumnal dinner, one that would be very brown, but in a good way.
I started by making Ina Garten’s apple chutney. Making your own chutney may sound intimidating, but basically you throw a chopped onion into a pot with a few chopped apples (okay, you should core and peel them first), then some cider vinegar, brown sugar, ginger, mustard seeds, and red pepper flakes.
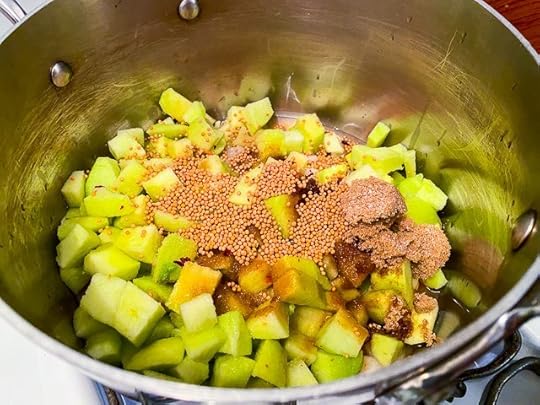
Crank up the heat, wait for a boil, lower to a simmer, and 45 minutes later you have chutney (then you add raisins, unless you hate raisins, in which case… don’t add them).
Delicata squash may be my favorite squash to cook because you don’t have to cut off the skin (many a finger has been lost to a butternut squash). You just cut the squash down the middle, scoop out the seeds, then slice into little half moons. I tossed with olive oil, a little maple syrup, salt and pepper…
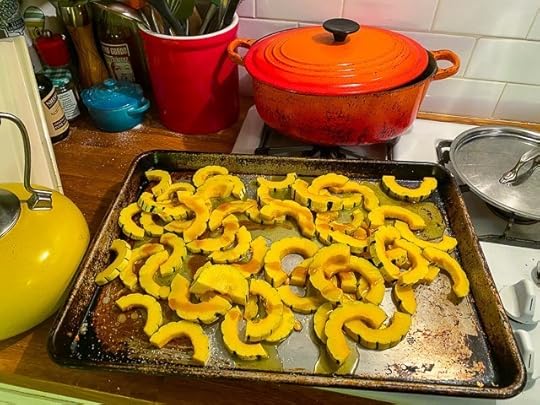
…and roasted at 425 until it was golden brown all over, flipping halfway through.
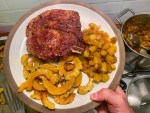
Now for those pork chops! Here’s what I do: I coarsely grind fennel seeds, coriander seeds, and peppercorns in a spice grinder, bring the chops to room temp, season them with lots of salt and then the spices. Then I heat a cast iron skillet on high heat, add the tiniest splash of grapeseed oil just to coat the bottom of the pan (but not like a layer of oil, just a slick of oil), and when it starts to heat I put the chops in fat side down first.

As the fat renders, the pan gets hotter and hotter and even more fat coats the bottom of the pan. Then, when that side is pretty golden brown, I carefully lay the chops flat-side down into the skillet. Cook on one side until golden, then flip.

You can finish in a hot oven, but I like to finish in the skillet. I just keep flipping until a thermometer inserted into the center of the chop reads 135/140.
Let them rest, serve with the apple chutney and the squash, and wash down with some French apple cider if you’ve got it. (We didn’t have it, I don’t know what made me say that.)
It’s a dinner that sings “fall!” and “new friends!” even though I didn’t invite my new friends over to eat this. But when Covid’s over, you better believe, I’m going to make some new friends and feed this to them (sorry, Ben and Nik, I just used you for my podcast).
Spiced Pork Chops with Delicata Squash and Apple Chutney
IngredientsFor the apple chutney:6 Granny Smith apples, peeled, cored, and half-inch diced1 cup chopped yellow onion2 tablespoons minced fresh ginger1 cup freshly squeezed orange juice (2 oranges) for an extra thrill, put the orange zest in with everything3/4 cup apple cider vinegar1 cup light brown sugar, lightly packed1 teaspoon whole dried mustard seeds1/4 teaspoon hot red pepper flakes1 1/2 teaspoons kosher salt3/4 cup raisinsFor the delicata squash: 3 delicata squash1/4 cup maple syrup1/4 – 1/2 cup olive oilSalt and pepperFor the pork chops:3 tablespoons coriander seeds3 tablespoons fennel seeds1 tablespoon black peppercorns2 bone-in, well-marbled pork chops, left at room temperature for an hour It's really important to get two thick, fatty chops with the bone; otherwise, they'll come out dry. Best to get from a butcher.Kosher saltGrapeseed oil or other neutral oil
InstructionsStart by making your chutney: combine all of the ingredients, except the raisins, in a large saucepan. Bring to a boil, lower to a simmer, stirring occasionally, and cook for 50 minutes to an hour until most of the liquid is evaporated. Take off the heat and add the raisins.To make the squash, heat the oven to 425. Slice the squash in half lengthwise, scoop out the seeds, and slice into 1/2 inch rings. Toss on a cookie sheet with the maple syrup, enough olive oil to coat everything, and lots of salt and pepper. Roast in the oven for 20 minutes, flipping halfway through, until the squash is deep golden brown on both sides.To make the chops, grind the coriander seeds, fennel seeds, and peppercorns in a spice grinder just until coarsely ground (you don't want a powder or it'll burn). Season the chops all over with lots of salt and the spice mixture.In a large cast iron skillet, heat a splash of the grapeseed oil until very hot. Lay the chops in on their side with the fat-side down. Render the fat until golden brown, then lay the chops flat in the skillet — they should sizzle — and cook, without moving, for 2 to 3 minutes until deep, dark brown. Flip over and cook on the other side. Start taking the chops' temperature in the middle — you're shooting for 135. Keep cooking, flipping every few minutes, until you reach that temperature.Remove the chops to a plate and let rest for 5 to 10 minutes. Serve with the squash and lots of the chutney.
Related Posts:
The Secret To Killer Pork Chops at Home
Quick-Brined Pork Chops with Pan-Fried Cauliflower
Pork Chop Paprikash (Ben Mims, L.A. Times)
Coconut Chutney (Nik Sharma, A Brown Table)
The post Spiced Pork Chops with Delicata Squash and Apple Chutney appeared first on The Amateur Gourmet.

October 5, 2020
Five Weeknight Dinners That’ll Make Your Week Better

Some of you may know that my husband Craig is a director. Last week he went back to work, directing four episodes of our friend Ryan O’Connell’s Emmy-nominated Netflix show Special. The protocols on set are intense, as they should be during Covid. Craig gets tested almost every morning, he wears an N95 mask all day, and when he gets home after a thirteen hour day he’s super tired because of all the extra rigamarole Covid’s causing.
That’s where I enter the picture. I remember one of the first cookbooks that I ever bought was Nigella Lawson’s How To Be A Domestic Goddess and, even though I have my own work to do during the day (I have a few projects in the works!), at night I’ve blossomed as a true domestic diva. Here are the five dinners that I made last week each night that Craig came home from work. They certainly made our week better, maybe they’ll help with yours.
Meal One: Parmesan Chicken Cutlets with Fennel Orange Salad.

In a week of excellent dinners, this was probably our favorite. It’s Ina Garten’s favorite thing to make and you don’t really need a recipe. Here’s all you do: buy some boneless, skinless chicken breasts (one per person is plenty), put each between two pieces of plastic wrap, and smack with a rolling pin until flat.
Then set up three pie tins or cake pans: in one put flour (about a cup or two), in one put three eggs that you whisk, and in the third breadcrumbs (ideally Panko, though my store ran out so I used Progresso plain bread crumbs). Season each of the components with salt and pepper, season the chicken breasts, then dredge them through each: first the flour, then the egg, then the bread crumbs. If you’re feeling fancy, you can put some ground Parmesan in with the breadcrumbs (that’s what I did here).
Heat 1/2 inch of neutral oil in a cast iron skillet and when it’s hot (toss in a few breadcrumbs; if they sizzle, it’s hot), carefully lower in your chicken and fry until deep golden brown on one side, then finish on the other side.

To serve, I made a fennel orange salad by slicing fennel on a mandoline slicer (one of the best times to use your mandoline is for fennel), cutting the peel off the orange and then slicing, and adding a good glug of olive oil, a splash of white Balsamic, salt, pepper, and chopped parsley.
Together, the salad and the chicken were great foils. The acid from the white Balsamic cut the richness of the fried chicken cutlet. A four star weeknight meal and not that hard to make.
Meal Two: Deconstructed Eggplant Parm.

The recipe for this one lives on my blog, though the chef whose recipe inspired it is something of a pariah. Let’s focus on the technique, then, which is pretty straight forward: you slice eggplant, rub with olive oil, sprinkle with salt and pepper and roast on cookie sheets in a 450 oven. Meanwhile, you make your favorite tomato sauce (mine’s basically olive oil, onions, garlic, red chili flakes, tomato paste, and two cans of San Marzano tomatoes).

To assemble, you layer in the roasted eggplant, the sauce, slices of fresh mozzarella, lots of Parmesan cheese…
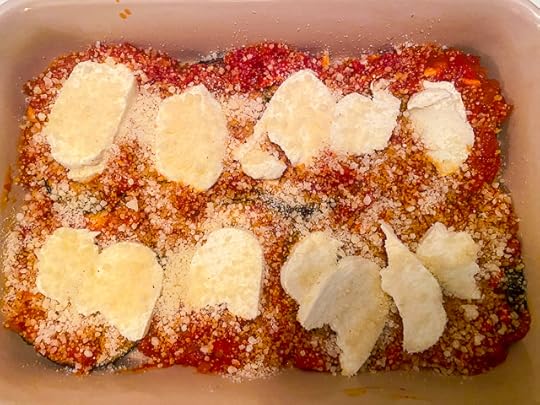
…then you do it again and top the whole thing with breadcrumbs that you cook, briefly, on the stove top with olive oil, salt, and pepper. Pop that into the oven (now at 350) and after twenty minutes, it should be bubbling and the cheese should be melted. If you’re like me, you’ll want to turn on your broiler to get it extra crispy on top. A dreamy weeknight meal, and not that hard!
Meal Three: Ziti with Arugula Pesto and Roasted Cauliflower.

This was so easy and so fast. Have I told you my arugula pesto technique? Let me check. Ah: I have in this post about pistachio arugula pesto. Well this one is the same thing, only I changed the nut.
What’s so great about arugula pesto is that you don’t have to sit there picking leaves off a stalk of basil. You just tear open a bag of arugula, shove it in your food processor with toasted nuts of your choice and garlic, then slowly add olive oil until you have what looks like pesto. Then add a ton of Parmesan. The addition here is roasted cauliflower, for health purposes. Use any roasted cauliflower technique that you like. Me? It’s a 425 oven, olive oil, salt, and pepper on a cookie sheet until the cauliflower is golden brown all over and easily pierced with a knife.
Meal Four: Roasted Sausages with Onions and Potatoes.
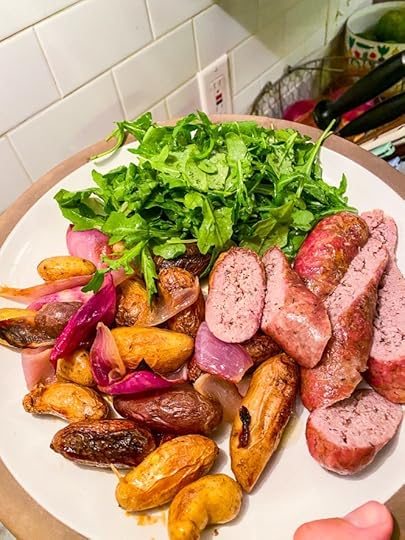
This is one you’re going to want to memorize. It has a lot in common with my go-to roasted chicken technique, except in this case you’re doing it with fat sausages (it works best with fat sausages from the butcher because of all of the fat that’ll help coat the potatoes).
Preheat your oven to 425. Put little potatoes in a cast iron skillet with a red onion peeled and cut into wedges. Toss the veg with oil (I think I used olive oil), salt and pepper, and place the sausages — these are fennel thyme sausages from McCall’s Meat & Fish — on top. Cut some slits into them, to stop them from exploding, and drizzle with a little more oil.

Into the oven it goes for 20 to 25 minutes, until the sausages register 160. Then you take the sausages out of the pan, toss the veg around a bit, and pop back into the oven until they’re deep golden brown and just look delectable and amazing.
I sliced the sausages on the bias and served with lots of grainy mustard. YUM.
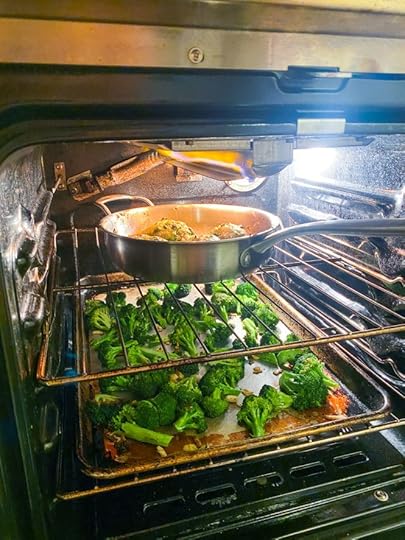
Meal Five: Pesto Chicken Thighs with Roasted Broccoli.

Finally, I had some leftover arugula pesto from the pasta night, so I slathered it all over some chicken thighs and also shoved some of it under the skin. I put the thighs into a skillet and roasted in the oven at 425 until they registered 165 on a thermometer and then, unhappy with their color, I blasted them under the broiler while, on the lower shelf, I was making the best broccoli of your life.
‘Twas a lovely end to the week and a good repurposing of leftovers.
Now before you ask “how do you eat all this and not gain five hundred pounds,” I just stepped on the scale and I think that I did. But at least Craig was comforted after work and, as for me, this week it’s all salads and Jane Fonda workouts. It’s hard work being a domestic goddess.
The post Five Weeknight Dinners That’ll Make Your Week Better appeared first on The Amateur Gourmet.

September 30, 2020
Oatmeal Raisin Cookies That Will Keep You Sane

I don’t know about you, but my head started to crack a bit like an egg last night thirty minutes into the debate. And instead of throwing that egg into a skillet by continuing to watch (“this is your brain on Trump”), I decided to turn off the TV and crack a few eggs for real.
Making cookies is self-care in 2020. True, cookies are self-care at most times, but that’s especially true now. These cookies — chunky oatmeal raisins, maybe the best I’ve ever made — are from Arezou Appel, the founder and baker of Zooies Cookies (the recipe was published this week in The LA Times ), a cookie shop in a gas station in Cheviot Hills.

What makes the cookies so good? Little touches. There’s a lot of butter, always a good sign. There’s a mixture of both old-fashioned oats and instant oats, all-purpose and whole wheat flour, which helps the texture. There’s ample spices — lots of cinnamon and nutmeg — and there’s lots of raisins. (Let’s not debate about raisins right now, we’re all too exhausted.)

These cookies will provide cheer and sustenance as we stumble into October and then, finally, November when we can finally vote this *insert expletive here* out.
Until then, let’s all just try to stay sane with cookies.
Oatmeal Raisin Cookies That Will Keep You Sane
A recipe for chunky oatmeal raisin cookies from Arezou Appel of Zooies Cookies.
Servings 3 dozen cookies
Ingredients2 cups all-purpose flour1/4 cup whole wheat flour1 1/2 teaspoons fine sea salt1 1/2 teaspoons ground cinnamon1 teaspoon baking powder1 teaspoon baking powder1 teaspoon baking soda2 large eggs, room temperature1 1/4 cups unsalted butter, room temperature That's about 2 1/2 sticks.1 cup granulated sugar1 cup dark brown sugar1 tablespoon pure vanilla extract3 cups old-fashioned oats1/4 cup quick-cooking oats1 1/2 cups raisins You could also use dried cherries, cranberries, or currants (like I did because I ran out of raisins).
InstructionsHeat the oven to 375 degrees.Whisk together your dry ingredients: the flours, the salt, cinnamon, nutmeg, baking powder, and baking soda in a medium bowl. (Truthfully, I skip this step and just add all of the dry ingredients later.)Beat the butter and both sugars in a stand mixer with the paddle attachment on medium speed until creamy and very smooth. With the machine running, add the eggs one and a time, and then the vanilla. Scrape down the sides of the bowl with a rubber spatula, then add of your dry ingredients. Mix briefly — you should still see streaks of flour — then add all of the oats and raisins. Mix just until incorporated.Use an ice cream scoop to scoop mounds of dough on to parchment lined cookie sheets, spacing them 2 inches apart. Slightly pat the cookies down and then bake 14 to 16 minutes, until golden brown around the edges and dry on top. (Note: the original recipe has you refrigerate the dough first for 3 hours and up to 24 hours, but I don't want to drive you any more insane than you already are.) Cool on the sheet on a wire rack for 5 minutes then transfer cookies to the rack to cool completely.
Related Posts:
European-Style Oatmeal Raisin Cookies
“Baked” Oatmeal Cookies with Cardamom
Very Good Chocolate Chip Cookies
Oatmeal, Chocolate Chip, and Pecan Cookies (Smitten Kitchen)
Spicy Chocolate Chip Cookies (A Brown Table)
The post Oatmeal Raisin Cookies That Will Keep You Sane appeared first on The Amateur Gourmet.

September 28, 2020
“This Is Not A Waldorf” Salad
You don’t often think about turning on your oven to make a salad, but that’s exactly what I did after flipping through Suzannne Goin’s AOC Cookbook during the build-up to lunch on Saturday. My usual salads are normally quick affairs of tearing up some lettuce, drizzling on some good olive oil (lately it’s Séka Hills), and my beloved white Balsamic.
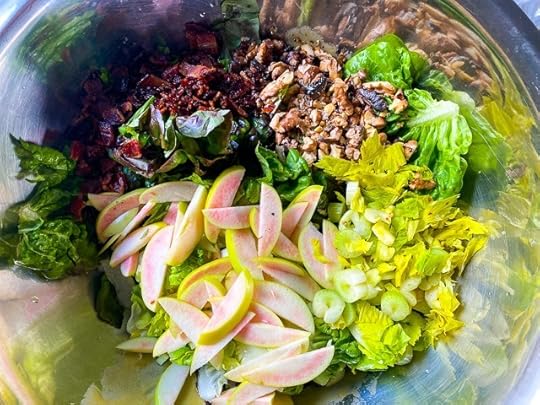
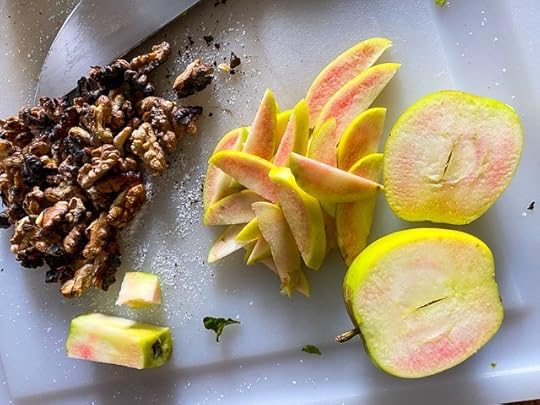
Chef Goin has you toast walnuts in the oven for her chopped salad (which this isn’t), but I liked the idea. As I was getting ready to do that, I remembered Nicole Rucker’s trick of cooking bacon on a cookie sheet at 375 (see: my most excellent BLT). So I popped some bacon in there along with the walnuts and suddenly this salad was seeming very promising.

As for the other elements, I bought some Pink Pearl apples from All Time in Los Feliz which I was very excited about because, get this, they’re pink on the inside.
I also bought what I thought were shallots but were kind of spring onions? (Actually, I think they’re shallots again.) Plus I had some wilting celery in the fridge which I brought back to life in a bowl of very cold water and then sliced.
As for the dressing, I whisked together a big spoonful of Dijon, a splash of Sherry vinegar, and enough olive oil to emulsify. I do all of this in a big bowl, then pour all of it out, add the lettuce, the celery, the apples, the spring onions/shallots (scallions are a good alt), the chopped toasted walnuts, and the chopped crispy bacon, and toss everything with just the residual dressing and add more if necessary. Then, at the very end, I add some crumbled Feta (Roquefort would’ve been more ideal, but Feta was a good substitute).

As you can see, this is not a Waldorf salad — no mayonnaise, no grapes, it’s not gloppy — but it’s in the world of a Waldorf salad. And that key combination of apples, toasted walnuts, crispy bacon, and cheese (either Feta or Roquefort) is so dreamy, you can call it whatever you want, you’ll be too busy stuffing your face to worry about a name.
So the next time you’re making a salad, move to the oven before you move to the refrigerator if you know what’s good for you.
“This Is Not A Waldorf” Salad
Ingredients5 strips raw bacon, preferably Applewood smoked I like Neuske's.1/2 cup walnuts1 heaping Tbs Dijon mustard3 Tbs Sherry vinegar1/4 – 1/2 cup olive oilSalt and pepper2 small apples, cored and sliced thin2 pieces celery, sliced (plus leaves, if you have some)1 bunch scallions, sliced (both white and green parts)2 cups assorted lettuce leaves (Boston lettuce, little gem, etc.), torn1/2 cup crumbled Feta or Roquefort or other blue cheese that you like
InstructionsHeat the oven to 375. Place the bacon strips on a foil-lined cookie sheet and bake until crispy, about 15 – 20 minutes. Carefully remove and pour off the bacon fat for another use.Meanwhile, toast the walnuts on a separate cookie sheet. Cook 5 to 7 minutes until fragrant and a golden brown.Let the first ingredients cool while you make the dressing. In a large bowl, whisk together the Dijon and Sherry vinegar and add oil, a little at a time, until it emulsifies. Taste and if it's too acidic, keep adding oil. Season with salt and pepper. Then pour the dressing out into a small bowl.In the same large bowl, add the apples, the celery, the scallions, the lettuce, the chopped walnuts (oh yeah: chop the walnuts), and the crumbled bacon (you can crumble it or chop it with a knife). Toss with the dressing that's already coating the bowl and add more dressing as you need it. Add the crumbled cheese, continue tossing, and taste for salt and pepper.
Related Posts:
Blood Orange, Date, and Parmesan Salad (Suzanne Goin, NYT)
Arugula, Grape, and Almond Salad with Saba Dressing (Suzanne Goin, Bon Appetit)
The post “This Is Not A Waldorf” Salad appeared first on The Amateur Gourmet.

September 23, 2020
Get Your Freekeh On with Balsamic Mushrooms, Caramelized Onions, and Feta

Sometimes I do Q&As on Instagram and lots of people have been asking me lately how I shop for the week.
The answer: I do a Supermarket Sweep every Monday at Cookbook in Echo Park. It’s a SuperMarket Sweep because you get the store to yourself, but you only get ten minutes, so you have to go as fast as you can. Here’s my strategy: dry goods first (Rancho Gordo beans, pastas, ancient grains like freekeh (more on that in a sec)), fruits and vegetables next (I load up on as many as I can; I feel like you can’t buy too many fruits and vegetables during Covid, they can go into salads, side dishes, desserts), and, finally, I buy three proteins to dole out over the week. One of those proteins is almost alway sausage because sausages work in soups, pastas, or you can cook them whole in tomato sauce and serve over polenta.
The biggest challenge for me has been: vegetarian dinners. My default, as you can probably guess from my archives, is almost always pasta. My other default is beans. And when we’ve had enough from those categories, I turn to… ancient grains like freekeh. I told you I’d come back to it.
Freekeh, as mentioned twice now, is an ancient grain, a superfood like quinoa, spelt, and farro, that’s made from wheat harvested early. I cook it, according to the package directions, by toasting it in olive oil (similar to how I toast oatmeal in the morning), then adding water, salt, pepper, and letting it simmer with the lid on for thirty minutes.
The other ingredient I had on hand from the last sweep through Cookbook was a bevy of assorted mushrooms. I did some Googling — “Ottolenghi mushrooms” was my search — and actually found a recipe of his featuring bulgur and mushrooms. I figured it would work just as well with freekeh and, sure enough, it did.
When I encounter a recipe like that online, these days, I don’t print it or follow it to the letter. I just read it and get the gist; then I riff on it.
So, in this case, I cooked the onions and garlic in a pan, as he suggests, and then I seared the mushrooms in that same pan. I used my strange technique of adding olive oil, getting it hot, adding the mushrooms, letting them color, and then — here’s where it gets strange — adding a splash of water. I do this because I don’t love the texture of mushrooms that don’t cook down a bit in liquid; it gives them a chance to soften and cook through before the water evaporates and they sear again.

Once that happens, you add a splash of balsamic (those are the first batch of balsamic mushrooms on the left) and let the liquid cook away. The second time I did that, I shook the pan — which was very hot — and some of the oil must’ve caught on the burner, because the entire pan ignited into flames. It was very Top Chef just as Craig walked into the kitchen. I think he was impressed. (He would’ve been less impressed if I’d caught the whole kitchen on fire.)
To finish, you toss the balsamic mushrooms, the sauteed onions and garlic, with the freekeh, along with some Urfa chili, chopped parsley (Ottolenghi calls for dill, which I didn’t have), and crumbled Feta.
It makes for a hearty, surprisingly nutritious dinner that doesn’t involve pasta or beans. As long as you don’t burn down your kitchen doing it, you’ll definitely be adding this to the rotation.
Freekeh with Balsamic Mushrooms, Caramelized Onions, and Feta
A riff on a recipe by Yotam Ottolenghi with surprising pops of flavor.
Ingredients1 package freekeh (250 grams) I like the Canaan brandOlive oilSalt and freshly ground pepper1 yellow onion, sliced thin4 cloves garlic, sliced thin2 cups assorted mushrooms, wiped clean, stemmed (unless the stems are edible), and slicedBalsamic vinegarUrfa chili (to taste)Chopped parsleyCrumbled Feta
InstructionsCook the Freekeh according to package instructions. You should monitor the heat when the freekeh is simmering; if it drinks the water too quickly, you may need to add more and lower the heat. Taste for salt and pepper.In a non-stick skillet, heat a splash of olive oil (about 3 tablespoons) until hot. Add the sliced onion and let cook, without salting, until it starts to turn dark brown. Add the garlic and continue cooking, monitoring the pan, so nothing burns. When everything is good and golden, add a pinch of salt, stir around, and add to the pan with the finished freekeh.In that same skillet, heat another 3 tablespoons of olive oil, and add half of your mushrooms, plus a pinch of salt. Allow to sizzle; if no liquid is released, add a splash of water and let the mushrooms simmer until the liquid evaporates. Continue to sear until the mushrooms are a deep brown. Carefully add a splash of Balsamic vinegar — don't shake the pan too much or the oil might ignite! — and cook until the liquid is absorbed. Stir the mushrooms into the freekeh and repeat again with the second batch of mushrooms.To finish, stir in Urfa chili to taste (it takes a lot to really taste it). Add chopped parsley and as much Feta as you like. You can eat it right away or let sit and eat later.
Related Posts:
Fun Times with Farro: Cauliflower and Cara Cara Oranges, Smoked Trout and Parmesan
Freekeh Tabbouleh with Harissa-Roasted Chickpeas (Chef Heidi Fink)
Freekeh, Chickpea, and Herb Salad (Martha Rose Shulman, NYT)
Triple-Herb Freekeh (Food Network)
The post Get Your Freekeh On with Balsamic Mushrooms, Caramelized Onions, and Feta appeared first on The Amateur Gourmet.

September 21, 2020
Julia Moskin’s Corn Fritters

According to Pulitzer Prize-winning food writer Julia Moskin, “Corn is the One True Vegetable of American summer.”
And though I sound like a broken record talking about trying to cook all of the summer things before it stops being summer (an unlikely prospect here in L.A.), I do have to make some time for corn here. I already told you about my skillet chicken breasts with peppers, corn, and scallions, and that’s basically how I’ve been doing corn all summer: cut straight off the cob (see that post for the technique involving a bowl inside a bowl) and cooking it in a skillet with aromatics and some kind of fat (butter, olive oil, bacon fat, or in that post, chicken fat).
But this time around I wanted a peppy appetizer that featured corn in its purest form. Enter Julia Moskin’s corn fritter recipe.

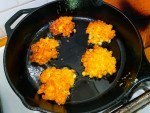
This is a dangerous corn fritter recipe in that the corn is barely held together by the flour and wet ingredients. You’ve got some cornmeal, some flour, some spices, a little milk (I used buttermilk), and an egg, and then tons of fresh, sweet summer corn.
When they hit the skillet, I’ve got to admit I started to doubt the recipe. It looked like wet corn sizzling in a skillet, not something that was going to come together into an incredible fritter. But after a few minutes, I flipped them over and…

…they were golden, crispy and almost impossible not to eat straight out of the skillet.
Imagine crispy cornmeal pancakes brimming with fresh corn kernels and you’ll get the idea. And though I made a whole stink about this being the last taste of summer, blah blah blah, you COULD make this with frozen corn anytime of the year. Though I do think, unlike frozen peas, frozen corn doesn’t taste as good as fresh corn at the height of summer. So if you see those fat cobs of corn in their husks at the supermarket, grab a few and make these fritters. Please pay for them first.
Julia Moskin’s Corn Fritters
The perfect crispy corn appetizer to celebrate this sweet ingredient at the end of summer.
Ingredients3 ears sweet yellow corn husked, silks removed, and then cut off the cob into a bowl Best to do this on a little bowl set upside-down in a larger bowl to catch all of the kernels.1/3 cup milk or buttermilk1 large egg1 tsp sugar1/2 tsp baking powder1/2 tsp salt, plus more for sprinklingPinch cayenne pepper1/2 tsp smoked paprika This is my own addition.1/4 cup cornmeal1/4 cup flourVegetable oil, for cookingMaple syrup, for serving I skipped this but sounds great.
InstructionsMix the corn with the milk, egg, sugar, baking powder, salt, cayenne, and smoked paprika. Mix in the cornmeal and flour and let rest for ten minutes.In a cast iron skillet, heat a few tablespoons of vegetable oil over medium-high heat. Drop heaping tablespoons of the batter into the hot fat, let cook for a few minutes until golden brown, then flip and finish on the other side.Remove cooked fritters to a tray, pat dry with paper towels, sprinkle with salt, and if not eating right away, keep warm in a 200 degree oven.
Related Posts:
Cookfight! Kim Severson vs. Julia Moskin
Julia Moskin’s Steak with Sam Sifton’s Potatoes
Julia Moskin’s Caramelized Corn with Fresh Mint (The Wednesday Chef)
Roasted Corn Cobs with Serrano Mint Sauce (A Brown Table)
The post Julia Moskin’s Corn Fritters appeared first on The Amateur Gourmet.

September 18, 2020
Peach Ice Cream
Romeo asked, “What’s in a name? That which we call a rose, by any other name would smell as sweet.”
The same can be said of ice cream flavors. If we didn’t call Cookies & Cream “Cookies & Cream,” would it still taste like Cookies & Cream? Ice cream is an arena where names seem to matter. We love a Jeni’s flavor called “Brambleberry Crisp” but would we love it as much if she had called it “Soggy Blackberry Mixture with Oats?” I don’t think so. Which is why, for this post, about ice cream made with the ripest, end-of-summer peaches, I’m sticking to the simple and direct: this is a post about Peach Ice Cream, plain and simple.
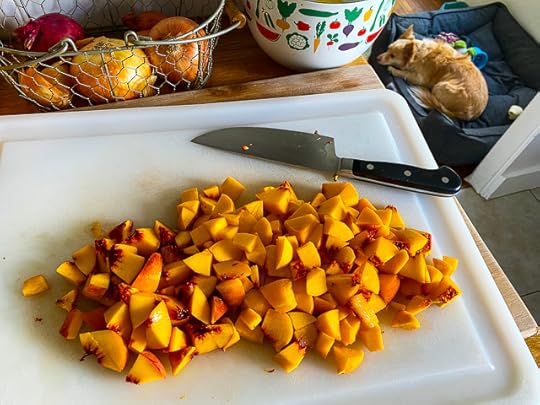
I’ve been waiting a week to make this ice cream. I bought the peaches a week ago — yellow peaches, some with red skin, some all yellow — but they were hard as a rock. I knew there’d be no point making peach ice cream if the peaches weren’t fragrant and juicy. So, with the patience of a saint, I waited and then the moment came. I chopped the peaches and mixed them with sugar, lemon zest, and lemon juice, per the recipe in La Grotta Ices by Kitty Travers. (This is her favorite flavor in the whole book.) Then, again with the patience of a saint, I popped that into the fridge and let it macerate overnight.

I also made a simple ice cream base with milk, cream, sugar, salt, and egg yolks that also spent the night in the fridge.
When the big moment came, it was as simple as blending the two components together with a stick blender.

Then straining out the skins. I did it over a giant measuring glass to make it easier to pour into the ice cream maker (everyone should have a giant measuring glass in their lives). Be sure to press down with a spoon to extract all of the liquid.
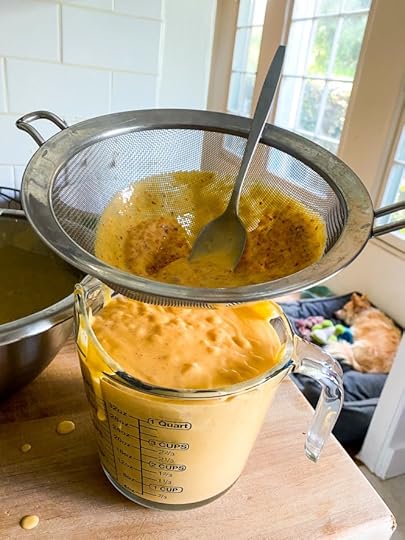
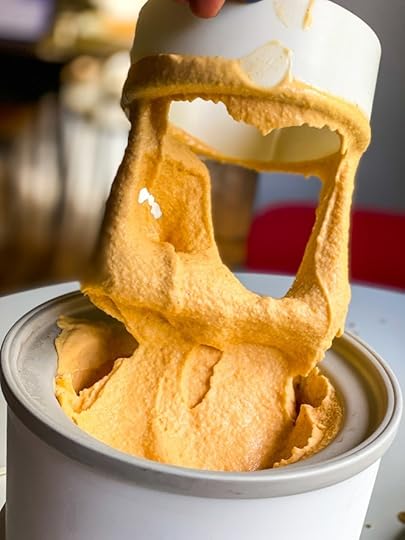
Finally, it was a simple matter of pouring that into the frozen canister and letting the ice cream maker churn. A lot of people ask me what kind of ice cream maker I have; the answer is a simple Cuisinart with a canister that stays in the freezer until I’m ready to make ice cream.
This one churned up in about twenty minutes; Kitty Travers says to stop when it’s “the texture of whipped cream.” I transferred as much ice cream as I could to a soup container to place in the freezer, but then I went to town with a spoon, eating the bits that didn’t make it into the soup container. You know that cliché about eating a perfect summer peach over the sink with the juices dripping down your arms? Well try the non-clichéd version and eat peach ice cream straight out of the ice cream canister with the peach ice cream dripping down your arms. It’s heaven.

That night I served two scoops to Craig after dinner. Peaches are his favorite fruit and his face lit up as he tried this and he said it reminded him of a Dixie Cup with the freshest ingredients; almost like a Creamsicle. I took all of this as a compliment. Kitty Travers says this is “best consumed when it’s freshly made, or at least within a week, as the flavour is soon lost” which is basically a permission slip to finish the whole thing this weekend. That shouldn’t be a problem.

Peach Ice Cream
An end-of-summer delight using the ripest peaches and a simple ice cream base.
Ingredients4 large ripe peaches (about 650 g) Be sure to let the peaches really ripen — they should be fragrant and soft — or it won't be worth it.1 lemon, zested and juiced210 g sugar You'll need a kitchen scale for this recipe. Sorry! (Or you can cheat and let Google do the conversions.)1 cup whole milk1 cup heavy creamPinch sea salt4 egg yolks
InstructionsStart by prepping the peaches. Rinse them, halve them, pit them, quarter them, then chop. Place in a large bowl with the lemon zest, lemon juice, and 50 grams of the sugar. Stir gently, cover with plastic wrap, and place in the fridge overnight. Make the ice cream base by bringing the milk and cream, plus a pinch of salt, to a simmer, stirring now and then. Meanwhile, start whisking the egg yolks with the rest of the sugar. Temper the egg yolks by pouring some of the warm milk mixture in, whisking furiously, then slowly adding the rest (this prevents the eggs from scrambling). Pour the mixture back into the pot and stir constantly, over low heat (I got impatient and put it on medium), with a heat-proof rubber spatula, until the temperature reaches 180 degrees F. Immediately pour into a soup container, let cool a bit, then cover and refrigerate overnight.The next day, pour the custard over the peaches and use a stick blender to blitz for two minutes, until there are only small flecks of peach skin visible in the mix. Press the peach custard through a fine-mesh sieve into a clean container (I used a large measuring cup), squeezing hard to extract as much smooth custard as possible. Discard the peach skin.Pour the mixture into your ice cream machine and churn for about 20 to 25 minutes, until frozen and the texture of whipped cream.Transfer whatever you can to a container and freeze and whatever's left you should eat right away. It'll be the highlight of your day.
Related Posts:
Double Vanilla Bean Ice Cream (Amateur Gourmet)
Darkest Chocolate Sorbet (Amateur Gourmet)
This Blackberry Peach Crisp is Summer in a Pan (Amateur Gourmet)
La Grotta’s Mint Chip (Vogue)
Apricot Noyau Ice Cream (The Happy Foodie)
The post Peach Ice Cream appeared first on The Amateur Gourmet.

September 16, 2020
Cap Off Your Summer with Caponata

Okay, we have a week left of summer and I’m milking it for everything it’s worth. Right now I have peaches ripening in my fruit bowl and I’m going to make peach ice cream, probably the last ice cream I’ll make for a while. It’s not that summer truly ends here in L.A. — if anything it keeps going and going and going — but at some point, as a seasonally-focused home cook, you’ve gotta embrace the calendar. So right now it’s tomato salads galore; next week it’ll be pumpkin bread.
And a great transitional dish? Caponata. “What’s caponata?” you ask. Think ratatouille with the dial turned up to eleven. Instead of a bunch of stewed summer vegetables, you have deeply browned eggplant, earthy celery, briny capers, and then red wine vinegar, sugar (yes, there’s sugar), and white wine. It’s sort of like an eggplant pickle but also an eggplant salad and also an eggplant condiment.
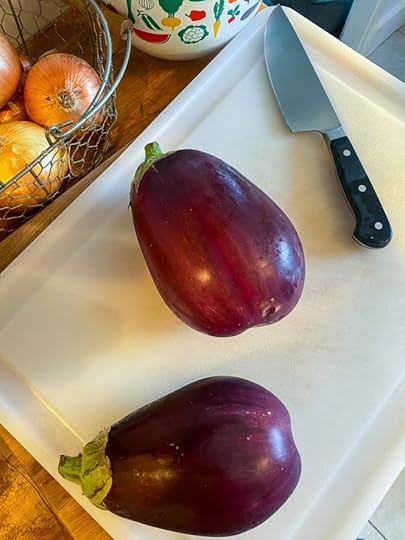
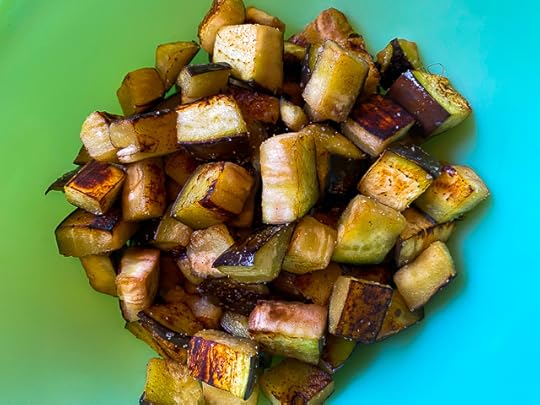
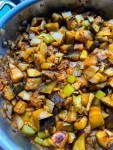
Eggplant is a little intimidating for people. There are a lot of rules associated with it — “salt it or it’ll be bitter,” “drain it,” “look for thin ones,” “it drinks up all the oil” — but I’ve learned to just be casual with eggplant and my life has been better for it. Turned out, I didn’t need these two enormous eggplants to make caponata; I cubed one up and fried it, in batches, in a skillet with lots of olive oil.

My technique here is: I add 1/4 cup oil, add in a portion of the eggplant cubes, and I don’t touch them. I let them fry for a bit and then, after a minute or so, I shake the pan. If they detach, they’re ready to flip. Even though, at this point, most of the oil will have been absorbed, I don’t add more (I made this mistake once when cooking dinner for a celebrity (!) and served the greasiest eggplant you can imagine). I just cook it on the other side and then remove the eggplant to a bowl when it’s brown all over and season just then.
Then comes the onions, the celery, and, in this case, fennel. I was following this David Tanis recipe from The New York Times, only I wanted to do it all in one pan. He doesn’t mention fennel, but I had fennel, so I thought: “Why not fennel?”

You’ll also see tomato paste there and white wine. When I was going to wing it, I was going to add actual tomatoes; but what’s great about tomato paste is you get that tomatoey flavor without the liquidity of actual tomatoes.

Capers add the requisite brininess and olives would be great here — they’re traditional — but I forgot to buy them. Never you mind! “That’s not caponata,” a caponata expert might say. If you’re a caponata expert, please stop reading.

Once you add the red wine vinegar, sugar, and white wine, you return the eggplant to the pan, stir everything around, and then you just leave it to sit and marinate. It’s really a glorious thing: you can make it hours ahead.
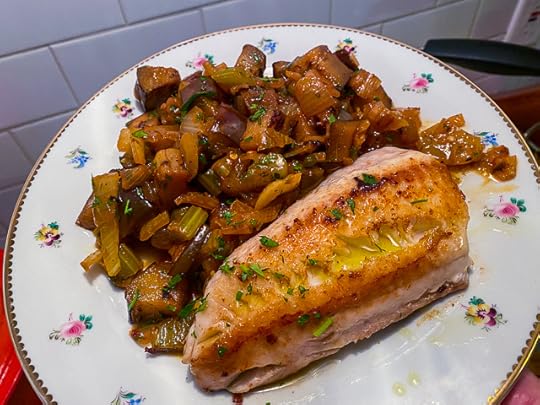
As you can see here, I served it with seared cod and the combination of the buttery fish with the spiky, sweet-and-sour eggplant was dreamy. But caponata could be used for so many things: put it on grilled bread and call it bruschetta; serve it with salmon, on pasta, or just eat it by itself.
It’s a dish that’ll have you sad that summer’s over but, also, you can make this in the winter. The only seasonal ingredient, really, is the eggplant and, between you and me, have you ever tasted a winter eggplant vs. a summer eggplant and thought: “Wow, that tastes so different?” This last paragraph is what’s called a twist ending.
Eggplant Caponata
A spiky, sweet-and-sour combination of eggplant, celery, onions, capers, and olives.
Ingredients1 large eggplantOlive oilKosher salt1 yellow onion, chopped2 ribs celery, chopped1 bulb fennel, cored and chopped1 Tbs tomato paste2 Tbs capers1 cup pitted green olives Note: I didn't have these, but they're kind of important.3 Tbs sugar1/4 cup red wine vinegar1/2 cup dry white wineChopped parsley, celery leaves, and fennel fronds
InstructionsCube the eggplant and start heating 1/4 cup olive oil in a large metal skillet. Add the first batch of eggplant; giving the eggplant enough room so every piece is touching the bottom of the pan. Leave alone and let fry for a minute then shake the pan. If the eggplant detaches, you're ready to flip. If it doesn't, keep going. Fry the eggplant on all sides (but don't add more oil here or it'll be greasy) until golden brown, then set aside, and continue with the rest of the eggplant, adding another 1/4 cup oil with each new batch. Season the eggplant, once cooked, with kosher salt. Add another 1/4 cup oil to the now-empty skillet. Add the onions, celery, and fennel with a pinch of salt and cook, stirring occasionally, until the vegetables start to brown. Might take up to ten minutes.Add the tomato paste, stir around, and let toast for a minute. Then add the capers, the olives, the sugar, the red wine vinegar, and the white wine. Stir all around, working up any brown bits on the bottom of the pan, and allow to simmer on medium heat for a minute or two.Add all of the eggplant back in, stir all around, simmer another minute until most of the liquid is gone, then turn off the heat. Add the chopped herbs, stir together, and allow the caponata to sit for an hour before serving.
Related Posts:
Lamb Merguez with Eggplant Jam and Green Olives (Amateur Gourmet)
Stuffed Eggplant with Lamb and Pine Nuts (Amateur Gourmet)
Seared Eggplant with Spicy Glazed Peanuts (Ben Mims, LA Times)
Caponata (David Lebovitz)
Caponata (Smitten Kitchen)
The post Cap Off Your Summer with Caponata appeared first on The Amateur Gourmet.

September 14, 2020
One Chicken, Three Meals: Braised Chicken Over Polenta, Chicken Cabbage Salad, and Tomato Pasta with Chicken Jus

If I teach you anything, anything at all, during our time together let it be how to turn one meal into three. Case in point: this chicken dinner I made on Wednesday night, which turned into Thursday’s lunch, and then turned into Thursday night’s pasta. How did I get all of that out of one little bird? Allow me to astound you!

First, let’s talk about braising. It sounds like a fancy word but it really just means cooking something in a liquid until it becomes very tender. It works best with tough cuts of meat (if you love Osso Bucco or short ribs, you love braised food) but also works with chicken, as long as you take the breasts out before they get too dry and leave the dark meat to finish a little longer.
The fun thing about braising is you get to play around with your aromatics (garlic, ginger, onions) and your braising liquid (white wine, red wine, apple cider, vinegar, you name it). For this particular braise, I cut a whole chicken into parts (that’s a lesson for another time), seasoned them well with salt and pepper, seared them in olive oil and a little butter until they were golden brown on all sides, removed the pieces to a plate, and then added onions and garlic to the brown bits in the pan. I cooked those together for a bit, then added white wine to help scrape those brown bits up: that’s where all the flavor is. And then I added about three chopped heirloom tomatoes.


I let that cook together, with a pinch of salt, until the tomatoes started to release their liquid…

…then I added all of the chicken back in (it was a Noah’s Ark kind of situation in there, not very photogenic), keeping the breasts on top so I could take them out first. I cooked at a low simmer, lid-on, for about 25 minutes, checking after 20, until the breast was 160-ish. I removed the breasts, then let the dark meat go until it was fork tender (another 10 – 15 minutes). Meanwhile, I cooked slow-cooking polenta in a pot with water and salt for 45 minutes or so and then added lots of butter and Parm at the end.

I ladled the polenta on to plates, topped with the dark meat, and some of the braising liquid, but saved the white meat (the breasts) and the rest of the liquid (of which there was a lot) for the next two meals.
So let’s look at the next meal: chicken cabbage salad!

I know I told you I wasn’t going to talk about my coleslaw, of which this is a close cousin, but I will tell you about this salad. I basically shredded green cabbage, tossed it with arugula, sliced red onions, toasted pistachios, golden raisins, heirloom cherry tomatoes, the cubed chicken breast, and then a mixture of mayo, grainy Dijon, white balsamic, olive oil, salt and pepper. A dynamite lunch salad packed with protein from the previous night’s dinner. I just think it needs a better name than “chicken cabbage salad.”
Finally, and perhaps best of all, that chicken braising liquid solidified in the refrigerator from all of the butter, olive oil, and schmaltz that came out of the chicken. It was basically a container filled with chickeny, tomatoey, garlicky gold. So on Thursday night, I started a basic tomato sauce — onions, garlic, and red chili flakes — in olive oil, then a can of cherry tomatoes in with some salt. And then I added the liquid gold container.
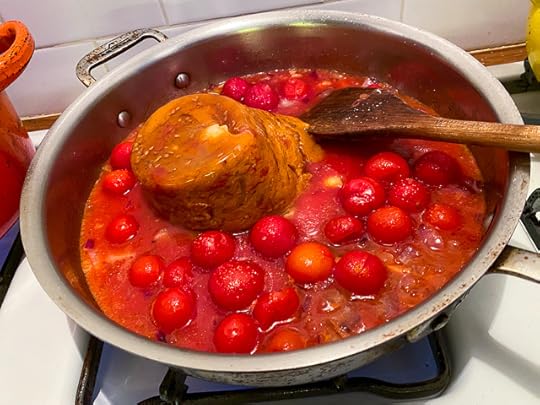
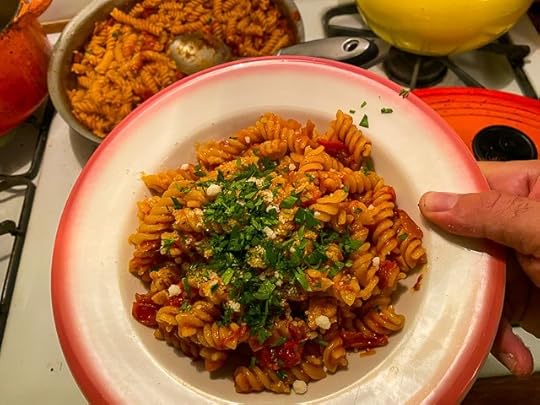
I let that all cook together until it was a thick, homogenous sauce and OH MAMA was that tasty. Meanwhile, I cooked fusilli in lots of salted water and then lifted, while it was still al dente, into the pan with the sauce, cooking everything together until the pasta absorbed the sauce and there wasn’t any liquid at the bottom of the pan.
Parmesan and parsley to gild the lily, and there was a dreamy pasta dinner using liquid that some unknowing innocent might’ve just dumped down the sink.
So there you are: three enticing meals from one little chicken. Who knew a little bird could do so much good in the world?
Related Posts:
One Bag of Beans, Three Meals (Amateur Gourmet)
One Chicken, Two Dinners + Stock (Amateur Gourmet)
How To Turn One Chicken into a Week of Meals (Food52)
Make 17 Meals from One Chicken (Lifehacker)
The post One Chicken, Three Meals: Braised Chicken Over Polenta, Chicken Cabbage Salad, and Tomato Pasta with Chicken Jus appeared first on The Amateur Gourmet.

Adam D. Roberts's Blog

- Adam D. Roberts's profile
- 3 followers

