
Adam D. Roberts's Blog, page 6
January 12, 2023
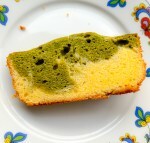
Marbled Matcha Pound Cake
Sometimes I make mental note of a food-related thing that leads me to buy another food-related thing and then that food-related thing sits around for a very long time until I look at it and remember the original food-related thing that led me to buy it in the first place. That’s the case with the original Tartine cookbook; Samin Nosrat mentioned in a podcast or in an interview (possibly with me?) that the recipes in it are flawless and it’s one of her favorite baking books. That book has sat around forever and I’ve never made anything from it until yesterday when I remembered that I had a glut of poppy seeds (long story) and thought that I’d make the lemon poppyseed cake from it because I’ve had it at the bakery and it’s surprisingly light and citrusy. But then another recipe caught my eye on page 191: a recipe for a marbled matcha pound cake.

I’ve discovered, in my almost mid-forties (I turn 44 next month), that instead of exercise at the gym, I prefer the kind of exercise with a reward at the end. My friend Charlotte told me that she takes exercise walks in New York towards bakeries as the carrot dangling at the end of the fishing line. My version of that is to bake something in the afternoon and the effort expended — from whisking, cracking eggs, doing dishes — counts as the exercise and then the cake is the hard-won reward. (Don’t groan, this makes a lot of sense.)
In terms of a workout, this cake doesn’t offer much. You simply beat butter and sugar together in a mixer, add three eggs and an egg yolk, add sour cream and vanilla extract (I used vanilla bean paste because I’m fancy), and then flour and baking powder. The trick is to take 1/3rd of the batter out and sift matcha powder into that, creating a green layer which you then lay on top of the beige layer that goes first into your prepped baking pan.

The book offers no instructions as to swirling, so I relied on the internet and ended up just using a butter knife and gently swishing it around, not wanting to blend the two layers too much. (Some recipes just have you plop the top layer on without any swirling, relying on gravity to do the dirty work of marbling your marble cake.)
The ballsiest thing about the Tartine recipe is that it doesn’t give you a baking time! It says, “Bake until the center of the cake is set and a knife inserted into the center comes out clean.” How dare they. I set a timer for 45 minutes and started testing around then; I’d say it took about 55 minutes total.

By the time this had cooled and I’d taken it out of the pan, it was dinner time and then I was nervous to eat this for dessert because I had a bad experience with a matcha-based dessert once where I ate it and then spent the whole night wide awake from all the caffeine. So, instead, I had this as breakfast this morning and it was a most excellent combination. The pound cake portion is just what you want: buttery, sweet, slightly tangy from the sour cream. And then the matcha adds depth, a hint of bitterness and earthiness. It’s a super winning combo. And way better than spin class.
 PrintMarbled Matcha Pound CakeA modern twist on an old classic from Tartine: A Classic Revisted by Elisabeth Prueitt and Chad Robertson.Course DessertCuisine AmericanKeyword baking, cake, matcha, pound cake, TartinePrep Time 30 minutesCook Time 1 hourServings 8 servingsIngredients1 1/3 cups + 1 Tablespoon all-purpose flour If you're weighing, it's 185 grams3/4 teaspoon baking powder3/4 cup + 2 tablespoons unsalted butter at room temperature That's 200 g1 cup granulated sugar 200 g1/2 teaspoon kosher salt3 large eggs, room temperature1 large egg yolk1/2 cup sour cream 120 grams1 tablespoon vanilla extract If you have vanilla bean paste, it works really nicely here1 tablespoon Matcha powderInstructionsPreheat the oven to 350. Butter a 9 X 5 inch loaf pan (softened butter works way better here than cooking spray, so don't be lazy! Not only does it help the cake detach better, it adds more flavor).In a small bowl, sift the flour and baking powder together and set aside.In the bowl of a stand mixer fitted with a paddle attachment, beat the butter, granulated sugar, and salt on medium speed until combined and lighter in color, about 1 minute. Add the eggs and egg yolk one at a time, mixing well after each addition until incorporated before adding the next. Stop the mixer and scrape down the sides and bottom of the mixing bowl with a rubber spatula. With the mixer on medium speed, add the sour cream and the vanilla extract. With the mixer on low, add half of the flour mixture. Once it's combined, add the remaining flour mixture and mix just until incorporated (I finished this final step with a rubber spatula).Spoon two-thirds of the batter into the prepared pan, reserving one-third in the bowl. Using a rubber spatula, mix the sifted matcha powder into the reserved batter until smooth. Spoon the matcha batter on top of the batter in the pan. Marble the two cake batters together slightly using an offset spatula (I used a butter knife). Don't be too agressive here or you'll create a uniform blob.Bake for 45 minutes to an hour, until the center of the cake is set and a knife inserted into the center comes out clean. Transfer the cake to a wire rack and let cool completely. Once cool, turn out the cake from the pan and return the cake right side up. Slice and serve.NotesIf I have one piece of advice, it’s to really wait until your butter and eggs are at room temperature. Mine were still a little cool, so I don’t think the batter whipped up airy enough, and as you can see from the pictures the cake came out a little flat. But it was still delicious.
 The post Marbled Matcha Pound Cake appeared first on The Amateur Gourmet.


January 11, 2023
No-Bacon-Necessary Pasta with Porcini Rosemary Tomato Sauce

Every so often, I think about my dog and the fact that I could never eat him. Then I think about how he looks like a piglet and how I do eat pigs by way of bacon. But if I do eat bacon and bacon comes from a pig aren’t I eating a version of my dog? Don’t worry, I’m not making a case for vegetarianism (though there’s certainly a case), I’m setting up a post about a porcini rosemary tomato sauce.
Hi, my name is Adam Roberts and I started this food blog almost twenty years ago (it’ll be exactly twenty years next year!) and I haven’t blogged on it for a long time. That’s because I found other outlets like Substack and podcasting and Instagram and TikTok and cookbooks to express myself food-wise. Then yesterday I had a revelation: nowhere, in the Amateur Gourmet metaverse is there anywhere to share recipes. Especially ones that you can print. And, at the end of the day, isn’t that what people want the most from food writers? Recipes? That they can print? “Maybe I should take the old food blog out for a spin,” I thought to myself. And here we are.

So what’s the deal with this pasta and why did it make my revive my ancient food blog?
Well recently I launched a new podcast called You’ve Got to Taste This and the premise is that I ask people to send me a recipe that they’re absolutely passionate about, I make it, and then we talk about it for an hour. My first guest was Noah Galuten, author of the brand new Don’t Panic Pantry Cookbook, based on the YouTube show he co-hosts with his wife, comedian Iliza Shlesinger. Here we are talking all about this surprising, game-changing recipe:
The original version calls for bacon but Noah made a vegetarian version with dried porcinis and he liked that version even more than the bacon version. And that’s the revelation that relaunched The Amateur Gourmet: dried porcinis, soaked for thirty minutes in hot water, can be sautéed with onions and garlic just like bacon and they caramelize and create a fond on the bottom of the pan. Then you add fresh rosemary — whole sprigs of it — and finally, you deglaze with white wine, and add that super potent porcini mushroom soaking liquid (aka: a magic, umami elixir). Scroll through the following to see the action shots:
View this post on InstagramA post shared by Adam Roberts (@amateurgourmet)
The resulting pasta has such deep, profound flavor, it’s truly a “don’t miss the bacon” moment. And with the new year and everything, eating less meat is kind of a good resolution? Not just for the animals, but for the environment? Hey, don’t do it for me, do it for your dog.
And now for the recipe. Welcome back, blog friends.
PrintPasta with Porcini Rosemary Tomato SauceA deceptively simple pasta sauce featuring dried porcinis and fresh rosemary from Noah Galuten's new "Don't Panic Pantry Cookbook."Servings 4 peopleIngredients1/2 ounce dried mushrooms (I like porcinis for this)Kosher salt 1 tablespoon + 1 teaspoon extra virgin olive oil 2 garlic cloves, choppedPinch crushed red pepper (more if you like it spicy)3 sprigs fresh rosemary (you want the fresh stuff here!)1/2 cup dry white wine (whatever you're drinking)1 28-ounce can whole peeled tomatoes, crushed by handFreshly ground black pepper1 pound dried pastaFreshly grated Parmesan or Pecorino (I used Pecorino)Your nicest olive oil, for drizzlingInstructionsStart by soaking the dried mushrooms in a small bowl or measuring cup with 1/2 cup of warm water until fully softened, about thirty minutes. Reserving the porcini liquid, scoop up the mushrooms, transfer them to a cutting board, and finely chop them.Bring a large pot of water to a boil for the pasta and season with enough salt so that it tastes like a good soup (but not the ocean, that's too salty).In a large skillet or Dutch oven, heat the olive oil over medium heat. Add the onion, garlic, and a pinch of salt. Sauté until the onions are just wilted. Increase the heat to medium-high, add the chopped mushrooms, and saute until the onions start to brown a bit — about 5 to 7 minutes.Add the crushed red pepper and rosemary sprigs, stir, and toast for 30 seconds. Add the white wine and reserved mushroom soaking liquid (leave behind any sediment at the bottom) and scrape the bottom of the pan with a wooden spoon to deglaze any brown bits (that's where all the flavor comes from). Simmer until most of the liquid has evaporated.Add the tomatoes, season with salt and pepper, and stir. Once it's bubbling, lower heat to a simmer, cover, and cook for ten minutes.Meanwhile, cook the pasta: add it it to the boiling water and cook it one minute less than package directions.To finish, use a spider tool to lift the pasta directly into the pan with the sauce. Increase heat to a steady simmer and stir constantly, adding a ladleful of pasta water as necessary to get a sauce that fully coats the pasta without being soupy or overly dry. Taste and adjust for seasoning.Serve right away in pasta bowls, drizzled with olive oil, and topped with lots of cheese.
The post No-Bacon-Necessary Pasta with Porcini Rosemary Tomato Sauce appeared first on The Amateur Gourmet.
May 9, 2022
The Ultimate Sunday Brunch
You know, when I lived in NY, I used to go crazy on Sunday mornings waiting in huge lines to eat mediocre brunches for way too much money. That’s when I took it upon myself to learn how to make brunch at home. Today’s video features some of my favorite tricks and techniques: slowly caramelizing onions while you get on with the blueberry muffins, baking the bacon in the oven to save you time and clean-up. In just 45 minutes, you can have the dreamiest brunch on the table for your guests and you won’t get elbowed in the head by a waitress with a tray of Belgian waffles. Be sure to like and subscribe!
The post The Ultimate Sunday Brunch appeared first on The Amateur Gourmet.

May 4, 2022
Homemade Yellow Cake with Chocolate Frosting
Who doesn’t love a yellow cake with chocolate frosting? For most of us, it evokes a sense of childhood and birthday parties and coming home from school and eating a slice with a cold glass of milk (okay, in my family it was more like a slice of Entenmann’s and a glass of Crystal Light Lemonade, but stick with me here). In this week’s episode of The Amateur Gourmet Show, I show you how to make this beloved cake from scratch. And even if there are a few hiccups along the way, the end cake is well worth it. Be sure to like and subscribe while you’re there!
The post Homemade Yellow Cake with Chocolate Frosting appeared first on The Amateur Gourmet.
April 26, 2022
My Favorite Healthy Soup
I’ve really become obsessed with ribollita lately. It’s such a simple soup to make: carrots, onions, celery (check!), cabbage and kale (check!), then a bunch of flavoring agents (garlic, Parmesan rind, bay leaves, chili flakes). Watch the video above to see how easy it is and if you enjoy it, please like and subscribe. You’ll find the recipe under the description. Bon appetit!
The post My Favorite Healthy Soup appeared first on The Amateur Gourmet.
April 18, 2022
Caesar Caesar
The secret’s out! Well, the secret to my world famous Caesar salad. Check out the premiere episode of The Amateur Gourmet Show on YouTube and be sure to like and subscribe so you don’t miss next week’s episode. If you’d like the full recipe, here it is on Substack. Enjoy!
The post Caesar Caesar appeared first on The Amateur Gourmet.
February 2, 2022
It’s All Happening on Substack
Hi everyone, did you know I’ve been writing TWO Amateur Gourmet newsletters a week, filled with recipes, restaurant reviews, and links? The Monday one is totally free and if you find yourself loving it, you can get the Thursday one for just a small fee. Enter your e-mail address above and join the fun! Or click here to see what it’s all about before you sign-up. Either way, I’ll see you over on Substack.
The post It’s All Happening on Substack appeared first on The Amateur Gourmet.
May 20, 2021
We Sold a Cookbook!

If you know anything about me you know that I love two things more than anything else: (1) cooking and (2) Broadway musicals. A few years ago, I was lucky enough to become friends with one of my favorite Broadway actors, Gideon Glick (we met up at The Russian Tea Room), and over the pandemic we jokingly sent each other funny Broadway-themed dishes for a potential Broadway cookbook: Sunday in the Pork with George. Bundts on this Island. The Sound of Moussaka. At some point, I pitched this idea to my brilliant cookbook agent Alison Fargis at Stonesong and she loved it. Then we hit the jackpot and convinced renowned Broadway illustrator Justin “Squigs” Robertson to illustrate the book for us and guess what? We just sold the book to an incredible publisher: Countryman Press! So look out for GIVE MY SWISS CHARDS TO BROADWAY, coming Fall 2022. 


The post We Sold a Cookbook! appeared first on The Amateur Gourmet.

May 11, 2021
Lunch Therapy is Back
Hey fans of Lunch Therapy! The podcast that you know and love is back.
When the pandemic started, I figured I couldn’t do the podcast anymore because I was interviewing everyone face-to-face. But a year later, I realized that I was an idiot: not only is Zoom a totally valid way to do these interviews, it’s an even better way because (a) I can interview anyone in the world!: and (b) I can record the video as well as the audio, so there’s two ways to experience Lunch Therapy.
So, if you’re someone who loves to listen to podcasts on your headphones or in the kitchen or in your car, listen to the new episodes of Lunch Therapy on Apple Podcasts or Spotify or wherever you listen to podcasts. And if you’re more of a visual person, watch my recent Lunch Therapy sessions on my new YouTube Channel. (Be sure to subscribe.) Recent guests include the founder of Serious Eats, Ed Levine (see above); San Francisco Chronicle food critic Soleil Ho (no video there, for anonymity reasons); artist-in-residence at Joe’s Pub and author of Intimacy Idiot, Isaac Oliver; and comedian/TV/film star (Search Party, Once Upon a Time in Hollywood) Kate Berlant. Be sure to leave some comments/reviews if you get a chance… it’ll help things along. Enjoy and don’t forget to eat lunch!
The post Lunch Therapy is Back appeared first on The Amateur Gourmet.

April 26, 2021
The Ultimate Strawberry-Rhubarb Pie

I’m a terrible dancer, though I enjoy dancing. In college, I was in a production of A Funny Thing Happened to the Way to the Forum (I played Hysterium; such typecasting) and learned the box step. That’s the extent of my dancing prowess. Give me a bouncy Sondheim score and a solid square of dance floor, and I’m there.
Pie-making is a bit like dancing for me. I’m enthusiastic, but often limited in my capabilities. There was that patched-together rhubarb pie from 2010; and that blueberry disaster from 2007. Things have gotten much better since then: the last pie I posted about, Nicole Rucker’s Nectarine Plum Pie with a Brown Sugar Crust, was a bonafide hit. And then there was this strawberry-rhubarb pie that I made for the Oscars. No longer was I a goofy Hysterium bouncing around a college theater; for one brief moment in time, I was Anna Pavlova… except instead of a dying swan, I was a soaring bird!
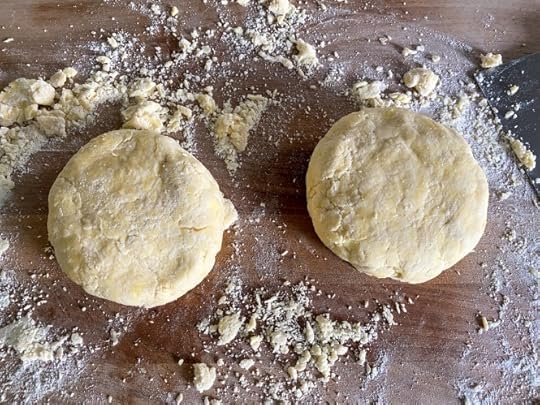
I bring up dance because that’s what it felt like when I made this pie. I waltzed my way over to the food processor and poured in the flour, the sugar, the salt, the cold butter, and pulsed, adding just enough cold water for it to hold together. Then I shaped it into these discs (I work the dough a bit more than I did in the past; just a few smushes and schmears so it holds together).
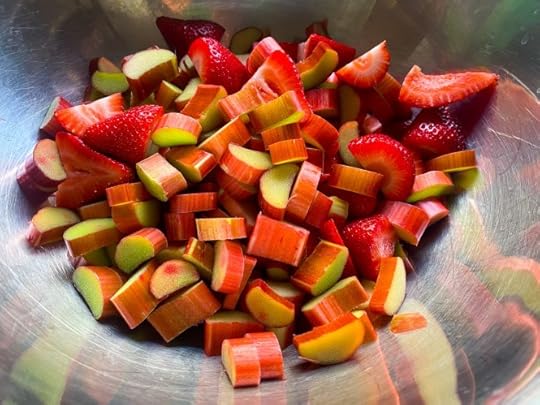
Meanwhile, check out these strawberries from our weekly trip to the Atwater Village Farmer’s Market.

Honestly, I could’ve put those on a cookie and it would’ve made a delectable pie. As it was, I bought a whole carton and then got rhubarb at the grocery store and used Bon Appetit’s pie filling as a guide.
Then, once again, I put on my tutu and did the pie dance: rolling out the dough, shaping it over the pie dish (I put it on a foil-lined tray, which proved to be smart… there was a lot of leakage), pouring in the filling, laying on the top, and crimping it.

The most surprising thing about this pie recipe is how long it bakes for: almost an hour and thirty minutes. The Bon Appetit people push you towards a golden crust so that’s what I did, and I’m not sorry. (It helped that I brushed it with egg and sprinkled with Turbinado sugar, aka: Sugar in the Raw.)

I don’t know how to embed video into a blog post, but if you look on Instagram, you can see that pie burbling away. I was dancing and this pie was singing. The hardest part was letting it cool for four hours. Good thing we had the Oscars to watch, so by the time the big awards came up, it was time to cut in.
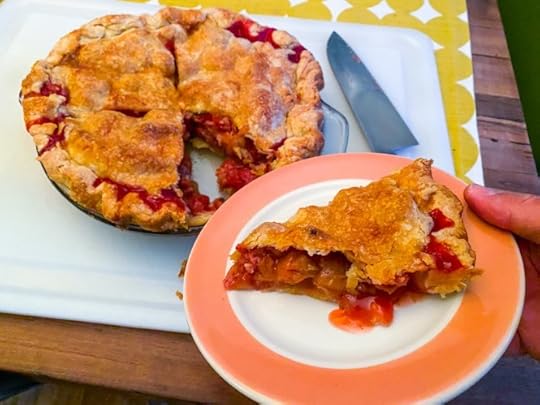
I don’t know how you felt about the Best Picture winner or Best Cinematography, but I can tell you what took the award for best pie: this strawberry-rhubarb beauty. Now you can throw roses at me as I curtsy and bow!
 PrintThe Ultimate Strawberry-Rhubarb PieA mixture of my favorite pie crust with a not-too-sweet and very tart filling.IngredientsFor the pie dough:2 1/2 cups all-purpose flour1 tablespoon sugar1 teaspoon salt2 sticks very cold butter, cut into cubes1/2 – 3/4 cups ice waterFor the filling:1 1/4 pounds rhubarb, cut into 1/2-inch pieces1 pound strawberries, hulled and quartered1/2 cup granulated sugar1/3 cup light brown sugar5 tablespoons corn starch1 teaspoon freshly grated lemon zest1 teaspoon vanilla extract or vanilla bean pastePinch kosher salt1 large egg, beaten1 tablespoon Turbinado sugarInstructionsTo make the pie dough: place the dry ingredients in the bowl of a food processor and pulse a few times. Add the cold, cubed butter, toss with your fingers in the flour, then, with the lid on, pulse a few more times until the butter pieces are the size of large peas. Now, add some of the cold water, pulse twice; check the texture. It should look like wet sand and hold together easily when you pinch a clump. If not, keeping adding the ice water and pulsing until it does. (Better to err on the side of a little wetter than too dry, IMO.)Pour the mixture on to a well floured board. I like to work the dough a tiny bit here: press down with the heel of your hand, fold over with a bench scraper, and do it a few more times — being sure not to warm up the butter — until the dough holds together neatly. Cut in half and shape each half into a disc. Wrap in plastic and refrigerate for an hour.Heat the oven to 425 and make your filling. In a large bowl, combine the rhubarb, strawberries, sugar, brown sugar, corn starch, lemon zest, vanilla, and salt.To assemble your pie, place a 9-inch pie dish on a cookie sheet lined with foil (this will help with leakage). Place one disc of dough on a well-floured board and smack with a well-floured rolling pin, rotating as you do. Begin rolling out from the middle, rotating counter-clockwise a tiny bit each time and sprinkling with more flour if it gets at all sticky. When you've rolled it out to a big circle, bigger than your pie dish (10 inches or more), drape over the pie dish and roll out the other disc of pie dough. Add your filling to the pie in the dish and drape the other dough on top.Pinch the two overhangs of dough together and then use a scissor to cut around, leaving about an inch of overhang. Pinch together again, then fold over towards the pie dish. Crimp using your thumb and pointer finger from both hands (I bet there's a YouTube video you can watch about that). Beat the egg in a small bowl, brush on to the pie, and sprinkle with the sugar. Cut three slits at the top outward from the middle.Place the pie on the cookie sheet in the oven and bake for 5 minutes. Then reduce the temperature to 375 and continue cooking until deep golden brown and the juices are thick and bubbling, about 75 – 90 minutes longer.Remove from the oven and allow to cool for at least four hours so the pie sets up. Serve by itself or with vanilla ice cream.
The post The Ultimate Strawberry-Rhubarb Pie appeared first on The Amateur Gourmet.

Adam D. Roberts's Blog

- Adam D. Roberts's profile
- 3 followers

