
Adam D. Roberts's Blog, page 4
March 20, 2023
Lemon Meringue Pie
Cooking clichés are cliché for a reason: they usually contain some wisdom. Take this one: “The simplest things to make are often the hardest.” I had this lesson hammered home to me in Japan, where just a tiny wedge of sweet potato was somehow the most incredible sweet potato of my life. Or in Kyoto where we ate a whole carrot that was battered and fried-tempura style, arriving at the table like a work of art. The American version of that, I believe, is pie. Simple to behold, challenging to make. And perhaps the most simple and challenging of all is the lemon meringue pie.
Weigh Your Pie Down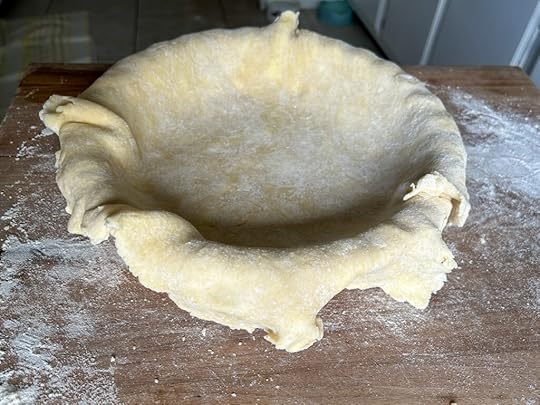
Over the years, I’ve gotten more confident at making pie crust. My technique is to do everything in the food processor and to work quickly. I add more water than the experts tell you to, to make it easier to roll out. And then I knead it a little on the counter to make the dough come together without overworking it.
This time around, though, there was an extra challenge: blind-baking. Thankfully, I had two pie crusts in the fridge and after the first one folded in on itself, my pie pal Nicole Rucker advised me to put more weights into the second attempt, filling it all the way to the brim. As you can see, I didn’t have enough weights to pull that off (I used chickpeas and dried lentils), so the results were a little sketchy.
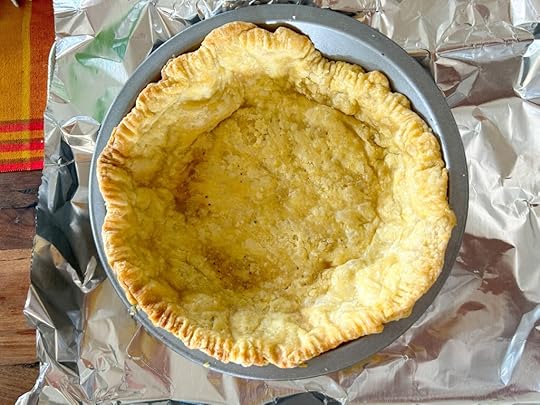 Nobody Sees the Crust in a Lemon Meringue Pie
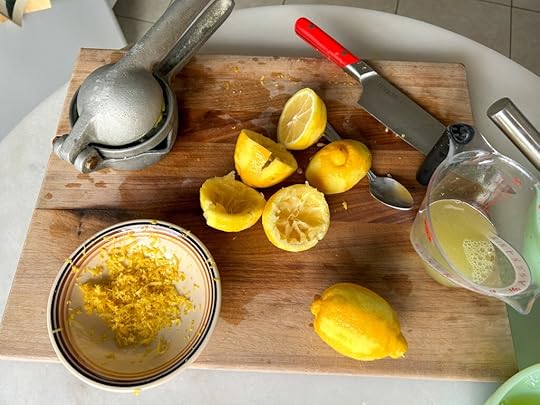
The nice thing here is that, after you blind-bake the crust, you’re just making your filling and then your meringue… all of which will cover a multitude of sins.
This particular filling, which comes from Cheryl Day’s wonderful cookbook, Treasury of Southern Baking, has a good amount of corn starch to help it set up. I went a little extra on the zest to make it super puckery.
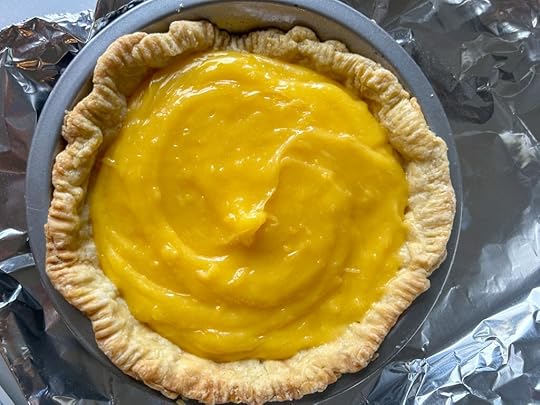
You may be thinking: “Adam, I can see the crust there… you lied to us!” Have no fear. Meringue is here.
Meringue it on Home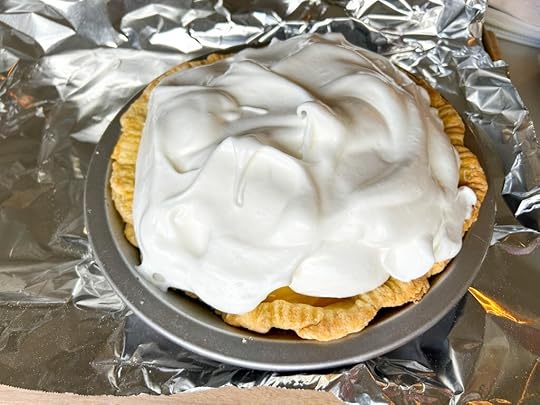
What a miracle meringue is. Not only does it add height to your pie, you can spread it around as much as you need to in order to hide the cracks.
Some people use a blowtorch to give your meringue color, but Cheryl Day has you pop it into the oven for ten minutes and that does the job.
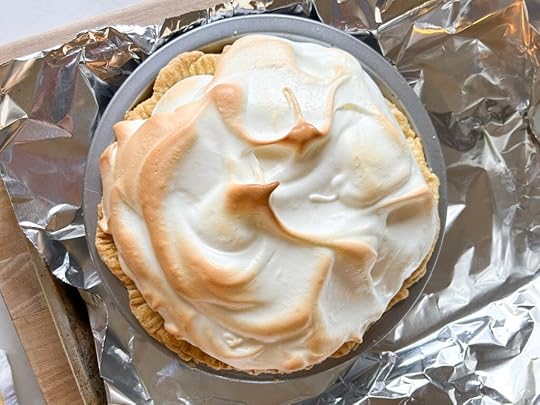
See what I mean? When David Lebovitz posted about it on Instagram he called it: “a picture-perfect lemon meringue tart.”
I think it’s time to update the cliché. “The simplest things to make are often the hardest… unless you can pile a ton of meringue on top. Then they’re pretty easy.”
 PrintLemon Meringue PieA classic recipe adapted from Cheryl Day's Treasury of Southern Baking.Course DessertCuisine AmericanKeyword Cheryl Day, crust, lemon, meringue, piePrep Time 2 hoursCook Time 1 hourServings 8 peopleIngredientsFor the pie crust (makes two)2 1/2 cups all-purpose flour1 tablespoon granulated sugar1 teaspoon baking powder1 teaspoon fine sea salt1/2 cup ice water1 tablespoon apple cider vinegar2 sticks cold unsalted butter, cut into 1-inch cubes (1/2 pound)For the lemon filling:6 large egg yolks1 1/2 cups granulated sugar1/3 cup cornstarch1/2 teaspoon fine sea salt1 1/4 cups water1/4 cup whole milk1 tablespoon grated lemon zest I used more to make it punchy1/2 cup fresh lemon juice3 tablespoons unsalted butter, cut into piecesFor the billowy meringue:6 large egg whites, room temperature1/2 teaspoon cream of tartar1/8 teaspoon fine sea salt1/2 cup granulated sugar1/4 cup confectioners' sugarInstructionsFor the pie crust:In the bowl of a food processor, pulse together the flour, sugar, baking powder, and salt. In a large measuring cup, combine the water and the vinegar. Set aside.Toss the pieces of very cold butter into the flour mixture, then pulse a few times to get a rough texture, with some pea-sized pieces in there. Drizzle in half of the ice water mixture, pulse again, and test the dough. If you can pinch it, and it comes together, it's ready. If not, repeat again with the rest of the ice water mixture.Dump the dough out onto a floured counter and use a bench scraper to bring it together. With the heel of your hand, smear the dough a little at a time, pushing it away from you and working your way down the mass of dough to create flat layers of flour and butter. Gather up the dough with a bench scraper and repeat the process once or twice more.Cut the dough in half. Shape each piece into a disk and flatten it. Wrap in plastic and chill for one hour. NOTE: You'll only need one disc for this recipe, but it's good to have backup in case things go awry! And if you don't end up using it, you can freeze it for another time.Preheat the oven to 375. Dust a surface with flour and unwrap one of your pie discs. Dust with flour, flour your rolling pin, whack it a few times, and then roll it out into a 12-inch round. Carefully drape the dough into 9-inch pie plate, guiding it into the edges without forcing them in. Trim the dough overhang to about 1 1/2 inches. Fold the overhang on to the edge of the pie plate and use a fork to crimp it together. Cover with plastic and refrigerate for 30 minutes.To blind-bake, dock the bottom of the crust with the tines of a fork, line the shell with parchment or foil, and fill with dried beans, rice, or pie weights. Bake for 15 to 20 minutes, until the edges of the crust are lightly golden brown. Carefully remove the parchment and weights (you can use them again!) and continue baking for another 5 minutes, until the crust is golden brown. Let cool completely before filling.For the lemon filling:In a medium bowl, lightly whisk the egg yolks. Set aside.In a medium heavy nonreactive saucepan, whisk together the sugar, cornstarch, and salt. Set the pan over medium heat and gradually add the water and the milk, whisking until smooth. Continue to whisk until the mixture comes to a boil, 4 to 5 minutes, then whisk constantly until the mixture begins to thicken, 1 to 2 minutes longer. Remove from the heat. To temper the egg yolks, add about 1 cup of the hot milk mixture to them, whisking vigorously so the yolks don't curdle. Pour the warmed egg yolk mixture into the rest of the milk mixture and set over low heat. Whisk in the lemon zest and juice, bring to a simmer, whisking, and simmer until the custard is thick and glossy, 4 to 6 minutes. Remove from the heat and stir in the butter until melted and fully incorporated.Place the pre-baked pie crust on a parchment or foil-lined cookie sheet. Pour the custard into the crust and set aside while you make the meringue. For the billowy meringue and to finish the pie:Preheat the oven to 375.In the impeccably clean bowl of a stand mixer fitted with the whisk attachment, beat the egg whites, cream of tartar, and salt on low speed for 1 minute, or until the egg whites begin to thicken and look frothy. Slowly add the granulated sugar, then continue beating until soft peaks form.Add the confectioners' sugar and whip on medium speed until the meringue is stiff and glossy; it should form stiff peaks that hold their shape when you lift the whisk out of the bowl.Immediately pile the meringue all over the surface of the pie, making sure it touches the crust all around. Use a spatula or the back of a spoon to make big, luscious swirls. Bake for 8 to 10 minutes, until the meringue is lightly golden brown. Remove the pie from the oven and cool on a wire rack at least 1 hour before serving.NotesThe pie is best served the same day it’s baked, but it can be covered with plastic wrap and refrigerated for up to 3 days.
Related Posts:
Nectarine Plum Pie with a Brown Sugar Crust
The Best Apple Pie I’ve Ever Made
The Ultimate Strawberry-Rhubarb Pie
The post Lemon Meringue Pie appeared first on The Amateur Gourmet.

March 19, 2023
Swiss Chard Lasagna with Gruyère and Hazelnuts
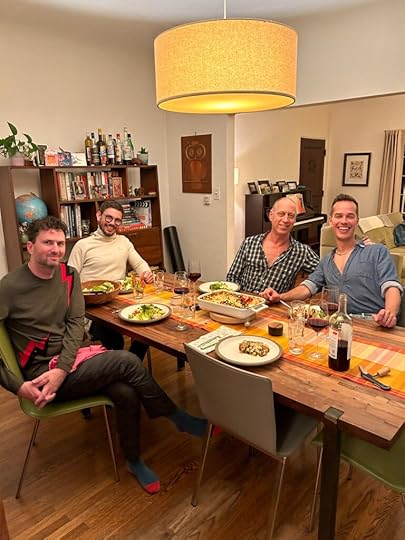
When celebrated food writer David Lebovitz is coming to dinner, you have a lot of planning to do. Do you make something fancy? Something casual? Something French? American? After lots of cookbook perusing and soul-searching, I remembered a Yotam Ottolenghi recipe I saw in The Guardian for Swiss Chard lasagna with Gruyère and hazelnuts. And I thought: “Now that’s something David won’t be expecting!”
Start with the Sauce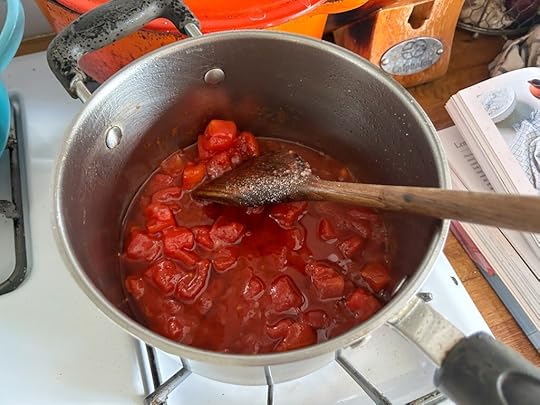
As with most lasagna recipes, you start with a tomato sauce. This one has garlic that you toast until brown, tomato paste which I toasted along with the garlic (even though that’s not part of the original recipe), and then you add tomatoes. That cooks for a bit and then you blend it together with a hand blender. Set it aside, you’re done with that portion.
A Swiss Chard Lasagna Needs Swiss Chard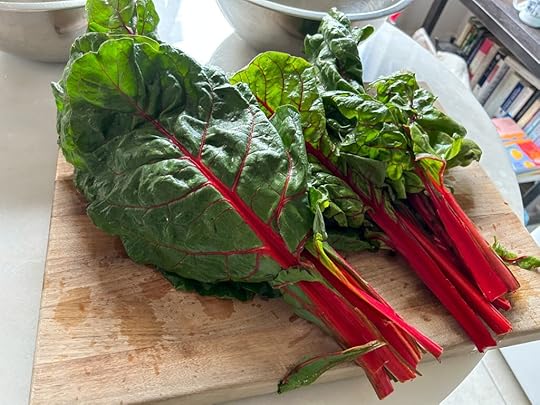
The real fun begins after you make the sauce. That’s when you strip the stems off of the Swiss chard, slice them thinly, and then cut up the leaves.
You sauté the stems in olive oil, add half the greens, then the other half, until it’s all wilted. But you’re just beginning! Then you add a bunch of baby spinach, more than you think your pan can hold.
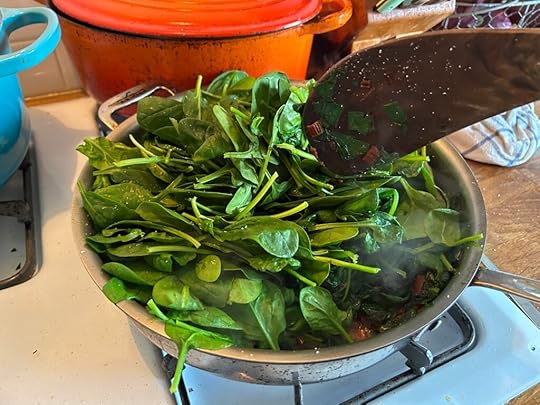
Once that all cooks down, you’re ready to assemble your lasagna.
Lasagna Assembly Time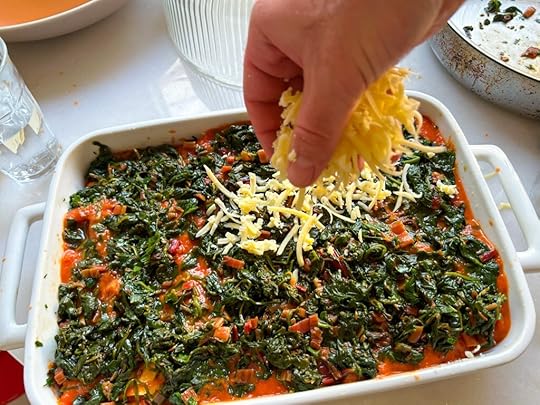
The real trick to this lasagna is using oven-ready lasagna sheets. They’re a godsend. Think about how many pots and pans you don’t have to clean by using them! No boiling, no shocking in ice water, no rinsing. And you don’t notice the difference at all.
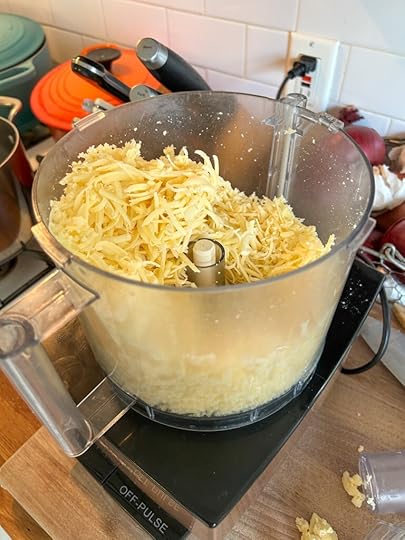
My other hack is to use a food processor to shred the Gruyère. I bought cave-aged Gruyère which wasn’t cheap, but makes such a difference. Grating it by hand would’ve taken twenty minutes. In the food processor with the shredding disc? It took five minutes.
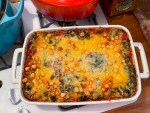
 Let’s Get Baked
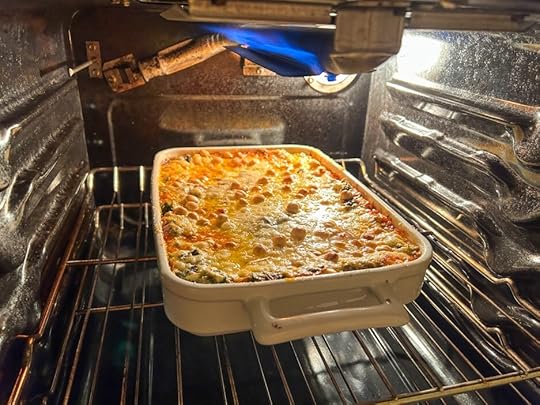
The lasagna bakes in a 375 oven for 30 to 35 minutes. And it looks nice at that point, but I’m a broiler junky. And for this lasagna, I wanted to crank on the broiler to give it a little extra pizzazz. Which the broiler does. Just watch it so your hazelnuts don’t burn.
To serve, I made a nice crunchy salad with little gem lettuce and a Dijon vinaigrette with shallots.
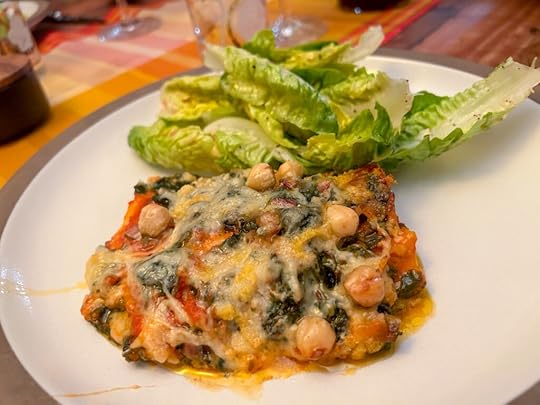
It may look squidgy in this pic, but trust me when I say it was a flavor bomb. And David was absolutely delighted! He even said “mmm” when he ate it. What more could you want? Swiss chard lasagna for the win.
 PrintSwiss Chard Lasagna with Gruyère and HazelnutsA nifty, unexpected lasagna adapted from Yotam Ottolenghi's recipe in The Guardian.Course Main CourseKeyword Gruyère, hazelnuts, Ottolenghi, Swiss chardPrep Time 1 hourCook Time 35 minutesServings 6 hungry peopleIngredients1/3 cup extra-virgin olive oil4 garlic cloves, smashed and peeled28 ounces canned chopped tomatoes This is more than Ottolenghi calls for, but I figure you may as well use the whole can.Pinch Sugar If you're into that sort of thingKosher salt and freshly ground black pepper1 1/2 pounds Swiss chard or rainbow chard, leaves and stems separated, leaves roughly chopped, stems thinly sliced1 1/2 pounds baby spinach2 teaspoons caraway seeds, lightly toasted I toasted mine in a dry skillet just until fragrant1/2 cup chopped Italian parsley, stems included1/2 cup chopped fresh dill I didn't have any, so left it out… but I bet it would've been great8 dried lasagna sheets Look for oven-ready lasagna sheets1 1/2 cups freshly grated Parmesan cheese1 1/2 cups freshly grated Gruyère1/2 cup hazelnuts, roughly chopped Oops I forgot to chop themInstructionsHeat a tablespoon of olive oil in a sauce pan over medium/high heat. Add the garlic and cook until it starts to toast a little. Add the tomato paste and stir around, then add the canned tomatoes. Add a pinch of sugar, a pinch of salt, and pepper and let simmer for ten minutes. At that point, add 1/2 cup water, stir all around. Take off the heat and blitz with a hand blender until smooth. Taste to adjust for salt and pepper.Heat a tablespoon of olive oil in a large sauté pan. Add the chard stems, a pinch of salt, and cook until soft — a few minutes. Then add half of the chard leaves, another pinch of salt, and cook until the leaves are wilted. Add the rest of the chard leaves, cook until wilted, and then start adding the spinach. Stir and cook on medium heat for 5 to 10 minutes, until wilted. Add the caraway seeds and some freshly ground black pepper. Turn the heat to low, cover the pan, and cook for an additional fifteen minutes. Stir in the chopped parsley and dill and taste to adjust for salt. Set aside.Heat the oven to 375. Brush a 9X13 pan with olive oil. Cover the base with four sheets of the lasagna. Top with half of the tomato sauce, then half of the cooked greens, then half of the cheeses. Lay on another four sheets of lasagna, the rest of the tomato sauce, the rest of the greens, and the rest of the cheeses. Top with the hazelnuts. Bake for 30 – 35 minutes, until golden brown and bubbling. If you'd like a little extra color on the top, turn on the broiler and watch it carefully. Allow to cool for five minutes before serving.
Related Posts:
Nancy Silverton’s Epic Eggplant LasagnaBirthday LasagnaLasagna alla Bolognese al Forno (Or: The Ultimate Lasagna)Taste the Rainbow Chard FrittataThe post Swiss Chard Lasagna with Gruyère and Hazelnuts appeared first on The Amateur Gourmet.March 15, 2023
Naturally-Sweetened Granola
When it comes to granola, we’re all living in denial. The word evokes such feelings of healthfulness, it’s actually become an adjective to describe somebody who’s wholesome. “They’re a little too granola,” you might say about that guitar-playing, “aw-shucks” guy in your reading group. But the truth is that granola is PACKED with sugar. I read on the interwebs that 1/2 cup can contain up to 20 grams of sugar. Which is why I was so excited to find a recipe for naturally-sweetened granola in Marco Canora’s wonderful book, A Good Food Day.
Always Trust a Skinny Chef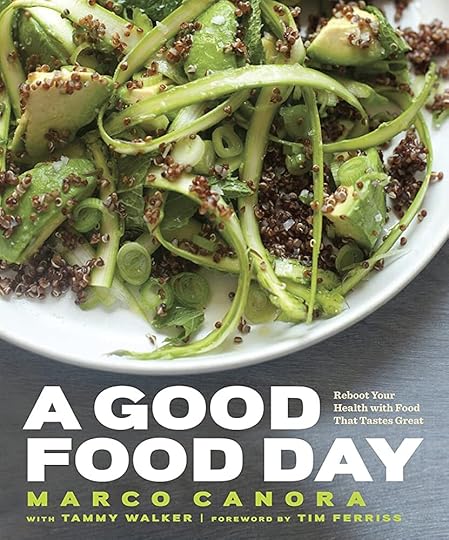

There are a lot of “healthy” cookbooks written by chefs but what I love so much about Marco’s is that you can tell that he really makes these recipes and that they abide by his very high standards of what constitutes good food. His restaurant, Hearth (which has been kicking around the East Village for almost twenty years and is one of the places I’m most looking forward to frequenting when we move back) serves just this sort of food too. Nourishing, but not punishing. Which is exactly what you can say about Marco’s granola.
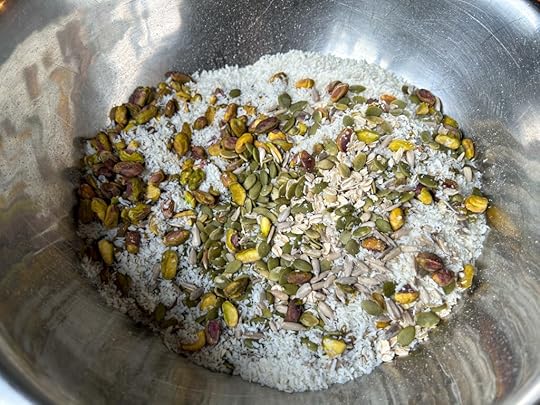
In terms of ingredients, it has all the delectableness of pistachios and coconut mashed up with the good-for-you-ness of chia seeds, sunflower seeds, and pumpkin seeds. And there are enough old-fashioned rolled oats in here to please any Quaker.
Naturally-Sweetened Granola Needs Natural Sweeteners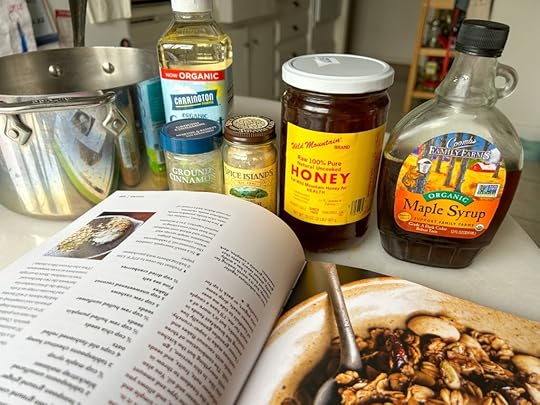
The original recipe — which I’ll include here — calls for molasses which I thought I had, but turns out I didn’t. So I just added more honey along with the maple syrup. Those two things — honey and syrup — are applied delicately. The finished granola isn’t too sweet; it’s just sweet enough.
And the addition of cinnamon and ginger gives it just enough complexity so it doesn’t feel like health food. Which it normally isn’t. Except this one is.
Get it Good and Toasty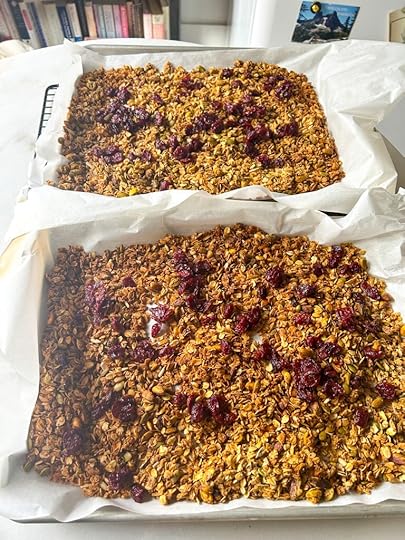
Your main goal, once you pop it into a 275 oven, is to take it as far as you can without burning it. The toastiness is what gives this naturally-sweetened granola its signature crunch; take it out too early, you’ll have some dusty, oaty, sandbag filler.
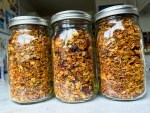
But this stuff? It feels like such a treat. Especially if you splurge on the dried fruit that you add. I went for dried cherries, which are my favorite.
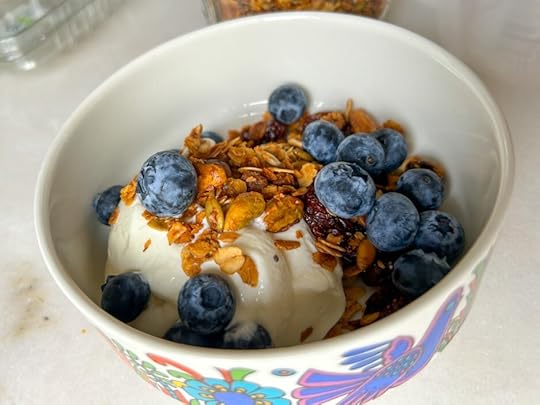
With some full-fat yogurt (Marco says it’s okay!) and some fresh blueberries, this granola makes for a breakfast of champions. And though there’s some sugar in there, there’s not twenty grams of it. And the chia seeds make it undeniably healthy. So thank you Marco Canora for my new go-to granola recipe!
 PrintNaturally-Sweetened GranolaA healthful, not-too-sugary granola from James Beard Award-winner Marco Canora.Course BreakfastCuisine AmericanKeyword chia seeds, coconut, granola, oats, pistachiosPrep Time 20 minutesCook Time 45 minutesServings 8 cupsIngredients1/3 cup virgin coconut oil1 teaspoon ground cinnamon1 teaspoon ground ginger2 tablespoons unsulfured blackstrap molasses If you don't have, just replace with an equal amount of maple syrup or honey1/4 cup maple syrup2 tablespoons chestnut honey Regular honey works great too4 cups old-fashioned rolled oats1/4 cup chia seeds1/2 cup raw hulled pumpkin seeds1/2 cup raw hulled sunflower seeds1 cup raw cashews I used pistachios; walnuts and almonds would work well too1 cup unsweetened coconut flakesFine sea salt1/2 cup dried cranberries or cherries or even raisinsInstructionsPreheat the oven to 275. Line 2 baking sheets with parchment paper.In a small saucepan, combine the coconut oil, 2 tablespoons water, cinnamon, ginger, molasses, maple syrup, and honey and whisk over medium-low heat until everything is melted together, 3 to 5 minutes.In a large bowl, combine the oats, chia seeds, pumpkin seeds, sunflower seeds, cashews, coconut flakes, and a couple of pinches of salt (I was pretty generous with salt because I like that punch). Pour the wet ingredients over the oat mixture and stir until thoroughly combined.Divide the granola between the baking sheets and spread in a thin, even layer. Bake for 30 minutes, then stir with a spatula. Continue baking until the oats are golden brown, 10 to 15 minutes longer. Let the granola cool completely on the baking sheets; it will harden and become crispy as it sits. Divide the dried cranberries or cherries or raisins between the two batches and toss to combine. Store in airtight containers at room temperature.
Related Posts:
Reasons to Make Granola This Weekend
Granola, Yogurt, and Peach Parfaits in Mason Jars
The post Naturally-Sweetened Granola appeared first on The Amateur Gourmet.
March 14, 2023
Crispy Parmesan Chicken
When Craig told me our friend Lucci was coming for dinner on Monday night, I said “great!” I figured I could throw something together, it being a Monday and all. But when Monday rolled around I was at a loss. Do I make something complex, like a stew? Do I make a simple and satisfying soup, like a ribollita? And then it came to me in a flash: Crispy Parmesan Chicken with Escarole Salad. Aka: the fanciest-looking, easiest dinner in the world.
It’s All About That Breast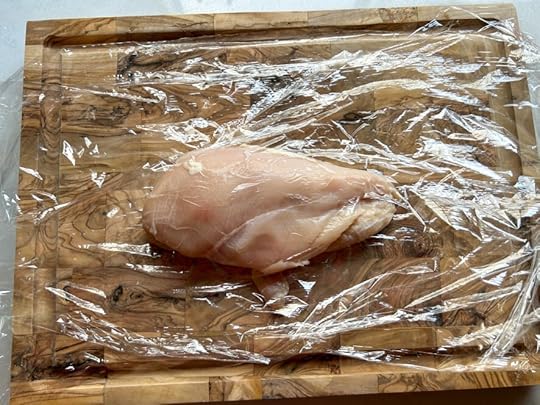
I’m normally not a fan of boneless, skinless chicken breasts, but as my sister-in-law once taught me they have their moments! Especially when you want a neutral protein to take on the impact of other flavors, like a sauce or, in this case, some zesty Parmesan bread crumbs.
Your first step is to take out your aggression and to pound the boneless, skinless breast between two layers of plastic. There’s really no right or wrong way to do this: I used a rolling pin, but you can use a skillet, a meat tenderizer, what have you. As long as the chicken’s about 1/4-inch thick when you’re done.
To Your Crispy Parmesan Chicken Stations!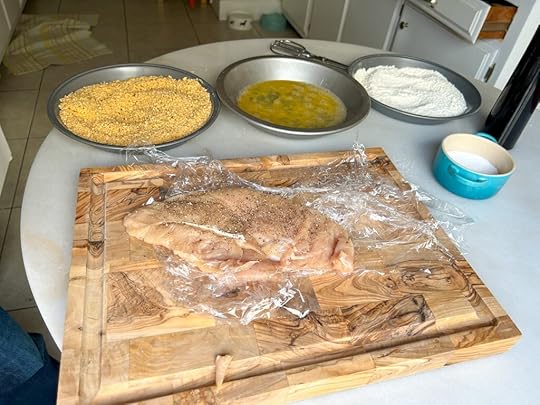
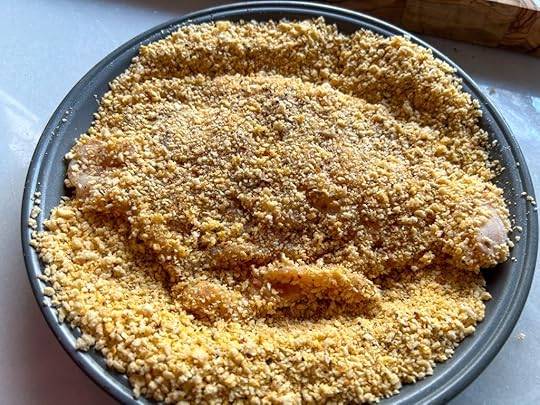
Once you’ve flattened your breast (well, your chicken breast, not yours), you’ll want to season it well with salt and pepper. Then you get out three pie plates or cake pans or even just ordinary plates. Put all-purpose flour on one, three eggs in another, and finally some Panko breadcrumbs in the third. I used Italian-seasoned Panko, but that’s up to you. The main thing is that you season each component with more salt and pepper.
Then you dredge: first in the flour, then the egg, and finally the bread crumbs which you want to pat on extra aggressively. Considering the fact that I was making crispy parmesan chicken, I did forget one crucial ingredient: the Parmesan! I whisked that in at the end and patted some extra on.
 Pretty Fly for a Fry Guy
The final beat is to fry your chicken. This isn’t frying chicken the way you’d fry traditional Southern fried chicken; this is a shallow fry. So get out your biggest cast iron skillet, pour in a layer of vegetable oil, and heat it until breadcrumbs instantly sizzle when you flick some in. Lay in your breaded breast away from you and fry until deeply golden brown on one side, then flip.

If that’s not getting you hungry, I really can’t help you.
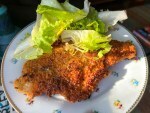
You’ll Want a Salad with Your Crispy Parmesan Chicken
As you can see, Lucci was one happy Monday night dinner guest. What rounded out the dinner was a salad made with escarole, radicchio, and frisée. I whipped up a dressing with garlic, Dijon, lemon juice, red wine vinegar, and olive oil. The fresh, acidic, slightly bitter crunch of the salad was the perfect foil for the rich, salty, umami-packed crispy parmesan chicken.
And that’s how you do a Monday night dinner.
 PrintCrispy Parmesan ChickenAn impressive-looking, easy to make fried chicken cutlet with a zippy, lemony salad.Course Main CourseCuisine ItalianKeyword chicken, fried, parmesan, saladPrep Time 30 minutesCook Time 12 minutesServings 4 peopleIngredientsFor the chicken:4 boneless, skinless chicken breastsKosher salt and freshly ground black pepper2 cups all-purpose flour3 large eggs1 tablespoon water1 package Panko breadcrumbs (8 ounces) You can get the Italian-seasoned variety, if you want extra flavor.1 cup freshly grated Parmesan cheese1/2 cup vegetable oilFor the salad dressing:3 tablespoons Dijon mustard1 clove garlic, grated on a microplaneJuice of one lemon1 tablespoon red wine vinegarKosher salt and freshly ground black pepper1/2 cup – 3/4 cup extra-virgin olive oilAn assortment of salad greens, preferably bitter and crunchy ones like escarole, radicchio, and frisée InstructionsStart by laying a piece of plastic wrap on your cutting board: you'll probably want to pound two breasts at a time, so make it large enough for that. Lay in the two breasts, put a piece of plastic wrap on top, and whack away with a rolling pin until the breasts are 1/4-inch thick. Repeat with the remaining breasts. Season them with kosher salt and freshly ground black pepper.Place the flour in one pie plate, the eggs and the water in a second pie plate (whisking them together), the breadcrumbs and Parmesan in the third pie plate (mixing them together too). Season each component with salt and pepper. Dredge each piece of chicken first through the flour, then the eggs, then the Panko/Parmesan mixture and set aside. You can actually coat all of the chicken ahead and refrigerate until you're ready to fry.In a large cast iron skillet, heat the oil on high heat until bubbles form around a few Panko breadcrumb testers. Lay in two pieces of chicken at a time and fry until golden brown on one side. Carefully flip and cook on the other side until equally brown. To check for doneness, use a thermometer and shoot for 155. You can keep them warm in a 250 degree oven while you fry the rest.Meanwhile, make your salad dressing by whisking together the Dijon, garlic, lemon juice, red wine vinegar, salt, and pepper. Slowly stream in your olive oil as you whisk, trying to get the mixture to emulsify. Stop after adding 1/2 a cup of oil and taste. If it's too acidic, keep adding oil until it's well-balanced. Toss half of the dressing with your lettuce leaves and taste. If it needs more dressing, add the rest.To serve, place the four pieces of chicken on four plates and pile up the salad on the side. Grind some pepper on top and sprinkle with any extra Parmesan. Serve right away.
Related Posts:
Fancy Weeknight Chicken and Cauliflower
The Best Fried Chicken of Your Life
Parmesan Chicken (Ina Garten)
Chicken Milanese with Tomato, Mozzarella, and Basil Salad (Melissa Clark, NYT)
The post Crispy Parmesan Chicken appeared first on The Amateur Gourmet.
March 13, 2023
Salted Chewy Peanut Butter Cookies
When the Oscars rolled around this year, I went through all of my dessert cookbooks looking for the most elegant dessert. And then I remembered: people like to drink wine during the Oscars. And when they’re done with their pizza, and eating dessert, what dessert still goes well with wine? Something salty. Which is why I had the idea to make these Salted Chewy Peanut Butter Cookies.
The Less Natural the PB, the Better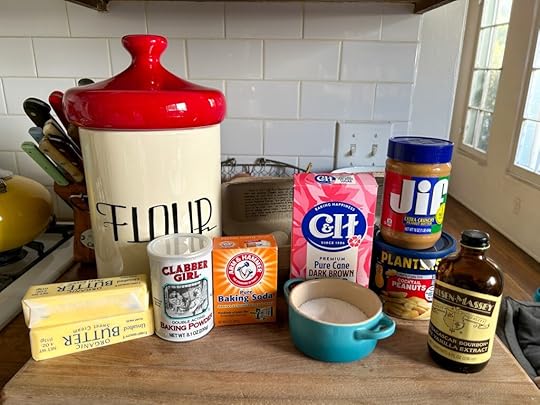
Normally, when you cook (or bake) you want to use all natural ingredients. Not so when you make peanut butter cookies! The more commercial the peanut butter, the better. You’re going to ask me why and all I can say is: it just is. Maybe the stabilizers keep the peanut butter moist? Maybe the chemicals shine the most when they’re combined with butter and sugar? All I know is I’ve baked with all natural peanut butter before and the results were blech.

But if you’re bemoaning the lack of naturally occurring peanuts in this recipe, have no fear…
From Nuts to Scoop
…because you grind up some fresh ones to fold into the batter.
The rest is like any other cookie recipe: sift together your dry ingredients, beat together your sugar and butter (including the peanut butter) and add your eggs and vanilla. Then you fold in your dry ingredients — including the ground-up peanuts — and it’s time to scoop and shape.
Fork Your Peanut Butter Cookies
The funnest part of this recipe for peanut butter cookies is what you do after you scoop them (I used a 1/4 cup scoop). You fork them! As in: you dip your fork in cold water, then create a cross hatch pattern in each cookie. It’s fun for the whole forking family.
My addition to the recipe was to add Maldon sea salt at the end because that just seems right.
 Get Baked
These cookies spread a bit when you bake them, so beware!

My other tip is to really listen to the recipe when it says “they’ll look underdone” when you take them out. My first sheet looked so underdone, I kept them going, and that batch was dryer than the one I took out sooner.
Still, the dry ones went better with wine… which was the whole point! And the chewy ones were wildly good: soft, buttery, and just salty enough to make you sit up in your seat. Which is a good thing to do when you’re watching the Oscars.
 PrintSalted Chewy Peanut Butter CookiesMy spin on an America's Test Kitchen recipe featuring more salt, both in and on the cookie.Course DessertCuisine AmericanKeyword cookies, peanut butter, saltPrep Time 30 minutesCook Time 13 minutesServings 24 cookiesIngredients2 1/2 cups all-purpose flour1/2 teaspoon baking soda1/2 teaspoon baking powder3/4 teaspoon kosher salt1 cup roasted salted peanuts2 sticks salted butter (1/2 pound), room temperature1 cup packed dark brown sugar1 cup granulated sugar1 cup extra-crunchy peanut butter (I like Jif or Skippy)2 large eggs, room temperature2 teaspoons vanilla extractMaldon sea salt (optional)InstructionsHeat your oven to 350 degrees. Sift together your flour, baking powder, baking soda, and salt. Pulse the peanuts in a food processor until they're the texture of breadcrumbs.In the bowl of a stand mixer, beat together the butter and the sugars until well-integrated, about three minutes. Add the peanut butter and beat until that's nicely worked in, scraping down the sides of the bowl as necessary. Beat in the eggs, one at a time, and finally beat in the vanilla.With a rubber spatula, fold in the dry ingredients: starting with the flour mixture and finishing with the ground-up peanuts. Don't overwork the dough.Line two cookie sheets with parchment paper. Using a 1/4-cup scoop, scoop the cookies on to the cookie sheets, spacing them two inches apart (they'll spread). Wet a fork with cold water and create a cross-hatch pattern in each cookie. If you like 'em salty, sprinkle each cookie with a little Maldon sea salt.Bake the cookies, one sheet at a time, for about fifteen minutes — just until the cookies are slightly brown on the outside. They won't look completely done in the middle, but that's okay. Remove the cookie sheet to a wire rack and allow to cool completely.
Related Posts:
No-Bake Chocolate Peanut Butter Cookies
The Chocolate Peanut Butter Cookie of Your Dreams
BA’s Best Peanut Butter Cookies (Bon Appetit)
Peanut Butter Paprika Cookies (David Lebovitz)
The post Salted Chewy Peanut Butter Cookies appeared first on The Amateur Gourmet.
March 9, 2023
Citrus Upside-Down Cake
Some desserts just elicit an “ooh” or an “ahh” when you bring them to the table. This citrus upside-down cake is one of them!
I’ve made this cake (which comes to us from Melissa Clark) several times for dinner parties over the past few years. Every time I bring it out people stop their conversation to marvel at the grid of reds and oranges and yellows from the variety of citrus that I use. To put it in layman’s terms, it’s a showstopper! (Do laymen use the word “showstopper”?) And it’s actually a cinch to make.
It’s All About the Citrus
As you might guess with a citrus upside-down cake, it’s all about the fruit that you layer into the bottom. You could use everyday navel oranges or tangerines, but here in California we also get Cara Cara oranges (which are pinkish on the inside), blood oranges (which are red), and all different sorts of orange oranges. I like to buy one of each and then stagger the colors.

The only challenging part to this recipe is cutting off the skin. It’s definitely a skill you should practice. Not only is this great to do for an upside-down cake, but it’s also great for a salad. You just slice the tops and bottoms off your fruit with a very sharp knife. Then, with the knife, follow the white from the top to the bottom until all you’re left with is fruit. It’s way pretty.
A Piece of Cake The batter for this cake has two key ingredients: cornmeal, which gives it a rough texture (almost like polenta), and sour cream, which makes it tender. The only planning you have to do is to bring the butter and eggs to room temperature before you use them, or they won’t incorporate.
You let it cool for ten minutes and then put the upside-down in the citrus upside-down cake: you flip it out on to a cake stand. If you’re wearing oven mitts, and you’re confident, it’ll go like gangbusters. Next: you let it cool. When it’s time to serve, whip up some whipped cream and work a little Cointreau in there to exaggerate the orange.

As winter winds down, this cake’s a big blast of California sunshine to remind you of the sunny days to come.
 PrintCitrus Upside-Down CakeA complicated looking, easy-to-make cake adapted from Melissa Clark.Course DessertCuisine AmericanKeyword cake, citrus, cornmeal, orangesPrep Time 30 minutesCook Time 45 minutesServings 8 peopleIngredients2 sticks butter plus 3 tablespoons, at room temperature2/3 cup light brown sugar2 teaspoons fresh lemon juice3 oranges (Cara Cara, blood, etc.)1 cup granulated sugar1 cup fine cornmeal1/2 cup all-purpose flour1 1/2 teaspoons baking powder1 teaspoon kosher salt4 large eggs, room temperature1/3 cup sour cream, room temperature2 teaspoons vanilla extractInstructionsHeat your oven to 350. Grease a 9-inch round cake pan with cooking spray.In a small saucepan or skillet over medium heat, melt the 3 tablespoons of butter. Add the brown sugar and the lemon juice and cook until the sugar melts, about 3 minutes. Scrape the mixture into the bottom of your prepared pan.Grate the zest from two of the oranges into a bowl with the granulated sugar. Pinch the zest into your sugar with your fingers to extract the oils. Set aside.Cut the tops and bottoms off the citrus, then use your knife to cut away the rind top to bottom, following the curve of the fruit. Slice the fruit into 1/4-inch thick rings and place decoratively into the cake pan on top of the brown sugar/butter mixture. You may be left with extra fruit — a snack for the chef.In a large bowl, whisk together cornmeal, flour, baking powder and salt. In a stand mixer, cream the 2 sticks of butter with the sugar until light and fluffy. Beat in the eggs, one at a time, scraping down the sides every so often. Beat in the sour cream and vanilla and fold in the dry ingredients by hand. (It may look a bit curdled, that's okay.)Scrape the batter over the oranges and spread evenly. Bake 40 to 50 minutes until a tester comes out clean. Cool for ten minutes in the pan; then use a knife to run it around the perimeter and carefully (with mitts on) flip the cake out on to a cake stand. Let cool completely before serving.
Related Posts:
Eric Wolitzky’s Pineapple Upside-Down CakePineapple Upside-Down Cake with Toasted Coconut Ice CreamSeared Scallops with Citrus RisottoThe post Citrus Upside-Down Cake appeared first on The Amateur Gourmet.
March 6, 2023
The California Veggie Sandwich
Now that the secret’s out (the secret being that we’re moving back to NY after twelve years in L.A.), it’s time to talk about what I’ll miss the most about California. Will it be the beaches? It won’t be the beaches. Will it be the glamorous movie premieres? It won’t be the glamorous movie premieres. No, the thing that I’ll miss the most about L.A. is very simple: it’s the produce. Every trip to our farmer’s market is like a trip to an edible jewelry store: the bright orange persimmons in December, the juicy blood red oranges in January, and the huge array of chilies and tomatoes and summer squash when we’re in the height of August. Which is why I imagine, when the time comes for me to conjure up our L.A. years from our much smaller NY kitchen, I’ll turn to the California Veggie Sandwich.
There’ve Got to Be SproutsThe idea for this sandwich came to me via this week’s podcast guest, Starlee Kine, who you may know from This American Life or her iconic podcast The Mystery Show. When I asked Starlee to send me a recipe for the podcast, she confessed that she really didn’t cook. So I asked her to send me somewhere in L.A. featuring a dish that she really loves — which is when she brought up The California Veggie Sandwich from The Trails in Griffith Park.
I wasn’t able to make it to The Trails before our interview, so I did the next best thing: I found a picture of the sandwich online and recreated it at home. I showed Starlee the picture, which featured watercress, and she adamantly insisted that the picture must be wrong because it’s not watercress, it’s sprouts. “It has to have sprouts,” she told me.
Season as You Go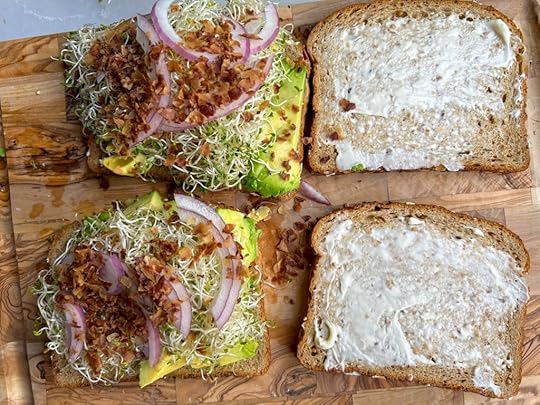
Let’s be honest: we’re talking about a simple sandwich here. It doesn’t really need a recipe, though I’ll give you one.
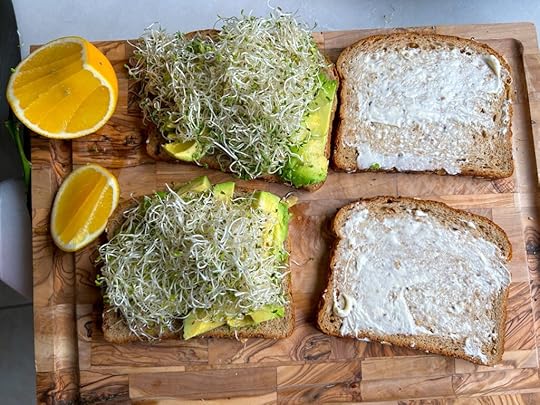
My key discovery was to season each layer as I built it. I started by shmearing mayonnaise on one half of the sandwich; on the other, I layered in a whole ripe avocado per sandwich. Yes, you heard that right. I seasoned with salt and pepper and squeezed on some lemon juice. Then I piled on the sprouts, and did the same (salt, pepper, lemon). Finally I added sliced red onion and the key ingredient: Fake Bacon Bits.

These things are an essential ingredient, no matter which brand you use. They add crunch and salinity without harming any animals in the process. And this is a California Hippie sandwich, is it not? (Well, Veggie Sandwich, though Hippie Sandwich will do too.)

What can I say about this sandwich? It totally hit the spot. The avocado adds density but it’s the sprouts that really make it sing. This is the taste of California on two pieces of bread and it features ingredients that you can find anywhere, only — I must confess — those ingredients won’t be as good. California produce, I’ll miss you most of all.
 PrintThe California Veggie SandwichA wholesome hippie sandwich inspired by the one at The Trails Cafe in Griffith Park.Course LunchCuisine AmericanKeyword avocado, California, mayo, sproutsServings 2 sandwichesIngredients4 slices of whole grain bread2 tablespoons mayonnaise2 very ripe avocadosFreshly squeezed lemon juiceKosher salt and freshly ground black pepper1 cup alfalfa sprouts1/2 cup thinly sliced red onion1/2 cup vegetarian bacon bitsInstructionsLay out your four pieces of bread. Spread the mayo on two of them.On the non-mayo pieces, lay in your avocado (you can slice it or mush it, up to you!). Season with lemon juice, salt, and pepper. Then add 1/2 cup sprouts to each sandwich. Season that with lemon, salt, and pepper. Lay on the red onion and, finally, sprinkle with the Bacon Bits. Close the sandwich and cut in half on the diagonal. Eat right away.
 Related posts:
A Most Excellent BLTDeviled Egg SaladCalifornia’s Timeless Veggie Sandwiches Have One Key Ingredient (Tejal Rao, NYT);The California Veggie Sandwich Makes the Most of the State’s Summer Bounty (Ben Mims, LAT)The post The California Veggie Sandwich appeared first on The Amateur Gourmet.
March 2, 2023
Birthday Enchiladas
When Craig and I first started dating back in 2006, my friend Patty asked what sign he was and when he said Aquarius she weighed that against the fact that I was an Aquarius and concluded: “It’ll never work. Two Aquariuses? I don’t see it.”
Seventeen years later, we’re still two Aquariuses battling it out. And February is of course our favorite month because we both get to celebrate our birthdays. For my birthday this year, we went to Antico Nuovo and ate pasta and ice cream and had a grand old time. For Craig’s birthday this year, we went out to Kato and ate an extravagant tasting menu of exquisitely plated seafood dishes. But before that, I threw another birthday bone Craig’s way (I’m such an Aquarius) and made him a dinner he’s always wanted me to make: his mother’s enchiladas. Only I dialed them up a little and turned them into birthday enchiladas.
Just Like Mom’s, Only Different
Craig’s mom Julee’s enchiladas are a classic: they’re flour tortillas stuffed with cheese (Monterey Jack), covered in a chili powder-infused tomato sauce, then topped with more cheese before being baked in a 350 oven. I’ve had them before and they’re like a marriage of grilled cheese and lasagna by way of Mexico.
Because we invited some friends over, I wanted to bulk up the enchiladas a little more and that’s when I found Ali Slagle’s recipe. The technique is the same, except the filling is a mixture of onions, Poblano chilies, garlic, and black beans that then gets a mix of Cheddar and Monterey Jack folded into it.
 Cool Little Enchilada Tricks
As for the tomato sauce, Ali smartly has you blend half of the sautéed aromatics (pre-black beans) with fire-roasted tomatoes, chili powder, and hot sauce (I used Chipotle Rancho Gordo).

The one thing that I brought to the table enchilada-wise (lol) was the concept of charring the flour tortillas before rolling them. I love doing this. It’s the main reason I’d miss a gas stove. You just lay the flour (or corn) tortilla directly on the gas flame, flip it with tongs, until it gets some charry spots.
 Bring on the Birthday Enchiladas
Then it’s just a fun assembly. Pour half the sauce into a casserole. Put some bean stuff into a charred tortilla, roll it up, lay it it on top of the sauce, and continue until the casserole’s filled. If you have extra bean stuff, put that around the sides like I did.

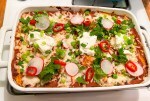
The rest of the sauce goes on, more cheese goes on top, and into the oven it goes for ten minutes or so until the cheese is melted (I broiled it for extra pizazz). Then, for even more pizazz, I topped the enchiladas like nachos: with sour cream, pickled red chilies, radishes, scallions, and cilantro.
Look at these dazzled faces!

And now you know the secret of how these two Aquariuses have made it work all these years. When the moon is in the second house, we make enchiladas.
 PrintBirthday EnchiladasA riff on Ali Slagle's enchilada recipe with flour tortillas, black beans, and two cheeses.Course Main CourseCuisine MexicanKeyword beans, cheese, enchiladas, Mexican, tortillasPrep Time 1 hourCook Time 15 minutesIngredients2 tablespoons olive oil2 yellow onions, finely chopped1 Poblano chile, stemmed, seeded, diced4 garlic cloves, peeled and thinly slicedKosher salt and freshly ground black pepper1 teaspoon ground cumin1 15-ounce can fire-roasted tomatoes2 teaspoons chili powder (make sure it's fresh)1 teaspoon hot sauce (or more to taste)2 15-ounce cans black beans, drained and rinsed2 cups grated Cheddar or Monterey Jack or both10 – 12 soft corn or flour tortillasSour cream (optional)Pickled red chilies or jalapeños (optional)Thinly sliced radishes (optional)Cilantro, roughly chopped (optional)Scallions, chopped (optional)InstructionsHeat your oven to 425 degrees.Heat the olive oil in a large skillet over medium high heat. Add the onions, Poblano chile, and garlic and season with salt. Cook just until softened and slightly charred in spots. Stir in the cumin and cook another minute, just until fragrant. Remove from the heat.Transfer half of the vegetables to a blender and blend with the tomatoes, chili powder, and hot sauce. Taste and adjust with salt. (If the mixture is too thick, add a splash of water or, according to Ali Slagle, 1/4 cup sour cream to make it looser.)Add the black beans to the vegetables in the skillet and sauté a little bit with a little more salt and pepper, tasting to adjust. (My secret? I sometimes add a tiny splash of Balsamic to round them out, but that's just between us.) Turn off the heat and stir in 1/2 cup of the cheese.Heat the tortillas either in the oven on a cookie sheet or over a gas flame, as mentioned above, stacking them as you go. Cover with a kitchen towel to keep them warm. Pour 1/2 of the tomato sauce on to the bottom of a 9X13 baking dish and spread it around.Line up the filling, tortillas and baking dish in a row. Place a little more than ¼ cup of the bean mixture in the center of one tortilla, roll it up, and place it seam-side down in the casserole. Repeat until you've used up all the tortillas. If you have any extra filling, spoon it around the edges of the pan.Pour the remaining sauce on top and top with the remaining cheese. Bake until the cheese is melted, about ten minutes. If you want it a bit more charred on top, turn on the broiler and watch it carefully. Garnish with big dollops of sour cream, pickled chilies, radishes, cilantro, and scallions.
Related posts:
Cheese Enchiladas with Chile con CarneCraig’s Birthday Dinner at KatoMy Birthday Dinner at Antico NuovoThe post Birthday Enchiladas appeared first on The Amateur Gourmet.
February 27, 2023
Noodles with Mushrooms, Chiles, and Lime
When you cook a recipe with lots of ingredients, you expect a big impact. So it would follow that cooking a recipe with just a few ingredients would be less impactful; that it would be simple in the way mashed potatoes are simple: straightforward, satisfying, but not complex. And then someone sends you a recipe for noodles with mushrooms, chiles, and lime and you think to yourself, “okay that seems pretty basic,” but then you make it and you marvel at the way every ingredient sings. Not just flavor-wise, but texture-wise. From the crunchy, salty, roasted peanuts you add at the end, to the refreshing whole cup of cilantro that gets stirred in too. Suddenly simple isn’t basic, simple is where it’s at.
A Vegan Made Me Do ItMy guest on this week’s podcast is Vegan Chef Chris Tucker who cooks vegan food for private clients and celebrities (he’s doing vegan desserts for the Elton John Oscar Party this year!). Our conversation runs the gambit from how to become a vegan (and why) to how to stock a vegan pantry. But everything launched with this recipe that he sent me which comes from my old food blogging friend Heidi Swanson’s newest cookbook Super Natural Simple.

The ingredients are all things you can find easily. The mushrooms can be anything from everyday creminis to more exotic things like oyster mushrooms or Hen of the Woods (I chose shiitake). As for the chiles, I used pickled Fresnos, but any chile will work.
Bring on the Mushrooms, the Noodles, the Chiles, the Lime
Is there anything more fun to cook than mushrooms? I doubt it.
What other ingredient starts out so bulbous, so chest-out confident, so bright and then — just with some heat and a little fat (a tablespoon of olive oil here) — transforms into a concentrated, flavor-packed, golden brown nugget of meaty goodness?

Once that happens, you’re set. Just whisk together some soy sauce, lime juice, the chiles, scallions, and lime, and add the mushrooms in to marinate.
For the noodles, I used Umi Organic ramen which I loved for their rough texture and their wholesome mix of flours (though I missed the instruction about defrosting them first before boiling, so be sure to do that).
It All Comes Together
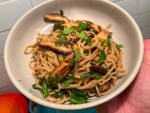
Once the noodles are cooked (which takes just two minutes), you toss them with all of the other stuff, adding more lime juice and soy sauce as necessary.
Finally, you add the toasted peanuts and the cilantro, toss those in and you’re done. Serve it up into bowls.

It’s a wholesome, nourishing, vegan dinner that doesn’t feel like a wholesome, nourishing, vegan dinner. And it takes just a few ingredients to make it happen. Sometimes more is more, but not here. Here less wins the day.
 PrintRamen Noodles with Mushrooms, Chiles, and LimeA simple but super impactful combination of noodles, mushrooms, chiles, and lime from Heidi Swanson's Super Natural Simple.Course Main CourseCuisine JapaneseKeyword chiles, lime, noodles, peanuts, ramenPrep Time 15 minutesCook Time 15 minutesServings 3 peopleIngredients8 green onion, white and tender green parts, thinly slicedJuice of 1 lime, plus more to serve1/2 serrano chile, seeded and minced I used my own pickled red Fresnos here but you can use whichever chile you like1 tablespoon Tamari or soy sauce, plus more to taste1 tablespoon extra-virgin olive oil1 pound mixed mushrooms, sliced 1/4-inch thickGenerous pinch of sea salt1 cup chopped mixed fresh herbs (cilantro, basil, mint)1/3 cup toasted peanuts or other nuts4 ounces frozen ramen noodles (preferably Umi brand), defrosted Note: you can also serve these mushrooms with rice or just eat them by themselves too.InstructionsCombine the green onions, lime juice, chile, and tamari in a large bowl and set aside.Heat the oil in a large skillet over medium-high heat. Add the mushrooms and season with the salt. Cook for 4 minutes, stir, and cook for a few minutes more, until the mushrooms release their liquid and start to brown. When the mushrooms are deeply golden, remove the pan from the heat.Add the mushrooms to the onion mixture and gently toss. Stir in the herbs and peanuts, conserving some for garnishing the noodles.Bring a pot of water to a boil. Add your defrosted ramen noodles and cook for two minutes (tasting to make sure the texture is right). Lift into the pan with the mushrooms and toss all around. Taste and adjust for more soy sauce and lime. Garnish with the remaining herbs and peanuts and serve in bowls.
Related recipes:
Noodles with Spicy Peanut Sauce
Baked Pasta with Fontina and Roasted Mushrooms
The post Noodles with Mushrooms, Chiles, and Lime appeared first on The Amateur Gourmet.
February 23, 2023
Chicken Sauce Piquant
It’s funny the things that inspire us to cook dinner. I was recently scrolling through TikTok (as one does these days) when a video popped up of Emeril Lagasse making a roux. I’ve long been curious about the process of making a true roux; from everything that I’ve read, it’s a long process — you have to stand there, like you’re making risotto, only instead of twenty minutes, it can take up to an hour. But that process of stirring flour into fat and slowly toasting it creates a base for your soup or stew or gumbo or, in this case, chicken sauce piquant, that not only boosts the flavor, but thickens things into a rich and decadent gravy.
What is Chicken Sauce Piquant?Imagine a stewy braise of fried chicken thigh pieces cooked with all kinds of spices and the holy trinity (celery, onions, peppers), thickened by a roux made with the leftover chicken fat, and then cooked with tomatoes and garlic and chicken broth, and doctored with hot sauce (Crystal, of course). It’s hearty, it’s spicy, and it’s cozy for a cold winter’s night.

I found this recipe in my favorite Cajun cookbook: Donald Link’s Real Cajun. (I’ve shared so many recipes from it on here, I’m waiting for a lawsuit.) On my last trip to New Orleans, I ate at two Link restaurants: Cochon Butcher (their Cubano was outrageous) and Peche (maybe my favorite meal of the trip). I’m a Donald Link obsessive and so, I hope he’ll forgive me if I share another recipe of his.
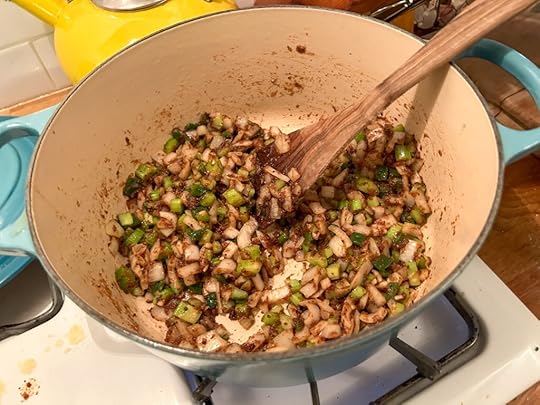
The Holy Trinity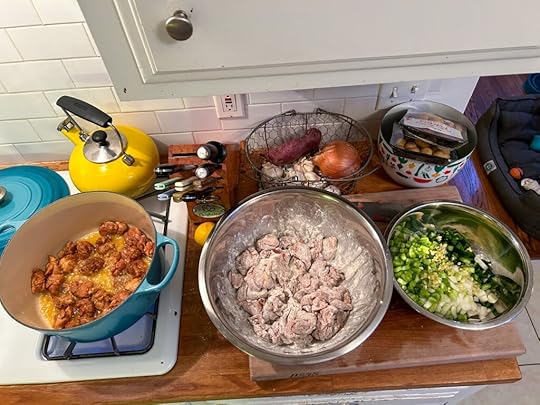
As you’ll see from this picture, the set-up for this dish is actually pretty simple: in one bowl you toss cut-up chicken thighs with salt, pepper, cayenne, chili powder, paprika, and flour. In another bowl, you mix together your onion, celery, poblano (the holy trinity, though with a spicier pepper than your normal green pepper), and garlic. Finally, in a third bowl (not pictured), you mix together plum tomatoes, canned tomatoes, chicken broth, thyme, bay leaves, and hot sauce.
You start by browning the chicken in hot oil and that’s a step where you want to take your time. The more golden brown you can get the chicken pieces, the more flavorful your chicken sauce piquant will be. And then comes the moment we’ve all been waiting for.
Roux McLanahan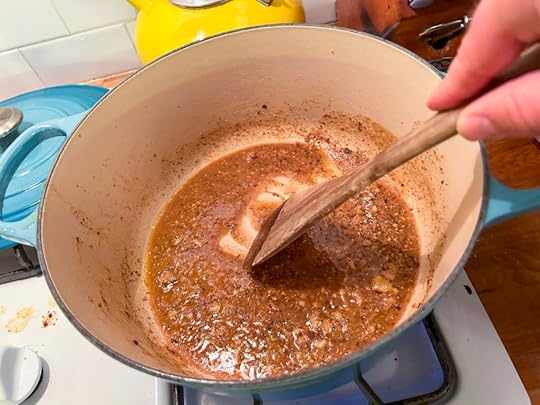
Once you’ve browned your chicken, you’ll be left with oil and chicken fat at the bottom of the pot. If you don’t see enough, you can add a little more oil (that’s what I did). Then you add the remaining flour from the chicken bowl (and if you need more flour, you can add some too). The goal here is to toast the flour in the oil until you get “a medium-brown, peanut butter-colored roux.” This isn’t like the Emeril video where it all happens very slowly; in this particular case, it should happen in five minutes. That’s probably because you’re starting mid-dish with some flour already toasted in there from the chicken. It’s still very exciting and very fragrant.
Once the trinity goes in, the dish basically becomes a braise. You cook your aromatics until the vegetables are soft, then add the liquids, and finally return the chicken to the pot. That all simmers for 45 minutes until you have a light gravy and the chicken is tender.
Order Up!
Imagine that on your stove just as your friends arrive for dinner. I put a lid on it and just kept there, heat off, and cooked a pot of basmati rice to serve it with; setting the table with all kinds of hot sauce for doctoring.
Needless to say, when I heated it back up and brought it out to the table. it was quite a culinary triumph. A soup, a stew, and a gravy all in one.

So get things together and make a roux this weekend. Your tummy and your friends will thank you.
 PrintChicken Sauce PiquantA zesty, spicy, rich stew from Donald Link's Real Cajun.Course Main CourseCuisine CajunKeyword cajun, chicken, Donald Link, New Orleans, piquantPrep Time 30 minutesCook Time 1 hour 28 minutesServings 4 hungry peopleIngredients1 1/2 tablespoons kosher salt2 teaspoons ground black pepper1/2 teaspoon ground white pepper2 teaspoons cayenne pepper2 teaspoons chili powder1 teaspoon paprika3 to 4 pounds boneless, skinless chicken thighs Donald Link's original recipe calls for a whole 4-pound chicken, boned, and cut into cubes; I think packaged chicken thighs make things a lot easier3/4 cup vegetable oil or lard1 cup all-purpose flour1 small onion, diced3 celery stalks, diced1 small poblano chile, seeded and diced1 tablespoon finely chopped garlic5 plum tomatoes, diced2 cups canned tomatoes5 cups chicken broth1 tablespoons fresh or dried thyme (if fresh, just the leaves, chopped)4 bay leaves4 dashes of hot sauce Steamed rice (for serving)Thinly sliced scallions (for garnish)InstructionsWhisk together the salt, peppers, chili powder, and paprika in a large bowl. Add the chicken pieces and use your hands to toss until evenly coated; set aside.Heat the oil in a large pot or Dutch oven over medium-high heat until it begins to smoke slightly. While the oil heats, toss the chicken with flour to coat. Shaking off the excess flour from the chicken, transfer the pieces to the hot oil and fry until golden brown on all sides. Fry the chicken in two batches so you don't overcrowd the pan — the chicken should be in one layer, and not on top of each other. Reserve the leftover flour. Use a slotted spoon to transfer the chicken to a deep plate, leaving the oil in the pan.Add the remaining flour to the oil and cook (I added a little more oil and flour at this point, because the leftovers didn't seem like enough — there should be at least 1/2 cup of each). Monitor the heat — you don't want the flour to burn! — and cook, stirring constantly, for 5 minutes to create a medium-brown, peanut butter-colored roux.Add the onion, celery, poblano, and garlic and cook 5 minutes more. Add the chicken tomatoes, broth, thyme, bay leaves, and hot sauce. Simmer over low heat for 45 minutes, stirring occasionally, until thickened to a light gravy and the chicken is tender enough to shred with a fork. Taste and adjust seasonings, adding more salt or hot sauce as desired. Serve over rice, garnished with scallions.
The post Chicken Sauce Piquant appeared first on The Amateur Gourmet.
Adam D. Roberts's Blog

- Adam D. Roberts's profile
- 3 followers

