
Adam D. Roberts's Blog, page 5
February 20, 2023
Blow-You-A-Whey Pancakes with Homemade Labneh
Little Miss Muffet can keep her curds: I’m stealing her whey. Especially to make these blow-you-a-whey pancakes with homemade labneh which (spoiler alert!) are easily some of the best pancakes that I’ve ever made and/or eaten in my life.
The secret is the milky white substance that collects in the bowl underneath the sieve when you strain yogurt overnight in the fridge. If you’ve never done this, you’ve never made labneh, which is a real shame because labneh is like yogurt taken to the power of eleven. It’s thick and creamy and works as a dip, a spread, even on its own as a base for fruit and granola. But we’re not here to talk about the labneh, we’re here to talk about the whey!
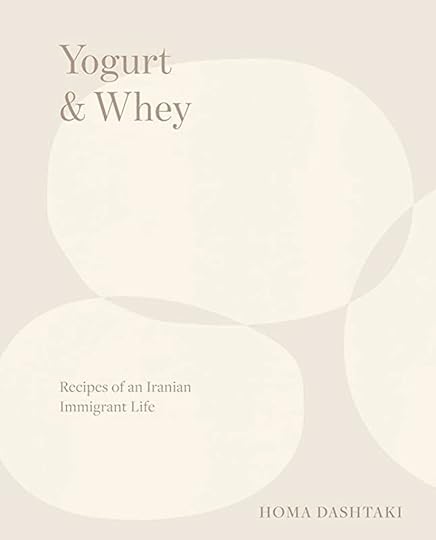
Why am I so obsessed with the stuff? It’s all because of Homa Dashtaki’s terrific new cookbook, Yogurt and Whey. Homa is the founder of The White Mustache, which sells some of the most celebrated yogurt in America. She’s also my podcast guest this week:
When I asked her to send me a recipe to make, she very quickly responded with the pancake recipe, giving me instructions for making my own whey. I’ll include it in the recipe below, but it’s as simple as buying two quarts of full-fat plain yogurt (not Greek) and straining it overnight with a sieve lined with cheesecloth in the fridge.

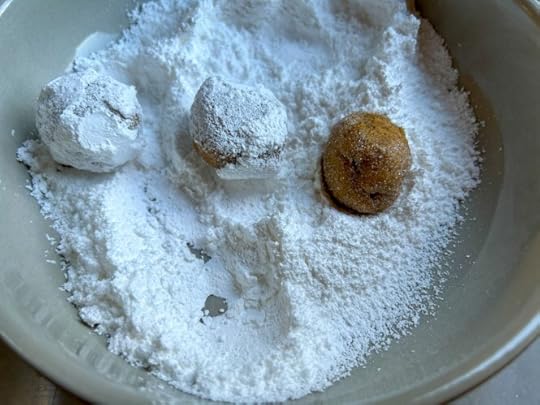
Such an easy thing to do and it yields such rewards! Again, the labneh is super versatile, but look what happens when you mix the whey with eggs, melted butter, flour, sugar, baking powder, baking soda, and salt.

See those happy blobs? See all the bubbles on top? That’s because all of the acid from the whey is interacting with the baking powder and baking soda, creating an amazing amount of lift. And then the natural sugars in the whey are helping the pancakes get nice and crispy on the edges.
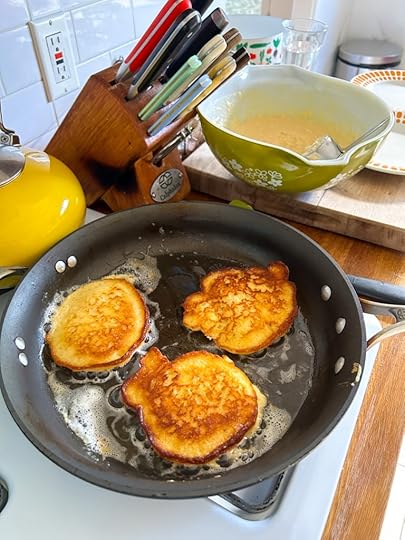
If they remind you of buttermilk pancakes, you’re in the right ballpark: buttermilk pancakes are fluffy and crispy too (again, because of the acid). But the key difference here is that the whey has none of the heaviness of dairy. It’s lighter yet still contains all of the chemical properties you love about buttermilk. And look at how gorgeous these look hot out of the skillet.

What a gift to give yourself in the morning and all you have to do is strain yogurt overnight? In the time that it took you to read this, you could’ve already set that up. And the best part is you can top it with some of the labneh (in the lead picture, I also added some cherry compote we had in the fridge).
Who knew that something most of us throw away could lead to a life-changing pancake moment? Homa knew. And now, thanks to her, we know it too.
 PrintBlow-You-A-Whey Pancakes with Homemade LabnehThe best pancakes you'll ever eat from Homa Dashtaki's Yogurt & Whey.Course BreakfastCuisine AmericanKeyword breakfast, pancakes, syrup, whey, yogurtPrep Time 1 dayCook Time 25 minutesServings 4 peopleIngredients2 quarts whole milk, full-fat, plain yogurt (not Greek)1 1/3 cups all-purpose flour2 tablespoons sugar1 teaspoon baking powder1 teaspoon baking soda1 teaspoon kosher salt2 large eggs4 tablespoons unsalted butter, melted, plus more for skilletNeutral oil (such as sunflower, canola, or grapeseed)InstructionsThe day before you plan to make the pancakes, place a fine-mesh sieve over a large bowl and line it with cheesecloth. Carefully pour in the two quarts of yogurt and place everything in the refrigerator overnight (it needs at least 24 hours). You need one cup of whey for this recipe — if you have extra, save it for more pancakes.In a large bowl, whisk together the flour, sugar, baking powder, baking soda, and salt.In a medium bowl, whisk the eggs, one cup of whey, and melted butter until thoroughly combined. Pour the wet ingredients into the dry and gently whisk just until incorporated (don't overmix; a few lumps of flour are okay). Set the batter aside for 15 minutes at room temperature until the surface is dotted with bubbles.Heat a large nonstick skillet over medium heat. Add 1 tablespoon of butter and 1 tablespoon of oil and swirl to coat well.Using a 1/3rd cup measure, scoop the batter into the hot pan — leaving some space between each pancake (I did four at a time). Bubbles will form on the tops of the pancakes; wait to flip them until most of the bubbles have popped and the pancakes are golden brown underneath (about 3 minutes). Flip and cook another minute or two until golden on the other side. Transfer to a plate and repeat with the remaining pancakes, adding more butter and oil as needed.Serve with some of the labneh, maple syrup, jam, or compote.
 Related posts:
Ricotta PancakesCaramelized Apple PancakesStrawberry PancakesThe Pancake at CanéleThe post Blow-You-A-Whey Pancakes with Homemade Labneh appeared first on The Amateur Gourmet.


February 14, 2023
Baked Chicken Thighs with Butter and Onions
Keep your ferments, your sous vide pork chops, your deconstructed French Onion Soup; when it comes to dishes that I’m interested in, I’d much rather eat the favorite thing that you ate in childhood — especially if it’s something that your mother made for you with love. That’s the case with Aaron Hutcherson’s baked chicken thighs with butter and onions. It’s a deceptively simple dish that his mother made with a homemade spice mix, bone-in, skin-on chicken thighs, and just enough butter to give everything some pizazz. It’s a weeknight dinner that feels good enough for the weekend.
I learned about this dish on this week’s episode of You’ve Got to Taste This, in which Aaron talks about his childhood in Chicago, how his mom let him cook with her in the kitchen, and how he ultimately branched out on his own, attending culinary school (after working as a wealth manager) and becoming a recipe columnist for The Washington Post. You can listen to our whole conversation here or on Apple podcasts:
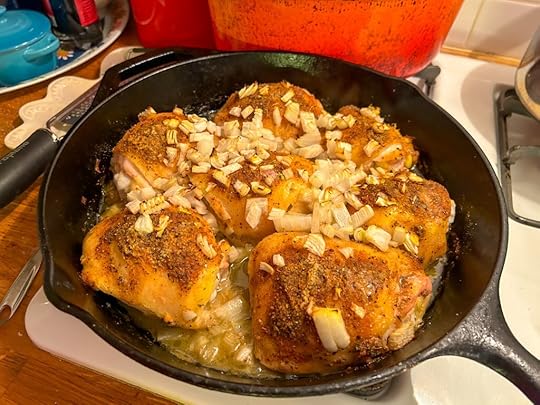
The spice mix is a classic combo of salt, freshly ground black pepper, garlic powder (which made me think of my own mother — she loved sprinkling it on pasta and pizza), dried thyme, ground cumin, and paprika. You sprinkle that all over eight bone-in, skin-on chicken thighs (you don’t want boneless, skinless here: the skin and bone insulate the chicken from the heat of the oven, keeping everything juicy).

If you just did that and stuck it in the oven, you’d have a great dinner. But Aaron (and his mom) take things a step further, scattering a chopped onion over everything and adding pats of butter.

If I’ve learned anything in this life, it’s this: butter and chicken are the best of friends. It’s what makes my roast chicken so special.
You bake that in a 400 degree oven (Aaron recommends a 9X13 pan, but I used a 12-inch cast-iron skillet) for 40 minutes and at the end, if the thighs aren’t crispy enough, you broil them.

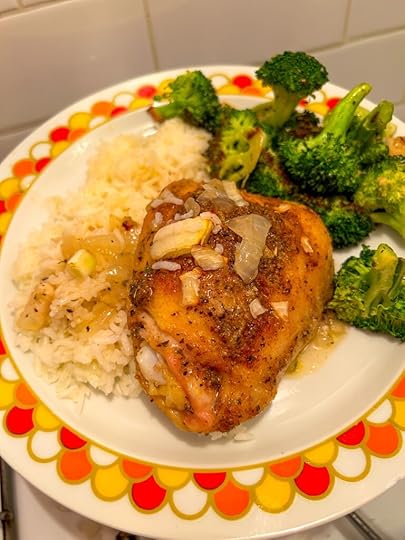
I mean, who wouldn’t have a smile on their face if this came to the table?
Aaron suggests serving with rice and I think that’s a must: what else is going to soak up all of those buttery, spicy, chicken juices? I also added some of my famous roasted broccoli for health.
This is one of those versatile, back-pocket recipes you’ll whip out any time you need a quick, comforting dinner that’ll impress and nourish at the same time. Thanks Aaron, and thanks to your mom, for this newest addition to my repertoire.
 PrintBaked Chicken Thighs with Butter and OnionsA lovely family recipe from food writer Aaron Hutcherson featuring chicken, spices, butter, and onions.Course Main CourseCuisine AmericanKeyword butter, chicken, main courses, onions, spicesPrep Time 20 minutesCook Time 40 minutesTotal Time 1 hour 5 minutesIngredients8 bone-in, skin-on chicken thighs (4 pounds total)1 tablespoon kosher salt (I like Diamond Crystal)1 teaspoon freshly ground black pepper1 teaspoon garlic powder1 teaspoon dried thyme I used dried oregano here and it worked great1/2 teaspoon ground cumin1/2 teaspoon paprika1 small yellow onion, diced4 tablespoons unsalted butter, cut into 8 piecesInstructionsPreheat the oven to 400 degrees. Pat your chicken thighs dry with paper towels and mix together all of the spices.In a 9 X 13 baking dish or a 12-inch cast-iron skillet, add your chicken thighs. Sprinkle on all sides with the spice mixture, finishing with the chicken skin-side up.Sprinkle the chopped onion over the chicken and then top each piece with a slice of butter. Bake for 40 minutes or until the internal temperature reaches 165 degrees.If the chicken isn't crispy enough (is it ever crispy enough?) place under the broiler and broil just until the skin gets a bit darker, but not so long that it burns. Let it cool slightly and then serve with rice and lots of the pan juices on top.
The post Baked Chicken Thighs with Butter and Onions appeared first on The Amateur Gourmet.
February 6, 2023
Keema Pau
Have you ever been in a cooking rut? Sometimes I literally have no idea what to make for dinner even though I have a cookbook shelf overflowing with books and I read about food on the internet for 85% of my day.
Thankfully, I started this new podcast and my guests send me recipes to make that I would never think of making on my own. Case in point: this Keema Pau which was suggested to me by my guest this week, Karan Soni, who you may know from the Deadpool movies or the show Miracle Workers. Karan and his partner Roshan came over for dinner and noticed the Dishoom cookbook on my shelf and Karan lit up: he cooked his way through it during the pandemic and absolutely loved the food that he made. So when I asked him to send me a recipe for the pod, he referred me to page 109, which has the recipe for Keema Pau.
What is Keema Pau?
Well here’s our discussion if you’d like to hear us talk all about it:
But for those who don’t have time to listen to a highly acclaimed, much beloved podcast, here’s the gist: you sauté onions in oil, add fresh ginger and garlic, and then three teaspoons of freshly ground coriander seeds (I use a spice grinder).

Here’s where things get really wild: you add 1/2 cup of full-fat Greek yogurt, crank the heat up, and cook until the yogurt starts to separate. In my twenty years of cooking, I’ve never added dairy to heat and tried to get it to separate — the whole thing was thrilling. To that you add ground lamb, flour, and an herb paste that you make with spring onions, cilantro, mint, and green chili.
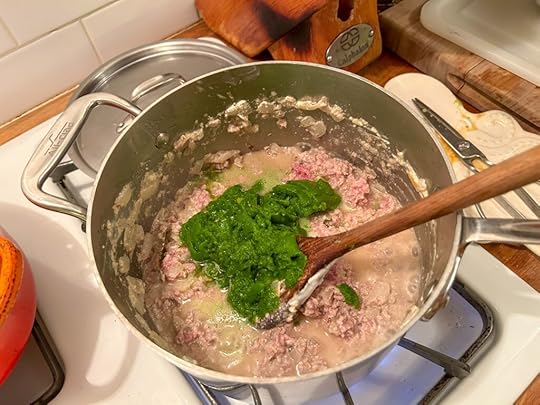
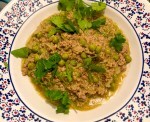
By the time this all cooked together for twenty minutes, I tasted and the flavor absolutely knocked me on to my butt. I’d never tasted anything like it: it had the sourness and tang from the yogurt, the meatiness and slight gaminess of the lamb, and then the herbaceousness from the mint, cilantro, and chilies. Visually, it wasn’t the most alluring thing I’d ever seen, and adding frozen peas didn’t really help, but the flavor was undeniable. Karan suggested buying frozen paratha from the Indian supermarket near my apartment which was a delight to just heat up directly in a cast iron skillet.

Seriously, if you take nothing else away from this post let it be this: frozen paratha are a brilliant thing to have in your freezer. They’d make a terrific base for scrambled eggs (Karan’s mom used to make hers with chilies and other aromatics and serve it over paratha for breakfast); I was even thumbing through the new Turkey and the Wolf cookbook and they serve one of their sandwiches on paratha.
For a side, I made one of my favorite Indian dishes: Meera Sodha’s Cauliflower, Cashew, Pea, and Coconut Curry. (The pomegranate seeds were an added flourish.)

This food was so good, it didn’t matter that the power went out just as our dinner guests arrived!
Everyone was so busy chowing down, we barely noticed when the lights came back on. If that’s not the sign of a good dinner, I don’t know what is. Thanks, Karan, for teaching me about Keema Pau! It really packs a punch.

 PrintKeema PauAn enticing combination of lamb, yogurt, spices, and herbs from the Dishoom cookbook.Course Main CourseCuisine IndianKeyword cilantro, Dishoom, lamb, yogurtPrep Time 30 minutesCook Time 1 hourServings 4Ingredients2 inch piece of fresh ginger6 to 7 cloves garlic2 scallions or spring onions1 cup cilantro leaves, roughly chopped1/2 cup fresh mint leaves, roughly chopped2 whole green chilies plus an extra 1 tablespoon roughly chopped As you'll hear in the podcast, Karan recommends the small, spicy green chilies you find in Indian groceries; if you can't find, use any small, spicy green chile3 tablespoons vegetable oil1 onion, finely diced3 teaspoons ground coriander Buy the seeds whole and grind them in your spice grinder or mortar and pestle1/2 cup full-fat Greek yogurt1 pound ground lamb1 1/4 teaspoons fine sea salt2 bay leaves1/3 teaspoon plain flour1/4 cup frozen peasFor serving:4 frozen paratha, heated according to package directionsChopped red onion (for garnish)A few cilantro leaves3 to 4 lime wedgesInstructionsStart by grating the ginger and garlic with a microplane into a small bowl; set aside.In a blender, blitz together the scallions, cilantro, mint, and tablespoon of chopped green chilies together to make a paste (you may need to add a splash of water to help it come together).In a large saucepan over medium heat, heat the oil. When hot, add the onion and sauté gently for five minutes, stirring regularly, without browning (I added a pinch of salt here; up to you). Add the grated ginger and garlic and cook for 2 minutes, stirring almost constantly. Add the ground coriander and cook for 2 to 3 more minutes.Crank up the heat and stir in the yogurt, sautéing for 3 minutes just until the yogurt starts to separate. Lower the heat back to medium, stir in the lamb, salt, bay leaves, and mix well. Sauté, stirring regularly, until the moisture starts to leave the meat. Sprinkle in the flour and stir well.Stir in the green paste, turn the heat down to low, and simmer for 20 minutes.Add the peas and the whole green chilies and simmer over the lowest possible heat for a further 15 minutes, stirring occasionally. When the time is up, put the lid on, turn off the heat, and allow the keema to stand for ten minutes. This is a good time to taste and adjust for salt.To serve, heat the paratha and scoop the keema into bowls, garnish with red onion and coriander. Serve with the paratha and lime wedges.
The post Keema Pau appeared first on The Amateur Gourmet.
February 2, 2023
Rosemary Dijon Rack of Lamb with Crispy Potatoes
Would you believe that I’ve cooked lamb necks, lamb shoulders, lamb legs, but never that most famous lamb preparation of all… a classic rack of lamb?
The reason’s actually pretty simple: rack of lamb is expensive. And as confident as I am as a meat cook, I’m always scared that if I splurge on something as decadent as a rack of lamb, I’m going to screw it up. And meat is hard to fix once you overcook it. Thankfully, I didn’t have to worry with this particular rack because it was a gift! Well, I received a gift certificate for $100 for an online butcher and I chose one 1 1/2 pound rack of lamb that, with shipping, worked out to the full $100. (I know, that’s insane, but now you know why I’ve avoided cooking lamb racks for so long.)
Once my rack arrived, I popped it straight into the freezer and left it there as I pondered what to do with it. Then, afraid that I’d never cook it if I didn’t just defrost it, I placed it in the refrigerator for two days as I explored my options. When it was finally time to go, I knew which recipe I wanted to make: David Tanis’s Rosemary Rack of Lamb with Crushed Potatoes.
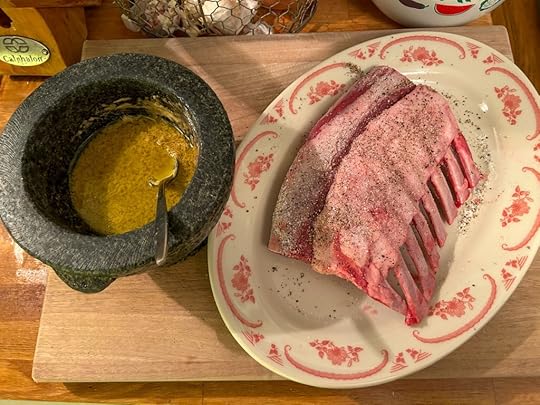
David Tanis knows something about lamb that I also know from my previous lamb efforts: the best ingredient to draw out the taste of lamb is… anchovies. Yes, you heard that right. The umami of an anchovy draws out the inherent funkiness of lamb which makes it so much more interesting than your typical boring red meat. Mashed together with garlic, stirred together with lots of Dijon mustard, and then emulsified with olive oil, you season the meat generously with salt and pepper and then slathered this potent mixture all over your rack (your lamb rack, I should say) while you deal with your potatoes.
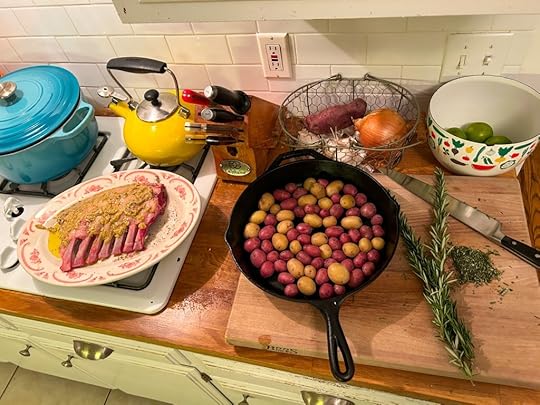
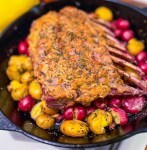
The potato prep is as easy as this: you boil little potatoes in salted water until a knife through one easily. Then you smash them, toss them with olive oil, salt and pepper, lots of chopped fresh rosemary and place the lamb on top… sprinkling with even more osemary.
Sometimes you can look at something before it goes into the oven and just know it’s going to turn out dyn-o-mite. This was one of those times.

And guess what? Cooked at 400 degrees for just twenty minutes, the lamb came out better than it would at a restaurant. I kid you not! Using a thermometer to insure proper doneness, I stopped cooking the lamb when it hit 125 for medium-rare. I lifted the lamb off of the potatoes on to a cutting board to rest for ten minutes while I tossed the potatoes and put them back into the oven to crisp up.
Once I sliced into the perfectly cooked lamb, it was hard not to gobble up every morsel right then and there.
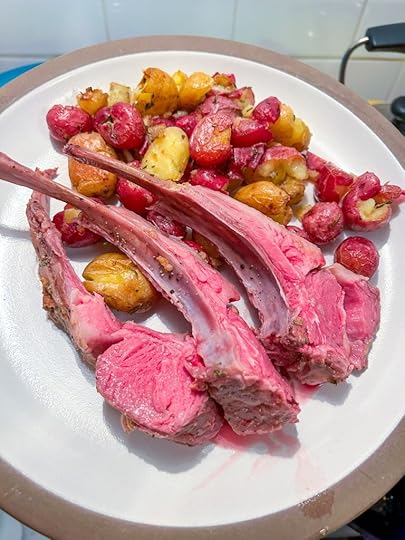
But I was kind enough to bring it to the table where, like barbarians, we devoured it. The meat alone was transcendently good cooked to that perfect medium-rare temperature; but with the marinade? All of that garlic and the anchovies and the mustard? It was otherworldly. And the potatoes were the perfect crispy foil for all of that succulent meat.
A meal like this is so good, I’m glad I can only afford it once in a blue moon or I’d be eating so much lamb, my future blog posts would all read “bahhhhh.” But there’s nothing bahhhhd about this rack of lamb. I can’t wait to make it again.
 PrintRosemary Dijon Rack of Lamb with Crispy PotatoesDavid Tanis's otherworldly rack of lamb with garlic, anchovies, Dijon, rosemary, and crispy potatoes.Course Main CourseCuisine FrenchKeyword anchovies, David Tanis, lamb, meat, rosemaryServings 4 peopleIngredients2 racks of lamb, 1 1/2 pounds each, Frenched I only did one rack but made the same amount of marinade and the same amount of potatoes and it worked great.Kosher salt and freshly ground black pepper3 cloves of garlic4 anchovy filets2 tablespoons Dijon mustardExtra-virgin olive oil2 pounds small potatoes2 tablespoons roughly chopped fresh rosemary2 tablespoons roughly chopped parsley, for garnishInstructionsPreheat the oven to 400 degrees and bring a pot of water to a boil, seasoning it well with salt.Pat your rack of lamb dry and then season it all over with lots of salt and pepper. In a mortar and pestle, smash together the garlic and anchovies until you get a paste (add a little salt to help it along). Stir in the Dijon and then work in about 1/2 cup of olive oil. Slather the marinade all over the lamb and set aside.Boil the potatoes until a knife goes through one easily, about ten to fifteen minutes. Drain them and then place them in a roasting pan (or large cast-iron skillet) large enough to fit them in one layer. When they're cool enough to handle, smash them with the palm of your hand or a measuring cup, toss with two tablespoons of olive oil, salt and pepper, and some of the chopped rosemary.Lay the lamb on top of the potatoes and sprinkle with the rest of the rosemary. Roast in the oven for about twenty minutes or until a thermometer inserted into the center of the lamb reads 125, for medium-rare.Lift the lamb off of the potatoes on to a cutting board, tenting with foil, to allow to rest for ten minutes (don't skip this step or all the juices will run out!). Meanwhile, toss the potatoes around and place back into the oven until they get nice and crispy.To plate: scoop the potatoes on to plates and slice the lamb between the bones. You should get about four chops per customer. Sprinkle with parsley and serve.
The post Rosemary Dijon Rack of Lamb with Crispy Potatoes appeared first on The Amateur Gourmet.
January 30, 2023
Claire Saffitz’s Meyer Lemon Bundt Cake
Bundt cakes often look better than they taste. That’s because, at the end of the day, you’re dumping a bunch of cake batter into a big heavy mold that needs to cook for a while to have stability, but also (very often) dries the cake out in the process. So how do you make a big, impressive-looking bundt cake that actually tastes good? You soak it as soon as it comes out of the oven. I’ve seen recipes for lemon cakes where you cook sugar with lemon juice just until the sugar dissolves to make a lemon syrup and then pour that over the cake (see: The Barefoot Contessa); but I’ve never seen one where you mix raw lemon juice with sugar and olive oil and pour that over the cake. That was until I encountered Claire Saffitz’s Meyer Lemon Bundt Cake in her new cookbook What’s for Dessert?.
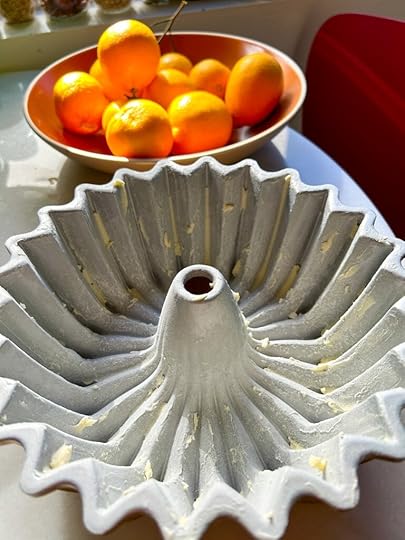
This is the lemon bundt cake to rival all lemon bundt cakes. Not to show off, but we started the bundt cake journey in our backyard picking Meyer lemons off our Meyer lemon tree (well not ours, technically, we rent).

The hardest part of the whole recipe is the very first step: buttering and flouring your plan. From Nicole Rucker I learned that your best strategy when coating a bundt pan is to use lots of softened butter and to get it into all the crevices. I’m very liberal with the butter here because can you imagine anything worse than going to the trouble of making a lemon bundt cake only to have it stick to the pan?
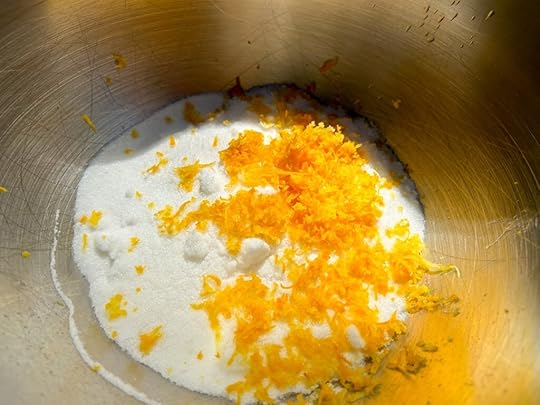
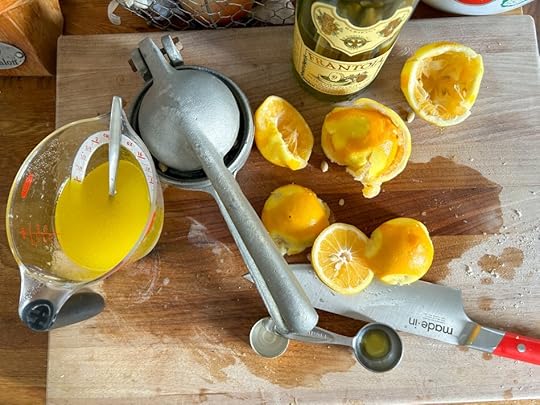
After that, it’s all fun and games. You zest the lemons into sugar and pinch it with your fingers to extract the oils (very satisfying, I must say).
 Then you add eggs, stick it under a mixer, and beat until it looks custardy. To that you add a lot of olive oil — I used some fruity good stuff (Frantoia, which you can buy online) — until it emulsifies, then the dry ingredients (flour, etc.) alternating with milk, lemon juice, and vanilla. Voila: your batter.
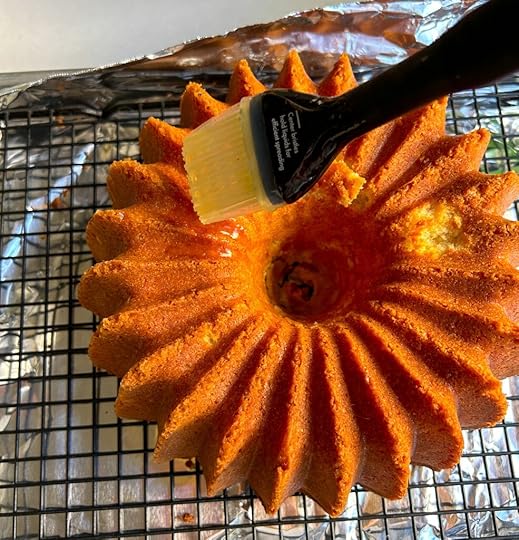
Into the oven it goes to bake (and wow, does it rise up); meanwhile, you make your magical potion of lemon juice, olive oil, and sugar.
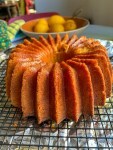
When the cake comes out of the oven, you let it rest for fifteen minutes and then poke holes in it and start brushing with the glaze. The scary part comes when you flip it out and pour the glaze all over the other side. Confession: the first time I turned the pan over, the cake didn’t detach! Even with all of that butter. So I flipped it back over and used a paring knife to really make sure it wasn’t sticking; the real trouble spot was the middle section, where I had to stab like Norman Bates to get it done. But get it done I did and then I brushed the rest of the glaze all over the gorgeous cake.
So the next time you go to the trouble of making a bundt cake, have a glaze standing by or your efforts won’t be worth it. (Exception: a sour cream cake which will be plenty moist.) Shellacked with the raw Meyer lemon juice, sugar, and olive oil, this cake becomes a bright and peppy affair that’ll delight your guests at your next dinner party. Not ifs, ands, or bundts about it.
 PrintClaire Saffitz’s Meyer Lemon Bundt CakeA bright and citrusy recipe from Claire Saffitz's "What's for Dessert?"Course DessertCuisine AmericanKeyword bundt, cake, Claire Saffitz, lemon, Meyer lemonPrep Time 40 minutesIngredientsRoom temperature butter (about 3 to 4 tablespoons) and flour for the pan3 cups all-purpose flour2 1/2 teaspoons baking powder1 teaspoon Diamond Crystal kosher salt1/2 teaspoon baking soda1 tablespoon finely grated Meyer lemon zest (from about 2 lemons)1 3/4 cup sugar + 2/3 cup for the glaze3/4 cup Meyer lemon juice, divided1 cup whole milk, room temperature2 teaspoons vanilla extract4 large eggs, room temparture1 1/3 cups extra-virgin olive oilInstructionsPreheat the oven to 350. Schmear the softened butter all around your 12-cup metal Bundt pan: you really want to work it into the crevices or anywhere the batter might have a tendency to stick (like the middle tube). When it's nicely greased, spoon in enough flour to coat and pat all around, tapping out any excess.In a medium bowl, whisk together the flour, baking powder, salt, and baking soda. Set aside.In the bowl of a stand mixer, zest your lemons directly into the sugar (you can zest more than the recipe calls for if you like it extra puckery). Use your fingers to pinch the zest into the sugar — it should smell amazing.Now that you've zested the lemons, you can juice them. Mix together 1/4 cup of the juice with the milk and vanilla. Set aside.Add the eggs to the bowl of the stand mixer with the sugar and the zest and beat with the whisk attachment on medium speed until it looks thick and mousse-y, about 3 minutes. Very gradually stream in the 1 1/3 cups of olive oil and beat until the mixture looks smooth, thick, and emulsified.Reduce the speed to low, add 1/3rd of the dry ingredients, 1/2 of the milk mixture, 1/3rd dry, 1/2 milk, and finish with the dry. Don't overwork here; finish mixing with a rubber spatula, scraping the bottom of the bowl, making sure it's evenly mixed. Pour the batter into the Bundt pan and bake for 45 to 55 minutes until a cake tester comes out clean. Set aside to cool for 15 minutes.Meanwhile, make the glaze by whisking together the remaining 1/2 cup Meyer lemon juice, 2/3rds cup granulated sugar, and 2 tablespoons olive oil. Whisk vigorously with a fork until the sugar mostly dissolves.While the cake is still warm, use a toothpick to poke holes all over the surface and brush it with some of the glaze. Then very carefully use a paring knife to make sure the cake isn't sticking to the sides of the pan and flip it out on to a wire rack set over a cookie sheet lined with aluminum foil. Poke more holes with a toothpick and brush with the rest of the glaze; any glaze that drips on to the cookie sheet, pour back on. Let the cake cool completely.
The post Claire Saffitz’s Meyer Lemon Bundt Cake appeared first on The Amateur Gourmet.
Crystallized Meyer Lemon Bundt Cake
Bundt cakes often look better than they taste. That’s because, at the end of the day, you’re dumping a bunch of cake batter into a big heavy mold that needs to cook for a while to have stability, but also (very often) dries the cake out in the process.
So how do you make a big, impressive-looking bundt cake that actually tastes good? You soak it as soon as it comes out of the oven. I’ve seen recipes for lemon cakes where you cook sugar with lemon juice just until the sugar dissolves to make a lemon syrup and then pour that over the cake (see: The Barefoot Contessa); but I’ve never seen one where you mix raw lemon juice with sugar and olive oil and pour that over the cake. That was until I encountered Claire Saffitz’s recipe for Crystallized Meyer Lemon Bundt Cake in her new cookbook What’s for Dessert?.
This is the lemon bundt cake to rival all lemon bundt cakes. Not to show off, but we started the bundt cake journey in our backyard picking Meyer lemons off our Meyer lemon tree (well not ours, technically, we rent).
The hardest part of the whole recipe is the very first step: buttering and flouring your plan. From Nicole Rucker I learned that your best strategy when coating a bundt pan is to use lots of softened butter and to get it into all the crevices. I’m very liberal with the butter here because can you imagine anything worse than going to the trouble of making a lemon bundt cake only to have it stick to the pan?
After that, it’s all fun and games. You zest the lemons into sugar and pinch it with your fingers to extract the oils (very satisfying, I must say).
Then you add eggs, stick it under a mixer, and beat until it looks custardy. To that you add a lot of olive oil — I used some fruity good stuff (Frantoia, which you can buy online) — until it emulsifies, then the dry ingredients (flour, etc.) alternating with milk, lemon juice, and vanilla. Voila: your batter.Into the oven it goes to bake (and wow, does it rise up); meanwhile, you make your magical potion of lemon juice, olive oil, and sugar.
When the cake comes out of the oven, you let it rest for fifteen minutes and then poke holes in it and start brushing with the glaze. The scary part comes when you flip it out and pour the glaze all over the other side. Confession: the first time I turned the pan over, the cake didn’t detach! Even with all of that butter. So I flipped it back over and used a paring knife to really make sure it wasn’t sticking; the real trouble spot was the middle section, where I had to stab like Norman Bates to get it done. But get it done I did and then I brushed the rest of the glaze all over the gorgeous cake.
So the next time you go to the trouble of making a bundt cake, have a glaze standing by or your efforts won’t be worth it. (Exception: a sour cream cake which will be plenty moist.) Shellacked with the raw Meyer lemon juice, sugar, and olive oil, this cake becomes a bright and peppy affair that’ll delight your guests at your next dinner party. Not ifs, ands, or bundts about it.
PrintCrystallized Meyer Lemon Bundt CakeA bright and citrusy recipe from Claire Saffitz's "What's for Dessert?"Course DessertCuisine AmericanKeyword bundt, cake, Claire Saffitz, lemon, Meyer lemonPrep Time 40 minutesIngredientsRoom temperature butter (about 3 to 4 tablespoons) and flour for the pan3 cups all-purpose flour2 1/2 teaspoons baking powder1 teaspoon Diamond Crystal kosher salt1/2 teaspoon baking soda1 tablespoon finely grated Meyer lemon zest (from about 2 lemons)1 3/4 cup sugar + 2/3 cup for the glaze3/4 cup Meyer lemon juice, divided1 cup whole milk, room temperature2 teaspoons vanilla extract4 large eggs, room temparture1 1/3 cups extra-virgin olive oilInstructionsPreheat the oven to 350. Schmear the softened butter all around your 12-cup metal Bundt pan: you really want to work it into the crevices or anywhere the batter might have a tendency to stick (like the middle tube). When it's nicely greased, spoon in enough flour to coat and pat all around, tapping out any excess.In a medium bowl, whisk together the flour, baking powder, salt, and baking soda. Set aside.In the bowl of a stand mixer, zest your lemons directly into the sugar (you can zest more than the recipe calls for if you like it extra puckery). Use your fingers to pinch the zest into the sugar — it should smell amazing.Now that you've zested the lemons, you can juice them. Mix together 1/4 cup of the juice with the milk and vanilla. Set aside.Add the eggs to the bowl of the stand mixer with the sugar and the zest and beat with the whisk attachment on medium speed until it looks thick and mousse-y, about 3 minutes. Very gradually stream in the 1 1/3 cups of olive oil and beat until the mixture looks smooth, thick, and emulsified.Reduce the speed to low, add 1/3rd of the dry ingredients, 1/2 of the milk mixture, 1/3rd dry, 1/2 milk, and finish with the dry. Don't overwork here; finish mixing with a rubber spatula, scraping the bottom of the bowl, making sure it's evenly mixed. Pour the batter into the Bundt pan and bake for 45 to 55 minutes until a cake tester comes out clean. Set aside to cool for 15 minutes.Meanwhile, make the glaze by whisking together the remaining 1/2 cup Meyer lemon juice, 2/3rds cup granulated sugar, and 2 tablespoons olive oil. Whisk vigorously with a fork until the sugar mostly dissolves.While the cake is still warm, use a toothpick to poke holes all over the surface and brush it with some of the glaze. Then very carefully use a paring knife to make sure the cake isn't sticking to the sides of the pan and flip it out on to a wire rack set over a cookie sheet lined with aluminum foil. Poke more holes with a toothpick and brush with the rest of the glaze; any glaze that drips on to the cookie sheet, pour back on. Let the cake cool completely.The post Crystallized Meyer Lemon Bundt Cake appeared first on The Amateur Gourmet.
January 26, 2023
Dirty Chai Earthquake Cookies
I have a vivid memory of being in Venice with my parents in the early 2000s (it’s documented here) when my brother and I decided to freak out our mother by drinking espresso after dinner. We were actually always a coffee-after-dinner family but the coffee was always decaf. To this day, my parents still order decaf if they’re in the mood for a hot beverage after a big meal. But in Italy, drinking espresso after dinner is a tradition and to quote Tevye, “Tradition!” So we drank the espresso and, as far as I can remember, we still fell asleep and all was fine. But my mother’s concern was still on my mind when I made Susan Spungen’s Dirty Chai Earthquake Cookies for a dinner party last week.

Ever since Craig and I got the Breville Barista Pro we’ve been running a veritable coffee shop out of our kitchen. I’m almost fully capable of making a barista-worthy heart with microfoam and I have to limit myself to two coffee beverages per day or even if I have that second beverage at one o’clock, I’m still jittery at night. Hence the concern over these cookies! They have a full tablespoon of finely ground espresso (not instant) in them.
Granted, that’s one tablespoon distributed over two dozen cookies, so maybe I was being overly cautious. I chose them because I was cooking an Indian feast for our friends Ryan and Joe and I needed a dessert that rounded out the theme. Dirty chai cookies seemed perfect.
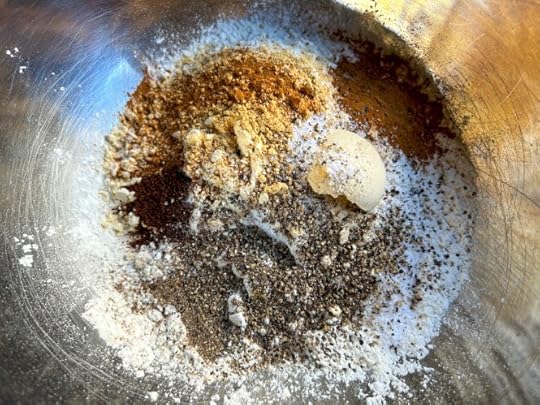
The dough is chock-full of those spunky Chai spices: ginger, cinnamon, cardamom, cloves, and black pepper. The secret ingredient is malted milk powder, which is what makes David Lebovitz’s malted milk ice cream so memorable, and adds a mysterious texture and yeasty flavor to the whole affair.
The coolest part is that you bloom the espresso with browned butter.

Once the dough comes together (you beat eggs in a mixer with the sugar before working in the other ingredients), you refrigerate it for a few hours so it firms up, and then you scoop tablespoon-sized balls and roll them in both granulated sugar and then powdered sugar.
You freeze for ten minutes, bake for twelve minutes, and then you have a tray of festive, notably complex cookies that are perfect for a wintery meal or an Indian feast. The bitterness of the espresso and the nuttiness of the brown butter plays beautifully against all of the spice and the sweetness. And they won’t keep you up at night. I promise, mom! Unless you eat all twenty four which, considering how good these cookies are, is entirely possible.

 PrintDirty Chai Earthquake CookiesSusan Spungen's spicy, sugary chai cookies with espresso and brown butter.Prep Time 2 hours 30 minutesCook Time 12 minutesServings 24 cookiesIngredients1 tablespoon finely ground espresso (not instant) or finely ground cofee1/2 cup unsalted butter (that's 1 stick)2 cups all-purpose flour2 tablespoons malted milk powder (I used Carnation)1 teaspoon baking powder1 teaspoon ground ginger1 teaspoon ground cinnamon1/2 teaspoon ground cardamom1/8 teaspoon ground cloves1/2 teaspoon kosher salt1/2 teaspoon finely ground black pepper2 large eggs3/4 cup light brown sugar2 teaspoons vanilla extract or paste1/4 cup granulated sugar1/2 cup confectioners' sugar, siftedInstructionsPut espresso in a medium-sized bowl. Cook the butter over medium-high heat in a small saucepan, swirling every so often, allowing it to turn nutty brown (about 5 to 6 minutes). Pour over the espresso, stirring it together, then set it aside.Whisk together the flour, malted milk powder, baking powder, ginger, cinnamon, cardamom, cloves, salt, and pepper in a medium bowl.In a stand mixer with the paddle attachment, beat the eggs and light brown sugar on medium speed for about 3 minutes until well-combined and lighter in color.Add the vanilla and the butter mixture, scraping the sides of the bowl if necessary, and mix on low to combine. Add the flour mixture, mix again, and use a rubber spatula to finish the job so you don't overwork the dough. Cover the mixer bowl with plastic wrap and refrigerate for two hours to firm up. (DIrty chai cookie secret: I only refrigerated for an hour and it was fine.)Heat the oven to 350 degrees. Pour the granulated sugar into one bowl and the powdered sugar into another bowl. Using a small cookie scoop or a tablespoon measure, scoop out heaping tablespoons of dough, roll into a ball, roll in the granulated sugar, then the powdered sugar, and place on a parchment-lined cookie sheet. Leave about two inches of space between the cookies and freeze the tray of cookies for ten minutes before baking. Bake until the cookies are golden underneath but still very tender (they'll firm up as they cool), about 12 to 14 minutes. Let cool a few minutes on the baking sheets and then slide the parchment on to a wire rack to cool completely. The cookies will keep for up to a week, covered, at room temperature.
 The post Dirty Chai Earthquake Cookies appeared first on The Amateur Gourmet.
January 23, 2023
Crispy Pierogi with Pork and Dried Fruit
The best pierogi I’ve ever eaten in my life — one that ruined all other pierogi for me — was at Michael Symon’s now-closed restaurant Lola in Cleveland, Ohio. I still remember what it looked like: a half moon of crispy dough stuffed with beef cheeks. It was maybe one of the most decadent things I’ve ever tasted; somewhere between an empanada and a calzone; the amount of labor that went into it was evident with every bite. I vowed to make it some day from Symon’s cookbook (which has my favorite chili recipe) but never did.
Enter Nicole Rucker, this week’s guest on You’ve Got to Taste This. Nicole’s in a cookbook club (sorry men, it’s women only) and one of the most successful recipes they’ve ever tested happens to be the pierogi recipe that she sent me to make this week. They come from Zuza Zak’s cookbook Pierogi, which makes sense, and they’re stuffed with this magical mixture of caramelized pork blended with soaked dried fruit, boiled in salted water, and then sauteed in copious amounts of butter. Needless to say, they were an absolute trumph.
Here’s me and Nicole talking about what makes them so great:
View this post on InstagramA post shared by Adam Roberts (@amateurgourmet)
And here’s our full conversation about it, should you be in the mood for a podcast:
Now, about these pierogi. (I realize now that pierogi plural is the same as pierogi singular, so ignore the ‘s’ in some of the above links.) The dough is a dreamy combination of flour, egg yolks, butter, salt, and warm water. You bring it together in a bowl, knead it for five to six minutes, then let it rest before you roll it out and stamp out large circles for the pierogi (not pierogis).

Meanwhile, you make this wild filling of ground pork that you cook in butter until golden brown and dried fruit which you soak in water to soften. Deglazed with a little white wine and then blended, you adjust with sugar, salt, pepper, and lemon juice until it tastes undeniable. And then, after it cools, you stuff it into your little pierogi.

I was a little unclear as to how to bring it all together, but having made ravioli and other circular doughs filled with stuff, I figured I could wet the border with my finger, pinch it in half, and press down, crimping a little just to see if I could. Tossed on a sheet with with semolina flour, these pierogi looked good enough to eat raw.

Alas, I decided to cook them. The boiling in salted water part will be familiar to anyone who’s ever cooked homemade pasta… you take them out when they float. (Very Stephen King’s It.) But the real fun begins when you melt a ton of butter in a large skillet and add the pierogi to that and cook, tossing all around, until they start to crisp up. Then you add some sesame seeds to toast along with the pierogi.

Brought to the table and served with some cooked red cabbage (courtesy of my friend Tyler), plus sour cream for dipping, these were an event unto themselves. There’s no reason to compare them to the Michael Symon pierogi… they’re both glorious expressions of the form. And the form, in case you missed it, is buttery dough stuffed with intensely flavored meat and then fried in more butter. Who could turn down something like that? You’ve got to taste this, indeed!
 PrintCrispy Pierogi with Pork and Dried FruitDecadent golden-brown and crispy pierogi from Zuza Zak's Pierogi.Course Main CourseCuisine PolishKeyword dried fruit, dumplings, pierogi, porkPrep Time 1 hourCook Time 30 minutesServings 4 hungry peopleIngredientsFor the filling:1/3 cup dried prunes, pitted1/3 cup dried apples 1/3 cup dried apricots Feel free to substitute the dried fruit in the recipe; Nicole Rucker used dates and dried cherries.2 tablespoons salted butter3/4 pound ground pork1/2 cup dry white wine1 tablespoon fresh lemon juice1 teaspoon sugarSalt and white pepper, to tasteFor the dough:2 1/4 cups all-purpose flour, plus more for dusting2 egg yolks2 tablespoons butter, meltedLarge pinch salt1/2 cup warm water from a pre-boiled kettleSemolina flour (optional)To serve:4 tablespoons butter The recipe calls for only 1 tablespoon here, but I think that's ridiculous. Life is short.2 tablespoons sesame seedsSour creamInstructionsFor the filling, soak the dried fruit in a bowl of hot water for an hour. Lift the fruit out, reserving the water, and dice it finely.Meanwhile, combine all the ingredients for the dough with your hands. Bring the mixture together into a ball and turn on to a floured work surface and knead for five to six minutes, until the dough is smooth and elastic. Cover with a damp dish towel for 20 to 30 minutes.For the filling, heat the butter in a saucepan with a lid and cook the pork, stirring, until golden brown (don't skip this step! the color adds so much flavor). Add the fruit, the wine, and a splash of the fruit water. Turn the heat down, cover, and simmer for about ten minutes. Remove the lid, add another splash of fruit water, and taste here to adjust with salt, pepper, and lemon juice. Cook for another five minutes, then remove from the heat, cool a little, and blend in a food processor to a "rough mince" consistency. Tatse again to adjust with salt, pepper, and lemon juice.Roll your dough out on a floured surface as thin as you can. Depending on the size of the pierogi you're going for, use a two to three inch cutter or the top of a water glass to cut out circles. Add a teaspoon to a tablespoon of filling to the center of each pierogi (depends on how big they are); wet the border with your finger and then pinch closed, pressing all the air out and crimping the perimeter closed with your fingers or a fork. Add to a sheet covered in semolina and repeat with the remaining pierogi. At this point, you can cook right away or freeze for later use.Bring a large pot of water to a boil and season with salt. Drop in the pierogi — you can do this in batches if you have a lot — and cook until they float, plus another minute. Meanwhile, melt the butter in a large skillet. As the pierogi finish cooking in the water, lift them with a spider tool into the skillet with the butter until all the pierogi have been boiled and then crank up the heat in the butter pan. Sauté, tossing all around, until they start to crisp up. Sprinkle in the sesame seeds and continue cooking until the seeds start to toast. Serve right away with lots of sour cream.
The post Crispy Pierogi with Pork and Dried Fruit appeared first on The Amateur Gourmet.
January 18, 2023
Baked Pasta with Fontina and Roasted Mushrooms
Some new friends were coming over the other night and I asked them what they ate and they said “we eat meat but mostly vegetables” and that’s when I knew I was going to serve them a pound of cheese. It’s not that I was trying to fatten them up or punish them for being so wholesome, it’s just that I count cheese as a vegetable. But on the off chance they were looking for real vegetables in their dinner, I decided to find a recipe that had cheese AND a vegetable and landed on Melissa Clark’s recipe for baked pasta with ricotta, fontina, and roasted mushrooms.
It’s kind of a genius thing, this recipe? Especially the first step. Are you ready to have your mind blown? You roast the mushrooms in the oven.

Now maybe you knew that you could roast mushrooms in the oven, but I definitely didn’t. Or if I did, I didn’t believe it would accomplish much. After all, my favorite thing to do with mushrooms is to add them to a hot pan with lots of olive oil and butter and to cook all the liquid out of them until they’re deeply bronzed and take in all of the garlic and wine that I add later.
But on a cookie sheet in a 450 oven, you can use way less oil and add some rosemary for a subtle perfume, and they come out just as golden with none of the mess.

These were shiitakes, but Melissa says you can do this with any mushroom and suggests lion’s mane, maitake, or oysters. Shiitakes was as exotic as the mushroom section of Gelson’s gets.
As for the rest of the recipe, you simply boil your pasta in salted water and stir it into a mixture of heavy cream, ricotta, fontina, Parmesan, sage and garlic.

Because I wanted to use the full box of pasta (the recipe only calls for 1/2 a pound), I changed the proportions a bit. So I almost doubled all the cheeses: instead of 5 ounces fontina, I used 8 (because that’s what I had, but 10 would be ideal), instead of 1/2 a cup fresh ricotta (I used Bellwether Farms), I used a whole cup, etc. I also used way more Parmesan cheese than half a cup, because I like to buy it pre-grated at the store (the freshly pre-grated not the canned pre-grated) for recipes liike this so I can add it liberally, especially to the top where it gets all caramelized.
I served this with David Chang’s Brussels sprouts with fish sauce, not an obvious pairing, but Craig requested it and it somehow worked to have another vegetable on the table besides the cheese and mushrooms.

Our guests, Roshan and Karan, were pleased as punch and doubling the recipe had the added advantage of making the casserole look more full and plentiful. To think that their request for vegetables would yield such a hearty vegetable-focused dinner! And we’re not even counting the rosemary leaves, which is a salad unto itself.
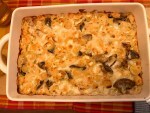 PrintBaked Pasta with Fontina and Roasted MushroomsMy adaptation of Melissa Clark's recipe with everything doubled for more oomph.Course Main CourseCuisine ItalianKeyword casserole, fontina, mushrooms, parmesan, pastaPrep Time 1 hourCook Time 15 minutesServings 6 peopleIngredients2 pounds mushrooms (any kind, the more interesting the better)1/4 cup extra virgin olive oil1 teaspoon kosher salt1/2 teaspoon freshly ground black pepper2 to 3 fresh rosemary branches1 pound Orecchiette1 1/2 cups heavy cream1 cup fresh ricotta10 ounces freshly grated Fontina1 cup freshly grated Parmesan4 – 5 sage leaves finely chopped2 cloves garlic, gratedInstructionsPreheat the oven to 450. If you're using mushrooms that need to be stemmed, stem them! (Shiitakes need to be stemmed and the stems need to be discarded.) Tear the mushrooms into one-inch pieces and toss them with the olive oil, salt, pepper, and rosemary and place on a cookie sheet. Roast in the oven, tossing every five minutes, until deeply burnished brown on the edges. Set aside.Bring a large pot of water to a boil and season well with salt. Add the pasta and cook a few minutes less than package directions. Drain but don't rinse! (Rinsing will stop the sauce from sticking to the pasta.)Now the easiest part: crank the oven to 500 degrees and stir together the cream, ricotta, fontina, Parmesan (leaving some to sprinkle on top), sage and garlic. Taste and adjust for salt; then stir in the mushrooms. Pour into a 9 X 13-inch dish, sprinkle with the extra Parmesan, and bake until it's bubbling in spots, about 10 to 15 minutes. If you want it extra burnished on top, stick it under the broiler and keep an eye on it. As soon as you get some nice golden brown spots, take it out and serve.NotesAgain, I doubled this recipe from the original recipe, so definitely feel free to halve everything if you’re serving just two to four people. Also, if you stick to my doubled version, you don’t have to use the full two pounds of mushrooms (I only had the one pound that I bought when I decided to double everything and it still turned out great).
The post Baked Pasta with Fontina and Roasted Mushrooms appeared first on The Amateur Gourmet.
January 16, 2023
Makoviy Rulet with Apples and Poppyseed Paste

Baking a recipe at home is hardly a political act and yet, as a show of solidarity, you can’t really argue against it. With all of the horror going on in Ukraine right now, it feels important to honor and celebrate Ukranian culture, especially its recipes. If that sounds like homework, let me put it another way: Ukranian food is delicious and if you decide to give it a go, do what I did and start with Olia Hercules’ Makoviy Rulet, an elaborate Ukrainian braided apple poppyseed bread.
This recipe comes to us by way of London-based journalist Felicity Spector, my second guest on You’ve Got to Taste This. Not only is Felicity a scholar of the region, having won a Fulbright to Harvard where she did her masters, she’s a wonderful cook as evidenced by her popular Instagram page. Our talk today covers everything from the rise of British cuisine to her heroic act helping to gather and deliver baking supplies to ravaged bakeries in Kyiv.
You can listen to the whole thing here:
I made the bread a few days before we spoke and the whole process was mesmerizing. For starters, you simmer a whole 1/2 cup of poppyseeds in milk until it’s absorbed, then blend that with toasted pecans, sugar, vanilla, and butter to make a paste.

Meanwhile, you make the loveliest dough with warm milk, yeast, demerara sugar (I used brown sugar), salt, eggs, vanilla, and flour, bringing it together roughly and then letting it rise for an hour.

After it rises, you knead it for five minutes, then let it rest for 15 minutes before rolling it out into a big rectangle.

Then the real fun begins: you slather it with the poppyseed paste, which you’ve mixed with diced apples.

And then, channeling all of the confidence you can, you begin to roll it up into a coil like you’re making a Swiss roll (not that I’ve ever made a Swiss roll, I just watch a lot of the Great British Baking Show). Then you perform surgery, slicing it lengthwise to bisect it. Finally, you coil one of the halves into a snail, place on a parchment-lined baking sheet, and wrap the other length of dough around it. Got all that?

And just when you think that you’ve seriously messed this up, that there’s no way this will ever bake into anything except a fiasco, you pop it into a 350 oven and bake for 30 minutes and watch as this bizarre, wet, coiled weirdo fluffs up into the most elegant, dramatic-looking braided bread you’ve seen since Shabbat dinner at your Aunt Rhoda’s house.

Seriously, this is one of the most stunning transformations that I’ve experienced in my kitchen. It was almost impossible not to nibble on it as it cooled, and when I finally served it to my friends who came over for dinner, we were all marveling at the balance of fluffy bread, sweet and earthy poppyseed paste, and fresh-tasting apples. It was hard to tell if it was a dessert or a first-course bread basket kind of thing, but much like the floor wax/dessert topping SNL sketch, it could very easily be both!
I feel so lucky to be doing this podcast where my guests push me to make things that I’d never think of making on my own. So thank you to Felicity Spector for leading me to Makoviy Rulet: a perfect reminder of what’s at stake as Russia continues its aggression on the other side of the world.
 PrintMakoviy RuletA stunning Ukranian braided bread with apples and poppyseed paste by food writer Olia Hercules. Course BreadCuisine UkrainianKeyword baking, bread-making,, UkrainePrep Time 2 hoursCook Time 30 minutesServings 8 peopleIngredientsFor the dough:200 mL warm whole milk1 packet fast-rising yeast (7 grams)1/2 cup dark brown sugar If you have demerara sugar, use that1 teaspoon kosher salt2 eggs1 teaspoon vanilla extract3 cups all-purpose flour, plus more as necessaryFor the filling:200 mL whole milk1/2 cup poppy seeds If they've been in your cabinet for a while, get new ones: they can go rancid1/2 cup lightly-toasted pecans1/2 cup sugar2 teaspoons vanilla extract6 tablespoons lightly salted butter2 apples I used Granny SmithFor the glaze:2 egg yolks2 tablespoons milkInstructionsStart by making the dough. Mix the yeast and the warm milk (slightly warmer than body temperature) and set aside until it gets a little foamy, about ten minutes. Whisk in the eggs, the salt, and vanilla. Sift in the flour and begin to bring it together with your hands. If it's ultra-sticky and unworkable, add a little more flour until it comes together but isn't too dry. Stretch it and fold it for a bit and then cover it with a towel and leave it in a warm place to rise for an hour.While that's happening, make your poppyseed paste. Simmer the milk with the poppyseeds on low heat for 20 to 30 minutes, stirring every so often, until all of the liquid is absorbed. Allow to cool briefly and then blend in a food processor with the other paste ingredients until you have a shiny thick black pate.No need to peel the apples: just core and dice them (about 1/2-inch dice) and mix with the paste.Lift the dough on to a well-floured board and knead it for five minutes. Shape it into a smooth ball and leave it for 15 to 30 minutes to allow the gluten to relax.Now, on that same well-floured surface, begin rolling out the dough. You're shooting for a 12 X 16-inch rectangle, more or less. Dot with the poppyseed apple filling, spreading all around with an off-set spatula. Now the scary part: roll it up from the longer side into a log shape. Then cut the log lengthwise so you have two strips of dough with an exposed filling.Line a baking sheet with parchment paper. Take the first piece of dough and twist around into a snail shape with the filling-exposed upward. Lift that on to the baking sheet and then wrap the other dough around it, also with the filling upward, pinching it closed. Cover with a kitchen towel and allow to rise for another 30 to 45 minutes.Preheat the oven to 350 degrees.Mix together the egg yolks and milk and brush all over the dough. Bake in the oven for 30 to 40 minutes: it should puff up and eventually start to turn golden. You want to take it out before it gets too dark; the dough will continue to cook as it rests. Lift the parchment on to a wire rack to cool down. Serve at room temperature or still a little warm. Some salted butter on it might be nice.
The post Makoviy Rulet with Apples and Poppyseed Paste appeared first on The Amateur Gourmet.
Adam D. Roberts's Blog

- Adam D. Roberts's profile
- 3 followers

