
Adam D. Roberts's Blog, page 3
April 24, 2023
Wining and Dining Our Way Up the California Coast, from Los Angeles to Sonoma
We’ve lived in Los Angeles for twelve years (moved here in 2011!) and in all of that time, we’ve only taken one legitimate road trip up the coast… and that was during the pandemic when we escaped to Washington State to see my husband Craig’s family. On that odyssey, we stopped in Carmel, which was a beautiful respite from the monotony of our apartment, though it was also stressful because we were all in masks. That’s why, with the big news that we’re moving back to NYC in September, we decided to take a totally spontaneous road trip from Los Angeles to Sonoma. And we had such a blast, I thought I’d lay it all out for you here, in case you happen to be in L.A. and are craving a road trip of your own.
Day One: L.A. to CarmelWe set off at about ten o’clock for the first leg of our journey and took the 101 (last time, we took U.S. 1 which was curvy and beautiful, but a leg of it is now closed because of a landslide).
For lunch, we stopped off at Metropulos in Santa Barbara, a much-loved destination for sandwiches. Craig had one with turkey; I ordered a salad with grilled chicken (should’ve ordered a sandwich) and we sat outside on a day so perfect, it was almost obnoxious. We grabbed coffee (and a pistachio baklava) next door at Dart Coffee Co. and then hit the road again.

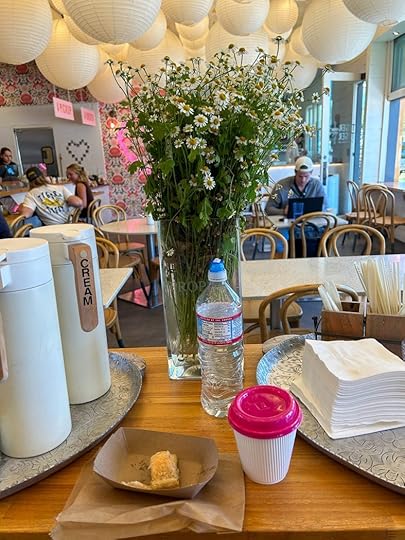
Back on the road, it was just a few hours to Carmel. Going in April is a great time to go, especially midweek (we arrived on a Wednesday): the temperature was just a little cool, and the streets were almost empty. We checked into our lovely hotel — L’Auberge (we used Amex points to book it) — and we were greeted with a beguiling and delicious chai-spiced grape juice, before they showed us to our room.


The hotel is elegant without being over-the-top. Our room had a four-poster bed and a marble bathroom and fresh cookies that they put in a little basket. There’s no air conditioning, but it’s totally fine because you open the window and get a nice gust of ocean breeze.
For dinner that night, we’d heard tell of a local spot called La Bicyclette. I thought that they didn’t take reservations; apparently, they do: you make via a phone call, whatever that is? Luckily, on this not-so-busy night, they found a table for us and we enjoyed a local favorite.


We really liked the grilled little gem appetizer, but for me the highlight was the mushroom pizza. Our waitress suggested we order it with the gnocchi (seen behind the pizza), because we could dip the crust in the cream sauce. Good tip! We also ordered half a bottle of Pinot Noir (it came in a mini bottle) and that was cute.
Day Two: Carmel to Monterey to BerkeleyThe next morning, we met Craig’s friends Sam and Amy (who live in Carmel) at a spot they recommended, Carmel Belle, which definitely seemed like an in-the-know kind of place.


I had a most excellent smoked salmon sandwich (Craig had the green eggs and ham, not pictured) and then we set off for the Monterey Bay Aquarium, which was only a short twenty minute drive away.


Truly one of the world’s great aquariums (if not the greatest), we somehow missed our many chances to go here over the years. (I even bought Craig two tickets for Christmas one year… and we never used them!) But finally we made it, and my octopus-loving husband came face-to-face with a Pacific octopus that was so alive and showy, he was like Octopus Liberace. And that fish on the left kept staring at me. Hey fish: take a picture, it’ll last longer!
From the aquarium, we hit the road north and headed to Berkeley to visit our friend J., who’s in grad school there. We met up at Tupper & Reed, a cocktail bar really close to the campus and also our hotel: The Hotel Shattuck Plaza, which seemed like the place all the Berkeley parents stay while visiting their kids.


After enjoying Black Manhattans, made with Amaro, Craig and I toured the Berkeley campus — which was undeniably beautiful. It was 4/20 on the day we went, so there were lots of students 4/20-ing on the lawn. Apparently there was even a trampoline.
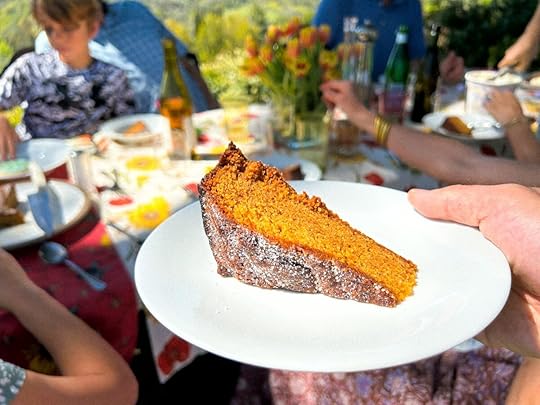
Now, you’re not going to believe this, but when we went to spontaneous plan this trip, I checked Resy to see if one of the country’s most important restaurants, the place where “organic,” “farm-to-table,” and “local” all took on meaning in the United States, had any reservations. And would you believe it? I grabbed an 8:15 PM for two people at Chez Panisse for the night we were there.


The last time I went to Chez Panisse — over fifteen years ago! — my friend Kristin and I experienced the lavish tasting menu downstairs. This time, on the recommendations of various friends and alumni of the restaurant, we ate upstairs at the Café. Even though it’s more casual, the food is just as carefully made and you have more control over what you order. We started with a Little Gem salad with marinated beets and a creamy basil dressing and cooked broccolini with anchovy breadcrumbs.


Though the rest of the meal was tremendous (see below), these salads were the highlight for me. Especially the one on the left: something about the way that it was dressed made me wish I could sign up for the Alice Waters salad school. (Funny enough, I actually made a salad with Alice Waters for my cookbook! Maybe I need to read that chapter again.)


For our entrees, we each ordered the braised lamb with celeriac puree and sugar snap peas. My favorite part was the jus underneath: very classic French, but not at all pretentious. We ordered a bottle of Pistus Etna Rosso to go with our meal, on the recommendation of the server, and it was a perfect, mineral, robust wine to balance out the richness of the lamb.


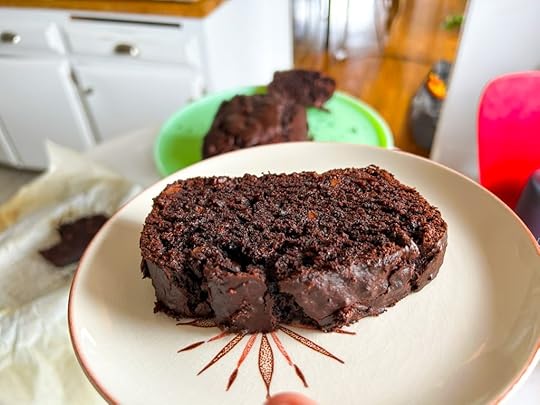
You can’t eat at Chez Panisse without ordering dessert and these classics — an apple tart with cherries on the left, a chocolate cake with caramel and pecans on the right — did not disappoint. They were emblematic of the restaurant itself: thoughtfully-made and sophisticated while also downright delicious.
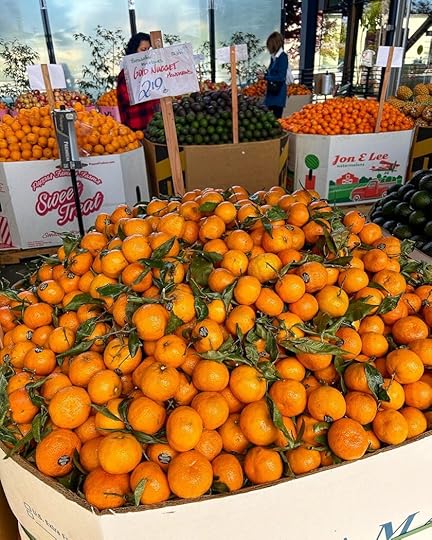
Day Three: Berkeley to SonomaOn Friday morning, we explored Berkeley a bit. My friends Toby and David both insisted that I check out the Berkeley Bowl, so while Craig showered, I took a quick jaunt over there and marveled at the stacks of gorgeous produce. It was like a Costco and the Garden of Eden had a baby.

From there, Craig and I headed over to grab lunch at Fava — another spot recommended by Toby, from two Chez Panisse alumns — and their falafel sandwich was simple and surprising, with various textures and flavors and an embarrassment of herbs.


After that, we checked out The Cheese Board Collective, a Berkeley institution. Toby made me promise him I’d visit and grab a pastry: I chose a corn cherry scone and it was out-of-this-world.


Well-fed and eager to get on, we hit the road for the two hour drive north to Sonoma.
Now the big splurge that I made for this trip was using almost five years of American Express points to book a swanky hotel (at some point, you’ve gotta use them!): so I settled on The Farmhouse Inn, which was lovely and cozy all at once.


Our room was directly over a Michelin-starred restaurant and originally we were going to skip it to get dinner at Glen Ellen Star, about forty minutes away. But that afternoon, we went to a wine tasting on the hotel grounds (one of the perks of staying at a nice place in Sonoma) hosted by Kathryn Sloan of Smallvines Vineyards.


After sampling and buying a few bottles (how could we not?), we told her our dinner plan and she was shocked that we weren’t eating at the hotel. “My husband and I eat all over Sonoma all the time, and it’s our favorite restaurant, hands down.” Considering that we were buzzed from the wine and preferred walking down a flight of stars to driving for forty minutes, we agreed that the hotel made more sense.


The meal itself was super pricey ($225 a person, to be specific) but it was our blow-out meal at our blow-out hotel and the food was truly above reproach, if not downright spectacular. The chef trained at many prestigious institutions (including Atelier Crenn) and the attention to detail was undeniable. We also did a wine pairing which was so extravagant and interesting, I started a new Instagram account just to write about it.
That night we stumbled upstairs to bed and slept happily dreaming about caviar covered asparagus with onion flowers and grilled steak with pressed pickled Daikon radish with herbs.
Day Four: A Day in SonomaThe next morning, we ate breakfast once again downstairs at the hotel. This time we sat outside and enjoyed some Eggs Benny before heading out for the day.


We drove over to Guerneville, which we’d heard a lot about (mostly from our gay friends). We walked around and saw some antiques and a river and a cute book store.
From there, we went to a one o’clock wine tasting at Ryme Vineyards, which came highly recommended from the hotel.


Turns out wine tastings are just opportunities to sit in lovely spaces and drink wine while gossiping about the people next to you. (A table of six women and two men amused us because the men were bored out of their minds, staring at their phones; one of them left.)
The wine at Ryme was excellent: our favorite was a Sangiovese Friulano, which was a deep dark red rosé. We bought a few bottles. From there, we went back to the hotel and swam for a bit and finally made our way into town for our final dinner of the trip, at The Matheson.


I’m so glad we wound up here: not only was the food great, but before dinner we partook of “the wall of wine.” You basically give them your credit card, they give you a wine card, and then you can go along an enormous wall and use the card to try splashes, 1/2 glasses, or full glasses of over ninety different wines. At first my card didn’t work, and when I showed the handsome bartender he said: “Sir, that’s your hotel room key.”


All of the food at the Matheson was top notch (though they ran out of bread by the time we got there, and it looked so good!). Loved my steelhead trout with a clam-infused sauce and that Baba au Rhum for dessert was Baba au righteous. (We ordered a bottle of Flowers Chardonnay which was a great discovery; next time, we’ll visit their vineyard too.)
Day Five: The Journey HomeAnd yesterday, our last day, we had breakfast at the hotel and then started the long drive back.
This time we didn’t take the scenic 101; we were eager to get home to our dog, so we took the not-so-scenic 5. We listened to some podcasts (highly recommend Randy Newman on vintage Desert Island Discs) and before we knew it, we were back in L.A.
What a fun road trip! If this was our farewell-to-California tour, I don’t think we could’ve done much better.
The post Wining and Dining Our Way Up the California Coast, from Los Angeles to Sonoma appeared first on The Amateur Gourmet.


April 17, 2023
Holy Sheet Pan Pizza
Some people see the light and get religion. Other people see the light and get sheet pan pizza. That’s what happened to me this past Friday night when I cooked up the best sheet pan pizza of my life here in my own apartment, setting off a smoke detector and freaking out the dog in the process, but oh was it worth it. (Sorry, Winston.) Now that I know how to make a killer sheet pan pizza, I plan to make sheet pan pizza on the regular.
There’s No Knead, There’s None
Basically this recipe is a combination of two recipes: Deb Perelman’s, from her new terrific cookbook, Smitten Kitchen Keepers and Carla Lalli Music’s from Bon Appetit and this video, which I found very helpful.
From Deb, I gleaned that you don’t need to work the dough. Just combine the flour, yeast, oil, and salt, let it rise for a bit, and then refrigerate overnight. When you’re ready, let it come to room temperature for ten minutes, and you’re good to go.

Is there anything more satisfying that finding a giant blob of pizza dough ready to go in your refrigerator on a Friday night? I think not!
It’s a Stretch
Once the dough was on my massage table — aka: the sheet pan — it was slathered with so much oil, it probably thought it was getting a happy ending. The Carla Lalli Music recipe tells you to pour 1/2 cup of olive oil onto the sheet pan (and both of ours are 18 X 13, though at first I thought hers was bigger) and the idea is that the oil helps get you that crispy bottom that makes sheet pan pizza so good. Personally, I thought it was too much… but then again: it was an amazing pizza.
The name of the game is stretching the dough into the corners. I did a great job of stretching the dough in general, but getting it into those corners took work. The secret is counterintuitive. You think you need to keep working on it, but actually you need to step away for the gluten to relax. Eventually you’ll get there.
Choose Your Own Sheet Pan Pizza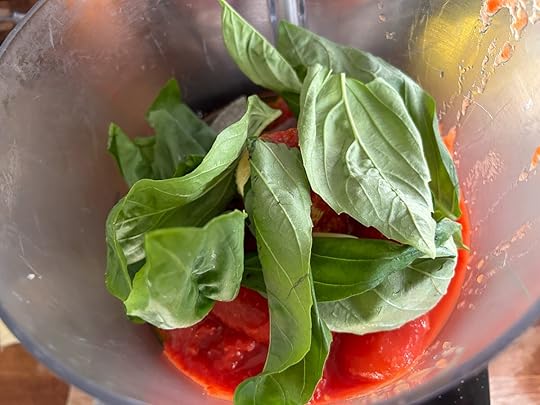
There are lots of theories about what to put on your homemade pizza, but I subscribe to the raw sauce theory. As in: don’t put cooked tomato sauce on your pizza. Instead, strain a can of tomatoes and put the tomatoes in a food processor with garlic, anchovies, olive oil, and basil and blitz. The tomatoes will concentrate in the oven and you’ll get something truly great.
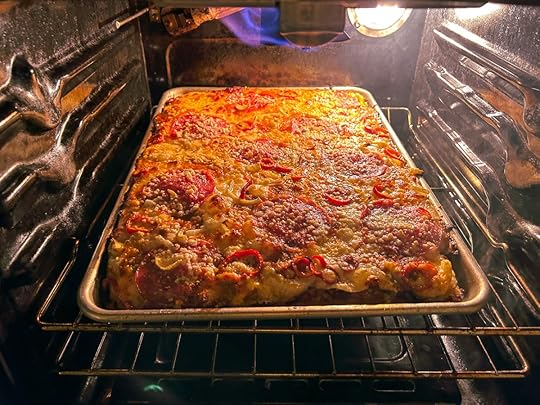
Both Deb’s pizza and Carla’s pizza have soppressata, fennel, mozzarella, Pecorino, and chilies. Mine were homemade pickled Fresno chilies because that’s just how I roll. What you’re seeing in the above pic was my decision to broil the pizza towards the end to get the cheese nice and bronzed. As for the bottom of the pie…

…I was scared it was going to burn, but in just fifteen minutes at 550 degrees, the only thing that burned was a little cheese towards the top. The bottom was golden and crisp, like your favorite focaccia.
And that’s how to think of this pizza. It’s like the love child of a deep-dish pizza and a focaccia and, hot out of the oven, it’s just as good as any pizza you could have delivered. Next time I’m playing around with the toppings (maybe anchovies, chilies, and olives?) and, more importantly, disabling my smoke detector. Let that cheese burn in peace.

 PrintHoly Sheet Pan PizzaA combo of two different recipes, this is my new favorite go-to Friday night pizza-at-home recipe.Course Main CourseCuisine ItalianKeyword pizzaPrep Time 1 dayCook Time 1 hourServings 12 slicesIngredientsFor the dough:2 cups warm water (not hotter than 116 F)1 packet instant yeast (2 1/4 teaspoons)2 teaspoons kosher salt1 tablespoon olive oil4 cups all-purpose flourFor the sauce:1 28-ounce can San Marzano tomatoes, drained2 anchovy filets (optional, but they add some pizazz)2 garlic cloves6 tablespoons extra-virgin olive oil1/4 cup fresh basil leavesKosher saltFor the pizza: 1/2 cup olive oil + more for drizzling on top12 ounces shredded mozzarella cheese You should probably use fresh and shred it yourself, but I bought the pre-shredded stuff and thought it was great4 ounces soppressata, thinly sliced1/2 small fennel bulb, thinly sliced, fronds reserved2 fresh red chilies thinly sliced I used pickled red chilies which worked great1/2 cup grated Pecorino RomanoInstructionsThe night before you want to make your pizza, whisk together the warm water and the yeast in a large bowl. Let sit for a few minutes and as soon as you see small bubbles, add the salt, olive oil, and all-purpose flour and combine with a rubber spatula. Grease another large bowl with olive oil and transfer the dough to the new bowl. Set it aside for 1 1/2 hours and as soon as it's almost doubled, cover with plastic and refrigerate overnight. (Note: you can actually use this dough day-of when it doubles, it's just more flavorful after a night of fermentation.)Heat your oven to 500 degrees, or as hot as it will go. While it's heating, make your sauce by combining the drained tomatoes, anchovies, garlic, extra-virgin olive oil, basil, and a pinch of salt in a food processor, pulsing just until combined. (You don't want to aerate it.) Taste and adjust for seasoning.Pour the 1/2 cup olive oil on to an 18 X 13 cookie sheet and spread all around. Remove your dough from the refrigerator and transfer it to the sheet, allowing it to warm up for fifteen minutes before beginning to stretch. Gently start pulling at the dough, trying to get it to cover the width of the sheet. If it gives you any trouble, just step away for a few minutes and let the gluten relax. Continue stretching until you have the dough reaching all four sides and all four corners.Now's the fun part: topping the pizza. Sprinkle the entire surface with the mozzarella cheese. Then dot with small spoonfuls of the tomato sauce in various spots, making sure not to overdo it (you don't want soggy pizza). Use about a cup. After that, lay on your soppressata and your fennel and scatter with the chilies. Sprinkle with the Pecorino Romano and drizzle with a little more olive oil. Bake in the hot oven for 15 to 20 minutes, until the cheese is melted and the bottom of the crust is golden brown (you should use a spatula to test it before removing it from the oven). If you want an extra burnished top, turn on the broiler and let it go until the cheese starts to turn golden. Remove from the oven and garnish with the reserved fennel fronds. You can serve it in the pan or carefully transfer it to a large cutting board and slice it into twelve large pieces. I'd tell you how to reheat the leftovers, but you won't have any.
The post Holy Sheet Pan Pizza appeared first on The Amateur Gourmet.
April 16, 2023
Eggs on a Green Blanket
Iconic dish names have to start somewhere. Who invented Toad in the Hole? Chicken a la King? S’mores? I’m sure they all have stories, and if we had more time we could research those stories, but my point is that sometimes a dish needs an official name. And that’s why I Christen (what’s the Jewish version of Christen? Bar Mitzvah?)… I Bar Mitzvah this dish: Eggs on a Green Blanket.
A Green Blanket Needs Greens
Not to be one of those people who say “first, I went to the farmer’s market,” but… first, I went to the farmer’s market. And I gathered up three bunches of greens: one a bunch of collards, one a bunch of Tuscan kale, and one a bunch of Swiss chard.
The next twenty minutes was spent washing the greens, stemming the greens, and slicing the greens. Pleasant work, especially when you’re listening to West Side Story.
Cook Your Greens and Add More Greens
This recipe is inspired by one in Gregory Gourdet’s award-winning cookbook, Everyone’s Table. That one also features ginger and chilies in the base, but here we stick to just garlic (lots of it) and the Swiss chard stems. Once those are sautéed and starting to toast, you start adding your greens by the handful.

What you’ll quickly learn, if you’ve never cooked greens before, is that what you thought was a lot of greens will quickly become not-a-lot-of-greens because they cook down. What’s fun about cooking greens, is you can put them in wet from their wash and that’ll help with the wilting process.
Let’s Put the Eggs on a Green Blanket
Once your greens are nicely cooked down and seasoned (taste as you go, people), it’s time to crack on the eggs. If you’re nervous, you can crack the eggs into a little bowl and tip them on. Or if you’re bold just crack the eggs directly on top. Then you bake in a 450 oven for seven minutes or so, just until the whites are set and the yolks are still runny. At the end, I dusted everything with Aleppo pepper and lots of herbs (basil, dill, parsley, and chives).

Now is that an iconic dish or is that an iconic dish?
Eggs on a green blanket. Say it with me, teach it to your children. One day it’ll be a menu staple.
 PrintEggs on a Green BlanketAn easy recipe for eggs baked on a blanket of greens inspired by Gregory Gourdet's Everyone's Table.Course BreakfastCuisine AmericanKeyword collards, greens, Gregory Gourdet, kale, Swiss chardPrep Time 30 minutesCook Time 30 minutesServings 2 hungry peopleIngredients1 small bunch collard greens1 small bunch kale (any kind you like)1 small bunch Swiss chard1/2 cup extra-virgin olive oil6 cloves garlic, peeled and thinly slicedKosher salt6 large eggsAleppo pepperHandful of mixed herbs, such as basil, parsley, dill, and chivesInstructionsPreheat your oven to 450. Remove the stems from the collards, kale, and Swiss chard, reserving the chard stems. Chop the chard stems (set aside) and cut the greens into 1-inch wide strips. Rinse the chopped greens in a bowl of cold water to get any dirt off and then lift into a colander, leaving all the dirt behind. (No need to dry them.)Heat the oil in a 9-inch to 12-inch cast-iron skillet over medium heat. Add your garlic and sauté for 30 seconds; then add the chard stems and a pinch of salt. Cook for a minute or so just until the garlic starts to turn golden. Start adding your greens a handful at a time, with a small pinch of salt, stirring all around. Cook until they're good and wilted and then add the next handful. Keep going like this until all of the greens are cooked down and taste good (adjust for salt).Off the heat, crack six eggs on top of the greens. Season with salt and pepper and bake in the 450 oven for 7 to 10 minutes, just until the whites are set, but the yolks are still runny. Sprinkle with Aleppo pepper and all the herbs and serve right away.
The post Eggs on a Green Blanket appeared first on The Amateur Gourmet.
April 13, 2023
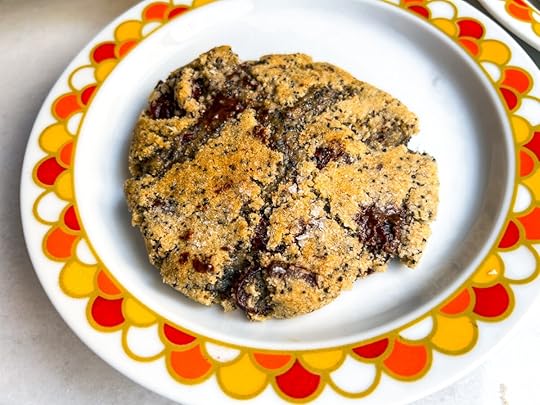
Chocolate Cherry Poppyseed Cookies
Call me a rebel, but when a recipe calls for dried cranberries? I used dried cherries. “Adam!” you might say. “What are you? Some kind of thorn in the side of society, trying to topple the status quo?” To that I say, “Hey, I’m just your average every day food blogger who happens to like dried cherries more than dried cranberries.” Especially when they pop up in these chocolate cherry poppyseed cookies.
Things Won’t Go Awry… if You Use Rye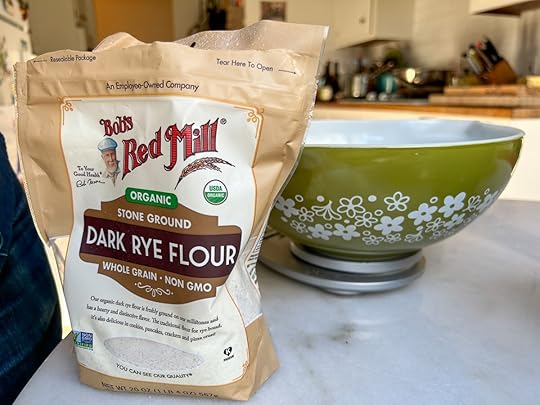
This recipe comes to us from none other than Dorie Greenspan, the doyenne of all things French and all things baking. She learned it from the owners of Mokonuts, a chic cafe in Paris that I somehow miss every time I visit. (Not that I visit Paris that often, but I’ve been a few times.)
The recipe has all kinds of twists and turns that make them fascinating to make. For starters? It uses mostly rye flour with just a little white thrown in. Does that make the cookies taste like a pastrami sandwich? Hardly. It tastes more like a nutty, complex cookie dough than your typical all-white version.
Chocolate Cherry Poppyseed Cookies Need Chocolate, Cherries, and Poppyseeds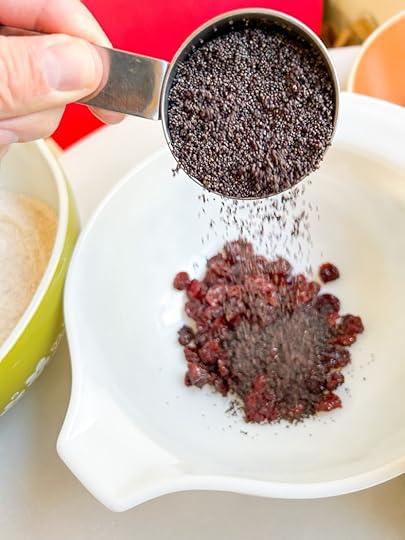
The batter is a pretty standard affair: butter, sugar, egg. But after the dry ingredients go in come the goodies. Poppyseeds render the cookie slightly crunchy and complex. The dried cherries (and cranberries if you must) lend a tartness and a fruitiness. And then, of course, there’s the bittersweet chocolate.

It’s just four ounces of chocolate — one bar of Ghiardelli’s 70% bittersweet, if you shop like I do — but it gets the job done.
Patience is a Virtue (Even with Cookies)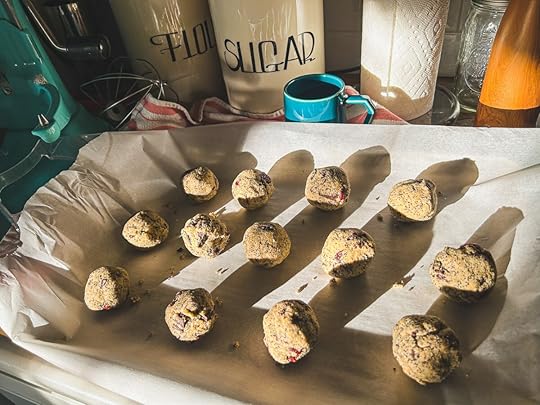
See the end-of-day light hitting these balls of cookie dough? That’s because it was the end-of-the-day and I wouldn’t be making the cookies until Day 2. That’s because you have to refrigerate the batter overnight.
Now I know that sounds tedious, but it really makes a difference! There are even experiments that prove the point.
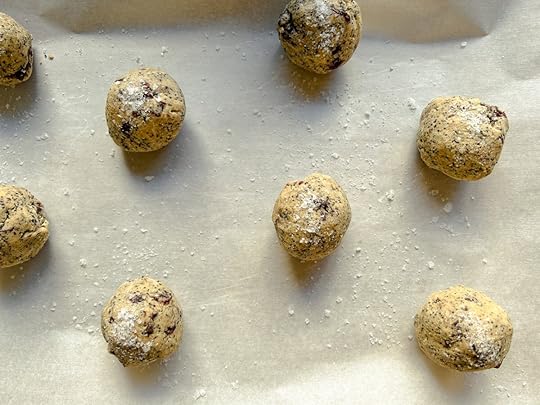
Show a little patience and the next day, you’ll be rewarded with scrumptious cookies. All you have to do then is salt them, bake them for ten minutes in a 425 oven, and then bop them with a spatula to flatten them a little. That’s the fun part.
That’s a cookie worth flying to Paris for. Or, if you can’t swing that, it’s worth waiting 24 hours for. (And if you cheat and make them the same day, I won’t tell. Just don’t tell Dorie Greenspan.)
PrintChocolate Cherry Poppyseed CookiesA riff on Dorie Greenspan's riff on a recipe from Mokonuts in Paris.Course DessertCuisine FrenchKeyword chocolate, cookies, dried cherries, poppyseedsPrep Time 1 day 30 minutesCook Time 10 minutesServings 15 cookiesIngredients1 cup plus 1 1/2 tablespoons medium-rye flour That's 130 grams if you're weighing, which you really should. More accurate1/2 cup plus 2 tablespoons all-purpose flour 85 grams1 teaspoon baking powder3/4 teaspoon sea salt1/2 teaspoon baking soda10 tablespoons unsalted butter at cool room temperature 140 grams1/2 cup sugar 100 grams1/2 cup light brown sugar 100 grams1 large egg1/3 cup poppyseeds 50 grams2/3 cup moist, plump dried cherries (or cranberries) 80 grams4 ounces bittersweet chocolate, chopped into chunks 113 gramsMaldon sea salt, for sprinklingInstructionsWhisk together the rye flour, all-purpose, baking powder, sea salt, and baking soda. Set that aside.In the bowl of a stand mixer with a paddle attachment, beat the butter and sugars together on medium speed for three minutes, scraping down the bowl as needed. Add the egg and beat two minutes more. Turn off the mixer, add all of the dry ingredients, then pulse the mixer on and off until the dry ingredients are mostly incorporated. Add the poppyseeds, cranberries, and chocolate and mix just until combined.On a cookie sheet lined with parchment paper, scoop out the dough (I used a 1/4-cup ice cream scooper) and roll each scoop into a ball. You should get about fifteen cookies. Cover the sheet with plastic and refrigerate overnight or up to 3 days.When you're ready to bake, heat the oven to 425 degrees. Line another cookie sheet with parchment and space 6 to 8 cookies 2-inches apart (you'll bake the rest the next time around). Sprinkle them with flaky sea salt.Bake for ten minutes, until golden brown around the edges. Remove the sheet from the oven and using a metal spatula, smack them down so they spread out and wrinkle a little. Think of it as whack-a-mole, only with cookies. Allow to cool on the cookie sheet for three minutes, then transfer to a rack (I just pulled the parchment directly on to the rack, as opposed to lifting each individual cookie). Cool another ten minutes and then they're ready to eat.Bake the remaining cookies or freeze them for another time.The post Chocolate Cherry Poppyseed Cookies appeared first on The Amateur Gourmet.
April 10, 2023
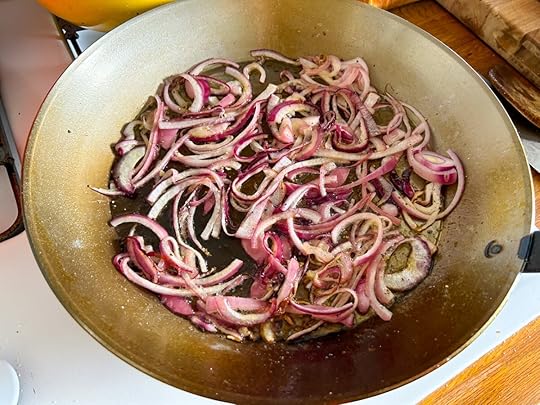
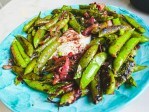
Scorched Sugar Snap Peas with Burrata
At its most basic level, cooking is playing with fire. And as anyone who was ever a kid knows, lighting things on fire can be fun? But dangerous. But fun? Fast forward to the me of today, and now I have no desire to light things on fire, but sometimes I have the desire to get my vegetables really charred over a hot flame. And now that I’m the proud owner of a carbon steel pan (see here), I decided to put it to work this weekend and make a recipe from Sheela Prakash’s upcoming cookbook, Salad Seasons; a recipe for scorched sugar snap peas with burrata.
The recipe here is so simple, it’s almost not a recipe; and yet it’s a brilliant recipe because of how simple it is.
Step one: heat olive oil in your pan and add onions. Two: char onions. Step three, remove onions and do the same thing to sugar snap peas.
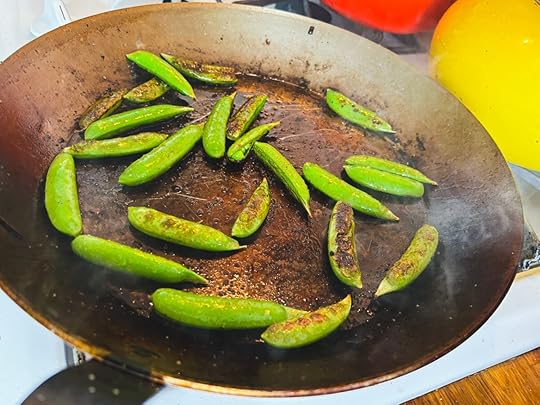
Now notice what’s happening there. This isn’t your every day, average “get vegetables brown in a skillet.” This is “may-as-well-be-outside-on-a-grill” level charring and it’s the best I’ve ever achieved at home (though it did, indeed, smoke up the house. hehe). The secret was just to crank up the heat to high high high, let that pan get scorching hot, pat the sugar snaps really dry, and to add them a few at a time, in one layer, without moving them around. The not moving them around is key: the longer they sit, the char-ier they get. Season with salt and pepper, then add to the bowl with the onions and add lemon juice, mint, and sumac.

All by itself, these sugar snaps would be divine. But the sugar snap peas with burrata? It’s next-level pea-dom.
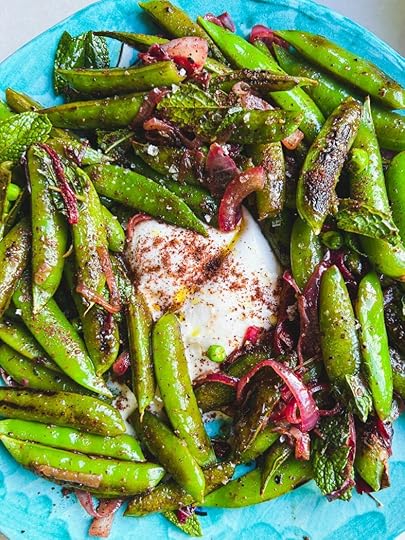
Whether you’re outside this summer charring sugar snap peas on a grill, or inside like me smoking up your kitchen, the point is to channel your inner arsonist and get some black spots on your peas! Your lungs may sue you, but your mouth will thank you.
 PrintScorched Sugar Snap Peas with BurrataA charry, lemony, minty salad of charred sugar snaps and burrata from Sheela Prakash's upcoming cookbook Salad Seasons.Course SaladCuisine AmericanKeyword charring, onions, sugar snap peasPrep Time 15 minutesCook Time 15 minutesServings 4 peopleIngredients3 tablespoons extra-virgin olive oil, divided, plus more for serving1/2 medium red onion, thinly slicedKosher saltFreshly ground black pepper1 pound sugar snap peas, strings removedJuice of 1 lemon1/4 cup loosely packed chopped fresh mint leaves1 teaspoon ground sumac, plus more for serving1 8-ounce ball burrataFlaky sea salt, for servingInstructionsHeat 2 tablespoons of the olive oil in a large cast-iron or carbon steel (my pick!) skillet over medium-high heat until shimmering. Add the red onion, season with kosher salt and pepper, and cook, stirring occasionally, until softened and lightly browned in spots, 3 to 4 minutes. Transfer to a large bowl.Add the snap peas to the skillet in a single layer and cook, undisturbed, until charred in spots on the bottom, 2 to 4 minutes. Season with salt and several grinds of pepper. Continue to cook, stirring occasionally, until crisp-tender and lightly browned in spots all over, about 2 minutes more. Transfer to the bowl of red onion.Add the remaining 1 tablespoon olive oil, the lemon juice, mint, and sumac to the bowl, then toss to combine. Taste and season with additional salt and pepper, as neededPlace the burrata in the center of a serving platter and spoon the snap pea mixture around the burrata. Drizzle with a little more olive oil and sprinkle with a little more sumac and a few pinches of flaky sea salt.NotesI think it’s nice to take the burrata out of the refrigerator when you start prepping the vegetables, so it’s not refrigerator cold. Also: if your skillet develops a layer of gunk after all of the charring, add water off the heat while it’s still hot (it’ll sizzle and spurt) and use a wooden spoon to scrape up any bits that are sticking to the bottom. Makes it way easier to clean later.
The post Scorched Sugar Snap Peas with Burrata appeared first on The Amateur Gourmet.
April 9, 2023
Almond Cake
We all have our ride-our-die recipes. These are the recipes we love above all others, the recipes that we’d go to hell and back for, the recipes that we want chiseled into our gravestones. In my particular case, I have two: the cavatappi with sun-dried tomatoes that I talk about all the time, and this almond cake… which I also talk about all the time. It’s a recipe that I first wrote about back in 2004 (!) when I made it with my friend Lisa in the kitchen of my Chelsea apartment, back when I was a grad student at NYU. Since then, I must’ve made this recipe at least a hundred times. It’s my go-to dessert in almost any and every situation and it always dazzles. And I’m doing a new post about it now because I want to really emphasize the point: this is a recipe that you need in your repertoire.
Mr. Latte’s Mom’s Recipe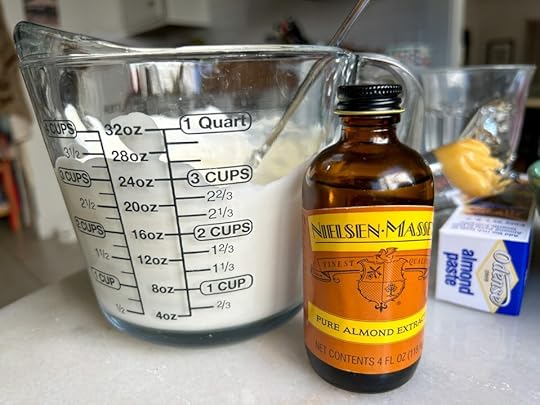
The first thing that you need to know about this almond cake is that it’s from Amanda Hesser’s wonderful book, Cooking for Mr. Latte. This book (one of the only books I’ve ever read twice) covers Amanda’s courtship with the New Yorker writer, Tad Friend. What makes the book charming and perennial is Amanda’s fearlessness in writing about her life; from getting annoyed with her grandmother on a trip to Italy to hating to share her food when she’s out at a nice dinner, Amanda’s a lovable anti-hero. And some of the best parts of the book are her descriptions of Tad’s mother, Elizabeth Groesbeck Pierson, a wonderful cook who passed this recipe on to her future daughter-in-law.
Like the best recipes, the cake seems really simple at first. It’s just almond paste, butter, sugar, sour cream, almond extract, baking powder, and salt. But once you taste it, you’ll understand why this recipe’s a classic: the whole is greater than the sum of its parts.
Prepping Your Almond Cake for Take-Off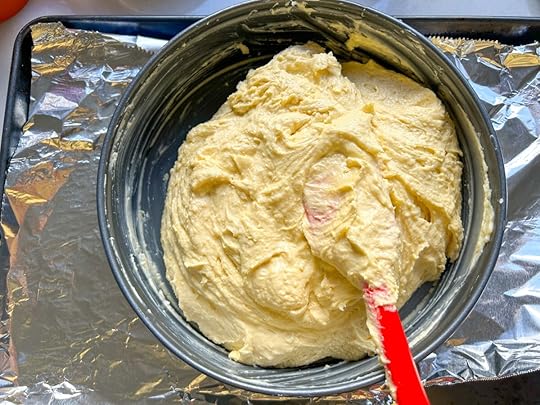
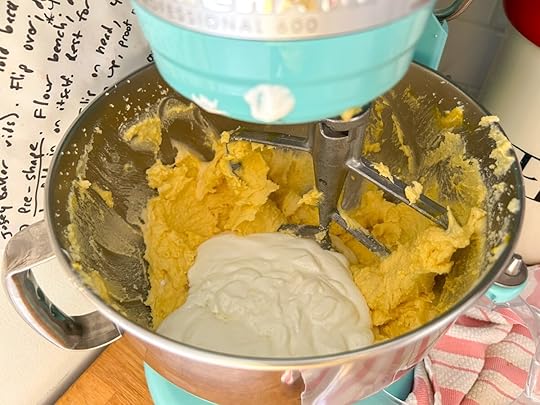
There are a few tricks about this almond cake I’ve learned over the years. The main one has to do with lightness. Because of the almond paste, this cake has a tendency to be dense, but there are a few tricks to make it fluff up. Trick #1: Listen to the recipe when it says to sift the flour before measuring. This ensures that (a) you’re not using too much flour and (b) that the flour you are using is aerated.
Trick #2: Really make sure your butter is at room temperature before starting. That’ll help it incorporate better with the sugar and will allow more air to get worked in. Trick #3: Make sure to mix the baking soda with the sour cream before you add it to the batter. Like a science experiment in middle school, the two react together and the sour cream will double in volume. All that activity is your friend in terms of making a light cake.
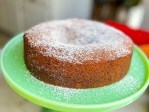
Dust with Powdered Sugar and Serve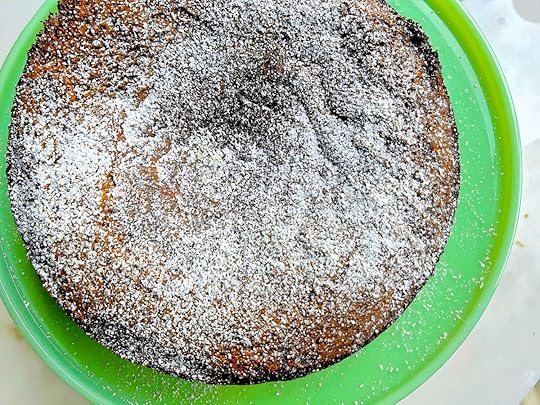
Some cakes need icing, some cakes need whipped cream. This cake is marvelous on its own, but it does need a dusting of powdered sugar just to give it some necessary pizzazz. Sift it on right before serving… it has a tendency to get absorbed into the cake. You could also sprinkle on some raspberries if you want to, that might look nice.
And now you know everything you need to know about one of my favorite recipes of all time. All you have to do is make it and soon it’ll be one of yours too.
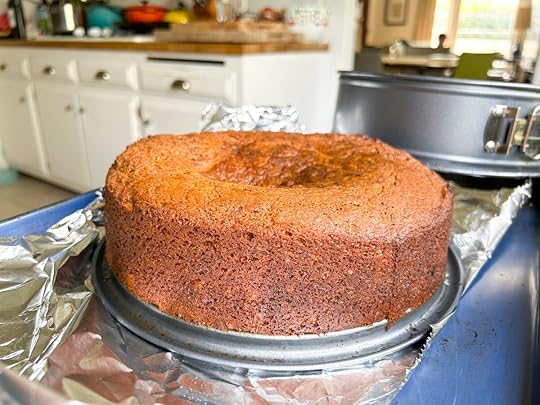
 PrintAlmond CakeThe greatest almond cake of all time, from Amanda Hesser's Cooking for Mr. Latte.Course DessertCuisine AmericanKeyword almond, baking, butter, dessertPrep Time 30 minutesCook Time 1 hourServings 8 peopleIngredients2 sticks butter at room temperature (plus more for buttering the pan)1 cup sour cream, room temperature1 teaspoon baking soda2 cups sifted all-purpose flour (measured after sifting) This is worth doing to keep your cake light!1/2 teaspoon sea salt I use 1 teaspoon, but I like the salty-sweet thing.1 1/2 cups sugar7 ounce tube almond paste4 egg yolks at room temperature1 teaspoon almond extract It's worth buying almond extract for this recipe because you'll definitely be making this cake again.Confectioners' sugar, for sifting over the cakeInstructionsPreheat the oven to 350 degrees. Generously butter a 9-inch springform pan (I use at least a tablespoon). The butter not only ensures that the cake will release later, it adds a little extra flavor. Mix together the sour cream and baking soda in a bowl or a large measuring glass. Sift the flour and salt into another bowl.In the bowl of an electric mixer fitted with the paddle attachment, cream the two sticks of butter and sugar at medium speed until light and fluffy. At that point, start breaking off little pieces of the almond paste and dropping them in. Your goal here is to do a little at a time so each little piece gets worked in before you add the next one. Once all the almond paste is added, continue to beat the mixture for an additional 8 minutes. This ensures that the almond paste really gets worked into the mix.Beat in the egg yolks one at a time. It might look curdled, that's okay! Blend in the almond extract and the sour cream mixture. Reduce the speed to low and gradually add the flour mixture, mixing just until the last streak of flour disappears. Remove from the mixer and use a rubber spatula to scrape around from the bottom just to make sure everything is incorporated.Pour the batter into the prepared pan and bake for about one hour. You'll know it's done when it's no longer wobbly in the middle and pressing your finger into it doesn't leave an indentation. Remove from the oven and cool completely in the pan. Run a knife around the cake, open up the spring form, and flip the cake on to a plate. Then flip the cake back on to a cake stand and sift powdered sugar all over it. Eat right away or save for later… this cake actually gets better as it sits.
 The post Almond Cake appeared first on The Amateur Gourmet.
April 5, 2023
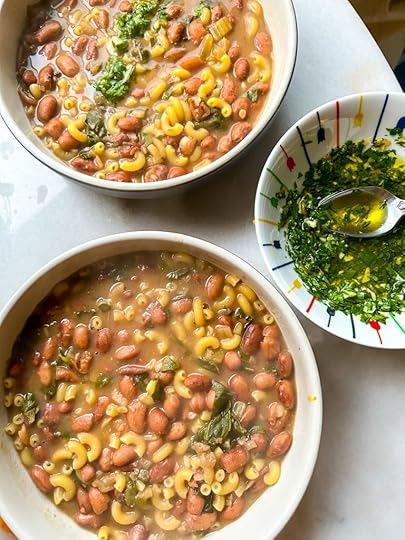
Borlotti Bean Soup with Swiss Chard
The pandemic really changed people’s relationship to beans. In the time before we were all locked into our abodes, bored out of our minds, beans had a negative connotation; as in “that’s not worth a hill of beans” or “you’re full of beans.” Now being full of beans is a good thing. People look at heirloom dried beans like they’re looking at jewels; and getting a membership to the Rancho Gordo Bean Club is harder to get than a membership to The Soho House. Not to toot my own horn (though tooting comes easily when you’re eating a lot of beans), but I was way on the heirloom bean bandwagon way before it was cool. I was cooking Rancho Gordo’s Good Mother Stallards back in 2012. And my cabinets have always been filled with the good stuff; most recently, Borlotti Beans from Italy (via Gustiamo) which I transformed into this robust but springy Borlotti Bean Soup with Swiss Chard.
To Soak or Not to Soak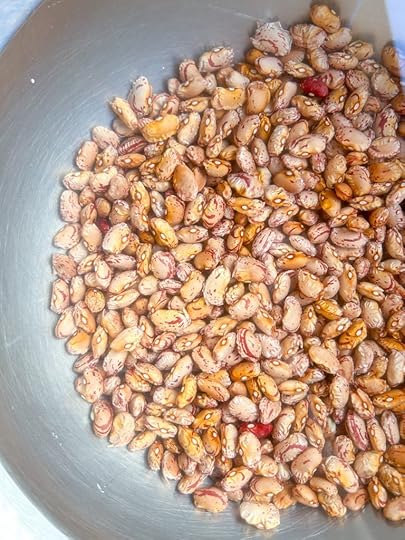
Look, in this crazy world, you’ll meet soakers and you’ll meet non-soakers. The non-soakers will tell you that you don’t need to soak. The soakers will say: “I’ve been doing it this way for years, and I’m not changing my methods now!”
My attitude is: if you remember to soak, great! If you forget to soak, just cook the beans longer. Borlotti Beans (which are cranberry beans in America) actually cook relatively fast, so if you don’t soak, you’re still in the clear. Your borlotti bean soup will still taste good.
Whole Lotta Veggies Going In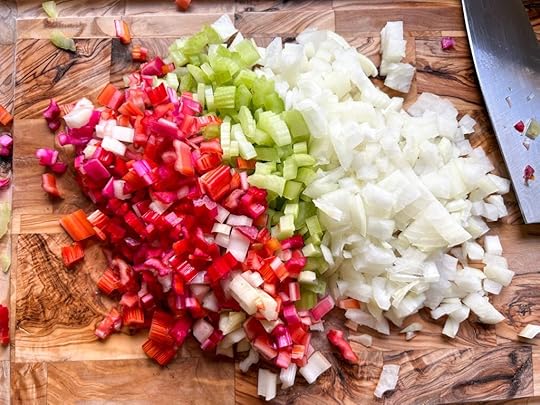
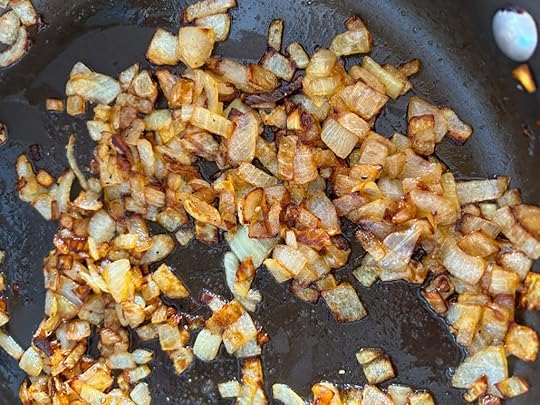
I used to be weird about my beans. I’m not sure whose recipe I read or where I got it from, but my old method was to cook dried beans with a whole onion, a whole carrot, and a whole piece of celery for two hours or so until the beans were cooked through, then I would drain them — saving some of the cooking liquid — and saute a bunch of chopped onions, celery, and carrots in a different pan. I’d add the beans to that, with the liquid, and I guess it freshened things up to have those new chopped vegetables instead of the old soggy ones?
But that’s so unnecessary. Just chop your veg at the beginning and it’ll still taste good at the end. I didn’t have carrots for this particular presentation, but I did have Swiss chard from the farmer’s market, so I chopped the stems along with celery and onions and a lot of garlic (not pictured). Eventually I added the beans and water (plus salt) and when the beans were about 9/10ths of the way there, I added the leaves all chopped up.
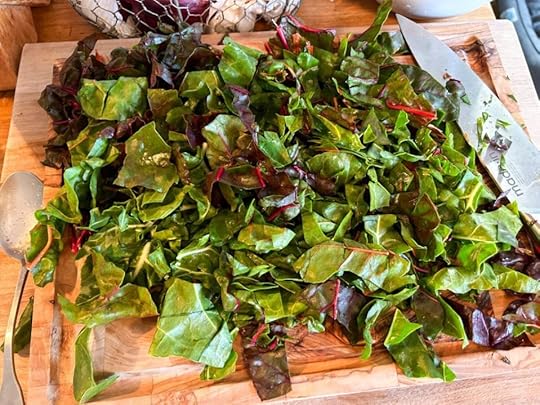
As tends to be the case with greens, these quickly cooked down to about half their size. I let them cook for another thirty minutes, just to meld with all of the other ingredients.
Take a Lesson from the French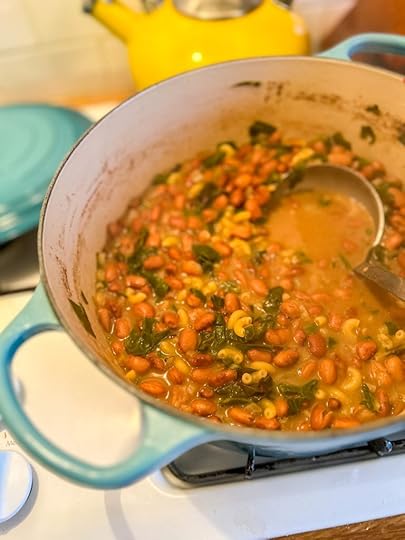
Once the soup was done, I added macaroni to give it a little more body; ladling out the next day’s portion before I did, so it didn’t get sucked up by all of those thirsty noodles.
And this soup was tasty as it was. I forgot to mention: I seasoned everything right from the beginning, another controversial subject, but one that I feel strongly about. If you don’t season the beans early on, good luck getting any flavor into them later.
But here’s the thing: I wanted this soup to be brighter, a little more zesty. So I took a tip from the French and made a pistou — which is a bit like taking a tip from the Italians and making a pesto, minus the cheese and nuts. This version was super simple: just garlic, parsley, lemon zest, lemon juice, and olive oil. And it brightened things up tremendously.
So whether you’re an old-school pre-pandemic bean nut or a new-school post-pandemic bean newbie, give this Borlotti Bean Soup with Swiss Chard a try. You don’t have to belong to any club to enjoy it and it’ll have you tooting and tooting your own horn at the same time.
 PrintBorlotti Bean Soup with Swiss ChardA light but substantial soup featuring borlotti beans, Swiss chard, and a quick herb salsa.Course SoupCuisine ItalianKeyword beans, Borlotti, soup, Swiss chardPrep Time 30 minutesCook Time 2 hours 30 minutesIngredientsFor the soup:1 pound dried borlotti beans1/4 cup Extra-virgin olive oil1 yellow onion, chopped2 stalks celery, chopped2 carrots, chopped I didn't have carrots, but if you do, it'll add more depth of flavor1 bunch Swiss chard, leaves and stems separated, stems sliced thinly, leaves choppedKosher salt6 cloves garlic, thinly sliced1 pinch red pepper flakes1 Parmesan rind (optional) Brings extra umami to the soup2 Bay leaves (optional)1/2 pound elbow macaroniFor the herb salsa and for serving:1 bunch flat-leaf, Italian parsley2 cloves garlic, peeled1 lemon zested and juiced1/4 cup extra-virgin olive oilAged Parmesan cheeseInstructionsIf you're a person who soaks your beans, soak your beans in plenty of cold water the night before you plan to make this soup. If you're not a soaker, skip it! Just cook the beans longer.Pour the olive oil into the bottom of a Dutch Oven. Heat it on medium-high heat and when it's hot, add the onions, celery, carrots, and Swiss chard stems with a pinch of salt. Saute for five minutes or just until the vegetables are soft, but not brown. Add the garlic and stir together, cooking another minute. Add a pinch of red pepper flakes — more if you like it spicy.Strain the beans and pour them into the pot with the vegetables. Add eight cups of water and bring to a boil. Season the water with a tablespoon or two of salt… you don't want to over-season it here, because the liquid will reduce and it might get too salty. But under-season, and your beans might be bland. So try to strike a balance. Add the Parmesan rind and the bay leaves, lower to an active simmer.Cook the beans for an hour — adding more water if the soup becomes too thick — and start to study them. Are the skins starting to come off? Do they smush easily against the side of the pot? Taste here. You're looking for incredibly soft and creamy. You don't want al dente beans, this isn't pasta. Also taste for seasoning here — if the liquid is bland and the beans are bland, add more salt. When the beans seem to be close to done, stir in the Swiss chard leaves, another pinch of salt, and cook for another thirty minutes. Remove the bay leaves and the Parmesan rind and add the pasta. Cook just until done.To finish, make your herb salsa. On a cutting board, cut the leaves off the parsley the best you can (but a few tender stems are totally fine) and lay the garlic on top of them. Chop the garlic and parsley together for a while until all you have are green and white flecks. Lift them into a bowl, stir in the lemon zest, the lemon juice, and finally the olive oil. You might want to use more oil if you have a lot of bowls of soup to doctor.To serve, ladle the soup into bowls, drizzle on the herb salsa, and grate some Parmesan cheese on top.
 The post Borlotti Bean Soup with Swiss Chard appeared first on The Amateur Gourmet.
April 2, 2023
Matzo Brei with Lox, Eggs, and Onions
Here’s the thing about my Jewish childhood: I grew up eating lox, I grew up eating eggs, and I grew up eating onions (lots and lots of onions), but I didn’t grow up eating matzo brei. What can I say? It was a blindspot in my otherwise very Jewish upbringing. And it’s a shame because matzo brei — the Jewish version of migas, with matzo replacing the tortilla chips — is a wonderful way to stretch your scrambled eggs in the morning, to use up leftover matzo from Passover, and to turn both things into something that’s greater than the sum of its parts. Take, for example, this matzo brei with lox, eggs, and onions; a tribute to my dad’s favorite Jewish deli breakfast order. It’s a breakfast that anyone, Jewish or not, would have a hard time saying no to.
Onion Breath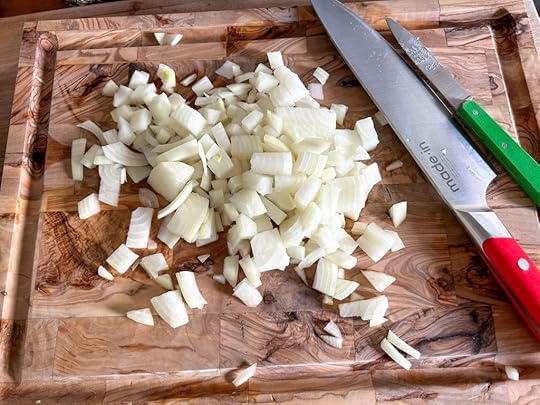
I remember my grandmother used to say that people told her she had bad breath. She’d usually tell me this while we were eating at Bagelworks in Boca Raton where she would order her eggs with “extra raw red onion,” a regular addition to her meals.
So raw red onion takes me back to my childhood and breakfasts with grandma. But so does quickly caramelized yellow onion, which is different than the low-and-slow caramelization you do for French onion soup.
See how these are almost on the edge of black? And that they’re inconsistent, not at all homogeneously golden? These bring back memories of diner omelettes, of the almost acrid taste of onion on the outside of a bagel. These are the flavors we want in our matzo brei with lox, eggs, and onions.
How Do You Matzo Brei?
If matzo brei sounds complex, worry not! It’s as simple as this: you wet some matzo under a faucet, to get it slightly moist so it melds better with the eggs. Then you break it into 1/2-inch to 1-inch pieces directly into the skillet with the onions.
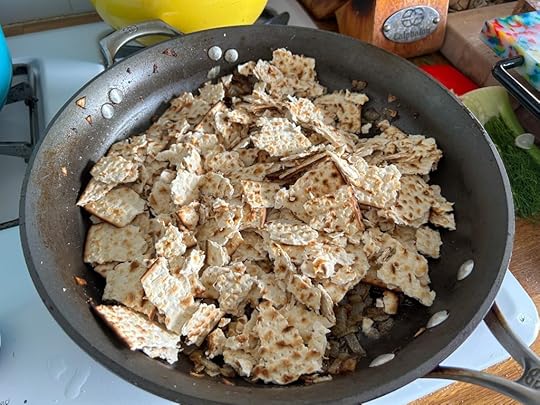
Some add the eggs and the matzo at the same time, but I enjoy this opportunity to meld the matzo with the onions and to get a little color on it with high heat. Also: if your matzo is unseasoned, it’s a good idea to season it here.
Bring on the Eggs, the Lox, the Dill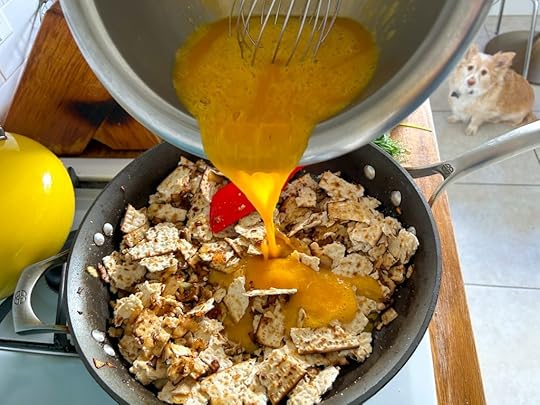
I actually got the idea to make matzo brei watching America’s Test Kitchen where they revealed their ratio: for three eggs, it’s two sheets of matzo. Because we were having company over when I made this, I upped the number of eggs to eight and the sheets of matzo to five. How’s that for SAT math? Maybe it’s not 100% accurate, but it worked. And once the eggs set up and all of the matzo was coated, I stirred in the smoked salmon (I couldn’t find lox at the farmer’s market) plus lots of chopped chives and dill.

Pretty, right?
To plate, I made a quick salad with winter lettuces (radicchio, endive, frissé), Cara Cara oranges, radishes, and fennel and served that alongside the matzo brei which I topped with labneh (sour cream or créme fraiche would work too) and more herbs.

This is a dish even my grandmother would love (hers would be sprinkled with red onions). Give it a try. And would it kill you to leave a nice comment if you like it? I never hear from you anymore.
 PrintMatzo Brei with Lox, Eggs, and OnionsMy take on two classic Jewish dishes: a "LEO" (a classic Jewish deli breakfast order of lox, eggs, and onions) and a savory Matzo Brei.Course BreakfastCuisine JewishKeyword eggs, Jewish food, lox, matzo, onionsPrep Time 20 minutesCook Time 20 minutesServings 4 peopleIngredients4 tbsp unsalted butter1 yellow onion, choppedKosher salt5 sheets plain matzo8 large eggs, whisked together until yellows and whites are mixed It's good to season the eggs with salt and pepper when you whisk them togetherFreshly ground black pepper4 ounces Nova lox or smoked salmon, chopped into small pieces You can use more or less based on what you have on hand and according to your tasteLots of chopped dill and chivesLabneh or sour cream, for garnishInstructionsStart by melting the butter in a large, non-stick skillet on medium-high heat. Add the onion — don't season it yet — and crank the heat to high. Cook the onion, stirring every so often, until it gets deeply golden brown in spots, almost on the edge of burning. Turn off the heat and season with salt.At the sink, run your matzo under cold tap water for twenty seconds or so, until damp. Bring it to the skillet with the onions and break the matzo into 1/2-inch or 1-inch pieces directly into the skillet. Crank the heat back to high and stir all around, coating the matzo in the butter and onions. Cook until the skillet starts sizzling and the matzo starts to take on a little color.Pour the eggs directly on to the matzo and lower the heat to medium. With a heatproof rubber spatula, stir the eggs and matzo together just until the eggs are set. Off the heat, stir in the lox and most of the dill and chives. Taste here to adjust for seasoning.To plate: spoon the matzo brei on to four plates and top each portion with a spoonful of labneh or sour cream. Garnish with the remaining herbs.
The post Matzo Brei with Lox, Eggs, and Onions appeared first on The Amateur Gourmet.
March 27, 2023
The Ultimate Chocolate Banana Bread
Banana bread is a great way to pretend you’re that eating something virtuous when, really, you’re eating cake. That’s what makes this chocolate banana bread, from Jessie Sheehan’s Snackable Bakes (my new favorite baking book), such a treat. There’s no pretense here about “healthfulness” or “low-calories” or “gluten-free” (not that there’s anything wrong with that). It’s basically chocolate cake mashed up with banana bread with all of the best qualities of each.
And the Secret Ingredient Is… Sour Cream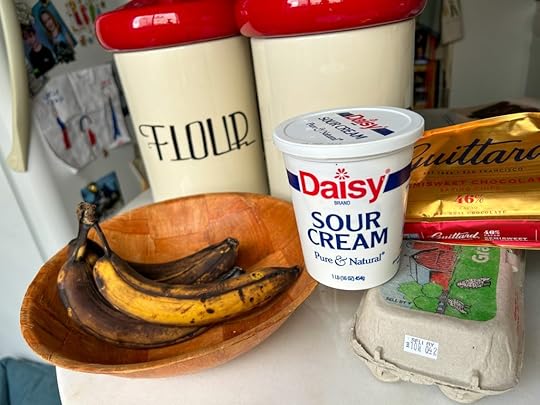
I have a theory about baked goods and the theory is: if there’s sour cream in it, it’s going to be good. That’s because the sour cream adds richness, tanginess, and, because of the way it interacts with the baking soda: lift.

The rest of the ingredients you already have around the house, assuming you keep bananas around the house. (I do and I let them get really, really black before baking with them.) Then there’s the cocoa powder (I like Valrhona), flour, baking soda, salt, vegetable oil, sugar, vanilla, an egg, the sour cream, and the banana. Oh and did I mention the chocolate chips? Yeah, there’s chocolate chips in there too.
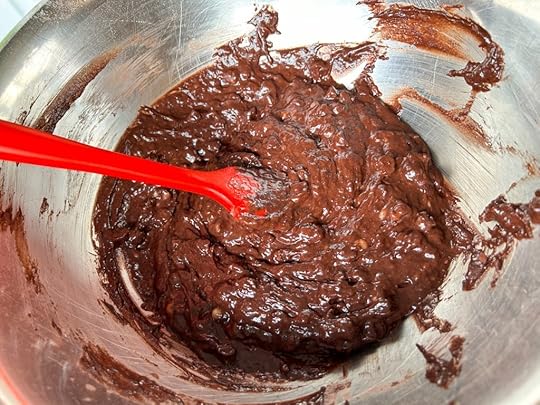
I don’t know about you, but seeing a batter like this in a bowl makes me feel like a nine year-old, standing at the sink, waiting to get my hands on an egg beater to lick off every bit that I can without cutting my tongue. Only now I’m an adult and I suppose if I wanted to I could eat all of that batter with a spoon. But why do that when you can bake it for seventy minutes and get this?
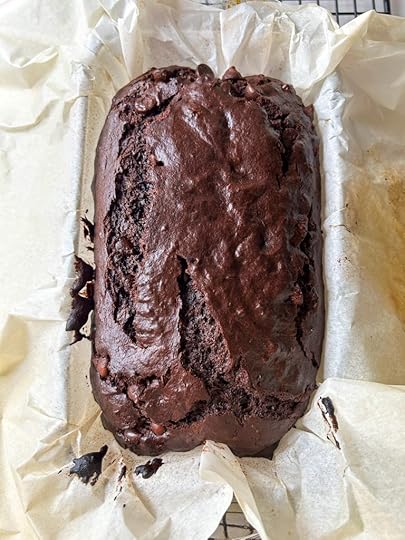
Once it comes out of the oven, you let it cool for as long as you can and then you slice into it and eat a warm piece of chocolate, banana-enriched goodness.
Call it breakfast. Call it dessert. Call it a snack. Call it whatever you want — banana chocolate cake, chocolate banana bread — but whatever you call it, make sure you save a slice for me… because ours is all gone and I’m sad.
 PrintThe Ultimate Chocolate Banana BreadA rich and satisfying combo of chocolate cake and banana bread that you can make in a jiff from Jessie Sheehan's Snackable Bakes.Course DessertCuisine AmericanKeyword bakes, baking, banana, chocolate, snackPrep Time 10 minutesCook Time 1 hour 1 minuteServings 1 8 X 4-inch loaf cakeIngredientsCooking spray1 1/4 cups all-purpose flour1/2 cup Dutch-processed cocoa powder (I like Valrhona)1 teaspoon baking soda1/2 teaspoon kosher salt3/4 cup semisweet chocolate chips If you add a little more, I won't tell anybody1 cup granulated sugar1/2 cup vegetable oil1 teaspoon vanilla extract1 large egg, at room temperature1/4 cup créme fraiche or sour cream1 cup mashed bananas, about 2 very ripe onesInstructionsHeat the oven to 350 F. Grease an 8.5 X 4.5-inch loaf pan with cooking spray or softened butter. Line the bottom with a large sheet of parchment that extends up and over the two long sides of the pan. (This makes it easy to lift the cake out later!)Whisk together the flour, cocoa powder, baking soda, and salt in a medium bowl. Whisk in the chocolate chips. (This keeps them from sinking to the bottom when you bake!) Whisk the sugar, oil, and vanilla in a large bowl for 30 seconds; whisk in the egg and then the creme fraiche or sour cream and, finally, the bananas. Gently fold in the dry ingredients into the wet with a rubber spatula just until the last streak of flour disappears. Don't overmix or it'll be tough.Transfer the batter to the prepared pan and smooth the top. Bake for 65 to 70 minutes, rotating the pan at the halfway point. The bread is done when a wooden skewer inserted into the center comes out with a moist crumb or two. Remove from the oven and let cool in the pan for about 20 minutes. Lift the loaf out of the pan by the parchment overhang and cool to room temperature before serving (if you can wait that long).
The post The Ultimate Chocolate Banana Bread appeared first on The Amateur Gourmet.
March 22, 2023
Red Lentil Soup with Harissa and Lime
Cooking seasonally doesn’t just mean winter, spring, summer, fall. It also means looking out your window and getting inspired. If you live in L.A. and you’ve been looking out the window lately, you may have noticed a little rain falling from the sky. Actually, a lot of rain. God knows, L.A. needs it, and I love the rain, so this isn’t me complaining. This is me explaining why today, for lunch, I decided to make red lentil soup with harissa.
The French Call it Mirepoix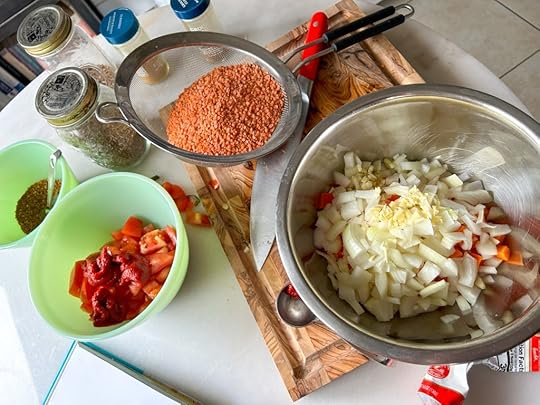
To make this soup, you’ll have to chop up some carrots, onions, and celery (aka: mirepoix or soffrito, depending on your allegience). Then you’ll chop some tomatoes (it’s okay if they’re out of season, they’re there for juiciness and tartness, not freshness.) You’ll need to grind some spices, notably coriander seeds and cumin seeds. And you’ll need to rinse some red lentils.
It’s worth seeking out red lentils here: they’re softer and less intense than their green and brown cousins.
Start Cooking Your Red Lentil Soup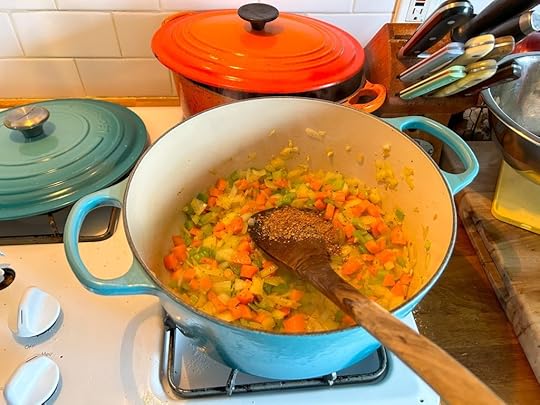
This recipe, I should mention, comes from The Mediterranean Dish by Suzy Karadsheh. It’s a great book because the recipes are approachable but also exciting. Like this one: you basically cook a bunch of vegetables in olive oil, add spices, then your tomatoes and tomato paste.
In goes vegetable stock, some water, a pinch of salt. You simmer for 25 minutes and then the fun really begins.
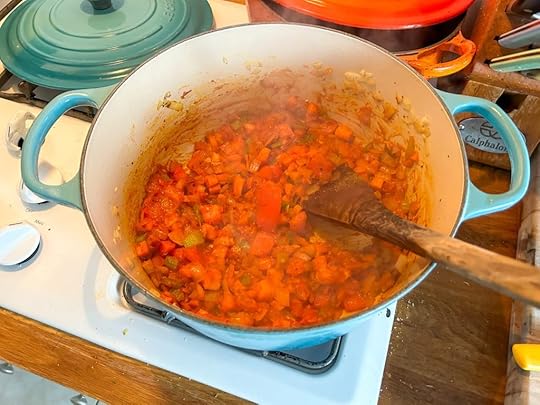
Let’s Take Things Up a Notch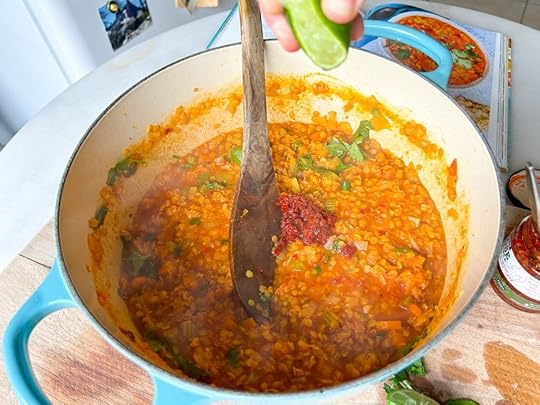
It’s really at the end that this recipe becomes bookmarkable. That’s because Suzy Karadsheh has you stir in harissa, lime juice, and cilantro. And that has the same effect on this recipe that Love Potion #9 does to the cop down on 34th and Vine. It wakes things up with a big fat unexpected kiss.
And look at this finished soup.

So the next time you look out your window and see wet stuff, make red lentil soup with harissa. This is as seasonal as it gets.
 PrintRed Lentil Soup with HarissaCourse SoupCuisine Middle EasternKeyword harissa, lentils, soup, tomatoesPrep Time 20 minutesCook Time 30 minutesServings 4 peopleIngredientsExtra-virgin olive oil1 medium yellow onion, roughly chopped2 large garlic cloves, minced3 medium carrots, peeled and roughly chopped2 celery stalks, roughly choppedKosher salt and freshly ground black pepper1 tablespoon ground coriander 1 teaspoon ground cumin1/2 teaspoon turmeric2 vine-ripened medium tomatoes, chopped3 tablespoons tomato paste1 1/2 cups red lentils, rinsed4 cups vegetable stock1 cup water2 to 4 tablespoons harissa, to tasteJuice of 1 large lime1/2 cup roughly chopped fresh cilantroInstructionsIn a medium Dutch oven or pot, heat 3 tablespoons of the olive oil over medium-high heat until shimmering. Add the onion, garlic, carrots, and celery and season with a big pinch of salt and black pepper. Reduce the heat to medium and cook the vegetables for 5 to 7 minutes, tossing regularly until they soften.Add the coriander, cumin, and turmeric to the pot and stir to coat the vegetables. Stir in the tomatoes and tomato paste and cook for another 5 minutes over medium heat, then add the lentils, vegetable stock, and water.Raise the heat to medium high and bring to a boil, then boil for 5 minutes. Turn the heat to medium-low, cover partially with the lid, and simmer for 20 to 25 minutes, until the lentils are tender and creamy. Check occasionally and add a little more stock or water if the soup gets too thick for your liking.Stir in the harissa, the lime juice, and the cilantro. Taste and adjust the seasoning. Serve hot.
The post Red Lentil Soup with Harissa and Lime appeared first on The Amateur Gourmet.
Adam D. Roberts's Blog

- Adam D. Roberts's profile
- 3 followers

