
Adam D. Roberts's Blog, page 7
April 23, 2021
Gregory Gourdet’s Cashew “Hummus” with Harissa

Back in my blogging bigshot days, publishers would send me free cookbooks. For me, that was better than having Ed McMahon show up at my door with a giant check. I love cookbooks. I have stacks and stacks of them in my kitchen right now because there’s not enough room left on my shelves. (“Maybe you should pull out the ones you don’t use and sell them?” says my well-meaning but delusional husband. “I USE ALL OF THEM!” I reply.)
So imagine my delight the other day when an advanced copy of Gregory Gourdet’s new cookbook, Everyone’s Table, showed up at my door. I’ve been a fan of Gregory’s since he first appeared on Top Chef, and I was really rooting for him when he came back for the All Stars season. Now he’s a judge — a much more comfortable role, I imagine — and it’s great to hear him thoughtfully and gently weigh in on everyone’s dishes.

The recipes in Gregory’s book are so perfect for this moment we’re in, slowly tiptoeing out of quarantine, ready to stop pounding down the Oreos and eager to eat something a bit more wholesome but not, like, boring. Enter Gregory’s book, which he wrote after getting sober. These recipes, to quote the jacket copy, are “both full of nutrients and full of flavor.”
I’ll be honest… I haven’t spent much time with the book yet because when I flipped it open, the first recipe that I landed on was the one that I instantly wanted to make: Cashew “Hummus” with Chile and Herbs.

The idea seemed so fascinating to me: you boil raw cashews in water for 30 minutes. Then you treat them like chickpeas and make hummus with them. (It’s pretty straightforward.)
If you know anything about cashews and cashew products — like cashew butter, for example — they’re often super rich and surprisingly sweet. Boiling them and blending them, as you do here, into a hummus with tahini and garlic and lemon juice and salt is completely MIND-BLOWING.
I kid you not! I served this last night to some vaccinated friends before dinner and this BECAME dinner. They ate up the whole bowl with Persian cucumber spears and Pita chips and couldn’t get enough. (Craig said he liked it way better than actual hummus.) Unlike chickpeas, which can be a little blah, the cashews pull their weight: think of a smooth peanut butter-like texture that’s packed with garlicky, lemony, salty flavors.
The recipe below is slightly tweaked from the one in Gregory’s book. He has you blend the boiled cashews separately from the lemon juice, garlic, cumin and salt, and then you stir it all together manually with the tahini. I just thought it was easier to blend them all together, using the cooking liquid to thin it out a little. (I’m sure there’s a reason he did it his way; maybe for the texture?).

As for serving, I mixed some harissa paste with olive oil and drizzled it all over the top and sprinkled on some smoked paprika. I was so eager to serve it, I forgot to sprinkle on parsley and scallions. And the guests didn’t seem to mind.
So the next time you’re thinking about making hummus, break out the cashews. Chickpeas, please pack your knives and go.
 PrintCashew “Hummus” with HarissaA surprising new take on hummus from Gregory Gourdet's Everyone's Table.Servings 8IngredientsFor the "Hummus":2 cups raw cashews1/2 teaspoon baking soda1 tablespoon kosher salt3/4 cup fresh lemon juice (from 5 to 6 juicy lemons)8 medium garlic cloves, peeled1/2 teaspoon cumin seeds, ground to a powder2 cups well-stirred tahiniFor Serving:6 tablespoons harissa, homemade or store-boughtSmoked paprika1/4 cup plus 2 tablespoons extra-virgin olive oilHandful small parsley sprigs3 scallions, trimmed and thinly slicedInstructionsIn a medium pot, combine the cashews, baking soda, and 3 cups of water and bring to a boil over high heat. Reduce the heat and simmer, stirring occasionally and skimming off any foam, until the cashews are fully tender and creamy inside, like cooked beans, about 30 minutes.Use a slotted spoon to scoop out 1/3 cup of the cashews and transfer them to a small bowl to cool. Continue to cook the remaining cashews until they're very soft and start falling apart and most of the liquid has been absorbed, 5 to 10 minutes more. You should be able to smoosh a cashew easily against the side of the pot with almost no pressure. Drain the cashews, reserving 1 cup of the cooking liquid.Place the cashews, salt, lemon juice, garlic, cumin, and tahini into a food processor and blend into a paste. Slowly add the reserved cooking liquid through the feed tube to achieve a creamier consistency. Taste and adjust for salt and lemon.To serve: scoop the hummus into a serving bowl and create a big well in the center. To the well, add the harissa, whole cooked cashews, and smoked paprika. Drizzle on the olive oil, sprinkle on the parsley and scallions, and serve.NotesThe recipe calls for 8 medium garlic cloves and 3/4 cup fresh lemon juice, which makes for a really assertive hummus. If you want to dial it down a bit, start with 4 garlic cloves and half the lemon juice and then adjust once blended to your personal taste.
The post Gregory Gourdet’s Cashew “Hummus” with Harissa appeared first on The Amateur Gourmet.


March 5, 2021
Salad on the Same Plate as Dinner, Revisited
Back in 2013, when I was still something of an innocent, I wrote a post called “Salad on the Same Plate as Dinner” in which I argued that hot food and cold food never belong together on the same plate. I was specifically reacting to a dinner that I had at Parm on the Lower East Side in which a chicken Parmesan was presented on the same plate as an Italian chopped salad. “[The] red sauce did not make the salad taste better. It was something hot and mushy underneath something cold and crunchy. Inversely, the salad didn’t do much for the Chicken Parmesan. The heat from the chicken wilted a few stray lettuce leaves which lay there sadly on my fork as I cut my way through the cheese and the breading. All in all, this dinner would’ve been better if the chicken had been served on a hot plate and the salad on a cold plate.”
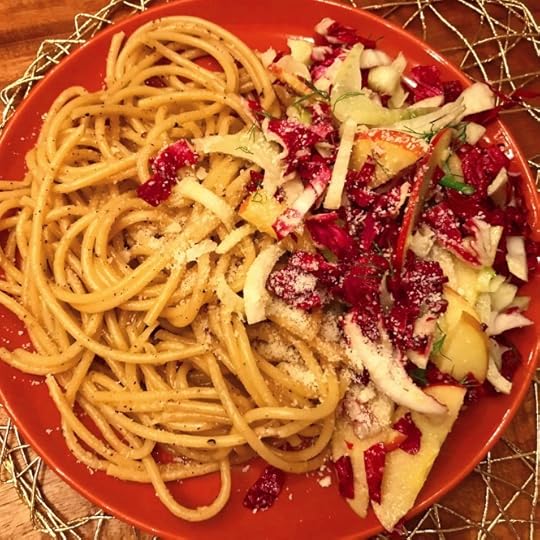
Now I read that and think: “Wow, are you wrong!” Salad on the same plate as dinner is an excellent idea for many different reasons. 1. It provides a textural contrast; 2. It’s offers up some necessary roughage (great movie, by the way); 3. The acidity from the salad can often cut against the richness of your entree (especially if your entree is bucatini Cacio e Pepe, like in the picture above); and 4. It creates less dishes.
How did this change of heart come about?
I think it started as an issue of pacing. Normally, at a dinner party, I’d do a salad course and then an entree course. For example, when making my famous cavatappi with sun-dried tomatoes, I’d often make a Caesar salad and serve that up first.

But then I got to thinking: wouldn’t all of that pasta on a plate be kind of repetitive? The same combination of noodle, bean, and sun-dried tomato in every bite? And aren’t some of the flavors in my Caesar salad the same flavors in the pasta? The garlic? The Parmesan? The olive oil?
And so, instead of drawing out a dinner into a multipart affair, I just put everything on the table: the big pot of pasta, the salad in a salad bowl, and let everyone pile whatever they wanted on to their plates.

Concerns about temperature are moot when the pasta’s on one side of the plate and the salad’s on the other side. Suddenly, there’s variety: there’s crunch, there’s lemon, there’s tomato, there’s anchovy. Salad on the same plate as dinner isn’t a compromise, it’s an ideal. Now I wouldn’t think of serving pasta any other way.
So, in conclusion, people change. Some of us get grouchier as we get older, some of us grow more open-minded. And though my husband thinks I’m pretty grouchy on a variety of subjects (blasting Van Halen at nine in the morning, shoving the laundry into a pile instead of folding it right away), when it comes to salad on the same plate as dinner, I’m now truly enlightened.
The post Salad on the Same Plate as Dinner, Revisited appeared first on The Amateur Gourmet.

February 3, 2021
Join Me On Substack!

Hi, in case you’re wondering where I’ve been… I’ve been on Substack! Ever since I discovered how easy it is to shoot out a weekly dispatch on there, I’ve been putting all of my energy into my Monday newsletters: the last one had the quick salmon dinner you see above, my favorite chocolate chip cookie recipe, a link to a video of me making seared scallops and citrus risotto, and tons of links to the best food content on the web.
Paid subscribers get the newsletter every week and right now I’m offering a 20% discount for loyal Amateur Gourmet readers: CLICK HERE to redeem it and you’ll get this next Monday’s newsletter, which’ll have my apple pie secrets, plus all kinds of great links, stories, and pictures of Winston the dog. Offer ends on 2/10. See you over there!
The post Join Me On Substack! appeared first on The Amateur Gourmet.

December 16, 2020
There Will Be Borscht

Recently I interviewed Dorie Greenspan on my Instagram Live and she talked about how she’s been cooking so much lately from cookbooks. I confessed that I’d fallen into a rut where I just keep making the same things over and over again: roast chicken with root vegetables, pasta, pork chops, pasta, soup, pasta. Did I mention pasta?
She urged me to take more chances on recipes that I’d never made before and when we finished I looked at all of the cookbooks in my collection that I hadn’t been using. If you know me at all, you’ll know that I’m guilty of buying cookbooks on a whim (see: the piles of cookbooks everywhere in our apartment) and the first one that caught my eye was the Kachka cookbook, winner of the 2018 Piglet tournament of cookbooks. I’ve had Kachka for two years and never cooked from it. I flipped it open and immediately landed on the recipe I knew I had to make: short rib borsch.
My ancestors are all Russian Jews (well, except for my mother’s mother’s father’s parents, who were from western Europe) and so borscht is somewhere in my blood, perhaps literally. It’s something that I’ve always enjoyed, most notably at Veselka in New York, but I’ve never attempted to make it myself.

Helping me along on this journey was the fact that my parents got me the most thoughtful gift for Hanukkah: a 7-quart Le Creuset Carribbean-colored pot, featured above. I was eager to break it in and what better way to break it in than to sear some short ribs in hot oil?
That’s hot this borscht recipe starts: you sear short ribs and that’s how you build flavor. You use onions to work up the brown bits and then add beets to the pot.

You cover with beef broth, which you simmer for an hour until the broth is flavored with beets and the beets are partially cooked through. Then you remove the beets, put the short ribs back in, and cook for several hours more (about four in my case) until the short ribs are fall-apart tender.

I love a pot like that on the stove: I bet a similar pot was on the stove in a shtetl a century ago in one of my great, great-grandparents’ kitchens.
Did I mention that making borscht is incredibly easy? There’s a lot of passive time where you just let things simmer. At this point, you remove the short ribs, let them cool, then shred the meat. Then in goes a potato.

And shredded beets, plus a shredded carrot.

Once the potato’s cooked through, you add the meat back in, and that’s that: you’ve got borscht.
The best part, though, is topping it. Traditionally you top it with smetana, which the Kachka cookbook says is creamier than American sour cream and that you can make it yourself with buttermilk and cream, but I just used the American stuff. You also add scallions, dill, and most interestingly the book instructs to add some spicy mustard directly into the soup. “To me, it’s not borsch without this finishing touch.”

This dinner was an enormous hit. It was cozy but also surprising; ancestral while also, somehow, modern. And the colors!
Thank you, Dorie Greenspan, for inspiring me to crack open a cookbook and to try something new. Next up: OXTAILS. More on that next week.

Short Rib Borscht
A braised beef stew with beets adapted from the Kachka cookbook.
Servings 6
Ingredients1/4 cup Canonla oil2 1/2 to 3 pounds bone-in beef short ribsKosher salt2 medium yellow onions, halved and sliced into half moons3 large red beets, scrubbed thoroughly I used a clean sponge under cold water to really get the dirt off, since the beets go into the soup unpeeled.2 quarts beef stock2 large Yukon gold potatoes, peeled and cut into 3/4-inch dice1 carrot, peeled and grated on the large holes of a box grater1/2 cup smetana or European-style sour cream1 handful thinly sliced scallions1 handful coarsely chopped fresh dillGrainy mustard (for serving)
InstructionsStart by browning the short ribs. In a large stock pot, over high heat, add the oil. While the pot is heating, season the short ribs all over with salt (be generous). Add the short ribs, a few at a time, and brown to a nice dark sear (a few minutes per side), using tongs to flip. The brown bits at the bottom of the pot give you all the flavor; monitor the heat so they don't burn. Set the browned short ribs aside and discard the excess grease from the pot.Reduce the heat to medium and add the onions, plus a pinch of salt. Cook, stirring occasionally, until they're deeply caramelized, about 30 minutes. (Keep an eye on it so the onions don't burn.) Add the beets and the stock.Bring to a boil, reduce to a simmer. Keep simmering until the beets are about half cooked — a knife will go in with some resistance — about 1 hour. (You're flavoring the stock with beets in this step.)Carefully remove the beets with the ladle and add the short ribs back to the pot, cooking at the gentlest simmer, for 3 to 4 hours, uncovered, until the short ribs are fall-apart tender. Taste about halfway to see if it needs more salt. (Mine was super salty, so I added some water.)Peel away the skin of the cooled beets, then grate them on the largest holes of a box grater.When the short ribs have fully cooked, remove them to a bowl. Add the potatoes to the pot, simmer until they're cooked through (about 10 minutes). While the potatoes cook, pull the short rib meat off the bones, removing any connective tissue. Discard the bones and chop the meat into bite-size chunks. Stir the meat back into the pot, along with the grated beets and carrots. Simmer a few minutes more until the beets are cooked through.Ladle the borscht into bowls and garnish with a dollop of smetana or sour cream, a sprinkling of scallions and dill. Serve with spicy mustard.
The post There Will Be Borscht appeared first on The Amateur Gourmet.

December 9, 2020
Nancy Silverton’s Epic Eggplant Lasagna

Remember the end of The Goonies, when the Goonies reunite with their parents and they’re rattling off all of the things that happened to them on their adventure? And Data says, “The octopus was very scary,” even though there wasn’t an octopus, though technically there was an octopus, it was just cut from the movie?
That’s how it feels to tackle an epic recipe. And when it comes to epic recipes, the reigning queen on my bookshelf is Nancy Silverton. Her Frito Pie — which was a three day process — is still one of my proudest culinary moments. That recipe, like the one I’m about to tell you about, comes from her Mozza at Home, a cookbook that doesn’t get enough praise, possibly because it’s affiliated with a restaurant, even though it’s one of the best cookbooks on my shelf. (Put it on your list.)
What makes this cookbook so invaluable (why can’t I just say valuable?) is Silverton’s perfectionism. For this eggplant lasagna, which is probably the best lasagna I’ve ever made next to this one, it’s not enough to just brown the eggplant in your oven, you have to brown it on the oven floor to expose it to the maximum amount of heat.

It’s not enough to put garlic in the tomato sauce, you have to put twenty cloves, preferably sliced 1/16th of an inch thin on a mandoline (I sliced by hand and didn’t measure, don’t tell Nancy).

It’s not enough to flavor the tomato sauce with salt and pepper, you’ve got to add three tablespoons of Za’atar (okay, that step’s not hard, but it is unusual).

If you think you’re done here, you’re dead wrong. This is the Chester Copperpot stage of the journey; there’s still lots of Fratellis to overcome in the rest of the recipe.
Take the cheese sauce. It’s not enough to just make a béchamel with butter and flour; you flavor it with onions, bay leaves, and a chili de Arbol.

And once you make the béchamel, it becomes a cheese sauce with the addition of not one, not two, but three cheeses: shredded mozzarella, fresh ricotta, and grated Parmesan.

At this stage, with your eggplant tomato sauce and your cheese sauce ready to go, you might think you could take a shortcut and just soak the lasagna noodles in hot water, Ina Garten style. But I figured, since I’d gone to all this trouble to follow Nancy’s directions, I should boil the noodles in a big pot of salted water, shock them in ice water, and then dry them on kitchen towels, as she instructs. So that’s what I did.

At last, it’s time to assemble the lasagna.

In goes a layer of reserved tomato sauce, on goes the lasagna sheets, then half the eggplant mixture, then half the cheese sauce. I mean…

You repeat, top with lasagna sheets, then spread on some reserved béchamel and sprinkle on lots of Parmesan. Into the oven it goes for 35 to 45 minutes and then, of course, you broil it for that perfect golden top.

At last, you have achieved the “rich stuff,” a vegetarian lasagna good enough for your holiday table.

Was it worth the hours it took to make? To quote a great man: “Down here, it’s our time. It’s our time down here. That’s all over the second we ride up Troy’s bucket.”
Which is all to say, make this and enjoy the adventure for the adventure’s sake. Even One-Eyed Willy would approve.

Nancy Silverton’s Epic Eggplant Lasagna
An incredibly involved but highly rewarding vegetarian lasagna good enough for the holidays.
Servings 8 people
IngredientsFor the eggplants:2 large eggplants (2 to 2 1/2 pounds)1 cup extra-virgin olive oil3 1/2 teaspoons kosher salt1/2 cup large garlic cloves (about 20), peeled and sliced thinly Nancy says sliced 1/16th inch thick lengthwise, but if you can measure your garlic slice to that degree, I commend you.1 28-ounce can crushed San Marzano tomatoes1 1/2 teaspoons sugar1/2 cup pitted small black olives3 tablespoons za'atar 1/2 teaspoon freshly ground black pepper1/4 teaspoon red chile flakesFor the cheese sauce:1/2 large Spanish onion, halved and thinly sliced4 tablespoons unsalted butter1 arbol chile pod2 bay leaves (preferably fresh)1/4 cup unbleached all-purpose flour1 quart whole milk2 teaspoons kosher salt12 ounces shredded low-moisture mozzarella (about 3 cups)8 ounces fresh ricotta (about 1 cup)1/2 cup finely grated Parmesan2 extra-large eggs, lightly beatenFor the pasta and assembling the lasagna:6 tablespoons kosher salt1 16-ounce package dried lasagna noodlesOlive oil (if needed)1 cup finely grated Parmesan
InstructionsPreheat the oven to 500 degrees.Prep the eggplants by discarding the tip and stem ends; then cut the eggplants into 1-inch cubes. Divide between two baking sheets. Drizzle each portion with 1/4 cup plus 2 tablespoons of the olive oil. Toss and gently massage the cubes to coat the eggplants. Spread into a single layer. One batch at a time, place the baking sheet on the oven floor or lowest rack and cook for 15 to 20 minutes, until the cubes are dark brown all over, tossing occasionally with a metal spatula. NOTE: this'll produce a lot of steam, so be careful when you open the oven door. Also: this might set off your smoke detector. Remove the baking sheet from the oven and season cubes with 1 teaspoon of the salt.Combine the garlic and remaining 1/4 cup olive oil in a large Dutch oven. Cook until the garlic is soft and very light golden brown, stirring occasionally so it doesn't burn, about 5 minutes. Add the tomatoes, sugar, and the remaining 1 1/2 teaspoons salt, stir to combine, and cook the tomatoes for 5 to 6 minutes, until they thicken slightly. Spoon out and reserve 1/2 cup of the tomato sauce. Add the roasted eggplants, olives, za'atar, pepper, and red chile flakes. Stir to combine and cook until the eggplants have taken on the color of the sauce, about 5 minutes more. Add a splash of water (up to 3/4 cup) if the sauce is too dry and sticky. Taste and adjust for seasoning; then set aside. Now it's time to make the cheese sauce! Combine the butter, onion, chile pod, and bay leaves in a medium heavy-bottomed saucepan over medium-low heat. Cook, stirring often, until the butter is melted and the onion is soft but not brown, about 10 minutes, stirring often to prevent the onion from browning. Add the flour, whisking constantly, and cook for 2 minutes. Gradually add 1 cup of milk, whisking constantly. Increase heat to high and cook the sauce, whisking constantly, until it thickens. Add another cup of milk, continue to whisk constantly. Return the sauce to a boil and add the remaining 2 cups milk, whisking constantly. Return the sauce to a boil, reduce the heat to low, and simmer, whisking, until the sauce is thick enough to coat the back of a spoon — 3 to 4 minutes.Turn off the heat and stir in the salt. Pour the sauce through a fine-mesh strainer into a medium bowl and discard the contents of the strainer. Ladle out 1 cup of the white sauce (this'll go on top of the lasagna later) and set it aside. Add the mozzarella, ricotta, Parmesan, and eggs to the bowl with the remaining white sauce and gently whisk to integrate the additions into the sauce.Time to make the lasagna. Exhausted yet? Preheat the oven to 350 F.Combine 6 quarts water and 6 tablespoons salt in a large soup or pasta pot and bring to a boil over high heat. Prepare an ice bath in large bowl and create a bed of clean dish towels.Drop the lasagna into the boiling water, stir, and boil the pasta one minute less than it says to on the package. Drain the pasta (or use tongs to lift it out) then add directly to the bowl of ice water. When cool, lay on the dry kitchen towels to dry. (If you're laying them on top of one another, use olive oil so they don't stick.)To assemble your lasagna: spread 1/2 cup reserved tomato sauce over the bottom of a 13 X 9-inch baking dish. Lay 3 sheets of lasagna on the bottom of the pan to cover it. Add half of the tomato eggplant mixture (about 2 1/2 cups), and spread it evenly over the pasta. Spoon half of the cheese sauce over the sauce and use another clean spoon or spatula to push it to the edges. Lay 3 sheets lasagna on top. Press gently down. Spoon the remaining tomato and eggplant sauce on top of the pasta. Spoon the remaining cheese sauce over the tomato and eggplant sauce. Lay a final layer of pasta on top of the cheese sauce.Using a rubber spatula, gently spread the reserved bechamel (white sauce) evenly over the top of the lasagna and sprinkle the Parmesan over the bechamel. Using a long sharp knife, cut the lasagna into 9 or 12 equal-size servings (this makes it much easier to serve later).Place the lasagna on a baking sheet and bake in the oven for 35 to 45 minutes, until the edges are golden and puffed up.Turn on the broiler and carefully broil the top of the lasagna until the top is golden brown all over. Keep an eye on it, so it doesn't burn.Remove the lasagna from the oven and let it cool for at least 1 hour before serving (!!!). (That's Nancy's hardest step. See if you can pull it off. I think it helps the lasagna set.) Enjoy!
The post Nancy Silverton’s Epic Eggplant Lasagna appeared first on The Amateur Gourmet.

December 3, 2020
Miso Peanut Butter Cookies
Do my friends read my food blog?
We’re about to find out. See, I had this idea of buying cookie tins and making a whole assortment of holiday cookies to bring to friends around L.A. a la Melissa Clark’s latest NYT piece. But then I thought: it’s Covid, am I really going to drive all over L.A. dropping off cookies when there’s a stay-at-home order? Plus: if I’m going to make a full assortment of cookies, isn’t that a lot of butter and a lot of time and, honestly, wouldn’t I be better served making the cookies for myself and taking pictures and telling YOU about them? I’m a terrible person; good thing people don’t read this part anyway.
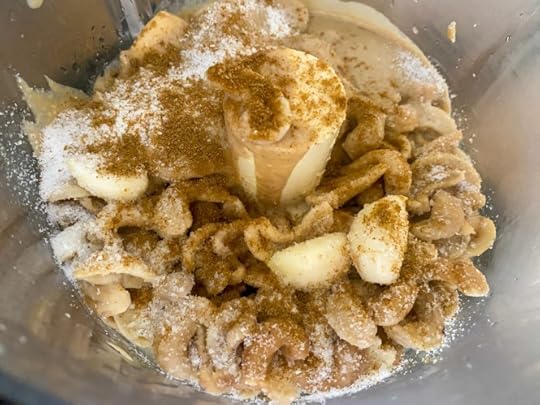
Somewhere, during this dark journey of the soul, I stumbled upon this recipe for Miso Peanut Butter cookies, also from The New York Times. The idea intrigued me, especially because I had yellow miso in my refrigerator that’s been a major player in my kitchen lately.
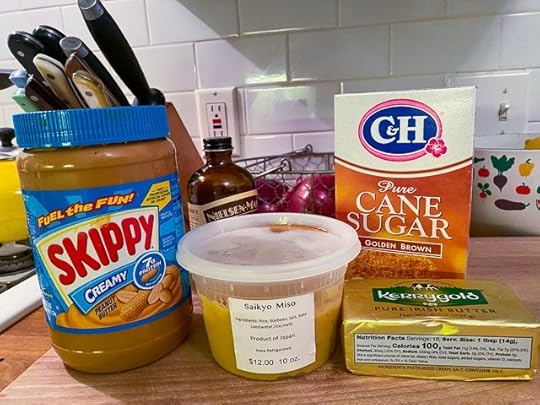
The recipe calls for chunky peanut butter, but I only had Skippy creamy. Still: I was feeling adventurous. (Note: I’m a firm believer in using synthetic, commercial peanut butter in cookies vs. the natural stuff. Don’t @ me!)

The dough comes together like a dream: you cream the butter and sugar, you add your miso and peanut butter, plus an egg and a healthy dose of vanilla, and then you use an ice cream scoop to shape into balls and roll around in Turbinado sugar.

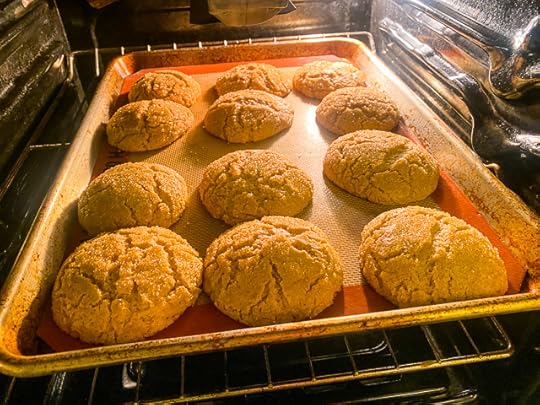
You refrigerate for a few hours, then pop into the oven. The funnest part? After baking, you drop the tray on to the counter to flatten them, pop them into the oven for another few minutes, then drop the tray again so they get all crinkly.

The verdict?
These cookies are INCREDIBLE. They’re creamy, moist (I know you hate that word), but crispy on the outside and they have so much flavor from the peanut butter and the miso.
The miso, in fact, is one of those ingredients that makes something taste better without you being able to identify why (see: anchovies). I don’t recommend putting anchovies in your cookies, but miso? Absolutely.
So, in conclusion, I still might make cookie boxes (if my friends are reading, they’re definitely not reading this far, so they’ll be surprised) and if I do, these cookies will definitely go in them.
Or I’ll just make another batch just for me! I’m the worst.

Miso Peanut Butter Cookies
A brilliant new cookie from The New York Times.
Ingredients1 3/4 cups all-purpose flour3/4 teaspoon baking soda1/2 teaspoon baking powder1/2 cup unsalted butter, room temperature1 cup light brown sugar1/2 cup granulated sugar1/3 cup white miso paste I only had yellow and that worked fine.1/4 cup chunky peanut butter Smooth worked fine for me; I recommend commercial peanut butter in cookies.1 large egg1 1/2 teaspoons vanilla extract1 cup Demerara or Turbinado sugar
InstructionsWhisk together the dry ingredients: the flour, the baking soda, and the baking powder.In a stand mixer, cream together the butter and both sugars until light and fluffy (about 5 minutes).Add the miso and the peanut butter and mix for another minute, scraping down the sides of the bowl as needed. Add the egg and the vanilla extract and mix until combined. Add your flour mixture and mix on low until just combined.Pour the Demerara or Turbinado sugar into a bowl. Using 1/4-cup ice cream scoop, scoop out dough, roll into balls, drop into the sugar, coat on all sides, and place on to a lined cookie sheet. When finished, place the cookie sheet into the refrigerator for at least 2 hours.Heat the oven to 350. Place the cookies in the oven and bake for 15 minutes: they'll get all puffy in the middle. Take the cookie sheet out of the oven and DROP it on to your stove top to flatten the cookies. Place the sheet back in the oven for another 3 to 4 minutes; they'll puff again and look crisp on the edges. Take it back out and PLOP again on to the counter. It'll make the cookies crinkly. Let the cookies cool for a bit… then eat them! Or give them away. Up to you.
Related Posts:
Pfeffernussen, Orange Sables, and the Chocolate Peanut Butter Cookie of Your Dreams
Chocolate Cranberry Oat Cookies
Frosted Holiday Cookies (Melissa Clark, NYT)
Unfussy Sugar Cookies (Smitten Kitchen)
The post Miso Peanut Butter Cookies appeared first on The Amateur Gourmet.

November 23, 2020
Shaved Brussels Sprout Salad with Pears, Toasted Almonds, and Parmesan

There’s been some debate about whether or not you should serve salad at Thanksgiving.
My stance? A traditional salad — with wan lettuce leaves from a bag, dried cranberries (the most clichéd Thanksgiving salad ingredient), and toasted pecans — is a pretty depressing thing to see on the table, TBH. But, as I get older, my body does crave some kind of crunchy vegetable situation if I’m going to eat a lot of heavy food (turkey, stuffing, gravy, etc). So what’s a Thanksgiving chef to do? Enter the shaved Brussels sprout salad.
Okay, this idea is nothing new. Smitten Kitchen told you about it; so has Jody Williams in the NYT. Speaking of the New York Times, I had Melissa Clark on my Instagram Live on Friday and I asked her what I could do with the Brussels sprouts in my fridge besides roast them, and she said: “Shave them and make a salad.” So this salad was simply meant to be.
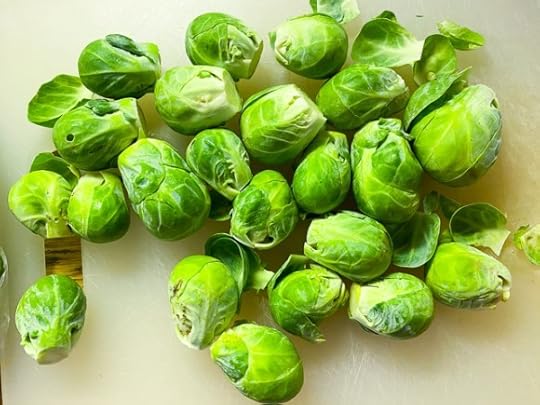
Here’s the wonderful thing about this salad, especially for Thanksgiving: it’s super easy to make with a food processor. Simply set up your slicing disc, cut the stems off the Brussels sprouts, and whir away. The whole thing takes five minutes.

Once you have that, you get to play. I put them in a big bowl and immediately added lemon juice, really good olive oil (Séka Hills), salt, pepper, a dab of mustard, and a drizzle of local honey. I also toasted some whole almonds and chopped them next to the local honey for this charming picture.

Looking in my fruit bowl, I saw pears and apples; I decided to go for the pears. I tossed everything through and tasted, then adjusted with some white Balsamic vinegar, more salt, and pepper.
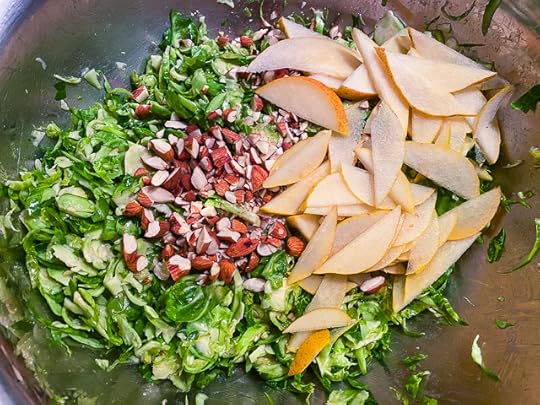
But I wasn’t done. In went some raisins and lots of Parmesan cheese (I buy the store-grated stuff; not the kind from the can, but freshly grated in the cheese section).

Once that’s all tossed together, you taste and adjust one more time.
On Saturday night, I served this with some leftover chicken, some spreads I picked up from Gjusta, along with some bread I also got there. But this salad was definitely the star.

And the best part? We had it again the next day with brunch — a toasted bialy with cream cheese, smoked trout, and caper tapenade, if you must know — and the salad tasted even better.

Which is great news for your Thanksgiving: you can make this salad on Wednesday afternoon and it’ll be even better on Thursday (it definitely helps to soften the Brussels sprouts).
So as you contemplate a salad this Thanksgiving, don’t look to the lettuce drawer; look to those Brussels sprouts. They’re ready to step up and really add some pizzazz to your Thanksgiving table.

Shaved Brussels Sprout Salad with Pears, Toasted Almonds, and Parmesan
A perfect Thanksgiving salad that you can even make a day ahead.
Servings 4 people
Ingredients2 pounds Brussels sprouts, stems removed1/4 cup lemon juice1 tablespoon Dijon mustard1 tablespoon honey1/2 cup good olive oil 1 tablespoon Kosher salt, plus more to adjust1 teaspoon freshly ground pepperWhite Balsamic vinegar (optional)3/4 cup whole almonds, toasted, then chopped Toss them in a small skillet over medium heat until fragrant and brown in spots.1 to 2 pears, thinly sliced I used a pineapple pear from the farmer's market.1/2 cup golden raisins1/2 cup ground aged Parmesan
InstructionsStart by shredding the Brussels sprouts in the food processor. Using the shredding attachment, drop them through the tube, and press down until they're all shredded. Wasn't that easy?In a large bowl, whisk together the lemon juice, mustard, honey, olive oil, salt and pepper until emulsified. Add the Brussels sprouts and toss all around and taste, taste, taste. If it needs more acid, add a splash of white Balsamic (or rice vinegar or white wine vinegar) for a rounder acidity. If it needs more salt, add more salt, etc.Add the almonds, pears, raisins, and Parmesan and toss all around and taste again. Eat right away or allow to mellow overnight in the fridge. (You may need to enliven it with more salt and vinegar right before you serve it).
The post Shaved Brussels Sprout Salad with Pears, Toasted Almonds, and Parmesan appeared first on The Amateur Gourmet.

November 18, 2020
Overnight Oats in a Mostly-Empty Yogurt Container
There used to a website called “Is It Iced Coffee Weather?” that would tell you whether you should drink hot coffee or iced coffee on a particular day.
I’d like to build a similar website for oats. For me, it’s either overnight oat weather or hot oatmeal weather. Right now, in L.A., we’re on the cusp. Yesterday, the weather was in the 80s; this morning, it was in the 50s. Usually I make my decision the night before: if it’s hot oatmeal, I put a cup of steel-cut oats in a pot, cover with 4 cups of water, bring to a boil, turn off the heat, and cover so they’ll cook up in ten minutes the next morning. Last night, though, I opened my refrigerator and saw a mostly-empty yogurt container. That was the universe telling me it was time to overnight oat.

The thing about my overnight oats is that I don’t use a recipe. So those of you who are scrolling to the bottom of this post, sorry!
It’s all impulse; you make various decisions along the way: sweet or less sweet? Wet or not so-wet? (When I make it not-so-wet, my husband says the overnight oats “taste like concrete.” I don’t mind that though.)
Here’s how you start: look inside your mostly-empty yogurt container. This one had about 1/2 cup to a cup of yogurt. To that, I added milk and stirred it in. Let’s say I added 1/2 cup of milk. Then I add a pinch of salt and I start sweetening it with maple syrup (you could also use honey).

At this point, you taste it. Not sweet enough? Add more maple syrup (or honey). Too sweet? Add a little more salt. (You could also add a splash of vanilla here.) As far as the wetness, you want the mixture to feel like slightly thinned-out cream.
But here’s the thing: you really can’t screw this up. As long as you like the taste, the next step is adding the dry stuff. So start with less dry stuff: add old-fashioned rolled oats (start with 1/2 cup) and then play around. I like to add pistachios, unsweetened flaked coconut, golden raisins, and pumpkin seeds.

Other options: slivered almonds, dried currants, pitted and chopped-up Medjool dates, pomegranate seeds, dried blueberries. You get the idea!
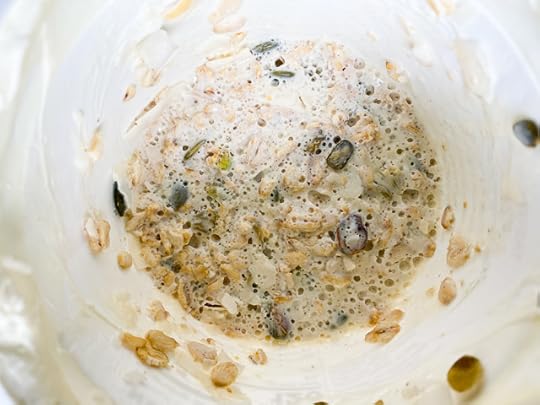
You stir that all together and look at your concoction. If it looks pretty wet, that’s okay — you’ll have wet overnight oats in the morning. If it looks very dry, you may wind up with concrete. If that worries you, add more milk. Here’s what mine looked like last night before bed.

As you can see, mostly wet.
And here’s what it looked like this morning when I woke up.
As you can see, the oats absorbed most of the liquid. That’s the cool thing about overnight oats — they suck up whatever liquid you put in there, so it’s really up to you how you want this to go.
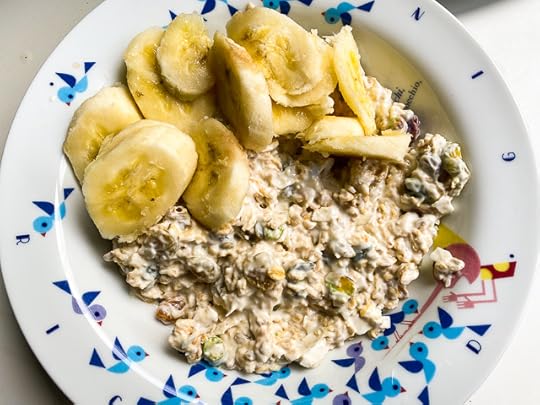
To serve, I scooped the oats into my Pinocchio bowl and topped with a banana that was on the verge of overripe, but there were only two left so I wasn’t going to bake anything with them.

So tonight, when you go to bed, ask yourself a few questions: “Is it going to be hot tomorrow?” “Is it going to be cold?” “Do I have a mostly-empty yogurt container in the fridge?”
If the answer to the last question is “yes,” ignore the first two questions and do what I did. Even on a chilly morning (it’s 61 degrees right now, brrr!), these are oats you won’t want to kick out of bed.
The post Overnight Oats in a Mostly-Empty Yogurt Container appeared first on The Amateur Gourmet.

November 16, 2020
The Only Grilled Cheese That Matters

Back in the before time, in November of 2018 to be exact, the chef Nancy Silverton hosted a grilled cheese night at Republique here in L.A. Republique — one of the best restaurants in L.A., if not the best (see here) — is the site of Nancy Silverton’s iconic restaurant of yore, Campanile. There, with her then-husband Mark Peel, Nancy would have a regular grilled cheese night which was especially popular because of the bread she used, from her own La Brea Bakery which was next door.
So this grilled cheese night harkened back to the original grilled cheese night and Nancy’s signature grilled cheese — The Nancy — was offered on the menu. I ate it and delighted at the combination of onions (which I remembered as being caramelized but now see were marinated), grainy mustard, and lots of Gruyère.
Sometimes the passing of recipes is like a game of telephone; something gets lost in translation. I’m sure Nancy has good reason for marinating her onions, but in my own attempts to recreate her signature grilled cheese, I started caramelizing the onions.

Whereas I suppose the marinated onions in The Nancy offer up some necessary acid, my caramelized onions lend depth and even more decadence to the proceedings.
The process goes like this: you take two small yellow onions, or one large one, peel and slice them thin then caramelize them slowly in butter and olive oil. Let’s say two tablespoons of each. You start on high heat with a pinch of salt and then, when you’ve got some color (see above), you crank the heat to medium/low and cook, slowly (you should hear a gentle sizzle) for 45 minutes or longer. You want the onions deep, deep golden brown, like below.

Then it’s a simple assembly job.
Bread-wise, I like sourdough. Spread a thick layer of grainy mustard on one side (that’s where you get your acidic pop in this version), add a mound of grated sharp white cheddar (my preferred cheese to the Gruyère; also, you’re more likely to have it around), and then top with the caramelized onions.

It’s a lot, and that’s the point.
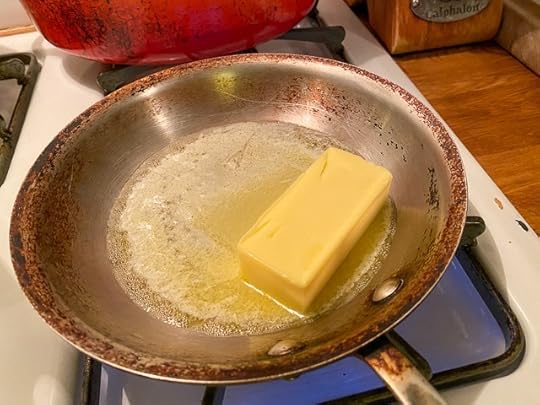
To finish, close your sandwiches up, melt 2 tablespoons of butter in a large skillet on high heat. Add the sandwiches, lower the heat to medium-low, and cover.
Cover? That’s Craig’s trick (Craig is my husband if you’re new). His only culinary expertise is grilled-cheese related and this is the extent of it: covering the grilled cheese while it cooks lets the cheese melt.
Proceed for several minutes until the bottom of your grilled cheese is golden brown and most of the cheese has melted. Flip, finish on the other side (you can leave the cover off at this point and crank up the heat a little).
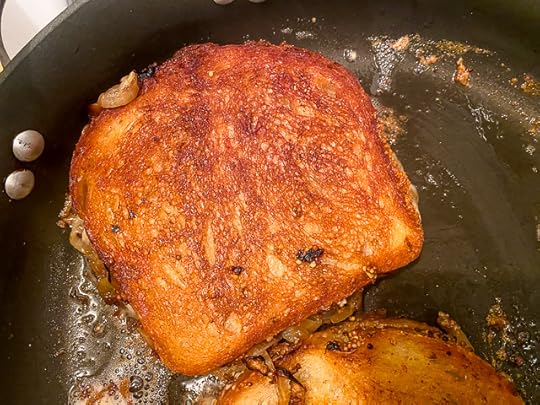
If you’re lucky, some cheese will fall on to the outside of the bread and crisp up along with it (in Italy, it’s called frico).
All in all, this isn’t The Nancy, and I wouldn’t dare call it The Adam. It’s just a grilled cheese with deeply caramelized onions, grainy mustard, and an obscene amount of cheese… aka: the only grilled cheese that matters.
The post The Only Grilled Cheese That Matters appeared first on The Amateur Gourmet.

November 11, 2020
Got Persimmons? Make Persimmon Bread

And so it was that I found myself at an AirBnb in Santa Barbara with persimmon trees. The trees were so beautiful — I’m mad at myself for not taking a picture of them (sorry!) — it felt like a crime to actually pull persimmons off of them. But pull persimmons off of them, I did, and when I got home with them, they were so very squishy, they almost seemed rotten. But I knew better.

These are hachiya persimmons. You know because they’re acorn shaped and they’re only edible when they get squishy like this. (The other kind, fuyu persimmons, you can eat like an apple.)
Just by itself, the jelly-like persimmon flesh tastes sweet and delicious. But I’d long been curious about James Beard’s Persimmon Bread, which David Lebovitz adapted on his blog.
James Beard, the grandfather of American gastronomy, has been on my mind lately because my friend John Birdsall has a new biography of him called The Man Who Ate Too Much. That book’s going on my Christmanukkah list and it’s already scoring rave reviews.

As for the bread, it’s as simple as whirring up the persimmon flesh (is it creepy that I call it “flesh”?) in the food processor, then mixing it along with eggs and melted butter in with flour, sugar, all the usual stuff. Plus some freshly grated nutmeg.
The secret ingredient here is booze. David calls for Cognac or Bourbon whiskey, but I had some Brandy and figured “why not?”

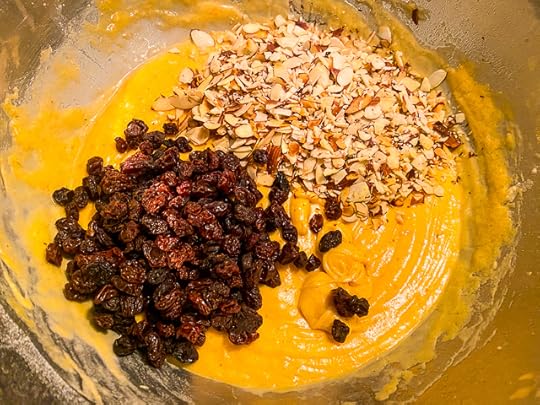
He also calls for walnuts or pecans, but I only had slivered almonds. So I toasted those, chopped them, and added them along with the raisins.
The only tricky thing here is the baking time. I cooked the bread for an hour, as instructed, but it was still very wet when I tested the middle. So I kept going…

…and the resulting bread came out a little dry on the ends, but wonderfully moist in the center.
If I had to do it all over again, I’d take it out while still a little wet in the middle and let the residual heat cook it.
All-in-all, though, this is a perfect way to use up squishy persimmons. Think banana bread, but more tropical and Christmasy with the nutmeg and the booze. Can’t wait to eat a piece while drinking tea and reading John Birdsall’s book which my husband is going to get for me because I’m sure he’s reading this post in its entirety. RIGHT, CRAIG?

James Beard’s Persimmon Bread
A recipe for one loaf, adapted from David Lebovitz's recipe.
Ingredients1/2 cup unsalted butter (one stick), melted; plus, softened butter for coating the pan1 3/4 cups all-purpose flour3/4 teaspoon salt1 teaspoon baking soda1/2 teaspoon freshly grated nutmeg1 1/4 cups sugar2 large eggs, room temperature1/3 cup Cognac, Bourbon, or Brandy1 cup persimmon puree Scoop the flesh out of very ripe hachiya persimmons and whir in the food processor.1 cup toasted walnuts, pecans, or almonds, chopped1 cup raisins or other dried fruit
InstructionsHeat the oven to 350 and generously coat your loaf pan with softened butter (about a tablespoon).In a large bowl, whisk together the flour, salt, baking soda, nutmeg, and sugar. Create a well in the center and add the eggs, booze, persimmon puree and whisk together until just combined. With a rubber spatula, fold in the nuts and fruit.Pour the batter into the prepped pan and bake for one hour, or until a cake tester comes out clean. (Based on my experience, it's better to under-bake a little than to over-bake.) Let cool before slicing and serving.
Related Posts:
How to Add Flair To Your Banana Bread
Persimmon Rum Bundt Cake (The Little Epicurean)
Persimmon Spice Bread (Martha Rose Shulman, NYT)
Persimmon Bread (Proportional Plate)
The post Got Persimmons? Make Persimmon Bread appeared first on The Amateur Gourmet.

Adam D. Roberts's Blog

- Adam D. Roberts's profile
- 3 followers

