
Adam D. Roberts's Blog, page 11
July 14, 2020
Multicolored Plum Cake with Pistachios
There’s only one plum cake worth making in this world and that’s The New York Times‘s most popular recipe of all time: Marion Burros’ Plum Torte. It’s one of those magical recipes where you think there’s so little going into it, it can’t possibly be that great — you basically make a pancake batter and drop some plums into it — but then the torte comes out of the oven and you feel like Escoffier himself.
The thing is: when I first made this plum torte, I made it with the wrong kinds of plums. The original recipe calls for prune plums, which are very narrow, and allow for maximum plum-age: the recipe calls for 10 to 12 of them halved lengthwise. When I first did it, I used normal purple plums and couldn’t fit all of the plums in. It wasn’t until my friend Cary came over last year with prune plums that I made the cake the right way.
But you know what? My original technique — using normal-sized plums — actually yields a better result if, and only if, you get lots of different kinds of plums with lots of different colors. On a recent trip to Cookbook in Echo Park, I picked up Green Gage plums and Santa Rosa plums (which are purple on the inside too) and made the most gorgeous plum cake I’ve made so far.

The cake takes less plums when you do it this way, but if it’s true that “you eat with your eyes first,” this cake is far tastier than the original version. Plus, this time around, I sprinkled on some pistachios to give it even more color and also flavor and texture.
The results were so dazzling, it felt like eating a firework on the fourth of July (and, funny enough, I served this on the fourth of July). So the next time you’re out of the house and you see plums of many colors (Joseph shoutout!) grab a bunch, come home, and make this cake. It takes no time at all and the results will have you go go go-ing back for more.


Multicolored Plum Cake with Pistachios
A riff on Marion Burros' famous plum torte, with multicolored plums and pistachios.
Servings 8 slices
Ingredients1/2 cup unsalted butter, softened, plus more for greasing the pan3/4 cup sugar, plus more for sprinkling2 large eggs, room temperature1 cup unbleached flour, sifted In this particular version, I did 1/2 cup whole wheat flour, 1/2 cup AP flour, which worked great1 tsp baking powder1 pinch salt6 to 7 multicolored plums, halved and pitted1/2 cup green pistachios (out of the shell)1/4 cup powdered sugar (optional)
InstructionsPreheat the oven to 350 degrees and generously butter a springform pan with softened butter. (I use a lot here, it makes the outside of the cake extra brown and toasty and helps it come out easily.)Now cream the 1/2 cup butter and 3/4 cups sugar in a stand mixer until fluffy. Add the eggs one at a time until well incorporated. Add the flour, baking powder, and salt, and mix just until combined. Pour into the prepared pan.Place in the plums, skin side up (I did the opposite here and it still worked). Sprinkle with the pistachios and a little more sugar.Bake one hour or until a cake tester comes out clean. Cool in the pan for 15 minutes, then remove the sides, cool completely, and dust with powdered sugar right before serving.
Other Plum Cakes:
Almond Cake with Plums (Amateur Gourmet)
Plum Cake “Tatin” (Ina Garten, Food Network)
Plum Cake (Martha Stewart)
Olive Oil Plum Cake (NYT)
Purple Plum Torte (Smitten Kitchen)
The post Multicolored Plum Cake with Pistachios appeared first on The Amateur Gourmet.


July 12, 2020
Darkest Chocolate Sorbet
There’s a certain math when it comes to frozen desserts. The math goes something like this: ice cream > sorbet. The logic for this has everything to do with decadence: ice cream has fat, sorbet traditionally doesn’t. You can blend a watermelon, add a little sugar syrup, and freeze that in an ice cream maker and that’s “sorbet.” It’s basically frozen, blended fruit. Ice cream involves warming cream, infusing egg yolks, adding lots of chopped naughty bits — chocolate, candied walnuts, cake crumbles — and churning that into something that feels like a real treat. Again, at the risk of repeating myself: ice cream > sorbet.
Imagine my shock and surprise, then, to make Melissa Clark’s Darkest Chocolate Sorbet from her new book, Dinner in French, only to discover that this frozen chocolate concoction of the sorbet variety was far to superior to any frozen chocolate dessert I’ve ever had. I’ll give you a moment to take that in.
What makes this chocolate sorbet so extraordinary? It has everything to do with the texture. To make it, you whisk cocoa powder, granulated sugar, and dark brown sugar into water and cook that until the sugar has dissolved. Then you pour that over chopped dark chocolate and wait until the chocolate melts. You stir in vanilla and refrigerate that until it’s ready to churn.

The result, after churning, is light because of the water — it makes refreshing, chocolate ice crystals that cool you down as you eat it — but then there’s that melted chocolate which makes everything so rich. The closest thing I can compare it to is the famous frozen hot chocolate at Serendipity 3 in New York (apparently, it was Andy Warhol’s favorite dessert).
Hot chocolate is a good thing to think about when contemplating this dessert because the best hot chocolate is made the same way: you stir cocoa powder into hot water (sometimes milk, but forget that) and then add chopped chocolate. So you could call this frozen hot chocolate sorbet or you could call it darkest chocolate sorbet or you could even, I bet, call it chocolate ice cream (even though it’s not) and your family would be fooled.
Whatever you call it, you simply have to make it. It’s the best dessert I’ve made all quarantine and I polished it off last night and I’m so sad that it’s gone, I may have to make it tonight. Stop me before I sorbet again.

Darkest Chocolate Sorbet
A decadent yet refreshing chocolate sorbet from Melissa Clark's new cookbook, Dinner in French.
Servings 1 quart
Ingredients3/4 cup granulated sugar1/2 cup dark brown sugarPinch fine sea salt2/3 cup Dutch-process cocoa powder I use Valrhona (it's the best!)8 ounces dark chocolate (at least 72% cacao), chopped Scharffen Berger bittersweet is my go-to.1 tsp vanilla extract
InstructionsIn a medium pot, combine the granulated sugar, brown sugar, salt, and 2 1/2 cups of water and bring to a boil. Reduce the heat to a simmer and whisk in the cocoa powder. Cook, stirring occasionally, until the sugar has dissolved, about 5 minutes.Meanwhile, place the chopped chocolate in a heatproof bowl. Pour the hot cocoa mixture on top. Let the mixture sit for 2 minutes to start melting the chocolate, then whisk until the chocolate is completely melted and the mixture is smooth.Stir in the vanilla. If you want a perfectly silky sorbet, use an immersion blender to briefly blend the mixture and get rid of any chocolate lumps. You can skip this step if you don't mind a bit of chocolate chip-like texture in your sorbet (I skipped this step!). Cover and chill for at least 4 hours and up to overnight.Process the mixture in an ice cream machine according to the manufacturer's instructions. Serve immediately or freeze until hard.
Other Worthy Chocolate Sorbets:
David Lebovitz’s Chocolate SorbetKing Arthur Flour’s Chocolate SorbetSmitten Kitchen’s Chocolate SorbetSaveur’s Chocolate Sorbet
The post Darkest Chocolate Sorbet appeared first on The Amateur Gourmet.

July 10, 2020
Ricotta Pancakes

When I look back on this period of our lives — and I do sincerely hope that we’ll be looking back on it someday and that quarantine isn’t just a new way of life — there are certain cultural artifacts that’ll remind of me this time: The Leftovers (which we marathoned at the start of the pandemic; it’s very on-the-nose and also very good), The Nilsson Sessions (my go-to cooking music these days), The Patrick Melrose novels (read them over the past few months), Parting Glances (an incredible movie that we watched in our Zoom movie club), and, most relevant to your interests: ricotta pancakes.
How did I arrive at these ricotta pancakes? I can trace it back to my friend Diana telling me about Farm Fresh To You (a great CSA) and the incredible ricotta that they carry from Bellwether Farms. I signed up and started getting the ricotta every week — it comes in a little basket, so the whey drains out and the ricotta is extra thick — and at some point I had a ricotta pile-up. Instead of just eating it with a spoon (a viable option, considering how good it was), I decided to treat ourselves to ricotta pancakes one morning for breakfast.
Craig is a waffle guy, a French toast guy, but not a pancake guy. I mentioned that I was making pancakes and he seemed unenthused. I told him that they had ricotta and he seemed a little more thused. Then I made them using a recipe from The Kitchn...

…and upon taking a bite his eyes lit up and he said that they were easily the best pancakes he’d ever had.
What makes them so great? Well the batter is super easy: it’s flour, a little sugar, salt, baking powder, milk, and then that ricotta, which makes everything so rich. But the real kicker is you separate the eggs, working the yolks into the batter, and then you beat the whites until you get stiff peaks and fold that in. That lightens things up so much, the pancakes practically float out of the pan when you’re making them.
So treat yourself, this quarantine, to a pancakes with a little pizazz. When you look back on this time, they’ll be one of the good memories.

Ricotta Pancakes
The fluffiest, most ethereal pancakes you'll ever meet.
Servings 8 pancakes
Ingredients1 cup ricotta cheese The better your ricotta, the better the pancakes will be (find Bellwether if you can). Drain the ricotta for 30 minutes in a strainer if it seems very wet.1 cup all-purpose flour1/2 tsp baking powder1 1/2 Tbs granulated sugar1/4 tsp fine salt3/4 cup milk Whole milk is best here. 2 large eggs, separated1/2 tsp vanilla extractButter
InstructionsWhisk together the flour, baking powder, sugar, and salt in a small bowl. Mix together the ricotta, milk, egg yolks, and vanilla in a separate bowl. Add the dry to the wet and stir gently 'til it's all combined.Now's the workout: beat the egg whites BY HAND with a whisk. I say "by hand" because this is your morning workout! You have to earn those pancakes. Stop when they form stiff peaks (lift up the egg whites with a whisk, and if they stay frozen like a painting of a wave, you're good). Stir some of the egg whites into the pancake batter, then fold in the rest with a spatula.Heat a griddle or a non-stick skillet over medium-high heat and add enough butter to coat the pan. Use an ice-cream scoop or a 1/3-cup measure to pour batter on to the hot butter. Cook for 3 to 4 minutes until you see bubbles on top of the pancakes and the bottoms are starting to crisp and turn golden brown. Flip and cook another minute or two, until golden. Remove the pancakes to a cookie sheet and keep warm in a 300 degree oven until all the pancakes are done.Serve the pancakes with maple syrup and blueberries, if you have blueberries. (Poached rhubarb is great here too.) Enjoy!
Other Worthy Ricotta Pancakes:
Ricotta Pancakes with Blueberries (Food & Wine)Light, Fluffy, and Rich Ricotta Pancakes (NYT)Ricotta Pancakes with Blueberry Compote (Bon Appetit)Lemon Ricotta Pancakes (Simply Recipes)Blueberry Lemon Ricotta Pancakes (The Spruce Eats)
The post Ricotta Pancakes appeared first on The Amateur Gourmet.

July 8, 2020
Darkest Chocolate Sorbet

There’s a certain math when it comes to frozen desserts. The math goes something like this: ice cream > sorbet. The logic for this has everything to do with decadence: ice cream has fat, sorbet traditionally doesn’t. You can blend a watermelon, add a little sugar syrup, and freeze that in an ice cream maker and that’s “sorbet.” It’s basically frozen, blended fruit. Ice cream involves warming cream, infusing egg yolks, adding lots of chopped naughty bits — chocolate, candied walnuts, cake crumbles — and churning that into something that feels like a real treat. Again, at the risk of repeating myself: ice cream > sorbet.
Imagine my shock and surprise, then, to make Melissa Clark’s Darkest Chocolate Sorbet from her new book, Dinner in French, only to discover that this frozen chocolate concoction of the sorbet variety was far to superior to any frozen chocolate dessert I’ve ever had. I’ll give you a moment to take that in.
What makes this chocolate sorbet so extraordinary? It has everything to do with the texture. To make it, you whisk cocoa powder, granulated sugar, and dark brown sugar into water and cook that until the sugar has dissolved. Then you pour that over chopped dark chocolate and wait until the chocolate melts. You stir in vanilla and refrigerate that until it’s ready to churn.
The result, after churning, is light because of the water — it makes refreshing, chocolate ice crystals that cool you down as you eat it — but then there’s that melted chocolate which makes everything so rich. The closest thing I can compare it to is the famous frozen hot chocolate at Serendipity 3 in New York (apparently, it was Andy Warhol’s favorite dessert).
Hot chocolate is a good thing to think about when contemplating this dessert because the best hot chocolate is made the same way: you stir cocoa powder into hot water (sometimes milk, but forget that) and then add chopped chocolate. So you could call this frozen hot chocolate sorbet or you could call it darkest chocolate sorbet or you could even, I bet, call it chocolate ice cream (even though it’s not) and your family would be fooled.
Whatever you call it, you simply have to make it. It’s the best dessert I’ve made all quarantine and I polished it off last night and I’m so sad that it’s gone, I may have to make it tonight. Stop me before I sorbet again.

The post Darkest Chocolate Sorbet appeared first on The Amateur Gourmet.

July 3, 2020
Adeena Sussman’s 24-Hour Salted Lemon Spread

Here in quarantine, we can use all of the thrills we can get. You can run through sprinklers, for a start, or cull your coffee mug collection (Lord knows we have too many) but here’s one that you can actually eat: Adeena Sussman’s 24-Hour Salted Lemon Spread.
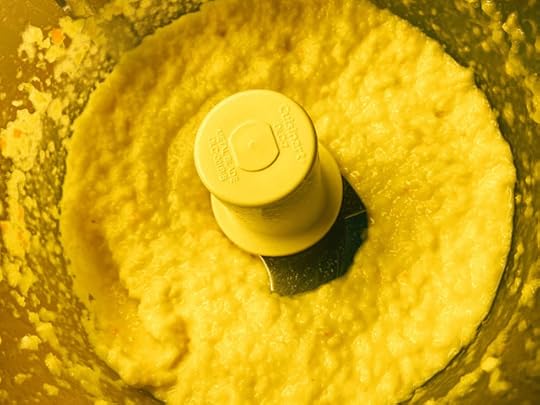
I’m a bit obsessed with Adeena Sussman’s cookbook, Sababa. Everything that I’ve made from it has been an enormous hit: the herb and garlic kebaburgers, the creamy green shakshuka, even just the white tahini sauce with garlic that you make in the food processor with ice water (it makes it fluffy). But this salted lemon spread is something else. It’s not for the faint of heart: it’s very salty, very lemony, a little bitter and a little hot from the chiles (I used habaneros). But oh how it enlivens an otherwise humdrum dinner.
For example, the other night I shallow-steamed haricots verts and some Romanesco florets, then seared some salmon in Canola oil (I normally use grapeseed but couldn’t find any). The dinner would’ve been tasty, but then I stirred some of the salted lemon spread into the vegetables and WHAM! POW! They became exciting. And I put more of the spread on the plate for dipping the salmon, and that too started singing like Ariel in The Little Mermaid.

Then yesterday, I was eyeing an heirloom tomato on the counter and the loaf of sesame sourdough I’d purchased from Cookbook in Echo Park (where you shop one customer at a time, which I love). I decided to mix some of the salted lemon spread with mayo, spread it on slices of the sourdough, top with arugula tossed in olive oil and white Balsamic, and then thick slices of the tomato. It was a tomato sandwich for the ages.

So how do you make it? I suppose this is the place where I should just put the actual recipe so those who like to skip over all of the writing I did above can just read it and make it themselves. Fair enough! Here you go. Hope it wakes up your quarantine the way it’s woken up ours. And if you come up with other exciting ways to use it, please share them here.
Adeena Sussman’s 24-Hour Salted Lemon Spread (from Sababa: Fresh, Sunny Flavors from My Israeli Kitchen)
3 large or 4 medium lemons (1 pound), preferably thin-skinned, scrubbed3 large garlic cloves, thinly sliced1 small green jalapeño, seeded and chopped (I used a habanero because I like the heat and the fruitiness)3 tablespoons kosher salt2 tablespoons canola or other neutral-flavored oil
Trim the tops and bottoms from the lemons and slice each one into 8 wedges, then trim and discard all the visible white membranes from the tips of the wedges and remove and discard the seeds.
Cut each wedge crosswise into 3 chunks (oops, forgot to do this!) and toss them in a medium nonreactive bowl along with the garlic, jalapeño, and salt. Cover and refrigerate for 24 hours, tossing every 8 hours if you can.
Transfer the contents of the bowl to the bowl of a food processor and puree with the canola oil until just about smooth, 30 seconds to 1 minute. Stored in an airtight container, the 24-Hour Salted Lemon Spread will keep in the fridge for up to 1 month.
The post Adeena Sussman’s 24-Hour Salted Lemon Spread appeared first on The Amateur Gourmet.

April 17, 2020
Homemade Sourdough
Hello from quarantine, my long-lost blog readers. I know I’ve neglected you for a while — I’ve shifted all of my energies to Instagram and my podcast — but something has happened during this strange time that calls for me to dust off the ol’ food blog and tell you about it. And that something is that I’ve become one of those sourdough people.
I know, I know: there’s a lot of uproar about making sourdough right now. For starters (haha: sourdough humor), you need a LOT of flour to make it. Not just to make a loaf, but to feed the starter that’ll give your loaf rise. I bought some red fife whole wheat flour on Anson Mills website a few weeks ago that’s been sustaining me, along with their bread flour; but when that ran out, I went to Central Milling and bought three fifty pound bags of flour. At the time, I didn’t really visualize in my head what that looked like (it seemed like a good deal); now I have three enormous bags of flour in my kitchen that I can barely lift, let alone open. (If that sounds selfish to hoard all of this flour, don’t worry, I’m giving lots of it away; and baking loaves of sourdough for friends which I put in my trunk, so I can stay six feet away upon delivery.)

Now that I’ve addressed the downside of making sourdough right now, let me address the upside: this is the perfect moment to take the time to learn how to make sourdough. Emphasis on the word “time”: if you’ve got plenty of it, like most do in quarantine, and you’ve got plenty of flour, the only thing stopping you is fear. So let me help you with that.
Sourdough is an intuitive process. The main thing to understand is that you’re working with wild yeast. You could make a very plain-tasting bread with a packet of yeast that’ll be a wonderful way to begin your bread journey (I recommend this Splendid Table sandwich bread, which I made a few weeks ago on the recommendation of Tucker Shaw and loved); but with a sourdough starter (and the wild yeast contained within it), you’re going to get a bread that brings in ‘da noise, brings in ‘da funk.
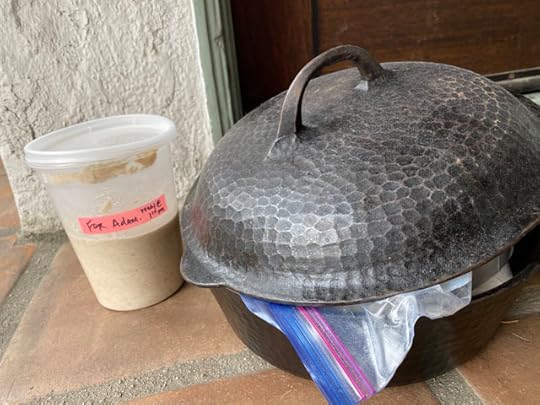
What you see above, is the greatest gift I’ve ever been given: a mature sourdough starter (from the amazing pizza restaurant, Ronan), a cast iron cooking vessel, and two bags of flour from my extremely generous neighbors Rachael Sheridan and Jeremy Fox. You may be thinking to yourselves: “Oh, well no wonder he’s had so much luck with sourdough… famous food people gave him an amazing starter!” And you’d be absolutely right: I think so much of my early success (I’m eight beautiful loaves in), has to do with this magical starter.
But all is not lost! If you can’t get your hands on a mature starter (and you can buy mature starter online, or ask any bakery if you can have some), you can definitely make your own. My sourdough journey actually began two weeks ago when I started watching Josey Baker’s sourdough tutorials on Instagram. If this post leaves you with nothing else, let it be these tutorials. After reading countless books on sourdough (including Tartine Bread and Flour Water Salt Yeast, both excellent), the Josey Baker videos are what got me off my ass and into the kitchen. He demystifies everything, including making your own starter. In fact that video is kind of hilarious: you just mix flour and water and that’s it. Leave it on your counter for two weeks, feed every day, and you’ve got starter. (Whole grain flour is best.)
Josey made everything seem easy and that’s how I’ve been thinking about sourdough bread-making: the less you build it up in your head, the easier it’ll be. Rachael turned me on to a recipe from Ursula Siker (@basic_baker_bitch) who has her own helpful sourdough tutorials on Instagram. Her recipe made two loaves and so I cut it in half. I often find it helpful to write out complex recipes by hand to help me understand each step, so this is what’s currently attached, via magnet, to my fridge.

It seems complicated, so let me simplify.
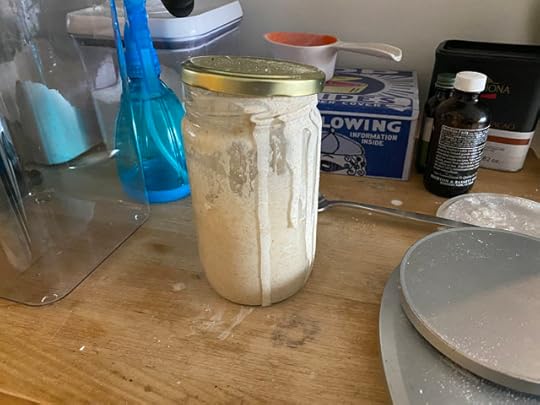
The first step is to turn your starter into a leaven. What’s the difference between a starter and a leaven? This is something I’ve been trying to figure out, so here’s how I understand it: a starter is something you maintain to make future bread; a leaven is something you mix when you’re ready to make bread that day. (In either case, I keep the starter on my counter with the lid half-off. You can refrigerate, but then you have to revive the starter, something that I’m scared to do. Plus keeping it on my counter encourages me to keep making sourdough; the more you make sourdough, the better you’ll get at it.) So every day, I feed the starter: I pour out most (leaving 1/2 cup), add 1/2 cup of warm water, and then I add enough flour to make it into a mildly thick paste. That’s it.
But when I’m ready to make sourdough, I make the leaven. So, using a kitchen scale (a must for making sourdough) at 9 in the morning, I mix 25 g starter, 200 g water (at 78 degrees; I don’t take the temp, I just guesstimate), 100 g of AP flour and 100 g whole wheat flour. It should be a thickish paste. Leave that in the jar or container and go have your morning. At 1:30 PM, when your leaven has hopefully come to life (it’ll be bubbly and bigger) it’s time for the next step.
Now it’s time to make your dough. In a large bowl, using the scale, mix together 375 g water (at 90 degrees; again, I guesstimate), 100 g leaven, 450 g AP flour, 50 g whole wheat flour, and 10 g salt. Don’t forget the salt! I mix this by hand, which is important; not only does it help you bring everything gently together, it allows you to get a feel for your dough. As I’ve gone along, I’ve started to notice if my dough is too wet and I’ll sometimes add a little more flour.
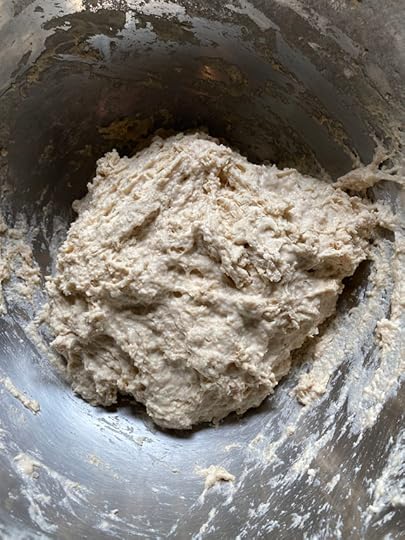
That’s what your dough will look like in that first, shaggy step. Worry not: you don’t need to knead it or work it or do anything. Once it’s mixed (and this is what I learned from Josey), you just cover it with a dish towel and walk away for an hour.
When the hour’s up, it’s time to start your folding. This is where time comes in. You’re going to fold the dough, every 30 minutes, for the next four hours. “Four hours!” you might be thinking. “Yes, four hours,” I reply. But we’re in quarantine, what else are you doing?
Folding may sound complex, but it’s actually super fast and simple. Here’s an image from Flour Water Salt Yeast, I hope I don’t get in trouble for using it. (Josey’s videos are also super helpful on this front.)
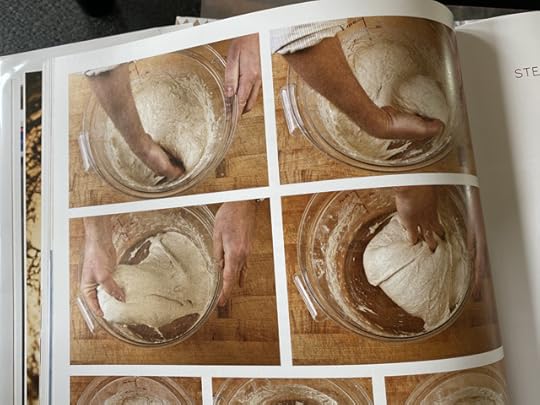
As you can see you just grab the dough from one side and pull it up. You’re stretching it basically; pull it up, but don’t tear it, and lift it to the other side of the dough. So if you’re pulling the dough up from 9 o’clock, pull it to 3 o’clock. Do this four times all the way around (it helps if your hand is wet) from 9 to 3, 12 to 6, 3 to 9, and 6 to 12, and finish by flipping the dough upside down. Cover and do again in 30 minutes.
You’re basically giving this shaggy dough structure each time that you do this. When four hours are up, you should notice that the dough is smoother and sturdier. You can do something called the windowpane test after four hours: that’s where you stretch the dough to see if you can see through it, like a windowpane. If you can, you’ve done a good job. If not, you could keep folding for another hour or so.
Now we’re ready to pre-shape! Dust a large cutting board with flour, dust the top of your dough, and flip upside down (flour-dusted side down). Do your same folding technique and then flip upside-down again and gently shape into a nice ball. Rest for half an hour.

After half an hour, you’re ready to do the final shape and transfer to a proofing basket. I got my proofing basket in France years ago; it’s linen-lined and I DUST IT WELL WITH FLOUR before adding the dough, or I’d never get it out the next morning. My friend Emily doesn’t have a proofing basket and made a successful loaf lining a colander with a dish towel and also dusting it well with flour.
To do the final shape, dust the top of your dough with flour again, flip upside down, then do the same four folds, only this time, instead of flipping upside down, you’re going to place it — smooth side-down, seam-side up — into the well-dusted proofing basket. Nicole Rucker (my friend and one of the best bakers around) saw what I was doing at this point on Instagram and told me to really pinch the seams closed, so be sure to do that.
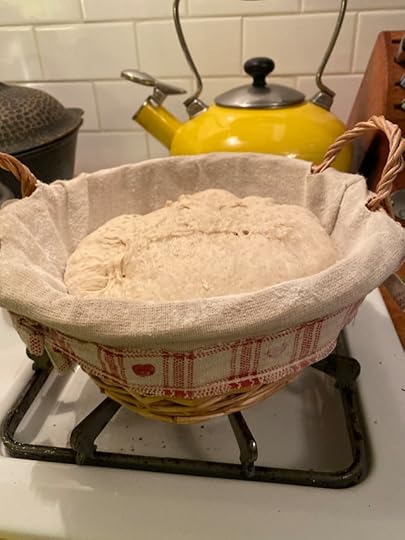
Are you proud of yourself? The hard part’s over! Now you just cover this with a dish towel and place in the fridge overnight.
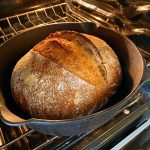
The next morning, place your Dutch oven into the oven with the lid on and heat to 475. Again, Rachael and Jeremy leant me a beautiful cast iron one; I have a 4-qt Staub one from Sur La Table on the way right now (it’s on sale and worth looking at; $99, down from $400!). The key here is your want a round, 4-quart Dutch oven if you can find one. Anything larger — like my normal, oval-shaped Le Creuset — will give too much room to the bread and it won’t puff up into a beautiful boule.
So once your Dutch oven is hot (I leave it in there at least half an hour), CAREFULLY take it out and lift the lid off. Carefully remove the dough from the proofing basket (don’t handle too much, you don’t want to deflate it) and place it in the hot Dutch oven, smooth side up. Then take a serrated knife and carefully slash along the top.

Carefully put the lid back on and place back in the 475 oven and cook for 20 minutes. Then take the lid off (your kitchen is going to smell amazing right now). Look at how it’s puffed up!

The final step is just to bake it another 15 to 20 minutes. Ken Forkish, the author of Flour Water Salt Yeast, says it’s important to really brown your bread here. So just keep it an eye on it and see how far you can take it. I try to really get a deep, dark brown.
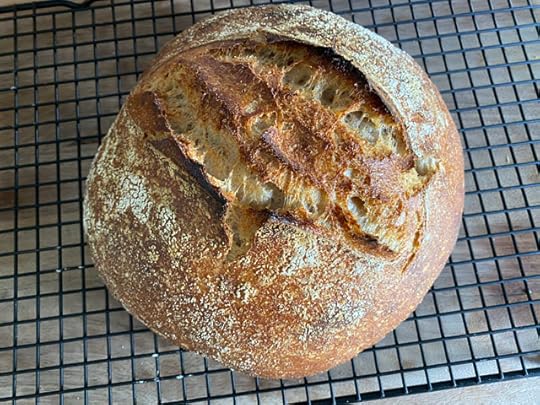
Take it out of the oven, lift with a metal spatula on to a baking rack, and cool for at least an hour before cutting into it.

So, yes, it’s a lot of work to make sourdough. But the secret is, the more you do it, the more all of these steps become second nature. Now I’ve started making a loaf a day; it’s a soothing break from reading the news. And dropping off loaves to friends is a way to not only still feel connected, but to feel like you’re doing some good during this crisis.
And nothing beats the feeling of triumph you’ll feel when you pull a loaf of sourdough that you made yourself out of the oven. So I’m passing the baton to you, dear reader: now it’s your turn to sourdough.

Homemade Sourdough
A step-by-step guide to making amazing sourdough at home with an already active starter.
Servings 1 loaf
EquipmentDigital kitchen scaleProofing basket (or bowl lined with a kitchen towel)4-quart Dutch oven with a lid
IngredientsFor the leaven:200 g water (78 degrees)100 g AP flour100 g whole wheat flour25 g starterFor the sourdough:375 g water (90 degrees)450 g AP flour50 g whole wheat flour100 g leaven10 g salt
InstructionsFirst, make the leaven: in a jar, mix together the 200 g water (at 78 degrees), 100 g AP flour, 100 g whole wheat flour, and 25 g starter. Cover loosely with lid and leave for four hours until bubbly and almost double in size.To make the dough, in a large bowl, using your hands, mix together the 375 g water (at 90 degrees), 450 g AP flour, 50 g whole wheat flour, 100 g leaven, and 10 g salt. The dough should be shaggy; if it's very wet, you can add a little more flour. Cover with a kitchen towel and leave for one hour.Now we start the folding: grab the dough from one side and pull it up. You’re stretching it basically; pull it up, but don’t tear it, and lift it to the other side of the dough. So if you’re pulling the dough up from 9 o’clock, pull it to 3 o’clock. Do this four times all the way around (it helps if your hand is wet) from 9 to 3, 12 to 6, 3 to 9, and 6 to 12, and finish by flipping the dough upside down. Cover and do again every 30 minutes for the next four hours.Time to pre-shape: dust a large cutting board with flour, dust the top of your dough, and flip upside down (flour-dusted side down). Do your same folding technique and then flip upside-down again and gently shape into a nice ball. Rest for half an hour.The final shape: dust the top of your dough with flour again, flip upside down, then do the same four folds, only this time, instead of flipping upside down, you’re going to place it — smooth side-down, seam-side up — into the well-floured proofing basket or a bowl lined with a well-floured kitchen towel. The hard part’s over! Now you just cover this with a dish towel and place in the fridge overnight.The next morning, place your Dutch oven into the oven with the lid on and heat to 475. Once your Dutch oven is hot (I leave it in there at least half an hour), CAREFULLY take it out and lift the lid off. Carefully remove the dough from the proofing basket (don’t handle too much, you don’t want to deflate it) and place it in the hot Dutch oven, smooth side up. Then take a serrated knife and carefully slash along the top.Carefully put the lid back on and place back in the 475 oven and cook for 20 minutes. Then take the lid off (your kitchen is going to smell amazing right now). Look at how it’s puffed up! The final step is just to bake it another 15 to 20 minutes until it's a deep, dark brown.Take it out of the oven, lift with a metal spatula on to a baking rack, and cool for at least an hour before cutting into it.
NotesA lot of people have asked about the amount of leaven this recipe makes vs. the amount that’s actually used (seems to make too much). Lately, I’ve just been winging the leaven step by pouring out most of my starter (until there’s 2 Tbs left in the jar), adding warm water from the faucet (about 1 cup), stirring with a knife, and then adding enough whole wheat flour to form a thick paste. I just use that as my leaven in the next step.
Related Bread Content:
The No-Knead Bread (Amateur Gourmet)
Rustic Sourdough Bread (King Arthur Flour)
How To Make Sourdough Bread (Serious Eats)
Sourdough Bread (The Splendid Table)
Sourdough Starter Crackers (Bon Appetit)
The post Homemade Sourdough appeared first on The Amateur Gourmet.

How I Sourdough

Hello from quarantine, my long-lost blog readers. I know I’ve neglected you for a while — I’ve shifted all of my energies to Instagram and my podcast — but something has happened during this strange time that calls for me to dust off the ol’ food blog and tell you about it. And that something is that I’ve become one of those sourdough people.
I know, I know: there’s a lot of uproar about making sourdough right now. For starters (haha: sourdough humor), you need a LOT of flour to make it. Not just to make a loaf, but to feed the starter that’ll give your loaf rise. I bought some red fife whole wheat flour on Anson Mills website a few weeks ago that’s been sustaining me, along with their bread flour; but when that ran out, I went to Central Milling and bought three fifty pound bags of flour. At the time, I didn’t really visualize in my head what that looked like (it seemed like a good deal); now I have three enormous bags of flour in my kitchen that I can barely lift, let alone open. (If that sounds selfish to hoard all of this flour, don’t worry, I’m giving lots of it away; and baking loaves of sourdough for friends which I put in my trunk, so I can stay six feet away upon delivery.)
Now that I’ve addressed the downside of making sourdough right now, let me address the upside: this is the perfect moment to take the time to learn how to make sourdough. Emphasis on the word “time”: if you’ve got plenty of it, like most do in quarantine, and you’ve got plenty of flour, the only thing stopping you is fear. So let me help you with that.
Sourdough is an intuitive process. The main thing to understand is that you’re working with wild yeast. You could make a very plain-tasting bread with a packet of yeast that’ll be a wonderful way to begin your bread journey (I recommend this Splendid Table sandwich bread, which I made a few weeks ago on the recommendation of Tucker Shaw and loved); but with a sourdough starter (and the wild yeast contained within it), you’re going to get a bread that brings in ‘da noise, brings in ‘da funk.
What you see above, is the greatest gift I’ve ever been given: a mature sourdough starter (from the amazing pizza restaurant, Ronan), a cast iron cooking vessel, and two bags of flour from my extremely generous neighbors Rachael Sheridan and Jeremy Fox. You may be thinking to yourselves: “Oh, well no wonder he’s had so much luck with sourdough… famous food people gave him an amazing starter!” And you’d be absolutely right: I think so much of my early success (I’m eight beautiful loaves in), has to do with this magical starter.
But all is not lost! If you can’t get your hands on a mature starter (and you can buy mature starter online, or ask any bakery if you can have some), you can definitely make your own. My sourdough journey actually began two weeks ago when I started watching Josey Baker’s sourdough tutorials on Instagram. If this post leaves you with nothing else, let it be these tutorials. After reading countless books on sourdough (including Tartine Bread and Flour Water Salt Yeast, both excellent), the Josey Baker videos are what got me off my ass and into the kitchen. He demystifies everything, including making your own starter. In fact that video is kind of hilarious: you just mix flour and water and that’s it. Leave it on your counter for two weeks, feed every day, and you’ve got starter. (Whole grain flour is best.)
Josey made everything seem easy and that’s how I’ve been thinking about sourdough bread-making: the less you build it up in your head, the easier it’ll be. Rachael turned me on to a recipe from Ursula Siker (@basic_baker_bitch) who has her own helpful sourdough tutorials on Instagram. Her recipe made two loaves and so I cut it in half. I often find it helpful to write out complex recipes by hand to help me understand each step, so this is what’s currently attached, via magnet, to my fridge.
It seems complicated, so let me simplify.
The first step is to turn your starter into a leaven. What’s the difference between a starter and a leaven? This is something I’ve been trying to figure out, so here’s how I understand it: a starter is something you maintain to make future bread; a leaven is something you mix when you’re ready to make bread that day. (In either case, I keep the starter on my counter with the lid half-off. You can refrigerate, but then you have to revive the starter, something that I’m scared to do. Plus keeping it on my counter encourages me to keep making sourdough; the more you make sourdough, the better you’ll get at it.) So every day, I feed the starter: I pour out most (leaving 1/2 cup), add 1/2 cup of warm water, and then I add enough flour to make it into a mildly thick paste. That’s it.
But when I’m ready to make sourdough, I make the leaven. So, using a kitchen scale (a must for making sourdough) at 9 in the morning, I mix 25 g starter, 200 g water (at 78 degrees; I don’t take the temp, I just guesstimate), 100 g of AP flour and 100 g whole wheat flour. It should be a thickish paste. Leave that in the jar or container and go have your morning. At 1:30 PM, when your leaven has hopefully come to life (it’ll be bubbly and bigger) it’s time for the next step.
Now it’s time to make your dough. In a large bowl, using the scale, mix together 375 g water (at 90 degrees; again, I guesstimate), 100 g leaven, 450 g AP flour, 50 g whole wheat flour, and 10 g salt. Don’t forget the salt! I mix this by hand, which is important; not only does it help you bring everything gently together, it allows you to get a feel for your dough. As I’ve gone along, I’ve started to notice if my dough is too wet and I’ll sometimes add a little more flour.
That’s what your dough will look like in that first, shaggy step. Worry not: you don’t need to knead it or work it or do anything. Once it’s mixed (and this is what I learned from Josey), you just cover it with a dish towel and walk away for an hour.
When the hour’s up, it’s time to start your folding. This is where time comes in. You’re going to fold the dough, every 30 minutes, for the next four hours. “Four hours!” you might be thinking. “Yes, four hours,” I reply. But we’re in quarantine, what else are you doing?
Folding may sound complex, but it’s actually super fast and simple. Here’s an image from Flour Water Salt Yeast, I hope I don’t get in trouble for using it. (Josey’s videos are also super helpful on this front.)
As you can see you just grab the dough from one side and pull it up. You’re stretching it basically; pull it up, but don’t tear it, and lift it to the other side of the dough. So if you’re pulling the dough up from 9 o’clock, pull it to 3 o’clock. Do this four times all the way around (it helps if your hand is wet) from 9 to 3, 12 to 6, 3 to 9, and 6 to 12, and finish by flipping the dough upside down. Cover and do again in 30 minutes.
You’re basically giving this shaggy dough structure each time that you do this. When four hours are up, you should notice that the dough is smoother and sturdier. You can do something called the windowpane test after four hours: that’s where you stretch the dough to see if you can see through it, like a windowpane. If you can, you’ve done a good job. If not, you could keep folding for another hour or so.
Now we’re ready to pre-shape! Dust a large cutting board with flour, dust the top of your dough, and flip upside down (flour-dusted side down). Do your same folding technique and then flip upside-down again and gently shape into a nice ball. Rest for half an hour.
After half an hour, you’re ready to do the final shape and transfer to a proofing basket. I got my proofing basket in France years ago; it’s linen-lined and I DUST IT WELL WITH FLOUR before adding the dough, or I’d never get it out the next morning. My friend Emily doesn’t have a proofing basket and made a successful loaf lining a colander with a dish towel and also dusting it well with flour.
To do the final shape, dust the top of your dough with flour again, flip upside down, then do the same four folds, only this time, instead of flipping upside down, you’re going to place it — smooth side-down, seam-side up — into the well-dusted proofing basket. Nicole Rucker (my friend and one of the best bakers around) saw what I was doing at this point on Instagram and told me to really pinch the seams closed, so be sure to do that.
Are you proud of yourself? The hard part’s over! Now you just cover this with a dish towel and place in the fridge overnight.
The next morning, place your Dutch oven into the oven with the lid on and heat to 475. Again, Rachael and Jeremy leant me a beautiful cast iron one; I have a 4-qt Staub one from Sur La Table on the way right now (it’s on sale and worth looking at; $99, down from $400!). The key here is your want a round, 4-quart Dutch oven if you can find one. Anything larger — like my normal, oval-shaped Le Creuset — will give too much room to the bread and it won’t puff up into a beautiful boule.
So once your Dutch oven is hot (I leave it in there at least half an hour), CAREFULLY take it out and lift the lid off. Carefully remove the dough from the proofing basket (don’t handle too much, you don’t want to deflate it) and place it in the hot Dutch oven, smooth side up. Then take a serrated knife and carefully slash along the top.
Carefully put the lid back on and place back in the 475 oven and cook for 20 minutes. Then take the lid off (your kitchen is going to smell amazing right now). Look at how it’s puffed up!
The final step is just to bake it another 15 to 20 minutes. Ken Forkish, the author of Flour Water Salt Yeast, says it’s important to really brown your bread here. So just keep it an eye on it and see how far you can take it. I try to really get a deep, dark brown.
Take it out of the oven, lift with a metal spatula on to a baking rack, and cool for at least an hour before cutting into it.
So, yes, it’s a lot of work to make sourdough. But the secret is, the more you do it, the more all of these steps become second nature. Now I’ve started making a loaf a day; it’s a soothing break from reading the news. And dropping off loaves to friends is a way to not only still feel connected, but to feel like you’re doing some good during this crisis.
And nothing beats the feeling of triumph you’ll feel when you pull a loaf of sourdough that you made yourself out of the oven. So I’m passing the baton to you, dear reader: now it’s your turn to sourdough.
The post How I Sourdough appeared first on The Amateur Gourmet.

September 9, 2019
French Pizza and Mint Chip Ice Cream

I’m not normally quid pro quo when it comes to food, but when you make something as delicious as David Lebovitz’s mint chip ice cream, someone’s gotta give you something pretty good for dinner before you offer them a whole container. Good thing I’m friends with Harry and Cris. Cris is from Bordeaux (that’s in France) and he’s one of the best natural cooks I know. The other night, they invited us over for pizza.
It just so happened that the day before, I churned up a batch of David’s ice cream. This is the best ice cream I’ve ever made (in my opinion), and I’ve been making a lot of ice cream. What makes it so good? The real mint, of course:

Infusing real mint into cream gives it an authentic, herbal flavor that’s nothing like the synthetic flavor you get from grocery store mint chip.
As for the churning, it’s really fun: after refrigerating the base (which you make with egg yolks and sugar), you pour into your ice cream maker (I use a Cuisinart) and just as the ice cream finishes churning — you’ll know because it’s thick and you can drag your finger through it — you pour in five ounces of chocolate that you melt in a double boiler. The chocolate gets broken up into chips and behold:

I wish you could stab a spoon through your screen and eat some because it’s really that good.
Which is why I must like Harry and Cris a LOT to have brought my whole container over to their place in Pasadena on Saturday night. But then Harry and Cris had spent the day making pizza dough from the Chez Panisse Pizza and Pasta cookbook. Cris being French, he added cream to the dough instead of milk, which I think made it more tart like? But it was still crispy? And amazing?
Look at all the toppings he set out:
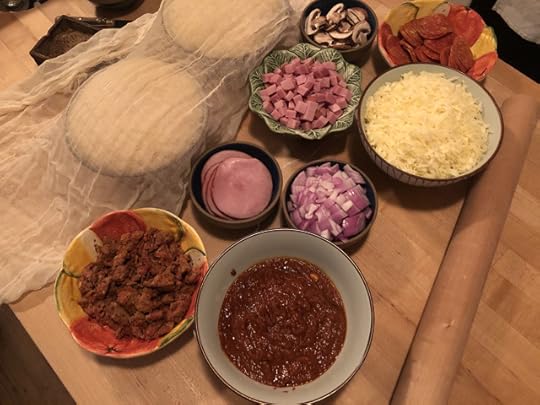
Watching him build the pie was like watching an artist at work. He rolled out the dough with a rolling pin (very French!). He topped it with sauce and then tons of meat and cheese: Canadian bacon, ham, sausage, pepperoni, mozzarella. But his REAL flourish was dusting everything with super potent, floral French pepper (I know it’s special because he’s brought me some).
Here’s the pizza out of the oven:

The crust was super crisp and the cheese perfectly melted and that pepper gave everything an amazing heat.
I always forget that it’s possible to make really good pizza at home until someone makes me really good pizza at home. I think it helped that he had a pizza stone (I once got sent a metal sheet for pizza making that’s somewhere in a closet, maybe I should dig it out).
We ate so much of this that I almost forgot about the mint chip that I brought for dessert! (Just kidding: I was thinking about it the whole time.)
Harry scooped some up for us:

And here it is in a bowl:

Maybe Cris and I should open a French pizza and ice cream parlor?
But then I’d have to share with EVERYONE and what would I get out of the deal? Oh, money. That’d be nice.
The post French Pizza and Mint Chip Ice Cream appeared first on The Amateur Gourmet.

Greek Stuffed Peppers

My podcast is having an effect on me. I had Jenni Konner on my second episode and she talked all about letting people into her kitchen during a dinner party, giving people tasks, sharing responsibilities. That’s the total opposite of what I normally do; normally, I get everything done hours ahead then just warm everything up when everyone gets there. It’s a control thing. It’s also an anxiety thing. Basically, it’s a me thing.
Not too long ago, my friend Cary asked if he could cook with me and, with Jenni’s podcast on my mind, I said: “Sure.” I didn’t know what to expect. I went to the market in the morning and bought a bunch of tomatoes, green peppers, and a melon. He texted that he was picking up prune plums from his farmer’s market.
At some point during the day, while doing the crossword puzzle (almost solved it!), I started thinking about those peppers and the tomatoes and I was thinking about stuffing the peppers with the tomatoes and then I was thinking about what else has peppers and tomatoes and I thought about a Greek salad and how I had Feta in my fridge, so I texted Cary to pick up some olives on his way over and we could riff.
When he got here, we put those prune plums to work and made the famous New York Times plum torte.

I’d made it before with much bigger plums, and it comes out looking a bit like a solar system; the one I made with Cary looked much more like a cake.

Once that was done, we walked Winston, then came back and got to work on dinner.
First: Cary sliced up the melon and draped it with prosciutto for a snack. It’s pretty much the ultimate summer appetizer.

As for the peppers, here’s what we did. I had Cary cut the tops off and scoop out the insides and put them in a baking dish.

I also had him rub the peppers, inside and out, with olive oil and then sprinkle everything with salt and pepper.
Meanwhile, I heated olive oil in a large skillet and added chopped red onion, which I let soften with some salt, and then 4 to 5 cloves of slivered garlic and a big pinch of red chile flakes.
I added about 5 diced heirloom tomatoes and let those cook down a bit.
When the pan was super liquidy and the tomatoes were starting to disintegrate, I scooped out about a cupful and set it aside, and then added about a cup of Arborio rice. I stirred that in with more salt and waited for the rice to absorb most of the moisture. At that point, I added a glug of Balsamic vinegar, a bunch of halved and pitted Kalamata olives (thank you Cary), a ton of chopped herbs (mint, dill, parsley, basil), and a block of crumbled Feta.

At this point it’s REALLY important to taste and adjust so it’s truly amazing. I found that mine needed a lot more salt and a bit more balsamic to make it zippy.
Then you just preheat your oven to 375 and stuff your peppers. It’s really as simple as spooning that mixture inside each pepper and putting it back in the baking dish.

Once they’re all stuffed, mix some of the tomato sauce you conserved with a splash more balsamic vinegar and, if necessary, some water so you have enough to cover the bottom of the pan.
Put the lids back on the peppers, pop into the oven, and bake for 30 to 40 minutes until the peppers are wrinkled all over and the inside is fully cooked. A knife should pierce a pepper easily.
To serve, just put a pepper on a plate and spoon some sauce on the side.

It’s a simple, late summer, farmer’s market dinner that’s fun to make with a friend. See, look, I’m reformed!
The post Greek Stuffed Peppers appeared first on The Amateur Gourmet.

September 3, 2019
Pasta with Zucchini and Almonds

I’m not the world’s biggest zucchini fan. It’s fine: I like it in bread, I guess I like it in a salad. Maybe on a pizza?
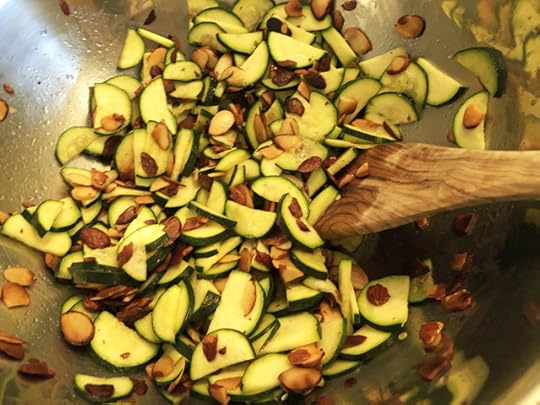
But there’s one recipe from my archives that really made zucchini come alive for me. That’s this side dish of Zucchini with Almonds from The Red Cat in New York. Here’s what you do: you sauté slivered almonds in olive oil and just as they start to get toasty you add a bunch of sliced zucchini. Add a big pinch of salt, toss all around, and serve right away with a squeeze of lemon.
I’m not sure why this technique works so well: maybe because the toasting of the nuts adds a smokiness and a depth to the otherwise bland zucchini? Also, the technique keeps the zucchini from becoming soggy and wet: you do everything quickly so there’s still that vegetal snap.
The other night, I had a few zucchini in the fridge from the farmer’s market and I was trying to come up with a dinner that would feature them. Then I had an idea: “I have an idea!” I said, to no one in particular. “I’m going to turn that zucchini and almond side dish into a pasta!”
Here’s how I did that: I did the thing with the zucchini and almonds. To repeat: you pour some olive oil into a skillet. You heat it and then add a bunch of sliced almonds, as many as you’d like. Add some salt, toss all around, and just as they start to get toasty, add a bunch of sliced zucchini (about three zucchinis worth). Toss around with more salt and cook until everything is nicely combined and the almonds are brown and not burnt. Remove to a bowl.
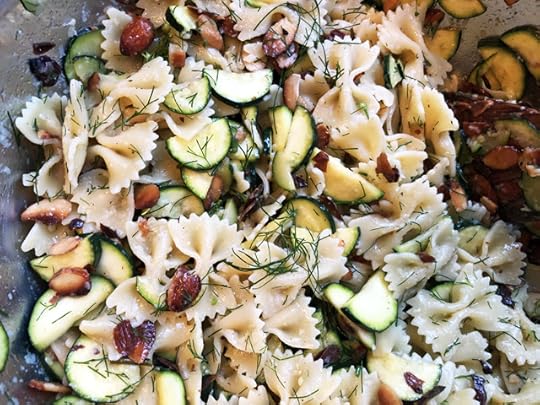
Then it’s just a matter of cooking some pasta. I chose bow-tie because I was feeling formal (haha). No, I chose it because I though it would play nicely with the zucchini and the almonds.
So just salt a big pot of water, boil your pasta until it’s cooked to your liking (but make that al dente) and stir it in with the zucchini and almonds and adjust with more salt and LEMON JUICE and some Parmesan and any herbs you have lying around. I used dill.
If I teach you anything at all on this here blog, let it be this: there’s no such thing as a bad pasta recipe because you can ALWAYS adjust it at the end. If you don’t like the taste, add more salt, more lemon juice, more Parmesan. You could literally put salt, lemon juice, and Parmesan on styrofoam and make it taste good, so really it’s up to you here.
But this was no styrofoam supper: this actually was a real winner.

So learn to love zucchini and make this before summer’s over. I did and I’m a better man for it.
The post Pasta with Zucchini and Almonds appeared first on The Amateur Gourmet.

Adam D. Roberts's Blog

- Adam D. Roberts's profile
- 3 followers

