
Adam D. Roberts's Blog, page 13
September 9, 2019
French Pizza and Mint Chip Ice Cream

I’m not normally quid pro quo when it comes to food, but when you make something as delicious as David Lebovitz’s mint chip ice cream, someone’s gotta give you something pretty good for dinner before you offer them a whole container. Good thing I’m friends with Harry and Cris. Cris is from Bordeaux (that’s in France) and he’s one of the best natural cooks I know. The other night, they invited us over for pizza.
It just so happened that the day before, I churned up a batch of David’s ice cream. This is the best ice cream I’ve ever made (in my opinion), and I’ve been making a lot of ice cream. What makes it so good? The real mint, of course:

Infusing real mint into cream gives it an authentic, herbal flavor that’s nothing like the synthetic flavor you get from grocery store mint chip.
As for the churning, it’s really fun: after refrigerating the base (which you make with egg yolks and sugar), you pour into your ice cream maker (I use a Cuisinart) and just as the ice cream finishes churning — you’ll know because it’s thick and you can drag your finger through it — you pour in five ounces of chocolate that you melt in a double boiler. The chocolate gets broken up into chips and behold:

I wish you could stab a spoon through your screen and eat some because it’s really that good.
Which is why I must like Harry and Cris a LOT to have brought my whole container over to their place in Pasadena on Saturday night. But then Harry and Cris had spent the day making pizza dough from the Chez Panisse Pizza and Pasta cookbook. Cris being French, he added cream to the dough instead of milk, which I think made it more tart like? But it was still crispy? And amazing?
Look at all the toppings he set out:
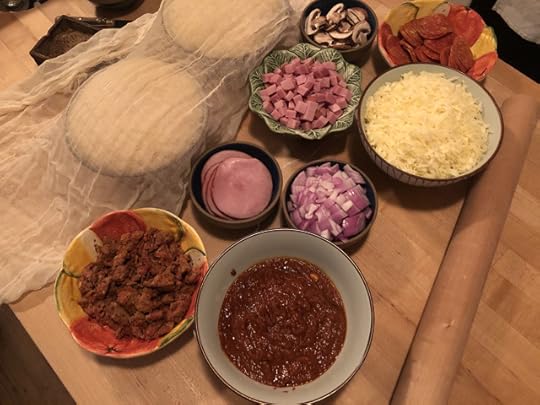
Watching him build the pie was like watching an artist at work. He rolled out the dough with a rolling pin (very French!). He topped it with sauce and then tons of meat and cheese: Canadian bacon, ham, sausage, pepperoni, mozzarella. But his REAL flourish was dusting everything with super potent, floral French pepper (I know it’s special because he’s brought me some).
Here’s the pizza out of the oven:

The crust was super crisp and the cheese perfectly melted and that pepper gave everything an amazing heat.
I always forget that it’s possible to make really good pizza at home until someone makes me really good pizza at home. I think it helped that he had a pizza stone (I once got sent a metal sheet for pizza making that’s somewhere in a closet, maybe I should dig it out).
We ate so much of this that I almost forgot about the mint chip that I brought for dessert! (Just kidding: I was thinking about it the whole time.)
Harry scooped some up for us:

And here it is in a bowl:

Maybe Cris and I should open a French pizza and ice cream parlor?
But then I’d have to share with EVERYONE and what would I get out of the deal? Oh, money. That’d be nice.
The post French Pizza and Mint Chip Ice Cream appeared first on The Amateur Gourmet.


Greek Stuffed Peppers

My podcast is having an effect on me. I had Jenni Konner on my second episode and she talked all about letting people into her kitchen during a dinner party, giving people tasks, sharing responsibilities. That’s the total opposite of what I normally do; normally, I get everything done hours ahead then just warm everything up when everyone gets there. It’s a control thing. It’s also an anxiety thing. Basically, it’s a me thing.
Not too long ago, my friend Cary asked if he could cook with me and, with Jenni’s podcast on my mind, I said: “Sure.” I didn’t know what to expect. I went to the market in the morning and bought a bunch of tomatoes, green peppers, and a melon. He texted that he was picking up prune plums from his farmer’s market.
At some point during the day, while doing the crossword puzzle (almost solved it!), I started thinking about those peppers and the tomatoes and I was thinking about stuffing the peppers with the tomatoes and then I was thinking about what else has peppers and tomatoes and I thought about a Greek salad and how I had Feta in my fridge, so I texted Cary to pick up some olives on his way over and we could riff.
When he got here, we put those prune plums to work and made the famous New York Times plum torte.

I’d made it before with much bigger plums, and it comes out looking a bit like a solar system; the one I made with Cary looked much more like a cake.

Once that was done, we walked Winston, then came back and got to work on dinner.
First: Cary sliced up the melon and draped it with prosciutto for a snack. It’s pretty much the ultimate summer appetizer.

As for the peppers, here’s what we did. I had Cary cut the tops off and scoop out the insides and put them in a baking dish.

I also had him rub the peppers, inside and out, with olive oil and then sprinkle everything with salt and pepper.
Meanwhile, I heated olive oil in a large skillet and added chopped red onion, which I let soften with some salt, and then 4 to 5 cloves of slivered garlic and a big pinch of red chile flakes.
I added about 5 diced heirloom tomatoes and let those cook down a bit.
When the pan was super liquidy and the tomatoes were starting to disintegrate, I scooped out about a cupful and set it aside, and then added about a cup of Arborio rice. I stirred that in with more salt and waited for the rice to absorb most of the moisture. At that point, I added a glug of Balsamic vinegar, a bunch of halved and pitted Kalamata olives (thank you Cary), a ton of chopped herbs (mint, dill, parsley, basil), and a block of crumbled Feta.

At this point it’s REALLY important to taste and adjust so it’s truly amazing. I found that mine needed a lot more salt and a bit more balsamic to make it zippy.
Then you just preheat your oven to 375 and stuff your peppers. It’s really as simple as spooning that mixture inside each pepper and putting it back in the baking dish.

Once they’re all stuffed, mix some of the tomato sauce you conserved with a splash more balsamic vinegar and, if necessary, some water so you have enough to cover the bottom of the pan.
Put the lids back on the peppers, pop into the oven, and bake for 30 to 40 minutes until the peppers are wrinkled all over and the inside is fully cooked. A knife should pierce a pepper easily.
To serve, just put a pepper on a plate and spoon some sauce on the side.

It’s a simple, late summer, farmer’s market dinner that’s fun to make with a friend. See, look, I’m reformed!
The post Greek Stuffed Peppers appeared first on The Amateur Gourmet.

September 3, 2019
Pasta with Zucchini and Almonds

I’m not the world’s biggest zucchini fan. It’s fine: I like it in bread, I guess I like it in a salad. Maybe on a pizza?
But there’s one recipe from my archives that really made zucchini come alive for me. That’s this side dish of Zucchini with Almonds from The Red Cat in New York. Here’s what you do: you sauté slivered almonds in olive oil and just as they start to get toasty you add a bunch of sliced zucchini. Add a big pinch of salt, toss all around, and serve right away with a squeeze of lemon.
I’m not sure why this technique works so well: maybe because the toasting of the nuts adds a smokiness and a depth to the otherwise bland zucchini? Also, the technique keeps the zucchini from becoming soggy and wet: you do everything quickly so there’s still that vegetal snap.
The other night, I had a few zucchini in the fridge from the farmer’s market and I was trying to come up with a dinner that would feature them. Then I had an idea: “I have an idea!” I said, to no one in particular. “I’m going to turn that zucchini and almond side dish into a pasta!”
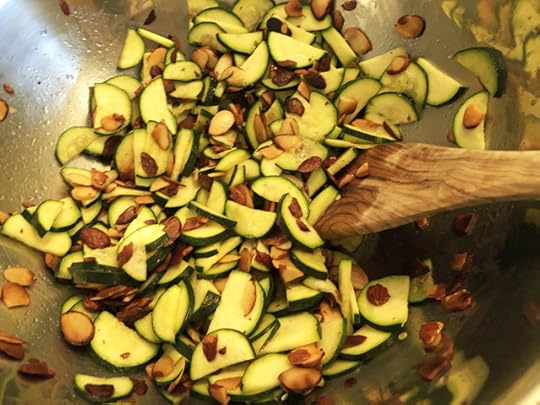
Here’s how I did that: I did the thing with the zucchini and almonds. To repeat: you pour some olive oil into a skillet. You heat it and then add a bunch of sliced almonds, as many as you’d like. Add some salt, toss all around, and just as they start to get toasty, add a bunch of sliced zucchini (about three zucchinis worth). Toss around with more salt and cook until everything is nicely combined and the almonds are brown and not burnt. Remove to a bowl.
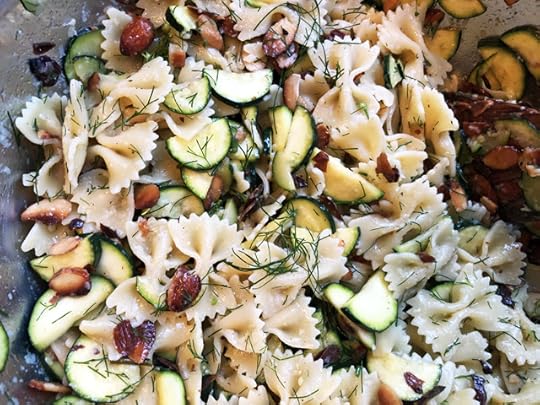
Then it’s just a matter of cooking some pasta. I chose bow-tie because I was feeling formal (haha). No, I chose it because I though it would play nicely with the zucchini and the almonds.
So just salt a big pot of water, boil your pasta until it’s cooked to your liking (but make that al dente) and stir it in with the zucchini and almonds and adjust with more salt and LEMON JUICE and some Parmesan and any herbs you have lying around. I used dill.
If I teach you anything at all on this here blog, let it be this: there’s no such thing as a bad pasta recipe because you can ALWAYS adjust it at the end. If you don’t like the taste, add more salt, more lemon juice, more Parmesan. You could literally put salt, lemon juice, and Parmesan on styrofoam and make it taste good, so really it’s up to you here.
But this was no styrofoam supper: this actually was a real winner.

So learn to love zucchini and make this before summer’s over. I did and I’m a better man for it.
The post Pasta with Zucchini and Almonds appeared first on The Amateur Gourmet.

August 26, 2019
Whole Lemon Strawberry Sorbet
I’m going through a real sorbet / ice cream-making phase right now. If you follow me on Instagram (and how can you not?!), you saw me make a vanilla bean ice cream a few weeks ago, and a Concord grape sorbet more recently. Not only was it fun to dig out my old ice cream maker (it’s nothing fancy; just a crappy old Cuisinart, with a canister I keep in the freezer), but it’s been EXTRA fun to have homemade frozen treats waiting for me every night after dinner. I have a real sweet tooth, but eating a whole dessert every night is a lot, so I just have a spoonful or two of homemade ice cream or sorbet, and I’m good.
Yesterday, I was at the farmer’s market and I decided to brave the line at the only organic stand (they’re so popular, they scared away all the others). As I gathered up heirloom tomatoes and zucchini, I spied really gorgeous strawberries. Even though strawberries are more of a spring thing (aren’t they?), these specimens were pretty undeniable.
I mean: who could say no to these?

As I lounged around reading the Sunday Times, I contemplated what I’d do with these berries. Obviously, I was going to take out my ice cream maker, it was just a question of ice cream vs. sorbet.
A lot of the articles that I read about strawberry ice cream spoke of the challenge of texture; that a strawberry puree would make for icy patches, etc. Plus most of the recipes involved many, many steps, like letting the strawberries steep with sugar and vodka for a few hours. Who has time for that?
As I turned to the world of sorbet, many of the recipes had you cook the berries. These berries were so beautiful and tasted so good, something about that felt very wrong. Wasn’t there a recipe that’d let me preserve that raw berry flavor?
Which is when I hit upon the most insane sorbet recipe I’ve ever encountered: Amanda Hesser’s take on The River Cafe’s recipe which has you blend a WHOLE LEMON along with TWO POUNDS of berries and two cups of sugar. That’s it. You churn that. Say WHAT?

I knew that I had to try it.
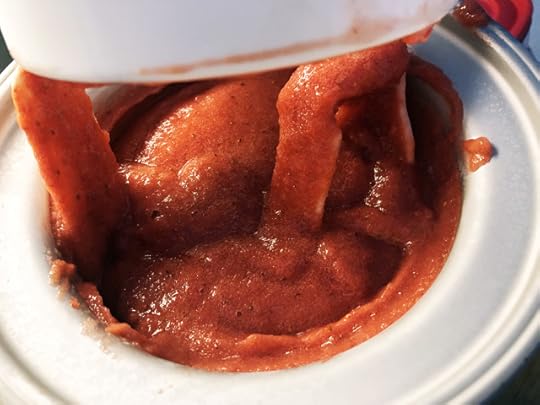
Luckily, I had a lemon: so I just sliced it, picked out the seeds, chopped it some more, and threw it into my food processor with two cups of sugar.

That’s what it looks like all blended up. That went into a bowl, and in went the two pounds of hulled berries.

When those were blended, I folded the two mixtures together and added a big splash of Campari because alcohol helps sorbet not get too hard in the freezer (plus: Campari seemed like a good idea).
This all went straight into the ice cream maker (it was a lot of liquid, may have been smarter to do this in batches) and I churned away while I did all of the dishes.
Thirty minutes later, I had this Whole Lemon Strawberry Sorbet:

What did it taste like?
Pow! It was so punchy and exciting and very, very sweet. But that raw berry flavor that I wanted was there, along with the bitterness and acidity of the lemon. The texture is kind-of viscous. But it’s unlike any sorbet you’ve had before, and the process is undeniably easy.
So if you see strawberries at the market, grab yourself a lemon and break out that ice cream maker. The zippiest strawberry sorbet you’ve ever had is just thirty minutes away.
The post Whole Lemon Strawberry Sorbet appeared first on The Amateur Gourmet.

August 21, 2019
Lamb Burgers and Tomato Salad

One of the reasons that I stopped blogging for as long as I did was that I felt like I was starting to repeat myself. How many times could I tell you about making cavatappi with sun-dried tomatoes? Or how I roast a chicken?
Now, on this new-ish iteration of the blog (where my m.o. is to be much more casual about the whole thing), I find myself repeatedly talking about Cookbook in Echo Park. It’s where I do most of my grocery shopping and it’s pretty much the best food store I’ve ever been to anywhere. Look what I saw when I walked in there yesterday…

If that doesn’t make you want to do a cartwheel, I don’t know what would.
Craig had only one request for dinner: “Some protein.” I’d made spaghetti Carbonara the night before, and he ate the leftovers for lunch, so he was feeling those Carbonara carbs.
At Cookbook, I eyed the meat case and saw ground lamb. My eye traveled up and I saw buns. That’s when I had an idea: “Lamb burgers!”
I looked up a recipe — Anne Burrell’s did the trick — got the ingredients I needed (lamb, buns, yogurt, Feta, mint, dill) and also grabbed some heirloom tomatoes, because now is the time to eat tomatoes with everything.
Here’s how easy this dinner was: when I got home, first thing I did was heat some olive oil in a non-stick skillet and while that was heating, I diced a red onion and threw that in, and then chopped two cloves of garlic and when the onion was soft (oh I added salt to it), I added the garlic and let that cook a little too.

I scooped all of that into a large bowl and let it cool.
Meanwhile, I made the tzaziki topping: mixed Greek yogurt with lots of crumbled Feta (the good stuff), lots of chopped mint and dill, lemon zest, and a splash of white wine vinegar. Oh: added salt and Aleppo pepper too.
Finally, in another bowl, I cut the tomatoes into chunks and tossed them with olive oil, red wine vinegar, salt, pepper, some more of the Feta, and some more of those herbs.

Then all I had to do was make the burgers.
To the cooled onions and garlic, I added the pound of ground lamb, added a big pinch of salt, some more lemon zest and herbs, and — the most surprising ingredient of all (per Anne Burrell’s recipe): water! About 1/4 cup.
I lightly mixed all of that together and formed four loose patties which I sprinkled with even more salt (salt on the outside makes ’em extra tasty).
In the same skillet that I cooked the onions (a Scanpan), I wiped out the onion bits and put the skillet on high heat. When it was nice and hot, I added the burgers and let them sit, undisturbed, for three – four minutes. When they were nice and charred on the bottom, I flipped them.

Then I kept them cooking like that until a thermometer showed an internal temperature of 125, which is exactly medium rare.
I moved them to a plate, let them rest for five minutes, and then put them on buns with lots of the tzaziki on top, tomatoes on the side.

This dinner was such a huge hit. I can always tell it’s a success when Craig gets a conspiratorial look on his face, like: “Oh my God, I can’t believe how good this is.”
So give it a shot! And if you live in L.A. and need a place to do your food shopping, have I mentioned Cookbook? (I swear, they should pay me a commission.)
The post Lamb Burgers and Tomato Salad appeared first on The Amateur Gourmet.

August 7, 2019
Fancy Weeknight Chicken and Cauliflower

Yesterday I went food shopping with my friend Diana. We went to Lassen’s and the produce looked fine, not great, so I grabbed two cauliflowers (cauliflower?) even though it’s the height of summer and I should be buying corn and tomatoes. Then we went across the street to the butcher (McCall’s) and despite the vast array of meat and fish options — short ribs, head-on shrimp — I chose two skin-on chicken breasts because I was just feeling very basic yesterday.
Sometimes, though, the most basic, bland, white ingredients (chicken breasts and cauliflower!) can be canvasses for the creative mind. To quote George Seurat in Stephen Sondheim’s Sunday in the Park with George: “White / a blank chicken breast or cauliflower / the challenge? Bring order to the whole.”
The only decision I had to make was: one pan or two.
I could’ve gone the one-pan route, seared the chicken breasts, finished them on a cookie sheet in the oven and then cooked the cauliflower in the brown chicken bits. But I liked the idea of using the chicken bits to make a sauce, so I opted for two pans.
Here’s how easy this dinner was: I got my biggest non-stick skillet, poured in a layer of olive oil, heated it up, and then cut two cauliflower (cauliflowers?) into florets, leaving some of the leaves. When the oil was hot, I added all of the cauliflower with a big pinch of salt.

I just let that go and go and go on high heat, turning every so often. At a certain point, the smaller pieces were getting browner and the larger pieces weren’t cooked through, so I just put a lid on the pan so the big pieces would steam.

Around this point, I added 4 sliced large garlic cloves and stirred them all through the cauliflower and the oil, letting them toast a bit.
At the very end, I added a big spoonful of capers and chopped up pickled peppers (the ones I made two weeks ago, but you could use Peppadews), plus lots of chopped parsley.
As for the chicken breasts, I preheated the oven to 425 and then in a large metal skillet, I heated another layer of olive oil until it was hot. I added the chicken breasts, seasoned with salt and pepper, skin-side down and let that brown for a while on high heat. When the breasts were golden brown, I flipped them over and put them in the oven for about 30 to 40 minutes until a probe thermometer showed an internal temp of 160.
I removed the breasts to a plate and looked at those beautiful brown bits left behind.

(Note the placement of the oven mitt… that’s to remind me that the handle’s hot!)
First I added a clove of sliced garlic and a splash of olive oil and toasted it in the pan. Then I added about an inch of white wine (1/4 bottle?), a big spoonful of capers, and a big pat of butter and brought it all to a boil.

You can make the sauce as thick or as thin as you want; I opted for thinner because I wanted more of it. Basically the more you let the liquid evaporate, the thicker it’ll get it. Just keep swirling that butter around as you go.
Then you just put the cauliflower on the plate, put the breast next to it, pour the sauce on top and sprinkle everything with parsley. Serve with the wine you used in the sauce (I used a Gruner Vetliner).

There you are: a fancy dinner with everyday supermarket ingredients and just two pans to clean afterwards.
Now back to your regular summer cooking.
The post Fancy Weeknight Chicken and Cauliflower appeared first on The Amateur Gourmet.

August 5, 2019
Lunch Therapy

Super excited to share with you loyal blog readers my brand new podcast, LUNCH THERAPY, which just launched today on iTunes. The concept is a riff on that old Brillat-Savarin quote from Iron Chef: “Tell me what you eat: I will tell you who you are.” Only here, it’s “tell me what you eat for lunch.”
My first guest is superstar RYAN O’CONNELL, whose new Netflix show Special just earned FOUR Emmy nominations (including one for best actor). We go deep on his Sweetgreen salad, tracing it back to childhood traumas involving room temperature Taco Bell.
I’ve got lots of amazing guests in store, so SUBSCRIBE and, if you enjoy what you hear, please give it a nice rating in iTunes. Here’s to an exciting new therapeutic adventure!
The post Lunch Therapy appeared first on The Amateur Gourmet.

July 29, 2019
Tomato Salad Shakshuka

The greatest sin you can commit at any dinner party, as far as I’m concerned, is to not have enough food. ALWAYS, ALWAYS make too much. There are two reasons for this: 1. No one ever leaves a dinner party saying, “My oh my, there were far too many delicious things to eat!” and 2. Whatever doesn’t get eaten, you can use the next day.
And sometimes — not always, but sometimes — the thing that you make the next day is even better than the thing you made for the dinner party. Case in point: this tomato salad shakshuka which, hyperbole police alert, may be the single best thing that I’ve cooked this year.
First: the tomato salad. I bought a bunch of heirlooms at Cookbook and just sitting there in a bowl on my kitchen table, they looked like a finished dish:

Actually, while I was at Cookbook, I ran into Ben Mims who pointed out the Nardello peppers (which I’d never seen before)…

He described them as having all of the flavor of a spicy pepper, without all the heat.
When I got home, I decided to quick pickle them: I just sliced them into rings, poured a cup of apple cider vinegar into a pot, added 1/4 cup sugar, a big pinch of salt, a bunch of peppercorns and brought everything to a boil. Then I added the sliced peppers (seeds and all)…

…let it boil for a minute, then turned off the heat, and just let them sit.
As for the tomato salad, it couldn’t have been easier: I just sliced the tomatoes into wedges, chunks, slices, and added them to a big bowl. I glugged in olive oil, Katz’s red wine vinegar, a big pinch of Maldon sea salt, lots of pepper, and tossed them all around.
I lifted them out on to a platter, then to the leftover dressing in the bowl, I added a sliced shallot, swished it around, then layered it on top of the tomatoes. Finally, I did the same with some arugula. Behold my tomato salad:

It was a big hit at the dinner party and I made so much, that I had about 1/4 of that leftover the next morning.
(I just put it in a plastic container and kept in the fridge overnight.)
The next morning, I took it back out, along with some bacon, eggs, sungolds, the pickled Nardello pepper rings, and parsley.

Here’s how I made the shakhuka… it was so easy. I took two pieces of the bacon, used scissors to cut into lardons, and added them to a non-stick skillet with a glug of olive oil.
I cranked up the heat and when the bacon had rendered a bunch of fat and gotten pretty crispy, I poured off half the fat and then added the leftover tomato salad directly to the pan, along with some sungolds and a pinch of salt.

I put a lid on it, let the liquid come out, and after three or four minutes, I took the lid off and used a wooden spoon to smash the tomatoes a bit.

When a lot of the liquid evaporated, but before the tomatoes completely broke down into a sludge, I cracked three eggs directly into the pan, sprinkled them with salt and pepper, and covered the pan, lowering the heat to medium.
I let that go, checking every 30 seconds or so, until the whites were set but the yolks were still runny.

I used a spatula to lift that into a serving bowl, drizzled everything with Italian olive oil, then topped with the pickled Nardello peppers and lots of chopped parsley. I sliced a piece of sesame sourdough to use to sop up all of the sauce. Check out this breakfast:

Mic drop.
The post Tomato Salad Shakshuka appeared first on The Amateur Gourmet.

July 26, 2019
Instant Pesto

We’re all obsessed with instant things, these days– Instant Pots, Instagram — that the idea of doing anything NOT instant can be pretty unappealing. Which is why I’m here to tell you that pesto — which, for many, seems like a tedious, labor-intensive process — can be made instantly and deliciously if you have a food processor, a bag of arugula, and a few pantry staples.
In fact, I single-handedly guarantee that you — yes YOU — can have bright green, intensely flavorful pesto on the table in FIVE MINUTES. That’s right FIVE MINUTES.
Watch this. Take a handful of walnuts, and toast them in a tiny skillet until fragrant. (You could also use pine nuts or almonds. Doesn’t matter. Whatever you have.)

Meanwhile, cut a few chunks off a wedge of good Parmesan (you know it’s good because it’s a wedge and not pre-grated) and pop them into your food processor.

Blitz until it’s coarse…

Dump that out, put the walnuts in (let them cool a little first) and a few cloves of garlic, as many as you like (three fat ones is a good way to go, but four works if you like things very garlicky). Add a pinch of salt for good measure.

Blitz that, then add a BAG of arugula. You heard right: just buy arugula at the farmer’s market (that’s where I get mine, it’s extra peppery) or a box of organic arugula at the grocery store. The point is, unlike basil, you don’t have to do any stemming; you just put the whole bag in. Hence the INSTANT nature of this pesto. (I’d say it’s about three cups.)

Add another pinch of salt and blitz.
At this point, I add lemon juice (from about two lemons, but I like it zingy) then I put the lid on and slowly add olive oil through the feeding tube as the motor runs. About 3/4th a cup, but it could take a whole cup depending on how loose or thick you want your pesto. Ideally, you want it chunky.
And then you just add back your Parmesan and pulse a few times.

I wasn’t lying to you!
That’s seriously it: pesto in five minutes.
IMPORTANT NOTE: if your pesto doesn’t taste amazing here, fear not. Add more salt and lemon juice until it does. Seriously, I’ve had disappointing pesto moments that become amazing pesto moments just by adjusting with salt and lemon juice. So it’s important that you do that here.
There’s so much you can do with pesto in the summer. You can toss it with green beans (see here). You can do what I did the night that I made this and toss it with rigatoni, white beans (drained from a can), and a chopped tomato. (Not pictured: the tomato.)

Stir that all together and voila.

Or do what I did this morning, and put some pesto in with your eggs.

I just heated a little olive oil in a non-stick skillet, cracked in three eggs, scrambled with salt, and then stirred in a little pesto at the end.

Pesto will your best friend this summer. And now you know how to make it in an instant. Get cracking!
The post Instant Pesto appeared first on The Amateur Gourmet.

July 23, 2019
Doctoring The Bagel

Writing this post on a hot Tuesday afternoon feels wrong: this is definitely a Sunday morning post. It’s what we did this past Sunday morning and what you should do this upcoming Sunday morning. So file this one away for the weekend, okay?
Here’s what we’re talking about: how to turn a bagel that you don’t make yourself (though you certainly can) into something special. You’ll need: two bagels and two packets of cream cheese. Then take a trip to the farmer’s market and come back with…
…smoked trout (assuming your farmer’s market sells that, mine does!), a tomato, really good lettuce, and lots of fresh herbs.

Now there are two types of herbs out there: those that do well in water, and those that do well in oil. I know that’s a weird thing to say, but Sara Moulton taught it to me when I cooked with her for my cookbook, and it kind of makes sense: if you were heating olive oil on the stove and you wanted to infuse it with herby flavor, you wouldn’t throw in parsley or tarragon or chives… they’d just sizzle and fry. But you could throw in rosemary, thyme, oregano: those would infuse the oil. Hence the oil / water distinction. (The water-friendly herbs would blend up easily in water.)
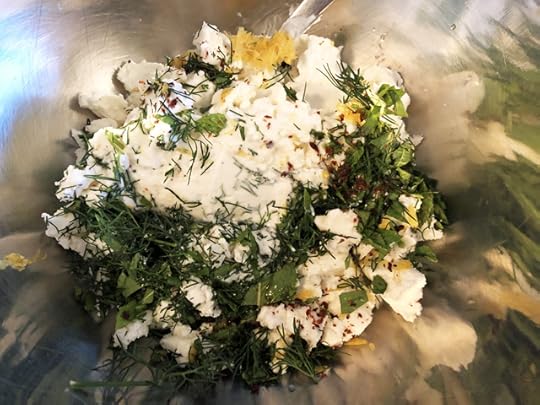
For today’s bagel journey, we’re using water-based herbs or grassier herbs: chives, tarragon, dill, and parsley. Put them on your cutting board and chop like crazy! (You should probably stem the parsley and tarragon and dill first.) Once you’ve chopped like a madman, add the herbs to a Kitchenaid mixer (fitted with the paddle) that’s been pre-loaded with two packets of cream cheese.

Other things you could throw in at this point: a chopped shallot, lemon zest, a splash of really good olive oil, lemon juice. Me? I just stuck with the herbs, salt, and pepper and whipped it on high.

That’s the most amount of work involved in this “recipe.”
Now, just toast your bagel (unless it’s warm out of the oven, in which case, toasting isn’t necessary).
While it’s toasting, toss your farmer’s market lettuces with your best olive oil, vinegar (I use Katz’s), Maldon sea salt, and pepper. Set aside.
Now schmear one side of your bagel (isn’t “schmear” a great word?) with lots of the herbed cream cheese and top with some of the smoked trout. Schmear the other side with more of the herbed cream cheese and top with a slice of the tomato.
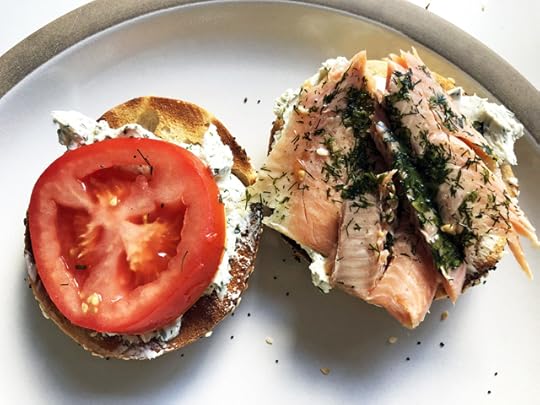
Put one half on top of the other, place the salad on the side, and there you are: a dreamy, doctored bagel sandwich for your Sunday.

Maybe not unrelated, but after eating this, I solved the Sunday Times crossword in pen.

Coincidence? I think not.
The post Doctoring The Bagel appeared first on The Amateur Gourmet.

Adam D. Roberts's Blog

- Adam D. Roberts's profile
- 3 followers

