
Adam D. Roberts's Blog, page 15
June 20, 2019
One Mac and Cheese To Rule Them All

I’ve found it. I know you’ve been looking for it, but it’s here, you can end your quest.
My friend Diana makes the best mac and cheese that I’ve ever had. Not too long ago, I asked for her recipe and she told me it’s Martha Stewart’s as posted on Food52. I made it soon after for our friends Harry and Chris as a housewarming gift and they declared it the best mac and cheese they’d ever had.

I made it for our friends Jonathan and Ryan for Jonathan’s birthday (see lead pic) and they both said it was the best they’ve ever had. And I made it last night for our friend John’s birthday and he and his husband Michael and their son Miles also swooned:

What makes it so good? For starters, there’s a lot of cheese. Over a pound of sharp white cheddar and half a pound of Gruyere.

(I recommend buying it whole like this and shredding it in your food processor. It’ll taste better.)
Then there’s the “sauce” that hold it all together: it’s over a quart of whole milk, thickened with flour and butter, that you flavor with nutmeg (grate it fresh; I can’t believe Ina uses pre-ground! That’s so chilling), cayenne pepper, salt and pepper. You add a bunch of the cheese and par-cooked macaroni.

Then you pour that into a baking dish and top with even more of the cheese (I add whatever Parmesan I have to the topping mixture, just for a little extra zip).

But that’s not all! If that were all, it would just be a very good mac and cheese, not the one MAC AND CHEESE TO RULE THEM ALL.
Here’s the deal: you take six slices of white bread, cut the crusts off, and cut what’s left into cubes. You toss those cubes with butter and put that on top of everything.

What does that do?
It makes a crunchy topping that puts this mac and cheese over the top and makes it the best you’ll ever have. My little trick is to broil it at the end to get it extra dark and crispy.

So here it is, folks. The only mac and cheese recipe you’ll ever need. Maybe if you’re nice to me, I’ll make it for you someday. Otherwise, here’s the link again.
Happy mac-ing!

The post One Mac and Cheese To Rule Them All appeared first on The Amateur Gourmet.


June 17, 2019
Three Smoke Alarm Chicken, Sausage, and Broccoli Rabe

As far as arrivals to one of my dinner parties go, last night was maybe the most dramatic of all time. I was making a chicken and sausage dish from Nancy Silverton’s under-appreciated cookbook Mozza at Home (I seriously consider it one of the best cookbooks to come out in recent years) and I’d cranked the oven up to 450, despite the fact that some of the liquid had spilled on to the oven floor. Well! That liquid sent PLUMES of smoke out of the oven, so much so that two things happened: all four smoke alarms in our apartment started going off; and the air became noxious with the scents of vinegar and burning. Which is exactly when our guests arrived.
Craig’s Aunt Liz, Uncle Chris, and Cousin Katie were great sports about the whole thing. They quickly helped us open all of the windows; they carried the children out back (the children being our dog Winston and Katie’s dog Ruthie); to help fan the air around the smoke detectors so they would stop beeping.
When things calmed down, we all got to appreciate the Meyer lemon tart that Katie brought for dessert (Amanda Hesser’s recipe):

As for the dinner, it actually came out okay. Here’s the concept: you brown a bunch of sausage in a pan and then, in that sausage fat, you brown chicken thighs. (McCall’s, my butcher, only sells thighs attached to the legs, which was part of the problem. Made the pan too crowded.)
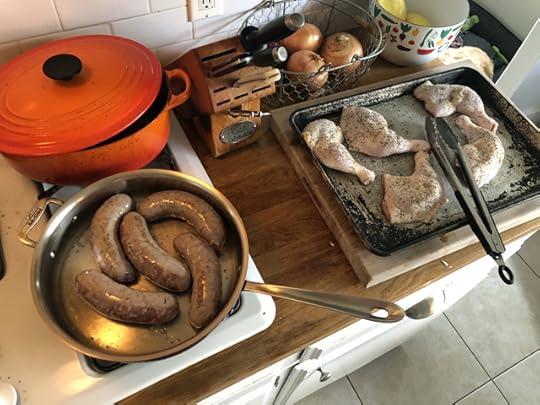
Then comes the good stuff: in the pan with all of the brown bits from the sausage and chicken, you add lots of garlic and spicy, pickled peppers (I used Peppadews), then deglaze with white wine, red wine vinegar, and some of the Peppadew liquid.

That’s when I encountered some trouble. I had to add all of the meat back in, cover the pan, and stick it in the oven. It was kind of a Noah’s Ark situation with chickens and sausages vying for space.

I also used more sausages than I was supposed to. I just wanted to make sure there was enough food for everyone! (And everyone ate everything, so I was right.)
So, yeah, that went into the oven with the lid, the liquid spilled over, and the plan to remove the sausages after an hour and finish in a 450 oven so that the chicken could get glazed and bronzed was foiled by all of the smoke.
Still: I rallied and removed the sausages and finished the chicken on the stove top, on medium high heat with the pan half-covered.
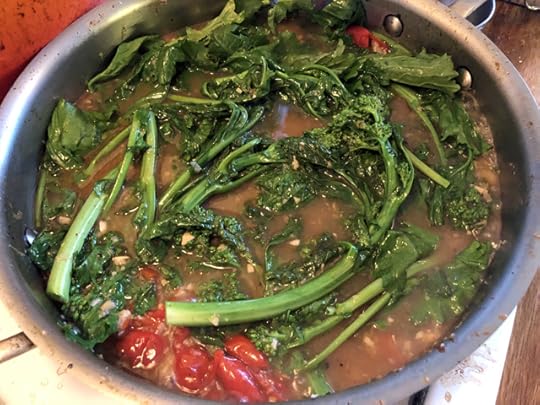
Here’s the genius part of the recipe (and it’s truly genius): when you remove the chicken, you use all of that rich, spicy, vinegar-y liquid to cook broccoli rabe.
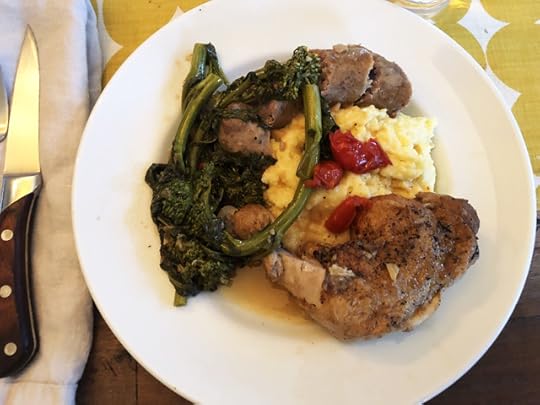
As for plating, I cooked a bunch of polenta in a pot and doctored it with lots of butter and Parmesan.

The final plate was a well-balanced dish that would’ve been a lot prettier if, again, I hadn’t crammed so much meat into a tiny pan.
Look at all of the happy people gathered around the table.
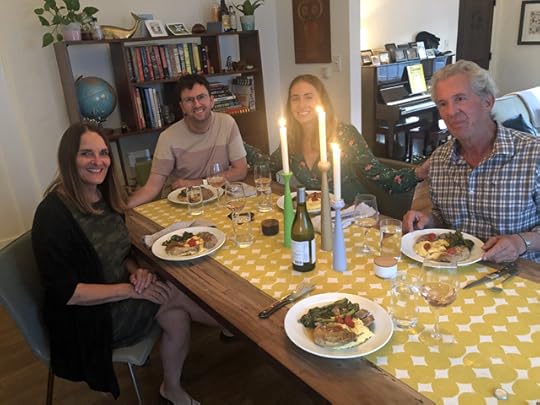
Just goes to show you: it’s not how much you mess up, it’s how well you recover.
Still… once an amateur, always an amateur.
The post Three Smoke Alarm Chicken, Sausage, and Broccoli Rabe appeared first on The Amateur Gourmet.

June 14, 2019
Toss Your Beans in Pesto

There’s a lot of treachery when it comes to substitutions in recipes. “Hide sweet potatoes in the brownies, your kids will never notice!” “These zucchini noodles taste just as good as real noodles but with half the calories!”
Me? I’m all for transparency when it comes to the things that I cook. And that’s why I recommend tossing your green beans in pesto. You’re not pretending that the green beans are anything they’re not — “If you close your eyes, they taste just like French Fries!” — what you see is what you get.
I’m pretty sure I got this idea from Lidia Bastianich (I watch her show religiously on PBS every Saturday). Here’s what you do: first you make a pesto.
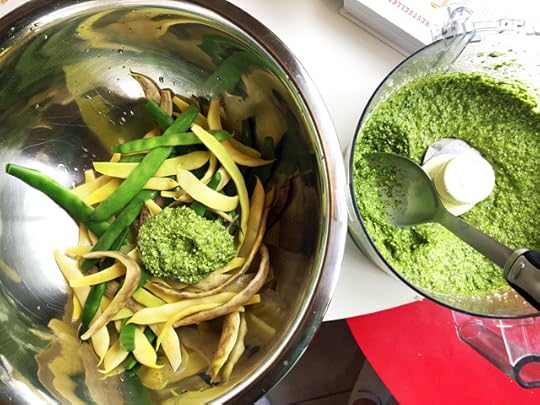
I make mine by tossing a handful of walnuts from the freezer (about 1/4 cup; I keep them in the freezer so they don’t turn rancid) into a small skillet and I toast them until they’re fragrant and golden brown. I put them in a food processor with four fat cloves of garlic and pulse with some salt. Then I add handfuls and handfuls of something green — basil leaves, arugula, even carrot tops would work — about 4 cups total and I start pulsing that along with about 3/4 cup of olive oil that I drizzle in as it’s whirring.
At this point, your pesto won’t taste like much: that’s why you have to adjust with lots of salt, lemon juice, and about 1/4 cup to 1/2 cup of freshly grated Parmesan. Pulse that all in and taste. It should be a “whoah” moment when you’re finished.
And then you just blanch and shock some green beans or runner beans. (I realize that the title of this post implies, like, white beans: and you can do that too.) The first time I did this, I did it with haricot verts from the farmer’s market.
I dropped them in rapidly boiling salted water, let them cook for 2 minutes, and then shocked them in ice water. I drained them very well and then tossed with the pesto.

I also added a little more olive oil, lemon juice, and salt just to make the beans pop. They were incredibly good.
Then, the other day I was at Cookbook in Echo Park, and I saw these gorgeous runner beans.

So I did exactly the same thing with them: I blanched them, shocked them, and tossed them with pesto. I served ’em up with seared swordfish and a lemon wedge, with lots of pesto to spoon on top of the fish (I know, I know, cheese and fish, but who’s watching?).

These were both tremendous dinners that were mostly healthy and very, very summery.
So don’t trick your dinner guests into eating anything. Be honest and toss your beans in pesto. They’ll thank you for it, I guarantee.
The post Toss Your Beans in Pesto appeared first on The Amateur Gourmet.

September 4, 2018
Let’s Newsletter

Hey everyone, guess what? I started my weekly newsletter back up again and I’m having lots of fun with it. Unlike my previous newsletters, I plan to stuff these with lots of content: recipes, restaurant reviews, and links to things that I’m loving on the web. Last week’s had a recipe for buttermilk biscuits in the food processor, a shrimp and bok choy stir-fry, and an oyster mushroom frittata; PLUS there was an excursion to L&E Oyster Bar with our new dog Winston. Tomorrow’s is going to feature a recipe for the corn salad that you see above, plus a hash with bacon, tomatoes, and even more corn, and everything that we ate on our Labor Day trip to Palm Springs. Signing up is super easy: just CLICK HERE and enter your info. Make sure to do it right away so you don’t miss tomorrow’s exciting dispatch!
The post Let’s Newsletter appeared first on The Amateur Gourmet.

March 20, 2018
Come Join The Fun on Instagram

Hello there, you’re probably wondering where I’ve been these first few months of 2018, and the answer is: INSTAGRAM.
If you’re not following me there, download the app and look me up: @amateurgourmet.
It’s just a much easier way for me to share my cooking adventures, and also much more exciting, especially with the stories feature where I shoot videos as I go. For example, last night I turned the spring risotto you see above (which I’d documented in Stories on Sunday) into risotto cakes by shaping them into patties and frying them in oil. The whole thing is captured in real time:

And the results were pretty stupendous.

So if you miss hearing my voice and seeing my pictures (and my mistakes), now you know where to find me. To reiterate: @amateurgourmet on Instagram. See you there!
The post Come Join The Fun on Instagram appeared first on The Amateur Gourmet.

January 19, 2018
Pork Belly and Smoked Sausage Cassoulet

The last time (and only time) I’ve ever made cassoulet, it was a bit of a Noah’s Ark affair. There was duck, there was sausage, there was bacon. My cup, quite literally, was runneth over with meat and beans. Cassoulet is meant to be a hefty dish and, as a general rule, the bigger your cooking vessel, the better off you’ll be. This time around, I thought I was in good shape making Donald Link’s Pork Belly and Smoked Sausage Cassoulet from his Down South cookbook. There were only two meats to worry about, pork belly and smoked sausage, and only one pound of dried white beans. This time I’d have my cassoulet under control.
One of the nice things about making cassoulet for a dinner party is that it seems like a lot of work, but really it’s just a matter of soaking beans overnight (the only step you really need to do ahead), browning a bunch of meat the next day, adding vegetables, adding the beans, adding liquid, and cooking it in the oven for four hours.

The only tricky thing with this particular recipe is tracking down the pork belly. Lucky for me, there’s a great butcher in L.A. that I mention all the time, McCall’s Meat and Fish, and I called them Saturday morning to see if they had 2 1/2 pounds of pork belly. They did and they set some aside for me, which I picked up after getting an iced New Orelans style coffee at Blue Bottle across the street. Have you ever had that? There’s chicory in it.


Here’s how easy it is to make cassoulet: cut that pork belly into 1-1/2 inch cubes and season with lots of salt and pepper.

Add to a dry Dutch Oven, crank up the heat, and brown the meat. The fat will render out (you’ll be surprised how much comes out) and you’ll hear lots of sizzling. This step is super important; the browner you get the pork belly, the better your cassoulet will be.

Once the pork belly is all browned, you add your sausages. I found smoked sausage at Gelson’s that was smoked beef sausage, and I’m pretty sure this recipe wanted smoked pork sausage, but I couldn’t find that. The beef stuff worked great.

Now it’s time for your vegetables: onions, celery, carrots, garlic, bay leaves (are bay leaves a vegetable?), red pepper flakes, and fresh thyme.


Once those cook down a bit, you add white wine and let that reduce for three minutes.
Then you add the ingredient that makes this cassoulet really flavorful; so flavorful, in fact, that my friends Mark and Diana, who came over to eat it, called it “the best cassoulet we’ve ever had.” They speak in unison. It’s really weird.
Are you ready for the secret ingredient? THREE TABLESPOONS OF WHOLE-GRAIN MUSTARD. Also tomato paste. But that mustard works wonders.

In it goes and then you add the pork belly back to the pot, along with a quart of chicken broth, and you cook it covered for 60 minutes until the pork belly is cooked through “but not falling apart.”
Here’s where things got dicey: you add your soaked beans and another quart of stock. Only, my pot couldn’t take another quart of stock. Take a look.

Once again: my cup runneth over.
But it didn’t matter… I just stuck that whole thing (very carefully) into a 250 oven and let it cook for 3 1/2 hours uncovered. Actually, I got nervous that it wasn’t bubbling enough, so I cranked the oven up to 300 eventually. In the last half hour it gets cranked up to 450 until you get a crusty top.
And that’s basically exactly how things worked out… despite my fears, the cassoulet emerged from the oven looking pretty stellar. Served with a green salad, it was a perfect Sunday night dinner.

The fat from the pork belly melts away during all of that cooking time and infuses the beans; at the end, you get these incredibly flavorful beans and incredibly tender pieces of meat.
So find the largest oven-proof cooking vessel you have, track down some pork belly, and start soaking your beans. Cassoulet isn’t for the faint of heart, or for those suffering from heart disease, for that matter. But it is for those who are looking for some rib-sticking goodness on a cold (L.A.) winter’s night. Happy cooking.
[The recipe is online in various places. Here it is on NJ.com; it’s also on Genius Kitchen.]

The post Pork Belly and Smoked Sausage Cassoulet appeared first on The Amateur Gourmet.

January 12, 2018
Paris Highlights

Travel is a funny thing. The more you build it up in your head, the less likely you are to do it.
Which is why, a few months ago, when our friends Harry and Cris told us that they were going to France for Christmas and New Year’s (Cris is from Bordeaux), I spontaneously suggested that we all spend New Year’s together in Paris. The idea took, especially since Craig had never been to France, and I cashed in all of our Delta miles and booked us two roundtrip tickets to Paris. In terms of great spontaneous decisions, this was one of the best I’ve ever made.
I’ve been to Paris five times now, four times in winter and once in summer, and I much prefer going in the winter, when all of that rich, hearty food feels oh-so-right and keeps you oh-so-warm. (Plus, it warmed up quite a bit once we got there.)

The only downside to going for New Year’s was that quite a few restaurants were closed while we were there, including the ones most universally recommended: Clown Bar, Yam-Tcha, Septime. But, as you’re about to see, we did really well for ourselves and by the end of the trip, I was so full that if any of those restaurants had actually opened back up, I’d have waved a white flag and said, “Maybe next time.”

Funny enough, the best meal of the whole trip was the one that we had with Harry and Cris on New Year’s Eve. Where did we go? L’Arpege? Another Michelin three-star? Hardly. We went that morning to the Marché d’Aligre (on the recommendation of Verjus chef, Braden Perkins) and stocked up on cheese, bread, radishes, clementines, dates, butter, and all kinds of sausages and pâtes.
 (Cris did most of the shopping since he speaks the language perfectly. I took French lessons before I left, but I only spoke un peu.)
We brought it all back to a friend’s apartment and enjoyed it all that night with lots of good French wine and champagne. Seriously, the best bite of the whole trip was a torn off piece of baguette from Maison Landemaine (a David Lebovitz recommendation) smeared with the grassiest, creamiest, unpasteurized Camembert, washed down with a sip of cold, crisp champagne.

The other best bite of the trip? Well, prepare to be very jealous: legendary cookbook author, and just all-around incredible person, Dorie Greenspan, invited Craig and I over for pre-dinner drinks with her husband, Michael, and she fed us homemade gougères. Makes me think of The Sound of Music lyric: “Somewhere in my youth or childhood / I must have done something good.”

Other highlights, before we get to the restaurants. We had drinks at Ina Garten’s favorite bar, on the recommendation of our friend Marcos. The bar is called Bar 228 and it’s in the Hotel Meurice and the two drinks that we had there were the most expensive drinks I’ve ever had in my life (we’re talking over sixty Euros for a Negroni and a Daiquiri). We drank them very, very slowly.

But it was worth it, especially because drinking them cast a magic spell and, you’re not going to believe me, but Ina and Jeffery were on our flight home to JFK. That’s not a joke: I heard a familiar voice, looked up, and saw Jeffery making his way down the aisle, with Ina following close behind. It was probably the highlight of my life (and, no, I didn’t talk to her; I was really clammy and gross because, without going too much into it, I experienced food poisoning on our last night in Paris. And also, I wanted to respect her privacy. And also I was afraid she’d accuse me of stealing her broccoli recipe.)
Another highlight: after giving up on the line outside The Musee D’Orsay (which I’ve been to before, Craig hadn’t), we decided to check out the Musée de la Chasse et de la Nature, which I found to be ten times more fun and unique. What is it? It’s kind of a hunting museum, but also a nature museum, infused with strange French art. It felt like we were exploring the home of a mad, French, hunter and artist who left cryptic messages everywhere, especially cryptic for people who don’t read French.


We walked around Montmartre after a rainstorm, and it was just as charming as everyone says it will be.

I used this New York Times article as a shopping guide, and wound up at Marché St.-Pierre at the base of Montmartre where I spent way too much time trying to find the kitchen section.

I did find it eventually and stocked up on kitchen towels and a handsome linen apron that cost only fifteen Euros (half a drink at Bar 228).
OK, now for the restaurants!
How do I talk about the restaurants? We went to ten restaurants. I’ll tell you about my favorite five, but mention the other five too so you can get the whole picture.
Favorite Restaurant Meals in Paris 2018:
1. Bistrot Paul Bert.

If you’d have interviewed me five minutes after our dinner at Bistrot Paul Bert, I would have told you that I’d had a terrible time. “Wait, what? What do you mean?” I mean that when we arrived for our reservation, we were immediately seated in a back room full of loud, obnoxious Americans. One table demanding hamburgers, another table demanding “the sweetest, cheapest bottle of wine that you have.” I don’t mean to be a self-hating American, but part of the fantasy of going to Paris is that simply by being in a room full of chic Parisians, you become somewhat chic yourself. Eating at Bistrot Paul Bert was the least chic meal of our entire trip; it felt like we were eating at the French pavilion in EPCOT.
So why in the world is it my number one pick for favorite restaurant meal of the trip? Easy: the food.


The food at Bistrot Paul Bert is phenomenal. The front rooms are full of savvy Parisians who know a good thing when they see it. This is the French food of your dreams, the kind of meal you hear someone talking about in rapturous tones while closing their eyes, whisking thesmelves back to happier times.
In fact, Craig ordered the very dish that made Julia Child fall in love with Paris in the first place: Sole Meunière. (Actually, not sure this was Sole Meunière… but it was definitely sole.)

And I had a dish I’ve been wanting to try forever (especially since it’s prominently featured in the screenplay I’ve been working on for the past two years): Blanquette de Veau.

Served over rice, this was chicken soup for the French soul. Except instead of chicken, it was baby cow.
Then the most wonderful thing happened. Craig ordered cheese instead of dessert and they brought out this giant board of cheeses and let him eat as much as he wanted. For someone who’d never been to France who absolutely loves cheese, this was like being given the key to the city.

And me, I had the best dessert of the entire trip (and this all happened on our first night) a Paris-Brest bigger than my head.

Here’s the thing: if you go into your meal at Bistrot Paul Bert knowing that, if you’re American, you’ll most likely be seated amongst the other Americans, given menus in English, spoken to somewhat patronizingly (though with the best of intentions; our waiter was very sweet), you’ll have what’s probably the best French food of your entire trip. Again, I was in a terrible mood when we left. But I was incredibly well fed.
2. La Bourse et La Vie.

There’s a new phenomenon happening in Paris involving American chefs: basically, they’re running the kitchens at some of the city’s most celebrated restaurants. In fact, the next three places I’m going to mention all have American chefs. It’s just a thing that’s happening. And Daniel Rose, the chef at La Bourse et La Vie, happens to also be the chef at Le CouCou in New York, which I recently named my second favorite meal of 2017.
Located in the financial district, La Bourse et La Vie (La Bourse refers to the stock market, though the full restaurant name also colloquially means, “Your money or your life”) has a real polish and sheen to it that, again, makes a place like Bistrot Paul Bert feel like EPCOT. You’ll feel very stylish eating here, though most of the other tables, once again, were full of Americans. These ones, though, weren’t demanding hamburgers or asking for sweet wine.


The food at La Bourse et La Vie is absolutely lovely. That feels like the right word for it: it’s carefully made and very subtly executed. My soup, made of Jerusalem artichokes, wasn’t bright with too much acid or over-salted. It was just soothing and creamy and earthy. And Craig’s leek salad was mellow, not at all stringy, and satisfying.
We each had steak frites for our entree:

There was a tiny bit of gristle to work through (Craig had to spit out his first bite) but those fries were phenomenal and with a glass of red wine at lunch, the only thing I really needed afterwards was a nap.
Instead, we had the dessert which was a killer crème caramel.

OK, then I really needed nap.
3. Verjus.

Remember our friends Harry and Cris who inspired this whole trip? So we finally met up with them on our third night in Paris (they were coming from Bordeaux) and our reunion happened at one of the most charming restaurants that we visited the whole week that we were there: Verjus.

The craziest thing about Verjus is that, apparently, a few years ago I met up with the chefs/owners, Braden Perkins and Laura Adrian, in New York. “We had a cookie at Birdbath,” said Braden when he came over to visit our table. “Oh yeah!” I said, the memory coming back to me. When we’d met, Verjus was just a twinkle in their eye; they were still hosting pop-up dinners in Paris. Now they were at the helm of one of the most recommended restaurants in Paris.
And the food at Verjus is truly wonderful. My pictures didn’t come out so great, but the meal started with all kinds of little bites set out before us: a hollowed out squash filled with cheese, an egg with truffles in it that Harry and Craig couldn’t stop raving about, a crostata-like tart filled with greens.

There was so much more that came out, including my favorite dish (a wedge of pumpkin with a mussel sauce), but the most memorable may have been the seared foie gras served over lentils:

And the desserts totally hit the spot.

We loved our dinner at Verjus.
4. Au Passage.

Down a dark alley, in what felt like the middle of nowhere, lives Au Passage, a restaurant recommended to me by Melissa Clark and, once again, a restaurant run by an American chef.
This place just oozed cool. And we were surrounded by French people here, including our friend Brad Comfort who was visiting Paris from L.A. because this is where he grew up. Well not this alley, but Paris.

He supervised as I ordered the food in French; that’s one thing my French lessons prepared me well for: ordering food with proper inflections. We ordered oysters, which in French are called “huitres.”

We, of course, ordered more foie gras (when in France).

We ate some kind of raw fish.

We drank a really nice Beaujolais.

And we also ate more fish, some pork, and dessert.


Actually, that dessert was the most memorable: a baba au rhum that was positively packed with flavor.
Our meal at Au Passage was definitely the coolest one of our trip. If you want to visit Paris and feel like a hip Parisian, eat here.
5. Champeaux

When we knew we were coming to Paris, I reached out to my old pal Clotilde of Chocolate and Zucchini to let her know that we were coming. And she was kind enough to make a reservation for us at Alain Ducasse’s new brasserie, Champeaux, situated in the historic marketplace, Les Halles.
We met up there with Clotilde and her husband Maxence and they guided us through the menu of French classics. Craig and I each had French Onion Soup, which was very good indeed, especially on a rainy night.

But the highlight of the meal came next, and it was so good that it put Champeaux in my Top Five list, above places like Frenchie and Chateaubriand, where we also ate. And that dish was the chicken for two:

This chicken. Oh my God, this chicken. Perfectly cooked, perfectly moist, but, more importantly, exploding with bright, lemony flavor. And, even more important, surrounded by bright, lemony, chicken jus, which I over-eagerly sopped up with bread. Apparently, Clotilde has a recipe for this chicken in her new cookbook that’s coming out soon; I’ll be first in line to buy it just so I can try to make this at home.
There was also mashed potatoes, rich with butter:

And a molten chocolate cake for dessert.

All of that was great, but oh my, that chicken. I’ll be dreaming about that chicken for a long time.
* * * * *
So what of the other places that we ate? Frenchie was a classy place with beautifully prepared food. Here are some pics:


I enjoyed everything that we ate at Frenchie very much, and especially appreciated the service which was convivial and professional, but frankly the food felt like food I could have at a good restaurant in America. Nicely made chicken. Nicely prepared fish. The cheese came from England. The dessert was very familiar to me, like something we might have at Trois Mec here in L.A.
It’s not really a dig on Frenchie. It’s more a point about the kind of food that you want to eat when you’re traveling; for me, that’s food that tastes like nothing I could get at home.
As for the other places we visited, Chateaubriand was vibrant and exciting, though the food was tipping its hat a bit too much to what’s trendy right now in America. So we had a watermelon gazpacho, a ceviche, etc.
Le Comptoir was great on a rainy night.

Here’s where we had the obligatory escargot:

We also had the most intriguing salad of cooked and raw vegetables with chestnuts.

For my entree, I had a rabbit stuffed with liver. Yeah, I wanted to try something I couldn’t easily get in the States. The sauce sort of tasted like French mole.

Here’s where we first encountered these really cool steak knives that I ended up buying as a souvenir (Clotilde told me where I could find them; Courty et Fils.)

If Le Comptoir’s not in my top five, it’s only because the food came out a little too fast and I wasn’t sure how I felt about everything. Like the escargot was good, but not as good as the one at Petit Trois here in L.A. But frankly, this could easily switch positions with Champeaux on my list. They’re both equally good.
Finally, I have to mention Le Fontaine de Belleville, where we had breakfast one morning.

It was cold and rainy out, but we found a little table in there and the servers only spoke French, but we figured out that the stove wasn’t working so we ordered the meusli and two baguettes with butter and ham.

It was an utterly simple breakfast but, in its simplicity, incredibly memorable. Especially that baguette with the butter and the ham; the butter had a grassiness to it that American butter just doesn’t have.
In fact, if I had to sum up my food takeaway from this trip, there are only three things you really need to eat in Paris to experience the sublime: bread, butter, and cheese. Everything else is nice, but those are the three things that are just categorically better in France.
To that point, Craig’s favorite bite of the whole trip may have been the one we had at a random coffee shop that we stumbled into called Blackburn. We ordered eggs cocotte and Craig could not stop raving about what he was eating: eggs baked in the most luscious cream (tangy and rich, like creme friache), browned bubbly cheese, and a simple yolky egg that we sopped up with good bread.

And so ends this GIGANTIC post. I won’t bore you with details of our journey home, except to say that after getting sick at our last dinner (not saying where, because they were so nice, but I’ll tell you the dish: tripe and calamari… just typing those words makes me want to vomit), being too sick to say hi to Ina on the plane, we got stranded at JFK for the night because of the bomb cyclone.

Luckily, we had our memories of Paris to get us through it.
Previous Paris Posts:
We’ll Always Have Paris (2014)
Paris, The Rest of the Trip (2005)
The post Paris Highlights appeared first on The Amateur Gourmet.

December 18, 2017
My Ten Favorite Dishes That I Cooked in 2017

Was this the best cooking year of my life? (Oh no, there I go saying “best” again.) But, looking back on the past 365 days, I feel like I really came into my own this year in the kitchen. Gone are all the old insecurities that fueled this blog in the first place. Now, I basically know what I’m doing when I step behind the stove. Even if I’m making something that I’ve never made before, I can imagine all of the steps in my head, plot a course that works for me, and get things done with enough time to clean up before the guests arrive. And when it came to seemingly insurmountable tasks (for example: making five hundred latkes for a Hanukkah party, two hundred more than last time), I just took things one latke at a time and managed to get it all done, shedding only onion-induced tears. So in a year of tremendous cooking, the following ten dishes must also be pretty tremendous. I hope you’ll agree.
1. Marion Burros’s Plum Torte.

It’s the most requested recipe in the history of The New York Times (you can find it here) and, yet, I’d never attempted it until this year. Once I did, I became hooked, making it over and over again for dinner parties this summer, adding my own personal touch by using a variety of multi-colored plums instead of the monochromatic purple ones we all know. The process is oddly soothing and surprising; you make what feels like a glorified pancake batter. You pour it into a greased springform pan and then pile in many, many halved plums, way more than you think can possibly fit into such a situation. Then you sprinkle with sugar, lemon juice, and cinnamon, bake it in a hot oven, and it comes out looking and smelling gorgeous. Serve with some freshly whipped cream or vanilla ice cream, and you have my most winning recipe of 2017.
2. Seafood Stews For One, For Two, and For A Crowd

When Craig left to go shoot his new movie in New York, I treated myself to a solo seafood dinner that I loved so much, I vowed to make it for him when he got back. It was less about a particular recipe than it was the grandiosity of the experience: lots of shrimp and clams and mussels cooked with garlic and chiles and white wine, served with arugula on top, a ramekin of blender-made aioli, some French bread, and a crisp glass of white wine. I don’t know if it’s possibly to have an orgy with just yourself, but this dinner felt like one.
Then, when Craig returned, I recreated this exact same meal, just doubling everything.

Once again, it was a hit. So much so that when he went back to New York to edit the movie, I invited some friends over and multiplied everything by four, making the Big Pot of Seafood I blogged about a few weeks ago.

(Sorry these pictures are so blurry, is this is a sign that I need to get a new camera in 2018? Or maybe just a new iPhone, Santa?)
3. Frito Pie

Who’d a thunk that cutting open a bag of Fritos with a pair of scissors at a dinner party and then piling in a bunch of spicy chili, onions, limes, cheese, and cilantro could be so much fun? But in terms of elevating a famously humble dish to a level of pizazz that absolutely commands you’re attention, Nancy Silverton’s recipe (which is actually an adaptation of Dean Fearing’s recipe) is pretty much unbeatable.

Nancy suggests smaller bags of Fritos, but I think the medium-sized bags work fine, as long as you dump out a bunch of the Fritos into a communal bowl first (it’s part of the fun).
4. Dario’s Olive Oil Cake with Rosemary and Pine Nuts

Once again, a recipe adapted by Nancy Silverton. (If you keep seeing the name “Nancy Silverton” on this blog and have no idea who I’m talking about, get onto Netflix and watch the Chef’s Table about her. She’s pretty much one of the most brilliant chefs alive, as far as I’m concerned.) This one comes from the famous butcher, Dario Cecchini, and it’s a cake that has many steps and many ingredients: raisins soaked in Vin Santo, toasted Sicilian pine nuts, whole oranges cut into pieces. (You can find the recipe here on Food52.)

There’s half a cup of olive oil, tufts of whole rosemary leaves, and by the time it goes into the oven, you have no idea what this thing is going to taste like. Well, spoiler alert: it tastes pretty amazing.

And it looks pretty impressive too. It’s a great winter dessert.
5. Lamb Shanks with French Cris’s Mashed Potatoes

We went away with our friends Harry and Cris last February to Oceanside, California, and after a day of exploring the beaches, etc., the idea was put forward that Cris and I should cook dinner together. Cris, you have to understand, is French and has cooking in his blood (see here). I’m a neurotic Jewish guy from Florida who barely knew how to boil water when I graduated college. Which made this collaboration dinner slightly nerve-racking for me.
But when we got to the grocery store to figure out what we were going to make, things just kind of fell into place. I found lamb shanks at the butcher counter and Cris said he could make his famous French mashed potatoes to go with them. I found a recipe online (don’t remember which one) but basically just browned the shanks in lots of olive oil, added mirepoix, a bottle of red wine, and let them cook away for a few hours. Cris’s potatoes were boiled with lots of herbs and then mashed with lots of love and possibly butter.
The best moment came, though, when I removed the shanks from the liquid and thought I was done. French Cris cried “non!” and proceeded to put the liquid on high heat, letting it boil down to a thick sauce that was absolutely wonderful poured on top of everything. Très magnifique.
6. Smoked Trout Sandwiches

Sometimes a certain sandwich just becomes a part of your life. Such is the case with this smoked trout tartine that I started making when Craig began joining me for my Sunday walk to the Atwater Village Farmer’s market. One day, he spied smoked trout at a fish stand. We bought that, I bought some seeded rye bread, some heirloom tomatoes, and, most intriguing of all, this thick French kefir yogurt that’s so rich and luscious, it basically feels like cream cheese. The sequence goes like this: I toast the bread, spread on the kefir, top with tomatoes that I drizzle with good olive oil, salt, and pepper, and then on goes the smoked trout.
It seemed like a pretty unbeatable experience until the day we discovered the most amazing focaccia at a place right near the front of the market, I forget the name of it, but it’s truly incredible focaccia. I also bought some wild arugula there and my smoked trout tartine became a smoked trout sandwich.

The focaccia is positively dripping with olive oil and the whole thing is like the west coast sister to the traditional New York Sunday morning bagel and lox. Paired with an iced coffee from Proof Bakery and a Sunday New York Times, it’s pretty much the ultimate California Sunday morning sandwich experience.
7. Tahini Chocolate Chip Cookies

You know that Portlandia sketch where they talk about pickling everything? Well that’s how it feels these days with putting tahini in desserts. “You can put it in brownies! You can put it in cheesecake!” So the idea of adding it to chocolate chip cookies kind of made me shrug my shoulders. “Yeah, yeah, how innovative. Puhlease.” (My shoulders are pretty grouchy.) But then I made Ottolenghi’s recipe, and the friends that I made it for absolutely swooned.

(That’s them reacting to chicken, but their reaction to these cookies was twice as big.)
The tahini added this richness that’s hard to describe; I guess the closest thing would be stirring peanut butter into your chocolate chip cookie batter, but with a smokier quality.
A few months later, I followed Ottolenghi’s recipe for Brownies with Tahini and Halvah, and that was also pretty wild. Color me convinced.
8. Green Polenta

It’s pretty ugly (and I batch-edited these pictures, so there was no individual tweaking) and yet, when I made this green polenta for Harry and Cris, they went nuts for it. So much so, that a few weeks later, Cris made this for an important dinner and called me for advice on how to make it. When a Frenchman is impressed by your cooking, you know you’ve done something right.
The recipe comes from April Bloomfield’s A Girl and Her Greens. (Here it is on Food Republic.) You basically make a super garlicky kale puree with olive oil, then cook polenta the normal way with water and salt, and then you stir in that puree with more olive oil, Parmesan, and mascarpone. It’s pretty transcendent. I topped it with some spatchcocked chicken and a salsa verde, but frankly, on a cold winter’s night? You could just make a big bowl of this polenta and top it with an egg and be very happy.
9. Chicken Parmesan / Kerala Fried Chicken

When my friends Louis and Jared were coming over for dinner, there was some discussion about what I might make. At some point, Chicken Parmesan was put forward and everyone seemed pretty excited about that. And sure enough, it was a pretty excellent thing to make for a dinner party: you flatten boneless, skinless chicken breasts, coat them in flour, egg wash, and then lots of bread crumbs (I used panko), fry them in lots of oil, then layer them in a pan with tomato sauce and lots of cheese.

I didn’t really follow one particular recipe, just kind of combined ideas from a bunch of them. The most important thing, though, is to season all of the elements: the flour, the egg wash, and the bread crumbs. Also, it’s good to have a good, clean setup when you make this or it could get messy. (I almost ran out of space.) And keep one hand clean as you dredge, in case you don’t know that trick. There’s your dredging hand, and your non-dredging hand.
And speaking of dredging and frying (nice transition!), earlier this year, I made Asha Gomez’s Kerala Fried Chicken from My Two Souths.

It looks complex, but really you just marinate a cut-up chicken in a blended mixture of buttermilk, herbs, and serrano peppers overnight. The next day, you dry off the chicken, coat it in flour (remember: one dredging hand!), and fry in Canola oil. At the end, you drop in two stems of curry leaves which I get at the Indian supermarket near our apartment. For a minimal amount of work, it’s yields pretty explosive results. Everyone loved it.
10. Tres Leches Cake with Strawberries

Earlier this year, I hosted a taco dinner for twelve people. It was a bit overwhelming–it’s the largest group of people I’ve ever cooked for at a dinner party, not counting Thanksgiving–even though it was basically a taco bar where I made two types of fillings (pork from a Rick Bayless recipe, and one with squash and mushrooms, also a Rick Bayless recipe). There was black bean soup for an appetizer, which was nicely received, but it wasn’t until dessert that people really lit up. This tres leches cake from Food and Wine was so beloved and ballyhooed, I ended up making it again on Frito Pie night.
It’s kind of a cinch to make: you make a very simple batter that you pour into a 9 X 13 inch pan. You bake that, let it cool, and then the fun part comes when you poke holes everywhere and pour in a steeped mixture of the three milks (cream, evaporated, condensed) infused with lots of cinnamon and vanilla. The best part is, you actually need to make it a day ahead, so you can get your dessert done 24 hours before you need it, and as it sits in the refrigerator, it gets better and better and better.
And that, my friends, were the best things that I made in 2017. (Honorable mention: Grapefruit, Blood Orange, Campari Sorbet. Also: Spaghetti and Meatballs.)
The post My Ten Favorite Dishes That I Cooked in 2017 appeared first on The Amateur Gourmet.

December 11, 2017
My Favorite Restaurant Meals of 2017

When you’ve been food blogging for long enough, your old posts can act as your own personal culinary archives. What was I eating in December of 2010? The answer is just a few clicks away. (Looks like it was spaghetti and gingerbread cake.)
There’s a gap, now, in that data from July 2015 to September 2017, when I stopped blogging, and future historians and biographers will have no idea what I ate during that period. Not since the burning of the Library at Alexandria has there been such a loss for civilization. But here I am, ready to remedy some of that by sharing my favorite restaurant meals of 2017. Really, the idea to do this came to me while scrolling through all of the pictures on my phone from this past year. It’s been an insane 365 days: we’ve ping-ponged from Mexico City to Washington State to Provincetown to Florida, with frequent stops in New York, where Craig was working on his latest movie, Alex Strangelove. And, not to rub it in, but we’re ending the year in Paris. Paris! OK, I did just rub it in. But come on, it’s Paris, and Craig’s never been and we’re using all of our miles to go. We are très excited.
But back to the meals we ate in 2017. They run the gambit from fancy and decadent to casual and low-key. Obviously, the ranking is totally arbitrary. I can’t say that the deliciousness of the food at AbcV was really that much dramatically better than the food at Trois Mec, but I’d been to Trois Mec before, and AbcV was brand new, so that’s why it gets the edge.
And so, without further ado, here we are… my favorite restaurant meals of 2017.
1. The Willows Inn (Lummi Island, Washington State).

Some restaurants are so beautiful, and the experience of going there is so breathtaking, that the restaurant would have to REALLY screw up to not make it your favorite meal of the year. Dinner at The French Laundry comes to mind. And El Bulli. The Willows Inn, on Lummi Island in the Pacific Northwest, belongs in the same category. We were lucky enough to receive a gift certificate from Craig’s parents as a Christmas gift a few years ago, and this past July, we decided was the time to use it. We flew to Bellingham, where Craig’s parents live, and then drove their car on to a ferry. Did you know that cars could go on ferries? I had no idea.

Once we arrived, we were seated on a patio where lots of little bites came out, along with our cocktails. These little bites were actually my favorite bites of the whole dinner, which isn’t a disparagement of the dinner, but more a comment on how delicious these little bites were.


Everything was caught or found locally (including those wild plums) and treated with the utmost care. That mussel was smoked in a box filled with rocks from the surrounding San Juan Islands. And everything there was super casual, despite the seriousness of the food. It was a perfect restaurant for me and Craig because I like fancy restaurant food and Craig likes a laid-back atmosphere. So this was a perfect dinner in a perfect location and, hence, it was my favorite meal of 2017.
2. Le CouCou (New York, NY).

Some restaurants are so hyped, they’re bound to disappoint. Other restaurants are hyped the appropriate amount, and not only do they deliver the goods, the goods are even better than the goods you’d been fantasizing about. Such was the case with our dinner at Le CouCou in New York.
It all started, actually, with a phone call. Knowing how popular the place was, I just called up one day and told the person who answered that I was coming to New York, dying to eat at Le CouCou, and would come at any time on any day that they had available. I think my enthusiasm and openness did the trick, because we scored a prime reservation and a beautiful table with a view of the open kitchen. But, first, there were drinks at the gorgeous bar.

I don’t remember what we drank, but I do remember feeling really classy drinking it.
We were shown to our table where, with the help of our server, we navigated the classically French menu. And then the food started to come out.


Everything was so polished, like it jumped right out of the pages of a classic French cookbook and landed on our table. But sometimes fussy old French food can taste flat, and here, everything popped. Especially that braised endive, which was probably my favorite dish of the whole night, braised, as it was, in bright, acidic orange juice with lots and lots of butter.
Everything at Le CouCou was spectacular, which is why I posted all of the pictures of our meal, because I just want to emphasize that. I’d happily go back, but we’re going to go one better: we’re having lunch at the chef Daniel Rose’s new restaurant in Paris, La Bourse et La Vie. I’ll be sure to report back.
3. The Canteen and Liz’s Cafe (Provincetown, MA).


This summer, we took a big trip to Provincetown with a bunch of our friends and had a blast. Many meals were had, some more formal than others, but the best of the bunch took place at two places: Canteen, which is situated right on the water, and Liz’s Cafe, a brand new spot run by a sassy proprietor named Liz.

Sometimes your favorite meals of the year have nothing to do with the food, really. Not that the food at either of these places was bad; in fact, it was often great. But my enthusiasm for these meals has much more to do with the context: the friends we were with, the setting (which was often beautiful), and, most importantly, the frosé.

In case you’re unaware of the phenomenon, frosé is frozen rosé; like a rosé slushie. And we drank a lot of it at Canteen. It went particularly well with this lobster roll, though it also was fun to drink just by itself.

Liz’s Cafe didn’t have frosé, but it did have a bar shaped like a boat.

And excellent clam chowder, fried fish sandwiches, and pie (not pictured).


And then there was Liz, who frequently joined our table and gossiped about the locals. She’s a real character but she runs a tight ship and on our next trip to Provincetown, I know where I’ll be having brunch.
4. Pujol, Maque, and Contramar (Mexico City, MEX).

We went to Pujol in Mexico City last January, one of the world’s best restaurants, just before it was completely re-conceived and reopened by its creator, Enrique Olvera. So we were there, really, for the end of an era, and what we experienced when we ate there was a sort of a “greatest hits” menu of ants on a baby corn served in a giant hollowed-out gourd and, perhaps most famous of all, the dish with two types of mole served with warm tortillas for dunking.


It was all very delicious and I’m glad that we ate there, but it also felt a little rushed and regimented. I was very aware that we were on the clock, so to speak, and there’d be another party coming to our table in a few hours and they needed us gone. For those reasons, I actually had a better time at Cosme, Olivera’s New York restaurant, which would also be on this list if I had the space. The feeling there was way more relaxed and the food just as good. (We also ate, this year, at Atla, Olivera’s new casual restaurant in SoHo. We’ve achieved the Olivera trifecta.)
My favorite meal in Mexico City, though, was at a casual brunch spot called Maque.

Abutting a park in the Condesa district (which, sadly, was badly hit during the earthquake), this place had such a warm vibe and such great hospitality. A waiter came by with a tray of pastries when we were seated at our table out on the sidewalk.

And the food, when it came out, hit the spot in the way the best Mexican food does: spicy, stewy, and deeply comforting.

Perhaps the most recommended restaurant in Mexico City is Contramar. Everyone tells you to eat there. And those people are right.


As you can tell from those pictures, Contramar is known for its seafood, and the tuna tacos–maybe their most famous item–truly were great. The only mistake we made was not ordering dessert. We’ll do that next time.
5. AbcV (New York, NY).

One of the most stunning meals that I ate this year was at the newly opened AbcV in New York’s Flatiron district. It was nice to eat there right when it opened, before the reviews came out, so I could form my own opinion about it. Helping me form my opinion was the co-founder of Jarry Magazine, Lukas Volger.

We really were dazzled by all of the food as it came out. Sure, some of it was pretentious (I could’ve done without the beverage menu featuring Vibrations, aka Restorative Tonics) but the food, when it came out, really spoke for itself.


Healthy eating never felt so naughty. (AbcV, feel free to use that blurb on your cookbook.)
6. Trois Mec (Los Angeles, CA).

Well, I just told you about this one (click here to read the post), so I won’t bombard you with pictures again. But my dinner with my friend Ryan on a Monday night (a Cyber Monday night, to be exact) at Trois Mec was definitely one of my favorite meals of the year. Everything was so inventive and exciting and it was so great to see Ludo Lefebvre, the subject of the most recent Mind of a Chef, there in the kitchen overseeing everything. In a city as spread-apart as L.A., it’s easy to forget how casually one can just go eat at a world class restaurant, but Trois Mec is right there on the corner of Highland and Melrose with Petit Trois, Pizzeria Mozza, Osteria Mozza, and Chi Spacca all waiting for you to enjoy them. All you have to do is get into your car and drive.
7. The Union Square Cafe (New York, NY).

The legendary Union Square Cafe re-opened in a new location this year and, as far as I’m concerned, it’s even better than the original. Everything we ate there was so delicious, especially the famous tuna burger, pictured above. We were joined by our friend Tim Federle, author of Better Nate Than Ever and co-writer of the upcoming animated film Ferdinand. In his spare time, Tim works as a food model.

The service, of course, was top notch. So much so that when our server heard us debating about which dessert to get, she brought us out both desserts, one of them on the house. That’s the Danny Meyer touch.

(I swear there were two desserts. Maybe we ate the other one before I took this pic?)
8. Cosa Buona (Los Angeles, CA).
Alimento is probably our favorite Italian restaurant in L.A. It’s the kind of place you go for upscale Italian food in a casual setting: chicken liver crostini, incredible homemade pastas, etc. So when we heard that the chef, Zach Pollack, was opening up a pizza joint in Echo Park, I shouted: “Sign me up!” OK, I didn’t really shout that, but we were definitely super excited to go there when it finally opened. I mean, look at this garlic toast.

And these mozzarella sticks. They’re insanely delicious.

The salad’s just what you want to balance everything out.

And then there’s the pizza.


And, of course, cannolis.

Really, what more could you possibly want in a pizza joint? Excuse me, I think I know where I’m having lunch.
9. Via Carota (New York, NY).

Boy, Craig really should get a commission for the amount of times he’s featured in this post.
On a random Sunday in a random month in the West Village, we were looking for a place to have dinner. I remembered that Jody Williams, of Buvette, and Rita Sodi, of i Sodi (two of our favorite New York restaurants) had opened a place together. That’s all I knew, but then there we were on the doorstep of Via Carota and there was a table for us, if we wanted it. We wanted it. And the meal that transpired was just lovely.


No need to go into detail, those pictures pretty much tell the story, except add great people-watching, charming waitstaff, and sparkly Aperol spritzes and you get the idea. On a spring day (I’m pretty sure it was a spring day), there’s probably no better place to eat in New York.
10. Prune and Hearth (New York, NY)
Prune really is my favorite restaurant in the world. It’s so idiosyncratic, so clearly the vision of its owner, Gabrielle Hamilton, who also happens to be a genius writer. You know that question they’re always asking in the New York Times Book Review: who would you invite to your dream literary dinner party? Well, eating at Prune is like eating at such a party; you’re having a meal in a genius writer’s house. And everything she makes is perfect, in my book.


This dessert, by the way, was a whole orange cooked in sugar syrup and it’s just insanely good.

Now my other favorite chef in New York is easily Marco Canora. He’s so beloved in his field, and you can see why. His food is so smart, made with so much passion and skill. If you don’t follow him on Instagram, you’re really missing out. His stories are brilliant cooking demonstrations.
His restaurant, Hearth, is now Craig’s favorite place to eat in New York. Working on his movie, he ate there all the time and I frequently ate with him. My pictures of the food there aren’t so great because it’s so dark, but here we are at brunch with our friends Ola and Andrzej.

Everything that we ate there was so delightful (especially since legendary pastry chef Karen DeMasco makes all of the muffins and pastries, as well as the desserts). It’s perfect for a weekend brunch, and even better for a weeknight dinner. OK, here are some very dark pictures of a dinner there. Actually, maybe they’re not that dark.


That should give you the idea… it’s oh so good.
And that, my friends, were my favorite restaurant meals of 2017. Now your browsers are just as clogged as my arteries.
The post My Favorite Restaurant Meals of 2017 appeared first on The Amateur Gourmet.

December 6, 2017
A Response From America’s Test Kitchen

After posting yesterday’s post about applesauce and “best recipes,” I woke up to an e-mail this morning from Tucker Shaw, who’s the new editor-in-chief of Cook’s Country at America’s Test Kitchen. Tucker’s actually been a long-time supporter of my blog (a blurb of his is featured on my first book) and I had no idea he’d taken over the helm of such a storied institution. Since I called out ATK in my post, it somehow caught his attention and here’s what he has to say. Don’t worry: I asked his permission to publish this. And I figure it’s only fair to put his response on here, since it so clearly addresses my attack on their use of the word “best.” (Though feeling a little hypocritical after someone pointed out on my Facebook page that my cookbook is called Secrets of the Best Chefs.) Thanks, Tucker, for reaching out.
Hey Adam!
I love your applesauce post from yesterday. We’re all talking about it this morning at ATK. I know your post isn’t really about ATK as much as recipe prescriptiveness in general (and also applesauce). But it’s got us musing over here
I totally get what you’re saying! What’s best for one goose isn’t always best for the next goose.
I think that ATK’s intent when we use words like “best” has changed over the years, and is still evolving, but I think that our aim is never to corral home cooks into an our-way-or-the-highway situation, but rather to get them as close to an objectively successful/satisfying result as possible (insofar any cooking result can be “objectively” satisfying, see goose v. goose above). This in turn, we hope, gives them confidence — confidence in us, of course, that’s our business hope so that they re-subscribe — but also confidence in themselves to then go off and invent.
We don’t always get that message exactly right, and I can see how sometimes it sounds like we’re discouraging creativity. But I think our real mission, and certainly the most gratifying result, is when we’re able help someone develop the skills and experience to be able to inhabit those creative decisions with confidence and build on them. We always need to check ourselves on how we communicate that goal, and your post is a really nice opportunity for us to do some checking. We don’t want to prey on insecurities! We want to instill confidence.
It’s funny timing. I actually just finished writing an editor’s letter for an upcoming issue of Cook’s Country about this very thing. About how for me personally, I always follow a recipe exactly the first time because I know I’ll learn something. Then, on my second date with a given recipe, I tinker and tailor. (Send over a soldier and a spy and, well, that’s a complete meal.)
Anyway, this is really just a long winded way of saying hi, and thank you for the food for thought this morning!
I hope all’s well your way. Those fires out there looks scary.
The post A Response From America’s Test Kitchen appeared first on The Amateur Gourmet.

Adam D. Roberts's Blog

- Adam D. Roberts's profile
- 3 followers

