
Vickie Howell's Blog: Vickie Howell's Website, page 48
October 26, 2015
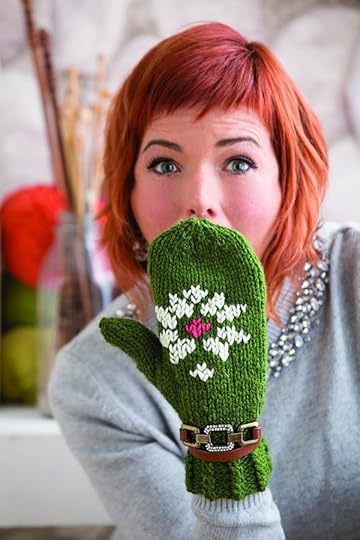
Fall Festival Mittens

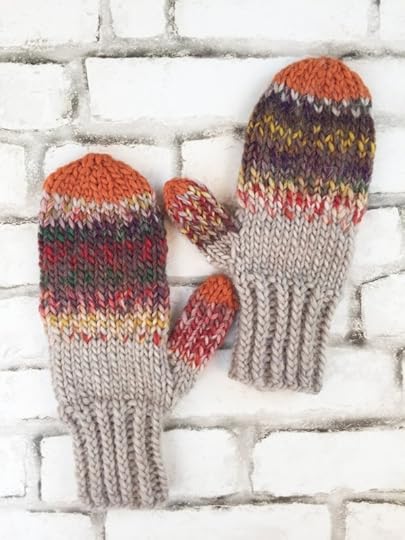
Over the weekend, Austin, Texas FINALLY (albeit briefly) gave up its delusions of it still being Summertime. We had a bit of crisp air, a whole lotta rain, and the whisper of hope for more knitterly weather to come. This autumnal glimpse inspired me to start thinking “Fall” colors and, as I have been for the past couple of months, delve even further into my handmade holiday gift plans. The result was the design and creation of the Fall Festival Mittens, which I’m sharing with you today. Here’s to pumpkin patches, chai lattes, and warm hands — enjoy!
FALL FESTIVAL MITTENS
Materials
1 ball each Patons Classic Wool Roving (100 % Wool; 120 yds/109 m), in colors: (A) Natural, and (C) Pumpkin
1 ball Patons Colorwul (100% Wool; 90 yds/81 m), in color (B) Bramble
Set, U.S. 9 (5.5 mm) Clover Takumi Bamboo double-pointed needles –or size needed to obtain gauge
Set, U.S. 10 (6 mm) Clover Takumi Bamboo double-pointed needles –or size needed to obtain gauge
2, Clover Soft Stitch Markers
Finished Size
Women’s One Size
Finished Measurements
8″/20.5 cm Circumference
10″/25 cm Length
Gauge
13 sts x 16 rows = 4″/10 cm in Stockinette Stitch using larger needles
Special Term
ktbl = knit stitch through the back loop
Directions
Right Mitten
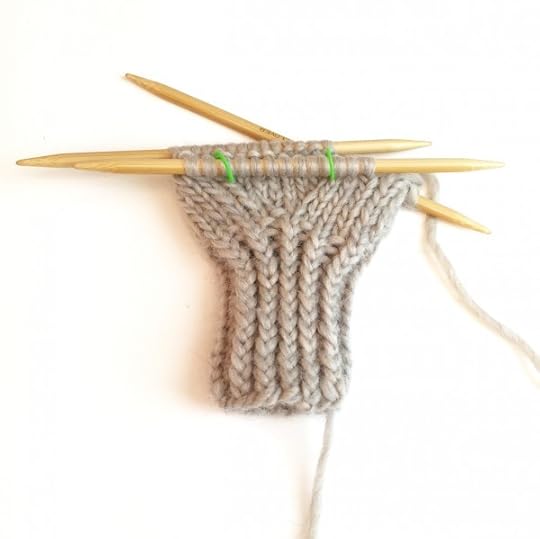
With A, and smaller needles CO 24 sts. Divide sts evenly among needles. Join round, taking care not to twist.
CUFF:
Rnd 1: *P1, k1tbl; rep from * around.
Repeat Rnd 1 until cuff measures 3″/7.5 cm from CO edge.
Next Rnd: Knit, while increasing 4 sts evenly.–28 sts
BODY:
Divide sts as follows: N1: 7 sts, N2, 14 sts, N3 7 sts.
Knit two rnds.
Gusset:
Rnd 1: Knit all sts on N 1 & 2, N3: k2, pm, k1, m1, k1, pm (4 sts between markers), k to end.
Rnds 2: Knit.
Rnd 3: K to marker, sl marker, M1, k to marker, M1, sl marker, k to end. (2 sts increased.)
Rep Rounds 2-3 (increasing 2 sts between markers once more. — 8 thumb sts between markers.
Next Rnd: Knit to marker, place 8 thumb sts on scrap yarn, k to end.–26 sts.
Join B when necessary.
Next Rnd: *With A, K1, with B k1; rep from * around.
Next Rnd: *With B, K1, with A k1; rep from * around.
Cut A.
With B, continue knitting every round until piece measures 8 1/2”/21.5 cm from CO edge, or 1 1/2”/4 cm less than desired length of mitten.
Join A when necessary.
Next Rnd: *With B, K1, with A k1; rep from * around.
Next Rnd: *With A, K1, with B k1; rep from * around.
Cut A & B; join C.
Next Rnd: Knit.
Next Round: Knit, while decreasing 2 sts evenly around. — 24 sts.
TOP SHAPING:
Rnd 1: [k2tog, k1] 8 times. –16 sts
Rnds 2, 4 & 6: Knit.
Rnd 3: [K2tog] 8 times. –8 sts.
Cut yarn, leaving a 6”/15 cm tail. Weave yarn through remaining sts and draw closed.
THUMB:
Sl sts from scrap yarn to 2 double pointed needles, Using 3rd, pick up 2 sts at thumb gap. –10 sts.
Divide sts evenly over 3 needles.
Rnd 1: With B, knit.
Repreat Rnd 1 until thumb measures 2”/5 cm, or 1”/2.5 cm less than desired length of thumb.
Cut B; join C.
Next Rnd: Knit while dec 1 sts. — 9 sts.
THUMB SHAPING:
Rnd 1: [K1, k2tog] 3 times. — 6 sts
Rnds 2 & 4: Knit.
Round 3: [K2tog] 3 times. –3 sts
Cut and weave yarn through remaining sts and draw closed.
Left Mitten:
Work as for Right Mitten, reversing thumb gusset as follows:
Rnd 1: N 1: k3, pm, k1, M1, k1, M1, pm, k to end of N 1, k sts on N 1 & 2.
Finishing
Weave in ends. Block.


October 22, 2015
The Craftys Awards

I’m excited to announce that I’ve been asked to be one of the judges of this year’s The Crafty Awards! I’m honored to be included in a panel that consists of so many esteemed designers, editors, writers, and ambassadors, and a broadcast hosted by my friend, Mark Montano. I look forward seeing the amazing designs submitted by the many, talented nominees!
If you’re interested in hearing more about the awards, give the short video below a looksie. Then, head on over to TheCraftys.com to vote for the best in crafts and D.I.Y.!
xx,
Vickie
P.S. Know someone who deserves to be nominated? There are still a few more days to do so. Nominations are open until October 25th!
October 19, 2015
Finger Knit Medusa Snakes

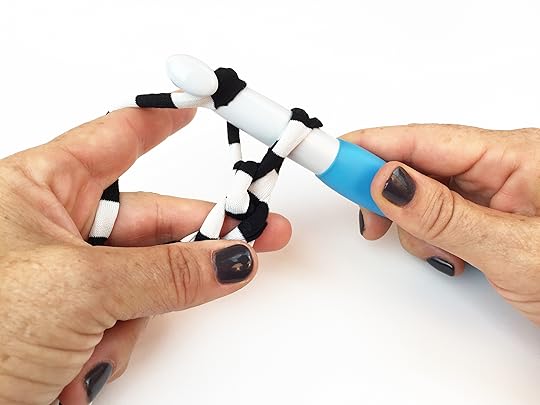
A while back I came across the most amazing Medusa wig (by Outfitters Wig) on Pinterest, and immediately new I needed to make my own version using yarn-y snakes in place of their slimy, rubber sisters. Thankfully, my friend, Jennifer Perkins throws the most amazing Halloween party (you may’ve seen her decorations and tutorials on the Tuesday Morning blog, DIYNetwork.com, Craft Gawker, Treetopia.com, etc.) every year, so I had motivation to make it, and an excuse to wear it (outside of the house.) I found the perfect wig at Goodwill (don’t worry, though; it was brand new, so this will be a lice-free Halloween!), and already had green, kettle-dyed yarn for the snakes in my stash. Along with some small, plastic snakes, a bunch of bobby pins (to haphazardly style the wig with), and the Snuggly Snakes pattern from my latest book, and I was good to go. The result was a maker’s Medusa that had people’s heads’ turning, and eyes averting. Here’s the how-to scoop!
Use the instructions (excerpted from my book, Finger Knitting Fun) to make the snakes, then follow these steps to make then wig ready:
Use yarn and tapestry needle to whip-stitch underside of snake (tube) closed.
Feed floral wire through snake body; using pliers, fold wire over a stitch of knitting to secure, then trim excess with wire cutters.
Using needle and thread, hand sew snake end to the wig cap.
Bend wire to make snake come alive!
Repeat process for all snakes. Note: I made my snakes in differing lengths. Play with it and have fun!

Medusa (aka Snuggly) Snakes
Supplies
• bulky yarn scraps
• set of colorful googly eyes OR black beads
• yarn needle
• hot glue gun or fabric glue
• felt scraps
Finished Size
18″ (45.5 cm) long
Make It!
Step 1. Yarn-wrap around four fingers—4 stitches.
Step 2. Finger knit until the piece measures 18″ (45.5 cm).
Step 3. Fasten off.
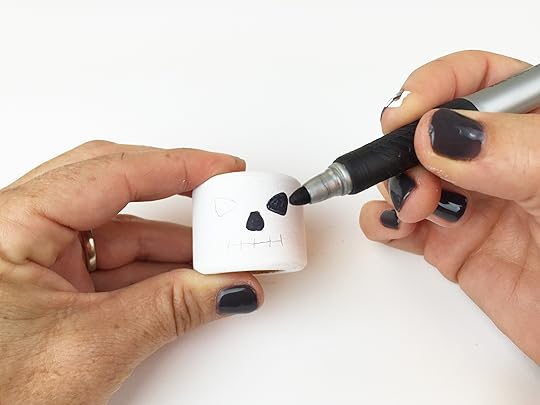
Step 4. Using a needle and yarn, sew a stitch on the underside of where you want your snake’s head to end to cinch it.
Finish It!
Step 1. Weave in ends.
Step 2. Cut tongue template from felt scrap.
Step 3. Glue on eyes and tongue.

October 12, 2015
For Anyone Gift: Cup Cozy


Every week on Facebook I stream live video from my home studio (or wherever I happen to be at the time) in a segment I call, “Ask Me Monday”. It’s an opportunity for me to answer questions that viewers have asked (either live or through posts on social media) about knitting, crochet, craft, business and lifestyle. Often I’ll choose a themed topic to get the video started. This week I focused on my 3 Tips for Successful Holiday Gift Making. In part, I talk about the peripheral people in our lives that we’d like to give a token of appreciation that isn’t time consuming, but still seems personal. I love cup cozies for this purpose, because paired with a beautiful mug and a gift card to a coffee shop, they’re general enough to give to anyone without seeming completely generic. Here are instructions for both knit and crochet versions. Pick yer poison, and get stitching. Only 5-6 more weeks until the Winter holidays!

Mosaic Knit and Ribbed Crochet Cup Cozies
MOSAIC KNIT VERSION
MATERIALS
Small amounts (approx .5 oz each) of two colors (A & B) of bulky-weight yarn. (I used Bernat Roving & Patons Classic Wool Roving)
Size U.S. 10.5 (6.5 mm) Clover Takumi Bamboo Needles — or size needed to obtain gauge
Clover Jumbo Tapestry Needle
FINISHED SIZE
11″/28 cm (or desired) circumference
4″/10 cm width
GAUGE
13 sts x 24 rows = 4″/10 cm in mosaic pattern stitch
Note: If you’d like to adjust the width for a smaller cup, CO multiples of 3 + 1 edge stitch.
DIRECTIONS
With A, CO 13 sts.
Row 1 (WS): Knit.
Join B when necessary.
Rows 2-3: *With A sl 1, with B k2; rep from *, ending with A and a sl 1.
Rows 4-5: With A, knit.
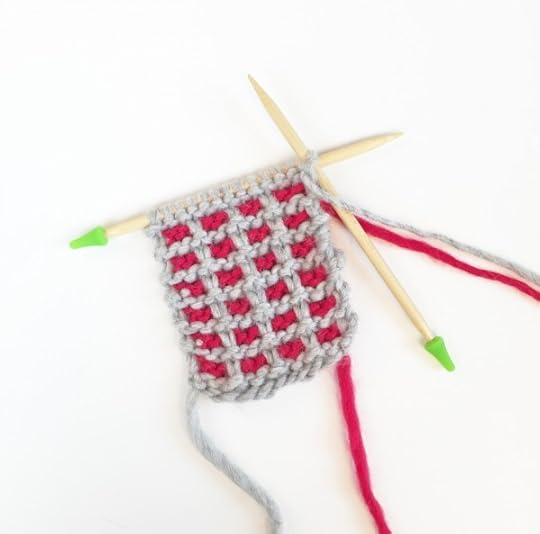
Pro Tip: 2 double-pointed needles are often a better length for straight knitting smaller pieces. Simply add Point Protectors to one end (to prevent stitches falling off), and you’re good to go!
Repeat Rows 2-5 (mosaic pattern stitch), until piece measures 11″/28 cm or just a smidgen shorter than the circumference of your cup.
BO.
FINISHING
With jumbo tapestry needle and yarn, seam together short ends.
Weave in ends.
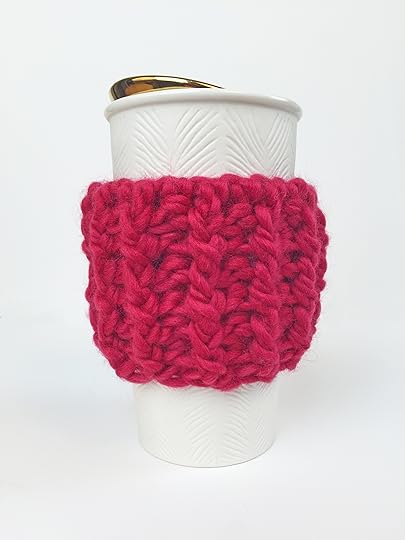
RIBBED CROCHET VERSION
MATERIALS
Small amount (approx .8 oz) of bulky-weight yarn. (I used Patons Classic Wool Roving)
U.S. Size K (6.5) Clover Amour Crochet Hook
Clover Jumbo Tapestry Needle
FINISHED SIZE
10″/25 cm (or desired) circumference
3 1/2″/9 cm width
GAUGE
10 sts x 4 rows = 4″/10 cm in ribbed pattern stitch
Note: If you’d like to adjust the circumference for a smaller cup, CO multiples of 4 + 3. This is a very stretchy stitch pattern, so consider making your cozy 1″/2.5 cm than cup circumference.
DIRECTIONS
Ch 27.
Row 1: Hdc in 3rd ch from hook, and in every ch to end. Turn. –25 sts.
Row 2 (RS): Ch 2 (does not count as hdc), *FPhdc, BPhdc; rep from * to end. Turn.
Row 3: Ch 2, *BPhdc, FPhdc; rep from * to end. Turn.

Repeat Rows 2-3 (ribbed pattern stitch) until piece measures 3 1/2″/9 cm. or desired width.
Fasten off.
FINISHING
With jumbo tapestry needle and yarn, seam together short ends.
Weave in ends.
Interested in hearing more about Holiday Gift making? Watch this week’s, Ask Me Monday!
Ask Me Monday #10: 3 Tips for Holiday Gift Making + Q & A!
Posted by Vickie Howell on Monday, October 12, 2015
xx,
Vickie
October 9, 2015
Flakey Fingers Mittens KAL
Can you believe it’s time for another Knit-along?! Man, I feel like we’ve been knitting-along with a fervor, lately. With the Holidays coming up though, why slow down? Every thing we’re working on is for the greater, gift-giving good! So, whether you’re knitting for friends, family, office mates or charity, I hope you’ll join me for this one: the Knit Simple Magazine, Flakey Fingers KAL, starting October 13th! As always, we’ll be casting on and off together on Facebook. Knit at your own pace, and check in when you can.
The pattern for these can be found in the Holiday issue of Knit Simple (available in both digital and print editions). You’ll also need a skein of Caron United (or equivalent, worsted-weight yarn), along with scraps of two other colors.
Hope to see you there!
Yours in perpetual knit-alongs,
Vickie
October 7, 2015
20 Weekend Projects for Halloween!
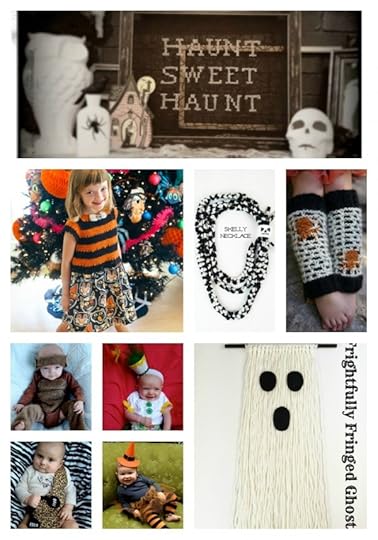 20 Halloween Projects You Can Make in a Weekend!
It may only be Wednesday, but let’s be honest: we’re all thinking about our weekend projects! The good thing: you can head to the craft store over the next few days for supplies, then start and FINISH any one of these 20 projects for Halloween! That’s one, wicked win. Here are the project links!
Haunt Sweet Haunt Wall Hanging
Trick or Sweet Dress
Skelly Necklace
Webbed Legwarmers
Baby Sasquatch Costume
Baby Munchkin Costume
Frightful Fringe Ghost
Baby Strongman Costume
Baby Witch Costume
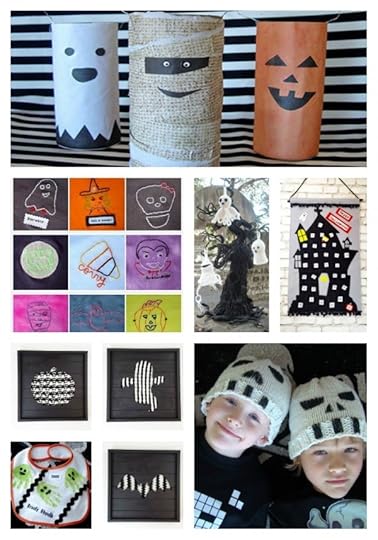
T.P. Jeebies Decorations
Halloween Doodle Embroidery
Halloween Tree
Halloween Countdown Calendar
Spooky Swatch Pumpkin
Spooky Swatch Ghost
Drooly Ghouly Bib
Spooky Swatch Bat
Last Minute Skull Caps
NOT SHOWN:
Halloween Tree
Wicked Stitch Totes
Here’s to some creepy crafting!
xx,
Vickie
September 30, 2015
Ode to Adam Lippes, Plaid Hat

Ode to Adam Lippes for Target
This Fall –ok, and frankly since my punk rock, late teens — I’m mad for plaid, so I’m thrilled to see retailers and runways alike, riding the cross-stripes train! From Tartan to lumber jack, it’s hip to be (melded) square(s); and I dig ’em all. It’s the simplest form, checkerboard and outlined cubes, however that has me swooning this season.
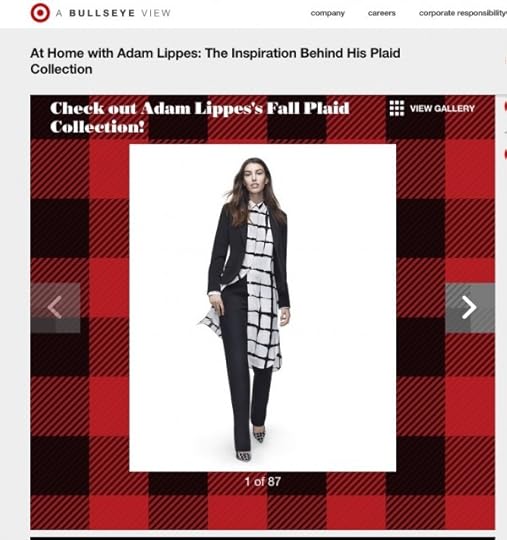
Which brings me to the point of this post, and my latest beanie pattern: the Adam Lippes collection for Target. His pieces go from simple Shibori to the fundamental flannel plaid, which inspired me to create an accessory project to compliment a be-squared outfit during the colder months. So knitters: be in-the-(k)now and get to work on your tricoté tartan! Here’s how to make the Ode to Adam (OtA) hat.
OtA Hat
Materials
1 ball each, Patons Classic Wool Roving (100% wool; 109 m/120 yds), in colors: (A) Aran, and (B) Black.
Size U.S. 10 1/2 (6.5 mm) double-pointed needles (dpns) –or size needed to obtain gauge.
Size U.S. 11 (8 mm), 16″(41 cm) circular needle (circ)–or size needed to obtain gauge.
Size U.S. 11 (8 mm) double-pointed needles (dpns) –or size needed to obtain gauge. (NO SLOUCH VERSION ONLY)
Tapestry needle
Sizes
S/M(L/XL)
Finished Measurements
Circumference: 20″(21″)/51 (53.5 cm)
Fits up to 22″ (23″)/56 (58.5) head
No Slouch Version Length: 8″(8 1/2″)/20 (21.5) cm
Slouchy Version Length: 10″(11″)/25.5 (28) cm
Gauge
12 sts x 22 rows = 4″/10 cm in garter mosaic pattern stitch.
Directions
With A and smaller dpns, CO 60(63) sts. Divide sts evenly amongst needles; join taking care not to twist.
Rows 1-6: *K1, p2; rep from * around.
Switch to circ needle.
Row 7: Knit.
Join B when necessary.
Row 8: *Sl 1 with Color A , K2 with Color B; rep from * around.
Row 9: *Sl 1 (A); p2 (B); rep from * around.
Row 10: With A, knit.
Row 11: With A, purl.
Rep Rows 8-11 for garter mosaic pattern stitch, until piece measures 7″ (7 1/2″)/No Slouch Version, and 10″(11″) Slouch Version.
SLOUCHY VERSION:
Bind off, leaving long tail of A.
NO SLOUCH VERSION ONLY:
Crown shaping — switch to larger dpns when necessary.
Row 1: *K1, k2tog; rep from * around.
Rows 2, 4 & 6: Purl.
Row 3: *K2tog; rep from * around.
Row 5: *K2tog; rep from * around, ending with a k0 (k1).
Row 7: Repeat Row 5. –5 (6) sts.
BO, leaving a tail.
With tapestry needle, weave tail through remaining live sts on needles; remove needles; cinch shut. Feet tail through inside of hat.
Finishing
SLOUCHY VERSION ONLY
Close hat crown as follows:

Vickie’s Signature Slouchy Beanie Closure Method (Follow L-R)
With tapestry needle & Color A tail, insert through center front and back (joining front and back at center); take a stitch. (Upper left photo above.)
Pinch side edges to the same center point and stitch through both thicknesses. The top of the beanie will now be in a star formation.
Continue in this manner, pinching the opposite edges and stitch them together until top of hat is completely closed. Fasten off.

Shown: White, Slouchy Plaid; Red, No-Slouch Plaid
BOTH VERSIONS
Using colors A & B held together, make pompom using your preferred method. I love using a Pompom Maker!
Sew pompom onto top of hat.
Weave in ends.

Love you beanie, and ready to embrace even more plaid? See my “Mad for Plaid” board on Pinterest! Oh, and don’t forget to tag @vickiehowell or #vickiehowell on Instagram, Twitter or Facebook, if you make the OtA hat. I love seeing your finished projects!
xx,
Vickie
September 28, 2015
5 Ways to Knit & Crochet the Blues Away

Every week I hold a live, video Q & A session on my Facebook page called, Ask Me Monday (10amPT/1pmET). Sometimes I show a technique, often I just talk, and sometimes there’s a theme. Today, I went the latter route. Although I did answer a bunch of unrelated questions, my main focus was sharing how knitting and crochet can help one get out of a funk (or at least ease it.) See above for the gist, and/or give the video a watch for more in-depth scoop.
Ask Me Monday #9: 5 Ways to Knit & Crochet the Blues Away + Q & A
Posted by Vickie Howell on Monday, September 28, 2015
Be well, stitchers!
xx,
Vickie
September 23, 2015
Halloween Project: Skelly Necklace

Today’s the first day of Fall which means it’s officially time for some creepy crafting! Even though I’ve been making Halloween projects for the past month already, I’m celebrating the “official” season by kicking Hallow’s Eve prep off with a skull-turning necklace crocheted using chunky, black & white jersey yarn and a Jumbo Amour hook. Speaking of, this project will surely get your kids hooked on crochet. Created using only the chain stitch it’s a great, first project that your baby boos can make with friends. Looking for a treat for teacher? This necklace will do the trick! So chain on and have some fun using your crochet skills for stitching Skelly. Enjoy!

Materials
Approx. 3.5 oz., t-shirt or jersey yarn ( I used this.)
Size U.S. P/Q (15 mm) Clover Jumbo Amour hook
Over-sized wooden barrel bead, or unfinished napkin ring
White craft paint
Sponge brush
Black marker
Finished Length
Hangs approx 17″/43 cm long
Directions
Crochet three chains, respectively measuring: 24″/61 cm, 28″/71 cm, and 34″/86 cm long.
Fasten off; set aside.
Paint bead white; let dry.
Using marker, draw skeleton face onto bead.
Finishing
Lay crocheted chains on a table from shortest to longest, and looped to create necklace shape.
Slide 3 tails from one end of loop up through bead; knot tails from both ends.

Slide bead back over knot. Trim tails.

xx,
Vickie
P.S. Want more Halloween craft projects? Check these out!
September 16, 2015
Cork Board Weaving

Cork Board Weaving
If you’re a parent (or student), then you’ve probably spent a lot of time recently in the office supplies section buying back-to-school items for the kids — I know I have. No matter how far ahead I plan there always seem to be several trips made to the store, as fellow adults elbow their way towards that last, kitty cat folder while our kids wander around in a pencil-selection-induced haze. It’s never the smoothest of operations, but on the up side I find the beefed-up stationary section to be a veritable playground of crafty potential. After all, some of my favorite organization containers include pencil cases and zippy bags found amidst the school supplies!
This year the small, square cork boards (intended for dorms or other small places) caught my eye. Traditionally, these are made to hold and display visual items so why not, I thought, use it as the actual vehicle to create one of those items? So, I threw one in my basket along with a box of pins and set off to turn it into an office supply loom. The result was a fun experiment with creating textiles out of scrap yarn and a dream! Here’s how you can give it a try.

Materials
Cork board
Straight pins
Tapestry needle
Plain string or Sport-weight yarn
Small amounts of varying weights, colors, and textures of yarn (Scraps from your stash!)
Scissors
How to Cork Board Weave:
Line up pins next to each other towards top of cork board; then again towards bottom (or the distance at which your finished piece will be a few inches/several centimeters shorter.)
Create warp: Tie a slip knot in string or plain yarn and place it on the top-left pin; bring string down to bottom-left pin and wrap around, then up to the next pin on top and wrap around. Continue wrapping string until you reach the last pin; tie knot.
Weave weft: Using tapestry needle and a strand (doubled for thinner yarns) of yarn and leaving a tail, weave over and under warp strands all the way across piece; turn and come back weaving the opposite way (so, under if you went over on the last row; under if you went over). Continue in this manner until you feel like you want to change colors; cut, leaving a tail. Begin weaving process with new color.
Continue until piece is as long as you want or is about 2-3″(5-7.5 cm) from pins.
Leave piece on cork board to display as is on a shelf or wall, or finish as follows:
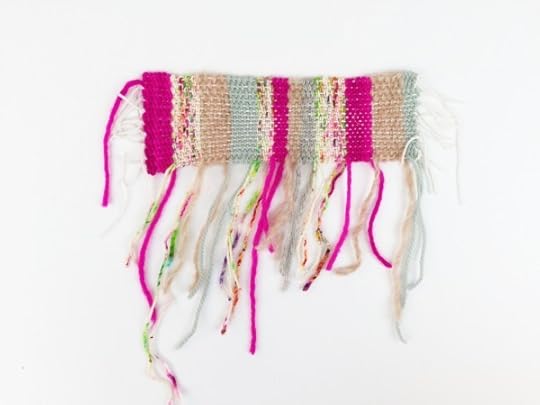
Snip warp string close to the pins on either end. Knot strands together across to secure work.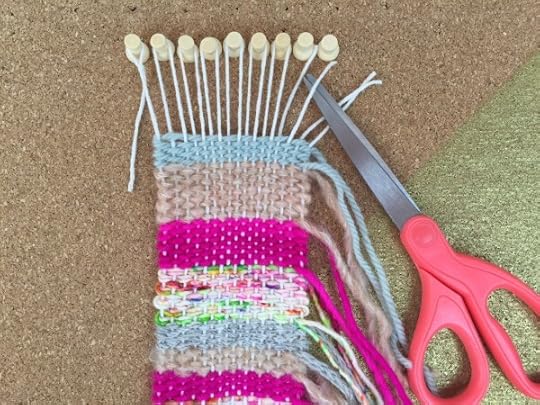
From here the world is your cork board-woven oyster. Weave in ends; or don’t — fringe is cool, too! Sew together to made a wristband, or cup cozy, or frame as is for a gloriously scraggly piece of art!
Enjoy!
xx,
Vickie
@vickie
Psst…parents, art teachers, and scout leaders, bookmark this project for a future teaching project. It’s a great intro to weaving for kids!


