
Vickie Howell's Blog: Vickie Howell's Website, page 49
September 14, 2015
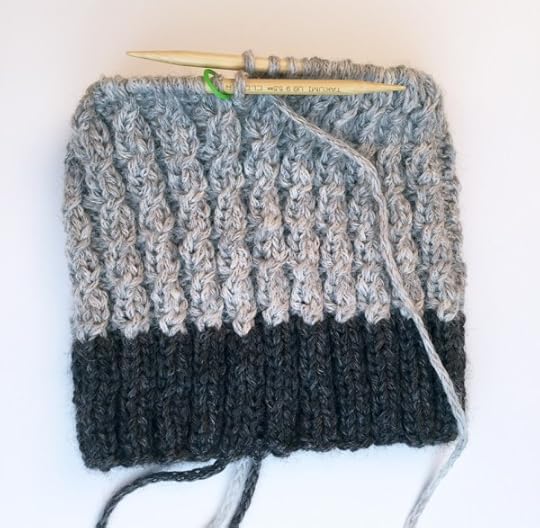
New Pattern: BIL Beanie


Knitting Pattern: BIL Beanie
Us knitters get a lot of requests for handmade gifts, which is both a blessing and a curse. It’s a great feeling to be able to give someone something that you put your love and work into, but there aren’t always enough hours in the day to produce all the knitted-love we have to offer! This conundrum came up when my brother-in-law asked me for a hat. Several times. I really, really wanted to make him one, but with deadlines and family obligations it took way longer than I’d have liked it to. That said, I wanted to knit him something classic enough that it wouldn’t go out of style (read: wouldn’t require a replacement any time soon), and also quick enough to make that I’d be able to finish it in a few evenings. The result, is the BIL Beanie. Knit in a chunky, lush alpaca blend and on Takumi Bamboo Size 9 needles this project goes by fast, but feels luxurious every stitch of the way. Bookmark this for holiday gifts for the guys (and gals) in your life. Enjoy!
Materials
Approx 150 yds/75 gr of bulky-weight, alpaca blend yarn in (A) Dark Gray and (B) Light Gray. (I used 1 hank each of two colors of this.)
Size U.S. 9 (5.5 mm), 16″/41 cm Clover Takumi Bamboo circular needle
Size U.S. 9 (5.5 mm) Clover Takumi Bamboo double-pointed needles
Stitch Marker
Clover Jumbo Tapestry Needle
Finished Size
Unisex S/M(L/XL)
Stretches to fit 21″(23″)/53.5(58.5) cm head
Gauge
Approx 17 sts x 20 rows= 4″/10 cm in 2 x 2 rib, slightly stretched.
SPECIAL TERM
RT: Right Twist—K2tog but do not slip st off needle, insert right needle between these 2 sts and knit the first st again, slip both sts off needle.
Directions
Brim:
With circular needle and A CO 88 (92) sts. Join, being careful not to twist sts. Place a marker (pm) for beginning of round (rnd).
Rnd 1: *K2, p2; rep from * around.
Rep Rnd 1 until piece measures 2″/5 cm from CO edge.
Beanie body:
Join B; cut A.
Rnds 1 and 2:*K2, p2; rep from * around.
Rnd 3: *RT, p2; repeat from * around.
Rnd 4:*K2, p2; rep from * around.
Repeat Rounds 1–4 until piece measures 6″(6 1/2″)/15(16.5) cm from CO edge.
Crown:
Note: Change to dpns when necessary.
Join A; cut B.
Rnd 1:*K2tog, p2; repeat from * around—66 (69) sts.
Rnd 2: *K1, p2; repeat from * around.
Rnd 3: *K1, p2tog; repeat from * around—44 (46) sts.
Rnds 4: *K1, p1; repeat from * around.
Rnd 5: *K2tog; repeat from * around—22 (23) sts.
Rnd 6: Knit.[image error]
Rnd 7: *K2tog; repeat from * to last 0 (1) sts, k0 (1)—11(12) sts.
Cut yarn leaving a long tail. Thread tail through remaining sts. Pull tight and secure.
Finishing
Weave in ends.
Block if necessary.

xx,
Vickie


September 10, 2015
Coming Soon: Brioche Cowl Knit-along!
Shadow Cowl
Hey there! I’ve teamed up with Yarnspirations for another knit-along, and for this one we’re stepping it up a bit with some intermediate techniques — Brioche Stitch, and Applied i-Cord — to make the Shadow Cowl!
Watch the video above to hear the scoop, then nab your supplies here!
xx,
Vickie
September 9, 2015
5 Ways to Monetize Your Craft
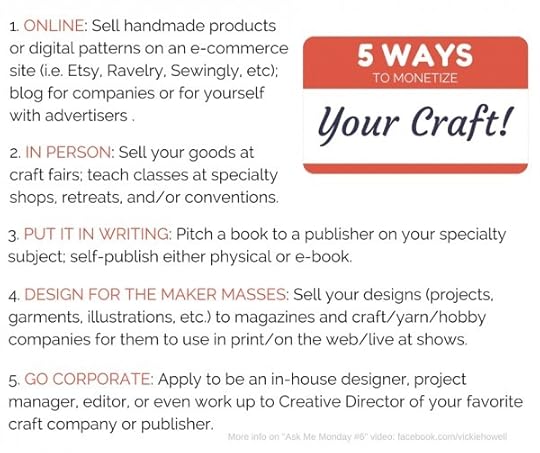
Hey, all! FYI, I’ve started doing weekly, live videos on Facebook. Every Monday at 10amPT/1pmET I join you, from wherever I am, to chat knitting, crochet, crafts, and creative entrepreneurship– along with an interactive Q & A. I call these streams, Ask Me Mondays. So far there have been 6 videos which can all be watched on my Facebook page here.
This week, in honor of Labor Day, I talked about 5 different ways that creative types could turn their craft into streams of income. The bullet points of those are pictured above, but if you click on the image below you can watch the video where I go pretty deep into each of the 5 points.
 Click here to watch the video!
Give it a watch, and if you like it, please share it! Also, tune in next Monday for a new, live stream!
Thanks!,
Vickie
@vickiehowell
September 3, 2015
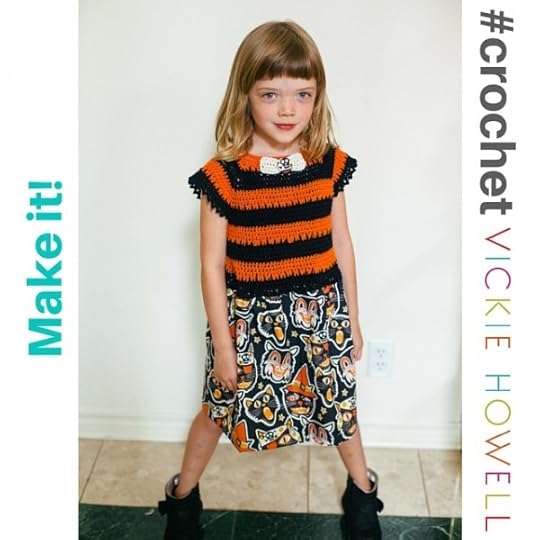
New Crochet Pattern: Trick or Sweet Dress


Trick or Sweet: Crochet Halloween Dress Pattern!
As those of you know who watch my “Ask Me Monday” videos on Facebook, a couple of weeks ago I got a wild hair to design a girls’ crocheted dress for Halloween — the combination of scoring this awesome, vintage-looking cat fabric along with a Halloween photo shoot my buddy, Jennifer Perkins was already planning, was too much motivation to ignore! Well, I’m happy to announce that the dress is finished and photographed, and the pattern written, edited, and ready to go. It’s been forever (years?) since I’ve designed something that’s not for a company or magazine, or as a promotion on my own site. Man, I’d forgotten all the work that goes into taking an idea from conception to a pretty pdf, but it felt good to add a pattern to my Ravelry store!
Trick or Sweet is a hauntingly cute dress that’s perfect for your favorite, little monster. It’s made with a top-down, seamless, crocheted bodice and fabric skirt, which makes it relatively quick to whip up. This is definitely a project that can be made in a weekend, so if you start now your cool cat will have a plenty of time to wear the Halloween heck outta it before the big day. Here’s the scoop:

MATERIALS
Trick or Sweet Pattern
1 ball each, Bernat Cotton-ish by Vickie Howell, (55% cotton/45% acrylic; 258 m / 282 yds) in colors: (A) Cotton Harvest, (B) Cotton Club, and (C) Cotton Ball (optional) — or similar, sport-weight yarn.
Size G/4 mm crochet hook — or size needed to obtain gauge
Tapestry Needle
4, split ring stitch markers
1/2” yard, cotton fabric
Straight pins
Coordinating sewing thread & needle
Sewing machine (optional)
1, 7/16” button
Fabric covered button (optional)
If you make this dress, please be sure to tag @vickiehowell on social media with any pictures. I love seeing them!
Happy, Halloween hooking!
xx,
Vickie
Psst…Change the colors and fabric and it works for any holiday or theme!
September 1, 2015
New Mag + Fringe Tree Wall Hanging

It’s so fun to watch a magazine go from conception to reality! Thus was the case for me with Interweave’s new, craft-of-all-trades cutie, Craft.Girl. About a year ago, my buddy Louisa Demmitt shared with me that she pitched a magazine to her bosses at F+W that would speak to the cool kids who are up for trying anything crafty. Thanks to her vision, a supportive team, and the projects from a bunch of designers: the first issue was born!
I was thrilled to be a part of the C.G. launch through my contribution of a Wintry Tree Wall Hanging, made using weaving sticks and different types of yarn. If you’ve ever wanted to dabble in wall tapestries, this is a great way to start. It’s easy and fun to make, and the finished product lents itself to to Fall or Winter decor!

It’s shaggy, 70’s-lovin’ look can be yours asap, too because Interweave has created a kit which includes all of the main supplies. Nab it now, and have yours done in time to decorate for the cooler months.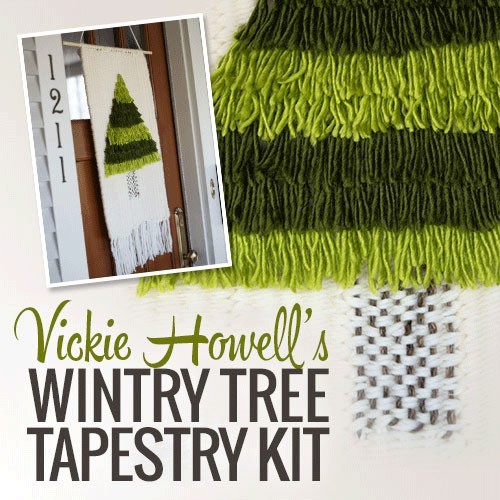
Enjoy!
xx,
Vickie
August 28, 2015
Plant Happy: Crochet Planter Hanger
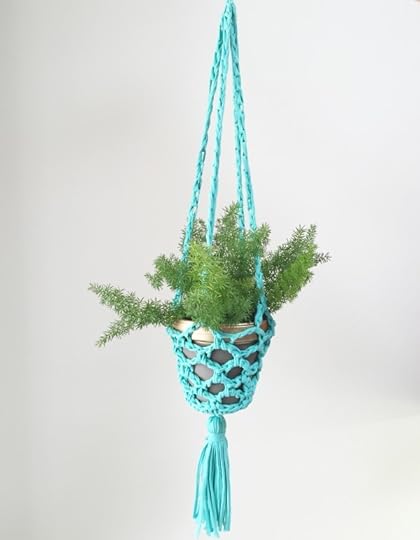
Crochet Hanging Planter
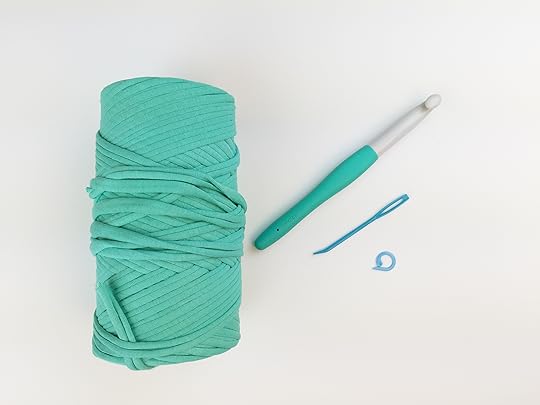
Every time I think I’m going to sit down and teach myself how to macrame a plant hanger, I end up looking longingly over at my crochet hooks. Crochet is so much more my jam! Truth be told, though I much prefer the look of bulkier yarn hangers, made with chunky yarns. Unfortunately, though until recently I didn’t have a large enough hook that would both do the job, and be comfortable to work with. I love the look of big crochet but man, sometimes creating it makes my wrist angry. Well, my friends, I’m pleased to report that my crochet dilemma is no longer! Thanks to my friends at Clover, I’m now the proud owner of a size 12 mm, Jumbo Amour Crochet Hook which is not only super-comfy to crochet with, but also comes in my favorite color: turquoise.
Man, I dig this hook — and when I also came across the same shade of jersey, t-shirt yarn I knew they’d be besties, right away. The result of their partnership is: Plant Happy, a bulky planter holder that’s fit to be tied onto anyone’s patio awning. Make one for yourself today, then bookmark this pattern for teacher gifts later. Enjoy!
PLANT HAPPY
Materials
T-shirt or Jersey yarn (12 oz. I used 1/2 a cone of this.)
Size 12 mm Jumbo Amour Crochet Hook
Split Ring Stitch Marker
Super Jumbo Tapestry Needle
Tara-cotta pot (7″/18 cm diameter at mouth x 6″/15 cm tall)
Book or 8″/20 cm piece of cardboard
Finished Size
Stretches to approx 25″/63.5 cm long (excluding tassel and hanging loop)
Gauge
9 sts x 8 rows = 4″/10 cm in sc
Directions
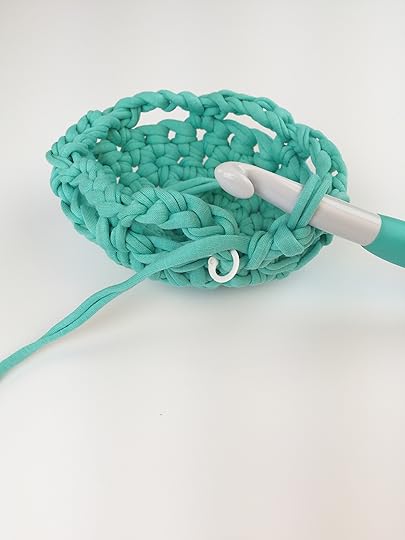
Bottom:
Ch 7; join with a sl st, taking care not to twist. Place marker.
Rnd 1: Ch 1 (counts as sc), sc in next ch and in every ch around. Join with a sl st. –7 sts.
Rnd 2: Ch1, sc in same st, *2 sc in next st; rep from * around. Join with a sl st. –14 sts.
Rnd 3: Ch 1, 2 sc in next st, *sc, 2 sc; rep from * around. Join with a sl st. –21 sts.
Rnd 4: Ch 1, sc in next st and in every st around. Join with a sl st.

Main Section:
Rnd 1: Ch 5, sk 2, sc in next st, *ch 4, sk 2, sc in next st; rep from * around. Join with a sl st in first ch of beginning ch 5. Place marker. –7 loops made.
Rnd 2: *Ch 4, sc in loop space; rep around. From here you’ll be working in a spiral, but use the marker as a guide to know when you’ve made a full round.
Continue as for Rnd 2 until piece stretches to approx. 4 1/2″/11.5 cm tall, ending with a ch 4, sl st in the loop closest to the marker.
Fasten off.

Hanger Strands:
Divide planter Main Section into fourths. Join yarn at the loop space of one of those four points.
Crochet a 14″/35.5 cm chain.
Fasten off, leaving at least a 9″/23 cm tail.
Repeat for remaining 3 points.
Finishing
Make tassel:
Wrap t-shirt yarn 15 or so times around cardboard piece. Slip an additional piece of yarn through the top loops of all of the strands; tie.
Carefully slide yarn off the cardboard, and pinch together about 1″/2.5 cm down from top, cinching tightly, using an additional strand of yarn.
Cut the bottom loops to create tassel strands.
Knot the four, Hanger Strands together, then create a hanging loop by tying an additional knot with the chain tails.
Weave in ends.
Place pot inside Planter Hanger. Donezo!

xx,
Vickie
Psst! Learn more about knitting, crochet, and cool products like the Jumbo Amour hooks on my, “Ask Me Monday” live video streams. Log on and tune in to my Facebook page every Monday at 10amPT/1pmET. Hope to see you there!
August 20, 2015
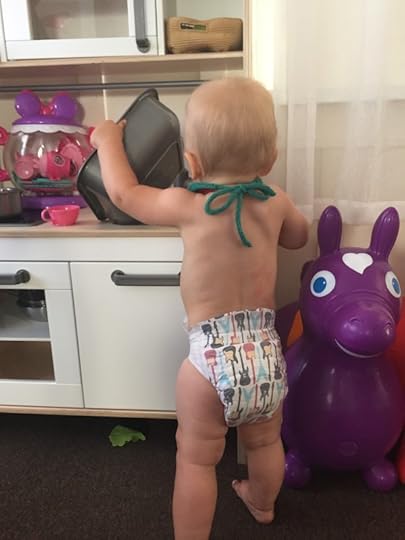
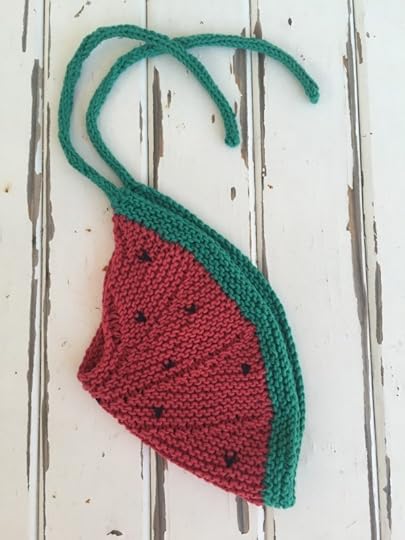
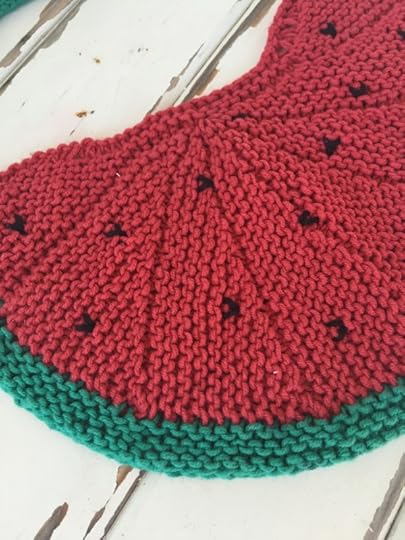
Knitting Pattern: Watermelon Baby Bib!
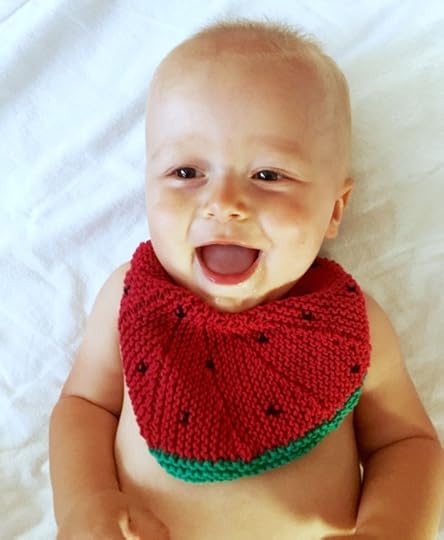
You may’ve noticed that just as fruit goes in and out of season, its respective member’s likenesses go in and out of style. Last year you couldn’t walk more than a few paces in your local department store or boutique shop without seeing something inspired by pineapples. This year, the same seems to be the case for its less-acidic friend, the watermelon! I’ve seen slices everywhere — from beach balls and buttons, to handbags and headbands, to dolls and dresses. Watermelon is the new pineapple. Clearly.
After spying this trend (again, and again), while out and about, I jumped on Pinterest to do further research. The result was a rabbit hole of watermelon findings, of which I curated my favorites onto a virtual board. That particular board, I promise, is bursting with fruit flavor! Click here to scroll through, and repin to your juicy, heart’s content. But I digress.

My point is that I was inspired. That inspiration combined with the fact that I was headed on a trip to visit some of my favorite bubbies, got me thinking about cute ways to apply the trend to something a baby would wear. It’s so dang hot right now, though that the only knitwear I could bear to subject a little one to, is a sweet bib. So, I grabbed the Takumi needles from the set I always travel with (you can watch the video on Facebook from this week’s, “Ask Me Monday” live feed to hear more scoop on knitting while traveling), and cast-on for this wee watermelon, wearable-treat! Here’s how you can make one too.
Enjoy!
xx,
Vickie
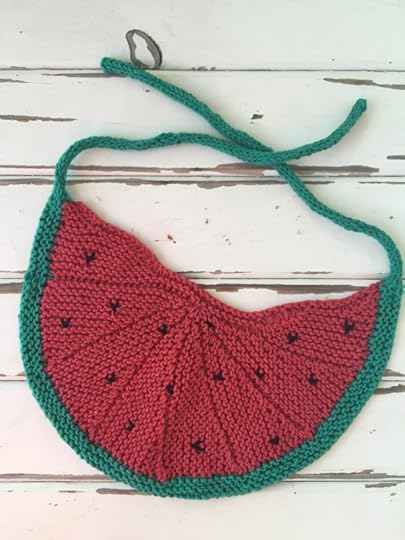 WATERMELON BIB
Materials
1 ball each of Bernat Cotton-ish by Vickie Howell, in colors: (A) Crimson Twine, (B) Jade Jersey, and Scraps of (C) Cotton Club
Clover Takumi Bamboo 16″ (41 cm) Circular Needle, Size U.S. 5 (3.75 mm)–or size needed to obtain gauge
Optional: 2, Clover Takumi Bamboo Double-pointed Needles (dpns), size U.S. 5 (3.75 mm)–or size needed to obtain gauge
Clover Chibi Tapestry Needle

Finished Measurements
Length: (at center) 5 1/4″ /13.5 cm
Width: 9 1/2″/24 cm
Gauge
21 sts. x 44 rows = 4″/10 cm in Garter Stitch
Directions
Note: This section is worked in short-rows, and can knit with either a circular needle or two dpns.
With Color A, CO 24.
Row 1: K 23, sl 1, bring yarn fwd, sl st back to LH needle, turn (last st will now be wrapped.)
Row 2: K 23.
Row 3: K 21, sl 1, bring yarn fwd, sl st back to LH needle, turn.
Row 4: Knit 21.
Row 5: K 19, sl 1, bring yarn fwd, sl st back to LH needle, turn.
Row 6: Knit 19.
Row 7: K 17, sl 1, bring yarn fwd, sl st back to LH needle, turn.
Row 8: Knit 17.
Row 9: K 15, sl 1, bring yarn fwd, sl st back to LH needle, turn.
Row 10: Knit 15.
Row 11: K 13, sl 1, bring yarn fwd, sl st back to LH needle, turn.
Row 12: Knit 13.
Row 13: K 11, sl 1, bring yarn fwd, sl st back to LH needle, turn.
Row 14: Knit 11.
Row 15: K 9, sl 1, bring yarn fwd, sl st back to LH needle, turn.
Row 16: Knit 9.
Row 17: K 7, sl 1, bring yarn fwd, sl st back to LH needle, turn.
Row 18: Knit 7.
Row 19: K 5, sl 1, bring yarn fwd, sl st back to LH needle, turn.
Row 20: Knit 5.
Row 21: K 3, sl 1, bring yarn fwd, sl st back to LH needle, turn.
Row 22: Knit 3.
Row 23: K 1, sl 1, bring yarn fwd, sl st back to LH needle, turn.
Row 24: Knit 1.
Repeat Rows 1-24, seven times MORE.
Note: If you chose to use dpns for last section, switch to circular needle here to accommodate extra sts.
Next Row: K 24, pu 23 across top of piece. –47 sts
Next Row: Knit.
Neck shaping:
Row 1: K 15, sl 1, bring yarn fwd, sl st back to LH needle, turn.
Row 2: K 15.
Row 3: K 14, sl 1, bring yarn fwd, sl st back to LH needle, turn.
Row 4: K 14.
Row 5: K 13, sl 1, bring yarn fwd, sl st back to LH needle, turn.
Row 6: K 13.
Row 7: K 12, sl 1, bring yarn fwd, sl st back to LH needle, turn.
Row 8: K 12.
Row 9: K 11, sl 1, bring yarn fwd, sl st back to LH needle, turn.
Row 10: Knit 11.
Row 11: K 10, sl 1, bring yarn fwd, sl st back to LH needle, turn.
Row 12: K 10.
Row 13: K 4, sl 1, bring yarn fwd, sl st back to LH needle, turn.
Row 14: K 4.
Row 15: K 3, sl 1, bring yarn fwd, sl st back to LH needle, turn.
Row 16: K 3.
Row 17: K 2, sl 1, bring yarn fwd, sl st back to LH needle, turn.
Row 18: K 2.
Row 19: K 1, sl 1, bring yarn fwd, sl st back to LH needle, turn.
Row 20: K 1.
Left neck shaping done.
Row 21: Knit 47.
Rows 22-41: Rep rows 1-20 (only wrap and turn rows will now be works on WS rows.)
Right neck shaping done.
Edging:
Note: You can use either dpns or circular needle for this section.
With Color B and RS facing, pu 88 sts evenly along entire bottom edge.
Row 1 (WS): Knit.
Row 2: Knit, picking up 7 sts evenly. –54 sts.
Row 3: Knit.
Row 4: Knit, picking up 2 sts evenly. –56 sts.
Row 5: Knit.
BO.
Ties:
With Color B and either dpns or circular needle, pu 4 sts at top corner of bib.
Work in i-cord for 10″/25.5 cm.
BO.
Repeat for opposite side.
Finishing
Using Color C and tapestry needle, duplicate stitch “seeds” in desired pattern across bib.
Weave in ends. Block if necessary.
August 18, 2015
Finger Weaving from Japan’s Naoko Minowa!

I get a lot of books for potential features or reviews, but rarely do they feature yarn-y techniques that I’m unfamiliar with. That (along with the fact that I *heart* anything, Japanese craft-related) is why I was thrilled to receive
Finger Weaving
by, Naoka Monowa. And, thanks to the folks at Stackpole Books, I’m even more excited to be able to share a HUGE excerpt showing the basics of this new-to-me method with you! I hope you’re as inspired by Naoka as I am. Happy finger weaving! –xx, Vickie
LOOP START METHOD
This method requires you to cut long pieces of yarn that will be folded in half when attached to the ruler. Always use this method when a project calls for the fringe to be finished with a Braided Loop (see page 52).
1. Tie a 59″ (150 cm) long string to both ends of the ruler.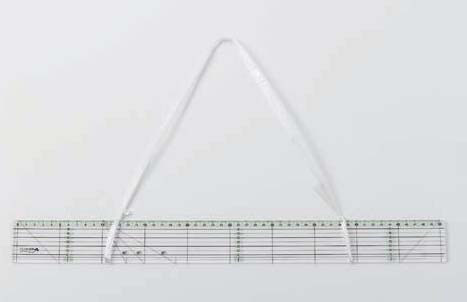
2. Pull the string taut at the center. Use a full plastic water bottle as a weight to hold the string and ruler in
place.
3. Fold one piece of yarn in half and bring the loop under the ruler.
4. Insert both ends of the yarn through the loop and pull to bring the knot up to the edge of the ruler.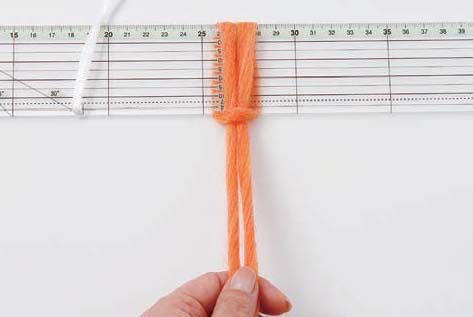
Note: When using multiple colors, pay attention to the order in which you attach the yarn to the ruler as this will influence the finished pattern. Refer to the individual project instructions for specific order.
5. Repeat steps 3-4 to attach the remaining pieces of yarn to the ruler.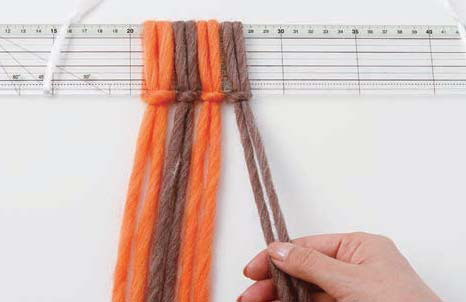
6. Completed view once all pieces of yarn have been attached to the ruler using the Loop Start Method.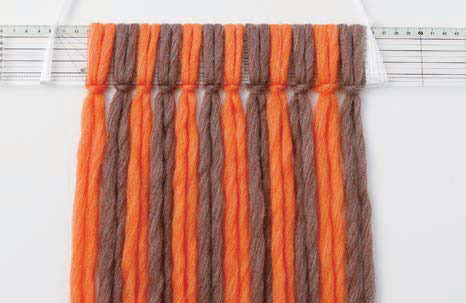
BASIC WEAVING TECHNIQUE
The basic weaving technique uses the far left strand in each row as the weft (horizontal) yarn. This method produces a slanted, striped pattern when worked in two or more colors of yarn.
MATERIALS
—20 yards (38 g) of super bulky-weight (#6 super bulky) wool yarn in orange
—20 yards (38 g) of super bulky-weight (#6 super bulky) wool yarn in brown
GETTING STARTED
1. For each color, cut 6 pieces of yarn that measure 118 1/4″ (300 cm) long each. You should have a total of 12 pieces of yarn.
2. Attach the yarn to the ruler using the Loop Start Method (see page 32). Make sure to alternate yarn colors as shown in the step 1 photo below. Once the yarn is attached to the ruler, there will be 24 strands of yarn that measure 59″ (150 cm) long each. Insert a string through for three rows to prevent your work from unraveling (see page 34).
INSTRUCTIONS
1. Separate the far left strand to be used as the weft yarn.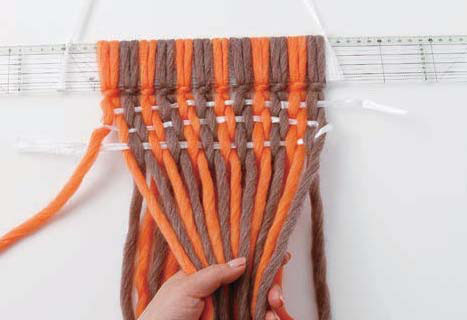
2. Pick up the strands of yarn positioned under the third string (in this example, these are the right strings of each looped piece of yarn).
3. Lift these strands up while holding the bottom layer of yarn down with your other hand.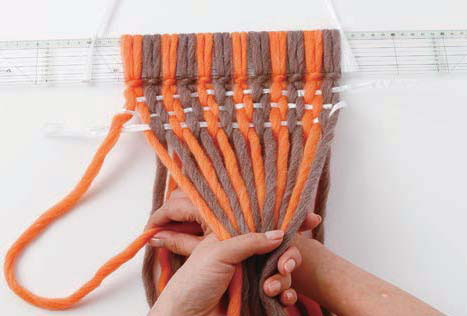
4. Insert the weft yarn between the two layers.
5. The first row is complete. Leave the weft yarn at the right edge for now—it will eventually become a warp (vertical) yarn.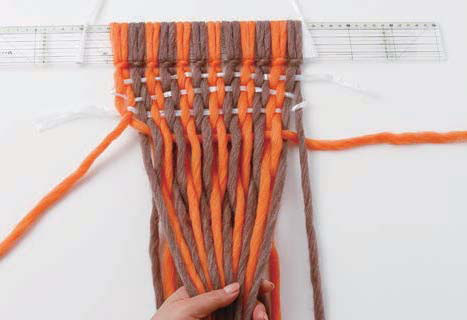
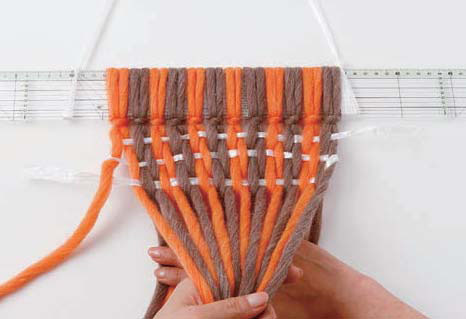
6. Separate the far left strand to be used as the new weft yarn. Pick up the strands of yarn that made up the bottom layer of the first row.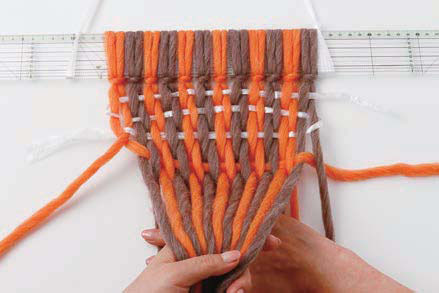
When picking up the bottom layer of yarn, pull the strands taut to tighten the weft yarn and stabilize the weave.
7. Insert the weft yarn between the two layers following the same process used in step 4.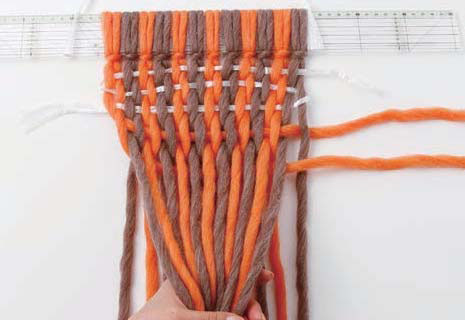
8. Bring the first row weft yarn down so it becomes a warp yarn. Make sure it crosses over the second row weft yarn.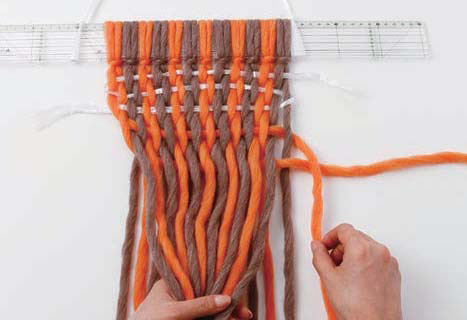
9. Repeat steps 6-7 to weave the third row. Bring the second row weft yarn down so it becomes a warp yarn again. Make sure it crosses over the third row weft yarn.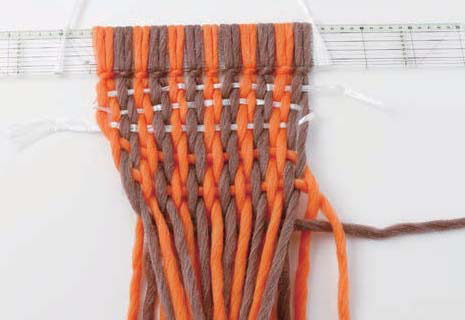
10. Continue weaving, making sure to always use the far left strand as the weft yarn. As you weave, move the plastic water bottle closer to you to hold the work in place.
11. The weaving process will cause the strands of yarn to become uneven in length. Weave until the shortest strand equals the desired fringe length (6″-8″ [15-20 cm] in this example).
12. Finish the fringe (see page 51), or continue with steps 13-15 to level out the end of the weave before finishing the fringe.
13. The last row of weaving will be slanted, as visible in the step 11 photo above. To level out this row, separate the far left strand as the weft yarn. Pick up about half of the strands that made up the bottom layer of the previous row. Weave the weft yarn between the two layers. The weft yarn will be positioned in the middle of work.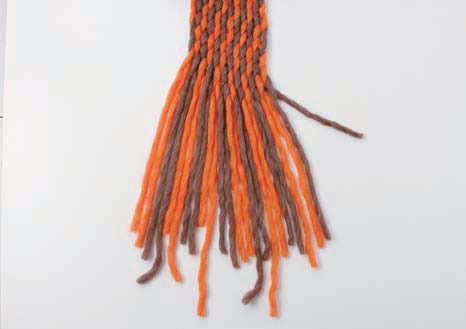
14. Repeat step 13, but only weave the weft yarn through a quarter of the work this time.
15. The end of the work is now level.
Finishing Methods
Once you finish weaving, use these options to finish both ends of the work. Note that certain finishing methods can only be used in conjunction with a particular start method.
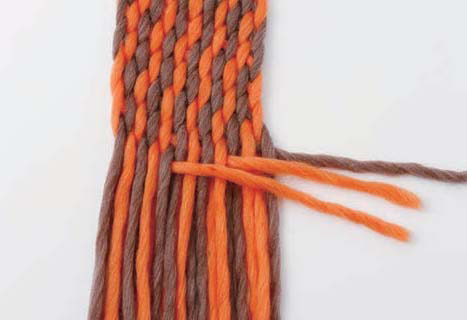
THE NECKTIE KNOT
1. When the weaving is complete, hold the weft yarn from the final row in your right hand and the rest of the yarn in your left hand. Wrap the weft yarn around the bundle in your left hand one time.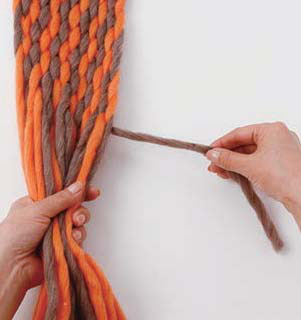
2. Bring the weft yarn through the loop to tighten.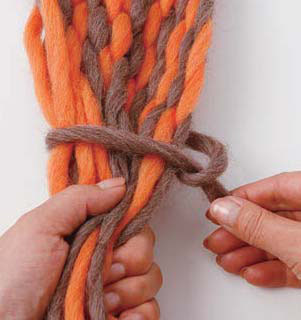
3. Pull the knot taut. Trim the fringe to desired length.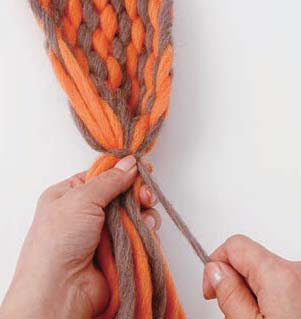
Finished piece!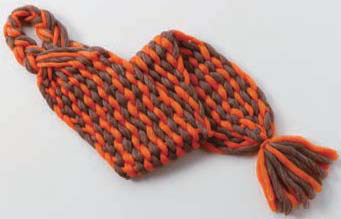
To learn additional, finger weaving techniques and make truly inspiring scarves and shawls be sure to grab a copy of Finger Weaving Scarves & Wraps (Stackpole Books), by Naoka Minowa!
August 13, 2015
Tree People Beanie Knit-Along Recap

I *heart* knit-alongs. It’s a great way to have some virtual hang-time with friends and “friends” (i.e. people I may not know personally, but who love the knitting as much as I do.) Last week was the 15th in a series I’ve been hosting for Knit Simple Magazine and Yarnspirations, this one for the Tree People Beanie. This project is quick, and relatively easy so some of us have made more than one as potential holiday gifts. Bookmark the pattern to keep that in mind for when you’re ready to start churning out presents for the Winter! In the meantime, though you can continue to join us on perpetual, the Knit-along Facebook page. But first, here’s a glimpse at some of our KAL, works-in-progress (WIPS), and finished objects(FOs)!

Tree People WIPs and FOs
The pattern for this hat is in the Fall 2015 issue of Knit Simple Magazine. The Patons Classic Wool Worsted used for this project is available in craft stores or online (along with pattern download) at Yarnspirations.com.
Stay tuned for the next, Knit-along with Vickie Howell coming in October!
xx,
Vickie
August 11, 2015
Please Vote: SXSW Interactive Panel!

Hey, guys! One of my passions is to help other creative types thrive in their careers, and my craft super-star friends, Jennifer Perkins and Jamie Dorobek (of Creative Really Awesome Free Things) have pitched a panel for next year’s SXSW Interactive show. If you would, I’d appreciate if you took a moment to vote for it. We’d love to make this panel happen! Here’s the scoop:
Crafting Success in the Digital World
The tech age has opened the doors for makers, writers, D.I.Y. experts, and other creative types to craft their own, independent careers. Whether it’s Lifestyle blogging, producing an artist-series podcast, or hosting a D.I.Y. Youtube channel, the world-wide-web is your oyster! How, though do you take your personal brand or project to the next level? During a panel discussion with 3, world-renown makers, we’ll approach that while also talking “buzz words”, creative titles, inventing opportunities, and how every social media post is really, just a mini-pitch of your awesomeness. Through conversation, stories from the trenches, and tried and true marketing tips, we’ll inspire you to thrive!
Thanks in advance for your help, and we hope to see you here in Austin next March for SXSW!
xx,
Vickie


