
Vickie Howell's Blog: Vickie Howell's Website, page 45
April 20, 2016
Spring Cleaning: Crochet Hangers!

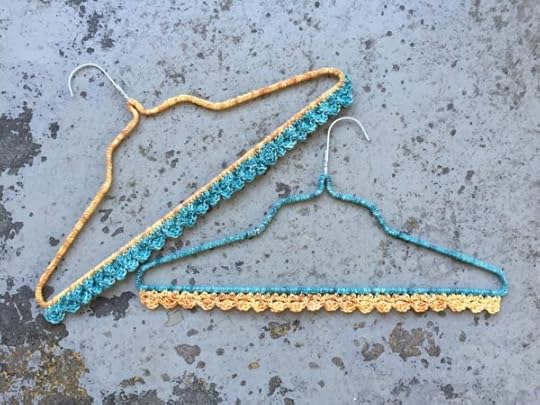
As the weather gets warmer, I find that my closet and I are exchanging knowing glances. It’s time. The mess must be dealt with. That Spring cleaning just got sweeter, though with some stitched wire hangers.
I see you, dirty closet, and raise you some crochet cuteness! Stitch these, then hang on.
Enjoy!
Materials
Wire Hanger
Size U.S. H (5 mm) Clover Amour Crochet Hook
Small amounts of 2 colors, worsted-weight yarn. I used Cascade 220 Superwash Effects
Clover Tapestry Needle
Instructions
With main color, join yarn around hanger with a slip stitch.
Single crochet (sc) around entire hanger as shown in Instagram video below.
A video posted by Vickie Howell (@vickiehowell) on Apr 19, 2016 at 2:07pm PDT
Take care to push stitches together firmly as you go, so that wire gets completely covered.

Fasten off.
Edging
Join contrasting through the back loop of one of the stitches towards the end of the hanger bottom.
NOTE: Since the stitch count may vary, you;ll have to fudge this a bit. Just do what you can to make it even.
1st Row: Join yarn by pulling loop through top of 1st blanket stitch. Ch 3, sk 4, sc in next st, *ch 2, sk 4, sc; rep from * to end. Turn.
2nd Row: Ch 3, *dc in ch-2 sp, 3 dc around the post of dc just made (makes 3 dc group), sc in next ch-2 sp; rep from * ending with sc in same ch-2 sp as last 3 dc group.
Fasten off. Weave in ends.
Happy hanging!
xx,
Vickie
P.S. Need something to listen to while you stitch? Check out my podcast, CRAFT-ish here or on iTunes!


April 12, 2016
Lunch Hour Knit Kits on Kitterly!

I. AM. SO. EXCITED. Today is the launch of my Lunch Hour Knit Kits collection for Kitterly! Each, totally doable D.I.Y. project is designed with busy knitters in mind. There are 4, individual accessory kits all of which are fun to make and can be knit in a handful of lunch breaks so that you, my spread-to-thin friends can work with gorgeous yarns and finish with a sense of accomplishment. Here they are!

Oven Mitt(ens) | Kit starts at $23.33 | Yarn: Manos Del Uruguay Maxima (Available in 3 colors!)

Patio Cafe Cowl |Kit starts at $44.33 | Yarn: Plymouth Baby Alpaca Magna (Available in 4 colors!)

Market Run Bag | Kit starts at $33.83 | Yarn: Blue Sky Alpaca Skinny Cotton (Available in 3 colors!)

Happy Hour Hat| Kit starts at $20.83 | Yarn: Cascade 220 Superwash Effects (Available in 3 colors!)

Like what you see? Well then, click on over to Kitterly to nab your kit(s)! But wait. Come closer. Psst, if you listen to the Episode 4 of the CRAFT-ish podcast you’ll hear a special code for 20% off these kits (or any Kitterly kit.) So come on. Whattaya waiting for?
Happy kitting!
xx,
Vickie
April 6, 2016
Oval Loom Ankle Sock Recipe

I love playing with new tools, so when Clover sent me the new, Oval Sock Loom I dove right in. I found it to be a fun (and speedy!) alternative to knitting socks on traditional needles, and quickly altered the sock directions from the package into an ankle sock for Spring. To tighten up the looser strands created from a loom cast-on, I added a crocheted picot edging which also gives the sock a feminine touch.
Here’s a recipe to make your own ankle socks. Loom on, twinkle toes! —Vickie

Materials
1 Ball, worsted-weight yarn
Scraps, contrasting color worsted-weight yarn
Clover Oval Standing Sock Loom
Size U.S. H/8 Clover Amour Hook
Clover Tapestry Needle
Finished Size
Women’s Medium
Finished Measurements
9″ circumference x desired length
Directions (Make 2)
Following the manufacturer instructions, cast-on stitches to all 24 pegs.
Cuff:
Work on all 24 pegs.
Rounds 1-8: *Knit 2, purl 2; rep from * around.
See demo of this stitch pattern from this week’s live, Facebook video below.
Ask Me Monday #29: Rib Stitch on Sock Loom + CRAFT*ish Update!
Ask Me Monday #29: How to Rib Stitch on Oval Sock Loom
Posted by Vickie Howell on Monday, April 4, 2016
Rounds 9-14: Knit.
Heel (Work as for Knit Sock instructions in package as follows):
Knit on peg 1-12 only.
Decrease stitches:
Decrease one stitch on each side of peg 1 and peg 12.
Simply bring the working yarn loosely across the front of peg 1 (no loop), then knit from peg 2-11.
Without knitting peg 12, bring the strand around the peg from back to front, and across the front of peg 11. Remove as well.
Change knitting direction and proceed counter-clockwise. Knit Stitch peg 11-3.
Without knitting peg 2, bring the strand around the peg from back to front, and across the front of peg 3. Remove as well. Change knitting direction and Knit Stitch from peg 3-10.
Without knitting peg 11, bring the strand around the peg from back to front and across the front of peg 10. (same method of Step 7). Change knitting direction and stitch from peg 10-4.
Continue decreasing in this manner on both sides until you decrease peg 9. Knit Stitch peg 8-5 to complete the decreases.
Increase stitches. Firmly wrap the working yarn around peg 4 from front to back, use the hook to scoop up 2 strands from the peg and Knit Stitch both loops together. (”Knit Two Together”)
Change knitting direction, wrap the working yarn around peg 4 clockwise, and then knit stitch. Next stitch from peg 5-8.
Firmly wrap the working yarn around peg 9 from front to back, use the hook to scoop up 2 strands from the peg and knit stitch both loops together.
Change knitting direction, wrap the working yarn around peg 9 clockwise, and then Knit Stitch. Next, Knit Stitch from peg 8-4.
Increase both sides, as described above, with the Knit Two Together and knit stitches. Knit from peg 1-12. After stitching one each of the knit two together and knit stitches on peg 12, change directions, and knit back to peg 1 to complete the increases.

Top and bottom view of heeled worked.
Foot:
Knit on all pegs for approx. 8 1/2″/21.5 cm OR 1 1/2″/4 cm shorter than your foot.
Toe:
Work as same for heel. Cut yarn, leaving tail.
Finishing
With a length of yarn (shown in a contrasting color in photos) and tapestry needle, thread through loops from bottom to top on pegs 1-12, then from top to bottom on pegs 13-24. Remove loops from loom; loosely tie knot. This yarn is simply to hold stitches from dropping while you graft.

Graft toe using Kitchener Stitch instructions from manufacturer. For the traditional knitters reading this, you’ll treat the waste yarn as you would needles and proceed with Kitchener Stitch as normal. Here’s a demo video as a refresher! Remove waste yarn when finished.
Using contrasting color yarn, decoratively whip stitch a seam over the toe grafting.
Picot edging:
With crochet hook, join contrasting yarn to cuff edge with a slip stitch.

Ch 4, slip stitch (sl st) in 3rd chain (ch) from hook. Single crochet (sc) in next st, *ch 3, sl st in 2rd ch from hook, sc in next st; repeat from * around. Join round with a slip stitch.
Weave in ends.

April 5, 2016
CRAFT*ish Podcast is LIVE!

My latest podcast, CRAFT*ish is officially live!, launching with three episodes with guests: Best-selling novelist, Rachael Herron, Spoonflower Co-Founder, Stephen Fraser, and Knitter’s Review Founder, Clara Parkes. Click here to listen on our website, or to subscribe through your favorite podcast app!

Thanks to all of you who have already subscribed and made CRAFT*ish show up on the iTunes, New & Noteworthy feed! If you like what you hear, please take a moment to rate & review on iTunes so we can get the visibility it takes to gain more listeners. I really appreciate it!
Special thanks to the first company to sign up to Sponsor episodes of CRAFT*ish, Kitterly. Your support means so much!

Happy listening!
xx,
Vickie
@vickiehowell
#CRAFTish
March 23, 2016
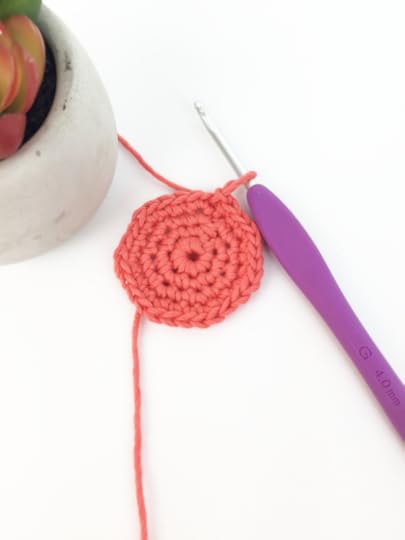
Sweet Succulent Stitches

I may be crafty, but the only thing in the garden I can craft is the certain demise of any foliage that meets my black-thumbed grasp. And yet, I can’t help feel smitten by the promise of Spring and all of its floral glory! Alas. Lucky for me I cam across these sweet, little succulents — more plastic than plant — that will give my office the air of wilderness without any living item getting hurt. They’re cute as is, but you know, because I’m a stitcher, I thought a little crochet adornment would add an extra dose of happy to their tiny, ceramic habitats. Sometimes, it’s the little things, people — and these little bits make my whole mouth smile. Happy Spring stitching! xx, Vickie
P.S. Don’t forget to bookmark this project for future teacher, host, and Mother’s Day gifts!
Materials
Scraps (read: stashbuster!) of sport-weight yarn
Size U.S. G/4mm Clover Amour Crochet Hook
Tapestry needle
Mini succulent pots (these are from the Dollar Spot at Target)
Finished Size
Made for 2 1/2″/6.5 cm pot
Gauge
Approx. 20 sc x 24 rows = 4″/10cm, slightly stretched
Special Stitch
Picot: Ch 3, sl st in 1st ch).
Directions
Base:
Ch 4. Join with a sl st in first ch to form ring.
Rnd 1: Ch 1 (doesn’t count as st), 6 sc in center ring. Join with a sl st. –6 sts.
Rnd 2: Ch 1, 2 sc in ea sc around. –12 sts.
Rnd 3: Ch 1, *2 sc in next st, sc in next st; rep from * around. –18 sts.
Rnd 4: Ch 1, *2 sc in next st, sc in next two sts; rep from * around. –24 sts.
Rnd 5: Ch 1, *2 sc in next st, sc in next 3 sts; rep from * around. — 30 sts.
Note: If working with a larger pot, continue in this manner, increasing 6 sts evenly each round until desired diameter, but taking care to finish with a multiple of 12 plus 6.
Body:
Rnd 1: Ch 3, dc in each st around.
Rnds 2-3: *Picot, ch 3, sk 3, sc; rep from * around, ending with a ch 3. Join with a sl st in ch-1 of picot.
Rnd 4: *Ch 3, sc in next ch-3 sp; rep from * around, ending with a ch 3. Sl st in 1st ch of beg ch-3.
Rnd 5: Ch 1 *3 sc in ch-3 sp, sc in sc; rep from * around. Join with a sl st.
Fasten off.
Finishing
Weave in ends.
This cozy with be really, well, cozy. It needs to fit snuggly to stay put, so expect a little wiggle-waggle when getting the pot in place!

Need crochet help? Check out my Get Schooled: Crochet playlist on Youtube, or ask me a question on my weekly, “Ask Me Monday”, live Q&A on Facebook (10amPT/12pmET)!
March 15, 2016
YARN: the Movie | Filmmakers SXSW Interview

Just a drive-by post from the SXSW 2016 festival to share my interview with the co-directors/producers of the new film, YARN: the Movie, Heather Milliard & Thordur Jonsson. Special thanks to Ben & Kyle from Bond/360 for setting this up, and to Dave Campbell for shooting and editing. Enjoy! –Vickie
March 14, 2016
“Paper Chain” Garland

Paper Chain Garland
Excerpted from Wee Garter Stitch (Sixth & Spring Books)
MEASUREMENTS
13-loop chain is approx 40″/101.5cm long
MATERIALS
I 1 2.4oz/70g skein
(each 282yd/258m) of Bernat Cotton-ish by Vickie Howell (cotton/acrylic) each in pop colors: #16208585734 Turquoise Terry Cloth (A), #16208585628 Cotton Harvest (B), and #16208585020 Lemon Twill (C)
OR neutral colors:
#16208585044 Grey T-shirt (A), #16208585008 Cotton Ball (B), and #16208585012
Coffee Filter (C)
I One pair size 5 (3.75mm) needles or size to obtain gauge
GAUGE
24 sts and 40 rows to
4″/10cm over garter st using size 5 (3.75mm) needles.
Take time to check your gauge.
STRIP (MAKE 5 IN A,
4 EACH IN B AND C)
Cast on 12 sts.
Work in garter st (k every row) until piece measures 12″/30.5cm from beg. Bind off, leaving a long tail for sewing.
FINISHING
Sew cast-on edge to bound-off edge of first A strip, forming a loop. Place B strip through loop and sew ends tog. Cont in A, B, C color sequence, join rem strips, end with A. I
March 13, 2016
Knitting on Home & Family!
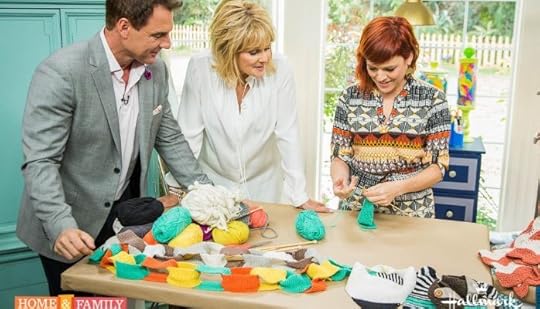
My professional passions are making and broadcasting, so any time I get to combine the two I feel like I’m pretty much winning the job lottery. Last week I had the pleasure of making a second appearance (see first here) on Hallmark’s Home & Family to spread the knitting gospel, and chat baby fashion in support of my latest book, Wee Garter Stitch: Must-have Knits for Modern Babies & Toddlers (Sixth & Spring Books). It was a blast, so I thought I’d share a couple photos, plus a behind-the-scenes video from my Facebook live stream showing the entire, H&F set. Enjoy!
 Table set-up with garments from my book for the shoot.
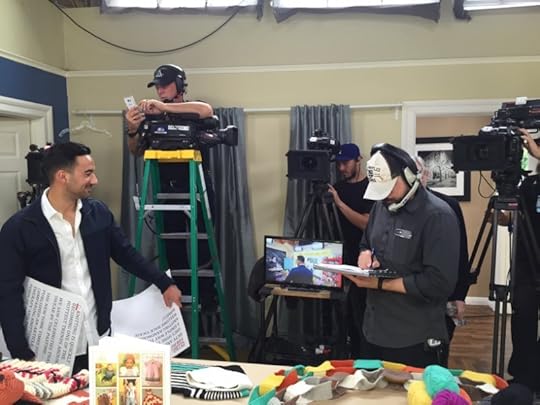 My view, minutes before the shoot.
If you missed the original airing of the episode, check out the re-broadcast on Hallmark Channel right after the newest episode on Monday!
xx,
Vickie
March 9, 2016
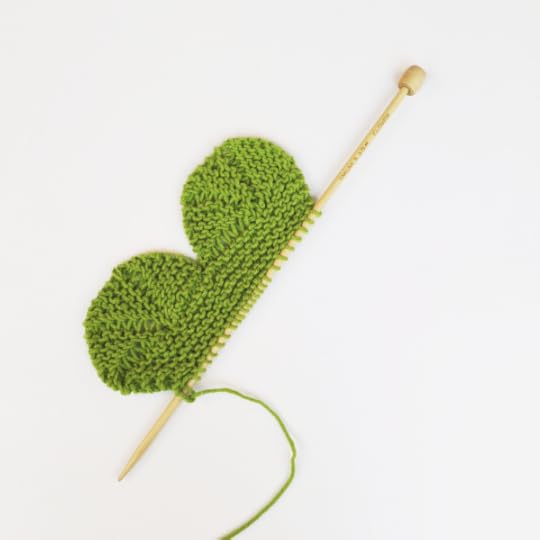
Knit 4-Leave Clover Motif

With a daughter named, “Clover”, as the Yarn Arts Ambassador for Clover Needlecrafts, and with a nephew who was born on St. Patrick’s Day the shamrock is a fairly prominent symbol in my life. This time of year, though the foliage synonymous with luck, finds its way into the hearts and homes of many — especially us crafty types!
This week’s project is a 3 or 4 leaf (your choice!) clover that you can use on its own as a wash cloth, or sew it it to any number of things as an applique. Knit on Takumi straight needles, the curved tops are created with short-rows, then stitches picked up for the body of the individual petals. Sewn together (or left apart with negative space in between on a fabric surface), the stitched hearts take on a leafy look fit for the leprechaun in your life. Here’s how you can make your own!
Materials
1 ball, Cotton-ish by Vickie Howell — or any, sport-weight yarn
Size US 5 (3.75 mm) Clover Takumi Needles
Clover Jumbo Tapestry Needle
Optional: Sewing needle & thread, trimming, and kid’s vest or tote bag
Note: For smaller clovers, use a light-weight yarn and size US 3 Takumi Needles. For larger clovers, go up a size or two in yarn weight and needle size.
Clover Leaf Directions (Make 3-4):
Curved Top:
CO 8 sts.
Row 1: Knit.
Row 2: K 7, sl 1, bring yarn to front and return sl st to LH needle, turn.
Row 3 (and all WS rows): Knit.
Row 4: K 6, sl 1, bring yarn to front and return sl st to LH needle, turn.
Row 6: K 5, sl 1, bring yarn to front and return sl st to LH needle, turn.
Row 8: K 4, sl 1, bring yarn to front and return sl st to LH needle, turn.
Row 10: K 3, sl 1, bring yarn to front and return sl st to LH needle, turn.
Row 12: K 2, sl 1, bring yarn to front and return sl st to LH needle, turn.
Row 14: K 1, sl 1, bring yarn to front and return sl st to LH needle, turn.
Row 15: Knit.
Repeat rows 2-15, three times total. One Curved Top complete.
Cut yarn, leaving live sts on hold on needle.
CO 8 sts, and repeat Curved Top Directions, for 2nd top.
Connect tops:
Next Row: K across 8 sts of Curve Top 2 on needle, pick up 8 additional sts across CO edge; k across 8 sts of Curved Top 1, pick up 8 sts across CO edge. –32 sts.
Knit one row.

Petal Body:
Row 1: K1, ssk, k to last 3 sts, k2tog. –2 sts decreased
Row 2: Knit.
Repeat Rows 1-2 until 4 sts remain.
Next Row: Ssk, k2tog, SKP.
Voilà, you’ve now finished one, heart-shaped petal!

Assemble Petals:
Using yarn and Clover Jumbo Tapestry Needle, seam together 3-4 petals (your choice) together at the side edges.
Weave in ends.
Optional Finishing
Now that you’ve got your clover, you can sew it to the back of a child’s vest, or onto a tote bag or pillow. To do that, you’ll just need sewing thread & needle. Decorate with an initial or other trimmings.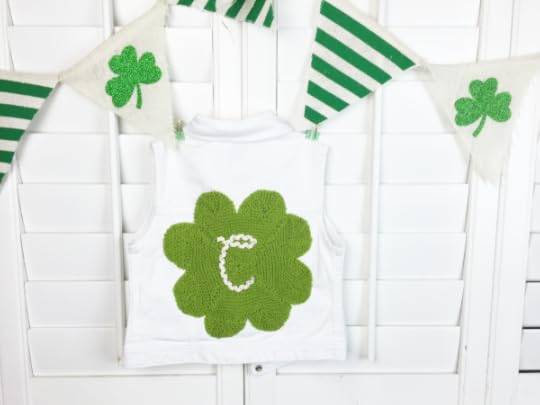
Have a lucky, knitting session. Happy St. Paddy’s Day!
xx,
Vickie
Psst! Can’t get enough Clover making? Give these additional knit and crochet options a whirl, using Clover Takumi Double-Pointed Needles or Amour Hooks!

February 28, 2016
Oscar Worthy Knits
 With moments until the 2016 Oscar Awards, I found myself reflecting upon some of the wonderful movies I was fortunate to see this year, as well the knitwear that appeared as quiet co-stars to a few magnificent characters. Here’s a quick, photo ode to knitting moments in film.
 45 Years: Honeycomb stitch pullover.
 Anomalisa: Simple cardigan with embroidered embellishment.
 Brooklyn: Stockinette Stitch cardigan and pullover.
 Inside Out: Turtleneck sweater.
 Hateful Eight: Double knit scarf.
 Room: Sock monkey mittens and raccoon hat.
 Trumbo: Cabled men’s collared shirt.
 Carol: Mohair, plaid tam.
If anyone reading this knows any of the designers who contributed to tonight’s nominated films, please post in the comments section so we can properly tribute them with awe.

Enjoy the show!
xx,
Vickie


