
Vickie Howell's Blog: Vickie Howell's Website, page 44
June 13, 2016
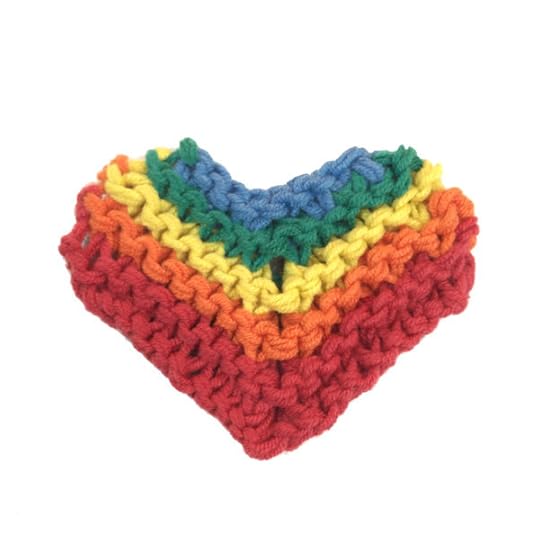
Knit Rainbow Heart for Orlando
I was in Washington, D.C. over the weekend for the National Needle Arts convention. While I was there it also happened to be Pride weekend. The city was alight with rainbows worn on people, draped over buildings, flying in the sky.
Meanwhile the worst gun massacre of our nation’s history was occurring in Orlando, Florida — each bullet killing or wounding over 100 of our fellow citizens, but also aimed at splintering the reflection of light that creates the rainbow symbol. However, we as a human society have not gone dark — we WILL NOT lose the light.
My whole heart goes out to the people of Orlando, to the family members of those slain, and to the LGBT community.
Everything that needs to be said about these acts of terror, hate and gun violence, I feel, has already been said. As long as we as people –members of the same human collective — use ANY belief system or ANY religion as license to be vile towards one another then, we will not be able to evolve into a more advanced society. We’ll remain stuck in a HOLDING PATTERN OF HATE; in an endless loop of fear, dread, and violence. I believe, though that we are better than this. I believe that we have a capacity to love that far exceeds the capacity to hate.
What does that mean for us in the craft community? I also believe that creative people swell with the ability to make good. We can MAKE positivity. We can MAKE gestures of love. Through our craft, we can MAKE our voices sing to reach to the highest rainbow.
So today we’re going to knit hearts, because we as makers feel better when are hands are creating. So create a little spot of happiness. Do it for yourself, or make one (or some) for others as a gesture of good will.
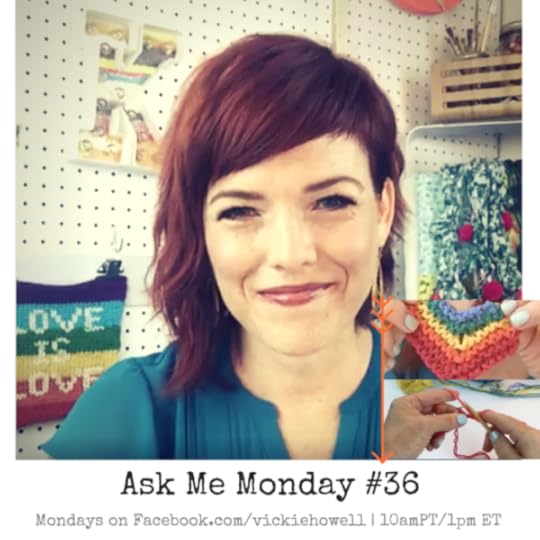
Click on image to watch video tutorial from this week’s, Ask Me Monday on Facebook.
Mitered Rainbow Heart
MATERIALS
Any type, worsted weight yarn in colors: (A) Red, (B) Orange, (C) Yellow, (D) Green & (E) Blue
US Size 8 needle
Tapestry needle
Optional: Small piece of felt + sewing needle & thread or hot glue gun
GAUGE
1 heart= 3 1/4” at widest point.
Note for bigger or smaller hearts, simply choose a lighter or heavier weight yarn.
DIRECTIONS
With A, CO 20 sts.
Row 1: K8, ssk, k2tog, k8.
Rows 2,4,6,8: Knit
Join next color.
Row 3: With B, k7, ssk, k2tog, k7.
Row 5: With C, k6, ssk, k2tog, k6.
Row 7: With D, k5, ssk, k2tog, k5.
Row 9: With E, k4, ssk, k2tog, k4
Row 10: Ssk, BO to last 2 sts (you’ll still have one st on the RH needle as well), ssk, BO remaining sts.
FINISHING
Weave in ends.
Block in heart shape.
Optional: Cut felt piece in same shape and hot glue or hand sew to back for stability and/or so you can add a pin to make this heart an adornment.
Pass it on, love it on.
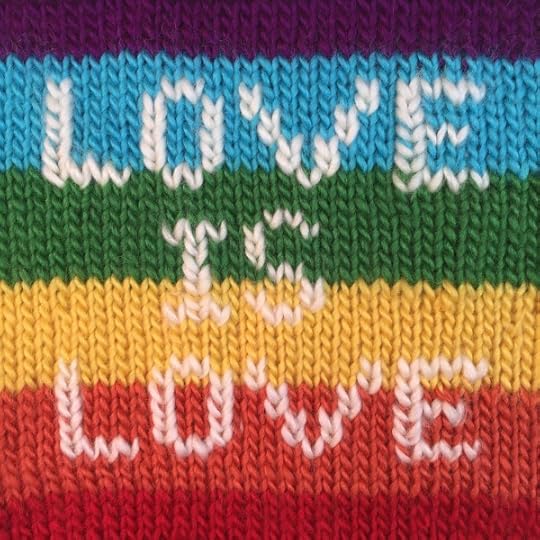
Looking for another project of the same ilk? Here’s the link to the Love is Love chart for sweaters, beanies, or whatever!
Sending so much love and peace to you all!
xx,
Vickie


June 8, 2016
15 Minute Bohemian Necklace


It’s Summertime, which means beach parties, bbqs…and bohemian baubles! Flip through this season’s catalogues — for places like Free People, House of Harlow, and Anthropologie — and you’ll find oodles of odes to gypsy-chic style. It’s hard not to get lured into the easy-breezy look of the bejeweled beatnik, and thanks to the raw stone charm trend at craft stores and the Handy Thread Twister (necklace strands have never been so easy to make!) you can stop trying. With just a few supplies and about 15 minutes of time, you can create a personalized piece thats fit for anywhere from Burning Man to brunch. Here’s how:
Materials
Clover Handy Thread Twister
Large stone charm
Thin strands of leather, cotton and/or metallic thread
8″/20.5 cm piece of chain
Jewelry findings (o-rings, endcaps, and clasps)
Jewelry Pliers
Finished Length
15″/38 cm (from clasp to bottom of chain)

Directions
Make Necklace Strands:
Cut 2, 12″/30.5 cm lengths of leather, cotton and/or thread to desired necklace length.
Create twisted cord as follows:
Tie thread piece to each hook on Handy Thread Twister, taking care that knot ends are short so they don’t tangle.
Lay the Handy Thread Twister on a table; pull threads perpendicularly and know ends together so the two pieces are even.

With the index and middle finger of your non-dominant hand, stretch the thread so it’s taught.
With your dominant hand, turn gear from top to bottom, 40-50 times, ending with the hooks facing down.
Pinch the knot at the end of the two threads; gently release hand holding the Handy Thread Twister; let spin. Thread will be twisted once spinning is complete.
Remove threads from the hooks; tie loose knot to hold in place for later. Necklace Strand made.
Repeat this process to make two more Necklace Strands.
And now for a break for an old-timey, tool-in-action flicker!
A video posted by Vickie Howell (@vickiehowell) on Jun 7, 2016 at 2:19pm PDT
Assemble Necklace:
Gently unknot ends of Necklace Strands. Lay pieces with one end off all strands so they’re even.
Using jewelry pliers, attach endcap finding to one end. Loosely braid Necklace Strands; attach endcap to opposite end.
Attach o-rings and clasp to endcaps.
Attach stone pendant by folding strands in half, sliding loop through pendant ring, and feeding strand ends through loop; pull taught.
Attach chain to onto Necklace Strands on either side of pendant.Wear it!

June 7, 2016
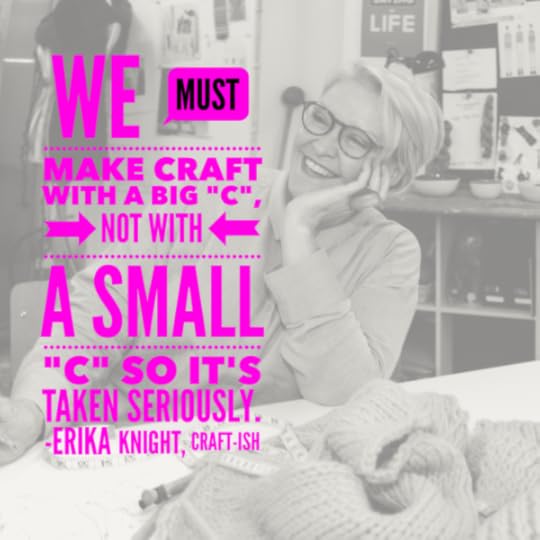
A Conversation with Erika Knight
May 31, 2016
Food & Lifestyle Photographer, Jody Horton!
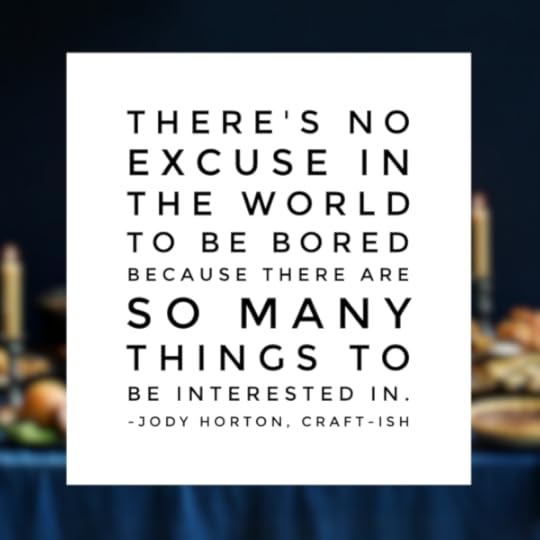
This week on CRAFT-ish, Vickie talks with Jody Horton about his journey from struggling documentarian to James Beard Award-winning and internationally recognized Food & Lifestyle photographer, how he applies his degree in Anthropology to his work, and his views on infusing creativity into his young sons’ lives. Go here to listen, get links, and see a few of Jody’s photos!

May 27, 2016
New Project: In Circles Tote

In Circles Tote by Vickie Howell. Black & White wallet by Kailo Chic.
Summer prep has me running in circles which perhaps, is why I’ve been drawn to knitting them so much lately. Thanks to Clover’s new Knitting & Crochet Jumbo Wonder Clips, now there’s an easy way to hold them in place while piecing these curvy cuties together. This week’s project plays with this handy tool –along with a few other of my Clover favorites — to create a great tote for the well-rounded gal. Enjoy! xx, Vickie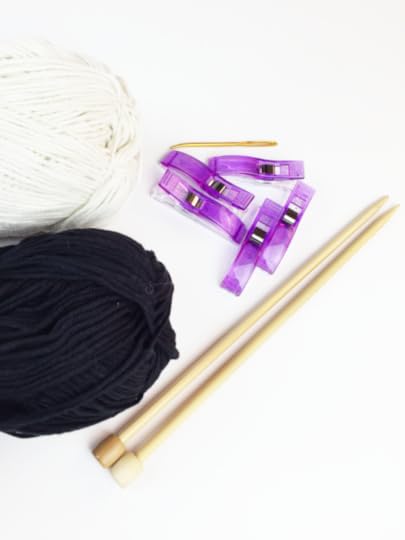
Materials
Bernat Cotton-ish by Vickie Howell (55% cotton /45 % Acrylic; 282 yds/252 m), in colors: (A) 2 Balls Cotton Ball, and (B) 1 ball Cotton Club.
Size U.S. 9 (5.5 mm) Clover Takumi Knitting Needles
CloverJumbo Tapestry Needle
Set, Clover Knitting & Crochet Jumbo Clips
1/2 yd. canvas fabric
Sewing needle & thread
Set of leather handles (with punched holes for sewing)
Sharp, Large-eyed Needle
Sewing machine (optional)
Finished Measurements
Approx 14″x 13″h/ 35 cm x 33 cm, excluding handles
Gauge
14 sts x 8 rows = 4″/10 cm in Garter Stitch
NOTE: This project is worked with a TRIPLE strand of yarn throughout. Wind each color of yarn into three separate balls ahead of time.
Instructions
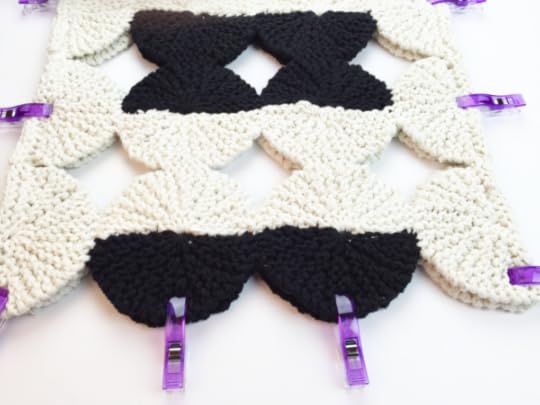
Circle Motifs (Make 12):
With a TRIPLE STRAND of A, CO 8 sts.
*Short row 1 (RS): K7, sl 1, bring yarn to front, return sl st to LH needle, turn (sl st is wrapped), k to end on WS.
Short row 2 (RS): K5, sl 1, bring yarn to front, return sl st to LH needle, turn, k to end on WS.
Short row 3 (RS: K3, sl 1, bring yarn to front, return sl st to LH needle, turn, k to end on WS.
Short row 4: (RS) K1, sl 1, bring yarn to front, return sl st to LH needle, turn, k to end on WS.**
Repeat from * 5 times more. Cut A, join B.
Repeat from * 6 times more.
BO, leaving tail for seaming.
Using tapestry needle, seam together CO and BO edges to complete circle.
Watch my short-row circle demo from this week’s, Ask Me Monday video!
Semi-circle Motifs (make 12):
Work as for Circle Motifs from * to **.
Next row (RS): Knit 8 sts (1st half of top of semi-circle), pick up 8 sts across 2nd half of semi-circle.
Next row: Knit.
BO.
Weave in ends on all motifs.
Assembly
Using main photo as guide, lay out 6 circles sandwiched by 6 (total) semi-circles out for FRONT of tote. Using ONE strand of yarn, tapestry needle & Jumbo Wonder Clips to hold in place, seam motifs together.
Repeat for BACK piece.
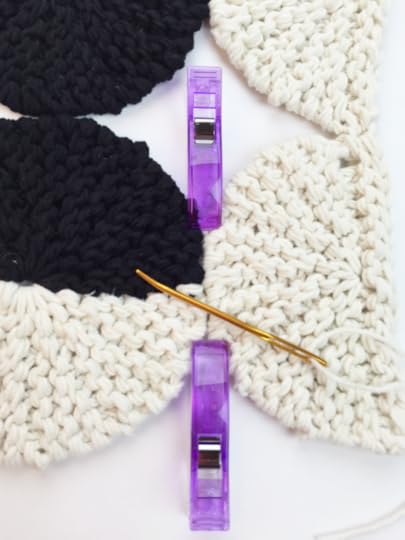
Once you have FRONT & BACK pieces assembled, use Jumbo Wonder Clips to hold them together (with wrong sides facing). Seam together sides, and rounded sections of the bottom motifs.
Finishing
Make lining:
Cut canvas to measurements of finished tote, adding seam allowance for sides and bottom, and hem allowance for top.
Pro tip: Painter’s drop cloths work great for tote bag lining. Bonus: they’re already hemmed!
With wrong sides facing, hem top; sew sides and bottom seams.
Turn right-sides out; press. Insert lining into bag; hand-tack to top, side seams of bag and along top motifs.
Using ONE strand of yarn and Sharp Tapestry Needle, sew handles to tote and lining.

Hooked on knitting circles now? Try making the Round Peg Blanket from my book, Wee Garter Stitch: Must-have Knits for Modern babies & Toddlers!

May 23, 2016
Knitscene Handmade

I’m so honored to be included in the special, Handmade edition of Knitscene Magazine which focuses on indie designers, dyers, artists, and shop owners. It’s such a great issue, filled with cool garments, interesting people and thoughtful features. Get the digital version now, and keep your peeps open for hard copies on shelves this week! xx, Vickie

May 18, 2016
Moogly on CRAFT-ish
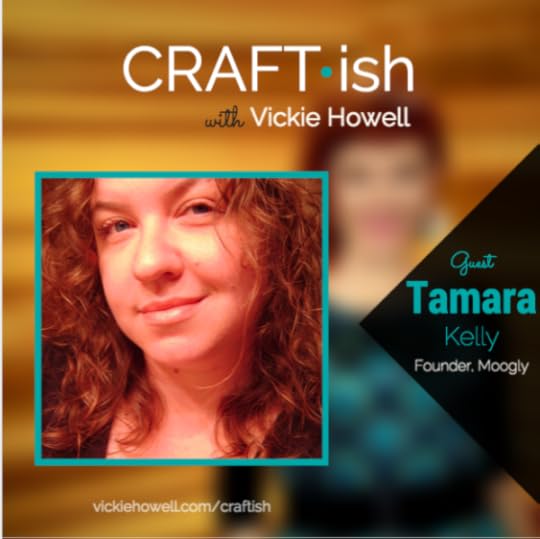
Hey, crochet lovers! This week on the CRAFT-ish podcast I got to know Tamara Kelly of Moogly a bit. Tune in hear about her transition from mommy blogger to crochet curator, what she hopes her followers gain from her and more. Get the scoop on the Show Notes page here, and don’t forget to leave an iTunes rating here!
xx,
Vickie
May 11, 2016
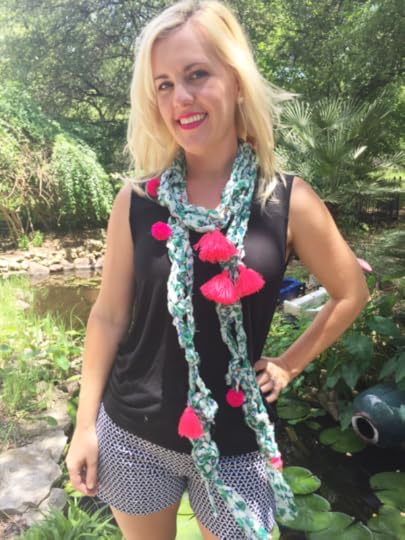
Maypole Scarflette


Summer’s almost here which means night-night time for heavy wool. That doesn’t mean, however that those large hooks have to hibernate, too. No, my crochet-compadres, the warmer months are the perfect time to play with alternative materials! Strips of ribbon, grocery bags, and fabric can all be crocheted into beautiful items, and thanks to the sweet, sexy glide of Jumbo Amour Hooks it’s never been easier to experiment.
When yarn is made from non-traditional fibers, though yardage is often an issue. Hundreds of yards of textile yarn can get pricey! This week’s project addresses both cost effectiveness and the (read: my) desire to make something wearable for the Summer. The Maypole Scarflette utilizes just one, beautiful hank of fabric yarn (which I was recently gifted by the folks at Knit Collage) to create a scarf/necklace hybrid. It works up fast, which makes it a lovely project to crochet while sitting on the patio enjoying the weather. Ahhhh.
Happy crocheting!
xx, Vickie
Materials
Approx. 35 yds, cotton fabric yarn. I used 1 hank of this.
Size U.S. P/Q (15 mm) Clover Amour Crochet Hook
Large Eye Tapestry Needle
Finished Length
82″/208 cm (excluding fringe)
Gauge
Not important for this project.
Directions
Ch 106.

3 dc in 4th ch from hook (chain counts as first dc), *sk next 5 ch, 4 dc in next ch**, ch 4, sk next 4 ch, [sl st, ch 5, sl st] in next ch, ch 4, sk next 4 ch, 4 dc in next ch; rep from * across, ending last repeat at **.
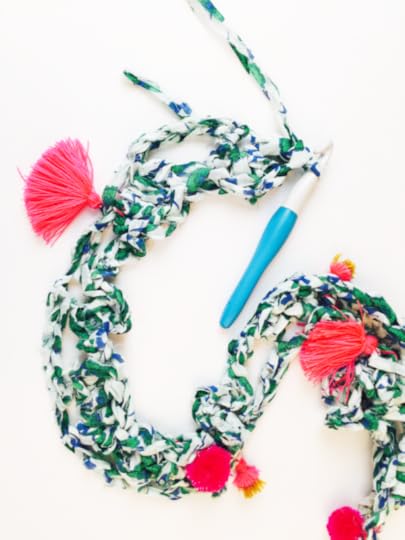
Fasten off.
Finishing
Cut 4 lengths of fabric yarn, double the length of desired fringe.
Attach 2 pieces of fringe to either scarflette end as follows: Fold fringe strand in half; insert Amour Hook through the right side of scarflette end and lay strand at the folded point over the hook; pull the strand through, from back to front, just enough to create a loop; set aside Amour Hook and use your hands to fold the loop over the edge of the project, and pull the ends of the strand through the loop. Pull tight.
Want to make your own fabric yarn? Find a nice, light-weight cotton; use the Soft Cushion Rotary Cutter & straight edge to cut 1″/2.5 cm strips; knot strips together; roll into ball.
Wear it, and you’re ready for Summer!
May 10, 2016
New on CRAFT-ish

It’s Tuesday, which means another episode of the CRAFT-ish podcast. This week I talk with with textile artist and author, Anna Joyce about growing up as the daughter of artists, how she teachers her own girls to live creatively, and what it’s like running a creative business. Check it out on iTunes, or click here for more info on the show and where else to find it.
Breathe in. Craft out.
— Vickie
May 3, 2016
Zelma Rose’s Lisa Shaffer on CRAFT-ish

It’s Tuesday, which means another episode of the CRAFT-ish podcast. This week I chat with with artist Lisa Anderson Shaffer about creativity, motherhood, how we as women need to stop competing with each other, and how the definition of success if purely personal.. Check it out on iTunes, or click here for more info on the show and where else to find it.
Breathe in. Craft out.
— Vickie


