
Vickie Howell's Blog: Vickie Howell's Website, page 40
November 18, 2016
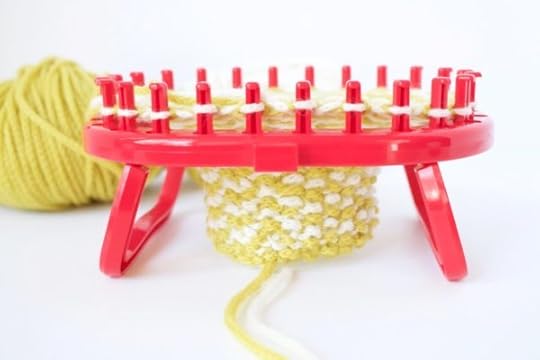
Oval Knitting Loom: Make a Wine Sleeve!


Oval Knitting Loom Wine Sleeve
As the holidays are upon us, I’ve been thinking a lot about host gifts, as well as creative ways to wrap them. For this week’s project I combined a few things I love: yummy wine, a cool tool (the Clover Oval Knitting Loom), and luscious yarn (my Woolpaca Chunky proved to work like a dream on the loom). The result: a wine sleeve that makes for a be-cozied bottle of good cheer to bring to your favorite festive occasion.
WINE SLEEVE HOW-TO
Materials
Clover Standing Oval Knitting Loom
1 ball each Vickie Howell for Deramores Woolpaca Chunky (80% Merino Wool/20% Alpaca/120 yds) in colors: (A) Goldengate, and (B) Creampuff
Velveteen Ribbon
Directions
With A, cast-on yarn to all pegs.
Round 1: With A, *K1, p1; repeat from * around.
Round 2: *P1, k1; repeat from * around.
Seed Stitch Pattern established.
Join B.
Round 3: With B, **K1, p1; repeat from * around.
Round 4: *P1, k1; repeat from * around.
Carrying unused color of yarn along the inside of piece as you go, repeat Rounds 1-4 until piece measures 9″/23 cm, or as long as your wine bottle measures to the curving point.
Tip: To check the length as you knit, periodically slip the wine bottle in through the bottom of the piece.

Cut B.
Eyelet Round: With A, * K2tog (place loop from 2nd peg onto 1st peg — it will be tight; e-wrap around peg; slip both stitches over e-wrap and let drop off of peg), YO (lay yarn over empty peg); rep from * around.

Next Round: Knit.
Work 18 rounds in established, Seed Stitch Pattern.
Cast off using Sewn Cast-Off method.
Finishing
Weave in ends. Weave ribbon through eyelets.
Need a Oval Knitting Loom Refresher?
Watch a past episode of my weekly, Ask Me Monday live stream! I cover both knitting and purling on the loom.
The post Oval Knitting Loom: Make a Wine Sleeve! appeared first on Vickie Howell.


November 17, 2016
Conversation with DIY Network Contributing Designer, Jennifer Perkins

On CRAFT*ish: Craft Designer, Jennifer Perkins.
This week I talked with my close, crafty compadre, Jennifer Perkins. Jennifer is a Content Contributor for DIYNetwork.com, Brand Ambassador for Treetopia, Blogger Team Member for Tuesday Morning Stores, and independent designer, crafter and artist. You may also know her from her years as the force behind the handmade jewelry company, Naughty Secretary Club or as the host of the TV show, CRAFT LAB.
How I know her, though? Well, that goes way back. Jen and I were in the Austin Craft Mafia together, were both co-hosts of a TV show called Stylicious, and have spent about 15 years talking crafts, business strategy and more recently carpool and Girl Scout Leader duties. She’s a good friend and a great person to have in your creative corner. She also decorates a mean Christmas tree!
Listeners can find CRAFT-ish on iTunes, Soundcloud, or Stitcher. Then go to the Show Notes page to get links and see photo’s of some of Jen’s work.
A Special Deal for CRAFT*ish Listeners
Thanks to our sponsor, eSigns who would like to offer 10% off signs to CRAFT*ish listeners Just use code: CRAFTISH at checkout!
Enjoy!
–Vickie
The post Conversation with DIY Network Contributing Designer, Jennifer Perkins appeared first on Vickie Howell.
November 14, 2016
Crochet Color Work: Video Tutorial + Kit
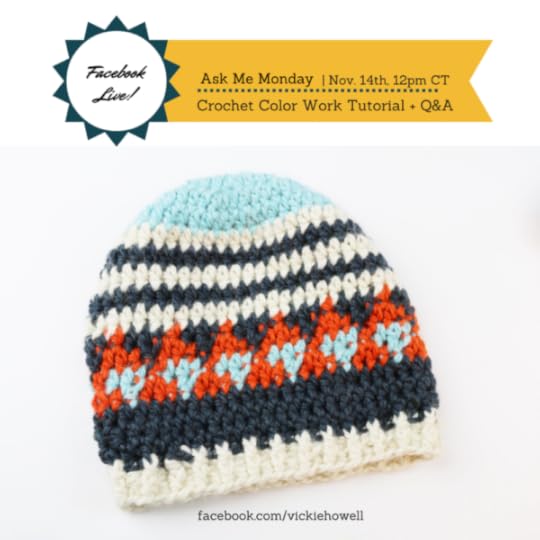
On this week’s Ask Me Monday live stream, I showed an introduction to the crochet color work that’s used in my Bear Mountain hat, but can be applied to any project requiring creating a graphic look through crochet.
Crochet Color Work
My Bear Mountain Beanie plays with two types of color work: stripes and stranded. Stranded color work in crochet may look intimidating, but is really quite easy. By simply carrying the unused color behind the work and periodically grabbing the strand under your hook, the yarn moves along with out bunching. Whe you want to swith colors, just pick up the new one during the last yarn-over step of the stitch before the one you want worked in the new color.
Watch & Learn the Basics of Crochet Color Work
Now that you’re all knowledge-filled on crochet color work, why not give it a whirl? Get the complete Bear Mountain Beanie kits from my Yarncraft Kits for Interweave here.
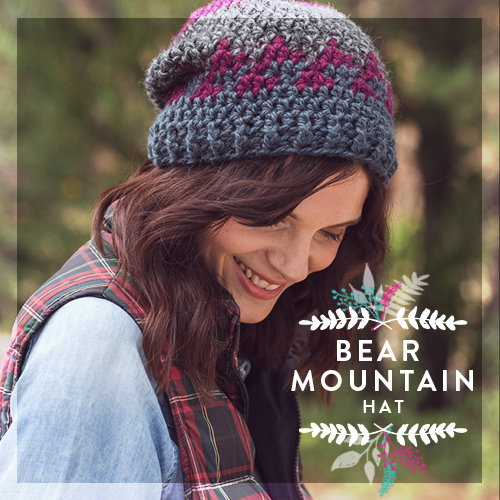
Gray/Purple version: Finished Size: 21 (28)” in circumference. Yarn: Wool and the Gang Wooly Bully Alpaca (80% superfine alpaca, 20% merino wool; 43 yd [40 m]/13/4 oz [50 g]; CYCA #5): Shacklewell grey (B) and eagle grey (C), 1 (2) balls each; Margaux red (A) 1 (1) ball. Hook: Size K/101/2 (6.5 mm) hook. Adjust hook size if necessary to obtain gauge. Notions: Tapestry needle. Gauge: 11 sts and 9 rnds = 4″.
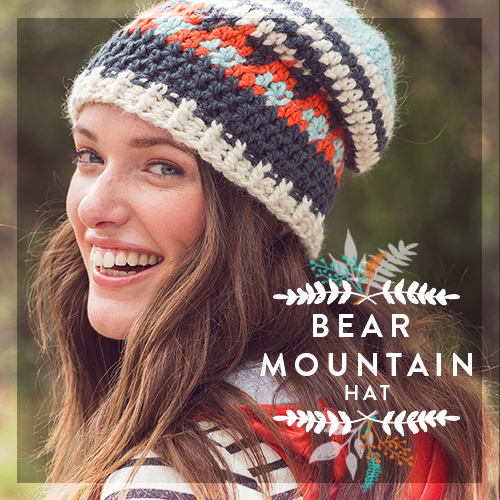
White/Orange/Blue/Gray Version: Finished Size: 21 (28)” in circumference. Yarn: Wool and the Gang Wooly Bully Alpaca (80% superfine alpaca, 20% merino wool; 43 yd [40 m]/13/4 oz [50 g]; CYCA #5): ivory white (B), eagle grey (C), 1 (2) balls each; Mr. Sky Blue (A), rusty orange (D), 1 (1) ball each. Hook: Size K/101/2 (6.5 mm) hook. Adjust hook size if necessary to obtain gauge. Notions: Tapestry needle. Gauge: 11 sts and 9 rnds = 4″.
Enjoy!xx,
Vickie
The post Crochet Color Work: Video Tutorial + Kit appeared first on Vickie Howell.
November 11, 2016
A Conversation with Novelist, Nora Zelevansky

On CRAFT*ish: Novelist Nora Zelevansky.
This week I talked to Brooklyn-based journalist and novelist, Nora Zelevansky. Her latest book, Will You, Wont You, Want Me is out on shelves now.
During our conversation, Nora gave me a peak into her life as a full-time writer and mom. She shared a bit of her creative process, some of the experiences that helped shape both of her novels, and the educational, life and spiritual journeys that have brought her where she is today.
Listeners can find CRAFT-ish on iTunes, Soundcloud, or Stitcher. Then go to the Show Notes page toenter to win a SIGNED copy of Nora’s latest book!
A Special Deal for CRAFT*ish Listeners
Thanks to our sponsor, Makers’ Mercantile who would like to offer free shipping to CRAFT*ish listeners Just use code VickieMakes at checkout through November 16, 2016 (offer valid in U.S. only.)
Enjoy!
–Vickie
The post A Conversation with Novelist, Nora Zelevansky appeared first on Vickie Howell.
November 4, 2016
Hot Headed Headband: Knit One in 20 Minutes!
MAKE IT: Hot Headed Headband

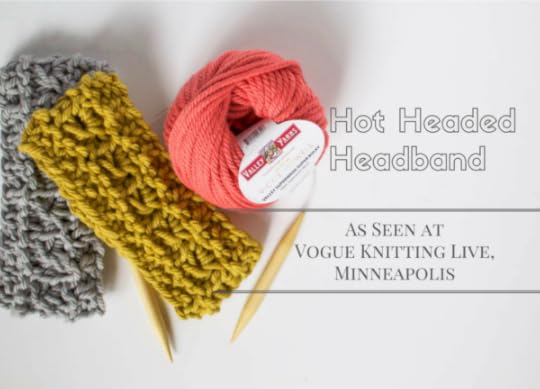
The folks at Clover, WEBS-America’s Yarn Store, and I have teamed with Vogue Knitting Live to present a Make & Take on the Marketplace floor at the Minneapolis Convention Center this weekend. Show-goers will be able to sit down at a table, with free supplies (my help, if they want it) and the pattern for a warm, snuggly headband. In about 20 minutes, they’ll walk away with not only the experience of working with the new Takumi Size 17 circular needles and my colors of Valley Superwash Super Bulky, but also a finished object. It’s a win-win…win!
Alas, though not everyone will be able to make it Minnesota today, but that shouldn’t mean that they can’t knit-along with us from home! Below is the pattern for the same, Hot Headed Headband we’ll be making at the event. All you’ll need to do is snag some Takumis and yarn and get stitching! Knit one (or more!) up and post a photo online for us to see (tag @CloverUSA and @VickieHowell), that way we know you’re with us in knitting spirit. Enjoy! –Vickie
Hot Headed Headband Materials
1 ball Valley Superwash Super Bulky in Colors by Vickie Howell (Shown in Grey Gardens and Moontower Mustard)Size US 17, Size U.S. 17, 16″ OR 24” Clover Takumi circular needle
Jumbo Tapestry Needle
Directions
CO 36 sts. Join rnd, taking care not to twist.
Rnds 1: *K1, p1; rep from * around.
Rnd 2: Knit.
Rnd 3: Purl.
Rnd 4: K around wrapping yarn twice around needle for each stitch. (You’ll have double the loops on the needle at this point.)
Rnd 5: * Slip next 3 stitches knit-wise to right-hand needle dropping extra loops, pass these 3 stitches back to left-hand needle, [k1, p1, k1] through 3 stitches together; rep from *around.
(Psst! Rnds 4-5 are where the actions at! If you’re having trouble, you can see the same stitch — but from a the Super Scarf project– demonstrated during the Ask Me Monday episode below!)
Rnd 6: Knit.
Rnd 7: Purl.
Rnds 8: *K1, p1; rep from * around.
BO in patt st.
Finishing
Weave in ends.

The post Hot Headed Headband: Knit One in 20 Minutes! appeared first on Vickie Howell.
October 29, 2016
Crochetscene 2017: Guest Edited by –>This Gal

Crochetscene 2017: Look What I Helped Make!
Nearly a year ago, I was brainstorming with Lisa Shroyer, Interweave’s content strategist, about how best we could collaborate. One idea I really liked was being guest editor for the 2017 issue of Crochetscene under the guidance of the smart, clever, fellow-Scorpio and Editor Marcy Smith.

And that’s a wrap! Marcy and I say goodbye at the end of the Crochetscene shoot.
I didn’t want my “guest editor” role to be only a vanity title. I wanted to work. I wanted to create. So I rolled up my sleeves and dove in.
Creating an issue of a crochet magazine calls for copious amounts of designer submissions and a coupla people with big ideas. It was easy to find the latter (see aforementioned Scorpio dynamic duo). As for the former, Marcy showed up at my house in Austin with a huge box of submissions. And for an action-packed forty-eight hours—with breaks only for sleep, a visit to the LYS, and possibly a bevvie or two—we talked over visions, designs, and yarn. We took over my office, then migrated to the kitchen table, and even absconded with my daughter’s whiteboard easel to hold our sticky-note
map for the issue-to-be. It was intense. It was a blast!
A photo posted by Vickie Howell (@vickiehowell) on Mar 7, 2016 at 8:49am PST
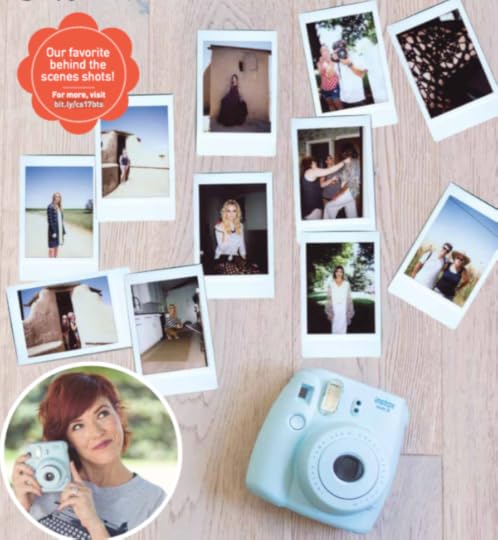
During our time together in Austin, and for the weeks and months that came afterward, Marcy and I rounded out story themes (those are the series of designs in a magazine that seem to go together). I’ll be posting loads more later with details about the projects, but for now here’s a brief peek courtesy of my iPhone and studio carpet:
Crochetscene: Hi, Desert!
(jewel-toned garments channeled through Coachella’s eye)

Fun fact: Annastasia Cruz originally submitted this design in black and as a cami. I immediately thought it would look amazing as a dress, and wow did she surpass my expectations with the result!
Crochetscene: Black & White
(because . . . those noncolor colors are the bomb!)

Last year Angelina Jolie was on the cover of Vogue wearing nothing but a knit, black and white striped pullover. It was striking, and stuck with me. I knew I wanted crocheters to be able to make something like it, and was thrilled with Marcy told me she’d booked Melissa Leapman to design it for this issue!
Crochetescene: Apartment Living
(for those who balance smaller spaces with kitsch and cool)

This was the first shoot. It was in a 200 square foot apartment, so A.) we had to get creative about using every single corner to create different shots, and B.) I got to know everyone up close and personal!
Crochetscene: Wide Open Spaces
(a celebration of bulky yarn + open-weave stitchwork)

The phenomenal Teva Durham did me a favor and came out of industry retirement to design the cornerstone piece for the Wide Open Spaces spread.
Crochetscene: Thread Lightly
(a finer-gauge look and modern take on flapper style.)

Originally the Crocehtscene designer had envisioned a different theme for this section. Delicate and feminine isn’t really in my comfort zone, though … but if seen through the lens of the 1920’s it just felt right to me. I pitched a Great Gatsy-esque take on it, and they Obliged. It was really brought home, though by make-up/hair artist Candace Tucker, and stylist Tina Gill!
The culmination of this experience for me was the photo shoot in Fort Collins. I walked in and was greeted with open arms. Art Director Kit had great ideas and was happy to embrace mine. Assistant Editor Dana was a wonderful right hand. The
photographer, Nate, was both fun and ridiculously talented. And the stylist, Tina, brought life to my mood boards in a way that made me swoon. I was able to stay for only two of the three days of shooting, but I left with confidence that these people had it covered. I wanted to be a part of a magazine team. Thanks to Marcy and all the Interweave peeps, I got to do all of that.
So, my crochet community, I hope you enjoy these pages of crochet happy. They were hooked with love and made with friends. Thee issue is available in both digital in print formats and can be found online, in craft stores and at book retailers.
Enjoy!
xx,
Vickie
P.S. If you make something from this issue of Crochetscene, please tag @vickiehowell and @interweavecraft with photos. We love seeing our community in action!
The post Crochetscene 2017: Guest Edited by –>This Gal appeared first on Vickie Howell.
Crochetscene 2017: Guest Edited by This Gal
Crochetscene 2017: Look What I Helped Make!
Nearly a year ago, I was brainstorming with Lisa Shroyer, Interweave’s content strategist, about how best we could collaborate. One idea I really liked was being guest editor for the 2017 issue of Crochetscene under the guidance of the smart, clever, fellow-Scorpio and Editor Marcy Smith.
And that’s a wrap! Marcy and I say goodbye at the end of the Crochetscene shoot.
I didn’t want my “guest editor” role to be only a vanity title. I wanted to work. I wanted to create. So I rolled up my sleeves and dove in.
Creating an issue of a crochet magazine calls for copious amounts of designer submissions and a coupla people with big ideas. It was easy to find the latter (see aforementioned Scorpio dynamic duo). As for the former, Marcy showed up at my house in Austin with a huge box of submissions. And for an action-packed forty-eight hours—with breaks only for sleep, a visit to the LYS, and possibly a bevvie or two—we talked over visions, designs, and yarn. We took over my office, then migrated to the kitchen table, and even absconded with my daughter’s whiteboard easel to hold our sticky-note
map for the issue-to-be. It was intense. It was a blast!
A photo posted by Vickie Howell (@vickiehowell) on Mar 7, 2016 at 8:49am PST
During our time together in Austin, and for the weeks and months that came afterward, Marcy and I rounded out story themes (those are the series of designs in a magazine that seem to go together). I’ll be posting loads more later with details about the projects, but for now here’s a brief peek courtesy of my iPhone and studio carpet:
Crochetscene: Hi, Desert!
(jewel-toned garments channeled through Coachella’s eye)
Fun fact: Annastasia Cruz originally submitted this design in black and as a cami. I immediately thought it would look amazing as a dress, and wow did she surpass my expectations with the result!
Crochetscene: Black & White
(because . . . those noncolor colors are the bomb!)
Last year Angelina Jolie was on the cover of Vogue wearing nothing but a knit, black and white striped pullover. It was striking, and stuck with me. I knew I wanted crocheters to be able to make something like it, and was thrilled with Marcy told me she’d booked Melissa Leapman to design it for this issue!
Crochetescene: Apartment Living
(for those who balance smaller spaces with kitsch and cool)
This was the first shoot. It was in a 200 square foot apartment, so A.) we had to get creative about using every single corner to create different shots, and B.) I got to know everyone up close and personal!
Crochetscene: Wide Open Spaces
(a celebration of bulky yarn + open-weave stitchwork)
The phenomenal Teva Durham did me a favor and came out of industry retirement to design the cornerstone piece for the Wide Open Spaces spread.
Crochetscene: Thread Lightly
(a finer-gauge look and modern take on flapper style.)
Originally the Crocehtscene designer had envisioned a different theme for this section. Delicate and feminine isn’t really in my comfort zone, though … but if seen through the lens of the 1920’s it just felt right to me. I pitched a Great Gatsy-esque take on it, and they Obliged. It was really brought home, though by make-up/hair artist Candace Tucker, and stylist Tina Gill!
The culmination of this experience for me was the photo shoot in Fort Collins. I walked in and was greeted with open arms. Art Director Kit had great ideas and was happy to embrace mine. Assistant Editor Dana was a wonderful right hand. The
photographer, Nate, was both fun and ridiculously talented. And the stylist, Tina, brought life to my mood boards in a way that made me swoon. I was able to stay for only two of the three days of shooting, but I left with confidence that these people had it covered. I wanted to be a part of a magazine team. Thanks to Marcy and all the Interweave peeps, I got to do all of that.
So, my crochet community, I hope you enjoy these pages of crochet happy. They were hooked with love and made with friends. Thee issue is available in both digital in print formats and can be found online, in craft stores and at book retailers.
Enjoy!
xx,
Vickie
P.S. If you make something from this issue of Crochetscene, please tag @vickiehowell and @interweavecraft with photos. We love seeing our community in action!
The post Crochetscene 2017: Guest Edited by This Gal appeared first on Vickie Howell.
October 28, 2016
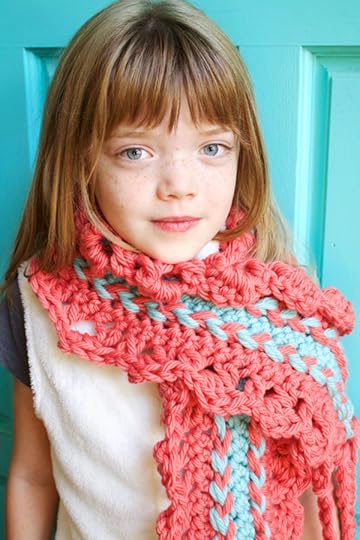
Chunky Hairpin Lace Scarf
 Last week I streamed live on Facebook to show viewers the scoop on one of Clover’s latest, new items: the Hair Pin Lace Tool. For me as an instructor (and general jazz-hander of yarn crafts) it was a great experience because while I was demonstrating, I could also ask the viewers if things were making sense — and get real-time answers (and make adjustments, if necessary.) Man, I love technology! I also love, though the irony of using high-tech, to show how to use low-tech.
Since the live stream took place, over 15,000 people from around the world have watched the recording — and are hopefully excited to play with the Hair Pin Lace Tool themselves. What project to start out with, though? Well, I’ve got a couple of choices for you.
If you’re in the bohemian jewelry state of mind, check out my Leather Bracelet post. If you’re ready to snuggle in, hunker down and get makin’ for cooler weather, then this here post is for you!
The Chunky Hairpin Lace Scarf is created with 3 strips made on the Hair Pin Lace tool, then pieced together using a hook to “ladder” the loops over each other, and is finished off with a crochet edging and some braided tassels. Oh, and the pattern’s written for both Child and Adult sizes, so you can get the kiddos involved in crafting these with you. Enjoy! xx, Vickie
Chunky Hairpin Lace Scarf: Let’s Make It!
Materials
Clover Hair Pin Lace Tool
Size U.S. M/N (9mm) Amour Crochet Hook
Valley Yarns Superwash Super Bulky Yarn, in colors: 3(4) balls (A) Castaway Coral by Vickie Howell, and 1(2) balls Aqua Oasis by Vickie Howell
Lareg-eyed tapestry needle
String or embroidery floss (to attach to tool as guide thread)
Sizes
Child (Adult)
Finished Measurements
Approx 7 1/2″ Wide
35″ (60)” Long — excluding fringe
Gauge
2 loops = 1″ — after joining strips
Directions
MAKE STRIPS: (2 in Color A, 1 in Color B)
With appropriate color yarn, cast-on yarn to Hair Pin Lace Tool.

Using single-crochet and Amour Hook for center braid, work until 70 (120) loops are made.
Need a Refresher Course on using the Hair Pin Lace Tool?
Each time the Hair Pin Lace Tool becomes fully loaded, you’ll need to attach the top clip, then detach the bottom clip as you slide all but the top two loops (on each pin) onto the guide threads. Re-attach the bottom clip and detach the top clip; continue working.
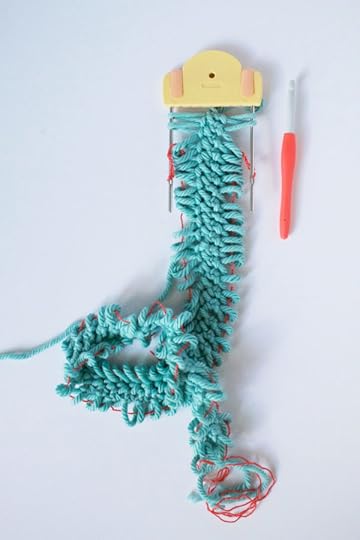
Once you have the appropriate amount of loops for the size you’re making, fasten off.

JOIN STRIPS
Lay a Color A strip and Color B strip parallel to each other as shown above. If your guide threads were knotted, unknot them now.
Removing guide threads as you go, insert hook through first 2 loops of strip on the RH side (Color B Strip), then first 2 loops of strip on the LH side (Color A Strip); pull both Color A loops (as if they were one) through both Color B loops (you’ll now have only two Color A Loops on the hook.) *Insert hook through next two loops of Color B strip; pull them through the Color A loops; insert hook through next two Color A loops; pull them through Color B loops. Repeat from * until strips are fully connected.
Cut yarn, leaving a tail and feed it through the last loops. Knot if necessary.
Repeat process to attach second Color A strip.
Edging
Note: You’ll be working through two loops at a time for the entire edging.
Removing guide thread as you go, join Color A by inserting hook through the first 2 loops on one side of the piece and pulling a loop through.
Ch 2 (counts as sc), *[dc into next two loops, 3 dc AROUND the post of that same dc], sc through next two loops; repeat from * to end.
Fasten off.
Repeat for opposite side.
Having a hard time visualizing the edging? Watch below.
Adding a #crochet edging to my #hairpinlace scarf. #amourhook #needmanicure
A video posted by Vickie Howell (@vickiehowell) on Oct 27, 2016 at 8:31am PDT
Finishing
Weave in ends.
MAKE BRAIDED FRINGE: (Make 10)
Cut 3, 40′′/101.5 cm, strands of yarn. Holding strands together, fold in half. Insert crochet hook through RS of scarf edge; lay yarn at the folded point over the hook. Pull yarn through, from back to front, just enough to create loop. Set aside hook and use hands to fold the loop over the edge of the project, pulling the ends of the yarn through the loop. Pull tight-ish.
You’ll now have 6 strands hanging (3 stands folded). Separate into 3 groups of 2 strands; braid. Knot off. Trim and fray ends.
Repeat process, attaching 5 fringe bunches evenly across each end of scarf.
You just hairpin laced the heck outta that scarf!

The post Chunky Hairpin Lace Scarf appeared first on Vickie Howell.
October 27, 2016
A Conversation with Annie’s Lead Designer, Lena Skvagerson

On CRAFT*ish: Lena Skvagerson, Lead Designer for Annie’s Signature Collection.
This week I had a conversation with Lena Skvagerson, the Lead Designer for Annie’s Signature Designs and one of the experts on public television’s Knit and Crochet Now, hosted by Deborah Norville. During our conversation we talked about what she’s learned about the knitting & crochet industry over her triple decade career, whether or not perception of needle arts is different in her Native Sweden than in the United States, and what still excites her about producing collections to be made by the masses.
Listeners can find CRAFT-ish on iTunes, Soundcloud, or Stitcher. Then go to the Show Notes page to see photos of some of the designs from the issue, and for info on Amy’s Patreon campaign.
A Special Deal for CRAFT*ish Listeners
Thanks to our sponsor, Makers’ Mercantile who would like to celebrate Lena Svagerson by offering CRAFT*ish listeners 20% off ALL YARNS and Addi Crochet Hooks! Just use code VickieMakes at checkout through October 12, 2016.
Enjoy!
–Vickie
The post A Conversation with Annie’s Lead Designer, Lena Skvagerson appeared first on Vickie Howell.
October 25, 2016
Hairpin Lace Leather Bracelets
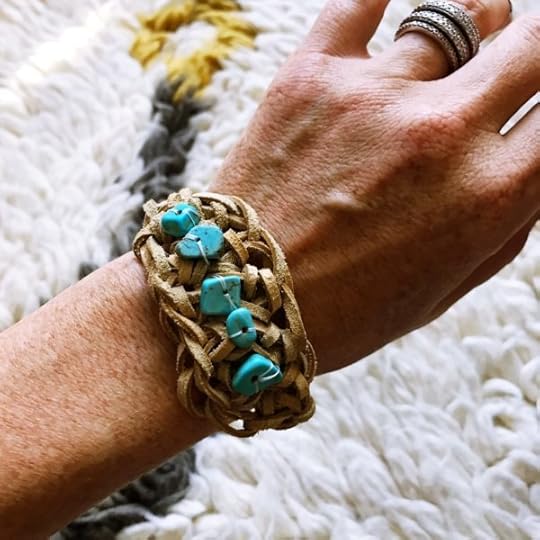
Hairpin Lace Leather Bracelets
This week on Facebook I gave a live stream tutorial on using the new, Clover Hair Pin Lace Tool. In the video I also showed a couple of leather bracelets I made using the tool. Here’s how you can make them, too!
**Need a quick refresher course? Watch my Hair Pin Lace Tool video tutorial here.
Materials
Clover Hair Pin Lace Tool
Size J/6mm Clover Amour Crochet Hook
Leather lacing
Jewelry pliers
Beads or large stone
Nylon thread and sewing needle
Jewelry findings (2 o-rings, lobster clasp, and 2 rectangular fold-over cord ends.)
Directions
Leaving a a tail (6″/15 cm is safe) cast on leather to loom.
Using single crochet as center stitch, make 7-9 loops (depending on wrist circumference — you can always pull out loops if it’s too long.)
Fasten off, leaving another tail.

Place around your wrist to gauge length of tails required. Trim tails to accommodate that length.
FOR TAN VERSION ONLY: Use fingers or crochet hook to “chain stitch” or ladder the loops over each other on side of bracelet. Feed the respective tail through the last loop and knot into place. Repeat for opposite side.
Following the manufacturer instructions, attach findings to both tail ends.
Hand sew beads or stone to bracelet.

The post Hairpin Lace Leather Bracelets appeared first on Vickie Howell.


