
Vickie Howell's Blog: Vickie Howell's Website, page 38
March 13, 2017
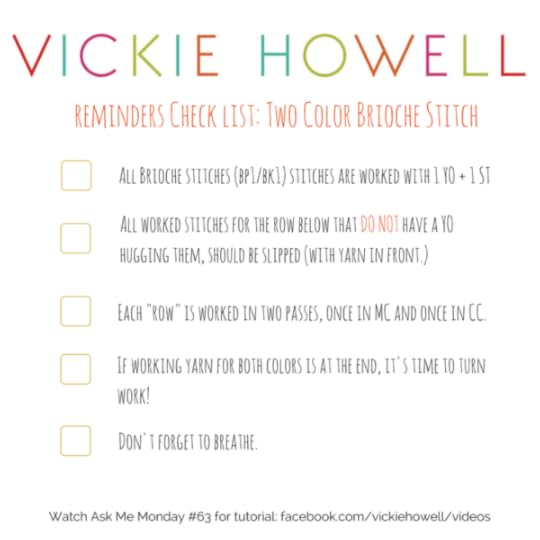
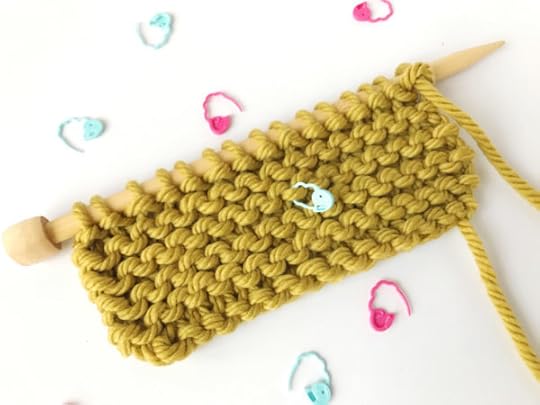
How to Knit Two Color Brioche Stitch


Learn to Knit Two-Color Brioche Stitch!
This week on my Ask Me Monday Facebook Live series, I used Clover Takumi Bamboo Circular Needles to show viewers how to knit two-color (aka bi-color) Brioche Stitch. In the video I go through each step of the basics for this double-knit technique including: joining the Contrasting Color (CC), how to work the Brioche Knit and Brioche Purl stitches, what it means to work each row twice, and how to bind-off once you’re finished!
Watch and learn: How to Knit Two Color Brioche Stitch
Brioche the Subject Scarf
(from Step It Up Knits, Chronicle Books)

Materials
Appro.x 165 yds each of TWO colors of any worsted- weight (#4) wool blend
Size US 8/5 mm Clover Takumi Bamboo Circular Needle (of any length)
Crochet hook (any size)
Yarn needle
Size
Unisex (one size)
Finished Measurements
Width: 5 in/12.5 cm (slightly stretched) Length: 60 in/152 cm (without fringe)
Gauge
14 stitches and 16 rows per 4 in/10 cm in pattern stitch
Special Stitches
BP1 = Brioche Purl 1, purl together the slipped stitch and the YO from the row below.
BK1: Brioche Knit 1, knit together the slipped stitch and the YO from the row below.
Instructions
With MC, CO 18 sts. Do not turn work.
Prep Row: (RS CC, forms purl columns in CC on RS) Slide work to other tip of needle and attach CC wyif, *sl 1, yo, p1h rep from * across. Turn work.
Row 1: (WS MC, forms purl columns in MC) Wyif, *sl 1, yo, bp1 (purl together the slipped stitch and yo from row before); rep from *across. Do not turn, slide sts to opposite end of needle where CC is attached.
Row 1: (WS CC, forms knit columns in CC) With CC, *bk1 (knit together the slipped stitch and yo from row before), yf, sl 1, yoh rep from * across. Turn work.
Row 2: (RS MC, forms knit columns in MC) Maintain the CC yo of last worked st by holding it under left needle to the back; with MC, *bk1, yf, sl 1, yoh rep from * across. Do not turn, slide sts to opposite end of needle where CC is attached.
Row 2: (RS CC, forms purl columns in CC) With CC, wyif, *sl 1, yo, bp1h rep from * across. Turn work.
Repeat Rows 1 and 2 RS and WS with colors indicated, until scarf measures 60″/152 cm and finishing with a RS CC row.
BO using CC as follows: K1, bp1, pass second stitch over first stitch on the RH needle (one st BO off.) Cont in this matter, knitting the knit stitches and bp1 ( the sl st and YO) while binding off.
Cut both colors, leaving 6 in/15 cm tails.
Finishing
Fringe (make 12)
Using MC, cut 5 strands of yarn double – ished fringe to be. Holding strands together, fold in half. Insert a crochet hook (any size) through the right side of the edge of your project and lay yarn at folded point over the hook. Pull the yarn through, from back to front, just enough to create a loop. Set aside crochet hook and use your hands to fold loop over edge of project and pull ends of yarn through loop. Pull until taught. Repeat this process, attaching 6 fringe bunches evenly across each scarf end.
Weave in ends. Block if necessary.
Like this pattern? Get more great projects to step up your skills!
Step It Up Knits is still available on Amazon!

The post How to Knit Two Color Brioche Stitch appeared first on Vickie Howell.


February 27, 2017
5 Reasons New Knitters Need this Knitting Accessory Set for Beginners

5 Reasons New Knitters Need this Knitting Accessory Set for Beginners
Clover’s done it again; they’ve come out with yet another kit that makes things easier for us crafters. The latest, Knitting Accessory Set for Beginners, which arguably is not just for newbies as it’s got the basic supplies that any knitter needs, but nevertheless was created to give a great start to unseasoned stitchers. Here are 5 reasons why!
Stop the Drop
When you’re new to knitting the thought of dropping a stitch can be panic-inducing. After all, a dropped stitch means something needs to be fixed, and fixing comes later in learning, and really ALL YOU WANT TO DO NOW IS KNIT! Right? So, even though picking up a rogue stitch or two isn’t difficult (and Clover has a tool for that, too!) it’s definitely easier to just not deal with it at all.
The most common occurrence of stitches becoming unknit is ironically when we’re not actually knitting at all. It’s when we set our project down on a table and a pesky pet knocks the needles, or throw it in a bag (because we’re guys and gals on-the-go!) that can be the problem. The solution? The Knitting Accessory Set for Beginners‘ Point Protectors set! Stick ’em on your needle tips and your knitting will stay nestled on its needles where it belongs!

Wait, where was I?
If you’re a beginner working in rib or seed stitch — or frankly, any knitter with a pension for zoning out while knitting garter stitch — forgetting which side of your WIP (work in progress) is the right-side can be iffy. Well, here’s a trick that will prevent that issue in a jiffy! (See what I did there?) Simply place a Quick Locking Stitch Marker from the Knitting Accessory Set for Beginners on the right side of your work to help keep track. It’s removable, which makes it easy to move along your work as you go!
Lather, Rinse, Repeats
As knitters venture passed working one type of stitch continuously to instead knitting a combination of stitches to create a pattern repeat, it’s helpful not to have to guess where you’re at in that repeat at any given time. The Knitting Accessory Set for Beginners comes with a plethora of stitch markers with a purpose: which in this case, is to aid in your repeat realization!

It’s the End of the Round as We Know It
The natural progression of learning how to knit is often first, working flat pieces and then, moving to knitting-in-the-round. As one gets more experienced they may (or may not) decide to cheat by using the yarn tail as a guide for where one round ends and the other begins. This is risky, though because you really have to have an eye (especially if a pattern stitch is involved) for “reading” stitches. The more efficient choice, is to use a stitch marker to note where you are (and where you’ve been) in your circular project! And hey, and on that note, the Knitting Accessory Set for Beginners hits the mark!
Organization is Key
There’s a lot to remember when you’re learning any new skill, and knitting is no different. Which supplies to use together and for which projects; which stitch happens on what row; what abbreviations in patterns mean — you know the drill. One way to make things easier on ourselves, though is to stay organized. Keeping our Takumi Bamboo Knitting Needles together (by size) in a case, gathering yarns by weight or color, and keeping notions together all in one place — like with the Knitting Accessory Set for Beginners, will help you keep calm and knit on!
So here’s to you, new knitters: we’re so happy to have you hand-making with us, and we hope some of Clover Needlecrafts’ handy tools help you along the way. Enjoy!
The post 5 Reasons New Knitters Need this Knitting Accessory Set for Beginners appeared first on Vickie Howell.
February 13, 2017
Clover Mini Weaving Loom: Woven Wall Hanging
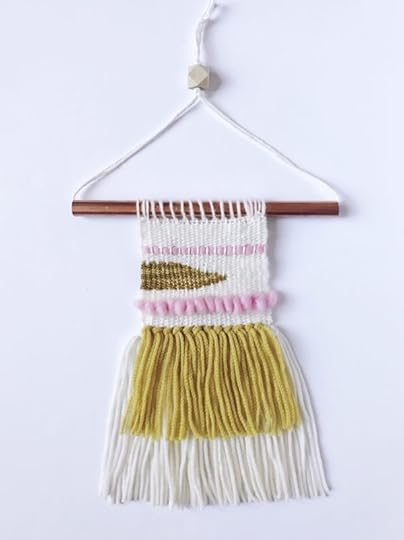
Wall Hangings: the Clover Mini Weaving Loom
Woven wall pieces are once again at the forefront of home decor. Prominently featured on Pinterest, fashion magazines, home catalogues, etc. — you’d be hard pressed to peruse any of them without glimpsing a piece of woven work! Now, thanks to the affordability and accessibility offered by the Clover Mini Weaving Loom you can jump on the trend for maximum home decor happiness, but with a minimum time commitment. You know how I love totally doable DIY and this my friends, makes weaving fit the bill!
Below you’ll find a step-by-step guide to making the wall-hanging pictured above. Follow it exactly, or use it as a jumping off point for creating your own design. Either way, be sure to tag @vickiehowell and @cloverusa with your finished, woven pieces. We loving seeing your work. Happy weaving! xx, Vickie
How to Make a Clover Mini Weaving Loom Wall Hanging
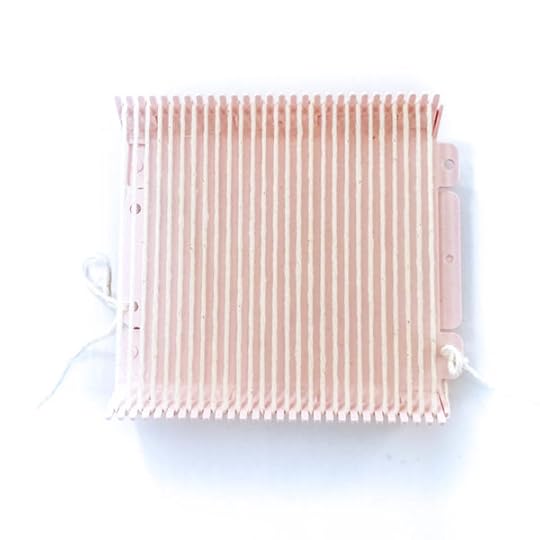
MATERIALS
Clover Mini Weaving Loom (Single)
Worsted or sport-weight cotton yarn (A). I used this.
Worsted-weight yarn, in same color as A. (B)
Chunky-weight yarn, in same color as A & B (C) I used this.
Chunky-weight yarn in contrasting color (D) I used this.
Worsted or sport-weight yarn in contrasting color (E) I used this.
Clover Natural Wool Roving in contrasting color (I used Pink)
1 Takumi Bamboo Knitting Needle (any size)
Clover Jumbo Tapestry Needle
10″ piece of copper piping, dowel or branch wood
1 large wooden bead (optional)
[image error]
FINISHED SIZE
12″/30.5 cm (excluding pipe and hanger yarn)
DIRECTIONS
Want a primer before you dive into a project? No problem. We’ve got you. Watch the rebroadcast of the Facebook Live stream, Ask Me Monday featuring this product and my tutorial for assembling the loom, using the tools, and general weaving method. Go ahead, I’ll wait for you!
Ok, now let’s do this! Using cotton yarn, set-up Clover Mini Weaving Loom warp.
LONG FRINGE (Make 13):With C cut 3, 20′′/51 cm, strands of yarn. Holding strands together, fold in half. Slide folded yarn under first two warp strands. Pull yarn up through next warp space, from back to front, just enough to create loop. Use fingers to fold the loop over the edge of the project, pulling the ends of the yarn through the loop. Pull tight-ish, and slide towards bottom of loom.
Repeat process, attaching fringe over two warp strands at a time, across the row. Trim if necessary.
SHORT FRINGE (Make 12): With D, cut 2, 12″/30.5 cm strands of yarn. Repeat the process as for LONG FRINGE, except starting one warp strand in so that SHORT FRINGE alternates warp strand couplings established by LONG STRANDS.
Load shuttle with B for weft. Weave 8 or so rows.
PILE WEAVE ROW: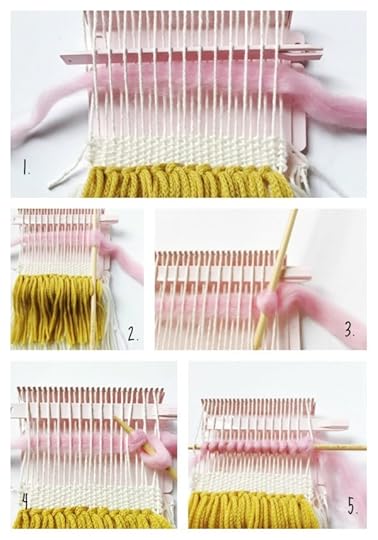
1. Slide a long piece of roving under the even warp strands, and a few inches up from existing work. Take care to leave a significant tail on either side of loom.
2. Introduce Takumi knitting needle by coming up under the roving and in between the first warp space.
3. Rotate Takumi needle counter-clockwise to twist roving, and dip the tip of the needle into the next warp space to the left. Pile established. From here, you essentially just want the roving to wrap around the needle.
4. *Twist needle so it’s pointing upward in wrap space while grabbing the next bit of roving; dip down in next wrap space. Repeat from * to end.
5. One needle is fully loaded, slide the pile piece down so it sits just above the weaving below. Carefully remove the needle.
NOTE: Due to the small scale of this piece is found that weaving in the roving and yarn ends along the back of the piece later, to be less bulky looking.
With B, return to plain weaving for 6 rows.
Next row: With B, weave to halfway point of row; turn around and weave back.
NOTE: I found that ditching the shuttle for this portion in favor for the plastic needle, was much easier.
Next row: Weave to 2 warp strands before last turning point; turn around and weave back. Repeat this step until only the first 2 strands have been woven.
Next row: Now we’ll reverse the process, weaving 2 warp strands further, only this time we’ll go past the halfway point and continue until an entire row has been woven. (You’ll have an open, non woven section now.)

Weave back from last row, and weave two more rows. Set B aside.
With E and Clover Jumbo Tapestry Needle, fill in open space by weaving using the same method as for creating the space in the first place.
With Roving, plain weave a piece above last full row of weaving.
Revert back to B, and finish weaving until loom is full.
FINISHING
Using tapestry needle, wave in ends on the back of piece. Since this piece won’t get a lot of wear and tear once it’s hung, don’t worry about weaving in more than an inch or two of tails.
With A, whip stitch piece to copper piping or the like. Tie off.
Cut 2, 30″/76 cm or so strands of A. Double strand and feed through pipe (if you’re using a dowel instead, cut pieces in half and tie on either end.). Knot strands together, to form a triangle of yarn above the dowel. If desired, slide bead over all strands and knot again. Create hanging loop by knotting one last time.
YOU DID IT! Now hang and gaze ine awe at your new art piece.

Listen while you weave!
Looking for some auditory inspiration for while you’re weaving? Check out my interview with DIY Woven Art‘s Rachel Denbow on the CRAFT*ish Podcast!
Resource Credits:
Smile and Wave
A Pretty Fix
The post Clover Mini Weaving Loom: Woven Wall Hanging appeared first on Vickie Howell.
February 7, 2017
Pucker-up Pillowcases for Tuesday Morning


Pucker-up Pillowcases
When you’ve been with your sweetheart for a long time, sometimes romantic gestures aren’t just the obvious ones. I mean, of course flowers, bubbly and grand declarations of love are nice — we all need those every once in a while. And yet, it’s those thoughtful nods to everyday needs that can often be the sweetest. Your favorite coffee when you thought you were going to have to go caffeine-less; wool socks for perpetually cold feet; the perfect pillow for a much-needed night’s sleep. Just knowing what little things make your mate’s life happier is its own type of intimacy. It’s the spirit of those gestures that inspires this Valentine’s Day project, perfect for longtime loves.

On the average day, splurging on fluffy pillows and luxurious, bamboo-rayon pillowcases isn’t always a top-priority. On V-day however, and thanks to Tuesday Morning’s prices, you can treat your sweetie to such dreamy delights right now!
Make them!
To read more, head on over to the Tuesday Morning blog for a step-by-step DIY tutorial, along with a supply list of all the TM goodies needed for this project.
Sending crafty heart-eyes your way!
xx,
Vickie
The post Pucker-up Pillowcases for Tuesday Morning appeared first on Vickie Howell.
February 6, 2017
How to Make Paper & Crochet Galentines

Galentines = Valentines for Your Gal Pals!
This week’s edition of my Facebook Live stream, Ask Me Monday was brought to you courtesy of Tuesday Morning. I teamed up with the retailer to create Valentine’s Day themed card ornaments for your girlfriends, using a plethora of items from their craft section. See how below!
Watch and Learn How to Make Paper & Crochet Galentines
Click below to watch the recording of my live stream demo on how to choose papers, laminate, come up with message ideas, punch lacing holes, and crochet a picot edging around a paper heart!
Galentines Picot Border
Join yarn by pulling a loop through hole in laminated paper heart.
Rnd 1: Ch 3 (counts as sc + ch 1), *sc, ch 1**; rep from * to ** to heart point, [sc, ch-1] 3 times in heart point hole, rep from * to ** around; join round with a sl st in beginning ch.
Rnd 2: Ch 4, sl st in 3rd ch from hook, ch 1, sk ch-1, *[sc, ch 3, sl st in 3rd ch from hook] in the next sc, ch 1**; rep from * to ** to center sc of heart point from previous round, [sc, ch 3, sl st in 3rd ch from hook, ch 1] 3 times, rep from * to ** to last st, sc, ch 20, sl st in first chain to create loop; join round with a sl st in 3rd of beginning ch.
Fasten off.
Be sure to tag @vickiehowell with photos of your Galentines projects — I love seeing your work!
xx,
Vickie
Join me every week on Facebook for my live stream. I show tutorials, answer viewer questions, and talk tips and trends. Tune in live on Mondays at 12pm CT, or watch the recorded version anytime here.
Tuesday Morning Featured Products
K & Company Card & Mat Pad $1.99 (Compare at $7.69), K & Company Kelly Panacci Designer Paper $4.99 (Compare at $14.29), Xron ezLaminator $19.99 (Compare at $49.99), We R Memory Keepers Crop-A-Dile $14.99 (Compare at $29.99), Amy Tangerine Stamp Alphabet $6.99 ($14.99), American Crafts Mini Ink Pastels $3.99 (Compare at $9.99), Knitting Fever Babe Yarn $1.99 (Compare at $5.00)
The post How to Make Paper & Crochet Galentines appeared first on Vickie Howell.
February 2, 2017
Video: How to Crochet a Heart Motif

Today I got to teach across the pond without leaving the comforts of my very own home studio in Austin, Texas! That’s right, I was back to my live streaming antics again only this time from the Deramores Facebook page. Today’s video included a step-by-step tutorial on how to crochet a heart motif using both US and UK terms! This Valentine’s Day –thanks to some super-soft Mod Wool and my quick tutorial– it’s easy to share the love with the gift of handmade hearts! Here’s how.
Watch the video: How to Crochet a Heart Motif
Crochet Heart Motif: Get the pattern!
Now that you know how to crochet it, go on over to the Deramores blog to nab the free pattern for these crochet heart motifs.
Hook those hearts then tag @vickiehowell and @deramores with pictures so we can see how you’re sharing the love!

The post Video: How to Crochet a Heart Motif appeared first on Vickie Howell.
January 31, 2017
How to Use the Clover Mini Weaving Loom

Clover Mini Weaving Loom
This week’s episode of my Facebook Live stream, Ask Me Monday was brought to you by the folks at Clover Needlecrafts. Clover’s not only the manufacturer of needle art staples like Takumi Bamboo Knitting Needles (I never travel without my adjustable set) and Amour Crochet Hooks. They’re also the company behind loads of crafty tools like Pom Pom Makers, Oval Knitting Loom, Yo-Yo Makers and now, the Clover Mini Weaving Loom. The latter was the focus of this latest video in which I give you the full scoop on this fun loom!
Watch and Learn: Clover Mini Weaving Loom(s)
Click below to watch the recording of my live stream demo on how to use the Clover Mini Weaving Loom (both single and double options.) I take you through every step of assembling the loom, setting up for a project, and how to weave.!
Be sure to tag @vickiehowell with photos of your Clover Mini Weaving Loom projects — I love seeing your work!
xx,
Vickie
Join me every week on Facebook for my live stream. I show tutorials, answer viewer questions, and talk tips and trends. Tune in live on Mondays at 12pm CT, or watch the recorded version anytime here.
The post How to Use the Clover Mini Weaving Loom appeared first on Vickie Howell.
January 27, 2017
Conversation with Rachel Denbow

On CRAFT*ish: A Conversation with Author & Blogger, Rachel Denbow
This week is our first episode of 2017. We took about a month hiatus for the holidays, but now I’m thrilled to be back in my little, audible world of inspiration. I’m really excited for the lineup of upcoming guests which span creative passions ranging from knitting and quilting, to floral design and general craft, to spoken word performance and fiction novel writing. I’m looking forward to hearing about — and of course, sharing with you –how each of these amazing artists have found their own, creative path.
In today’s episode we kick things off with lifestyle blogger and Author of DIY Woven Art, Rachel Denbow. Rachel’s a creative skills teacher, weaver, and home decor expert. She’s been featured in HGTV Magazine, Apartment Therapy, Design Sponge, and writes regular features for A Beautiful Mess.
I’d never met Rachel before this interview, but within minutes it felt like I was chatting with an old friend from the craft industry. We talked about her evolving aesthetic, her urge to create daily, what she does to feel connected with other makers, and what it’s like balancing a creative career with a family and home life. Click here to “meet” her now!

Listeners can find CRAFT-ish on iTunes, Soundcloud, or Stitcher. Then go to the Show Notes page to get links and see photo’s of some of Rachel’s work and to enter to win a copy of her book. Enjoy!
The post Conversation with Rachel Denbow appeared first on Vickie Howell.
January 25, 2017
Monetize Your Facebook Live Videos (Via Sponsorship)

Monetize Facebook Live Videos via Sponsorship
Facebook Live is the new marketing black. Forget those gorgeously shot, highly produced videos of yester ( read: last) year. In-the-moment streams are where it’s at when it comes to nurturing community, engaging with consumers, and promoting anything from personality to product to an audience that cares about what you have to share.
I started using the “live” function on Facebook the first day it was offered via their Facebook Mentions App in beta form to verified (those folks with the little checkmark by their names) users. That was a year and a half ago, and since then I’ve integrated the capability as a major part of my business plan.
In addition to the occasional one-off videos, I also produce a weekly live stream called, Ask Me Monday. As a tv show host/producer it was an easy transition for me to treat the weekly stream as a (rudimentary) tv series. As long as there was consistency in original air time, a general theme, and a name then people would follow it as they would any other series. As the host of a podcast, I saw the monetization opportunity parallels between the two mediums. After several months of experimenting I began applying a method commonly used amongst podcasters for sponsorship, and have since found it to be a success model for Facebook Live streams as well. With a few minor tweaks, I came up with a plan. Since sharing is caring, it’s time I pass along what I’ve learned (so far.) So, stream-y friends, let’s talk sponsorship!
Different Types of Sponsorships
Here’s the sponsorship breakdown.
1.) Product Only: Trade with companies. Your” face time” in exchange for their products.
$0 cash exchange, but potential option for high-dollar items that are worthwhile for your business. This is also a good option if you don’t currently have a consistent video schedule.
2.) Package Deal: Incorporate live video(s) as a feature (or perk) of a larger deal.
For example, if you’re courting a company to pay you a regular payment of $X/month, and need to line item several things (blog posts, social media coverage, tutorial, etc.) to make it worth it for them, then live video will sweeten the deal. Live streaming is a hot-topic marketing term right now, so use it! This option can, but does not have to be tied to a regular video schedule. You may choose to offer X amount of live videos as part of the deal, vs. specific episodes on a regular schedule.
3.) Flat Rate: Sole sponsorship offer to one company for a specific amount of time (ie. 1 quarter, 6 months, year, etc.). This rate would be based on viewership (see formula below) PLUS an exclusivity fee (there’s value in being the sole sponsor, but also the broadcaster should get a bump for taking him or herself off the market for other sponsorships during that term, even if his/her viewer numbers rise.)
4.) Episode Sponsorship: Rate-based structure on a per episode basis (with or without a discount for multi-episode sponsorship.)
Over the past 18 months, I have used Options 2, 3 & 4. The latter, however is where there is the most room for financial growth. As you nurture your audience, gain a following, and invest in “Boost”ing videos you’ll see your numbers S-L-O-W-L-Y, but surely rise. With more viewership, you can charge more money. How’s that, you ask? Well, there’s a formula. Ok, there isn’t a formula specifically for live streaming, but as I mentioned above there is one for podcasting. That’s the one I use for my, Ask Me Monday Facebook Live stream. Podcast sponsorship is based on CPM (cost per mile, which for whatever reason means, 1,000 listeners/viewers.) Instead of counting each individual viewer, marketers will round up or down to the nearest thousand (or fraction thereof) and pay a rate for each 1000 (rounded up to .25 or .5.) The going rate scale is between *$20-$50 CPM. To figure out where on that scale your broadcast would fall, I’d refer to your Facebook follower numbers, then go from there. This is a bit of a grey area because X number may be a big deal for the Mom & Pop craft store you’re pitching to, but pitiful in the eyes of the Fortune 500 company you hope to woo. Like anything else be honest with yourself about your value, and know your audience.
*If you work with a marketing hive group, the rate will be lower as their business is bulk. It may or may not be worth it for you to go with that option. I usually only go this route if I haven’t secured full price sponsorship for the episode.
THE EPISODE SPONSORSHIP BREAKDOWN
For the purposes of this article, let’s just work under the assumption that prospective sponsors are all in the craft industry. Let’s say that you have 80k followers. Solid! Not mind blowing, but respectable. Based on that assumption let’s also say that you feel comfortable asking for a $35 CPM fee. What now, though? Just do the math!
RATE FORMULA: Rate x CMP Average = Episode Rate
Now that you know your rate, here are some options of how to serve it up to perspective clients.
Pay for What They Get
Do you wait to quote the company the total until you see how many views occur over a 1-2 week period? You could, although getting a marketing exec to approve a number that doesn’t exist yet would be a feat unto itself.
Numbers Guarantee
How about guaranteeing a number of views and quote on that? Eek, that’s risky. Facebook algorithms are one of the great mysteries of life, and they change frequently. You really won’t know how much reach your video will have (even if you “Boost”, which you should, that’s only an estimated reach. Facebook is under no obligation to deliver on the maximum reach suggested at the rate you’re boosting for.)
Be Average
“Over achiever” is probably a term that’s been used on many people taking the time to read this article, so aiming for “average” is tough. It’s also smart. That is, basing your rate on the average number of viewers your videos receive. By telling your sponsor you average X amount of views (based on at least 3-6 past live streams), it does not guarantee that number of views for their video. It simply states that it’s the average for which they’re paying on. If their video gets less views, you still get the same amount. If it gets more, you still get the same amount. It’s a safety net for all. Not to worry, though. As I mentioned earlier, this net is one that can grow…and relatively quickly. The key is: consistency and knowing your numbers, then making those numbers work for you. What that means is that if you know your viewer average breakdown for “All Time”, “Year to Date” and “Quarterly”, then you can see which number looks the most favorable and quote from there. This may ebb and flow. If you have a great quarter (as I did for Q3 in 2016), then you might want to quote on that. If you had a lesser quarter (as I did for Q2), then you’d avoid that. I actually recommend avoiding quoting off of either of those, though because one means less money, and the other means you have to hustle your arse off to make sure you meet that goal again. We do enough hustling as independent contractors. We should be kind to ourselves. How? Look at all of the numbers, then go with your gut. Ok, this is where I get number-y. Here’s a hypothetical breakdown of a fictional live stream series I’m calling, Facebook Live Fantasma (FLF)!
FACEBOOK LIVE FANTASMA BREAKDOWN
–All Time Views: 172, 925 over 25 total episodes.
All Time AVERAGE: 6,918 views
If the FLF host based his/her rate on All Time Views based on a CPM rate of say, $35 then the math would look like this:
$35 x 7 (rounded up from 6.9k) = $245 per episode/sponsor
–Year to Date Views (YTD): 60,739 views over 7 episodes.
YTD Average: 8, 677 views
$35 x 8.5 (rounded down — if you’re being conservative– from 8.6k) = $297.50 per episode/sponsor
–Quarter (3 month period) Views: 100, 025 views over 10 episodes.
Q Average: 10, 002 views
$35 x 10 = $350 per episode/sponsor
Looking at these numbers, I’d probably recommend that the FLF host charge the YTD rate. The quarter average is significantly higher than the other calculated averages, so it’d be risky to attempt to replicate that average for the following quarter. We don’t need that kind of stress, people. Conversely, the All Time Rate is a number that seems pretty easy to hit, so YTD seems like a happy medium. 
Ok, there you go. That’s how I run financials on the live streaming portion of my business. I hope it’s helpful info for those of you considering taking the plunge into the Facebook Live frontier!
Sponsor My Facebook Live Series
If you’re interested in partnering with me on a Facebook Live video for your product or business, go here to nab a spot!

More on Crafty Monetization
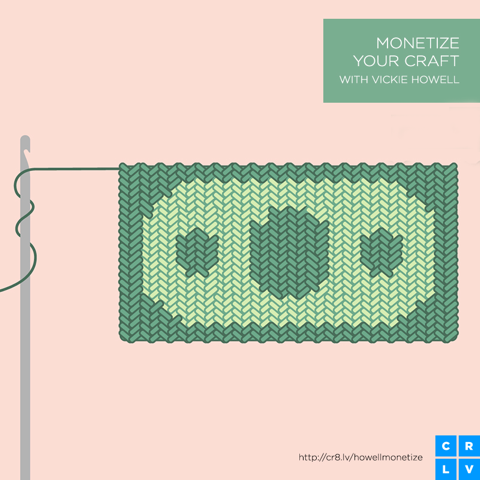
If you’re starting a new, craft-based business and would like more info on earning money from it, then check out my CreativeLive course, Monetize Your Craft.
Happy creative marketing!
xx,
Vickie
@
https://www.facebook.com/pg/vickiehow...
The post Monetize Your Facebook Live Videos (Via Sponsorship) appeared first on Vickie Howell.
January 16, 2017
Chunky Crochet Shawl Pattern + Quick Locking Stitch Markers = TLA

Quick Locking Stitch Markers = Crochet Shawls’ BFF
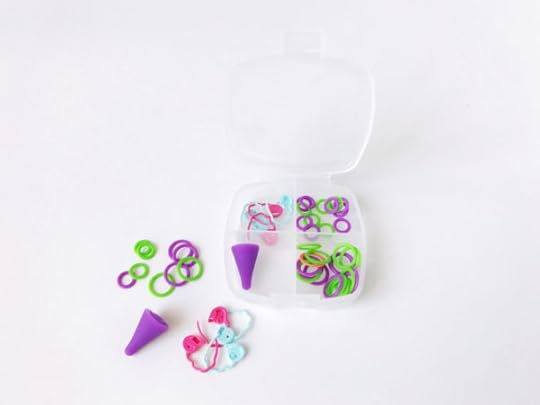
Counting is important. Arguably in life, but definitely in crochet. Unlike with its knitting sister with her handy needle which holds all live stitches in a tidy row, crochet’s stitches are never “live” — and also, less uniformly in place. It’s so easy to miss a stitch in crochet (especially when one is *cough* binge watching, Night Manager while stitching), but important not to when trying to create a geometric shape. My first recommendation is to stop and count stitches at the end of every row. I know, snoozeville. My second, and more exciting suggestion is to use the new Clover Quick Locking Markers to help keep track of crucial stitches that create the shaping for said, well, shape.
This week I made a luscious, bohemian wrap-blanket. It’s a triangle, designed to start with just a few stitches at the tip and open up outward as you move along. The most important thing to keep track of in order for this project to work is where the center point of each row is, so you’ll know where to increase. This seems simple enough, but when you’re working with a yarn that has any texture at all, and/or working shorter stitches (like hdcs) one stitch can sometimes be a little tricky to track down. This is where Quick Locking Stitch Markers come in.
Place a Quick Locking Stitch Marker on the first center stitch of the piece. As you progress, move the marker to the appropriate place to ensure your increases are happening where they should be. If the marker’s off, you’ll know that your stitch count is, too.
SIDE NOTE: You’ll notice the wiggly leg of the marker helps hold it in place, even when the marker isn’t shut. This makes using them fool proof, because you don’t have to worry about the marker accidentally slipping off your shawl!
So grab some scrumptious yarn, an Amour crochet hook (my favorite!), and some Quick Locking Stitch Markers, and get stitching towards some shawl success, people!
Chunky Triangle Shawl
MATERIALS
3 Hanks Knit Collage Spun Cloud (100% Wool; 100 yds), in color: Fog Heather — or equivalent bulky, thick & thin yarn.
12 mm Clover Amour Crochet Hook
Clover Quick Locking Stitch Markers (Medium)
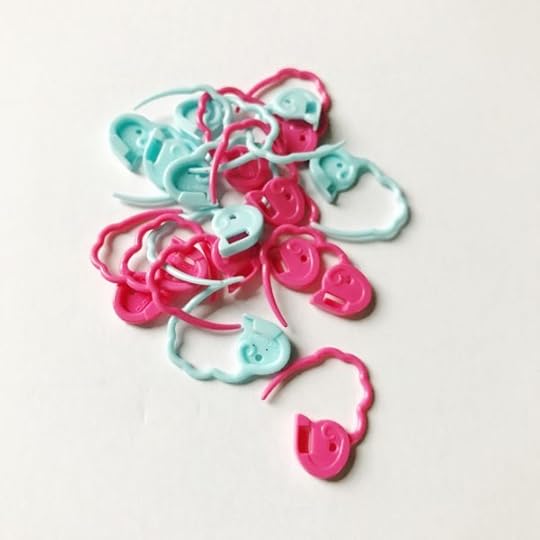
NEW: Clover Quick Locking Stitch Markers are perfect for keeping track on increases in a crochet project like this one!
FINISHED MEASUREMENTS
72″/183 cm wide — excluding fringe
34″/86 cm deep — excluding fringe
GAUGE
Approx 8 sts = 4″/10 cm in (hdc, ch-1) stitch pattern.
DIRECTIONS
Body:
Ch 4.
Row 1 (RS): [(Hdc, ch 1) 3 times, hdc] in 4th ch from hook (skipped ch counts as first hdc and ch-1 sp), turn. –5hdc, 4 ch-1 sps
Note: Place Quick Locking Stitch Marker in center hdc. Move marker to keep track of center grouping stitch as work progresses.

Row 2: Ch 4 (counts as dc and ch-1), dc in first st, ch 1, sk next ch, dc in next hdc, ch 1, sk next ch (dc, ch 1) 3 times in center hdc, sk next ch, dc in next hdc, ch 1, sk next ch, (dc, ch 1, dc) in last st, turn. –9 dc, 8 ch-1 sps

Row 3: Ch 3 (counts as hdc and ch-1), hdc in first st, ch 1, sk next ch, *hdc in next dc, ch 1, sk next ch** ; repeat from * to ** across to center dc, (hdc, ch 1) 3 times in center st (center group); rep from * to ** to last st, (hdc, ch 1, hdc) in last dc, turn. –13 hdc, 12 ch-1 sps
Row 4: Ch 4, dc in first st, ch 1, sk next ch, *dc in next hdc, ch 1, sk next ch ** across to center st, (dc, ch 1) 3 times in center st (center group), sk next ch; rep from * to ** to last st, (dc, ch 1, dc) in last st, turn. — 17 dc, 16 ch-1 sps
Row 5: Repeat Row 3. — 21 hdc, 20 ch-1 sps
Row 6: Ch 5 (counts as tr and ch-1), tr in first st, ch 1, sk next ch, *tr in next hdc, ch 1, sk next ch** across to center st, (tr, ch 1) 3 times in center st (center group), sk next ch; rep from * to ** to last st, (tr, ch 1, tr) in last st, turn. –25 tr, 24 ch-1 sps

Adding multiple Quick Locking Stitch Markers offers a great visual reference, to ensure your center point (and stitch count) is where it should be!
Rows 7-8: Repeat Row 3. — 33 hdc, 32 ch-1 sps
Row 9 (RS): Ch 5 (counts as tr and ch 1), tr in first st, ch 1, *sk next (ch, hdc, ch), tr in next hdc, ch 1, tr in sk tr, ch 1** repeat from * to ** across to center grouping, tr in first hdc of grouping, sk ch, (tr, ch 1) 3 times in center st, sk ch, tr in last st of grouping, ch 1, repeat from * to ** to last hdc, (tr, ch 1, tr) in last st, turn. — 37 tr, 36 ch-1 sps
Row 10: Repeat Row 3. — 41 hdc, 40 ch-1 sps
Repeat Rows 6- 10, twice more. — 81 hdc, 80 ch-1 sps
Note: On some repeats of Row 9 there won’t be an even number of sts to cross before the center grouping. In that case, simple work 1 tr on either side of the center grouping.
Repeat Rows 6-7, once more. — 89 hdc, 88 ch-1 sps.
Fasten off.
FINISHING
Messy Braid Fringe (Make 29):
Cut 3, 24″/61 cm strands of yarn. Holding strands together, fold in half. Insert crochet hook through RS of shawl edge; lay yarn at the folded point over the hook. Pull yarn through, from back to front, just enough to create loop. Set aside hook and use hands to fold the loop over the edge of the project, pulling the ends of the yarn through the loop. Pull tight-ish.
You’ll now have 6 strands hanging (3 stands folded). Separate into 3 groups of 2 strands; loosely braid halfway down fringe, and pull to make messy. Use one strand to wrap and tie braid off. Trim and fray ends.
Repeat process, attaching 29 fringe bunches evenly (every 3rd ch-sp gap) across shawl edge.
Weave in ends.

ENTER TO WIN: Quick Locking Stitch Markers
I have a couple of packs of the NEW Clover Quick Locking Stitch Markers to give away. To enter, just post a comment telling us if you’ve ever used removable stitch markers before (for knitting, crochet, weaving, etc.), and if so, what did you use them for? Comments should be posted by 10PMCST on January 23rd.
Thanks!,
Vickie
The post Chunky Crochet Shawl Pattern + Quick Locking Stitch Markers = TLA appeared first on Vickie Howell.


