
Vickie Howell's Blog: Vickie Howell's Website, page 50
August 6, 2015
Geometric Pencil Case
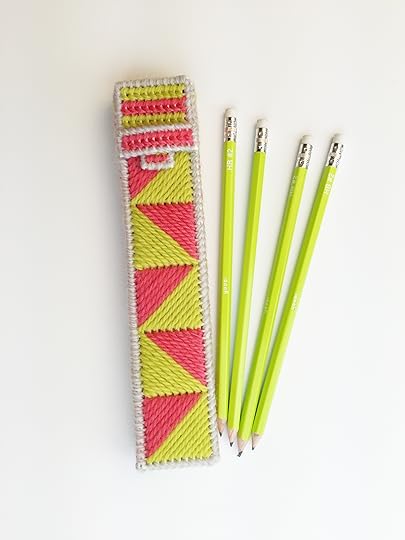
Heya! Did you know that every Thursday I write a post for the Yarnspirations blog? I cover trends, curate round-ups, and create quickie, themed projects. This week, the Y-folks (my nickname for the Yarnspirations team) are focusing on Back to School projects, so I whipped up a tutorial for a plastic canvas, pencil case that’ll give purpose to the scraps in your stash. Go here for the scoop, and check the Yarnspirations XO blog every Thursday for my posts. Hope to see you there!
xx,
Vickie


August 4, 2015
Author, Mary Jane Hall on Colorful Crochet Lace!

Colorful Color Crochet: 22 Chic Garments & Accessories, By Mary Jane Hall (Interweave/F+W; $24.99)
Colorful Crochet Lace – book by Mary Jane Hall
Welcome to the first stop on my blog tour! First of all I want to thank Vickie for giving me this fabulous opportunity as her guest blogger making it possible to share my newest book, Colorful Crochet Lace with all her friends in the crochet world! I have followed Vickie for years and was able to meet her at TNNA as she was just beginning to promote her yarn, Sheep(ish) (such a cute name!) But even before that I was fortunate enough to have Vickie choose my scarf for her book, Pop Goes Crochet which by the way was an awesome book with a unique idea. It’s a really cool book with projects that are still stylish today! Look for my scarf she titled Heidi, named after super model, Heidi Klum. Another connection I feel with Vickie, is that she is a fellow Texan!
Some of you may know me from my previous books, Positively Crochet and Crochet That Fits. After CTF, I had to take a few years off from designing due to some circumstances in my life that I almost did not recover from. But after finally realizing the only thing that would help me heal was to put my focus back onto something I really loved and could get excited about, which was my designing career. Not only does the motion of working the hook and yarn calm and soothe our senses as it’s forming into something incredible, but our minds were made to create, which gives us such a sense of accomplishment. One of my deep rooted satisfactions in life is helping people in any way I am able and I really enjoy the thought of helping to make crochet easier for anyone out there who may struggle from time to time, so I always have that in the back of my mind as I’m writing my patterns.

Parisian Gardens Circular Shawl
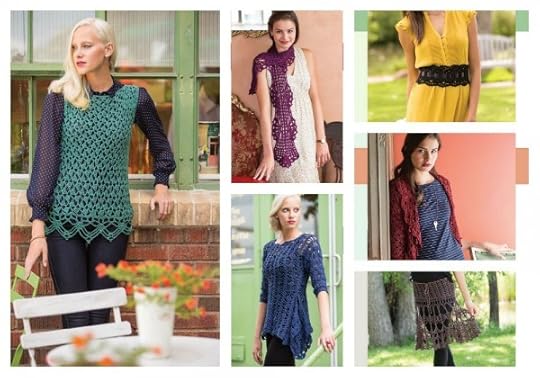
Colorful Crochet Lace is a book I’ve been wanting to write for a very long time because making crochet lace garments and accessories is my very favorite way to showcase this amazing craft. The book is “laced” with 22 stylish projects of garments and accessories with a Parisian theme.
Even though I have always loved lacy Victorian things, fans and shell stitches, I wanted to create some garments that would appeal to a variety of people. Some of the designs are lacy and feminine, such as the Au Naturel Cropped Top with a delicate edging, the Parisian Gardens Circular Shawl (see above), the Juliette Scarf, the Ooh La La Flared Dress, the La Fleur Doily Bag and of course my favorite, the Haute Couture Peplum Top, which has no increases or decreases in the upper body part. The Brigitte Wide Belt is a feminine piece, but one person has already made the comment that she was reminded of the “Steampunk” style when she saw the belt! Then there are other projects a little less frilly such as the Tunique Unique Pullover, the Cafe Au Lait T-shirt, Magnifique Modular Tunic, Tres Chic Neck Warmer and Boutique Bolero.

La Fleur Doily Bag
Many people have asked what my motivation was in coming up with the Parisian theme. I was born near San Antonio, TX and am in love with the Riverwalk adorned with sidewalk cafes that remind me of places in Europe. It’s been a life long dream of mine to go to Paris! You should see my Pinterest board titled “Paris”, where I have pinned photos of beautiful scenery, ornate buildings, balconies with hanging flowers, sidewalk cafes and especially the Eiffel tower. I asked the publisher (Interweave Press /F+W) if we could do the photo shoot with a Parisian theme and find an ornate sidewalk cafe and a beautiful garden. They loved the idea and found those places in Denver where the photo shoot took place. I think they did a fantastic job and I am thrilled with the photos and the fact they loved my ideas!
I would be honored for you to check out my new book, Colorful Crochet Lace and hope you find something you just have to make! I love seeing your projects so please post them on Ravelry, and you may get a request for your project to to be featured on the pattern page!
For the full schedule of the Colorful Crochet Lace blog tour, check out my blog.
 Mary Jane Hall, Author
http://positivelycrochet.com/


July 29, 2015
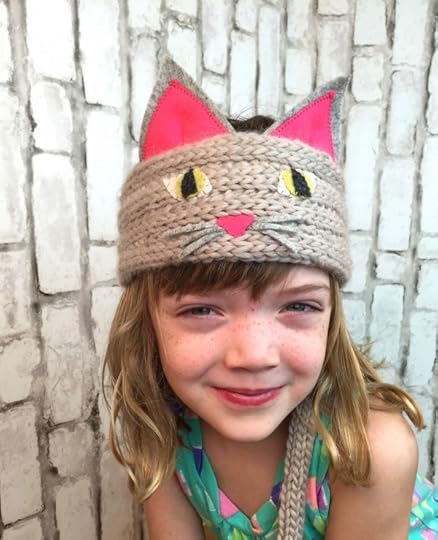
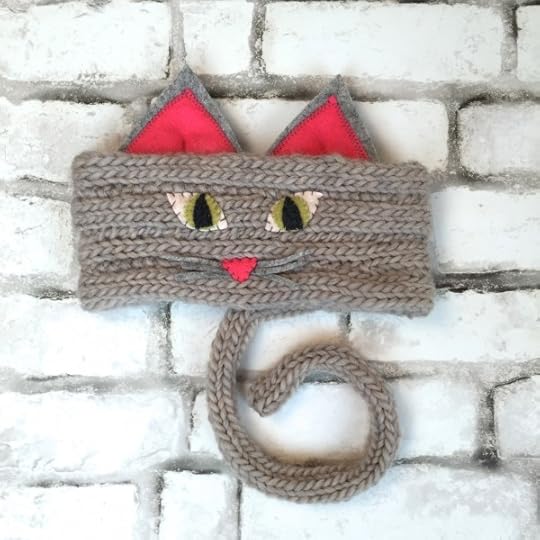
Kids Craft: Cat Headband

I don’t know about you fellow parents, but my youngest kiddo wants to be entertained. All. Of. The. Time. As we hit the homestretch of school break, I’ve found that it’s harder and harder to find things to do that don’t require me acting as her own, personal cruise director! So, as I have my whole life, I turn to crafting for some solace.
Thanks to the Wonder Knitter, kids can create knit pieces with relative ease. With that in mind, I set-off to collaborate with my kitty-fanatic daughter! We came up with a cute-as-a-kitten headband (the tail was totally her idea!) that’s constructed by sewing together one, continuous strand of Wonder Knitting. We took turns knitting, I assembled, and voila: a kids craft that’s the cat’s meow! Here’s how you can make one, too.
Materials
1 ball, bulky-weight yarn (I used, Patons Classic Wool Roving, in color: Natural)
Clover Wonder Knitter
Clover Jumbo Tapestry Needle
1 felt sheet each, in 2 ear colors
Felt scraps in 3 colors for eyes
Sewing needle & thread OR felt glue
Scissors

Finished Size
Toddler (Child)
Finished Measurements
Fits 18″(20″)/ 46(51) cm head
Directions
Knit headband fabric:
Using Wonder Knitter with bulky disk and yarn, knit an 84″(92″)/213.5(234) cm piece.
Fasten off.

Assemble headband:
Make an 18″(20″)/ 46(51) circle with end of piece; use tapestry needle and yarn to sew into place (this will be the back of your project). You now have the top of your headband.
Wrap the piece in a spiraling formation, taking care to measure every round to ensure circumference stays the same, using whip stitch (or whatever stitch gets the job done for you!) to sew rounds together, 4 times, and ending at the back.
Make an extra stitch or two to secure piece, letting the last 12″/30.5 cm or so hang. This will be the cat’s tail.
Weave in ends; flip piece over so tail hangs downward.
Make cat face:
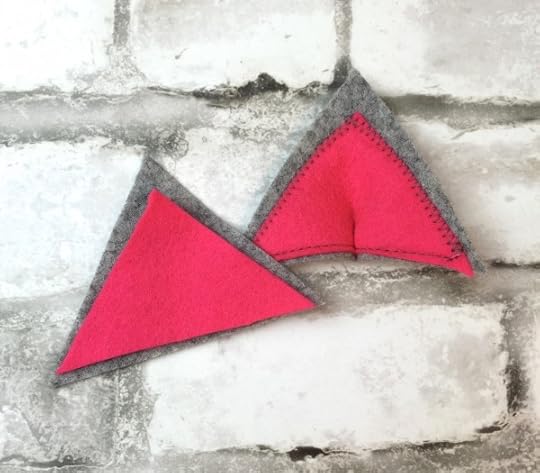
Using template as guide, cut outer & inner ear, nose, and eye component pieces out of appropriately colored felt. Cut 6, matchstick thin pieces of grey felt for whiskers.

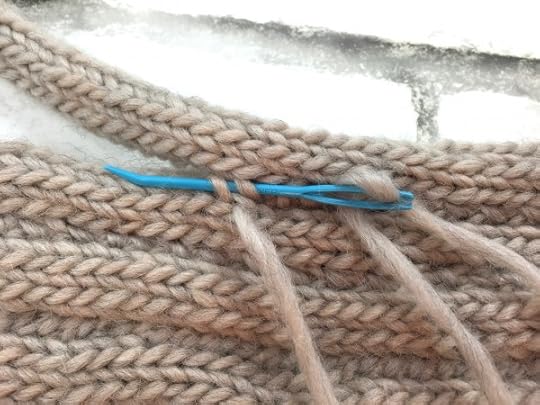
Using needle & thread OR glue attach pink, inner ear to outer ear pieces. If you’re sewing, also pinch ears and tack to create a pucker at the bottom-center (see below). Attach ears to inside of the top-front of headband.
Assemble 3 layers of eye components; attach eyes to upper-front of headband.

Attach whiskers, then layer and attach nose to lower-front of headband.
That’s it; you’re feline-fantastic!
xx,
Vickie
Psst! Bookmark this project for a gift, Halloween, or ski season!
July 21, 2015
Guide to Yarn Put Ups

Guide to Yarn Put Ups (aka How yarn’s wound.)
Walking through the aisle of your favorite yarn or craft store, you may’ve noticed that the way yarn is wound, packaged and/or displayed varies. The reason may also vary — from brand, yarn weight, or fiber type. The general term for the actual way the yarn is presented (assuming it’s not in an unwound pile) is called, “put up”. Yarn can be put up in different ways. The above image gives you a visual guide to put up types and names, but I thought I’d also give a little explanation for each.
Hank: A hank is created but looping yarn (think, wrapping around your palm and elbow), then loosely twisting it into itself. Generally this is the choice for higher-end yarns which consist (at least in part) of a natural fiber, because it allows for the fiber to “breathe”. This is the only put up of the bunch that cannot be knit or crocheted directly from, as their isn’t enough structure to keep the strands from becoming tangled as it’s pulled from.
Cake: If a yarn store employee has ever asked you if you want your yarn (hanks) wound before you leave, the result is most likely a cake. A cake is the satisfying little bundle that’s created when yarn is wound by a winder and swift. It can be made center or outer pull. In my opinion, it’s the cutest of the put-ups, because you can stack multiple cakes and take pretty pictures for Pinterest or Instagram. But I digress.
Skein: This is the most tightly wound version of the bunch, and is great for high-yardage yarns. This is also the easiest put up to get uniformity from, so it’s great for craft stores with limited real estate for each yarn line.
Ball: This is the term that’s up for the most interpretation. With the exception of a hank, you could use “ball” to describe any of the other put ups, and even though not technically be right, still not be wrong in the general sense. A basic ball, is the sphere-version that you probably associate with string. If you were winding by hand, without any special technique, this is what you’d get. The fancier version is a center-pull ball (high-end yarns when not in hanks, are in this put up), that’s loose(ish), and not very spherical. They often resemble more of a donut shape, in which the brand’s label is folded through the center.
**Cone: This one isn’t on my info-graphic, but should at least get a mention. This put up is when yarn is wound around a cone. You’ll see this packaging method most often (but not exclusively) with yarn intended for weavers or machine knitters.
So there’s the scoop. Everything you need to know should you ever be in a name-that-yarn-presentation death match! You’re welcome.
xx,
Vickie
@vickiehowell
July 15, 2015
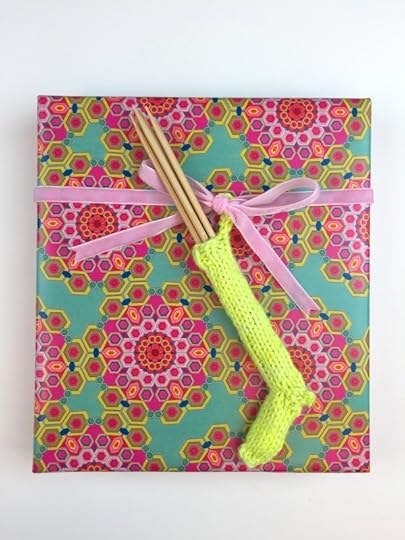
Project: DPN Stocking Ornament!

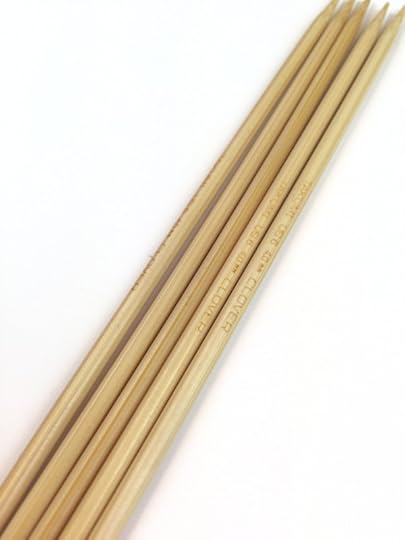
I’m loving the new, sharper tips on the Takumi double-pointed needles so much that I’ve been thinking about gifting them to some of the knitters in my life. I know I’d love receiving a set either by themselves, or bundled with some luscious yarn! Well, here we are barely into mid-summer, and I’m already pondering holidays — so this week, I thought I’d post a little (literally), “Christmas in July” gift idea that you can either start churning out in advance, or else bookmark for later. Stitch a wee stocking for a set of DPNs for the perfect, parcel topper or tree ornament. Not only is a sweet sock sure to put a smile on any stitcher’s face, but it’ll also keep the needles together when they’re not in use. Bonus: you can use the same needles to knit the stocking that will later keep them all Christmas-cozy. Enjoy! xx, Vickie
MATERIALS
Scraps (about .2 ounces), DK weight yarn
Set, size U.S. 6 (4 mm) Takumi Bamboo Premium Double-Pointed Needles
Waste yarn
Clover Tapestry Needle
Optional: size U.S. E (3.5 mm) Takumi Bamboo Crochet Hook
FINISHED SIZE
Fits one set of up to size U.S. 6 (4 mm), double-pointed needles
FINISHED MEASUREMENTS
Approx 6″/15 cm (from cuff to toe)
GAUGE
22 sts x 28 rows = 4″/10 cm in Stockinette Stitch
STANDARD ABBREVIATIONS (Click here.)
DIRECTIONS
CO 10 sts; divide evenly onto dpns; join, taking care not to twist.
Cuff:
Rnds 1-3: *K1, p1; rep from * around.
Rnd 4: Knit.
Repeat Rnd 4 until piece measures 4″/10 cm from CO edge.
Next Rnd (Heel prep): K 5 sts with waste yarn; slide sts back onto LH needle, k sts again with working yarn; k around.
Continue knitting until piece measures 5 1/2″/14 cm
Toe:
Rnd 1: K2, k2tog, k3, k2tog, k1. –8 sts.
Rnd 2: Knit.
Rnd 3: [K2tog] 4 times. –4 sts.
Cut yarn, leaving a tail. Using tapestry needle, weave tail through live sts, letting them drop off of needles; cinch shut. If any gaps show, sew together using tail. Feed tail end through toe.
Heel:
Carefully remove waste yarn; place sts on dnps. –9 sts.
Set-up Rnd: Knit sts, picking up 1 additional st at each gap. — 11 sts.
Redistribute sts on needles as follows: Needle #1 (back of “leg”), 5 sts; Needle #2, 3 sts; Needle #3, 3 sts.

Rnd 1: Needle 1: ssk, k1, k2tog. Needle 2: ssk, k1. Needle 3: k1, k2tog — 7 sts
Rnd 2: K4, k2tog, k1 — 6 sts.
Place 3 sts each on two needles; hold parallel. Bind-of using the 3-needle BO method.
Use tail to sew together any gaps.
FINISHING
Create hanging loop by either braiding 3-strands of yarn and attaching, or crocheting as follows:
Join yarn at top edge of stocking; place slip knot on hook. Chain 12; slip stitch in same place as yarn joined.
Fasten off.
Weave in ends.
#NotJustforChristmasPresents
July 7, 2015
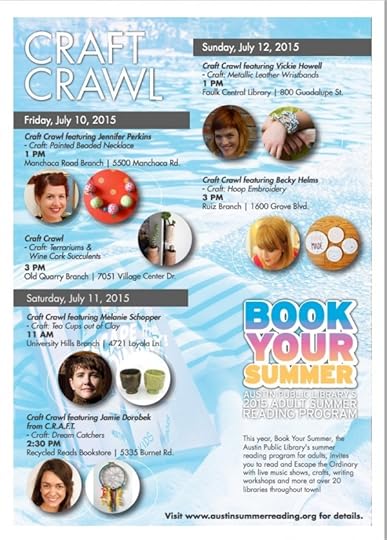
Hey, Austin locals! Join me this weekend as I take part...


Hey, Austin locals! Join me this weekend as I take part in the Library Craft Crawl. Every day for a long weekend, a different library in the area will host a craft-along led by local designers like myself, Jennifer Perkins, Jamie Dorobek, and more! My session takes place on Sunday, July 12th at the Faulk Center branch. We’ll be making Metallic Leather Wristbands fro my book, Finger Knitting Fun. No experience necessary, and all materials provided. Event is FREE!
Hope to see you there!
xx,
Vickie
June 26, 2015
Love is Love
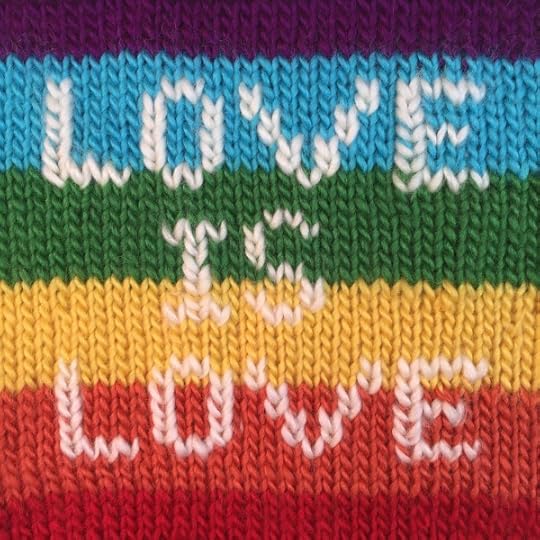
Today is a big day in U.S., civil rights history. As of June 26, 2015 a sect of our population can no longer be discriminated against when it comes to being in committed, loving relationships. Federal law now permits legal, same sex marriage. It is now, as it always should’ve been.
There is significant LGBT representation in the knitting, crochet, and craft industry, so I feel especially moved to publicly show my support. When I have no words, I often go to my needles, which is what I did today. Regardless of whether or not you knit this swatch to frame, stitch it onto a pillow, or make the above photo your Facebook profile picture — it’s my hope that you hold the sentiment in your heart. Love is love, my fellow humans. Be kind to one another.

With love,
Vickie
#062515
#lovewins
June 24, 2015
6 Tools That Make a Knitter’s Life Easier
 You already love it: choosing your favorite fiber in colors that speak to you; deciding on a project that expresses your vision; casting on a string of possibilities; working individual stitches which ultimately become something beautiful. If you read this blog, then chances are that knitting is your passion. That doesn’t mean, however that it’s not work. It is, and arguably the best kind. Even so, though we knitter’s can occasionally use a helping hand (or two) in the form of tools which make the intricacies of our craft a little less, fussy — handy little items, that add even more “happy” to our hand-making. Here are six of my favorites that I use on a daily basis. They make my knitting life easier, and they will yours, too!
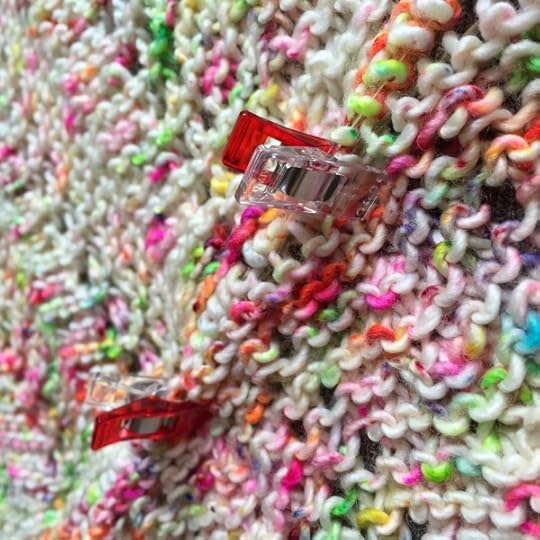
1. Wonder Clips. I don’t know what I did before I discovered these little… well, wonders! Using them is like have extra sets of tiny hands to hold pieces in place. They worked perfectly for me the the other day while I was grafting two, knit pieces together — easily grasping the fabric while arching over the needle cords at the same time!

2. Latch Hook Darning Needle. Bulky yarns are fun to knit with, but can be persnickety when it comes to weaving in the ends of projects made out of them. Shoving a super-plush fiber through a needle-eye is often frustrating, which leads to a bad, project experience. We don’t want that! Replace the eye with a latch hook however, and your yarn will slide in seamlessly– brilliant!
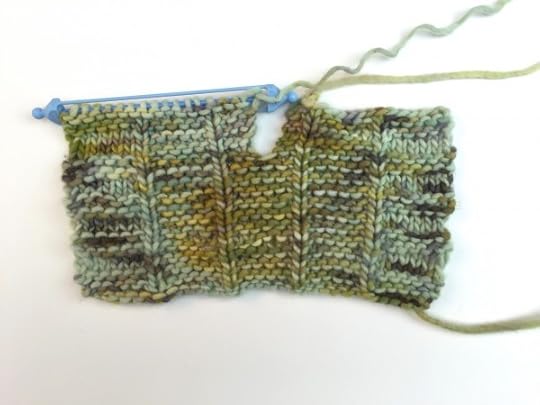
3. Double Ended Stitch Holder. This tool is my favorite of the sort because unlike their latching counterparts, you don’t have to worry about which end you “load” the stitches on; you can work off of either end. They’re also a great alternative to waste yarn, because you can knit right off of them, versus needing to place your stitches back on a needle before working with them again. It may only save you a minute but hey, that’s an extra minute you get to be knitting!

4. Double-Pointed Needle Protectors. I’m a big proponent of taking your knitting time when you can get it, which often means on-the-go. Who wants to spend those precious, few stitching moments snuck while waiting in line at the grocery store, digging around the bottom of your bag-abyss looking for that loose dpn? Or even worse, trying to salvage the dropped-stitch mess you pull out of your purse? Not me. Get yourself a set of these. You’ll thank me later.

5. Pattern Chart Marker. Perhaps your eagle-eye sight is such that you can glance back and forth from your work to tiny, explanatory symbols with great precision. If you’re like me, though nothing will drive you to drink quicker, than following a lace chart without marking it as you go along. Clover’s Pattern Chart Marker does the trick with it’s flexible construction (so it easily curves over book pages) and magnetic backing!
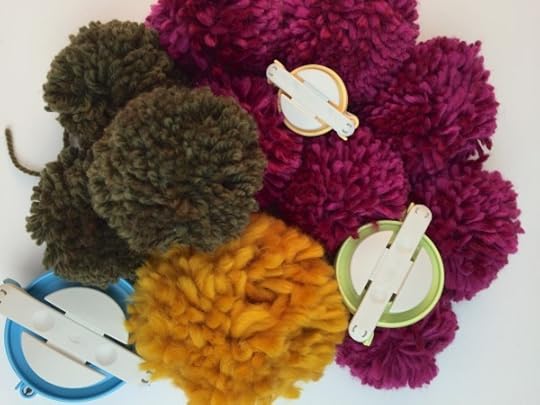
6. Pom-Pom Makers. In a pinch, a piece of cardboard, a fork, or even your fingers can whip up a pom-pom with relative ease. More than likely, though the result will be a wee bit scraggly (not that there’s anything wrong with that.) If pom-pom perfection is something you strive for — which may be the case if you’re working on a project that requires more than one, so you’d want them to be uniform — then, a pom-pom maker is a yarny’s best friend. In just a few simple steps, you can make picture-perfect poms for that knit pillow, scarf or garland!
What are the tools that make your knitting life easier? We’d love to hear about them!
xx,
Vickie
@VickieHowell
June 22, 2015
Jute Pot Cozy

Planter Perfect (Excerpted from Amazon #1 Release, Finger Knitting Fun)
Let your imagination bloom while you decorate a simple terra-cotta pot. Each little added detail will surely plant the seeds for your very own creatively cool garden!
Supplies
• ball chunky, jute rope
• terra-cotta pot, any size
• gold-leaf paint
• paintbrush
• decorative ribbon, long enough to fit the circumference of the pot top
• hot-glue sticks and glue gun
• large-eye yarn needle
How-to
Step 1. Yarn-wrap around three fingers—3 stitches.
Step 2. Finger knit until the piece measures long enough to fit around the circumference of the pot’s widest point, which is just below the lip.
Step 3. Fasten off and set aside.
Step 4. Paint the lip of the pot. Let dry.
Finishing
Step 1. Weave in ends.
Step 2. Use hot glue to secure the cozy to the pot.
Step 3. Glue the ribbon to the pot lip.
Get more, great projects in my book, Finger Knitting Fun! For a LIMITED TIME ONLY, you can get personalized and signed copies on Etsy! Nab one here.
xx,
Vickie
@VickieHowell
June 17, 2015
Crocheted T-Shirt Potholder

It’s official: school’s out for Summer. For those of us with kids, that means a loooong few months of taxiing, playdating, and otherwise looking for something, anything to keep our offspring occupied. Well, my parental friends, there’s no time like the present to get them crafting — and what says, Summer Camp crafts more than making a pot holder? Well, perhaps a lanyard, but humor me.
This week I thought I’d post a project that had a little something for most ages of children. Thrifting for t-shirts can be done with baby in-tow. Optional coloring on tees, is great for the toddler and pre-schooler set. Cutting the t-shirts and winding into yarn, is great for the kinder and early elementary schoolers. Finally, crocheting that t-shirt yarn into a pot holder will keep a tween and teen busy for a day. You’re welcome.
So grab your jumbo, Amour hook and get ready to think outside the yarn-box, because today kids, we’re crocheting with clothing. Enjoy! — Vickie
Make T-shirt Yarn
Gather 2-3, old t-shirts. I found these at a Goodwill for around $2 each. If you want to add a little flair, use fabric paints and markers to give color to the shirts. This is a great time to get younger kids involved spraying and splattering!
Tip: These Fabric Spray Paints work great!

1. Fold t-shirt in half length-wise, leaving about an 1″-2″/2.5 cm-5 cm between folded edges. Cut off hem.
2. Cut approx 1″ (doesn’t need to be perfect) strips, STOPPING after the first folded edge (leaving the second uncut.) Cut off sleeve & shoulder section.
3. You’ll now have what looks like ribs. Cut first strip from top right to bottom left of first strip. Disregard excess piece.
4. From here, you’ll cut each rib at a diagonal. See the dotted lines in Image 4 as a guide. You’ll end up with a long strip.

5. Gently pull on strip to create rolled “yarn”.
6. Knot strips together from subsequent t-shirt strips.
Wind t-shirt yarn into ball.
Crochet Pot Holder
SUPPLIES
T-shirt Yarn (Approx. 4 oz., or 2, XL Men’s shirt’s worth)
Size US N/P (10 mm) Clover Amour Hook
Tapestry Needle
FINISHED SIZE
9 1/2″/24 cm square
GAUGE
7 sts x 8 rows = 4″/10 cm in single crochet
DIRECTIONS
Ch 17.
Row 1: Sc in 2nd ch from hook, and every ch to end. Turn. — 16 sts.
Row 2: Ch 1, sc in each st to end.

Repeat Row 2 until piece measures 9 1/2″ / 24 cm. Do not Fasten off.
Hanging loop:
Ch 10, sl st in base of first ch.
Fasten off.
FINISHING
Weave in ends, including those from knotted areas.

Psst! Looking for a knit version of this project? Go here.


