
Emily Henderson's Blog, page 88
June 6, 2023
I Designed My Forever Coffee Table With Two Local Makers And This Is How It Turned Out

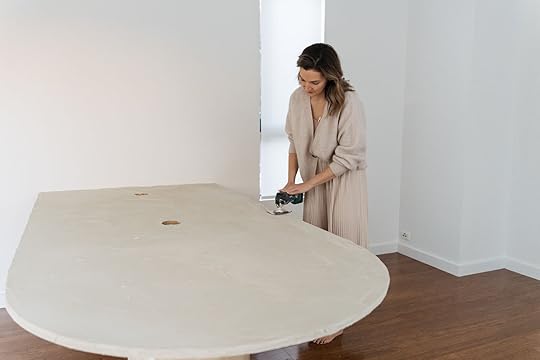
I knew that I needed a really big coffee table and while they do exist on the market, the ones that I loved were in the thousands. Then I figured that if I were going to spend a chunk of change I’d rather work with a local maker on something unique and special. Plus I really wanted to create some joy and form relationships through the process (and learn a lot so I can share). So today I’ll walk you through the 2-month process that I enjoyed every second of. (Oh, and check out that sofa:))
Our Living Room (A Few Months Ago)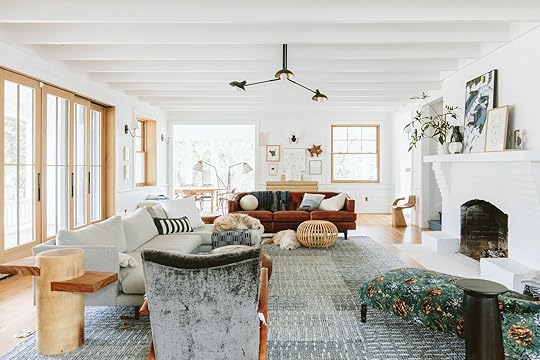
Swivel Chairs (from opening photo) | Rug | Sectional | Leather Pouf (similar) | Leather Sofa | Rattan Ottoman | Sconces | Chandelier | Black Side Table
In case you need a visual reference this is an older version of our living room, before we finalized placement and got some new pieces. But you get the idea – it’s big and it’s a pass-through space so organic shapes (or ovals) lend themselves to this much more. Now I could have gone a few different ways, but really wanted a huge dark live-edge table for the following reasons:
1. Because it would be very grounding – the centerpiece on a big dining table as it were.
2. It’s an organic shape that is neither round nor rectangular (so it’s a great contrast/addition to both of those typical furniture shapes).
3. Because it’s a literal tree root it can’t be mass manufactured the same way other materials can – this shape will never exist in another table and while I’m not obsessed with having something custom just for the sake of exclusivity, I also didn’t want to customize something that would then just get easily knocked off. Yes, live edge coffee tables have existed for decades and I’m not inventing the concept, but I like that the shape, species, and the age of the tree is really in charge of the design which inherently means that it’s non-duplicatable.
4. I’ve decided that I never get sick of high-quality wood, anything. Because of that fact, I feel ok investing further into it. Yes, there are great affordable versions of them on the market and I love those, too. But this shape just checks a ton of boxes for me.
5. It’s my woo-woo belief that everything has energy and living things specifically have a soul. It’s why I went with reclaimed wood in , and Zena wood flooring for this house. I want to make sure (when possible) that the wood that I bring into our house had a happy life as a tree and that the people who work on it (same with tile, which is why I love Pratt + Larson and Rejuvenation lighting) have happy lives, too. This one was old (and happy?) and fell in the ’70s in southern Oregon (so I was told). I wasn’t really interested in getting one from a “dealer” although honestly most trees in Oregon are pretty darn happy and have had good lives so I wasn’t concerned about that.
So I texted Purl, a local maker/artist in town who I love, and flagged it for him. I said, if you find a huge ideally reclaimed slab of wood, let me know – I’d be interested in a coffee table. After meeting Purl at the flea market last year I just knew that I wanted to collaborate with him somehow because his energy is incredible, playful, wildly creative/artistic and he is so prolific (I think he’s going to be a real art force, y’all). I feel incredibly grateful that at this point in my career, I can hire local makers and artists to do their thing to create works of art in our home.
A Few Weeks Later He Texted Me Photos:
He said the size was 46″ x 62″, reclaimed redwood that was clearly refinished in the 70s with the finish not in the best shape. It’s huge so it was probably a really old (and happy) tree. Part of me wanted to look for bigger, but with the deadline coming up I knew that this was probably big enough. So I asked Purl if he could refinish it to be less shiny/beat up and then make the hard edge more organic. He said absolutely and a week later sent through these photos.
Stripping, Sanding, Planing, And Shaping
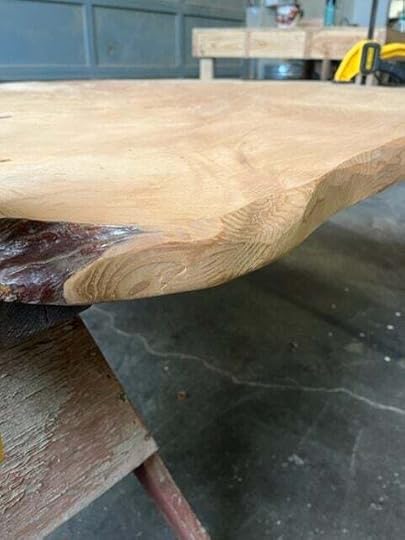

SO BEAUTIFUL. He sanded and planed the wood and then softened that hard edge so that the whole table had a more organic shape. Yes. Yes. Yes. I didn’t need to see it at this point because I knew I wanted dark, rich wood. I sent him some reference photos of the stain color I wanted and he went for it.
First Coat Of Stain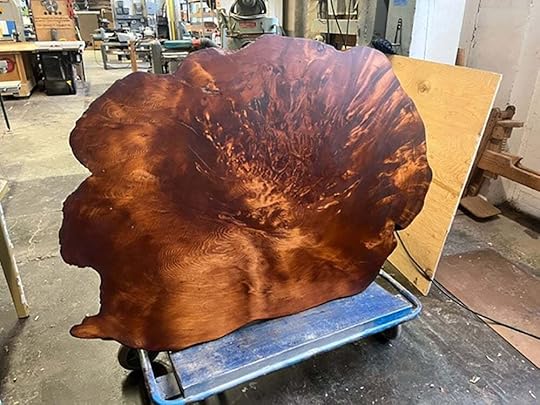 first layer of stain – too blotchy, not dark enough, and a little orange
The first coat brought out all the movement in the grain and we loved it, but immediately said, “Go darker”! We were hoping (and fairly confident) that a few more coats would even it out and pull down the orange.
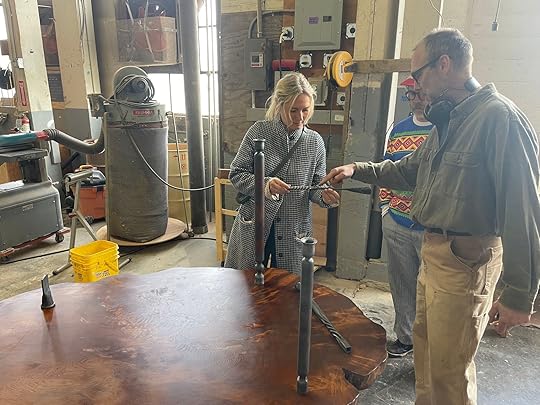
A Visit To The Studio almost done, I wanted it one coat darker
Purl and other artists work out of Past Lives Makerspace which was incredibly inspiring to tour. We went to see it in person and make sure that we agreed on which side was “up” and talked through base ideas. Purl suggested his friend, local Blacksmith and fellow studio mate, Billy to help us design it. At this point, I knew that I could take a simpler/less expensive route and just do a big chunky cross wooden base, but when Purl suggested doing some custom iron blacksmithing work I got really excited to learn what that meant.
I treated this like a proper commission (which I’ve never done before) where I gave my needs/wants and initial ideas, but I really wanted them to have creative freedom and not just dictate the design. So in addition to the refinishing, I hired Purl to oversee the art direction of the base and ensure that it came together on time.
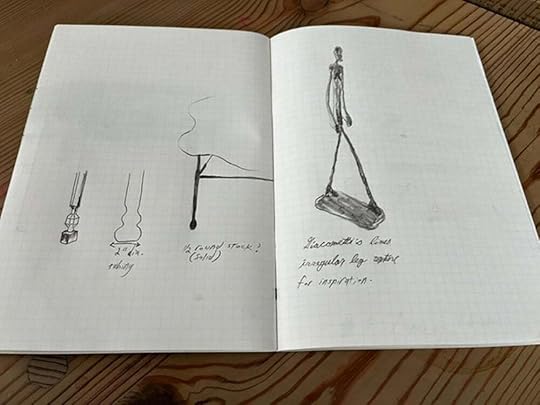
These were Purl’s initial design sketches for the legs. To the right, he’s pointing to sculptor, Alberto Giacometti for inspo. On the left were different leg iterations, the first one too structured, the third too simple, so we landed somewhere closer to the middle.


Here’s an awesome early sketch by Purl that ended up looking pretty close to the final product. We knew we wanted to keep the coffee table low to emphasize that “grounding” feeling. We landed on 13” legs to go with the 2” thick slab. 15” feels like just the right height for the space. As a tip – coffee tables can be much higher of course, but when they are huge they should be low (IMO).


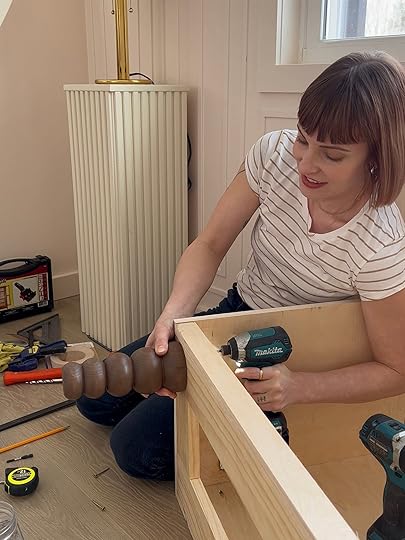
These were different leg samples we looked at with Billy. We considered the diameter of the legs – too thick felt weird and clunky, and too skinny didn’t feel substantial enough. We also debated whether we wanted the base of the feet more bell-shaped and whether the bell shape should be sharper or more rounded/curled up. Then we talked details, what shape we wanted the balls, more organic or more uniform, how many balls to put on each leg and the cross bars. Lots of ball talk.

Then it was time to look at crossbars (or “stretchers,” as Purl called them). We discussed height and where the balls would land on the legs. We talked about actually crossing the bars but thought that would feel too busy and you wouldn’t see the craftmanship enough. We talked ball pattern (Do we go all the way across? Only have a few? Do the number of balls on the long crossbars match the ones on the shorter bars? Should the pattern be uniform throughout?). We also talked about how they should connect, discussed attaching with rivets but decided welding was better – it gave a more streamlined look and was less expensive/less work.

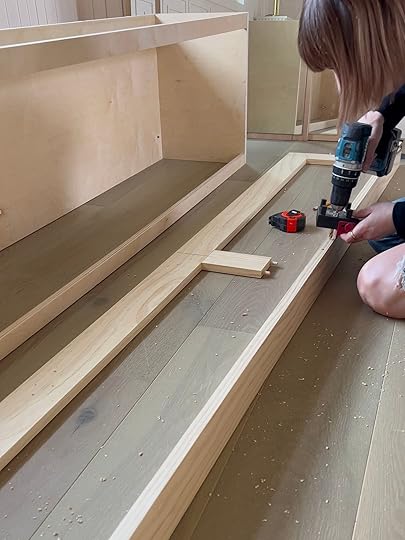
Then we came back for a third visit to approve the legs and figure out the spacing and placement of the legs/bars. The wood here represents the crossbar lengths. Nearing the final product here (and we were so excited), next up was one last stain, then sealing the wood, forging the legs and crossbars, sealing those, attaching the legs, then delivery. The timing was a little tricky because the sealant could take up to 12hrs to cure but these two worked so hard to meet our deadline.
Price/Hourly Breakdown:So I don’t feel comfortable putting their hourly charge on the internet (that is up to them and could change at any point), but I thought it would be helpful to understand how much work goes into this kind of craftmanship (especially for a prototype, if they get hired to do more of these they said it would be faster as they’ve troubleshot a lot).
The slab itself was $600 (which was a very good price, FYI, so if you are working with a dealer expect higher, but if it’s more of a found/reclaimed/vintage piece like this you can get some deals like we did)Billy the Blacksmith put in 20 hours of workThe pipe materials cost $145Purl put in 15 hours in staining, sealing, and art directing Extra fees totaled $200The total I paid was $3,650. This felt slightly higher than I had in my mind at the beginning, but honestly, we as consumers just tend to think things are easier and cheaper to make than they are, so I totally respected the amount of time and materials spent and feel honestly very grateful and proud of myself that I’m at a point in my career and life to support craftsmanship like this.
Wanna See My Forever Coffee Table??
There she is!!! Is she revolutionary? No! And it’s perfect and exactly what I wanted. It’s a stunning piece that everyone comments on the second they come in. It’s the perfect height and scale for the room (we thought we could have gone bigger at first, but it’s actually ideal). The deep dark finish of the top is exactly what I pictured, and the hand-forged legs are neither too simple nor too busy.

The edges just get me. They are so beautiful, sculptural, and truly mother nature’s work.


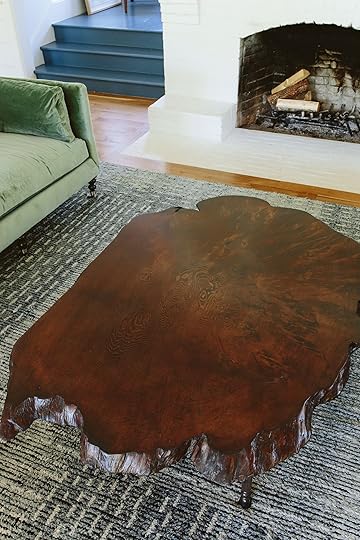
I love how it’s not a more contemporary white oak color, and instead creates this really rich depth in the room. It also hearkens to the ’60s and ’70s more with this finish (we left the shine on the edges) which I love so very very much. It’s not your grandma’s live edge table, but also it could be – it just feels super timeless and era-less.

I love how Purl and Billy went “random” with the legs. Purl had a whole pattern planned, where he created different shapes and named them, then they repeated those shapes on all four crossbars.

This is Purl, to the left. You all should follow him. He spent 18 years on a commune where he learned and practiced every art form and medium known to man, and his knowledge of art history is so impressive. I personally would love to see him on the next season of “Making It” (that show is incredible FYI and one that our kids love just as much as us). I’m glad that I was able to hire him before he blows up as I feel confident that he will. 🙂

This is Billy who like most artists/makers isn’t terribly active on social, but he does have an account if you want to hire him. Both of them work out of Past Lives Makerspace with many other artists I’m excited to explore in the next few years.

A huge thanks to Purl (left) and Billy (right) for this piece of craftsmanship that I get to call my coffee table. We are SO HAPPY WITH IT. Consider the “Henderson family coffee table heirloom” box checked forever (well, unless our next living room is tiny 🙂 but it will stay in the family forever). It makes me extremely happy and proud that this blog (and all of you) can promote and grow someone else’s career and livelihood. While doing this is not in everyone’s budget (and I’m so glad that there are affordable versions of this one on the market), if you have the budget to support local makers/artists in your area and do something like this, I think it’s a wonderful way to use your design dough and honestly makes me feel better about my other inevitable consumption:) I personally feel that pieces that tell a story (including heirlooms, travel souvenirs, and vintage pieces) are what really create a home. xx
*Living Room Photos by Kaitlin Green
The post I Designed My Forever Coffee Table With Two Local Makers And This Is How It Turned Out appeared first on Emily Henderson.


June 5, 2023
All The Sofas I Considered For Our Living Room After Shopping For TWO FULL YEARS

Months ago I wanted to lay out the living room with a long sofa, a short sofa, and two chairs. But the room is big and I just couldn’t find my dream sofa. At one point Brian said that he actually feels sorry for our future sofa (or spoiler, sofas) because there is no way it was going to live up to the pressure I have put on it to be perfect. I’ve been shopping for this fantasy sofa for two years (probably longer) and I don’t think that what I wanted existed. And it’s not that what I want is so incredibly special, it’s the combination of elements that seems virtually impossible. I ended up landing on a different layout, negating a lot of the things I wrote in this post (started it months ago), but I like the information, and it’s a good lead-up to our final layout post!! So I wanted to bring you along my woeful process. This sofa search was intended for this layout – THE sofa facing the fireplace, flanked by a smaller sofa and two club chairs. Easy peasy.

While I am truly a huge fan of that Article sectional it’s not the right orientation for this room and it’s incredibly water damaged and stained. But that’s the layout I’m chasing.
So let’s walk you through why this long sofa is seemingly unattainable:
Length – she needs to be at least 108″ long. They exist, but not very many are readymade. Comfort – we need an 8 on the comfort scale. I refuse to torture myself again – both emotionally and physically by not having an extremely comfortable sofa in our living room. But you know what? All those dope-looking sofas on the internet that are streamlined, curvy and so beautiful? So few of them can stand up to this challenge. I’m outing them all right now. Dog friendly – My kids are old enough now to not really have to worry about them, but no matter how well we wash the paws off after a winter walk, the dogs will run around and hop on the sofa afterward. It doesn’t stain, but I don’t want to look at all the dirty paw prints in between cushion washing. “So do you want a sofa that hides your dirt so you don’t have to deal with it?” Yeah. I do. This means no mohair, no boucle, no light colors – doesn’t matter if it’s performance fabric, I don’t want to spend my weekends wiping them up. Remember performance fabric doesn’t repel or hide dirt, it just wipes up easier and doesn’t stain. I’ve shopped for a patterned fabric for months and months and months and nothing is right enough to invest in long term.Ideally, it would look good with the rug + leather sofa we already have – Now, of course, I could move them to other rooms (and spoiler, I do) but initially, I really liked both of them so I didn’t want to. The rug has a million blues in it and a little of “white dashes” which has made it extremely dog friendly and cozy. And the leather sofa is super classic and pretty (and the perfect color leather). But it’s tufted, which means that whatever we choose really shouldn’t be. Again, at this point, I’m willing to move this to another room if the most perfect tufted sofa came into existence. I’d like this sofa to be more “living room,” less “tv room” – Not formal per se, but we have a big sectional in the next room so ideally it would feel more elevated than that (I’m willing to give up on this requirement at this point). Special, editorial, not something I haven’t seen every single day on the internet – not because there is ANYTHING wrong with that, only because as a designer I want to create something new. Like a chef not wanting to cook from someone else’s recipe or an advertising exec not wanting to do a similar campaign to someone else. I wanted, ideally, something that tickles my eyeballs every time I see it. This is definitely the one requirement at this point that I am most likely going to have to give up (and have). Well, What Is Your Dream Sofa?
Thanks for asking. If I could snap my fingers what would I own? You know it because I’ve said this for YEARS. It’s from BDDW and it’s incredible – the perfect combination of cool, comfy, edgy, and classic. It’s also close to $30k. And the thing is that I’m kinda glad it is – it’s a work of art by a company that I’m obsessed with and admire so much. I don’t want it knocked off. I don’t want it ubiquitous. I look on 1stDibs all the time for a used one (nothing, ever). I have of course, in the past reached out to see about any press or marketing opportunity (it will be in a magazine! I’m a blogger! I’m also from Oregon!) and haven’t heard back. At this point, YOU BET I would partner up with them, drain the kid’s college savings, take a discount, and make payments. And hell, had I kept track and calculated the hours, weeks, months, and years I’ve tried to find an affordable version of this sofa and multiplied it by my hourly rate it would probably be over $30k at this point!!! But I can’t do it. The last time I was in New York, I went into BDDW and sat on it, we had a moment and what I realized is that it’s a bit too deep. I was relieved momentarily, thinking maybe my unicorn sofa is just a really awesome horse. But it’s not. I would put more pillows or customize it 2″ shallower. Anyway, the dream is dead and we are moving on (full disclosure if they reach out after this post I will have no scruples – I’d do what I could to lock down a discount for marketing/PR/photography usage purposes). And you know what? I think its unattainability, like a piece of art, is a huge factor in why it’s so valuable and why I’ve loved it for so many years. If you are rolling your eyes at the price, I get it – anybody able to spend that amount of money on a sofa is probably enjoying capitalism more than 99.9% of the rest of the country and if you let yourself think about it too long you will feel gross. But it’s similar to the Devil Wears Prada monologue about Cereleum blue. BDDW is (in my opinion) the tip-top of creativity + quality + art + style in the furniture/design world for decades now. Major retailers have been trying to knock them off for years, but nothing touches the real thing. Nothing. Have you seen the modern Delft tile? The art they curate? The tables and wingbacks? Everything they do is edgy, classic, AND totally timeless. HOW???????? I think the high quality and unattainability are what make it timeless – it’s not everywhere. You don’t get sick of looking at it and wanting it. I implore major retailers to stop trying to knock them off, please. Let’s collectively let some things be worth just admiring as art, shall we?
A Classic English Roll Arm
I LOVE this sofa. It only comes 84″ but we could have customized it (had I ordered it in time). But also I already had the rug and was worried that it wouldn’t match or clash or just be wrong. I think if I could go back in time I’d order two of these facing each other, but I didn’t have that thought until about a month ago and it was just too late. It’s a stunner, though.
Almost It – A Restored Antique
Last year I found this white sofa (above) on 1stDibs and immediately said, “That’s it. That’s our statement sofa”. I put it on my *very* working mood board and my whole future fell into place. It was at a vintage store in LA, a totally restored antique from France circa 1830, and yet those modern lines were so simple and special. And it was long enough!!! The problems were A. It was $18k and newly reupholstered. B. It was in white boucle so we’d have to reupholster it (nope, not for that price), and C. It didn’t look sink-in able. I could tell that it would be more bouncy and firm. And that’s fine for other people, but not us. I want to USE our living room and after making this mistake in the past I will not again let an uncomfortable sofa haunt me. Our sofa will be inviting and comfortable, not something people avoid sitting on.

So I reached out to Rosa Beltran, with her company Clad Home (I’m a huge fan of hers, btw) and we talked about custom designing something similar – adding a cushion on top. I trusted her eye for proportions and her expertise in ergonomics. But I just kept dropping the ball, so busy with everything else going on that by the time I reached out again to get it done it wouldn’t have gotten here in time. SAD!
Vintage + Reupholster????Getting closer to the shoot I started having two options – Vintage (nearby) and reupholster or big box. I looked on 1stDibs, FB marketplace, Craigslist, and Chairish almost every day. I found many others that have made me excited, but none of them check all those boxes above. Besides, not being able to sit on them and actually test them out is a real problem when they would all be a fortune and the almost singular function of a sofa is to be sat on. But I go through and favorite anything I’m attracted to so that if I were to customize something I can look through what I like and get some insight.


This made me start to rethink the entire layout and opened a few doors – sofa-wise.
What About A Curved Sofa? A Semi-Circle?I even considered moving out everything we have so that we could bring in one big curved sofa, but Caitlin reminded me that you can’t lay down on curved sofas. I hadn’t even thought about that! As I write this I’m stretched out on the chaise part of our Article sectional and don’t want to only be able to sit on the sofa – I want to have a loungeable option.


 What About The Camaleonda? It’s Cool And Comfortable?
Ha. Jokes on all of us that this sofa is famously uncomfortable, not to mention unbelievably expensive. Yes, it’s knocked off now (all the more reason for me not to invest in the original), but I just wanted to quickly break that story – that this sofa is a wonderful hotel lobby sofa, a beautiful formal living room sofa for guests, but no, it’s not a family sofa. She is bouncy and you can’t really lie back. Trust me, “modular” is NOT always a good thing.
Two Vintage Sectionals I Was This Close To Buying
This one is so long and beautiful. But ultimately so expensive and felt too deep for everyday conversations. And now I don’t remember how much it was or where it was, but I’m sure it wasn’t cheap nor close to Portland.

This is a vintage Milo Baughman that once recovered could be cool (and was right size/scale) but the amount of work/time and money I’d have to pitch in with no guarantees that I’d nail it was too risky with my deadlines and all my other work. I got the quote to reupholster it, which was $5k not including fabric (nor the cost of the sofa and shipping). So we are talking over $10k for something I’m unsure about????
Lawson Fenning + Nicki Kehoe + Amber InteriorsFour months out, I also stalked some of my favorite brands. I love any and all things from these three brands. While they are all expensive (around $8k+ for sofas, probably closer to $12k) I trust their quality and timelessness. Unfortunately, even if I did want to spend that it was too late when I started shopping and we wouldn’t get the sofa in time to shoot. Way to go dummy.
Crate & Barrel – The Athena Sofa
This whole collection was a huge mouth and mic drop. I ordered the dining chairs and have been so extremely happy with them. And this sectional is incredible too. I have to think it’s heavily inspired by the ’70s designer that designed the mountain house sectional (the exact same lines) but y’all this one doesn’t fall apart!!!! Brian was still hesitant that it wouldn’t be that comfortable (tight seat and tight-backed sofas tend to not have as much give) but I could have gone for it. Crate & Barrel makes comfortable high-quality furniture, surely they designed this one to be super comfy? But without one to sit on we were hesitant. My other hesitations were that the green color that I loved was the same fabric as the dining chairs. Can you see them at the same time? Yes. Is that bad? I DON’T KNOW!!!! Part of me thinks maybe it’s just cohesive?? Unfortunately at this point, it’s ALSO too late, and wouldn’t get here til July.
The Other Athena Sofa
When I went to Crate to see the first one, I sat on this above sectional and it was EXCELLENT. Super long, beautiful, and extremely comfortable. But it only comes in white or a burnt orange (I happily gave my feedback about needing more color options haha).
Both of those couldn’t get here in time, so now we are down to custom making (I found a company here that could turn it around in three weeks should I design it quickly) or quick ship from a big box. This is also when I started opening up all layout options – sectional, two facing sofas, etc. I wouldn’t say I felt desperate, but yes, my options were dwindling by the day. So I started considering…
Article Sectional
Last year I got this sectional to replace the vintage one at the mountain house (because it fell apart all day every day) and I literally couldn’t have been more happy. We then used it (because I forced Kaitlin) for Kaitlin’s basement makeover and once again I was like, “MY GOD THIS IS GOOD”. But was a big corduroy sectional the right vibe for our living room? Again, we have a sectional in the room over, and is that fine? Maybe??!! And with Article, I could have gotten it in time, but Brian was like, “This just feels more like a family room sofa, not our living room sofa” and I knew he was right.
CB2 Sofa
We are clearly out of farmhouse territory now, I know. But I love this one and felt that two of these facing each other could be so simple and pretty, and let my art/accessories shine. I went to the store to sit on it and the wheat one was in stock but I didn’t love the color (but they are comfortable and have lovely lines) and the blue one was backordered til June. While it might have made it here in time, at this point I have to design the rest of the room around the sofa I choose, so it’s a domino effect. I couldn’t wait til a week before the shoot to get the sofa as it affected so many other decisions.
Maiden Home Sofa
I love this sofa for its simplicity and that pretty curve in the back. But I fear that I sofa this simple needs to be in mohair or something special, and after staring at their mohair samples for weeks (they are so pretty) I read the usage recommendations on the back and I fear that it’s too fragile for our pups paws and puke. Mohair isn’t as forgiving as velvet (not by a long shot), so that felt unwise.
Lulu And Georgia Sofa(s)
I love all things Lulu and Georgia and trust them a lot re quality and comfort. I LOVE Ginny’s sofa and Jess has it and vouches for it. I have also loved the more classic English sofa for years – it’s very pretty, simple, timeless, and looks so comfortable. They didn’t have a long version, but this is when I realized that maybe two facing sofas were the way to go. Or maybe I didn’t need as long as I think and I could bring the conversation area in a bit? So I stalked Chris Loves Julia as they have it and I looked at all the photos of them sitting on it. I honestly stared at how they sunk into it, leaned back on it, crowded on it with multiple kids and dogs, and felt confident that the comfort and ergonomic box was being checked. I ordered samples of both colors (a mossy green and a darker blue) and two months out from the shoot I placed the order (they do give me a press discount, but not fully traded).
So what did I choose???????? Well, come back tomorrow for one more HUGE living room piece to discuss, then we’ll get to all things layout:)
Opening Image Credits: Photo by Kaitlin Green | From: My Journey To FINALLY Choose A Wall Color For Our Living Room (And How I Feel Now That It’s Painted)
The post All The Sofas I Considered For Our Living Room After Shopping For TWO FULL YEARS appeared first on Emily Henderson.
June 4, 2023
The Link Up: The “Dorky” House Sandals Emily Won’t Take Off, Ryann’s Design-Forward Dog Bed, And The Swimsuit We Just Bought 3 More Of
Happy Sunday and happy Pride Month! Our beautiful queer community needs us more than ever to fight for their right to simply exist safely and joyfully. So while this month’s celebrations are without question amazing and incredibly fun, fighting against the countless deeply harmful laws needs to be front and center, not just this month but for as long as it takes. Safety and being yourself shouldn’t be a privilege, it needs to be a right.


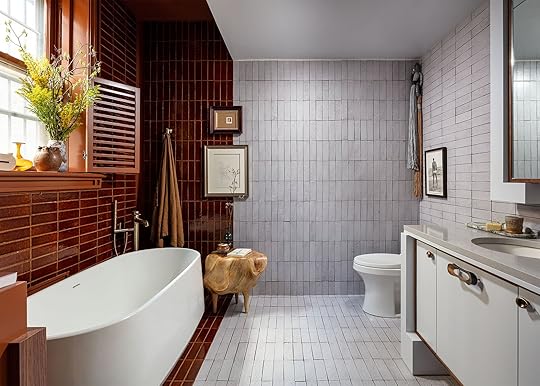
 design by ahmad abouzanat | photos by joe kramm
This week’s house tour is this stunning bathroom at the 2023 Kips Bay Show House New York designed by Ahmad AbouZanat (who is also a 2023 House Beautiful Next Waver!). When we saw this design we instantly fell in love with that dramatic, earthy color-blocked tile. Also, notice how the tile orientation changes on the side walls! A small shift that makes for a very cool moment. The whole space is both simple yet rich and we can’t wait to see more of Ahmad designs. Check out more photos here!

From Emily: I found the dorkiest (remember dorky is cool now) house shoes that I wear for all my household tasks (which are all day every day these days). I’m a massive winter slipper/house shoe fan, but what about the summer when our feetsies get warmsies? I can NOT walk around the house without arch support and due to my job I do a lot of walking. So I was in Hood River at a great outdoorsy store and tried on these Tevas which were successfully marketed as walking on clouds, so I tried them on and literally couldn’t not get them. They are a perfect mix between sneaker (supportive), house shoe, and sandal (waterproof). I’m trying to not wear them outside so I don’t track dirt inside, but they are obviously great as summer hiking sandals, too. I never knew how Oregonians hiked in sandals but now I do. These are just so supportive and comfortable. And again, I think their chunkiness is on that fence between dorky and cool – a fence I’m living on these days.
From Arlyn: I have the great fortune of now living within 10 minutes of Jess, which works out for me because she’s incredibly handy and I always have something for her to help me with around the new house. In exchange, I feed her and let her snuggle my daughter. It’s a very fair deal if I say so myself. Last weekend, I opted for my favorite lentil soup recipe, and while I know June isn’t exactly Souptember, a lentil soup is a go-to recipe for me year-round. This one got the crowd’s approval. Bonus points if you make your own stock from a half-eaten rotisserie chicken you found in the freezer the day prior. Bonus-bonus points if you serve it with your favorite roll.
Also from Arlyn: I’ve never been a runner, no matter how hard I’ve tried (which isn’t very hard) but I recently got into it to be more active and find a way to exercise with my one-year-old in tow, and the Hoka Clifton 8 running shoes have made a tremendous difference in how much impact I feel on my legs and body in general. After asking my community on Instagram to recommend some, these were far and away the top pick and I can see why. I picked a vibrant blue and orange but will likely also get them in black and white (or other colors) soon. They make asphalt feel like a springy treadmill, and hence, running is less painful, to me at least.
From Mallory: I love me a hardworking sandal that I can wear all day long in the summer, so I ordered these and I have VERY high hopes!! They’re Dr. Scholl’s but they’re actually…cute?? I had no idea that the foot doctor (if he even is a real doctor) made good-looking shoes but boy am I glad I learned. I’ve been wanting a good fisherman sandal for a while now, so when I found this pair for under $40, I immediately added them to my cart (I ordered the white pair but the black ones are cute too!) If you’re in the market, I thought I’d share these with you guys!!
From Caitlin: It’s time for my annual recommendation of my all-time favorite swimsuit: it’s this incredible shaping one that makes me feel super supported and confident (so much so that I literally keep the blue one in my car for swim emergencies. You know how secure you have to feel in a swimsuit to be ready and eager to change into one at a moment’s notice at any time? IT’S THAT GOOD). I also have this one in red for when I want to feel a little more Baywatch-y (and the support is AWESOME – I have an F cup and can confirm that it keeps the girls secure). They’ve launched a ton of new styles this year – some with full coverage and sleeves, and some that show a lot more skin – but I’m super excited about this square-necked version that looks really pretty and timeless! They carry sizes XS-4X with short, regular, and XL torso sizes, their website features models of all shapes and sizes (hooray!), and the suits are comfortable and easy to get into/out of by yourself (just to address one of my initial concerns). They sell out EVERY SUMMER – trust me, I am still sad that I missed out on the pink and green versions last year – so if this is interesting to you, be sure to grab one in early June BEFORE people start shopping for their 4th of July long weekend suits. If you’ve ever felt a little awkward or nervous in your swimsuit, I promise that these will help ease your mind a little!! Take it from your resident size 14 gal:) UPDATE! While Facetiming with Jess on Friday, she bought two and I bought ANOTHER ONE!
Also from Caitlin: OK WAIT. I cannot be the only person who is currently being bombarded with IG ads for this magic color-correcting cream that totally evens out your skin tone without makeup, right? I don’t want to be the dummy that goes into this with too-high expectations, but all the videos I’ve seen have been pretty shocking and transformative – does anyone have first-hand experience? Even the before-and-afters on the site are pretty noticeable! The reviews make it seem like maybe the color-correcting drops are a better call for me as a pale gal (a little more sheer, I guess?) but I would love any advice before I consider spending that much on a little tub of goo! PLEASE ADVISE?
Also Also From Caitlin: It’s 6 PM on Friday and I have reopened this post to add one more link because I am OBSESSED with this Architectural Digest piece about the Barbie set. Come to see the famous design elements, stay for the realization that filming caused an international shortage of hot pink paint. (Additional required reading, ICYMI: this Margot Robbie profile in Vogue; this Ryan Gosling profile in GQ – both have a ton of interesting movie tidbits!)
From Ryann: It is high time I talk about this dog bed. It is easily the most design-forward bed I have seen and it actually looks even better in person. It seriously looks like a Sherpa rug. The best part?! The cover is not only removable and machine washable but it’s also water and stain resistant. When my dog tracked mud into the house and on the bed, I washed the cover a few days later and it was good as new. It also should be noted that my dog is high maintenance when it comes to comfort, and he will sleep on this bed all day long. I am SO impressed with this product and can’t recommend it enough.

From Jess: I went camping last weekend with about 50 people so I grabbed my personalized Yeti insulated Wine Tumbler my cousin had made me for her bachelorette weekend (see above). First off, incredible gift. Not to knock other personalized bachelorette-themed gifts but…I’ve never really used any of them after the fact. This however was great for her weekend AND was the perfect reusable cup for camping (especially with a group) since it’s hard to lose track of! You can personalize all kinds of Yeti cups if you’d prefer having a handle or something bigger. Not a bad gift idea for an outdoorsy dad:)
Also From Jess: While I am most definitely biased, my dad wrote a pretty wonderful Father’s Day gift guide in case you missed it and need some ideas (and maybe a good cry:))
That’s it from us today! Have a beautiful rest of your weekend and see y’all tomorrow. xx
Opening Image Credits: Design by Ahmad AbouZanat | Photo by Nick Sargent
The post The Link Up: The “Dorky” House Sandals Emily Won’t Take Off, Ryann’s Design-Forward Dog Bed, And The Swimsuit We Just Bought 3 More Of appeared first on Emily Henderson.
June 3, 2023
We All Needed Lightweight, Comfy Summer Pants And Found 10 That We Love

Usually around this time of year, I am anxiously searching for THE denim shorts that will change the course of my life. For whatever reason, shorts shopping feels like a competitive sport where I get to lose hundreds of dollars and end up disappointed. But not this year. This year, I am embracing–nay CHAMPIONING–summer pants. Here’s my pitch: as long as they are breathable and lightweight, they are just as comfortable as shorts, there are more styles to play around with, and they transition from day to night effortlessly. As an added bonus, pants offer more coverage and can protect from outdoor elements (bugs, UV rays, wandering eyes, etc etc). So while I am not throwing out all my dresses and shorts this summer, I am excited to rock pants unapologetically, like a 19th-century woman wearing them for the first time. Are you with me?? If so, here are some great picks that we want to add to cart and a few that we already have and love:
1. Pull On Full Length Linen Pant
 via j. crew
Something about this shade of blue makes me swoon and I love the relaxed shape (I hate to admit it but I might be leaning into low/mid-rise pants…).
2. The Colette Cropped Wide-Leg Linen Pants

 via anthropologie
I am so thrilled that Anthropologie brought these pants back! I have them in a checkered green pattern and they are possibly the most comfortable pants I have ever put on. They come in 17 other patterns and colors too!
3. Crinkled Crepe Straight-Leg Crop Pants
 via madewell
From Caitlin: Hi, it’s me, ready to make you feel like you’re living inside a Nancy Meyers movie!!! I LOVE a flowy linen pant for summer and these are such a dream – they’re lightweight and breezy (a treat for when you want to feel cool but you don’t necessarily want your gams hanging out), the cut is great (straight down, even if you have bigger hips like me!), the price point rocks ($68 for pants that you’ll turn to all summer?), and you’ll waltz around feeling like Diane Keaton in the Hamptons. If you’re looking to try out this style without breaking the bank, highly recommend these (and the Farm Rio options below too, TBH – #4 and #7 look SO GOOD on Jess!!!).
4. Deep Blue High Waisted Pants
 via farm rio
From Jess: I have these pants in a rust/brown and am pretty devastated every time I need to wash them because that means I have to take them off:) They are cool, so comfortable, and I am very very tempted to get them in this blue. Also, the quality is so good.
5. Kinsale Italian Performance Linen Trouser
 via frank & eileen
Emily recently introduced all of us to this brand and it’s hard not to love. The price point is definitely on the higher side but according to Em, the quality can’t be beat. How timeless do these look?? And that raw hem gives them the perfect amount of “edge”. You’d be the coolest Nancy Meyers character on the beach:)
6. Women’s High-Rise Wide Leg Linen Pull On Pants


These are super affordable ($25!), comfortable, and come in a bunch of colors!
7. Lime Green Pants
 via neiman marcus | via farm rio
From Jess: Since I was hooked on my first pair of Farm Rio pants, I decided to try another style. Guess what?! I love them too. They aren’t as high-waisted if that’s what you want but they also don’t sit quite as low on me as on the model in the photo. I have them in black but look at that lime color! It’s so good!! I think I’m a Farm Rio pant gal for life.
8. Traveler Pants via anthropolgie
Oh, I really like these. They are made from stretch cotton and have an elastic waistband, but they look like flared jeans. LOVE.
9. Ingrid Fringe Trim Pant via j. crew
You can pair these adorable fringe pants with a slim, cropped tank and a kitten heel for a super cute summer date night outfit. Also, what a perfect vacation pant.
10. High-Waisted Linen-Blend Wide-Leg Pants

 via old navy
These are affordable, linen, high-waisted, and easy to pull on. What more could you ask for? Oh, and to top it off over 2,500 people have rated these pants FIVE STARS!
That’s all from me, your resident pants-in-the-summer advocate. Let me know your thoughts and drop your favorite comfortable pants down below. xx
Opener Image Credit: Photo by Veronica Crawford | From: My First Foray Into Renting Clothes With Rent The Runway
The post We All Needed Lightweight, Comfy Summer Pants And Found 10 That We Love appeared first on Emily Henderson.
June 2, 2023
Cancel Your Weekend Plans: 6 DIY Projects to Transform The Look & Feel Of Your Home

I am what I like to call a “DIY-isher”. Most of my “DIY” projects have been with my dad but I have done some by myself like my balcony floor and new bench cabinet (not yet revealed but I LOVE it:)). Every time, once of course I’m in too deep, I curse the day I thought that project was a good idea. That is until it’s done and I feel like superwoman. Ha. So if you’re wondering whether or not I am pro DIYing, I am! There’s really nothing like making something with your own two hands (or four if you have a friend which I highly recommend:)). So today, I am bringing you some pretty special DIYs – ones that will undoubtedly have a HUGE impact in your home. While most of these are a little more involved, I, of course, made sure to include some beginner-friendly options too. Ready to be inspired? This way please…
Travertine Office Table
 via gina ciancio of style curator
In need of a BEAUTIFUL desk/table??? When I saw this DIY pop-up on my Instagram from Gina Ciancio of Style Curator, I immediately saved it. As someone who has her “office” in her living room, I know that finding a desk that doesn’t immediately scream, “DESK!” is a challenge. I’m embarrassed to say that it wasn’t until I started writing this that I realized my desk and Gina’s DIY have a very similar aesthetic. What can I say, I have a type.
Now, I know this may look pretty intimidating if you don’t consider yourself a DIYer. However, Gina did an incredible job breaking it down – so with determination and a couple of power tools, baby, you’ve got this!


To start Gina found these round side tables at Kmart, bought four, then stacked and glued them. For those of you in the US, Kmart in Australia is more like Target here. It’s really good, while Target is…not as good. Hopefully, Australian Targets have gotten better since I was living there but they are NOT what they are here. Anyway! Those tables were the perfect bases to give Gina the pillar base she wanted.
Note the 2x4s they help make the table tall enough to be the height she needed. Then note the wall mount to secure the end of the MDF tabletop! Since she wanted the table to be flush with the wall and have more stability, creating a ledge for the end of the table to sit on top of was key.


With the help of some screws and a power drill, everything is secure.

Then it’s time to trace your arch! You can use a ruler like she did, a string and pencil method, it’s up to you.


Now, it’s time to bust out your jigsaw to cut out your perfect arch and holes for your cords (a hole saw bit for your drill will also make this easier). I have this jig saw and it’s very user-friendly. An eclectic sander may also help out with smoothing those edges but not necessary since you are about to get those hands dirty:)


After some trial and error, Gina used primer and feather finish to give that organic concrete look.

Then how smart is this?! Since Gina didn’t have a tile cutter (like most of us), and her sheets of tile didn’t perfectly work with the height of the base, she used a travertine tile-like adhesive (like this one) to bridge the gap! Since it’s under the table you can hardly see it but it makes everything look beautiful and finished.

For the tiling process details, head to Gina’s post, but she makes it seem very doable! I think using tile sheets is key. Waaay less labor.
She then sanded the tabletop, painted it to her desired color, grouted between the tiled pillars as well as the space between the wall and the tabletop, then boom! A truly special and custom desk that cost a fraction of what something similar on the market would cost. Again, Gina’s post goes into more detail but I can’t thank her enough for letting me share this project with you on our site:)
Ok, so this beauty is very organic and neutral but if you love color this idea could totally still work! Just pick a colorful tile and a tabletop color that looks pretty with it. Or if you want to splurge a little, you could get a real piece of wood for the top. The sky’s the limit!
NO-SEW Canvas Scraps Collage Art via brittni mehlhoff of paper & stitch
Ok, here’s a DIY that’s a little easier and requires zero tools! I promise anyone can do this one and you could even do it this weekend if you wanted.
We all know how expensive art can be. I think we’ve said it 109845738 times. And for good, handmade art, it’s absolutely understandable why it cost $$$. However, not all of us have that money, priced fairly or not. Enter this canvas scrape collage art by the very talented Brittni Mehlhoff of Paper & Stitch. She is no stranger to our DIY roundups because they are impossible not to love.
All you need are canvas (or fabric) scraps, some glue OR no-sew tape and an iron. See! Not hard or expensive! Brittni only spent $7.

First, you want to figure out the size you want and if you want to use a mat like she did. Brittni decided to paint her background canvas that pretty blue color (optional) for some contrast. Then she cut her other, nonpainted scrap pieces into the shapes she wanted and then simply attached them with no-sew tape and an iron. She does warn if you want to use fabric glue instead to make sure to not let it soak through the fabric. If you are handy with a needle, you could also attach these pieces with thread which would add more pretty texture. Choose your own adventure:)
All that’s left is placing your masterpiece in your frame and deciding where it should go!
One-Of-A-Kind Media Cabinet
 via brit arnesen of brit dot design
Ok, ok, this one is pretty advanced but LOOK AT IT!! How could I not include this crazy special, one-of-a-kind credenza?? If you somehow don’t know or have yet to follow Brit Arnesen of Brit Dot Design then your day just got A LOT better. She is fearlessly creative, SO talented, and her designs only evoke joy. With this project, I am going to spare you with me trying to give a step-by-step as building a credenza is pretty involved unless you already know what you’re doing (or are really handy). So for those who do want to tackle a full-on cabinet, I included some process photos, but for those who are not able don’t worry, I’m going to talk through an alternative:)

Impressed? Me too. This is the origin story:
“I’d been wanting a larger cabinet for the extra storage and also to fill the space a bit better under the gallery wall where it was going to sit. I knew I wouldn’t be able to find anything big enough within my price range, so I decided to build one. I spent $70 on the legs, which I found on Etsy, and the knobs were $30 on Amazon. I bought two pieces of plywood for around $130. The paint, Olive Sprig by Pittsburgh Paint, was $10 or so for two samples (my 9-year-old daughter actually picked out the color) and the Rub ‘n Buff in Gold Leaf was around $7. In all, it cost around $250 for the supplies I didn’t already have on hand.”
I love that she chose fun legs (similar to these). If that was all she did (plus some cool hardware) this credenza would have been great.

But because Brit constantly outdoes herself, she designs a 3D “pattern” on her cabinet’s doors and it knocks everything out of the park.


So like most, if not all DIY projects, Brit did had to pivot with the design:
“This project involved a lot of trial and error, changing my mind, and adapting as things didn’t go as expected. Initially, I’d wanted to give the cabinet a two-toned wood look; but when some of the 1/4” overlay pieces splintered during cutting, I had to change course. One thing led to another from that point and I ended up with no natural wood at all! I almost gave up on the idea of the overlays altogether for that reason, but figured out a way to make them work instead. I’m actually really surprised (and relieved) I pulled it off!”


I’m so glad she stuck with the overlay because it really adds that “something extra special” for me.


Now again, if building a whole credenza really isn’t in your wheelhouse but you’ve also fallen in love with the project I have an idea. I think you could get an already build credenza like the BESTA from IKEA, add those cute legs, paint it using this IKEA painting guide, then add your own original design! If you want to design an overlay then you will need a jigsaw but clearly, it will pay off in the end. Don’t give up!
Bamboo Mat Art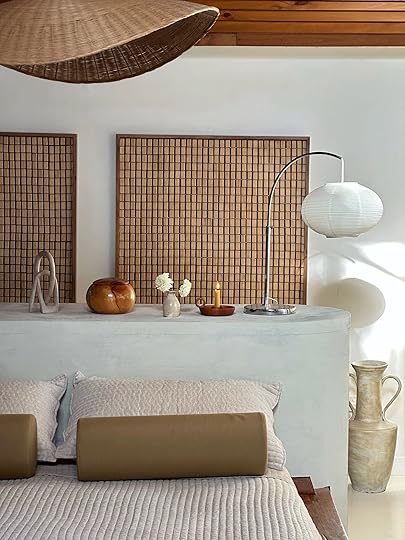
 via erena te paa
Following Erena Te Paa‘s account is like stepping into a beautiful mediation. If there’s a neutral-toned world that I’d want to live in it would be hers. Her DIYs are impossibly beautiful and chic and this one is no expectation. In terms of difficulty, I would say this is beginner/novice. It’s clearly more involved than the canvas art but doesn’t require power tools:)
This large piece of art is simply a second-hand bamboo mat attached to the back side of a picture frame! Check out her video to get a visual step-by-step. Here is a list of materials she used:
Back-side of an existing picture frame or alternatively a floating-style picture framePair of heavy-duty snipsBamboo floor mat – I purchased mine secondhand but you can also try searching these on Amazon – or alternatively try searching Bamboo bath mat or Bamboo placemat for a smaller versionClear-dry wood glueHeavy-duty wall mounting tapeErena did also say that “sometimes the back side of a readymade art print has a recessed back which is what I used to lie the mat in. I did need to remove the hanging hardware first.” Finding new uses for used things is something I am trying a bit of in my own house so this gave me a huge boost of confidence to try!
Roman Clay How-To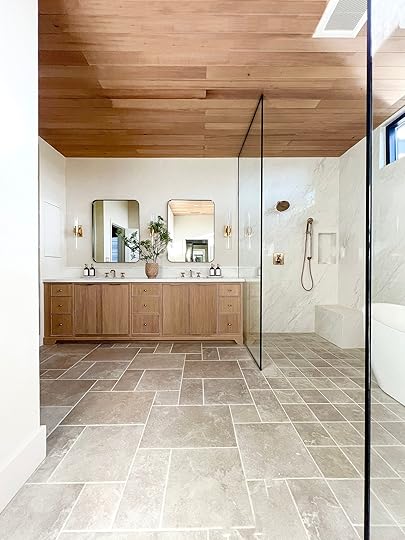
 via lisa of lhk interiors
So if you’ve been on the internet (or maybe my specific algorithm), limewash has EXPLODED! I thought it was popular a few years ago but that was nothing compared to it now. FYI I am not against it. In fact, I love it too. In the right space, it’s so beautiful. But if you read this post, you know that there is a similar but different “paint” option that gives you a similar effect. Enter Roman clay. When I wrote my closet post, Lisa of LHK Interiors, graciously emailed me to chat about her experience and to give me some tips. Honestly, they are all so helpful that I’m going to give them all to you verbatim! But before we get into those, when I asked her why Roman clay over limewash she said, “I chose Roman clay over limewash because the person at Portola Paints told me it’s more forgiving than limewash.” That was the vibe I got when I went there too:) Essentially, it’s probably better for DIYers. Ok, now for all her tips:
First tip: DIY IT! It’s so expensive to outsource Roman clay because it is a lot of labor. For my bathroom and bedroom, I was quoted $7500 for my bedroom and $3000 for my bathroom. Hence, I decided to do it again. Roman clay is a budget-friendly way to add depth and dimension to any space and it really is so fun to do unless you have really high ceilings I would say source it out. Apply Roman Clay in small amounts using a spackle knife or putty knife. A plastic knife will give you a smoother finish. Start at one top corner and go straight across the wall. Or sometimes I would start in a 3×3 square and keep moving across and up and down. You always want to keep a wet edge where you finish and keep pulling the clay as thin as possible. A little goes a long way. I discovered sadly when I used a metal knife with my light-colored paint it left dark streaks on the wall. When I switched to a plastic knife it solved that. You can buy these spackle knives in any hardware store. The first coat will look CRAZY! You MUST trust the process because you’ll totally be doubting yourself or if you’re my husband, call a painter to fix what your wife did. Use sweeping motions when applying, going in different directions. I did a lot of motion from left to right, up down, u shape, upside U. There really is no wrong way – just play! The more you vary your strokes the more texture and depth the end result will be. Just don’t stop until you reach the end of the wall.Once you start applying Roman Clay on the wall you cannot stop. If you stop the remaining half of the wall will be a different color and you’ll see a line where you stopped. So when you’re getting ready to start make sure you have enough time to go across the entire area in one shot. Do not go back and try to touch up an area that’s already dry because the new Roman clay you add will be a different color. The hardest part about applying it was cutting into the corner where the wall meet. Sometimes there would be gaps where the clay couldn’t reach so I would apply the color in my finger and blend it in. I would also suggest buying a corner sanding sponge (like this one) because the inner corner will be a bit rough to get smooth.I ended up doing three coats of Roman clay, sanding in between each coat to achieve the desired look I wanted. Since the main walls in the bathroom had Roman clay I wanted the trim to blend in with the walls. I took the Roman clay and had it color-matched at the paint store and it blended in perfectly.After reading her tips it made me feel much more confident…despite still needing to choose a color (long story). These were her parting words:
“After you’ve lived in your space for a while if you ever get anything on your wall, I discovered you can just sand off any marks that are made from everyday living, fingerprints, or even pencil/crayon marks from kids.
Roman clay honestly is probably my favorite wall treatment! I’d apply it on all the walls in my home – it’s such a vibe. Once you do it, you will love it! Trust me! The labor will be worth it. It goes by much faster than you’d expect.”
 via bronte lovelis
Just as I was prepping this post, I got an email from the talented and wonderful Bronte Lovelis (remember her amazing loft!?) about how she basically made her own limewash for $10. I’ll let her talk about it…


“I figured there had to be a DIY for this. I went to Home Depot to see what I could find. I ended up buying a $6 paint sample and decided to try mixing it with water to give my walls that limewash look. I experimented with different ratios and found the best was about 80% water and 20% paint. I’m super happy with how it came out. My open space finally feels cozy like I‘ve always wanted. This also has to be the cheapest DIY I’ve ever done! Literally under $10!”
I think it turned out so great! It definitely has more visible movement than a classic limewash paint or Roman clay so that’s the only thing to note if you want to try it yourself. But for $10 how can you beat it?!
Ok! That’s it for today. I really hope this sparked a little project for you because it’s almost annoying how rewarded completing a DIY project is. I also want to thank the six amazing designers that allowed me to share their incredible projects. Nothing but inspiration when it comes to you all. Have a great (and potentially project-filled) weekend!
For a few (read: A LOT) more DIY ideas head here and here!
Opening Image Credit: Design and Photo by Brit Arnesen of Brit Dot Design
The post Cancel Your Weekend Plans: 6 DIY Projects to Transform The Look & Feel Of Your Home appeared first on Emily Henderson.
June 1, 2023
Our Biggest Landscaping Splurges And How We Feel About Them

I’d like to open today’s post by repeating our favorite question when we have a renovation/remodeling conundrum – either when a mistake is made or when something turns out not like you want it to. It goes like this: “What are the options and how much will they cost?” We have found it to be the quickest way to solve any construction problem. One of those “conundrums” was our purchased trees. There were a few areas where we had planned on larger, more statement trees but once they were planted in the ground we did the fairly annoying/bratty thing of asking why they were so small. The obvious answer was that our team was trying to stick to a budget and bigger plants are more expensive. After exploring how long it would take them to get to the desired size, we realized it would be 5-10 years. OOF. If this house weren’t a show house for brands, essentially, we would wait – despite our own desires. But this house needs to get shot a lot and soon, and while we can wait for the smaller plants to grow into shrubs, we “need” these big anchor pieces to be larger.
The Kitchen Patio Dogwood yardzen rendering
Near the kitchen patio, we wanted a large dogwood to help bridge the gap between the two structures – the covered walkway and the kitchen. Yardzen put it in their renders and while we knew that their renders were based on mature heights, when we saw the tree that was planted we felt we couldn’t wait the maybe 10 years before it got to full maturity (different dogwoods grow at different rates and I forget which one this is but it’s the slow one).
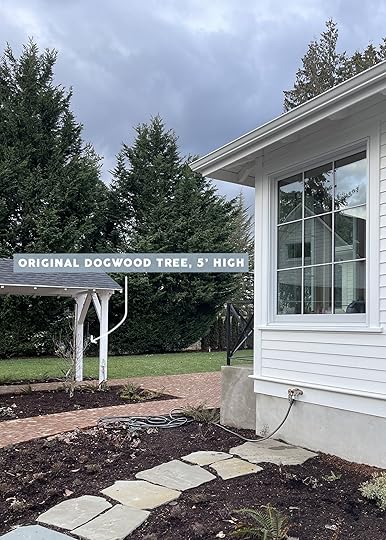
See? She was small and leafless so you could barely even see it. A quiet statement for sure:) We were able to move her to the side of the house which fits perfectly, don’t worry. Meanwhile, I went to a nursery called Big Trees Today where, as you can imagine, they have much BIGGER trees still growing in the ground at a much more mature height. To top it off, they are full service – they dig up, transport, install, and guarantee their trees for a year. Of course, this comes with a much higher price tag. The dogwood that we planted was probably $180 or so and transport/carrying of it is usually double or triple the cost of the plant (I believe that’s a common formula from landscapers). So let’s say that size tree cost us between $400- $500. The Big Trees Today cherry tree that we picked out was $2k (including planting/guaranteeing). It’s obviously a luxury to do this, but what you are buying is time. Our 5′ Dogwood wouldn’t reach this 15′ height for 10 years. So how much was it worth it to us per year to have it at that height now? When you think about it like that it becomes easier to justify (I also do this with skincare or expensive athleisure – break it down by how many days a year you’ll use it and you’ll find that at 50 cents a day it’s worth it! It’s a really dangerous mindset, TBH).

This is the cherry tree from Big Trees Today right after it was planted (fruitless, the Japanese version I think!), around 15′ feet tall (I believe). That was in April, and here she is now!
We couldn’t be happier.
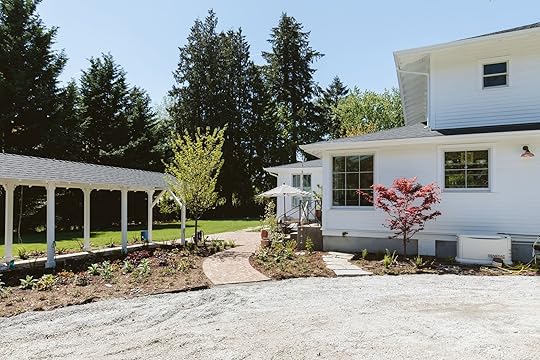
Our Statement Oregon Native Red Oak
In the backyard, to break up all the grass, we had planned this gorgeous Oregon red oak – a native Tree that Cali (Studio-Campo) was so excited about. At maturity, it would look like this. With a swing!
But when we got it it was about 12′ (which sounds tall but compared to the scale of the backyard it was small).

It’s the tall one near our broken-down garages (and this is in a pot, so it would be about 20″ lower than that once in the ground). We considered nixing this one altogether and returning this tree and honestly, we probably could have, but we really wanted some shade in the summer (eventually) and I really wanted to break up the lawn from being so flat. So we looked to Big Trees Today for an alternative. I’m not sure y’all know, but I REALLY LIKE TREES.

 installing the white oak tree from big trees today
It was definitely taller, but when leafless still not that statement. We also switched from an Oregon red oak to a white oak because it was much less. At first, the salesperson sent us a 25′ Oregon red oak for $10k and we almost bailed on the whole thing. This guy was $2k 🙂

Here it is now:
It’s super pretty. Still on the smaller side but better scaled for the house. Imagine if it were 1/2 that size! Lessons are being learned, folks. Also, I do not care for that perfect circle around the tree but they said that they wouldn’t guarantee the tree unless you let it breathe, like so. But yes, I want to go sprinkle wildflower seeds in that perfect circle asap! If you are wondering why we stopped the grass there it’s because that was the plan two years ago, but as more and more of the construction ruined some bushes that were over there we now are considering extending it. We just didn’t plan for irrigation over there so it’s a thing. We might wait until fall to plant some, so winter will establish their roots, and then try to hand water anything over there next summer. Don’t quote me on that, though. Just thinking out loud about how we don’t like where the grass cuts off as of now and we are working with Native Northwest on solutions.
Two More TreesBefore we went to the Big Trees Today nursery, we realized there were two more areas where we could really use an anchor tree that we hadn’t planned for – on the side of the house by the kitchen and in a corner by the pack porch. We all agreed that Japanese maples would thrive well in both areas, add a lot of seasonal color, much-needed height, and shape while the rest of the shrubs grow in. So before I went to BTT I had two of those on my list.
 shopping for japanese maples at the nursery
Cole, the salesperson, helped me decide on the white variety of Japanese maples and he convinced me that Beni Mako was the way to go – I think for the color of the bark when not in bloom as well as the leaves when in bloom. These are about 8′ tall and 6′ wide and cost $1800 (again, including delivery and installation + their guarantee). I’ve bought Japanese maples many times before and they are always around $500 and much smaller, so honestly this didn’t feel overpriced. These things were already 7-10 years old so you are paying for the growing time where someone else has taken care of the plant. They grow very very slowly so they’ll get bigger, but over many years.

Here this one was in April right before spring really sprung in Portland. Below you can see how she is looking now.
 Was It Worth It?
 I think YES. Imagine if those two trees weren’t there – I think the architecture and scale of the house really needed some larger trees to soften everything. They provide immediate impact and help the whole property look less newly constructed.

It’s also strangely easier than I thought. While you obviously have to have the budget for it, we were impressed with their speedy service and you don’t have to have a landscape contractor hired if you are in need of a big statement tree that you feel like you can’t do yourself. Big thanks to Dan’l and the Native Northwest team for dealing with our impatience. It’s not my best personality trait, believe me (I’m sure you do). But for the sake of my job and photography, I think that these splurges were worth it – at least that’s what I’m telling myself!!!
Big Trees Today didn’t do any press trade or anything, FYI. I simply like them and how dedicated they are to growing beautiful trees. 🙂
*Design by Emily Henderson (me!), Studio Campo, and Native Northwest
**Pretty Progress Photos by Kaitlin Green
The post Our Biggest Landscaping Splurges And How We Feel About Them appeared first on Emily Henderson.
May 31, 2023
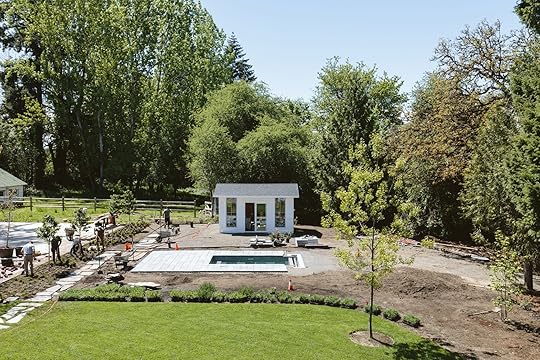
THE MUD IS GONE! A Farmhouse Exterior Update That Has Us Seeing The End Of The (Phase 1) Tunnel

It’s been a minute since I showed you what is happening on the property and today we are bridging that gap. Like many a renovation, we truly didn’t intend to bite off this much when we bought the property (“A fun fixer,” they said. “We’ll do most of it ourselves,” they insisted). At times it felt like more than what we could chew, and as we looked at how much we had left to eat we decided to shove the whole thing in our mouth, fingers pinching our nose to just get her done. We figured it would be one big bandaid to pull off instead of years of extended muddy construction. And as we approach the end, we are obviously so glad and grateful that we went for it. So today’s post is to catch you up, show you where we are at (as of last week) with the backyard, and then we are going to break down all the elements as they come to life in separate posts. Speaking of, spring has sprung and the weather in the PNW has been unbelievable – and y’all, Oregon can not be beat right now. Brian and I are absolutely loving almost every aspect of living here.
Let’s catch you up: Almost three years ago we hired Studio Campo to design the “farmstead” and hired Native Northwest as our landscape contractor to execute (a huge thanks to Dan’l, Scott, and his team for the execution of this during many, many, many rainy days with two fairly impatient clients inside). The construction started last August (I believe) and the scope just kept growing and growing so the project took a lot longer than any of us predicted, and yes, cost much more than we will ever want to admit out loud. Someday we might add it up (kinda like how I blogged about the Portland project loss years after), but for now, I’m going to stay comfortably in the state of denial and just try to enjoy and appreciate it all.

We’ve done so much!! The flagstone, irrigation, plants, Soake Pool, the “greenhouse”, the split-rail fence, the now smaller sports court, and a new driveway. It’s a lot – and we are equal parts grateful to be in this position and have this our home and excited to be done and able to enjoy it. As of this summer, we are going to be finished up to the edge of the sports court and the in the front just at the edge of the patio.

Does that mean there will be a phase 2? In some areas, yes (the orchard needs help to make the trees thrive), but I really hope not. There is half an acre full of blackberries, and then tons of pockets full of dense ivy/weeds/growth but those aren’t areas we need to use so until they have a purpose then no, we aren’t going to spend any time or resources there. We have more than enough as is…Also maintenance – EEEEKK.
The Evolution Of The “Backyard”Four years ago, when we were still looking at this house before we bought it it looked like this:

It was pretty darn sweet. That’s Bear, their dog, who we spent three hours with while we fell swiftly in love with the property (and him). The big bushes were in front of the now back porch that opens to the backyard.

Here’s a better shot of it – this is right before the demo when they had taken out some of the vintage windows to repair (so that the demo crew didn’t, well, accidentally demolish them). But this gives you a better sense of the space/property.

Then a month later, halfway through the demo, we came up to visit. We were so naive to think that they could save and transplant all the plants, or reuse the brick. I know many of you will say how possible it is but that wasn’t the advice given to us nor our skillset. We tried, but the advice we got was that trying would cost far more and it wouldn’t work anyway. They said the same about the windows – but we all agreed that trying to save and reuse was worth it, even if it cost more than replacing (it was about the same, btw).


 Move-In Week!!!
Here is what it looked like when we moved in – on a sunny day the dirt just looked like dirt, but as you can imagine it quickly turned to mud. I didn’t take many pictures of the mud – almost like how you only journal about your problems. But I found a few to give you a sense of what it was like for this last year.

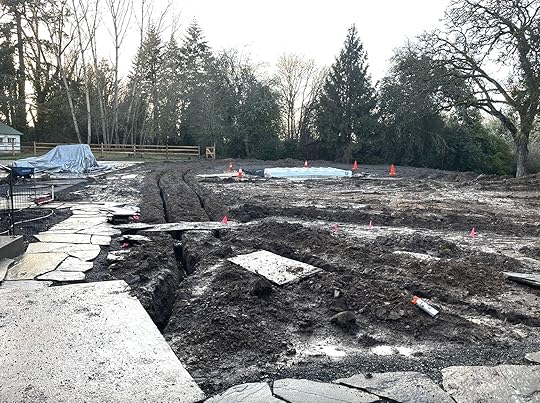
But, like most renovations near the end, you kinda forget about some of the harder challenges – a remodeling amnesia that I think is a psychological tool our brain uses to help us do it again. I’m still processing some of the things that I learned (which per usual fall in the personal growth category for me) because I wasn’t the best version of myself during parts of this.
Almost Done – As Of Two Weeks Ago
It’s QUITE the transformation and unbelievably satisfying to see (even more so to live with every day). The grass is done, the plants are planted (small at first, exploding now) and the flagstone around the house is almost complete. All of you who have done landscaping projects in the past know that it takes 2-4 years before it looks like it was intended, but honestly, this looks AMAZING to me based on where we started. We really want this property to look natural and like it’s always been there, but y’all that is a challenge when you have to grade the entire thing to make sure that it drains right, and then put in fresh tiny little plants. So as of right now, it does look more professionally landscaped than it does a natural farmstead, but we hope that the vision (two summers from now) will come to life. I pushed hard for the grass to have little hills/mounds (or to be a clover lawn) but there were a lot of reasons to not do that from experts so we didn’t. Once all the wildflowers and ornamental grasses come up I think the whole space will be softened a lot.

The Soake pool is almost done, just in time for summer. I’ll give you a breakdown of the process soon, but essentially our Native Northwest crew was doing the whole property with a lot of moving parts, so despite having it in the ground in February there were a lot of other things to do (and we weren’t going to use it surrounded by dirt anyway). So we think it will be done by next week. Since this photo was taken the hardscape is almost finished and the pool motor/cover/filter/heater are being finished. GAH!!!
I just realized that since these photos, our split rail fence even went in (which makes a massive difference) = instant-charm.

That’s our “greenhouse” which is admittedly not exactly a sweet little greenhouse anymore – it’s really a “pool house”. I have a lot to tell you – like why did we build it? (to hide the mechanics of the pool and utilize extra windows). Why are the doors lower than the windows? (funny story and it’s changing) How big is it? What are you going to do with it? How much does adding a structure like this cost? Does it have HVAC, plumbing, and electrical? I’ll get to all of that, I promise.
Eventually, the ground cover in between the flagstone will cover the mulch and make it all look more natural. The green of the grass almost looks fake, but y’all, after a year of mud back here we couldn’t love a patch of green MORE. Dan’l and his team did such an excellent job of prepping, grading, and mixing soil/sand so that even on the rainiest multi-day storms, it isn’t soggy – it drains beautifully (Brian can’t stop talking about this – he’s a proud grass dad right now). Extra credit for those who notice the gutter on the front well house/shed in the back falling down… Speaking of wells, we got our well recommissioned and repaired, so soon we’ll be using well water for irrigation, which as you can imagine will be helpful in the summer on a property this size. It rained a ton this winter so everything is extremely green but you can’t plant this many new plants without proper irrigation or they will die, so we are very grateful to tie it into the well and eventually offset the cost of fixing the well (which wasn’t cheap). Once roots are established we can minimize the watering.

Imagine a split rail fence between the sports court and the “pool house” and pool area. There is pea gravel, plantings (mostly wild grasses and meadow-scaping), and garden beds happening.

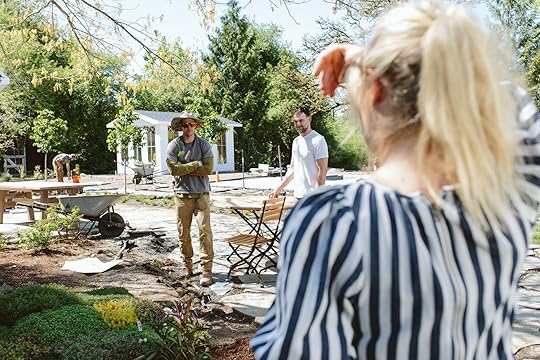
That is Scott, our project manager (Kaitlin caught us in the middle of a meeting) where we realized that we had put the future split-rail fence too close to the flagstone (our fault as we booked the fence guys and didn’t update the plans). It’s fixed now and looks so awesome. So many moving parts.

Here are some satisfying befores:

 Progress!
To be clear, this is after we demo’d out the OG sports court (which wasn’t the original plan but it was so cracked and in such disrepair that we had to). Then we repoured a pickleball sized.
The angle is the same as this one…

It’s extremely fun to see Cali, Dan’l, and our vision coming to life. Trying to make this highly renovated property look “natural” and like it’s always been there (ahem, with a plunge pool, I know) has been such a challenge. Honestly, we were very worried along the way that it was going to look too suburban and manicured. It’s perfectly and professionally executed, which I’m so grateful, and only time will tell how natural it will look, once it’s all grown in. We are soooo happy it’s close to done, I can’t even express it to you.

Brian and I are not the type of people to wait til things are done to have people over, so don’t worry – we have already spent many afternoons out here on the sports court with friends and families. We are planning the summer pickleball tournaments now.

More to come soon, but boy are we feeling grateful that we had the help we clearly needed to execute something that we would never have been able to do ourselves. This summer will be very different than last and we made the decision over dinner the other night to stop any construction on the other buildings until fall (at the earliest). The garages are falling down and the old 1850s home on the property needs, well, everything. But after three years of this project we are ready to just sit and enjoy it for a few months, give our checkbook a break, and have some quiet moments with our kids out here this summer (and besides, our alpacas aren’t going to adopt themselves :))
*Design by Emily Henderson (me!), Studio Campo, and Native Northwest
**Pretty Progress Photos by Kaitlin Green
The post THE MUD IS GONE! A Farmhouse Exterior Update That Has Us Seeing The End Of The (Phase 1) Tunnel appeared first on Emily Henderson.
May 30, 2023
Pantone Got It Wrong: *This* Magical Hue Is Actually the Color of the Year (+ It Could Be The Missing Piece In Your Color Palette)

Move over 2023 Pantone Color of the Year, because I’ve got something better for you EHDers. A color so rich and with so much depth that it *literally* can save nearly any color palette that feels incomplete. “Wait…remind me what the Pantone Color of the Year is, Arlyn,” you may be mentally prompting me. Ah yes, I, too, had to look it up because frankly, Viva Magenta (the actual COTY) isn’t that memorable.
Presenting…Arlyn’s Color of the Year: Mulberry. Or if we want to get fancy with it, Ebullient Mulberry…Merry Mulberry…Cozy Mulb…let’s just keep things simple, shall we, because I’m not good at the color naming game. It’s like a raspberry and a blackberry had a berry baby; or more simply, it’s just the color of an actual mulberry fruit, but I don’t know about yours, but my supermarket doesn’t make those readily available so it’s hard to imagine.

 left: pantone’s viva magenta | right: a mulberry hue I dug around for (the number shown is its hexcode)
If we take a look at mulberry next to the official COTY, sure, it’s not *that* different from Viva Magenta. Except for a color nerd like me, it is. It’s like mayonnaise and Miracle Whip. Long-grain rice and riced cauliflower. Whitney Houston vs. someone singing a cover of Whitney Houston. Close but absolutely no cigar. If you were hoping to bite into a mulberry pie and it ended up being cranberry, your mouth would be surprised at the tartness. Similar in theory, sure, but far from the same thing. It’s hard to replicate the jammy goodness of authentic mulberry.
Color nuance is hugely important. Alter the undertone of a shade just slightly, and it completely changes the vibe. For example, a green with blue undertones is soothing, quiet, and sleepy while a green with yellow undertones is lively, verdant, and energized. Energized ≠ quiet.
So, why do I think mulberry is actually the sleeper hit of the design world currently, and how can you make it work in your own home? Let’s get into it.
The Velvet of the Color WorldThis post actually started with me culling together 10 color palettes that were a bit unexpected for anyone tired of the same ol’, same ol’. While I was writing, though, I noticed something that hadn’t been super obvious to me at first. As I took a break and sat on the stoop of my front porch, bubble wand in hand to entertain my toddler, I grabbed my phone and sent Jess a nearly out-of-breath voice note. “Mulberry! It’s always been Mulberry!” was a summary of my thoughts. There it was, in nearly every photo I had plucked from the internet, from different designers, from different countries.
It worked with blue, it melded with orange and red, it danced with yellow and green and aqua. Mulberry seemed to add a je ne sais quoi to each room that made them all feel well-rounded, rooted, and not too precise. The color is just red enough to balance warm shades, but just purple enough to be a surprising partner to cooler, analogous tones. It has just enough black to bring down a room that’s overly sweet, and punchy enough to shake up anything too neutral or monochrome. Honestly, it’s a finishing touch secret weapon and I can’t believe I’m only just becoming aware of it. The next part of my design life can begin now, armed with the powerful sangria-esque hue.
To me, mulberry adds the same necessary richness to a room that a mahogany or walnut vintage wood piece brings or even a bit of velvet. It’s all about visual balance and subtle complexity and depth. It’s the kind of color that touches your soul in an almost nostalgic way, reminiscent of popsicle-stained tongues from childhood on a hot summer afternoon.
I may have abandoned my initial concept I pitched to Jess, but I didn’t jilt all the beautiful photos I was going to use as examples. Just a slight pivot, so I can walk you through how mulberry works in rooms of all different styles and colors.
Let’s See Mulberry in Action photo by fanny radvik | design by inuti design | styled by linda ring
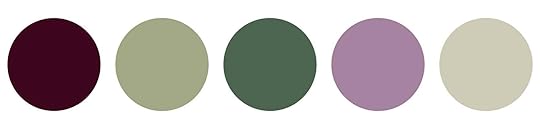
First up, we have this unthinkably charming breakfast nook by Inuti Design. The oyster walls and mix of wood tones allow for a bit of play with the palette so that there’s plenty of color without feeling colorful. The fabric on the bench—a textile by the homeowner Cathy Nordström—is the star, with its mulberry and lilac checkerboard pattern. I love how it tangos with the red-toned wood of the built-in base and also works as a complementary shade to the mint and Kelly green happening in most of the other pieces. Without the fruity hue, sure, it would have been a lovely space, but the weight of it gives the whole space a presence that probably couldn’t be replicated with another color.
 photo, design and styling by dabito
Here’s a fun one: take your hand and cover that mushroom stool in this living room by Dabito for just a moment. Try to envision the room without it. Go on…that’s a nice spot energized by the drama of orange but toned down by the fact that it’s fairly monochrome (and sage green overhead and underfoot). Now, take your hand away. POW! A jolt of the unexpected. It’s easy to think maybe it doesn’t go with the existing color scheme, but it’s actually genius. The mulberry, as an offshoot of the warm earth tones, bridges the gap between the coolness of the mossy green. It exists both in a red space and a blue space that makes shakes the room out of the seriousness going this bold can sometimes create.

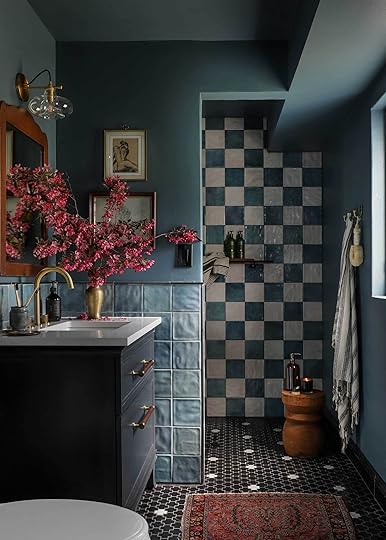 photo, design and styling by jenni yolo of i spy diy
When I first asked Jenni Yolo of I Spy DIY if I could use the photo of her bathroom for this post, she sent me two images and it turned out to be the perfect use case. That first image, with its cream rug and white flowers, is so pretty. It’s calm yet dripping in drama. But the next image, the one with the burgundy rug and the fuchsia blossoms is magic. The subtlety of her palette is more noticeable. Obviously, the lighting is a bit warmer in the second photo, so the walls and shower tile lean a bit greener, but regardless, things come to life with the addition of mulberry-esque details.
 photo by sara ligorria-tramp | design by zachary-jones studio | styling by emily bowser
By now, you may have noticed a throughline. Designers love balancing light greens and poppy oranges with raisin-y mulberry. Here, it makes an appearance in the rug and it’s all the room needs to take a palette of mint and marigold to a whole other level. To my eye, it also does a wonderful job of balancing the golden oak cabinet and the deep walnut or wenge dining chairs. Had the rug just been cream, ochre, red and pink, I’m not sure there would have been enough to steady the vibrant oranges, but Sarah Zachary knew what she was doing.
 photo by haris kenjar | design by heidi caillier
At an initial glance, you might miss the mulberry moment here, but the sleeper hit by Heidi Caillier is pulling its weight without you even realizing it. If you do another “finger over the mulberry to see the difference” exercise, what you have without the sconce is definitely sweet. Timeless. Inviting. But just that touch of an effervescent merlot gives the room some edge. I love how it plays off the traditional wallpaper, and above all, I’m smitten with it in tandem with burlwood. I’m saying it now: mulberry and burlwood together are like a design elixir that can’t go wrong.
 photo by sara ligorria-tramp | design by allison pierce | styling by velinda hellen & erik staalberg
I have loved this image Sara shot for Emily’s second book from the moment I saw it on her computer screen. I’m not much of a tea drinker, but boy would I love an invite over to Allison Pierce’s home for some Earl Grey and a cranberry scone. The design is just cottage-y enough to scratch my itch for English interiors but cleaned up enough to seem livable and uncluttered. But…let’s get back to the matter at hand.
The truth is, there is no mulberry in this photo, but the way the blue and red of the rug come together tricks my eye into thinking there is. It reads purple in some spots, which frankly, is the secret sauce of the entire design. I’ve tried to avoid repeating my use of the word balance throughout this article, but oh well: balance. If your safe space is blue and wood tones, I hope this room—heck, this whole post—inspires you to add in a touch of something else (::cough:: mulberry ::cough::) to round the whole thing out.
So, here we are. We’ve reached the end of my love letter to the color mulberry. As I sit and rethink the color palette in my new home, I find myself so drawn to it. There were many other photos I could have shown you to keep proving my point, but I have to imagine you catch my drift by now. The shade of purply red really is the great equalizing. It works in traditional spaces, modern designs, and all the in-betweens. I tend to prefer it used in moderation, just a sprinkle to keep it special, but hey, go all in if you’re so inclined (and please DM me a photo, if you do). I’ll be sure to keep you all posted on how I plan to pivot my existing furniture (plus some new finds) in the new place by shaking up my colors, and if this post is any clue, it’ll certainly include our new friend, mulberry.
Until next time. XOXO, your friend in design.
Opener Image Credit: Design by Allison Pierce | Photo by Sara Ligorria-Tramp | Styling by Velinda Hellen & Erik Staalberg
The post Pantone Got It Wrong: *This* Magical Hue Is Actually the Color of the Year (+ It Could Be The Missing Piece In Your Color Palette) appeared first on Emily Henderson.
May 28, 2023
The Link Up: Em’s Gripping New Podcast Rec, Mal’s Favorite Cooling Sunscreen, And Two More Awesome Spring Dresses We Just Bought

Happy Sunday everyone and Memorial Day weekend! Hope you’re having a good one. Did everyone see the farmhouse back patio reveal?? I think ALL of us are ready to start eating outside full-time after seeing those pretty photos. And since it’s a holiday week for hopefully most of our American readers, here’s to an extra day of relaxation. Enjoy the rest of your weekend and of course, these links:)
This week’s house tour is a hotel! But not just any hotel, it was designed by the incredible Dorothée Meilichzon with the Experimental Group (check out their other collabs here). Montesol Experimental is in Ibiza and was designed to perfection. The interesting shapes (that headboard!), playful color palette, and wild textures make this hotel a new item on our “visit someday” list. Check it out here!
From Emily: I found a podcast series that was gripping (and makes cleaning the house or doing laundry FLY BY). I listen to 12-18 hours of podcasts a week (walking dogs and cleaning the house) and this is one of my favorites of the last two years. It’s true crime, but not in a creepy “can’t listen to while walking the dogs at night” kind of way. It’s about a murder that happened 35 years ago, and how the law enforcement may have put the wrong guy in jail for over 35 years – a real worst-case scenario situation. The journalists reported on this for over four years and it truly is so gripping. It’s excellently reported – along the lines of “In Your Own Backyard,” where the existence of the podcast itself turned the course of history for all involved. It’s not depressing (well, it’s not happy) but it’s more riveting and a cautionary tale about our justice system and how individual law enforcement can really change the course of so many people’s lives. Bone Valley, y’all.
From Caitlin: Obsessed with this article about the secret mansion located directly below the Bay Bridge in San Francisco. There are some gorgeous interior photos in there too that I NEVER expected after seeing some of the exterior’s wear-and-tear. Gotta admit that I don’t think I’d mind living there, despite the location (I mean, I do already live next to a 6-lane road, you know?). What say you???
Also From Caitlin: Coming in hot with my now-weekly dress recommendation (can you tell I’ve been trying to refresh my summer wardrobe staples?). I am a HUGE fan of this midi dress with a Swedish blue cabana stripe print! The skirt is pleated and lightweight (perfect for twirling!) and I love the way it fits on top (it has adjustable straps, so I could adjust the cleavage level to my liking). It’s another great basic that looks super cute dressed down with sneakers, but it can also be jazzed up a bit with sandals (plus, the more muted color scheme makes it perfect for year-round wear – will be so cute with a cropped sweater on top when the weather cools down!). It’s 30% off right now, too. Very excited about it!!!
From Ryann: The last day we were in Japan, literally hours before we got on the plane to go home, we happened to go to the famous Parco mall where this awesome brand had a pop-up. It’s a sustainable lifestyle brand called Puebco, that makes travel accessories, bags, and home goods out of recycled material. Everything they make has a very cool and industrial vibe that’s also eclectic and interesting. I got two tote bags and love them so much (and I think they are surprisingly affordable for the quality!). Run don’t walk!
From Mallory: As we get into warmer months it’s time to remind everyone (aka remind me) how important daily SPF is on your face!! I have a real hatred for thick gloopy sunscreen (especially when you have to apply makeup on top of it) so finding this Coola cucumber sunscreen changed my life. It’s so cooling and so lightweight, plus it smells unbelievable. The whole experience of putting it on feels incredibly luxurious. Could not recommend it enough!!!!
From Jess: Now it’s my turn to recommend a spring/summer dress:) I tried on this midi dress last weekend and instantly fell in love. It’s easy to dress up or down, it drapes so nicely, and you don’t necessarily need to wear a bra (I’m around a 36D)! I l also think the green color is so pretty. I know I’m going to get SO much use out of it. Oh, and consider sizing up one size.
From Arlyn: I’ve been using moderately not-super-poisonous cleaning supplies for a while now, but the last time I cleaned my daughter’s bathroom, the smell lingered in her room for days. Even with those “healthy” cleaners. So I went on an internet tear to find something better and I landed on Branch Basics. Anytime you can use the same cleaner on your toilet as you can your dishes or your hands, chances are, you’re in the right place (safety-wise). Basically, they use one concentrate mixed up at different ratios for the application you need. And you only need a tiny bit for each, really. I bought my own glass spray bottles because it was more cost-effective, followed the instructions on site for ratios to use, and made bathroom cleaner, all-purpose cleaner, glass cleaner, and hand soap. I also picked up their Oxygen Boost and scrubbed the shower with it and it did a great job. I’m a convert.
Also From Arlyn: My beloved mattress from Avocado is on sale for Memorial Day! The brand rarely has a sale, so if you’ve been thinking about it, now’s the time! They’re offering up to 30% off sitewide (though mattresses are 10% off). For a king-size like mine, that’s about $260 in savings. I wrote all about why this mattress works for us in my bedroom reveal last month, but as a reminder: it’s certified organic, made of natural materials like wool and latex, has medium firm support which has done wonders for my bad back, and doesn’t sleep hot like my old memory foam. In fact, maybe it’s time I Avocado-fy my pillows, too…
Thanks again for another great week and see y’all tomorrow. xx
Opening Image Credits: Design by Emily Henderson, Yardzen, and ARCIFORM | Photo by Kaitlin Green | From: Our Back Patio Reveal! (+ How Everything’s Held Up To 6 Months Of Portland Weather)
The post The Link Up: Em’s Gripping New Podcast Rec, Mal’s Favorite Cooling Sunscreen, And Two More Awesome Spring Dresses We Just Bought appeared first on Emily Henderson.
May 27, 2023
Blanking On A Good Father’s Day Gift? Jess’s Dad Has Got You Covered With His 15 “Dad-Approved” Ideas

Hello again. It’s Jess’s Dad with another helpful (I hope) Father’s Day post. I actually had one ready for last year but the editor didn’t reach out to me. This year she did (guilt trips are a wonderful tool). I have traveled extensively since you last heard from me. Europe has always impressed me. The food, the people, and their way of life have always moved me. I got to spend a couple of months in Paris. This planet can be a grand experience if you let it (and are able). Admittedly, I found out that I probably couldn’t live so far away from my kids though. Also, they would call me in the middle of the night because they obviously don’t understand the rotation of the Earth relative to the Sun. So I’m happy to be back and writing this post. I hope it is as much fun as the last time. So let’s see what I can come up with.

Everything I suggested last time is still a good bet. The tools, the kitchen knife, a cool T-shirt, or some of the experiential things I mentioned. I will always love a professional baseball game. BTW Minor League Baseball is professional baseball for any dads living in a non-MLB city.


Cordless Multi-Tool Kit with 2.0 Ah Battery and Charger | Sharp Pog: Oscillating Saw Blade Sharpener
Last time I mentioned the Multi-tool by Ryobi. One of the drawbacks of the multi-tool is when the blade gets dull you replace it with a new blade. The old blade would be discarded. Not anymore! Now they have come up with the Sharp Pog oscillatory multi-tool blade sharpener. What a godsend. Blades can be expensive when your only choice is to throw them away. If your dad is like me it would bug the crap out of him too to toss them. Rockefeller, I am not.

My favorite new gadget is an OBD diagnostic scanner for your vehicle. Ya know when your engine light goes on and you have to head to a mechanic to see what’s wrong? Buy this tool and those days are gone. Just plug it into your vehicle and it will give you the code for your problem. Look up that code online and you’ll know what’s wrong with the vehicle. Hell, half the time you can fix it yourself. It will also keep your mechanic honest if you do need to bring it in. I like that. They range from $20 to $99. My fav is one by Innova. It’s the more expensive model but I love the buttons and bells.

Milwaukee Battery Adapter for Dyson Vacuum | Ryobi Battery Adapter for Dyson Vacuum
Something else I have just come across is a battery adapter for my Dyson vacuum. Nothing against Dyson. It’s a great vacuum but the battery doesn’t get me through the entire house (my house is small too). Of course, when I have to plug it in to charge it I’ll stare at it so it naturally takes twice as long. There now are adapters to adapt the vacuum to your cordless tool battery. They make them for all major tool brand batteries. I chose the Milwaukee adapter. That vacuum is smoking this house now. Because I have more than one Milwaukee tool I have replacement batteries coming out of my ears. What a difference. I even bought the Ryobi one for Jess. I’m too good to her. Ha!

As long as we’re cleaning the joint, Ryobi makes a scrubber accessory kit for your cordless drill. It’s come in handy on more than one occasion.

Golf Pencils (My Preferred Brand)
As I said, I was living in Paris earlier this year. I ended up making all sorts of improvements to my VRBO apartment (the landlords loved me). What I missed most were my pencils. Years ago I bought a box of small pencils like the ones you see at a golf course. I have never been tasked with looking for a pencil since then. What a relief. It’s a small inexpensive gift that your dad doesn’t even know he needs or wants. I guarantee he will be calling you to thank you on more than one occasion (with apologies for the weird look he gave you when he opened them). I cannot tell you how many times I have set a pencil down and the universe ate it. Now, who cares, I have a supply that seems unlimited (there were over a hundred in the box). Make sure they have erasers. Once in a while even we make mistakes.

Torq Foam Blaster 6 Foam Wash Gun
If your Dad prefers to wash his own vehicles, Chemical Guys makes a product called the Foam Blaster 6. It connects to your garden hose and covers your car or truck in foam just like a car wash. It works great and you don’t need a power washer. Makes the chore go a lot faster.

 building jess an “english cottage” with my kids 20ish years ago

4.5″ Tools Handi Disk Deux Grinding Sanding and Cutting Wheel | 14 Piece Multipurpose Drill Bit Set
If you want to spend a little more money there is a company called Bad Dog Tools. (Less bark more bite) I just purchased a grinding/cutting wheel called the Heavy Diamond HDII. It’s guaranteed for life and will cut through anything. It runs about $170. But it’s the last one you’ll ever buy. They also make drill bits that are guaranteed for life. Bad Dog makes some badass tools. I wish I was aware of them when Jess and I built her playhouse 20+ years ago (pictured above). Quality tools are expensive but worth it to the guy that is going to use them. I’m one of those guys. I’m also a Tom Ford suit guy. Go figure.

Flannel Sherpa-Lined Shirt Jacket
I have been living in NoCal for a while now and it is definitely a chilly climate. My blood has definitely thinned since growing up in Chicago. That’s what 30 years in SoCal will do to you. I have come to rely on Carhartt clothing to keep me from freezing to death. I have grown particularly fond of their lined flannel shirt/jacket. It’s perfect for feeding them damn chickens in the morning. I look pretty good in it also. (not that anyone looks at me anymore) Geez! Their classic ranch jacket has become quite stylish these days also. I see a lot of young women wearing them too. Hell, you can match your Dad.

As long as we’re talking clothes there is a Seattle-based kilt maker by the name of Utilikilt. They make a tool kilt (my favorite), a casual kilt, and also a formal kilt (non-plaid) among others. I own three. I’m gonna let you in on a little secret. When I am in any of those or in my formal kilt from Scotland I am a badass 73-year-old male, period (Braveheart). No clothes I own are more masculine. My wife was of Scottish descent and was of the same opinion.
 can you tell we went on a family trip to scotland? this was almost my first kilt. hooked ever since.

Ultra Flex 3.0 Right Away Slip-Ins | Go Walk 6 Slip-Ins – Easy On
Another item new to the scene are my Slip-In Skechers. Believe it or not, the older we get the less we like bending over. Putting my work boots on is work. Tying my shoes is work. Damn, sometimes gettin’ out of bed is work. Those shoes are like a coffee break. Yay!

For Jess’s 5th The Little Mermaid-themed birthday party (she was obsessed), I portrayed the French chef from the movie and sang his song. Admittedly, I look more like Groucho Marx in a chef’s hat than a classic chef but hell it was fun.

For those dads that like to cook, there is one thing I cannot be without in the kitchen. The Ov Glove is the best kitchen tool I have. For years we were forced to use oven mitts. There goes my masculinity in one fell swoop. Yikes. The Ov Glove has fingers like a regular pair of gloves. When you take the hot pan out of the oven wearin’ these bad boys you feel more like you have created a masterpiece than just a plain ole meal. It’s like wearing gloves to handle a fine piece of art. Cooking is art is it not? Make sure you get two. I couldn’t retrieve my famous meatloaf cordon bleu from the oven with just one glove.

Magnetic Paper Towel & Foil Holder
Another item in my kitchen that saves me time and space is my magnetic foil and paper towel holder. I put it on my fridge which is next to my counter. It allows me more space to create my meals and comes in real handy when I need a piece of foil. They also make them without the foil holder. I use foil a lot to make my baking pans easier to clean. Less mess in the beginning less work at the end.


Baseball has been a huge part of my kid’s youth. Between softball, little league, the Cubs, and Wrigley Field, Jess and Morgan are hooked. It’s a good thing.


I was in Louisville, KY last month. I had to visit the Louisville Slugger Baseball Bat Factory and Museum. I found a t-shirt that just might be my all-time favorite. BEHOLD! You can also buy with any name engraved on it. I picked one up for my son when I was there. They ship anywhere.

I hope this info helps you. Sometimes we are tough to shop for. If you still cannot decide, try something that all fathers love. TIME! A simple phone call. A visit no matter how short. Jess came to Paris for a week and I cannot tell you the joy it brought me (and her). We were truly and totally father and daughter for that week. It was breathtaking.

As adults, my kids are my best friends. We walked the Camino de Santiago together. It made us whole again after the loss of their mother. I could not have been the father I was or am without her. I never lose sight of that.
 my parenting partner and my favorite picture
Dads don’t need much. A simple card with flowers hand-delivered beats anything I mentioned here (except maybe my pencils). We understand our grown children have their own lives. That was the whole point of fatherhood. It’s ok. If you live far away from your dad how do you think a handwritten letter would go over? Breathtaking? Ha. Whenever I ask a dad with grown children when were they the happiest in their life, the answer is always the same. It’s when we were raising our kids. I look at these pictures that we’ve attached and am quite overwhelmed by that happiness. I forgot that I reenacted The Little Mermaid movie at Jess’s birthday party (I look like an idiot). I cannot imagine what the adults on hand thought (kinda didn’t care either). All I know is that being a dad is what I was meant to be. And damn, I was and am happy about it. Who the hell knew that a lack of sleep, a lack of energy, a lack of money, and a lack of sanity would be so frickin’ enjoyable. Have a nice Father’s Day everyone.
The post Blanking On A Good Father’s Day Gift? Jess’s Dad Has Got You Covered With His 15 “Dad-Approved” Ideas appeared first on Emily Henderson.
Emily Henderson's Blog

- Emily Henderson's profile
- 10 followers

