
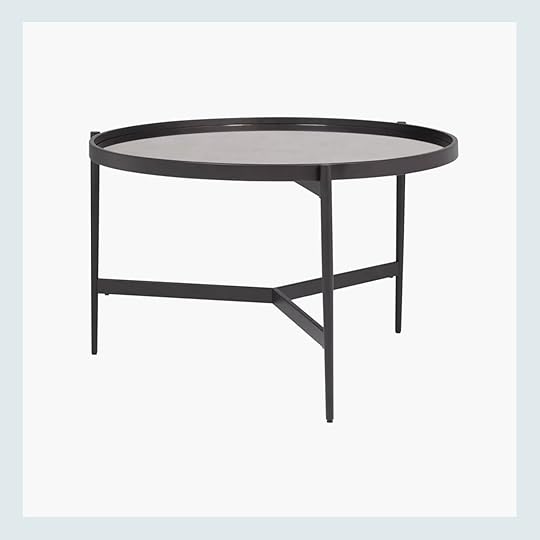
Emily Henderson's Blog, page 87
June 16, 2023
15 Living Room Furniture Pieces Under $200 That Actually Love
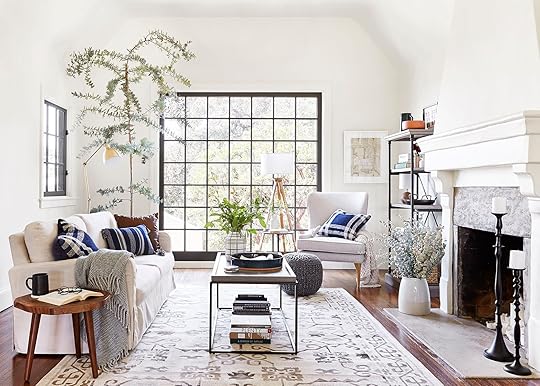
When Caitlin first suggested this post idea – 15 affordable pieces of living room furniture under $200 – I thought “in my sleep!” Well, well, well, cocky isn’t a good color on anyone and shopping for affordable…and pretty….and positively reviewed furniture in 2023 isn’t for the faint of heart. And this list doesn’t even include sofas (sorry, I tried)! Of course, we always want to encourage looking for second-hand first because there are so many gems out there. However, sometimes you don’t have the time that can take or you don’t know where to start, so having a trusted source handpick some great suggestions is really nice. That’s clearly where we come in. As I already alluded to, this post took longer to put together than I expected (because I thought there would be sooo many options…there weren’t) so please know if you’ve also been having trouble in your affordable furniture journey, it’s not you…it’s the market. Hopefully, this post solves some of your furniture problems because man do I stand behind all of these pieces. I also added in some inspiration shots to help you visualize the endless possibilities. Let’s jump in!
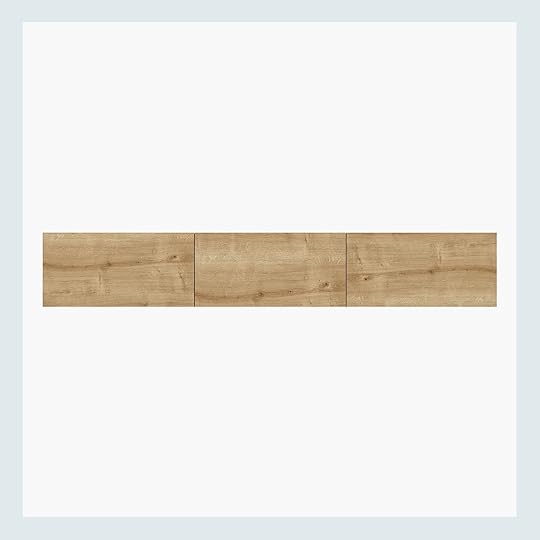
15. TV Stand For TVs Up To 55″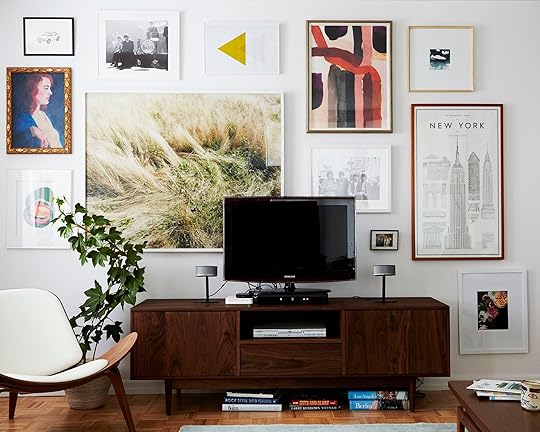
 left: photo by ryan liebe, from: cup of jo makeover | the living/dining room | right: photo by sara ligorria-tramp, from: arlyn’s bright & happy rental living room makeover
A mid-century modern media cabinet is a classic and an easy staple. Look at the two examples above for instance. The photo on the left is from a makeover Emily did for Joanna Goddard (Cup of Jo) of her past contemporary NYC apartment. Mid-century modern furniture always works great in that style of home because it grounds the space without looking out of place. But then on the right, Arlyn chose this beautiful piece from Article to help add some “modern” balance to her beautiful Spanish-style apartment. They can work anywhere!
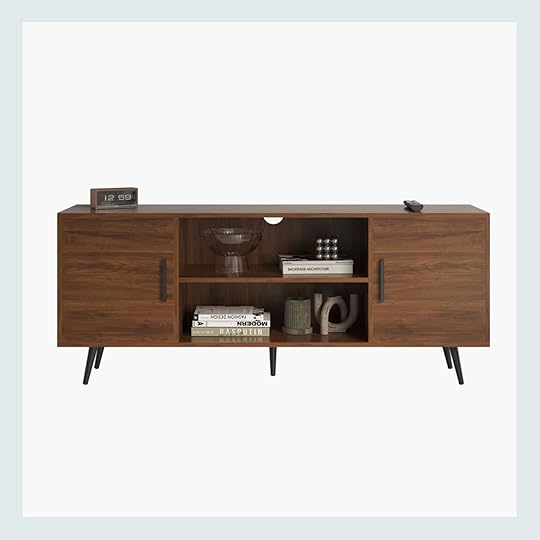
Classic, simple, and pretty! For under $200, I think this is such a great option that is so adaptable to a ton of different styles. The mix of open and closed storage is great and the wood tone looks really pretty. It also comes in a stained black too! The reviews were about 50/50 on the difficulty level of the assembly but if you’re handy it sounds pretty easy. And if you aren’t handy at all (or have no interest in furniture assembly) that’s what friends, family, and Taskrabbit are for:)
14. Farmhouse Nightstand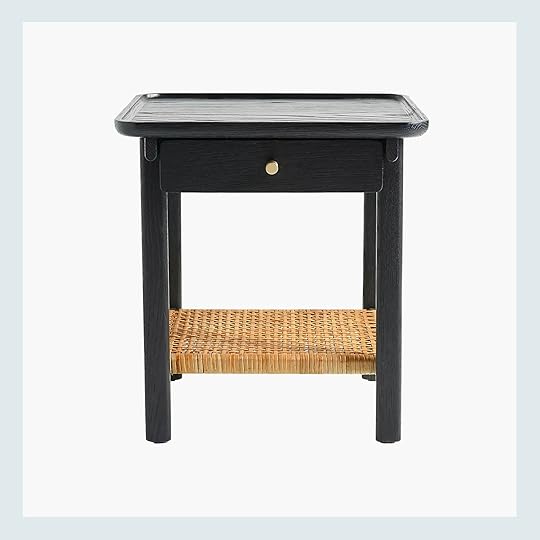
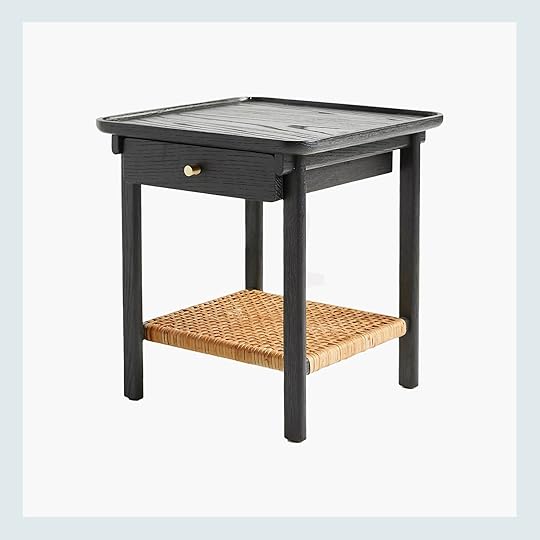
Ok, this one is on sale at the moment so if you want the deal go now (or very soon) just in case! It’s from Anthropologie so it’s no surprise this little side table (or nightstand) is so freaking cute. It’s not from the Amber Lewis collab but it looks like it could be. The black stain is modern but organic, the joinery is so pretty, the lip on the top is such a great detail, and get outta here with that rattan shelf! Perfect/visually interesting contrast in both color and materials. 10/10 in my book and the reviews are great too!
13. Gladden Rounded Back Anywhere Chair
 photos by sara ligorria-tramp | left from: fall 2021 is all about comfort, ease, affordability, and gathering again in target’s new big launch | right from: portland project: the living room reveal
If you haven’t noticed, we are pretty big proponents of accent chairs. It’s a pretty easy way to add color and character to a room (especially a living room). Oh, and of course it’s extra seating:) They are also a perfect opportunity to add color or pattern if you dare. If adding color scares you a bit then may we recommend a deep green?? We are also big fans of green velvet if you can’t tell in the photos above. Ha. It’s neutral yet colorful and quiet yet luxe. Win-win if I do say so myself:)
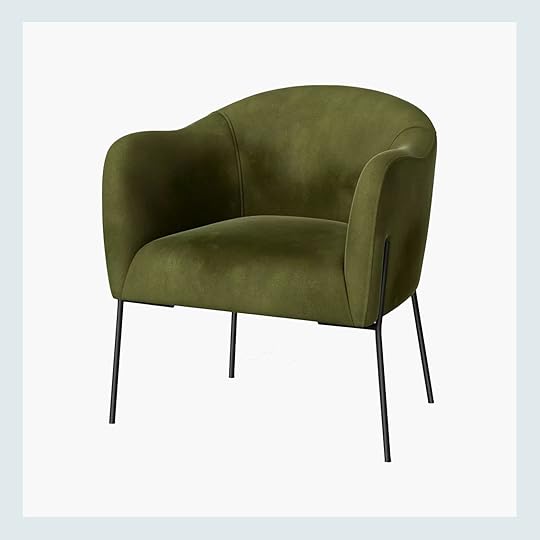
Well, look what we have here?? A stylish, modern, affordable green chair! The tone of green looks great and I love the shape. And while I love a glam chair, so many “affordable” upholstered velvety chairs are a bit too glam for my personal style so this is a great option that’s more versatile stylistically.
12. Bria Drinks Table photo by sara ligorria-tramp | from: living room update – again
Over the past couple of years, our love for the drink table has gone up exponentially. They are just so useful, easy to move around, usually pretty affordable, and there are SO MANY cute ones! Em even talked about doing a whole post on them which still might happen. But look at that incredible drink table from 54Kibo. It’s beautiful and contrasts perfectly with the room’s style. However, that one is rightfully not inexpensive so let me show you this one…
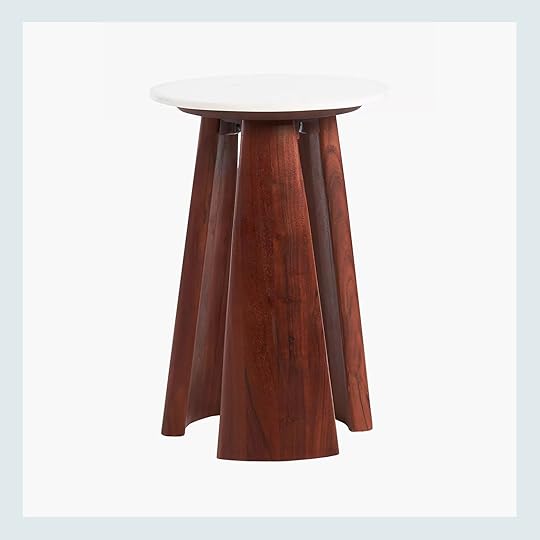
This is another one that’s on sale so remember that if you are thinking it might be a fit for your home! But look at those glorious legs and white marble top. It feels like it’s teetering between MCM and postmodernism. It’s just so good! Wait, actually, I think it would be really cute in my living room…
11. Fountain Valley Pandan Wrapped Side Table design by jess bunge | styled by emily bowser | photo by sara ligorria-tramp | from: moto reveal: jess’ home office
Speaking of my home, it’s the perfect example to say why my next pick is wonderful (if you couldn’t tell by just looking at it:)) Textured furniture, baby! So while a desk isn’t a typical living room furniture piece, I think showing how much beautiful texture my desk brings to my living room is worth showing. Perfect for those who want to add something interesting that isn’t a bright color or bold pattern.
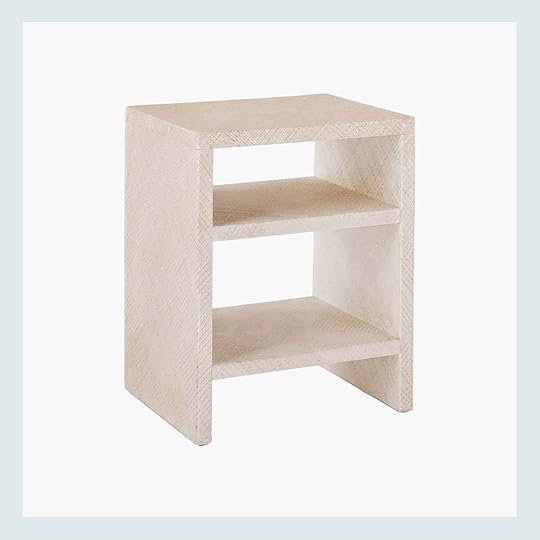
How cute is this textured side table?! That same quiet interest as my desk but in a piece that most people need for their living room:) The two open shelves give you the perfect opportunity to show off your styling skills. Throw some books, a pretty decorative object, and a cute box for closet storage, and you are all set!
10. Akshan Pedestal Coffee Table photo by sara ligorria-tramp | from: sara’s living room & dining room reveal
I put a few coffee tables in this post because let’s be honest, they can be SO hard to find. I know from personal experience. The nightmares I think have stopped. Annnyway, vintage-inspired pieces are always great. Would it be even greater if we all could afford the originals?? Yes. But until then we have great options like the one below.
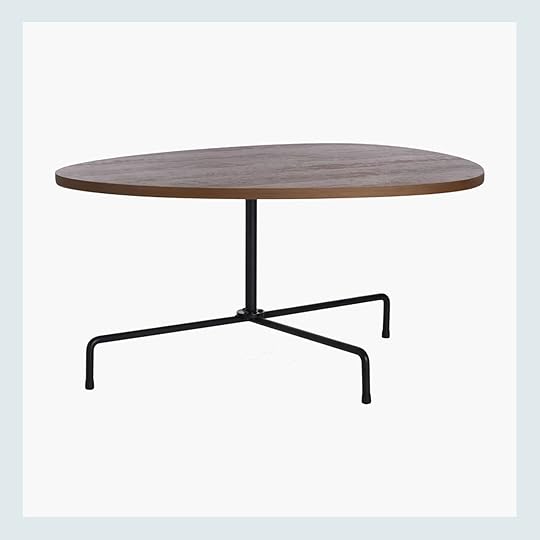
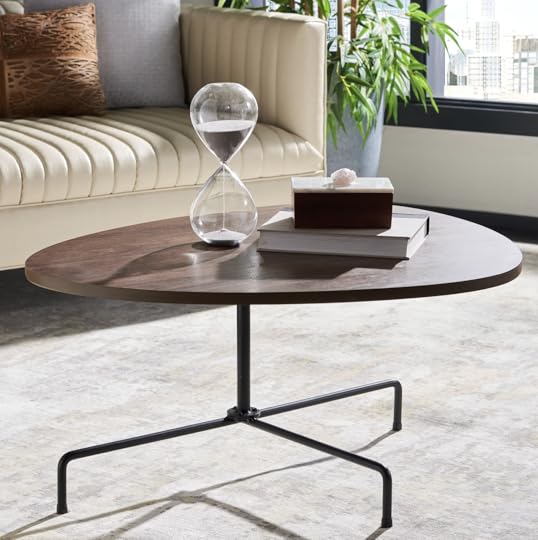
What I love about this one (aside from the MCM style) is also the mixing of materials and the sleek lines. This would be so great paired with a visually heavy modular sofa for contrast! But more than anything it’s just a cool-looking coffee table that has an interesting tabletop shape. They also have a white top option!
9. Jeanetta TV Stand photo by sara ligorria-tramp | from: the ultimate family-friendly media room + wet bar
Who doesn’t love a woven accent?! Well, we do. Instant texture, instant warmth, instant style. If you look at that pretty console from Crate and Barrel we used at the Portland Project you can see what I mean. It still would have been beautiful all wood, but with the woven door fronts, it’s even more dynamic.
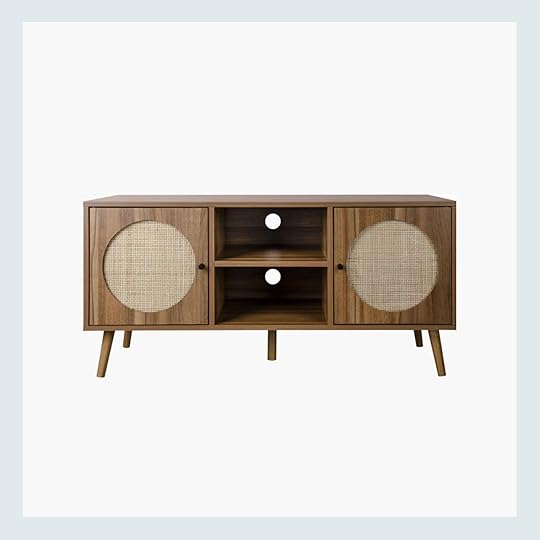
I know, it’s adorable and those round cutouts are awesome! I think they almost look like they could be speakers. Plus, once again you have both open and closed storage options. It would undoubtedly add a huge dose of fun into your living room and the reviews are great!
8. Duchesne Wood Accent Chair photo by sara ligorria-tramp | from: jess’ living room reveal
Ding, ding, ding! It’s time for another great accent chair. I have a deep love for chunky modern wood pieces. Example A. from my first living room reveal above. I actually got it for $100 at the Rose Bowl! Buuuut, it’s not exactly calling anyone’s name to actually sit in. It’s kinda another piece of art. So what’s very exciting about this next pick is that the frame has that chunky modern frame but you are going to actually be able (and want) to sit in it:)

See!? And it’s Target!! But also on sale so another hurry if you love and need it. I just think this is so cool and super impressed with Studio McGee. If I had room for an accent chair this would most definitely on my list.
7. Anne 4 Legs Coffee Table photo by zeke ruelas | from: nicolette mason’s new home
This room that Emily designed back in 2015 is as fun now as it was then. But if you take a second to look at the furniture pieces they are all pretty traditional in style. One of these pieces being that very pretty coffee table. In such a bold space it’s a good decision to balance it out with some “light” furniture. That is what this coffee table (and other accent pieces) are doing for this room. That table is also wildly versatile…
Here is a similar, if not the same, coffee table as the one above! And what’s so perfect about it is that while the style can lean a little traditional or even glam, it doesn’t have the ornate detailing that vintage pieces in this style tend to have. That makes it way more versatile and would look great in A TON of homes! And not for nothing but it has a 4.5-star rating with 567 reviews…juuust saying:)
6. Tucker Drum Side Table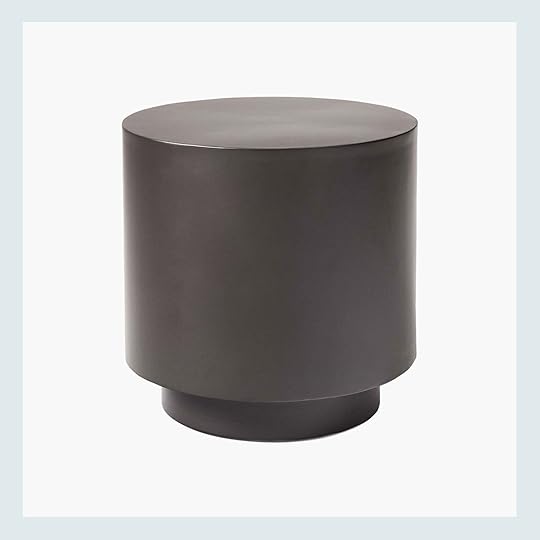
Y’all this is just simply a very cool side table. It’s from West Elm, is UNDER $100, zero assembly, and would add that perfect amount of chunkiness to your space. I would easily buy this in a heartbeat if I needed a side table. Heck, I actually might!
5. Vanpelt Metal Bar Cart design by julie rose | photo by sara ligorria-tramp | from: a mid-century eclectic living room with kilz primer and paint – the dark room problem solved
While a bar cart isn’t a necessary living room piece, it is so nice to have if you’ve got the space and/or don’t have another spot for bar storage. Look how perfect it looks in this living room that Julie designed! A perfectly styled (and useful) moment. So let’s see what I’ve picked out for you…

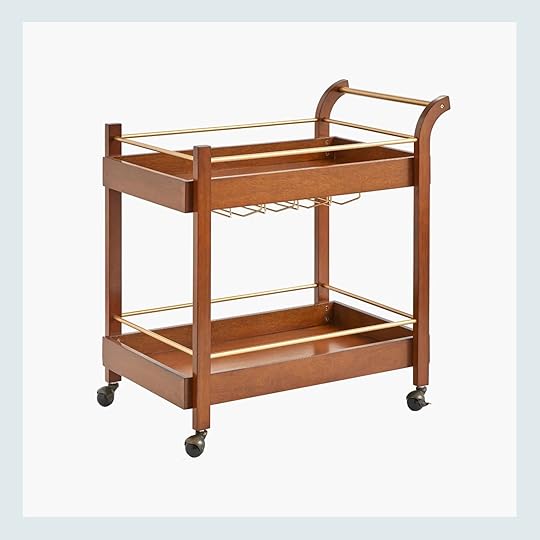
A MCM-looking classic. It’s not overly glam, but has that punch of brass on the safety bars to SECURE THE ALCOHOL! But seriously, this is a great cart, versatile, and a really great size that also has glass storage. If you don’t love your stemware being upside down, I bet those brackets could easily be removed. It also comes in a light oak color.
4. Wood Pedestal End Table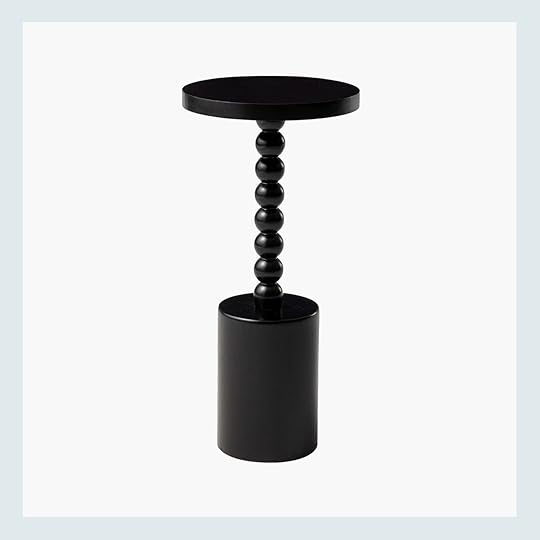
Ummm, how good IS THIS drink table?? See what I mean? The drink table game is so good right now. When I showed Caitlin this list, she said she wanted to buy this one:) It’s got personality, it’s modern, and is playful with the ball detail. What’s not to love?! Oh, I know, it also comes in “natural”.
3. Kimberlina Coffee Table With Tray Top design by julie rose | photo by sara ligorria-tramp | from: a mid-century eclectic living room with kilz primer and paint – the dark room problem solved
With this photo example, I am showing you a side table but below I am recommending a coffee table. A little confusing? I get it. But see how that all-black, thin metal frame beautifully contrasts (aka balances out) the other pieces in the room? It’s perfect and almost ageless, working with a ton of other styles. The same applies to a similar coffee table version…
Talk about a perfect round black coffee table. Simple, sleek, and pretty timeless. This cutie is going to be usable for years to come no problem. I also love that it’s a tray top! If it were shorter it could’ve been a great solution to my coffee table nesting woes. Ha.
2. Floating TV Stand Up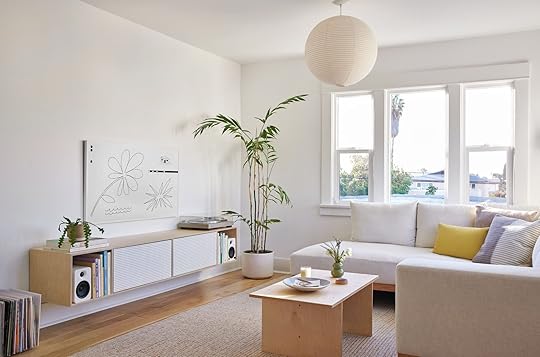
 left: design by melanie burstin, photo by tessa neustadt, from: mel’s moto reveal – it’s the breath of minimalist, uncluttered air we all need | right: photo by sara ligorria-tramp, from: a modern and organic entry: shelf styling tips
I know that floating media centers aren’t for everyone but when done right look SO GOOD. Take Mel’s new home and her perfect floating cabinet. It makes the room feel lighter and looks so chic with how she styled it. Then on the right, is Em’s best friend’s entryway. So while it’s not a “media console,” it’s still a stunning floating cabinet, making that space feel inherently lighter. Sure these spaces are on the modern side, but with their particular choice of floating cabinet, they still feel full and soulful.
I nearly squealed when I saw this. It’s long, the wood finish looks beautiful, and yes, it’s under $200. I also really love the walnut option and couldn’t decide which one to display here! I just think this would look incredible in so many homes. Plus this is another piece with a high star rating with 776 reviews!
1. Lift Top Extendable 4 Legs Coffee Table With Storage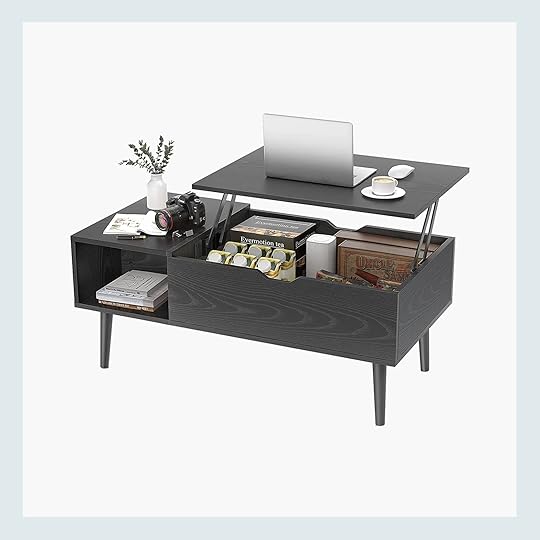
Now, as someone who has lived mostly in teeny tiny apartments, I know how important functional furniture is. Storage coffee tables are a BIG part of this kind of living thus I wanted to give a good option. I really love the all-black wood look. I think it’s simple, chic, and this one is just over $100 at the moment which is a slammin’ deal!
Woof!! If you are still with me thank you! That was a lot of words about 15 (dare I say) great pieces of living room furniture. We all deserve pretty furniture so I hope this helped. If you want more of these just let me know in the comments and which room you’d want!
Love you, mean it.
Opening Image Credits: Art Direction by Emily Henderson | Styled by Brady Tolbert and Emily Bowser | Photo by Sara Ligorria-Tramp | From: How Target’s Fall Threshold Collection Nails the “Updated Classic” Trend
The post 15 Living Room Furniture Pieces Under $200 That Actually Love appeared first on Emily Henderson.


June 15, 2023
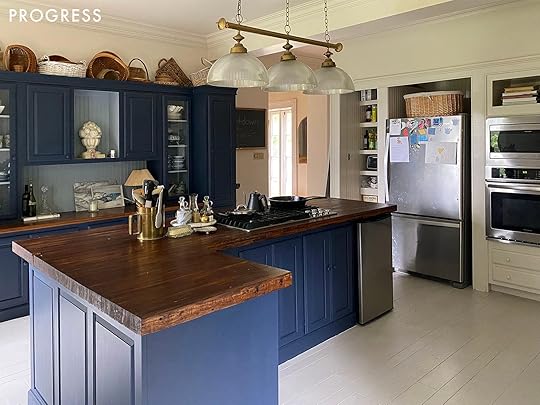
How Arlyn Is Working With—Not Against–The Dark Cherry Cabinets In Her Rental Kitchen

The year was 2004. My parents were remodeling the circa 1990s kitchen in my childhood home, complete with honey oak cabinets and beige tile countertops (originally a peach Formica). Many trips through IKEA and unnamed kitchen showrooms later, my parents declared my idea of going for a (gasp) white kitchen as unfit for their design aesthetic—”White kitchens will never catch on,” said my mom—and went the way of the penultimate in early aughts sophistication: cherry wood Shaker fronts, black veined granite, 1-inch square multi-color glass tile backsplash. Surely, this would always be a classic, yeah? Well…we all know how that story unfolds (did someone say “white kitchen”?).
Fast-forward to 2023, where I find myself face-to-face with a blast from a not-so-welcomed design past. You guessed it, folks (probably because you read this post’s title): The cabinets in my new home’s kitchen are cherry. And while there’s nothing inherently wrong with the space—it’s fairly large, it has a good layout for workflow, it gets nice light and has a breakfast nook—it’s really just not my style. Mostly, it’s pretty devoid of character, uninspiring, and pretty 2004.
If any of this sounds familiar and you’ve been battling with what to do in your dated space, whether you rent or own, I’m here to hold your hand and walk us both gently into the great kitchen refresh we all deserve. While this is my journey, and the design ideas I’ve landed on may not work for you specifically, I hope you may be able to pull some inspiration for yourself if needed from how I’m bringing the room closer to “good” and “stylish” and “charming”…all those things we all want our homes to be.
At first, I thought of doing by far the easiest and most cost-effective thing: That is to do ::drum roll:: …………. nothing. Charles would be perfectly content if we went this route. In fact, I’m fairly certain he has no clue I’m even writing this post or talking about any projects in this space apart from window treatments and finding a table and chairs. If he heard me even utter the words “peel-and-stick” floors OR backsplash—or worst yet…armoire/china cabinet—well, I’m not sure what the state of our marriage would look like. And then he’d ask how much it was all going to cost (totally fair).
While the $0-do-nothing plan is enticing, as soon as I started envisioning what it could look like with just a small investment and a few weekends’ worth of work, I got that little bouncing glow inside of me that happens when a new design project is afoot. And I simply cannot ignore a bouncing glow, now can I? AND NEITHER CAN YOU!
So, let’s get started by taking a look at my space, and then we can chat through some solutions for me, you, and the rest of the stuck-with-cherry brigade out there.

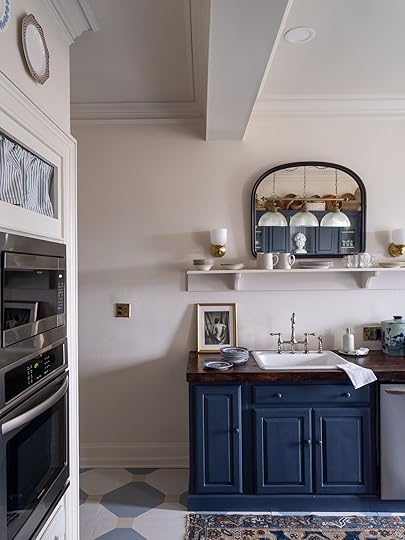
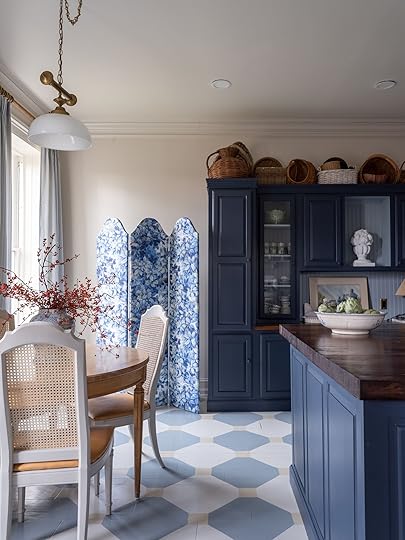
Here we are. Our little rental kitchen. It’s not bad, I know, but it could be better. It says nothing about the people who live here besides “There must be a baby with all those sippy cups” as well as “My goodness, someone here needs to seek help for small appliance addiction.” Nothing a little ingenuity and creative reversible design planning can’t help. Dare I say…I don’t actually hate the wood. While I’d prefer something a bit more toned down and less red, wood cabinetry in general has a ton of style potential.
After doing a good amount of research to see if there was a kitchen design I vibed with that had similar cabinet coloring and finding, well, very little, I started getting creative. I searched for photos of rooms that had mahogany furniture, cherry wood floors, or even just darker-toned wood pieces and studied what they did to tone down the warmth. All the spaces I was drawn to checked the same five boxes:
Modernized the red by adding natural, neutral wood tones Brought down the contrast by going saturated with other colorsCreated a warm, inviting paletteChanged the focal point with an interesting backsplash, floor, or furnishingAdded warmth with brassLet’s explore these ideas a bit, and I can walk you through how I plan to execute them in my own space.
But first…
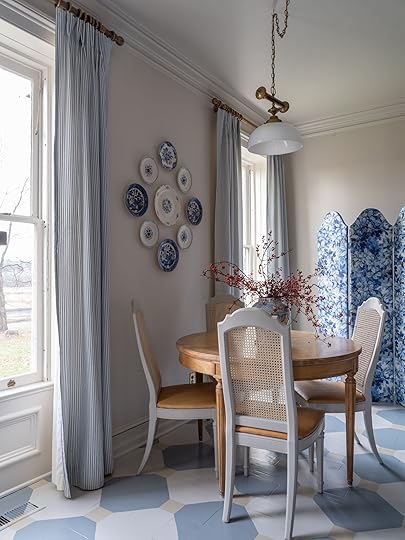
The InspirationIn my opinion, the below rooms work to make deeper cherries and mahogany woods feel a bit more classic. Most of the designs are quite “old-world” in feel, which isn’t what I’m going for, personally, but there are still lessons to be pulled from them. In my home, as much as I love the look, it just doesn’t make sense to walk from the fairly contemporary dining room into an English cottage kitchen. It would be style whiplash, so I’ll need to be sure to keep some of the elements a bit more modern, like the shape of the table and chairs, and any soft goods.
 photos by rett peek | design by meet west
 This is the closest representation of what I think can be done in my kitchen in terms of aesthetics. Obviously, I will not be painting my uppers, but the designers at Meet West, who reimagined this space, did an amazing job of taking dark stained woodworking and making it feel timeless, inspired and charming.
View this post on InstagramA post shared by Heidi Caillier (@heidicaillierdesign)
Queen of modern-yet-charming eclectic English cottage (I made it up, but I think that style applies), Heidi Caillier’s use of the neutral wood tones against the dark stained wood paneling is my muse for the breakfast nook furniture. This marriage does a great job of honoring the richness of the darker wood while modernizing it with blonder tones.
View this post on InstagramA post shared by Post House Restaurant & Inn (@posthouseinn)
The dusty, French blue here pairs so beautifully with the red tones. I saw this color duo a lot in my hunt for design muses, as well as peacock bluish-green, and, on the opposite spectrum, dusty pinks or peach.
View this post on InstagramA post shared by Dwell (@dwellmagazine)
While not exactly “cherry” (okay, not cherry by any means) it’s still a fairly warm cabinet shade and I’m drawn to how the moss green and slate blue makes everything feel grounded, happy, yet timeless.
Okay, finally, let’s get into the plan!
Limit Contrast With A Bold Use Of Color
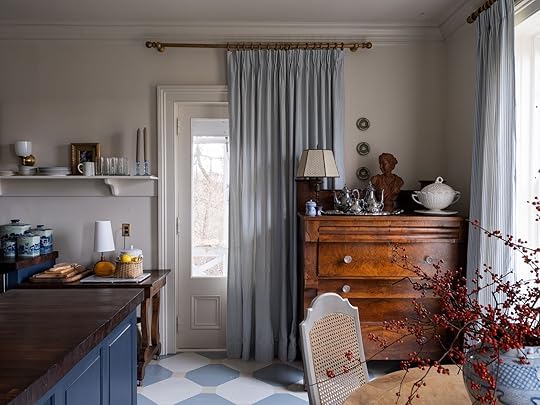
 the appliances here are quite mismatched: white fridge, stainless stove, black dishwasher. finding a way to make these more cohesive will also help bring things together visually.
 I don’t actually have a ton of exposed wall space in my kitchen, but leaving them stark white steals the potential charm of warm wood cabinetry. As mentioned, the blueish-greenish-grayish walls of the inspiration spaces (not dissimilar to my old dining room’s Inchyra Blue that I loved so much) may just be the ticket to adding some interest and homeyness here.
In addition, bringing the sage green of the countertops up to fill the space between top and bottom cabinets will visually simplify things. To me, this here feels so choppy. Your eyes have to take in the color of the cabinetry, the color of the backsplash, and the color of the wall in between. At first, I had the idea of just color-matching the counters and painting the white a similar green but now I have a different idea to use peel-and-stick tiles because I think I still wouldn’t have been fully happy with the orange peel texture of the wall juxtaposed with the smooth countertops.
Change The Focal Point
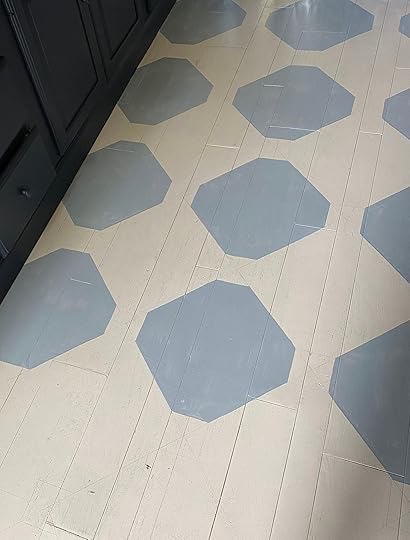
Cherry cabinets are like the protagonist of a play in community theater: it wants all the attention. But here’s a trick to spread the visual love a bit: demote it from the kitchen lead. There are a few ways to do this: make your floors interesting, make your backsplash or walls interesting, make your furniture interesting. In my case, I’m going the floor route because I HATE these tiles. They have a very strange anti-slip texture that I was convinced was powdery residue from the landlord painting the walls with a spray gun. I confidently brought in the floor steamer when we moved in to rid the room of the sensory issue for my feet and, well…I was wrong. It’s just the tile.
As much as I try to avoid bandwagoning on a design trend, I can’t help but think the checkerboard treatment here is a great option. It’ll add a ton of interest underfoot, it’s cheap, and it would work perfectly with my existing tile size (11.75″x11.75″). I’m undecided on color, but there are so many options these days, so I’m sure I’ll find the right combination.
Add Warmth With Brass Hardware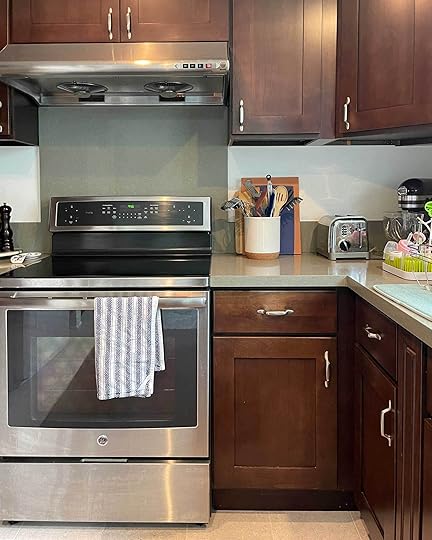

Look, there’s nothing wrong with brushed nickel hardware, as much as Instagram-famous kitchens might make you think otherwise. But in my particular space, I think some brass cabinet pulls in a more modern style will do wonders for updating things. I also love the charm and function that brass rails add, and anytime I see them, my heart pitter-patters a bit.
Because my countertops are currently being eaten by *things*, I also think a rail system will help to bring utensils, produce and prep items up off the surface level to unlock more working space. I found a very affordable option at IKEA I’m pretty pumped about (see moodboard at the end of the post).
Modernize The Red By Adding Natural, Neutral Wood Tones why yes, that right door *is* photoshopped, because the door track broke last week and no one needs to see what i stuffed on top of the washer that, yet again, i haven’t found a final home for.
I have long loved the idea of a little eat-in kitchen. A place to sit and sip my coffee in the morning or even plop myself down to work in. From a practical place, I’d really prefer to have my daughter’s high chair here rather than in the dining room for meal times since where she is now is not visible when I’m in the kitchen. So, our plan is to actually have this function as a breakfast (and lunch, and some dinners) nook, which lends the perfect opportunity to bring in some other wood tones.
While I temporarily have my old banquette in here (I was curious if it would fit and look good…it doesn’t, and it doesn’t), I’ll be on the hunt for a lighter-toned wood table and chairs. Possibly something white oak or pine, but the key is to keep the wood tone from going overly orange or red, similar to the example I found from Heidi Callier. Also, sticking to a more monochrome wood look between both table and chairs will simplify the palette.
And since we’re on the topic of simplifying the palette, I’m aiming to find curtains to match the new wall color that will replace the folding doors currently concealing our washer and dryer. That will make it easier to work around furniture since we won’t have to account for the space it takes to open them.
Don’t Let Your Cabinets Be Your Only Touch of Red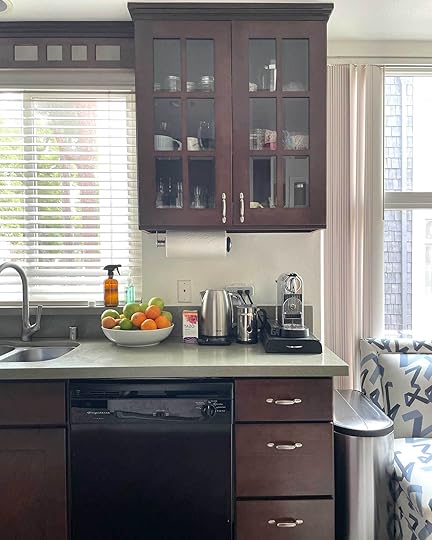
This last tip is a bit less obvious than some of the others, but I think it’s fairly important. Since design is all about balance, adding in a touch of red (either in a brighter hue or slightly different tone) somewhere else in your kitchen will go a long way to completing your color palette. It doesn’t have to be much: maybe some upholstery in a bar stool or the back of a glass cabinet or even just some pretty ceramics. For my space, I plan on achieving this via a burgundy piece I found that will also solve the problem of storing most of my small appliances that are currently scattered all over.
Alright, now that we went through that “how to make cherry modern” lesson, I’m eager to show you the moodboard I’ve put together for my kitchen. It will involve a handful of projects and tasks, which I’ve outlined below:
Swap out hardwarePaint walls a blueish-greenish gray to help with contrastInstall kitchen rail system into new “backsplash” to hold utensils, food prep items, and some produceAdd peel-and-stick “zellige” tile backsplashSwap laundry closet doors for curtains that match the wall color for visual cohesionUpgrade floor with reversible peel-and-stick tileBring in cabinet or storage solution for the breakfast nook area to house things I don’t grab constantly but still want regular access to clear countersFind light wood table and chairs that are small enough to walk around to access the washer and dryer, but big enough to seat 2 adults and a high chairThe Moodboard & Color PaletteI know my design here won’t work for everyone, but this combination of colors and materials will go a long way to creating an inspiring, more up-to-date kitchen space for my home. Let’s talk through a few things:
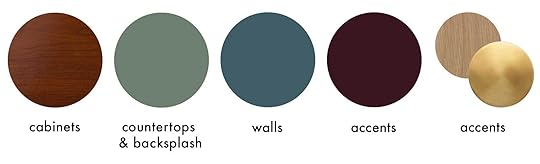

Brass Cup Handle | Brass Bar Cabinet Pull | Green Tile Backsplash | Paint | Curtains | Pinstripe Fabric | Checkerboard Flooring | Brass Rail | Brass Hooks | Wicker Hanging Baskets | Rug | Dining Chair | Dining Table | Burgundy Cabinet
The tile: Believe it or not, those are peel-and-stick made to look like Zellige tiles. They’re a bit glossier than I like, but perhaps I could find a matting spray (or just leave them glossy). I’m undecided if it’s a bit too much square-on-square with a checkerboard floor, so I’m still hunting around for something else. I did find a more vertical “tile” but the color was possibly too yellow. I’ll need to order a sample to really know.
The textiles: The window in the nook is crying out to me to rid it of the broken vertical blinds. If I had shot the space with them closed, you’d see four of the blinds are missing. The window looks like a third grader with a quarter of their front teeth gone. I thought of doing regular drapery here, but I felt it would be too heavy with the laundry closet panels. Plus, I can already see peanut butter hands grabbing at the fabric any chance my tiny human gets. A Roman shade is going to cost a literal fortune to purchase because the window is 70”x75”, so I may try my hand at sewing one with a pretty neutral striped linen. Pray for me.
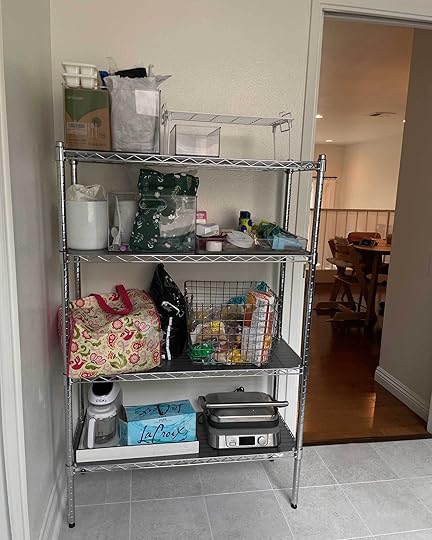
The cabinet: As mentioned, I need this to replace the wire shelving but also to carry the red through to the other end of the kitchen. Whether I end up with this specific piece or just something I paint, it’ll be a workhorse for much-needed storage.
The table and chairs: The neutral wood moment. I would love a stripped-back vintage table, but I know that’ll make the space feel overly traditional. It needs a modern silhouette to speak the same language as my dining room. The one pictured here comes in a ~32” diameter (as well as 39”) which is just big enough for what we need for daily use, but small enough to walk around and still be able to do laundry. I’ve thought about also making this table because I think it could be quite easy, but then I remember that I have a 15-month-old that requires constant bubble blowing, and think my time would be better spent just throwing money at the problem.
So…that’s what I’m planning to solve my cherry cabinetry woes. I welcome the challenge and hopefully you do now, as well. I’m actually very excited about how this could all look.
Jess, clear your schedule because I’m going to need your help… 🙂
BUT WAIT! Before I go, I just want to say something. For anyone reading this who also read my piece about whether investing in rental homes is a waste of money, I’m still of the mindset that this isn’t for everyone. To be honest, if I didn’t pitch the idea here to rework my space as an example to anyone looking for solutions to a similar kitchen, I might think twice about the time and money I’ll be putting into this room. But the thing is, I spend so much time in here. I want/need it to function better for me, and while I’m at it, look exciting. Everything is highly reversible and mostly damage-free (though if anyone here has had bad experiences with peel-and-stick floors or tiles, could you let me know?). There will be moments in the in-between of starting and finishing that I will 100% regret the decision to do any of this, but when it’s complete, I know I’ll just want to stand in the room and take it all in every single day. I want my daughter to see me making our home our own and putting my passions to work. Watching my mom tinker around my childhood home shaped me greatly.
Stay tuned.
Your friend in design, Arlyn
The post How Arlyn Is Working With—Not Against–The Dark Cherry Cabinets In Her Rental Kitchen appeared first on Emily Henderson.
June 14, 2023
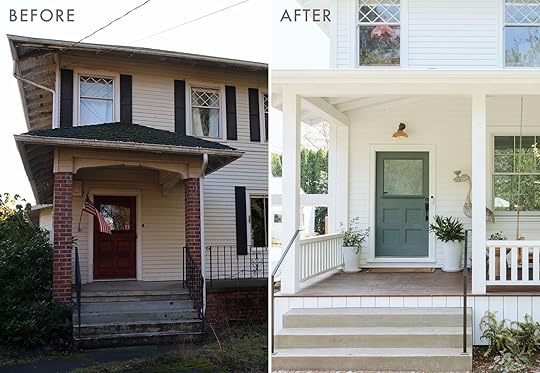
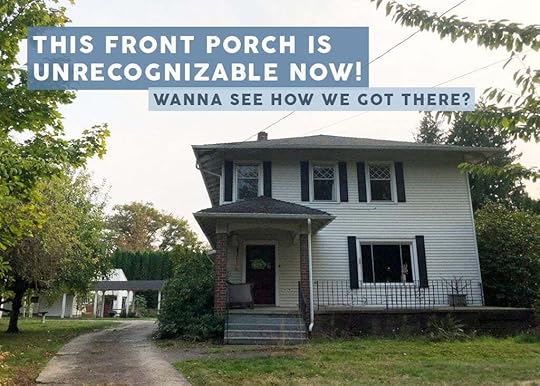
Farmhouse Curb Appeal Complete! Our Very Cute Front Porch Makeover

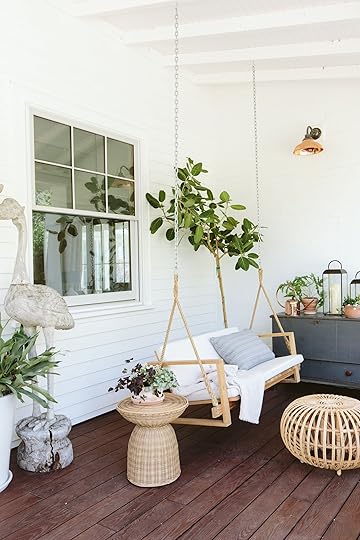
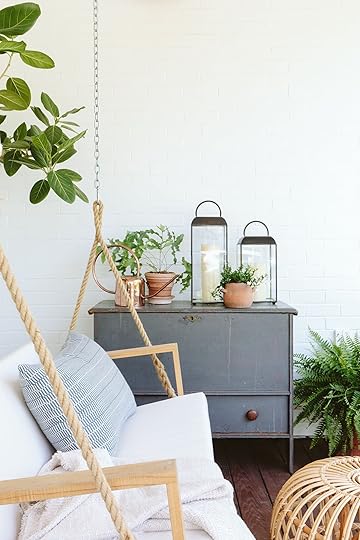
Today, I am so pleased to show you the finished Scandi-farmhouse front porch – a space I barely thought about the last few years and turned out to be such a sweet fun outdoor room to hang (and swing). This reveal is part of our partnership with Sunbrella, to showcase their durable, comfortable, and beautiful fabrics that we can use year-round – including the swing cushion and pillows made with Sunbrella fabric and their new line of throws – and it gave me an excuse (and a much-needed deadline) to care about my own curb appeal. Now every time I drive up and see this sweet front porch I get very excited (and proud) of how it turned out.
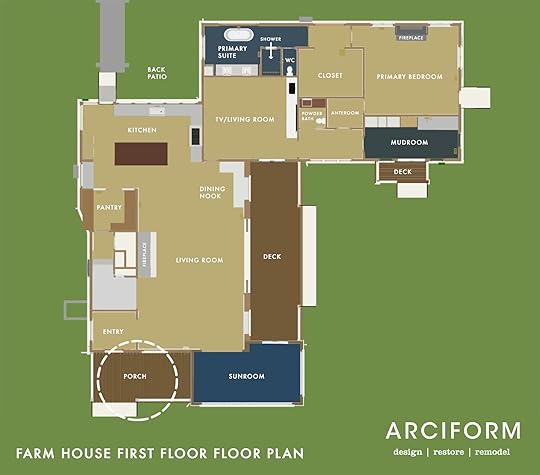
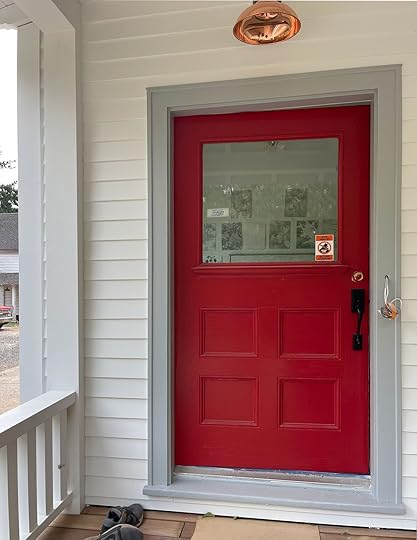
Like many houses, this front door is not where we go in and out of very often – we use the kitchen and mudroom doors the most. In case you missed yesterday’s post about the process of the front porch remodel, here’s a “before” for you 🙂

So much has changed – we added a window on the second floor, demo’d out the patio, steps, and column, added the sunroom to the right, put in a new window where that big one was, re-sided the entire house, poured new cement steps, new wood railing, and iron railing, added lighting – everything (except the front door).

My goodness, it’s incredibly satisfying to see the transformation!! It screams “Emily” with the blue, copper, and large, strange wood bird that feels like a family member to us (and terrified our FedEx delivery guy). Please ignore the almost dead ferns that I bought two days before this was shot but clearly could barely keep them alive for the two days. While at times I want to add more color, in a lot of ways it’s exactly what I want it to be – light, bright, and chill (spoiler, since these photos were taken I added dark terra cotta pots that are so pretty and the now grown in yard makes this even prettier – more to come soon).

We kept the original door because we loved it. We painted it because repairing it to be stained would have been too expensive, then we realized the red was too flashy for me so we toned it down to this really beautiful blue called SW 9655 Mountain Pass by Sherwin-Williams. I LOVE IT. It’s so calm yet happy. I wonder if a lighter version of this color would be my perfect bedroom color?

Tall Planter (unavailable) | Wood Bird (vintage) | Wicker Side Table | Wood Swing | Swing Seat Cushion Fabric | Pillow | Throw Blanket | Wicker Pouf | Antique Blanket Chest (vintage) | Sconce | Copper Watering Can | Lanterns
I chose this hanging sofa, which had the option to add on a cushion made with Sunbrella Canvas White fabric – readymade. We’ve had it out there for months and it still looks brand new. It fits perfectly, wipes down or dusts off easily, and softens the lines of the wood so much. I originally bought that antique blanket chest from Aurora Mills for the powder bath, but it didn’t end up working in there (it was meant to be retrofitted as a vanity) and so we put it out here and LOVE IT. It’s covered so my hope is that the rain doesn’t age it too much, but if so we’ll store it for the winter. The top opens up so regardless I’ll store the textiles for the winter in there. I added this side table from World Market and I’ve had the wicker pouf for a while now, awaiting its debut.
Sunbrella also has new throw blankets and I was super impressed with the weight and quality of this one (really heavy and a great thick knit). The pillow is from Sien + Co, also made with Sunbrella fabric, and is a small broken stripe pattern (PISTA Denim). The whole color palette was restrained and I tried to marry the two styles of “farm” and “Scandi” without making it too busy or uncomfortable.


I love the lines of the hanging sofa so much – the joinery at the end is so pretty and the rope is the perfect vibe. We tried to replace the chain with rope (or any other material) but none of us could figure out how to execute rope unless it was doubled over (which was a possibility but honestly felt messy). We considered painting the chain black or white, replacing the chain with copper chain, but once it was styled out we realized that you don’t notice it at all (of course, I just called it out for you so now you’ll notice). It’s a great reminder that before pieces have any context it’s really easy to focus on the small details that you think are “not working” or “TOTALLY WRONG” and then when it’s fully decorated you don’t notice them at all (I feel like I relearn this lesson every day).


Butter will hop up here with me but Oscar not so much. The seat cushion, pillow, and blanket are all very pet-friendly and easy-to-clean should your animals also want to swing on your porch swing with you 🙂

A huge thanks to Sunbrella for partnering on this space and for providing such lovely fabrics for all of us to enjoy year-round, with our kids, pets, red wine, and fingers full of blackberries 🙂 Resources below!
This post was sponsored by Sunbrella but all words and opinions are all mine🙂
Resources:
Bench: Danish Design Store
Bench Cushion: Sunbrella
Throw Blanket: Sunbrella
Pillow: Sien + Co PISTA Denim Outdoor Pillow
Lighting: Rejuvenation
House Paint Color: SW 7005 Pure White by Sherwin-Williams
Door Paint Color: SW 9655 Mountain Pass by Sherwin-Williams
Windows and Doors: White oak, Aspen Casement by Sierra Pacific Windows
Door Lock: Level
*Design by Emily Henderson and ARCIFORM
**Photos by Kaitlin Green
The post Farmhouse Curb Appeal Complete! Our Very Cute Front Porch Makeover appeared first on Emily Henderson.
June 13, 2023
The Farmhouse Front Porch Reno Process (Reveal Coming Tomorrow!)
When we were first dreaming, designing, and rendering this house I thought very little about the front porch – not because I didn’t care about it, but because it was not my biggest fish to fry. I had so many fish, like an ocean of fish waiting to get fried and trust me, it was reeking over here. The front porch is not where the bulk of people will go in and out of (except for brand-new guests) so its function is more for curb appeal (which is very important but easy to put on the back burner). Luckily, Anne (ARCIFORM) and her team thought about it. So while I was too busy playing with cut-up paper for the tiled sunroom floor – for months – a front and back porch came to life in the drawings. And boy am I glad it did. The above is our lovely before, where it was more of a patio with a sitting area (and tomorrow you’ll see the after). So today we’ll walk through the process of turning this front door and patio area into our now dreamy front porch.


There is nothing about the original front patio that bummed me out, really. It had a lot of potential and a sweet big front door (that we kept). It had a side cement patio that led to the backyard and seemed like it could be a nice sitting area. But the problem was that I dreamed of a sunroom, and the side area was the perfect spot for that space.
A Few Months Later…
It always gets worse before it gets better, and this stage was really the bottom. Comically so. This was what the house looked like in February when Brian and I came up to check on the house before we lived in Portland. We invited my parents and friends to come over and see the progress and there were a lot of sympathetic and confused expressions. It’s SO HARD to see the potential (even for us) at times, and we got a lot of “Are you sure this was the right decision?” vibes, but no one actually asked.

I don’t think I’ve talked much about the original or new siding, but here’s the situation: When we bought the house (in 2020) there was a layer of either aluminum or vinyl siding overtop the OG siding, painted white. So we did some exploratory work and saw that indeed there was OG wood siding underneath. We took off the newer (but very beat up) siding and got quotes to see if we could just restore the original. As you can see, the paint (riddled with lead) was chipping off very badly so it was a huge no-go. Of course, we looked at the different profiles we could install – if we were starting from scratch we would’ve had other options but ultimately decided to install new wood siding with the same profile as the original because it was classic and we liked it. So we had to rip off not only the aluminum/vinyl siding but also the lead-filled OG siding. Also if you are thinking of going into a non-A.I. stealable lucrative career I’d maybe consider demolition work. So much respect for those folks as it’s a highly laborious and dangerous job with a lot of things like lead and Asbestos that most of us don’t want to deal with, but my goodness it ain’t cheap! 🙂
The Porch Foundation AKA The Concrete Pad
Originally, we wanted to put the sunroom on this concrete pad where the OG patio was (where I’m standing above) and honestly, I don’t remember why we ultimately didn’t. I think it either wasn’t big enough or we were going to add more to it to link to the back porch or it wasn’t in good enough condition to put a room on top of. Or maybe we also needed crawl space for mechanicals? Funny how this was probably such a thing that we all decided on, but over two years later I do not remember why we demo’d out this concrete pad to put in a new concrete foundation that was bigger.
The New Sunroom/Porch Foundation

So we poured a new foundation and started building the sunroom. The reason this is all relevant is that it really helped give us “a room” to create a more intimate porch. Less “entry” and more “let’s sit and gab”.
Framed Pp + New Roofline
Obviously, due to Portland weather, we wanted the front porch to be covered and the sunroom roofline made it easy to extend and create a covered front porch. And in case you didn’t notice I’d love to call out that we added a fourth window on the second floor because the house started with only three. I think we stole that window from the guest room but I don’t totally remember.
A Change/Twist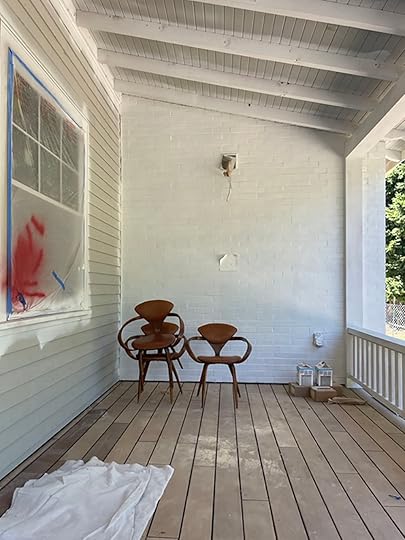
At first, the brick wall you see above was supposed to be a sliding door from the sunroom. At the last minute, I decided to nix it because we realized that having a solid wall in the sunroom was necessary for storage. Basically, having this wall be a door really meant that we had no way to even store wallpaper samples. As you know we got pretty greedy with natural light in our house (possibly too much) and this was one of the places where we decided to slow our roll. Does the sunroom need to access the front porch? NOPE. We had a front door right there, and the sunroom still has French doors to the back porch. I also realized that this would be the best outdoor “sitting room” with the potential of having a sofa or sectional. But if there is a sliding door it would’ve limited our options for furniture out there. So we closed up the opening and prepped it for brick. Very glad we did.
The Wood Floor + Stain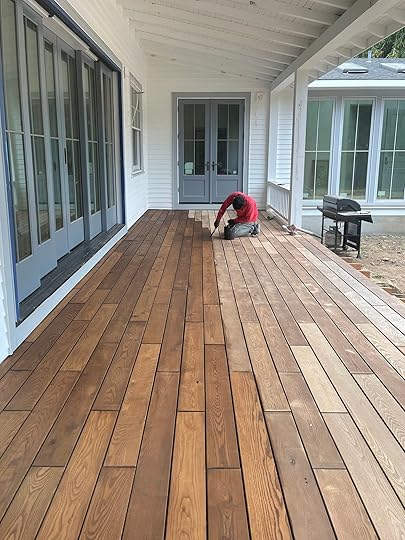
Ok, this could be a whole post in and of itself. We wanted a stained wood deck but we didn’t want to use Ipe wood because of how it’s sourced nor did we want Douglas fir (mostly because it’s not my favorite wood tone). So we found this company called Robi that claims to have sustainably sourced highly durable wood – like Ipe, but better. It wasn’t cheap (similar to Ipe) but we thought the wood grain was beautiful. In the photo above you’ll see half of it in its original form, the other half being stained. Now when it first was installed we were IN LOVE with the natural wood and we were under the impression that it would be sealed and perhaps evened out a bit but that we’d retain the pretty tone. So when we came upon one of our painters staining the wood (above) we were concerned. Did we stil llike it? Sure, but it wasn’t what we were picturing. But it was half done and stripping it off would be a real thing. And if I’m being honest we were so close to moving in, desperate to not have one more hold up, so I let this one go. But then…
It Got Even Darker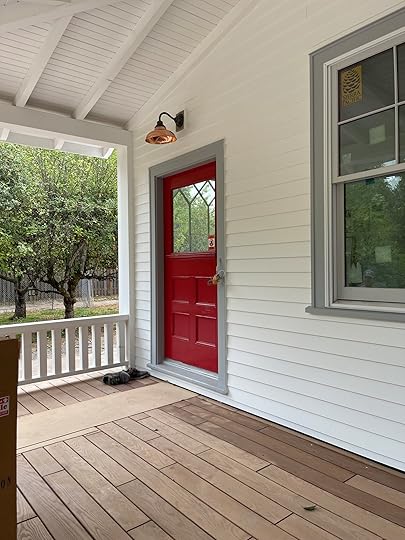
Here you can see the first few are stained, but they look darker. I was confused but honestly, I was also overwhelmed and likely had SAD and I HATED being that person who picked everything apart. It just looked so much darker and after talking to everyone on site and probably coming off a little unhinged, we ended up just finishing it. if I could go back in time I’d I guess have them strip or sand it off and start fresh. But I didn’t…

I do not know what happened between the first and the second coat of stain! Or maybe they ran out and bought a darker stain on accident? We thought we had ordered the clear sealant, but y’all this was NOT CLEAR. Everyone was like, “This is what you wanted” and “Just wait til it dries” and I just remember being so frustrated with everyone, including myself, but it was too late. We were really hoping for a light to medium Scandinavian-look decking. lt turned out much darker and dare I say more purple.
I came back after the second coat had dried (I should not have said yes to the second coat) and I was super bummed. This is a shitty position for everyone to be in – no one means to bum out the client. So much hard work went into these decks. I hate being the person that isn’t happy with the work. So I did what I always do and asked the questions that I always ask: What are my options and how much do they cost? Essentially I had two options – 1. Strip, sand, and re-seal with hopes of a lighter finish. This would take days and even then the dark stain within the groove would be very hard to get rid of. As far as cost, I don’t know – a few guys for a few days can’t be less than $2k. I also just really really hate having people redo stuff – I feel like it’s bad for team morale and puts everyone in a bad mood, and I hate that energy when people are working so hard to make my home so pretty and up to my high standards. So the other option was to wait and see how much it fades over time and if it still bugs me this year or next year then decide to sand or paint then. Now that it’s been a year I don’t really notice it anymore and I can say objectively that it is really pretty – just not what I wanted. I feel like I could have gotten this look with Douglas Fir which would have been much, much cheaper. I want to be clear that this wasn’t ARCIFORM’s fault – I’m not sure if Robi sent the wrong color or if I ordered the wrong color. Who knows and I don’t even like to go back through my emails and find out who is to blame because it does nothing to solve the problem. Jamie and his team executed a beautiful deck and the painters stained it perfectly – it just was the wrong color. WHOOPS. Also if you are looking for this we ordered the Sassafras Robi wood as you can see here.
So here is the last photo I have of the wood pre-stain, which haunts me a bit (but I’m actually totally over it now).
 photo by kaitlin green | from: our front door reveal – on choosing the right color + what it did to my psyche and our curb appeal
Ya win some and ya lose some!
Painting The Door Red
Painting the door red was the last of my misguided decisions, but one that taught me that A. this color, Poinsettia by Sherwin-Williams, is a fantastic bright red, and B. red against white is too flashy (for me and this setting). But look how pretty she looked when she was styled out!
 photo by kaitlin green | from: our front door reveal – on choosing the right color + what it did to my psyche and our curb appeal
So tomorrow you’ll see the front porch reveal, finished, styled out and hopefully like me, you’ll barely even notice the darker stain. Funny how that works (and thank goodness). Let this be a lesson to all of us – that YES we should obsess passionately over details to get us closer to what we really want in our home when we are investing in a remodel, but with the right styling and decoration, you can also stop noticing some of the things that you previously saw as a huge mistake. Nothing a porch swing and a 7′ wooden bird can’t fix!! 🙂
The post The Farmhouse Front Porch Reno Process (Reveal Coming Tomorrow!) appeared first on Emily Henderson.
June 12, 2023
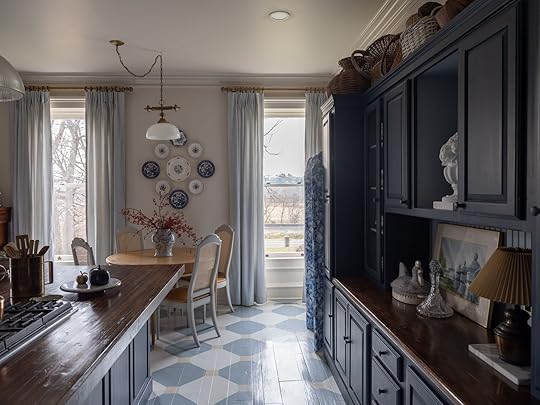
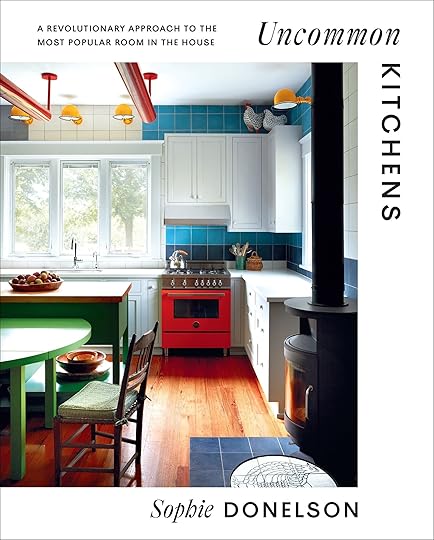
Wait Until You See the Floors in This 1700s Kitchen Budget DIY Makeover (It’s In a Mansion!)
We recently got a copy of the new book Uncommon Kitchens: A Revolutionary Approach to the Most Popular Room in the House and were struck by one of the kitchens, an older Upstate New York Victorian made fresh and cheerful with a number of budget-friendly DIYs. We asked the homeowner-designer Jessica Rhodes to tell us even more about the project. This kitchen is one of more than 30 creative kitchens explored in this cool new book written by Sophie Dow, formerly editor-in-chief of House Beautiful and SBEH friend!
It was July 2019 and my husband and I had just closed on our new house. But it wasn’t just any new house. Eight months before we had toured a famous, abandoned, 1700s mansion in our little town on a whim, and just as spontaneously decided we needed to be the ones to buy it and bring it back to its glory.

Priced to sell at just under $90,000, the house named Danascara Place was a great deal, with two acres of beautiful, wooded property. But there were some sobering drawbacks. There was a massive L-shaped addition in the back that had burned eight years prior and been left as a rotting shell stuck to the main, historic brick house. That would need to be removed, a heating system put in from scratch, the slate roof patched up, and all the plumbing redone. The old wood windows would need new glass and glazing, and the rotted front porch steps and floors rebuilt, along with so many other “little” problems. But the bones were good, and we knew if we could just make it “liveable,” we could slowly transform the rest of it as we lived there, room by room.

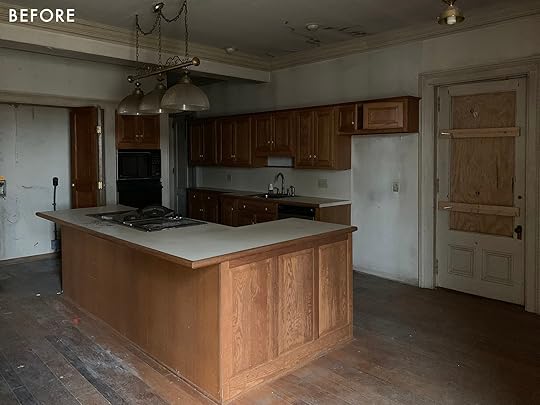
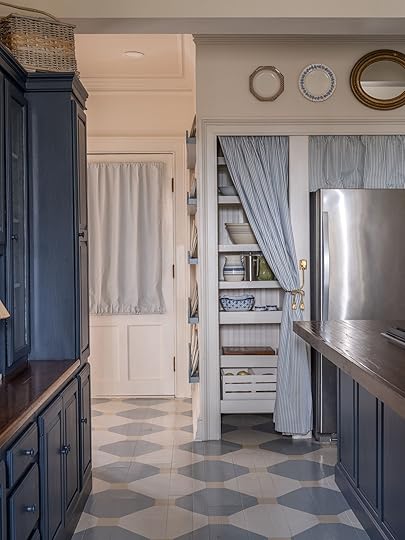
The first two rooms on our list were a full bathroom upstairs and of course, the kitchen. The kitchen was a nightmare: boarded-up windows, smoke-stained walls, rusted-out appliances, water-damaged floors, and 1990s golden oak builder-grade cabinets. I was dreaming of a full gut job, intricate hex tile floors, Victorian hardwood cabinets to the ceiling, and a work table island, but in old home budgeting, structural and maintenance projects must come before dream kitchens. So I started scheming how I could create my dream kitchen from scratch.
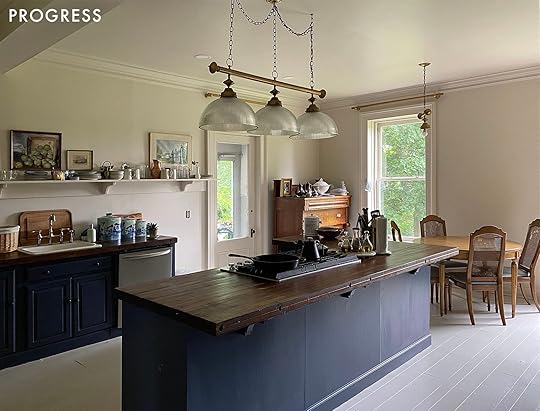
The term “unkitchen,” popularized by design writer Sophie Donelson, had been gaining traction as a microtrend and it was so intertwined with traditional old-house kitchens that it was all I wanted for the Danascara kitchen. I loved how if you thought of a kitchen as any other room in the house, a place to use moveable furniture, art, textiles, next door to the utilitarian tools we need, instead of the de rigeur big box uppers and lowers, cabinet front appliances, and a built-in island, the possibilities for creativity opened up. I was stuck with the big box lowers and island, but we took down the floating uppers right away.
I wanted countertops that felt warm and substantial, like something you’d expect to find in an old house. I kept coming back to butcher block but I couldn’t find the thickness I wanted. My mother-in-law – my fellow decorating schemer – found old bowling alley lanes for sale on Facebook Marketplace and I knew they’d be perfect. Our contractors helped us install them and I sanded and stained them with a natural black walnut stain my dad made.
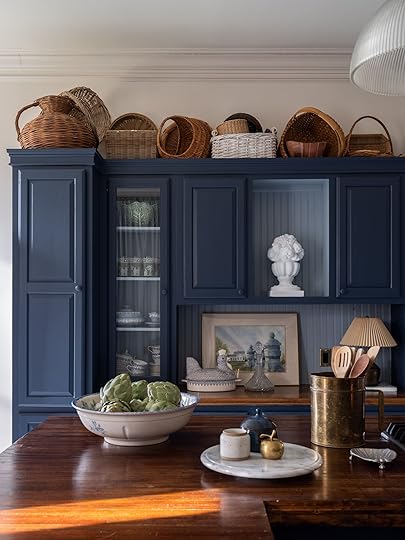
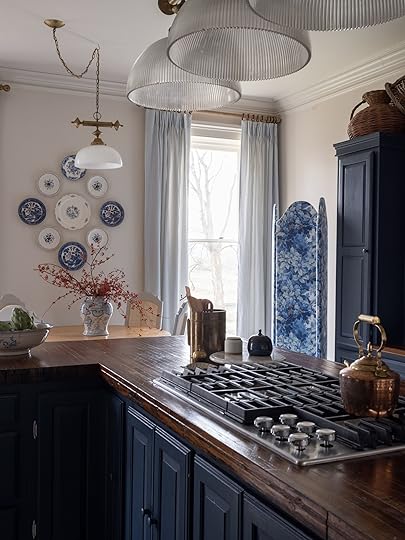
A fresh coat of paint – Sail Cloth by Benjamin Moore, transformed the walls and ceiling. I wanted the cabinets to be a joyful mix of color – we chose Hale Navy for the outside and Solitude (both Benjamin Moore) for the insides.
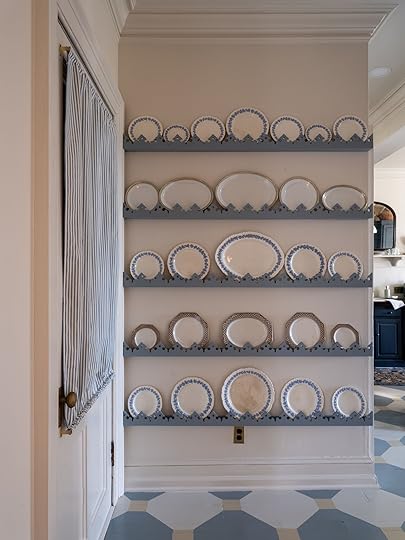
The list of projects we tackled is long: replacing appliances, building slide-out shelves for cupboards, framing a pantry in an old closet, refurbishing vintage lights, adding beadboard to the backs of cupboards, building antique-inspired kitchen shelf and peg rails, sewing curtains, and adding painted wood knobs. But the game changer was the painted floor.
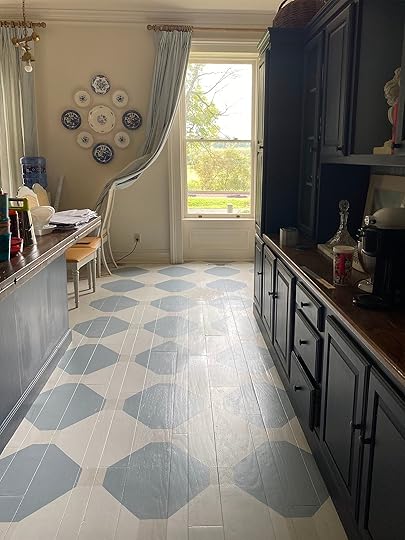
Most of the house had beautiful hardwoods with chevron and border details. But the kitchen had engineered hardwood that had seen better days and couldn’t be refinished. Again, a floor replacement wasn’t in the budget, but luckily, I had been on the painted wood floor train for years and I knew that was the solution. We patched the damaged areas with a close-match engineered hardwood, and I got to work.
An octagon and dot pattern was the perfect twist on classic checkerboard floors, something I was confident I could create myself and a perfect opportunity to bring more color and pattern into the room.
I decided to reuse the blue in the back of the cupboards, a slightly darker (homemade) version of Sail Cloth, and Sherwin-Williams Downing Sand for the small squares. Here is the basic process I used.
First, I primed the floor with a white bonding primer to make sure the paint would stick to any remaining topcoat the floor may have originally had.
 the main walkway where i started
Much like when you’re installing wallpaper, it’s important to start the pattern in the most visible space in the room. I chose the main walkway between the island and hutch-style cabinet. To get a center line, I measured between the two cupboards at multiple points and connected those with a chalk line extending from wall to wall.

I created a cardboard template for the large squares that measured 15 inches by 15 inches (you could also use a piece of plastic or a tile for a more durable template). Because the squares would be painted diagonally, I had to figure out the diagonal measurement of the square. Did you know the diagonal of a square is larger than its sides? High school math is coming back for us. You can figure out the diagonal with a quick Google – the diagonal of a 15-inch square is 21.21 inches.
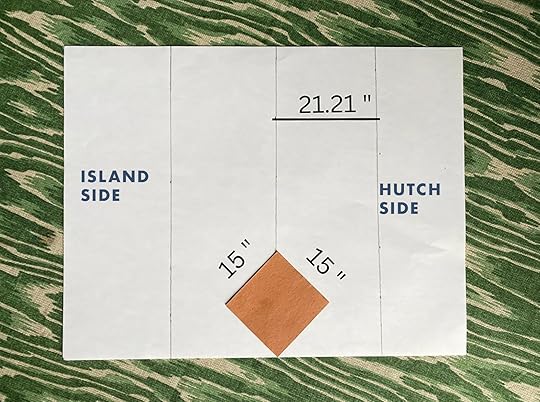
That means the lines I drew on my floor had to be 21.21 inches apart (see diagram). Once I drew those lines across the whole room, I was able to line my template up along the lines, with two corners touching the line, and draw on the main squares.
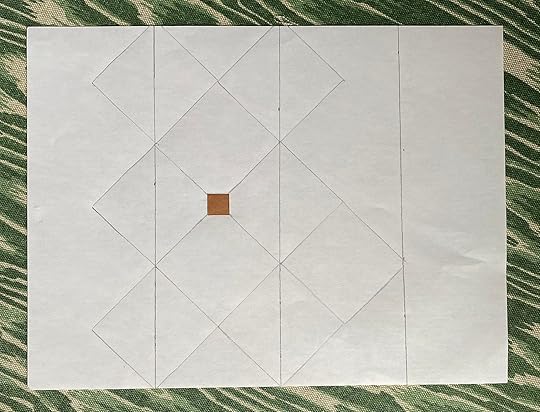
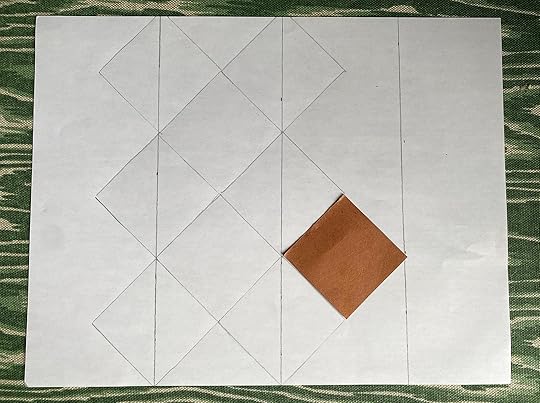
For the small squares that make the “dot” in an octagon and dot pattern, I used a 4-inch by 4-inch square and lined it up so the corners touched the lines where 4 of the larger squares meet (see diagram). I drew those on across the room.
Then came the fun part – painting.
I used porch and floor paint and a 1-inch angled brush and a small craft brush for along the baseboards.
Working in small sections so that we could still use the kitchen, I painted two coats of each color, one at a time. So each section had six painting sessions with dry times in between. Let’s just say, this was the perfect pandemic-era activity.
Once I was finished with the whole room – and countless podcasts and audiobooks – I worked in sections again to apply the top coat: Benjamin Moore Stays Clear in Low Lustre. This step was the most important. Even in the few weeks between finishing a section and adding this top coat the floors developed chips and stains. For each section, I scrubbed it clean, touched up damage with a craft brush, and then wiped on the topcoat with a microfiber pad. I would wait for it to dry overnight and then apply the second coat, barricading the section with all the chairs, empty boxes, and baby gates I had to protect it from doggy paws. With that topcoat, these floors have held up incredibly well for the past three years and are so easy to vacuum and mop. There have still been chips, but just enough to add that old house character.
The biggest surprise of the process of renovating our kitchen with virtually no budget was that I now have no plans for a Phase 2 renovation in the near future. We somehow created a beautiful, character-filled, and flexible kitchen that can serve us for years and look beautiful doing it. This past fall the kitchen was put to the ultimate test when we hosted a 70-person wedding for my brother-in-law. Caterers took the room over and served a beautiful meal in our backyard and they loved the function and flow we had created in the room – the best compliment!
EHD again! Clearly, after seeing Jessica’s kitchen, this is a very special book that you all should grab! Here’s the link to get it now. xx
*Design by Jessica Rhodes
**After Photos by Elizabeth Haynes
The post Wait Until You See the Floors in This 1700s Kitchen Budget DIY Makeover (It’s In a Mansion!) appeared first on Emily Henderson.
June 11, 2023
The Link Up: Em’s $28 Striped Shirt Dress, Caitlin’s #1 Summer Must Have, And The Craziest Vintage-Related Craigslist Story
It happened!!! The Real Simple team came to the farmhouse, got a ton of beautiful shots, and now it’s all done. We couldn’t be more excited about it! Ok, Emily might be the most excited/relieved but we are really pumped too:) That means we can really start publishing the reveals of whatever rooms aren’t being held for the September issue. See? EXCITING!!! So as we wait for August to roll around (when the magazine comes out) let’s link…
might be one of our favorites…which makes sense since it belongs to the owner of one of our favorite fashion brands, Sezane. This vintage-filled, mint green French paradise is about to make your Sunday a whole lot better. !


From Emily: I found this super cute striped shirt dress at Target last week for the Real Simple shoot. The thicker stripes make it look expensive and there’s a cute shoulder detail. When I want to give myself a little more shape, my new thing is to just tie a sweatshirt around my waist. Also, it’s not thin like poplin, it holds its shape well. But the shape is definitely oversized so don’t size up! Such a good spring/summer dress!
From Ryann: I needed some new throw pillows for my sofa and was delighted when I spotted this one in Target a few days ago. I love the olive green color and subtle stripe pattern. They have it in other colors too and it’s such a solid, affordable pillow that’s timeless and looks more expensive than it is.
From Caitlin: I’ve finally found it: the little white dress that’s PERFECT for all summer outings. It’s that dreamy mix of summer silhouette-meets-structured execution – it really highlights your waist but the skirt construction is SO flattering. (It’s actually the shorter version of the blue and white dress that Em wore in this post, so you can get an idea of the shape – just imagine that one shorter!) I put a lot of time and energy into finding my go-to white dress every summer and am SUPER jazzed about this one – it’s perfect for picnics, beach days, grocery shopping, antiquing, walking around the neighborhood…you name it:) (PS. It also comes in black and coral if white isn’t your go-to color!)
Also From Caitlin: As a side note, I literally would not be able to wear any dresses/skirts/shorts in the summer without my trusty anti-chafe stick. I am not joking when I say that this thing is transformative: it’s made being outside and walking around SO much more comfortable and manageable. One stick lasts me all year and it’s literally been life-changing – it’s so much easier to say “yes” to things when your thighs don’t feel like they’re sporting a pair of open wounds! (That’s not just me being hyperbolic, either – you can read the same sentiment in every review on their site! Best $14 I’ve ever spent).
From Jess: My dear friend is having a Baby Sprinkle next month so I want to get on top of my gift before I procrastinate and it’s way too late. While she isn’t really asking for gifts, diapers and onesies never hurt (and they said were ok to bring). Looking for baby clothes might be one of my favorite things to do. Look at this sweet little summertime set! But for a newborn, onesies are great to get because you know babies go through those things fast (one burp and it’s game over). I really love this set of three but I think my friend likes a bit more color, so this set is a very cute option too. I am tempted to buy this one because Emily (and all of you) have raved about the quality of this brand! Plus it’s super cute and on sale. Any thoughts or suggestions??
Also From Jess: I like movies as much as the next person but when I saw the trailer (which is above) for Past Lives (an A24 film:)) I was counting down the days until I could finally see it (which I did last Sunday). Here’s the official description but do yourself a favor and watch the trailer above because it’ll be at the top of your must-see movie list: “Nora and Hae Sung, two deeply connected childhood friends, are wrest apart after Nora’s family emigrates from South Korea. Two decades later, they are reunited in New York for one fateful week as they confront notions of destiny, love, and the choices that make a life, in this heartrending modern romance.” From what I’ve read it’s now in select theatres but will be available nationwide by June 23. If you’re in the UK it says you have to wait until Sept. 8th. It’s such a beautiful film and I hope y’all love it too.
From Mallory: Imagine buying a chair for $50 and selling it for $85k. WELL, THAT’S EXACTLY WHAT HAPPENED TO JUSTIN, YOU GUYS. The story is so wild, if you haven’t been following along, it’s time. His Instagram is here and his TikTok is here (he’s so entertaining and so fun!!!) Be prepared for this to be one of your favorite follows. xx
Also From Mallory: I’m on a quest to have better pajamas (the janky t-shirts aren’t cutting it anymore), but I’m also a very hot sleeper (so no flannel button-downs for me). My main struggle was finding something that was sexy without being full-blown lingerie, but also comfortable. I found this set for $25 (originally $60) and it’s so comfortable but also sexy which I love. Highly recommend if you’re in the market for some steamy but comfy PJs 🙂
From Arlyn: They said it couldn’t be done (no one said it) but I found the perfect summer robe. Lightweight, cooling, and soft on the skin, mid-length so you still feel covered in all the right places but aren’t sweating by 8 am, and it’s nearly half off. I’ll accept my award in the form of comments of gratitude. But for real, I LOVE the WonderKnit Mid-Length Robe from ThirdLove and glad I took the chance on a print I wouldn’t normally buy. The colors are very cute in person and it’s a pleasure to wrap around myself in the morning and after a hot shower at night. I opted for the XL because I wanted to make sure it had enough fabric to fully close around my goods, and sadly the larger sizes are sold out, but if you’re looking for a tiny nugget of self-care in the form of a lightweight robe, this is it.
Hope that you have a wonderful rest of your weekend and see you tomorrow. xx
Opening Image Credits: Design by Jess Bunge | Styled by Emily Bowser | Photos by Sara Ligorria-Tramp | From: Jess’ Communal Patio Reveal – Beautiful Outdoor Furniture, Some Great Flea Finds, And Of Course… A DIY D ad Project
The post The Link Up: Em’s $28 Striped Shirt Dress, Caitlin’s #1 Summer Must Have, And The Craziest Vintage-Related Craigslist Story appeared first on Emily Henderson.
June 10, 2023
We Had Portraits Drawn Of Our Pups By A Professional Artist – You Have To See Them!!

Well, I think this means we are officially “dog people”. You would be too, if you met our dogs (says every dog parent ever). I don’t know HOW we lucked out with these two (rescued during lockdown, last two in a litter of seven that was dropped off, full story here), but we are all obsessed (thank god, I was honestly nervous). We are doing a family photo/art wall up the stairs with different self-portraits of the kids (including their DIY silhouettes also done during lockdown) and so yes, I wanted the dogs to be properly represented. I went on IG to find some dog portrait artists (truly one of the best things about social media – finding talented people) and had “liked” a ton of portraits from one artist’s IG posts. So when said artist, Natalie Cooperman, reached out and offered to capture my pups likeness for some original portraits we all (including the kids) screamed, YES YES YES, enthusiastically. Here’s how it went down…
While I love the idea of our pups sitting still for an oil portrait session (like Kate Winslet in Titanic for Leo’s character), this wasn’t exactly Natalie’s process. It’s much easier. You have to take good photos of your pups’ faces, ideally with an expression that looks like them (either up close or in a high enough resolution that she can zoom in close).
Here’s a video of all of us Hendersons seeing the portraits for the first time (just wait for the ad to play & as always THANK YOU):
Buttercup – The Sweet, Sensitive Cuddlebucket


A lot of people can’t tell them apart initially but they are so different (the easy way is Butter has white ears, Oscar has gray). Butter is gentle and sweet – she licks my leg politely when she would love a walk (I don’t like this, but her method is far sweeter than Oscars, see below). She apologizes for anything by rolling over and hiding her face with her paws – it’s like out of a movie cute. She gets jealous of Oscar’s attention so the best way to get her to come inside when we call or to do anything we want her to do is to praise Oscar first with a good boy, then she runs right in. She, they both, are extremely cuddly and sweet, greet us happily, and follow me around all day long in the house. Look at their little black noses!!!! She’s quiet and sweet (until she meets a dog on the street that she deems threatening and then she goes nuts – LITTER SYNDROME IS REAL). But mostly, she seems like a human in a dog’s body, wants to make eye contact while she kisses us (weird but so sweet, IYKYK), and greets the kids with so much happiness I could cry.

So we sent Natalie those three photos and she chose the middle one – with her ears cocked a bit and head to the side.
Oscar – The Grumpy And Assertive Brother


Now Oscar is more of a punk – a hilarious, assertive punk. He sighs big huffs when he doesn’t get what he wants (can this be a gene inherited from his human dad?) and he tells you exactly what he wants and insists on it in that moment. He looks you straight dead in the eye as he barks for a walk. He wants cold water filled to the top of the bowl. He goes “grocery shopping” up to the kids’ bedrooms and steals stuffies. He has a stuffie baby bird that he’s been OBSESSED with for four months now (it’s disgusting) and he takes such good care of it (while slowly chewing its eyeballs off – not the best caretaker I guess). He huffs and puffs around in the early morning when he wants a walk and then if I don’t move fast enough, he barks so loud – KNOWING that the kids will hear and I’ll rush to take them on their walk. Now, does that sound annoying if you aren’t a dog lover? YES. But it’s because we have an established morning routine (I wake up, get dressed in dog walking clothes, down 1/2 cup of coffee, fill up my to-go cup with the second cup, find a fanny pack with poop bags and headphones). He’s fine up to the “fanny pack” point, but if I linger or dilly dally after that, he tells me, loudly – and the whole house hears. It’s a highly effective method to get what you want, (is there a mom version of this that I can steal?), so we are normally out of the house by 6:15 so we can be back by 7:15 to help get the kids out of the door. That’s all to say that Oscar is my funny, grumpy, goofy, and happy boy.
Natalie chose the middle photo because she liked his smile and tongue out (as you can barely see in the photo he is caring for his baby bird stuffie).

Natalie was able to turn this around in a couple of weeks and we got the original drawings in the mail… I LOVE this shot of Oscar looking at his portrait. Here’s a side-by-side so you can see what an incredible job Natalie Did:

 left: buttercup | right: oscar
Oscar sitting on Brian’s lap is painfully cute. He looks genuinely delighted about the portrait!!

Natalie drew them both with what seems to be colored pencils in a variety of soft shades (even some pinks and purples). We just love them SO MUCH (the portraits and the dogs).

The portraits came on paper with a little note. I can’t thank you enough, Natalie. I advise you to get on this early for holiday presents (no, I’m not pushing gift guides yet – we have, you know, 3 months til we have to get on that haha). I just know that she is going to get slammed. I love how serious they are – I’m sure I’d also love more animated cartoon-like portraits of them, but these are going to be so awesome inside two vintage matching antique frames (with oval openings?). I’ll hang them together, like the royalty that they are.

Y’all should go follow Natalie Cooperman on IG and if you like her work give her some love. It makes me so happy that part of my job can be doing posts like this, and expose all of you who are interested to artists who are bringing a lot of joy to family like ours. Pet portraits FTW! xx
*Reveal Photos by Kaitlin Green
The post We Had Portraits Drawn Of Our Pups By A Professional Artist – You Have To See Them!! appeared first on Emily Henderson.
June 9, 2023
The 13 Best Mosquito Repellents (Including Kid-Friendly Stickers, All-Natural Sprays, And Beautiful Bistro Lights)

OMG. Someone, please invite me to join your bar trivia team. I KNOW SO MUCH ABOUT MOSQUITOS NOW. I know that bar trivia topics are usually centered around things like “culture” or “history” or “things that people could reasonably be expected to know about,” but MAN. This mosquito intel is GOLDEN. Did you know they’re attracted to the CO2 and heat you give off? Or that they’re more attracted to people drinking beer? Or that only female mosquitoes bite? Or that they’re super sensitive to garlic, to the point where one researcher couldn’t get mosquitoes to bite him because he’d been eating so much Italian food? (That’s a real thing that happened in a Duke biology lab.)
On that topic: you know what else mosquitoes don’t like? EVERYTHING ON THIS LIST. Last month, we put out an ask to the EHD audience – can anyone recommend mosquito control gear that’s actually effective? – and boy, did you deliver! Today I’m highlighting just a few of our favorite effective anti-mosquito picks, from bistro lights that prevent bites (who knew those existed?) to a few landscaping solutions that’ll turn your yard into a long-term no-bug-zone. And if you just want to throw $50 bucks at the problem and have it fixed immediately…well, we’ve got a recommendation for that, too. 🙂
Our Top Pick
When you post a question on Instagram and get 16 immediate and simultaneous answers that say “Thermacell,” it’s a pretty great indication that you’ve landed on a great product. This rechargeable Thermacell E-90 protects about 300 square feet in still conditions (check out some more heavy-duty options here!) and boasts a battery life of 9 hours. You will need to stock up on refills – a 120-hour pack will run about $50 more bucks – but it’s worth it for protection that actually, you know, protects.
Aesthetically-Appealing Options
It’s a Thermacell…in the sky. (Full disclosure: this was actually my favorite option.) If you’re going to light your exterior, why not opt for lights that will also make you more comfortable? (And get this: you can turn off repellency when you don’t need it, so they’re totally functional year-round.) The refills are very affordable, too – just $12.99 will grab you 64oz worth, which is enough to refill a little more than a strand and a half of lights. If you’re a frequent entertainer (or if you just like sitting outside and enjoying some beautiful ambient light), this is absolutely the best mosquito repellant option for you!
50 Piece Citronella Tea Candles
I love these tea lights in particular – they’re super fairly priced (cheaper than Amazon!), cream-colored (not bright yellow!) and they have a perfect 4-hour burn time. I have found that these protect a pretty tiny radius – about 3 feet – but they also look so beautiful scattered around the hardscaping of a patio or yard! It’s a great way to create a mosquito barrier that won’t break the budget.

Remember that tidbit about CO2 and heat? Fans keep the air circulating, which means less mosquito interest. There’s no need to splurge here – a box fan works just as well! – but if you’re ready to upgrade your outdoor oasis, our team is especially partial to the fans at Rejuvenation. (But whatever you do, make sure you’re only looking at options that are damp-rated and approved for covered outdoor usage!)
Budget-Friendly Fixes

Murphy’s Mosquito Repellant Incense | Madison James Flyaway Sticks
I gotta admit: these incense sticks are surprisingly effective. The Murphy’s smells of citronella, cedar, lemongrass, rosemary, and peppermint; the Madison James is a mix of geranium, Texas cedar, clove, and some secret family ingredients. Both brands have a burn time of around 2.5 hours and both cost about a dollar per stick, too. If you have a small outdoor space (like a balcony!), just one of these will keep you comfortable all night.

Mosquito dunks are dissolving tablets to be used in any standing water. They contain a natural bacteria, found in soil, that’s fatal for mosquitos but nontoxic to other wildlife. Each tablet works for about 30 days and can treat about 100 square feet of water, so they’re a great budget buy that you can grab for under $10! (Pro tip: break your dunk into smaller pieces for treating birdbaths, troughs, and tiny ponds!)
Sprays And Stickers
Parents, rejoice!!! You no longer need to chase your kid around the house in an attempt to get them to wear bug spray! These non-woven fabric stickers are coated with all-natural oils that repel mosquitos – AND THEY ACTUALLY WORK, for up to 72 hours (though they’re markedly more effective in the first 8 hours). Simply throw a few patches on – 4 is the recommended number for kids 6 and up…including parents 🙂 – and you’ll be good to go. I was genuinely BLOWN AWAY by these.


Kinfield Golden Hour Spray | Kinfield Golden Hour Wipes
Clean ingredients that smell like a nostalgic summer memory? SIGN ME UP. Kinfield was a new-to-me brand (thank you to those who recommended them!) and I’m so excited to pass them on – this DEET-free spray uses Indian Citronella, lemongrass, clove, and a liiiiitle bit of vanilla to keep the bugs at bay. And if the spray’s scent is too strong for your tastes, give their mosquito repellant wipes a try! (Similar ingredients, lighter scent. Perfect for stashing in the car, too!)

If the all-natural products aren’t cutting it and you’re in need of something with a bit more bite (pun intended?), this Sawyer repellant is the best picaridin (like DEET, but nontoxic) option on the market. It protects for up to 12 hours against mosquitoes and ticks and up to 8 hours against other annoying critters, like flies and gnats. The only caveat is that it can leave your skin feeling a little greasy, but it’s a small price to pay for being bite-free!
Environmental Solutions
 photos by sara ligorria-tamp | from: our backyard makeover – the final reveal
As it turns out, we can use nature in our favor! If a summer filled with gardening sounds like fun to you, be sure to plant a bit of catnip, citronella, beautyberry, lemon balm, lavender, or marigolds around any of your favorite outdoor lounge spots. They’re beautiful (win) and mosquitos HATE the way each of these plants smell (double win!). A local gardening center can help advise. (And for the record: some of these aren’t safe for pets, so do your research if you have any furry friends who like to chow down on greenery!)

Never in my wildest dreams would I have EVER anticipated seeing so many testimonials from folks who say their bat houses totally annihilated their mosquito population. And since I wasn’t going to test it out in my apartment, I guess I’ll take them for their word? I did look into it, though, and bats can eat up to 7,000 bugs per night (again, ready to join your bar trivia team anytime), so they’re an extraordinary form of natural pest control if you have the space!
After The Bite
So you heeded none of my advice and got bit. WHAT NOW? Enter: these anti-itch patches, designed to soothe inflammation and stop the scratching. (Like a zit patch, but for your body.) Buyer be warned, these are INCREDIBLY sticky (in a good way, so they’re not coming off in the shower or pool; nor will you rip them off in a moment of itch-induced mania), so they’re best used for those super big, frustrating, monster bites.

It may take a few attempts to reach full efficacy (take it from experience!) but this thing ABSOLUTELY beats using your nails to make little X marks on all your annoying bites. (Why do we literally all do that?) Bug Bite Thing does take a little workshopping – maybe you need to hold it longer, or use it on the same bite more than once – but it’s also a cheap, awesome way to get insect residue from underneath your skin. (And it isn’t just for mosquitoes – it works on bites/stings from bees, wasps, ants, and more!)

Heat It – Smartphone Powered Bite Healer
This is – no joke – the most “holy crap, we’re living in the future” product on this list. Connect the Heat It to your iPhone (Android version here!), customize your heat level and duration, and slowly warm your itch away! The best part: it’s a one-time purchase and it doesn’t require any additional batteries, so you’ll be able to treat any future bites and discomfort with ease.
That brings us to the end of our EHD-approved mosquito control gear roundup…but I’m also only one gal, so I’m sure there are some great products and methods out there that I missed! Anyone wanna share their experience or recommendations with the class? We’re all ears. Have a great (and mosquito-free) weekend 🙂 xx
Opening Image Credits: Photo by Sara Ligorria-Tramp | From: Our Backyard Evolution – The Changes I Didn’t Tell You About And How The Trees Are Doing After The 2017 Massacre
The post The 13 Best Mosquito Repellents (Including Kid-Friendly Stickers, All-Natural Sprays, And Beautiful Bistro Lights) appeared first on Emily Henderson.
June 8, 2023
The 4 New Farmhouse Living Room Layouts I Tried (+ The One I Liked The Most!)

I’ve said this before and I’ll say it again – “comfortable” living rooms are the hardest rooms to nail. Give me a bedroom any day (symmetrical design with a singular purpose) or a formal “meant to be pretty” living room – that’s fine! But a comfortable, practical, usable, and yet beautiful everyday living room is a challenge. Then add in five doorways, two focal points, and needing it to be a pass-through space, and you have yourself a recipe for marriage counseling because you will be arranging re-arranging for years to come (Brian got to flex his guns and good attitude on today’s video:)). Of course, some houses are easier – you walk into an entry, and on your left or right is a contained room, with 2-3 uninterrupted walls so you can throw a sofa + two chairs and call it done, knowing you have a separate family room. But not this lovely lady – she is HARD. So let’s recap my needs/wants (which are all pretty intuitive, but here they are for the readers in the back):
Comfortable where almost every chair is desired. Not overly eclectic – on the simpler side (ha). I love eclectic design in photos, but for our real life which is really busy here, I want my eye to be able to settle easily in the room and not be overstimulated. The good news is that we don’t need to watch TV or necessarily need storage in here either. We are lucky that it’s big – but long is always a challenge and big living rooms are harder to design. When We Moved In
 photos by kaitlin green
We had that awesome Rejuvenation leather sofa and two swivel chairs (which weren’t the right scale tbh) and the Article sectional + pouf (no longer available). Throw in some random throws, an IKEA lamp, a table, and an awesome rug from Loloi and it was a good placeholder for a while as we figured out how we wanted to live in here. I liked some things about it, but y’all I could NOT find the long sofa of my dreams – as you now know from my earlier post. So far, there are 110+ sofas (not sectionals) out there that I liked enough to commit to. I searched on every vintage platform for two years, then as the shoot was approaching three months out I was like, “You need to commit” so I went to the big box options but then nothing could get here in time! I almost purchased like six vintage sectionals that would have shipped from across the country or world (so expensive), and then I would have to choose the fabric (unknown, and so expensive), then reupholstering (all around $5k), and most importantly the not knowing if they would actually be comfortable – all the unknowns made me feel super averse to risking it. I even thought about custom-making one. You’ll see what decision I made, below, but that’s all to say that there was and will never be one clear layout for this room which made purchasing the sofa very challenging.
A More Eclectic Version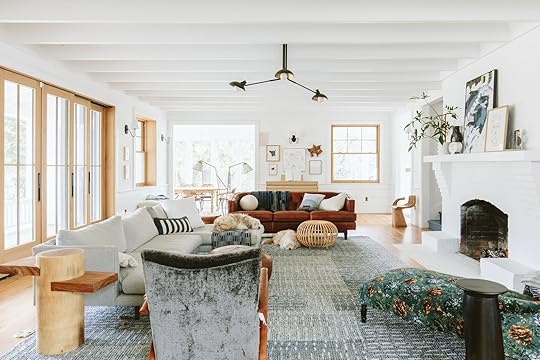
 photos by kaitlin green
Here we tried two more eclectic chairs which I liked in a way, but ultimately I really liked how we had it over Christmas where there was a sofa facing AWAY from the kitchen. It made your eye go straight over the back of the sofa and stare at the beautiful kitchen tile which is so stunning. Not sure that makes sense (and sorry there isn’t a proper photo) but imagine a sofa where the chaise and the vintage chair are above. It strangely made the room feel more separate in a really good way (which I hadn’t predicted). So we tried the leather sofa there, but because the dark brown island is right behind it visually, it didn’t work.
So I enlisted a strong hot man (Brian) and a videographer (Michael) to shoot a video where we in real time figure out our layout. We had a lot of players involved (meaning furniture pieces) because I’m a collector of beautiful things (and I have another house to furnish eventually on the property so I feel ok about buying, playing, and moving to another space should it not work).
The Players
1. Green Lulu and Georgia Sofa | 2. Soho Home Accent Chair | 3. Vintage Papa Bear Chair (similar) | 4. Rejuvenation Leather Sofa | 5. Our Custom Coffee Table | 6. Two Rejuvenation Swivel Chairs | 7. Brian’s Favorite Vintage Chair | 8. Vintage Chaise From Jayson Home

The rug is Amber Interiors for Loloi, the green dining chairs are Crate and Barrel, and don’t forget the cutest piano benches ever from Schoolhouse. All the lighting is, of course, Rejuvenation (chandelier, sunroom pendants, double sconce, and single sconce) and the window treatments are Decorview.

Ok, so we started with a blank slate (almost) and removed all options (out on the deck). Our video producer, Michael snapped photos as we went (we didn’t have time to set up a tripod of each version) so you get an idea, but you really should just watch this video:
To see the full (more detailed) video head to my YouTube!
Layout #1: Two Matching Sofa + Two Matching Accent Chairs

Two Green Lulu and Georgia Sofas | Two Rejuvenation Swivel Chairs
If I’m being honest, I really like this simplicity. In the video, you’ll get Brian’s reaction and I don’t disagree with him, but this sure is calm and cohesive. And styling can go FAR. But yes, this is super safe and looks too matchy (almost like it was staged). Ah, but look at that coffee table🙂

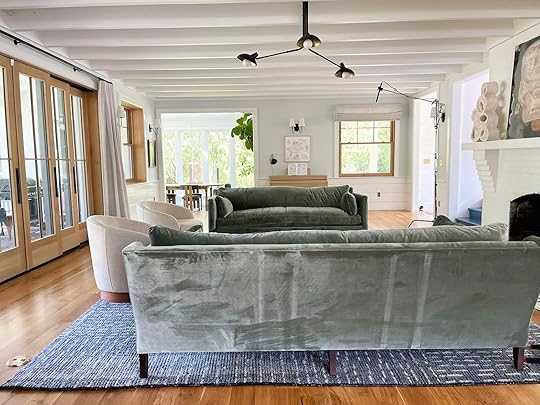 Layout #2: Two Matching (Perpendicular) + Two Matching Accent Chairs
Two Green Lulu and Georgia Sofas | Vintage Papa Bear Chair (similar) | Brian’s Favorite Vintage Chair
Hmmm. The perpendicular sofas could work, but not these sofas. Their arms were high so it really cut off the conversation. The chairs were ok, but not awesome.

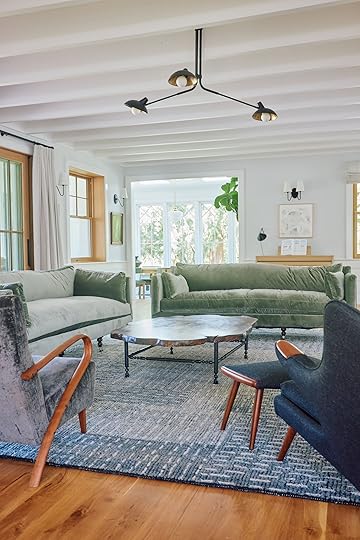
 Layout #3: Two Non-Matching Sofa + Two Non-Matching Accent Chairs
Green Lulu and Georgia Sofa | Rejuvenation Leather Sofa | Brian’s Favorite Vintage Chair | Soho Home Accent Chair
I had high, high hopes for this one, but it wasn’t a love connection. I love the Soho Home chair with the leather sofa so much. I don’t know, it just felt a little messy?

 Layout #4: Two Matching Sofas + 1 Big Chair + 1 Accent Chair?
Two Green Lulu and Georgia Sofas | Soho Home Accent Chair | Brian’s Favorite Vintage Chair
So we tried this again and I really really really like the two sofas facing each other. The rest of the decor is not dialed in obviously (and I’m unsure if the sofas on the rug are ideal, which is not ideal). But it was just so cozy, inviting, comfortable, and had that simplicity that I desired. Again, you have to watch the video to fully get it – we focused on video content for this project so the photos don’t really represent the space.


I know I’m leaving you hanging (me, too). In the video, you’ll see what we decided (for now!) and I’ll have an update soon for you on how it turned out. Still a huge WIP and while I love the sofas + coffee table combo, now I’m unsure of other things in the room. We shot this room for Real Simple last Tuesday (June 5th) and I’m writing this post on Saturday (June 2nd) so by the time you read this so much will have been decided, including art, accessories, window treatments, etc. I can’t show you everything as I promised to keep some things secret til the magazine issue comes out, so STAY TUNED!!!
Resources:
Lighting and Outlets: Rejuvenation
Wood Flooring: Oregon White Oak by Zena Flooring
Windows and Doors: White oak, Aspen Casement by Sierra Pacific Windows
Window Treatments:
Decorview
Skylights: Velux
Wall Color: Mantra by Sherwin-Williams
Paneling Color: Extra White by Sherwin-Williams
*Video by Michael Raines
The post The 4 New Farmhouse Living Room Layouts I Tried (+ The One I Liked The Most!) appeared first on Emily Henderson.
June 7, 2023
An Ex-Marketing Director Spills The Secrets To Scoring The Best Deal On Furniture

I’ve always been the type of person who proudly announces when she got a deal. “This shirt? Girl, I bought it for $2.99, down from $200!” So anytime I was able to share my inside knowledge of the retail industry with people I cared about to help them buy smart, I’d take the chance.
And guess what? I care about YOU ALL! After I left the EHD world, I spent three years as a brand marketing director for an online-only furniture company. It was a fun challenge for my brain to switch from editorial to marketing, and for a while, I thought it was my perfect job, though ultimately, I missed my writer roots (and opted to spend more time with my young daughter). However, I did learn A LOT, and I called some of the hardest-working people my peers. Oh, and of course the employee discount was pretty sweet.
So now, I get to pass on all the juicy details I acquired along the way that hopefully no one will sue me over for sharing. So that you can make the best, most informed buying decisions on your furniture-buying journey.
Note: All these “secrets” won’t apply to every single brand. Many direct-to-consumer stores play by different rules or produce their own pieces, which makes pricing, discounts, and all that jazz very different. But most big box stores or even medium-sized ones (IRL and online) have very similar practices to stay competitive. When one starts doing it, they all eventually start doing it. Oh, and this is very much for all you American readers, not anyone abroad.
Before getting started, however, I did want to add a very important note about how stores price their goods. A “cheaper” price tag comes at a cost, not to you but often to the company’s employees. My previous employer didn’t have the lowest prices around, I’ll say that, but I was paid well, I had fairly good health insurance and dental and vision and life and short- and long-term disability. I had paid vacation and a good amount of sick days. They paid American craftsmen to make our sofas, rather than pennies on the dollar abroad. All of this is factored in when deciding on margins. How human are the humans being treated who are answering your emails and shipping your products? It can be very easy to forget when we want the biggest bang for our buck and the fastest delivery possible. I use and abuse places like Amazon far more than I’d like to admit, but even typing this out for myself is a good reminder to shop well and shop responsibly if you can (because yes, it’s a privilege to even consider any of this when shopping. I get that).
 design by julie rose | photo by sara ligorria-tramp | from: one of emily’s best friends gets the cozy yet sophisticated bedroom makeover she really deservesInsider Secret #1: Sales, especially major holiday sales, don’t end when they say they’re ending.
 Ah, the ever-popular “false ending.” Here’s how it works: The website mentions an end date of say, June 1. They push that there are only a few more days…then hours…then minutes to save. You feel rushed. AGH! Gotta buy now to lock in that price. Maybe you make a decision you weren’t quite ready to make. Or maybe you turned to a credit card because you wouldn’t have the liquid assets for another few days. Guess what? I promise you, that BIG sale during a major holiday specifically, is probably going to still be live tomorrow for a few more days or up to a week or so.
Here’s a list of the major “furniture” holidays, so you know when most likely the sales will be extended and also have the best discount:
February: President’s DayMay: Memorial DayJuly: 4th of JulySeptember: Labor DayNovember: Black Friday/Cyber MondayAlso, keep an eye out for things like anniversary or “friends & family” sales. Those are also usually landmark promotional periods to get extended.
Oh, and if you guessed wrong, and the sale did in fact end (or you thought there might be an extension on the extensions—this isn’t happening, sorry—you can always reach out to customer service and see if they’ll honor the sales pricing from the day before. Some will, some won’t, but it’s worth an ask.
Insider Secret #2: If you don’t see something you want…ask for it.Let’s say you’re window shopping at a retailer you know has a made-to-order program. You’re not seeing the exact size you need, or maybe you don’t like the button tufting, or perhaps you’d prefer a bench cushion rather than three separate cushions…ask for it. Chances are, they can make it for you the way you want or need it to be for the same price or a small upcharge.
It’s what I like to call the “secret menu.” We didn’t like to do it at my last company, but someone could even provide their own fabric or ask to see “off-menu” textile choices or colors, and it could be done. Don’t be afraid to reach out and get to know that customer service team. They are your best friend for getting to the finish line the way you were envisioning.
 design by ryann trombetti | photo by sara ligorria-tramp | from: ryann’s moto reveal: a moody multi-functional living and dining room with a lot of soulInsider Secret #3: Watch and learn…their sales cycle.
Unless we’re talking about the Nordstrom Anniversary Sale or anything during Black Friday (non-affectionately referred to as BFCM in the biz), sales feel like a big SURPRISE as a consumer. But, trust me, they are not. Sales calendars are mapped out months (or more) in advance. My advice, if you have a little time to watch and wait, is to do just that: watch the sales over the course of at least three months, and take note of their highest discount tier (for furniture, it’s normally between 25% off and 35% off, btw) and then wait for that to come back around again.
Insider Secret #4: Free shipping isn’t actually free.Some people know this, and some people look past it, but here’s an absolute truth: that “free shipping” the company you’re eyeing is touting; you’re already paying for it. It’s all rolled in. While it certainly makes it convenient, it’s super important to take the tally on final pricing across all the brands you’re considering shopping from. While one store might charge a flat rate of $199 as a shipping fee, others might charge by the piece, or not at all. See what it all adds up to and then make your decision, because sometimes the place without the free shipping will actually come in lower.
And lowest? Well, that’s your mom-and-pop store, because they likely aren’t passing along shipping costs to you. They may be passing along other overhead, but if you do a bit of sleuthing to find out what factories are making the items you’re interested in purchasing, you may just be able to find the same piece locally. Because that’s right: That proprietary design you’ve coveted is likely not proprietary at all and one factory is supplying the same or very similar frames to multiple retailers, just under a different name.
 design by julie rose | photo by sara ligorria-tramp | from: a mid-century eclectic living room with kilz primer and paint – the dark room problem solvedInsider Secret #5: Google image search is your friend.
My dear, dear friends. If you are not using reverse Google image searching to make sure another store isn’t selling the same furniture or decor item (or really, anything in any category of retail), you need to start. Retailers “whitelist” the name of the products they sell—meaning, the vendor will provide a name such as the Arlyn Sideboard, but the consumer-facing brand you buy it from will change its name to the Evelyn Credenza so it feels unique to them. It’s not enough to search “Evelyn Credenza” to see if you can find it elsewhere; you need to use the plain product image on white.
Not everything is vendor-supplied and sold by multiple storefronts, but a lot is. In these cases, you’ll find that prices are all over the place. Some may be offering free shipping while others are not. Some might have higher price points to offset a discount. Others may just have to charge more for certain items to hit the margins their corporate headquarters require of them. And some sites are just weird money holes. If it looks shady, it is likely shady.
When we all used to just go into stores, we “shopped around” and that shouldn’t stop just because most of us are scrolling and clicking from our phones and laptops before adding to cart. Sometimes, the difference is hundreds of dollars.
Insider Secret #6: Don’t be tricked by higher discount tiers.This is very similar to my final advice where I discussed shipping: consider and compare the FINAL pricing across a few stores if you’re not totally settled yet on a specific piece. I won’t name names, but numerous companies have recently raised their prices by a certain percentage only to raise their minimum (or maximum) discount tiers to sound more alluring or be more competitive. By no means a new practice in retail, in fact, it’s pretty common. If you’re heading to the virtual checkout counter in the cloud during a promotional period, it’s fine…the total will be pretty similar regardless, but be mindful of this. If a brand you follow was always consistently at a 20% off discount, and suddenly they’re offering 30% consistently, chances are, those prices ticked up 8-10% to make up for it.
It’s a game, but it does lead me to the next factoid…
 design by ajai guyot | photo by ellie lillstrom | from: see how ajai transformed her client’s builder grade guest room -get ready for a ton of cozy design ideas & working-mom real talkInsider Secret #7: When prices go up, it’s not usually the brand just being “greedy.”
 I cannot speak for every company out there in existence; only the few I was made privy to inside operations. Surely there are “greedy” brands out there, but here’s the truth: so much goes into the cost of an item like a sofa. The factory crafting and supplying the product has to consider the cost of foam, the cost of dacron wrapping (for cushions), wood, fabric, transit, workmanship. A small uptick in each of those things can equal massive profit drops when pricing stays the same.
And during the pandemic and then inflation, it was B.R.U.T.A.L. The cost of gas went up which meant shipping rates shot through the roof. Demand was at an all-time high for wood in the building industry, so the suppliers could just charge more for it. We’re seeing this everywhere, from eggs to your sectional to (what feels like) the air we breathe.
 design by velinda hellen | photo by sara ligorria-tramp | from: sara’s living room & dining room reveal
So there you have it. Nothing here is super hush-hush or unknown. It’s just a matter of keeping your eyes open and, most importantly, taking your time. Give yourself the runway to study up and make an informed choice if you’re buying new (there are a whole set of other rules and things to know if you’re buying second-hand).
Please let me know if you have any questions or want me to clarify anything. I’m happy to share or answer what I’m able to.
Shop smart, friends. Until next time… <3
Opening Image Credits: Photo by Sara Ligorria-Tramp | From: A Modern and Organic Living Room Makeover
The post An Ex-Marketing Director Spills The Secrets To Scoring The Best Deal On Furniture appeared first on Emily Henderson.
Emily Henderson's Blog

- Emily Henderson's profile
- 10 followers

