
Emily Henderson's Blog, page 84
July 14, 2023
Our Living Room Art Show And Tell + Framing My Favorite Vintage And Contemporary Pieces By Local Artists
Y’all with the living room reveal on Monday I wanted to do a show and tell on some of my favorite art pieces that I bought, collected, or reframed for this room. Art is the single most difficult thing for people to commit to – we think because art is supposed to say something about you and your style since it’s the one thing in the house that is fully decorative (meaning has zero practical function). This makes it HIGHLY personal, which can make people understandably feel paralyzed especially since great art can be so expensive. Up until five years ago (when we did ) I bought almost exclusively vintage art because contemporary art by current artists is just hard to find at affordable prices (understandably). But as you can imagine, when I started to incorporate newer pieces along with my vintage collection my walls, nay the whole room, just came alive for me. I don’t think that most people would walk in and say, “Your art collection is epic” but to me, it really does represent my style because I know art that feels like “me” almost immediately. And yet for me, I’m all over the place – I love all mediums, all styles – I have a massive vintage portrait and seascape collection, as well as weird old drawings, huge abstracts, etc. I think it’s one of the areas where I feel the most brave and confident. I can almost guarantee to myself that if I love a piece I’ll find a place for it.
When we did the first Portland Project we did a call out for artists to borrow for the staging of the house in exchange for photos, press, and potential sales. I think it was highly successful for everyone, but the big winner was me for realizing the power of great contemporary art by local artists. These are pieces that feel like they have a story and a soul, beyond just being cool to look at. This is where I discovered and fell in love with artists like MaryAnn Puls. So when we moved up here she reached out and said she was at a gallery now, which I was so happy for but feared that I wouldn’t be able to afford her work any longer. But then I pulled on my big mama blog pants and remembered that supporting local artists was one thing I felt really good about using my budget for – IF I loved the pieces of course.
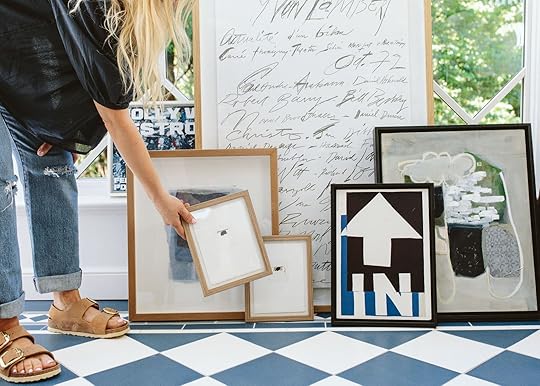
My First Gallery Purchase

So I went down to the Laura Vincent Gallery to see MaryAnn’s recent collection. Not only did I fall in love with hers but also with another artist named Marilyn Joyce. They all varied in pricing and many were framed while others weren’t yet.

MaryAnn Puls’ work is full of such incredible energy and movement, in often unexpected (yet cohesive) colors. They are mixed media – collages and painting/drawing. There was one piece that was an immediate “hell yes” (the blue one that is in our entry) while a few others I wanted to make sure I had the exact spot for before I splurged. I know I just said the opposite, that “I can almost guarantee to find a spot in my house if I love a piece,” which is true, but when these pieces were between $500 – $1,500 I needed to make sure they weren’t going to end up over the toilet in our powder room. If you are going to splurge on contemporary art make sure that your eyeballs get to see it and appreciate it ALL THE TIME.
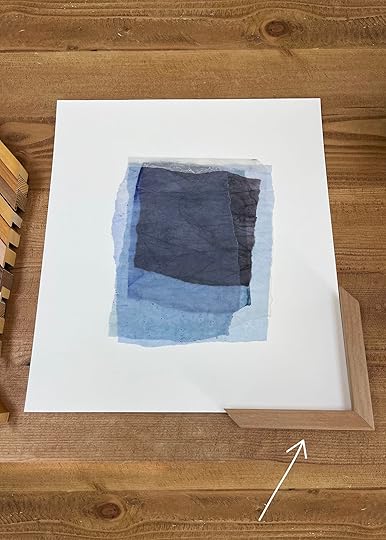
Hand Dyed Paper Collages
I was specifically looking for something simple/graphic and powerful for the entry or over the fireplace. Both walls were white and very textural. The entry had the new white wallpaper and the fireplace was painted white brick. So when I found these by Marilyn Joyce I thought they might be perfect to pop off of both white textural surfaces but still not be too busy. Ultimately, they ended up not being big enough to hold either wall, but I still bought them and had them framed (shout out to Dave!) because I loved them so much.

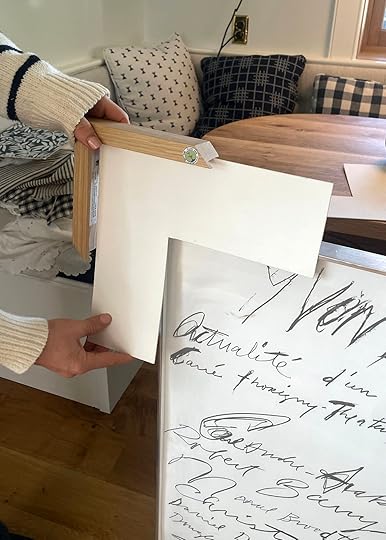
Our handyman, Dave, is an expert framer and while I don’t think he does this service for everyone, since he lives really close he actually brought all the frame and matte options to us and helped us decide on exactly how to frame them.


These MaryAnn Puls pieces are older ones that I bought years ago and actually gave them all to my team. There were a few extra that I obviously hoarded. We ended up float framing these (where you can see the edging) in a darker wood frame.

This is a Cy Twombly lithograph that I bought at the Rose Bowl, YEARS ago. Most people make fun of me for it, as it is just scribbles, but I love anything by him and won’t ever be able to afford an original so it makes me incredibly happy. After seven years of having it, I was so excited to reframe it properly since it’s just been in a basic chrome frame. We chose to float frame it with a white matte that matched the white of the paper, with a white oak frame.


I don’t love everything to have glass fronts in it (depending on where you put it with a window it can reflect so much that you can’t see it). So unless it needs the projection of the glass I sometimes skip it. I had these two art posters float framed and mounted for this reason.

I purposefully tried to not hang any art until I had most of the ones I LOVED framed and ready to go because I didn’t want to move them around endlessly and put a million holes in our new walls (so many of the pieces looked so good on all the walls). I needed to dial in the entry collection while also doing the living room walls and it’s such a domino effect. I don’t love multiple collections in one room for me, right now. I want breathing room, and where your eye dances around without too much contrast. Don’t get me wrong, there are rooms where I love floor-to-ceiling wall-to-wall gallery collection, but not right now for this house. I like art on every wall to be mixed up (some solid pieces, some diptychs, some small collections, maybe one large collection, a mirror, etc). Here’s a helpful post about it if you need some guidance:)

Come back Monday for the living room reveal, folks. 🙂
*Pretty Photos by Kaitlin Green
The post Our Living Room Art Show And Tell + Framing My Favorite Vintage And Contemporary Pieces By Local Artists appeared first on Emily Henderson.


July 13, 2023
A Living Room Deep Dive: Our Boro Fabric DIY Curtain Panels (I Finally Found Their Perfect Home)

While I don’t want to rank my favorite things in my house (they can hear me!), our vintage Boro fabric cafe curtain panels are definitely in the top five. If you’ve been following (thank you!) you know I’ve been collecting this fabric for years and years, buying directly from Japanese fabric dealers (mostly on Etsy). When I first started collecting (six years ago) there (unfortunately) wasn’t a huge conversation about appropriation versus appreciation. We were all idiots in a million ways (and still have a long way to go). But since then it’s become a much larger conversation and I’ve been both schooled and empowered by it. I feared that my favorite thing – quilted handstitched indigo plaid fabric, would be off limits to me, a white lady in Oregon. The more I dove into the difference between appreciation and appropriation I learned that it’s so much about context, acknowledgment, awareness, and historical crediting. It’s definitely nuanced. There are absolutely some things that as people not of the culture where a particular artifact is from, primarily white people, we need to be diligent about knowing its cultural significance (i.e. spiritual elements or pillaged artifacts due to colonialism). Above all, making sure these purchases are benefitting the people of the culture where a piece is from is the bare minimum. I’m not an expert or perfect but wanted to make sure this is something we continue to talk and learn about.

The Boro craft is rooted in 19th-century rural Japan where working-class people patched fabric together to make clothes as well as mend holes to stretch the life of the fabric/clothes. It’s mostly indigo, plaid, and denim and no two pieces will ever be alike. This hand-stitched technique resonates so much with me, deeply, because we are all full of holes and we don’t need to be scrapped completely, just need some mending with love. Pieces get handed down, never thrown out, just worked on and worked on for years, decades. It’s completely unduplicatable, utilitarian, and so special. Japanese design and culture are nothing short of inspiring, and even that descriptor feels short and lame.

Good art is good art and good design is good design. When we love it we should all be able to collect it (ethically) and share it with recognition of the source, awareness of the craft, and joy. I think there are a million ways to do this right and wrong, the goal is to be really thoughtful about it and try to support financially the culture that created the piece (i.e. an example would be to buy Indigenous jewelry from an Indigenous maker versus from somewhere like Free People). Again, I know that I have a million things to learn and I won’t get it right all the time either (and feel vulnerable talking about it knowing its importance) but I wanted to recognize the conversation and know that it’s always something we think about. Also, if you are a large retailer reading this please don’t try to do a version of this, it won’t work or look good – other countries’ vintage/antiques are not ours to copy.

 photos by kaitlin green | left and middle: ask the audience: which fabric should em use as a custom curtain to Cover her washer and dryer?? | right: the farmhouse powder bath update (did we stick with the blue walls??)
I knew that I wanted to showcase these fabrics in this home – but where/how and what actually makes sense? They aren’t strong enough to be upholstery (maybe a bench but not something that gets a lot of use) and as you know I kept trying to hang them as curtains somewhere – to cover the washer/dryer, under the powder sink as a vanity skirt, etc. If I had enough that worked together I had dreams of sewing them together a la Adam Pogue and making them a real art statement but for whatever reason it didn’t feel totally right to me.

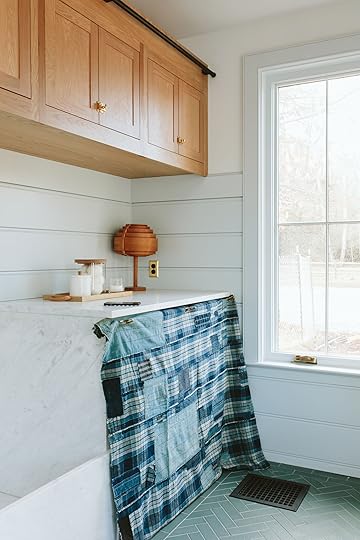
So one day I was playing around with putting cafe curtains in the deep sill of the double-hung windows in the living room. These two windows have an almost 10″ sill because the wall had to be thick to accommodate the track for the scenic doors. I hung a piece of fabric over a tension rod and I really really loved it (see above). It all of a sudden made the depth of the window make sense. Then as we were finalizing the house I was still playing with my vintage Boro – A pillow? A long lumbar for the sofa? Pillows for the dining nook, but that just felt like I was taking something so special and turning it into an everyday decorative item. So I hung up the Boro and when the light came through I was like, “OH YES, THERE SHE IS”. It just SUNG and was highlighted in the most beautiful way.
So then the issue became that we have two flanking windows, but not yardage enough of one fabric to match. So we played with having two different fabrics one on each window, and it looked pretty darn good. We had enough of each to split them in the middle and make more traditional cafe “curtains”.
But once bunched to the side you kinda lost the beauty of the quilted pattern. When we hung up one like a panel it had so much more power. So we decided to hang them, like art panels instead of cafe curtains.


We sewed (i.e. glued) tabs on top with fabric stolen from other Boro that we had more of. And we cut the size to match almost perfectly without any hemming anywhere. We had to patch a hole here or there but that’s obviously part of the beauty.
 photo by kaitlin green
I can’t tell you how much I LOVE how these turned out. LOVE. I also love that these panels don’t compete with the Decorview drapery on the scenic doors which is light neutral and more traditional (you’ll see what I mean in the reveal:)). This combination looks really purposeful and yet interesting. It’s always nice when you feel like you nailed a design element in a way that feels totally YOU.
Opening Image Credit: Photo by Kaitlin Green
The post A Living Room Deep Dive: Our Boro Fabric DIY Curtain Panels (I Finally Found Their Perfect Home) appeared first on Emily Henderson.
July 12, 2023
Our Farmhouse Living Room Design Recap + How I Really Feel About Our Custom Paneling

We are gearing up for our reveal of the living room on Monday, but the renovation and design process of the house was so overwhelming (in the typical fashion) that I captured photos/footage but often didn’t share/post as much as I should have about the design process. It’s like it happened both so slowly (over 3 years) and yet with so much happening at once I didn’t do the best job of rolling it in real time. So we are going to recap some of the spaces and deep dive/dissect some of the design elements before we reveal the rooms. Today is all about the living room (with of course a sneak peek at the end) and I have some more clarity around my conflicted feelings about our custom paneling. Settle in, folks. It’s a thing. Everything is a thing.
When we first toured the listing in 2018 this room had so much potential, clearly. You are greeted pretty immediately by this room (after the entry – did you see the reveal on Monday?) and she is big, architecturally interesting, and the problems and solutions were immediate and clear.
 What We Wanted To Change:She was DARK. Both with a lack of light and dark in tone/color. Now after living in the PNW for two years, I can say that there is a case for the dark/cozy room for sure (blog post, maybe?). But our first reaction was to lighten it up – in every way possible – ceiling color, add more doors/windows, and paint the walls. Again, I also recognize this was my natural light-obsessed California brain talking, but I don’t regret anything that we did light-wise in here. The flooring was from the 90s and not the worst, but not original or special. We knew that since we were opening it up with the kitchen we’d likely need to replace it all. The electrical/hard lighting situation was not helping – there were only 4 small sconces and you could just tell that once we’d try to replace those we’d see a lot more electrical issues (we were right). It felt almost unusably large, almost like the lobby of a lodge. This room just took up so much square footage, with the kitchen being undersized for the house. How do you make this space usable for a family of four without adding a million pieces of furniture to fill out the space?
  What We Loved And Wanted To Keep: The three diamond windows were so pretty, but we knew we wanted to open that wall to the backyard (and future porch). We salvaged them and used them upstairs and in the pantry. Now at first, we were just going to put one French door in between the two big windows (which could totally have worked although I love what we did). The ceiling architecture is so pretty – so many older homes have damaged low ceilings so these being 9′ before the beams was a real treat. The fireplace is great – super classic, inoffensive, and appropriately sized for the room. It had a stove insert probably for heat purposes and we wanted to make it either wood or gas (so you can see the flame for ambiance).
  So We Gutted…
 Now no one wants to gut a house, but once we got the inspection report back (which I’ll share more about in a future post) it was clear that literally everything needed to be done to make it safe to live in. EVERYTHING. She is 110 years old and needed more than a facial or a facelift and I am not a plastic surgeon or a miracle maker. ARCIFORM obviously played a huge part in restoring this lady and remodeling it from top to bottom – thank god for them.


The paint had lead, the electrical was dangerous, and there was likely no insulation – all the normal old house stuff. So after the demo, there was some hope of getting the room that we really wanted.

We knew that we wanted to have a door to the backyard and worked with Sierra Pacific on these gorgeous scenic doors that needed a HUGE opening. Then we flanked it with two large double-hung windows. Doing these changes is a real thing and requires proper engineering and permits as well as installing a large track for the doors (so you have to fur out your walls to be at least a foot thick, among other things). The day they cut that hole we could see our future, despite it still looking like a horror house. We were incredibly excited.

It felt like such progress and we were full of hope. The Soake pool is where that pile of dirt is now, a much much prettier view. We centered the doors on the fireplace which was the right thing to do (but did give us a competing focal point and created some flow questions/issues which are now resolved).

Here you can see what it looked like with drywall, white oak windows (from Sierra Pacific), and Zena white oak flooring. This was right before any of the trim or paneling went up and if I’m being totally honest I prefer this no-paneling look (more on that later). I even kinda like it without window trim. But is it weird to have a 100-year-old four-square craftsman and eliminate the window trim and baseboard? Literally everyone said, “YES, THAT IS SUPER WEIRD”. Also, we had the original vintage windows upstairs that we felt needed trim. I wasn’t pushing for this, but the point is I liked how clean and simple it was. Your eye went to the white oak and not a bunch of millwork. But when we were designing this we were living in and I have grown to prefer the no trim window look. I may be very wrong about this BTW – so many people who I respect disagree with me.

Ok, so here is where a hiccup came for me (many people don’t agree with me). We chose to do horizontal large beadboard paneling in here to add some architectural texture, but only up to the window sill. When we fell in love with this look it was at Anne’s cabin where she did it really high up and white-washed it so you could still see the knots and grain. We chose to instead paint it. Fine. How could that go wrong? It added a pretty wall element, of course, but it also made the room more formal – something I’ve been battling since we moved in. You’ll see…
I love the paneling when it was wood but it was poplar and not stain grade (same with the window trim). All the millwork was custom run, btw, which was extremely expensive (over $60k just for the materials for the whole house including the family room, out bedroom ceiling, mudroom, and the kitchen) – not including labor to install. Brian and I were ADAMANT that this was an architectural element we wanted so badly. This wasn’t something we were on the fence about – we were POSITIVE. I don’t consider any of this a mistake, it’s just looking back I don’t think we needed it for this room.
What Do I Wish We Had Done Instead?Now, I want to be very clear that Jamie and the ARCIFORM team designed and executed this PERFECTLY. This was a design choice that Brian and I made. Now that the living room is done, I feel differently but many many times I wished we had done stain-grade white oak window and door casing to match the windows, with white baseboards and no paneling. I’m over it and I mostly love this room, but I have this pathological compulsion to expose myself to anyone that comes into my house or blog. (I’m like that dog who immediately rolls over and shows you her belly upon first meeting. I love so much about this house – which I will yell loud and proud, but I’ve struggled with the paneling in here SO MUCH. And it’s OK! This room is objectively SO PRETTY and I feel like I’m allowed to show and tell you all my regrets without people thinking that I’m complaining or that I don’t think that it’s so pretty. It is. Very rarely do you do something custom and expensive and realize later you not only didn’t need it but perhaps would have liked it better without doing that expensive thing. So if you’ve done that in any way before know that you aren’t alone.
But we had to keep moving… we were moving in in a matter of weeks.

When we walked in after the priming I had mixed feelings (accompanied by a pit in my stomach). I was so happy that the ceiling was bright and white, but I missed all the warmth of the wood and realized that painting the paneling and trim work was not going to be the look I had originally wanted. But when it was masked off like this you couldn’t see the wood flooring, wood windows, or wood cabinets. There was so much wood in here!!! Surely it was warm but we just couldn’t see it! But I just felt so disappointed in myself (these were all my decisions, BTW, not ARCIFORM – they were mostly here for the layout and weighing in on my choices, getting square footage and drawings, etc, but these design decisions came from us).
Ok, What’s The Biggest Challenge With The Paneling?My biggest issue is that trim work can look more formal and fancy – but going too simple can look builder-grade. I love the profile that ARCIFORM designed for us (a 4″ with a tiny bead on both ends). Having the paneling only installed to wainscot height (we chose window sill) made it hard for me because painting them the same color as the walls would look like we just didn’t make a design decision – like we forgot to create a difference between the painted wood and drywall. And yet painting them two different tones or wallpapering would surely make the room look busier – so many doorways, so many lines, so much contrast. It just wasn’t what I had originally envisioned.

So on the two days before them finishing the paint job on, I pitched to Brian for them to paint the paneling a light tone of blue. We loved the color of our doors on the second floor (see here), so in UTTER HASTE, we were like, “Let’s just do that”. This was not my best moment, but likely relatable.

When we walked in after the first coat, both of our bodies and mouths screamed, “OH DEAR GOD, NO”. I think Brian made some sort of “Easter house” remark. Cool, cool, cool. We fully realized we were rushing it all and that is not the best head space to be in. But as you can see painting and repainting paneling is a THING.

I was starting to panic. Brian reminded me that our mountain house is 100% white and wood and we love it. Right! yes! White! Maybe it will be ok??? With literally ZERO time to make a different decision (without holding everyone up) we asked them to go back to the original plan and just paint it all white.

When we walked in on move-in day (the finished cleanup the day before) I loved so much about the house and this room. It was so transformed and I saw so much beauty. But it’s like my stomach knew before my eyes did and I got a pit immediately. So many people had worked so hard on this house, that for me to say anything negative out loud was not going to happen. But to me, the living room looked so unfinished. At the time the only solution was to build a time machine to go back and not put up the paneling and use white oak window and door trim to match the interiors of the window. In case you are wondering why we didn’t do that it’s because we just financially and mentally couldn’t go back into the construction phase. I couldn’t rip stuff off that we had just spent SO MUCH MONEY to custom-make and install. Ironically, it was a bit of a dark time for me because I kept it all inside besides the occasional breakdowns to Brian. I was just so disappointed in myself and full of regret, but nothing was so bad that it was a mistake that needed to be fixed. No pity here – FYI, I had opposite reactions to the kitchen, mudroom, sunroom, and our bathroom – all so beautiful I wanted to cry and can’t wait to show you the rest of them soon. But this room!! I really felt like I messed up on this room in a non-fixable way and yet I KNEW that it wasn’t a huge deal that was worth losing sleep over.
We Moved In… August 2021
Our rental lease was up, school was starting in eight days and I was DETERMINED to move in and get the kids settled before they started school. It had been a long, mentally rough year and in my mind moving in would solve all my woes. So without construction fully finished (ARCIFORM busted their asses to get us that close – THANK YOU), we moved in and decided to live with the furniture we had for a while, which was the best decision (and really we didn’t have a choice)… Once I got art up on the walls it was starting to feel more like our home. I liked being in the space a lot but the words “stark,” “cold” and “unfinished” always floated around.
A reader, Misty, reached out and offered to photoshop the living room with different paint/wallpaper options.


Now these colors I don’t think are very representative of the samples I had. Both of these were meant to be WAY more muted (or at least they seemed to be that way in person). But my reaction was so bad when I saw them photoshopped that I didn’t even want to consider pursuing or tweaking. But as you can see, for a while I thought about painting the walls a light color of the pink bedroom upstairs which I love SO MUCH. The photoshopping just made it a hard no.


Then I asked her to put the entry wallpaper in here (which wasn’t up yet, obviously). Sometimes I think it’s just the rendering and now that it’s in the entry I’m wondering if I should have done this paper instead in the living room, but the photoshopped photos did NOT convince me (and it would be very expensive so not something you just “try”).
I even asked Misty to do a different neutral on the walls and paneling/trimwork that was not yellow, but it sure looked like it was!
I almost gave up on doing anything until I found this soft blue/gray called ‘Mantra‘ which is really pretty. We left for a weekend and it was done in one day. Painting drywall isn’t a big deal, it’s the paneling that is (requires so much paint, sanding between coats, etc).

It does look pretty, for sure. And at this point, so many of the other elements make me so happy so I’ve stopped fixating on the paneling.
Shoot Approaching – Time For Furniture and Accessories
In case you missed it we customized our dream coffee table (that we are obsessed with) with two local makers (shout out to Purl and Billy). Read this post if you want to learn how we did it or how much it cost.
The Layout

Then we arranged and rearranged literally every piece of furniture to try to find the right combination… I wrote a post about my dream sofa and how we landed on this one.


We even produced a Youtube video with Michael Raines to walk you through the layout issues and show you where we landed.
Sneak Peek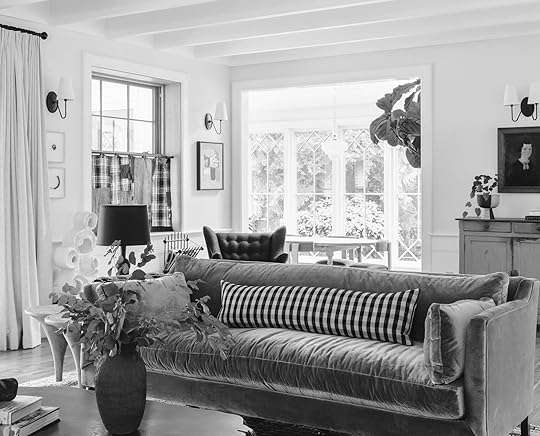
The full reveal coming on Monday (if I get my act together to write it in time!). There are a few more elements that I need to walk you through that we’ll be deep diving into this week before the reveal. So for all of us design nerds, we’ll be diving into our fun window panels and art!
Geez, she is nothing if not wordy. This blog started out 14 years ago as a journal, so sometimes that’s what you still get. 🙂 Come back Monday!!
And a huge thanks to ARCIFORM for the architectural design and perfect execution of the carpentry in this house. Just because I don’t like every single of my own design decisions doesn’t mean that they didn’t do their part perfectly. Anne, Stephyn, and Jamie – THANK YOU FOR BEING A PART OF THIS LADY’S PROJECT 🙂
*The Pretty Photos by Kaitlin Green
The post Our Farmhouse Living Room Design Recap + How I Really Feel About Our Custom Paneling appeared first on Emily Henderson.
July 11, 2023
The Look For (Way) Less: We Reviewed Thousands Of Prime Day Deals – Here Are the Best Affordable Furniture & Decor Pieces On Major Sale

Happy Prime Day! (I also can’t believe that phrase has entered our lexicon.) You may know July 11th and 12th as the day when people purchase air fryers, Roombas, Kindles, et. al en masse (those are all EHD-approved versions of those products, for the record), but let me tell you: THERE ARE SOME REALLY GREAT HOME DEALS THIS YEAR, TOO. Below, you’ll find some of our favorite pieces that are on sale through the end of the day tomorrow, July 12th. (And you’ll also find some fun inspiration – will you recognize all the photos? I’m curious!) And for more updates on Prime Day discounts – including our favorite practical essentials, some back-to-school and dorm room necessities, Em’s highly-recommended Turkish dish towels, and even more of our home favorites – be sure to keep an eye on our Instagram stories over the next 48 hours. ALRIGHT – preamble over – LET’S TALK SAVINGS.
Budget-Friendly Finds (+ Decorating Inspiration)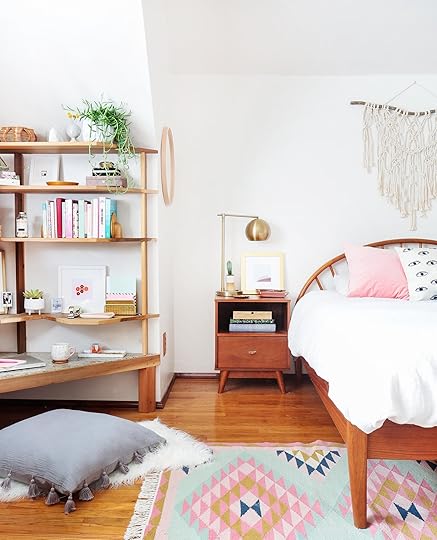
 design by sara ligorria-tramp | photo by tessa neustadt | from: sara updates her childhood bedroom
$87 Mid-Century-Style Nightstand
There’s something so charming and functional about a nightstand that mixes open and closed storage, don’t you think? This piece has classic lines, a great price tag, and a mid-toned walnut stain that’ll harmonize with the other wood pieces in your home.

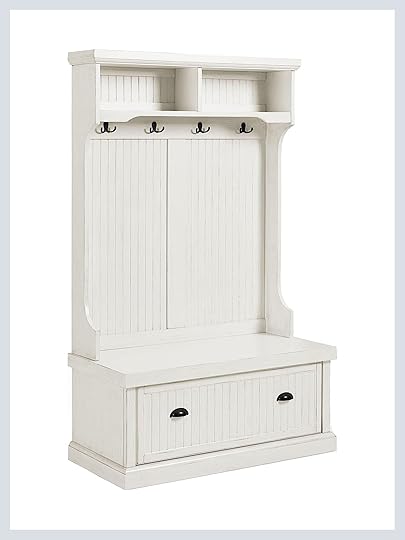 design by priscilla frost | photo by sara ligorria-tramp | from: my best friend’s basement makeover
59% Off, Easy-to-Customize Hall Tree with Hooks + Storage
Don’t let the white finish fool you – this hall tree is the perfect candidate for an upgrade! Case in point: the DIYed piece above, which was totally transformed with a coat of paint, some new hardware, and a bit of added moulding. The on-sale version is a great jumping-off point if you’re looking to get the built-in look without dropping $$$ on custom cabinetry, you know?

 design by orlando soria | photo by zeke ruelas | from: orlando’s guest bedroom reveal
Your eyes do not deceive you – that is a king-sized bed frame for under $100 bucks. (It comes in a few colors, too!) The airy shape is perfect for those who need to place their bed directly in front of a window – do you see how the frame in Orlando’s guest room above still allows for light to flow through the space?

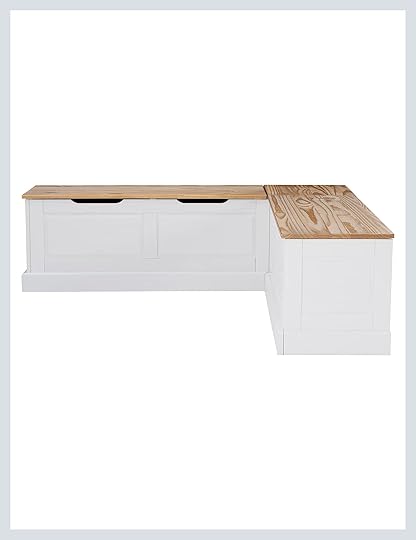 photo by tessa neustadt | from: griffith park sunroom reveal
Easily-Customized Corner Storage Banquette
Throw a few cushions on top of this banquette (I swear by this Etsy seller, if you’re looking for something semi-custom!) and you’ve got yourself a comfortable piece that’ll jazz up your breakfast nook AND provide some much-needed extra storage.
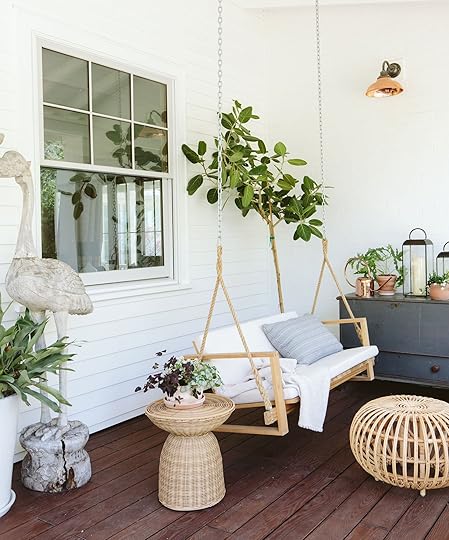
 photo by kaitlin green | from: farmhouse curb appeal complete! our very cute front porch makeover
 This patio swing has some charming square arms, an easily-swapped chain (if you want to go the rope route, like Em did above!), and it won’t break the bank. Add a few cushions and you’ll have a cozy place to relax for the rest of the summer! (Bonus: Meranti wood is fairly easy to refinish or paint if you want to change things up in a few years.)
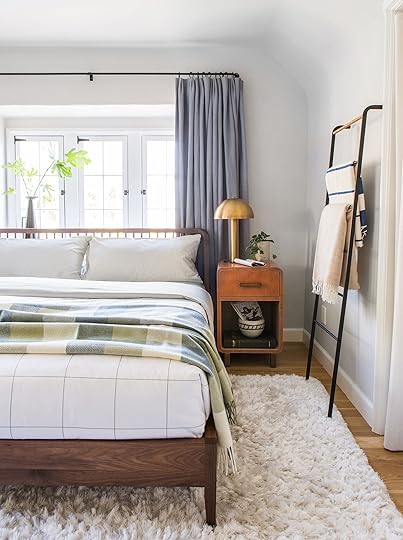
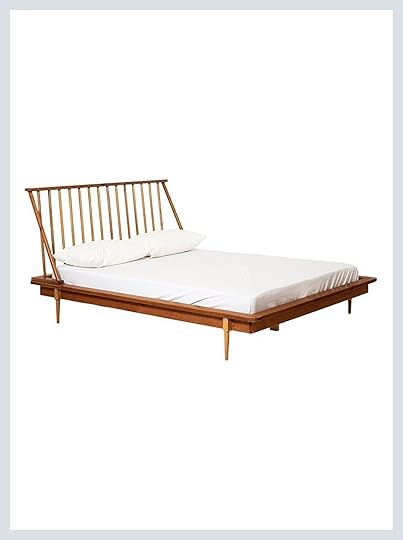 photo by tessa neustadt | from: the new luxury bed in a bag
If a wooden bed frame is more your style, this spindle version is an awesome way to get the high-end look for less. Be warned, though: while reviewers love the style and aesthetic of this bed, they also warn that assembly can take a REALLY long time. (Like…REALLY LONG.) But at 5-10% of the price of similar beds…it might be worth it? (You know your patience level better than I do. Be responsible!)
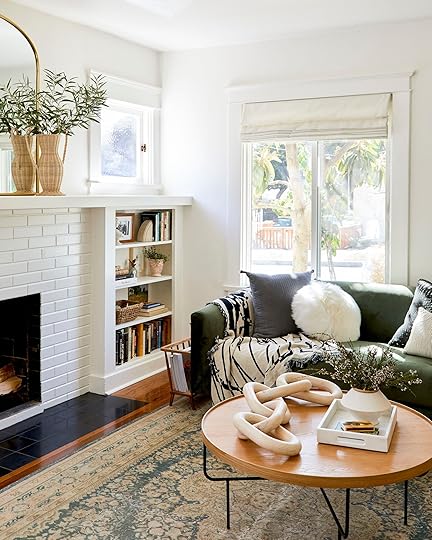
 design by velinda hellen | photo by sara ligorria-tramp | from: sara’s living & dining room reveal
CUTE. This chain is a bit more petite than the giant version we see on Sara’s coffee table above, but WHAT A DEAL. This piece is perfect for a bookshelf, a mantle, or as a finishing touch on a stack of books.

 photo by zeke ruelas | from: modern bohemian home office
$140 Mid-Century-Inspired Desk
Something about a mid-century style desk mixed with a hit of brass, a bit of blue, and some vibrant greenery just feels SO GOOD. It’s clean, simple, and timeless – like the visual equivalent of a breath of fresh air. And at $140 bucks…what’s not to love?
 design by julie rose | photo by sara ligorria-tramp | from: a midcentury eclectic living room
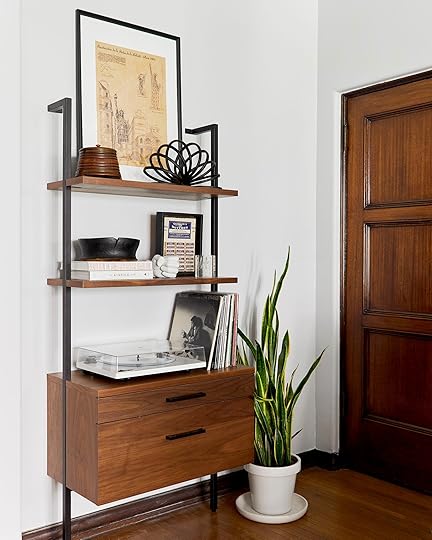
$164 Bookcase with Closed Storage
This free-standing bookshelf is a sweet option for renters (or anyone who prefers to not drill mounting holes in their walls, TBH – hello to my fellow plaster wall pals!). It’s a breeze to style – art on top, books in the middle, records on the bottom – and you can shove any unsightly home necessities, like a printer, into the bottom cabinet.

 design by sara ligorria-tramp | photo by tessa neustadt | from: sara’s living room reveal
Classic TV Stand (with Extra Storage!)
Nothing like a 43% off sticker to get your heart beating a little faster, no? This media stand supports TVs up to 64″ and offers built-in cable management for any of your electronic storage needs. The three drawers on the bottom are the cherry on top (they’re a great place to stash Blu-Rays, manuals, PlayStation controllers…the world’s your oyster!).

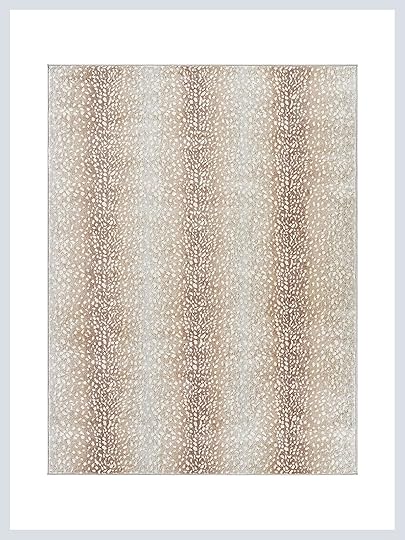 design by caitlin higgins | photo by sara ligorria-tramp | from: caitlin’s long dark hallway makeover
I don’t think it’s any secret that I love an antelope print rug – it’s a little more elevated, luxe, and understated than most of the animal prints we see on the market today. Comparable antelope 8×10 rugs typically run for about $700, so this is an AWESOME deal. (Might I suggest pairing it with some Evergreen Fog paint?)

 design by william hunter collective | photo by sara ligorria-tramp | from: a basement-turned-office reveal
SO EASY TO STYLE. Use one of these classic pieces as a dining table, or as a work station, or as a landing zone in an entryway…the options are literally endless. You can’t go wrong with a tulip table, but this marble top and fits-anywhere size make this version especially versatile.

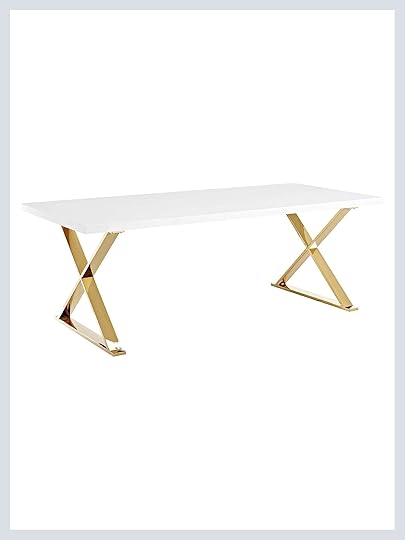 photo by mike garten | from: my house tour from good housekeeping
A 7+’ Dining Table for Under $600
Tone down this ultra-glam table with streamlined vintage chairs, denim-blue linen upholstery, a woven credenza, 1960s art, and a few lighter-than-air string pieces. (Did you spot the famous cover girl piece on the left?)


 design by jess bunge | photo by sara ligorria-tramp | from: jess’ long-awaited (small space) living room reveal
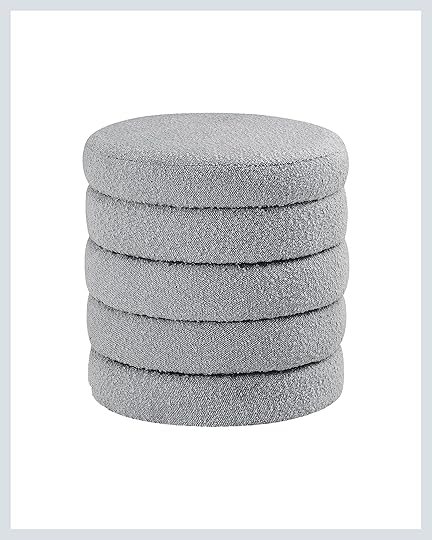
A $29 Coffee Table Dupe (+ Add This Stool for a Monochrome Take On Jess’ Look!)
On the hunt for a small-space coffee table solution? WE GOT YA! Grab this simple folding table (you can use it outside, too, if your needs change in the future!) and pair it with an upholstered pouf that can double as seating when friends visit. (We also checked the measurements – these should be a perfect fit if you want to bring Jess’ whole look home!)

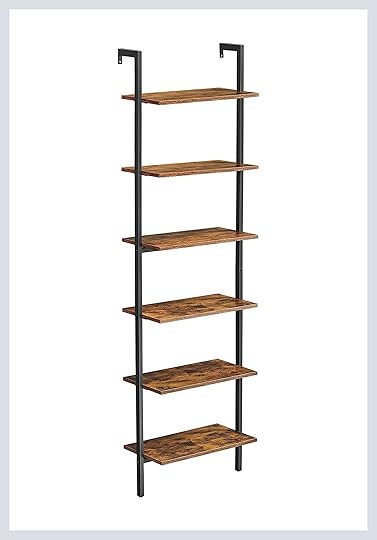 photo by zeke ruelas | from: moody mid-century home office
You can grab the original at CB2 for $349, or you could try this $59 version and take yourself out to a nice dinner with all the cash you saved.


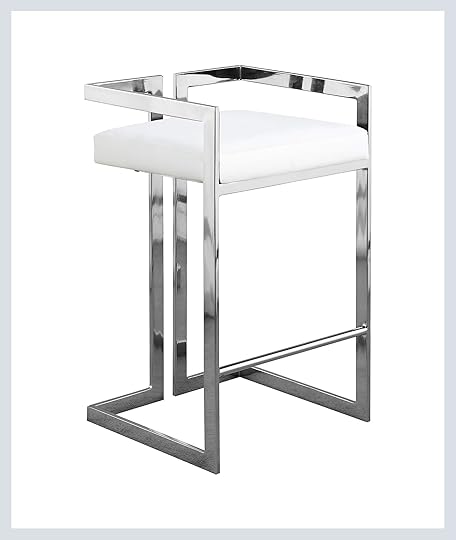 photo by tessa neustadt | from: griffith park sunroom reveal
$59 On-Trend Chrome Mushroom Lamp (+ Some Bar Stools!)
WHERE MY CHROME GALS AT? I’ll always have a soft spot for brass, but there’s something so dynamic and fresh about the chrome resurgence we’ve been seeing over the past few years – it brings a lot of life, interest, and balance to warmer-toned spaces. I love the shape and price tag of this lamp, and these stools would be showstopping with a little DIY cowhide upholstery. (I mean…aren’t the ones above SO cool?)

 design & photo by anne sage | from: the office reveal with a clever accent wall
$145 Bookcase, Perfect for Flanking a Sofa
Pop two of these neutral-toned oak bookcases on the sides of your sofa and BAM – you’ve got a super classic look for under $300. I’m especially charmed by the curved bottom and the hardware on the lower cabinet – it’s an antique, high-end look at an achievable price point.
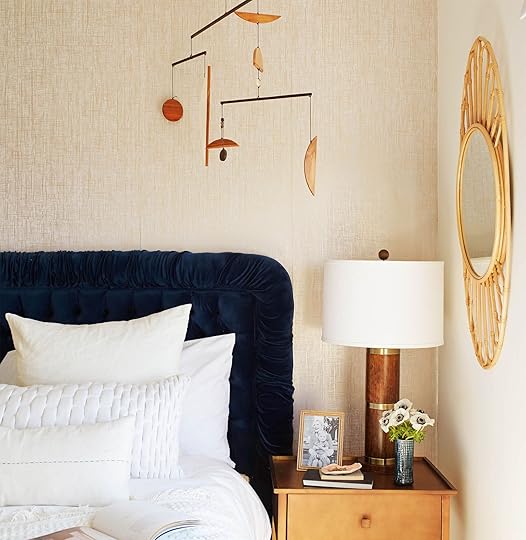
 photo by jessica isaac | from: the primary bedroom – where we are now
A Sweet $22 Mobile Wall Hanging
This piece threads the design needle perfectly – it’s a dreamy mix of graphic (the shape! The hits of black!) and quiet (interesting to look at, but not screaming for attention). Hang in a bedroom for a modern, adult take on a classic mobile!

 design by caitlin higgins | photo by sara ligorria-tramp | from: caitlin’s mostly thrifted living room
A Modern Take on the Classic Campaign Dresser
I love campaign furniture, but it can be tricky (read: time-consuming, borderline maddening) to find affordable pieces in great condition. If you’re more of an “I want it now” type, this dresser is a great option – have seen it used in several homes on Instagram and I’m always impressed by how beautiful it looks in person.
 design & photo by keyanna bowen | from: key’s totally transformed office makeover
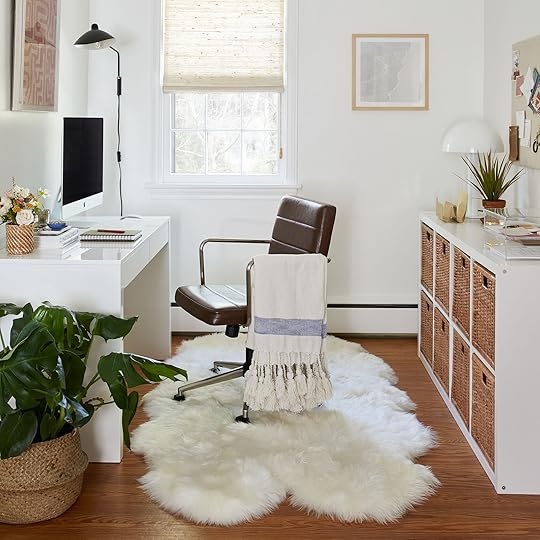
The sheepskin rug is an EHD styling essential. Throw it on a sofa; drape it over a headboard; use one in a nursery (Emily has!); place one in your office area to make your WFH setup a little more luxurious. This sheepskin looks great with all kinds of styles AND it’s available at a great price, to boot.
More Affordable Furniture
1. Myron Modern 6-Drawer Solid Wood Dresser | 2. Brooklyn Sherpa Office Chair | 3. Tess Accent Cabinet | 4. Brody Square Pouf | 5. Piper Rattan Storage Media Console Stand | 6. Aimee Etagere Bookcase | 7. Ergo Pedestal Cocktail Side Table | 8. Contemporary Velvet Accent Chair | 9. Contemporary Upholstered Bench | 10. Acrylic Stacking Chair | 11. Saxon Mid Century Modern TV Stand | 12. Retro Bar Stools (Set of 2)
Something for everyone, right? A few of these stand out in particular to me, though. #3 is CUTE – it’s hearty enough to stand alone, but it looks so sweet when paired with a second unit. (The styled product shots are very well done!) The lines on #7 are super special and interesting, too – if I saw it at a friend’s house, I’d think they were very chic. #4 and #10 are total classics – they’ll never go out of style. I’m also super impressed with the contemporary options available, like #8 and #9.
Decor That Only *Looks* Expensive
1. Rattan and Metal Wall Sconce | 2. Stoneware Bowl | 3. Woven Cane and Rattan Display Boxes with Glass Lids (Set of 2) | 4. Rope Design Metal Frame | 5. 20″ Square Velvet Knife Edge Pillow Cover | 6. Hand-Painted Terra-Cotta Dots and Fabric Shade Table Lamp | 7. Minimalist Round Marble Charcuterie Board | 8. Modern Small Stoneware Pitcher | 9. Transitional Wood Wall Leaner Mirror | 10. 24″ Black Farmhouse Ceramic Pottery Jug Table Lamp | 11. Marble Chain Link | 12. Marble Bookends (Set of 2)
WOAH, OKAY. So many incredible pieces to love – I was genuinely blown away by the decor selection this year. (Not pictured here: the 70+ other pieces I pinned before we narrowed it down to these 12! I highly recommend poking around the site if you have a few extra minutes.)
#2, #6, #8, and #10 all look like they walked straight out of a Lulu & Georgia catalog – it’s extraordinary. I added #4 to my own cart, too – I love how the roped motif is really traditional, but also a little modern and special. And man, how cute are #1 and #3? They’re perfect for adding a little texture, movement, and life in both minimalist and eclectic homes.
A Few EHD-Approved Rugs
1. Chris Loves Julia x Loloi Polly Rug | 2. Marcia Machine Washable Faux Cowhide Area Rug | 3. Montauk Collection Area Rug | 4. Jordan High-Low Pile Art Deco Geometric Indoor Outdoor Area Rug | 5. Justina Blakeney x Loloi Cornelia Area Rug | 6. Don Chevron Jute Tasseled Rug | 7. Loloi II Adrian Rug | 8. Rigo Hand Woven Farmhouse Jute Area Rug | 9. Magnolia Home by Joanna Gaines x Loloi Banks Rug
If you’ve been eyeing a Loloi rug, you’re in luck – there are lots of fun options available, like #5, #7, and #9 (#1 is my personal favorite, though. I love the pattern!). I’m also a huge fan of #2 and #3 – they’re a little punchy, but neutral enough to work in lots of different spaces. Finally, I found myself really taken by the quiet chevron print of #6. It’s super subtle, but it does a nice job of elevating this jute rug into something a little more considered and polished.
That’s it for today! Be sure to check Em’s Instagram for updates on a few more of our favorite deals over the next two days…it’s gonna be fun, I promise. 🙂 And if there’s anything we can help you find, please drop a note! It’s literally our job to help. (What a dream!!!!) xx
Opening Image Credits: Design by Julie Rose | Photo by Sara Ligorria-Tramp | From: A Midcentury Eclectic Living Room
The post The Look For (Way) Less: We Reviewed Thousands Of Prime Day Deals – Here Are the Best Affordable Furniture & Decor Pieces On Major Sale appeared first on Emily Henderson.
July 10, 2023
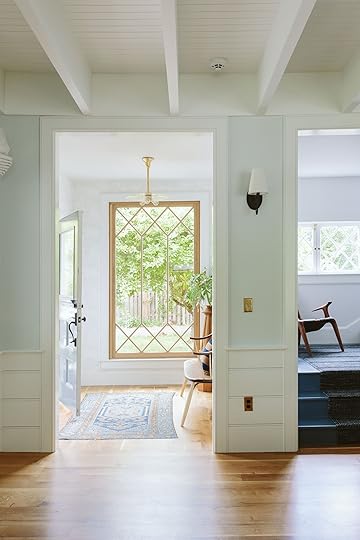
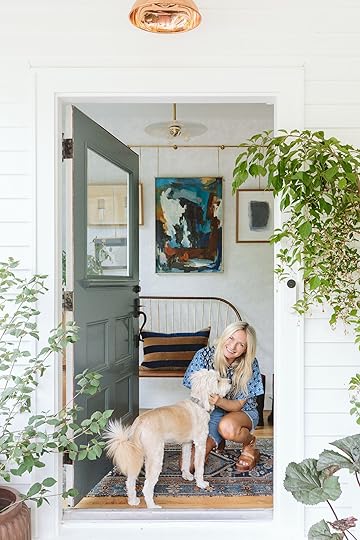
The Farmhouse Entry Reveal (+ How To Hang A Gallery Wall On Wallpaper)

Come on in, folks. Our entry is finished (for now) and ready for you to get a full tour. I love it. If you are just catching up, head to this post from last Thursday where I walk you through the full renovation process of this little happy room. For those of you caught up let’s head straight into the reveal.

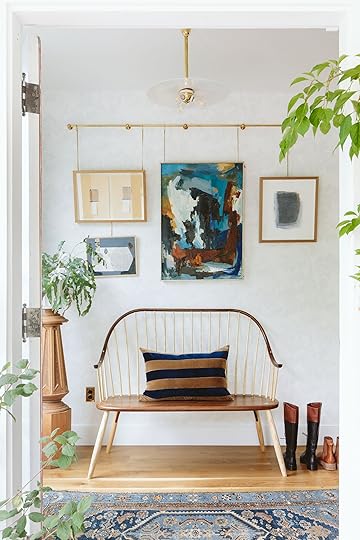
“Setting the tone” for a house can be a lot of pressure, especially for someone like me whose mood changes frequently. Regardless, I want it to feel calm but full of personality and have it represent our style. So I kept the wallpaper super quiet, and then the art, bench, plant stand, and rug really pretty with color and bigger personality.


I love every element in here so much. That beautiful window from Sierra Pacific is the focal point of this view (from inside the living room), but when you are walking in from the front door, the art and bench make a more eclectic fun statement.
The Brass Gallery Rail Art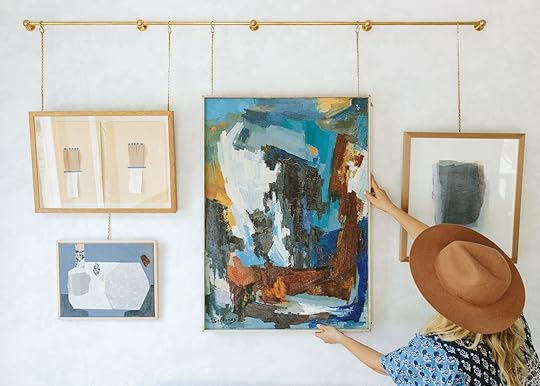
While I love a mirror in the entryway, we actually don’t have a TON of wall space in this house (what with my addiction to windows). This room was fairly self-contained – you could see it from the living room but you couldn’t really see this wall from the living room – thus giving us an opportunity to do something really fun and specific here. So I brought out one of my favorite pieces – a vintage painting that my friend Scott gave me as the anchor and then I started building the gallery from there. But then I got nervous…
Hanging The Gallery Rail…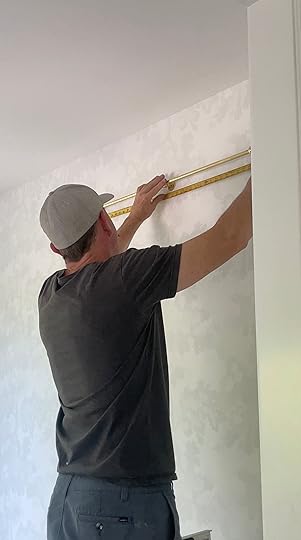

Putting nails OR command strips on wallpaper can be super destructive with less to no ability to repair like you can on drywall. So I decided to do this gallery art rail which would allow me to switch it up, anytime, including just having maybe two large pieces or even one larger one. I ordered the 72″ rail from Pepe and Caroles which came with middle brackets and two endcaps, plus the length of the gallery chain and S hooks. Our handyman, Dave, came over and hung it because I don’t trust myself with “measuring” or “making things level” (he’s also my neighbor so it makes it really easy:)).

We laid it out for him and obviously decided on the distance from the walls and ceiling.
Time To Play…Per usual, my first go-around is always BIG. LOTS of stuff. I really really tried to not steal all the best art for this room because many of them looked great where I had already put them. Admittedly I have collected a lot of great art over the years – both vintage and contemporary and I personally think it’s the fastest way to make your home feel personal to you.


I knew that I loved a few of the pieces together (the big abstract and the collage with the tan background). So then it was a matter of adding to it to get the right combination. I first put up the “Molly Vidor Destroyer” piece that’s in the left photo but Brian had the oddest but honest reaction – he said it felt too “dorm room”. I think the vintage graphic print (the one with the arrow) and gallery poster felt too “young” (which I felt looked cool and was a great contrast with the busier abstract and the old-timey art). But his reaction was immediate and strong and I certainly had more to play with so I eliminated those two and added more (as you can see in the photo on the right). That felt a bit much for me despite loving every piece. I think that the space is just too small to have quite so many pieces (although secretly I miss my dog in this mix).
Here’s Where We Landed…
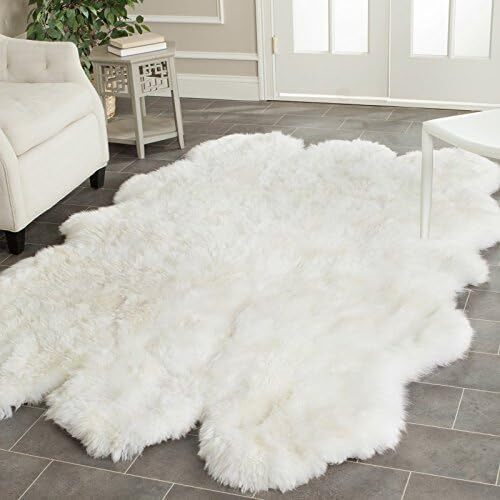
Ok, I KNOW that this might now look too pared back, but I think it’s a great balance of fun but not too busy. The artist left to right are: Kiril Bergart, underneath MaryAnn Puls (a new purchase of mine by a local artist I love). Then the middle painting is vintage from the 60s, a gift from my friend Scott. On the right, is a new hand-dyed paper collage by Marilyn Joyce (another recent purchase by a local artist).
Pendant (vintage) | Wallpaper | Art Rail | Plant Stand (vintage) | Bench | Pillow | Rug (vintage) | Trim and Ceiling Color | Outlet Cover
I think all together it looks really pretty, but admittedly maybe the art is not not as balanced as it can be. Luckily we have the gallery rail to add more or switch any out. Now as you can see the one on the lower left is eschew which was NOT my intent. Whoops. That is the only drawback of the chains – they can be wonky and taking them on and off is easy, but making the super straight with the S hooks on the exact same ring of the chain can be challenging. We still plan on using museum wax to make sure they all stay in place. Next time I’m going to loop the chain like a triangle so that it hooks on both brackets on the back but only has one center S hook (does that make sense?). Anyway, I can keep playing with it forever and likely will 🙂

The plant stand is an antique stair newell that I bought at an antique store. It has a threaded bolt thing on top that I threaded through the bottom hole of the plant so it stays on top (but is wonky from different angles and I don’t know how to fix it). I love the busyness of the newell with the simplicity of the bench – the mix of woods that is just so pretty.


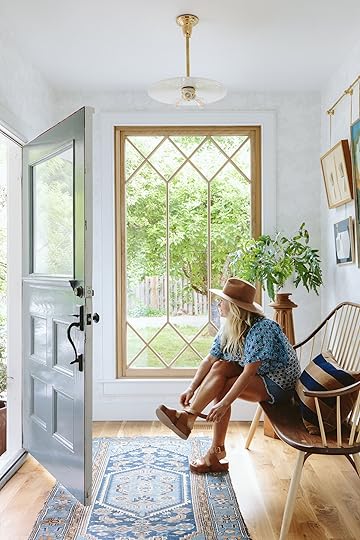
I splurged on that pillow from Lost & Found LA because the colors are so beautiful and it’s so lush. We styled it simply here which I really love. Please note how the Rejuvenation milk glass vintage light fixture allows the window to really pop (and the door to fully open which was a consideration obviously).
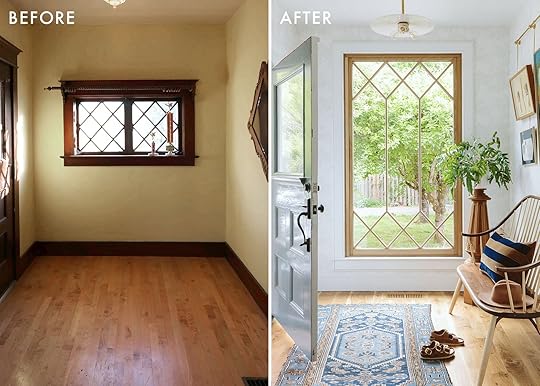
Seeing it side by side with the before photo is pretty mindblowing. I’m just so so grateful.
So there you go. Our entryway. I hope you like it (we do). All resources are linked below 🙂 xx
Resources:
Floors: Oregon White Oak by Zena Flooring
Wall and Interior Door Color: Extra White by Sherwin-Williams
Wallpaper: Scalamandre Raphael Sandberg Wallpaper in White
Windows: White Oak Sierra Pacific Windows
Wood Bench: Thos. Moser
Pillow: Lost & Found
Plant Stand: Vintage
Rug: Vintage
Light: Rejuvenation
Outlet Cover: Rejuvenation
Art Rail: Pepe & Carols
*Design by Emily Henderson and ARCIFORM
*Photos by Kaitlin Green
The post The Farmhouse Entry Reveal (+ How To Hang A Gallery Wall On Wallpaper) appeared first on Emily Henderson.
July 9, 2023
The Link Up: Em’s First GREAT Read From The Romance Novel Post Comment Section, Jess’ Affordable IKEA Picture Frame Alternative, And A Great Smelling Bug Spray

Happy Sunday everyone! Did you see the farmhouse entry recap (reveal coming tomorrow!) and Sara’s sweet and FAST front yard oasis?? We can’t wait to show you the reveal and love that Sara is still sharing her wonderful home with us:) We also wanted to try something a little different for our weekly home tour. It’s a mini tour within the Link Up! This won’t be every week but there are so many wonderful projects out there we get pitched but can’t write full posts about that this seemed like a great place to give them a little love. Enjoy!

 design by ome dezin | photos by austin leis
 design by ome dezin | photo by austin leis
 design by ome dezin | photos by austin leis
 design by ome dezin | photo by austin leis
 design by ome dezin | photos by austin leis

 design by ome dezin | photos by austin leis
 design by ome dezin | photo by austin leis
This week’s mini house tour is from the talented design-build firm Ome Dezin. It’s a stunning 5-bedroom property (WOW) in Los Angeles that was completely renovated. Had we received this project pitch before Jess’ “Updated California Casual” trend post this would have been perfect! It’s kinda wild how perfect actually. What we especially love are those bathrooms! Love how special all of those mirrors are and the marble/tile accents. Also, we really can’t get over that outdoor soaking tub. What do you love most??
From Emily: Thanks to all your book recs (y’all, the comment section from my romance novel post is full of GEMS), I downloaded “Nora Goes Off Script” and read it in two days. After I storied about it, my cousin texted that she is very close friends with the author, Annabel (who she had talked about a lot, but I never connected the dots), and vouches how wonderful/funny/smart she is (I always love knowing people I admire are actually wonderful in person). Anyway, I loved it. It’s smart and witty and if you are a single mom I think there is a lot of relatability with her writing (it’s def PG with the sex stuff). I keep going back to all the suggestions in the comments and have been flying through books but wanted to call out that one because I enjoyed it so much from the first page.
From Caitlin: If you would have told me last week that I’d be up at 1 am devouring a super long-read about two women’s tennis stars from the 1970s and their changing relationship through time, I would have NEVER BELIEVED YOU. I don’t know what prompted me to click – I think it was a tweet? – but I’m SO GLAD I DID. This piece follows the relationship between Chris Evert (painted as an All-American great) and Martina Navratilova (her strong, powerful, Czechoslovakian rival). It follows their changing relationship through time – as competitors, double’s partners, bitter rivals, dual champions (they finished their careers tied, with 18 Grand Slam victories each), and now as dear friends who are supporting each other through their respective battles with cancer. A touching clip: “Navratilova came by the house and called regularly, but she also knew how to ‘lay back.’ Sometimes she would call and Evert would answer right away. And sometimes it would take three or four days before she answered. It felt, in a way, like the old locker room days when she knew Evert was laboring with a loss. ‘I think because we were there for each other before, we kind of knew what to do or what not to do, instinctively, even though this was a first,’ Navratilova says.” IT IS A VERY GOOD READ!
Also From Caitlin: I did it – finally took the plunge on a pair of Tevas and I’m so happy I did! I bought them in the 90s Multi colorway and they are SO CUTE. My mom and godmother both asked where I got them (so they’re fun for all ages!), and they’ve gotten a TON of compliments on the street. They didn’t require any break-in time (thankfully – I really rolled the dice on my first wear and took them on a looooong walk!) and the cushion is really comfortable and plush, which I didn’t totally expect and have been super pleasantly surprised by. They come in 26 different colors, they’re super on-trend, and I only paid $50 (pro tip: sign up for the mailing list!). Hooray for easy-to-wear sandals!
From Mallory: I’m extremely popular amongst mosquitos, so this summer I thought I’d finally do something about it. A while ago I was on a trip with Emily Bowser and Sara and was introduced to Public Good’s Insect Repellent. Now this is important: IT DOESN’T SMELL BAD. In fact, IT SMELLS VERY GOOD. Every single bug spray I’ve tried has this weird smell to it which is why I have historically avoided them (and just dealt with the consequences later), but not any more people. If you’re unfamiliar, Public Goods is a membership service so you sign up and then pick your refillable everyday products. The ingredients are great and it’s a very sustainable company, so if you’re interested in signing up make sure you add this repellent (or just sign up for the free trial and get the repellent just saying). I’ve been wearing it daily and no bites thus far!! YAY.


From Jess: If you read my Paris trip post then you know Allison, an incredibly talented and kind interior designer, who reached out and offered to take my dad and me around Paris. Unfortunately, she was out of town the week I was there. As a design and vintage lover it can feel VERY overwhelming to try to find “the good stuff” so needless to say, we were bummed. But she did give me so many recs that were awesome! So if you are also someone who might want a local designer to help you find the truly great spots in Paris then you are in luck because my new friend, Allison (we’ve kept in touch:)), is hosting a Paris Vintage Design Trip in October. Join her for shopping, dining, and experiencing Paris like a Parisian! Trust me when I say I wish I could go.
Also From Jess: I was at my friend’s house last weekend and she showed me these great square picture frames she got that were three for $60 ish bucks! They are a really good alternative for IKEA’s 20×20 RIBBA frame THAT DOESN’T EXIST ANYMORE!!!! Like why IKEA?!?! Anyway, EHD-approved affordable frames:)
From Arlyn: I admit I have fairly easy hair to manage. It’s straight-ish, shiny, and I have a decent amount of it. But if I use the wrong shampoo, it can either get poofy and dried out or limp and dull. I always find volumizing shampoo for thin hair which doesn’t check the box, shine-enhancing shampoo that strips me of volume, and ultra-moisturizing varieties for damaged strands. BUT THEN I found The Ouai’s Medium Hair Shampoo and Conditioner which is maybe the closest match to perfect I’ve found for me. It’s formulated for, well, medium hair…not thin, not thick, not curly. And OMG it smells SO good. The 10 oz bottles are pricey but I find that you don’t need much to get the job done. It leaves my hair full, bouncy, shiny, and happy. They also offer formulations for thin and thick hair, too!
Thanks for hanging out on a Sunday with us and see y’all tomorrow for this reveal!
Opening Image Credits: Design and Photo by Sara Ligorria-Tramp | Styled by Emily Edith Bowser | From: This Yard Makeover Only Took 3 WEEKS, Some Elbow Grease, And A New (Very Good) Seating Area
The post The Link Up: Em’s First GREAT Read From The Romance Novel Post Comment Section, Jess’ Affordable IKEA Picture Frame Alternative, And A Great Smelling Bug Spray appeared first on Emily Henderson.
July 8, 2023
Testing, Testing: Arlyn Reviewed 12 Of The Internet’s Favorite Wireless Bras – These Are The *Actual* Best (& Worst) For Large Breasts

For as long as I remember, I’ve had to wear a wired bra. Or at the very least, my preference has been a wired bra. It’s supportive, lifting, and separating. The only problem? It’s just not that comfortable. Yes, I’ve had a handful of underwire bras that I could happily wear all day, but even still, it was such a relief to take it off at night. Though touted for comfort and even breast health, wireless bras just couldn’t hack it for me and my H-cup boobs. These ladies are heavy and need as much support as a floating shelf stuffed to the brim with hardcovered coffee table books.
But then I had a baby and chose to breastfeed, so wireless was my only option. It took a ton of research, money, and trial and error, but I found a brand that worked for me (more on that below) for this stage of my life. Fast forward a year and a half, and even though my nursing journey is basically over, it’s hard to imagine going back to the prison that is the underwire on a daily basis.
Surely the wireless bra game has come a long way in the last decade since I bought a mesh bralette that was the equivalent of using pantyhose as a chest sling (read: not good)…right? Finding out was going to take some testing, so I researched all the “best wireless bra” articles I could find that seemed legitimate, dug up a few other brands on my own, and also tapped into an old faithful, all in the name of finding the best wireless bra on the market for large breasts. Because if MY boobs could give the seal of approval to a wireless bra, trust me…you know it’s likely going to be able to hold up your girls…and then some.
There were some companies that look promising, but they didn’t offer an extended cup size range. Everything tested here checked the box of having G+ sizes, or at least an equivalent in a S-XXL(ish) range. I wore each one for at least a few hours, trying to see how they performed in regular life. There were some good ones, there were some flops (as in floppy boobs), and then, there were a few standouts, including my new all-time favorite.
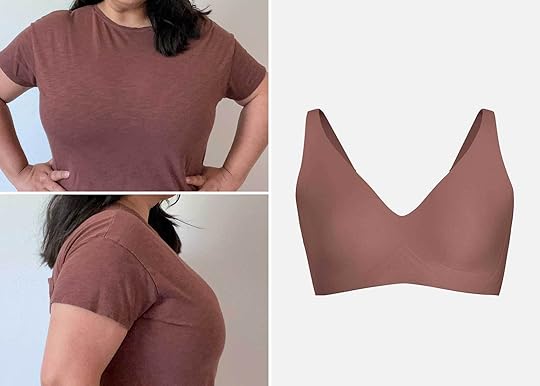
Each bra has a photo of me wearing it under a standard cotton T-shirt so you can see the shape, how visible it is under clothing, and the lift. I’m also including the image of the product from the manufacturer’s website. I scored each one for shape (does it make me feel rounded, pointy, too widespread, too pushed out, etc.), lift (how high does it bring them up), support (how bouncy or shifty things felt in there), and comfort (self-explanatory). There are also notes on sizing, my overall thoughts, and a final score for each.
While everyone has a preference for how a bra fits and feels, I hope my notes help guide you to at least find a few options to try out for yourself.
Read on for my honest, real-life review of 12 wireless bras best suited (or not) for large (DD+) boobs.
Playtex Women’s 18-Hour Ultimate Lift & Support Wireless BraWhere to Buy: Amazon | Price: $18
 Shape: 5/10 – A little pointy but liftedLift: 9/10Support: 9/10Comfort: 6/10Sizing: Ordered regular size
Boobie Real Talk: Okay, so…I wasn’t originally going to order this bra for this test, but it’s probably the most traditional wireless bra on this whole list. The OG, so to speak. Plus, it was under $20 so I couldn’t help myself. I was pleasantly surprised by this bra. I mean, is it the sexiest option here? Absolutely not. Full stop. It’s the kind of wireless bra I imagine my grandmother would have worn, but…this thing is supportive. I will say, the straps felt way too short for my petite frame even fully loosened (probably just because of my cup size), which was odd. I’m 5’3” so normally I have the opposite issue. If it weren’t for the straps, I’d wear this thing for everyday running around the house because it keeps the girls UP. The band was a tiny bit scratchy, unlike many of the seamless options I tested, but it was also new and I’m sure will wear to be a bit softer.
Overall Score: 7/10
Best For: Anyone looking for *very* good support, doesn’t mind a sort of Fem-Bot pointy boob factor, and wants to try out the wireless bra game at a low entry cost.
The Comfort Shaping Bra With Adjustable StrapsWhere to Buy: Underoutfit | Price: $42
 Shape: 6/10 – A bit tear-drop-like and wide setLift: 3/10Support: 4/10Comfort: 8/10Sizing: Not sold by cup size so I followed the sizing chart to find my size. The band is super soft and stretchy, so maybe consider that when purchasing.
Boobie Real Talk: This is the first bra that showed up after ordering the whole bunch, and when I first put it on, I remember thinking, “Oh, this is soft.” This bra is maybe the softest one I tested. Seamless, stretchy, but maybe a little too stretchy to offer the support I look for. It has sewn-in pads, which I don’t love personally, though thankfully they don’t add too much bulk. If you have a strong nip game, this could be just what you’re looking for as many wireless bras tend to be a bit on the showier side in that arena. I didn’t feel like the straps were wide enough to hold up the goods and they rolled a little bit from the pressure. Aside from that, it’s a very comfortable bra without a ton of lift. Good for lounging, sleeping, traveling, and anything that doesn’t require a lot of action.
Overall Score: 5/10
Best For: Someone who prefers a lighter touch from a bra (nothing overly tight around the rib cage), wants soft, pillowy fabric, needs some padding, and doesn’t need a military-grade lift as I do.
Good To Go Seamless BraWhere to Buy: Knix | Price: $42
 Shape: 6/10 – Not a ton of side support but gives a nice, rounded shape anyway (but a little droopy)Lift: 5/10Support: 5/10Comfort: 8/10Sizing: Follow sizing chart to convert your cup and band size and consider sizing up. My cups felt one size too small.
Boobie Real Talk: There’s a lot to like about this bra (and Knix in general, including the best packaging of the whole lot). The fabric is so nice—just thick and sturdy enough by soft and high quality. I love the color offerings because sometimes you want something other than black or nude, amiright? It comes with removable cups and the adjustable straps have a ton of runway to play with (basically the entire length of the strap can be pulled in tight or loosened). For me though, the sizing just wasn’t right. I like the band to sit flush against my ribcage and it ended up tucked in the underboob. A larger size might help that but might also be too loose around which is where the support comes from. This is a winner for someone in a smaller cup size than me, though.
Overall Score: 6/10
Best For: Anyone up to about a G cup size with a band smaller than 38 (if you have a larger band, the sizing could still work for you, I think!). If you’re looking for a seamless, moderately supportive yet comfortable wireless bra with very adjustable straps that moves with you and can be worn all day with good shaping, you found your match here.
Revolution BraWhere to Buy: Knix | Price: $58
 I realized while I was putting this together that my shirt is on backward. It was hilarious, so I left it. You’ll find a few more smooth moves like this in later photos. Whoops!Shape: ?/10 – The bra didn’t fit, so it’s hard to tellLift: 7/10Support: 6/10Comfort: 5/10Sizing: Though I ordered the same size as the other Knix bra, it felt like it was two sizes smaller. The band almost didn’t clasp shut and the cups didn’t fit me at all. Size WAY up.
Boobie Real Talk: Well, I wish I could say more about this bra. With a name like the “Revolution” bra and 4.5 stars from 2,300+ reviews, I had high hopes, but the size was completely wrong for me. I also found it to wear very stiff without much give even though the fabric is so buttery soft and beautifully truly seamless. So while it didn’t even remotely fit me, let me still talk about some of the merits: Removable padding is always a plus for me, there’s a decent amount of space to adjust the straps (though even at their longest, they still felt suffocating to me), and the back band has five eyelet hooks which is super generous and a rare luxury not offered by most companies. Considering you fit in it, I’d imagine this would be so nice under your clothes as it’s very smooth.
Overall Score: 6/10
Best For: Anyone after a bra that’s nearly invisible under even the thinnest fabrics and fits more like a bra than a sports bra. Also, hopefully, you don’t mind a stiffer band and straps (for support) and have a high tolerance for ordering multiple sizes (or finding a store) to get the right fit.
Embraceable Full Coverage Wireless Unlined BraWhere to Buy: Soma | Price: $44
 Shape: 5/10 – Flattens a bit up top and a little pointier than most (not great cleavage)Lift: 5/10Support: 7/10Comfort: 7/10Sizing: Ordered my normal American cup size but the band felt a bit snug at the loosest setting and cups felt tight.
Boobie Real Talk: Soma has always been a trusted brand for me. They make a quality product, have great in-store customer service, and a wide selection of extended sizes. I liked this bra, if only the sizing had been a better match for me. The construction is sturdy without being too stiff, there’s great side support so the boobs don’t get too droopy and wide set, and the pronounced center seam gives decent separation. I did wish the straps were more adjustable but this might be why the bra itself has good support. I did my usual bounce test and it was a comfortable shift up and down rather than a ricochet that nearly slaps my chin. The band under the breasts is narrower than most, but I didn’t mind it. If I could size up just a bit, I’d keep this and wear it on the regular.
Overall Score: 6/10 (solid 7/10 if it had fit me better)
Best For: Someone who needs support in both the band and straps without feeling strangled, is okay with a more “utilitarian” look, and prefers a more pushed-in-and-out-from-the-sides silhouette.
The Nellie Simply Wireless BraWhere to Buy: Kindred Braverly | Price: $45.99
 Shape: 6/10 – Round but wide setLift: 7/10Support: 7/10Comfort: 8/10Sizing: They offer regular, busty, and super busty sizes. The straps get thicker and more supportive the bustier the cups get. Be sure to check the size chart.
 Boobie Real Talk: I’m a little biased here. Kindred Braverly has gotten me through so much including pregnancy and breastfeeding. All of my nursing and pumping bras came from them, and I switched from my SUPER supportive wired bras to their Nellie halfway through my pregnancy. I even wrote about it being the best wireless bra I bought back in 2022 on my personal blog. After testing 11 others for this post, I don’t necessarily prefer it as I thought I would, though it’s still a solid contender. I can wear this bra all day: to sit around, to play with my toddler, to go on long walks, to hop in and out of my SUV running errands. I wouldn’t wear this with a nice dress or anything more dressed up mostly because the shaping isn’t as refined as I like with blouses, but it’s great to throw on under T-shirts and even weekend button-downs.
Overall Score: 8/10
Best For: Someone who wants all-day comfort, medium support, and likes the option of removable pads. A fantastic option for anyone in the VERY extended size range like me who thinks a wireless bra is a pipe dream that will never come to pass.
Women’s C Magnifique Full Bust Wireless BraWhere to Buy: Chantelle | Price: $68
 Shape: 7/10 – Really nice rounded yet supported shapeLift: 6/10Support: 6/10Comfort: 8/10Sizing: I ordered up a band size but kept my cup size because I had a feeling it would be too small otherwise based on my experience with this brand.
 Boobie Real Talk: True story: I put this bra on and immediately felt good. It made my boobs look great, the fabric was pretty on the outside and silky on the inside, and it wore super light. As in…it didn’t even feel like I was wearing a bra. It’s a bit pricey, and the reviews (on Amazon) seem to be hit or miss, but I really liked this baby off the bat. I will say, as the day went on, it felt like it was getting looser and my lady parts shifted closer together creating a lumpy uni-boob. I had to adjust in the afternoon if I got too aggressive with my movements (or bent over to pick something up). That was a bit of a bummer, but for those first few glorious hours, it was possibly worth it? The band only had two vertical hooks so it didn’t provide AMAZING support, but I also ordered up a size. I think in my standard 38, it would have been better.
Overall Score: 7/10
Best For: Someone who likes the look of a more traditional “pretty” bra, wants silky smoothness against their nips, and likes a round shape. I don’t know that I’d jump to wear this all day again as a busy mom, but I’d don it out on a date night, to brunch with friends, etc. because it does wear nicely under less casual outfits.
Zara BraletteWhere to Buy: Bravissimo | Price: $68
 Shape: 4/10 – Smooshed and spread out all at the same time (but maybe just bought the wrong size)Lift: 5/10Support: 5/10Comfort: 5/10Sizing: Ordered regular cup size and band size (I normally buy UK sizes, so be sure to check your American size before ordering).
 Boobie Real Talk: I found this bra on so many lists of “best wireless bras” so it had to go on *my* list for this piece to see what all the hype was about. I should have known I wasn’t going to get the support or shaping I need with the word “bralette” in the title. This is exactly what it says it is: a bralette so…my bad? This piece is beautiful, I will say that, but the straps aren’t adjustable and the lift and support I found in other bras just wasn’t there for my size. While the band fit well, the cups felt a bit small. It did hold up my boobs decent, but there was a bit of a squish factor and some spillage out the sides. If I had gone up a cup and maybe down a band size, I think the fit would have been better for me.
Overall Score: 5.5/10
Best For: Anyone without super heavy breasts that are maybe a little perkier than my post-breastfeeding pair and don’t mind that the straps aren’t adjustable. If you’re looking for something to wear that makes you feel good (visually) and you plan on doing no running or jumping, this could be a good pick for you.
Crossover BraWhere to Buy: Honeylove | Price: $69
 You can see a “third” boob forming on the side view since the cups didn’t fit and squished everything up and forward.Shape: ?/10 – Didn’t fit, so hard to tellLift: ?/10Support: ?/10Comfort: ?/10Sizing: They offer a quick quiz that walks you through a sizing chart to recommend a size for you. Mine was off, but I think that’s because my cup size just isn’t compatible with their range.
Boobie Real Talk: If the number of ads I’ve been fed is any indication, Facebook and Instagram have wanted me to buy this bra for months. They are relentless with digital advertising, but the models do make the bra look really nice, shapely, and sculpting. Sadly, this bra just didn’t fit me. Makes sense, considering the largest size shown on their charts is a G but sometimes I have blind optimism I can make something work. This is the only bra that had distinct, sturdy side support similar to a wired bra as well as straps that could be unhooked and crisscrossed. The mesh detailing is very pretty and I feel like, if it fits you, this could be a great, sexy bra to wear to get nice cleavage on the kind of outfits that need that without the discomfort or hard pokey wires.
Overall Score: 7.5/10 (this is an estimate based on the details, reviews, and potential if it fits you)
Best For: Anyone willing and able to spend nearly $70 for a “next gen” type bra. It feels like a lot of engineering went into this thing, and it likely performs very well for a smaller cup size.
Soire Confidence BraletteWhere to Buy: Cosabella | Price: $79.75
 Shape: 6/10 – Separated, rounded but a bit flattened on topLift: 4/10Support: 6/10Comfort: 6/10Sizing: They offer “regular”, “curvy”, and “extended” so there’s a nice range to find your size even if you have large cups and a narrow band, or vice versa. (I ordered a “curvy” size.)
Boobie Real Talk: While my scores are pretty middle of the road here, this is actually a nice wireless bra option because it’s the only one that provided distinct separation. Each boob was properly in its own compartment, and while it’s not a cleavage maker, it’s lower cut and more comparable to a plunge style which is good for certain tops and wrap dresses. This bra is mostly double-layer mesh so it’s fairly see-through but it does look good on. It doesn’t really lift that well but does hold things in place, which works well if you have a perkier set.
Overall Score: 5.5/10
Best For: Anyone who likes clear separation and a “hubba hubba” vibe. It’s pricy but seems well made and the size range offers even someone with H+ cups an option, which yes, usually comes at a price.
Never Say Never Curvy Sweetie BraletteWhere to Buy: Cosabella | Price: $79.75
 Shape: 3/10 – Wide set and a little droopyLift: 3/10Support: 3/10Comfort: 7/10Sizing: They offer “regular”, “curvy”, and “extended” so there’s a nice range to find your size even if you have large cups and a narrow band, or vice versa. (I ordered a “curvy” size.)
Boobie Real Talk: This is a lesson in really paying attention to the name of a bra. I made the same mistake here as I did with the Bravissimo. This is a “bralette”…not a bra, and it wears like one. It fits overhead like a sports bra without an adjustable back. While it’s really beautiful and spacious even at my cup size, it just isn’t something I could wear on the reg. There’s just no support. Bounce-city here.
Overall Score: 4/10
Best For: Someone who just wants something really pretty at a large cup size but doesn’t need or desire much lift and support. Could be a great sleeping or lounge-around bra, but at this price point, I’d want more.
Beyond BraWhere to Buy: Evelyn & Boobie | Price: $88
 Shape: 8/10 – Rounded and liftedLift: 9/10 Support: 9/10Comfort: 9/10Sizing: 6 sizes available that, according to their chart, fits up to a J cup
Boobie Real Talk: I didn’t want to like this bra, mostly because of the price (okay, entirely because of the price, being the most expensive one in the lot). But I gotta tell you…this is the best bra on this list for several reasons: the support is THERE (the lift is on par with a wired bra); the fabric is so smooth and comfortable, the shaping leaves nothing wanting. I mean…it’s a bra for people who want their boobs to look like they’re in a wired bra but, well…they’re in a wireless bra. I’m always one to rip pads out of cups, but even with the cups, it still worked for me (though my preference is always without). Evenditly, the brand has a patent for something called “EB Core” that provides the incomparable lift. Yes, it’s $88 which is very cost-prohibitive, but I’ve spent so much money over the years on such bad bras that I’d gladly just go back in time and put that same money toward something that actually works.
Overall Score: 9/10
Best For: Anyone with a bigger budget looking for the best support, seamless lines, and all-day comfort. Great for a wide range of cup and band sizes, even for very large breasts.
Before signing off, in case it wasn’t clear, this is a truly honest review. There was no payment from any of these brands to be included. My opinions are my own. I’m just one person with a chest trying to help another person with a chest feel good, lifted, supported, and empowered.
Good luck out there, and Godspeed to all you large-breasted warriors out there. It ain’t easy on these bouncy boobie streets.
Your friend in design (and bras), Arlyn
The post Testing, Testing: Arlyn Reviewed 12 Of The Internet’s Favorite Wireless Bras – These Are The *Actual* Best (& Worst) For Large Breasts appeared first on Emily Henderson.
July 7, 2023
This Yard Makeover Only Took 3 WEEKS, Some Elbow Grease, And A New (Very Good) Seating Area

There’s nothing quite like summer in California – the heat, the dry heat, the dryer heat… And yet, early mornings and late afternoons still draw us all outside. When you’re up at 8 am, and it’s already 70 degrees, and you sit out on your front porch drinking a cup of coffee. Or it’s 6 pm, and you get caught chatting outside with your neighbors during golden hour, as it finally starts to cool down. For some, summers in California are unbearable. For me, they’re filled with nostalgia. And so many of those memories are from time spent outside.
 from: sara updates her backyard with a hand-me-down loveseat & $350
You may remember a small post I did a few years ago, about making the most of the backyard space I had. I want to emphasize the word had. This year, due to some upcoming life events, we decided it was finally time to renovate the garage. And while we were renovating the garage, we decided to pull all of the concrete out. But now what we’re left with is a dirt patch instead of a backyard. At this time we do not have the bandwidth to fix it ourselves, nor the funds to have someone else do it. So, while we’re happy that we got all the concrete out, we still have a long way to go in terms of having a usable backyard space.
 (but at least we have new fencing and pretty stuccoed walls instead of cinder blocks – progress!)
About two months ago Caitlin asked if I had any desire to do some outdoor content. Staring longingly at my backyard, I knew the lift to get that space done – even with the assistance of an amazing brand and EHD – would be too much to take on. My sights began shifting to our front yard. It too was in need of…help.

It had good bones (branches?) but had been pretty neglected since we moved in and focused on interior projects – like functional bathrooms. Many of the existing plant life had either died or was dying due to lack of automatic irrigation and a forgetful caretaker. The plants that were still holding on were overgrown. And the lawn had become a dirt patch of its own (don’t let these before photos fool you, that greenery is weed clover that grew up after a few weeks of rain we got).
BUT, the front yard was definitely in a better starting place than the backyard – and it was significantly smaller.

After doing some research, chatting with my husband, Macauley, and crunching some numbers, I got back to Caitlin with a proposal. In the absence of a backyard for the time being, what if I turned my front yard into the curb-appealing, summer hang-out spot that my home and soul desperately needed. I had a great gardener recommendation who would be able to work within our budget, my dad was on board to help with a fence overhaul, and one of my favorite brands of all time, Article, was lined up to provide the furniture that would be the cherry on top of the whole space.
In a matter of about three weeks, we went from this…
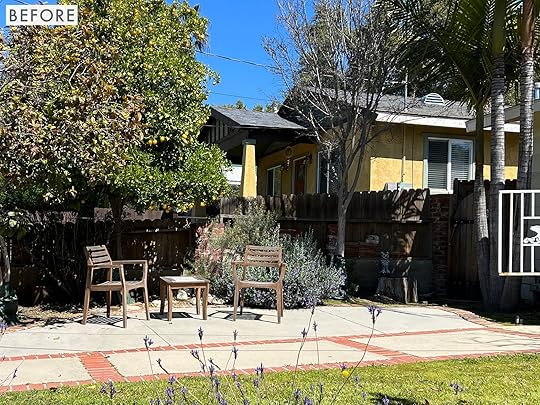
To this…

This has been a dream come true for this Southern California gal. We’ve lived here for almost five years now (holy moly – remember this post?), and I finally, finally, FINALLY feel proud of our front yard. So many neighbors have stopped by to say how nice it looks, which is such a good feeling. Plus, I actually have a space to entertain this year.
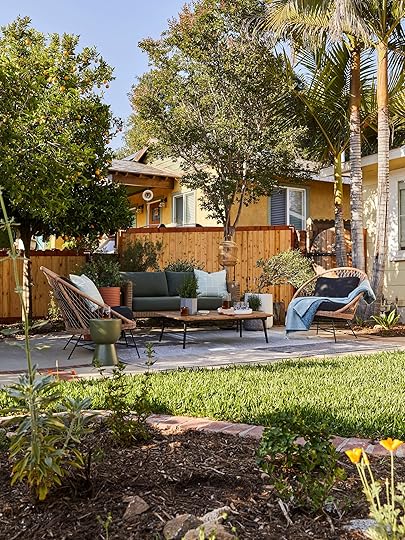
The most important thing we started with was irrigation – I know myself, and I know my husband. We are good people, but we are not water-your-entire-yard-every-night-to-keep-it-alive good. So we added three sprinkler zones to our yard – one for the small lawn, one for the flower beds, and one for the street-facing curb beds. Once there was irrigation, I knew we could finally keep plants alive. So we had new fescues sod installed, a handful of California natives popped into the flower beds, and mulch put down to help with moisture retention in the beds.
All in, the landscaping and irrigation came out to be about $7,500.
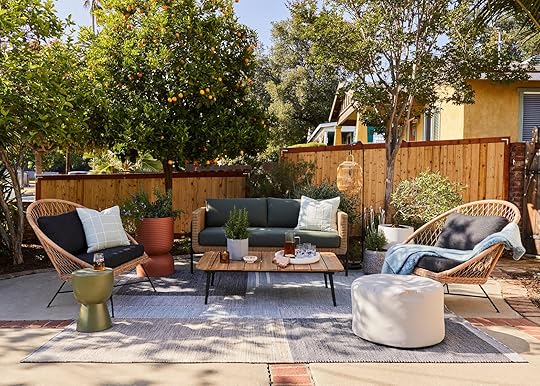
Next, my dad installed this beautiful teakwood fence. It took him two days – one to buy, measure, and cut all the wood, and a second to install it. It matches the wood fencing he’s installed in our backyard and side walkway. Let’s appreciate how much this new fence upgrades the space.
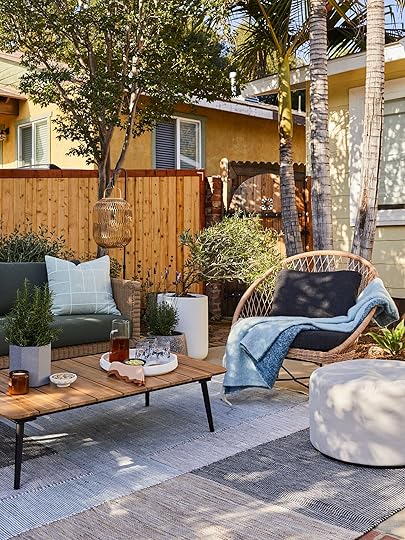
He also built us that beautiful side entrance gate you can see in the background there. I can’t say it enough – my dad is awesome.
The fencing material was about $800.
Sofa | Sea Green Pillow | Tall Wide White Planter | Wide Gray Terrazzo Planter | Lounge Chair | White Pillow | Throw Blanket | Terracotta Planter | Coffee Table | Small Gray Planter | Rug | Pouf | Green Side Table | Standing Lantern
So now let’s chat about what makes this space not just curb appealing, but entertainment worthy – the furniture. Just about everything you see is from EHD favorite, Article. I have owned many an Article piece over the years, and they are just really good. The style is obvious *waves hand*, the quality is incredible (I’m going on four years strong with my velvet Sven Sofa), and the value is unmatched. And even though this post is sponsored, I’ll add that the folks over at Article are some of the nicest I’ve ever worked with. LOVE YOU GUYS.
Now the space we were working with wasn’t very big, so I knew we didn’t have room for different zones with a dining space, a fire pit area, and a lounge (I have backyard goals). Instead, I opted to just focus on creating one cozy area that could function as both a hangout area or a small meal-outside kinda space.
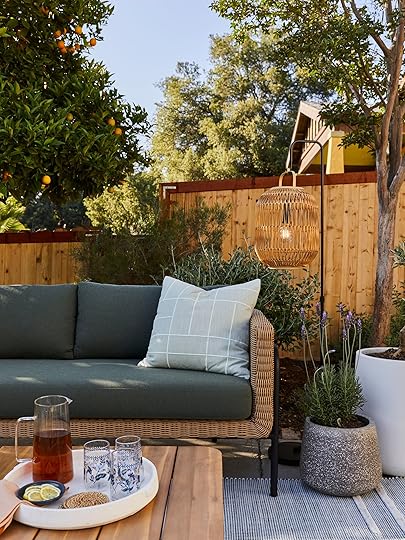
I started with the biggest piece – the couch. I chose this one because I loved the earthy tones that I felt would complement the whole California native gardenscape that was just installed. The black legs give it a touch of modernity, but the wicker keeps it feeling warm. And I’m in love with that green cushion. It also felt like just the right scale for this smaller area, while still being able to nap one, comfortably seat two, and cuddle three.
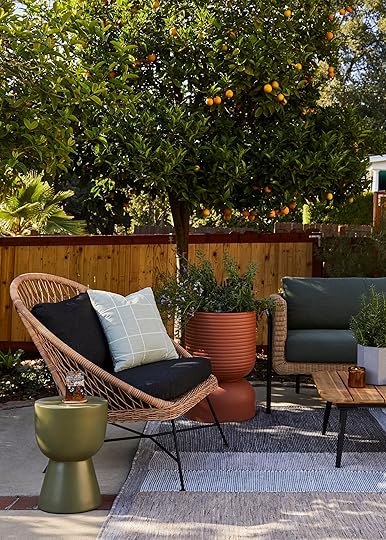
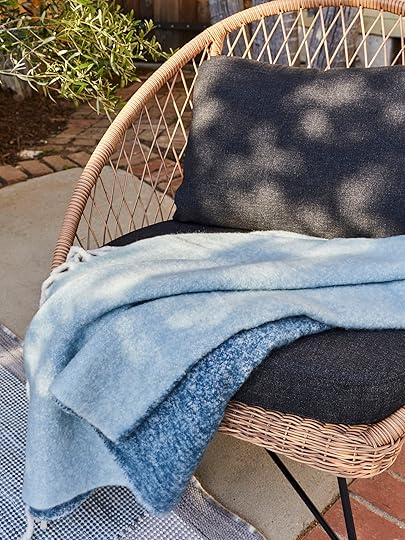
Next up, I picked out lounge chairs to flank either side of the couch. These were an easy choice because I had sat in them before – once at a rooftop movie showing that Article invited us to over the summer, and then multiple times on my friend Emily Bowser’s front porch. I don’t know what to say other than they’re the most comfortable outdoor chair I’ve ever sat in. They’re deep and wide, in a way that makes you feel hugged when you sit in them. It was a happy accident that the wicker detail tied them together with the sofa.
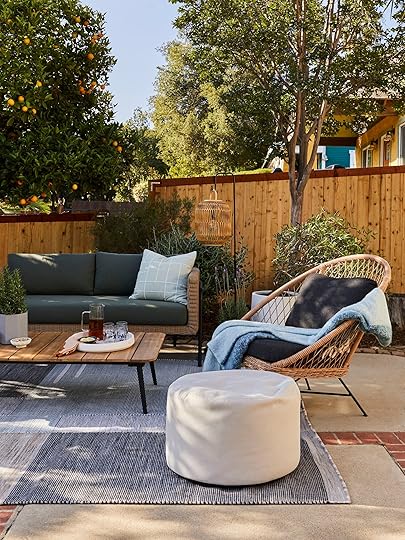
I added this outdoor pouf to make lounging in these chairs even easier (and an extra ‘in a pinch’ seat for those hours of summer entertaining I’m due to have). After this photoshoot, this is exactly where I sat for the next hour answering emails during golden hour, snacking on the props.
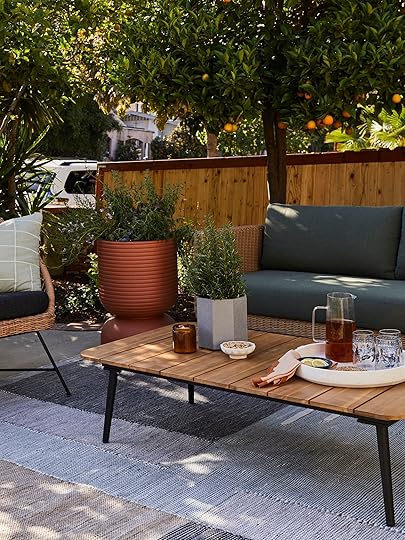
White Tray (similar) | Glass Pitcher | Scalloped Napkin | Glassware (similar) | Woven Coaster (similar) | Small Footed Bowl (similar)
Next on the list was a coffee table. It’s on the smaller side, so it fits nicely between all the pieces but still feels big enough to hold snacks, small dinner plates, or drinks. This table originally caught my eye because the wood felt like it would tie in with the wicker of the couch and chairs, not to mention the black powdered metal legs that tie all three major furniture pieces together. That’s a testament to how Article really does make it easy to design a beautiful space – no matter what you choose, it’s all going to look good together, seamlessly and effortlessly.
I also added this sweet little green side table – both to bring in some more earthy tones, but also to function as an additional drink stand if someone felt they were too comfy lounging to reach all the way to the coffee table from their seat.
Then, for some finishing touches, I brought in some planters and this hanging lantern. The lantern is really cool because it’s battery-operated, and just has a button on the top of the bulb that you press to turn it on. That means no cords needed. And it gives off the perfect amount of soft light – especially considering it’s staying light out until 8 pm these days.
Having additional planters in terrazzo and also a simple, crisp white around the seating area helps it feel more enclosed in nature, almost like the flowerbeds are creeping out and around you.
Article has larger furniture pieces on lock, as evidenced, but have really stepped up their decor game with really great options for planters as well because they have a good variation of sizes and colors/finishes – great for mix/match but still coordinated look. This terracotta one was a lot bigger than I was expecting it to be, but it ended up being a great way to add some height and warmth to the setup. I planted a variety of California natives here together, since it was so big, and they’re still living in happy harmony.
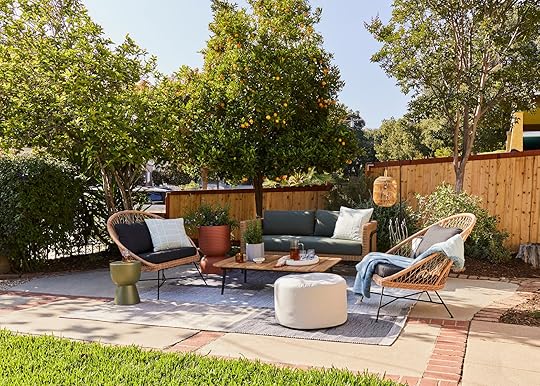
Lastly, I picked out an outdoor rug to anchor the whole space together – that way these pieces didn’t feel like they were floating on a concrete sea. I wanted something big enough to hold it all together, but neutral enough to kind of disappear. This rug checked both boxes.
I spend a lot of time out here in the mornings and evenings. It’s so incredibly wonderful to have outdoor space to enjoy, and I’m taking full advantage of it.
Here’s one more quick before and after to really bring it all home.

A big thank you to EHD for bringing me in on this and making it all possible, our gardener for working so hard to create this beautiful space, my dad for the endless home help, and Article for continuing to partner with me on different projects. And of course Emily Bowser, for hanging out in the hot, dry heat to style it all while we waited for the perfect lighting.
And because Article continues to be the best, they are offering $50 off an order of $200 or more, valid until July 21. Just click THIS LINK and it will be applied at checkout:)
This post was sponsored by Article but all words and opinions are all mine🙂
*Design and Photo by Sara Ligorria-Tramp
**Styled by Emily Edith Bowser
The post This Yard Makeover Only Took 3 WEEKS, Some Elbow Grease, And A New (Very Good) Seating Area appeared first on Emily Henderson.
July 6, 2023
The Full Farmhouse Entryway Recap + What’s Happening Next
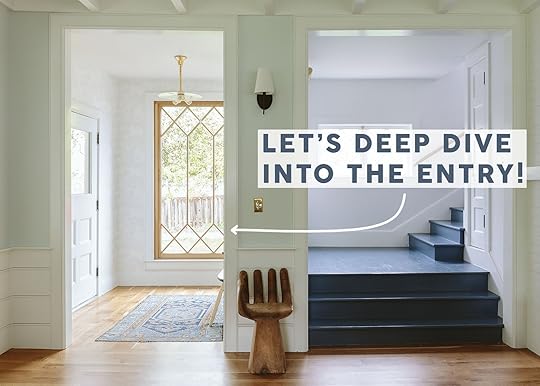
This coming Monday we are revealing the entryway to you (first round reveal, at least), a sweet little room that sets the tone for the house. Before we show you the reveal we wanted to give you a recap of where we started, why we did what we did, and where we landed on things before the final layer. We don’t come in and out of this door as much, but it was a great opportunity to be a welcoming little vestibule. However, it wasn’t always so bright and airy, no siree. Here’s where we started:
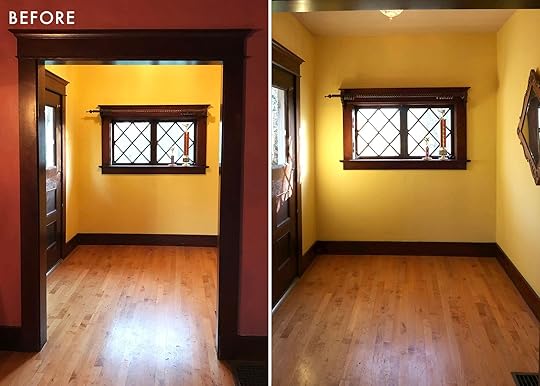
It was a great space, pretty big for an entry (8’x7′ or so), and had a really pretty door and window. We wanted to bring more natural light into the living room so we ended up repurposing that window into the upstairs guest bathroom so we could install a much bigger one.


As you can see the living room was dark, and this entryway leads right into it. The paint color would need to change. The trim ended up being replaced because we renovated the whole house and the style of the trim changed. And the flooring, which was not original (a ’90s update), was not what we wanted and not in great shape.
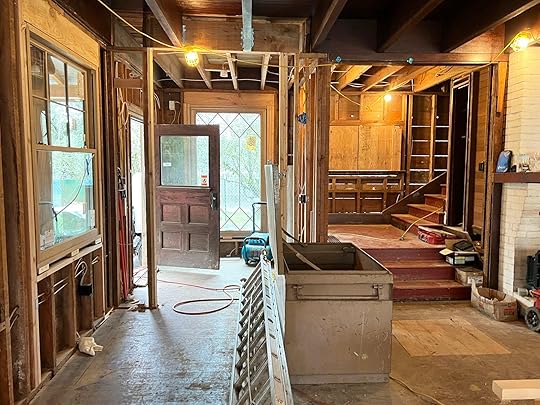
We worked with Sierra Pacific to design this window that married the original diamond pattern design that remains upstairs and throughout some other areas (pantry) with the more traditional and simple grid pattern of the double hungs in the living room and kitchen. It’s unbelievably gorgeous and brought so much light into the living room like we had hoped it would.
 photo by kaitlin green | from: the farmhouse entryway – a peek into my pinboard and process
Originally, we were going to put a wall of closets in here but that was before I realized that we likely weren’t going to go in and out of here too much so we need as much storage. We still need to add a coat rack for guests, but we just don’t need it on a daily basis.
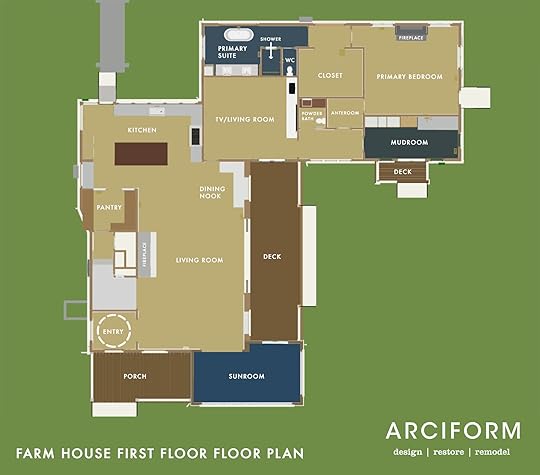
We go in and out of the kitchen door and the mudroom door far more, so this room just needed to function as a welcome for guests. I think my FedEx dude sees this door more than anyone else 🙂
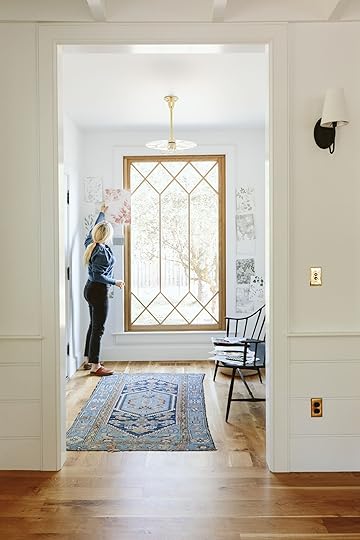
 photos by kaitlin green | from: our farmhouse entry – an update and big wallpaper debate
As you might remember, we stared for hours and hours and HOURS at wallpaper samples for this room, over the course of six months. I really wanted to stick to this calming Scandinavian farmhouse vibe, despite loving color and pattern so much. I love so many of these, a lot, but living long-term with one is a different story.
 photo by kaitlin green | from: the case for the quiet neutral wallpapers
I ultimately decided to go more neutral (which I know that many of you were confused/disappointed by) but I continue to be so happy about it in person. I suppose I’ve reached the point in my career and with this blog where I’m choosing what I want to live with over what I know will look good on camera – because admittedly this paper pattern barely reads in photos.


 photos by kaitlin green | from: the case for the quiet neutral wallpapers
It’s just really pretty and calm in person and has allowed me to layer on a lot of art (in a fun way which you’ll see in the reveal!). Will I someday wish I had gone bolder with the wallpaper? Maybe! But here we are now and I’m super into it. Oh, and I’m not convinced that the door will stay white but it is for now, FYI.
The Bench photo by kaitlin green | from: the case for the quiet neutral wallpapers
The only furniture that this space needed was either a console table or a bench. I was open to both but mostly wanted the piece to be super special. I had this outdoor Rejuvenation bench for a long time which looked pretty darn good, but when Thos. Moser said they would partner on this wood spindle bench I screamed, “YES”. It’s the world’s most beautiful bench, with two tones of wood, the most beautiful joinery, and a better scale for the entry (a foot longer than the black one).
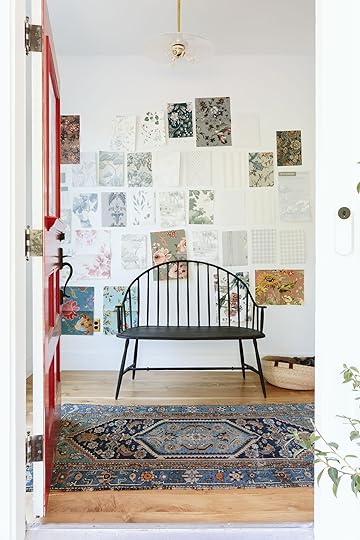
 photos by kaitlin green | left: our farmhouse entry – an update and big wallpaper debate | right: the case for the quiet neutral wallpapers
Black Bench | Two-Toned Wood Bench
I’ve had that vintage rug forever and want to blow it up to a 12’x15′ and put it in the living room – it’s perfection. And the light fixture is an antique that I got from Rejuvenation’s Vintage Department. It’s a simple milk glass disc with a triple bulb brass fitter on an unlacquered brass stem. It’s made for this space because of how it interacts (or doesn’t interact) with the window. I wanted it paired back and simple, letting the pattern of the window shine.
How To Hang A Gallery Wall Of Art On Wallpaper??The reason I went quiet on the wallpaper was because this is one of the few walls in the house that I felt could handle a gallery wall (and no there are no rules on an entry just having a mirror). I have a lot of fun art that was feeling odd in other places or was competing too much with the art that I already had there. It’s my opinion, however, that busy art on busy/bold paper would be too much for me in this home. So I chose to keep the backdrop quiet and let the art be more eclectic and colorful.
But I know myself enough to know that I love to switch up art, especially a gallery wall A LOT. Another one of my talents is putting holes in the wall. So this wallpaper created quite a challenge for me – you can’t just willy-nilly throw holes inside wallpaper, y’all.
So I found this art rail from Pepe & Carols and decided that I’d hang that, which would allow me to switch up the art on the chains. This allowed for ultimate flexibility and I thought would be such a pretty architectural detail. I chose the 72″ length which came with 17 feet of chain and then ordered 5 of the large S hooks and 14 of the small S hooks.
So here’s a sneak peek into the art that we hung – via a really bad iPhone shot by me.
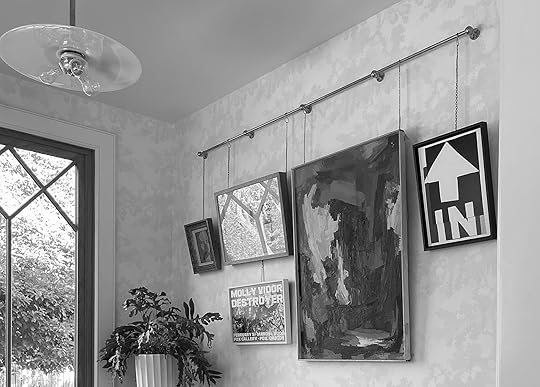
Since this room is so small I can’t give you a better sneak peek without giving the whole space away, so you’ll have to come back Monday to see how it all turned out and how I feel about it. 🙂
Resources:
Floors: Oregon White Oak by Zena Flooring
Wall and Interior Door Color: Extra White by Sherwin-Williams
Wallpaper: Scalamandre Raphael Sandberg Wallpaper in White
Windows: White Oak Sierra Pacific Windows
Black Bench: Rejuvenation
Wood Bench: Thos. Moser
Light: Rejuvenation
Art Rail: Pepe & Carols
Opening Image Credit: Photo by Kaitlin Green | From: The Case For The Quiet Neutral Wallpapers
The post The Full Farmhouse Entryway Recap + What’s Happening Next appeared first on Emily Henderson.
July 5, 2023
Our 18 Favorite Pieces From The New Studio McGee x Target Collection (Y’all It’s GOOD)

Whenever a new Target x Studio McGee collection drops I am never not excited. I really feel like they’ve elevated Target’s home brand so much! Sure do I wish we call could afford handcrafted pieces that cost hundreds of dollars because that’s what they should cost? YES. But that’s not the reality. So when collections like these come out it feels like everyone can have a home that feels special. I have LOVED my Target pieces and have had some for years! Just because something isn’t expensive doesn’t mean you won’t have it for a long time or that it won’t last. And this new offering from Target and Studio McGee has some pretty special pieces if I do say so myself. Right this way.
Wall Art
 photos via target
Target does not mess around with its art and mirrors. Sure, do they still have some “live, laugh, love-esq” pieces? Sure. But not in these kinds of collections (also if you love those signs we support you!). In these collections, they give you affordable art that will likely get mistaken for expensive art. Remember this Target piece that Em’s friends thought cost lots of money???
 photo by tessa neustadt | from: our modern english tudor living room
Ugh, I couldn’t find a better shot but you get the idea. It’s GOOD. Here’s a similar one🙂
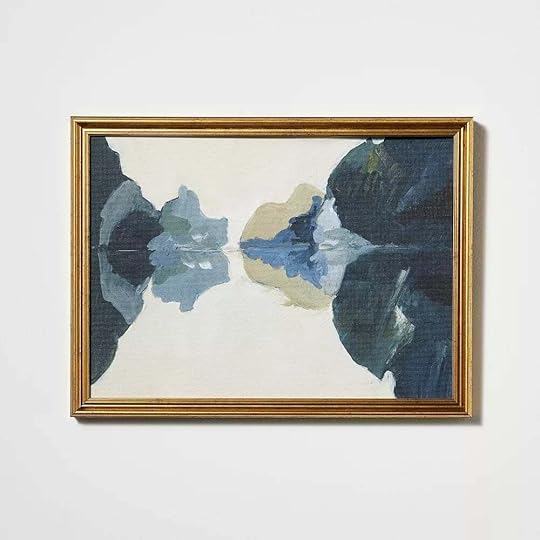
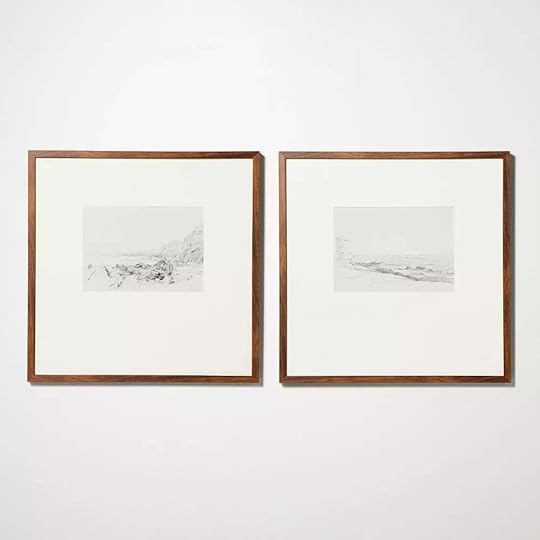
Abstract Framed Cotton Canvas: So this one is on the smaller side but adore the colors and the gold frame. I think this wold work with so many styles making it a great piece for being able to use for years!
Tortoise Shell Wall Mirror: Um so we most definitely talked about the tortious shell trend in March. I love the shape and the subtle but very cool print of the tortious.
Seaside Etchings (set of 2): This set is so pretty and simple. Oh, and they are such a great size at 20″x20″ each! Plus that oversized matting is so good.
 photos via target
Choosing woven seating is an easy and excellent way to add that ever-important TEXTURE to your home! When I saw these two pieces I was pretty excited about them:)
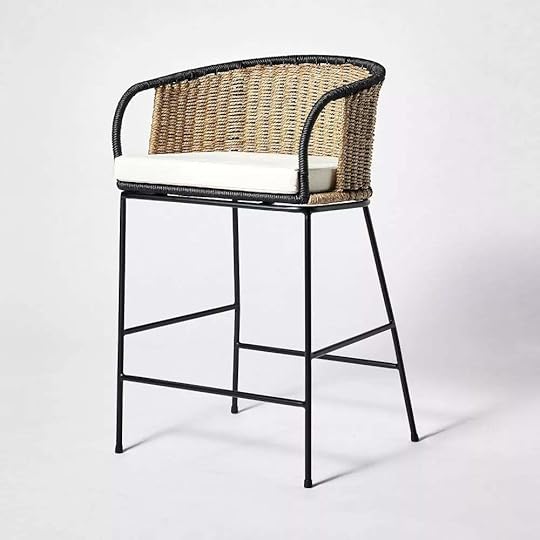

Westcliff Seagrass Counter Height Barstool: We have a whole post on what to look for when buying barstools and a BIG element we think is important is that it should have a back. That way you or whoever is sitting on the stool can lean back and relax! But style is also important (duh) and these are very cute. I love the two-toned option but it also comes in all-black which is also great!
Shiffer Waterfall Woven Bench: How pretty is that waterfall bench!? Truly would work in almost any home, the shape is great and I really love the chunk weave style.
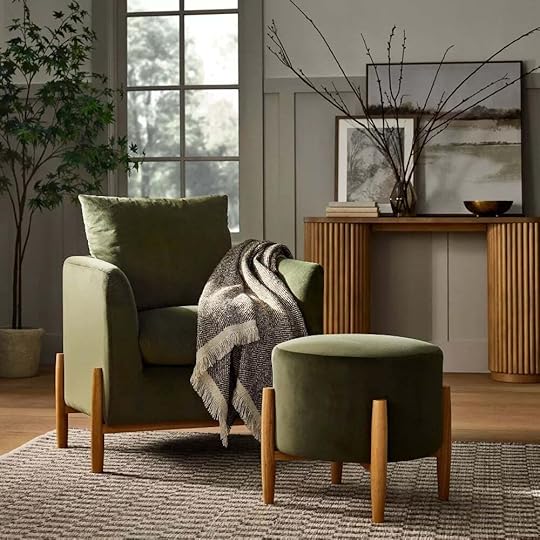
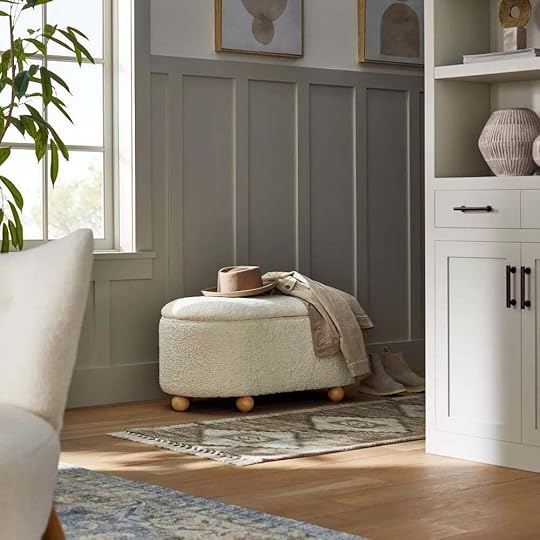
 photos via target
Being able to add a really beautiful accent chair or bench to a room can change the whole energy. Emily has been a Target accent chair fan forever (like with this one) so I’m not surprised these are so good. Plus Studio McGee always comes out with beautiful chairs in every collection. Let’s get into these three.
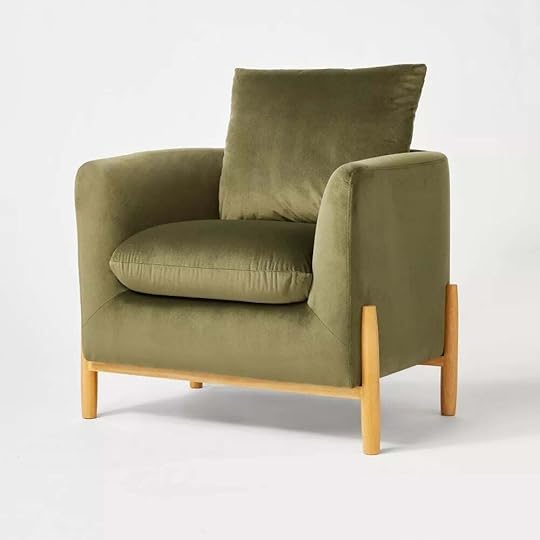
Elroy Accent Chair: Oh this is so pretty! A lot of you were asking about our photographer, Kaitlin’s, green velvet living room chairs. Well, these are soo similar but with a more organic feel with the wood legs instead of hers which have a metal frame.
Havenstone Pill Shaped Storage Bench: You know those ball legs have my heart! This is beautiful, trendy, and under $200. Plus it’s functional since it’s a storage bench. I would easily buy this if I had a place for it.
Slope Arm Swivel Chair: Another chic but more refined accent chair that also SWIVELS!! Plus that brown town is really lovely.
 photo via target
2 Drawer Nightstand: How good is this nightstand?! The space is simple but special since it’s not your average rectangle and I love the inset drawers and small knobs.
Decor
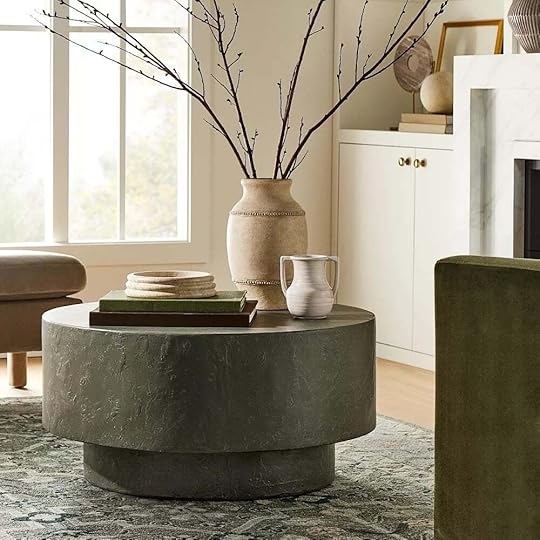
 photos via target
Of course, ideally, we want to fill your home with found treasures and family heirlooms that have deep meaning to us individually but there is nothing wrong with filling in some of your home decor gaps with beautiful and more affordable:)
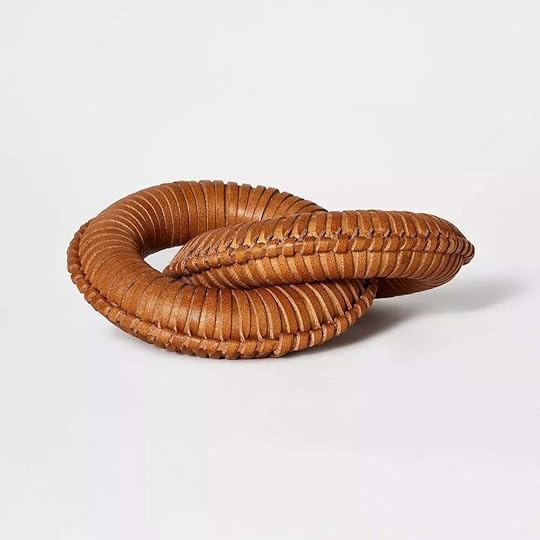
Ceramic Slate Bowl: This might be the perfect gray/blue color in the perfect shape. No notes!
Marble Tray: For $30 this tray/bowl can’t be beat. I love the variation in the stone and the ribbed detailing. Perfect for a coffee table.
Round Leather Links: A fun and textured take on the ceramic links we know and love! Look at the wrapped details. So perfect for a shelf, console table, or whatever surface you like!
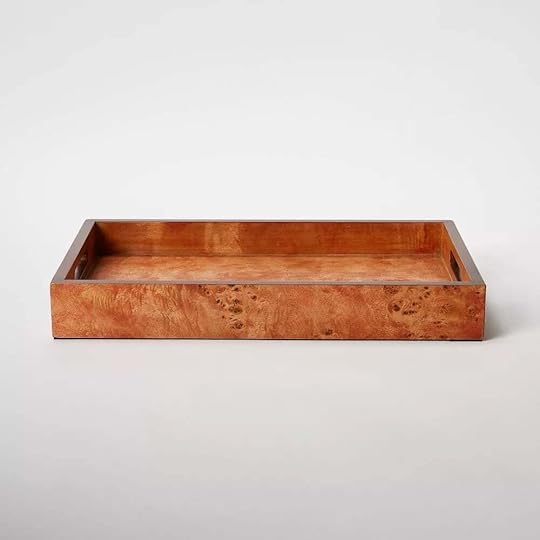

Burl Wood Tray: Does this not remind you of CB2 but for at least half the price? I also adore the darker Burlwood tone. Trendy and timeless in my opinion.
Marble Bowl: This is just cool (and also very CB2)! The shape/height is fun and I love love green stone.
Ceramic Bowl Candle: Who doesn’t love a big old candle?! The low profile made it feel elevated and the reactive glaze makes me think of Lawson-Fenning.
 photos via target
There were a few other pieces that didn’t quite fit in the other categories but couldn’t be missed!
Metal Log Holder: Traditional, modern, and simple so works for nearly every style. I also LOVE the little ball details!
Octagon Frame Coir Doormat: I really appreciate a doormat that isn’t a simple rectangle. This will undoubtedly elevate your curb appeal.
2-Head Floor Lamp: I mean, come on. So pretty and chic! Plus with those fabric shades, it’s going to give off the loveliest glow. 10/10.
Ok, that’s it! Truly, the whole collection is wonderful so you should absolutely check it all out. Hope you have a great rest of your day!
Love you, mean it.
Opening Image Credit: Via Target
The post Our 18 Favorite Pieces From The New Studio McGee x Target Collection (Y’all It’s GOOD) appeared first on Emily Henderson.
Emily Henderson's Blog

- Emily Henderson's profile
- 10 followers

