
Emily Henderson's Blog, page 80
August 21, 2023
Meet The Newest Members Of The Henderson Family – Our Pet Alpacas :)

Well, WE DID IT. A few weeks ago we adopted these few alpacas and we have a lot to talk about. They are hilarious, so cute, funny, have long weird necks, hilarious hair, and act like they are being surprised every single second. It’s been a month since we got them (I wanted to make sure they were the right fit before I announced it) so there is a lot to break down. The biggest question that we have, is WAIT, WHY DO YOU HAVE ALPACAS??? Like why these animals??? And I totally get that. They aren’t the normal city-clicker/hipsters-moves-to-the-country farm animal choice, so it seems odd to a lot of people. But y’all LOOK AT THEM.
Why Did You Adopt Three Alpacas?
So many reasons. Here you go:
Alpacas are just so funny and awkward so they bring us a ton of daily joy and laughter. They are characters just by existing. It’s like having Kramer as your neighbor. I’m sure other people feel this way about other animals but we just feel so connected to these silly fellows. They are extremely low maintenance (comparatively) and obviously require daily feeding, watering and we like to pet them, but the timing is flexible and they don’t do anything that is annoying (yet). Sure, we have to do the necessary vaccinations, annual shearing, and make sure their toenails aren’t too long, but we are up for it and the kids are heavily involved. But they simply don’t need that much from humans. In fact, a lot of alpacas would prefer humans not be around them and can be really skittish, which is why we were so connected to these three (well, mostly just two of them). You have to adopt three (at least 2) because they are herd animals. So just one wasn’t an option. Where Did You Get These Alpacas?
We went to probably eight farms in the last two years to research, felt them out and confirmed this was the right decision. We originally wanted girls because their temperament can be more mellow. But we never fell in love with any that we were allowed to adopt (many simply weren’t for sale or they were like $15k because they were 4-H prized). We ended up adopting these boys from Alpacas of Oregon which is a farm that does alpacas tours, so these guys were very much used to being pet by humans. Some of the farms we went to they would just run to a corner when humans came in (understandably) which isn’t what we wanted in pets. The little black guy, Milo, was really the reason we went for them. He is a year and a half and EXTREMELY affectionate with the kids (and with all humans). We stayed at the farm for over an hour petting him, and afterwards the kids wouldn’t stop talking about him. It was the extra motivation that we were looking for. He is such a sweet boy. He does this nose bop things with the kids that they interpret as kissing, and they nose bop him every day. Bert is funny but not as affectionate, and Otis is getting there but definitely the least affectionate out of the three (which is more typical).
 Why Three Boys And Not Girls?
 Well you can’t mix genders – the boys just can’t control themselves and it gets gnarly. We were definitely leaning towards girls, but we fell in love with Milo and then it was all over. I’m sure had we kept looking we could have found three ladies, and in a perfect situation we’d have a pregnant mom and her best friend, but we wouldn’t know if its a girl or boy and if it was a boy we’d have to give away when they are a year (or around breeding age because they can’t be with girls). Anyway, that’s all to say that we fell in love with Milo, he needed a best friend (Otis) and then Bert was just so hilarious looking so we added him in.
 How’s It Going With The Kids?

Now? Pretty darn great. I was nervous about this whole thing and Brian was really the lead on all of this. We had a deal with the farm that we’d foster for two weeks to make sure it was the right fit for us and them (and our dogs – which can be a real thing). The day that we got them I was so excited and then I got a pit in my stomach that night. What if we made a mistake and I just have more responsibility? What if it becomes another thing for us to battle over with the kids? What if they never warm up to us and we don’t ever connect? They were admittedly pretty freaked out the first few days (like a puppy would be) and I felt really bad. Was this the right decision? But every day they got more comfortable. The kids spent hours out there at first with them, talking to them so sweetly, taking care of their water and poop. They LOVE them, and the boys love our kids way more than us (it’s a size thing we think) so it makes them feel ownership over them (which was one of our goals, obviously).


Nothing will be perfect, but as of now the kids know that they have to put on their poop pounders every morning and night to go out and feed/water, shovel poop and pet the boys. They have so far done it without complaining (we have to ask a few times because we are their parents and they can’t seem to hear us the first time no matter what). It makes me SO HAPPY to look out the window and see them in their wellies shoveling the poop into a wheel barrow without us (which is less gross than other poop TBH and they only poop in one pile).
How’s It Going With The Dogs?
Ok, so this was the big question mark and we were very nervous. Alpacas #1 threat isn’t coyotes (which we also have), it’s domesticated dogs. Not totally sure why but we were told to keep them apart because the dogs can hurt/kill the alpaca and vice versa (some farms have them mixed in so it’s very confusing). Brian installed a no climb fence in the split rail to keep them all out. When the pups first saw them they barked like crazy out the window. Hours later we invited the out and they were obviously very excited and curious, and barky in a friendl- ish way. The alpacas were a tiny bit scared, but seemed ok. We are EXTREMELY cautious about the gates/fences and tell every kid that comes over the rules immediately – that the dogs could kill the alpacas so you HAVE to shut the gate right behind you. I def feel a tiny bit nervous still which I think is probably good. The dogs most of the day now barely notice them, but probably once every other day they bark at them and we have to put them inside.
 Are You going To Show Them, Breed Them, Or Sell Their Poop Or Fur?
 We don’t know! The poop is worth a lot to cannabis farmers, the fiber could definitely be used to make sweaters (Birdie really wants to learn), we have zero desire to breed them, and we aren’t sure what the commitment level would be to do 4-H and show them (so I think not).
If Not, Then Why Did You Get Them?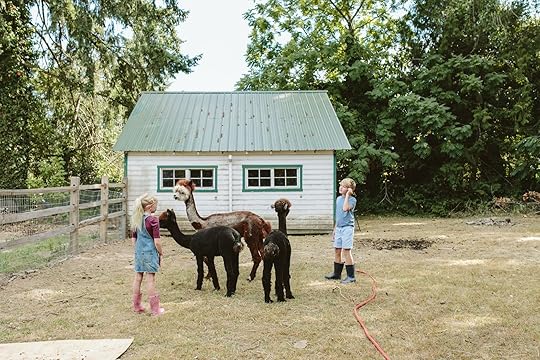
Well, chickens give eggs, goats give goat milk – I get it. But we love animals. Our new pets don’t necessarily do anything and we definitely talked about this a lot. Is this us wanting something unique to post on social media? Nope. I’m far too old for that these days. Where we landed is that they enrich our lives with joy and help teach our kids more responsibility. Listen, we don’t make our kids take piano lessons because I think they are going to be concert pianists, nor do we have our dogs to make money off of them (although we could, those dogs are GREAT on camera) – these new pets, like most things we do as parents – are here to add value to our kids’ lives and hopefully guide them to be good citizens through daily practice, right? These funny animals make life more fun, add a lot to our home and family experience. And that’s enough 🙂


It’s also just fun and exciting to have a new challenge, for us and the kids. We had a pasture and a barn, we bought a farmette for a reason. We weren’t going to NOT have animals (and this isn’t where we are stopping). These are a good first step and then who knows, maybe we’ll do the whole shebang.

As you know, we intentionally slowed down our lives a couple years ago (involving moving home to Portland) and while animals add responsibility (and we haven’t even had them during the winter months) somehow this kind of responsibility doesn’t feel stressful – shoveling their poop, like changing a diaper or walking the pups, is just what you do. It’s the good kind of stress, not the bad kind. It’s the good stuff that takes up time and it gets us outside and moving our bodies. I mean, I hope…


So folks, meet the boys. And while I’ll organically post about them when I feel like it, Brian is far more excited to keep the world updated on all things alpaca on his instagram (OH LORDY LORDY, LOOK WHOSE ACTUALLY JOINING SOCIAL MEDIA???). So head over there to see more alpaca videos.
*Photos by Kaitlin Green
The post Meet The Newest Members Of The Henderson Family – Our Pet Alpacas :) appeared first on Emily Henderson.


August 20, 2023
The Link Up: The New Style Of Jeans That Makes Em Feel GOOD, Caitlin’s AirPod Hack, And A Great Pair Of Affordable Sunglasses
Happy Sunday! This week we started the Farmhouse’s outdoor series and we are pumped to show you what we have. We know it’s a little late in the year but as Em said, it just wasn’t done until now and waiting to show it off until next spring is simply too long to wait! Plus we are looking at this as the “year one edition” with next year being more lived in version (and even more in bloom which is wild being it’s already so lush!). There is also a VERY fun announcement or umm, introduction tomorrow! But first, links.
This week’s house tour is a moody Brooklyn beauty designed by Augusta Hoffman! Every piece is perfectly selected to create a simple but rich home design (and was inspired by nighttime walks in the home’s neighborhood peeking into windows!). The hand painted blue bedroom mural is so beautiful that it would be a crime for the homeowners to move now! Also please note the contrast piping on the club chairs:) See it’s trending!! Go check out the whole space here.


From Emily: I tried on over 30 pair of jeans the other day. THIRTY. It was not fun. The styles out there right now… I just don’t feel good in! I know that skinny is out, but that’s what works on my body and that’s what makes me feel good (well, I love the wide leg ones from yesterday very much, too. But I found these fit and flares from Madewell (outside of my partnership, actually) and once paired with a heel I felt so GOOD. They are extremely flattering – hugging the hips butt and thighs in a good way (the shading of the denim and the seam placement makes it really flattering). Then it pops out at the bottom, balancing out the hips and it looks SO GOOD. They make me want to go out, they make me feel young and frankly just more “hot” than a “mom”. Sometimes we all need that y’all. Thank you, Jeans. I’m BACK!
From Jess: I really want to be a gal that can effortlessly rock a super trendy pair of sunglasses but classic shapes will always just be what I prefer/feel comfortable in. Enter these affordable cuties that I bought while walking around New York yesterday! They are classic but cool, slightly oversized, and for $29 you can’t beat ’em! 10/10 recommend.
From Caitlin: Do your AirPods slip out of your ears? Do you have to be constantly vigilant about headphone placement while completing normal human tasks, like “sitting still” or “getting out of a car” or “chewing gum,” lest your AirPod tumble out of your ear and into the abyss? (Or worse, into the street or the folds of an airplane seat?) BECAUSE HEY, SAME HERE. And my boyfriend found a solution! Last month, he bought me these affordable silicone ear hooks – they come in packs of three, slide right over each AirPod, and I HAVE NOT HAD AN INCIDENT SINCE. Y’all, I am napping on planes with RECKLESS ABANDON now – there are no more worries about having to fish a rogue headphone out of an embarrassing place in front of a bunch of strangers. They only cost $15 and have made wearing my AirPods so much more pleasant – I’m grateful to be dating such a good problem solver:) You can find the hooks for 1st Gen AirPods here, for 2nd Gen here (I got these!), and for 3rd Gen right here.
From Mallory: I checked into a cute apartment I’m staying in in NYC last week and coincidentally they gave us a Supergoop sunscreen in a little toiletry bag/welcome gift (on the same day that Em posted this video), so I had to try it out, of course. YOU GUYS. This is a nonspon message from me: This tinted matte sunscreen is the butteriest, smoothest, lightest thing I’ve ever put on my face. I’m HIGHLY into it and love that it gives a little bit of coverage without feeling like cakey foundation. Try this out if you haven’t. I’ll be buying this probably for the rest of my life.
From Gretchen: I stopped into Sephora the other day for no reason at all—which is typically how I wander in there—and left with a handful of stuff. I’m a low-budget kind of girl, so most of what I grabbed was Sephora brand, but I did treat myself to a Fenty Beauty cream blush and I have to say, I’m obsessed!! This specific color, Rosé Latte, is a sort of brown-tone nude that works well with my skin tone and gives me a naturally flushed look that I love. It’s super pigmented but blends out so well. I use it on my eyes, cheeks and lips—it’s become a staple in my makeup routine and I’m never looking back!
From Arlyn: I normally don’t share men’s items here but when my clothes-adverse husband buys something and actually makes comments about liking it, it’s worthy of a share. (And by clothes adverse I should say clothes-buying adverse…he’s not a nudist.) From my perspective, these shorts look great. Some chambray can look too shiny but these look both casual and dress up-able for shorts. Great with sneakers, boat shoes, and flip flops, T-shirts, polos and button downs. He says they’re comfortable, sized just right and hit right above the knee. In a style true to himself, I suspect he’ll go and buy every other color available because #men.
That’s it from us today. See y’all tomorrow. xx
Opening Image Credits: Photo by Kaitlin Green | From: Our Farmhouse Back Porch Reveal – The “1st Summer” Edition!
The post The Link Up: The New Style Of Jeans That Makes Em Feel GOOD, Caitlin’s AirPod Hack, And A Great Pair Of Affordable Sunglasses appeared first on Emily Henderson.
August 19, 2023
Some Cute New Fall Clothes I’m Wearing On My Body…

If you were to guess what season seems the most like “me,” many people might scream “SPRING” and that feels pretty darn accurate (flowers, bright colors, the sense of waking up, hope but not hot, etc), but fall clothes are THE BEST. I didn’t need a lot, as my life is just so utilitarian up here (which is my preference) but I mostly needed to size up to have clothes that fit better, which gave me a nice excuse to buy a few things (and purge a lot – still figuring out what to do with a suitcase of slightly smaller excellent clothes). So if you need some good fall clothes, I can tell you that I went to most major retailers and kissed a lot of frogs to find a few good things. I would also like to rant about lighting in dressing rooms because MY GOODNESS most of them feel like they are intentionally trying to make your reflection be at its worst. They all need to take a hint from Anthropologie which has the most flattering lighting. Is this a man thing? Do the people at the top of this department not know that bright ass florescent lights make your entire body look bumpy? Is this another reason I need to run for office? Point is, I had to look past the bad lighting (and get over how it made me feel) because I did, in fact, find some cute things that I’m really excited about.

Knit Cardigan | Cropped Oxford Top | Pull-On Barrel Jeans | Loafers


I bought these pants during the last mall shopping post and continue to LOVE them. They are barrel shaped (which is what works on my body versus just baggy), with a lot of distressing and are very comfortable. They are thicker so I didn’t wear them much this summer, but come fall I will be living in these. That Madewell button-up is excellent – super thin (not see through), easy to layer, great boxy cut but with that rounded sides to give it some shape. The sweater (Alex Mill) is a beautiful year round piece – I wore it a lot in spring and sure enough we are moving into fall with it. The shoes are from Everlane and when I first unpacked them I thought they were a little too simple, but I keep wearing them! They are really comfortable and while I love a lug sole, sometimes my feet don’t want the weight on them (I also love Nisolo for this reason – light weight but still high quality).

Shoulder Pad Top | Wide-Leg Jeans | Boots (Similar) | Mini Bag


Birdie said, “You look like a teenager” in this outfit and I have to admit, that pleased me greatly 🙂 Remember when I designed my faux dorm room and dressed like I was 19 and secretly loved it!!? Anyway, this was my foray into the ENORMOUS baggy jean trend that I previously thought was not for me. I tried on SO MANY JEANS – like 30-40 pairs and this was the only “baggy” one that I liked. These are Good American (some are so great, some are so cheesy, right?) and they are CRAZY long. Like I’m wearing 6″ boots here. Nordstrom will hem for free, so I might do that. But I have to say I think the look is fun and a little outside my norm. I didn’t know what to wear on top because I know the rule – if you go big on the bottom, you can’t go big on top (or the other way around which is my usual game) so I pulled out a shirt that I bought three years ago and have barely worn but LOVE. It has intense shoulder pads which is dope, but it’s such a statement. Also, living in SW Portland and not having an office job this isn’t something you just throw on. Anyway, for all of you who do leave the house, care about fashion and live in cities where dressing up is more of a thing both the jeans and the top are awesome. The top is spandex, but thick enough that it’s really flattering (I think I bought it when I gave myself the challenge to look “sexy” for a date night with Brian – needless to say this top wasn’t exactly what Brian would have picked to check that box, but we agreed it’s cool). I think I’d likely wear it with tiny shorts and heels – that’s more my game.

Vest | Striped Shirt (Similar) | Denim Shorts | Socks | Sorel Boot
This is a little more “me” right now and likely something I’m going to wear a lot in the next two months. I can’t say enough about these vests and I want to put it out there in the universe a few more times – I THINK I SHOULD DESIGN A LINE OF WALKING CLOTHES. I have extremely specific ideas on what makes something excellent for lifestyle walking (not competitive walking) to look cute/cool/comfortable and yet have the necessary bells and whistles to get the job done (the RIGHT pockets, breathability, layerability, versatility, etc). That’s all to say that this vest is EXCELLENT and I’ve been wearing it a lot on my morning walks (before this heat wave). It has many pockets (big ones for phone/wallet, small ones for doggy bags), is super flattering (it hugs but just so lightly at the waste) and while it technically adds volume, the way that it’s cut doesn’t add “bulk” like a lot of puffer vests do (that I can’t wear because my love pillows are already big enough). These pockets and the fabric just drapes really well. Even if you aren’t a daily lifestyle walker like me (y’all, get into it – listen to one of my favorite podcasts!) this is a great fall layering piece.

The shirt is from Pendleton (bought last year) and the shorts are from The Great (bought this summer, very splurgy but I lived in them this summer because The Great knows how to make cute clothes shockingly comfortable – sags in the crotch in just the way that I love (and Brian does not LOL, but he’s gotten used to it).
Now the shoes – THE SHOES. These might be my #1 favorite purchase thus far – mostly because they are perfect for my life up here. They are Sorels, rubber on the bottom so they are waterproof/mud-proof, and yet not crazy heavy (some of my lug soles are just too annoying to like walk in). They are snug at the ankle, BUT, and here’s the kicker – extremely easy to pull on because the finger loops are big and easy to access. I get so annoyed when you have to sit down to put on a boot because they’ve made the finger hole too small OR its snapped on its third use (true story). These feel super high quality and yet they are awesome in style, very on trend, and not over the top HUGE like some others which I just can’t get behind. My goodness I have a lot to say today – I think this coffee really kicked in!

Plaid Coat (Similar) | Striped Button Up | Flare Jeans | Clogs
Ok before you get too excited, it’s a vintage plaid coat that I got at the antique mall a couple years ago (there is still a hole in the market for plaid jackets, BTW). The blouse is a cute cut with white collar and contrasting sleeves (great to layer). But the real coup de grace here are the jeans. I’m obsessed with these jeans. These are “fit and flares” which really hearken back to high school, but in a way that I’m fully down with. I felt really really cute/flattered in these and frankly I needed it – they looked good in the butt but weren’t too rigid (like my old Levis that I still love but can’t sit down in, nor button up haha). In fact, I did a partnership with Madewell for social also this week so I had to take another photo of them (wearing only Madewell). Check them out here:

White Button-Up | Flare Jeans | Kitten Heel Boots


See? They are pretty good! I wish the inseam was shorter, but apparently I’m alone in that because the denim world is just dominated by high rise (which I like the look of, but what about us short torso’d ladies!?). I’m wearing a 27 BTW (I’m a size six right now if that helps, so size down, but I tried the 26 and it was TIGHT). That’s also the white Madewell blouse I was talking about above that I love – really thin and easy to layer under a cardigan – also I’ve washed it a few times and if I grab it out quickly enough from the dryer I don’t have to steam it (it’s poplin which sometimes I get annoyed with). The boots in that shot are my new kitten heel booties that are super cute/flattering and yet comfortable.

Denim Trench | Kitten Heel Boots
I bought this denim trench the SECOND I saw it (not part of my Madewell partnership). It’s excellent – drapes really well, layers really well, and is so much more me than a classic trench. I can dress it up like I did here or down (Soccer games? Sure!). Those are the kitten heeled booties I was talking about (my kids were very confused why the heels were so tiny and they naturally loved that they were called “kittens”.


Tank | Trousers | Braided Belt
The pants are a super nice/comfortable/flattering low waisted (thank you very much) pleated wide leg. I styled them rolled up so they weren’t as big. They feel a bit spring to me, but they come in other colors as well. The tank is a great layering piece that has a cute neckline and side straps (tanks are hard for me but I really like this one and wished it came in more colors).

Denim Blazer | Striped Top (Similar) | Pants (Similar) | Sorel Boot | Bag
You’ve seen this great denim blazer before but I just want to reiterate how great it is. It has a bit of stretch making it great to layer under (not crammed in the arms) and is boxy instead of being too body-con, which I think is a more modern shape. The pants are cali demi boot cut (they have a little flare at the end). Same Sorel boots – see how fitted they are at the ankle? But not too tight, just the perfect amount that pipes up into your jeans. The striped shirt is from Lost & Found LA and I’ve had it for years (it’s so thin and soft).


Blazer (Similar) | T-Shirt (Similar) | Wide-Leg Jeans | Clogs | Bandana (Similar)

These are the last jeans that I’m officially VERY INTO. During my epic denim try-on day that I was generally bummed out about, these brought me a lot of happiness. These are fitted in the thigh/butt, with a bit old flare that has a lot of structure. These are splurgy (Mother jeans always are) but I loved the wash, fit, style and I felt really really good in them. I wanted to show you how they look with heels and with flats. (Clogs are five year old Rachel Comey but still available, Madewell makes a much more affordable version).

Cotton T-Shirt | Carpenter Overalls | Birkenstock Sandals | Bandana (Similar)
OK, this one was one that I was SO EXCITED ABOUT, but I wish I had styled it cooler. Maybe with a blousy blouse underneath). We all agreed it was extremely cute and flattering (for oversized overalls) and I know I wear them a lot this fall/winter/spring both around the house and out and about. But yah, the styling was a miss on this shot.


Striped Sweater | Wide-Leg Jeans | Loafers


See? They are pretty cute with flats, too! I think where they hit on the ankle is PERFECT. Cropped boxy, dropped shoulder sweater is an updated version of what we probably all have. Big fan. Same Everlane loafers – I think that color might be perfect.
So that’s what I’m into for my fall fashion this year. A lot of it can be mixed together, and most of it is in the name of extreme comfort. I’m camping this weekend and off the grid (look at PNW me!) but I’ll pop into the comments on Sunday if you have any questions about the fit of the clothes (beyond my ramblings).
*Photos by Kaitlin Green
The post Some Cute New Fall Clothes I’m Wearing On My Body… appeared first on Emily Henderson.
August 18, 2023
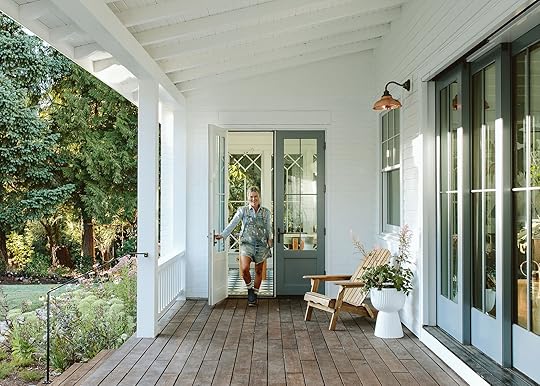
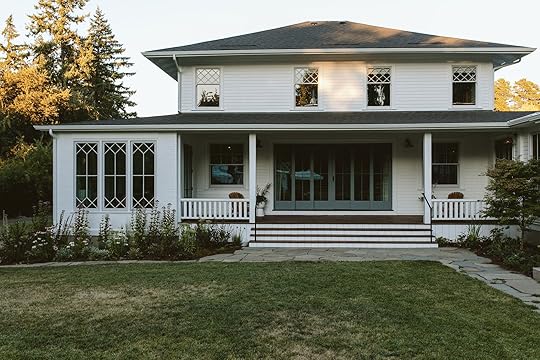
Our Farmhouse Back Porch Reveal – The “1st Summer” Edition!

Alright y’all. I know it’s very late in the summer to be doing backyard posts, but it simply wasn’t ready til now and I didn’t want to wait til next year to play show-and-tell. So this is not an official “reveal” because we didn’t style it all out – mostly because I want to see how we wan to use this back porch before I furnish it – so a fully decorated spring reveal coming at you in like 6 months:) Today’s post is more about the design elements we used for building the back porch and how it came all together. A massive thanks per usual to the ARCIFORM team, both design and build (looking at you Jamie, Adam, Paul, Taylor, Steve and I’m sure many more) – there was so much work, care and expertise to get here. We are so happy and excited every single day.
In case you are just landing here – you NEED to see the before:
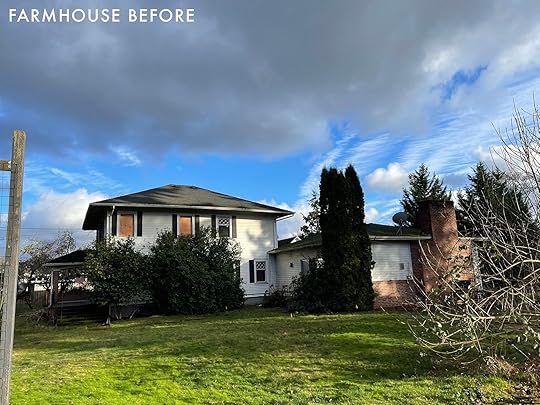
Yes that is the same house. Same view with a slightly different angle. Maybe this will help:


If you want a real thrill just scroll back and forth real quick between the before and afters. It’s truly incredible. So often I’m by the split rail fence and I can’t believe that not only is it over, but it turned out LIKE THIS!!!!!!!! I feel like the luckiest person on the actual planet. Thank you ARCIFORM, Studio Campo, Northwest Native, all our partners (Sierra Pacific, Velux, Rejuvenation, Sherwin-Williams) and especially all you readers who have followed along this longer-than-usual journey.
Double Porches… But Different Stairs??
We are breaking it down and per usual I’m going to point out some stuff you might have questions about (if you noticed). As you can see we ended up doing two separate porches (versus the big wrap-around deck, connecting the two). We have the large back porch and then the smaller porch, so why the different stairs? Well, the house has five entrances and exits, the stairs being exposed to the PNW rain in all of them. Wood stairs are not only more expensive to install than concrete, but they aren’t going to last as long (even the Robi wood that we used that’s meant to be extremely long-lasting but could at some point in my lifetime need repair). So doing all five in wood felt less practical and very expensive. But the idea of cement stairs off the back deck sounded harsh and depressing, so we chose to treat this differently and do wood on this big guy. Ultimately when you look at it in this shot it looks weird, but no one stands in this corner. Most of the time people are just looking straight back to the back porch and you don’t really clock the difference.

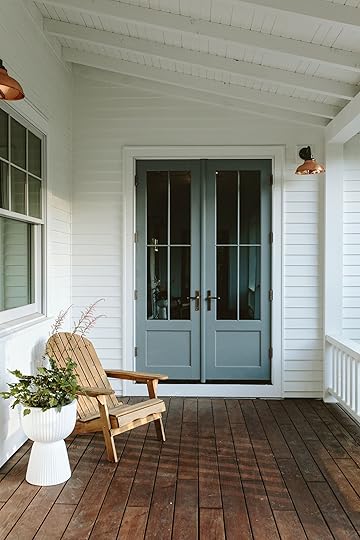
I LOVE how it turned out. We went with “steel” blue aluminum clad on the doors (from Sierra Pacific) and combined with the copper of the Carson Rejuvenation sconces, we couldn’t be happier (blues and blushes forever).
Same Porch But Two Different Railings?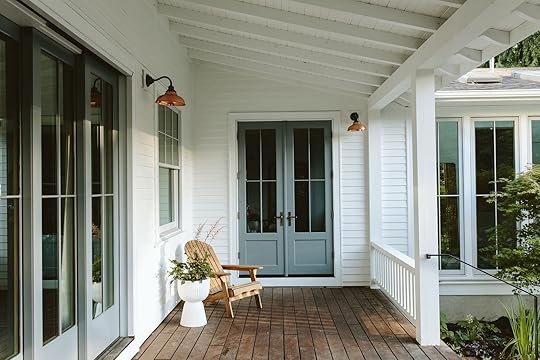
Yep:) Ok so for the porch itself we wanted something classic and “sit-on-able,” meaning chunky, wood and at least 6″ deep and 30″ high. Great. Now we could have done the same railing down the stairs, but again with the heavy rains here it might rot quicker than we’d want. Plus this black railing just disappears (and it’s what we have at every other entry with the cement stairs).

We chose a very slight profile – 1 1/2″ on top and 1/2″ in thickness. I saw it on a fence in a neighborhood while is was on a walk and figured if we had to do metal (which we decided was the right way to go) we’d do it simply like that. It pretty much disappears (and we had to do it to pass inspections).


The view into the sunroom here KILLS ME. I love it so much. This is the corner that we might put a sofa because we don’t use this door too much. I do like to sit out here on the weekend mornings and read and drink coffee, but we could also keep it simple and just do two Adirondack chairs, with the same on the other side. Maybe some hanging swings? Still all TBD. We are using this summer and fall to see where people gravitate – usually having to do with kids, food, and shade.

I do have VERY good news about the mudroom – we are using it SO MUCH this summer. I feared that we put it in the wrong place, that it should have gone by the kitchen because that is certainly where the kids go in and out of most of last year. But now that we play in the backyard so much and the kids have a lot of poop to pick up and twice-a-day visits to our new secret farm animals (stay tuned for Monday!!!!), this exit/entrance gets SO MUCH USE. Muddy and poopy boots everywhere, but only on this porch or inside the mudroom, just like God intended it.
I really like how it looks like this was always how the house was – it doesn’t feel like a new build – thanks to ARCIFORM’s expertise in helping choose architectural finishes, including those sunroom windows which are just ridiculous.

She’s a happy home, y’all. I can’t believe it’s done and ours. We feel extremely grateful and thankful, most seconds of most days 🙂

What’s left for these porches? Well, we forgot to put the post cap on the mudroom post (extra credit if you caught that). Then in the spring we’ll furnish it all, style it out and get lots of shots of the living room doors open so you can get a better sense of flow. Y’all shooting exteriors is so hard – with the full sun you can’t shoot when it’s directly overhead or there are crazy shadows that are so high contrast you can’t really see what you are looking at, so we shot over two nights 6-8pm and didn’t have time to get all the shots that I wanted to (perhaps because one night we were shooting us and the kids in the pool with some wine??). When we do the full tour (coming soon!) you’ll be able to see how it all flows together and works so well. Talk soon! xx

Resources:
Architecture/Build: ARCIFORM
Landscape Design: Studio Campo
Landscape Construction: Northwest Native
First Floor Windows and Doors: Sierra Pacific
Wood Decking: Robi Decking
Copper Sconce: Rejuvenation
House Paint Color: SW 7005 Pure White by Sherwin-Williams
Adirondack Chairs: Wayfair
Pots: World Market
*After Photos by Kaitlin Green
The post Our Farmhouse Back Porch Reveal – The “1st Summer” Edition! appeared first on Emily Henderson.
August 17, 2023
What’s Next in Fall Decor From Crate & Barrel (Spoiler: It’s Real Cozy) + My Personal Rules On Designing with Extreme Comfort In Mind

I am not wishing away summer by any means, but I will always dream of cozy weekends with the kids – what we call the “soup and snuggle”. We partnered with Crate & Barrel this year (you hopefully saw the 7-week kitchen update/remodel) and today I have a living room that I curated with some of their new fall products – all in the name of “weekends at home,” (aka extreme comfort). We shot in this gorgeous house in Sonoma, (designed by the Homme Boys for a client of theirs), and with the help of Emily Bowser, we styled out this room with some of our favorite pieces. As we all know Crate & Barrel is killing it right now – with some of the best designer collaborations the design world has ever seen (Athena Calderone, Jake Arnold, and Leanne Ford to name a few) so I feel pretty darn honored to get to use their pieces on some shoots (and in my life). Today is a show and tell including some of my living room rules to live by. But first here’s the living room all set up:)

Pleated Lamp | Framed Art | Candelabra | Console Table | Basket | Green Velvet Chair | White Bistro Table | Dome Table Lamp | Leather Sectional | Cream Lumbar Pillow | Tan Lumbar Pillow | Soft Stripe Pillow | Faux Fur Throw Blanket | Metal Side Table | Coffee Table | Scrabble Deluxe Edition | Vase | Decorative Bowl | Rug | Swivel Chair | Green Pillow | Floor Lamp | Wood Side Table | Cream Pouf
And my “rules” really just being guidelines I think are super helpful if you don’t know where to start.

Here they are:
Oval coffee tables offset the squareness of sectionals (or sofas): It’s all about mixing shapes for a fun visual contrast. No one wants all hard angles or all soft angles, right?
At least all front legs on your rug = grounding: Cozy up, folks! When your seating doesn’t at least partially live on your rug, there’s a feeling that everything is its own island and you lose that overall cohesiveness.
Lighting evenly dispersed: I LOVE lighting so making sure you space out your pieces (and that you have enough for the size of your room) will automatically make the space feel warm and of course, cozy:)
Fabric shades are best for ambient lighting: They just are! I’m not saying all of your lamps need fabric shades but one or two will give off that beautiful soft light we all love, especially when snuggling on the sofa.
Large shag rug doubles as floor seating: If you have been following me for any amount of time you know I need my rugs to be plush for maximum comfort. So adding in a shag rug is perfect for when people want (or need) to sit on the floor.
Cozy pillows soften a sofa: Cozy pillows and fall are like PB&J. They need each other. And especially with a leather sofa, they really soften and make it feel even more welcoming.
Creating zones makes a space bigger (and more usable): I learned this time and time again. When you are designing your room (space permitted) see if you can make 2-3 zones. For example, you can have a group lounge area, a reading nook, and a beautiful storage moment. This will make it so much easier to design and live in once you’ve made those decisions.

Leather Sectional | Green Pillow | Throw Blanket
I can be wary re leather sofas and at first, was nervous about using this sectional in the living room, but the leather on it is so buttery and soft with a lot of give. It is thick but doesn’t have that stiffness that so many have that feels cold and makes you bounce off of it. It’s really really soft and cushy.


Swivel Chair | Side Table | Mini Bowl | Pouf | Rug
Always a fan of swivel chairs and this one has such a pretty modern shape. We mixed so many textures in the room in the name of “curling up”.

Lamp | Art | Decorative Bowl | Console Table | Basket
We couldn’t believe how good that large-scale piece of art is, and the carved lines of the console are just perfection. Emily Bowser was specifically obsessed with that black chunky lamp and I, too have been trying to find a place for it. It looks like it could absolutely come from a gallery, what with its chunky brutalist design.

Head over to their site to see the video content of this all in action. It was such a fun shoot. I was only there for a day but the whole CB production team shot the entire house for their fall collection, room by room and it was all so beautiful. Here are some more of my favorite picks 🙂

1. Rivera Sofa | 2. Petra Black Oak Wood and Metal Shelf | 3. Pamplona Ebonized Ash Wood Dining Arm Chair | 4. Kota Square Textured Black Pine Side Table | 5. Frederique Cerused Natural Oak Wood Upholstered Dining Side Chair | 6. Bisou Accent Chair | 7. Estate Travertine and Metal Square Coffee Table | 8. Henning Leather Accent Chair | 9. Oro Natural Walnut Wood Tiered Side Table

1. Venezia Glass Taper Candle Holders | 2. Grace Arctic Ivory Organic Linen Blend 70″x55″ Throw Blanket | 3. Cirro White Ceramic Centerpiece Bowl | 4. Spiced Orange Mongolian Sheepskin Throw Pillow Cover | 5. Ophelia Natural Ceramic Centerpiece Bowl | 6. Black Tri-Footed Ceramic Centerpiece Bowl

1. Eino Ivory Ceramic Table Lamp | 2. Iiona Small Black Chandelier Light | 3. Ellery Tripod Table Lamp | 4. Corfu Black Table Lamp With Woven Natural Shade | 5. Larsen Sandstone Table Lamp | 6. Ellery 3-Light Floor Lamp

1. Agen Wool Grid Light Grey Area Rug | 2. Laval Viscose Solid Blue Area Rug | 3. Telluride Wool Ivory Area Rug

And my new fall headshot (sorry the sweater is old but here’s a link to a couple of sizes!). Head over to Crate & Barrel site and see the entire project there. xx
*Styled by Emily Henderson and Emily Bowser
** Photos by Steven McDonald
The post What’s Next in Fall Decor From Crate & Barrel (Spoiler: It’s Real Cozy) + My Personal Rules On Designing with Extreme Comfort In Mind appeared first on Emily Henderson.
August 16, 2023
How We Designed Our Covered Back Porch (+ All Of The Fun Ideas In-Between)

This back porch was never supposed to exist – it wasn’t my intention or idea, but once it was proposed (by Anne’s partner, Richard who is an architect and co-owns ARCIFORM with her) we felt it was worth exploring. I’m so glad we did. We knew that we wanted to add on this sunroom/writing room, so when Richard proposed to connect the entire house with this back, covered porch we were into it, but it took us a while to get there. This was the back of the house before:


When we bought the house they had a front porch, but the back had bushes along the exterior wall with two windows into the living room. We always knew that we wanted to open up the living room to the backyard – wanting that indoor/outdoor flow, view and of course natural light.
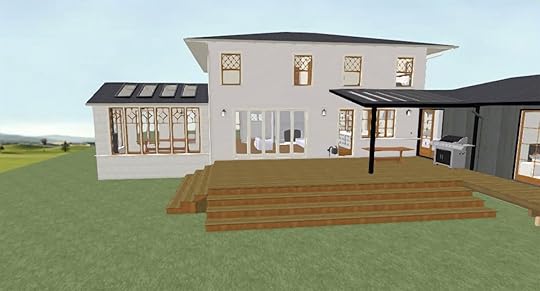
So we went through a few different iterations which was so fun for me, but so much work for ARCIFORM, of which I’m so grateful. Anne, the lead interior architect at ARCIFORM was so incredible during this process – she was so passionate about finding the right solution and went through iteration after iteration to help get us to where we all agreed was exactly the right design. She legit seemed to enjoy the puzzle of it all, which as her client didn’t make me feel like a burden and made it so fun to do together. What you are about to see are just screenshots of various ideas, none are flushed-out renderings.

Isn’t it just nuts?! Who’s house is this??? I think this was our first iteration, where the sunroom was actually on the back. During the design process with ARCIFORM I would just screenshot everything for future blogging, and just found this. This iteration was when the kitchen was in the living room, and our bedroom was where the mudroom is now. (That’s probably confusing unless you’ve been following along closely).
Some of the earlier ideas were clearly nixed – like painting or cladding the old 60s wing in different/darker color (and if you look closely you can see large wooden shutters on the lower windows – an idea that I was obsessed with for a while). We also nixed the hot tub. We just realized that we weren’t traditional hot tub people and it wasn’t something we wanted to invest in or prioritize in the design. We have one at the mountain house and the kids go in, but we don’t. Cut to three years later and now we have our Soake pool. It checks an empty box that I didn’t even know I had (more on that next week – reveal soon!!).

Here she moved the sunroom to connect it with the front porch and came a little into the back porch. And remember, we hadn’t lived here yet – we didn’t know how we were going to use the space. So a lot of these iterations include things like a BBQ area on the back porch or even a hot tub off of our bedrooms. We wanted a wrap-around porch at some point connecting the back porch to the mudroom porch (or in this case, our bedroom porch as the mudroom during these iterations was where the kitchen now is).
This design made sense for a bit because it was when the kitchen was right through that door and much farther into the living room – so the window would have been a pass-through space and grilling/eating out there was still really close to the kitchen (this was also before we created the kitchen patio near the future kitchen).

We ended rethinking the huge back deck. While we liked the idea of this, but this is western facing during the times of day that you want to be hanging back here (afternoon/early evening), so it gets blasted by the heat. This is when we started thinking more about the shady kitchen patio on the south side of the house, realizing that that was a great 4-7pm shady space.
Then we realized that we didn’t need the “wraparound” to the mudroom and that greenery and shrubs would be so much prettier and softer. So we nixed our main bedroom back deck (including the built-in hot tub)…

This version (above) is especially funny because this was when we had a little terrace on top of the sunroom – off of one of our kids’ bedrooms. The creative process (especially in the fantasy stage) is just so fun and hilarious. Brian even suggested a glass bottom floor (aka a glass ceiling in the sunroom). We got as far as reaching out to a company that makes them. Y’all, this was peak covid lockdown and I think we were going a little nuts and perhaps had too much time on our hands. But then we started talking about WHY we would want a terrace for a kids or guest room? This house has a million beautiful outdoor areas to hang out, and then if there was any furniture/chair/rug on it then when you are in the sunroom you’d look up and see it! And not to mention that the sunroom would have to be re-engineered (even more) to accommodate the walkable weight, etc). SO…the whole thing was canned in a matter of days, but I thought it would be fun to show you.


Here’s where we landed before construction started (not final). No big deck (just the porches) just three entrances – the back porch (which goes also into the sunroom and the family room), the mudroom porch and our bedroom exit (this was with a vintage salvaged fire escape which we never found). Of course in here there are still two things we decided to nix – the glass porch ceiling (too expensive, too modern, not necessary) and the built-in BBQ area (wrong place and too contemporary for this style of house). We wanted the back porch to be more classic. Don’t worry, the posts were engineered and added properly.
Ok so now to walk you through what we actually did:

As a reminder, that was the before – the summer of 2019 when we flew up to look at the house.
Then it took a real turn for the worst (but the blue sky sure helps).

They had to remove the plants, obviously, and most of the windows needed repair so they took some off-site to do them so that they didn’t get broken. Here you can see where they were about to add the 8′ addition to the previous addition on the right. Something I like to point out is that ARCIFORM helped us reconfigure the windows on the second floor to have more symmetry – moving one from downstairs upstair, to add a fourth.

Sometimes I can’t believe how much work went into this project. SO MUCH. ARCIFORM just did such an incredible job restoring this baby.

They cut in the opening for the huge doors, removed the windows (the two big ones became our pantry windows) and starting taking off the old gross residing. This was a fun stage to invite people over for. Those who had a design eye and had done renovation projects before were super enthusiastic and could see the potential, those that didn’t were just shocked into silence (which was super fun for me, LOL).

And then magically we had a back porch! This was the shot that I forced the ARCIFORM team to take the day after we passed our inspections to close up the walls inside (aka all rough plumbing, electrical, mechanical and engineering was approved). So as you can see the brick sunroom was added, the new windows were added to the first floor, the fourth window was added to the second floor, big posts were added to support the new covered porch, and the deck was being built.
I don’t like teasing you, I don’t. But this is already SUCH a long post and I have so much to say about how it turned out so you MUST come back Friday for the reveal (we have a different fun post for you tomorrow). Meanwhile here is another teaser, of the mudroom porch and a sweet little pup named Buttercup 🙂

*Opener and Sneak Peek Photos by Kaitlin Green
The post How We Designed Our Covered Back Porch (+ All Of The Fun Ideas In-Between) appeared first on Emily Henderson.
How We Designed Our Back Covered Porch (All Of The Fun Ideas In-Between)
This back porch was never supposed to exist – it wasn’t my intention or idea, but once it was proposed (by Anne’s partner, Richard who is an architect and co-owns ARCIFORM with her) we felt it was worth exploring. I’m so glad we did. We knew that we wanted to add on this sunroom/writing room, so when Richard proposed to connect the entire house with this back, covered porch we were into it, but it took us a while to get there. This was the back of the house before:
When we bought the house they had a front porch, but the back had bushes along the exterior wall with two windows into the living room. We always knew that we wanted to open up the living room to the backyard – wanting that indoor/outdoor flow, view and of course natural light.
So we went through a few different iterations which was so fun for me, but so much work for ARCIFORM, of which I’m so grateful. Anne, the lead interior architect at ARCIFORM was so incredible during this process – she was so passionate about finding the right solution and went through iteration after iteration to help get us to where we all agreed was exactly the right design. She legit seemed to enjoy the puzzle of it all, which as her client didn’t make me feel like a burden and made it so fun to do together. What you are about to see are just screenshots of various ideas, none are flushed-out renderings.
Isn’t it just nuts?! Who’s house is this??? I think this was our first iteration, where the sunroom was actually on the back. During the design process with ARCIFORM I would just screenshot everything for future blogging, and just found this. This iteration was when the kitchen was in the living room, and our bedroom was where the mudroom is now. (That’s probably confusing unless you’ve been following along closely).
Some of the earlier ideas were clearly nixed – like painting or cladding the old 60s wing in different/darker color (and if you look closely you can see large wooden shutters on the lower windows – an idea that I was obsessed with for a while). We also nixed the hot tub. We just realized that we weren’t traditional hot tub people and it wasn’t something we wanted to invest in or prioritize in the design. We have one at the mountain house and the kids go in, but we don’t. Cut to three years later and now we have our Soake pool. It checks an empty box that I didn’t even know I had (more on that next week – reveal soon!!).
Here she moved the sunroom to connect it with the front porch and came a little into the back porch. And remember, we hadn’t lived here yet – we didn’t know how we were going to use the space. So a lot of these iterations include things like a BBQ area on the back porch or even a hot tub off of our bedrooms. We wanted a wrap-around porch at some point connecting the back porch to the mudroom porch (or in this case, our bedroom porch as the mudroom during these iterations was where the kitchen now is).
This design made sense for a bit because it was when the kitchen was right through that door and much farther into the living room – so the window would have been a pass-through space and grilling/eating out there was still really close to the kitchen (this was also before we created the kitchen patio near the future kitchen).
We ended rethinking the huge back deck. While we liked the idea of this, but this is western facing during the times of day that you want to be hanging back here (afternoon/early evening), so it gets blasted by the heat. This is when we started thinking more about the shady kitchen patio on the south side of the house, realizing that that was a great 4-7pm shady space.
Then we realized that we didn’t need the “wraparound” to the mudroom and that greenery and shrubs would be so much prettier and softer. So we nixed our main bedroom back deck (including the built-in hot tub)…
This version (above) is especially funny because this was when we had a little terrace on top of the sunroom – off of one of our kids’ bedrooms. The creative process (especially in the fantasy stage) is just so fun and hilarious. Brian even suggested a glass bottom floor (aka a glass ceiling in the sunroom). We got as far as reaching out to a company that makes them. Y’all, this was peak covid lockdown and I think we were going a little nuts and perhaps had too much time on our hands. But then we started talking about WHY we would want a terrace for a kids or guest room? This house has a million beautiful outdoor areas to hang out, and then if there was any furniture/chair/rug on it then when you are in the sunroom you’d look up and see it! And not to mention that the sunroom would have to be re-engineered (even more) to accommodate the walkable weight, etc). SO…the whole thing was canned in a matter of days, but I thought it would be fun to show you.
Here’s where we landed before construction started (not final). No big deck (just the porches) just three entrances – the back porch (which goes also into the sunroom and the family room), the mudroom porch and our bedroom exit (this was with a vintage salvaged fire escape which we never found). Of course in here there are still two things we decided to nix – the glass porch ceiling (too expensive, too modern, not necessary) and the built-in BBQ area (wrong place and too contemporary for this style of house). We wanted the back porch to be more classic. Don’t worry, the posts were engineered and added properly.
Ok so now to walk you through what we actually did:
As a reminder, that was the before – the summer of 2019 when we flew up to look at the house.
Then it took a real turn for the worst (but the blue sky sure helps).
They had to remove the plants, obviously, and most of the windows needed repair so they took some off-site to do them so that they didn’t get broken. Here you can see where they were about to add the 8′ addition to the previous addition on the right. Something I like to point out is that ARCIFORM helped us reconfigure the windows on the second floor to have more symmetry – moving one from downstairs upstair, to add a fourth.
Sometimes I can’t believe how much work went into this project. SO MUCH. ARCIFORM just did such an incredible job restoring this baby.
They cut in the opening for the huge doors, removed the windows (the two big ones became our pantry windows) and starting taking off the old gross residing. This was a fun stage to invite people over for. Those who had a design eye and had done renovation projects before were super enthusiastic and could see the potential, those that didn’t were just shocked into silence (which was super fun for me, LOL).
And then magically we had a back porch! This was the shot that I forced the ARCIFORM team to take the day after we passed our inspections to close up the walls inside (aka all rough plumbing, electrical, mechanical and engineering was approved). So as you can see the brick sunroom was added, the new windows were added to the first floor, the fourth window was added to the second floor, big posts were added to support the new covered porch, and the deck was being built.
I don’t like teasing you, I don’t. But this is already SUCH a long post and I have so much to say about how it turned out so you MUST come back Friday for the reveal (we have a different fun post for you tomorrow). Meanwhile here is another teaser, of the mudroom porch and a sweet little pup named Buttercup 🙂
*Opener and Sneak Peek Photos by Kaitlin Green
The post How We Designed Our Back Covered Porch (All Of The Fun Ideas In-Between) appeared first on Emily Henderson.
August 15, 2023
Secret Source: This UK-Based Store Sells Cheery, Anthro-Style Decor at Target Prices (+ Our 17 Favorite Pieces)

Here’s the truth: despite being EHD’s resident over-sharer, I’ve kiiiiinda been holding out on you over the last few years. Gatekeeping, if you will. I KNOW. It’s criminal! My job is literally to spill the beans on the best home decor resources – and I do try! – but as it turns out, there are a few (or, uh, more than a few) thrift stores, vintage vendors, and online retailers that I’ve selfishly kept to myself for a little too long…
Until right now. That’s right, folks: welcome to the first-ever edition of Secret Source, in which I highlight one of my favorite budget-friendly retailers. (Read: My apartment is finally starting to feel “done” – whatever that means – and I’m no longer worried about competing with millions of readers for cute and affordable home goods. SO…IT’S SHARING TIME. Let’s sell some stuff out!)
Today, I’m taking you across the pond and introducing you to my tried-and-true destination for cheerful gifts, whimsical decor, luxe bedding, and so much more. (Europeans, be warned: you may already know this one!) If you love the Anthropologie aesthetic but find that your style and your wallet aren’t always in agreement (uh, hi, SAME), this one is for you! I hereby present Oliver Bonas, a UK-based high-street shop that sells some VERY cute homeware. Wanna take a quick peek at some of their EHD-approved inventory?
Fringed Cushion Cover, $41
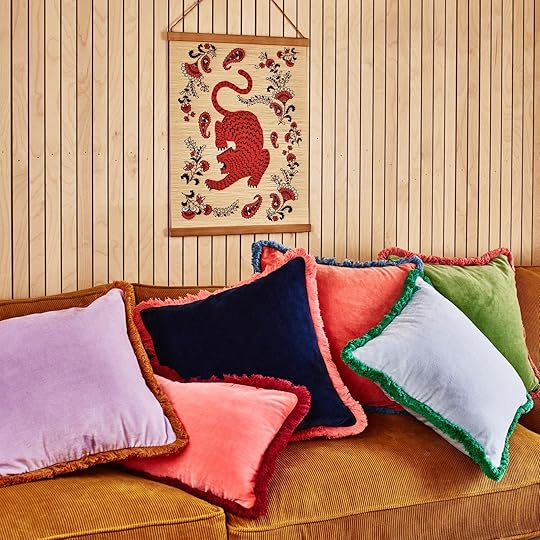
OK, CUTE. These large cushion covers are the perfect way to add a vibrant pop of color to your space, but they’re also an easy way to test out the fringe trend without splurging on a new piece of furniture. (They’re also a great alternative if you love this look, but can’t justify spending $125 on a single pillow.) I grabbed a pair in green and pink for my bedroom (my go-to colors, shocker!) but you can still nab them in navy and green, lavender and rust, ink and coral, and pink and wine red.
Mustard Cotton Placemats (Set of 2), $15.50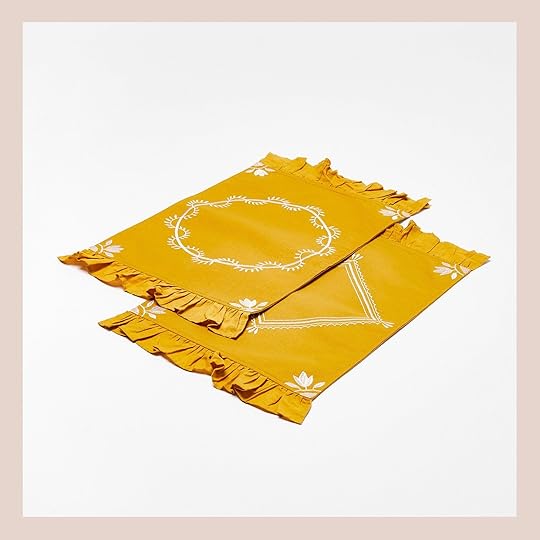

These embroidered cotton placemats are 100% cotton – what a score for the price, right? – and they’ll bring a really charming English cottage sensibility to your kitchen or dinner table. To finish the look, supplement with matching mustard cloth napkins (or these complementary blush napkins, pictured above!).
Striped Marble Coasters, $28.50
If you told me you spent $200 on these coasters at a store like Nickey Kehoe or Jayson Home, I would absolutely believe you. The striped marble is so elevated and polished – it’s a design-forward piece at an accessible price. (PS. These would make a great gift for your decor-loving friend!)
Green Ring Box, $21.50

The print! The tassel! The contrasting lining! This ring box feels like it would be right at home in Matilda Goad’s living room, don’t you think? I love small boxes like this for functional styling – it would look chic as a standalone piece on a dresser, but it’d also look so pretty perched atop a stack of books.
Bobbin Wooden Photo Frame, $36.50
This one was a really good deal (…and I also bought one a few months ago). Bobbin frames are normally pretty expensive – the comparable versions on Anthro are over $75, and it costs about $40 to DIY something similar – so finding a high-quality version (just wood, brass, and glass!) that can either be hung on a wall or displayed on a flat surface for only $36 is a total win. That green is such a perfect vibrant pop of color, too – it feels very Luke Edward Hall.
Whippet Ceramic Salt & Pepper Shakers, $25.50
AHH. So much charm. These vintage-inspired salt & pepper shakers are a modern interpretation of a classic canine motif. They’d bring a ton of cheer and whimsy to any kitchen or dining room, don’t you think?
Beaded Napkin Rings (Set of 2), $9.50

I know it’s fall, but don’t these have you dreaming of a spring dinner party? (Honestly, they could even be really pretty at Christmas if you leaned into that a sweet and classic red, green, and pink color palette.) There’s something about the beading that makes them feel a little more special and personal than a traditional napkin ring and I literally cannot believe that you can currently grab a pair for under $10.
Beaded Napkin Rings (Set of 2), $9.50

…or, if you’re a big ol’ freak and bugs are more your style (guilty as charged!!!), you cannot go wrong with these playful beaded insect rings. Do I own cloth napkins? No. But did I buy these with the knowledge that one day, I will own cloth napkins? I SURE DID.
Marble Pepper Mill, $47.50

It’s not all whimsy, though – there are some really simple, beautiful, heirloom-quality pieces available at Oliver Bonas, too. Case in point: this marble and stainless steel pepper mill which weighs a ton (in a positive way – it feels great to use) and works like a charm.
Gold & Glass Dried Flower Jewelry Box, $43
I’ve been thinking about these classic jewelry boxes since spotting one in the bedroom refresh Sara did for her parents – the mix of glass and brass is just so timeless. Plus, the dried flowers here are such a really sweet touch. (If boxes aren’t really your thing, it also comes in a tray form!)
Velvet Photo Frame, $27

ADDED TO CART. Own it, love it. And this velvet frame is just the tip of the iceberg – they stock SO MANY cute options. (I love this one with brass inlay stars, too.) For the record, we’re between seasons right now and fall collections should be dropping on the site any day now – I cannot wait to see what the new frame options look like!
Beetle Trinket Pot, $25.50

If you love the look of vintage brass but don’t have the time (or desire) to spend a morning digging through piles of stuff at the flea market, this trinket dish is for you. No one can tell me that this wouldn’t cost at least $80 at Anthropologie. (PS. The strawberry and butterfly jewelry stands are also still available if you’re interested!)
Strawberry & Elderflower Ceramic Candle, $29

LOVE. Is there anything better than a vessel that can do double duty? After this candle burns out, use the sweet ceramic strawberry to stash coins, ticket stubs, jewelry, candy…I mean, the world’s your oyster. (If you prefer a bright and citrusy scent, the lemon version is a bit larger and smells DIVINE.)
Velvet Jewelry Box, $43

Grab the small one for $27, the medium for $43, the large for $47.50, or a set of all three (you know, just in case you’re also hoping to have a moody photoshoot of well-lit boxes in your own home). They’re literally jewel-toned jewelry boxes, guys. Genius.
Whippet Bottle Opener, $21.50

It’s my go-to gift! (Is anyone surprised?) If you’re at a total loss as to what to gift someone – a coworker, an acquaintance, a hard-to-shop-for friend, perhaps? – you can’t go wrong with a fun beverage (beer is great, but local bottled sodas are also a great choice if they enjoy sugary beverages!) and a practical tool like this bottle opener. It’s a little more exciting than the standard-issue black and steel version, don’t you think?
Beaded Jewelry Box, $22

Be honest: are there too many beetles in the post? (To be fair, they’re definitely having a moment right now. I mean…remember the beetle-print bathroom tile we featured? SO GOOD. There are some newly released projects that have included similar entomological themes – I’ll drop some in the comments for us to discuss later.) ANYWAY. Would I happily accept anything to me if it were given in a charming little beaded and embroidered bug box? DUH.
Alphabet Glass Bottle Matches, $17.50

Final one, and I’m kind of cheating….because would these make a super cute gift? Yes. But would they also make a great, affordable DIY project? BIG YES. That’s what I love so much about Oliver Bonas – I’m consistently inspired by their styled shots and their inventory, even when I’m not looking to make a purchase. It’s a real treat when I can find an aspirational piece at a friendly price (case in point: those fringed pillows I mentioned up top!), but it’s just as special to find ideas for projects and products that I can tackle on my own, too.
A word of warning, before I leave you: shipping to America can be quick, but the website warns that it can also take an eternity (up to 6 weeks for certain pieces – I haven’t experienced that long of a delay, but I just want to make sure you’re aware). I think the wait is worth it – the quality:price ratio is great, so I wouldn’t mind an extra-long shipping window for any of my future purchases – but it’s something to keep in mind, especially when you’re purchasing gifts that need to be delivered by a certain time.
But with all that said…WHAT DO YOU THINK? How do we rate our first-ever Secret Source? WHAT SAY YOU?? See you in the comments… xx
*Photos via Oliver Bonas
The post Secret Source: This UK-Based Store Sells Cheery, Anthro-Style Decor at Target Prices (+ Our 17 Favorite Pieces) appeared first on Emily Henderson.
August 14, 2023
Real Reader Kitchens! 5 Dated Honey Oak Spaces & How A Design Expert Would Make Them Better

In the design world, at least as seen through the lens of the internet and social media, we’re so used to “perfect.” There doesn’t seem to be much room for “realistic” or even “good enough for now.” But the truth is, most of our homes do not look like all the photos hanging out in our saved folders and Pinboards. I’m guessing at least 75% of those of you reading don’t have kitchens plucked straight from the pages of Domino. A good majority of your cook spaces are likely just…normal. Maybe even—gasp—a bit dated.
I myself am renting a property with circa 2000s cherry cabinets, and am on a mission to work with them (not against them). It’s not easy, and it’ll never be my dream kitchen, but I’ll get it close enough to “pretty alright” with just a few additions and fixes. With a desire to help others get to their “pretty alright” states in their homes, I put out a prompt on the EHD channels for readers to send me pictures of their kitchens, specifically anyone with honey oak cabinetry. The darling of the builder world in the late 1980s, ’90s and early aughts, for better worse or for worse.
My inbox quickly filled up with photos of kitchens that looked plucked from my childhood, with calls for help in the body of the email. I sat with Jess one afternoon and whittled down the long list of submissions to five that felt varied enough to share some ideas that might be helpful to others here, as well.
The assignment for me was to cook up (ha!) quick-ish, affordable-ish solutions to bring the spaces out of the Seinfeld era without any significant renovation or upheaval. While every space could benefit greatly from new countertops and some fresh paint or wallpaper, there were some obvious themes that popped up for me when jotting down my notes for each. After some blog surfing and internet hunting on the subject, I found that most people with these orangey, yellowy, shiny cabinets tried to limit the wood and bring in freshness and light into the space as best they can (typically, with a lot of white, tbh).
You’ll see these suggestions peppered throughout the kitchens and my recommendations below, but in general, here’s what I think each of these spaces could use.
6 Rules For Honey Oak Kitchen UpdatesWhen in doubt, reduce the wood load. What I mean by this is to lose as much of the wood as you can while still having the appropriate amount of storage. This could mean taking down some uppers if you can spare them to keep the weight of the wood below eye level. Also, if an existing island is easily swappable, opt for a color or white to break things up. If it’s a permanent fixture, consider painting it a light color. The same applies to other wood in your space, including dining furniture and storage/display furniture. Find some contrast with these pieces either with a light wood, black or even a color; but definitely avoid trying to match the oak with more oak. The last thing honey oak needs is more honey oak. Find your drama moment. I think this is true for basically every room, but especially when you want to distract from something you don’t love. In this instance: the cabinets. Consider wallpapering, or going all in with a counter-to-ceiling backsplash where there is no cabinetry. Reduce clutter. Honey oak can feel very heavy, even without being a dark-stained wood. I’m guessing it’s the highly visible grain. Listen, coming from someone with a small appliance addiction and a toddler that has all the tiny things everywhere, I know what I’m about to say feels harsh and maybe impossible but…GET ALL THAT CRAP OFF YOUR COUNTERTOPS. Maybe not all of it, because there’s no sense in putting your toaster away if you use it twice a day, but look around and take inventory of what *really* needs to be out, and what can be stashed away. This will help immensely. Keep things light and bright. I sort of touched on this already, but the most successful “work with it” makeovers of honey oak kitchens I saw did not lean into any moodiness. Every space used white as much as they could (or pastels) and it was highly effective to balance the wood to make it feel more elevated and updated. That’s not to say you can’t layer in any charm if that’s your vibe. Keep the design moments in the rugs, curtains, backsplash and hardware. Go modern but not too modern. There’s a tough balance I see in dated rooms trying to pull themselves up by the bootstraps to err on the side of contemporary but all that does is make the dated part of the space feel even more dated. Avoid a stainless steel backsplash, ultra modern light fixtures and hardware, and the like. Don’t underestimate the power of some peel-and-stick. This option is either for renters or for homeowners who know they will be renovating down the line but want an update now without spending a fortune. Everything is peel and stick these days friends. EVERYTHING. Backsplashes (even real marble), countertop contact paper, wallpaper, hoods (kidding about this one, sorry). Put that temporary design power to use. Now, Let’s See Some KitchensAlright, the time has come to peek inside real people’s homes (yay!). Let me explain how I approached this project first, and then we can dive into each individual kitchen. First and foremost, I realized creating a moodboard a la my cherry kitchen post wasn’t going to be easy without knowing more about these readers’ styles, preferences and what the rest of the home looked like. So I did something else instead. Each home will include comments on the image of what I think they should try (remember, these are not permanent renovation ideas but more “good enough for as long as you want” ideas), and then at the end, I’m sharing a ton of product roundups that could work in any of these kitchens. Got it? LET’S GO!
Marisol: Stagnant In SwedenI was instantly drawn to Marisol’s Sundbyberg, Sweden, kitchen. The light in there is so beautiful and it’s an amazing space that just needs a little love. Here’s a summary of what she said to me:
“We love the space of our kitchen, and the layout works pretty well. It’s an unusually large kitchen for an apartment in Sweden. But the style of cabinets, extractor fan, and tiles are not our personal preference. The kitchen also serves as our dining room, and we can expand our dining table to sit up to 10 people. When we expand the table, we change its orientation and have it perpendicular to our refrigerator and freezer. The island can be easily moved since it does not have any plumbing or electrical. I would describe our style as a mixture of timeless with a hint of modern sprinkled with souvenirs from our travels.”

What a great space, huh? It just doesn’t know who it is yet: a backsplash with country kitchen vibes, a modern island with barstools, some charm. Which is it? I think the best move from Marisol is to cover up the tile (again, a peel-and-stick would be an easy no-reno option here), change out the hardware to something a bit more classic, possibly in polished chrome, simplify the (fantastic) hood and change the island. Either something longer (though that might run too close to where they orient the table for company), but definitely something more traditional and white.
A smattering of drippy plants and maybe even some of her souvenirs atop the cabinets would make things feel more homey and eclectic.

It’s hard to tell exactly what color those walls are, but a warmer white (I will always and forever recommend White Dove by Benjamin Moore or even Chantilly Lace) would glow more in that beautiful Swedish light. Also, the large cabinet on the left feels like a giant compared to everything else. If it’s easy enough to take out and replace with a smaller display cabinet, that’s the move. If not, paint that puppy the same color as the wall (or a gorgeous minty green or Swedish blue). If it’s going to be large, it might as well be in charge.

A simple white or cream linen Roman shade on each window would bring some life to this side of the room. At first, I wanted to suggest a built-in banquette but that could be tricky with the radiator under the window (and maybe not work for their large gatherings). Instead, to balance the heavy wall of cabinets on the opposite end, I’d say add more shelving or even a built-in bookcase situation.
The table and dining chairs feel too modern; something more Scandinavian like a rush seat wishbone or stackable bistro chair surrounding a farmhouse table would be beautiful. The last thing I’d add here is a large swing arm sconce on the wall to act as a “chandelier” moment above the table.
Michelle: Builder To BetterI saw myself in Michelle, probably because we’re both moms to tiny humans and the bottles, sippy cups, pump parts just don’t quit. There’s never enough counter space with a baby, but sadly, in the layout of this space, I can’t really offer her a solution for more, like a standalone island. But, we can get this kitchen looking less tract home and more personalized. From Michelle:
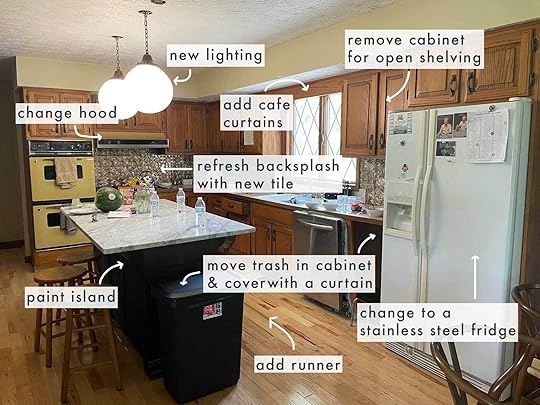
“I live in a builder-grade home that hasn’t had any real updates in 15 years. The cabinets are in really good shape and functional so I would hate to get rid of them. The kitchen layout also works really well but is very cramped and small compared to the size of the rest of the home. I’d like to get rid of the microwave and replace it for a true hood or other alternative.”

First up, let’s get some hardware on these cabinetry fronts. Since the space feels a bit more modern, I’d go for a classic simple bar pull on the bottom and matching smaller knobs on top, both in a polished nickel or bronze, since the space can’t handle too much visual clutter due to its size. (Hot tip: Here’s a post the team did a while back on hardware placement since it’s not always obvious once that drill is in your hands!) The brackets under the breakfast bar could use a little updating, as well.

A rug here would help to separate the wood floors from the wood cabinets that are all the same tone. I can’t get a sense of Michelle’s style in any of those photos, but a lighter color with some pattern would be nice since the countertops are darker. And speaking of the countertops, I keep reading about people honing their shiny granite to help bring it into modern day stylistically and it looked great! I couldn’t find any straightforward answers on how much a project like that would cost, but one source told me roughly $50 a square foot. Not cheap, but considering new stone would cost twice that much at least, it’s something to consider.
Some fresh cafe curtains hung higher at least halfway up the window (3/4 works well, too) wouldn’t hurt.

And finally, like most of these kitchens you’ll see, adding in a backsplash would go a long way to feeling more up-to-date. A white picket-style tile or even a micro-stacked subway might be great here. Also, I know Michelle mentioned wanting a proper hood and getting rid of the microwave, which could be beautiful, but she’ll lose some cabinets in the process of building something like that in. Maybe something to wait on until there’s less baby stuff to stash away.
Alison: Serenity Over StorageAlison’s was the first place I flagged to include in this roundup because there was a lot of room to play. Such a diamond in the rough we have here. The layout is already excellent, there’s tons of storage so it just needs a refresh. Here’s what she requested:
“Our kitchen needs some help. I’ve been working on some ideas, but would love another opinion! Storage near the stove is needed, but otherwise, we have plenty of storage to take out uppers or reconfigure things.”
This is the perfect example of one of my rules to lighten the load. Between the yellow double oven and hood, the mismatched appliances, the stainless textured backsplash, the mismatched island and rustic hardware, it’s A LOT.
Let’s start with the backsplash. I’m not sure if it’s those sheets that are glued or nailed onto the wall or individual tiles but they carry too much visual weight, in my opinion. They don’t look easy to cover so if they could easily be removed and replaced, that’s the way to go. Something hand-glazed (or hand-glazed looking) would work well here.
There appears to be an open cubby next to the dishwasher, which looks like maybe a good space for the trash can covered with a curtain? I really dig the oven situation actually, but the hood feels more dated. Even just a simple stainless hood to match the dishwasher would help (and if it’s in the budget, a matching fridge, too). As for soft goods, let’s bring in a simple runner in a green or blue and a cute cafe curtain in a coordinating hue.
Alison mentioned she didn’t need all the uppers, so the easiest place to start is taking down the ones to the right of the window (and maybe even left) to add some open floating shelving in white or metal similar to the ones shown here and lose some of the weight up top. Some new charming lighting and a lighter island and barstools could make a huge difference, too.

Something about the yellow tone of the walls makes the orange of the cabinets even more prominent, so I’d recommend painting all the walls and the closet doors either white or maybe even a super subtle pink (if that’s Alison’s taste…I know it’s not everyone’s). All the countertops seem to be old laminate, which could easily be covered with marble (or even just white) contact paper if they have the patience to install it. There are also plenty of DIYs on the internet for how to paint laminate and faux marble it (like this one!).
For hardware, I’d go for brass here: cup pulls on the drawers and matching flat knobs on the cabinet doors.
Kaitlin: Uppers Be GoneAnother honey oak kitchen with no backsplash, no hardware and very little life. What are these builders doing?!? But what Kaitlin’s kitchen lacks in character, it more than makes up for in storage space. WHICH MEANS WE CAN HAVE SOME FUN!
“We bought our house in January and have only made one (huge!) improvement to the kitchen: we painted the walls from a pepto bismol pink to an off-white. We know we want to make everything feel a lot more current and elevated, but we’re not sure what direction we should go in. Should we paint the cabinets, and if so, what color? Replace the cabinet doors with something like a Semihandmade and then paint? Can we make these whatever grey granite countertops look OK or would getting a different countertop make all the difference? What about a nice tile backsplash? How about light fixtures (the Tiffany glass isn’t me)? And obviously we need to update the white refrigerator because… a white refrigerator.
For reference on how the kitchen fits in with the rest of the house, the kitchen is part of a fairly new addition to the house (early 2000s) and the rest of the house is pretty old (1890). We’ve been redecorating the other rooms in kind of a slightly updated Shaker, eclectic, New England style (think: pretty wallpaper with a mix of antiques and modern furniture), so ideally this would look somewhat complimentary.”

Kaitlin seems the most open to overhauling this space, but in the spirit of this post, I’m not going to recommend anything too drastic. Yes, swapping the cabinet fronts and painting everything would go a looooong way to revitalizing this kitchen, but if not, there’s still a lot to do.
In the above view, you can see there’s an island in the middle that has an overhang breakfast bar, which frankly, is a bit odd. No one is going to sit with their backs to the stove just a few feet away. If the island is just floating over the floors, I’d give it the boot to replace it with an open freestanding island. They don’t need much more storage, and the room could use some airiness.
The grey countertops might look great with the honed or leathered treatment I recommended for Michelle. A cool linear pendant over the island would be great to hit that modern look Kaitlin mentioned wanting in here, and my note about removing the crown and adding in cabinet boxes would help make these look less dwarfed by the ceiling height. This is an example of what I mean.

Here, I want to recommend losing ALL of those uppers and framing the window in shelving (I think white shelves would be great here). I’d take the added backsplash up to the bottom of the top shelf and then wallpaper up from there (this is an example that Emily did in a recent kitchen reno). A Roman shade in a stripe would be wonderful against the print of a floral wallcovering. For the light above the sink, I’d ditch the pendant and go for a flush mount there instead or a sconce just above the window.
Caitlin: Cincinn-SaddieAnd finally, we head to Cincinnati to see reader Caitlin’s large builder-grade kitchen complete with an awkward island (why is this ever a thing?). Honey oak floors, honey oak cabinets…it’s a lot.
“I was so desperate for a change that I searched high and low for a ceiling color to bring a little life into the kitchen (seriously, my paint samples made the ceiling look like a patchwork quilt). We have taken down several upper cabinets (somehow there was too much storage?) and replaced them with a pot rack and a range hood (which means our over-the-range microwave became a countertop microwave). We’ve got an odd L-shaped island, a sliding door pantry that is very impractical, and so many cabinets! I am desperate for drawers. We also have a strange little corner area with a shallow counter and more cabinets under the pot rack that I don’t know what to do with. In addition, our pot lids live on top of the refrigerator, which is an awful place for them, and both the garbage can and recycling bin live out in the open. I would like to have them concealed.”

Okay, let’s see here. We have a few places we can keep removing cabinetry. First and foremost, if this island can be swapped, let’s swap it. There are some great options out there that are drawer-heavy, which is what Caitlin wants and needs. And that little narrow cabinet on the right…let’s just take it out. A tall freestanding cabinet would be nice to break up all that wood, plus it would nicely tuck away her pots, pans, and all the lids that currently live on top of the fridge.
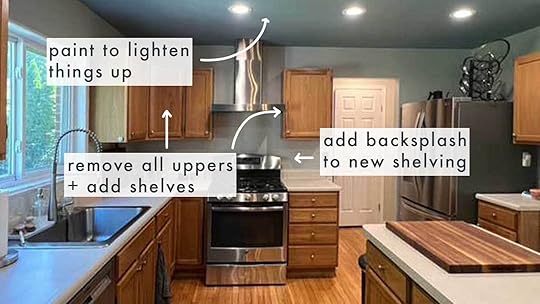
Caitlin mentioned an excess of storage and that she’d be happy to take down some cabinets, so to open things up a bit more, let’s pull down the cupboards around the stove hood. Adding shelves (and a backsplash up to the first shelf height throughout the kitchen) would modernize the space.

Again, take down some cabinetry, add shelving, and while the hardware here is perfectly fine, the size of the room allows for something a bit more stately or even something modern like a micro knob.
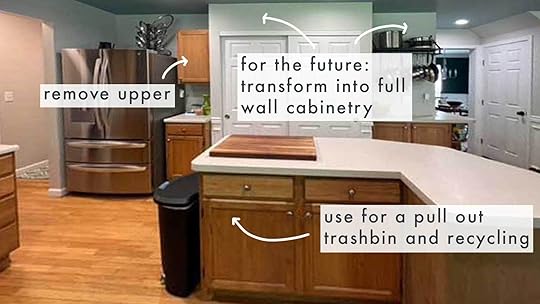
If they chose not to remove the island, I think it would be a solid place to install a pull out trash and recycling bin so we lose the visual weight of the black plastic can here.
And since she mentioned the pantry sliding door being inconvenient, in the future, if they’re open to it, reconfiguring this whole wall to be top-to-bottom cabinetry with an integrated fridge would be seriously groundbreaking to the room.
Phew, I feel like I just ran a “suggestion box” marathon there, but I really hope that was helpful. I know a lot of the ideas were similar across the board, but it seems that most of these spaces had the same issues. Small updates will absolutely make all the difference in how the kitchens feel to those using them every day, even if it’s not a full reno or reconfiguration. Let’s not make perfect the enemy of good (enough).
Now, for some shopping. I was pretty specific in my picks to find things that stylistically and colorwise would make sense with the honey oak color and general design aesthetic of all the rooms here. I’ll never be able to hand-select items for someone’s home without knowing much about their style and likes and wants, most of these things could easily be mixed and matched to great result.

1. Zellige Costa | 2. Smart Tiles Penny Sergio Green 8.97 in. x 8.95 in. Vinyl Peel and Stick Tile | 3. Mi Alma 6″x6″ Vinyl Peel & Stick Mosaic Tile | 4. 11” W x 11.2” L Stone Composite Peel and Stick Mosaic Tile | 5. 6″ x 7″ Stone Composite Peel & Stick Mosaic Tile | 6. InHome 19-in W x 20-in H Self-adhesive White Geometric Wall Decal
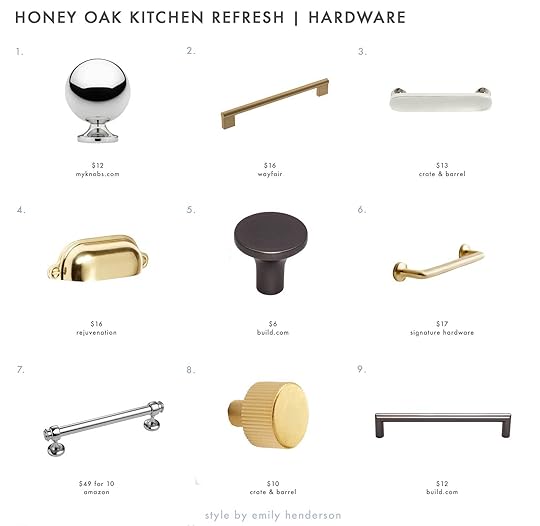
1. 1″ Diameter Spherical Knob in Polished Chrome | 2. Bradt Versa 8 13/16″ Center To Center Bar Pull | 3. Oval 4″ Polished Nickel HBar Pull Polished Nickel | 4. Vernon Bin Pull Aged Brass | 5. Marion 1-1/8 Inch Mushroom Cabinet Knob Ash Gray | 6. 4″ Belfast Solid Brass Cabinet Pull – Satin Brass | 7. Alzassbg 10 Pack Polished Chrome Cabinet Pulls, 5 Inch | 8. Modern Fluted Brushed Brushed Brass Cabinet Knob | 9. Kinney 6-5/16 Inch Center to Center Handle Cabinet Pull Ash Gray
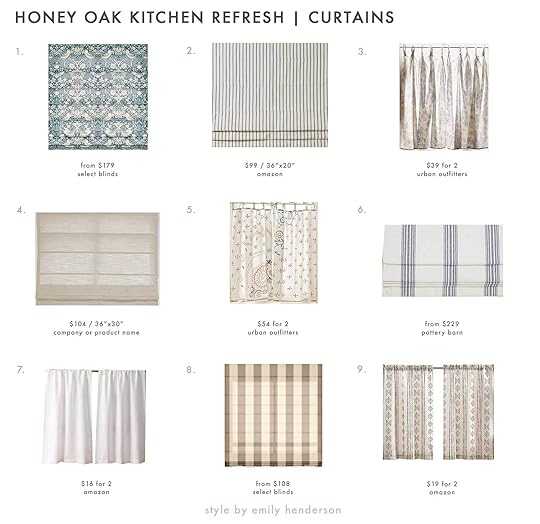
1. William Morris Roman Shades | 2. Artdix Cordless Roman Shades Blinds Window Shades | 3. Printed Café Curtain – Set Of 2 | 4. Cordless Roman Shades Made to Order Blackout Sand Beige | 5. Johanna Hankie Café Curtain – Set Of 2 | 6. Riviera Striped Linen/Cotton Cordless Roman Blackout Shade | 7. Faux Linen Kitchen Curtains 36 Inch Length | 8. Farmhouse Roman Shades | 9. Jinchan Boho Kitchen Curtains Linen Tier Curtains 36 Inch

1. Imperial 35.5″ Pedestal Dining Table | 2. Plumas Walnut Dining Table for 6, Extendable | 3. Keener All Wood Round Dining Table | 4. Aya 94″ Charcoal Brown Wood Dining Table by Leanne Ford | 5. Odyssey Brass Dining Table | 6. Massena Natural Wood Dining Table, 72″

1. Florence Modern Farmhouse Rubberwood Dining Chairs (Set of 2) – Midnight Blue | 2. Clement Solid Back Side Chair (Set of 4) | 3. Henry Solid Wood 30” Stool | 4. TON 18 Bentwood Caned Chair | 5. Svelti Aloe Green Counter Stool | 6. Note Side Chair | 7. Walsh Stool (Set of 2) | 8. Hamm Dining Chair | 9. Ceylon Woven Counter Height Barstool

1. Francis – FRA-01 Area Rug by Chris Loves Julia x Loloi | 2. GioHand-loomed Wool Rug 2.5’x9′ | 3. Amber Lewis x Loloi Billie Ocean / Brick Area Rug 2’6″x9’6″ | 4. Comb Washable Rug 2’7″x9′ | 5. Natural Sycamore Striped Jute Area Rug 2’x8′ | 6. Alina Light Stone Rug 2.5’x7′

1. Henry Pendant | 2. Trade Winds Genevieve 2-Light Wall Sconce | 3. Presley 1 – Light Single Empire Pendant | 4. Bezel Perforated Metal Pendant (16″) | 5. Aristo 12″ Wide Pendant | 6. The Creative Lamp | 7. Brashear Dimmable Pendant | 8. Handmade Rattan Lampshade | 9. Rodarte 1 – Light Single Pendant

1. Spence Wood Kitchen Island | 2. Vertex Closed Storage Bookshelf Cabinet | 3. Delaney Kitchen Console | 4. Arnika Dining Cabinet | 5. Frame Kitchen Console – Marble | 6. Hemnes Glass-Door Cabinet | 7. Torniviken Kitchen Island | 8. Casement Black Tall Storage Cabinet | 9. Grayson Kitchen Island | 10. Mysen Walnut 70″ Cabinet | 11. Belmont White Kitchen Island | 12. Luna 72.88” Tall Accent Cabinet with Fluted Glass
Thank you to all the readers who submitted their kitchens, and to the selected few for accepting my comments. And to any readers who might have other easy suggestions, feel free to hop into the comments and drop those gems.
Your friend in design, Arlyn
The post Real Reader Kitchens! 5 Dated Honey Oak Spaces & How A Design Expert Would Make Them Better appeared first on Emily Henderson.
August 13, 2023
The Link Up: The Lipstick Em Wishes She Found Sooner, The Multi-Tool We Could ALL Use, And A VERY Exciting Announcement About The Team
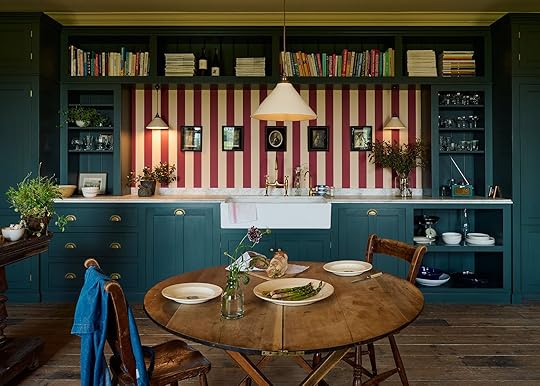
Welcome everyone. We don’t have to tell you that this was a devasting week for the island of Maui. Watching those flames ravage so much beauty and history as well as leaving so many people without homes was beyond heartbreaking. If you have the means please consider donating. Here is an article with organizations from a Hawaiian news site to donate to, as well as articles from CBS News and Time. Also as we’ve been watching and listening to indigenous Hawaiians, they are asking tourists to avoid traveling to the islands. As you can imagine resources are extremely limited given its geographical location and size. More than ever those should be reserved for the people who live there. Thank you for reading this<3
Ok, now let’s talk about this week’s links…
 courtesy of devol
 courtesy of devol

 courtesy of devol
 courtesy of devol
This week’s home tour is a beautiful kitchen and pantry by deVOL Kitchens and Clarence & Graves. It’s warm and moody with the perfect amount of pattern! The furniture pieces are so special, the way the color of the stove is almost the same color as the wall cabinets adds a fun playfulness, and that striped wall is SO GOOD. Thanks deVOL for sharing with us!!
From Emily: All summer long we use Supergoop (I’ve been using the Glowscreen for YEARS) especially when we were in Arrowhead on the lake a lot (the face stick FTW). So when they reached out to partner it was a very fast YES. We use their Play sunscreen on us and our kids most of the day (as you know we are very sensitive to the sun) and I even started to use their lipstick that has sunscreen (really wished younger Emily knew to do this – the sun can be so harsh on your delicate little lips). Anyway, a big quick plug for Supergoop in every way. If you didn’t see the fun reel we made go check it out🙂


Also From Emily: We’ve been trying to post more video clothing reviews on our LTK so you can see how products look and move on an actual person (me). This week, we highlighted some of my favorites from Vuori: that’s the gingham volley skirt on the left (also in tall) and their new romper on the right (also in black). My only word of advice is to SIZE UP. Vuori can run pretty tight, but the clothes are SO soft and comfortable once they’re on! (I usually opt for a medium.) A few other pieces I’d recommend, if you’re in the market for some high-quality athleisure: these joggers, a really cute tank, a hoodie that drapes nicely, easy-to-style pants, and this super-flattering zip-up hoodie.
 photo by kaitlin green
Ok ok, today is VERY special because we are finally announcing our newest EHD team member, Gretchen!! She’s so talented, learns incredibly fast, and just couldn’t be a better personality fit. Our last trip to Portland was the first time we all met in person and it was as if we had all known each other for a very long time. We are SO happy that Emily has such a great gal to work with every day and only wish we could all see each other more. And to give you a little visual example of Gretchen’s talent, Apartment Therapy just did a house tour of her apartment. DIY Queen! Needless to say, Gretchen welcome to the team OFFICIALLY! We are so grateful and pumped to finally have you<33
From Gretchen: Hey, y’all! I am SO HAPPY to be a part of this wonderful EHD team! Working with Emily (and Jess and Mal and Caitlin) is just incredible. So it’s literally part of my JOB to go to Target–can you believe?! Em and I were there a few days ago shopping for an upcoming shoot and I just happened to walk past the shoe aisle. Oops! These funky mules caught my eye and I just had to buy them. It’s the type of shoe that might be so ugly that it’s actually cute! I love the bone color, the chunky platform, but especially the rubber-like material. I’m telling myself they’ll be great shoes for the farm because they’re a breeze to clean, easy to slip on and go, and extra cushioned for those long shoot days.
From Arlyn: I love when I buy a super practical, useful gift for someone that ends up being just as practical and useful as intended. Enter: the Open-It! Multi-Tool I bought Charles for Father’s Day this year. We were constantly reaching for our kitchen knives and sheers to open packages and break down boxes, and they were getting dull from all the action. So in my hunt for a box cutter for the house, I found this. It has strong sheers that both cut and slide even on that super thick plastic packaging, a retractable box cutter, and a mini screwdriver with both a Philips head and flat head built right in. It’s basically the Swiss army knife of your utility drawer. We reach for this thing constantly!
From Mallory: My everyday kickin around town sneakers are only $60 right now!! I paid close to $100 for them so this is a SOLID deal. I love a white sneaker for the summer/fall transition and these are perf
From Jess: Ok, so today I have two body wash recs. One is a splurge and one is a save:) When I recommend this splurge please know that I know how unnecessary it is to spend this kinda money on a body wash. But as a single, childless person who is a sucker for luxury products, I tend to spend more money than I probably should on everyday items. But I tried a sample of this a while ago and just thought the scent was intoxicating. Capitalism wins again! This body wash from Le Labo makes my showers feel like a luxurious experience. And as someone who honestly only showers because it’s mandatory, that’s important to me. I shower, I promise! It’s really all the after stuff like wet hair that I hate dealing with. I need to bribe myself a little lol. The scent is definitely more earthy/herbaceous than floral which is my usual preference in all things scents. ANYWAY, a mere two days after this wild purchase a friend of mine gave me this body wash that ALSO smelled wonderful and was a fraction of the cost. That one is a little more floral since it’s lilac and white tea, but not so floral that I wasn’t into it. Whew! That was a mouthful but if you have been on a body wash hunt hope these recs help!
From Caitlin: I’m a little late to the party on this one, but I’m REALLY enjoying Rainn Wilson and the Geography of Bliss on Peacock. We follow Rainn around the world – the first three episodes feature slices of life in Iceland, Bulgaria, and Ghana – and it’s the PERFECT show to watch right before bed. It’s sweet and earnest and hopeful and a pretty great addition to the “travel, but in an emotional way” genre (if you loved Parts Unknown or Searching for Italy, this is right up your alley).
Thank you for stopping by and see y’all tomorrow. Sending all of our love to Maui.
Opening Image Credits: Courtesy of deVOL
The post The Link Up: The Lipstick Em Wishes She Found Sooner, The Multi-Tool We Could ALL Use, And A VERY Exciting Announcement About The Team appeared first on Emily Henderson.
Emily Henderson's Blog

- Emily Henderson's profile
- 10 followers

