
Emily Henderson's Blog, page 92
April 28, 2023
New Series Alert: Get The Look For Less – Emily’s Glendale Living Room
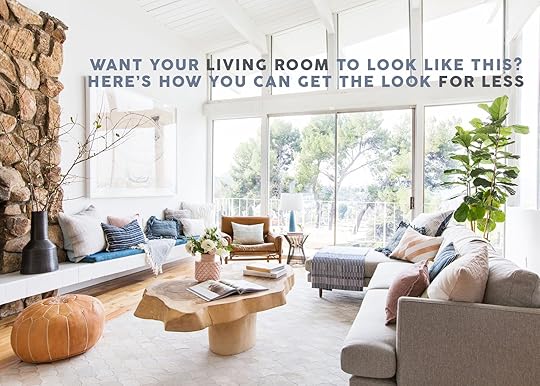
Do you have a favorite room on the internet? If so, have you ever wanted to replicate it, even slightly, so your home can feel the way you feel when you look at that photo? I think we design enthusiasts all suffer from a little design envy. We are bombarded with perfectly styled rooms daily which can be inspiring but perhaps at times, a little disheartening. I have definitely asked myself, “Why can’t my home look like that?” too many times to count which is of course AMAZING for my mental health :). If you have ever felt that way, now you know you are not alone.
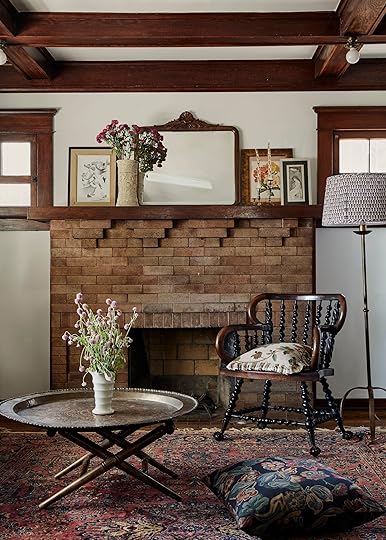
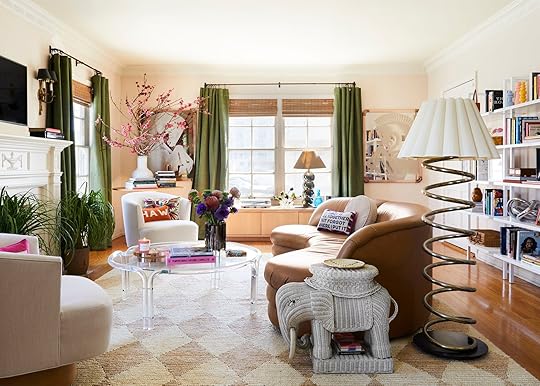
If you’ve been following Emily for a while you probably recognized the above living room immediately. It is Emily’s Glendale home living room and one of it’s those spaces that is warm, calm, and inviting while still being eclectic and fun. It has been an EHD favorite for years and years and it’s not hard to see why. So today’s post is for anyone who has ever wanted to shop straight from this room – but on a budget. We scoured the internet for similar pieces that are also affordable so you can essentially replicate this exact room if you so please. Ready to see what’s in store?
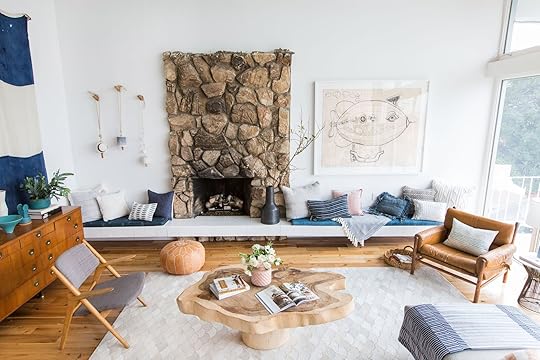
Before we get to the shopping portion of this post, I think it is important to dissect what makes this living room so successful. The white walls and wood flooring lay a light, warm base for the furniture to remain neutral and inviting. In addition, with the focal point being this large natural and rustic-looking stone fireplace, the space could easily become overwhelming or confusing with brightly patterned furniture. To create a cohesive space, the furniture pieces are variations of gray, wood, and leather (but all have special details so they are anything but boring). With light tonal furniture in place, there is so much room for color and pattern to be layered in.

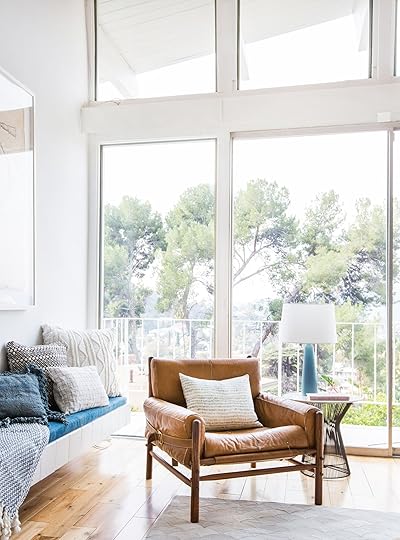
This living room is one of the best examples of mixing styles by sticking to a consistent and cohesive color palette. The colors are gray, blue, navy, white, and wood, with some hints of lighter-toned pinks and even some green and light coral accents. And you might notice that there are many different shades of blues and even pinks and that’s okay, because they are all tonal and calm. A bright pink pillow might look out of place, but a light and calm pink blends in effortlessly. The clean lines and neutral gray tone of the MCM-inspired sectional allow for ample color and pattern to be layered in with pillows and throws, in a way that is not visually overwhelming. While we are on the subject of sofa styling, always remember to mix different sizes, shapes, textures, patterns, and styles (again, in the same color palette).
You may have also noticed that the furniture styles are quite different. The sofa leans MCM, the vintage chair is more bohemian, the coffee table is rustic, and there is even a modern side table to top it all off. The key, as I said above, is that they are all neutral, inviting, and within the color palette so they don’t clash with each other. Instead, the mix of styles provides visual interest and personality to the space.
With all of these elements backed by gorgeous natural lighting, the result is an uber-inviting, warm, and lived-in room that has a ton of style.
Now are you ready to get the look?

1. Oliver 2-Piece Chaise Sectional: This is a great, affordable, and comfortable 2-piece chaise sectional that is 79″ wide. If you are looking for one a little bigger, we also love this one (that’s 112″ wide). If your budget allows, the original Burrand sectional Emily used is also still available!
2. Handmade Studio Leather Dorotheia Modern Leather Rug: This textural hide rug with scallop detail looks almost identical to the original one Emily used and comes in various sizes (the largest being 8’x10′).
3. Mid-Century Modern Walnut Dining Chair: This wood and gray dining chair could be a great accent chair for a small space.
4. Live Edge Coffee Table: Especially when mixed with straight Mid Century Modern lines, a live edge coffee table brings movement and warmth to a space.
5. Morrocan Pouf: This classic Morrocan pouf instantly adds a bohemian vibe.
6. Faux Fiddle Leaf Fig Plant in Pot: Fiddle leaf plants add so much vibrancy and movement to a room.
7. Bianca Striped Seagrass Tote Basket: We love putting potted plants in woven baskets for added warmth and texture.
8. Marla Vegan Leather Armchair: While Emily’s vintage safari chairs are obviously awesome, this vegan leather armchair is a great alternative (and also comes in black).
9. Marble Pedestal End Table: This black and marble side table brings in just the right amount of modern flair.
10. Grady 6 – Drawer Dresser: Adding a dresser to your living space provides extra storage and can exude a very relaxed and welcoming feel. Plus it’s a great place to display vases or other accessories.


1. Cozy Teddy Faux Fur Oversized Pillow Cover: This 30″x30″ boucle pillow cover would be a great companion to a gray sectional sofa.
2. Blue And Ivory Geometric Indoor Outdoor Throw Pillow: This blue patterned pillow is suitable for both indoors and outdoors.
3. Global Tufted Throw Blanket with Tassels: This is a nice, large (60″x80″), and affordable blanket with a lovely texture – not to mention it’s almost identical to the one in the Glendale living room.
4. Yucatan Terracotta Stripe Euro Sham: I love how Emily added so many colors to this room using throw pillows. This white and coral sham has such a pretty pattern and the soft orange hue blends beautifully with the blue, green, and pink colors throughout the space.
5. Vintage Blimp Aircraft Illustration Digital Art: Emily’s blimp art is an iconic piece that works with so many styles. If you are into the vintage drawing style art, this is a very cool one but please note it is a digital print so you would need to have it printed 🙂
6. Custom Frame: Once you have your art printed, you are going to need it framed. We love Framebridge for their quality and service.
7. Wood Coat Hooks: These wood coat hooks which are also perfect for hanging things like ceramic bells, will bring a warm, MCM flair to any space.
8. Stripy Ceramic Bell: We are forever fans of MQuan’s ceramic bells but if they’re out of your budget, these are great.
9. Pettini Vase: This is such a pretty vase that would add texture, movement, and color to your space.
10. Euro Woven Stripe Decorative Throw Pillow Blue: This is a high-quality pillow for the price and we love the grid pattern.
11. Sage Green Colorblock Pillow Cover: I love the calm sage green color of this handmade color block pillow cover.
12. Pink Pillow Cover: To complement the other pink hues in the space, this pillow cover is your guy.
13. Angeleta Woven Throw Blanket: This is a solid, affordable throw blanket that would work well with a variety of styles.
14. Onslow Tray: A woven tray will provide warmth and a hint of bohemian flair to your space. If you want, you can place it on the floor next to a chair (as Em did) to provide a place for extra magazines or books.
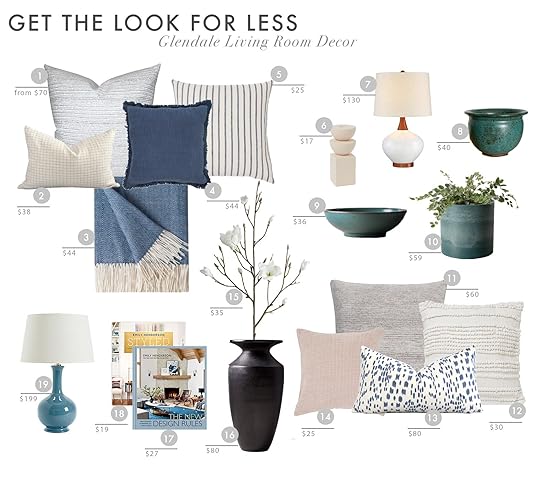
1. Saqqara Pillow Cover in Albatross: This playful pattern pillow cover is available in a wide range of sizes so you can tailor it to your specific needs.
2. Ivory and Grey Grid Pillow Cover: Mixing pattern scales is essential to styling your sofa like a pro. We love this grid pattern that pairs so well with smaller patterns.
3. Knitted Throw Blanket: This throw blanket will add a nice pop of blue to your sofa or chair.
4. Solid Cotton Fringe Throw Pillow: We love when a solid color pillow has a fringe hem that adds texture and style.
5. Oversized Cotton Striped Square Throw Pillow: A classic stripe pillow looks good in any room.
6. Ceramic Candlestick: This totem candlestick holder is a really solid piece for the price and we love the speckled off-white detail.
7. Brice Mid-Century Ivory Ceramic Table Lamp: We love the wood accents on this Midcentury-inspired lamp.
8. Turquoise Speckled Round Pottery Bowl: This is a one-of-a-kind turquoise pottery bowl that would look good styled on any shelf.
9. Handmade Japanese Bowl: How stunning is this handmade Japanese bowl? And you cannot beat the price!
10. Button Fern: This fairly low-maintenance plant is pet-friendly and comes in this gorgeous turquoise pot.
11. Bonnie Grey Pillow: It is so important to mix and match different size pillows. This one comes in various sizes and has a lovely woven texture.
12. Priya Throw Pillow: Here is another neutral pillow with a ton of texture.
13. Periwinkle Blue White Lumbar Throw Pillow Cover: I love the blue paint splatter pattern on this pillow cover.
14. Elsa Reversible Woven Striped Chenille Square Throw Pillow: This pretty pink pillow has a subtle and oh-so-lovely stripe pattern.
15. Faux Bradford Pear Branch 50″: We are big advocates for going outdoors and foraging for branches but if you want an easier route, you can also buy faux branches like this one.
16. Black Terracotta Vase: This vase ties in the other black accents in the room and grounds the space.
17. Styled: What’s a coffee table without a GREAT design book?
18. The New Design Rules: One design book is never enough. Have you picked up Emily’s new book yet?
19. Suzanne Kasler Gourd Lamp: To complement the other light blue tones in the room, we love this lamp.
And there you have it, folks. Please let us know if you enjoy this type of post, and if you would like us to start a series. If so, what room would you like to see next? xx
*Photos by Tessa Neustadt
The post New Series Alert: Get The Look For Less – Emily’s Glendale Living Room appeared first on Emily Henderson.


April 27, 2023
This “Happy Moody” Craftsman Home Is A Vintage Lover’s Dream (We Can’t Stopping Staring At This Kitchen)

When a home and a homeowner(s) find their perfect match, you can tell. There’s a visible energy that both are there to care for and protect each other. I think this is especially true with old homes. And look, sometimes an old home is too far gone – too many homeowners before either weren’t able to properly care for it while others made quick, trendy fixes that simply didn’t pay respect to the original structure. Today we have a happy story. A story of a young family who was in love with their wonderful 1910 craftsman, wanting to preserve as much of it as possible while needing to update for modern living.
When I was pitched this project by the incredible Jamie Haller (remember this craftsman she and her husband restored?) I was blown away. In that previous post, I called them the “soul keepers” and baby, that title remains intact. As we move through this home you will not only get to soak up an almost endless pool of vintage details but see how with careful and thoughtful design choices, old and new can beautifully coexist. I think that if you love this “happy moody” style there are some key elements you can incorporate into your home. But first, let’s hear how it all began and the biggest challenges Jamie faced.

What was the conversation about the color palette and style with your client? Did they have a style they said they specifically wanted or did they just want you to lean into the style of the home and run with it?
Jamie: “The direction was to embrace the authenticity of the home and create a modern and functional space that inspired them.”
Ah, the magic words for a historic home-loving designer, right? But before we get into the more extensive parts of the renovation let’s have some fun dissecting why the living and dining rooms are so special and why they nail the “happy moody” style.

First, let’s take about the choice of white paint. Jamie was told by the homeowner that they wanted to keep it a warmer shade which was absolutely the right call. It works with the dark warm woods in the room and makes it feel brighter but still cozy. Then to bring in that depth, it’s all about the patterns. Notice the scales all vary, bouncing your eye around but all are in darker moody tones so they don’t feel too overwhelming.
HOT TIP: Adding a bright decor piece that works with your established darker color palette, like that yellow table lamp with the burgundy shade, will help to bring out those colors elsewhere making everything pop a little more.

Another pillar of this look is vintage decor and florals. When vintage pieces have decorative elements in darker metals and wood tones it adds a cool playfulness. And of course florals, whether in textiles, art, or actual real flowers, also add a needed energy/joyfulness for a moody space.

Speaking of florals, this wallpaper by House of Hackney was a really important element to Jamie because it was meant to be a connector to the kitchen in terms of style and colors. She presented a few wallpapers in connection with a kitchen palette and this was the one they all decided on.

Clearly, a beautiful choice. What I also love is the use of a light (but not bright white) linen curtain and a vintage warm white tablecloth. It gently lightens the space to keep the vibe cozy and not too dark.

Chandelier (vintage)
Here’s a better view of how the light linens highlight the light tones in the rug and the wallpaper. And what is always important to remember when designing a vintage space is to still incorporate modern decor pieces to help visual balance. They also just add an inherent freshness. You can see that in action with those modern vases that have been placed on the back built-in. Contrast is always important:)

I had to include this shot because just look at all that original woodwork. It’s so stunning!!
But now it’s time to talk about this home’s beautiful kitchen renovation…

Cabinet Color | Pendant | Faucet | Countertop Material (soapstone)
Jamie: “For the kitchen, there were a couple of original cabinets in the room, and we knew we wanted to use that as a North Star. I also wanted there to be a color relationship between the dining room and kitchen. I wanted the glimpse of the kitchen at the dining table to have a connection to a wallpaper we would use in there. I wanted the home to tell a story as you went room to room.”

The original cabinetry she spoke of is that large built-in. Its specialness remained intact because of all the love and care that was put into it. Jamie explained what it took to bring this beauty back to life:
Jamie: “The kitchen had a few original cabinets in the space, however the only one worth keeping was the large built-in armoire. It was a little low and we had the box drawers rebuilt so they had a smooth and soft close. So many times it’s the heavy clunky drawers that kill a vintage piece. We corrected that here. We also added stone and wainscot to the piece to tie it into the kitchen flow.”
This would be my dream for my kitchen cabinets. I love the way they look but they are so heavy, overpainted, and hard to open. While this is not an affordable thing to do, if you have a vintage home and can afford to do this, it will only extend the kitchen’s longevity.

But wait, the other cabinets aren’t original too? NOPE! The time and care that went into this project makes my heart so happy. Here’s how she made the new cabinets look cohesive:
Jamie: “We did reuse the original doors from the cabinets we decided to not keep. We recut them into new doors in a new box configuration at the sink. We essentially remade new boxes for an improved layout, used all the doors and original pieces we could, and then fabricated matching doors as needed. You can’t really tell the difference between the old and new at this point.”
One thing I was curious about was if they talked about integrating the appliances, mainly the fridge and dishwasher. It’s no secret that it’s a VERY popular thing to do when getting to renovate a kitchen. But Jamie had a case against it and I agree:
Jamie: “There is something beautiful and industrial about seeing the stainless steel in such a painted and paneled room, I liked having the appliances be present and not hidden.”

I also wanted to know more about those sweet toe kicks. Creating a thoughtful toe kick is such an impactful way to bring character and uniqueness. I was curious why Jamie decided against matching the base of the built-in with the new cabinets. Here’s what she said:
Jamie: “I wanted something playful incorporated into the space so incorporating the beautiful toe kick was a way to add femininity to the space. The shape balanced out the utilitarian feel of the tongue and groove.”
That’s such a good point! Those curves are a beautiful contrast to all of the straight lines in the space.
Fun fact about that sconce – From Jamie: “We looked at probably 100 sconces for over the stove before landing on this one. It was actually a combination of two different sconces, both vintage from the era of the home. You would not believe how many months we discussed this sconce. It’s a good thing sourcing vintage lights is one of my favorite things to do.”

Knobs (similar)
You can also see how she incorporated some other curves with that little peg rail shelf and original hardware (well, as much of the original as possible). This is when having a client that cares about a vintage home restoration as much as you do comes in handy…
Jamie: “Half of the hardware was there, original, and half were matched. We had a few knobs and some beautiful butterfly hinges. My client actually took it as her project to source almost identical hardware. I think there were many nights of eBay deep dives involved.”
Well, those late nights most definitely paid off. Now let’s talk about the bathroom.

So I don’t know the state it was in pre-renovation but I can guarantee a masterful upgrade. Now that you’ve had a sneak peek let’s dive on in…
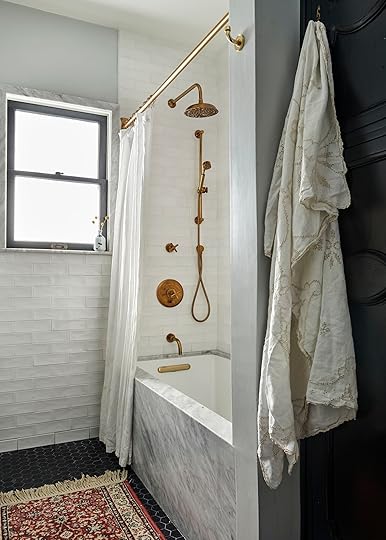
As Sara and Bowser will agree, the white subway and black hex tile mix is a classic. However, this white subway tile is a little extra special given that it has that beautiful tumbled look we all love. Also, the small scale size of the black hex makes it feel more original and vintage.
However, what I really wanted to talk about with Jamie was the marble window trim. While technically on trend, this is a modern use of a classic material – meaning it’s going to age beautifully with this home. When I asked why they decided to go for it this was her answer:
Jamie: “It was a solution to a problem. The window extended into the shower area a bit and the marble was used as a casing and sill so that it wouldn’t be damaged by water overspray. It came out so pretty and I ended up loving the detail.”
What a gift!! While I don’t know the cost of doing a stone trim, if you have excess pieces from a counter or want to buy offcuts from a stone yard, I think it’s worth asking. Such a pretty detail.

Another pretty detail? This vintage vanity.
From Jamie: “We wanted to use a vintage piece of furniture for the bathroom vanity. There is a beautiful curved shape to this one. It was a 1960’s secretary. Not of the era, but beautiful lines are beautiful lines.”
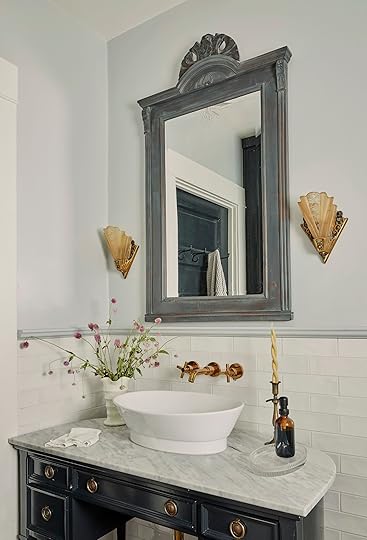

If you know us, we are very ok with mixing vintage eras if it feels right and this vanity feels right in here. All the vintage touches in this bathroom make it impossible not to love.

Bed | Velvet Curtains | Linen Curtains | Shams (no longer available)
To finish off this wonderful home tour, we have this wonderful bedroom. I believe this room just got a decor upgrade but man is it a good one and there are a lot of great style tips to grab!
I think this room is a great example of “happy moody”. The walls are light and soft while the furniture is dark and the textiles are colorful but a little muted. Then for added “happiness” there are florals galore!

As someone who also mixed vintage nightstands in a bedroom design, I love the playful shapes and how they are both dark but not the same color (ps I’m in LOVE with that chair). Then mixed with the black wood bed, your eye is able to bounce around the different dark tones and shapes without getting visually overwhelmed.
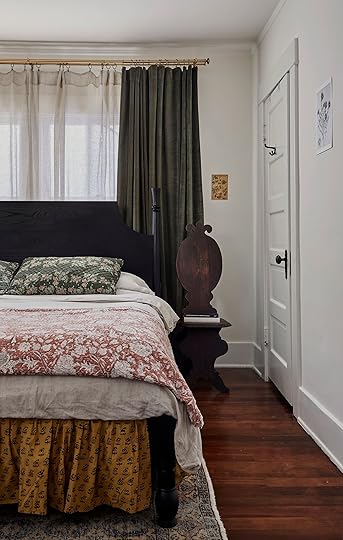
For the linens, this color palette is so pretty and the pattern scales all vary perfectly. They also work so well together because that solid light duvet keeps the patterns from touching which also gives your eye a chance to take it all in. As for the rug, choosing this one that hones in on the neutral colors of the room as well as ties in the green of the curtain makes the whole space feel wonderfully grounded.
In case you couldn’t tell, I love this home and how Jamie cared so deeply for it through her thoughtful design. When I asked if there were any specific challenges on this project this is what she said:
Jamie: “It went pretty smoothly. I would say that old homes aren’t straightforward. Figuring out which elevation of the wall to use where those cabinets and closets were was tricky. Communicating the slightly complicated cabinet design, using old original doors as material isn’t what cabinet makers are used to so it can be challenging to get people to work outside of their comfort zones. But they killed it! They did an amazing job and it was also refreshing to know we reused so much of what was original in the home.”
They completely killed it and goes to show how much time and expertise goes into a kitchen restoration like this. I hope all of your design tanks are full for today and if “Happy Moody” is your design style and you were needing some inspiration I also hope this helped! If you don’t already follow Jamie you are missing out. Before I leave you here are some before and afters of the kitchen:)


In case you were also wondering what was that small door on the right used for…
Jamie: “There was some storage of various depths along that wall, some extremely deep, think an overly deep boom closet, and some extremely shallow. There is a hall closet on the other side of the wall, as well as an office. Some of the space was given back to the hall closet so it wouldn’t be dead space.”
Ok, now I’m done:)
Love you, mean it.
*Design by Jamie Haller
**Photos by Jenna Peffley
The post This “Happy Moody” Craftsman Home Is A Vintage Lover’s Dream (We Can’t Stopping Staring At This Kitchen) appeared first on Emily Henderson.
This “Happy Moody” Craftsman Home Is A Vintage Lover’s Dream (We Can’t Stopping Starring At This Kitchen)
When a home and a homeowner(s) find their perfect match, you can tell. There’s a visible energy that both are there to care for and protect each other. I think this is especially true with old homes. And look, sometimes an old home is too far gone – too many homeowners before either weren’t able to properly care for it while others made quick, trendy fixes that simply didn’t pay respect to the original structure. Today we have a happy story. A story of a young family who was in love with their wonderful 1910 craftsman, wanting to preserve as much of it as possible while needing to update for modern living.
When I was pitched this project by the incredible Jamie Haller (remember this craftsman she and her husband restored?) I was blown away. In that previous post, I called them the “soul keepers” and baby, that title remains intact. As we move through this home you will not only get to soak up an almost endless pool of vintage details but see how with careful and thoughtful design choices, old and new can beautifully coexist. I think that if you love this “happy moody” style there are some key elements you can incorporate into your home. But first, let’s hear how it all began and the biggest challenges Jamie faced.
What was the conversation about the color palette and style with your client? Did they have a style they said they specifically wanted or did they just want you to lean into the style of the home and run with it?
Jamie: “The direction was to embrace the authenticity of the home and create a modern and functional space that inspired them.”
Ah, the magic words for a historic home-loving designer, right? But before we get into the more extensive parts of the renovation let’s have some fun dissecting why the living and dining rooms are so special and why they nail the “happy moody” style.
First, let’s take about the choice of white paint. Jamie was told by the homeowner that they wanted to keep it a warmer shade which was absolutely the right call. It works with the dark warm woods in the room and makes it feel brighter but still cozy. Then to bring in that depth, it’s all about the patterns. Notice the scales all vary, bouncing your eye around but all are in darker moody tones so they don’t feel too overwhelming.
HOT TIP: Adding a bright decor piece that works with your established darker color palette, like that yellow table lamp with the burgundy shade, will help to bring out those colors elsewhere making everything pop a little more.
Another pillar of this look is vintage decor and florals. When vintage pieces have decorative elements in darker metals and wood tones it adds a cool playfulness. And of course florals, whether in textiles, art, or actual real flowers, also add a needed energy/joyfulness for a moody space.
Speaking of florals, this wallpaper by House of Hackney was a really important element to Jamie because it was meant to be a connector to the kitchen in terms of style and colors. She presented a few wallpapers in connection with a kitchen palette and this was the one they all decided on.
Clearly, a beautiful choice. What I also love is the use of a light (but not bright white) linen curtain and a vintage warm white tablecloth. It gently lightens the space to keep the vibe cozy and not too dark.
Chandelier (vintage)
Here’s a better view of how the light linens highlight the light tones in the rug and the wallpaper. And what is always important to remember when designing a vintage space is to still incorporate modern decor pieces to help visual balance. They also just add an inherent freshness. You can see that in action with those modern vases that have been placed on the back built-in. Contrast is always important:)
I had to include this shot because just look at all that original woodwork. It’s so stunning!!
But now it’s time to talk about this home’s beautiful kitchen renovation…
Cabinet Color | Pendant | Faucet | Countertop Material (soapstone)
Jamie: “For the kitchen, there were a couple of original cabinets in the room, and we knew we wanted to use that as a North Star. I also wanted there to be a color relationship between the dining room and kitchen. I wanted the glimpse of the kitchen at the dining table to have a connection to a wallpaper we would use in there. I wanted the home to tell a story as you went room to room.”
The original cabinetry she spoke of is that large built-in. Its specialness remained intact because of all the love and care that was put into it. Jamie explained what it took to bring this beauty back to life:
Jamie: “The kitchen had a few original cabinets in the space, however the only one worth keeping was the large built-in armoire. It was a little low and we had the box drawers rebuilt so they had a smooth and soft close. So many times it’s the heavy clunky drawers that kill a vintage piece. We corrected that here. We also added stone and wainscot to the piece to tie it into the kitchen flow.”
This would be my dream for my kitchen cabinets. I love the way they look but they are so heavy, overpainted, and hard to open. While this is not an affordable thing to do, if you have a vintage home and can afford to do this, it will only extend the kitchen’s longevity.
But wait, the other cabinets aren’t original too? NOPE! The time and care that went into this project makes my heart so happy. Here’s how she made the new cabinets look cohesive:
Jamie: “We did reuse the original doors from the cabinets we decided to not keep. We recut them into new doors in a new box configuration at the sink. We essentially remade new boxes for an improved layout, used all the doors and original pieces we could, and then fabricated matching doors as needed. You can’t really tell the difference between the old and new at this point.”
One thing I was curious about was if they talked about integrating the appliances, mainly the fridge and dishwasher. It’s no secret that it’s a VERY popular thing to do when getting to renovate a kitchen. But Jamie had a case against it and I agree:
Jamie: “There is something beautiful and industrial about seeing the stainless steel in such a painted and paneled room, I liked having the appliances be present and not hidden.”
I also wanted to know more about those sweet toe kicks. Creating a thoughtful toe kick is such an impactful way to bring character and uniqueness. I was curious why Jamie decided against matching the base of the built-in with the new cabinets. Here’s what she said:
Jamie: “I wanted something playful incorporated into the space so incorporating the beautiful toe kick was a way to add femininity to the space. The shape balanced out the utilitarian feel of the tongue and groove.”
That’s such a good point! Those curves are a beautiful contrast to all of the straight lines in the space.
Fun fact about that sconce – From Jamie: “We looked at probably 100 sconces for over the stove before landing on this one. It was actually a combination of two different sconces, both vintage from the era of the home. You would not believe how many months we discussed this sconce. It’s a good thing sourcing vintage lights is one of my favorite things to do.”
Knobs (similar)
You can also see how she incorporated some other curves with that little peg rail shelf and original hardware (well, as much of the original as possible). This is when having a client that cares about a vintage home restoration as much as you do comes in handy…
Jamie: “Half of the hardware was there, original, and half were matched. We had a few knobs and some beautiful butterfly hinges. My client actually took it as her project to source almost identical hardware. I think there were many nights of eBay deep dives involved.”
Well, those late nights most definitely paid off. Now let’s talk about the bathroom.
So I don’t know the state it was in pre-renovation but I can guarantee a masterful upgrade. Now that you’ve had a sneak peek let’s dive on in…
As Sara and Bowser will agree, the white subway and black hex tile mix is a classic. However, this white subway tile is a little extra special given that it has that beautiful tumbled look we all love. Also, the small scale size of the black hex makes it feel more original and vintage.
However, what I really wanted to talk about with Jamie was the marble window trim. While technically on trend, this is a modern use of a classic material – meaning it’s going to age beautifully with this home. When I asked why they decided to go for it this was her answer:
Jamie: “It was a solution to a problem. The window extended into the shower area a bit and the marble was used as a casing and sill so that it wouldn’t be damaged by water overspray. It came out so pretty and I ended up loving the detail.”
What a gift!! While I don’t know the cost of doing a stone trim, if you have excess pieces from a counter or want to buy offcuts from a stone yard, I think it’s worth asking. Such a pretty detail.
Another pretty detail? This vintage vanity.
From Jamie: “We wanted to use a vintage piece of furniture for the bathroom vanity. There is a beautiful curved shape to this one. It was a 1960’s secretary. Not of the era, but beautiful lines are beautiful lines.”
If you know us, we are very ok with mixing vintage eras if it feels right and this vanity feels right in here. All the vintage touches in this bathroom make it impossible not to love.
Bed | Velvet Curtains | Linen Curtains | Shams (no longer available)
To finish off this wonderful home tour, we have this wonderful bedroom. I believe this room just got a decor upgrade but man is it a good one and there are a lot of great style tips to grab!
I think this room is a great example of “happy moody”. The walls are light and soft while the furniture is dark and the textiles are colorful but a little muted. Then for added “happiness” there are florals galore!
As someone who also mixed vintage nightstands in a bedroom design, I love the playful shapes and how they are both dark but not the same color (ps I’m in LOVE with that chair). Then mixed with the black wood bed, your eye is able to bounce around the different dark tones and shapes without getting visually overwhelmed.
For the linens, this color palette is so pretty and the pattern scales all vary perfectly. They also work so well together because that solid light duvet keeps the patterns from touching which also gives your eye a chance to take it all in. As for the rug, choosing this one that hones in on the neutral colors of the room as well as ties in the green of the curtain makes the whole space feel wonderfully grounded.
In case you couldn’t tell, I love this home and how Jamie cared so deeply for it through her thoughtful design. When I asked if there were any specific challenges on this project this is what she said:
Jamie: “It went pretty smoothly. I would say that old homes aren’t straightforward. Figuring out which elevation of the wall to use where those cabinets and closets were was tricky. Communicating the slightly complicated cabinet design, using old original doors as material isn’t what cabinet makers are used to so it can be challenging to get people to work outside of their comfort zones. But they killed it! They did an amazing job and it was also refreshing to know we reused so much of what was original in the home.”
They completely killed it and goes to show how much time and expertise goes into a kitchen restoration like this. I hope all of your design tanks are full for today and if “Happy Moody” is your design style and you were needing some inspiration I also hope this helped! If you don’t already follow Jamie you are missing out. Before I leave you here are some before and afters of the kitchen:)
In case you were also wondering what was that small door on the right used for…
Jamie: “There was some storage of various depths along that wall, some extremely deep, think an overly deep boom closet, and some extremely shallow. There is a hall closet on the other side of the wall, as well as an office. Some of the space was given back to the hall closet so it wouldn’t be dead space.”
Ok, now I’m done:)
Love you, mean it.
*Design by Jamie Haller
**Photos by Jenna Peffley
The post This “Happy Moody” Craftsman Home Is A Vintage Lover’s Dream (We Can’t Stopping Starring At This Kitchen) appeared first on Emily Henderson.
April 26, 2023
How Shavonda Made This Small Guest Room/Office Functional, Beautiful, And BRIGHT

Hi everyone! It’s been a little while since I was last here with the EH community and I’m SO EXCITED to share this project with you all. I was honored to take over the reins as VELUX Brand Ambassador and host of the Brighten Up Any Room Giveaway and I’m thrilled with how the space came together. So let’s meet our winner and take a look at the space they nominated for the makeover.
BUT FIRST! Holy wow! We had SO MANY amazing entries and it was really, really difficult to decide on just one. In the end, we chose Viet as the winner! Viet lives in Los Angeles with her husband, David, and baby, Ocean. How cool is Ocean’s name, right!? He’s also the coolest little toddler, but I digress. Viet and David purchased their first home and gave birth to their first child around the same time during the pandemic and quickly realized the room Viet was using as a work-from-home space also needed to function as a guest space as well. Shortly after moving in they discovered the room was likely the original primary bedroom and they also unearthed some pretty amazing original hardwood floors hidden under the carpet. We love an old house original detail discovery! While the floors were an amazing find, the room itself is pretty tiny coming in at right around 100 sq ft. After returning to work from maternity leave, Viet had to rely on the space a bit sooner than she thought and was at a loss for what to do with it. They painted it a sunny marigold yellow color and she envisioned a “feminine cozy library vibe” but it fell just short of her vision. My job was to get her closer to that goal, but also make it a workspace AND a guest sleeping space. Challenge Accepted.
A VELUX skylight installer did a site visit to determine if the space was structurally a good candidate for skylights and with their green light, myself and the VELUX team headed to L.A. As someone who is passionate about small-space living and designing bold color-filled small spaces, I was so excited to see this room nominated. I LOVED that they embraced its small size and wanted to maximize its potential to be a workhorse for their family. I also LOVED that Viet and David love colorful and bold spaces! So often I’m trying to convince folks to be daring and lean into color, but Viet’s home is full of color and playful patterns from the moment you step in the front door. This was already shaping up to be a bit of a dream project for me! Ok so now that we have a bit of the back story let’s have a look at the space we are working with.


The room wasn’t bad, but it could be better. 1. It relied heavily on artificial light as the two windows in the space are on the smaller side and one them faced a fence so it didn’t get the most ideal light streaming in. 2. Viet’s book storage wasn’t quite giving off those cozy library vibes. 3. The trundle bed didn’t exactly scream “hi guests, I hope you have a good night’s sleep”. 4. Her work area (hello amazing mid-century desk!) could use a bit better storage and streamlined organization.
The one thing we all loved about the space was the wall color! Viet was open to anything we wanted to do with the room and said we could either keep the color or go with something different, but there was no way I was getting rid of this color! I actually had a plan to really lean into it, and if you know me you already know that meant taking it all the way to the ceiling and on the trim too!
After visiting with Viet and getting a sense of the space and her overall needs I came up with a plan to help transform its small footprint into something dual-use, functional, and beautiful. Here’s how it turned out.

Skylights | Room Darkening Shades | Paint Color
So much to break down here, but let’s start with the skylights, of course! The VELUX Solar Powered Fresh Air Skylights are the real hero in this space! When the installer realized we could basically replace most of the ceiling with them we said, “Let’s do it”! And boy are we happy they did!

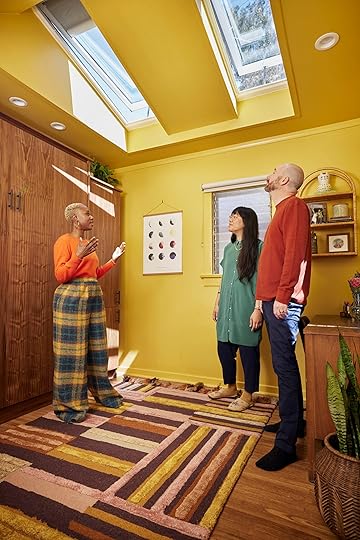
They flood this room with much-needed natural light and fresh air, and provide such amazing visual impact in the space. The room-darkening shades give Viet total control over the light concentration and allows her to adjust them according to how much (or little) natural light she wants to experience in the space, which is ideal for an office area with multiple screens. Viet really enjoyed having her desk placed nearby the window so we kept it in its existing spot and with the limited footprint it was the best choice overall.

Murphy Bed | Art (left) | Art (right) | Bedding | Orange Pillow (similar) | Lumbar Pillow (similar) | Rattan Wall Shelf
The key to really maximizing this small space was bringing in a Murphy bed with side cabinet storage that spanned the entire length of the back wall from pretty much floor to ceiling. It allowed us to bring in a queen size bed for guests, storage for all of her books, and a new place for her work files to tuck away. Murphy beds really are the secret weapon in a tiny space that also needs to function as a sleep area. I wanted this piece to feel like a beautiful piece of built-in furniture so we selected a pretty walnut finish that complements her vintage desk and other midcentury pieces they have throughout their home.

Gold Desk Accessories | Desk Calendar | Desk (vintage)


On the wall that used to have the bookcases, we created a mini gallery wall of some of their family photos and beloved art pieces, and brought in a couple of small benches that serve as both a place to sit when the space is being used as the office and a place to for a bag or personals when it’s being used as the guest room.
To complete the room we brought in some art from Minted to complement her existing pieces, beautiful bedding from Brooklinen, the gorgeous rug from Jungalow, the benches, pillows, and accessories are from Home Goods, baskets and planters from West Elm, the arched rattan wall shelf is from World Market, and of course, several plants. I always try to infuse as much of a client’s own things into a newly designed space and Viet’s gorgeous textile, which I used as a bed scarf, was a big inspiration for other overall design and color story of the space.

The key to getting a really small space right is having a very clear understanding of how it needs to serve you. By fine-tuning all of her needs we were able to create a space for Viet that delivers on both function and beauty. This room feels as chic as a boutique hotel room, and it also feels like a good place to be productive for work. The best part about is Viet and David LOVE it and that’s really all that matters in the end!

*Design by Shavonda Gardner
**After Photos by Rusty Williams Photo
***Sponsored by VELUX
The post How Shavonda Made This Small Guest Room/Office Functional, Beautiful, And BRIGHT appeared first on Emily Henderson.
April 25, 2023
In Defense Of TVs Over Fireplaces – A Friendly Rebuttal To Orlando’s Hatred Of That Very Thing

I was laying in bed on a recent rainy night, watching Love is Blind (so good), the fireplace on low as I clicked in to enjoy Orlando’s new highly personal and enjoyable sub-stack, The Lost Arrow (have you subscribed to it yet?). It was a rather hilarious rant about his #1 design pet peeve. I laughed a lot (because he is a funny and relatable writer) even while he was pointedly talking shit about my very own family room and bedroom. No, he wasn’t saying “Emily Henderson’s fireplace is the worst,” of course not, but he HATES TVs over fireplaces and makes a damning case against them. And you know what I hate? When I’m told I should NEVER do something when it comes to design. OOH that gets me riled up because how we use our home is 100% up to us, for our own pleasure and enjoyment (and usually comes with certain limitations). That’s why I am here to make a case against his extreme rule against a very thing that I enjoy. I thought it would be fun to cross-examine and make a case, not necessarily for TVs over fireplaces, but just in defense of them and talk about when/why and how to do it right (he’ll disagree with the notion that it’s ever right, but I have some pretty solid ideas). Let’s dance:)
Listen, I agree with him that in a perfect world, you don’t have a TV over a fireplace because you have a separate TV room, but even in that TV room you might also want or already have a fireplace. The court should note that both scenarios are obviously privileged. We decided to forego a TV in our current living room because I preferred art over TV, but mostly because we didn’t need it in here because we have a separate room right next to it, dedicated to TV. But what if we didn’t? Would putting a TV over the fireplace be so bad? NO! Would putting the TV on the wall next to the fireplace be better? In my opinion, no, it would look like a rectangle next to a chunky rectangle and maybe look even dumber.
 photos by kaitlin green | left from: my journey to finally choose a wall color for our living room (and how i feel now that it’s painted)
| right from: the family room update + the case for a dark moody room
My analysis of his hatred for TVs over fireplaces is that A. He isn’t a huge TV person (maybe?), B. He doesn’t have a fireplace in his living room or he has always had an easy layout for this situation, C. He doesn’t currently have kids, therefore has specific views about the design of a home that might not be as livable to many of us who have foregone some design pleasantries in the name of practicality and livability, and D. He lives (mostly) in Southern California where fireplaces aren’t as much of a mood and heat necessity as they are in areas where its cold and dark in the winter. What I found fascinating about his piece (again, you have to read it here) was that he likened a TV over the fireplace to stainless steel appliances and granite countertops – a sort of wealth signifier selling point that was built into many new builds or McManions during a certain period. These things are essentially examples that these houses are high-end enough to have a flat-screen TV (which for a while were so expensive, but now not at all). I think he’s right about that, which made me like my TV over my fireplace less, but I’m not here to agree with my friend/opposing counsel, I’m here to defend the TV over the fireplace.
So when and why is a TV over a fireplace ok? Can you do it where it doesn’t look dumb?
Reason #1: When You Don’t Have Any Other Choice And You Really Want To Watch TV In This Room design by caitlin higgins | styled by emily bowser | photo by sara ligorria-tramp | from: the reveal we’ve all been waiting for! caitlin’s mostly thrifted, postmodern regency deco living room
I’m a big proponent of enjoying how you live in your home first, and the design of the home should support that enjoyment. Do I want you to buy huge reclining sofas? Hmm, honestly, I don’t really care because that’s your choice. I’m not going to make that choice because there are great options that are almost as comfortable that might not look so overwhelming, but I also admit that sitting on a La-Z-Boy sofa can be wonderful so you do you! I lean so far into comfort and practicality that a lot of my former design pet peeves have been thrown out years ago (Covid also confirmed my need for comfort and practicality). I think design directives like this are good to have, but USING your home for your own enjoyment should be your #1 priority. I say this while knowing that I have some furniture that is better to look at than to sit on, so I’m not a shining example of this either (although in defense of myself, I wouldn’t buy those pieces now, they are a hold over from years ago when I didn’t prioritize comfort/practicality over style). Does every piece of furniture need to be the most comfortable? Nope. In some rooms, you don’t need that level of comfort and some beautiful pieces are worth having because they shift the whole context of the room in a good way. So I’m not saying that we should all live in La-Z-Boys in every room, but if the room doesn’t meet the purpose of you being in it because you’ve opted against something practical, then that’s a problem to me. In fact, I’ve been known to actually say to friends who don’t use their living room EVER, “are you sure you don’t want a TV in here?” because not using a room for fear of it not looking good with a TV in it is the bigger crime (again, especially because of nice looking art TVs like The Frame). Do I think that Orlando is being a little snobby? Of course, and so am I about a lot of things. Maybe calling us “picky” is what we’d prefer:) It’s the job of design influencers to help guide us to great choices so that we love our home more, and his vehemence against the TV over the fireplace is a noble one. I just fear that it’s not always an option unless you sacrifice your comfort, practicality, and livability. It’s YOUR HOME, you do whatever you want in it in order to love it and have it serve YOUR purposes.
The prosecutor/plaintiff, Orlando admits that it can be challenging to find a non-TV over fireplace layout that makes sense and he offers for readers to send him photos of their room and he’ll re-lay it out for them, ensuring that he can find a way to not have the TV above the fireplace. I’d personally love to see how he does that because in my experience, splitting the focal points can make a room feel chaotic and inevitably someone, multiple people actually, end up having a bad viewing seat. Obviously, some rooms are totally set up to do this naturally, but many are just not. I think that having it above the TV (listen, if I’m being honest I’m talking about Frame TVs) looks totally fine if you can put on a nice piece of art when not in use. Would I rather have actual art? Of course, but again, it’s about enjoying your own home and having it meet your needs.
Reason #2: When It Can Be Low Enough Not To Hurt Your Neck photo by sara ligorria-tramp | from: mountain house reveal: how we designed our super kid-friendly family room
Admittedly they can be too high in some houses, we all know this. At the mountain house, in our family room, ours was higher than I wanted. This is usually due to firebox sizes and clearances. I wish there were more that were low and wide that weren’t so contemporary looking (I don’t mind some linear ones, but I don’t love that they are usually just rocks instead of faux logs). So in order for the fireplace box to be scaled right for the room they are usually kinda big, and then when you had the usual 12″ clearance above it and add a mantel, your TV can be pretty darn high. But I have found that if your sofa is deep enough to lounge in, it’s totally fine. A shallow sofa can be a problem if you are forced to sit upright, but if you can lean back then your neck can be salvaged.
Reason #3: A High TV Over A Fireplace In A Bedroom Is Actually A Good Thing photo by kaitlin green | from: where do you really need canned or recessed lighting? what lights we used, didn’t use, or wish we had this winter
We knew that we would want two TV options in our home – one for kids and one for us, especially when having people over. During lockdown at the mountain house, we only had one TV and often had to set the kids up in their room with the laptop if we wanted to watch something less appropriate – which was fine because they were 4 and 6, but we wanted to make sure that for this house we had two options for those Saturday nights when Brian and I actually want to watch an R rated movie (we generally are so tired and go to bed right after them so unless we carve out adult TV time, we watch ZERO grown up shows/movies). So we put a TV over the fireplace in our bedroom and they can watch their garbage in the family room while we watch Severance. It should be noted that we’ve watched TV maybe 10 times in our bedroom since we moved in 6 months ago – so not a lot, but I’m still glad we have the option. We are both big readers (not being pretentious, I literally read romance novels) and rarely watch TV anyway post-lockdown so maybe we didn’t need it in here after all.
 photo by veronica crawford | from: our bedroom update (also how i feel about having a tv in the bedroom)
TVs in bedrooms are a whole other controversial debate which I’m not usually a huge fan of, but again because it’s a Frame, I don’t mind it. We thought long and hard about putting one in here and again only did it because we wanted to have two TV viewing options (we have since put one in our guest room because we accidentally bought one too big for our bedroom wall while we lived in the rental house – before the fireplace wall was even designed). So if we have a lot of kids over and want to shove them away they all climb on the guest bed.
Now, back to my case when you are lying down on a bed you need to make sure that you can see over your feet. So in a bedroom, you actually want your TV higher so you can watch while lying down. And, FURTHERMORE ORLANDO, there is nice simplicity of having both focal points on the same wall, allowing for symmetry next to it (something I LOVE in a bedroom).
Reason #4: I Don’t Like Split Focal Points, I Prefer Symmetry design by orlando soria | photo by zeke ruelas | from: combining furniture styles in the casa soria family room
If your room has the perfect layout then you can relax, and have your TV on a different wall than your fireplace, but most rooms do not. I personally don’t love when you have two competing focal points – and both square boxes. So in my mind, it actually looks better to have a Frame TV over your fireplace than to have it awkwardly floating on a different wall. Orlando uses the above example of how he’s done it, and this room is lucky because there is a blank wall right next to the fireplace so honestly it’s an easy choice, but what if there was a window there instead? Would a Frame TV above the fireplace look that different than the rectangular painting? No! It would look fine!
Reason #5: If You’ve Opted For Windows Instead Of Wall SpaceThis is the challenge we have faced every single time – where we have designed the house with the window and door plan, opting for more windows and negating the perfect wall place to have a TV and fireplace be separate. We have done this in our family room at the mountain house, our bedroom at the farm, and also in Ken/Katie’s future living room. We consciously made this choice of prioritizing windows and natural light OVER the ability to separate the TV and fireplace. Now, I will say that if you are building new or doing a complete remodel my favorite combination (should it be appropriate) is what we did in our current family/tv room – to put a stove-style fireplace NEXT to the TV, thus sharing the same focal wall, not being two big boxes next to each other and yet you can enjoy looking at both the same time. The reason we didn’t do this in Ken/Katie’s future living room is because the height/scale of the room is far too high/big for a small stove fireplace. We also wanted to be able to see the TV from the kitchen while cooking/hanging so it needs to be big and higher than Orlando would likely want it to be. When your sofa is back far enough, a higher TV is FINE.
So If We Want Both A TV And A Fireplace In The Same Room (And View Them At The Same Time) What Should We Do?? design by dee murphy | styled by velinda hellen | photo by sara ligorria-tramp | from: dee murphy’s home tour is giving us all wallpaper envy
I’ve thought about this A LOT and I have some solid solutions. By the way, I know that many of you will make the case AGAINST having a fireplace at all, and it’s one that I want to agree with in theory, but long dark, wet, winters are hard enough to get through. A fireplace that creates ambiance, and heat, and helps your mood which is a wonderful thing. If you don’t want a fireplace, don’t have one. I literally don’t have a car because I don’t like driving (but unfortunately it is becoming extremely apparent that I do in fact need one which I’m bummed about) – we all have our things that we enjoy and enhance our lives while here on earth. There are many of us who appreciate fireplaces immensely for ambiance, heat, and a necessary winter mood boost. Do I think you need one in LA? Nope. But up here, it gets used a ton and enjoyed when it’s cold, wet, and dark. And of course, you are not allowed to put in wood ones in many states, so we opted for a direct-vent gas stove in our family room. I’m also very very excited to see how the electric fireplace technology advances (it’s getting better every year). But today we are not talking about the pros and cons of fireplaces. Instead, we are addressing IF you opt for a fireplace and TV how do you design it to look the best?
Put your TV over the fireplace, make it as low as possible, and go dark with the whole fireplace (should that make sense). The reason we did a brick fireplace in our bedroom was to paint it all one dark color and have the firebox and TV disappear more. It’s my personal preference that new gas fireplaces (which for the most part is your only option if you’re building new) look better on dark fireplaces because they are black metal and glass. Design your TV/fireplace wall to have a shared focal point, but do a stove-style fireplace instead. Again, this is what we did here in our current TV room and it’s a GREAT combination IMHO. It is a shared focal wall but they are different shapes. The TV can be lower, making Orlando’s neck more comfortable should he come over to watch Love is Blind with you. Put your TV over your fireplace, but design the fireplace to be less formal, i.e more appropriate for a TV. Even though we could have designed the mountain house family room to have fewer windows (we probably didn’t need any or both) and we could have done the stove-style fireplace + TV combination I spoke of above, I think that the plaster treatment lent itself easily to a casual family room. I think what bugs Orlando (and myself) is a super formal-looking fireplace surround and mantel with a big bulky TV on top. But again, if it’s a Frame TV I don’t think it’s a huge deal.Ultimately I think my friend Orlando and I agree that there are certainly some less good ways to combine a TV and a fireplace, but just to say unequivocably that TVs over fireplaces are always terrible is what I found hilariously incorrect and deserving of this rebuttal.
 photo by sara ligorria-tramp | from: my best friend’s 1970s basement gets a comfortable, cozy makeover – wood paneling and wall-to-wall carpet included
I think what we’d both agree on is that in a perfect world, you’d have a separate TV room, where the TV is at eye level, sharing the focal wall with a fireplace that you use – like my friend’s basement that we designed last year. But if that is not your life/house, I’m here to tell you that it’s OK and there are ways to do it where you can continue to enjoy your own home, without feeling like you’ve committed a design crime. 🙂
**We’ll be trying out a new comment policy today, due to the fact that posts like this can be really controversial, with statements that someone might feel offended by, or one might want to attack those of us for even having a fireplace – something that we know to inherently not be great for the environment. So we’ll monitor comments and publish anything contributing to this conversation, and not publish anything that creates negativity, environmental evangelism, or frankly saying anything negative about my friend, Orlando. 🙂 If you don’t like him or me, simply don’t read 🙂
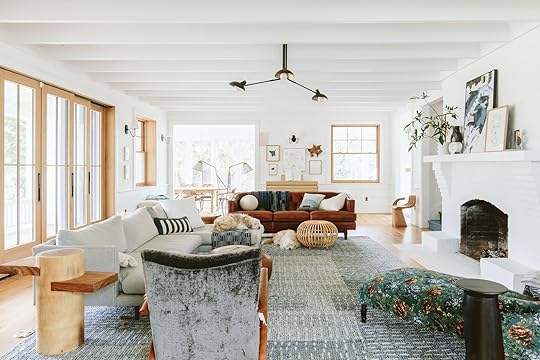
Opening Image Credits: Photo by Sara Ligorria-Tramp | From: Mountain House Reveal: How We Designed Our Super Kid-Friendly Family Roo m
The post In Defense Of TVs Over Fireplaces – A Friendly Rebuttal To Orlando’s Hatred Of That Very Thing appeared first on Emily Henderson.
April 24, 2023
The Reveal We’ve All Been Waiting For! Caitlin’s Mostly Thrifted, Postmodern Regency Deco Living Room
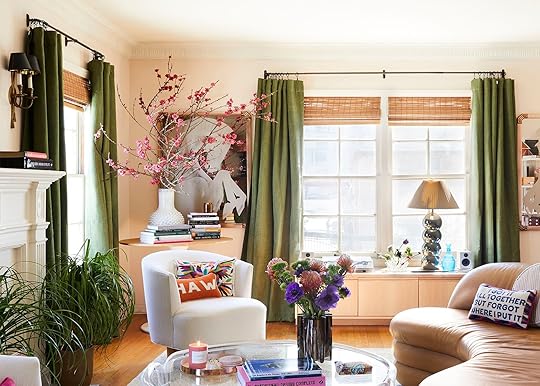
I need you all to know that I am sitting down to write this post with the same manic-meets-panicked energy of Michael Scott during a fire drill. Like, OH MY GOD, IT’S HAPPENING. (In case you’re just tuning in – my name is Caitlin and I head up partnerships and revenue around these parts. You may know me from greatest hits like “Caitlin designs an insane bathroom” and “Caitlin tries and fails to buy a condemned house that’s falling off the side of a hill.”) Today, though, I’m FINALLY welcoming you into my actual living space (and it only took 3.5 years to build up the courage, so that’s something).
Some context into the process, before we deep dive into the very personal photos up ahead: I’d say that this room was “collected” more than “designed.” Sure, there are a few new investment pieces in here – my dream swivel chairs, a classic rug, a modern record cabinet – but the rest of the room is filled with vintage furniture, family heirlooms, flea market finds, gifts from friends, and hand-me-downs from the big boss’ garage. (I am very lucky!!!) Here’s a quick reminder of where we started…
The Before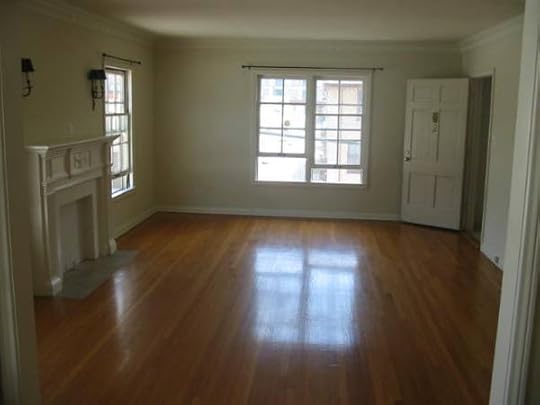
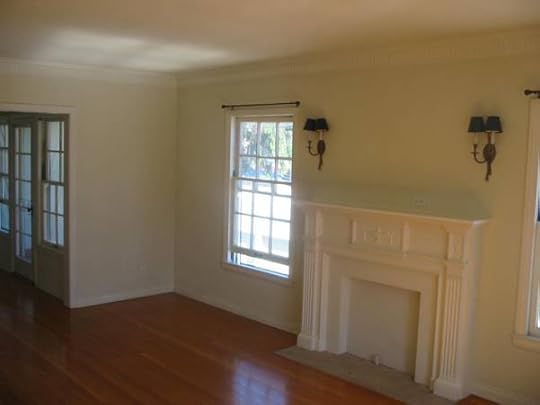
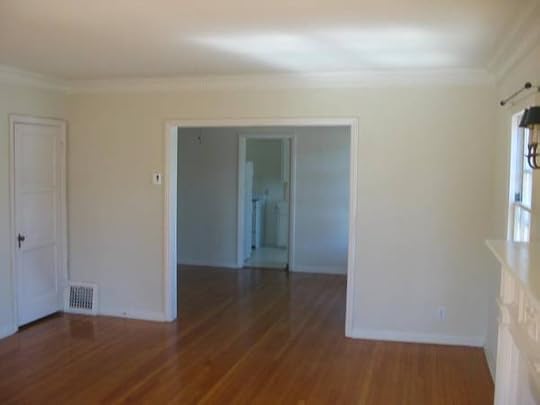
The good: a huuuuuge space (14’x20′!), original hardwood floors, plaster walls, beautiful moulding, a decorative fireplace, 1930s sconces, gorgeous windows, nearly 100-year-old hardware…SHEESH. The bad: well, it gets kind of hot? (I’m underselling – it regularly hits 90 degrees in here in the summer. It’s VERY HOT. But then I think about all of the people who buy sauna blankets and who love sweating, and about how my apartment – seemingly built of top-of-the-line insulating materials like “a piece of paper” and “a prayer” – is kind of like my own rent-controlled sauna blanket, and that helps.) All in all, it’s a beautiful place with incredible bones and I’m still so grateful that I get to live here, surrounded by so many special original details.
The Progress (Alternatively, “Trust The Process”)


This is where I last left you – most of the major pieces were in place, but I knew the layout, paint color, and styling still needed some SERIOUS tweaking. Earnest confession time: honestly, sharing this in-progress content left me feeling anxious and insecure. Like, my full-time job is to help the EHD team turn around beautiful, scroll-stopping makeovers in a matter of weeks…but this was as far as I’d gotten in my own home after years of collecting?
And while I could see the light at the end of the tunnel – I imagined new curtains, warm paint on the walls, two chairs flanking the fireplace, all kinds of stuff that made me feel excited and hopeful! – I also felt worried that my space wasn’t going to be “designed” enough to be internet-worthy, especially when I looked at all the beautiful, cohesive, seemingly uninhabited spaces on my Instagram feed. The absolute insanity of me – a journalism grad with 1. a business development background and 2. a tight budget – comparing my living room to the work of AD100 designers is not lost on me. But I couldn’t stop!!! I felt really disappointed in myself, honestly. The negative self-talk and self-flagellation were at an ALL-TIME HIGH, friends!!!
The After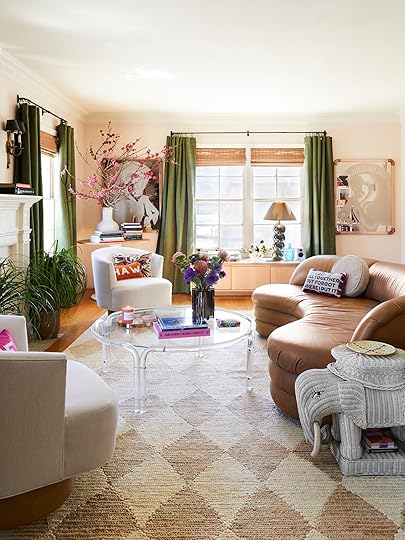
…buuuuuut then I saw this image pop up on Sara’s laptop screen. (HI, WELCOME TO THE REVEAL PORTION!) It was the first photo we took, and, well, it took me WAY back in time. I thought about the 13-year-old version of myself who had designed a striped pink, orange, and green bedroom and who had filled that space with wicker furniture and chrome accents and geometric lamps. (I’ll link a photo on my IG as not to fry your retinas; proceed with caution.)
So when I stood behind Sara and really looked at this picture, I just saw me. Like, that colorful (borderline abrasive?) style I had developed as a loud, strange kid? Turns out that I still have that same taste now, nearly 20 years later, as a loud, strange adult. It was a real “wherever you go, there you are” moment, you know?
Since the shoot, I’ve been thinking a lot about going back in time and meeting up with that weird kid in her nearly-neon bedroom – sitting her down, showing her these photos, and letting her know that it all does work out in the end (mostly, at least). Because friends, let me tell you: that lil’ freak who just wanted to get out of Delaware and who loved color and chrome and quirk would have FLIPPED OUT. She’d be overjoyed to live here, in Los Angeles (a lifelong dream!), in an apartment decked in her signature pink, orange, and green color scheme.
So after spending so much time worrying about how I’m stacking up to my “peers” (read: full-time famous designers who are by NO MEANS my actual peers in any way, shape, or form), realizing that little me would be SO proud to live in this apartment feels really fulfilling in a new way. It’s a welcome, WAY overdue change in my perspective. It may never be Elle Decor cover-worthy or Pinterest perfect, but it’s filled with things I love and it feels like a Lizzie McGuire set from the early aughts that’s enough for me. (FINALLY. Only took a photo shoot to get there, NBD.)
The Paint + Coffee Table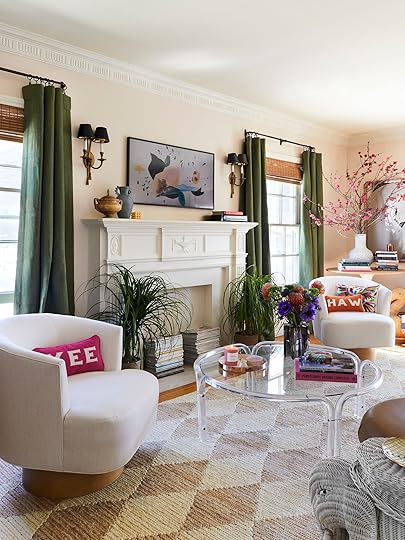
OKAY, ENOUGH BLUBBERING. Let’s talk about paint (because that’s a good transition, right?)! After a little bit of trial and error with my color selection (mainly “error,” TBH, as detailed previously here), I covered the walls with two coats of Pueblo from Sherwin-Williams and I couldn’t be more thrilled about how warm it makes this room look and feel. It’s technically a light orange (!!!), but it’s the perfectly barely-there, almost-pink shade – a little neutral, a little peachy, and SO GLOW-Y. We shot these photos in the late afternoon, and you’ll be able to see how the light and color change throughout the day as the sun goes down – it’s one of my favorite parts of living in this place.
I wanted to take a second to call out the vintage coffee table, too. It was a 2019 steal from AES of LA and it’s lived through every iteration of this room – I love that it’s statement-y, but not loud. The copper tray and stainless Georg Jensen vase were hand-me-downs from Em’s garage (zero qualms about mixing metals over here, can you tell?) and you can also spot my much-loved Horchow card box (copped for $25 on Chairish!) on top of a few recent book purchases from Hennessey + Ingalls. We kept the styling really true to life and only added some fresh flowers – I know I write a lot about maximalism, but it turns out that I like to keep surfaces pretty open in my own home. 🙂
The Closed Storage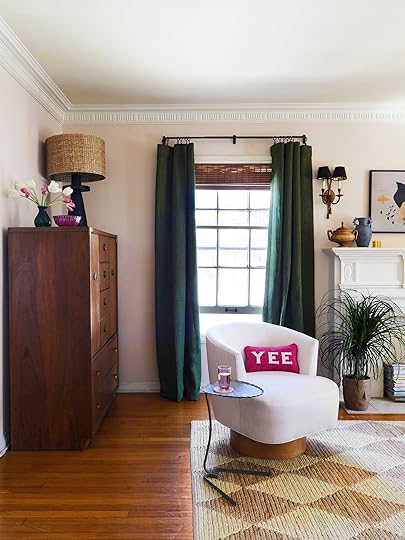

Chairs | Ceramic Lamp | Rug
Let me set the scene real quick: I’m currently writing from this exact spot (it’s my favorite place in the apartment!). My go-to playlist is on shuffle, the sky is blue, it’s 76 and sunny (after three months of nearly non-stop gloom – what gives, LA?), there’s such a nice breeze coming in from the open window, and I’m getting occasional whiffs of clean laundry from the laundromat next door. IT’S SO DREAMY.
Speaking of dreamy…can we talk about that vintage campaign dresser? It’s a workhorse that stores everything from board games and puzzles to wallpaper swatches and tile samples. The ceramic lamp is new from Crate & Barrel, and I love how it’s a modern cousin to the original sconces flanking the fireplace. The green glass vase and pink glass bowl are both family heirlooms that Brenda shipped to me before we shot (thanks, mom!!!), and it’s fun to think that my love of color is at least a little genetic. 🙂
The Dream Swivel Chairs
Chairs | Ceramic Lamp | Rug | Cat (Similar)
You may recognize that Salterini end table from the last update – it was a Rose Bowl flea find that I’m still pinching myself over. I also can’t speak more highly of the swivel chairs. I knew I wanted upholstery here to balance out the leather sofa, but I didn’t want to invest in something that couldn’t stand up to pretty intense daily wear-and-tear (I spill everything – no joke, I literally spilled Hawaiian Punch all over the sofa while we were shooting – and Buffalo spends at least half the day scaling chairs like a feline Alex Honnold, so performance fabric was essential.)
To that end, Sunbrella was the only upholstery option that made sense for my life, and I was THRILLED to find the offerings at Mitchell Gold + Bob Williams. I was immediately taken by the Costello Swivel Chair – customizable! Clean lines! No bulky cushions! The perfect arm shape for those of us who love to pull our legs up into our chairs! – and after ordering a few fabric swatches, I customized my pair with Sunbrella’s Performance Basket Weave in Almond fabric and Natural Wood bases. I’ve been living with these for 7 months and I genuinely couldn’t be more pleased – I love how they look (clean, modern), but I also love how they feel (comfortable, supportive) and how easy they are to maintain (seriously – if you’re only using Sunbrella fabric outdoors, you’re missing out).
A Lazy Gal’s Frame TV Hack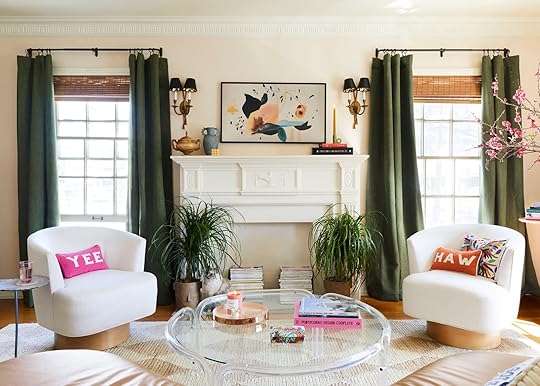
Chairs | ‘Yee Haw’ Pillows | Rug | Planters | TV
Um, hi, TEXTBOOK LIBRA REPORTING FOR DUTY. It’s not groundbreaking, but I love symmetry. A few other things I love: the vintage wooden sugar bowl on the left of the mantel (purchased from this Ukranian Etsy shop in 2020 – they’re still shipping and it’s a great business to support!); the old blue Anthropologie vase; and the little geometric candle, which was a gift from Em on our most recent team trip to Portland. And y’all, don’t even get me started on those Yee Haw needlepoint pillows – they’re so fun AND they’re from a small business in Texas, which rocks. (Who else grabbed one?!) I’ve had the embroidered Mexican Otomi pillow on the right for years – it was a Rose Bowl find and I never get tired of looking at the embroidery.
BUT WAIT, LOOK UP. You see that stack of books on the right side of the mantel? That’s actually the receiver for my Frame TV – I just wrapped it in a black book jacket right before we shot. There’s a famous Bill Gates quote that goes, “I choose a lazy person to do a hard job. Because a lazy person will find an easy way to do it,” and baby, IT’S TRUE. No need to make a fancy electronics cover or run wiring through the wall – just strip down a book, wrap it around your technical eyesore, and call it a day. www.lazygirldesignhacks.com
A Fun Planter
Planters | Cat (Similar) | Rug
I found these face-shaped planters at a Target in Glendale the night before we shot. I sent Bowser about a trillion texts about them (“Do you like these?” “Do you think they’ll look okay in the photos?” “Is this too weird?” “Am I overthinking?”)…and then I bought them anyway before she responded because the heart wants what it wants. (Nothing like repotting plants in the dark, amiright?) I think they’re kind of quietly kitschy – especially when paired with ponytail palms!!! Guys, it’s like they have little ponytails!!! – but most of my visitors haven’t really clocked the faces, so it’s like a fun inside joke with myself (and now with you, too).
An Updated Neutral Rug
Rug | Chairs | Media Cabinet
After years of writing “my apartment has the best bones and the best light,” it’s SO EXCITING to show you said “best bones” and “best light.” It’s so warm and bright, even at sunset – my favorite. 🙂 I wanted to honor the light and airy feeling in here, so I chose the Harwich Rug from Annie Selke to anchor the room. I love the timeless harlequin pattern – I think it speaks to some of the more classic architectural elements of my apartment (the moulding, the hardware, all that jazz). Beyond that, it can take a BEATING (read: daily maulings and clawings from a certain feline companion). It’s surprisingly comfortable underfoot and it’s held up beautifully over the past 7 months. If you’re on the hunt for a neutral rug with a little extra ~spice~, I’d wholeheartedly recommend this one.
Oh, and that vintage wicker duck basket is an all-time favorite of mine. I grabbed it 7 or 8 years ago from Pepe’s Thrifty Shop (there are two in LA – the one on Centinela is the good one!!!). Pepe’s genuinely has the best inventory, the greatest prices, and it’s owned by the sweetest family team. If you’re in the area, you’ve gotta follow them on IG and stop in sometime!
The Best Cheap Curtains, Shades, and Rods
Curtain Rods | Drapery Rings | Roman Shades | Curtain Panels
Well. Since I’m clearly not good at gatekeeping my favorite resources: LET’S TALK ABOUT MY CHEAP, FAST, AND GOOD WINDOW TREATMENTS. Y’all, these fooled Bowser and Sara – both gals thought they were gifted and custom, which is THE BIGGEST COMPLIMENT I COULD EVER RECEIVE.
From the top (make it drop?): I bought the French Rods and Drapery Rings, both in Bronze, during one of Ballard Designs’ 30% off sales (they happen frequently and they’re worth the wait). The cordless woven shades were from Amazon (about $40 each, and they come in a ton of sizes and colors – this one is “Squirrel”) and the curtain panels (in “Tuscany Green”) are currently on sale for $34 each. I used 7 rings per panel and I LOVE how they turned out (you know, in case you’re also the type of person who Googles questions like “where do I place my drapery rings” and “how many rings do I need” and “what’s the correct drapery ring spacing”). I’m really proud that I was able to outfit all the windows in here for the price I’d been quoted for ONE custom window treatment. Feel free to steal the formula for your own home!
A Vintage Tulip Table
Curtain Rods | Drapery Rings | Roman Shades | Curtain Panels
If you’ve been following along for a while, you may remember that this corner was my problem area…NOT ANYMORE! I considered a lot of different things for this space – game table? More storage? Sculpture? Large light fixture? – but then I saw this $120 vintage oak tulip table on FB Marketplace and was like, “oh, that’s what’s supposed to go there.” I love how this piece feels like it’s “friends” with the rest of the room – the white base speaks to the bookshelves and trim, and the wood speaks to, uh, the other ~15ish wood tones I have going on in here.
I’ve loved having a table in this corner, though – it’s fun for puzzles, practical as a bonus workstation, and it looks pretty freakin’ nice with a big bunch of branches, too. 🙂 Bowser grabbed this bundle of blossoms at the flower market in DTLA for only $20 (!!!) and a ton of blooms continued to open up in the weeks after we shot, which was such a genuine delight. (PS. Guess who gave me the big ceramic vessel – her name starts with “E” and ends with “mily Henderson.”)
A Little Decor Break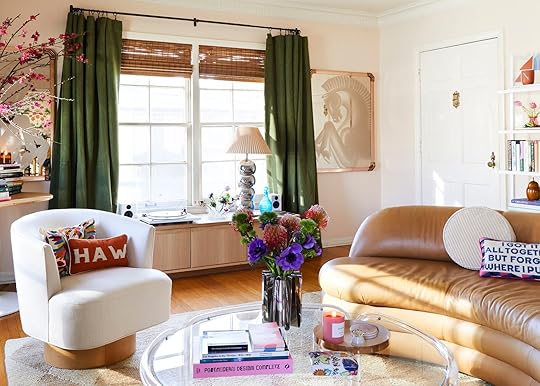
Media Cabinet | Circle Pillow | Rug
Welcome to the entry! The open space to the side of the door is typically reserved for my ice skating duffle bag (huge and ugly, so it did not make the cut for this shoot, but just know…it’s usually there). And man, I finally found the spot for my vintage horse mirrors!!! I bought them from Old Green Garage on a Rose Bowl trip with Jess in 2021 – our first excursion post-lockdown! – and I really, really, really love them. Speaking of vintage, you can spot the 1800s pear “box” that I grabbed in a Hungarian antique shop last November on the shelf right above the sofa! Thanks to a few brilliant commenters, I learned that what I thought was a ~fun souvenir~ is actually an $$$antique tea caddy$$$.
And while it’s not thrifted (finally, something from this decade to talk about!), I also wanted to call out the ceramic vessel on the top of the bookshelf, which was made by an artist I love named Scott Cooper. He’s based in Philadelphia (just a hop from my hometown in Wilmington, DE!) and I’ve purchased a few of his pieces over the years. All of his work is unexpected and irreverent and fresh – grab it while you still can!
The Best Vinyl Record Storage

Media Console | Record Player | Speakers
Pivoting around for a minute to show off my final new acquisition: the Keaton Media Cabinet from Room & Board. Y’all, I spent YEARS looking for this piece. My wishlist was incredibly specific: I needed something long (at least 60″ to fit a good chunk of my records), low (under 19″, to keep the windows functional), with closed storage (for blocking sun AND for blocking nosy cats), and with a simple shape (something that can work with any future styles or trends I decide to try). CHECK, CHECK, CHECK, CHECK. I grabbed the Keaton in white oak, pulled out the removable shelves, loaded it up with LPs, and it’s been the PERFECT base station for my little record zone.
All the decor on top is from the flea market with the exception of the blue glass decanter, which is another family piece that Brenda shipped to me before we shot. I’m so glad I got to document it like this! 🙂 And if you’re in the market for a high-quality audio setup that will not (majorly) bankrupt you, you cannot go wrong with a U-Turn Audio Record Player and these powered AudioEngine speakers. It’s easy to set up, aesthetically appealing, comparatively affordable, and it sounds WAY better than the all-in-one turntables out there. (PS. All the wifi/router/cord/mess situation in this room is just shoved behind the curtain on the left. www.evenmorelazygirldesignhacks.com)
A 1980s Sofa Moment
Shelving | Rug | Circle Pillow
It’s THE DREAM SOFA. I loved it, I loathed it, and then I learned to love it again. I bought this 1980s caramel leather baby sight unseen from Modtiques, an incredible vintage retailer in New Jersey…but when it arrived, I realized that I hadn’t considered that the shape (curved), material (leather), and construction (armless) makes it more of a “talking” sofa and less of a “lay down here and don’t move for the whole day” sofa.
Enter: the shaped, textured pillow. Instead of throwing the baby out with the bathwater, I realized I just needed to change the types of pillows I was trying to use here – this one from Crate & Barrel doesn’t slide off the leather, which makes the whole setup infinitely more comfortable and usable. PROBLEM SOLVED. And as it turns out, having a sofa that doesn’t make me want to waste the day lying prone and staring at the ceiling is kind of a win too, you know? It all works out! I love this sofa and I’m glad I learned to work with her. 🙂
A Little History
Well, well, well…if it isn’t more vintage 🙂 The gold chrome lamp was a pandemic purchase from Lackluster.co that I topped with a cheap lampshade from the Rose Bowl; the wicker elephant was a 2017 Long Beach Flea find that I bought for a single $2 bill! (Can you believe it?!) Bowser and Sara pivoted him out so you could get a nice look – the table’s in awesome condition and I love him SO much.
One of my favorite pieces, though, is the little tiled tray on top of the elephant. It was made by my great-grandpa Frank! He passed away when I was pretty young (6 or 7, I think), but he worked with tile as a hobby. I have a few pieces he made (smaller ashtrays, larger trivets) and they’re all so cheerful and geometric and colorful. It’s so exciting that the pieces he made decades ago blend in so seamlessly here, you know?
My other favorite piece in this shot is the leather box on the bookshelf farthest to the right – it was my dad’s backgammon set. He passed when I was very young (18 months – I know that one for sure!) and while I don’t have any memories of him, I love that his things also fit in perfectly here. It feels nice to have a connection to my family, even though they’re no longer around. 🙂
Bookshelves (with Books!)
And here’s some real up-close intel on SO MANY of my little treasures! The framed dog matchbooks on the left were a 2019 Christmas gift from Sara; the Carl Durkow candles up top were a 2022 Christmas gift from my boyfriend’s parents (literally was blown away when I opened the package – the Keenans knocked this one outta the park!!! I’m very lucky :)); I bought the pink vessel after writing about it here in a post about affordable accessories (purchased it minutes before the post went live, naturally); the chess board, lamp, and original chrome tangle are all flea finds; the “Doomed” art was a limited run piece in 2020 by my all-time favorite band, Los Campesinos.
I’ve always admired bookshelves that are styled a little more sparsely – you know, all curated vessels and objects in a cohesive palette – but I like to read, so I needed space for actual books, and I love to see all my little favorite sentimental pieces of decor displayed (even when they don’t technically “go together” – like, yes, of COURSE, I needed to display my tiny wooden mushroom forest next to a 1970s space age lamp). Overall, I love that the shelving units back here are a blank canvas with a ton of room to grow – I can’t wait to show you the next iteration someday in the future 🙂
That’s Just the Beginning…
Dining Room Wallpaper | Kitchen Wallpaper
On that note, HERE’S A SNEAK PEEK INTO WHAT’S NEXT. Lots of color, lots of wallpaper, and lots of fun. One day I’d like to get a big piece of art for the wall on the left to balance out the campaign dresser, but I’m still saving up for something special. (Dreaming of a Monica Ajenjo piece, TBH.) The dining room to the back is still a work in progress, but I CAN’T WAIT to show you the awesome $75 vintage china cabinet I just had delivered – it looks SO GOOD in there. (Did anyone catch it on my stories last week?!) I also finally hung my lucite ribbon chandelier! Just need some comfy dining chairs and some art and we’ll be cruising towards a shoot date. 🙂
The galley kitchen in the rear is almost ready to share, though…just finishing up a few hardware and lighting swaps. Are you ready for it?
But That’s All for Today 🙂
Here’s where I leave you – sitting in my favorite party dress with a champagne coupe filled with Hawaiian Punch. You know, JUST A TYPICAL TUESDAY. (Not pictured: me spilling all over myself and the sofa. You’ll have to imagine that one for yourself.) ANYWAY. If you’re also struggling with self-doubt and insecurity when it comes to the design of your home, I hope this helped a bit – we’re all our own toughest critics. I mean…did you notice that my TV is seriously off-center?! No one else ever does – and I didn’t have it fixed in the photos, because I wanted to keep it real! – but the idea of sharing all these small imperfections originally left me feeling scared. Now, though, it makes me feel kind of powerful – like, HERE’S MY HOME, MISTAKES AND ALL! It’s not perfect, but it’s perfect for me. 🙂
Signing off from my strange lil’ “1999 Limited Too Exec Time Travels to 2023″-style apartment. Thank you for being here. Any thoughts, questions, concerns? I’m ready to hear it all. WHAT SAY YOU? Let’s chat. See you in the comments. xx
*Design by Caitlin Higgins (me!)
**Styled by Emily Bowser
***Photos by Sara Ligorria-Tramp
The post The Reveal We’ve All Been Waiting For! Caitlin’s Mostly Thrifted, Postmodern Regency Deco Living Room appeared first on Emily Henderson.
April 23, 2023
The Link Up: The 3 Makeup Products Em Was Recommended For A Natural Look, Catlin’s Favorite Button-Down, And The Viral Perfume We Actually LOVE

Let’s start out this week’s link up with some very exciting news…Malcolm has been named one of House Beautiful’s Next Wave designers for their 2023 class!!! It’s beyond deserved and we are so happy that his immense talent continues to be recognized in very exciting ways. Congrats Malcolm! We are also very excited to see Meta Coleman, Victoria Sass, and Carmen René Smith on the list and can’t wait to learn more about the others:) Ok, now let’s get to these links.
This week’s house tour is a condo kitchen renovation by vintage lover, Virginia Chamlee. While the colors are neutral the design is anything but! It’s full of unique shapes, awesome finishes, and really great vintage finds (a thrifted mirror was her jumping-off point!). Go see the whole room (AND THE FLOOR!).
From Emily: I recently did a shoot with a new make-up artist, France Pierson, who specializes in making people look very natural. She gave me some product recommendations that she basically made sound like they were imperative for my skin, and for the look that I want…and the results were pretty incredible. One was this blurring setting powder with this kind of brush and this tinted cream highlighter. I haven’t actually bought these myself yet but I wanted to talk about them since Sephora is having its big sale. If you know anything about them leave comments in the comment section:)
From Caitlin: My favorite button-down is on MAJOR sale ($50 off – down to $75). I grabbed mine back in December in an XL and have found myself turning towards this shirt more than any other in my closet – I love the cheery stripe, the pocket detailing, the color, the drape, EVERYTHING. (I also have a 36F cup and there’s no pulling or gaping on the buttons, which is honestly incredible. It holds up great after laundering, too!) It’s the perfect weight for every season – breezy enough for the hot months; sturdy enough for the cool ones – and I’m SO GLAD that I took the plunge and tried out a new brand. I used to be a Madewell button-down loyalist (seriously – I am wearing a striped button-down from Madewell in my author photo and I even call out the Central Shirt in my author bio on this very website!!!) but this one blows my current Madewell inventory outta the water. If you’re in the market for a shirt that can do double duty for work and play and that will last for the long haul, this is an absolute winner. YOU WILL LOVE IT, I PROMISE!
From Arlyn: Keeping a toddler entertained (and fed) during any length of a plane ride isn’t exactly an easy feat, but this little device was a God send on a recent trip with my one-year-old. It’s a toy and a snack container in one with several little compartments and a center button you press to make it spin around! If you have any friends with littles (or have them yourself), this is an awesome gift both for the kid *and* the parent. Trust me. 🙂
From Ryann: I have been wanting to try Glossier’s fragrance ‘You’ for YEARS and I finally picked up a bottle a few weeks ago. I have tons of friends who have it and love it. I’ve heard rumors that it smells a little different on everyone – making it personal to YOU. After 2 weeks of using it, I am obsessed. I look forward to putting it on every day and my husband loves it too!
From Mallory: I LOVE a knee high boot (especially with a dress or skirt) but they can be so expensive and it’s been a struggle to find a really cute, quality one that doesn’t break the bank. ENTER THESE. They’re by Franco Sarto (which is an awesome brand with VERY expensive boots normally) but I found them for 50% off at Nordy’s Racky babyyyy!! I find them SO comfortable and can easily walk around in them for a whole day. Plus they’re not stiff at the top (more like a stretchy kind of leather) but they’re still a bit structured which is great. If you’re in the market these are so great!!
In case you missed Friday’s post but we just announced another Pen + Napkin Feel Good makeover. Ashley Fiocco, a designer from Orange County, has taken on a really special and important makeover for a mother and son who were able to escape a domestic abuser. Please go and read the post and if you have any money to spare for a donation, every dollar counts. You will absolutely be making a difference.
From Albie: In recent years I’ve become obsessed with robes! I’m currently in my long flowy robe “I feel rich” era because there’s just something about a long and flowy robe that makes me feel like a rich celebrity lol. That said, my most recent add to my robe collection came from the most unlikely of places — Fabletics! I treated myself to this number for my birthday, using my Fabletics credit. Worth every penny! It’s super lightweight, soft, long, and flowy… making it supes perfect no matter what I’m wearing underneath. The color is also gorgeous. Every time I wear it, I glide around the house like a princess; and now when my husband & mini see me wearing it, they know it’s my carefree day.
Revival Rugs (where Jess’ beloved new living room rug is from) is having an Earth Day sale! They are taking 20% off all recycled and upcycled products with code EARTHDAYYAY until tomorrow, Monday, April 24. This does include all of their vintage rugs!!
From Jess: I immediately clicked this Clever piece titled, “16 Interior Design Red Flags to Watch Out For When You’re Dating.” As a single lady, I laughed and could relate. However, these are VERY fancy design-minded people so some of their “red flags” were simply things they didn’t like. Fair but not always the same as a red flag in my opinion. I most definitely have my own list…let’s just say just because he looks like the man of your dreams and is finishing his law degree doesn’t mean he also owns a blanket for his bed. Y’all, not even a top sheet. Wait, he had a beach towel but I needed it for a pillow…The bar is truly on the floor. To be fair, while styled pretty, my mattress has been on the floor for 2.5 years. This year that WILL change so maybe my dating pool will too??
Also From Jess: It’s always a bittersweet piece of news when I find out the annual Sephora Savings Event is live:) My eyes light up but my wallet is reluctant. BUT there are a couple of things I use all of the time and need to buy anyway so might as well get those puppies on sale, right? One of those things is my beloved Alpha Beta® Universal Daily Peel Pads. They truly are worth the hype and I’ve used them for at least three years now. I don’t use them every day, just 2-3 times a week, and when I do my skin is noticeably brighter and happier. Also, if I could only own one eyeshadow palette for the rest of my days it would be this one from Ilia. It’s literally called “The Necessary Eyeshadow Palette”. I Iove the glowy but “natural” colors and it’s easy to use on the go or for a full glam eye. Mine is almost done so time to restock! Now while there are many more things I want, the only thing I want that I have yet to use is the new Dr. Dennis Gross’ DermInfusions™ Fill + Repair Serum with Hyaluronic Acid. I’ve loved every product I’ve ever tried of his (those peel pads, moisturizers, face wash, eye cream, tanning wipes, etc.) and while no one is expecting to look 10 years younger over here, this “alternative to injectable filler” is pretty enticing. It’s also not cheap so 15% off is mandatory for my willingness to purchase. In case you need a refresher, the Sephora Makeup Collection is 30% off, Rouge members get 20% off, VIB members get 15% off, and Insider’s get 10% off through 4/24…That’s tomorrow! Use code SAVENOW.
Like all of you, we are still in shock and heartbroken by the senseless devastation caused to Ralph Yarl, Payton Washington, as well as the Gillis Family. Is this the America we’re ok with? That a truly innocent and harmless mistake, like knocking on the wrong door, is reason enough for murder? We, of course, urge everyone to donate to their GoFundMe’s. However, preventing the need for crowdsourcing after traumatic events like these should be our bigger focus. So we ask you again to please call your reps. Here is the official phone list. Also, pay attention to when your local and state elections are.
See everyone tomorrow. xx
Opening Image Credits: Design and Styled by Emily Bowser | Photos by Sara Ligorria-Tramp | From: Emily Bowser’s Kitchen REVEAL! Plus The 8 Ways She Really Maximized Her Galley Kitchen Storage
The post The Link Up: The 3 Makeup Products Em Was Recommended For A Natural Look, Catlin’s Favorite Button-Down, And The Viral Perfume We Actually LOVE appeared first on Emily Henderson.
April 22, 2023
The At-Home Dog DNA Test Results Are IN! We Finally Know What Oscar And Buttercup Are Really Made Of:)

At some point in my early childhood, I was told that I was Scottish. Or maybe I was told I had some Scottish in me. Whatever the case, I ran with it, and by the time the movie Braveheart hit theaters in 1995, I was telling everyone I was a full-on Scotsman. This was before we found out that Mel Gibson was a total racist piece of trash who should be forever shunned and never make movies again. But at the time, I was obsessed with being William Wallace – the long hair, the accent, the blue stuff on his face. He was a true son of Scotland, just like me.
Sure, my mom kept telling me I was mostly English and German, but that’s beside the fact. I mean, come on, my last name was Henderson, I had bushy eyebrows, and I liked plaid. How much more Scottish could one guy be? I clung to my kilt and have kept up the rouse to this very day. I still tell people I’m Scottish, which I know is probably not totally accurate. But I’ve never seen a DNA test that proves otherwise, and I’m not going to take one, because a DNA test could crumble my very identity.

That’s why I had mixed feelings when we decided to give our dogs a DNA test. See, when we rescued Oscar and Buttercup, the shelter told us that they were Huskypoos — a mix of Husky and Poodle. The Poodle part makes sense, they’re curly blonde fluff monsters that don’t shed all that much. They’ve got little black button noses, puffy facial hair, and when we groom them they look ever so fancy. But Husky? Have you seen them? Other than their tails that gently curve upward, and the fact that they love to run in the snow, there’s absolutely no indication that they have any Husky in them. Of course, a doggy DNA test would tell us once and for all, if they did.
But wait, I thought. What if being Husky to them was like being Scottish to me? What if they had already told all their doggy pals that they were big strong Huskies? What if they built their identities around the belief that they’re brave Arctic canines? Were we going to take that away from them and break their little doggy hearts?
That’s when Emily told me how stupid I was being, and we gave them the tests.

We ordered a couple of different options to see if there was any variance between them. There are a few brands out there, but we went with Wisdom Panel and Embark.


Administering the tests was much easier than I expected, just a little swab on the cheek and done. If you’ve ever done an at-home COVID test, this is easier. You just swab, pack, and ship.


We did have to register both test kits on their respective websites, but even those were easy to set up and pretty user-friendly. The dogs got yummy treats afterward and we got sloppy dog kisses.

The hardest part of the whole process was waiting for the results. The Wisdom Panel came back first, within a couple of weeks. The Embark results were posted to the website and either we missed an email about it or they didn’t send one, but we didn’t see those results for about a month. User error? We don’t know.
But we finally got all the cross-referenced results, and it turns out that our dogs are…

Drum roll…
Get ready…
Keep reading like one of those recipe blogs that makes you scroll for two hours before revealing the recipe…
Oscar and Buttercup are…

 HUSKYPOOS!!!
The shelter was right! According to Wisdom Panel, these little shooshies are 34% Husky and 25% Poodle, with some other breeds in there as well: 10% Shih Tzu, 9% Aussie Cattle Dog, and 8% Chihuahua. Wait, Chihuahua??
Embark has the Husky/Poodle percentage flipped: 37% Poodle and 29% Husky. It also picked up Australian Cattle Dog (12%), Lhasa Apso (6%), and what they call Supermutt (15%)

And there’s more! They have siblings! There’s a sister out there named Brie and another named Lana, who lives in Long Beach!
Should we invite them all up to the farmhouse and have a Huskypoo reunion? I think so! Would it be like a normal family reunion with watered-down lemonade and awkward small talk between relatives who aren’t close? Or would it be a fluffy dogpile of siblings? Who knows!

One thing’s for certain, we can finally sit our dogs down, that is, if they’ll sit on command, and inform them that they are, without a doubt, Huskypoos. And if they want to keep telling other dogs that they’re full Husky, we’re fine with that too. It’ll be our little secret.
Photos by Kaitlin Green
The post The At-Home Dog DNA Test Results Are IN! We Finally Know What Oscar And Buttercup Are Really Made Of:) appeared first on Emily Henderson.
April 21, 2023
Introducing A New Feel Good Pen + Napkin Makeover For SUCH A Deserving Family (+ How You Can Help)

Hello and happy Friday! Ashley here, of Ashley Fiocco Designs. I am a LONG-time reader of this blog, so to be writing this right now is SURREAL. After having my two boys, I left my decade-long career in the culinary/celebrity chef world, to go back to school in order to turn my passion for beautiful interiors into the meaningful career I now enjoy! I’m a 1-woman studio based in Orange County, CA, taking on projects with budgets big and small. It’s important to me to help others, regardless of income, to live in spaces that make them feel their best. Obviously, sustaining my business is a goal, but the benefits of assisting anyone and everyone I can to realize their visions of homes that will bring them joy, confidence, and serenity are so much more fulfilling to me.
Back in 2021, when I read this EHD post seeking volunteers’ help to take their Feel-Good MOTOs national with Pen + Napkin, I immediately wanted to get involved. However, at the time, I was living in London with my family (a perk of being married to a professor is we all get to go on sabbatical!). So I had to settle for submitting an application and hoping to connect in the future… And now, a year and a half later and back in SoCal, I’ve been matched with a family that I am so grateful to be able to help!


Suzie, a hard-working single mom, and Brett, her teenage son, (not their real names) are survivors of domestic violence. As Suzie puts it, they’ve “been through a storm.” After escaping a horrible situation a few years ago, they had nowhere to go and ended up homeless. They made their way to OC and now have a roof over their heads. When I first visited them in their apartment to see it and get a feel for their preferences, it was apparent that the space was not ideal in decor or function. Suzie and Brett have been sleeping on mattresses on the floor. There are no wired lights in the main living area or bedrooms, and they don’t have the resources to buy lighting, so the apartment is quite dark. As a designer, this really struck me—ample lighting is so important, not just for purely functional reasons, but also to create an ambiance of warmth and coziness. The apartment also has no curtains and many of the blinds on the windows are broken, so even inside you feel quite exposed. With neighbors and strangers walking by, able to see inside, Suzie mentioned how she and her son often feel vulnerable. The little furniture they do have (just a few, broken pieces) was handed down or found on the curb.
Shortly after securing their apartment and getting back to work and back on track, Suzie lost her beloved dad, whom she called her “hero”. A few months later, one of her closest friends died of cancer. If things couldn’t get worse, she then had to have emergency surgery. This resulted in her losing her job since the time she needed off to recuperate couldn’t be approved by her manager.
To put it simply, Suzie and Brett need some help. Talking with them, I learned their greatest desire is to feel safe, cozy, and settled – Suzie, understandably, just wants a HOME for her and her son. She likes browns, dark blue, pinks, scented candles, and 80s music. She has young nieces and nephews who sometimes come over, so their home needs to be child-friendly. Brett is on the autism spectrum and feels more comfortable attending high school virtually for the time being. He needs a proper desk on which to do his homework and the appropriate setup in his room to read and play video games. Once, when I was over, Brett was sitting on the floor of his bedroom, trying to do schoolwork in his lap—there was nowhere else private to sit. Similar to many young men, he is into anime, sports cars, and basketball, and likes cherry red, black, and gold.


With all of this in mind, I created these designs that I hope will provide the mental and physical comfort Suzie and Brett are seeking. Suzie used the word “cozy” to describe her ideal home so many times, so I really tried to design spaces that will allow them to exhale, to make them feel like they’re getting a warm, pleasant hug. After all they’ve been through, they could really use a hug!
So, here’s where you all come in. Even though this living space is being designed on a truly tight budget, the costs of furnishing from scratch an essentially empty, 2-bedroom apartment are still significant. We need all the help we can get! The itemized wish lists of affordable furnishings and furniture at Wayfair, IKEA, and Amazon can be found here, and we have a donation link to try to cover other things we’ve already purchased from Target and other major retailers, as well as some higher-quality thrifted items, decorative objects, etc.
Pen + Napkin and I have launched a campaign page for donations. We are SO VERY grateful that this page is being shared with you all on EHD, but we could use your help in further spreading the word. Please send the link around to your communities, your social media networks, etc. If any extra funds are raised, they will be used for future Pen + Napkin projects, which I hope Ashley Fiocco Designs can be a part of, too! It’s tremendously satisfying (and fun!) to help paying clients achieve their preferred vibe and desired look in their homes. But to be able to do so for people who, without the initiative and expertise of the Pen + Napkin team, combined with the generosity of many others, would not have this opportunity—people who would still be sleeping on the floor or, literally, sitting in the dark—is an even more wonderful feeling — THE ULTIMATE wonderful feeling! Please, if you can, join us and be a part of this amazing effort, something kind and loving and just, basically, GOOD.
Let’s make MORE GOOD together.
You can follow along on the journey here where I’ll post progress made and updates, and we also plan to share an after post, once enough of the hoped-for items have been installed, so you can see the final transformation that (hopefully) you will have also played a part in. I, myself, cannot wait to see it and share it with all of you! Thank you!
The post Introducing A New Feel Good Pen + Napkin Makeover For SUCH A Deserving Family (+ How You Can Help) appeared first on Emily Henderson.
Introducing A New Feel Good Pen + Napkin Makeover For SUCH A Deserving Familly (+ How You Can Help)
Hello and happy Friday! Ashley here, of Ashley Fiocco Designs. I am a LONG-time reader of this blog, so to be writing this right now is SURREAL. After having my two boys, I left my decade-long career in the culinary/celebrity chef world, to go back to school in order to turn my passion for beautiful interiors into the meaningful career I now enjoy! I’m a 1-woman studio based in Orange County, CA, taking on projects with budgets big and small. It’s important to me to help others, regardless of income, to live in spaces that make them feel their best. Obviously, sustaining my business is a goal, but the benefits of assisting anyone and everyone I can to realize their visions of homes that will bring them joy, confidence, and serenity are so much more fulfilling to me.
Back in 2021, when I read this EHD post seeking volunteers’ help to take their Feel-Good MOTOs national with Pen + Napkin, I immediately wanted to get involved. However, at the time, I was living in London with my family (a perk of being married to a professor is we all get to go on sabbatical!). So I had to settle for submitting an application and hoping to connect in the future… And now, a year and a half later and back in SoCal, I’ve been matched with a family that I am so grateful to be able to help!
Suzie, a hard-working single mom, and Brett, her teenage son, (not their real names) are survivors of domestic violence. As Suzie puts it, they’ve “been through a storm.” After escaping a horrible situation a few years ago, they had nowhere to go and ended up homeless. They made their way to OC and now have a roof over their heads. When I first visited them in their apartment to see it and get a feel for their preferences, it was apparent that the space was not ideal in decor or function. Suzie and Brett have been sleeping on mattresses on the floor. There are no wired lights in the main living area or bedrooms, and they don’t have the resources to buy lighting, so the apartment is quite dark. As a designer, this really struck me—ample lighting is so important, not just for purely functional reasons, but also to create an ambiance of warmth and coziness. The apartment also has no curtains and many of the blinds on the windows are broken, so even inside you feel quite exposed. With neighbors and strangers walking by, able to see inside, Suzie mentioned how she and her son often feel vulnerable. The little furniture they do have (just a few, broken pieces) was handed down or found on the curb.
Shortly after securing their apartment and getting back to work and back on track, Suzie lost her beloved dad, whom she called her “hero”. A few months later, one of her closest friends died of cancer. If things couldn’t get worse, she then had to have emergency surgery. This resulted in her losing her job since the time she needed off to recuperate couldn’t be approved by her manager.
To put it simply, Suzie and Brett need some help. Talking with them, I learned their greatest desire is to feel safe, cozy, and settled – Suzie, understandably, just wants a HOME for her and her son. She likes browns, dark blue, pinks, scented candles, and 80s music. She has young nieces and nephews who sometimes come over, so their home needs to be child-friendly. Brett is on the autism spectrum and feels more comfortable attending high school virtually for the time being. He needs a proper desk on which to do his homework and the appropriate setup in his room to read and play video games. Once, when I was over, Brett was sitting on the floor of his bedroom, trying to do schoolwork in his lap—there was nowhere else private to sit. Similar to many young men, he is into anime, sports cars, and basketball, and likes cherry red, black, and gold.
With all of this in mind, I created these designs that I hope will provide the mental and physical comfort Suzie and Brett are seeking. Suzie used the word “cozy” to describe her ideal home so many times, so I really tried to design spaces that will allow them to exhale, to make them feel like they’re getting a warm, pleasant hug. After all they’ve been through, they could really use a hug!
So, here’s where you all come in. Even though this living space is being designed on a truly tight budget, the costs of furnishing from scratch an essentially empty, 2-bedroom apartment are still significant. We need all the help we can get! The itemized wish lists of affordable furnishings and furniture at Wayfair, IKEA, and Amazon can be found here, and we have a donation link to try to cover other things we’ve already purchased from Target and other major retailers, as well as some higher-quality thrifted items, decorative objects, etc.
Pen + Napkin and I have launched a campaign page for donations. We are SO VERY grateful that this page is being shared with you all on EHD, but we could use your help in further spreading the word. Please send the link around to your communities, your social media networks, etc. If any extra funds are raised, they will be used for future Pen + Napkin projects, which I hope Ashley Fiocco Designs can be a part of, too! It’s tremendously satisfying (and fun!) to help paying clients achieve their preferred vibe and desired look in their homes. But to be able to do so for people who, without the initiative and expertise of the Pen + Napkin team, combined with the generosity of many others, would not have this opportunity—people who would still be sleeping on the floor or, literally, sitting in the dark—is an even more wonderful feeling — THE ULTIMATE wonderful feeling! Please, if you can, join us and be a part of this amazing effort, something kind and loving and just, basically, GOOD.
Let’s make MORE GOOD together.
You can follow along on the journey here where I’ll post progress made and updates, and we also plan to share an after post, once enough of the hoped-for items have been installed, so you can see the final transformation that (hopefully) you will have also played a part in. I, myself, cannot wait to see it and share it with all of you! Thank you!
The post Introducing A New Feel Good Pen + Napkin Makeover For SUCH A Deserving Familly (+ How You Can Help) appeared first on Emily Henderson.
Emily Henderson's Blog

- Emily Henderson's profile
- 10 followers

