
Emily Henderson's Blog, page 245
October 5, 2019
Six Fall Sweaters I’m Loving (+ How To Wear Them)

Even though I was born/raised in Oregon, I have always resisted celebrating “sweater weather,” instead, opting for the more structured jacket in these fall months. I suppose it’s because these knitted numbers can feel really frumpy due to my secret boobs or they cling in the wrong places (always around the waist or they show a bra strap, etc). For me, the cut and drape have to be good and the styling has to look intentional. Luckily my friend Suzanne is a stylist, so we went to Nordstrom and she taught me how to shop for and style sweaters in a fresh (and flattering) way, with some sweater-wearing tips that maybe you might be into, too. Not frumpy, more fun. Let’s get to it:
1. Edge Up The Classic Sweater With a Leather Mini:

Shop The Look: Sweater | Skirt | Boots | Bag (similar)
Let’s start with this number. It’s a classic nautical-inspired sweater—high neck, gold buttons on the side and stripes. It drapes GREAT, being more fitted in the armpits and then straight down going over your pant buttons if you wish. We did the French tuck with this one, though, because we love a French tuck. I really liked it and knew that I would wear it a lot, but Suzanne feared it was a bit too basic and predictable if worn just with jeans. She insisted I wear it with a black leather mini to edge it up, and pulled out this amazing Redone leather skirt (which is a brand that repurposes vintage Levi’s, so they are more sustainable, but are not exactly affordable and no I didn’t buy it). Here are a few leather numbers that we like a lot (just couldn’t get in time for the shoot: this, this and this). We wanted something a bit more bell-like in shape, not just a tight, black leather mini and they are harder to find.

Let’s move on to my feet. Those boots are GREAT. They are the perfect casual over the knee boot because sometimes, the over-the-knee can amp up an outfit in a way that feels a bit “nighttime,” so because they are suede and have a medium height heel, they feel really easy with so many outfits. I haven’t tried them with pants yet but that’s probably because it’s still 80 degrees here. The belt bag is Suzanne’s from Claire V. (a designer that I love).
2. Layer Patterns

Shop The Look: Sweater | Shirt | Pants | Boots
I like a stripe and a plaid, but I learned you have to make sure that they complement each other. You have to mix scales (large stripe, small plaid) and ensure that they have different saturations (bold stripe, muted plaid) so they don’t compete and look cuckoo. I knew that I’d love this sweater, but because the plaid shirt is, well, just brown, I probably wouldn’t have put them together. But I ended up really liking it. This shirt is really easy to layer over because it’s so thin and has a very cute collar, but we like this and this, too, that are way more affordable.

I’ve had that vintage Coach bag way before I knew what “Coach” was although I still care as little about the brand name aspect as I did when I was 16.
The jeans are of “Sisterhood of the Traveling Pants” caliber. I wore them with 12 different boots in a boot review we shot recently (coming up next Saturday) and they worked strangely well with all of them. And they’re under $100 which makes me so happy. I’ve worn them to drop-off three times this week. Plus, you can hang your hammer on that loop just in case you have to move a piece of art…
Those boots are also going to be in the review, and while they are kinda basic, they are super comfortable, a nice long shape (thus lengthening your leg if you are into that) and I’ve already worn them three times this week so clearly, they go with a lot of my wardrobe.
3. Layer Over A Turtleneck:

Shop The Look: Sweater | Skirt | Shirt (similar) | Socks (similar) | Shoes
I wanted to try this layering thing although I think it was a fail (Suzanne wasn’t into it, either). I thought this sweater was super cute, graphic and cozy so we tried to put it with this vintage turtleneck I’ve had forever. I think it would be cuter if I were wearing pants and maybe “bigger” shoes. It feels pretty unbalanced so we took off the turtleneck (on the streets of Sunset Blvd., no less). I like the idea of the layering, I just think with the skirt, it was confusing as to what season I was in.

That’s better. SHE CAN BREATHE!
I was feeling claustrophobic but that could also be that it was 83 degrees and I was wearing a GD turtleneck and wool sweater…on Sunset Boulevard.
Oh and yes, I think we need to talk about the socks with the Birks. It was Suzanne’s idea and I am into it for a fall look despite the controversy. Maybe they would be more palatable with ripped denim shorts? Please weigh in.
4. Pair the Grandpa Sweater With A Babydoll Dress:

Shop The Look: Sweater | Dress | Bag | Socks (similar) | Boots

I love a massive grandpa cardigan, but honestly didn’t know how to style it. Suzanne pulled this Reformation dress and I thought I could never wear it outside of the Ren Faire. It’s not one you can really wear a bra with, but it’s surprisingly SO SUPPORTIVE that even I felt I could rock it without, which is saying a lot (check stories for proof).
It’s an itty bitty dress, so to get away with wearing it in fall around Los Angeles during the day, it needs something to pull it back a bit, and this sweater does that. Suzanne bought a large intentionally to give it that oversized look and SHE WAS RIGHT. Expert tip: If the sleeves are fitted enough at the wrists, going bigger gets you that oversized look that we all love right now.
I wore the same boots as look #2, with cute striped socks and my Claire V. belt bag that I’ve had for a couple years.

5. Make Preppy More Edgy With A Drop Crotch:

Shop The Look: Sweater | Shirt (similar) | Pants | Bag (similar) | Shoes

The argyle cardigan is super classic, right? Well, nothing edges that up more than a really long drop crotch. I know these pants are controversial and aren’t for everyone, but I love them and wear them ALL THE TIME. Boy are they comfortable for obvious “room in the crotch” reasons. Do men get to feel this joy all the time!!!??
Suzanne thought that wearing a more ruffly shirt underneath would take it in an interesting direction and once again, she was right. Just that peek of white ruffle collar makes it less expected.
Those shoes though, these will also be in the boot review next week but spoiler alert: they are AWESOME. They are tight at the ankles so they fit into pants really well and they have this awesome flatform bottom that feels edgy and modern.
6. Pair the Chunky Sweater With a Sleek Western Boot:

Shop The Look: Sweater | Shirt | Pants | Shoes
Admittedly, this is the shape of sweater that I love the most: wide and kinda cropped, big sleeves but tapered at the wrist and a wide neck that distracts from the two bulges of lady pillows right below (I’m into downplaying them, but if you aren’t, that’s cool, too).
I LOVE this sweater and it comes in a bunch of different colors. Here’s how Suzanne helped me styled it:

These are the same jeans from above that I LOVE. They are on the skinny side, with a straight calf and a bit cropped (the silhouette of 2020). She added a peek of a pattern coming out underneath the sweater and a fitted boot (these fit nicely under the pant leg) with a slight heel adds some height. These are the same boots as my snakeskin, only in black because I LOVE them. They are my first shootie, you guys, and I didn’t realize the benefits of a shape that holds such an annoying name. They really hold your foot in in such a comfortable (and tight) way and taper in at the ankle even more (there is a zipper on the back). I tried on more expensive ones, but these were my favorites. Oh and that western style is obviously happening right now so if you are ready to hop on that trend, these might be for you.

A big thanks to Suzanne for all your sweater expertise. I will now celebrate sweater weather like the Pacific Northwest patriot that I am.
Here are some that I bought, have or love and can’t wait to try:

1. Thompson Nautical Stripe Pocket Sweater | 2. Patch Cable Crewneck Sweater | 3. Shoulder Button Sweater | 4. Funnel Neck Crop Sweater | 5. Angelic Balloon Sleeve Sweater | 6. Victoria Turtleneck Sweater | 7. Cable Knit Sweater | 8. Crop Sweater | 9. Stripe Micro Ribbed Turtleneck | 10. Feather Fuzzy Stripe Sweater | 11. Payton Coziest Yarn Stripe Pullover | 12. Linetta Balloon Sleeve Sweater

1. Shaker Stitch Grandma Cardigan | 2. The Stripe Lounge Cardigan | 3. Bobble Cardigan Sweater | 4. The Big Cozy Cardigan | 5. Plaid Eyelash Cardigan | 6. Folk Daze Fringe Cable Stitch Cardigan | 7. Kent Colorblock Long Cardigan | 8. High Hopes Cardigan | 9. Button Front Crop Cardigan
Thanks to Nordstrom for partnering on this post. We, and America’s sweaters, thank you. xx
**photography by Veronica Crawford, styling by Suzanne Thune
The post Six Fall Sweaters I’m Loving (+ How To Wear Them) appeared first on Emily Henderson.


October 4, 2019
All the Hows, Whys and How Much’s of Upholstering with (Kid- and Pet-Friendly) Crypton Fabric
In an attempt to have pretty furniture while also living a full life with disgusting children equipped with hands and feet and mouths full of a marinara, jam or gold old-fashioned dirt, we’ve opted for finishes that are, well, forgiving. Gone are the days when you have to choose microsuede or a stiff outdoor fabric—THREE CHEERS FOR PROGRESS. So for today’s post, we partnered again with Crypton, and I’m going to walk you through how and why we used Crypton fabric throughout the mountain house while breaking down the details of the vintage sectional that we reupholstered (you asked, I got you).
First, though, my Crypton history:
We used it on my best friend’s sectional in her living room (a brave choice of white when you have small kids…even for a stain-resistant fabric).
It was and still is stunning, for sure (full reveal here). I stole that table back by the way. There are perks to being my friend, but it doesn’t come without some risks.
In her dining room, we opted for a light pink linen on her Verellen chairs (see full reveal here).
In a prior iteration of my dining room, I had my chairs reupholstered in Crypton and chronicled my thoughts on the process in this post.
On to the mountain house.
I went with Crypton again, knowing that I wanted it to be kid-friendly without sacrificing style. You can see it in the kids nook, the dining nook, the vintage sectional in the living room and the darker sofa in the family room.
Let’s start in the dining room. I knew that even though it’s stain-resistant, this house, with as many kids that we have up there, needed leather so I thought that Crypton wasn’t going to happen until they proudly announced to me that indeed they now DO have leather—a ton of options, actually.
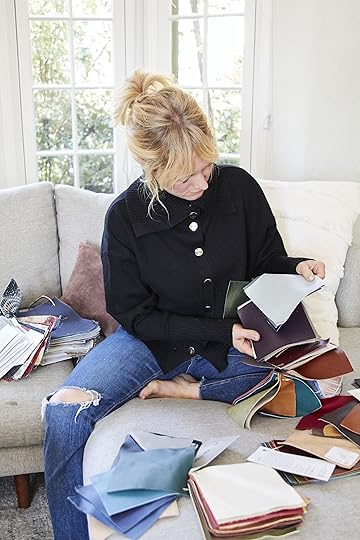
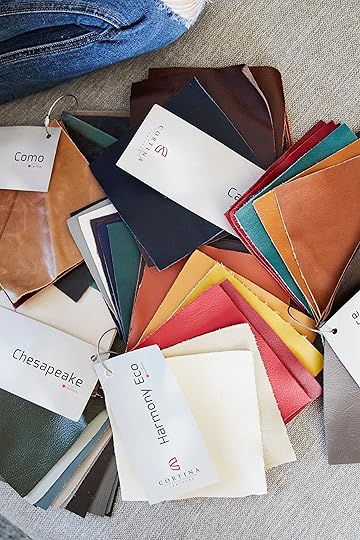
We went with a color called Earl Grey from the Cafe line by Cortina Leathers which has a really warm feel, and muted tones. Why Crypton leather? Well, the only bummer about leather is oil. Sure you can wipe off milk, but oil can make huge marks that might look okay after years of patina, but at first can just be a big old dark circle.
We had the House Beautiful shoot only weeks away so we had to choose from what was in stock (I wanted this gorgeous slate blue or a really dark green that wouldn’t have come until after the shoot). We figured that a dark charcoal was actually a very safe choice since the island was black.
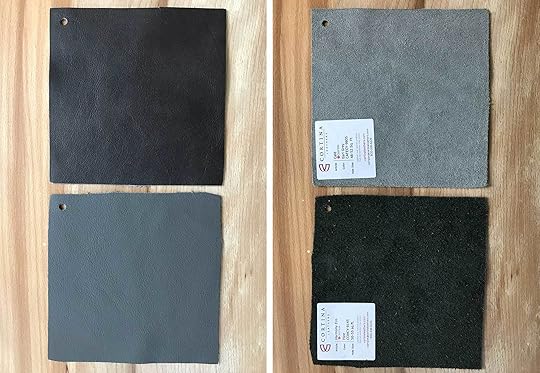
There was a decent amount of hemming and hawing, making sure that it looked good with our table and popped enough without being too extreme.

We landed on the Earl Grey, the darker of the two grays we were debating (for some reason, the backs of the leathers are different colors, so it looks like the lighter gray is labeled Early Grey, but really it’s the deep charcoal).
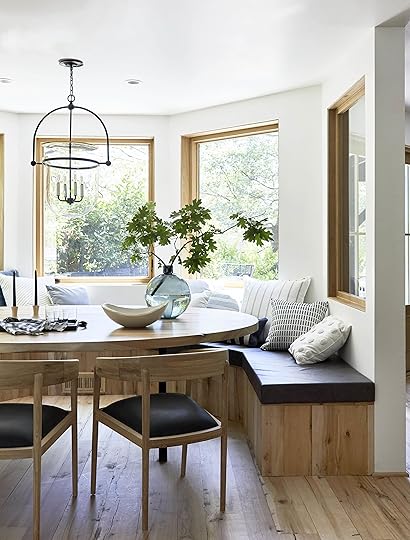
So far so great. We love it and while we still want to figure out what to do with the back cushion (read about how that came in wrong here and I can’t handle the styling responsibility of the pillows) the leather itself is pretty, soft and yes, oil-spill proof.
Want proof of this spill-proofness?
We tried it (and storied it) weeks ago, and wanted to show you photos of that here. No cheating, folks, I promise. I could be at a booth in the mall demonstrating this and you could see it yourself (but I won’t).


Next up is the customized Cisco Home sofa in the family room.
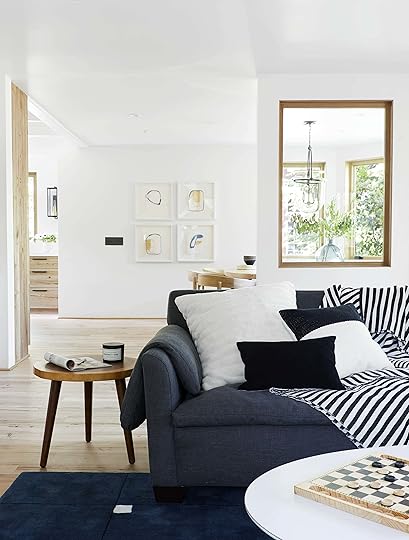
Now, I talked all about the kid-friendliness of it, with its dark Crypton fabric in the family room reveal here, but for anyone who missed that post, it’s a room we use HARD when we’re up there. It basically doubles as the kids’ playroom, so the low-maintenance factor of just wiping off greasy popcorn hands is clutch. (A quick note on the Cisco Brothers Donato sofa: it’s really deep and cozy with a single bench cushion that’s basically a big pillow top and it’s VERY comfortable. We went with Black Slate from the Crypton Home line, which is one of several Crypton fabrics offered by Cisco Brothers though you can also get it from United Fabrics if you want to re-upholster something you already own (FYI, if you DO source this specific fabric through United Fabrics, this color is called Saturn Midnight). It’s great to be able to source a good-looking modernized sofa through a brand we love for its devotion to craftsmanship…made right here in southern California. It’s a bonus that Cisco offers the option to cover it in Crypton that acts like a shield to the filth of disgusting beautiful children).

With Crypton, we don’t REALLY need a dark color to cover up the grossness that materializes with little kids since everything would scrub out easily, but it does let you push off cleaning just a little longer.
Anyway, the sofa turned out GREAT and I never have to worry about popcorn grease.
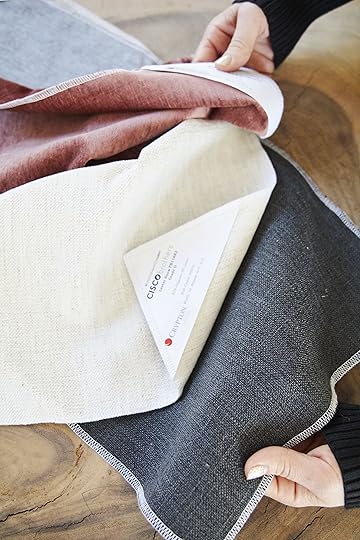
And lastly, our vintage sectional that we reupholstered with a soft nubby Crypton.

When we first met this circa ’70s sectional (I found it on Chairish through Gallery L7 in LA), it was in a rusty brown terry cloth. Yes, towel material although we secretly kinda liked it.
My only regret is not finding this sectional earlier so we had to rush the upholstery decision time, as well as the actual upholstery job. Not ideal, but this happens in our field far more than you would imagine. You think you are happy with the sofa when you find THE ONE that will make your life complete, although temporarily very stressful and complicated.
So here’s what happened:
We had to choose this fabric in ONE day from what was actually available in LA. Luckily, Calico Corners stores carry lots of different Crypton Home fabrics, including this one we chose called Maxwell in Pewter. For this sofa, we needed 30 yards and it retailed for $35/yard (but this was part of our partnership). Typically, a sectional like this would be anywhere between $900-$1,300 to recover NOT including the fabric or foam if any of that needs replacing. The sectional is ALL foam, like there aren’t any springs or a frame, so if we were to replace the foam then well, there was no way it would be done in time, plus it would have added about $800 because high-quality foam is VERY expensive. We took off the cushions and they were indeed in fantastic shape so all of us decided that they were salvageable. I’m sure someone will get upset that my kids are this close to dust mites, but listen, there was less waste. 
October 3, 2019
We Predicted This Color Trend Early This Year…We Were Right

Man does it feel good to be right sometimes. We do a lot of trend forecasting as design editors (which sometimes really just feels like straight-up guessing based on seeing something on Instagram/Pinterest or in a magazine, oh…twice?), so naturally, just on statistics alone, some of the trend spaghetti we throw at the wall doesn’t always stick. And on the other side of that logic, some DOES. This time, the sticky noodle is what we’re calling “schoolhouse green.” In January, when we typically stop and take inventory of what we think will be a thing in the upcoming year, we did a deep dive color trends post, and this shade of green was on our radar back then…though with a bit of trepidation.
You see, a few years back, before this version of Charlie’s room, the chalkboard-green hue graced a portion of the walls in his bedroom in Emily’s current LA home:


If you remember the post (and if you don’t, head here for the recap), this ended up being a compromise between Emily and Brian (Charlie made the original request for green), but the finished product never felt right to Em. She used words like “dated” and “school-like” to describe how it made her feel. While it didn’t work in this room with her design vision, I’m here to tell you that it CAN work for you, but I’ve taken notice of spaces where it feels fresh, updated, edgy and delightfully unexpected.
But first, what exactly is “schoolhouse green?” It’s, well, kind of what it sounds like. A saturated mid-tone green that is reminiscent of chalkboards and school furniture from yesteryear (I’m assuming teachers just DM students now with equations to solve or word problems to pick apart, no?). It’s deeper and richer than mint, more subdued and “milkier” than emerald and not as punchy or as yellow as Kelly green or chartreuse. Got that? Sometimes it can have slightly blue undertones, other times, more yellow as you’ll see, but in general, if it looks like you could go to town on it, chalk in hand, you’re in the neighborhood.
I’m partial to schoolhouse green in architectural details (moldings, kitchens, bookcases), but that’s the most “permanent” application of the set I’m going to walk you through, so let’s start with something a little more transient:
Furniture
 image via architectural digest | design by meg sharpe
The “easiest” way to bring in this comfortable yet peppy color is through furniture. My favorite way to do that is in a mostly neutral space where the green is the star but still somehow feels…neutral? That’s a sentence that might leave you scratching your head, but let me explain. There’s something really snug and relaxed about it in a setting like this that makes it feel like it just belongs. Schoolhouse green is like that kid at school that can sit with either the cool, popular kids but also fit right into the marching band table or the artsy folk. It’s a superlative color chameleon, people!
 image via yellowtrace | design by genesin studio
Here, it takes on a more Postmodern (’80s?) vibe in a restaurant by Genesin Studio. The green is just the POP the pastel blue and pink space needed to round it out. Also, very much an aside, but…raise your hand if the phrase “pop of color” makes you die a little inside every time you hear it? I’d like to campaign hard for a new way to describe an addition of a specific color in a room. I’ll be waiting for you in the comments to discuss. Carrying on…
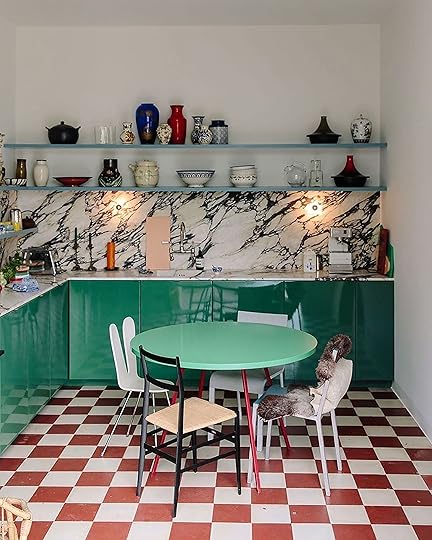 image via freunden von freunden | design by muller van severen
 Frankly, I’d be afraid to pair MOST shades of green with red for fear of obvious Christmas-related reasons, but the mix of chairs, the intensely modern marbled stone and the general eclectic-yet-cool vibe here is able to sidestep my preconceived notions of the color pairing.
 image via architectural digest | design by meg sharpe
 This is actually in the same house as the brass kitchen with the green chairs from above, so it makes sense designer Meg Sharpe would carry the color throughout. The addition of soft baby pink and the vintage Art Deco-esque sconces and mirror (or would these be more Regency?) take it from feeling a little Memphis-y to more streamlined maximalist.
Paint
 image and design via dabito/old brand new
Alright, okay maybe you weren’t on board with the schoolhouse green furniture (if you were, welcome to my inner circle of close friends, if not, keep reading). But we’ve now entered into a new category that might be a little easier to digest: paint.
The walls of this bathroom in the home of Dabito (the color aficionado behind Old Brand New) might be a little too blue-toned to be classified as schoolhouse green, but the cement tile floors are spot on. I like that Dabito brought in both warm, earthy elements through the floating vanity (likely to avoid things from feeling too contemporary) but freshened it up with the marbled wall slab and brass fixtures.
image and design via atelier daaaI find this room, by Atelier Daaa to be a really good example of mixing old-world and new world, with the schoolhouse green being squarely in the middle of both those design adjectives. The ceiling moldings and plaster, as well as the herringbone floors, are all very classic while the furnishings and fixtures are very contemporary. This specific shade of green (again: chameleon) works in both style realms, so it marries the eras effortlessly.
 image via remodelista | design by helen cathcart
In a home by Helen Cathcart, a soft yet deep green via the recycled glass vessels and the window framing are the only flash of color in this Italian flat. Paired with the rich wood tones and the plaster-y walls, it just feels effortless. Fun fact: this image actually inspired our very own Julie, back when we published it in January. She plans on incorporating a similar green (Breakfast Room Green by Farrow & Ball) in a very similar treatment in her bedroom MOTO that’s in process. Stay tuned for that in a few weeks.
 image via homes to love | design by kennedy nolan
Most of the schoolhouse green I’ve shown you so far has been fairly muted, but it can also be ALIVE (without being electric) like above. It’s particularly cool with black accents and just a touch of oak or pine to ground it.
Architectural Details
 image via yellowtrace | design by kennedy nolan
And finally, my favorite category/use of schoolhouse green: architectural details. I nearly keeled over when I saw this staircase on Yellowtrace (designed by Kennedy Nolan). The entire home is a study on how to do black-white-and-natural, with this metal showstopper as essentially the ONLY color element in the home. You want to make a very cool but somewhat restraint statement? This is how it’s done.
 image via remodelista | design by robson rak
Here we are again with another mostly-neutral-with-a-green-punch room, this time in a kitchen. The satin subway(ish) tile with the gray grout lines keeps this otherwise very contemporary kitchen from feeling like a straight-up showroom. It’s a very specific look, but one that still feels balanced and fun.
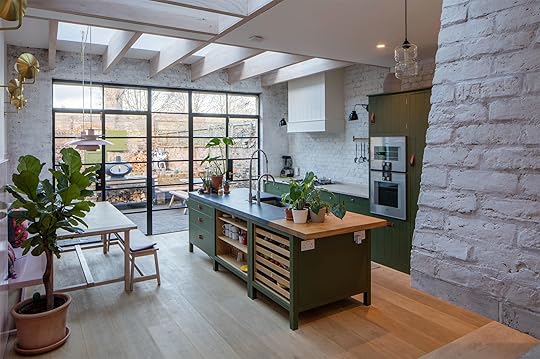 image via remodelista | design by mike tuck studio
On the other side of that last modern kitchen is this more classic vibe by Mike Tuck Studio that still feels fresh via the leather cabinet pulls, contemporary lighting and wide-plank blonde wood flooring and banquette furniture.
 image via architectural digest | design by rodman primack
Rodman Primack is one of those designers whose work I like to turn to when I’m feeling stuck or uninspired. He has an almost other-worldly knack for putting things together that no person in their right mind would, but…it always works. Toucan desk object and a coffee table overlapping a desk (?!?)…WHY THE HECK NOT. I think that’s why the schoolhouse green built-ins work so well in here. This whole room has a IDGAF attitude of an impossibly cool person, so the jolt of color in the bookcases somehow grounds everything and lifts it all at the same time.
SO…how you feelin’? Are you convinced? Were there other colors from our original paint trends post (again, here) that you felt were a home run and would like some more inspiration for? Let’s hear it.
Hungry for more trend and inspiration posts? Head to our ROOMS page!
The post We Predicted This Color Trend Early This Year…We Were Right appeared first on Emily Henderson.
October 2, 2019
Sara’s House Part II: All the Befores, The Renovation “Snowball” & What’s Next

I’m back, friends. Sara here to regale you with more anecdotes of first-time homeownership—the misery, the woes, the money hemorrhaging, and all the joys in between.
Last we left off, I told you all about how we went about buying our house, what the process was like for us, and covered some tips that could be helpful if you were shopping for a home. What we didn’t cover was how much we actually paid for the house, what that amount got us, or what’s happened since we got the keys. In all honesty that was partly because I was scared to; disclosing hyper-personal information, like how much you’ve paid for a very big thing to thousands of people online, is a bit intimidating. In a lot of ways, people are impressed to hear that we’ve bought our first house under the age of 30 in a market like LA. But the truth is we didn’t do it alone. We have family that pitched in to help make it a reality for us. And, at the risk of sounding like insurance fraud, the renter’s insurance check we received because of the fire that forced us to move out from our apartment also helped a lot. We ended up choosing not replacing a majority of the damaged items that we were being paid out for and instead invested that money into a down payment. It was a lot of stars aligning, family support and financial assistance, and a lot of personal savings on our own behalf (and I recognize that even being able to put money away every month is a big privilege). BUYING A HOUSE IS HARD and I would never want anyone to feel bad that they weren’t in a position to do it, or feel like we were taking out ability to for granted.
But then Emily Bowser wrote an amazing post all about her home buying process (which was so different than ours, and wildly more dramatic). I was riveted. Her transparency was utterly refreshing, and kept my eyes GLUED to the screen all four (4) times I read her post. So, taking a page from her book, I’ve decided to be totally transparent about the actual numbers when it comes to these posts moving forward. And we’ve got a lot of great content in the pipeline about house renovation and design that will hopefully keep you all entertained while also being honestly informative.
Here we go.
Buying Our House: What It Took
Mac and I bought our house for $550k. It had been on the market for a month at $575k without any movement. The weekend we went to see it, they dropped the price to $495k—lucky! And honestly, I could see why it wasn’t getting a lot of attention at $575k: it needed a lot of work, and I think people’s eyes were just glazing over when they thought about the amount of effort they’d have to put in. It also just pulled itself out of the price range were investors might be interested in it as a flip. I, on the other hand, either out of desperation or sheer force of will, saw potential. And I told Mac that I wanted this house. I found out much later (after we finished round one of renovations) that my grandma had actually called my dad desperate for him to convince me that this house was a bad investment. To be fair, when she came to see it while we were still in escrow, there were rotting banana peels on the floor in one of the bedrooms and a dead car sitting in the backyard. It didn’t look good. BUT I WANTED THIS GARBAGE FIRE HOUSE. So we offered $550k—$55k more than asking because I wasn’t about to risk not getting this house after being outbid seven times in the previous eight months. As we all now know, our offer was accepted.
Here’s what $550k got us in north Pasadena (in November 2018): An 1,100-square-foot “three” bedroom, two bathroom single-family home on a 4,770-square-foot lot. The lot includes a front yard, back yard, driveway, detached garage, and a whole lot of checkered tile. Everywhere.
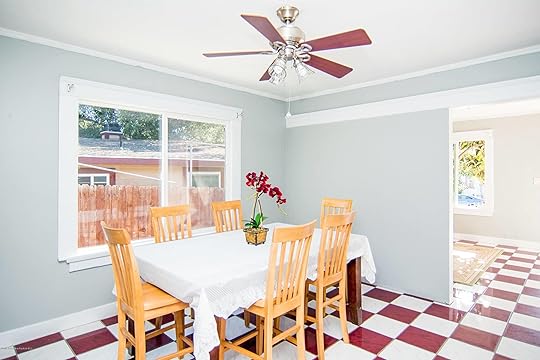
We still feel like this was a really, really good deal. Especially considering how much red and white checkered tile we were getting! Some of the houses we had been looking at were around 600-800 square feet, with no parking, no garage, and no backyard for about the same price… or higher. And zero checkered tile. What shifted the most in our search? Well… GUYSWEBOUGHTINTHESUBURBS. Ugh, it pains me in a certain millennial way to write that. And I know it was a hard mental shift for Mac, who is a unicorn in the sense that he’s actually from LA, and has never lived outside the city. He grew up Mid-Wilshire right across from LACMA, not out in The Valley. But now that we’re here, it’s actually great (though Mac is still team “sell the house and raise our kids in the city” if anyone is wondering). Overall, it reminds me a lot of Claremont, which is where I grew up and where my parents still live. Pasadena is big enough and close enough to East LA and Downtown that we don’t feel like we’re out in the suburbs. Just in our local area, we’ve already found lots of restaurants and cafes that we’re really into!! Plus some stores where we’re quickly becoming “regulars.” Pasadena is pretty awesome!!!
I honestly don’t know who I’m trying to convince with that paragraph (and all those exclamation points). But the moral of the story is, trying to find something worth our money in the city wasn’t happening. We just didn’t have enough to buy something that would meet even the bare minimum of our needs…like parking.
What We Were Working With

That tile was pretty… aggressive. And, wow, that pink master bathroom. Once we owned the house, we had to decide how we wanted to tackle this beast of a renovation. We both agreed that the tile floors needed to go, and a fresh coat of white paint was needed all around. We figured we’d do three things to start:
Rip out all the floors and replace with solid hardwood (this would be the BIG thing we’d spend money on to start).
Tear down the partition wall between the living room and dining room.
Paint every room white until we decided what was happening with furniture and design.
Those three things sounded like a lot of work already, but we’d closed escrow at the end of November and didn’t have to make our first mortgage payment until January, so we could afford to stay in our apartment in December. That gave us a month to get it all done, with my dad and brother (Shade) working pretty much full time on it with our help on the weekends.
I had known we needed to find a fixer, something that would be in our price range just due to the simple fact that it needed a whole lot of work. Plus, I knew my dad and brother would do the majority of the heavy lifting when it came to the renovation labor. My dad has always been extremely adept at figuring things out, and even though he’s not a licensed contractor or craftsman, I grew up watching him renovate whatever house we were living in. He’s refinished floors, built closets, and made beautiful stain glass windows for their living room and bedroom. And my brother inherited that “figure it out” handyman gene from my dad. Between the two of them, I kind of figured we’d be able to renovate anything that had good bones in a good area.
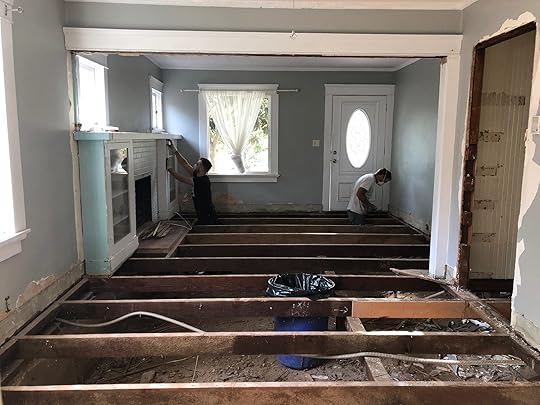
That first week in December, we got started by pulling up all the tile in the living room and dining room. Our plan was to pull up all the old flooring ourselves, and then get quotes for having someone else come lay the new hardwood flooring.
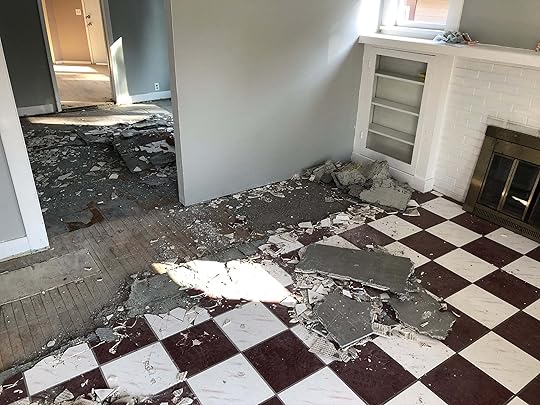
We actually found original hardwood underneath the tile in the living room, but it was so damaged, there was no hope of refinishing. It did, however, gave us a glimpse of what could be!

And the room already looked so much better without the tile. So we brought in two different flooring companies to give us quotes for laying down solid hardwood floors. One came in at $15k+ and the other around $11k, but that was only if we removed and laid new sub-flooring ourselves. Both companies stressed that we really needed new sub-flooring before we could even think about laying hardwood. The bids had us reeling, so in typical dad fashion, he decided we’d just do it ourselves. He agreed that new sub-flooring would give us the best results, so up came all the flooring everywhere except the bathrooms and kitchen.
The underside of our house, much like the topside, was a mess. There was so much garbage piled under our house that we spent two whole days just cleaning it out, raking it, and leveling it out. If anyone ever needs to go under our house, I guarantee it will be one of the cleanest and clearest crawlspaces they will ever encounter. I’m sure at this point Mac was feeling more than a little anxious about the path we were on. We’d just bought a house—one that had been totally livable—and torn out all the flooring. Not just the surface level flooring, ALL OF IT. We spent the next two weeks walking around by balancing on the joists of the house.

Looking at that photo up there, I honestly can’t believe that was our house at one point.
Let’s talk about the joists. The house is almost 100 years old, and over all that time, there had been some sinkage in the house. And that meant that without re-leveling those bad boys, we’d be laying sub-flooring on uneven joists, which would lead to uneven floors. So my dad and brother began the painstaking work of carefully threading a spider web of twine with tiny floating levels all around the floor, finding the highest point in the joists and then doing something called “sistering.” That means adding new wood to existing joists in order to strengthen weak pieces or help level sagging pieces. Feel free to type “sister joist” into the Google machine to find hundreds of Youtube videos all about this riveting topic.
This set us back several weeks, and honestly we were SO happy we decided to do it ourselves because paying someone to pull up the floors and deal with that mess would have no doubt made their initial estimates look like nickels and dimes. But this is also where our three-part renovation got a little out of control. Have you ever started jogging down a hill only to end up running at full speed trying not to lose your footing? That’s what our renovation started to feel like.
The Renovation That Snowballed
In order to sister joist our floors, my dad had to remove a little more wall than anticipated. Once he did that, he found some termite damage in the back of the house. Well, we can’t just LEAVE that damage there. We might as well replace those damaged wall beams while we can see where the damage is. So down came some of the walls in the back of the house. But with the walls already down, shouldn’t we replace all the electric and insulation? It’s going to have to happen at some point anyway! So out came the walls throughout the whole back of the house in order to run all new electrical. And if we’re doing the insulation in the walls, we should do the ceiling, too (and create an attic space up there). We literally came home one day to no ceilings in the back part of the house. “Had to go” was all my dad said.
I have no doubt that Mac was seriously considering how much he valued our relationship and this house over his sanity.

“Had to go” has now become a running joke, but at the time I felt like I was trying to play mediator between my dad who “wanted everything done right, and why not do it now?” and my boyfriend who was just trying to financially and emotionally survive an extreme home renovation he didn’t realize he’d signed up for. Honestly, I was game for anything. I just assume that if my dad takes something apart, he’s going to put it back together even better than he found it. I also didn’t have any qualms with living in a human garbage dump. Mac on the other hand was (and still is) anxious to live like a normal human. Which I guess is understandable. We’d been unsettled for so long since the fire that all he wanted was to come home every night (after enduring his now hour-long commute) to a calm, clean, and organized house where he could relax and enjoy his life. This whole “tear the house apart and start from scratch” situation wasn’t what I had described when I talked him into buying a house with me, and it wasn’t getting better any time soon.
A Change of Plans
We quickly realized we needed more than a month to finish everything we had planned plus all the extra that came up. So we decided to break the renovation into two parts. We’d focus on the front part of the house first so we could make it move-in ready and live in the front bedroom while we continued to work on the back part of the house over the coming months. We asked our landlord for a two-week extension on our apartment and spent all of our Christmas break at the house with my family and our friends plastering, sanding, and painting. The day we moved in we still didn’t have our flooring fully installed, and had to walk carefully on certain parts of it while some glue matured.

What followed was the coldest winter of our lives. The back part of the house was nothing but a shell and the only thing separating it from our living area was a bedroom door. We still didn’t have our molding in the front part of the house, so cold air would seep in from all sides of the house. We didn’t have heat because we’d ripped the wall furnace out of the living room for aesthetics (we knew we wanted central heat and air and didn’t want to deal with removing the wall heater later). And it rained so much that winter. We’d literally wear our winter jackets inside the house, and I bought a box of those little bags of sand that get super hot to put in our shoes and hold in our hands while we hung out in the living room. Plus our dining room was a storage unit, and dirt and dust got tracked everywhere from the back part of the house. But we were IN.

Since then, things have gotten wildly better. Sure, we’re still living in the front part of the house, but the back part of the house has been insulated and has drywall that’s ready for plastering. We moved all the boxes out of our dining room, so it’s not a storage unit anymore, and we actually have some furniture in place that we can hang out on. We lived with protective paper on our floors for months, and that’s finally all gone. And after enduring the coldest winter and hottest summer, we had central heat and air installed this past weekend. It cost us $9,500 and pretty much wiped out our savings for the time being, but this morning I woke up to a warm and cozy house and I couldn’t be happier. We’re seeing the light at the end of the tunnel. We still have a lot of work ahead, but it’s feeling manageable!
Here’s a quick look at the “original” floor plan from the ’20s, the floor plan when we bought the house, and the floor plan with all the renovations we’ve made:
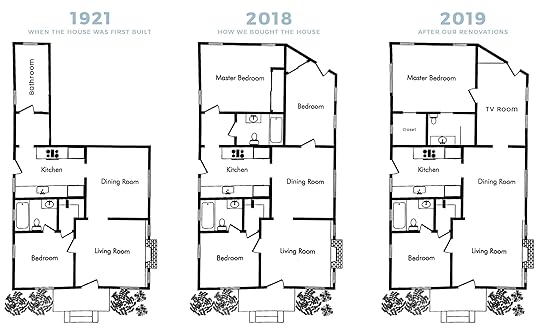
The biggest changes have all happened in the back part of the house. Originally to get to the master bedroom you’d have to go through this strange small cement room that we guessed was a laundry room. Now you go through the room off the dining room, which will be our TV room, and we’re turning that small room between the kitchen and master into a walk-in closet for the master. We also moved the door to the master bathroom. Both the closet and bathroom doors in the master are now pocket doors, which have helped us so much with maximizing space. The bedroom that we’ll be using as our TV room has a sharp angle to it but we didn’t want to change the actual structure of the house in any way, so we’re going to square that angle off by turning it into a built-in bookshelf with cabinets (to utilize the space left by the angle). And we tore out the partition wall between the dining and living room, making it one big open floor plan area which really makes the space feel airy (except for the TV we have right smack in the middle for now).

Looking Ahead
So here’s what we still have left to do:
The back part of the house (TV room, master bedroom, master bathroom, and master closet) needs plastering, paint, and wood flooring installed.
The master bathroom needs plumbing moved around and tiling.
The closet needs everything that makes it a closet.
The TV room needs a built-in built.
Eventually, we want to gut and renovate the kitchen, which will likely be the next project after the back part of the house is done (hopefully in late 2020 after our savings account has recovered a little).

We also want to gut and renovate the front bathroom. The front bedroom will be turned into an office/guest room with a sofa-bed. Our garage, once it’s emptied out, will be where our washer and dryer go. It needs a lot of love but works as storage for now. And lastly, our backyard and front porch both need to be jackhammered out completely and rebuilt. It’s a NEVER ENDING project, but one that we’re pushing forward on.

And here’s what we’ve spent so far…

WOW THAT NUMBER IS REALLY HARD TO READ. It makes me dizzy, and light-headed, and a little nauseous. But it’s actually a really good number, considering all the work we’ve done. Our biggest saver has been on labor. Guess what: dad labor is free! And dad labor has been so, so, SO valuable. We also roped in some friends to help with two big days of plastering and sanding. On the other hand, we’ve been paying my brother for his labor because he’s been doing the bulk of the work. And also because he wasn’t one of the adults who convinced us to buy a house (unlike my father), so he’s really innocent in this whole situation and deserves to be paid. And the funds for our AC and heat were a gift from Mac’s mom upon moving in, which we had just been holding onto until we were able to get around to it.
But the hope is that we’ve added more than $34k in value to the home already.

And now we FINALLY get to start focusing on the fun stuff. What is the fun stuff? Lighting fixtures, rugs, furniture, and paint colors besides white! THE DESIGN OF THE ROOMS, PEOPLE. Our master bathroom is practically done, design-wise. We have beautiful tile from Pratt & Larson sitting in our garage just waiting to be installed, and a custom vanity from Ross Alan Reclaimed Lumber ready to be picked up. We’ve also installed a room-changing skylight from Velux to get some natural light in there. Our bedroom is going to use a lot of the same bigger furniture pieces we already have (like our bed, nightstands, and dresser), but I’m excited to look for a new rug, light fixtures, and art for that space. The TV room is going to be a super exciting room to design because we have some dramatic paint plans for that space that I can’t wait to get started on.

But first, we’re starting with the living room and dining room, and we’re bringing in a VIP to help us out. Our very own Velinda Hellen (there she is above!) is going to be designing our living room and dining room in a series we’re tentatively calling “Design Diaries.” As in, Macauley and I are going to be her clients. And we’re going to document every single step of the process and share it with you. We’re hoping to let you guys in on what it’s actually like to work with a designer, what it’s like for a designer to actually work with clients, and how much it would all cost, hour by hour. There are a lot of “design agonies” in this open floor living/dining space that I’m so happy ARE NOT MY PROBLEM. How do we get the spaces to flow? How do they talk to each other? What do we do with our fireplace? Velinda is going to tell us (and by us, I mean all of you included). She’s also basically going to serve as our design intermediary/couples therapist. It’s going to be hilarious, informative, and hopefully very entertaining.
So that’s what’s next. Stay tuned for Velinda, who’s going to be up next sharing her initial design plans for our space. In the meantime, ask any questions you have down in the comments! And if you’re interested in watching step-by-step renovation process, I’ve documented it all in my saved highlights on Instagram.
For more renovation content (advice! rules! lots of process!), head on over to our ROOMS page or check out our PROJECTS section for all the pretty EHD inspo.
The post Sara’s House Part II: All the Befores, The Renovation “Snowball” & What’s Next appeared first on Emily Henderson.
October 1, 2019
4 Ways to Style That Credenza For “Real Life” + Shop Our Favorite Credenzas

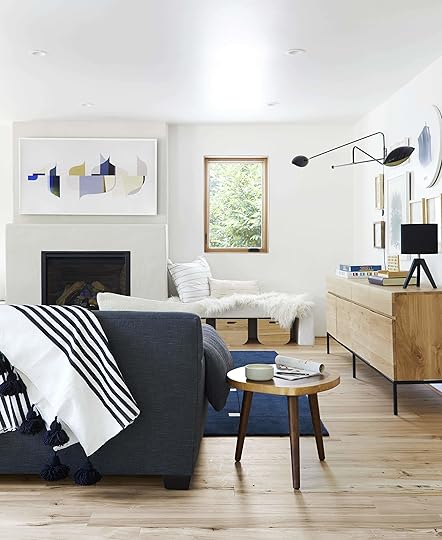
Today is a pretty great day. Not only is it officially October (cough my birthday month) but we are giving you beautiful people what you have been asking for… a shoppable styling post for real-life scenarios (not just to get a pretty photo). To kick off what will hopefully be the first of many, we thought… credenzas. Why? Well, honestly it’s tricky to properly style out a large/long surface. I didn’t truly realize this until I was styling out my “shelf bench” at 11 pm the night before my MOTO shoot. Whoops. Now if you’ve been around these blog parts for a while, you may remember this post from a few years ago that laid out some general rules or even THIS series from 2015 where Emily took one credenza and styled it four ways. All of those are still awesome but Emily and the editorial team wanted to not only give you four (and a half) more updated versions but ones that were actually functional…you know, for real life. So questions such as “how do I style my credenza when my TV is mounted above it?” or “I want to look at my beautiful family in frames ALL the time but how do I do it and have it look good??” shall all be answered with our infamous no-fail rules.
But since all four (and a half…you’ll see what I mean in a sec) of these looks are going to have slightly more specific rules, I want to cover a few things that apply to all/any credenza style you may attempt in the future. They are also the foundations to all four looks we are about to dive into.
Color Palette: I’m sure you knew this was going to be the first rule. Make sure to pick around 3-4 colors and then vary the tones with your different objects.
Varied Shapes: Think about your shapes. Make sure everything isn’t square, or all circular. Mix it up so you can create a visually interesting vignette.
Varied Heights: This idea is in the same vein of varied shapes. Having pieces that have different heights will frame your vignette and again create visual interest to keep that eye moving across the surface. I hope you are ready to hear that phrase A LOT.
September 30, 2019
All the Lessons We Learned in Our Mountain House Window Replacement “Journey”

I once asked an architect what he would prioritize, even splurge on, during a renovation. He said, without hesitation, “windows and doors.” It stuck with me, and my team (and friends, and husband) have heard me repeat this over and over because the second I heard it, I knew it was so true. As a stylist with professional expertise in pillow fluffing and vase swapping, I hadn’t really thought about what these elements do to a home but I can tell you now, it makes all the difference in this world. Our Marvin windows (and even some doors) transformed this mountain house. If you like window porn, are in the design field or if you plan on or have ever considered replacing your windows, CONSIDER TODAY YOUR WINDOW BIRTHDAY.

My story:
When we set out to replace our windows I had few, simple and yet very important and universal objectives:
1. Highlight the architecture of the space. Windows are an integral part of architecture, therefore, they needed to be thoughtful and, frankly stylistically perfect.
2. Add as much natural light as possible. Natural light is a designer’s best friend and also a huge part of well-being for me, which means Marvin is basically my boyfriend.
3. Create cohesion throughout the house. We sought to reduce the finishes to create a warm minimalism aesthetic as we wanted the warmth of wood everywhere possible.
4. Bring nature inside. We wanted to let the trees outside be a part of the color palette…to let blue sky speak to our throw pillows…we wanted the wind to be appropriately beneath our wings (because yes, we considered the wind direction before we decided which way the window opens–more on that below).

The reason I approached Marvin for our windows was because of three things that I had heard over and over (plus my own main priority):
1. Their customer service is amazing. From the first appt to delivery, you have a hand to hold. Being an enduring teenage romantic, that sounded nice.
2. Their product is so high quality and perfectly packaged, it’s very often the favorite of general contractors. I didn’t take a national poll, but my contractor Jeff Malcom (3rd generation contractor, 40 years experience) raved so much that I felt it appropriate to ask for this quote:
“What a pleasure to work with Marvin, particularly through the ordering process with the representatives having really good knowledge of the product line and helping us with sizing, hardware etc. When the units arrived on site, they were exactly as expected and easy to manage. They all come with good back-up data and the installation information is simple to follow. The detail work from the factory on the windows was excellent as far as the assembly, fabrication, the fit and the finish of all components is at a high level of craftsmanship—something seldom seen nowadays with building products. And more importantly, they operate very well for the homeowner. In a nutshell, Marvin’s current window and door products are excellent and we certainly have only high recommendations to use them moving forward here in the alpine climate of Lake Arrowhead!”
Get a room (with a window), Jeff!
And yet he’s right. Good windows are an important investment so trust me that you want them to be high quality, and endorsed by an unpaid expert in installation like him (I paid him, I just mean he wasn’t paid by Marvin to say any of this, and that guy couldn’t stop raving about the brand).
3. Their range of styles is great, but I particularly loved their simple, modern windows. Sure, I knew they had a solid reputation in the industry, but as a designer, what I first fell in love with, what made me approach them to begin with and what also makes me want to write long quotes about them like my contractor is the beauty of their solid wood, contemporary style windows.

There was a love connection, sure. But replacing the windows wasn’t as easy as just saying, “Great! We’ll take the natural white oak!” No. Every room had its own functional and stylistic considerations and that’s what this post is about.
Let’s begin with the mother window of this house. The one that birthed this partnership in the first place:
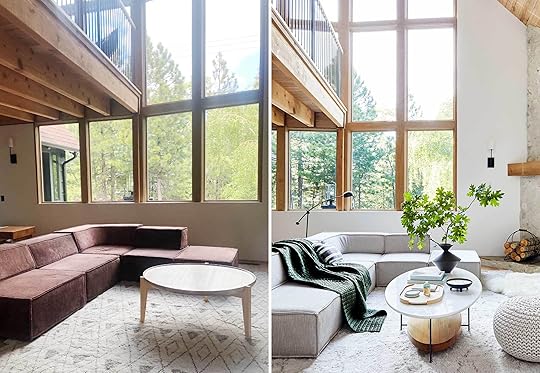
The Living Room A-Frame Window

Lesson Learned
For big, important windows like this, know it will take a while to correctly engineer (plus requires scaffolding and a good lead time—not to mention a decent budget) but boy is it important.
These windows were in bad shape being 60 years old and I’m not convinced were ever well made in the first place and yet they supported the entire house, as many A-frames do. Replacing them was a must, and before winter. We needed to make sure that the windows and, more importantly, the frames did the job of support, as well as adding beauty.
I’m not going to say those were fast, cheap and easy. Those windows are big, important and needed to be properly taken care of with a high-quality frame and panes, which is why working with Marvin was so important. Because we couldn’t remove the original frame (it was actually supporting the roof and thus house), we had to clad over the frames, beef them up on all sides so they were proportionate and add support.
You can see in the before that the frames were small, the panes were thin (and thus we were victims of the elements) and, being so big and tall, they required some serious professional engineering considerations. Thank GOODNESS for the Marvin customer service team that helped create and ensure they would be ordered (and received) properly. Marvin doesn’t install, your contractor does, but they deliver things in a way that make installation as seamless as ever is possible (sounds boring but they come in these crates with handles which means that your contractors don’t have to try to lug around a box full of glass without handle. This is one of the things our contractor truly raved about to no end).
The front A-frame windows were quite the undertaking, but most of the other windows in the house weren’t as dramatic (in both beauty and effort). Let’s discuss the dining room windows for contrast.
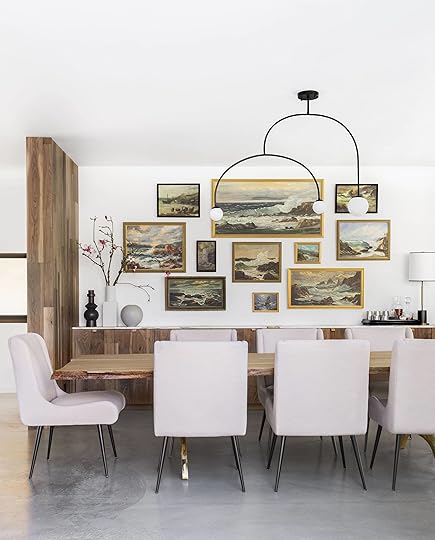
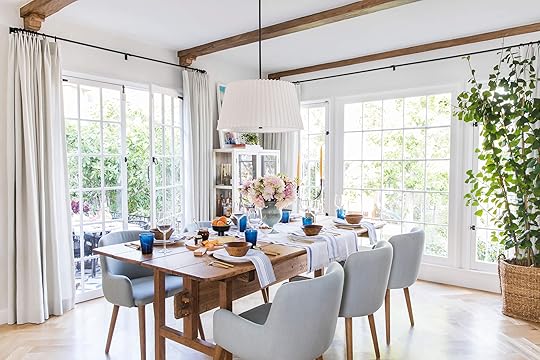
Dining Room Windows
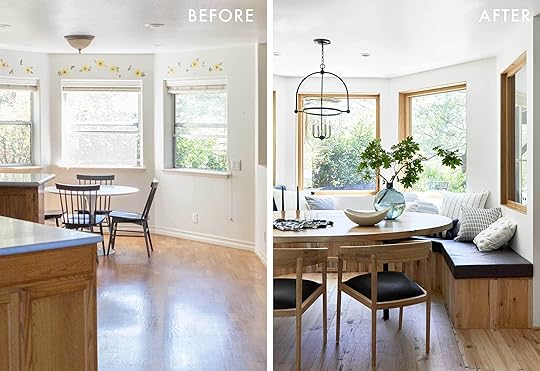
Lesson Learned:
Consider how people walk around a window or if opening them out would run into or constrict how/where we walk.
These original windows were add-ons and vinyl, which is fine if the rest of your house had vinyl windows but ours was a janky mishmash of vinyl and aluminum. They sat low to the ground and could have been bigger and better, so we used the opportunity of replacing them to make them the best they could be (which is a BIG lesson in general if you’re replacing windows in your home…always think about how you can make them BETTER, even if just in function for how you use the room). We did just that. The best tip that our rep Richard suggested was to look outside the window and go through the process in our minds of how someone might walk or if anything else could get in the way of the open window. With the French door in the family room, if I new windows opened the wrong way, they could have easily hit those doors or been in the way of the BBQ area, but the plan he suggested helped to avoid that, making sense for both how the windows would function for the inside and for the outside.
Onto the kitchen.
Kitchen Windows

Lesson Learned:
If you don’t need something fancy, opt for simple yet functional.
The kitchen’s only window was off to the side and we knew that I needed to stare at nature while stirring any given soup, so we ripped down those cabinets (and donated them) and put in a big beautiful sliding window.
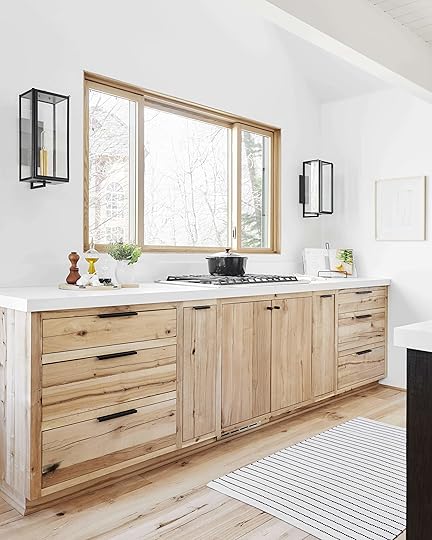

Choosing the function of the window was where Marvin’s well-educated customer service came in, in our case a lovely man named Richard, who works with BMD, Inc., a Marvin distributor in our area. I could have easily chosen a casement (opening outward), but he suggested the Ultimate Glider with a stationary panel in the middle for easier access and so if it were windy, it wouldn’t blow unnecessarily into the house.

We didn’t want unnecessary hardware on the windows, and the slider just has these super simple finger pulls that open the window so smoothly, which we ended up loving (because most times, simple operates best).
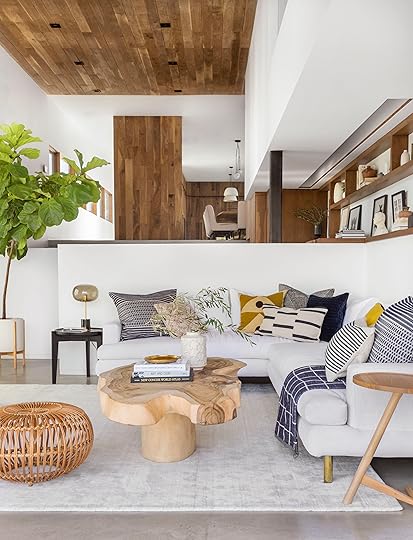
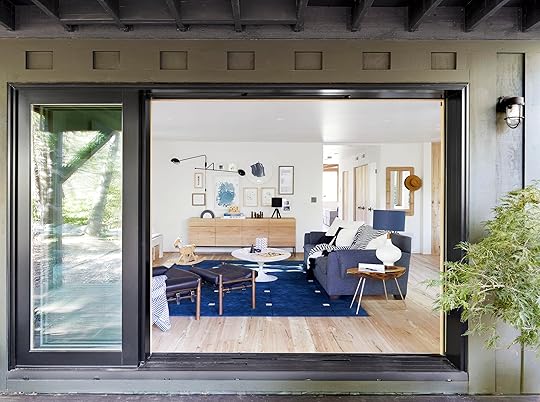
Family Room Sliding Door & Windows

Lesson Learned:
Think about how YOU want to use a room (as opposed to what the current house dictates).
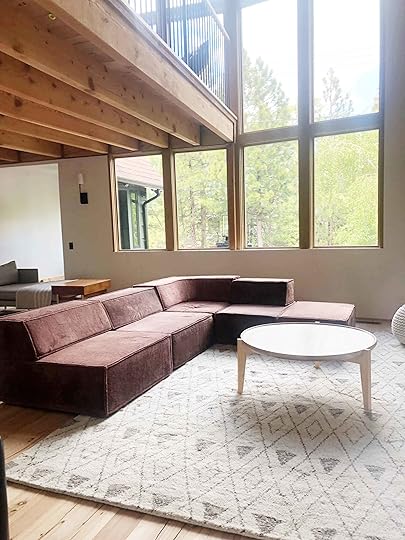
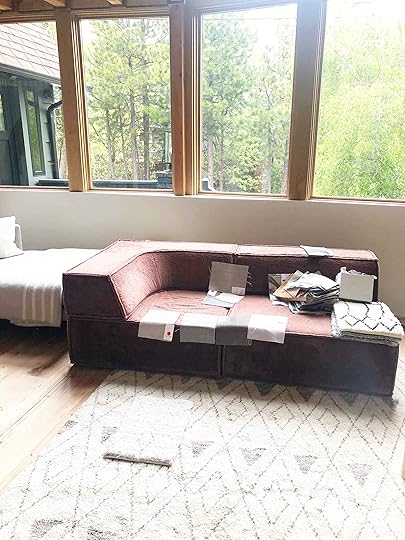
This EPIC Ultimate Multi-Slide Door—which we show off far too frequently—really transformed this room. The family room was dark before we got our hands on it and we were looking for an opportunity to create an indoor/outdoor feeling.

These scenic sliders are easy to open and close, have a pretty wood frame to the interior and thick double pane glass so the room stays really warm in the winter. The exterior is clad with aluminum so it’s super durable.
There are options for screens that we didn’t need because bugs aren’t a problem up here, but if you are thinking “but what about those mosquitos!?” don’t worry, this is an option (and one you can actually add later). You can even get a retractable option that hides out of view when you’re not using it.
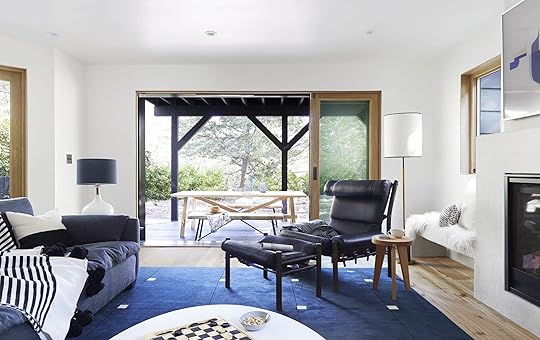
Something to note for yourself if you are deciding on these types of doors: Make sure you’re planning enough room for the door track. We originally had built-in cabinets planned for next to the benches by the fireplace, but we had to scrap them once we realized we had to move everything over because we didn’t plan for an additional 18 inches of track in the room.
We also added two windows flanking the new fireplace that add even more light and air flow which I knew would be important for our family and how we wanted to live in this house. Light has always been my design “secret weapon” but beyond aesthetics, it’s really just vital to a warm, welcoming home.
This room was transformed, sure, it wasn’t just the windows but boy are they simple and beautiful.
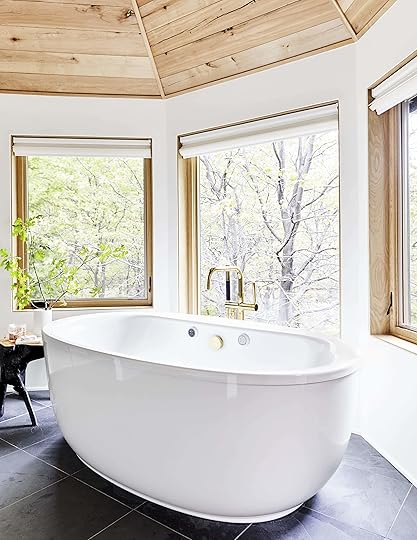
Master Bathroom

Lesson Learned:
Making a window abnormally large can become a statement, almost like an oversized piece of art.
This room was the biggest opportunity to rethink the original windows. Yes, we still wanted three windows but our architect, John Lyles, encouraged us to make the middle window oversized, much lower than the rim of the tub, thus making it a feature. You don’t have to twist my arm.
We chose two Ultimate Casement windows flanking an Ultimate Picture window. The casements allow for us to open and get airflow, but the picture needs no screen and no hardware (and can save some money on manufacturing). It’s really about looking out those big beautiful windows out onto the natural views of the protection woodlands in our back yard. I wish I could download my brain into yours to help you understand how important being surrounded by trees and nature are to me, what it does for my soul. It’s like a big reset button, honestly.
The casement windows open away from each other, which is good for direction of wind and something to consider so you don’t create a wind tunnel (ask your Marvin rep to help with this).
I don’t need to say much after that photo. Except please see the sill set-back and lack of molding. The wood looks so high quality even inside the frame. It pained me to cover up the top with a window shade, but with three windows and a bath-time routine that generally requires nudity, it seemed like a good idea.
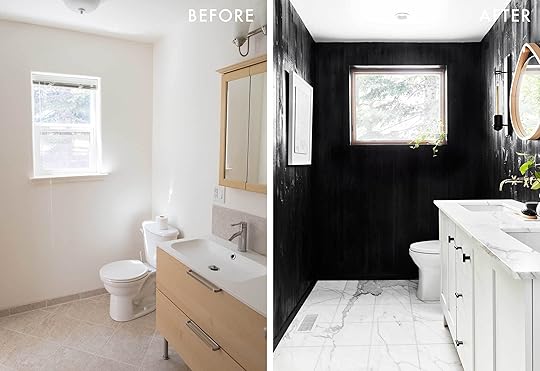
Downstairs Guest Bathroom
Lesson Learned:
Create better function for yourself and your space by shifting and enlarging.
As you can see in the “before” shot up there, the original window in the downstairs guest bathroom was standard sill height (3 feet from the floor), and a bit smaller in width. Because we knew we wanted to do something dramatic in here (black walls), we opted to maximize the light in the space by making the new window as wide and as tall as possible while still thinking about privacy (it’s a bathroom with a shower, after all).
We moved the sill height higher so the neighbors wouldn’t see our guests in all their natural naked glory (and because it sits much higher now, we didn’t need to put in a window treatment—I promise you can’t see in here…we checked).
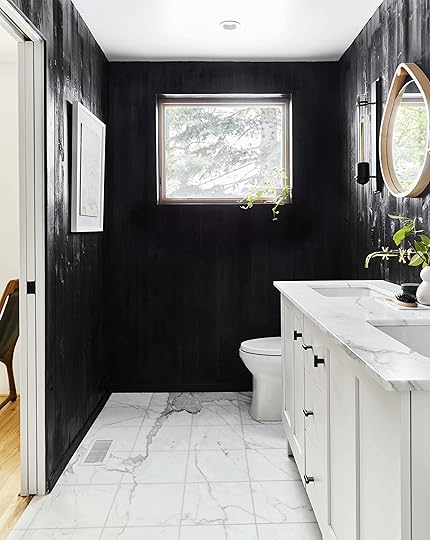
Something to keep in mind: If the window had been in the shower (like in the upstairs guest bath), fiberglass would have been required, but because it was further away from the “wet” area, we could stick with the white oak interior we used throughout the rest of the house. If you’re working with Marvin, though, their rep will be sure to point out all of those things along the way.
Kids Play Attic

Lesson Learned:
Embrace the exterior shape of your home, and then have some fun with it.
The window up here was aluminum and janky. and while we didn’t NEED to replace it, since the kids wouldn’t be up there a lot and it was a sliding window, it was a “when in Rome” situation.
We replaced the high and narrow window with a simple picture window rotated 45 degrees, like a diamond, which worked better with the exterior roofline enhancing the view to the outside and letting more light into the space. It could be lower since it embraced that upside-down triangle of the roofline. We are finishing this space very soon, but trust me that the whimsy of the window adds to it so much.

And that’s it. I’ve probably said it in any reveal of this cabin so far, but these windows have really, truly changed this house and how we live in it. Window replacement can feel like a journey, for sure, but having a window and door expert to consult when you’re replacing or choosing new windows makes all the difference. If you’re interested in talking with Marvin about your own window replacement project, you can start here.
Please let me know if you have ANY questions about the process, the windows we picked, why we did what we did in certain spaces…ask away.
*”after” photos by Sara Ligorria-Tramp
**This post is in partnership with Marvin but all thoughts are our own. Thank you for supporting the brands that help to support this business.
Check out all of the Mountain House reveals here: The Kitchen | The Kitchen Organization | The Kitchen Appliances | The Powder Bath | The Living Room | The Downstairs Guest Suite | The Loft | The Kids’ Room | The Upstairs Guest Bath | The Dining Room | The Family Room | The Master Bedroom | The Master Bathroom
The post All the Lessons We Learned in Our Mountain House Window Replacement “Journey” appeared first on Emily Henderson.
September 29, 2019
The Link Up: Arlyn’s $6 Knife Sharpener, Julie’s Glowing Skin Secret, & The Denim Jumpsuit Four Of Us Can’t Stop Wearing
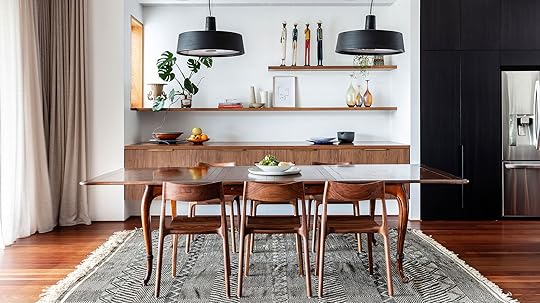 image by Tom Furgerson via The Design Files | design by Ricci Bloch
Happy Sunday ladies and gents, and welcome back to The Link Up. We are happy you’ve joined the party because we have LOTS of good recs in store for you today so we’re going to get straight to it. First up, today’s home tour is brought to you by The Design Files, and frankly, we can’t get enough of it. Click that link if you are in the mood for insanely cool but also bright, happy home tour. Now, let’s dive into those EHD links:
From Emily: “If you need a serious dose of inspiration and feeling of hope, watch The Biggest Little Farm. Brian and I both cried, tears dropping off our chins, out of sheer hope. When is the last time you wept from simply feeling inspired and hopeful by someone else’s beautiful work? (answer: when we saw Hamilton on Broadway with the original cast). This movie struck us hard and has changed our mindset (and if anyone knows them please email – we want to collaborate with them in any way – farm tour, tips for my janky veggie garden that they inspired, I’ll let their pig do my makeup – literally any way for me to be near them).
Also from Emily: “Once again I bought this rug for another project because we were all seriously impressed how great it was for the price.”
Julie’s secret to glowing these days after many years under the harsh sun is Pixi’s Glowtion Day Dew. Toner, moisturizer, Glowtion and then foundation has become Julie’s morning routine and the results have been fantastic. Added Bonus: It doesn’t irritate sensitive skin. Win win.
Caitlin is in love with these round circle hair clips from Verishop, a site she just discovered that has a well-curated section of EVERYTHING. They have beautiful home goods, indie beauty brands, well-curated clothing and accessories sections — it’s all here, folks. The site is actually manageable (like you can actually make it through every page, which is unprecedented) AND they have free one-day shipping. It’s her new favorite site.
Chandler loves these white boots from Nordstrom. She got them last season, and they held up super well and are back again just in time for fall! They are so comfortable and can be dressed up or down.
A friend recommended this podcast to Veronica and she is hooked. It follows the stories / killings of the Golden State Killer so if you’re into murder and crime podcasts, this one’s for you. But be advised: it will spook you to. your. core.
Bowser just got back from a bike trip through the foothills of the French Alps and was very happy she had purchased this mount for her phone so that she could safely both ride and see her maps.
Jess’ first pair of shoes were probably cowboy boots if her parents had any say…which they obviously did. But since those younger cowgirl days she has been on a bit of a western style hiatus. But these boots are SO cute and are the perfect modern cowboy blend that may have her back on the horse:) Plus she has never owned an uncomfortable pair of Seychelles soooo…. Must haves??
Mallory was wildly inspired by the budget lighting sources post, so she went on a hunt for the perfect statement sconce. She found it.
Sara is obsessed with this $35 denim jumpsuit (that her, Julie, Bowser AND Jess all have). It’s so comfortable and has a lot of stretch (she wears a small and she feels like it still has a lot of room to move around in). It is basically a super affordable knock off of a Madewell or Levi’s version and we are here for it.
Carolina is still thinking about RODARTE’s recent Collection Portrait Series. The whole lookbook is breathtaking and so, so dreamy.
From Arlyn: “Someone recommended this $6 mini knife sharpener to me that I decided to try because…well it was $5 and my knives are getting dull. I’m too lazy to take them to get professionally sharpened as often as they need, so I’m VERY happy to report that a few pulls through the blades on this little guy, and my knives cut almost like new again. I even used it on a knife that was so dull, it just smooshed everything I tried to cut with it, and it sliced through a tomato with ease after a little sharpening. GET IT. Best $6 I ever spent on my kitchen.”
Ryann discovered this artist on instagram recently and now her favorite pastime is scrolling through her feed, drooling over all her paintings. From Ryann: “I don’t have the words to describe this woman’s talent, but all I know is I want her work all over my walls, and I want to be her best friend.”
And before we go, if you haven’t had a chance to watch this video of 16 year old activist Greta Thunberg addressing the UN, we think it is worth the watch.
As always, thank you for stopping by, please leave your thoughts, comments, and suggestions below, and we hope you will join us in this wild internet space tomorrow xx
The post The Link Up: Arlyn’s $6 Knife Sharpener, Julie’s Glowing Skin Secret, & The Denim Jumpsuit Four Of Us Can’t Stop Wearing appeared first on Emily Henderson.
September 28, 2019
The 3 Stylish, Comfortable Pants I Wear ALL the Time (That Don’t Feel Like I’m Wearing Pants)

Early this week, the girls in the office were talking about the struggle of having so many pants that are too uncomfortable to actually sit in. This is a thing, and I once had to go home because of it and change. Most of them wear jumpers or overalls or dresses to the office. As much as I love my high-waisted button fly jam-it-all-in vintage Levi’s, if I know I have a big “sitting” day (or driving day or running around town in meetings day—basically doing anything except standing at a party) you couldn’t pay me to wear them, especially when it’s still warm out, after a summer of debauchery. Instead, I have 3-5 pants that I have found myself wearing ALL. THE. TIME. Pants that I feel look cool and are extremely comfortable. They have the comfort of sweats but are made out of material that looks stylish and pulled together. And no, they aren’t all drop-crotch but yes, the idea is that none of them cut in on your waist and do indeed give all the parts more room. It’s all about the proportion and silhouette. Let’s discuss.

Shop the Look: Sweater | Shirt | Pants | Shoes
These are my new favorite jeans. I ordered them to see if this new slouchy jean thing would ever be flattering on me. At first, I didn’t like them because indeed they are baggy in the bum and I felt frumpy. But then I put them on with a chunky sweater and showed them to my crew before I sent them back and they all RAVED. It’s all about the styling with these. The next day, I wore them with a long fitted jacket and vintage tee, then with a French-tucked oversized blouse and soon I was wearing them every day. They are baggy, which is a thing but I didn’t know it would be my thing but because they are also tapered and cropped, there is a good shape going on here. I love clothes that play with proportions in a way that doesn’t look frumpy. With these, your waist has room, your crotch is free, your calves are the star (?!?!) AND you can sit, run around and get stuff done all day every day.

Look at me sitting in such comfort! I’ll admit they are trickier to style out. The top half of your body and your shoes have to be considered because they can go real frumpy real fast. I like to do either a French tuck or wear something cropped like EHD’s new favorite sweater (it’s SO VERY GOOD).

I’ve had that bag (I know it’s bad luck to put on the ground, sorry) for YEARS because it’s perfect, so well made, fits my laptop and has both cross-body and shoulder straps. It’s by Parker Clay, a wonderful, beautiful sustainable brand that cares about the world.
The clogs are from Madewell and are still available (and come in a few different colors). I have other clogs that are taller that I love, but can’t wear them every day. These are my “every day” clogs.

1. Billie Distressed Relaxed Jeans | 2. Slim Boyfriend Jeans | 3. One Rip High Waist Boyfriend Jean | 4. Boyfriend Low Jeans | 5. The Summer Jean | 6. The Dad Jeans

Shop the Look: Shirt | Pants (similar) | Shoes | Bag | Hat
Next are my “bow-legged” pants—not a historically desired silhouette of mine or possibly anyone, but when I saw them online (months ago) from the maker of my favorite drop-crotched pants (Nilli Lotan), I knew that I had to try them. I put them on and it was a “hell yes,” followed by a quick “WTF” from Brian, and I even asked you guys on stories and 80% of you said “hell no,” although Kristin Bell amongst other people whose fashion I love, DM’d me that it was a “hell yes.” The cut is strangely flattering (YET SO COMFORTABLE) because it does this thing where it bows out in the knees, making a lot of space between the legs. And this is not me promoting any sort of thigh gap, but yes this pretty much has a crotch to ankle “leg gap.” All I know is that if I go on a trip and forget them, I panic. I feel stylish in them, while comfort level is a 10.
I should have taken a pic of me just standing straight so you can see the shape of the leg—head to IG stories and I’ll put it up there.

These pair are high end, and I bought them a while ago, but luckily this trend has finally trickled down to the more affordable brands, so we rounded up a few that are out now. (Nilli Lotan is one of the brands that I—and many other fashion companies—look to for things that feel more forward, but lucky for all of us that there are multiple markets for multiple budgets and if you wait a bit, usually a more affordable brand gets “inspired” by what they do and more pops up the following season. I feel that if you can support those that are taking the initial risk and really forging new ideas in the fashion/art/furniture/design world, we should. And those who want to wait one season for Madewell to remake it off at 1/2 the price, there’s a place for that, too.)
Speaking of, those Vince shoes that I wear almost every day (they give me a lift, they are super comfortable and I’m a big fan of the platform sneaker, stylistically) has a much more affordable version here, that we just found.
And yes, that is my favorite button-up (from Target), I wear a small which is still a bit oversized, but the cut is really good for layering. The front hangs down perfectly under sweaters and the color has a cute menswear style about it.
The belt bag is by local (now global) L.A. designer Claire V. I sat by her at a lunch last year and she was so sweet and humble and introduced herself as “Claire, a designer” and then an hour later I was like, WAIT YOU ARE CLAIRE V.???? I’ve had this one for a couple of years, but just bought this one.
And finally, the HAT. I get so many compliments on this hat, it’s stupid. I love it because it is really breathable; it looks like it’s a heavy felt, but it’s not. It’s just a really nice summer hat that shades my face really well (and amps up my outfit by a couple of notches).

1. Pleated Carrot Jeans | 2. Slouchy Jeans | 3. OneTeaspoon Streetwalkers High-Waisted Jeans | 4. Tony Denim Pants | 5. Cargo Harem Pants | 6. Slouched Trousers

Shop the Look: Shirt (similar) | Jacket (similar) | Pants | Shoes (similar) | Bag
Now THESE pants, at $35, are so cute and stylish and yes, still insanely comfortable. They have this really cute paper bag waist that I didn’t think/know I could pull off, but they have this awesome tapered shape that is, well, very cool. They aren’t as slimming as the other two, but their style level is high and when put with a crop top (!!!) and jacket, and booties that tuck under the hem, I feel like I’ve pulled together an outfit, like “I care.” Sometimes, that’s all we want to look like at work—that we are trying to be pulled together, while comfort is top of mind.
The shoes are by Nisolo and a couple of years old but I still wear them a lot. The circle bag is such a cute shape/size but warning that if you have an iPhone X, it BARELY fits because of its width. It closes, but it’s a struggle. The jacket I got last year from Nordstrom because I love and wear a plaid jacket ALL THE TIME. It is sadly unavailable but we found some similar ones here, here and here.

1. Tie Front Linen Blend Pants | 2. Paperbag Waist Ankle Trousers | 3. Paperbag Jeans | 4. Harper Paperbag Waist Crop Pants | 5. Paper-Bag Jeans | 6. Terra High-Waisted Paperbag Pants

We are trying out different types of fashion posts, sometimes trend-oriented (like this one that was INSANELY high in traffic) and others more about, well, clothes that I actually wear (like today). We also like to support brands of all budgets as we know that our audience has a wide variety of budgets. But I’d love to hear what fashion posts you’d like to see us try. I personally like the variety (fun trends, swimsuit reviews, comfort, and budget).
***photography by Veronica Crawford
The post The 3 Stylish, Comfortable Pants I Wear ALL the Time (That Don’t Feel Like I’m Wearing Pants) appeared first on Emily Henderson.
September 27, 2019
MOTO Reveal: Emily Bowser’s 32-Square-Foot Bathroom Is Packed With Small Space Hacks


Emily Bowser, back with that bathroom I promised you in my bedroom reveal last week (catch up: intro here, makeover here). SO! Welcome to my airplane-sized bathroom. Okay, that’s a little obnoxious to say. I’m sure plenty of people live with smaller bathrooms. Let’s call it economic? My whole house is very economic. There isn’t one space that isn’t used. There’s no “bust through this wall and use that empty space between the bathroom and hall closet,” because that space is where the fridge is in the kitchen. The closest during this renovation that we got to adding space was when we took out two closets in order to make our bedroom big enough to fit our bed AND a dresser, but even then, we lost two closets! I’m here to talk about how we completely renovated without (completely) breaking the bank and got creative with what we had to work with, both with $$ and space. This room is a total #ipaidforthis inside and out! Let’s get into it!
First, I thought it would be helpful to show the layout oft he house, since, after the last blog post, there were a handful of curious commenters:
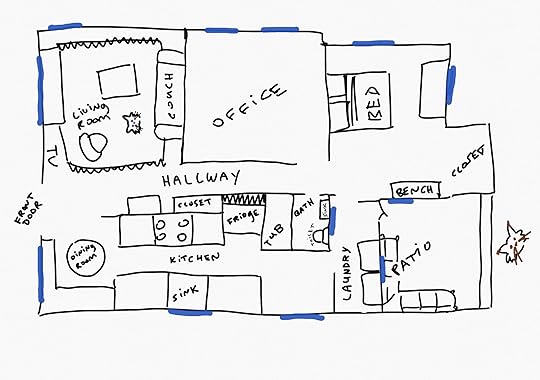
Neither the home nor the cats are to scale above, but it does the trick. As you can see above, this is the one and only (teeny) bathroom in the house.
Side note: Kudos to Sara, who was somehow able to take pictures of this space because apparently I could NOT. I didn’t take these pictures thinking that they would be on a blog for a lot of people to see one day so my apologies, they are crooked and dark and not terribly in focus.

The bathroom is off our hall and in the center of our home (read: no walls that face the outside). You may be surprised by this because isn’t that a window? Why, yes it is! A window that looks directly into our laundry room! The original home didn’t have the master bedroom or the laundry room (“room” may be an overstatement). We think the laundry room may have been a small porch because the door that leads to it from the kitchen appears to be original. The laundry room is very small, however, on one wall there is a window and a door that has a window in it so a lot of light comes in. The bathroom window is directly across from that wall so the light goes through the laundry room and lights up the bathroom pretty nicely. The window is made of obscure glass, so you can’t see through it and even though it’s not particularly pretty, I made the decision right away to keep it because it was a natural light source.
Side note here that there are SO many decisions you have to make right away when you are doing a bigger renovation like we were. If you are a person who likes a lot of time to think things through and talk them out, this part may be particularly hard on you. The reason being, once demo starts, you better know what’s getting knocked out because if you change your mind later, it will cost you and for sure, there will be things you hadn’t thought of or things that come up because of the demo. The window staying or going was one of those things.
The second reason I didn’t touch the window was because it was simply cheaper not to. In a perfect world, I think I would have taken the window out and done something creative along the top of the same wall, like a long and skinny window that was more interesting architecturally. That way the light could come in while giving me more wall space for a decent sized mirror and shelves. I don’t know, I didn’t let myself think about it too long because it wasn’t an option. Along these same lines, all of the plumbing fixtures, although we replaced all of them, were kept in the same places so that we didn’t have the extra cost and also, WHERE ELSE COULD THEY GO? There are only so many options in a 32-square-foot space.

About the Demo:
As you can see, there was chair rail height tile that continued into the shower and I probably could have lived with it, I mean, with a toothbrush and bleach to the grout (which was a lovely shade of orange throughout). The floor tile is the same that was in the rest of the house. It was damaged, many of the tiles cracked and obviously it was something we weren’t going to invest in keeping. We were ripping the tile up off the floor anyway, so why not go ahead and rip the tile off the wall too? Turns out it was a good idea because there was a ton of mold hiding behind those tiles.

We took out all the plumbing fixtures. The toilet here got moved to the back house because it needed a new toilet and if someone was getting a brand new toilet then IT WAS GONNA BE ME. The pedestal sink was also in fine condition but I wanted to try to find something that would have even a little bit of storage. I gave the sink to my contractor and he used it in one of his other personal projects. The tub was trashed unfortunately because of damage from the demo and the mold.

For those of you who will for sure ask, I didn’t throw the vintage corner storage cabinet in the dump. No, I paid $100 for it to be fixed because I neeeeeded that storage and it fits perfectly in the small amount of space I have between the window and the wall. When the workers were installing, they somehow dropped and shattered it so my contractor sent it off to be fixed and I never heard about it ever again. When you owe someone $80,000 (if you don’t know why, you probably missed my “buying an income property” post, read that here), it is kind of hard to be like “YEAH BUT WHERE IS MY MIRROR, RON?!”
On Choosing Finishes:
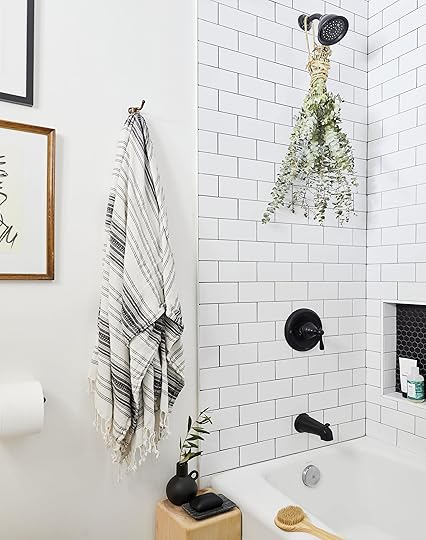
Tile:
As I discussed in the master makeover post, choosing tile was as simple as “what do I not hate that doesn’t cost a fortune?” Answer: subway tiles ($2.30/square foot) and black hex ($5/square foot). A little on the boring side? Kinda. Did I wish I could have afforded fancier tiles? At the time: yes. Now, I don’t know. My house is economic so I feel like it makes sense that the finishes are, too? I am one of those people that always picks out the most expensive thing in the store. My soul child is fancy AF (wallet, not so much). If I had been able to get whatever I wanted for this space, I feel like it wouldn’t have fit the house. I live in a box, one that doesn’t have a lot of architectural character, and the kinda boring finishes we ended up with make sense for the house, if that makes sense? I like it feeling more like a minimalist space whose character comes from the art or vintage pieces I bring into it.
I wouldn’t have minded doing the same chair rail height tile situation again, because it makes cleaning up a bit easier and protects your walls from water (and let’s be honest, other bodily fluids) but I didn’t care enough about it to spend the money on the tile or the labor. I did tile the shower walls all the way up and onto the ceiling. I had lived in many a rentals and noticed what the constant condensation would do to the area right above the tiling in a shower. I’m glad I did it.
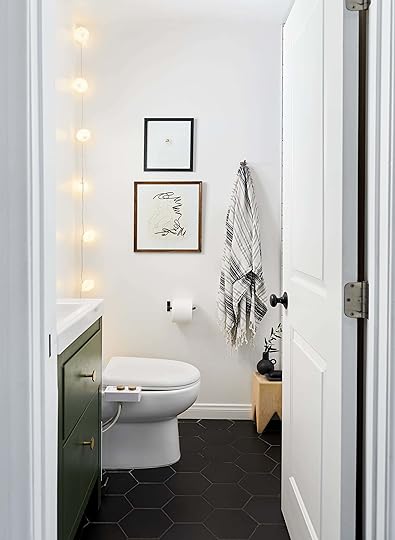
Plumbing Fixtures:
First and foremost, I found a toilet, but not just any toilet. It’s the toilet of my dreams. Well, my economic dreams anyway.
This toilet, hands down, is one of my favorite things about the house and I’m going to tell you why. I wish it was because it has a dual flush and therefore conserves water, but no, to me that’s just a bonus to the fact that IT DOESN’T HAVE THOSE WEIRD LEG THINGS THAT COLLECT PEE RESIDUE AND HAIR. This toilet is so easy to clean and I give it 5 stars based solely on that. It’s also not expensive. I will pay $299 (the price when I bought it) all day long to not have to get on my knees with my mouth all too close to the lid of the toilet, and awkwardly use my pointer finger through a rag to try to get in the crevices to remove bodily fluids that are most likely NOT MINE ANYWAY. Pro tip: buy all your fixtures and appliances during Black Friday sales. I even bought all my kitchen appliances and Home Depot waited to ship them out until I was ready for them.
I have a funny story about the mental state of a person in the process of buying a house vs. that of one that OWNS the house. As I’ve mentioned in this post, I was in escrow from May until October of 2016. That’s a long time. It’s also fair to mention that I didn’t get to see the house much before we actually owned it. There was a renter here that was in the process of moving out so we couldn’t bother him. That said, the idealistic side of me that was excited about becoming a homeowner remembered the house very differently than the day after I actually owned it and saw it naked for the first time (the house, not me). The house was naked in that it wasn’t full of the renter’s stuff and it was naked metaphorically because the rose colored glasses I was wearing were suddenly more like a cheap pair of glasses, smudged and scratched, found in the bottom of an unused purse in the back of your closet.
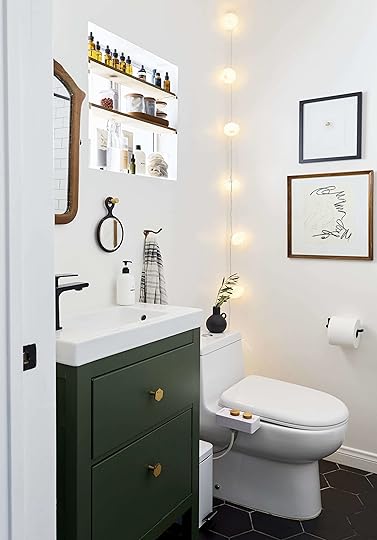
The reality of a $630,000 mortgage and an undetermined amount of money to be spent on the renovation changed my perception. Is this what they call buyer’s remorse? In the five months of being excited about being a homeowner, I did the thing you’re not supposed to do but couldn’t help myself: I bought stuff for a home I didn’t yet own. One of those things was a vintage dresser from the flea market that I wanted to turn into a sink for this bathroom. The dimensions of the dresser are 21.5” deep, 31” wide and 35.5” tall. What actually barely fits there: a sink that is 13” deep and 24” wide. Maybe that doesn’t seem like a lot but believe me, in real life, it is insane and laughable that I thought this piece of furniture (that now lives happily in my living room) would fit in this space. If you could see it you would understand me, as a person, fully.
After realizing we definitely would not be able to use it (immediately), I had to pivot, quickly. There was no time for sourcing a very specific piece of vintage furniture. HELLOOO IKEA. We bought the Hagaviken sink with the Hemnes sink cabinet that we later painted my favorite green and changed out the knobs. The faucet is from Amazon and actually works great. They no longer sell the sink cabinet in the size we have, but they do have the Godmorgon which I honestly don’t know why I didn’t get. I would have much preferred to have a floating sink (easier to clean—sensing a theme??).

I have a lot of opinions on this sink. It’s nice to have the storage. I fit a surprising amount of stuff in these two slim drawers. The depth of it would be fine if it were for a space where people just used it to wash their hands, a powder bath off your mudroom, for example. HOWEVER, washing your face is the most obnoxious process one could think of. I’m going to put this in the same box as “black floors” and “my cat, Puck”—they aren’t for everyone and by not for everyone I mean, “don’t have them unless you don’t mind cleaning, all the time” (we can talk about my cat Puck’s strange addictions in the comment section). Here follows my nightly routine: wash face, dry face with a small washcloth (kept in the top drawer of the sink, folded Marie Kondo style DUH), use used cloth to wipe down the top of the sink, the wall behind the sink, the front of the sink cabinet, the inside tops of the drawers, and finally, the floor. Every. Single. Day. I’m not kidding. You would think I was washing my face like a Clean & Clear ad from 1995—everything is soaked. There are two positives to this situation: 1. I dry my face with a clean towel every day which is good for your skin because of the bacteria that is on our everyday towels and 2. My sink and bathroom floor get a wipe down every day and therefore look cleaner throughout the week. *Rose colored glasses, put back on.*
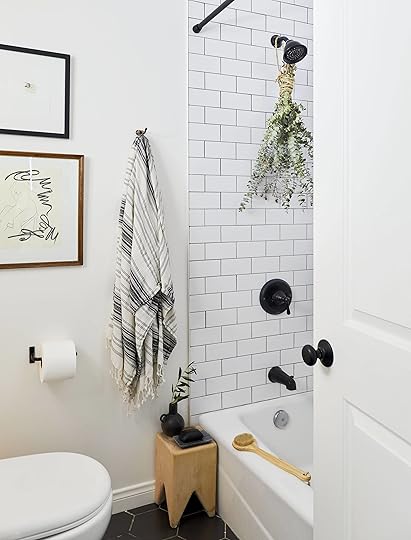
One of the only—maybe THE only—“must haves” on my husband’s buying-a-house list was that it had to have a tub. There was no budging on it. He’s a bather which I find slightly disgusting (because he doesn’t shower first or sometimes at all). But, whatever, he likes to do his creative thinking in a bath and doesn’t demand a lot, so a bath we would have! Plus, if we can ever afford children, a bathtub would be helpful. We bought basically the same tub that was in there, a run-of-the-mill alcove tub that we got somewhere in the valley for $300-ish. It’s 58” long, by 28.5” wide by 13” deep so a grown human can barely fit in it and have water covering them, but it gets the job done I guess. We put in two inserts for shampoo, soap and what have you and I’m very glad we did but I have a question: Am I supposed to put shelves in these things? They are entirely too tall. If I could do it again, I would make them a more reasonable size.
In 2016, matte black plumbing fixtures were still weirdly hard to find and if you did find them, they were $$$. We ended up with this one in wrought iron and it was only $270 when we purchased it. I wasn’t stoked on it but I will say, it works well and we haven’t had any issues. This one is more modern and definitely what I would buy now. It’s also by Moen so I would assume also good quality and an even lower price point than the one we bought is now. Something else I wish we could have invested in is a matching tub drain, but alas, we used the stainless steel one that came with the tub.
To shower door or not to shower door?? My contractor tried to convince me I needed a shower door and that water would go everywhere and it kinda does, but it was an extra expense and, you guessed it, impossible to keep clean. I bought a matte black tension rod, matte black shower rings, a hemp canvas shower curtain (hemp is antimicrobial and does better in moist climates) and a liner that has suction cups that *mostly* work to help any leakage onto the floor. All in all, it cost me $143 and saved me years of wiping down glass panels. Another positive to shower curtain vs. doors is that if you do have kids, it’s much easier to have the whole space open rather than having a glass wall in front of half of the tub.
I can’t believe I have this much to say about 32 square feet!

Moving on. Storage. If you will allow me to don my rose-colored glasses when the corner mirror was destroyed/disappeared, I had to make do, and as making-do usually does, I was inspired. I saw an opportunity in my window box (22”x22”x4.5” deep) to add shelves and create storage space. I simply bought a piece of wood and some smaller square wood dowels (0.5”x0.5”), cut the wood to the appropriate length, screwed the dowels in from the sides with 2 screws to hold the shelves and placed the shelves on top (with a little wood glue between to keep them from slipping). At first, I put a small tension rod with a sheer curtain over it so that I didn’t have to look at the clutter of misc bathroom stuff but I found that the stuff, along with the curtain, blocked too much of the light. While musing about it on Instagram stories, an acquaintance (shoutout Shadi!) told me I needed to just lose the curtain and make the things on it prettier and I took her advice. This meant I needed to decant and find some minimalist products that I wouldn’t mind looking at every day of my life. In my search, I found Public Goods which has the most simple packaging and simple ingredients to match. I figured if I didn’t like the products, I could just reuse the packaging because at their price point, it was just as, if not cheaper, than doing a run to The Container Store.
Turns out, I do like most of their products (I have a lot) and no, they did not pay me to say that and yes, we can talk about it in the comments. All of the things on “display” are things I use most, if not every day. A great thing about having limited storage is that it’s hard to keep stuff you don’t really want to have. The little containers with cork are Saxborga and the glass container holding my reusable bamboo cotton rounds is H&M Home (similar). I decanted mouthwash into the Korken from IKEA, pulled obnoxious labels off of my nail polish remover, and even decanted ibuprofen. My husband shaves his head and he always needs a mirror to see the back of his head and he somehow misplaces them?? It’s a mystery. My pretty way of solving this problem was to buy a vintage mirror with a handle and a hook for the wall so I never have to hear “WHERE IS THE MIRROR??” ever again. No room for towel bars (at least not if you want art!), but these Turkish towels dry fast so hooks are just fine.
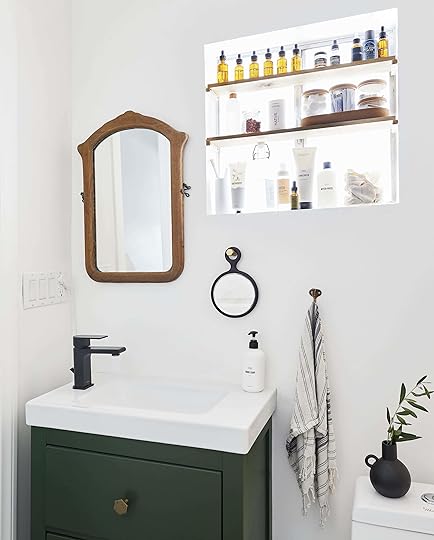
I regret not thinking about lighting in this space. If you don’t specify things, contractors will always do the standard without asking. I came over one day and he had installed recessed lights, one in the shower area and one in the middle of the wall, closer to the window. If I had been thinking before they closed all the walls up I would have had them run electrical over the mirror, but alas. The recessed lights are SO bright and my husband and I are both super sensitive to bright lights. We retroactively put dimmers almost everywhere and will here eventually but immediately upon moving in, out of necessity, threw these string lights up from Target (similar) and they have just kinda stayed.
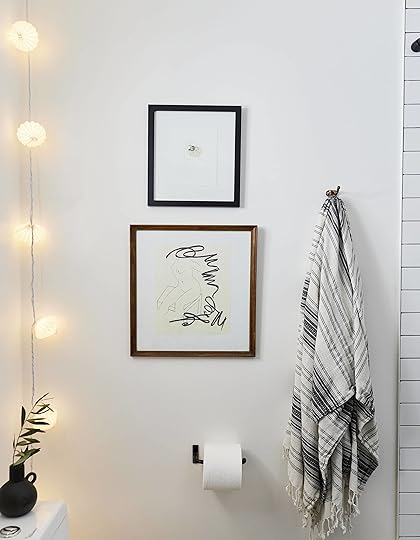
The naked lady art was $20 from the Melrose Trading Post and came framed (WIN). The wood frame was also a welcome addition to the other wood/warm accents throughout the space. We bought a perfectly small wooden stool from a local neighborhood store so that he would have a surface to put a book, a candle, a mug of hot tea or whatever else he needs for his romantic tub time alone. The smaller art is MaryAnn Puls framed in a Ribba from IKEA. I was toilet paper holder-less for over a year before I found this maker on Etsy and I’m glad I did.
Let’s talk about clean butts. Pretty sure that’s the only time that’s been said on this blog. If you have a keen eye, you will notice that I own a Tushy. I wanted to take the opportunity to give a review of their product. I became obsessed with bidets when I moved into my grandmother’s house for a year to plan my wedding 10 years ago. She had a Toto and you could say that there was the Emily before she lived with a Toto and the Emily after. For bidet aficionados, you know that the Toto is the top-of-the-line bidet. They range from $500-$2,000 so you can see why this bidet had me second-guessing if I really should get married and move out of my grandmother’s home.
In truth, there were MANY things about my grandmother’s home that made me never want to leave, but the bidet was up there on that list. 2010-2018 are considered the dark years for me. The years I lived without waking up in the middle of the night to a welcoming warm seat on a cold night, years without the confidence that I was squeaky clean no matter what time of the month it was (PERIOD POSITIVE OVER HERE). Then, Erik (upholstered-my-headboard-while-I-watched Erik) got a Tushy and told me I should, too. With the low price point of $69 for the non-heated (water, not the seat) and $99 for the heated, I opted for the heated. Here is what I have to say about my purchase: I love having a bidet and I 100% would buy it again. However, I would buy the $69 model because the water never really does heat on the other model unless you run your sink water until it gets hot, which is a huge waste of water. One knob would also be easier to clean than two. The place where the bidet connects to your seat is very hard to clean, let’s just say my cleaning supplies for this product includes a Q-tip. So this should be thrown into the box of things to pass over if you’re not a clean freak. However, if you don’t mind a little extra cleaning, are a firm believer that showering every day is probably not good for your sebaceous glands but still want your underbits fresh, want to conserve toilet paper use, this is a good product for you. Unless you can afford a Toto.
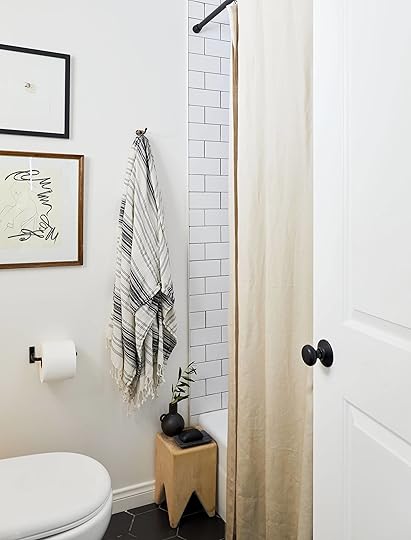
I can’t give you accurate labor cost because everything in my house was happening at the same time and my contractor didn’t break it down by room, unfortunately. But here is a breakdown of all the things in the bathroom (rounded up):
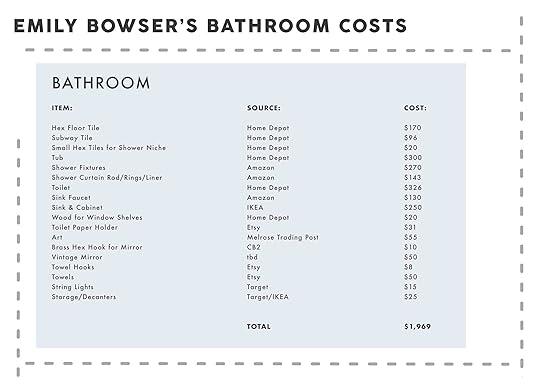
***photography by Sara Ligorria-Tramp
Don’t miss other posts in this series:
Makeover Takeover: How EHD Stylist Emily Bowser Tackled Her Awkward Master Bedroom | Reveal: Emily Bowser’s Bedroom “After” is Unrecognizable From the “Before” | DIY How-To: A Step-by-Step for Making Emily B.’s Wrap-Around Velvet Headboard
The post MOTO Reveal: Emily Bowser’s 32-Square-Foot Bathroom Is Packed With Small Space Hacks appeared first on Emily Henderson.
September 26, 2019
Target’s New Threshold Collection is Hitting the “Elevated Prairie” Trend Hard and Good
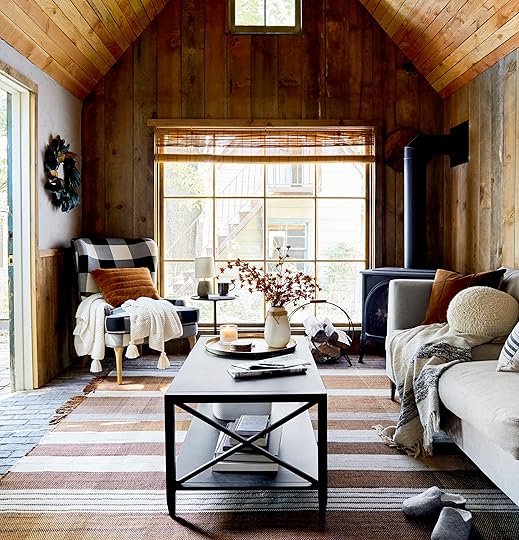
Would there be an EHD room reveal without a Frankenstein-ed style name attached to it? Today, we’re revealing Target’s cozy fall line and after seeing it all come together, we threw around a handful of word combinations to describe it—”Polished Cabin!” “Relaxed Rustic” “Refined Upstate.” Where we landed is actually funny, considering my latest personal style fashion evolution post, but honestly, this year, in both the home and our closets, evidently, it’s all about “Elevated Prairie.”
This look—which I’ll walk you through with all the hows and whys to get this warm, cozy vibe into your own homes successfully—feels like something out of a Nancy Meyers movie where Diane Keaton or Meryl Streep is the protagonist and this is the “upstate” home she escapes to from the big city when she decides to leave behind a big important corporate job to build a jam-making empire, and complicated relationships ensue.
“Elevated Prairie” is this happy place between rustic and traditional with a decidedly cleaner, more modern feel. Listen, rustic vibes do NOT have to mean cluttered or dated. The key is to keep lines clean, finishes more modern (hello matte black) and styling more on the minimal side, letting the materials and textures really charge forward on their welcoming crusade.
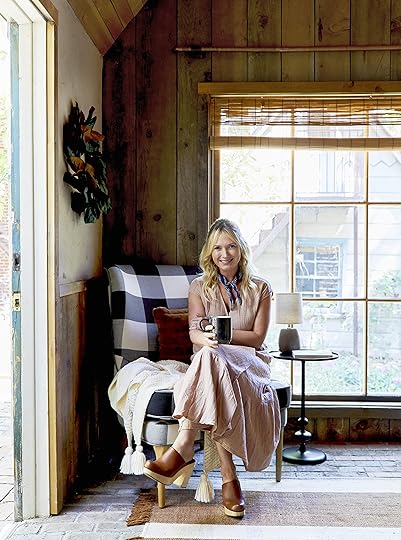
This is who I’m calling “cleaned up mountain Emily” because I put on a dress and heels, but if the neck handkerchief is any indication, I’m ready to go build a fire, hop on my horse into town, and DEFINITELY make an absolutely perfect pie crust, left to cool on my kitchen windowsill. But enough about my rustic-loving alter ego, let’s get into all the goodness behind Target’s new line and how we made it all come together in both a living space and bedroom.
Up first, the living room and entry (or hallway):
Step 1: Create a warm yet simplified color palette.
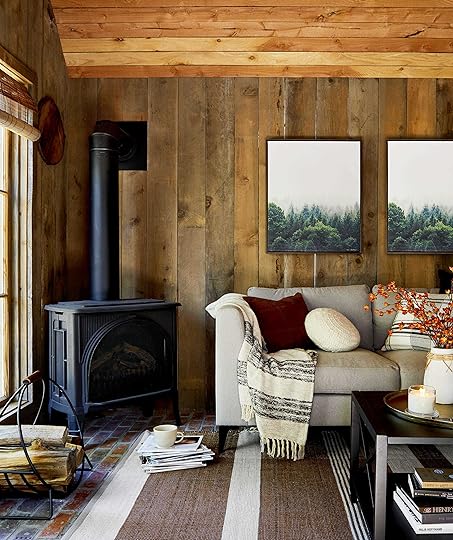
Shop the Look: Sofa | Square Suede Pillow | Hand Crochet Round Pillow | Woven Stripe Throw Blanket | Square Woven Plaid Pillow | Forest Framed Wall Art | Metal Log Holder | Mug
My general rule of thumb for ANY room, if you aren’t sure where to start, decorating wise, is to begin with the color palette. Typically, I like to advise anyone embarking on their color journey to pick 3-5 colors (including neutrals). Now, I’m not saying you can’t accomplish Elevated Prairie with a bunch of blues and greens, but well…yeah I am actually. There is absolutely room for both of those (and we brought in those cooler tones for some balance which I’ll show you in a sec) but in general, you want creamy neutrals (not bright white) anchored by tones with lots of depth, like rust and brown (yup!), while keeping it from going too dated with the addition of black, white and brass.
Here, we created a “not your basic” pumpkin spice palette that could honestly work year-round. We went with a mix of neutrals (off-white, gray and black) and pops of earthy hues (chocolate brown, rust, maroon) mostly pulled from the area rug but a sprinkling of other colors to keep it from feeling one-note.
I think green via trees (either in art or out the window) is almost a “neutral” to be honest and nearly every space has room for it. Here, we created our own diptych from matching framed canvases, which I actually really love. These would look great to round out both a sleek modern room, but also bring in nature to this refined rustic vibe. You know I love a tree moment; there’s something so grounding about them, and here, the framed canvas looks expensive and elevated (especially for $40). Also, unrelated, but equally good, is that log holder. I used a sample of it in the mountain house living room for the reveal and I’m 100% obsessed with it. It has a little leather handle that really levels up its simplicity.
Step 2: Keep key furniture silhouettes simple and unfussy.
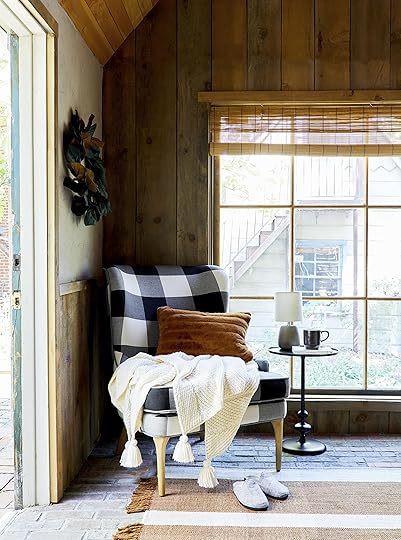
Shop the Look: Chair | Accent Table | Mug | Table Lamp | Sun and Her Flowers by Rupi Kaur | Faux Fur Throw Pillow | Throw Blanket | Artificial Magnolia Leaf Wreath | Slippers
Truly, this is my general advice for EVERY room (mostly so that those truly special pieces you bring in that make your heart sing can stand out). If everything is a “moment,” nothing is actually a “moment”…design words to live by I’ve found. Let’s take this cozy little reading nook for instance. That wing back chair is SO good. I first fell in love with it in last year’s line up except it’s back this year and BETTER THAN EVER in this buffalo check. A wingback can feel really traditional and stately, but the proportions here are much more minimal. The leg on this is delicate and slightly tapered, the arm is very low and subtle, and the “wing” part itself gives you a gentle hug without being too tall or overbearing. This is a Goldilocks chair moment: not too big, not too small…just right.
Also, that table. I professed my love for this little lady last fall when it was first released, and I still love it so much. It has a “traditional” turned base (it’s not really “turned” because it’s metal) but the silhouette is very thin and the black metal freshens it.
I’m going to show you that first photo again to talk through the other anchor pieces in this room so you can see that they fall under this “subtle furnishings” rule:
Shop the Look: Rug | Coffee Table | Coiled Rope Tapered Basket | Tray | Coasters | Vase | Faux Flowers | Candle | I Guess I’ll Write It Down by Beth Evans | All the Ugly and Wonderful Things by Bryn Greenwood
The sofa, in any other room, would be squarely in “modern” territory, particularly because of the contemporary leg, the gray felt-like fabric and just general sleek silhouette, but it’s actually exactly what this room needs to prevent it from going too heavy. Had we done something like a leather chesterfield in here, it wouldn’t feel as airy or welcoming, TBH, even though it certainly would have “fit in.” And while the X sides of the coffee table are certainly a little more traditional, the more delicate proportions (and being in a satin-y black finish instead of a heavier wood tone) keeps it quieter and a little more modern.
Step 3: Bring on (and vary) the texture.
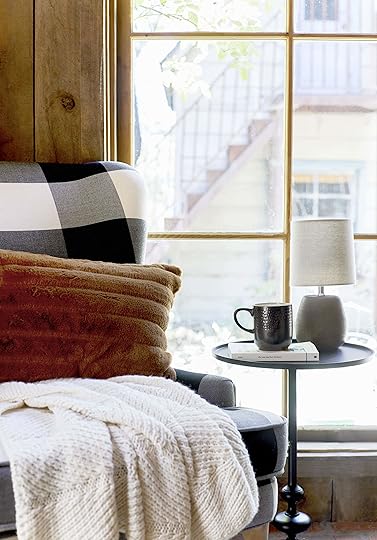
On the internet, it feels like fall is synonymous with texture. If you have a TON of cozy textures via throws and pillows, it’s FALL! The internet is not wrong and that texture is actually really important to pulling off Elevated Prairie. Here, almost everything is a textural element, from the rug to the pillows to the throws and even smaller decor items like the brass tray on the coffee table. But let’s stop for a second to really break these things down.
Quickly, before we move on though, I just want to say, MAN, I LOVE THAT TINY LAMP. It’s faux wood, but it kind of looks like concrete here? You know how much I love miniatures (and lamps), so this cutie really speaks to my soul and is the perfect scale to go on that petite side table. Okay, back to texture:

Pillows: Throughout the whole room, we went with a mix of mostly solid-colored pillows in our color palette but almost no two are alike in terms of texture. On the wingback chair, there’s a (ridiculously soft) faux fur lumbar that is (sort of) channel-tufted for an added graphic layer, the sofa has a GREAT faux suede pillow as well as the round and knit accent pillow. Nothing is duplicated, yet it all seems very cohesive.
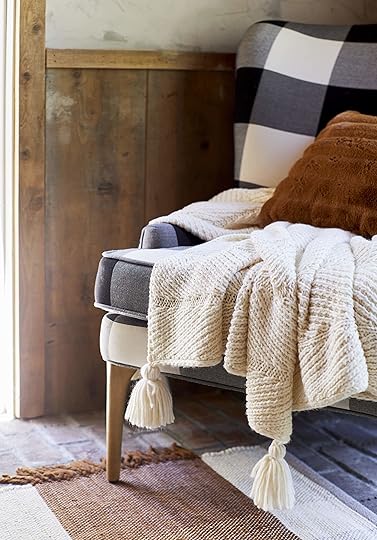
Throws: Same story here. These are scattered through the room because it’s fall and you might get cold, of course. We did a mix of solid, subtly striped and then colorful. I want to call attention to this great throw while we’re here. It looks so much more expensive than it is ($25), the large tassels and interesting alternative knit weave make it look like it could have come from a high-end design boutique. The throw on the sofa has a bit of a stripe that echos the pattern of the rug, and the maroon throw on the bench I’m going to show you in a second, is a great faux mohair with a quiet touch of mustard running through it and elongated fringe. All different, but, again, cohesive to the room’s color palette and general style vibe.
Rug: Scroll up for a minute to look at that area rug. Alright, you back? The colorway isn’t something I’d traditionally go for (if you’ve followed me for any time now, you’ll know I’m not huge on orange), but honestly, we’re all pretty obsessed with this one. It’s a stripe without being TOO graphic (thanks to the varied stripe width), it’s warm without being suffocating (thanks to the white throughout) and brings in a bit of unexpected texture via the staggered fringe. Most rugs have fringe fully on two sides, but this one shakes things ups by only having it in some key places (to draw your eye to the larger rust-colored stripe). I haven’t seen anything like that on the market, honestly, and it feels very “high market.”
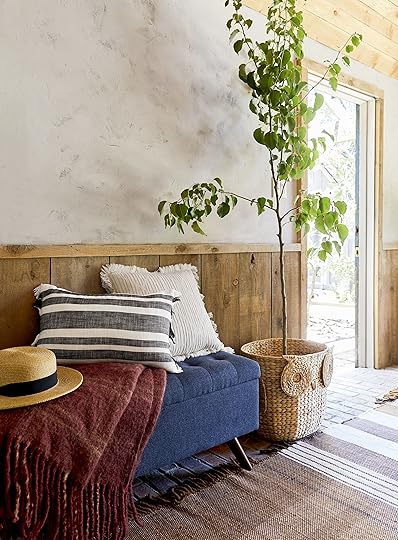
Shop the Look: Tufted Storage Bench | Owl Basket | Striped Pillow | Cream Pillow | Throw Blanket | Hat
Decor: Every Elevated Prairie room needs a seagrass owl planter basket, folks. Owls live in the prairie, right? But all jokes aside, how cute is this? It really serves as a textural moment that breaks up the seriousness that can tend to happen sometimes with “fall” or even just more traditional decor. (Side note, I know we’re not talking about this technically in this section, but I did want to bring up that great bench. It has storage (!!), the angled legs make it feel mid-century while the tufting is a bit more classic, and the shade of blue is so great in that it’s not too navy, not too cobalt and can really work in so many different styles and palettes.)
Step 4: Layer in a touch of modern glam.

Shop the Look: Brass Pendant
There isn’t much “glam” here but I can’t cruise through a room without leaving brass in my wake. Usually, I like to use brass to warm up a “colder” modern space, but that’s not really an issue that needed to be solved here. Instead, the rustic prairie vibes needed our golden decor savior to pull in a touch of glamour and modernity. We brought it in via this great new industrial pendant that’s such a nice size for either over a dining table, next to a bed, above a kitchen island, or you know, in a little hallway or entry vignette like this one. It’s large enough that it has a presence but not so big that it falls into “overscale” territory (which I normally lean toward in lighting but not every design plays nicely with it).
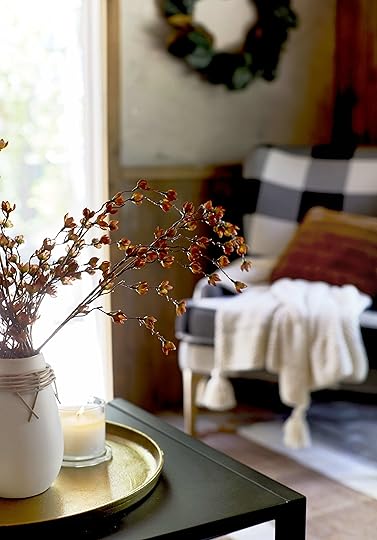
We also layered in brass on the coffee table, which balances the room (both brass moments are actually on opposite sides of the space so they didn’t feel like afterthoughts or too clustered together). When you have more of an earthy thing going on, a little glitz or surfaces that bounce light are always a welcome to cut through.
Step 5: Sprinkle in the “Rustic.”
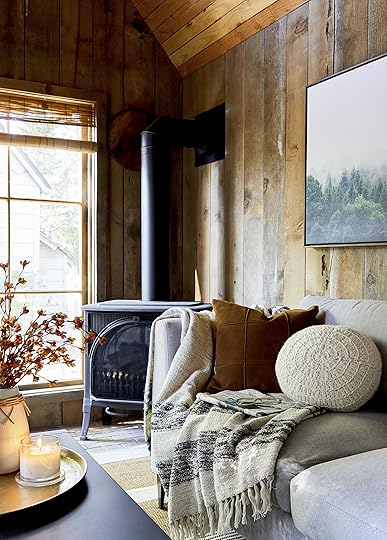
Of course, it would be remiss of me not to bring up the biggest “rustic” moment here which is the room’s actual walls, floors and ceilings. Sadly, you can buy none of that at Target, of course, but honestly, you can accomplish a similar vibe in your normal-walled home by sprinkling in a few more wood furnishings (another side table, a console, wood frames for art or personal items, etc.). Or, if you want more of the “Elevated” part of “Elevated Prairie,” pulling back that rustic wood layer all together would definitely tone things down. It would still feel welcoming and warm but without being too heavy-handed.
Either way, our obvious rustic fall touches here are those great faux florals in the vase on the coffee table. I’ve been on the fence about faux florals in the past, but I’m pretty much fully on board now (especially if you mix them into fresh flowers to fill things out…it’s about balance). Here’s why: look, I love dried florals, but if you’ve ever used them, they know they can be super fragile and messy once they start to crumble. Plus, you can use these year after year, which is always a win (and money saver).
Besides the fall-inspired color palette and all those cozy textiles we brought in, the other quiet, sophisticated fall moment here is that fantastic magnolia wreath. I’d put that on a door, over a bed, in a seating corner like above, layer on top of a mirror on a fireplace…it would work just about anywhere. Because it’s just faux leaves, it doesn’t really detract from any style or color palette. The back of the leaves are golden (like real magnolia leaves) which only helps to further the warmth of the room.
OKAY, GOT THAT ALL? Yes, it was a lot to go through, but I want to more quickly walk you through the same exercise in a bedroom that we set up in this same ridiculously inviting mountain house.
Step 1: Create a warm yet simplified color palette.
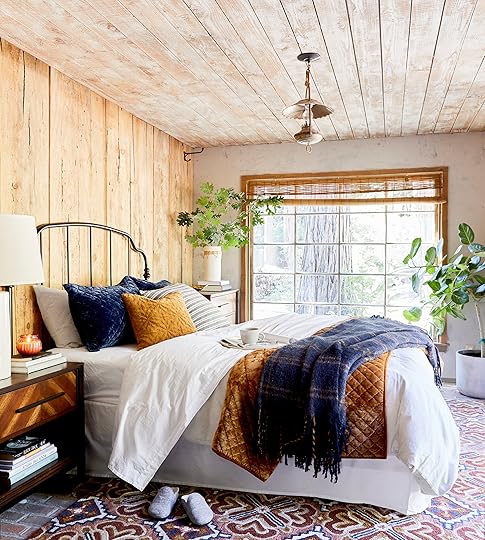
Shop the Look: Headboard | Bed Skirt | Woven Stripe Oversized Square Pillow | Standard Diamond Stitch Velvet Sham | Square Medalian Embroidered Pillow | Vintage Wash Solid Sheet Set | Full/Queen Micro Stripe Flannel Sham | Diamond Stitch Velvet Quilt | Faux Mohair Grid Throw | Concrete Planter
Man does this room give me life…and that’s saying something for someone who isn’t traditionally an “orange” person. But all that rustic wood is heavenly to this “mountain Emily” version of myself. Here, we pulled the color palette from the rug. We went with warm rust (like the living room), navy and neutrals, deciding to leave the softer pink and maroon to the rug so everything wasn’t so matchy-matchy. I think a good trick if you have an “anchor piece” like a rug that you’re picking colors from: leave a tone unique to it so it stands out as the feature it should be. This will also give you good tonal variety that will feel more effortless.
Step 2: Keep key furniture silhouettes simple and unfussy.

Shop the Look: Dresser | Gold Leaf Serving Tray | Homebody: A Guide to Creating Spaces You Never Want to Leave by Joanna Gaines | Vase
There’s almost nothing more nostalgic and “home” feeling than a simple spindle bed. The black metal of the one we used here keeps it a little more fresh than something heavier and wood and is SUCH a great price ($140). The curve on the top adds a nice movement to a room that typically has lots of straight edges. As for the nightstands here, we actually did a bit of a mix-and-match of the same style. The one on the left, which you say above, has a shelf for either a pretty styling moment or a basket to hold clutter or bed linens and a single drawer. The piece to the right of the bed is more a chest of drawers, which provides such great storage.
HOT TIP: Your nightstands DO NOT have to match. They can be either totally different or “fraternal twins” like these two. Where do you fall on this much-debated issue? Back to the nightstands. I want to point out that the drawers are nice and deep and wide so you can really use these (instead of like, shoving a single magazine and a remote control into it and running out of space soon after).
The varied ton of the wood feels super graphic in that chevron pattern, but the very fact that they are wood still makes it feel soft and not too attention-grabbing. I LOVE that long handle which makes it instantly more modern.
Step 3: Bring on (and vary) the texture.
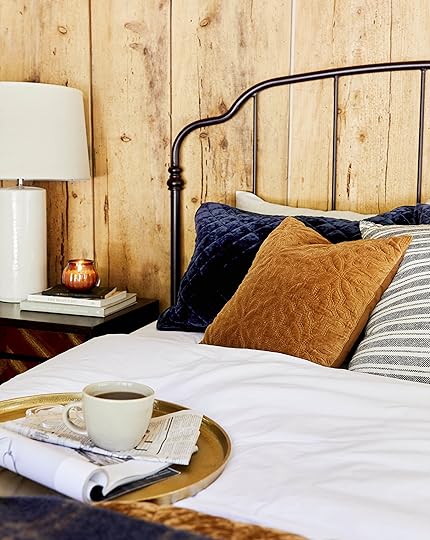
Pillows: Here, we went with a handful of pillows that are all about the texture. The caramel pillow there has a pretty embroidered pattern on it while the velvet gives it a really luxe look and feel. The larger euro striped pillow has a nice nubby fabric (BTW, this pillow is RIDICULOUSLY soft you kind of just melt into it). The diamond-embroidered shams in the crushed velvet bring in a similar texture to the caramel pillow but the fabric is slightly different, which visually, brings in another texture.

Throws: Because I love a layered bed, especially seasonally, we went with that same crushed velvet from the shams for the quilt. BTW, Target has released this same quilt in different colors for a few seasons now and I probably grab it every time because it’s SO good. It has just enough weight to it to feel luxurious and is very, very soft. To make sure the bed didn’t come off too “glam,” we brought in this mohair blue blanket. You already saw this in a maroon on the bench vignette from earlier…it’s what I’m going to call the “throw of the season.” It’s soft, you just want to pet it all day, the long fringe makes it feel really special and elevated and the subtle color variation brings in interest without being too loud. Buy one in every color, add to all your rooms. You can’t go wrong.

Rug: Target has REALLY stepped up its rug game in the last several years. You might think all “big box” budget rugs are polyester or synthetic, but nope, this is a hand-tufted wool loop rug and feels very high quality. Fun fact: wool is actually stain-resistant naturally, so on top of being a natural material and feeling good between your toes, it’ll also stay pristine for much longer than synthetics.
Step 4: Layer in a touch of modern glam.
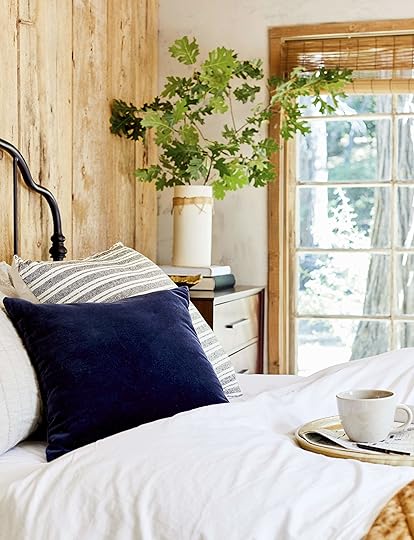
Just like in the living room from earlier, brass brings in a touch of glam that levels up and cuts through the rustic vibes. Here, we brought in lots of velvet (both traditional and crushed) through throw pillows, shams and the bedspread, and brass via the tray (which is the same one as in the living room).
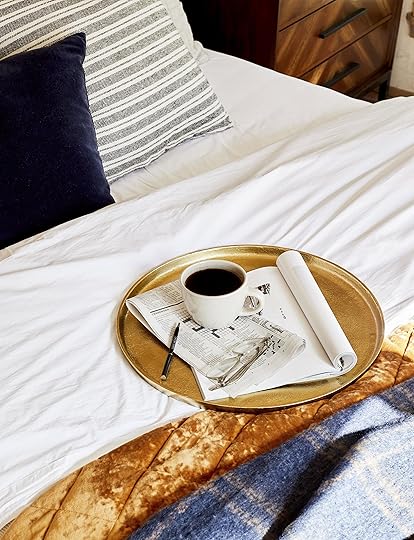
I love the scale of this tray. It works great in any space, but I like it here as a bed tray to hold your coffee and morning paper (tablet?). It has some weight to it to so you don’t have to worry about it flipping or things toppling over should someone shift in bed.
Step 5: Sprinkle in the “rustic.”
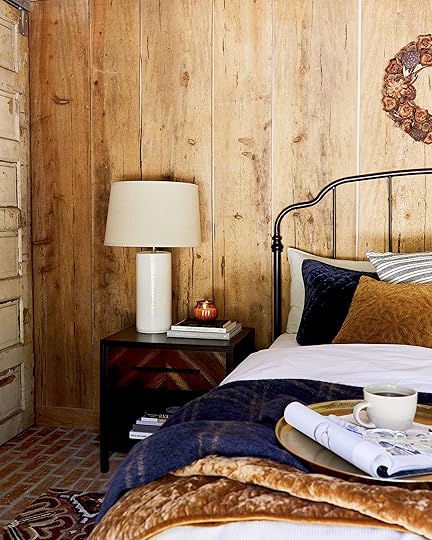
Shop the Look: Lamp Base | Lamp Shade | Nightstand | Lidded Iridescent Jar | Black Chalk by Christopher J Yates | 2 AM Thoughts by Makenzie Campbell | Home Edit: A Guide to Organizing and Realizing Your House Goals
Sometimes, all you need to do to get a little rustic and fall feeling in a space is bring in a candle. You’ve already set the stage with the other elements of the room, so it was a matter of just a few extra-cozy or seasonal item. This Harvest Pumpkin & Clove candle comes in a non-flashy glass jar that I’d totally reuse once the wax is burned up. I also want to talk about the wreath up there above the bed. While the room certainly doesn’t NEED it, it’s a nice way to “seasonal-ize” a space because sometimes its nice to bring in those elements into your bedroom (why should the living room have all the fun). The dried florals are the same tone as the wood-clad wall, so it almost disappears into the background while whispering “fall.” As long as the other elements in your room are too fussy, it won’t feel too traditional.

And finally, what is a “fall” vignette without some leaves, hm? The brass here makes it feel more evergreen (in that you could leave it out all year), while still speaking to the aesthetic of the room.
I’m VERY into this whole Elevated Prairie look (even without all the wood-clad walls and ceilings). It feels like a quiet, thoughtful, welcoming style that can easily transition seasons while also being able to be layered with more “festive” items.
How have you started decorating for fall? Could you see this warm vibe in your home year-round? Let us know what you plan on scooping up in the comments below.
*photography by Sara Ligorria-Tramp, art direction by me, styling by Emily Bowser
**This post is in partnership with Target but all thoughts are our own. Thank you for supporting the brands that help to support this business.
The post Target’s New Threshold Collection is Hitting the “Elevated Prairie” Trend Hard and Good appeared first on Emily Henderson.
Emily Henderson's Blog

- Emily Henderson's profile
- 10 followers

