
Emily Henderson's Blog, page 244
October 16, 2019
Are We Done With Canned Lighting?
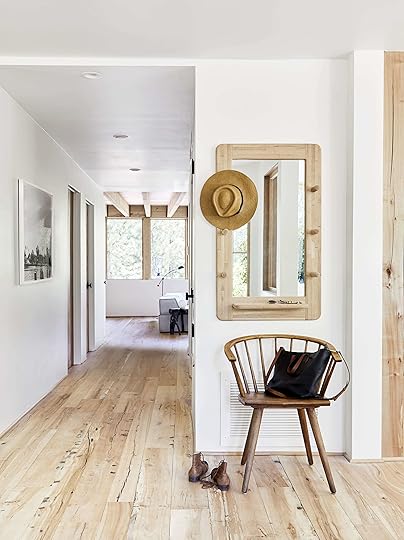 photo by sara ligorria-tramp | from: how we designed our kid-friendly family room
Overarching statements like being “done” with something as ubiquitous as canned lighting is maybe a little dramatic, yes, but I’ve been discussing the topic with Emily back and forth for a few weeks now. It can be fun to be black-and-white about a topic to force people’s hand to make a decision. It’s what I call the “gun to the head” decision, which, well, is very (unnecessarily) violent (considering the day and age we live in), but an effective discussion tool when used hypothetically. Emily’s stance on the subject was that she’s seeing new trends emerge in place of the traditional recessed light (I’ll walk you through those), so, as a designer, maybe there’s no reason left to use the “builder basic” feature. Me, on the other hand (not a designer, just a design enthusiast), think there will likely always be a place for them. That said, we thought to take our discussion to the internet…and here we are.
From Emily: “It seems like back in the day, the only options we had for overhead lighting were canned lights +flushmounts/pendant/chandelier, only canned, or flush/semi-flush fixtures, but we are seeing more alternatives to ceiling lights where there is an obvious shift from the really consistently placed overhead round white 6-inch canned light.”
Em, though I don’t necessarily disagree with you that people are doing different, cool things (but also, kind of cluttered things…stand by for photo examples), classic recessed lights are just one of those things in a home that, while not always super attractive, add enough value and ease of living (you know…if you classify wanting to “see” things in a well-lit room value) to outweigh their visual clunkiness. And frankly, I think, as long as they are well placed, they aren’t that clunky. Their very nature is to be visually unobtrusive, hiding up in the ceiling.
Let’s pause for a second, though, to throw out some definitions. I’m guessing most of you know what I’m talking about when I say “canned” or “recessed” lighting (which, according to my husband who’s in the architecture field, are two words for the same thing), just in case, these are the bad boys I mean:

Pretty basic, run-of-the-mill canned lights (also called “pot” lights) are about 6 inches round, typically with a slight ring around them that’s flush to the ceiling. The wiring and housing sit inside your ceiling. The install on these, according to Jeff Malcolm, the GC on the mountain house, is about $75 per light all in (wiring and installation) for a new build and about $125 per light for a remodel (considering there’s an existing light circuit). None of that includes the actual cost of the light itself which could run anywhere from $10 for something no-frills at say, Home Depot, to deep into the hundreds mark for something smaller, LED or more decorative.
Anyhow, I just wanted to lay that foundation for you all before diving into all the new “options” we’ve been seeing to keep costs in mind. Like with most things in life (and design), the nicer or even less visible something is, the more $$$ it becomes.
Emily did want me to remind everyone what she did use canned lighting in the mountain house (that’s a “before” shot above of the family room). Exhibit A:
 photo by sara ligorria-tramp | from: our soft yet secretly sultry downstairs guest suite reveal
The house was more modern than her LA house, so they “fit in.” Plus, the intention was to keep this house much more minimal in terms of “stuff” so the canned lights provided overall room light without filling any space with lighting fixtures.
Now, let’s dive into the whole “what we’re seeing” part of this post, starting with a project that’s likely familiar to anyone who’s been following this blog for a while:
Black, Square & Very Small
 photo by sara ligorria-tramp | from: a modern and organic living room makeover
Emily’s friends Corbett and Leigh opted for more modern recessed lights in their (ridiculously gorgeous) , shown above. The installation on something like this would likely not increase the cost; the only thing that’s the variable is the light itself. I personally love this look because it’s both functional and pretty good looking. It’s like a nice, kind, smart AND funny man. FULL PACKAGE PEOPLE. I think white, round canned lights might look a little sterile in a home like this…misplaced almost, so this is a great option.
 image and design via dko
Here’s another example, in another modern home. Definitely file away “small, black and square” into your modern home filing cabinet. These could also just as easily have been white to fade away, but I’m sure it was a stylistic choice. These appear to be double lights (two small bulbs in the same housing), which probably helps with light distribution and direction. I’m into it.
“Tube” Spotlights
 image and design via simone haag
The whole “tube” light fixture in general is what made this conversation about the hypothetical demise of the canned light come to light (ha). I’ll show you some shots where these are used in groupings (like canned lights would be) in a sec, but for right now, this is what we’re calling “spotlights” because, that’s frankly exactly what they are. Making them into more of a flushmount fixture does feel a bit more intentional. That’s not to say a recessed light wouldn’t have been premeditated, but being that it’s a one-off in the ceiling, making it stand out a little more rather than visually disguising it says “yeah, I meant to do this.” Could this also have just been a moment for a pendant? I think yes, but it really depends on the placement in the room. In this space in particular, it might be a bit strange, like a random hanging light fixture off-center to the room. What do you think?
 image and design via chelsea hing
The lights here seem to have a bit of a similar purpose (providing more direct light on the sofa…maybe for reading?) but they very well might also just be individual pivoting lights, similar to what you’d find on a track lighting system…just without the actual track.
 image and design via chelsea hing
Same situation (same designer, also), presumably for illuminating a dressing area near the closet. These, however, are black (or bronze?) so my question then becomes, why chose to make spotlights like this more visible. Is this purely stylistic? To pick up the black in the cord of the pendant above the nightstand? To play off the room’s more contemporary aesthetic?
Really Striking Black Track Lighting
 image and design via sam crawford architects
If you’re okay with the visibility of black, modern track lighting, this could be a good alternative to recessed lighting. It’s adaptable, works well for a ceiling like above and below (cement-finished, wood-slatted) where drilling in holes for the cans might look disruptive, and in my opinion, adds a certain cool industrial vibe. I’m not talking found iron barrels repurposed into a coffee table “industrial vibes.” I just mean it’s a bit more suited to an open, contemporary room/space.
 image and design via figr.
 image via the design files | design by gardiner architects
Recessed lighting has the option of having a pivoting “eyeball” like feature, so you can direct light similar to how you would a track lighting system, but again, I think it just boils down to aesthetic preferences, tbh.
Clustered Tube Lights
 image and design via mim design
These are just like the one-off spotlights I wrote about earlier, except…there’s more of them. I do really like them over a kitchen island, and they’re also pretty neat in a hallway:
 image via lightingstyles.co.uk
But I was curious about the kind of light they gave off (would they be harsher, is this any different than a can light that would sit 6-8 inches higher?), so I whipped out my phone and had an impromptu interview session with my unsuspecting architect husband about them. Here’s the gist of what he said:
Me: “So I’m writing about canned lighting and ‘what’s next.’ I’ve been seeing a lot of ‘tube’ lights lately, like this:”
 image via the design files | design by b.e architecture
Charles: “Ok.”
Me: “What do you think? Do you think it would create different light than recessed? Why do architects like using canned lights? PS, I’m quoting you, so don’t embarass me.”
Charles: “Well, the light would probably be more focused, so it wouldn’t spread as much. It would focus on an area directly below it, in this instance, the island. But because it’s so focused on an area, now you get light playing…a pattern…dark, light, dark, light, dark, light.”
Me: “Ah ha, I see…so as an architect, do you like something more decorative like this, or are you still a fan of the traditional canned/recessed light?”
Charles: “I like what works for the space. Something more decorative isn’t always the answer. Sometimes, elements have to fall back for others to stand out…so, it depends on what the space looks like and what’s trying to be accomplished. But canned light is probably less expensive.”
Me: “So, do you think this kind of thing is just trendy or do you see it having lasting power?”
Charles: “It’s hard to say for me, but if what I’m seeing is any indication, even traditional recessed lighting seems to be getting stale in a design-forward state of mind. What I’m seeing is either smaller lights with more power resulting in a smaller profile (think LED) or a bank of LEDs behind a surface that acts as a diffuser. It’s like hiding your hand…like a magician. This whole surface is lit…but how??”
Me: “Now you’re showing off, but thanks.”
 image via thelightingsuperstore.com.au
And there you have it folks…a look into my marriage. If you want someone who will always have something to say about literally anything, marry yourself an architect. SO MANY OPINIONS but SO USEFUL when you’re a design writer, I tell ya.
Before moving out of this category, I wanted to note…so many of these photos with the “tube” lighting situation are sourced from homes/designers out of Australia. The Aussies tend to lean much more “warm minimal modern” than Americans, but what we see over there eventually catches the wave across the Pacific stateside, so if you’re like “blegh this is offensive to my eyeballs” all I’ll say is this…just wait. Before you know it, you’ll be on board (like me with—I can’t believe I’m saying this—the scrunchie).
Multiple Flushmounts
 image via barn light electric company
And finally, I move into the category that had Emily and I the most chatty: the multiple, showy flushmount. This is not a subtle design move. In fact, it plays the opposite role of the camouflaged recessed light. It’s an “I do because I can” aesthetic play, which I’m not normally mad about. My heart lives far deeper into the maximalist zip code than minimalist, but I’m not sure I’m entirely sold. In the above room, I do kind of like it, probably because the rest of the space’s decor and furnishings are neutral and subtle. This is the big “moment” here.
 image via remodelista | design by penelope august
There’s also something interesting about the rose-hued blown glass flushmounts in this kitchen (if it looks familiar, I originally shared it in this post about lilac being back…and you guys called out the flopped over art piece which still makes me chuckle). They’re visually “light” so I think in this instance it works. Besides, if you’re someone who can muster the courage to do a purple kitchen with a funfetti-like terrazzo countertop and backsplash and a mustard yellow range…I doubt you’re worried about keeping things minimal.
 image via california home & design | design by haus of design
Okay, I just LOVE this. It’s so over the top and purposeful and I’ve had this image saved in my Instagram bookmarks for a few months now. When Emily first suggested this topic being a post, I instantly knew I wanted to use this shot. I consider this far more of an art installation than functional lighting, but if you’re going to buck traditional, might as well do it with some flair, no?
And finally, speaking of flair…
 image via modern palm boutique | design by tia zoldan
While I’m not sure I’d go this far in my own space, I do applaud the adventurous spirit of Tia Zoldan, the designer of this kitchen above. While six canned lights would have provided likely a sufficient amount of light, the brass flushmounts sure do add more style than recessed cans ever could.
So…I come back to the original question at hand: are we done with canned lighting? Me personally, I think no, we’re not. And frankly, I don’t think Emily thinks we are either, but it’s fun to dive into what ELSE there is out there. But now I throw it to you, dear readers…where do you stand on the “cans are dead” vs. “cans are alive and well” debate? Are you into the multiple flushmount look or even the “tube” downlight? Can’t wait to hear from you!
The post Are We Done With Canned Lighting? appeared first on Emily Henderson.


October 15, 2019
3 Design Agonies, 1 Post: Tricky Lighting, Big Empty Walls & Foyer Styling

An old friend is back in town and her name is Agony…Design Agony. This time, we are planning for her to embark on a more permanent residency both on Instagram and here on the blog. If you follow Emily on Instagram, she started answering followers’ design agony questions on stories. It’s been awesome and so far you guys are really into which we love. One of the aspects all of you responded to was getting real product resources. I mean, who doesn’t love that?! So for today’s post, we thought we would recap some of the more product-focused agonies that Em has already tackled but with even more resources. PLUS, so there is something new for everyone, we chose one new agony we think could be helpful to more people. Shall we just get into solving the world’s (design) problems? Yes, I think we should.
The Agony: How to Avoid Harsh Lighting
For our first Instagram Design Agony, we chose Jenny who was having an issue with her floor task lamp next to her sofa. In her own words, “it’s like looking into the center of the sun.”

We get it, directional lamps don’t give off the best light and can be harsh on the eyeballs (yet seem to be everywhere as they’re pretty on trend right now). Why not just use a drum shade lamp? Well, on the other side of her sofa, she already has a lamp with a drum shade and didn’t like the look-alike look. There wasn’t enough contrast and visual interest for her taste. See what she means??

Emily’s Four Solutions
1. Start simple. Try a lower wattage bulb like a soft white 40 watt. We get why people opt for a super bright LED bulb: bright spaces make you happy, right? Well, in the wrong lamp, it can be too harsh for the eyes. Here are three options:
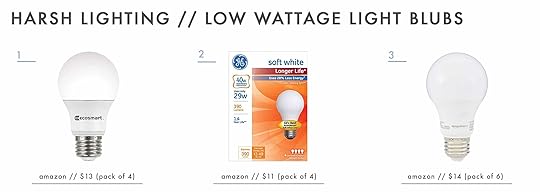
1. EcoSmart 40W Equivalent Dimmable LED Light Bulb | 2. GE Lighting Soft White Long Life | 3. AmazonBasics 40W Equivalent
2. Double arms. To keep the super sculptural look of the task lamp Jenny already has, she could replace it with a double-armed directional lamp. That will help distribute the light a bit more. We think these could be great:

1. Avallone | 2. Geneva Multiple Glass Globe | 3. Bruno Double-Arm
3. Opt for color. Jenny didn’t like the two drum shades but we think she shouldn’t give up on the idea because a drum shade will most often give you the softest light diffusion. To break up the “sameness,” she could change the color of the other drum shade so it doesn’t visually compete. These are our picks:

1. Black Drum | 2. Natural Burlap Drum | 3. Blue Drum
4. Lastly, she could try a hanging sculptural pendant that gives off ambient light. This way, it still looks architectural and cool but the light isn’t so harsh. We are very into these three:

1. Bonbon | 2. Sphere + Stem | 3. Mater Terho
Jenny, we hope this helps to solve your “sun” problem and you find the perfect light match.
The Agony: What To Do With A Big Empty Wall
This is a VERY common “agony” we get asked about…How do I fill up my big empty wall?? Well, in Emily’s instastory, she went through three great options that will hopefully not only help Kristin but also be useful for anyone else having the same issue. But before we get into the tips, the main thing to remember is that you want to break up the wall to add depth and dimension since it’s, well, a pretty big empty wall. So, if you have a truly large wall, stay away from the “one huge piece.” That’s not to say overscale art never works, it does. It can be powerful and fantastic, but to get anything large enough for a wall-like Kristin’s, it would be VERY overwhelming.
Now onto the issue at hand. Here is Kristin’s living room…

She’s got a great foundation here with some beautiful pieces, but the wall definitely needs some love.
Emily’s Three Solutions
1. Create a personalized gallery wall with an articulating sconce like we did in the Atlanta living room we did earlier this year. Also, adding a little sculpture in a wall display box adds a ton of depth and will really make your wall three-dimensional and pop.
 Photo by Sara Ligorria-Tramp for EHD | From: Reveal: A Budget and Rental-Friendly Living and Dining Room (With 80% Thrifted Finds)
Here are some sconces we think would look great.

1. Envoy Swing | 2. Alto | 3. Nymane
These are the kind of display boxes we are talking about. Box #1 was the one we used in the photo above.

1. Bjoernarp | 2. Black Metal Cube (set of 3) | 3. Barkhyttan
2. Another option is to make a grid of art with two matching flanking sconces. In the photo below, the sconces aren’t technically flanking since they are above but it’s the same principle.
 Photo by Geneieve Garruppo | From: A 120 Year Old Barn Makeover With The Frame TV + Shop The Look
These are some great options.

1. Simon Adjustable | 2. Savannah Single | 3. Perry
3. The last suggestion was to hang a large diptych (two corresponding pieces) or triptych (three corresponding pieces) with an added sconces or two to fill and make the space more dimensional. For Kristin’s particular space, if she wants to do just one sconce, we recommend something really sculptural, articulating and placed on the right side of the room (if you are standing in front of the sofa). Two would also be great but wouldn’t need to go so sculptural because it wouldn’t overwhelm the room.
 Photo by Zeke Ruelas for EHD | From: Silver Lake Hills Living Room Reveal
Here are some diptychs and a triptych we think would work in Kristin’s space…

1. Reticent 2pc Printed Tinted Gel Canvas | 2. The Line No 12 + The Line No 16 + The Line No 13 | 3. Calm Forest No. 20 + Calm Forest No. 18
(Pssst…For Emily’s IGTV on how to create a gallery wall, click here!)
The (NEW) Agony: An Unstyled Entryway
This is a NEVER before shared Design Agony from a reader named Sara. Sara messaged Emily asking if there was styling hope for her entry or if she should just rip it out and start over. Start over??? No need! This is a very cute entry that just needs a bit of styling to bring it to its full potential. The design team has four solutions for Sara…
EHD’s Four Solutions:
1. Put some leaning art on the shelf. It will help to draw your eye up and add visual interest to that empty space above the hook ledge. Here’s a good example from Erin Francois’ home tour we shared on the blog last year:
 Photo and Design by Erin Francois | From: House Tour: A Home Crush A Year In The Making
We really like these combos below. Go with only two pieces so it doesn’t feel cluttered, one larger in scale (by at least 4 or 5 inches where they overlap) and the other a bit smaller.

1. Folded Lines + The Chiton | 2. Landscape 151 + Shade | 3. 2:54 AM + Cactus Line Drawing
2. Next up is adding a bud vase on the shelf with a little greenery (it’s a little detail that’s instantly inviting).

1. Bud Vase | 2. Clear Glass Mini Vase | 3. Small Ceramic Vase
3. Mix in a couple of pillows on the bench to add warmth and texture.
 Photo by Tessa Neustadt for EHD | From: My House Tour From Good Housekeeping
It might seem silly to some to add something like pillows (or a throw) to an area of the home that seems like it could benefit mostly from utility, but hear us out. Some softness goes a long way to making a vignette feel purposeful and not forgotten. Plus, you know…a little lumbar support for when you’re grunting your way through pulling on your boots. Here are a few combos we are very into.

1. Anchal Crescent + Rebecca Atwood Waterfall Stripe | 2. Liana Fringe + Tweed Lumbar | 3. Woven Stripe with Fringe Lumbar + Cable-knit Cushion Cover
4. Spray paint! The last solution we suggest to Sara is to spray paint the woven bins she already has black. Having a contrasting color will create some more dimension. It’s also budget-friendly. (Take a look at the below entry—it’s my house!—where I spray painted the peg rail black to set it visually apart from the “blonder” tones below.)
 Photo by Sara Ligorria-Tramp for EHD | From: Makeover Takeover: Jess’ Long Awaited (Small Space) Living Room Reveal
Alright, that’s it for today’s agonies. Hopefully, some of you have found some inner design peace on this fine October Tuesday and are feeling empowered to conquer your problem areas. For the rest of you, don’t worry because this is just the beginning. We will still be covering agonies with Emily on her stories (we’ll be running those every Tuesday, so be sure to check back) and then every now and again, diving into them a bit further here with more product resources.
If you have any design agonies of your own, feel free to DM Em on Instagram (be sure to write DESIGN AGONY in the prompt so it stands out) and check out the Design Agony highlight on her profile to see what we’ve covered already. For an issue you’re having that might be a deeper dive, be sure to email us at designagony@emilyhendersondesign.com.
Love you, mean it.
The post 3 Design Agonies, 1 Post: Tricky Lighting, Big Empty Walls & Foyer Styling appeared first on Emily Henderson.
October 13, 2019
The Link Up: An Artsy Book Emily Loves, Jess’ Highly Recommended Facial Peel & The Boots We Are Lining up To Buy
 image by Erhard Pfeiffer via Dwell | design by Ehrlich Yanai Rhee Chaney Architects
Hello friends, and welcome back. This week, we invited you into Emily’s living room here AND here (with lots of sofa and vintage chair talk), we made a case for leveling up your tile with grout colors, Brian stopped by and gave us insight on being married to an influencer, and Emily reviewed a ton of boots. What a week. But now, we’re back with your regularly scheduled programming: The Link Up. Let’s get to it:
No link up is complete without a home tour and this one, via Dwell, does not disappoint. The architecture is super modern, while the decor is midcentury/boho/eclectic and it’s SO GOOD.
From Emily: “This book, by artists Jesse Chamberlain and Jimmy Marble (whom I love and have followed for years) is just what the title, Dream Baby Dream, suggests: dreamy. I actually bought one of his pieces for a Secrets From a Stylist episode years back. It’s incredibly weird and cool, but with a happiness about it that is totally inspiring. And fun fact, I knew them both separately before they met and got married (and had the MOST inspiring wedding) and now have a baby. It’s a great book/gift for anyone who loves inspirational and out of the box art and photography.”
Also from Emily: “Thimble sent some dresses to Birdie and now that she is only in ‘dress phase,’ I’m SO glad that I have some that are just incredibly cute (and handmade) versus the Elsa and Anna nightgowns she wants to leave the house in (which we don’t really protest because, WHY?). And while I’m on that note, Pepper is a small kids company that makes the cutest stuff and now that the kids aren’t growing out of things so quickly, I might actually buy some.”
Jess finally got a facial after about 10 years and her facialist highly recommended Naturopathica’s Sweet Cherry Brightening Enzyme Peel for a deeper clean that helps the years of sun damage and generally brightens. She uses it twice a week and LOVES how good it makes her skin look and feel.
Peaky Blinders is Veronica’s favorite show right now, and it’s finally back on Netflix for season 5. The show follows a crime family in the 1900s lead by Thomas Shelby, played by Cillian Murphy, and it’s just so good and binge worthy.
If you are looking for even more spooky cinema, this is a great list of horror comedies to watch this month. Sara loves getting into the spooky mood, but she is also TERRIFIED of actually being scared. So a good horror-comedy is her go to. Harry Potter is also an all-season option (duh).
From Arlyn: “I’m a meat eater, but I like to have at least a day or two where I cook without it, so I tried this vegetarian bolognese recipe this past week from Pasta Social Club (one of my favorite accounts) and I’m OBSESSED with it. It uses Beyond Meat, but I’m sure it could easily be swapped with another meat substitute…or just ground beef, TBH. It came together in under an hour with deep flavors that would normally take me HOURS to get in a ragu.”
Mallory recently found a boutique that has a bomb sale section and super cute clothes. It’s called Stevie Sister. “I just got the cutest jumpsuit and skirt on sale (for 40% off the already reduced sale price). Bargain shoppers unite!”
Veronica bought these boots after Emily tried them for the boots review post yesterday, and it’s safe to say we all LOVE them, and we want to buy immediately. From Veronica: “They are a chunky boot but are surprisingly lightweight when worn and you can’t even tell they have a slight heel, which is great because you can wear them all day comfortably.”
If you are a suffer of dry skin like Julie, try this Burt’s Bees Hydrating Overnight mask. From Julie: “I’ve used this once so far but woke up looking less haggard than usual. Millennial’s swear by it cause it has their favorite ingredient, Avocados.”
Ryann is really into this Madewell x Dickies collab. It’s the perfect blend of two brands that she loves, and she is especially pining after this jumpsuit (because we all know EHD loves a jumpsuit).
That is all we have for you lovely people today, and EHD is OOO tomorrow (so no blog post), but be sure to come back Tuesday for something special. See you then xx
The post The Link Up: An Artsy Book Emily Loves, Jess’ Highly Recommended Facial Peel & The Boots We Are Lining up To Buy appeared first on Emily Henderson.
October 12, 2019
18 Pairs of Fall Boots: A Review of the Good, the GREAT (and the So-So)

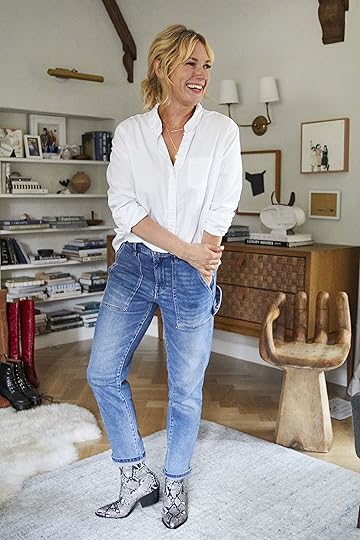
In an attempt to find the perfect fall boot, both in comfort and style, I tried on 18 different pairs. Today is a review based on comfort, style and versatility (for all budgets). All of these I liked visually for different reasons (some were a stretch stylistically for me) and while some proved uncomfortable or simply not worth it, there were definitely five stand out winners. I wore the same basic white top and jeans that I love for each of them (and a skirt for the tall ones) for the sake of keeping this experiment as controlled as possible (as this is VERY serious business). Here we go…
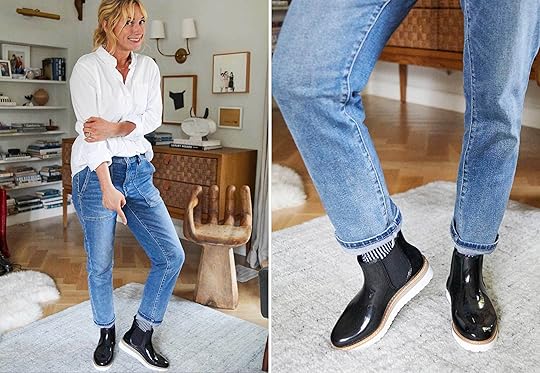
#1 Cloudy Waterproof Chelsea Rain Boots, $60

Verdict: Cute but kind of uncomfortable. I liked that these boots had a chunky sole and I generally love a Chelsea boot due to its easy slip-on abilities. Two weekends ago, when I had just got these, it rained and Birdie, the perpetual optimist, squealed and asked me to go jump in rain puddles with her. All the rest of my rain boots were up at the mountain house so I put these on and spent the morning in them. I can sadly report that they are cute, but a bit uncomfortable. It could be because I have wide feet, but I couldn’t wait to take them off and now sadly I have them forever (but might sell them on Poshmark).
#2 Forest Chelsea Boot, $175

Verdict: LOVE LOVE LOVE. These boots are cool, comfortable, modern/edgy and just generally so easy to wear. They are really skinny at the ankles thus they tuck into your jeans really well.
#3 Shanta Bootie in Black, $130

Verdict: LOVE. SO EASY TO WEAR. These are comfortable, they elongate the leg if you are into that (it zips in the back and the ankle is really tight and slimming) the heel is the right size, and the shape is the perfect reference to the cowboy without being too theme-y.
#4 The Cowboy Boot, $475

Verdict: SPECIAL, AWESOME, THEY MAKE AN OUTFIT (but a splurge). My best friend works at The Great and she is WILDLY convincing of their clothes (which we’ve both loved since way before she worked there), so I get to borrow her stuff and test it out. These shoes do make a basic outfit cool instantly. They just do. They are expensive, but if you are going to splurge I highly recommend these over the next pair.
#5 Mallory Chelsea Flat Booties, $415

Verdict: Cool, but not worth it if you aren’t going to wear them all the time unless you have an unlimited shoe budget. I did like these, and in the photos, I like them even more but for $415, they need to be way more interesting to me (like the cowboy boot above) to splurge on. A great boot, would likely last a long time, but too expensive.
#6 Suede Wooden Platform, $229
Verdict: LOVE SO MUCH, QUITE POSSIBLY MY FAVORITE. A DEFINITE KEEP. I guess these sell out really fast, and I can see why. I had no idea how into the “shootie” I would be but that platform is so cool and warms up the faux black suede. It’s very fitted so it feels comfortable for how high it is (and the platform adds good support). We all LOVED these.
#7 Shanta Bootie in Snakeskin, $130
Verdict: LOVE and so easy to wear. I’ve worn these far more than you’d think. They dress up a basic outfit instantly (kinda like the cowboy boot does, but far more affordable). They are a good everyday heel height and the neutral tones of the faux snakeskin make it easy to mix into my wardrobe.
#8 Isa Boot, $198

Verdict: GREAT, but I love their Chelsea boots the best. I love Nisolo as you know, but left my Chelsea boots up at the mountain house and didn’t have time to order them for this shoot. I really like these, too. They have that cute grandpa thing going on, I just prefer the Chelseas because they are strangely elongating and listen, I don’t have time for laces these days.
#9 Kensington Chelsea Rain Boot, $70
Verdict: These are fine, but I would worry about the white sole. We thought these were cute rain boots and they are on the more affordable side at $70, but I feared that the sole would get dirty so fast, which was my favorite part about them. Although one of you has given me the hack of using Mr. Clean Magic Eraser to clean off the souls of my Vince sneakers, so maybe if you don’t mind cleaning your shoes all the time, these are for you.
#10 Zoe Chelsea Boot, $89

Verdict: THE FASHION CREW ALL WANTED (and some bought). These are awesome for the price and some of the team bought them right after. I’m still trying to dabble in the chunky heel trend (I lived through the first round of it in the ’90s) so the idea of making my feet look huge isn’t really my thing. But my team can attest that they loved them and they are very comfortable.
#11 Leona Heeled Boot, $160

Verdict: Not for me. I really tried, I did. I know that these Doc Martens are cool (call them Doctor Martens if you want to make anyone laugh) but they are like 3 lbs each and A LOT OF SHOE. We all know people who love a really heavy shoe and I do think that these can be cool, although I think we can safely say that I’m not pulling them off nor do I have the time to lace them up.
#12 Raakel Knee High Boot, $225

Verdict: Rad, but too specific, intense and loud to be versatile. This just isn’t for my life which usually includes running around, shopping or sitting and writing. I rarely take meetings that would require this vibe. However, I think pairing these with a midi dress or a basic shift would look great.
#13 Nestel Knee High Boot, $240

Verdict: Versatile, but pretty simple. I’ve had these boots since June but have only worn them a couple of times due to it being summer. I think the over-the-knee boots below are more “me” but these are really good. If I lived in a climate where I’d wear tall boots more consistently, I’d highly recommend these.
#14 Dorien Over the Knee Boot, $252

Verdict: GREAT. LOVE. I’ve worn so many times. SO MANY. They are comfortable, they stay up but are a tiny bit slouchy so they look casual (I hate super slouchy boots).
#15 Siren-3 Pointy Toe Boot, $125

Verdict: GREAT for dressier boots. Admittedly these do not look great with these jeans (but seriously, how great are those jeans???) but I really need some boots like these because I notoriously don’t have any dressy shoes and these are still on the quieter side. They come up the leg a few inches higher than you see there, so I’m not totally sure how to wear them which means I actually might not keep them.
#16 Indie Faux Leather Heeled Boot, $35

Verdict: SO great for the price. So simple and classic, and look very similar to Madewell boots, but for a third of the price. They are easy to slip on and have a great heel height.
#17 Hudson Waterproof Boot, $215

Verdict: Great, if you live in a cold/snowy climate. I thought these would be good for the mountain house and they are, but they are more of an investment so I’m going to try these from Target instead because it doesn’t get THAT cold up there and it doesn’t snow THAT much.
And lastly, a boot that I really love (and wear all the time) that I just couldn’t NOT share. I am wearing a different outfit (from last weeks post), but the pants are the same so I think it’s allowed:
18. The Regan Boot, $178

Verdict: Simple, versatile and classic. At first, I thought that these were boring and almost too perfectly brown, but once I styled them out in this outfit, I was like, oh no these are good and yes I’ve worn them a ton (they are especially cute with a dress and socks how I styled them last week).
Whew, that was a lot of boots, but SO FUN. Here are all the ones I tried in one place:

1. Cloudy Waterproof Chelsea Rain Boots | 2. Forest Chelsea Boot | 3. Shanta Bootie | 4. The Cowboy Boot | 5. Mallory Chelsea Flat Booties | 6. Suede Wooden Platform Boots 7. Shanta Bootie in Snakeskin | 8. Isa Boot | 9. Kensington Chelsea Rain Boot | 10. Zoe Chelsea Boot | 11. Leona Heeled Boot | 12. Raakel Knee High Boot | 13. Nestel Knee High Boot | 14. Dorien Over the Knee Boot | 15. Siren-3 Pointy Toe Boot | 16. Indie Faux Leather Heeled Boot | 17. Hudson Waterproof Boot | 18. The Regan Boot
Do you have any boots you love love love? Do you guys like these types of review posts? Let us know below. xx
*photography by Veronica Crawford
The post 18 Pairs of Fall Boots: A Review of the Good, the GREAT (and the So-So) appeared first on Emily Henderson.
October 11, 2019
On Privacy, Perks & Ever-Changing Sofas: What It’s Really Like Being Married to an “Influencer”

How many times has this happened to you: You’re editing a video of your influencer wife, and you need some coffee so you head upstairs, and in your kitchen, you find your wife deliberately pouring a thick green smoothie onto a sofa cushion, surrounded by four women with cameras and phones, filming the whole thing. So you politely slide through, grab your coffee, and head back downstairs over talk of brand call outs and, “Let’s get a Boomerang!”
You’ve been there, right? I mean who hasn’t? It’s just par for the course when you’re married to a “Social Media Influencer.” You get it. Whew, it’s nice to be able to talk to someone who can relate.
Oh, wait. I guess I shouldn’t just assume that everyone on here can relate. Maybe there are a few of you, a slight few, who aren’t married to an “influencer.” Huh. Weird. Well, I suppose I should give a little insight on what that’s like, just so some people don’t feel left out. Okay, so let’s start here: Hi, I’m Brian Henderson and I’m married to an Instagram influencer.
First off, can we just take a second to discuss that term, “influencer”? What is happening? The fact that it’s become a normal and acceptable job title is utterly insane. And Emily thinks it’s insane, too! The term makes her cringe, and she avoids it at all costs. (In fact, after she read the first draft of this post, she specifically called out that she NEVER calls herself an influencer…like ever.) I mean, “influencer”? I suppose that it’s accurate on a technical level, maybe, but I have a hard time saying it when people ask what my wife does for a living. I always qualify it, like “I guess she’s an Instagram influencer, but not in the ‘show-your-butt-in-yoga-pants-with-a-bottle-of-diet-supplements’ way,” (not that I look at those or know what those are). But the problem is, there’s kind of no other way to describe her career to people who don’t know who she is, “She’s a designer, who’s also a stylist, and a host, and a writer, and a social media personality, but mostly she’s a blogger”…that doesn’t really work. So what do I do if I don’t want to use the “I” word? Can’t we come up with another term? You guys are smart, do you have any suggestions that aren’t so cringe-worthy? Please help.
“That’s what it’s like being married to an ‘I’ word. You have to get your head around the idea that total strangers know what the inside of your bedroom looks like.” — Brain Henderson

Until we find a new word, I have to stick with what we’ve got, so…
What’s it like being married to an influencer?
Well, let me ask you a question before I answer: How many different sofas have you had in your living room this year? A friend asked me this question recently out of amazement, and I honestly didn’t know the answer, there have been so many. I kind of turn myself on airplane-mode when Emily says she wants to try a new sofa, and just say “yes, move the old one out and the new one in.” There was a time when I couldn’t remember what color our sofa was without looking. And I’m sure to some of you reading this, that could seem annoying, which is true. Or it could seem exciting, which is also true.
It could seem stressful, or fun, depending on your personality type. It could seem wasteful, which was my concern, but I’m happy to report that every piece of furniture that we cycle through here is either donated or used in other design projects. There is no giant bonfire in the backyard with the ashes of Persian rugs and Article sofas (that’s a brand, right?). Trust me, everything finds a home. And yes, I used to get annoyed by the temporary feel of our home, like the time I went to put a cup down on a side table only to find a giant wooden hand in its place. How do you balance a cup on that? But I have learned to be chill about it, and even enjoy it sometimes. It’s definitely taught me to have a healthy detachment to “things.” So maybe there’s a deep Buddhist lesson that Emily is secretly teaching all of us: “Zen and the Art Of Transient Sofas.” And it’s not just sofas, we have all kinds of new pieces of furniture flying in and out of here like fish at Pike Place. Literally two days ago, we replaced a credenza with another credenza. And before that credenza, there were two other credenzas. It’s cred-azy!
But what’s really cred-azy is the fact that most of you probably know which credenza I’m talking about because it was on Emily’s Instagram feed. How trippy is that? You guys not only know what furniture I have in my home, but I bet there are people reading this who could sketch the entire layout of our house and backyard because it’s been posted so much. That’s what it’s like being married to an “I” word. You have to get your head around the idea that total strangers know what the inside of your bedroom looks like. That’s weird right? I have very mixed feelings about that kind of stuff. On one hand, it’s like, who cares if people know that much about my house, it’s not hurting anyone, and all of Emily’s followers (another term we need to discuss) are nice, normal people who just like design. But there’s something strange about it, the privacy thing.
“…you have to be ready to wake up and find a hair and make up person at work in your dining room, a few team members from social and creative popping in and out of the front door, and cameras and phones grabbing impromptu fashion tips as you try to find the sugar for your coffee. Our house is very much like an airport, with people arriving and departing at various times, chatting quickly and energetically as they head to their next flight.” — Brian Henderson
The Privacy Thing
It’s not just random privacy, it’s day-to-day stuff. Being married to an influencer means you have to be ready to wake up and find a hair and makeup person at work in your dining room, a few team members from social and creative popping in and out of the front door, and cameras and phones grabbing impromptu fashion tips as you try to find the sugar for your coffee. Our house is very much like an airport, with people arriving and departing at various times, chatting quickly and energetically as they head to their next flight. I have a newfound bond with those Cinnabon employees in Gate C. You just gotta do your thing and go with the flow. Even if that flow is overflowing from your bedroom. Some of my favorite days are when Emily does fashion posts and there’s a pow-wow of women in my bedroom, with shopping bags and the entirety of Emily’s closet spread across the room, which usually ends with Emily coming out in an outfit that looks like a mix of Punky Brewster and Lance Armstrong asking, “What do you think?”
But as annoying as that all may sound, it’s actually fun. There’s an energy here that is loose and vibrant, and never really takes itself too seriously. So I try to get that energy in me, too (with varying success), and just accept that my home is also home to many people. The good thing is, there’s not a single poopy-pants on Emily’s whole team, which makes it much easier. They’re all super cool. If anything, I’m the poopy-pants. And everything always is cleaned, emptied, and tied up in a bow by the time the kids come home from school. Emily’s made it clear to her team that 5 pm means our house is back to our house, and they are super courteous and respectful, and they’re probably thankful to escape before the kids come in melting down about me not playing “The Lone Dinosaur” in the car ride home.

Speaking of kids, that’s a pretty big deal when you’re married to an “I” word. How do you stay a lifestyle influencer without exposing your kids to the insanity that is social media? No, I’m really asking. How do you do that? Because we’re trying our best and it’s still very hard. Emily and I have definitely gone round and round about the privacy thing regarding the kids. I’d love to tell you that we’ve had big dramatic screaming matches about it, just to make this juicier, but the truth is that we’re on the same page about it. We decided that they get to choose their level of involvement in the photos and videos. We don’t push anything, and almost never involve the kids in sponsored things anymore. We’ve toyed with only showing the backs of their heads in her Instagram feed, too, which seems good to me. But Insta-stories are a different story (see what I did there?). Because the stories only last a day, it feels okay showing Charlie’s first lost tooth or Elliot’s scooter crash. I don’t know if that’s the right answer, but it’s what we’re going with right now. It’s still concerning to have your kids out there in such a widely viewed way. I’m not stoked when they’re recognized and it’s not fun for anyone when a stranger knows their names. If that happens, I get real bristly, sorry in advance. Maybe we’ll start putting things over their faces on social media like Kristen Bell does. Who, by the way, Emily literally refers to as “…my future-best-friend Kristen…” and she’s not joking in the slightest. So Kristen, if you’re reading this, let’s make that happen.
The only other privacy thing that’s a bummer is that I literally can’t play hooky because my whereabouts are always known! I’m not saying I would, or that it’s ever happened, but let’s just pretend that I told a potential client last year that I was booked on another video when in fact I was taking a booze cruise in our pontoon, and let’s just say that in this pretend scenario Emily posted a story with me in it, and let’s just say I didn’t sleep that night because of the anxiety that my client would catch me in a lie. Again, all hypothetical. And I know, I know, I shouldn’t lie in the first place, but sometimes you just want to drink greyhounds on a boat instead of going to work! Hypothetically.

Don’t Feel TOO Bad For Me…
There are, however, perks to being married to an influencer. I’m sure I’ll get a lot gruff for this, but it’s pretty rad to get VIP treatment at a place just because your spouse is willing to post a picture of it. That’s when I feel like a true hanger-on, and I’m not ashamed of it. I don’t have to do any of the work except maybe take a pic of her sitting at a hotel bar, and I get to reap the benefits of being an influencer. It definitely enhances any trip to know that we may have a little bottle of champagne waiting for us in the hotel room, or get a table at the busy restaurant downstairs. I just have to convince Emily to do a few stories during our stay. I mean, I would totally do it myself, but I only have like 23 followers, so I don’t think that would be a good trade for the restaurant. That’s the other thing about this whole setup: I’m not a social media guy, like at all. I never post on Instagram, barely check in on it, I didn’t even update it to see stories until like six months ago, and yet my wife has bought a couple houses in large part because of her involvement on that platform. How crazy is that? Don’t get me wrong, her success is built on her design skills and blog, but Instagram definitely plays a big part these days. It’s all tied together.
“I’ve definitely gained a new respect for Instagram people, to see how much actually goes into it.” — Brain Henderson
And by the way, she is killing this Insta game, with the help of her team. They work insanely hard—brainstorming, designing, shooting, coming up with new ways to see Emily in biker shorts. I can’t with those, by the way, sorry guys. I just can’t. But I’ve definitely gained a new respect for Instagram people, to see how much actually goes into it. I imagine all the influencers have to have a whole team. I hope. God, I hope Emily isn’t the only one working this hard and all the others are just rolling out of bed, pouting their lips and saying “…Samsung, bae…” and reaping the benefits that Em does by actually trying to create things you would find fun and interesting. Ugh. Whatever. Either way, it’s fine. It’s opening up her brand to more and more people and allowing her to do more stuff with her career, which is cred-azing.
And that’s good for me to keep that in mind when things get inconvenient here at the Henderson house. It’s easy to be pessimistic about it all, and complain about the more disruptive aspects of it, but I can’t say it hasn’t made our lives, on a whole, a little better. I can think of so many jobs that are more intrusive and annoying, that have more demands and less flexibility, which add stress to your life and family, and I’m super lucky that my wife is doing what she’s doing. I need to remember that the next time I can’t find my laptop because they’ve cleared out my office out to load in a Halloween story for fall. You know what I’m saying? Well, of course, you do, that’s happened to you before, too.
The post On Privacy, Perks & Ever-Changing Sofas: What It’s Really Like Being Married to an “Influencer” appeared first on Emily Henderson.
October 10, 2019
5 Fresh Grout Ideas & Trends That Should Be On Your Radar

Nothing elevates a simple tile (or frankly, an already elevated tile) like your choice of grout color and application. Sure, you’ve probably seen photos of bathrooms with white tile and bright yellow or cobalt blue grout, but if you’re looking for something a little more subtle and livable for the longterm, let me present to you the five grout ideas I’ve been taking notice of that are, frankly, just plain rad.
Low Contrast Tile & Grout
 image via domino
I found this shot on Domino and it says both “modern” and “warm/timeless” to me, to be honest. Not sure all of you would agree with that string of thoughts, but I wanted to show you what a matte tile with black grout does. Because the textures of the tile and the grout are “similar,” it just creates an overall “texture” for the backsplash, as opposed to a big TILE moment.
 image and design via studio mcgee
Here’s something similar but at a larger scale, from Studio McGee. While this is more “charcoal on charcoal” than the “black on black” from the previous image, the slight satin sheen of the tile catches the light nicely while still not being overbearing (say, as if there had been bright white grout in place of this dark gray).
Tonal Tile & Grout
Next, I want to move into a more “tonal” category, i.e. grout that’s similar in, well, tone from the tile it’s setting apart. It’s like a hushed “I’m here, but not trying to upstage anyone.” The supporting actor of sorts, except, guys, the tonal tile and grout situation is WHERE IT’S AT right now. Let me show you some great examples.
 image and design via sarah sherman samuel
We’ve been sharing photos of Mandy Moore’s house (designed by Sarah Sherman Samuel) for the better part of a year, and it’s the gift that keeps on giving. The taupe-y grout color works really well here with the “timeworn” tile. The application is a little “shaky” (in a good way) so it feels looser and less pristine.
 image and design via studio mrs
I see this “tonal” thing A LOT with penny tiles (which, by the way, are a fantastic budget choice for a remodel project that can be made far more special and “custom” with a deliberate grout color choice). Plus, with something this small, that means a ton of grout to get filthy and disgusting over the years, so going with a darker hue is always going to be a safer choice for anyone who’s concerned with that.
 image and design via studio mrs
When you step back and look at this room, it almost just feels like a big textural wallpaper moment, but upon closer inspection…just a penny tile (and that ceiling wrap…so good).
 image sources: pink | blue | green | black
I’m particularly fond here of that blue and the blush. The tonal grout really elevates the humble penny tile, people.
Gray Grout
Gray grout isn’t a “new” idea, no, but I felt it was important to talk about. White grout is such a default for people/builders, but gray is kind of a tiling secret weapon. Let me explain.
 photo by sara ligorria-tramp
In the Portland house, Emily and team were going for an “updated/modern traditional” look, particularly in the hard fixtures throughout the home, and an easy way to accomplish that in a bathroom is to go with a “fresher” gray grout. In the downstairs bathroom, it also happened to feel pretty tonal and give just enough depth (but not TOO much) with the beveled subway tile.
 photo by sara ligorria-tramp
This is the shower area for the same bathroom. A white grout here would have blended too much with the tile itself, defeating the purpose of going with a non-traditional tile shape. The (extra thin) gray grout line is quiet but lets the kite tile really shine.
 photo by sara ligorria-tramp
In the upstairs hallway bathroom, the beautiful shower tile already had so much texture and visual movement, so going with a gray tonal grout brings down the visual clutter that could have occured with a higher contrast grout.
 image via jackapole hotel
Gray doesn’t just have to be a “hushing” tile agent. I’m pretty obsessed with this bathroom color combo of terra cotta and gray. It feels moody, luxe and more down to the earth than having used, again, a white grout (I should go and rename this post “why not to use white grout.”)
Brass Inlay
 image by tessa neustadt | from: the final big kitchen makeover post
Anyone who’s been following Emily for the last several years will absolutely remember this brass “grout” line. It felt special then…and now. You can read all about how she decided the layout of the brass and the cost (spoiler alert: at the time, it was $32 per 8-foot length), head here.
 image and design via artisan signature homes
As you saw from Emily’s old kitchen and the one above, the brass insets work particularly well with marble, but I’d love to hear if you’ve seen it with any other tiling material as a backsplash.
 image via oh joy!
Now, onto floors. Friend of the brand Joy Cho of Oh Joy! is in the process of building a new home (which we’re following along over on Clever…are you?), and she snapped this photo a few weeks back of her brass grout lines, so for anyone who wonders if it’s still “happening,” why yes, yes it is.
 image via architectural digest | design by sarah sherman samuel
Ah, what do we have here? More of Mandy Moore’s house. I make no apologies. Anyhow, the sporadic geometric pattern on her floors made via brass insets on terrazzo are niche, yes, but still a showstopper.
Thick Grout Lines
And finally, something about grout that is unrelated to color. Enter, the thick grout line.
 image via yatzer | design by ted’a arquitectes
I’ve been seeing this pop up more and more and I’m VERY into it. I think it’s a really fresh, updated application to jazz up a basic square tile.
image via yellowtrace | design by ste. marieHere’s a space with a slightly less intense grout line, but it still feels stately and purposeful. Anything thinner might end up feeling like the sloppy work of a lazy contractor.
 image and design via sarah sherman samuel
Another Sarah Sherman Samuel triumph, she recently shared this photo of her upcoming master bedroom on her Instagram account and the thick-thin application feels so…new?
 image and design via bigger than the three of us
Here is a similar design from Bigger Than the Three of Us but in a black on black. I was wondering if the install process was any different for something like this, considering you likely weren’t using standard spacers, and they wrote the following: “We spent hours and hours installing the vertical black wall tile with a large gap. I think it looks amazing but it was a JOB. To lay tile like that, you have to install support boards for every single row. Those boards have to be installed and left installed until your mortar dries. Then, once you go through that whole process (which takes A LONG TIME), you get to try your hand at grouting a traditional grout line as well as an inch and a half grout line. You need different grout consistencies for both of those. I wouldn’t recommend laying tile how we laid it unless you are aware of the time investment that you need. I’d say that whatever time investment you need to lay a typical backsplash, then times that by five and you’ll have the time needed to lay this one. ” So, be warned if you want to embark on this journey, it’s…a process.
And that’s it! Five grout ideas that have been catching my eye recently. Any here you’d be interested in trying in an upcoming project of your own? Any you DID try and loved/hated? Let’s hear it.
The post 5 Fresh Grout Ideas & Trends That Should Be On Your Radar appeared first on Emily Henderson.
October 9, 2019
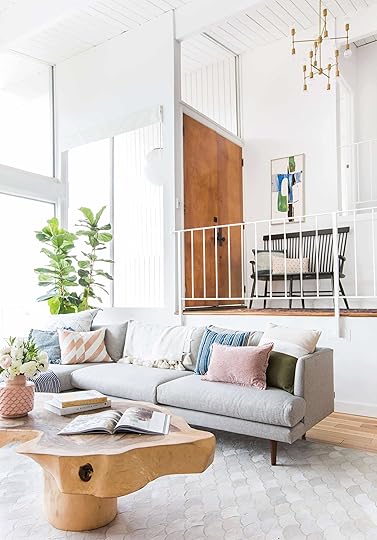
Our Living Room Update: What’s Next? (Moodboards + Sofa Debates)

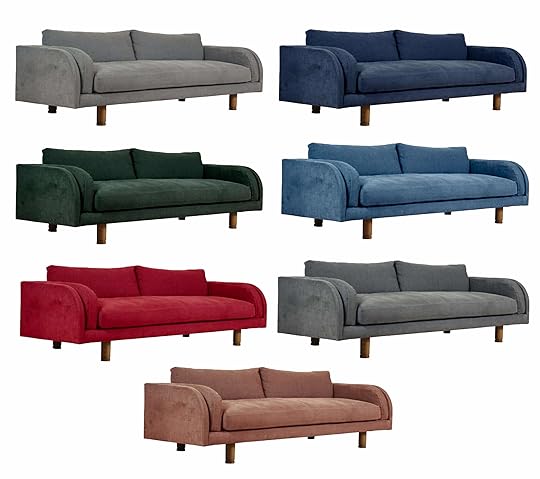
Yesterday, you saw (and commented on, thank you!) my living room update and boy did you have enlightening opinions. I’m actually going to take the ones that most of you agreed on and well, experiment with them, but meanwhile, I have been secretly shopping for a new sofa (even before I brought this Article one down here…even though now, I’m wondering if I should just keep it?!). So today, I’m going to walk you through my thought process on what sofa might be next, if any, and how that would change the room.
But first some inspiration, and to be honest, I haven’t found enough. I’ve struggled with marrying the traditional style of the home, this long room in particular and my innate love of midcentury. Plus, the fact that we have kids, like “things” and want it to feel minimalist yet interesting. So here are some:
 image via elle decoration | design by kristin lagerqvist
Those people are cool; that’s not up for debate. But what is is how I can bring in that personality without adding even more contrast and clutter.
 image and design via o’connor and houle
Classic Windsor + cool art = I suppose that is something I’ll always love, RIGHT?
So while shopping, here is what I’ve been really drawn to, sofa-wise:
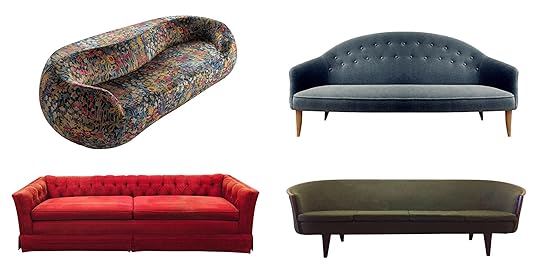
This collection is all vintage, and ones that I’ve loved but am not opting for for the following reasons.
Floral sofa: This is a statement and one that also looks comfortable and kid-friendly. It’s in LA so I could go test it out, but it is incredibly expensive (over $10k) so why go try on a wedding dress you’ll love but can’t afford and then cry about?
Blue velvet sofa: I love the curved back of this one that lends itself to the Danish traditional style. It’s so beautiful but again, above our budget (weighing in at $8k). Plus, it doesn’t look comfortable and we need extreme comfort in this room.
Red tufted sofa: This one is more affordable ($1,600) but I would reupholster it in a color that would be more timeless (adding about $1,500 to the price of it). I would put the same colored fringe on the bottom, to match the upholstery but it still feels like a risk as I felt my last tufted sofa was too traditional for me (plus would that low back actually back comfortable?)
Green curved sofa: This one I felt was PERFECT stylistically. It’s simple but special, long and the scale was great, but the cushions nor depth would fit our comfort expectations. Plus, it was also expensive.
So we nixed all of them and started looking at new pieces.

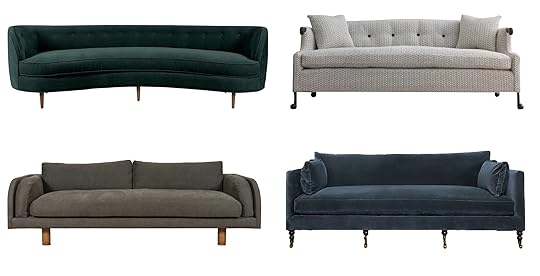
Top Row: Left via Jayson Home | Right via Interior Define | Bottom Row: Left via Shoppe Amber Interiors | Right via Anthropologie
Navy fringed sofa: This lady from Jayson Home is a modern Victorian chesterfield piece that I could see working in here except for the fact that it’s not long enough. We need at least 96″ so we’d have to customize which is an option, but kept me shopping.
Chaise sofa: I love the chaise of the one that we currently have so was drawn to this Interior Define sectional (designed by friend Maxwell Ryan of Apartment Therapy—see it in blue velvet in Arlyn’s living room for reference). I have had the sofa version and it’s really comfortable and deep, and the low back looked great in this room, letting the windows shine.
Beige modern sofa: Amber Interiors makes this simple, deep and comfortable version that has a low arm and low back (a profile we like in this room because it keeps it feeling open). I still love it and think it’s classic for sure.
Curved sofa: The room might lend itself to a curved sofa because of the bay window, so I started exploring rounded sofas. This would open the space from the entry, and still looks comfortable, but I didn’t know if it was something I’d love long term in another house if we moved. But it’s more affordable (around $3k, from Anthropologie) and it has personality. I also feared that it was trendy, and not as comfortable as we’d need but again, I never saw it in person.
Top Row: Left via Modshop | Right via BDDW | Bottom Row: Left via Lawson Fenning | Right via Lulu and Georgia
Green sofa: The top left is from Modshop and the curved back, customizable fabric and relative affordability and fast lead time is attractive. I still feel like I should go check it out in person (they have a store here in LA…and yes, we can choose any fabric which is attractive).
Printed white sofa: The top left sofa is one of my favorite sofas of all time from BDDW. Those feet. Those hands. I’ve never loved a sofa limb before and, yes, it’s customizable, too. It has that mix of “modern traditional” in the edgiest, coolest way which I want for this house. Sadly, it’s over $20k (listen, it’s designed and made in the states, beautifully constructed…a real piece of art) so we are opting for our children’s college education over this one.
Gray curved arm sofa: The bottom left (from Lawson Fenning) is, well, perhaps the winner. I found a vintage version of this once and freaked out about it, in a “that’s my sofa that my soul has always wanted” kind of way. The rounded arms are great for the “visual invitation” that I want for this room (high arms can cut off a room if you are entering from the side of it). The single bench seat is comfortable (I sat on it, it’s a 10 on the comfort level). It has all the shapes that I want—round and square—and is totally customizable when it comes to the fabric. It’s in the $3,500 to $5k range which is a lot. My one big fear is that if I spend that much on a sofa (sure, my dream sofa), that it will be knocked off in 2 years and I’ll wish I had just waited for the copycats to save money. Dark, but true.
Navy velvet sofa: The last one is from Lulu and Georgia and I do think that it’s a modern traditional sofa that fits in this house perfectly. There are some length constrictions (might not be long enough) and color restrictions (comes in a lot but might not be exactly what I want or have the flexibility at least). But it was a strong contender and $1,500 cheaper than Lawson Fenning.
Considering all of that, I went to go sit and see the Lawson Fenning sofa and in not so shocking news, I fell in love with it. So we started playing with colors…
How would she look in my house? With the things that I already love?? Here are some options:
VERSION #1: A medium gray (with a hint of green in it) with vintage black leather chairs:
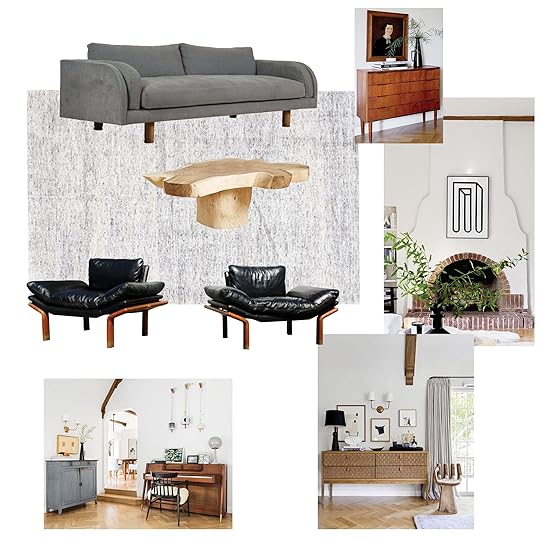
OH SNAP (the G-rated version of my real thoughts). The chairs that I have currently I love for many reasons, but like love at first site unlike a comfortable relationship, when I saw these black leather ’70s weirdo chairs, my heart skipped, my breath sucked in and from what I read in my teen romance novels of yore, that’s a good indicator that I’ll love it for a long time. Or maybe not because I’m me and being me means a level of furniture fickle that annoys even, yes me. I could give back the original chairs to Midcenturyla or sell them here, and I have a decent credit towards the company that sells these new chairs so they aren’t a fortune for me and would make up the cost ($1,500 for the pair). At the same time, I’m worried about how shiny the black leather is and I’d likely have to refinish the legs which would cost likely $400 for both. RISKY BUSINESS.
So naturally, the next question is WHY NOT A PINK SOFA???

I went fabric shopping on Saturday and brought home a bunch of options, with a rose linen as one of them. It looks soooo pretty and warms up the room so much, but it’s MAUVE and that concerns me long-term. If it were for a shoot or a client that was open to it, I would do/force this, but Brian looked at me with side-eyes and a “kinda grandma” comment and I’m also worried that in 2 years a mauve sofa is not what I will want. At the same time, I’ve always loved pink, it’s just the shade of pink that has changed. But look how good it looks with the fireplace???!!!!
Back to safety for a second:
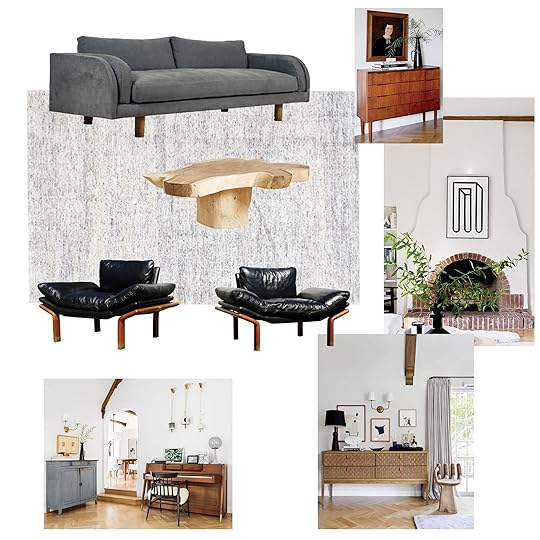
A light denim gray sofa (it’s bluer in person but not BLUE) with the vintage black chairs. I get my hit of blue (kinda) and yet these dope chairs that as forementioned do in fact make my heart skip that beat. HOWEVER, I haven’t seen them in person, sat on with my butt cheeks, or assessed how shiny that leather is, so I’m nervous. There are risks in buying vintage online. There are.
Next, denim sofa with vintage eclectic chairs:

Last week when I was planning this post, I was like, wait, why am I conforming to symmetry? I don’t believe in a perfectly designed room and never have, so let’s shake up those chairs!!
I remembered that I have this awesome vintage Børge Mogensen chair from the flea market that I can either live with as-is or refurbish/refinish/reupholster to make it the perfect color. And then I’ve ALWAYS loved these Adrian Pearsall UFO chairs that are huge and graphic in such a playful way. Why not correspond the fabric and create a room that is truly UNIQUE. One is more square and visually light, the other is low and round and grounded. They are meant for each other. Sure, there are some risks (they might not look that great in the room). The Adrian chair might be too big. The wheels might prove terribly annoying. The Børge chair might be uncomfortable. The investment in them might not be worth it. But if we reduced the stuff in the back as many of you want me to do then are two eclectic vintage chairs perhaps the most interesting choice? And if your answer is yes, then do I do that blue-ish denim sofa with them or the medium toned gray one? And if you are like Brian, you might not even notice the difference in their color (to quote him: “what the eff are you actually talking about?”…we’ll explain it to him later). Living with a designer who is a laid-back perfectionist is a real treat, I promise.
So what say you? Keep as-is? Medium gray sofa? Rose sofa? Denim blue sofa? Black leather chairs or the charcoal chairs we already have?
The post Our Living Room Update: What’s Next? (Moodboards + Sofa Debates) appeared first on Emily Henderson.
October 8, 2019
A Quick Update: The Changes I’ve Made to My LA Living Room

It’s been a while since you’ve seen , and boy are there changes. Why? Simply because it brings me so much joy to rearrange my house and tweak styling in an attempt to have my house reflect the personality, style and comfort needs of my family. It’s a hobby that was turned into a career and like all accidental creative business owners, there tends to be way less time to do the stuff you love (i.e. styling my own house). So In my ‘spare’ time I’ve been playing around and with no deadlines (on this room, at least)…it’s VERY fun.
This room has such great bones and beautiful light, but it’s never felt done done. And maybe nothing ever totally is, because your style and needs shift, sure, but I never felt the reaction to this room that I do to the living room in the when I walk in. There is a reason why I haven’t thrown any parties or events here, but couldn’t wait to have a reader event up there—I wanted to show it off!
So here is where we started, as you know, almost 3 years ago.

It’s warm and inviting and yes, full of life, but ultimately too much stuff for us and too traditional for me, mostly because of the rug and sofa combo. I do think it’s interesting and layered and full of personality, though.

Yes, there are times when I wish I had kept that rug, and just replaced the sofa with something more modern. Like maybe the rug got blamed too strongly for it feeling busy. A neutral, more modern sofa on this rug is perhaps all I needed to shift it. But I sold it years ago and someone else is loving it for who it is.
The Target chairs helped modernize everything, for sure, but one of them now lives in the mountain house living room and the other went to our last Feel Good Flash Makeover.
The coffee table now lives in the mountain house and is actually so perfect up there.

I’m still hoarding that chaise because the shape and scale are just so pretty and I have dreams of reupholstering it in a deep color, with the same color fringe. It’s probably 150 years old with original fabric so it’s absolutely falling apart and needs total restoration, but I’m willing to invest in it because it’s special. The blue demilune table now lives in my best friend’s entry and looks SUPER cute.

In this iteration, I brought in more color (some brighter teals in the shelves and art) in an attempt to make it more interesting.

The rug, sadly was pretty destroyed by my cats and we had to “mow” it every time we shot as it was unraveling. It’s now in my garage with a good chunk of it intact and I might cut it down into a smaller rug or have it bound in the exact shape of the kids play nook in the bay window…dunno.
Most recently, this is the version I tried out and showed you:
The green sofa I pulled from our TV room (it’s custom from Clad Home) and paired it with a BLUE antique rug (from Blue Parakeet), so similar in vibe to the red one but less “loud.” You can’t really see it in this photo, but in general, that sofa was just too small for this room and looked out of scale IRL. Plus, this room just didn’t make my heart pound and I wanted it to feel “cooler” and less heavy handed…once I figured out what that meant.
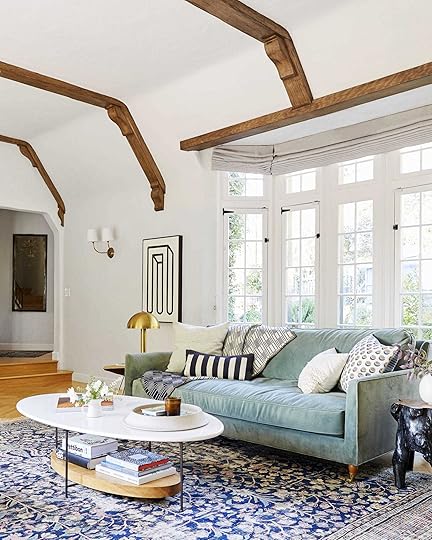
When I look at my past work, past living rooms, I always see this one and think, ah, that room was so pretty.
It was simple and light and still layered and interesting.

I kept that Article sectional up at the mountain house and when we replaced it with the vintage one, I was like, well maybe I should try that back in LA. Maybe THAT’s the answer…a more modern, simple sectional. So I did…

I’ve been living with the room like this for a month or so, and last week, I found this rug at HD Buttercup and it was incredibly soft, and just so simple and pretty. I took it out on “memo” (which means borrowing to see it in your space before fully committing) and well, we all couldn’t give it up. It’s not a shag, it’s just thick and so soft. I know you are all going to want to know about it and I’ll try to find a purchasable link (HD Buttercup only has a few rugs on their website and wasn’t too into working with us on getting a link for it…and I tried to tell them about the blog. 
October 7, 2019
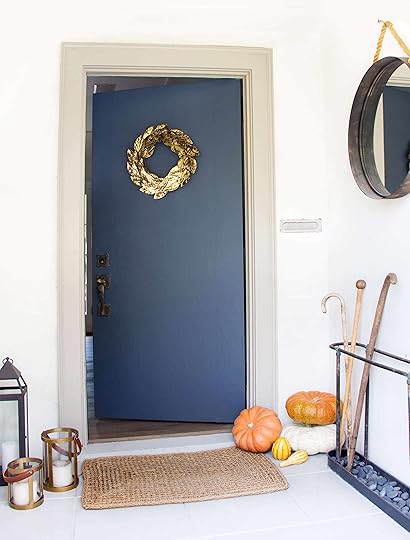
Self-Care For Your Entry: 9 Fall-Inspired Front Door & Entryway Combos
 photo by sara ligorria-tramp | from: make your home fall ready with 7 simple tricks
I could start this post off talking about the importance of making a good “first impression” and showing all of your neighbors, as they peek over at your house, that you are PUMPED it’s finally fall with your beautifully plaided and warm-toned porch (or front door) but I am not going to. No. Instead, I want to talk about some good ol’ fashion self-care…design edition. If you read this blog regularly, there is a good chance you love making your home look pretty and feel special. Me, too. Doing that is our part of how I “self-care.”
For me, it is the number one thing that makes me feel good (when my home is clean and pretty) and equally the first thing that makes me feel off if things are in disarray. So how I look at it, changing up your front door/porch area with some seasonal decor love is about putting you and your family in a good mood every time you walk in and leave your home. I mean, I am nearly 1,000% percent sure there are scientific studies done on the positive effects of Christmas decorations so if you are up for it, I say start the seasonal good times rollin’ early…like now…this weekend?
To help with this, I created nine looks, in three different styles, for three different sized front door areas (front door, small porch and large porch) to get you inspired/do the design work for you. Let’s fall (pun intended) into our front door looks.
First, though, let’s take a look at some IRL front facades to get our creative gears churning.
Here’s a good ol’ throwback from 2016 where we styled out a friend’s home with some quick fall vignettes. This set-up is just enough “season” for a small front door area. The candles in the lanterns would be so pretty lit if you’re expecting company at night, while the gold leaf wreath says “fall” but like…glam fall to balance out the more classic stack of pumpkins.
 image and design via melissa brookes
Now, yes, this is “technically” a foyer (by Melissa Brookes), as in…indoors, but I think there’s some inspiration we can borrow from this. If you house has a decent sized porch, a rustic wood bench with a fall-feeling print pillow and just a pumpkin or two might be all you need to get into the seasonal game (and well, maybe throw in a wreath if you want to really drive the point home).
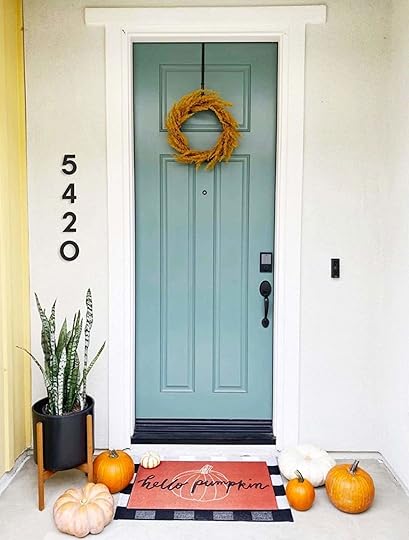 image and design via audrey crisp interiors
Fall front doors are typically all corn stalks and explosions of mums, but that doesn’t work with every house style. For something a little more “happy modern,” try a whimsical doormat, a smattering of pumpkins, and a delicate wreath.
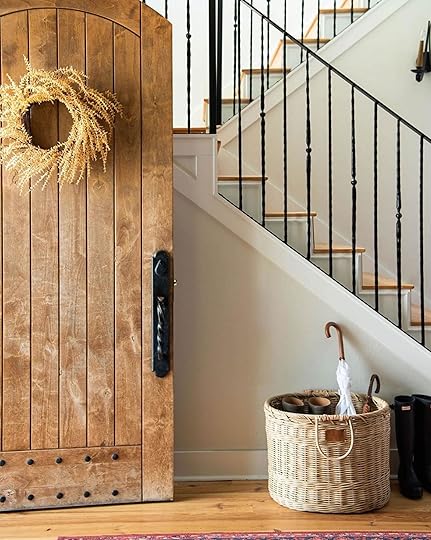 image via magnolia
Yes, another interior but I just love the simple, natural palette. A soft yellow wheat wreath and a rattan basket is subtle yet effective.
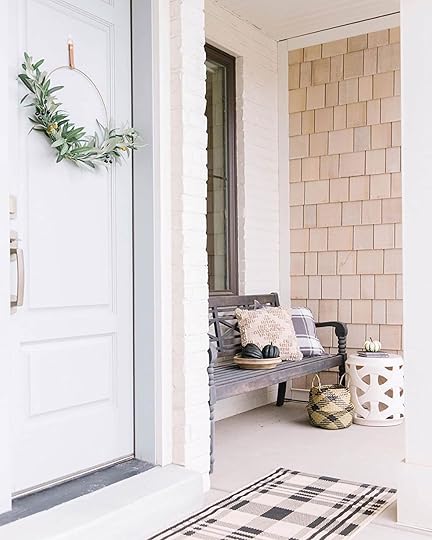 image and design via design love details
A bench is a great styling opportunity for seasonal decor. Swap out any textiles you have that might feel too summery for neutral textures and plaid (just add acorns).
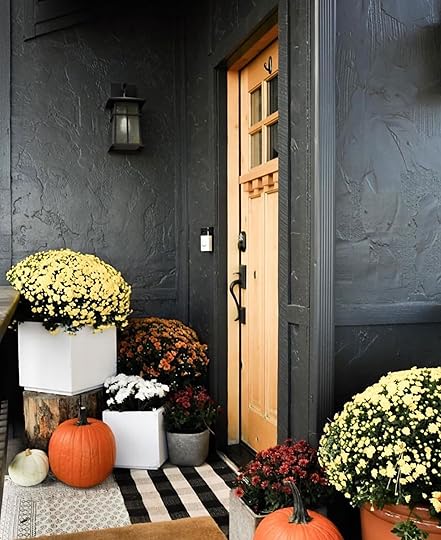 image and design via simplysuzys
For something a little more modern, don’t be afraid to mix in contemporary planters to offset the traditional vibes of mums and other fall foliage.
 image via crate & barrel
Alright, so this is a catalog shot from Crate & Barrel, so, not a real home, but I wanted to show it as an example of something that felt like autumn without screaming Instagram-y fall front facade.
Okay, let’s get to our product boards, starting with the cozy and casual fall front door…
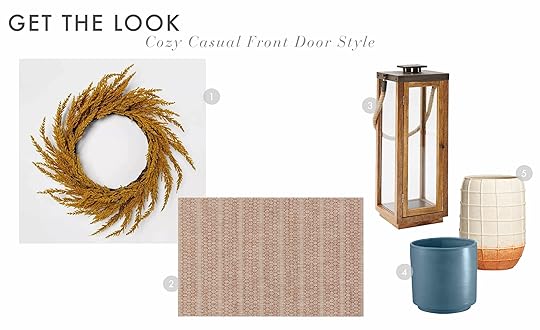
1. 22″ Artificial Goldenrod Wreath | 2. Geo Stripe Rug | 3. Wood and Rope Lantern | 4. Blue Round Planter | 5. Pescador Ombre Planter
This look is for the not-so-traditional seasonal decorator that still wants a hint of fall. We are all big fans of that faux wreath from Target. It’s simple but colorful and has a ton of movement. Then paired with the textures and patterns of the lantern, cream/orange planter and doormat makes it feel seasonal without it screaming. “HEY, I LOVE FALL.” And lastly, to really mix it up and add some visual interest, the blue planter is the perfect little cherry on top. Note the varying heights of the lantern and two planters. As in any and almost all styled vignettes, always mix up heights and pattern scales.
Onto the modern side of fall…
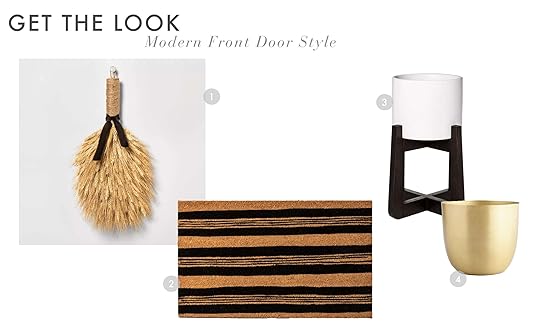
1. Preserved Natural Wheat Bundle | 2. 18″x30″ Door Mat | 3. Ceramic Planter With Stand | 4. Medium Brass Planter
While a monochromatic color palette isn’t the only way to make something modern, it is an easy way to go about it. That is exacly what we did for this cute combo. Instead of choosing the traditional wreath, I went with this very cute wheat bundle instead. Then, I opted for a modern patterned doormat (that would work year-round) with a natural texture to make sure the look didn’t feel visually cold. Then lastly, for the planters, I chose ones with clean, modern lines and made sure I threw in some gold to again keep the look still feeling warm despite the lack of color.
For our traditional front door…
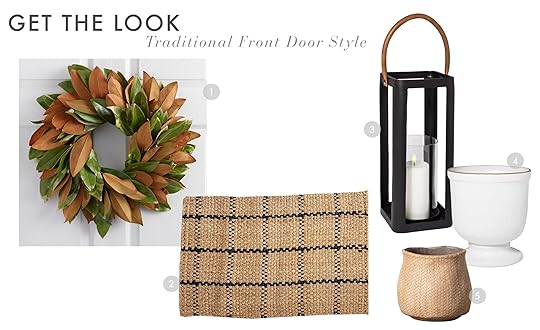
1. Live Magnolia Wreath | 2. Windowpane Jute Doormat | 3. 15.7″x7.2″ Metal Lantern | 4. 10″x9″ Ceramic Planter | 5. Planter Woven Cement
This look is also very monochromatic but with the softer shapes, cozier patterns and hint of green, it automatically feels classic. The wreath is beautiful (and real!), the rug is traditional in pattern but relaxed in texture and that lantern is another EHD favorite (hello leather handle). That beautiful footed planter and awesome ceramic woven cutie together are under $50. Winners!
Moving on up to our next size category…the small porch.

1. Modern Concrete End Table | 2. Outdoor Lounge Chair | 3. Sunbrella Rust Canvas Outdoor Lumbar Pillow | 4. Plaid Cotton Throw Blanket | 5. Red Broom Corn Wreath | 6. 18″x30″ Striped Tufted Door Mat | 7. Round Wooden Planter | 8. Livorno Planter | 9. Metal Lantern
A slight size upgrade (room for a chair and side table) made this small porch so inviting. I want to know the cool people that live here and sit in that chair while I stare at that beautiful wreath. Fall doesn’t need to mean dark and moody colors. Brighten it up with say, this happy yellow throw and light terracotta accents. But to make sure this porch didn’t feel too spring-y, I added those doses of black to ground the design and help welcome in the cool fall air. Dark colors do that, right?
This next modern look is one of my favorites.

1. Logan End Table, Anthracite Grey | 2. Montego Lounge Chair | 3. Preserved Myrtle Leaf Wreath | 4. Honeycomb Faux Fiber Indoor/Outdoor Lumbar Pillow | 5. Woven Throw Blanket | 6. Market Stripe Doormat | 7. 14″ Cylinder Outdoor Lantern | 8. Hexagon Stoneware Planter | 9. 26″x9″ Brass Planter With Stand
Like most of these designs, I drew color inspo from the wreath. The simple rust color is modern but warm and looks perfect with that throw blanket. How sophisticated would you feel sitting in that chair, draped in that beautiful throw sipping a cup of coffee? I think very. It’s important with any simple and modern design to keep the lines and patterns also simple. A touch of metallic like that planter with the stand will also almost guarantee a more modern feel.
Shall we get traditional?
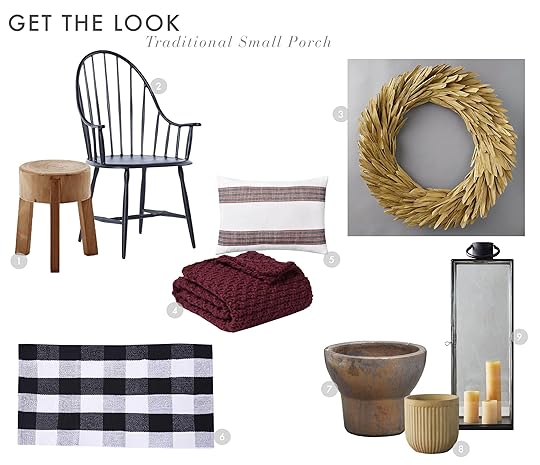
1. Roger Stool | 2. Henry Chair | 3. Preserved Corn Husk Wreath | 4. Chunky Knit Throw Blanket | 5. Striped Throw Pillow | 6. Cotton Rug Buffalo Check | 7. Copper Earthenware Planter | 8. Fiber Concrete Barrel Pot | 9. Slim Iron Lantern
Traditional doesn’t need to mean a ton of ornate, detailed old pieces. We here at EHD like clean lines in traditional shapes like the chair, lantern and planter. Since the chair, throw and doormat (washable) look a bit on the traditional side, I chose a more modern wreath and side table to keep the overall look fresh. Plus, add a green wreath and/or a reindeer and you my friend have a very pretty winter small porch situation on your hands.
It’s time to go big and then go home…large porch time.
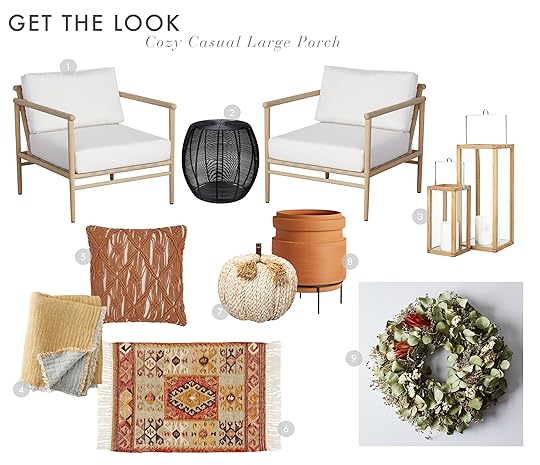
1. Grove Teak Chair | 2. Black Wired Stool | 3. Crosby Natural Teak Lantern 24″ | 4. Reversible Lightweight Throw | 5. Saffron Macrame Indoor/Outdoor Throw Pillow | 6. Cleary Indoor/Outdoor Flatweave Rug | 7. 9″x8.6″ Water Hyacinth Pumpkin Natural | 8. Brice Extra Large With Short Modern Metal Plant Stand | 9. Dried Protea Wreath
Lord, I love those chairs. So chic and versatile. But to make this look cozier, I threw in warm-toned textiles that are full of pattern. Now, the wreath doesn’t scream fall, but it’s beautiful, neutral and has that perfect pop of color. As as we have said 108943 times, the easiest way to make a space cozy is to add texture and this look has it in droves. The pumpkin, side table, planter…well actually just everything.
Alight, that’s enough warmth for one look. Let’s talk about the last modern combo…
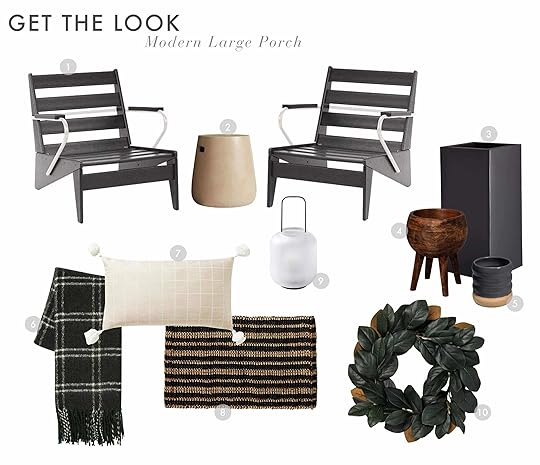
1. Modern Adirondack Lounge Chair | 2. Sand Side Table with Handles | 3. Blox 24″ Tall Galvanized Charcoal Planter | 4. 12″x9.5″ Standing Wooden Planter | 5. Elias Planter | 6. Faux Mohair Grid Throw Blanket | 7. Mayne Pillow Cover | 8. Multi Stripe Jute Doormat | 9. Modern Globe Lantern | 10. 22″ Artificial Magnolia Leaves Wreath
Well, this one is also warm (because of the texture) but in a cool way. I love the mix of pattern scale with the textiles and the splash of forest green and wood from the planter. There is a lot for your eye to look at without feeling overwhelmed. Also how cool is that lantern??
This last traditional look is traditional but with a twist…
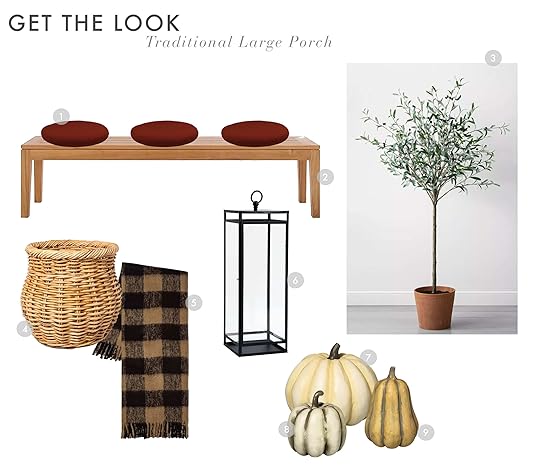
1. 16″ Round Sunbrella Outdoor/Indoor Seat Cushion | 2. Regatta Natural Dining Bench | 3. Faux Olive Branch Plant | 4. Rattan Basket | 5. Buffalo Check Faux Mohair Throw Blanket | 6. Maxwell Lantern | 7. 11″x10.5″ Papier-Maché Pumpkin | 8. 6″x6″ Papier-Maché Pumpkin | 9. 9″x6″ Papier-Maché Gourd
I wanted this look to still feel really fresh. To achieve that, I chose a bench and then added round warm-toned seat cushions. This way the colors and shapes are traditional without feeling old. Moving over to the right, that tree is faux people! I would be the perfect (long-lasting) moment for a large porch. Plus, no maintenance. Then by adding the neutral-colored pumpkins (very traditional looking) and the slightly more decorative lantern, it keep it all from feeling too modern. The texture of that pretty basket and pattern of throw doesn’t hurt either.
October 6, 2019
The Link Up: Emily’s Favorite “Unmentionables”, Jess’ New Favorite Hand Soap & Chandler’s Eco-Friendly Flats
 image via Remodelista by Alan Tansey | design by vonDALWIG Architecture
Happy Sunday, folks and welcome back to The Link Up (aka our excuse to dish about what we are into this week). It’s officially October, which means everyone around these parts is starting to get into the spooky season spirit. We are planning our Halloween costumes, lighting fall candles, and trying to convince each other to throw Halloween parties (so we have a place to wear our costumes we’re thinking up). It’s all very exciting. In fact, we want to hear your Halloween plans and costume ideas (we won’t steal, promise) but in the meantime, let’s get to those EHD links:
First and foremost, today’s home tour (curtesy of Remodelista) is a modern eclectic dreamboat that we are pretty obsessed with (that day bed! that chandelier!). Head on over to check out the whole tour here.
From Emily: “I officially replaced all my underwear with these. They are extremely comfortable, cute and NOT a fortune—but here’s the trick: size WAY up. Seriously, way up. I wear a large and maybe a medium would have fit, but the large is extremely comfortable with all outfits. P.S. would you guys be into an “unmentionables” review blog post? Stay tuned…”
Chandler recently bought these flats from Everlane. They are really comfortable and easy to wear, and are especially perfect if you are on your feet a lot. Also, Everlane is just a really cool company that we all love because they are transparent on what factories they work with and what it costs to make the items they sell.
As an unfortunate hardcore Aesop handsoap lover ($$$), Jess was pumped (soap pun intended) when she visited her dad’s house and found a great alternative: Everyone’s Lavender and Coconut hand soap. It smells SO GOOD. It’s also super eco- and human-friendly but comes at a great price point.
Caitlin’s birthday is coming up (October 14th) and all she wants is this lime green (!!!) Overman Pod Sofa from Candid Home. It’s technically like, 10 inches too long for her space, but she’d make it work if she magically fell into $2,000. (Another favorite from her Chairish deep dives is this lil’, appropriately sized, bright orange cutie.) This link is her veiled way of asking her mom/friends/family for Chairish gift certificates.
Ryann loves shopping for clothes, but has trouble pulling the trigger because too often the clothes in her budget are cheap quality and don’t last. That is unless what she is buying is from The Real Real. From Ryann: “It is my favorite place to shop because everything is from designers and high-end brands, but for at least 50% off the retail price (for example, I just bought a pair of Rachel Comey heels for $75. A DEAL). Everything on their site is second hand, so you are also supporting more sustainable fashion by buying there. It’s a win win, my friends.”
From Arlyn: “I love a good suspenseful movie in general, particularly this time of year, but I don’t like gore or possessions or anything too scary. Willow Creek on Amazon Prime is under an hour and a half, and is so bad it’s good. It’s about a young couple making a Big Foot documentary (it’s fiction) and while it starts out a little silly, it will likely leave you scrunched up in a ball on your sofa by the end, wondering if the sound in your hallway is, in fact, a rogue Sasquatch.”
Carolina is back with another EHD-approved jumpsuit/one-piece. She has been on a hunt to find the perfect denim overalls and she finally found the perfect pair from ASOS. From Carolina: “They’re so good. They have a tapered leg and have the best black wash. If you don’t mind ‘non-stretch’ denim then these are great and affordable!”
Veronica finally caved and splurged on this Away Backpack and she is in love with it. From Veronica: “I use it every day for work and for any small weekend trips or as a carry-on bag. It holds so much and the pockets are super organized + it has a hidden zippered pocket on the back for your keys, wallet, passport, whatever you want more protected! 13/10 recommend.”
Speaking of travel another great product is this All-in-One adapterAll-in-One adapter that Julie recently used on her trip. This adapter can work anywhere in the world, it has multiple spots to plug in all the electronics you’d ever need and even has a spot for a USB port because we all lose those squares.
Bowser is VERY excited to read Fair Play by Eve Rodsky with her unofficial couples book club. She’s just started it and she’s already hooked! It’s “a revolutionary, real-world solution to the problem of unpaid, invisible work that women have shouldered for too long” and she cannot wait to get to the “real-world solution” part and to hear the male perspective(/reaction). Please read along and let’s talk about it!
Mallory is moving into a new (empty, and small) apartment soon, and seriously tempted by the things we link to on the blog, but she’s gotta start somewhere. “I’m buying all the simple, yet small things that I know I’ll need. My first purchase (which was also featured in a blog post) was this silverware. Well, maybe gold-ware? You tell me.”
Alright that’s all we have for you today. Thanks for hanging out with us. See you beautiful people tomorrow. xx
The post The Link Up: Emily’s Favorite “Unmentionables”, Jess’ New Favorite Hand Soap & Chandler’s Eco-Friendly Flats appeared first on Emily Henderson.
Emily Henderson's Blog

- Emily Henderson's profile
- 10 followers

