
Emily Henderson's Blog, page 240
November 18, 2019
STOP, THIS IS GREAT: A Hardcore Room Crush from October’s One Room Challenge
 design and photo by hommeboys
If you’ve never heard of the One Room Challenge, lovingly referred to as ORC (aka the-best-two-times-of-the-year), you’re in for a treat today. One of those two-times-of-the-year is NOW (yes!) and we’ve got a good one to share with you. For those that don’t know, here’s the gist: design bloggers sign up to commit to completely revamping a room in their home in six weeks (sometimes involving hefty renovations), sharing the results week by week with their readers (and anyone following the challenge). I, Julie, stumbled upon this visual feast of a project earlier last week, and think we all need to take a moment to pause and stare deeply at this room ’cause, um, can you say “details?” Every inch of this space has been meticulously thought out by designers Austin Carrier and Alex Mutter-Rottmayer from Hommeboys.
This now master suite used to be their office. I know this because I read all about the process on their blog and you can, too, here. The transformation is so impressive, from all-white walls open to the rest of the apartment to dark and dramatic. This beautiful space was introduced to me via a DM from none other than our lovely Caitlin saying and I quote “this headboard has me DECEASED.” Agreed, lady!
 design and photo by hommeboys
We have all seen our fair share of amazing feature headboard walls but this one is miles above the rest. The intricate design, mix of fabrics and integrating that beautiful Rejuvenation mirror (photo below), I am truly impressed. And I just have to share with you this part of their blog post regarding the headboard design:
“…but we had sooo many arguments over fabric that it was quite the headache getting on the same page. Austin wanted patterns patterns patterns and Alex wanted velvets with absolutely no patterns. Do you want to know the secret to working with your partner without trying to murder them? Lots of alcoh…compromise. We decided on striped fabric for the pill shapes in our headboard and velvet for the bendy parts which made both parties very happy. Honestly, contention sometimes breeds the best results because you have to think outside of your comfort zone.”
Did I mention they are also hilarious writers? Again, do yourself a favor and read their posts.
 design and photo by hommeboys
Once you are ready to finally peel your eyes off that headboard, you then realize that they not only Roman clay-ed their walls with a beautiful green from Portola Paint but also wallpapered the ceiling in that amazing Milton & King crane print. They truly thought about every aspect of the space, how to draw your eye and stop your heart on every wall.
 design and photo by hommeboys
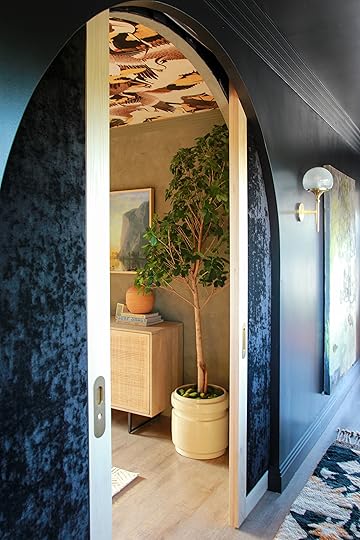
Now let’s talk about the other side of the room which balances out the statement headboard wall. The natural elements from the caning on the credenza and those arched pocket doors (WHAT?!?) and the nature photo on their Frame TV to the literal nature (the tree) in the room create a calm moment before entering the master bath (get ready).
 design and photo by hommeboys
But before we all metaphorically enter the bath, eye spy the cutest footed planter by ceramicist Carmen Ellis. The level of craftsmanship in her pieces is unreal and much appreciated by us all.
No, that door does not have a glass panel and yes, they did say on their Instagram Stories that they just walk through the opening. In said stories, they mentioned that right before revealing the space, the caning on the bathroom door broke so eventually this door will match the bedroom one.
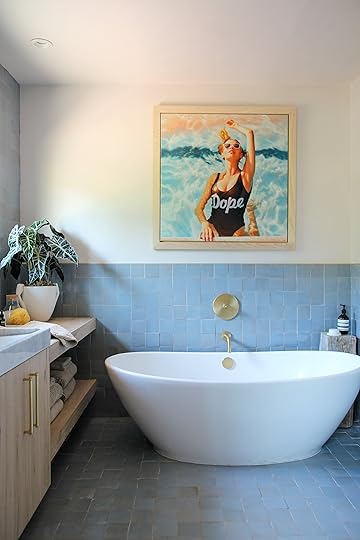 design and photo by hommeboys
The use of minimal finishes in the bath makes it truly feel like you stepped into a spa. And I could not believe it when they said that the art above the tub is a painting and not a print. I know, it is so realistic looking. It’s by a local artist in the Sonoma County area (where this home is located), Tati Holt.
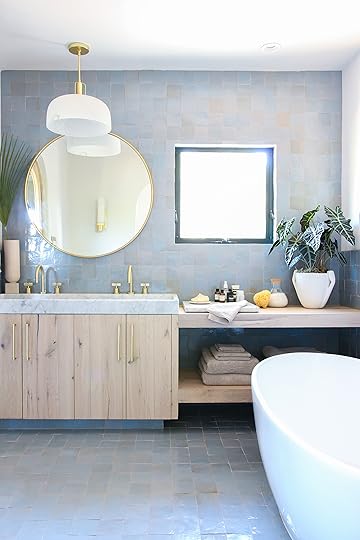 design and photo by hommeboys
They designed and custom-built this vanity by using leftover flooring, so smart! Read more about the details about this piece and those arched double pocket doors right…here.
 design and photo by hommeboys
Oh yeah, they also backed those doors with a deep blue velvet and by the way, this space is in a barn. It is safe to say that I am in love with this room(s) but are you? Leave all your thoughts, questions and comments below about this October’s One Room Challenge by Hommeboys. Would you wallpaper your ceiling? Put crushed velvet on your doors? Die to simply see this room in person?? Let’s talk.
The post STOP, THIS IS GREAT: A Hardcore Room Crush from October’s One Room Challenge appeared first on Emily Henderson.


November 17, 2019
The Link Up: A Happy Cry-Inducing Article, the Best $40 Air Mattress, Slipper-Like Socks & More
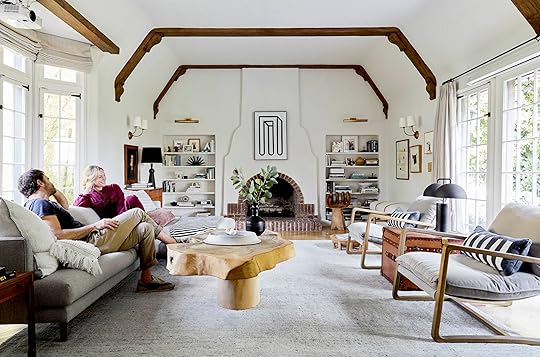
 image via Architectural Digest | design by Sawyer | Berson
Happy Sunday and welcome back to the Link Up. It has been a LONG week (is November going to last forever??) so we are just going to get straight to it:
No link up is complete without a jaw dropping home tour, and this one via Architectural Digest delivers the warm and eclectic eye candy we all deserve from stellar firm Sawyer | Berson.
Emily’s friend Suzanne (her now-neighbor who has a great eye for fashion and styles her for some of our shoots) has tried what feels like every single sleep mask and literally can’t sleep unless she has this one.
If you want to start your day off with a good, surprisingly emotional read that will make you happy cry, this article might do the trick (or at least it did for Ryann).
Velinda bought these slippers for a friend who’s been in a hermity mood this fall…easy, instant (inexpensive) coziness that’ll last beyond the season.
Caitlin is newly obsessed with this crazy affordable space heater. Someone on the team may or may not have left it on overnight this week (all is well and safe, FYI…won’t happen again) and when Caitlin came into the office the next morning, she was like, “holy crap, why is it so hot in here?” This thing is SO SMALL AND MIGHTY!
From Mallory: “This brow mascara tames the eyebrow beasts and I love it because I’ve always struggled to find something light enough for blonde eyebrows.”
Jess’ best friend Casey is a modern traditional style gal and was on the hunt for a bed frame this week. After a few different options, they both decided this beauty was the perfect option! It looks traditional in shape but modern in fabric, is super affordable and she loves that it’s from Amazon so free shipping.
From Arlyn: “It’s that time of year again! I don’t use my air mattress THAT often, so I didn’t want to spend $200+ on a fancy pants version. This one from amazon (about $40) has come in handy for guests and also myself several times, has a built-in pump, is decently comfortable (you know, for an air mattress) and stays inflated all night. What more can you ask for?”
Veronica bought this duvet in navy blue last year and fell in love the second she put it on her bed. “It’s fluffy and comfortable, and relatively breathable all for an affordable price.”
Sara says: “When I wanted to make pumpkin muffins last week, I went into it forgetting that I didn’t have muffin liners. Once I realized it, I shrugged it off and figured I’d just grease my muffin tin. BUT THEN I found these while digging through my baking box (still unpacked) searching in a last ditch effort for any sad crumpled paper liners. I forgot that my mom had gotten these for me years ago. THEY WERE AMAZING. My muffins popped out of these little guys so easily and I was able to use them for a second batch a few minutes after the first batch came out. Plus, they’re reusable, and much sturdier than their paper counterparts so they can be used for other things (like snacks or mixing up multiple colored frostings, or sauces).”
Julie bought a pair of these cozy socks from Target and went back the next day to buy two more. “It’s barely cold here in LA but I’ll take any excuse to make myself feel like I’m wearing slippers all day, every day.”
And lastly, we really love Elissa Barber’s single line drawings of ladies. Her style is so minimalistic yet unique! Her new collection just launched this week, go check it out!
That is all we have for you today. Same place and time tomorrow? See you then. xx
The post The Link Up: A Happy Cry-Inducing Article, the Best $40 Air Mattress, Slipper-Like Socks & More appeared first on Emily Henderson.
November 16, 2019
EHD Favorites: Our Tried and True Recommendations for the Best Bras & Underwear

Earlier this year, when Emily recommended this bra in a link up, you all went nuts for it. After that, we all had a good belly laugh about doing an EHD tried and true ~unmentionables~ post, but then it occurred to us that we would actually want to read that post. We all wear underwear, we have different bodies, different needs, and we talk enough about bras in the office as is. A small part of what we do here on this blog is give our recommendations, not as experts on everything but as humans who enjoy passing on good information and real honest reviews. Wouldn’t you tell your best friend if you found THE best bra for F-cup boobs?! Well, today you are our honorary best friends because we are getting real about the skeletons in our underwear drawers. And boy do we have strong THOUGHTS and OPINIONS on these things (namely, the boob cages) we put on our bodies day in and day out. Ready to dish? Great, let’s get to it.
Best Bras

Emily: Prima Donna Twist A La Folie Underwire Bra, $132
“I only wear one bra (three different colors) and have for YEARS. As I’ve mentioned before, my ladies are secretly big and while I’m by no means trying to reduce their impact, I also like them to be properly in their place. I got fitted a few years ago for this bra, and I’ve never gone back. It lifts, sculpts into a nice shape and is SO supportive but it’s still pretty with lace detailing!!! I just feel confident and secure in them, and my clothes fit FAR better than with most other bras that just don’t do the job. They aren’t cheap but they last for a few years (at least mine do) and this specific one is the only one I buy.”
Arlyn: Elomi Matilda Convertible Plunge Bra, $69
“I’m pretty sure I was a solid C cup by the 6th grade, and yet somehow, by the age of 30, I had bloomed even further into a GG/H (and that’s UK sizes folks). My breasts are g-g-gargantuan and heavy, so I need bras that are supportive and frankly, decent looking. AND THIS IS THE ONE. I have three of these bras by Elomi and I’m not stopping. I have it in blue, nude and black. Round, perky boobs with just enough cleavage when I want it. The straps stay put, the cups stay put, it’s unlined (LIFESAVER and absolutely necessary to not add even more bulk), the center plate is flush and low enough for a v-neck, the side wire doesn’t come up too high making my armpits ache all day (something I find with Panache-brand bras that I also love but that dang wire is just too high) and it looks nice, ya know? My one and only gripe is that the embroidery texture can be seen through certain fabrics, but because it is essentially impossible to find non-padded, smooth T-shirt bras in my size, I just deal with it.”
Velinda: Simply Perfect by Warner’s® Women’s No Dig Seamless Wireless Bra, $20
“Bras, yes. I’ll get to that. But I need to seize this opportunity to publicly shame my wife for being WRONG (typical, typical). I found the most comfortable bra EVER at Target. It’s so good, I never let Katie have a turn wearing it. When she finally had the chance, she made fun of me for accidentally buying a maternity bra. I didn’t care. Breastfeeding or not, I loved my maternity bra and the snaps that lead her to make a very WRONG assumption. While researching this post, I discovered the snaps on the front straps are to make the bra-straps flex between criss-cross or not… which means this soft, supportive but wire-free bra is even MORE brilliant than I thought. But my wife is not. It’s exhausting always being the one who’s right in the relationship, isn’t it?! If my wife sees this, I’m in so much trouble, so this stays here. But seriously, try the bra.”
Ryann: Calvin Klein UO Exclusive Modern Cotton Triangle Bra, $36
“My boobs fluctuate A LOT. If I lose or gain weight, it shows in my boobs first. I am a 34 D right now but next month I may be a C. This back and forth between bra sizes is why I buy cotton bralettes almost exclusively—not for support, but for comfort and for the sake of my bank account (if my boobs had it their way I would have 10 bras in all different sizes). The reality is, I cannot rely on a size D underwire bra only to find out in a week that it no longer fits. Cotton bras allow room for growth or shrinkage. I can tighten the straps if my boobs are shy that month, but can still fit in them when my boobs decide they want to be show stoppers. This bra is perfect for my conundrum. It’s affordable, comfortable, supportive enough, and has straps that can tighten/loosen.”
Julie: Women’s Unlined Triangle Bralette, $10
“I am not one of the ladies in the office who is well endowed and so I have my one and only bralette (okay, I really do have others) that I wear on the daily. It’s very comfortable and a little sexy.”
Veronica: Bra-llelujah!® Wireless Bra, $68
“Bought this bra (in black) after injuring my sternum in a car accident because regular underwire bras hurt to wear, and now I wear it all the time! It’s ultra-comfortable with no wiring, so you basically feel like you’re wearing the comfiest sports bra ever and the thick straps and clasp in the front ensure that the straps don’t fall off your shoulders. 10/10!
Best Sports Bras

Arlyn: Wacoal High Impact Sports Bra, $50
“Sports bra…HAHAHAHAHAHA. More like iron, super-strength boob cage. That’s what is necessary so I don’t knock myself out during a workout. I’ve done many things to tone down the bounce—TWO bras, a regular underwire bra + typical sports bra, two typical sports bras (nope). I finally found a few that were decent, but this one is my favorite. It wears like a standard underwire bra (i.e. no extra bulk), but the straps are heavy-duty and my ladies stay put. The center wires do come up a bit high for my petite frame but that’s a “con” I’m willing to live with. Wacoal carries American sizes so technically they don’t have my UK GG/H cup, but I find that their largest cup (H) still fits pretty well.”
Caitlin: Knockout Ultra Max Front-Close Sport Bra, $45
“Aiight, I have F cup boobs and this bra is a lifesaver (and I did ~elite sports~ for a few years, so you can trust me!). I do have to size up in the band and grab the DDD to make it work but HOLY CRAP, your boobs are not going ANYWHERE in this bra. You put it on like a shirt and clip it in the front (the first layer) and then you ZIP another layer on top of it. This is the only bra I’ll wear for things like running, jumping, and general cardio stuff.”
Caitlin: Free To Be Bra, $48
“Me again! This is my favorite bra of all time. I’m not joking: I wear this every day in my regular life. Is it as supportive as my Victoria’s Secret rec? No. Does it cover my nips and look cute? Yup. This one is functional, perfect for low impact workouts (and maybe even for high impact stuff, if you have a smaller cup size), and it is SO COMFORTABLE. It also has the fun benefit of confusing any dude who ever rubs my back (“what is going on here?” — like, at least three men I’ve dated) AND it actually looks good underneath tanks/dressers/rompers in the summer. DOUBLE DUTY BRA!”
Best Underwear & Spanks

Emily: All Over Lace Thong, $6
“I officially replaced all my underwear with these. They are extremely comfortable, cute and NOT a fortune—but here’s the trick: size WAY up. Seriously, way up. I wear a large and maybe a medium would have fit, but the large is extremely comfortable with all outfits.”
Jess: Lace Tanga, $13
“These are just really cute, some might even say sexy, and super comfortable! Plus, they are more affordable than Hanky Pankies and come in a lot of great colors.”
Velinda: Aerie Seamless Boyfriend Undie, $12
“You can’t beat Aerie’s deal for high-quality, comfortable undies. I love how many different choices, materials and styles there are to pick from. I like soft, simple underwear that feel and look seamless. This pair fits the mold.”
Jess: Thinstincts® Mid-Thigh Short, from $58
“I love that they are super thin and super comfortable. No pinching and the perfect amount of smoothing without making me look like I’m trying to become a Kardashian.”
Veronica: Stretch Cotton Logo Shortie Panty, $11
“I own these in a few different colors. They are the comfiest, softest underwear I’ve ever worn, and perfect for sleeping in. They make me want to do laundry more often so I can wear a pair every day.”
Ryann: Amazon Essentials Women’s Standard 6-Pack Cotton Stretch Thong Panty, from $9
“These are the underwear that I rummage through my drawer for every day, hoping and praying I have one left before laundry day is inevitable. They are comfortable, affordable, and don’t ride up in unfortunate ways. To top it off, I don’t feel like they are totally ugly period panties which is a win for me.
Alright, there you have it. Do you have any underwear recommendations that you are ready to shout from the rooftops (of the comment section)? We are all ears (eyes?).
The post EHD Favorites: Our Tried and True Recommendations for the Best Bras & Underwear appeared first on Emily Henderson.
November 15, 2019
Friday Finds: What We Really Want…That’s On Sale
 Photo by Sara Ligorria-Tramp | From: Arlyn’s Moody Dining Room Reveal Is All About The Insane Power Of Paint
 Hey everyone and welcome back to the second week of this little shindig we call Friday Finds. If you’re curious at all about why it’s named that it’s because, well, it’s Friday—obviously—and we have some unbelievably great deals we found for you! It’s pretty self-explanatory so you probably weren’t even wondering. Let’s just get to it, shall we?
This Week’s Steals:
I’d be lying if I said I haven’t been seriously considering buying this side table since Emily used it in the updated mountain house kid’s room and I can definitely confirm that I’m not the only one. But today’s a great day to be alive because it’s 20% off. *cries tears of joy*
Okay, this might not make your home feel special but it sure will make your body feel special and we like to throw in some fashion and such in here for fun. The brand Paige makes me weak in the knees (and not just cause Paige is also my middle name). But it’s an arm and a leg as you may know so if there’s any hope of buying it, it betta be on sale. Here’s potentially the world’s cutest jumpsuit for 60% off. (Speaking of jumpsuits…)
Do my eyes deceive me? Is this really a KING West Elm duvet cover with shams for $50 with an extra 30% off (if you use the code EXTRA). Yes. Yes, it is.
Arlyn just bought this cocoon coat at Uniqlo last weekend and LOVES IT (she’s normally a large, but sized down to a medium). It’s a wool-blend which is the perfect weight for LA’s wanna-be winter. Plus, it’s $10 off right now…
Need some chic coasters for the holidays?? These simple modern brass ones are beautiful and now $20 for a set of 4 (originally $48).
Emily’s favorite things in two words? Design and soup (and I mean, family, sure). You may remember she was highly resistant to the Instant Pot idea until she discovered how simple and easy it actually is to use (learning curves). If you’re trying to hop on board, here’s the ticket and the train’s pulling in right here at this hot Instant Pot discount.
We love a gallery wall, but no surprise here. Framebridge (the real secret to the perfect gallery wall as seen from Arlyn’s dining room wall) has 15% off this week.
Nordstrom is having their fall sale which means select items are 40% off through November 17. This sweater is one of my favorite finds (it’s super similar to the one Emily wore in the fall sweater shoot).
Speaking of Nordstrom, Nordstrom Rack is having a killer sale (up to 60% off) on their booties. These cuties (originally $140, now $70) are dangerously similar to the ones that Em tested in her boot review post ($132). We also love love these suede guys for $45 (originally $129) and THESE Vince boots that are now $130 (originally $295). WAIT we love these, too. WE. CAN’T. STOP.
This pillow is too cute to not let everyone know it’s now $40 (originally $68). Pom poms forever.
Get up to 70% off on Shopbop during their fall sale happening now!
If you’ve been dreaming of a canopy bed then boy do we have one for you. This modern beauty we have been drooling over is now $899. Okay, we know that is still not cheap BUT it is a savings of $300 dollars. That’s a pretty good discount if you are in the market.
A Brand You Should Know:

Blockitecture Big Apple Building Blocks by Areaware | Imprint Ceramic Mug in Ink by Danica Studio | Salon Tray, Large by Normann Copenhagen
Gretel Home is the place to go when you are looking for modern, whimsical decor and you’re tired of seeing the same ole same ole everywhere else. Not to mention, Abby Kellett, the brains behind the operation, is just the loveliest person and we believe in supporting and calling out the people behind a brand almost more than just the brand itself. Go check out Gretel Home for super dreamy (and well priced) home goodies.
See you next Friday for another round of deals (MORE LIKE STEALS) from the world wide interwebs. See ya!
The post Friday Finds: What We Really Want…That’s On Sale appeared first on Emily Henderson.
Trying Out Reader Suggestions For What to Do With My Living Room (No Shelves? New Layout?)

We had an open, serious conversation about “the day” for weeks before it actually arrived. My love of rearranging furniture is only matched by his hatred of the same hobby/task. But from the last post on my living room, so many of you had GREAT suggestions and we wanted to try them, both physically as well as with Photoshop. I needed Brian’s brute strength as well as his opinion as it is his house, too. So with a smile on our face and a proper meal in his belly (no hangry Hendo) we, with the help of Julie, Mallory and Sara, rearranged the living room (and Photoshopped) and “played” around to find out how it could be better. Brian doesn’t like to “play” this game, but I used my rarely played manipulation card and told him how important it was to you, and to the business. And guess what? WE LIKE IT MORE. And we are still married, so that’s pretty cool. He was actually a great sport.
Today, you get to see the options, read my opinions with the always interesting “WHY”?
Here’s where we were the morning of “the day” (catch up on how we got here, HERE and HERE):
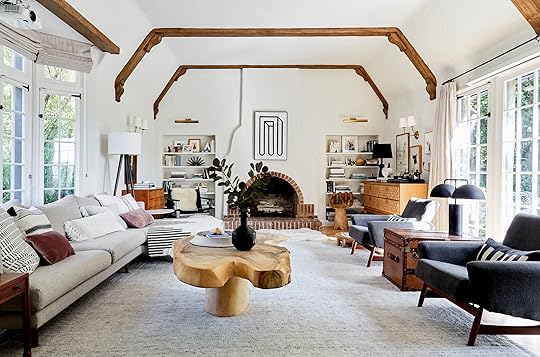
We’ve struggled with this room for the following reasons:
It has no place for a TV (and we don’t have a TV room) so orienting the room to be functional with a TV is impossible, thus the projector screen, which is totally fine but that’s why we face the windows (which is lovely and you can see kitchen from here so it is the best view).
It is our family and living room so all that furniture has to be COMFY and kid-friendly. Once you’ve owned a comfortable sofa (which news flash, are rarely cool/edgy/stunning), you can’t go back. Especially if you are one Brian Henderson (and I get it, no argument there). So making this room stylish and unique (things that, yes, are unabashedly part of my artistic value system) while being comfortable is HARD.
It’s a long room and while YAY for us for having a big room, it’s not so long that you can create zones (plus you don’t want to break it up in the middle of the windows) and so I’ve cluttered up the back trying to “engage the space.” Those bookshelves only provide about 8 inches of depth, aka a novel but I shove my coffee table books in there and they hang off precariously.
The first and most common suggestion/change came from reader Jessa who said this:
“I think you need to remove the credenza and the dresser. It’s just way too busy back there with the bookshelves – too many surfaces and too much stuff! The bookshelves are a great architectural feature – let them shine!”
So remove the credenza in the back we did.

While I love that Serena & Lily piece, it is nice to have less there and because of its height and depth, it felt too big. I also removed the tall standing lamp that was by the sofa which I miss light-wise but boy was it too tall to go there (at least from this angle).
Many of you commented to Photoshop out the shelves, and I was deeply curious myself if they were the culprit for the busyness.

I know this isn’t a fully done room. The art doesn’t look good and we need something to anchor the far corner, but we missed the shelves! Plastering over something original, despite them being shallow and not very tall, did seem crazy. I know that I could make this version work (maybe a tree and a chair/ottoman in the corner) but it’s not worth the risk (and expense) to do it.

I also tried just taking out basically all the furniture by the shelves, because some of you mentioned it was all too “junky” back there, so we took out the bench and the hand, too. And obviously, this is also too empty. Maybe with another anchor piece on the left and more art, but I think it falls flat.
Another way I was super excited to try was to face the sofa towards the fireplace:
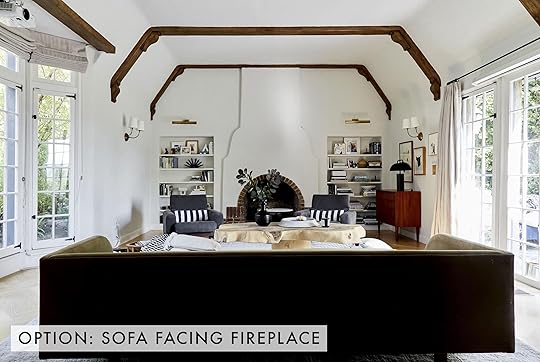
For this, we borrowed the Lawson Fenning sofa that we have been thinking about buying. It’s shorter than our sectional so we used it in this configuration. Now, we didn’t move the camera, but obviously this isn’t the angle that we would typically shoot it. Here is why it didn’t work:
The area behind the sofa (by the piano, which you’re not seeing in this shot) is so dark and becomes very unwelcoming.
There is nowhere for side tables on either side or you can’t get around into the room.
That sofa is REALLY low and it still really blocks the room and just makes it generally uninviting (you’d see this angle from the front entrance of the house and the kitchen).

A reader (Lydia) suggested the following:
“Have you ever tried a sofa running parallel with the piano and fireplace with a sofa table behind it? That would open the bay window up for chairs across from the others.”
Hmm…maybe? We staged these there by grabbing some chairs from the dining room and pretending there was a table between Julie and me (the photo above). It wasn’t compelling enough to make it work. The space (with this sofa size) is just too tight.
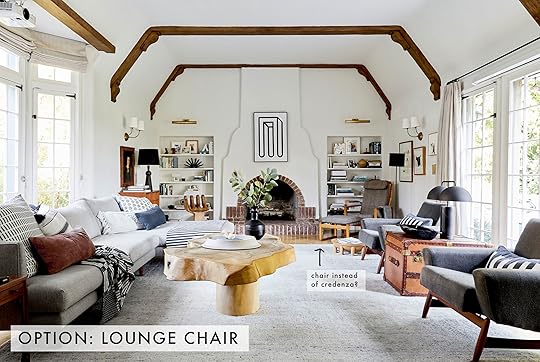
So we went back to the first configuration. But I was unsatisfied with the bench in the corner.

The corner (with the bench) felt like wasted space…like nobody was really going to sit on that bench in that corner…it was just for looks.
So I brought in the chaise lounge that I’m still hoarding (waiting for the perfect fabric) and I like it, but it’s a lot of upholstered pieces in a row. One of those chairs has to have some sort of wood arm, IMHO.

So we tried these chairs that I’m hoarding (and likely selling). I got them at the flea market for $300 a piece (I believe from vendor Makers & Smiths) and while I love them, they aren’t comfortable enough. But it helped show us that yes, a more streamlined, less upholstered chair would help.
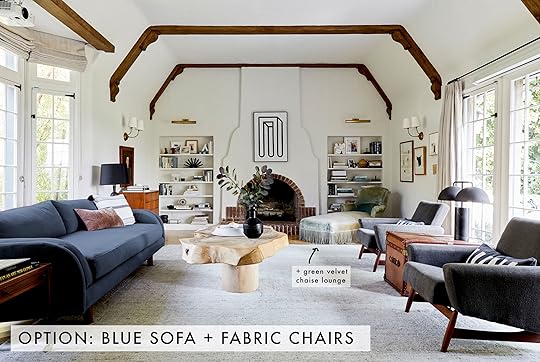
The sofa that we borrowed was a lighter khaki so we Photoshopped it dark blue and, of course, I like it way more than the beige on our rug.
Brian also told me that he LOVES having the chaise lounge on the sofa, which means we can’t have the chaise on the sectional AND the chaise in the corner.

And then I remembered that I have these two super comfy chairs in storage, that do have wood arms. It almost looks like a matching set, like we put all three pieces (sectional, two chairs) into our cart. But it also kinda works, it’s just not interesting. My favorite go-to combination is upholstered sofa + wood arm/upholstered chairs so I think that this could work, but I just wish that one of these pieces was more stylish or said something more interesting.
So then I thought that maybe I just need to put a pattern on the sofa…give it some weight through a throw or even reupholster it:

I have this Zak and Fox fabric that we are going to use in the kids’ room (if I ever get to it, I swear they are going to be 6 and 8 by the time I finish it and they won’t want to share a room anymore). It was too strong, for sure, but I’m still thinking that we need more quirk in here, so maybe it is a pattern—big or small.
For now, I added a darker throw and some stronger pillows that helped it work with the gray chairs. OH and I found this bentwood rocker that I got at a thrift store and wanted to try in here for some more “English quirk.”

I do like the quirk but it’s pretty busy against those shelves. it would work if the shelves were gone but I think we have officially settled on keeping the shelves.
BUT DON’T WORRY GUYS. I found ANOTHER chair and ottoman in storage that I love and have been hoarding for its perfect spot—the vintage number by Børge Mogensen.
It needs to be recovered and I could do it in some sort of pattern….
Then lastly, we Photoshopped the beams white and took down the art just to cut down the visual noise SOMEWHERE without having to nix the shelves.

There is a better balance to it, but I think that once we get another color on the sofa, it will need to be balanced with the beams being wood-toned (i.e. how they are right now).
And because Photoshopping options is so dang fun (thanks Sara!), I tried something else…
Should the sofa be pink? Let’s see:

Or floral? I’m desperate to bring in more pattern, color and quirk and nobody has loved floral fabric their entire lives more than me (post coming soon).
Meanwhile, this (below) is where we are at right now and I like it more, I do.

It’s super warm and inviting, with enough vintage to make it interesting. I’m still exploring a different sofa or maybe just a darker sectional (since Brian is now all of a sudden running for office on the “I need a chaise sectional” platform). I might be able to do a sofa with ottoman situation, but it’s going to take some shopping. Plsu, the chair in the corner still needs recovering.
Here is a little GIF with all the options:

Brian was such a good sport and didn’t complain even once which was impressive. He and his friend Derik started an Instagram account called @mywifemakesmemovefurniture and they are going to post this kind of stuff there. Derik’s wife, my good friend Annie, also has the disorder/desire to rearrange furniture obsessively and we know we aren’t alone.
So which is your favorite version? In the photos, I kinda prefer the Thonet rocker, just because it’s more interesting than the squared-off armchair, and I’m committed to using that pretty antique chaise somewhere in my life…
***photos (and Photoshop!) by Sara Ligorria-Tramp
The post Trying Out Reader Suggestions For What to Do With My Living Room (No Shelves? New Layout?) appeared first on Emily Henderson.
November 14, 2019
Another MOTO Reveal: Emily Bowser’s Happy Dining Nook (With Custom Cat-Friendly Banquette, Because Duh)

Welcome back, we meet again…this time in my dining room. This morning was the reveal of my living room, so head here if you somehow missed that but now it’s time to talk this little eating nook. Let’s get into it.
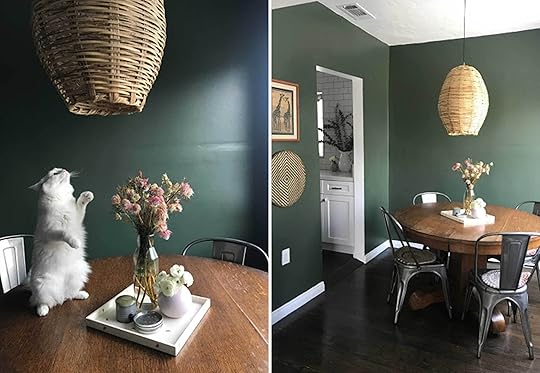 In process, September 2017. Can you even with Daffy? THOSE BACK FEETS!
I knew immediately that a banquette in the dining “area” was the best use of space. I call it an “area” and not a “room” because it is 7’5″ x 7’7″, it has two doorways (living room and kitchen) and is the main walkthrough to the kitchen. My house is a circle so if you really wanted to, you could walk down the hall, through the master, through the laundry and come in the back of the kitchen but generally, that’s not how we get there, especially when carrying in groceries. Putting an L-shaped bench on the two walls that don’t have doorways would allow me to push the seating and table into the corner a bit, opening up more room to walk. My existing dining setup worked for the meantime but Tolix chairs, although slim and timeless, are also very uncomfortable.
Let’s talk about the green that I know a handful of you will be bummed that I nixed. In photos, even in these bad iPhone pics, the green is really striking and pretty to me, not to mention Daffy really shines in front of a dark wall. In real life, the color was striking in another way…like, we’re in this light and bright room (living room) and there was a dark pit in the corner. It was separating the space too much when the idea was to open it up as much as possible. I really like this green though so I kept it for over a year before finally putting on Busy Philipps’ This Will Only Hurt a Little and painting a million coats to cover it up.
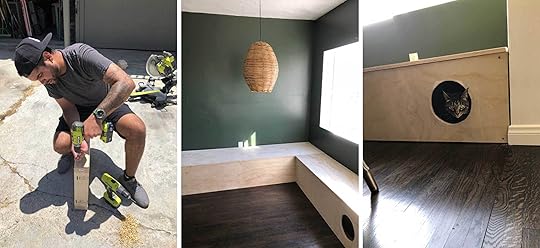
Before I repainted though, I convinced my brother Jacob to help me build a banquette. Look. How. Freaking. Cute:
 TA DA! (Ta-Done?). May, 2017
Ladies. He’s single. I KNOW. (also @Ryobi: let’s collab; I own every single one of your tools already!)
Basically, we (he) built two boxes with 2’x4’s and added high-quality plywood to the top and sides. If you want a tutorial, convince me to write it in the comments :). The side on the right was supposed to be storage but as we were putting it together, I was like OMG WHAT IF IT’S A CAT CAVE. He humored me. For the one Enneagram 6 reader who is concerned for the safety of the cats, the top can still fold up if the cats were stuck in there somehow.

Shop the Look: Round Pillow | Large Neutral Pillows | Rectangular Striped Pillow (no longer available) | Tray (painted, no longer available) | Incense Holder | Table (Craigslist) | Chairs (vintage) | Bench Fabric | Ribbon Art by Angela Chrusciaki Blehm | Chandelier | Roman Shade | Paint Color
The benches stayed in that unfinished condition for literally a year. I finally painted the space and the benches the same color (Polar Bear by Behr). A few weeks after that, I had the cushions made and of course, immediately thought WHAT WAS I WAITING FOR?? It’s crazy how nice it is to basically lay down while your husband eats a late dinner and rattles on about his newest horror short film idea. We use this space so much more now that it’s so comfortable. If you look closely, you will notice that there’s a stack of wooden dice; my husband and I regularly cozy up here with our Bulletproof coffee (what’s a post by me without a shameless call out to a brand I’m obsessed with) and play Yahtzee.
I used the same canvas as I did for the bench in my bedroom. Fun and cheap upholstery hack: upholstery fabrics can be expensive but canvas is relatively cheap (this one was $4.75/yd) and very durable. I discovered Pacific Blue Denims when sourcing for the tent fabric for the mountain house kids room and found them very easy to work with, they responded to emails and sent out samples quickly. I gave the upholsterer 10 yards and he gave me back leftovers. For reference: As I mentioned, the walls are 7’5″ and 7’7″ and the cushions are the length of the walls. The bench on the right is 19 inches deep and the back bench is 24.5 inches deep, the cushions are 3 inches thick. The upholsterer charged me $300 total for these cushions and recovering the bench in the bedroom. Honestly, I have zero money so is it weird to say it was worth it? You see how slow I move in my own space, so I’d still be sitting on plywood if I had put this on my list of things I needed to DIY.

Let’s get the vintage out of the way: The chairs are probably the coolest things I own. The best thing about them is that I bought them off our very good friends and we have so many amazing memories of games, parties and intimate dinners in them. The table is also vintage, got it for $100 off Craigslist from a Craftsman home where it apparently lived for almost 100 years. It’s on wheels and it came with three leaves that are tucked somewhere in my garage because I have hopes of owning a home one day where I can use them!

THAT. RIBBON. ART. I stole it. I’m half kidding. When sourcing art for the book shoot this year, Velinda and Erik somehow got this beaut from Angela Chrusciaki Blehm and when I saw it I was like “I NEED THAT IT’S MINE” (I didn’t, it wasn’t). But I guess I manifested that ish because when they wrapped shooting (they used it a bunch but you’re going to have to wait for that!), I “borrowed” it for my shoot and apparently here it will safely “live” until it’s needed for another project. Basically, I stole it.
After stealing art, my current (thrifted) light fixture just wasn’t working. The shape was too oblong and was blocking it so I couldn’t see it at all times. I wanted something that was going to complement it but not compete with it…easier said than done. When I saw the Isaac Chandelier by Schoolhouse, I felt like it was the light fixture that ribbon would have chosen for itself, slightly understated but definitely in a cool not try-hard way, so they could still be friends.

You may have noticed that the gorge linen “I’M AN ADULT NOW, RIGHT??” window treatments are very similar to the ones in my bedroom reveal. That’s because they are!! Barn and Willow sent these through at the same time. Window treatments are like the mascara of decor. I mean, sure, you can live without them but should you really go out in public without it? Coming from the person who does exactly that…very often. Same for window treatments I suppose. I cannot believe I lived without them, but I did—for YEARS. For the sake of privacy, for trying to sit on the couch and work anytime after 4 pm (sun blazing through the dining window specifically directly onto the couch), for trying to watch Survivor on a Sunday afternoon with the glare of the sun (and people’s eyes judging you). They’re also great for keeping this light and bright space cool on hotter days and also for giving the finished look to the room. They are beautiful and sturdy and very easy to install yourself. I got the flat style out here (relaxed in my bedroom) in Belgian Textured Linen Flax. There’s a handy-dandy measurement finder and have free shipping. I’ve been living with them for a few months now if you have more questions, head to the comment section!
 Chic cat scratcher by Mountain Pet Products.
Because who doesn’t love a little B&A (before and after), let’s take a look at the above side by side with what was happening prior to this:

I mean…it just feels so much more open, brighter, happier. The green was good, sure, but the white is better…in this space and for what both rooms needed.
I hope you enjoyed this journey. I’m done…for now, but you never know when I might pop back up with another treacherous story about my beloved money pit. See you in the comments!
***Photography by Sara Ligorria-Tramp, design and styling by Emily Bowser
Don’t miss other posts in this series:
Makeover Takeover: An Intro to Emily Bowser’s (Crumbling) Living & Dining Rooms | New Reveal: Emily Bowser’s Refreshed For Function Living Room | MOTO Intro: How EHD Stylist Emily Bowser Tackled Her Awkward Master Bedroom | MOTO Reveal: Emily Bowser’s Bedroom “After” is Unrecognizable from the “Before” | DIY How-To: A Step-by-Step for Making Emily B.’s Wrap-Around Velvet Headboard | MOTO Reveal: Emily Bowser’s 32-Square-Foot Bathroom is Packed With Small-Space Hacks | What It Really Costs to Buy an Income Property in LA (& Why I Thought It Was a Good Idea Even After Financial Ruin)
The post Another MOTO Reveal: Emily Bowser’s Happy Dining Nook (With Custom Cat-Friendly Banquette, Because Duh) appeared first on Emily Henderson.
New MOTO Reveal: Emily Bowser’s “Refreshed For Function” Small Living Room Makeover

If you’re here today, that either means you stopped by the blog yesterday to read the “intro” to today’s post or you’re like “who’s this lady and her two cats?” To answer the new faces, I’m Emily Bowser, lead stylist at EHD and this is my living room. If you already knew that, hello again…
We’re back new and improved! No more holes. No more rain falling into my home. Time to make these rooms feel finished. I mentioned yesterday that my old furniture fit pretty well into this space which made it low on the totem pole in the matter of importance when it came to spending any “extra” cash (what’s that??). Add that to the fact that less than a year after going $80,000 over budget in renovations that I had to drop another $20,000 and then 6 months after that an ADDITIONAL $20,000 on the back house, but that’s another story for yet another post. Point is, I had bigger fish to fry. Fish that came in the form of a crumbling foundation, or foundationS in my case. Two houses. Le sigh. That said, we also spend 99% of our time in this space so of course, the stylist in me had been day-dreaming about improving upon our situation although my wallet disagreed.
Here’s a reminder of where we started (or at least, where we left off before the real “after”):

These were my (not so) major issues in terms of decor:
Replace my 10-year-old couch that had lived through quite a few kitty fosters and had a bum leg
Create storage…but make it fashion. We’ve been over this but we have almost no storage other than our clothes closet and need to sneak it in wherever possible.
Figure out window coverings. Huge windows: YES, walking around naked: NO.
Get/make art for above couch that actually fills the space
Replace sconces on couch wall (current ones are too high for the art)
New rug? Clearly great minds think alike. I didn’t hate my Beni rug but I didn’t want to feel like my living room was too similar to Brady’s.
Maximize seating in the 56-square-foot dining space that is also a walk through to the kitchen (but more on that later today because the morning is just for the living room…come back after 11 am PT for the dining room!)
Enter: MOTO (Makeover Takeover). You all know this, but there are some serious upsides to working for Emily Henderson. One of the major ones is when you’ve spent over $200,000 renovating 1,300 square feet TOTAL, you can get a little help furnishing it through collaborations with amazing companies that appreciate the styled photos and press. I’ve talked about this before in the comments but would like to make it exceedingly clear here: I do not consider MOTO collabs “free stuff.” Here’s the breakdown: We do not work on these projects on work time. I have worked for Emily for three years and up until the day before we shot the space I was still putting finishing touches on it. In my “free time,” I am planning out, designing, sourcing, spending money so the room doesn’t literally collapse, emailing companies, finding/buying vintage items to keep the space interesting, designing, buying supplies and building DIYs, and finally styling the space to camera. This is to the benefit of Emily’s blog (which in turn pays a lot of people’s salaries) AND the companies involved. I know this is not an opportunity most people have, and I do not take any of it for granted, but it is WORK (though luckily, work I enjoy).
Big plus: In the end, I have a finished space that would have probably taken me an additional three years. Let’s get into the improvements, starting with…
 One more shoutout to that show-stopping handmade pendant by The Maison Craft.
Shop the Look: Pendant | Rug via Lulu and Georgia | Sofa via Article | Long Sconces via Schoolhouse | Short Sconce | Floor Lamp via Article | Credenza | Roman Shades via Barn & Willow | Frames via Framebridge | White Blanket | Ribbed White Vase | Black & White Boxes | (Everything else either vintage or no longer available)
The Rug
In my opinion, Beni rugs are classic. They had a huge comeback in 2015 but like white subway tiles, they never really go out of style. Brady clearly agrees and look how sleek and stylish he is!! (XO Brady). My job is to create content that is new and exciting though and Brady’s gorge living room has been on the blog multiple times over the years, so even though I would not have replaced it in other circumstances, I wanted Brady’s room to be his, and mine to be mine, if that makes sense?
I gave my rug to a friend (for free, because karma) and went on a hunt for the perfect replacement. The problem was I was really happy with the graphic, light and cozy aspect of my old rug and even though I found a lot of rugs I liked, none were comparing. Enter this rug, from Lulu and Georgia. I had pinned it over a year ago, but I was concerned because it read more gray than my former rug but it was cozy and graphic. That’s 2 out of 3. “Done is better than perfect” was ringing in my ears this particular week (the week I was making myself finish my bedroom MOTO) and I pulled the trigger. I reached out to Lulu and Georgia who is always SO lovely to work with (really, I can’t say enough good things about their team) sent it out right away! So fast in fact that I was like, “Sh*T I gotta finish this room!”
The gray wasn’t too gray at all and actually just made it even more livable. You may be surprised to hear this, but I didn’t have too much of an issue with a white carpet. However, the area where your feet sit next to the carpet was definitely darker even in our (mostly) shoe-free home (dust, etc., from the wood floors I assume) but this rug has just the right about of gray all over that you don’t notice wear at all. It also doesn’t shed nearly as much as our old rug.

The Sofa
When Andrew and I first got married and lived in a very small apt (2009 and 2010), we were so poor that we couldn’t afford a couch and we would just sit in our bed and watch Netflix on my laptop. This was about the same time I started following Emily and began to become interested in interior design. I remember taking screenshots of furniture I liked—this was before Pinterest—and arranging it on my desktop. One of those pieces was our well-loved couch that we eventually scraped enough money together to buy from Macy’s during a sale. That couch moved three times and lived through quite a few cats, including neighbor cats that would sneak into our apartment and sleep on it. I threw out on my Insta stories that I was giving it away, with all its bumps and bruises it’s still usable for sure, and our former neighbor (who owned the three cats that liked to break in) took it! CATSSSS.

I had a hard time deciding on a new couch. Our former couch was the perfect size and scale for the room so the pickings were slim. Most of the sofas that fit perfectly also looked pretty much exactly like our old one, which seemed a little boring, especially because I wanted it to be charcoal again so in that way it was already going to be similar. I played with the idea of a color and/or pattern but ultimately didn’t find anything that I liked that worked well with our burnt orange velvet chair or the pattern already in the rug. I loved the Quadra by Article but was nervous about the high arms, particularly on the side that was closest to the theater chairs and it generally feeling heavier than what was there. For three days I made my husband live with our old sofa in the middle of the entry/walkway so I could stare at a charcoal blanket that was painter taped to the wall and benches holding it up on the side.

Luckily I was right, it worked! Let me tell you everything I love about this sofa:
1. The shape is cool and edgy JUST LIKE ME.
2. The high arms make for perfect corner leaning.
3. The wide flat back is basically a desk.
As I type this, I am sitting with my back against the arm, legs reclined on the couch, laptop on the back. It makes for VERY comfortable typing. Also, my cats like to lay behind us while we are watching Survivor and I can turn around easily and kiss their sweet little faces. The Quadra is a modular couch that comes in a few different shapes so you can reconfigure to your liking. We simply got the left and right arm module and put them together to make a normal couch shape. If I had the space, I would have loved to have the chaise module. Just FYI, it’s a firmer couch (my personal preference) and we have the “carbon gray” although it also comes in taupe.

Article also sent through the task lamp in the corner and a secret side table. This lamp has been a staple at EHD for a while now and for good reason: it’s effortlessly cool. It was the exact size and shape I needed and has a small footprint so I could fit it and their slim side table in the very small space between the couch and wall. You could write (and in fact I think we DID) a whole blog post on lighting layering. I had the sconces, the overhead pendant, 2 ambient lights and I wanted a directional one, as well. ALL THE LIGHTS FOR ME!!
The super-secret slim side table (a name I really think Article should consider) in matte walnut is one of my favorite things because I love a multi-use piece of furniture. It fits in the smallest of places and has compartments, including an area for cords to live and if you know me you know I love hidden cords. Inside the back compartment, I have this power strip and everything, including a dimmer for the lamp, is plugged into it. DIMMERS FOR PRESIDENT.

Speaking of side tables, it’s kind of too dark to see, but my Nintendo Switch lives on the bottom right of that side table (vintage) and sometimes it’s a little aggressive for my laptop cord to reach over Andrew (MY side of the couch is clearly the Nintendo Switch side) so it’s good to have a phone charger and outlet on this side, as well. I bought these gray extra long iPhone cords and they blend in so much with the couch that we leave them out and just tuck them into the side of the couch so they don’t fall on the ground and get lost or trip someone.
The Art & Sconces
Guys. Did you notice…I have new art above my couch? I owned the frames from a Framebridge shoot I worked on with another stylist (HI Cat Dash) quite a while ago. Ever have this photo come up in your Pinterest feed:

I took that triptych home and had it on my wall with those printed from a home printer basic photos for…over a year? The frames fit nicely though so I had a genius idea. GENIUS. I went back and forth on whether to admit this BUT COME ON HAVE I EVER IN THREE WHOLE BLOG POSTS HIDDEN ONE THING FROM YOU?? But really, have I? Julie, Velinda and I (YES, I’m outting the two of you, as well) may have had a litttttle bit too much wine one night and made collaborative art. As in, we each contributed to each piece in some way. We were SCREAMING because of how awesome we thought we were and you know what, I’m going to go on continuing to believe that we would have fooled ALL OF YOU. Whatever, it was a very fun night with friends that I have enjoyed working with (and enjoy getting a little tipsy and making art with even more) and now it’s mine to keep FOREVER. Or until I get sick of it…BUT WE WILL ALWAYS HAVE THIS BLOG POST.
The sconces, which frame our beautiful and genius art, were another thing I needed to address. I mentioned yesterday that the ones I had were way too high for any art I put above the couch. It always bothered me but now with the new couch, it was a good three inches lower than the last couch, and I knew that would really put me over the edge. The reason they were placed where they were on the wall was to match the existing three on the other walls that were original to the house. I found these sconces on Schoolhouse and I emailed them and said, “would it be weird if I installed them upside down?” They were like, “no Emily, also, that’s kinda your job to figure out stop emailing us we are a huge company with lots of things to do.” Okay, they didn’t say that but they probably should have.
In reality, I wanted to make sure they wouldn’t think it was weird to do that to their product. I had already done the very techy thing of taking a screenshot on my phone and using the edit feature to flip it and then staring at it for 10 minutes thinking “is that weird?”…then decided it wasn’t. It actually had the exact effect I was hoping for, it brought the light visually lower without having to move the junction box, but with the circle at the top, it’s also technically still as high as the other sconces! It’s like I’m a designer guys.

The Credenza
Let’s about-face and check out the other side of the room. It took a while, but we found a credenza that was low enough to fit under our super low and large window. It’s from CB2 and I definitely bought it in the short period of time where we felt we were climbing out of financial ruin. The dream was to have two of them directly next to each other so that the second continued underneath the TV, behind the Eames-style chair. It would give a good effect with the added bonus of even more storage but ALAS, it’s not in the budget at the moment. The one we do own holds our records (record player sits on it, with Puck’s special basket—and usually him, as well—on top), part of my extensive vase collection, more Nintendo Switch gadgets, our printer and printer paper. To the side of the credenza, there’s a small basket that holds all of Daffy’s wine corks and Puck’s toys.

My $100 Craigslist Eames-style lounge chair is my unfinished pride and joy. I reupholstered this thing years and years ago (fabric look familiar? It’s the same as my DIY headboard!) but I’ve never gotten around to putting the piping on it because it seemed boring but let this be a lesson: if you don’t do the boring stuff early on, you’ll never do the boring stuff.

The TV & Eames(ish) Chair
The function of this piece is that it swivels. I never want a TV to feel front and center and until Samsung Frame prices go down, or a mysterious check arrives in the mail or an anonymous Venmo comes through or cold hard cash lands on my doorstep (I will leave my address in the comments…), I will straight up put a chair in front of my black box and call it a day. When we watch TV, the chair swivels to the side and the TV is on a crank so that we can angle it towards the couch…like this:

My final and most important piece of furniture to talk about when it comes to function is the wanna-be sink turned entryway piece.

 Dog art by my (then) 7-year-old cousin Addison of my family dog, Olivia.
The Would-Be Bathroom Cabinet (That is Now My Entry Table)
This piece of furniture I would say is the hub of our home. It’s our landing pad, everything in pockets gets thrown in the tray (think wallets, receipts, sunglasses). The top drawer is our “junk” drawer. Scissors, pens, batteries, measuring tape, box cutters, lighters, misc screws and keys that seem scary to throw out (where did they come from??) checks, stamps, etc etc. The next drawer down is where every cord that isn’t plugged into a socket already is put, along with rechargeable travel batteries. Third drawer has a divider in the middle, on the left side, I put all the mail and bills I need to deal with and paperwork I need to file, on the right are all my extra candles and incense. The bottom drawer has stationery, office/art supplies. You might have also noticed the very chic cat scratcher. It’s from Mountain Pet Products and it’s so cute and useful, I swear it’s why my furniture isn’t entirely torn to shreds.

And thus rounds out the living room. IT’S CURRENTLY 3:30 AM AND I COULD KEEP TALKING EXCEPT I’M DAYS LATE GETTING THIS POST TO ARLYN SO I NEED TO STOP WRITING. I do need to be up at 6 am so for you design nerds (come on, if you made it this far, you are a straight-up NERD), let’s talk more in the comments, after I shut my eyes for a sec. BRB…AND COME BACK THIS AFTERNOON FOR MY DINING ROOM. See you there.
***Photography by Sara Ligorria-Tramp, design and styling by Emily Bowser
Don’t miss other posts in this series:
Makeover Takeover: An Intro to Emily Bowser’s (Crumbling) Living & Dining Rooms | MOTO Intro: How EHD Stylist Emily Bowser Tackled Her Awkward Master Bedroom | MOTO Reveal: Emily Bowser’s Bedroom “After” is Unrecognizable from the “Before” | DIY How-To: A Step-by-Step for Making Emily B.’s Wrap-Around Velvet Headboard | MOTO Reveal: Emily Bowser’s 32-Square-Foot Bathroom is Packed With Small-Space Hacks | What It Really Costs to Buy an Income Property in LA (& Why I Thought It Was a Good Idea Even After Financial Ruin)
The post New MOTO Reveal: Emily Bowser’s “Refreshed For Function” Small Living Room Makeover appeared first on Emily Henderson.
November 13, 2019
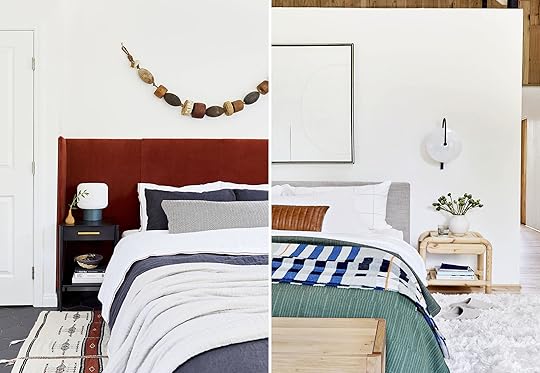
8 Easy Ways To Style Your Nightstand Like a Dang Pro
 photo by sara ligorria-tramp | from: portland master bedroom reveal (and how to pull together a your own dreamy suite)
It’s Afternoon Snack time! Head here if you missed this morning’s main post, otherwise, enjoy today’s style lesson.
I thought since I am the only one in the office without a traditional bedside table that I was the natural fit for writing a bedside table styling post. Those who don’t bedside table, teach bedside table…right? Well, fear not because I have learned from the pros and one day when I can fit a bedside table in my bedroom it will be a ba-reeeze to make beautiful. So in today’s styling post, I have created four different (creatively named) categories of how to style your bedside table. Let’s jump right…in bed.
The “Business On Top, Party On The Bottom” Nightstand
 photos by sara ligorria-tramp | left from: MOTO reveal: emily bowser’s bedroom | right from: mountain house master bedroom reveal
It’s as fun as it sounds. Keep it very simple on the top with two items max. Like in the bedrooms above, you can style a lamp and a bud vase or a vase and a water glass but really the possibilities are pretty endless. Just make it functional for you (and pared back). Then on the bottom, books are your friend. They look clean but add texture…plus, you know…reading. Overall, always keep your color palette (three to four colors max) and mix up the textures, too.
Rules:
On top: Keep to two items, vary the scales of those items and always throw in some greenery.
On bottom: Three books in corresponding color palettes and in ideally some descending sizes. Add a bowl or small box on top of books if there is enough space between the top book and the bottom of the drawer or shelf.
The “What Do I Do With All This Space?!” Nightstand
 photos by tessa neustadt | left from: the griffith park master bedroom reveal | right from: eclectic traditional bedroom reveal
Large bedside tables are great but can be challenging to style because there’s so much space (a bad problem to have, clearly). The right (and large enough) scale for the items you choose is important for this one. A good and large enough lamp really helps to anchor the look. Then with the other accessories, you don’t want things to feel too bitsy and small. This one is also fun because it can be more decorative. You have the space so take advantage.
Rules:
On top: Keep to around four items, vary the scales, textures and patterns of those items. Also, to keep things spicy, throw in some greenery or florals. It’s just something that will make you happy every morning and night. Trays are your friend and will add visual interest and help to corral things like small bowls, a water glass and/or bud vase.
On bottom: You can use large books, trays, more decor items, etc. Just keep it tidy, visually balanced and intentional looking. AND avoid clutter.
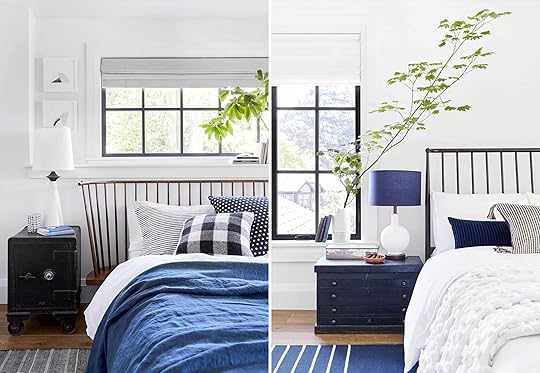
The “Keep Your Loved Ones Close” Nightstand
 left photo by sara ligorria-tramp, from: a romantic glam bedroom makeover | right photo by tessa neustadt, from: our master bedroom reveal
Some people…okay A LOT of people, like having a picture of their loved ones on their nightstand. I mean it’s really nice before you fall into sweet slumber to take a glance at someone you love. I get it. To help you make your loved one look their best behind that glass, I am showing you two ways to style them.
Rules:
Large frame: If you don’t have a table lamp and a medium to small nightstand (a large one could handle both) then go a bit bigger with your frame and have some fun with texture and/or color. Then to balance, but not overwhelm, just add a simple small vase (shorter than the frame) with some greenery. This leaves some space for you to stash a book or two, your glasses, etc. and boom you have a perfectly styled bedside table that’s still functional.
Small frame: First, pick a pretty table lamp (placed toward the back like how Emily did in her bedroom to open up space) then use a tray up front to corral the frame and a cute bud vase with greenery. Easy, breezy, beautiful.
The “Three’s Company” Nightstand
 Photos by Sara Ligorria-Tramp | From: 14 Rules for How We Style the Perfect Bedroom + 3 Reveals
We LOVE odd numbers when it comes to styling and three is a magic number around here. So that is a great rule of thumb when styling a nightstand like a friggin’ pro. Also, limiting yourself to three will force you to keep it simple which will make you feel less stressed as you are counting your sheep.
Rules:
The title on this one pretty much says it all, but stick to three items max in a corresponding color palette. One of those is usually a lamp. Make sure to vary the heights and materials. Then, lastly, make sure one item has a pattern for that hint of visual interest.
Hope this was helpful and that you are about to embark on your most beautifully styled sleep (that’s a thing, right?). If you don’t know where to start or just need some product inspiration, head to home decor section of the EHD shop page.
Love you, mean it.
The post 8 Easy Ways To Style Your Nightstand Like a Dang Pro appeared first on Emily Henderson.
Makeover Takeover: An Intro to Emily Bowser’s (Crumbling) Living & Dining Rooms

Welcome to the next installment in my series of unfortunate (house) events. This time, we’re talking all things living room/dining room (last time, we talked master bedroom and bathroom).
Let’s jump in!
 Me, our beloved first couch, in the state I was most found in, 2017.
I want you to imagine a situation where you see the below MLS photos and the $600,000 price tag and you’re like “I’LL TAKE IT.” Yeah, I can’t imagine it either and IT IS EXACTLY WHAT I DID. Read all about that nightmare/dream come true here.


Quick recap: The house looked exactly like the photos above and I was, as one could imagine, not feeling very positive about becoming a homeowner. Through a series of insane circumstances, we put an offer on this home and they accepted without my husband ever seeing the inside of it (he was at work when I saw it by myself…like I did many homes during our search with my realtor Keely). Who does that?? Six long months later, we owned the home and the above furniture was moved out. Turns out, it was covering a myriad of issues. See the piece of furniture in the right-hand corner with the roses on top (in the photo above)? Seem random? It was on top of this:
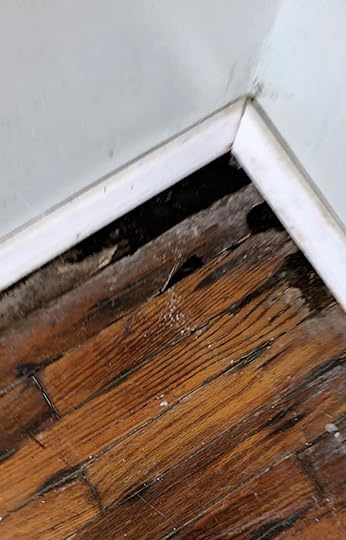
This corner was the beginning of the end for us. Termite damage on hardwood floors points to one thing and one thing only: water damage.
The previous owners had disclosed that the roof had a leak in recent history so it wasn’t a complete surprise. I mean, the gaping holes in the wood floor throughout the home were a surprise but according to the former owners, they had repaired the damage, fixed the roof and everything was okie-dokie. The roof inspection wasn’t great but there wasn’t any hard evidence that at the first sign of rain I would have a waterfall coming into my house. Which I did. Two days later.
After the rotted wood/soaked wall situation, the entire house had to be taken down to the studs to see what was really happening. What had originally been a $100,000 renovation bid grew and grew. Once walls are open, everything changes. You see the truth and you can’t hide from it.
Here’s the punch list of things that happened in this room:
Demo drywall
Water damage repaired
Rewiring (had original 1930 fabric wiring)
New insulation
Remove window AC unit
Remove wall heater
Replace sconces
Add 2 sconces on the longer wall
Remove ceiling light and fan in living room
Add one junction box for light in the center of the living room
Remove light in dining room
Remove existing windows
Reframe large window in the living room to a standard size (it was very low to the ground)
Remove tile in the dining area
Repair wood floors
Sand and stain wood floors
Open up the doorway to dining room as much as possible
Hang new drywall
Take out the old front door (we painted and reused it in the back house)
Replace front door to match interior doors
Replace baseboards
Paint
Unfortunately, I don’t have $$ totals of just this space because we had SO much going on at the same time. I can tell you this: by the end of this renovation, which included the back house and working on the “yard” between the back and front house, I’ve spent over $230,000. You did not read that wrong. No, I am not rich. No, I didn’t get free things. AND NO, MY HOUSE IS NOT A DREAM HOME. Yes, I am a very privileged person who has amazing family and also did a good amount of weaseling. I recommend reading my first post on the subject and to figure out your own stomach for risky behavior before proceeding in a market like LA.
But, this post isn’t about renovation. Today, I’m going to concentrate on the design decisions we ended up making in the dining and living rooms because of the fact that by necessity, we were essentially starting from scratch. (For anyone who wants to talk more about the renovation, I’ll meet you in the comments.)
Here’s what the house looked like empty (one day before waterfall in the corner):

Maybe you can’t see clearly, but that is a ceiling fan, directly next to a light fixture. Here’s a close up:

Did they not know that as a society we had already troubleshot the issue of wanting air circulation AND light? Can you even imagine the seizure-inducing effect if you wanted both on at the same time?

 The living room looking into the dining nook.
I want to apologize once again for my before photos. Past Emily was not aware that she was going to post them for hundreds of thousands of eyes. Also, we had a very unfortunate loss of photos during the process. Specifically November and December of 2016. Very frustrating. Luckily, I put a few on my Instagram…
 My husband, Andrew, October 2016. View of the wall where the heater was, seeing through to the office and bedroom in the back. I would say we were about a week out from complete overwhelm.
 Master looking through the office to the living room. You can see the arched window far in the background.
Here’s a reminder of the layout, thanks to my (not exactly-exact) husband:
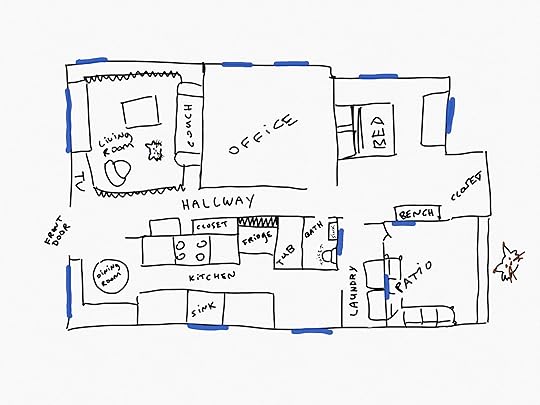
The general flow of the living/dining spaces stayed the same. Our house is 863 square feet, this space is 266 of it (despite how it looks in the drawing). It’s not a bad size. As you can see, a lot of the living room is, in fact, a walk-through space from the front door to the hallway which makes the real living space of the room about 12’x12′. I saw the layout right away though, and our furniture (that we already owned) would fit right in, thank God.
 We have light!
My contractor matched the height of the other sconces and added two on the wall to the right (where the old wall heater was). He took the width of my couch into consideration when deciding how far apart to put them. I found these matte black simple sconces at a local place in North Hollywood called Practical Props. If you live nearby, check them out for affordable new and vintage lighting. I believe they also do repairs on vintage lights. Everything I bought during this time was literally the cheapest so, as I’ve surely lost the receipt in a file of 1 million renovations receipts, I know they weren’t expensive. In fact, if you want 2 of them, slide into my DMs. I replaced the two on the right for reasons I will go into on the reveal post tomorrow.
 January 2017, 3 months after purchase, pondering the space.
Rug: West Elm | Sconces: Practical Props | Light Fixture: The Maison Craft | Paint: Polar Bear by Behr (my go-to white)
An 8’x10′ rug was the perfect size for the room as it would fill the 12’x12′ space without overflowing into the walking area. As for the ceiling light…ah, that glorious light fixture. I fell in love and fell in love HARD with this light before the house was even finalized. I still love it so damn much. It’s handmade in Thailand, makes a huge statement and the shop owner is lovely to work with. I highly recommend it! #ipaidforthis
The wall where the wall heater lived would be a great (slash only) spot for the couch. With the large window straight ahead, it’s like I knew I would one day spend hours sitting on my couch, staring out at the mountaintops, writing these posts and wondering “what are the words I’m searching for??…………..Right! ‘Flirting with…f-i-n-a-n-c-i-a-l r-u-i-n. Perfect!'” We made the new window a little smaller (kept the original window above intact) so that we could actually fit a piece of furniture in front of it. We owned a metal IKEA console circa 2010 that would *just* fit under it.
 Puck, in his basket, August 2017
Books: Surf Shack | If You’re Reading This There’s Still Time | Light: IKEA | Basket: vintage IKEA | Console: vintage IKEA | Pitcher: IKEA (SENSE A THEME??)
There was one problem though: if the window was directly across from the only place to put our couch, where did the TV go?? TVs are v important in our home because Survivor. Let’s talk about it in the comments. I luckily thought ahead and had Ron (contractor) run electrical up where I wanted to mount the TV so that the power cords would be hidden. We really only use an Apple TV and a Firestick. Do we need both? Probably not, but both are attached to the back of the TV so we don’t see anything…and don’t need to figure out where to put a cable box.
Here’s an in-progress shot of an unstyled space:
Theater chairs: vintage | Mirror: vintage | Coffee Table: vintage | Rug on wall: vintage Textiles: vintage | Ottoman: IKEA
And here’s the other side of the room that I’m afraid to share with you because I think you’re going to like it too much…

Dining light: vintage | Chair: vintage | Coffee table: vintage | Dining table: vintage | Rug on ottoman: vintage | Wood hand: vintage…SENSING A THEME?? | Cats: Luxe Paws 
November 12, 2019
Secret Saves: What’s In Our “Top Secret” Private Instagram Bookmarks

Just in case you missed last week’s announcement and are wondering why there are TWO posts today (head here to read this morning’s post), then let us welcome you to our new, regularly scheduled weekday afternoon post. It’s just a quick, fun article that can serve as a helpful PM pick-me-up. So we hope you are hungry because here is your daily “Afternoon Snack.”
There’s something about what you save as a bookmark on Instagram that feels safe. No one can see, so no one can judge, right? When you openly Pin something or share on your feeds, there’s always the moment of vulnerability where you stop and wonder…“is this cool enough to share?” But there’s a whole process and reasoning that goes into the save when you’re doing research. You can bookmark a shot just because you like the color palette your eye picked up, or the use of scale, or even just the composition of the shot.
I have my bookmark folders saved by “design,” “recipes,” “restaurants,” “fashion,” “editorial ideas,” and so on and so forth, so today, I’m throwing caution to the wind and pulling back the veil on my top secret “design” folder, what caught my eye and why. When someone on the team, including Emily, feels like sharing, they’ll pop up and show you their private bookmarks, which is essentially like looking deep into the soul of each of us (a bit dramatic, perhaps?). This week, to start, let’s see what’s hiding behind that little white tab on my Instagram profile.
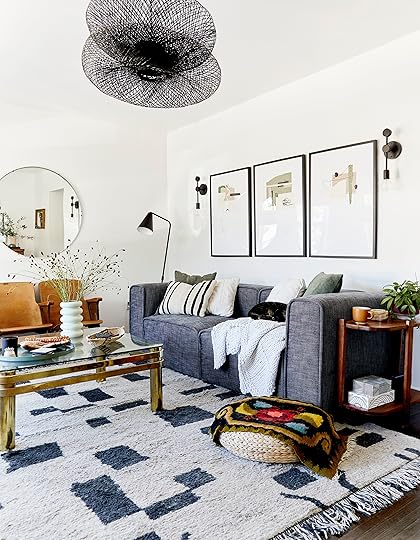
 via @decoristofficial | design by @ferrer.co
There is so much about this shot that caught my eye: the rounded sofa, the blue velvet, THAT AMAZING LEG on the sofa, the round pillow, the shelf high above the fireplace, that stool. It’s so much good in one photo that feels timeless yet edgy. Thank you Charlie Ferrer for cooking up this little corner.
 via @hutchapp | design by @bambetleblog
I’m not huge on pink, tbh. I can appreciate the color, as I do ALL colors, but it’s not for me, personally. I did love, however, how the painted orange arch (interestingly cut off around that edge) takes what could have felt pretty saccharine and made it brazen. I’m always on the hunt for high-impact, low-cost decorating ideas, and paint is basically as HILC (did I just start a new acronym?!?) as you get. Also, the hunter green on that chair upholstery is just always something that will make me stop mid-feed.
 via @lonnymag | design by @simonehaag
Simone Haag, you breath of fresh air, you. If you don’t follow her, I grant you permission to pop out of this post, head to Instagram, take care of business, and come back.
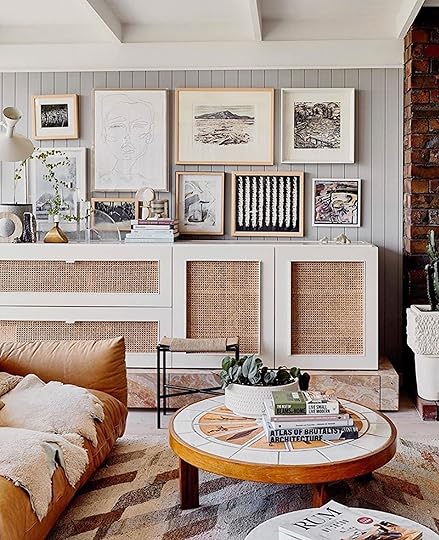
Back? Great. I give Simone my double tap most days, but this one got saved to the bookmarks for that gallery wall (always racking up those ideas for art), and that stellar caned cabinet on the stone plinth. OH, and there’s almost no chance I would have had eyes for that coffee table had I seen it in a store, but in this room, it works.
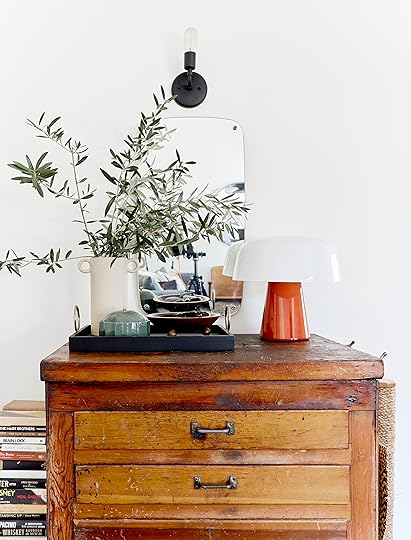
 via @thisisglamorous | design by @tamaramageldesign
I have my eye out on new kitchen and bathroom trends for the coming year, so anything that strikes me, I save. This one, from Tamara Magel Design, caught me because of the intensely marbled countertop and the speckled subway tile backsplash. It’s just a sliver of a photo, but I can already tell it’s very much a kitchen in which I want to be perfecting pie crust, as one does.
 via @my.life.in.colour
You had me at weird crumbly looking wall and dramatic arch. The color on that millwork and door next to the slate gray checkerboard tile floor feels very Swedish or maybe Parisian to me. (Actually, this is a space in Prague I believe, so…I’m wrong but I can’t help how it makes me feel.) It feels effortless yet grand, forgotten yet new all at once, and that is possibly grounds for another acronym (EYGFYN??).
 photo and design via @benjaminvandiver
And finally, a warm hug of a room from the immensely talented Benjamin Vandiver. He’s another one to follow. I’ve had my eye on his work since my print magazine days and he’s only gotten better from there. This room stopped me for a few reasons: the scale of the banquette and that GIANT oil painting is not something I’d think to do, but man do I love it here. I’d also never think to do a center chandelier, and then just a few feet away, a pendant that’s not centered on the bistro table beneath it, mind you. Man do I love a rule breaker.
And just like that, you know the inner workings of my soul, eh, private Instagram bookmarks. As we dabble with those second posts of the days, your “afternoon snack” if you will, we’d love to know what resonates with you. Are you interested in seeing behind the hedge of team EHD’s mental musings/research? Let us know in the comments, pretty please.
The post Secret Saves: What’s In Our “Top Secret” Private Instagram Bookmarks appeared first on Emily Henderson.
Emily Henderson's Blog

- Emily Henderson's profile
- 10 followers

