
Emily Henderson's Blog, page 249
August 28, 2019
Where to Buy Affordable Lighting Online: 18 of Our Go-To Resources
The importance of lighting is real people. Plus, sitting in the dark is only charming for a very short amount of time…like 5 mins I’d say. However, as I am sure I don’t have to tell you, lighting can be v expensive. Would all of us love to be able to afford a $700 floor lamp? Sure. But not all of us can or actually want to put a huge chunk of our budget into just that one department. We absolutely get that and thought that a comprehensive list of our favorite, more affordable, lighting resources would be helpful to fix this issue. To preface, we aren’t saying all of the sources we are about to provide are exclusively in the $50 and under price range. But knowing the market and how pricey lighting is for the most part, this list gives you a much wider range of more affordable options…don’t worry, some are under $50. We’ve got you. Let’s now shine that perfectly warm, slightly dimmed light on our favorites.
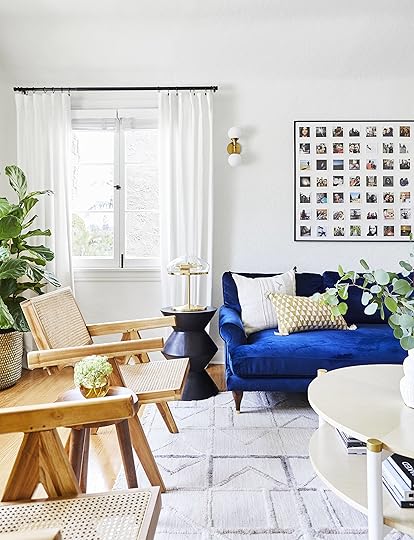
 Photo by Genevieve Garruppo | From: A 120 Year Old Barn Makeover With The Frame TV
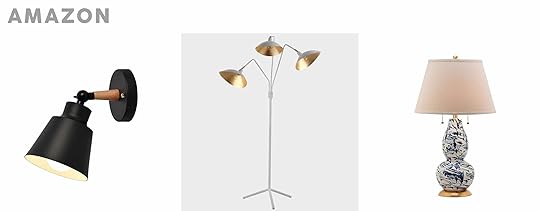
Nordic Wall Sconce | Iris Designer Floor Lamp | Color Swirls Table Lamp
Amazon
Yes, Amazon is an amazing resource for not only your books and hard to find beauty products but they have A TON of great and very affordable lighting options. Sure, you have to dig a bit but the reward is lots of savings and 2-day prime delivery. You may remember the sconces from the 120-year-old barn…yep, Amazon baby.
Reynold Matte Black Sconce | Grid Black and White Polka Dot Table Lamp | Plate Matte Black Wall Sconce
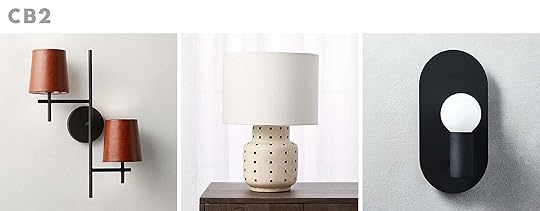
CB2
We are all big fans of everything CB2 and their lighting is no exception. While they aren’t super cheap, they are much more affordable than a lot of other similar style resources and are VERY chic (and edgy). Plus, they have sales all the time to help lower that price point.
Modern Black Gold Pendant Lamp | Black Brass Modern Pendant Lamp | Modern Brass Maple Wood Pendant
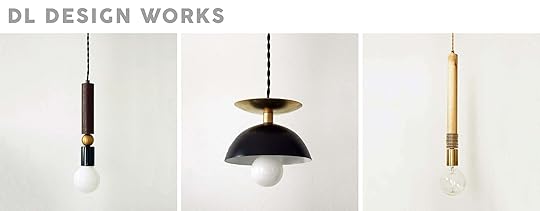
DL Design Works
This was a killer Etsy find. They have unique modern designs that have natural elements to them which is why they are so great. They have a moderate price point but from where we are standing, look like they are well worth it.
Rockport 1 Light Table Lamp | Mid Century Flowerpot Table Lamp | Mid Century Astia Long Wall Sconce
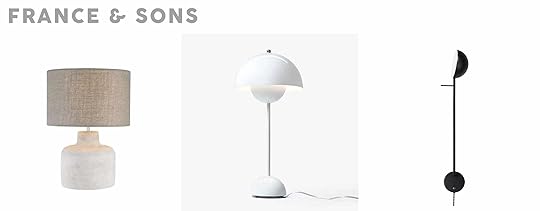
France & Sons
France & Son is the place to go for moderately priced modern Scandi design. They sell very pretty reproductions at a MUCH more approachable price. Now, we understand the complications behind reproductions and always want to promote original work. We think if you can afford original art then you SHOULD buy it. But original work is unattainable for most. We however, of course, understand the reason for the high prices since SO much work goes into it. It’s a fine line and we get both sides from a consumer standpoint. But will all that said we do love France & Son for making cool lighting accessible.

Oak Table Lamp Cone Shape | Wooden Table Lamp | Oak Table Lamp Bottle Shape
Home and Kitchen
All hail Etsy for showing us this great lighting resource. We are suckers for a good wooden lamp. These handmade beauties are not only real easy on the eyes but also affordable (around $60+). The perfect mix of modern and organic if we say so ourselves.
Modern Natural Wood Oak Tripod LED Floor Lamp | Matte Brass Desk Lamp | Gold/Black Minimalist Resin/Metal LED Floor Lamp
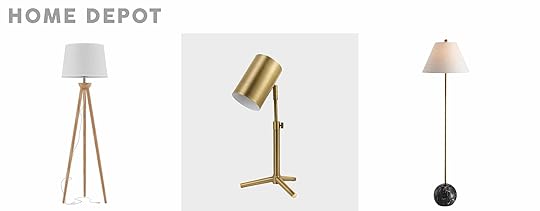
Home Depot
If you go on homedepot.com (the selection is much better than in-store) you are sure to find crazy inexpensive lighting deals. They have A LOT of products in a ton of different styles, so you need to dig a bit but the savings are too good to pass up.
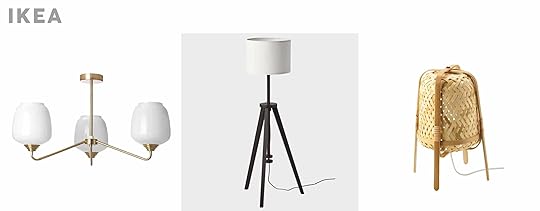
IKEA
Would this even be an affordable roundup post without the great IKEA? No, no it would not. IKEA is constantly stepping it up and we love their new lighting. That black wood floor lamp also comes in natural and Arlyn almost bought it for her living room MOTO. She says it’s even prettier in person so…GO GET IT (if you need it).
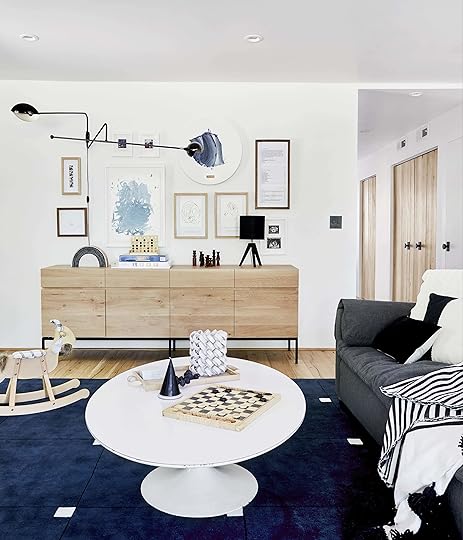
 Photo by Sara Ligorria-Tramp | From: Arlyn’s Moody Dining Room Reveal Is All About the Insane Power of Paint
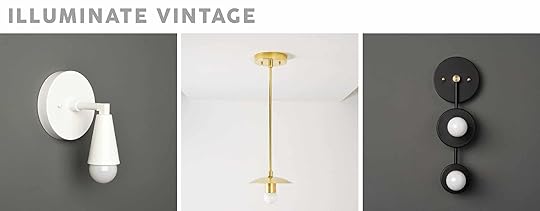
White Modern Sconce | Pendant Light | Black & Brass Sconce
Illuminate Vintage
See that sconce on the far right? That is the stunning sconce that Arlyn used in her dining room makeover. So not only can she vouch for the very chic design but also that they have awesome customer service and ship SUPER fast. Have a look because they have a huge selection. 


August 27, 2019
A Sneak Peek Into the Master Suite + Behind the Scenes of Our House Beautiful Feature
You may have seen all the reveals that we’ve shown thus far, but there is more to this story. As I’ve mentioned throughout this process, House Beautiful was going to be running an exclusive feature story on the mountain house (on newsstands now). We shot the house with some different styling options, sent them all the photos, I wrote the text and then I waited…with a big of happy anxiety to see how the story actually looked. I didn’t know what photos they’d chose or how they’d edit the story (no, magazines don’t give you—or me or anyone—final approval before it goes to print as part of their journalistic power. They run what is best for their readers). So when it finally arrived to me (a little earlier than newsstand date), it was so fun to see what they actually published—both photos and words.
So today I thought it would be fun to show you the published the House Beautiful spread of the house. I also wrote the story exclusively for them (you haven’t read this before) and today you’ll see a sneak peek into the master bedroom and master bath (coming at you next week). Lastly, I thought it would be fun to show you some of the different styling options that we gave them (magazines like options, I get it, ME TOO).
Not to anyone’s surprise, I exceeded my 600-word assigned story, by about 2,000 words. My final piece weighed in at 2,670 words, which is a typical blog post around here (this is not industry standard, FYI). I’m incapable of being concise, blamed mostly on the fact that (I think) I have a lot to say. The pros that they are, they cut it down to the assigned number (above) which basically tells the same story, in a much more concise way.
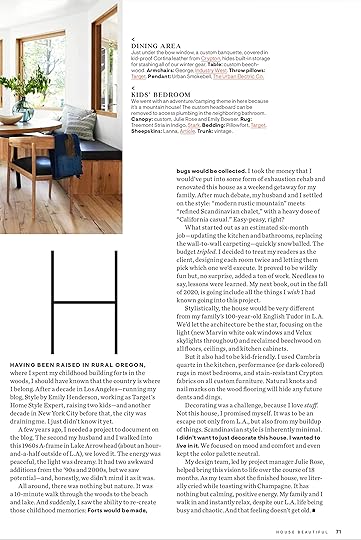
Below, you’ll see a few other shots that they ran. They originally asked us to reshoot the kids’ room without “Christmas,” when I informed them that A. It wasn’t Christmas, it’s just a “camping/adventure” themed room (thus the trees) and B. The kids now share a king bed (with me often in the middle) which I think most people think is weird, so we didn’t reshoot it. Hilariously even Birdie when she saw the magazine was like “ooh, remember Christmas in our room?” so I suppose those trees really did give off the holiday vibe.
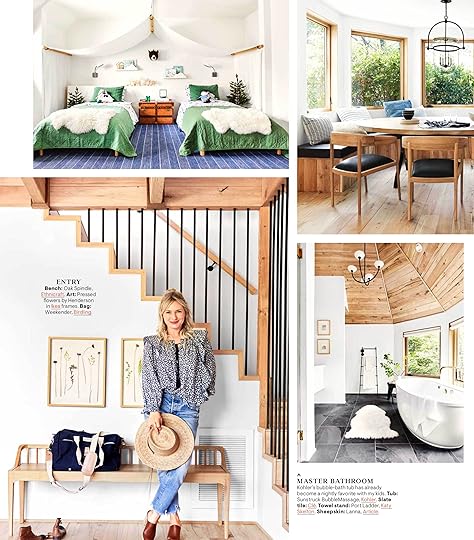
There you have your master bath sneak peek, but you HAVE to come back next week and see the full room. That one shot does not tell the full story, obviously.

They ran the loft shot, but with a different chair (this one is from Norell Furniture) than we actually have in there. They weren’t sure if they were going to run the living room and the family room, so we put this chair up in the loft (which actually lives in the family room) because I LOVE it and I wanted to ensure it got in a shot that would be run.
Here’s how it actually looks:

I actually like the Norrell chair in there better, but it also looks so much better in the family room than this chair would and it’s far more comfortable. No one really sits in that chair up here so it doesn’t have to be as comfy. For the HB shoot, we also borrowed some awesome pieces from County LTD in Silverlake (that stool in the previous shot) but I returned it after since they are pretty spendy and I don’t really need a side table there, or if I do it could be a more affordable version.
And here is your sneak peek into the master bedroom.
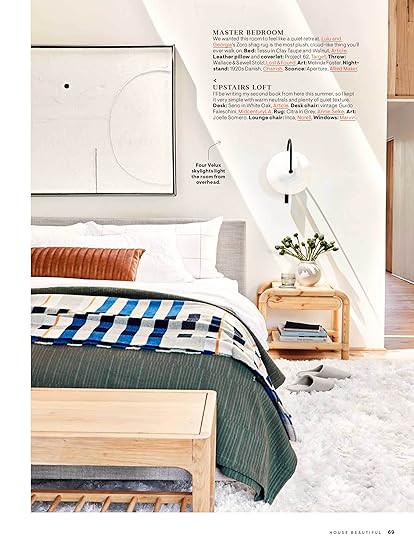
They only ran one shot so you’ll have to come back for the full tour next week (and all the resources). Hang tight.
August 26, 2019
Our First Ever Reader Event At the Mountain House—A Recap

Two Saturdays ago was our first reader event at the mountain house. We invited 30 (+ plus-ones) of our most dedicated readers/followers up to Lake Arrowhead and the EHD team hosted them for the day. It was EXTREMELY fun, fulfilling, rewarding and pretty much made our year. At first, I thought maybe it would be “good marketing” if it was more of an “influencer” or “press” event…what I “should” do, but I really just wanted to be with people who knew me, were dedicated to this process, super engaged in the contest and had commented for YEARS.
The goal of the day was to really thank these readers and treat them to a day in the mountains—both the house and the general cultures. Once I realized that so many people were flying in from Oklahoma, Florida, New York, Arizona, etc, I realized that a 3-hour party wasn’t good enough, so my team went all out to ensure that they had 8 hours of fun to look forward to. Thank you, Caitlin, for jumping in so fast to produce this event (we literally threw this at her on her second day of work).
But it wasn’t without prep, as we all know and it PAINED me that the exterior wasn’t landscaped yet, but my team came up with some really pretty solutions.

The team spent the few days prior (and the morning of…SO MUCH PREP GUYS) setting up the back yard area where we knew a lot of “hanging” out would happen (particularly during lunch). While, yes, I’m a chair hoarder, there wasn’t enough seating throughout the interior, so we pulled from our prop closet (remember these chairs from the Culligan spa post and that table from a vintage haul post we did last year?).
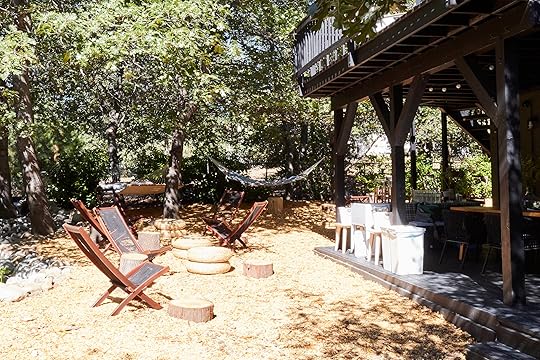
We bought a handful of these pretty rad folding lounge chairs from IKEA, cut down some stumps for “side tables,” hung some hammocks, and set out tables and chairs. Honestly, it was kinda perfect.
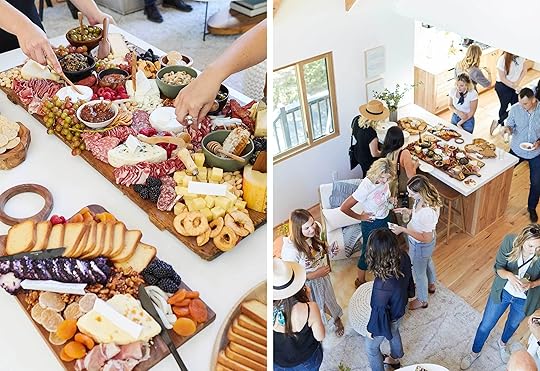
Because a party is no fun without things to awkwardly shove into your mouth mid-conversation the whole time, Emily Bowser crafted these RIDICULOUSLY gorgeous cheeseboards. She literally whipped them up on under an hour (prep and all), and we started calling these “Boards by Bowser” because they were so stunning and professional. Please don’t poach her from my styling team.

We bussed everyone in from town on a LITERAL party bus (yes, there were colored lights and, uh, a stripper pole…because we classy at EHD), and let everyone roam around the house, take pictures, talk to each other (plenty of them had met up the day prior and already knew each other!) and the team, and just generally hang out and really experience the space.

Shout out to Topo Chico who sent us nine cases of bubbly water to enjoy during the event (and at the office). I had never had it before but my team swore by it and now I’m foregoing La Croix for life. For some “libations,” we made some custom cocktails (something we called a “mountain house margarita” which was really just a margarita, ha, and a whiskey-based mojito which was so yummy). HOT TIP: Make drinks self-serve with plenty of cups, ice and garnishes so you don’t feel like you have to play bartender all night. We had a staff to help (my team) but we aren’t caterers or bartenders and I didn’t want them to feel too much like they were “working” by literally serving people so this worked GREAT.

Another big THANK YOU goes out to Stonefire Grill for providing lunch for the event. They brought over an assortment of entree salads, a ridiculously good pesto pasta, BBQ beef and pita and hummus. Jazz (pictured above) was AWESOME.

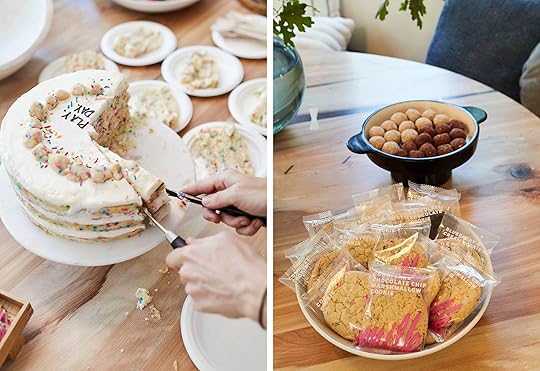
And lastly, another thank you to Milkbar who provided the most decadent funfetti cake, cake truffles and SO MANY COOKIES (if you’ve never had anything from Milkbar and have one locally, you’ll be very pleased when you stuff their sweetness into your cookie hole.
While the food was great, the BEST part of the day (of course) was meeting all these incredible, amazing, devoted readers. It wasn’t just for me, it made the whole team feel so good. Talking to actual human beings who consume our work behind screens every day is unreal. Honestly, by the end of the day, I think the whole EHD was floating around full of pure joy and just genuinely elated from the outpouring of support, encouragement and love we felt from this group ALL DAY.


A little after lunch, we did one of our favorite group activities: A STYLE DIAGNOSTIC. It’s basically an IRL version of our style quiz to “diagnose” your decor aesthetic and it’s so much fun (and strangely accurate). We should find a way to package this up and send out it in the mail to everyone who wants it. Wait…should we do that?!? I have this fantasy of sending it out and then doing a live IGTV or whatever platform people can ask questions with…stay tuned.


We also had a long, informal Q&A session where myself and the team answered TONS of questions, mostly about the business, how we run the crazy behind-the-scenes of this site and the production that goes into it (both design- and editorial-wise), but also some more personal “working mom” questions. I cried. What’s new.
Next up was a boat tour around Lake Arrowhead which was so much fun (for whoever didn’t suffer from seasickness). It seemed strange to invite all these people up to a mountain/lake town and not take them on the water (and Lake Arrowhead is private so you can’t even rent your own boats, thus renting out the tour boat).


If you’re local(ish) and ever make it up to Lake Arrowhead and want a kill of hour on a lake, take the tour. The captain calls out all the “famous” spots (i.e. like where they filmed the lake scene of the original Parent Trap where the twins put their dad’s girlfriend on a mattress and push her into the water)…basically it’s like an LA celebrity tour bus, but on a boat, and in Lake Arrowhead. It’s charming and sweet.

We wrapped up the night at my family’s favorite restaurant in the area: LouEddie’s Pizza. They have a beautiful area in the back that they rent out for events and weddings and it’s pretty magical. Basically, imagine eating yummy pizza under a canopy of trees and string lights with the sound of water fountains bubbling in the background surrounding by ridiculously charming little cabins.


The biggest takeaway from the day was the importance of connecting with our community. That sounds like I’m running for your local councilwoman, but it solidified the importance of getting real feedback from you, the people, who have read consistently for years rather than reading the comments of infrequent readers (or trolls) that steer us in directions that we can get easily lost in.
Thanks to all the readers for coming. Again, we were so touched that some of you left your babies for the first time, some of you dropped your kids off at kindergarten for the first day then hopped on a flight. I’m so glad it was a success. If you were at the event (a lot of you happened to have your own blogs!), please leave links to your posts below in the comments and we’ll update the post throughout the day to share.
I truly LOVED talking to every single person and felt totally elated, in fact, the next day I crashed (both because of adrenaline, but also because I think it was a real emotional high).
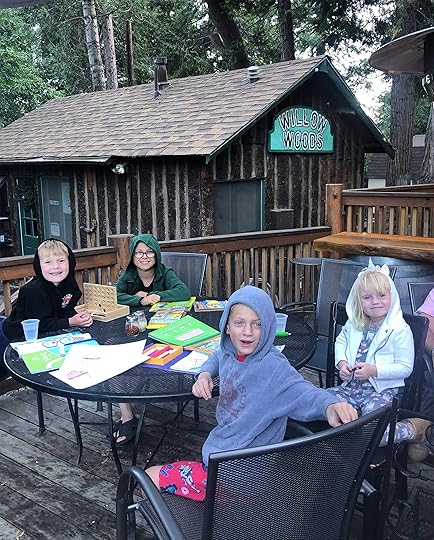
Brian was there shooting all day, and here’s a visual recap of the day:
Our sitter brought the kids to LouEddies where the readers got to meet them. Charlie was shy but listened to the Q&A next to Brian nearby. Brian helped explain to them what was happening, what I was doing, why everyone was there to see me…I could cry because that would NEVER have happened 50 years ago. Not that a woman wouldn’t have done these things, we have for decades, but that a husband would take the time to make sure that the kids knew how important their mom is. They know I write a design blog and work for magazines, that’s it. We don’t talk about a “following” or readers/fans, and they’ve never seen Instagram. They freaked out when I was on Good Morning America, trying to get me to wave back to them via the computer, but it’s not like they watch the news. So many people are on the internet (YouTube, etc.) so it wasn’t impressive. So to them, they were like “Woah, all these people are here to listen to my mama?” It was so special and I felt empowered answering questions, making people laugh in front of my family. I think the margaritas helped.
August 25, 2019
The Link Up: A Celebrity Home Tour, Chandler’s Everyday Skin Care Essential & The Best Bed For Your Fur Baby
 image source | design by humbert & poyet
Happy Sunday fun day, folks. We hate to brag, but it is an especially happy one for team EHD because we are OOO for the entire week (yes, our boss is pretty freaking cool and we are so grateful) but don’t worry, we have a week of blog posts scheduled for you because as they say, the show must go on.
Speaking of showbiz, Lena Dunham’s bright and happy home tour was featured in Domino this past week and we think there is a lot to love about it. It is extremely intoxicating with so many colors, shapes, and cool vintage finds. Plus, her essay on finding out “home is where you make it” is worth the read. Anyway, we can certainly talk about home tours all day long, but we have much more to dish about so let’s get to the rest of those EHD links…
First up, Emily couldn’t have been more excited to see that EHD alum Ginny Macdonald designed Create & Cultivate’s new office. The space is stunning and it is so wonderful to see a collaboration between two creatives that she loves.
Caitlin knows that pimple patches aren’t a new thing, but she’s here with the ultimate tried-and-true patch, and they only cost twelve dollars for a full year’s supply! “Y’all, these are Korean and nothing else holds a candle to them. Pop on a patch before bed and wake up zit-free. It’s like magic.”
Arlyn has held off on the Birkenstock trend for as long as she could, but she recently got these black leather ones and she’s never looking back because OMG are they comfortable. She says, “FYI, size down…I’m normally a 7.5 in open toe shoes (8 in closed toe), and I ended up ordered a US 6/EU 37. I could have easily gone for the US 7/EU 38, too, but I didn’t want them to look too…clompy.”
Ryann has been so inspired by all the bedroom reveals on the site lately and has the itch to start a MOTO for her own master. She knows she wants a vintage dresser, so she’s been spending her nights digging through Chairish for some inspiration.
Chandler is always looking for ways to sneak sunscreen into her morning routine. Something that doesn’t have a strong scent, lasts throughout the day and works well with makeup. Supergoop Unseen Sunscreen has proven to be just that. The sunscreen goes on matte and isn’t greasy, making it so easy to add to her morning routine layered right over her moisturizer. (Arlyn can also vouch for this as she uses it every day)
One of Sara’s favorite singers, Aurora, just released a new album called A Different Kind Of Human. From Sara: “All her songs kinda make me feel like a Viking warrior, which is pretty chill when I’m stuck in traffic or forcing myself to run that extra 2 minutes.”
Mallory is highly susceptible to Instagram ads, so she went ahead and purchased a Quip toothbrush. She’s very into the look of it (she got the gold metal), especially since she’s so tired of all the extremely bright colored plastic toothbrushes she’s had over the years. While she does wish the brush had softer bristles, it’s worth it for the refills that get delivered straight to your door every 3 months. And there you go, a full toothbrush review.
These sandals have become Carolina’s go-to this summer..She wears them EVERYDAY because they literally go with everything (FYI, they run small so she recommends going a half size up).
Velinda’s 16-year-old dog just got spoiled with TWO of these orthopedic beds because he gets “roamy” at night and giving him more places to settle helps his nightly stir-crazies. The bed is lower in the front so it’s easy for him to get in and out. It is a good option for old dogs, but comfy for any.
Bowser has been on the SEARCH for the perfect bedside table lamps for her MOTO and has been striking out. Luckily, Instagram is a stalker and knows this and put Gantri on her feed. Gantri is a sustainable lighting company with fair prices and great design. Check, check, CHECK! They use 3D printing to make their lights. HOW COOL IS THAT?? We are living in the future!
As an ample-chested gal (34D), Jess tends to have a hard time finding fun and dare she say “sexy” tops that still feel cool and casual. Enter in this very cute top. The ruffle straps are wide enough to wear a normal bra and neckline is super flattering without giving too much away if you catch her drift. Pair with a high waisted pant (it’s a little cropped) and you are good to go. Also, she got a large so it wasn’t too tight.
And finally, we are heartbroken about the devastating fires destroying the Amazon right now. It can feel hopeless and overwhelming trying to figure out what we can do to help, but we found this article extremely helpful. If you have any other resources, please leave them in the comments below.
That is where we leave you for today, but we hope to see you around tomorrow for a very special reader event recap. xx
The post The Link Up: A Celebrity Home Tour, Chandler’s Everyday Skin Care Essential & The Best Bed For Your Fur Baby appeared first on Emily Henderson.
August 24, 2019
How I Spent My Summer Vacation (a.k.a The Best Summer Ever)
Summer, 2019. This was the last summer before Charlie, 5 years old, starts real school—kindergarten—where we aren’t in control of our own lives/time as much. It’s the last summer before other, older kids have more influence on him, and perhaps the last summer that he is absolutely obsessed with his parents (although hopefully not). I say this all with glassy eyes. It was such a good summer I could cry.
In March, I proposed to Brian that we try to work up at the mountain house as much as we can over the summer with the kids. Not to “take the summer off”, but be with the kids as much as possible, up there instead of in LA. There was some resistance, the argument being I can work up there (writing and shooting), but he felt he would be bored and relegated to full-time childcare. I would have other outlets, he wouldn’t. My perspective was that our kids are only young once and while there are many stresses of owning and running your own business, and flexibility is one of the biggest and most valuable ‘pros’. This summer could be the best gift we can give our small kids and each other. Turning 40 next week has certainly made me want to prove to myself that my life choices are indeed mine and I really, really wanted us to choose this choice.
And then the best thing happened. Brian booked a video series job UP THERE. BOOM documenting another makeover (for Jenni Kayne’s president). I mother f*ckin’ manifested that (technically you aren’t supposed to be able to manifest things for others, but I mean, what are the chances???). At this point, we were already paying for some summer camps near LA for both kids, so no, we didn’t stay up there all summer, but I’d say a good 5 weeks over the two months. We had back-to-back very close family/friends from out of town, mostly Oregon, so many “cousins”, and it was incredibly special to have one-on-one time with all of them. We have a rule to only host one family at a time even if we can fit more because we find that we don’t connect with them if there are too many kids running around (nor do we connect with our kids so we had space between most of them where it was just us four).
I wrote/answered emails/comments from 7 am -11 am most days with some larger chunks when needed. And Brian was amazing and would take the kids 4-5 hours at a time during other days so I could work or shoot. I actually got a TON of writing done, in a quiet space (all the mountain house posts). But sacrifices were made and my team was so patient with me as I answered their 4 pm emails at 6 am the next day. Maybe it’s not ideal, but life with two jobs and two kids never is and I suppose I’m actively and proudly currently choosing my family over my work/business. Again, I know that is a very privileged thing to say, and while I often don’t feel like I have a choice, I DO—and not everyone does so I really try to not take it for granted.
Listen, whenever I’m trying to make a decision, I ask the only person who knows me better than myself: my 85-year-old version of me. I asked her if I’d ever regret neglecting work to spend time with my kids while they were so small and she said “NO.” Nobody in the history of time, on their death bed, has wished they spent less time with their kids when they were little. She is very wise.
I didn’t post or story too much what we did over the summer, mostly because I didn’t feel like it or I would simply forget. This is a GREAT thing as a huge part of being with the kids is being present. I hate saying things like “being in the moment” but we all know that social media rips you out of the moment so fast, and thank god I’m not actually addicted to my phone as much as you’d think I am (I got my first cell phone at 22 so I think my brain was more fully formed).
But as I was scrolling through all my photos, like a mom, I wanted to share them because this space has always been a journal for me, both design and personal, and it’s been a while…
So family summer 2019…HERE YOU GO (or at least whatever I remembered to capture).
SO MUCH SWIMMING:

So many bodies in so many bodies of water. Brian bought this pontoon on craigslist, and while it has broken down like five times, this party barge has absolutely been worth the stress. Besides, being rescued by the lake patrollers is actually kinda fun (twice was because the rope was wrapped up in the propeller; we are “still learning”).


The kids pretend to not like it ’til they get out there and we cruise, jump in, dock at the island, hike around and listen to “yacht rock.” We might be naming the boat the “Michael MacDonald” because every time we start the speakers, that’s what comes on. Although “I’m hungry, I wanna snack” is a close second because the SECOND we get on, those kids start at it for something packaged.

We went to the beach a TON. The kids mostly played in the sand and we sat there and read books/magazines and chatted and sipped on a beverage. The water was shallow enough that we didn’t have to worry too much.

So yes, we swam in lakes, in pools, at the beach. I’m happy to say that through consistency, Charlie is finally able (and comfortable) jumping into the deep end, and swimming to the side without drowning. All of you moms know that this is a moment we’ve been waiting for for 5 and a half years. Can he swim? HELL NO. Can he “not drown”? YES. All it took was consistency. We’ve had them in swim classes twice a week for 15 minutes each (30 total) for months and no progress. But after 2 weeks of swimming most days, we are there. Birdie, not so much. Hopefully this fall or next summer.
GOLF CARTING:


It became our goal to not get into the car, so we would golf cart it down (in the Ferrari, obviously) to the dock and then take our janky pontoon to the village for lunch or the small amusement park and then back. Brian bought the golf cart on Craigslist an hour away, with the Ferrari bumper sticker already perfectly placed, with a tape deck and fringe on top. It breaks down like once a month but good news! You can pay someone loads of cash each time to fix your 30-year-old piece of garbage!!
SKYPARK AT SANTA’S VILLAGE:


The most amazing family adventure park is 10 minutes from our house and once we became members, we went there 2-3 times a week. Brian and I got STRANGELY into mountain biking, although it’s extreme. As in professionals come from the whole country to bike down it. Biking has always been something we’ve done together, but I didn’t predict that I would become an extreme mountain biker. This was the beginning of #mountainemily.
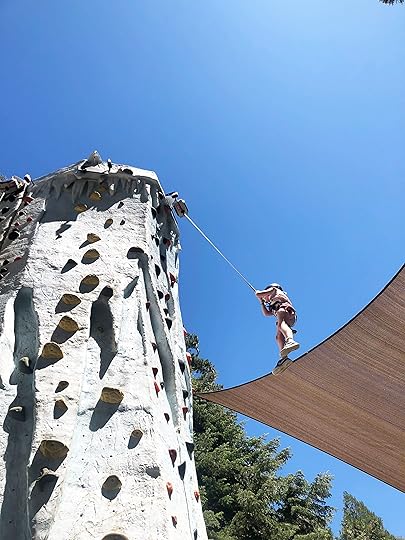
Skypark also has rock climbing, bouldering, zipline, archery, kids biking, hiking, fishing, roller skating (ice skating in the winter), panning for jewels, and 2-3 restaurants with decent food and good beers. It’s expensive for the day ($40) but if you can go frequently, it’s the best deal in town. It’s rarely busy so our kids can really run safely (but it makes me worried that it’s going to go out of business so please go!). No ad, and they don’t know I exist. It’s just a special place that used to be a year-round Christmas park that went bankrupt and a local family revamped it as a year-round adventure park with a huge Christmas component with Santas, ice skating, snow, reindeers, etc. IT’S AWESOME.
WE PLAYED IN THE WOODS:
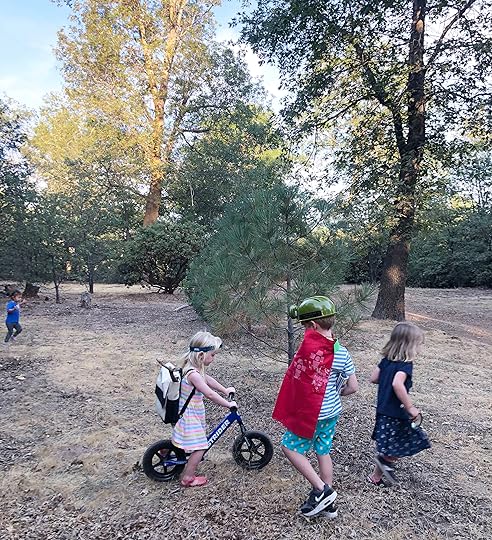
We made forts, climbed trees, biked around, and did a lot of night hikes with headlights. There are no mosquitos up there and our property backs up to 50 acres that are gated with no cars or bodies of water. It’s an absolute dream for people like us who like just collecting bugs, leaves, and the kids played so many games (all with a “buddy”).
WE CUDDLED AND SLEPT:
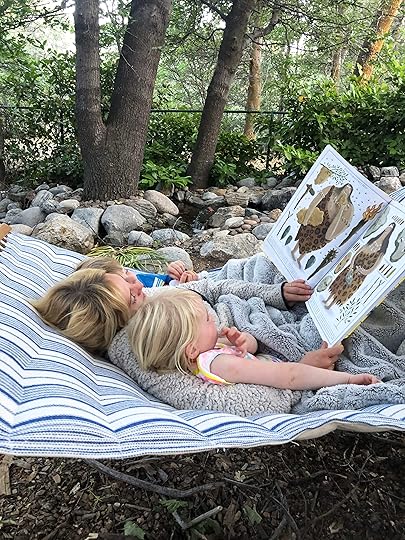
That might be my favorite moment of the summer. We laid in that hammock for an hour, next to the fake river and I got to snuggle both kids in the morning for like 45 minutes while we read. WHAT ELSE COULD YOU WANT?
Sure, we didn’t sleep as much as we should have (you never do on vacation with kids) but these two slept whenever and wherever they could.
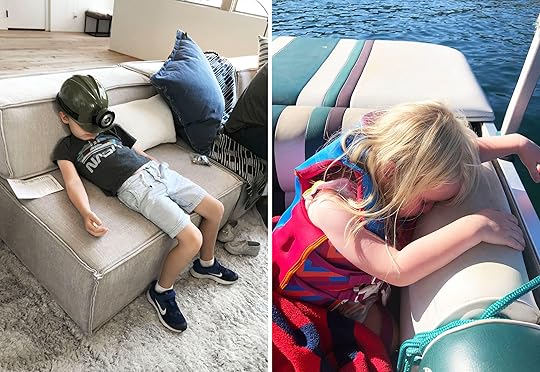
Birdie fell asleep on me most days either on the beach or on the boat. I LOVED it, even if I got held hostage by her sleep and couldn’t go jump in the lake or go on the hikes. My future self will NEVER wish that I had less time with my babies asleep on my chest.
WE BBQ’D, ATE AND TALKED/DRANK:

I don’t have any photos of it, but one night we got a sitter and took our adult friends out for a night cruise. We talked, danced and listened to music for FOUR HOURS. We all said that it was truly one of the most fun nights of our lives. We were alone on the lake, listening to college hits and for real DANCING.
I don’t have pictures of us BBQing, eating or partying but needless to say, we DID IT UP. Everyone who knows me knows that I have two modes: work mode and party mode and I’m pretty great at rallying at both, so I had to really learn to just chill, cook, lay in the hammock and read with my kids. We made delicious food and watched a lot of family movies.
Also, we gave my brother hair extensions. So natural!
WE WENT TO LOLLIPOP PARK:
There is also a tiny amusement park with a carousel, bumper cars, go-carts and a few toddler rides that the kids are OBSESSED with. It’s in the village and takes like 15 minutes to do with no lines, and it’s pretty cheap so we took each family there at least once.
This house, this mountain town is truly what our family needs. We are highly social so sometimes in LA, we invite too many people over and since I can’t sit down, I end up hosting to the point of burning out (without knowing it). So being up there, having one family at a time that stayed for an extended period of time meant that everyone was helping, I wasn’t “hosting” just providing the house. Also, the options for what to do are either woods, boat, pool or beach. Not having very many restaurants or museums/activities to go to means that your days are free to just choose what you feel like.
Re-entry has been hard, but Labor Day is nearby and while I’m not doing much for my birthday this year, it’s more of an excuse to unplug and feel “on vacation.” But my 85-year-old version of myself was totally right: I don’t think I’ll ever regret how much time I spent with my kids, friends and family this summer. Memories were made, folks, and you BET I’ve already started my summer of 2019 scrapbook (it’s for the kids, duh :)).
The post How I Spent My Summer Vacation (a.k.a The Best Summer Ever) appeared first on Emily Henderson.
August 23, 2019
Reveal: How We Brightened Up a Room (and Some Deserving Lives) with Velux Skylights

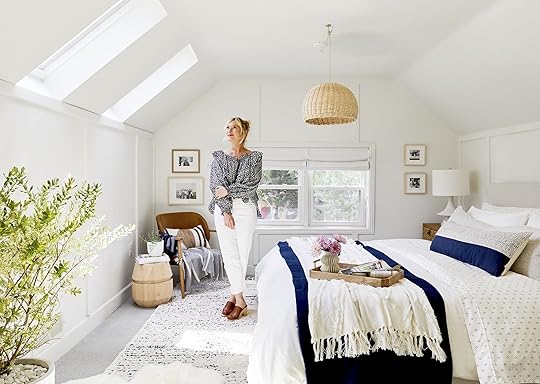
Today’s reveal is my favorite type of “work” and why I feel like the luckiest person on the planet that this is my job. Velux skylights approached me about doing a makeover for a family that could use some “brightening up,” and I said “yes” very quickly. When your job is helping others through design and style, you feel pretty darn lucky. We posted about the contest here, and hundreds of you entered to get the free makeover, which included new skylights. Raeann secretly entered Kristen for the contest, both being avid readers for years (THANK YOU) and their story was one that seemed perfect for what we were going to be able to bring to them. Here they are, with myself and the design lead on this job, Julie Rose.

Kristen and Raeann have been together for 7 years, married for nearly one. They live in Salt Lake City and bought their house a year and a half ago. Last year, Kristen (32) was diagnosed with a rare form of cancer called Cholangiocarcinoma, which she was predisposed to genetically. Typically, those who are diagnosed with this type of cancer are over the age of 65 and found more commonly in males. This is why it was very shocking that Kristen got diagnosed at such a young age. Obviously, that threw their life into a spin of fear and just so many unknowns. She began a clinical test and rounds of chemo, one that didn’t make her lose her hair (it’s a new clinical trial), but of course inside she wasn’t feeling good AT ALL.
So when Raeann entered her and we saw her bedroom, we knew that they were the perfect family for this. Kristen was spending a lot of time in her bedroom, resting, sleeping and recovering from the chemo treatments, and we were about to make that room so much more beautiful, comfortable and yes, bright and airy.
Here’s what Raeann envisioned for the space: “My wife just started chemo and is spending a lot more time in bed these days. I would love for our bedroom to be more of a haven for her—a serene, comforting, and light space that brings her peace and happiness when other things are tough.”


So Julie and myself flew out to Salt Lake City to meet them and get a sense of what their style was and really understand what they wanted for the space. I can’t tell you how wonderful they were and we clicked immediately and didn’t want to leave. I wrote about the process yesterday as it was fast and saved us a ton of time. They trusted us—with some guidance—which made the process so fast and easy plus we really loved their style and what they had pinned to a Pinterest board for the giveaway. I know that you guys are awesome, but to hang out with two that have been reading for years solidifies that I have the BEST READERS IN THE WORLD.

Their Functional Needs:
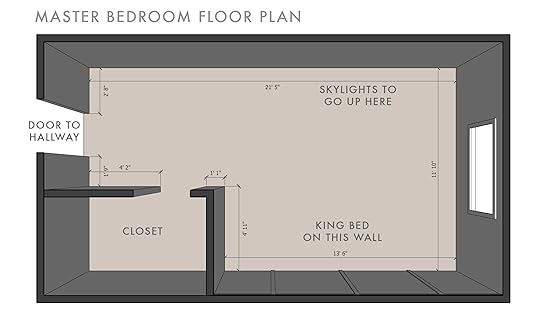
1. More light: The room needed more light and was honestly a perfect candidate for skylights. I am a firm believer that natural light changes the entire mood and feel of a room. In fact, studies show that people in hospitals with windows, who can see nature, may heal faster. By putting in skylights not only do you get more light, but you can see the sky, the clouds, the blue while you are laying down (and the stars at night). We put in two Velux No Leak Solar Powered “Fresh Air” skylights that are roughly 2 feet wide by 3 feet tall on the eastern wall because morning light is soft and prettier than afternoon light. Your Velux consultant or contractor can help you determine the best placement in your room so you are optimizing the light in the smartest way.

2. A bigger, cozier, bed: Right from the start, we determined that the bed should stay along the wall it was on initially but I convinced them that they had to get a king-size bed (which for them meant a brand new mattress from Tuft & Needle). They also wanted something more dog-friendly, i.e. lower so their pup, Izzy, could get on and off easily in her older years.
3. More nightstand storage: When you are in bed all day, you accumulate things around you (cups, books, etc.), so more space both in and out of drawers would be helpful.
Their Stylistic Wants:
Cozy and comfortable: After the initial small talk, we asked Raeann and Kristen to describe the feel of the room they wanted when they walked in for the reveal. Words like serene, cozy, comfortable, bright and Zen came out of their mouths and into our design minds. That, combined with being able to sit down with them and go through their pre-pinned Pinterest board, was a great learning experience to see what and why people are drawn to a random room from the internet.
Lots of layers, textures but not too many patterns: The wall-to-wall carpet was not bad but we decided to layer a lighter and brighter rug with some texture would make the space feel bigger and cozier. We went with subtle white Roman shades from Tonic Living (who were gracious enough to RUSH deliver these to us, thank you Tonic Living!) that filtered some light but visually “disappear” when needed. Oh, and as for things to avoid: NO velvet. Kristen HATES the feel of velvet for some reason, like my cats used to hate fur, she is repelled by the feeling of it.
As we wrote yesterday, we wanted it to feel serene but luxurious, neutral but with personality. So soft, so easy, so stress-less, with more storage and more bright (yet soft) light.
We planned from LA, and loaded up a big moving truck the Saturday before the week of the install. Within two days (with a lot of prep from my team, led by Julie), we transformed this space and absolutely brightened up their room (and yes, also their life). It’s so warm, happy, layered and yet simple and easy to navigate both stylistically and functionally.
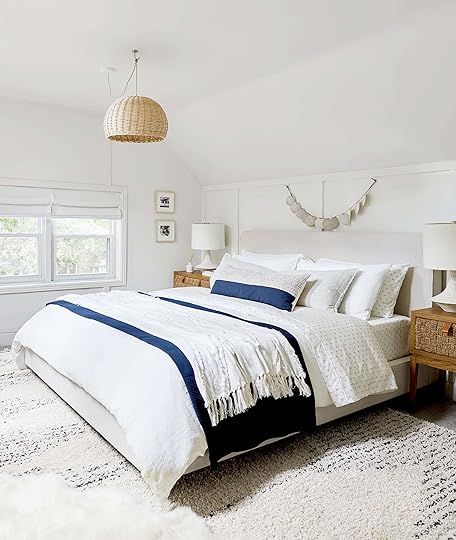
The Color Palette: We kept all the major pieces neutral and calm, and then layered on some higher contrast. Honestly, this is really the safest and easiest route to go if you aren’t into having a risky bedroom. It also keeps it really easy to change styles and colors in accessories and bedding. That bed, from Living Spaces, is a STEAL at $450 (for a KING!) and that upholstered headboard makes it so much more comfortable than the original wood one they had in the space. Kristen and Raeann both liked navy (as do we, duh) so it was really an EHD palette that we are very comfortable with—gray, white, navy with a lot of wood and natural textures.
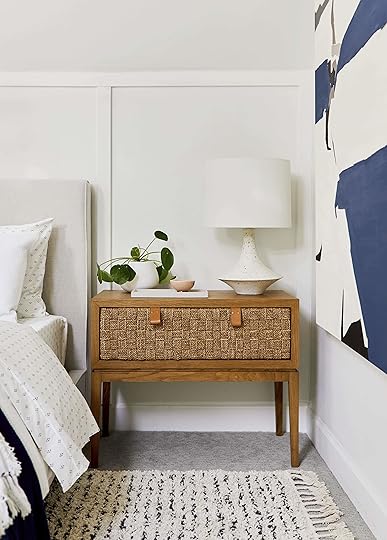
Textures: While we don’t have a lot of high contrast patterns, we do have a lot of textures throughout not only in the bedding but also the furniture. Please note the wood/woven nightstand from Serena and Lily. It’s very special and not just because it has leather pulls. The rug has a strangely soft texture (and is also so affordable for how soft and huge it is, a 9’x12′ for $338); it also brings in a slight pattern. Even the lamp has visual texture, with splatter paint all over it. Kristen loves woven window treatments but since we wanted to make sure the space could be completely dark during the day, we brought this element into the space through the nightstands and pendant over the bed.

Art: In an attempt to always have art be a more personal element in the room, we brought in a lot of family photos that we put into readymade frames.
But, we found the perfect large scale art for the space in the most kismet way. For our stay, Julie booked a house for the whole team through Airbnb not knowing at the time that it belonged to Holly Addi who is a local artist in SLC. Her abstract paintings are INCREDIBLE and also owns one of the cutest stores in town called Arte Haus Collectif. Her work is so beautiful and I wanted (still want) many pieces for my own home. If you don’t live in the SLC area, you can purchase her work through Uprise Art and she has a lot more in that collection that the whole team loved.
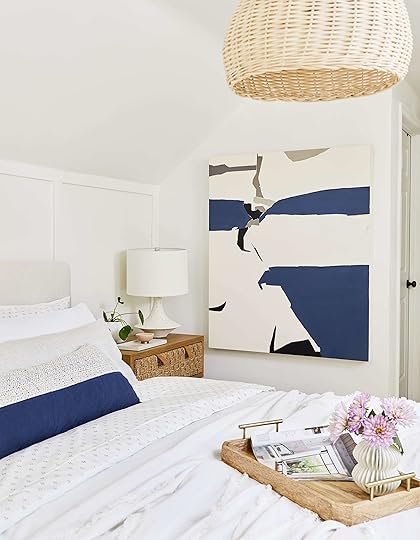
After hearing this story and seeing how perfect her piece would be in here, she was lovely enough to cut us a deal so this piece could live in the room. Look how incredible it is. We loved that it was overscale for that wall and yet fit so cohesively into the space. Thank you, Holly!
They were SO happy when they saw the piece and I told them the story.

I would be psyched, too.
August 22, 2019
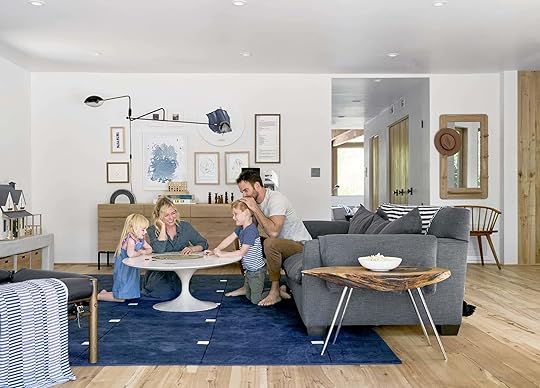
Our (New-ish) Super Fast, Super Useful Design Process (for Non-Designers and Beginning Designers)
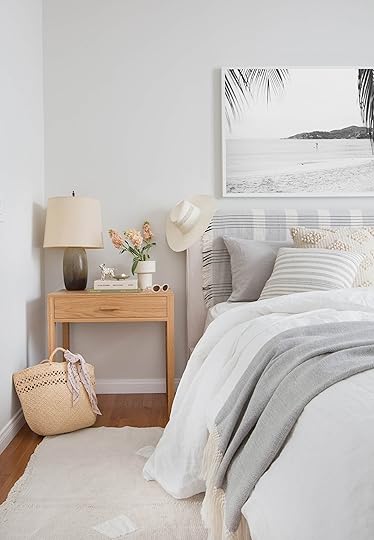 photo by tessa neustadt for ehd | from: 1 bedroom 4 ways with the citizenry
You can’t have “fast, cheap and good” in design. We all know that. At best, you get two out of the three and rarely is “fast” one of them. Often the design process truly is expensive and good, and layering in the word “slow” makes it even more expensive when you are working with a designer (who bills hourly). But for tomorrow’s makeover reveal (that one is a tearjerker so be sure to come back for it), we truly were able to do it in a month because we came up with a new fast process and once we realized how much time it saved us we, figured it was worth a post.
Here’s how it went down.
We only had a month between meeting the “client,” seeing the space and install/shoot of a master bedroom. That’s FAST. The clients (who you’ll hear more about tomorrow) were big readers, totally trusted us and yes, full disclosure, we had a special situation where our partner, VELUX Skylights, was covering the budget. So no, we are not in a normal design/client situation here, it’s more of a weird digital/social media fantasy, and it’s not a process that you can easily replicate.
HOWEVER, the process itself was totally eye-opening. It went SO much faster, and therefore if the client had been paying our hourly rate, the speed of it would have saved them SO much money. Now, this is not a process for a high-end designer/client situation, nor a renovation, but there are times when friends of mine are like “can you just come in and help and I’ll let you do whatever you want and pay for it.” Now I know the process that we’d do to speed it up, make us happy, and hopefully, no one goes insane—although they will still spend a decent amount. It’s true that a room that is full of unique pieces and very personal to the client will take much longer than this, so this process is more for the “I want my space to look pretty and pulled together, quickly, so I’ll let you do whatever you want” process. SUCH A DREAM.
So this post is more for non-designers that want to decorate more quickly or even better, beginning designers/decorators who don’t have a huge budget to spend on time/labor. Also, it’s one you can use on YOURSELF, even without a designer. Let’s walk you through it…
Step 1: See the space and take measurements.

This was our before which had a ton of potential, but just wasn’t pulled together or as functional as the homeowners wanted. This is a very typical “before” for us.
Step 2: Ask them the following questions:
How do you want it to “feel” when you walk in? Get them to throw out adjectives to help guide the design.
What are your functional needs?
What do you want to keep and what in here do you really want to lose?
Is there anything you really HATE? (Kristen HATED velvet, for instance, which we thought was hilarious).
What is your ideal budget (head to the bottom to see what we spent on this)?
Step 3: Use Pinterest to set up a visual language for easy referencing.
We ask almost all our clients (past and present) to create a pinboard before we talk so we have a visual language to reference. I once told a client, on a budget, that if he wants to save time on our hourly design fee that it would behoove him to pin as much as possible so we are doing less guesswork and thus billing fewer hours. He said “WAIT, You bill for that?” and I said “Of course, so to save money you should spend at least a few hours pinning” and he said “But I’m busy, I don’t have time,” which we found hilarious. I politely told him, it’s either his time that’s free or mine that you pay for—you choose. Oh, the undervaluation of design work.
Having a visual reference of what you like is SO important. We had asked Kristen and Raeann to do this and this is an edited down set that gave us the general vibe they were drawn to.
 clockwise from the left: image via amber interiors | image via etsy | from: 1 bedroom 4 ways with the citizenry | image via domino | image via amber interiors | image via lulu and georgia
It’s crucial to then go through each pin and ask what they loved about it, what drew them to pinning it. We then take out the ones that feel off because maybe they pinned them just because they liked the symmetry and not the look and feel. So you have to communicate, you can’t just take a pinboard on face value.
Step 4: Sketch out simple measurements and, if you have the skills, create renderings and floor plans before you shop.
With a rough floorplan with measurements, you can plug in major pieces like bed/nightstands/dresser and rug to ensure that they actually fit. We used SketchUp (well, Julie did), but you definitely do not need that. You also don’t need to worry about plotting out little details just yet like individual pillows, just making sure that the large pieces fit is the most important part here. You could do this with a simple ruler, pencil and graph paper.
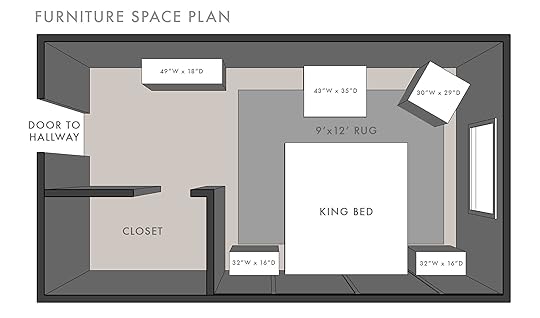
We blocked out the general areas where we knew we’d put certain pieces as well as some ideal dimensions (above), but obviously, that could end up changing as the final pieces may have slightly different dimensions.
Step 5: Create individual boards with pieces that are available in their style and budget.
Okay, this is what we did that was special: We didn’t pull together mood boards until we gave them some options on major pieces that we asked for feedback from. We asked them to “X out” anything they HATED and heart their top 3-4 choices per category to get a sense of what were hard passes and what they were drawn to.
KING BEDS
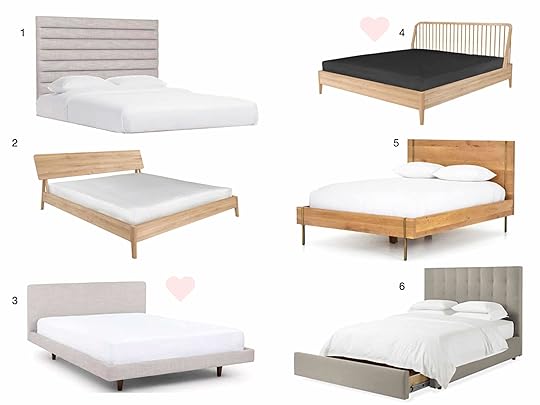
1. Sera Headboard | 2. Andie Platform Bed | 3. Tessu Bed | 4. Dellah Spindle Platform Bed | 5. Karma King Bed | 6. Avery Upholstered Bed | 7. Deva Linen Platform Bed | 8. Dean Sand Eastern King Bed | 9. Ella Bed | 10. Marlo Bed
We asked them to do this for every major category. This really helped us understand what our options TRULY were. Some of these were affordable (like a king bed for $450) and some were a couple thousand. None were insane, but it’s true that we were more focused on “fast and good” than budget.
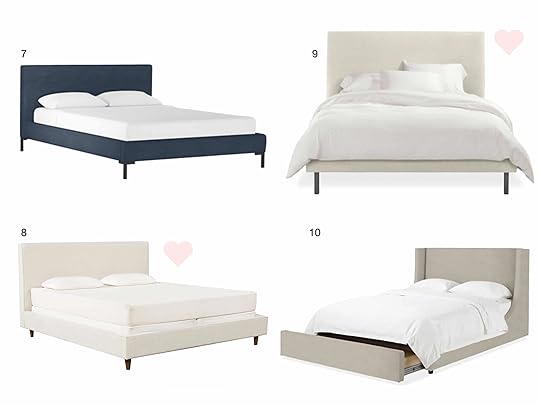
RUGS
1. Mil-01 White Rug | 2. Macramé Wool Rug | 3. Cobblestone Woven Wool Rug | 4. Nadia Rug | 5. Glacier Diamond Rug | 6. Zags Denim Woven Wool Rug | 7. Rachel Tufted Rug | 8. Naimee Rug
NIGHTSTANDS
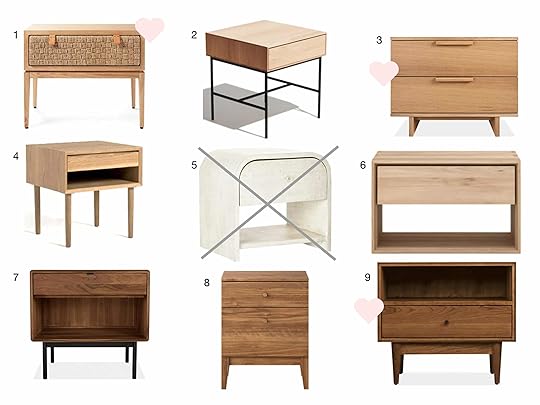
1. Caledonia Woven Nightstand | 2. Loring End Table | 3. Ashby Nightstand | 4. Franny Nightstand | 5. Archer Lacquered Nightstand | 6. Oak Nordic II Bedside Table | 7. Hensley Nightstand | 8. Siegel Nightstand | 9. Grove Wood Nightstand
DRESSERS
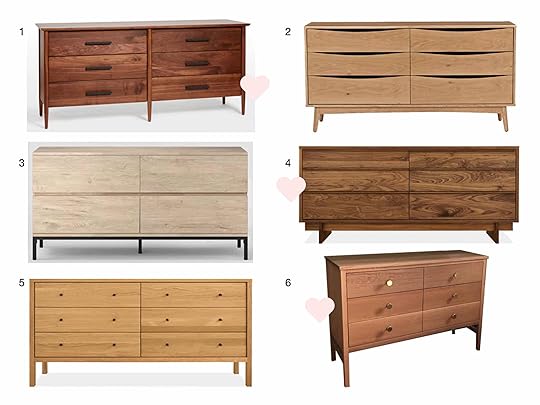
1. Shaw Walnut Dresser | 2. Culla Dresser | 3. Loring Dresser | 4. Anton Dresser | 5. Emerson Dresser | 6. Custom Dresser by Hedge House Furniture
ACCENT CHAIRS
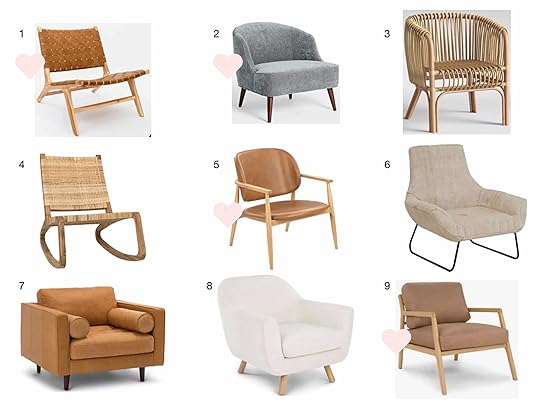
1. Tanner Armchair | 2. Ruxby Chair | 3. Isabella Rattan Chair | 4. Mariposa Chair | 5. Levo Chair | 6. Slide Chair | 7. Sven Chair | 8. Gabriola Chair | 9. Denman Chair
It was such a fast and fun process. They didn’t overthink it (again, probably because true money wasn’t being exchanged) and it felt so fluid. Since everything was in our cohesive style, we knew that we could mix and match to a degree. We could take what they liked/loved and start playing with them on boards to see what would turn into a beautiful room that worked well design-wise. We still had to consider scale, texture, color, wood tones, fabric tones, patterns, etc. But we felt free to be creative in a way that made things so fast.
So Julie started pulling together said boards to show me (not the client, at this point, we had carte blanche, plus it was supposed to be a surprise):


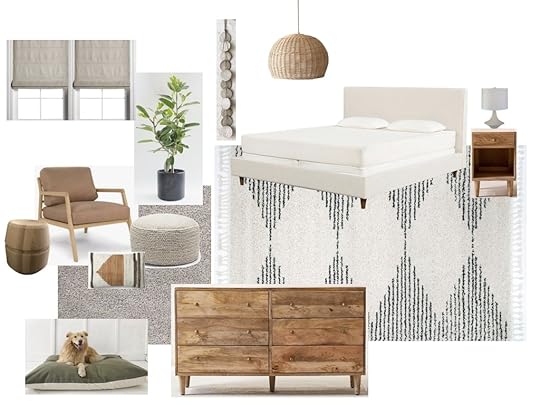
Since the reveal is tomorrow, we are NOT going to show you the final board.
August 21, 2019
In Defense of the Comfy Sectional—A Friend’s Almost-Finished Family Room

My friends have cool houses and good taste. You may be thinking to yourself that this room looks familiar like, “it belongs in a house I’ve seen and loved before.” It’s the same house owned by my friends Corbett and Leigh of whom have this entry, this living room, this dining room, the master bedroom and THIS backyard. They were gone for months in Australia with an unfinished family room, so when Sixpenny reached out to see if we wanted to partner to showcase their Neva sectional, I said “yes” even without checking in with them. I’m sneaky like that.
Their home is dope—ultra modern and the epitome of cool and contemporary. However, it is a lot of cement and glass, so their/our main goal has always been to warm it up. I had multiple kids before them and was touting the importance of comfort even while they were holding strong to more sculptural/beautiful pieces. For instance, they had these wood/wire dining chairs that NOBODY sat in, and we switched them out for upholstered chairs that people sat in for HOURS and they started admitting that maybe religion of comfort first (when it comes to family spaces) is the way to go.

I know this sectional well. I had the chair version in Elliot’s room for a while and LOVED it. Brady has the sofa version, but we haven’t used the sectional yet. It’s the Neva Modular sectional that yes, comes in a few different sizes. This one is 164” x 84” (that’s THIRTEEN FEET LONG), which obviously fits this room great, but yes it comes in shorter lengths. In fact, because it’s modular, you can add or take away a section AND switch the chaise depending on your preferred side. So say if you move it to another room or another home, this sofa can be customized and pieces could be eliminated and it can be shortened.
As far as comfort goes, this lady is extremely comfortable without being sloppy, and deep but with back cushions that are still supportive. It’s tricky because while a tight back sofa isn’t as comfortable, sometimes loose-backed sofas can get so disheveled and be so messy. This isn’t that.

We chose the Lightweight Linen in Black Pepper so that it brought a natural and tonal feel with the curtains and rug that were already in the space. Plus darker, neutral colors tend to hide minor stains. #nevernotthinkingofdirtykidhands Another tick in the “pro” column here for being kid- and family-friendly is that it’s slipcovered, so you can take it off and wash it if need be.
Huge, deep, chunky sofas can typically be not so attractive, but what makes this one cool/interesting is the French seams and the super-thin arms. It’s just extremely modern and fresh looking for a comfy, plush sectional.

The charcoal linen is so warm and washed, giving it a casual feel.
I know you have questions about the rest of the room because, well, it’s beautiful, so let me explain. Corbett chose the rug, shelving and curtains (with me weighing in, when I was around) but I can’t take credit for it. She obviously has a great eye. I was impressed with her brave “white rug” move in a family room with twin 2-year-olds but BOY is it beautiful (it’s custom). She is currently looking for a vintage persian rug to layer over it that is more forgiving. It’s the ultimate family conundrum: do you go for darker sofa and lighter rug or lighter sofa and darker rug? Either way, something has the potential to get ruined over time. But I also need to be better about not allowing food/drink in our family room or maybe our kids just have my complete inability to land food properly in my mouth.
Let’s talk about these shelves for a moment. So yes, this unit was custom but there are plenty of styling tips to learn from and take into your homes. But Corbett was struggling so we came in and added pieces and helped pull it together.
The first tip (as always) is color palette. Here we took their base neutral blue, grays and cream palette and added in greens and warmer browns/rust. This was a way to amp up the warmth in what is still very calm and visually soft. Another tip is variation in orientation, shape, size and medium. This unit (with all its separated sections) makes it very easy, for example, to make sure there were books vertical on some and horizontal on others, there were varied numbers of object pairings (two vessels on one, three on another, etc.) and natural elements like plants and vintage scenes that were evenly dispersed. But these tips apply to all shelf styling. For more shelf styling tips, head to this post.

Also, please note the super chic wall-to-wall closed storage at the bottom. It’s very smart (image all the board games/toys/books/kid supplies you can hide in there) and just so pretty.

Velinda found this incredible vintage one from Candid Home that reconfirms the power of the statement lamp. It’s neutral in color but has an effortlessly, cool personality. It is also another case for my colorful shade argument in that it adds instant depth and contrast to a room. So since we are already talking vintage, let’s talk about it some more as a major HOT TIP to bring warmth to a contemporary room.
This vintage side table from MidCentury LA is modern enough with its clean lines to complement the room’s contemporary style and its scale is large enough to look perfect with the large size of the sofa. It has a late ’70s vibe about it which I’m pretty into.

If by chance you have forgotten their view from the other reveals, here it is. Their view was another reason we kept everything tonal and neutral. When you have scenes out of your window that good, you want it to be the real star and not do too much design-wise to distract. That’s also why we chose these soft, contrasting nesting coffee tables. Since the sofa is again, large and therefore long, these nesting tables give us the perfect coffee table sofa length ratio.

We aren’t totally done with the room, so we didn’t show you the TV side (the TV is massive and the credenza isn’t quite there yet). Hopefully, when they get home from Australia, they’ll love it as much as we all do. We sent them photos and they freaked out. It’s a pretty darn great family room, sans any signs of family at this point.
August 20, 2019
All Our Favorite 2019 Decor Trends (& What We Think Will and Won’t Last)
 image source | design by jessica helgerson interior design
Trends, trends, trends. A term we love to hate but also can’t wait to see what crazy idea is up next in the ever elusive zeitgeist. And if we are honest, we love reporting on them because there are few things (design-wise) more fun than discussing with you a beautiful and/or whacky trend on the come up. SO with it being almost nine months into the year, we thought why not see if all (or some?) of the trends we predicted and reported on are still “a thing.” Even I’m curious to take a real look to see what has lasted, what never really hit and what may be around but never got a big trend ranking. So put on your tie-dye T-shirt, shell necklace and Tevas sandals (yep all current big fashion trends) and let’s see where they all stand…
1. 9 Kitchen Trends for 2019 We’re Betting Will Be Huge
 image source via remodelista | design by megan pflung designs
What We Thought Then: At the beginning of each year, we turn into design detectives, scouring our pins, saved Instagrams and general zeitgeist sources to see what’s on the rise. It is usually a mix of common ideas picked up from the end of the previous year, a cool idea that some ultra-hip influencers have dabbled with and straight up interesting things we think just should be a trend. For kitchens, we had nine strong feelings. I personally was very into the trend of mirrors in kitchens and the all stone counters, backsplashes and shelves combos. But we also felt strongly about seamless walls of storage, darker stone countertops with dark cabinets, statement appliances, statement hoods, linear pendant lighting, inset handles and cutouts, freestanding islands and finally mixing metals.
What We Think Now: So some are an absolute yes such as the “wall of storage,” linear pendant lighting and all-stone counters, backsplashes and shelves, darker stone countertops with dark cabinets and statement hoods. These were all very popular this year and we know they’ll continue to expand in popularity from there (as kitchen trends tend to turn roughly every 10 years). There were others that, while they were “in” enough, maybe weren’t exactly “trends” as much as they were just fresh ideas we wanted to see happen harder than they did, for example, I’m most sad about the mirrors. So pretty and useful but not enough people saw the light.
Lasting Power through 2019: 3.5/5
2. 10 New Bathroom Design Ideas We’re Super Pumped About For 2019
 image and design via sarah sherman samuel
What We Thought Then: A lot of new was on the rise for bathrooms at the beginning of 2019. Classic mirror shapes were being challenged, both vanities and toilets dare not touch the ground beneath then, faucet placement was turned on its side, nickel was making a play at brass as the king of finishes, long skinny tiles were the most popular kid in design school…and more. What a trend-forward year.
What We Think Now: The big stars were rounded rectangle vanity mirrors, floating vanities, long skinny tiles and marble used as art. As for floating toilets, it’s a little hard to know if those hit because most photos of bathrooms don’t actually show the toilet, so maybe it’s a secret trend? However, for the rest like console sink vanities, dam-less showers and floor-to-ceiling glass enclosures, while beautiful, they were not heavy hitters, though they still had their place in fresh bathroom design, specifically in higher-end homes.
Lasting Power through 2019: 3/5
3. Is This What’s Next In Furniture And Decor? (If So, We’re Very, Very Into It)
 image source via architectural digest | design by athena calderone
What We Thought Then: While I do love new kitchen and bath trends, what really gets my heart pumping is furniture and decor. The whole team contributed to this article and we came up with 12 solid predications. They are as follows: rust colored velvet, biscuit tufting, the new “it” chair, the other “it”chair, thin bench cushions, chunky wood-framed furniture, mixed modern dining chairs, burlwood, “shaped” pillows, mixing framed and unframed art, pleated lamp shades (my personal 2019 crowning jewel) and rocks as decor. A lot of great ideas but not all made the zeitgeist cut.
What We Think Now: It’s pretty interesting because a couple of these were just a hair off of what is actually SUPER trendy nine months in. For example, biscuit tufting didn’t fully take off but tubular furniture is everywhere right now, and despite my initial hesitation at Arlyn’s suggestion, burlwood absolutely had a comeback. On that same note, pleated lamp shades exploded despite Arlyn’s massive raised eyebrow when I threw it out there. That’s why we need to collaborate.
August 19, 2019
What’s Next With the Mountain House (Other Reveals & Upcoming Projects)

Well, we made it through and boy do I hope that you enjoyed it. So what’s next? Are we going to rent it out? Sell it? Move in permanently? Let’s debate:
BUT FIRST, a huge thanks for coming and reading and sharing. It honestly means so much to have a community of people so engaged in what we do. We had the reader event last Saturday where we got to meet 30 of our most dedicated readers (and their plus-ones) which was incredibly fun and fulfilling. We’ll be doing a whole post about it this week, but hopefully you saw it on Stories (we’ll keep it as a highlight so if you missed it head to Stories and see it there). Stay tuned for the master bed/bath reveal Tuesday September 3rd (the day after Labor Day), as well as the upstairs guest bedroom and attic soon after.
First off, we are DEFINITELY not going to sell it. I love this house so much I can’t even tell you, so as long as we are in LA (and potentially even longer), we will have this house. We want to appreciate all the work, as well as let it appreciate so we can potentially ever get out of it what we invested into it.
We are open to renting it out for photoshoots, catalogs, and corporate/creative retreats. We are still debating if we will put it on high-end vacation rental sites, but if we did they would need to be highly vetted and frankly worth it financially. As of right now, we do plan on coming up at least two times a month, and every three-day weekend so I’m not sure there is much availability on weekends and less interest during the week. Plus, my team and my friends have first dibs if we don’t go up there.
Will we move in? We are debating and very open to it. We LOVE living in Lake Arrowhead and our family is very very happy here both in this house as well as away from a major city. We have a lot of friends that have weekend houses (it’s blowing up up here and yet still really affordable less than two hours away from LA) so weekends are so fun. But the actual population is pretty small with what seems like 80% of the houses vacant during the week. Of course, we love the lack of people, but to actually live here we’d want friends and we aren’t seeing very many young families. We also aren’t sure about the schools and would need to check them out. Could we actually LIVE in a town with a population of 7k year-round? We don’t know. And if you are wondering what I’d do with the business, I’d simply commute a couple of days a week, possibly stay overnight and then work from home the other two. We’d likely try to find a fixer that Brian and I can do ourselves—all budget and cosmetic changes, focusing more on DIY than reno, and of course a totally different style than this house.
But let’s not get ahead of ourselves. We aren’t even DONE with this house yet. Hard to believe, I know. Here is what we have left:
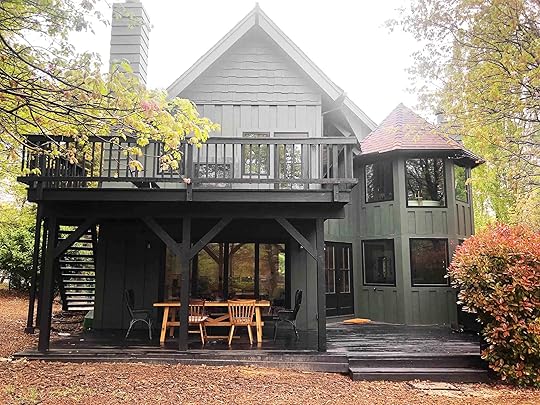
The exterior: We need to plan and save for this so while it pains Brian to not have a hot tub, we might not until next summer. But we have a lower patio and upper deck to show you as well as hopefully a hot tub room someday, we have the doors leading out to it from the downstairs guest room, but it’s just a pile of dirt. We’ve nixed the idea of a full outdoor kitchen to save some money, but would like to have the bbq and a prep area that feels more custom and built-in. The kitchen is so close that it just doesn’t make sense to put another kitchen so close outside.
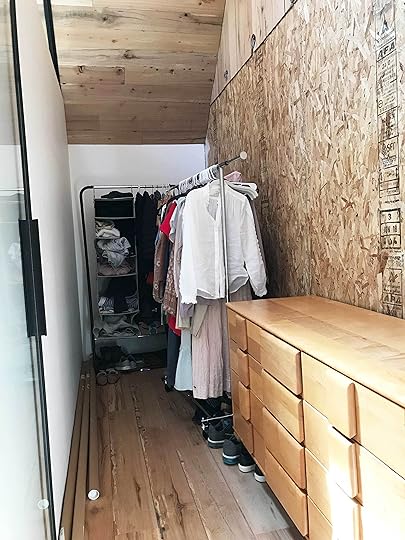
The master closet: It’s going to be finished THIS WEEK, so we’ll reveal it soon. Yay!
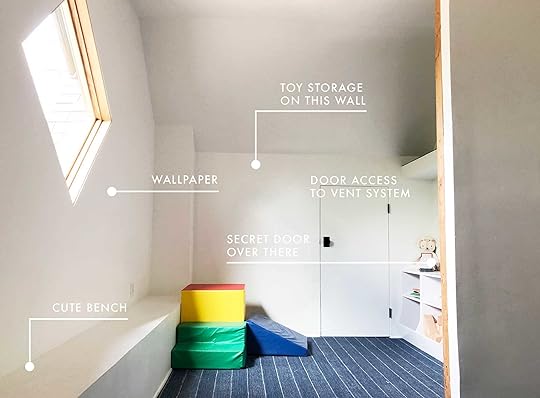
The attic playroom: We decked it out a bit for the reader event this last Saturday and it looks pretty darn cute. So we’ll shoot it and post about it ASAP, but this is what it looked like most recently when we showed you the two designs we were playing around with.
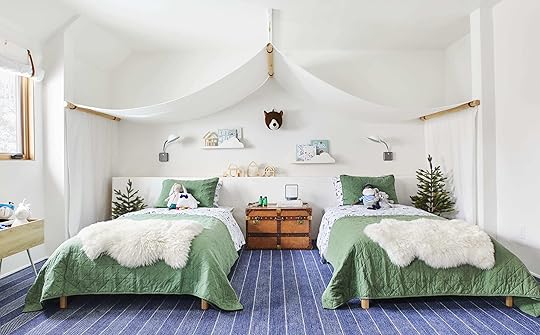
The kids’ room. This room is being reworked a bit because having two twin beds meant that I was basically either crammed with one of them or on the floor. So we shoved them together and threw a king topper on top of them. Why? Because we like to lay together and read as a family and couldn’t in the twin beds. I also decided that the white headboard fabric wall was a missed opportunity to do something more playful and fun. So we are putting a pattern back there. Stay tuned.
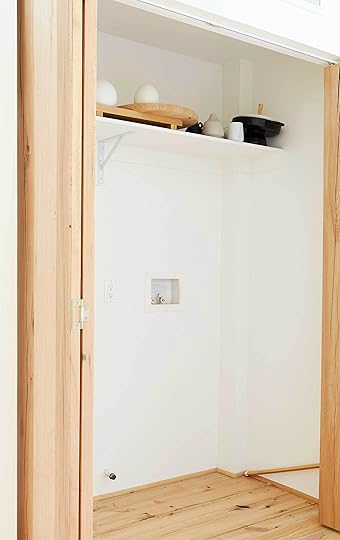
Laundry room: You may remember or not that we had a large laundry closet downstairs, and opted for a small one on the bedroom floor. As of right now, we’ve only installed the upstairs one and are currently shopping for the lower washer and dryer. We designed that space with storage for front-loading, but have recently been told that top-loading is just better in every way (mostly because front-loading can be harder to drain and creates mold).
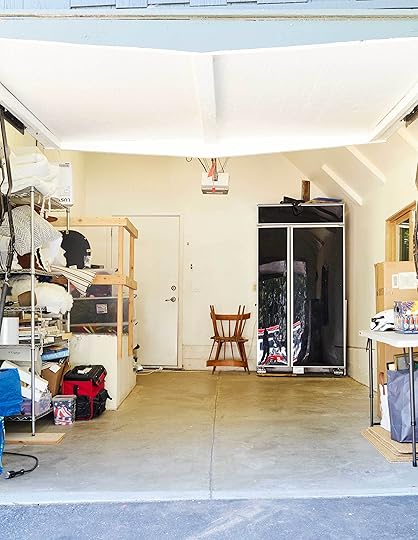
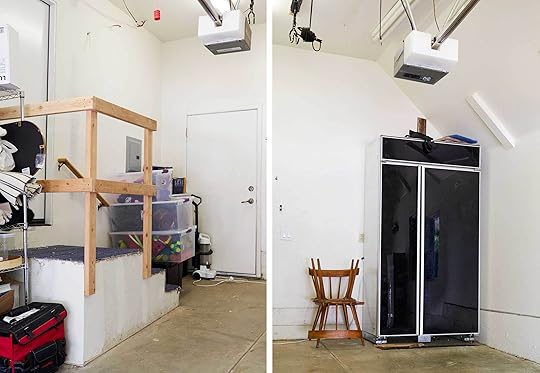
Garage: Right now, it’s too small to put in any modern cars, so it houses our golf cart and so much garbage. But it’s actually really cute: it has super high ceilings and a window. It could absolutely be a game room. Maybe we’d build a carport (or should I say a golf-cart port) and then put a ping pong table or pool table in there. No rush on this, but in a fantasy world that could happen.
So many thanks are in order. My editorial, social, photo and design teams worked their behinds off to not only design the house, but create the posts and link up every single resource. THANK YOU. I wish I could properly explain to you how much work it takes to do this, but it would be so boring. But yes, it takes 12 people to properly document a renovation from beginning to end: 12 VERY talented, creative, hard-working and fun to be around people. The team grew A LOT this year as my workload (and stress load) reached far overcapacity. A huge thanks to Arlyn for leading the editorial, marketing and social teams (Jess, Ryann, Caitlin, Carolina, Mallory, and Chandler) and Sara for leading the production and design teams (Julie, Emily Bowser, Velinda, and Veronica).
So what’s next for the blog besides all the mountain house things I just walked through? Well, we have new projects that we are announcing in September that we are all very excited about. It’s a new strategy and I think one that you will love. Announcement coming soon…
The post What’s Next With the Mountain House (Other Reveals & Upcoming Projects) appeared first on Emily Henderson.
Emily Henderson's Blog

- Emily Henderson's profile
- 10 followers

