
Emily Henderson's Blog, page 250
August 18, 2019
Mountain House Reveal: How We Designed Our Super Kid-Friendly Family Room
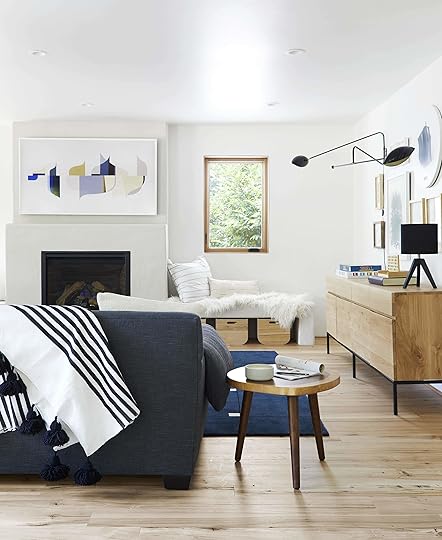
FAMILY ROOM REVEAL TIME (i.e. the last space we’re revealing during mountain house “shark week”—master bedroom and bath are coming up the first week in September. This is the one room that I wanted to feel even more personal and comfortable (if that’s even possible). It’s for our kids because as they are still young, they really like to play near us so while I’m in the kitchen cooking or hanging with friends at the dining table or living room, this is their room.
The Goal for the Space:
This room is where our family plays and makes a massive mess, every day. Games are played and Legos are built all day every day. And after the kids go down (if we possibly stay awake after the requisite 20 minutes we lay with them), this is where Brian and I watch Dead to Me on that awesome Samsung Frame TV.
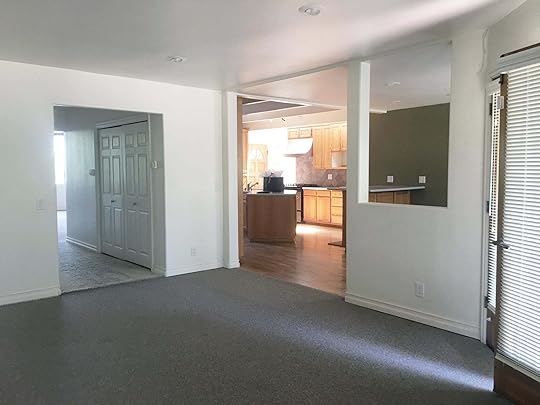
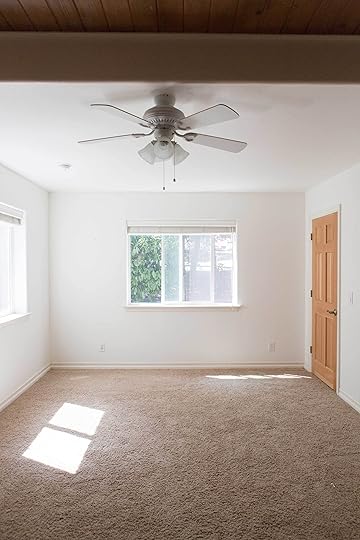
Here’s a peek at it what we were working with before the renovation:

The Challenges:
Ha. So many challenges.
First, as you can see in the “before” shot, this room had a big staircase to the upstairs hangout area (there were actually two, the other being the loft) that we turned into the master suite thus not needing the stairs. We removed them which made the room far more usable, bigger and squared off. It was so awkward before and now it’s probably the most used room in the house.
There wasn’t very much light so the scenic doors and the new windows we sourced through Marvin make it so much brighter and happier. And in here, we didn’t need window treatments for privacy or light so we skipped those so we could see the beautiful white oak frames.
Here’s How We Achieved Our Extremely Kid-Friendly Family Room:

Seamless Storage.
So much storage. The bench could have provided an area to put pretty birch logs, but after that silly debate, we knew that it was going to be for bins of toys. We found really sturdy and affordable bins from Target’s Project 62 collection which fit perfectly both in size and style (how pretty is that wood?). And that credenza from Ethnicraft is seamless with the flooring, thus again keeping it more minimal, simple and clean.
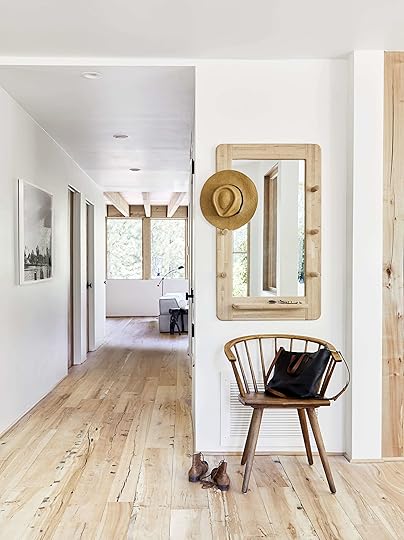
We created a mini back entrance with that vintage mirror from MidcenturyLA that holds all my hats, sunglasses and a pretty sculptural vintage chair. All in the light wood that again echoes the main wood of the reclaimed beech.

Color.
We wanted this room to be more colorful to reflect our kids and feel more playful and happy. So while the rest of the house (besides their room) remains more neutral, that rug and all the artwork make this room feel so alive and young. Now I’m like, wait, should I bring more color into the rest of the house??? (Ha, I already have.)
Kid-Friendly Textiles.
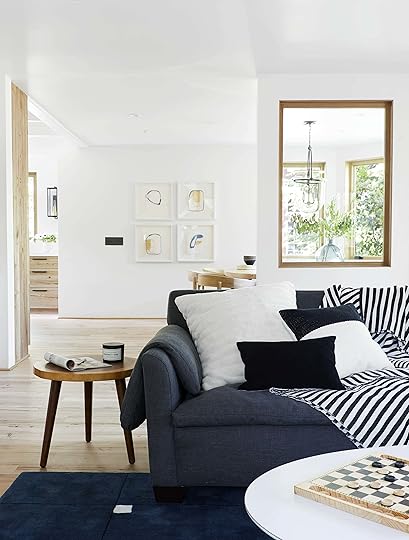
We chose a really deep, cozy sofa custom from Cisco Home that we upholstered in Crypton fabric. It’s dark, but even if it does get greasy popcorn on it, it comes out with a quick wipe because of the Crypton. It has a pillow top cushion that is SO comfy. For this shoot, we took off the back cushions to add more pillows and make it more editorial for the magazine but we actually live with the back cushions on it.
The rug from Nordic Knots is so high quality and beautiful. It’s low-pile, cozy, and dark thus making it a perfect surface to build on. Dark rugs show more lint, sure, but we love this happy hit of blue that the room needed. It’s also wool so it will last forever and actually doesn’t shed like other wool rugs.
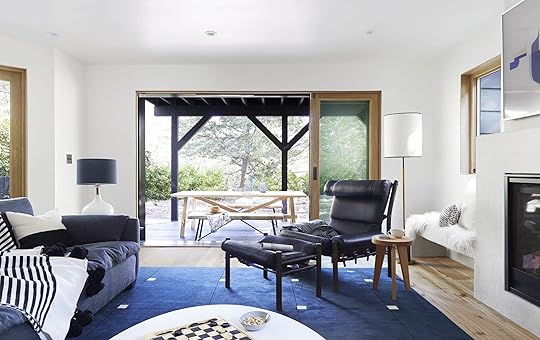
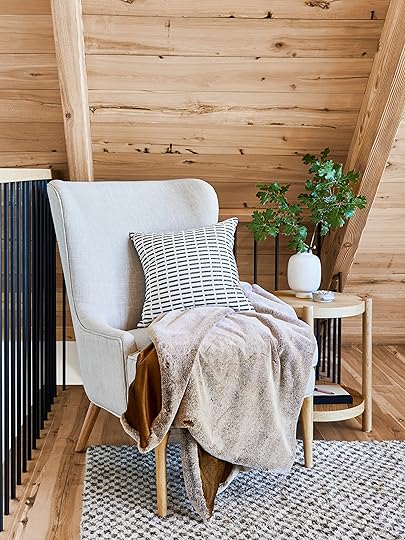
Now technically, this chair (more on it in a sec) isn’t “kid-friendly” but it’s important to break up a really cozy upholstered sofa with another material—leather, wood and brass, and a shape/style that ensures that isn’t your average TV room. Okay, back to the chair. It’s from Norell Furniture and is my dream chair, full stop. I want it in every room, but it’s PERFECT here. It’s so cool with the leather straps and the extended shape of the headrest. It edges up the room and brings it to another level.

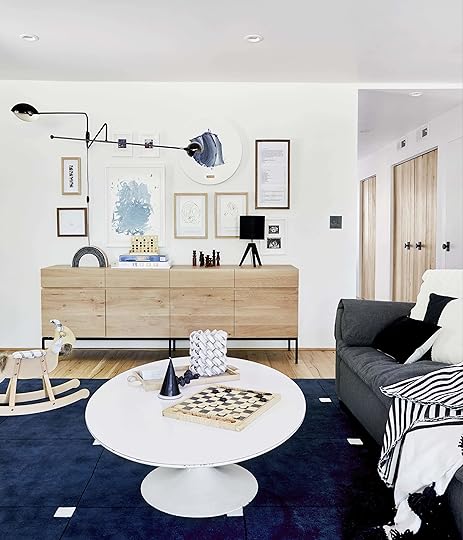
Personal art.
All the pieces in this room are personal to our family. I’m obsessed with this wall and it’s a total conversation piece. Everyone stops and stares and comments. It’s just so special to our family. I included our wedding vow cards, the kids’ ultrasounds, artwork by them, a special piece from Danielle Krysa with a collage of Brian and I incorporated into it, photo strips, Polaroids and the kids’ self-portraits from pre-school. It’s full of life and color and makes me SO HAPPY. We framed them all with Framebridge in a mix of light wood, dark wood and white mostly float mounted so it felt more collected and inviting rather than a grid or something that was more modern. It’s my favorite gallery wall I’ve ever installed and I don’t plan on changing it for the rest of our life here.
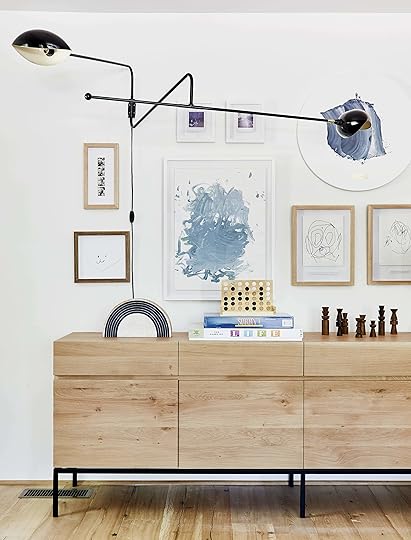
Also, in terms of the double sconce, we got it from Orange and it adds such architectural interest and breaks up the gallery wall in a really unexpected way. The room wouldn’t have been flat without it, but boy does it make it come alive having those arms project into the space.

An “Undercover” TV.
The TV (Samsung’s Frame which has a built-in art screensaver that is VERY convincing) is big, but again, looks like art. The kids know it’s there but are less distracted by it than they would be a huge black box that screams “I hold all contents of Paw Patrol.” As for the fireplace, it’s gas and turned on with a push of the remote. Every morning in the winter, we would put it on and immediately the room felt so cozy. It’s only a little hot to the touch (we normally had the flame on low; you can control the heat and the height of the flame). Fireplaces are magic, they just are, and create an ambiance in a mountain house that is very very welcomed. Sometimes the kids just cuddle in front it and puzzle for hours.
Easy Access to Outdoors.
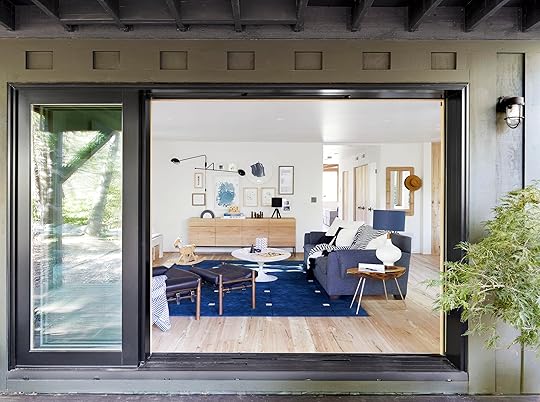
The scenic doors (by Marvin) open to the outside and they stay open all days when it’s cool enough outside, which means the kids can run out to the back without having to ask us to open the heavy doors for them. They are just stunning and the white oak finish is seamless with our reclaimed beech flooring. It’s incredible in both function and style.

When the four-panel doors are all the way open, it really just feels like the outdoor patio is part of this room and we can watch the kids from inside because it honestly feels like we’re out there with them.
How We Love In It Now (& Will We Change Anything?):

This room gets USED. For the magazine shoot, the direction was to make it less “kid” so we put cushions on the benches, but in reality, those are surfaces for Legos and doll-dressing. I couldn’t handle all the pillow styling, but they certainly look more fun and editorial than not having pillows. So we put the back cushions on and just have a throw for snuggling without the daily pillow placement pressure. 


August 17, 2019
Mountain House “Reveal”: The Dining Room Built-in Dilemma (+ The 3 Mistakes We Made)


MOUNTAIN HOUSE REVEAL, #6.
Alright, I’m going to say this from the get-go: The dining room is less of an “after” because things are changing already and mistakes were made (but check out the living room and loft for two spaces with little changing). While most people would consider it “done,” there were some hiccups in the final install of the upholstery the week of the shoot that requires a redo. SUPER FUN. So this post will be walking you through this problem, process and potential solution. But we wanted to shoot it for the magazine so we pulled it together in time—more below.
But first, here is where we started.

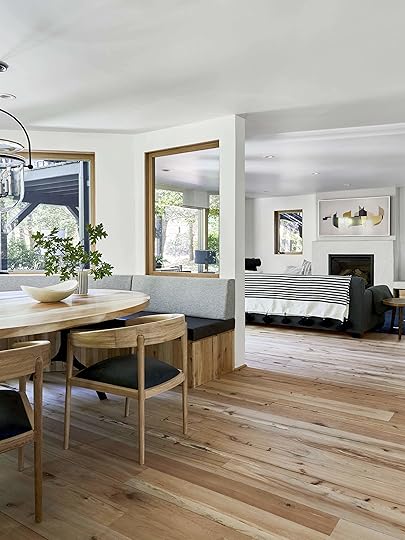
The dining room is attached to the kitchen and opens to the family room. The layout is DREAMY and incredibly livable, especially for entertaining. While I love an open kitchen/family room, having some separation for conversation is just awesome. I can watch the kids while cooking and able to have grown up conversations (although we all know they are ALWAYS LISTENING).
The Goal of this Room:
I wanted a really comfortable inviting place to eat big meals with our friends and family, a place where people could sit for hours and talk. Also, I wanted it to feel like a sunroom, surrounded by windows.
You may or may not remember that when we first moved in in January, we had a dining room floating in the middle, like so:

But everyone wanted to sit at the end of the table near the windows, plus the table blocked the flow a bit as it jutted closer to the kitchen, so we figured, why not just do my dream built-in? So we removed a light, leaving just this one closest to the window and had a custom built-in made by Ross Alan Reclaimed Lumber—more on that later.
Here is how we shot it for House Beautiful:

I think it looks really pretty, for sure, but yes there were some hiccups and will have some changes. See this process post for even more back story of why we did this and how we ended up here.
Let’s break those down.
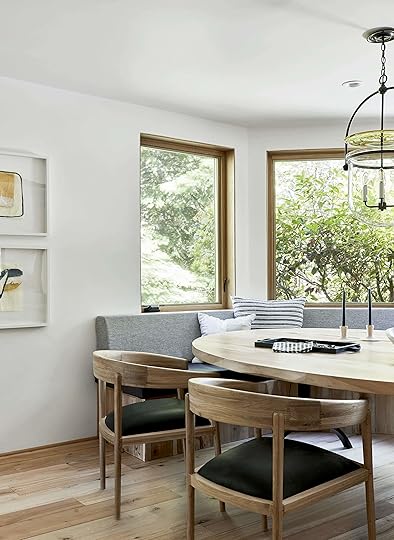
Mistake #1: The Back Cushion Size is Wrong.
These came in 2 inches too deep/wide, well, see for yourself:

How did this happen?
Well, first off, needing to make some fast design decisions led to us just choosing a standard rather boring taper back cushion style. Listen, it’s the most ergonomic and comfortable so we went with a safer more functional choice rather than doing something that would, frankly, look more interesting and stylish. The seats are deep so we knew that just a hanging cushion or whatever awesome trendy choice wouldn’t actually provide the back support anyone actually needs and might be too deep anyway. We were also working with someone we hadn’t used before (we needed to hire a local since it required templating and multiple job site visits) and didn’t know if they could execute something really complicated and custom. And frankly, due to all the crazy angles of the windows (that are not standard and each is different), we were fearful that it would turn out well, both design-wise and execution. We debated doing something hanging, or a horizontal channel tufted look.
See. She BULKY. Of course, it’s EXTREMELY comfortable, hits your back at the perfect place and even gives you an armrest on top, but it’s just so big, distracting and oversized. Yes, we had a drawing with very specific measurements and yes, our upholsterer made it bigger than our agreed-upon dimensions (2 inches deeper and higher—you can’t really see it in the photo but they hang over the bottom bench and also are slightly above the window) but honestly I’m not convinced that it would look good/interesting enough if they were smaller.
In terms of cost, we spent just over $1,500 on foam alone (but for both the bottom and back cushions), and another $700ish on the upholstery work (though that was a rush job, so it might’ve been cheaper if it didn’t have to get done so quickly). That’s a total of just under $2,300 WITHOUT the fabric (which was gifted, due to a partnership I have with Crypton). So not only did we waste the fabric but the labor time and foam expenses really added up. Cool! Next mistake?
Mistake #2: The Colorway Doesn’t Feel Right.

Regarding the fabric, we went with a charcoal black Crypton leather in a pretty matte finish to tie in with the kitchen island (paired with their “London” fabric in gray, well, technically “Atmosphere”). GREAT. We wanted leather because we knew that people would need to slide all the way around, but mostly for durability. We worked with Crypton because it’s a performance fabric that doesn’t allow for even oil stains. We’ll do a whole post on it and show you, but we tried it on the back of the cushion, rubbed it in and let it sit and it totally came out. I like black and I like gray, but together, they just don’t feel right in this room and the word “corporate” keeps coming out of my mouth. There is something too “board room” about it all, too cold. Not vintage-inspired. Not me. We went with two-tone because I like the style/look of it but also because that would be WAY too much black leather. And while I love this gray, the gray/black combo is just not happy enough for me.
I wanted green leather, Brian said absolutely not, saying that it would look to kitschy, dated and “diner” but I don’t think he had the vision. It would be a dark green, not a bright emerald vinyl but I couldn’t convince him. Then I wanted a slate blue leather but it wasn’t in stock to get in time for the shoot. So we settled on the black leather.
So for the shoot, we styled it with lots of pillows, which I think actually LOOK really cute, but, as most of you can presume, are VERY ANNOYING TO STYLE EVERY DAY. Our kids aren’t exactly mindful of their placement, and they fall down all the time.
We tried it with the back cushion AND pillows (below), hoping that the pillows would distract from the bulkiness.

It’s fine, and likely how we’d live with it for now, but nothing can hide those bulky generic cushions.
So what are we going to do? I don’t know. I kinda just want to get the slate blue leather that I originally wanted and wait for it to come back in stock, now that we don’t have a deadline. Then I think we do need to attach something more slim to the wall for the back cushion, so basically redesign it make it happier, more stylish and cooler. And then for comfort, we might need some custom cushions made in a kid-friendly fabric to break it up and for back support. It’s a whole thing, guys. I like the gray and can’t really go any lighter, but we might just choose one fabric and not two.
Mistake #3: The Light Fixture is Too Big and Yet Too Small.
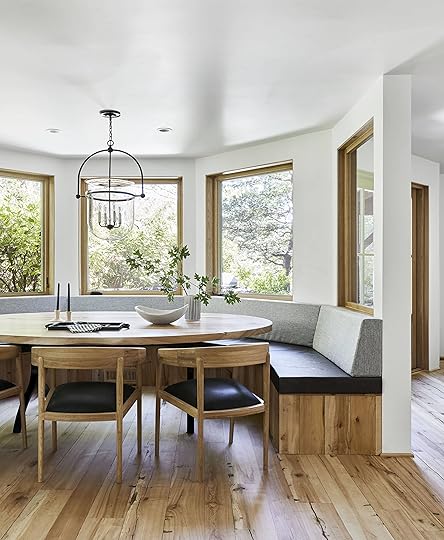
Let me explain. As you saw earlier in the post, the table was originally planned for the middle of the room and thus we had two of these fixtures from The Urban Electric Co. They are stunning and feel modern while having a bent towards traditional, though perhaps too traditional for the rest of the house. We took away the one that was floating in the middle of the room, but lucky for us the junction box was about right for the nook so we left it. Scale-wise, it’s wrong. Essentially, it’s too narrow—not taking up enough of the horizontal space, while also being too large vertically. What I didn’t really account for is that these kinds of massive fixtures really need high ceilings.
Luckily for my friends, we have a place for these two pendants in a future project—a grand English Tudor with a big kitchen island and high ceilings. They were up last weekend and LOVE the fixture and since I’m helping them with their house and obviously don’t want to waste it, we’ll use them in that project. Meanwhile, I’m still searching for the perfect fixture that is both linear without competing with the Katy Skelton island pendant, minimal so it doesn’t black the window view too much while providing good light, and more horizontal without feeling huge. It’s hard.
There’s Good News, Though:
Our custom table is beautiful.

Every single person who walks into this house LOVES it so much. We commissioned Ross Alan (they did all the woodwork throughout the house) to make it and chose the same beech wood as the floor and base of the built-in. It was extremely tricky to figure out the size of it with all the angles of the bench, making sure that each person is close enough to it to eat in comfort, overlapping around 1 inch.

They even put these beautiful butterfly joints in 3-4 appropriate places. LOOK AT THAT GRAIN. It’s just so beautiful. There is even a live edge quality to the perimeter, not all the way around but on the front. There were no live edge oval tables out there, and definitely not in our specific size.
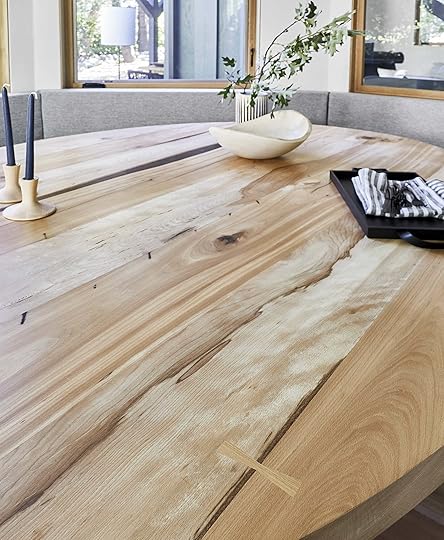
The table was originally fabricated with a big crack in it, intentionally, because we didn’t want it to feel too perfect or mass-manufactured, but the crack was bigger than any of us predicted and a bottle of wine certainly could have toppled over if set down near it. The solution (which admittedly I was nervous about) was to fill it with acrylic. It looks SO good and adds some depth seeing that darker tone, while being flat (you can see it on the table on the left side of the above photo).
More Good News:
The Marvin windows and the new interior window are beautiful.
Obviously, the white oak windows are stunning, and when you open them in the morning while drinking coffee, it’s so dreamy. We ended up putting an interior window where the pony wall was, which was YOUR idea, so thank you so much.
The chairs (from Industry West) are also awesome, so heavy, sturdy and the wood works so well with ours. They aren’t visually too heavy due to the open back, but they are so comfortable with the cushion and the arms. We also love that the shape of the arms works so well with the shape of the table.
How Do We Live In It Now?
Well, you know all the changes that we are going to make, but for now, we are going to live with the gray back cushions with some throw pillows to break it up. All those pillows you saw, by the way, we either already had OR they are from Target‘s new fall collection which I got my hands on early. They’ll be available August 25th.
Many of you were concerned about the size of the table/banquette and the people in the back being trapped. So far, since it’s summer, we eat almost all of our meals outside except breakfast which is just a small group of us. When it’s just the four of us, we use the chairs and sit at the edge of the built-in which is admittedly a little awkward. But I’m hoping that during the winter when we have a big Christmas dinner, it will be amazing to be able to seat so many people comfortably and I’ve already volunteered to be one of the interior trapped people. Passing food is admittedly hilarious and awkward—both people have to stand up to be able to reach across to pass something. We joke around about a lazy Susan when this happens. But it had to be this big to work with the space and shape of the windows/walls. I suppose I can give you an update next winter if the size of it and the “trappiness” of the back seats will bother us a lot or just be worth it.
One more peek at it before we go with some side by side before and afters.


I’d love to know ANY suggestions AGAIN regarding the back cushions. One more thought: if I didn’t have kids, I think a white back cushion would look best, but even if it’s Crypton, you have to wipe away marinara paw prints so we’d have to use leather and the notion of white leather is terrifying to me but maybe there is a pretty matte white leather out there? And then do horizontal channel tufting with a pretty wood frame around it?
Let the debate/advice begin, please.
August 16, 2019
Mountain House Reveal: The Upstairs Guest Bath That Used to Be a Closet (and a Peek Into the Bedroom)


MOUNTAIN HOUSE REVEAL #5. We’re in the home stretch now, having revealed the living room and entry, the downstairs guest bed and bath, the upstairs loft, kids/hall bath and now…
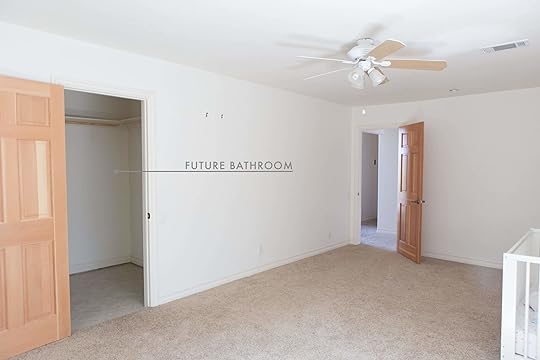
Welcome to the upstairs guest bathroom (with a peek into the bedroom that isn’t quite finished yet). This bathroom is the smallest, but boy do I love it, with only two things that I would have done differently (keep reading). Let’s get into it:
First, to place you in this house, here’s a floorplan of where we are:

Originally, this bathroom didn’t exist at all. It was a massive closet, which we felt would be better used as a bathroom. How lovely is it that each guest has their own bathroom? VERY.


The Goal of the Room:
Well, it was to create an en-suite bathroom with some luxuries for our guests. Since it’s on the smaller size, I wanted to keep it bright, simple and quiet. You won’t see it in today’s reveal, but for anyone wondering, yes we replaced the closet as I wouldn’t leave a room without one. Because this was always intended to be used for guests, there was no need for such a large walk-in closet, so instead, we built out a smaller more traditional “reach-in” closet on the wall next to the entry door of the room (more on that to come in future posts).
If you want all the process and the story behind each decision, read this process post. I REALLY love how it turned out and it’s far more “me” than the sexy black bathroom downstairs (which I also love). Here’s how we went about this redesign.
We Chose the Materials First:
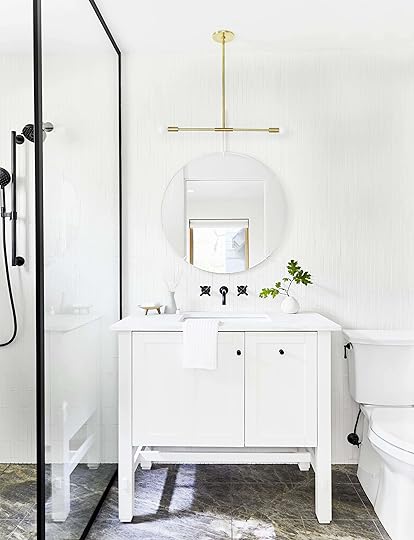
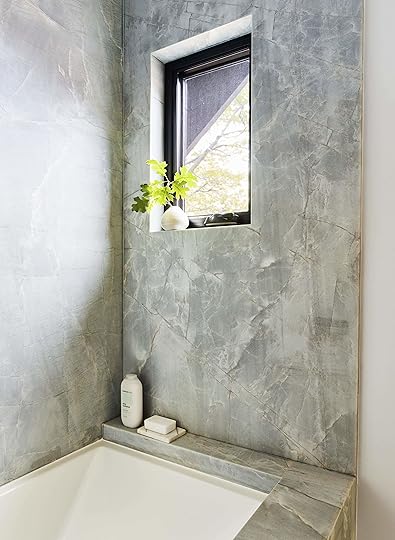
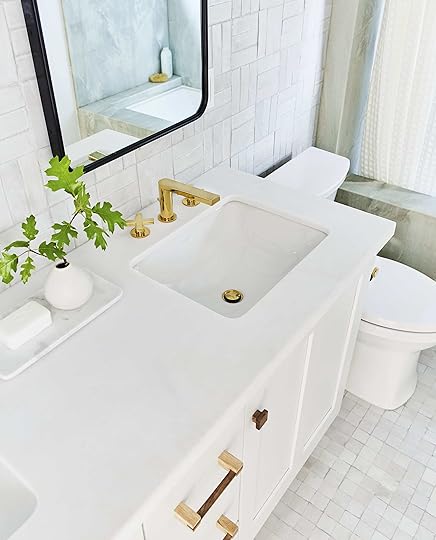
The stone slab tile floor from Bedrosians felt so “mountain” without it being slate (which we used in the master). It’s so warm and yet modern, with an amazing colorway and texture. The countertop is Sky White slab marble from Bedrosians that we had leathered because it was polished (but honed would have been great in here, too).
HOT TIP: If you want more of a “modern rustic” feel, opt for matte surfaces. In general, that’s what we did in this house (including the window frames from Marvin, all flooring/cabinetry and all stone). While I’m NOT opposed to shiny surfaces (I love how they bounce the light around), it just reads as more “glam” and sometimes that’s not what you’re going for stylistically.

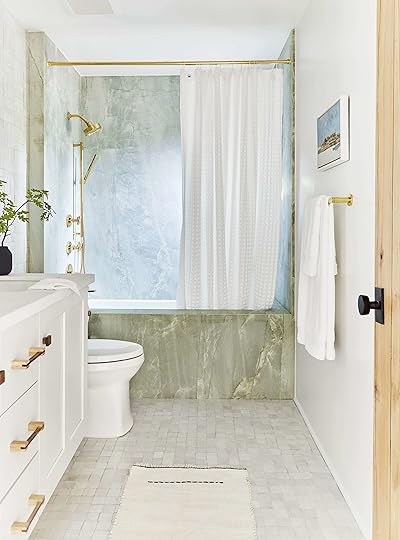
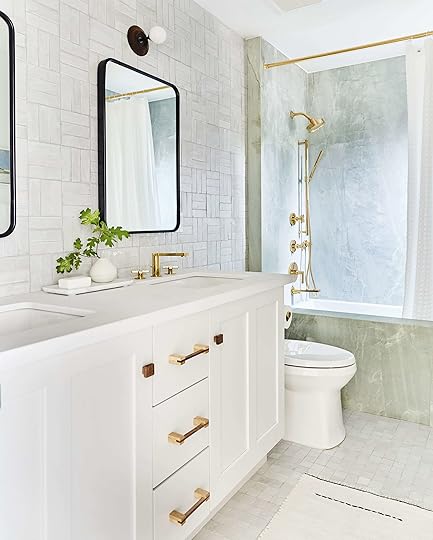
We complemented the floor stone with this incredibly special handmade tile from Pratt and Larson that we installed in the “double stacked and staggered” pattern (thank you Julie!). It’s a super simple 1×8 matte white, but how we applied it makes me so happy. I’m really proud of this tile because it accomplished exactly what we wanted in this house: simple but special. It has so much movement, reflects the light beautifully but is so quiet. We went for it and did it on the entire vanity wall and shower surround. We even rotated it on the bottom half of the shower to be horizontal, under the wall to wall ledge (which we opted for over a traditional shower niche). I think these kinds of details make this room feel so custom. Will everyone notice these details? NOPE, but as a design team, we are really proud.

The faucet suite might be my favorite in the house (and my favorite modern faucet in general). It’s the Purist line from Kohler in their flat black finish (but you can get it in several other different finishes). I love a cross handle and always will. And I know that the wall-mount faucet/under-mount sink combination was something I hadn’t seen that much around so I was nervous that it wouldn’t work, but GUESS WHAT? It’s GREAT. It’s so minimal and feels so modern and fresh.
For the vanity, we chose the Tresham 36-inch because I liked that it gave this room more of a clean country vibe, contrasting the modernity of the rest of the pieces. It warms it up a bit and had a Scandi vibe to me.

You might notice that there are no handles in the shower. Before you jump to the conclusion that we made a terrible mistake (ha), let me talk about why. We used the smart line from Kohler that uses a remote prompt to turn them on called a DTV panel. We put one in easy reach in the shower and another outside the shower, which lets you turn the shower on and get to temperature BEFORE you step into it. It’s very impressive to our guests and works great. You can set the exact temp that you like and of course adjust if you need while in the shower. If you’re interested in all the features of the DTV, we outlined them in this process post.

The DTV panel requires that you put the electrical components in the bathroom so we used this as an excuse to build a custom cabinet that houses them on the bottom (like 8″ deep and 12″ wide, so not very big).
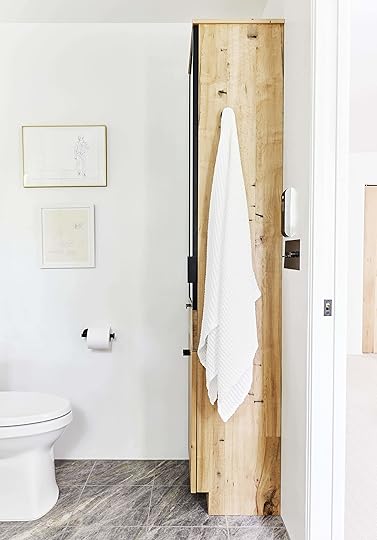
We commissioned Ross Alan to make it (they did all the custom woodwork throughout the home) and Julie executed the design. It’s BEAUTIFUL. We house all our extra backup soaps/paper towels for the whole house here.

I love the glass panel breaking up the heaviness of the wood, and the simplicity of the hardware. Great job team!!! Ross Allan obviously did a wonderful job constructing it. The wood seriously warms up this room.

No bathroom is complete without a toilet, so here is the other side of the room. We chose Kohler’s simple Corbelle toilet because I think it has a timeless design, with flat sides for easier cleaning. We also used this in the hall bath upstairs and the powder bathroom downstairs. Honestly, “cool” and “toilet” typically are not words that go in the same sentence, but for real, this is a pretty great piece. It’s one of Kohler’s newest toilets and has something called ContinuousClean technology (this fights germs, stains and other yucky stuff) and CleanCoat technology which together actually and visually keeps the toilet cleaner longer. Every time you flush, ContinuousClean dispenses a small, consistent dosage of your toilet bowl cleaner tablet of choice that’s housed in the tank away from kids and pets. Because it’s special and optimized, each tablet can last more than a year (instead of dropping one into your tank and running through them within weeks).
What Would I Change?
Now, I’m not sharing all the things I’d change in every room to seem dissatisfied. I LOVE this house and how things turned out, but there are little things here and there I think would be smart for me to share with you in case you go into your own projects and it could be helpful. Here, we didn’t realize that the mirror hanger (by Moebe) and the light fixture (from Allied Maker) would hit each other, visually.
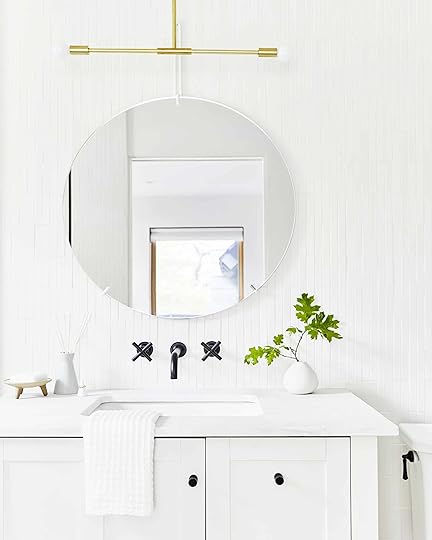
I love both of them so much, but the stem of the light is RIGHT in front. Also, I thought that we ordered the pendant in black, but nope, we went with gold and I wish it were black (FYI, this model is discontinued, but this is a similar one, plus we got it in a custom width and drop which they’re able to do). I might take it down and get it powder-coated, but it definitely doesn’t bother me enough to prioritize it into my life right now. Nor will I likely change out the mirror because I love it, and the hardware is white so literally no one would notice this except us. We put off sourcing the mirror until like two weeks before the shoot because it seemed to be an easy thing to find so we didn’t put it in the SketchUp rendering. Had we done that, we would have caught this.
But LITERALLY no one notices except me.

Lastly, the shower enclosure debate.

I LOVE this for the following reasons:
It goes floor to ceiling. We don’t even have a dam or bridge at the bottom.
It’s so simple and modern and reduces the number of lines that your eye sees (both on top and bottom).
It’s fully encased in black steel which mimics the window, faucets and just looks so modern and edgy (plus by putting steel on the edge, you don’t see the green of the tempered glass which I don’t like).
Now, I haven’t personally taken a shower in here, but will predict the following issues: it’s likely cold because it’s not fully encased in glass. We knew this, we were amply warned by our contractor and chose to do it anyway because it’s a guest bathroom that wouldn’t be used THAT often and we wanted the look. And no, we didn’t heat the floor in here to save money. But you should know that not having a full enclosure might be cold. We did so much research to find a floor to ceiling glass track solution, but couldn’t. We could have done a door, and honestly, we know that this is something you can add later so we figured we’d do the half wall for now and if our guests complain in the winter, we could customize and add a door.
Additionally, if you are reckless with your hand shower, yes it can get the bathroom floor outside the shower wet. I LOVE how it looks without the bridge, but yes, it can be slightly messier. The flooring slopes down to the linear drain in the middle so if you are a sophisticated showerer, you’ll be fine, but without a full enclosure or a bridge, you have a couple of risks.
But enough about that stuff…I LOVE this bathroom. It’s so quiet and modern, but it really does feel customized and so intentionally designed.

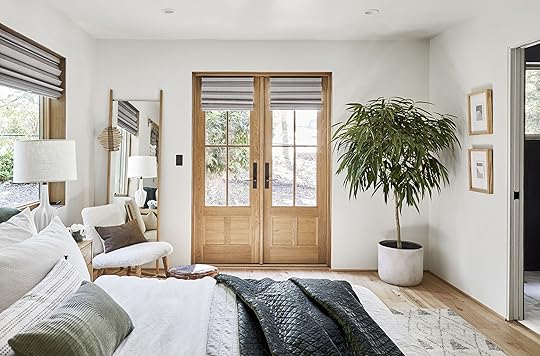
On to the bedroom…

For the House Beautiful shoot, we ordered this bed from Thos. Moser (my favorite bed ever) in a king, but it wasn’t going to arrive in time so we borrowed the queen.
The problem is that to center the queen bed to the room properly, it would hit the windows super awkwardly so we only shot 1/2 the bed, cheating it over. That’s all to say that the full reveal is coming soon as we just got the king bed and it looks soo good. In fact, as of right now we have both beds in there and it’s going to be the most gorgeous bunk room ever. That sconce by One Forty Three is awesome, that bed is a dream and all the bedding and chair is from Target’s new fall line that’s being released August 25. The window treatments are Hunter Douglas (and on remote, it’s wonderful) through Decorview and that vase is by Sheldon Ceramics.
Stay tuned for the full reveal.
And finally, I’ll end this with some satisfying before and afters.


Bathroom Resources
Finishes:
Pure White by Sherwin-Williams | Vanity Countertop Sky White by Bedrosians Tile & Stone | Flooring in Allure Marble by Bedrosians Tile & Stone | Wall Tile & Surround in Custom 1×8 in PUWM by Pratt & Larson | Grout Color
Lighting:
Brass Pendant by Allied Maker (similar)
Furniture & Decor:
Reclaimed Beechwood Cabinet by Ross Alan Reclaimed Lumber | Mirror by Moebe | Gray Oil Diffuser by Target | White Vase by West Elm | Towels by Parachute | Ring Cone by Muji | Soap Dish from Urban Outfitters | Wire Baskets from Target | Canisters by CB2 | Unisex Perfume by Target | Body Wash by Native | Pumice Stone | Loofah Pad | Art and Apothecary Jars (vintage)
Fixtures by Kohler:
Vanity | Faucet | Sink | Shower Head | Toilet | P-Trap | Handshower | Ceramic Valve | Thermostatic Valve | DTV Prompt Digital Shower Interface
Hardware:
Toilet Paper Holder by Kohler | Towel Ring by Kohler | Towel Bar by Kohler | Robe Hook by Kohler | Vanity and Cabinet Knobs by Schoolhouse | Cabinet Pull by Schoolhouse | Pocket Door Hardware by Rejuvenation | Switches and Outlets in Antique Bronze by Forbes and Lomax | Glass Shower Wall (custom)
Window:
Matte Black Fiberglass Ultimate Casement Narrow Window Frame by Marvin
Bedroom Resources
Finishes:
Pure White by Sherwin-Williams | Treemont Stria Carpet in Linen by Stark Carpet
Lighting:
Potence Style Otis Light by One Forty Three
Furniture & Decor:
Bed by Thos. Moser | Side Table by CB2 | Ceramic Bowl by Ben Medansky | Vase by Sheldon Ceramics | Sherpa Chair by Target (coming soon) | Beads (vintage)
Bed Linens:
Duvet Cover by Target | Shams by Target | Sheets by Target | Velvet Quilt by Target (coming soon) | White Lumbar Pillow by Target (coming soon) | Pink Lumbar Pillow by Target (coming soon)
Windows & Doors:
White Oak Ultimate Casement Narrow Window Frame by Marvin | Window Treatments by Hunter Douglas through Decorview
Thanks again to my incredible design team—Julie, Velinda and Grace de Asis. These spaces were styled by me with Emily Bowser and Erik Staalberg. Our contractor was Jeff Malcolm and our architect (that we used at the beginning of the project) was John Lyles.
***Photography by Sara Ligorria-Tramp
The post Mountain House Reveal: The Upstairs Guest Bath That Used to Be a Closet (and a Peek Into the Bedroom) appeared first on Emily Henderson.
Mountain House Reveal: The Upstairs Guest Bath That Use to Be a Closet (and a Peek Into the Bedroom)
MOUNTAIN HOUSE REVEAL #5. We’re in the home stretch now, having revealed the living room and entry, the downstairs guest bed and bath, the upstairs loft, kids/hall bath and now…
Welcome to the upstairs guest bathroom (with a peek into the bedroom that isn’t quite finished yet). This bathroom is the smallest, but boy do I love it, with only two things that I would have done differently (keep reading). Let’s get into it:
First, to place you in this house, here’s a floorplan of where we are:
Originally, this bathroom didn’t exist at all. It was a massive closet, which we felt would be better used as a bathroom. How lovely is it that each guest has their own bathroom? VERY.
The Goal of the Room:
Well, it was to create an en-suite bathroom with some luxuries for our guests. Since it’s on the smaller size, I wanted to keep it bright, simple and quiet. You won’t see it in today’s reveal, but for anyone wondering, yes we replaced the closet as I wouldn’t leave a room without one. Because this was always intended to be used for guests, there was no need for such a large walk-in closet, so instead, we built out a smaller more traditional “reach-in” closet on the wall next to the entry door of the room (more on that to come in future posts).
If you want all the process and the story behind each decision, read this process post. I REALLY love how it turned out and it’s far more “me” than the sexy black bathroom downstairs (which I also love). Here’s how we went about this redesign.
We Chose the Materials First:
The stone slab tile floor from Bedrosians felt so “mountain” without it being slate (which we used in the master). It’s so warm and yet modern, with an amazing colorway and texture. The countertop is Sky White slab marble from Bedrosians that we had leathered because it was polished (but honed would have been great in here, too).
HOT TIP: If you want more of a “modern rustic” feel, opt for matte surfaces. In general, that’s what we did in this house (including the window frames from Marvin, all flooring/cabinetry and all stone). While I’m NOT opposed to shiny surfaces (I love how they bounce the light around), it just reads as more “glam” and sometimes that’s not what you’re going for stylistically.
We complemented the floor stone with this incredibly special handmade tile from Pratt and Larson that we installed in the “double stacked and staggered” pattern (thank you Julie!). It’s a super simple 1×8 matte white, but how we applied it makes me so happy. I’m really proud of this tile because it accomplished exactly what we wanted in this house: simple but special. It has so much movement, reflects the light beautifully but is so quiet. We went for it and did it on the entire vanity wall and shower surround. We even rotated it on the bottom half of the shower to be horizontal, under the wall to wall ledge (which we opted for over a traditional shower niche). I think these kinds of details make this room feel so custom. Will everyone notice these details? NOPE, but as a design team, we are really proud.
The faucet suite might be my favorite in the house (and my favorite modern faucet in general). It’s the Purist line from Kohler in their flat black finish (but you can get it in several other different finishes). I love a cross handle and always will. And I know that the wall-mount faucet/under-mount sink combination was something I hadn’t seen that much around so I was nervous that it wouldn’t work, but GUESS WHAT? It’s GREAT. It’s so minimal and feels so modern and fresh.
For the vanity, we chose the Tresham 36-inch because I liked that it gave this room more of a clean country vibe, contrasting the modernity of the rest of the pieces. It warms it up a bit and had a Scandi vibe to me.
You might notice that there are no handles in the shower. Before you jump to the conclusion that we made a terrible mistake (ha), let me talk about why. We used the smart line from Kohler that uses a remote prompt to turn them on called a DTV panel. We put one in easy reach in the shower and another outside the shower, which lets you turn the shower on and get to temperature BEFORE you step into it. It’s very impressive to our guests and works great. You can set the exact temp that you like and of course adjust if you need while in the shower. If you’re interested in all the features of the DTV, we outlined them in this process post.
The DTV panel requires that you put the electrical components in the bathroom so we used this as an excuse to build a custom cabinet that houses them on the bottom (like 8″ deep and 12″ wide, so not very big).
We commissioned Ross Alan to make it (they did all the custom woodwork throughout the home) and Julie executed the design. It’s BEAUTIFUL. We house all our extra backup soaps/paper towels for the whole house here.
I love the glass panel breaking up the heaviness of the wood, and the simplicity of the hardware. Great job team!!! Ross Allan obviously did a wonderful job constructing it. The wood seriously warms up this room.
No bathroom is complete without a toilet, so here is the other side of the room. We chose Kohler’s simple Corbelle toilet because I think it has a timeless design, with flat sides for easier cleaning. We also used this in the hall bath upstairs and the powder bathroom downstairs. Honestly, “cool” and “toilet” typically are not words that go in the same sentence, but for real, this is a pretty great piece. It’s one of Kohler’s newest toilets and has something called ContinuousClean technology (this fights germs, stains and other yucky stuff) and CleanCoat technology which together actually and visually keeps the toilet cleaner longer. Every time you flush, ContinuousClean dispenses a small, consistent dosage of your toilet bowl cleaner tablet of choice that’s housed in the tank away from kids and pets. Because it’s special and optimized, each tablet can last more than a year (instead of dropping one into your tank and running through them within weeks).
What Would I Change?
Now, I’m not sharing all the things I’d change in every room to seem dissatisfied. I LOVE this house and how things turned out, but there are little things here and there I think would be smart for me to share with you in case you go into your own projects and it could be helpful. Here, we didn’t realize that the mirror hanger (by Moebe) and the light fixture (from Allied Maker) would hit each other, visually.
I love both of them so much, but the stem of the light is RIGHT in front. Also, I thought that we ordered the pendant in black, but nope, we went with gold and I wish it were black (FYI, this model is discontinued, but this is a similar one, plus we got it in a custom width and drop which they’re able to do). I might take it down and get it powder-coated, but it definitely doesn’t bother me enough to prioritize it into my life right now. Nor will I likely change out the mirror because I love it, and the hardware is white so literally no one would notice this except us. We put off sourcing the mirror until like two weeks before the shoot because it seemed to be an easy thing to find so we didn’t put it in the SketchUp rendering. Had we done that, we would have caught this.
But LITERALLY no one notices except me.
Lastly, the shower enclosure debate.
I LOVE this for the following reasons:
It goes floor to ceiling. We don’t even have a dam or bridge at the bottom.
It’s so simple and modern and reduces the number of lines that your eye sees (both on top and bottom).
It’s fully encased in black steel which mimics the window, faucets and just looks so modern and edgy (plus by putting steel on the edge, you don’t see the green of the tempered glass which I don’t like).
Now, I haven’t personally taken a shower in here, but will predict the following issues: it’s likely cold because it’s not fully encased in glass. We knew this, we were amply warned by our contractor and chose to do it anyway because it’s a guest bathroom that wouldn’t be used THAT often and we wanted the look. And no, we didn’t heat the floor in here to save money. But you should know that not having a full enclosure might be cold. We did so much research to find a floor to ceiling glass track solution, but couldn’t. We could have done a door, and honestly, we know that this is something you can add later so we figured we’d do the half wall for now and if our guests complain in the winter, we could customize and add a door.
Additionally, if you are reckless with your hand shower, yes it can get the bathroom floor outside the shower wet. I LOVE how it looks without the bridge, but yes, it can be slightly messier. The flooring slopes down to the linear drain in the middle so if you are a sophisticated showerer, you’ll be fine, but without a full enclosure or a bridge, you have a couple of risks.
But enough about that stuff…I LOVE this bathroom. It’s so quiet and modern, but it really does feel customized and so intentionally designed.
On to the bedroom…
For the House Beautiful shoot, we ordered this bed from Thos. Moser (my favorite bed ever) in a king, but it wasn’t going to arrive in time so we borrowed the queen.
The problem is that to center the queen bed to the room properly, it would hit the windows super awkwardly so we only shot 1/2 the bed, cheating it over. That’s all to say that the full reveal is coming soon as we just got the king bed and it looks soo good. In fact, as of right now we have both beds in there and it’s going to be the most gorgeous bunk room ever. That sconce by One Forty Three is awesome, that bed is a dream and all the bedding and chair is from Target’s new fall line that’s being released August 25. The window treatments are Hunter Douglas (and on remote, it’s wonderful) through Decorview and that vase is by Sheldon Ceramics.
Stay tuned for the full reveal.
And finally, I’ll end this with some satisfying before and afters.
Bathroom Resources
Finishes:
Pure White by Sherwin-Williams | Vanity Countertop Sky White by Bedrosians Tile & Stone | Flooring in Allure Marble by Bedrosians Tile & Stone | Wall Tile & Surround in Custom 1×8 in PUWM by Pratt & Larson | Grout Color
Lighting:
Brass Pendant by Allied Maker (similar)
Furniture & Decor:
Reclaimed Beechwood Cabinet by Ross Alan Reclaimed Lumber | Mirror by Moebe | Gray Oil Diffuser by Target | White Vase by West Elm | Towels by Parachute | Ring Cone by Muji | Soap Dish from Urban Outfitters | Wire Baskets from Target | Canisters by CB2 | Unisex Perfume by Target | Body Wash by Native | Pumice Stone | Loofah Pad | Art and Apothecary Jars (vintage)
Fixtures by Kohler:
Vanity | Faucet | Sink | Shower Head | Toilet | P-Trap | Handshower | Ceramic Valve | Thermostatic Valve | DTV Prompt Digital Shower Interface
Hardware:
Toilet Paper Holder by Kohler | Towel Ring by Kohler | Towel Bar by Kohler | Robe Hook by Kohler | Vanity and Cabinet Knobs by Schoolhouse | Cabinet Pull by Schoolhouse | Pocket Door Hardware by Rejuvenation | Switches and Outlets in Antique Bronze by Forbes and Lomax | Glass Shower Wall (custom)
Window:
Matte Black Fiberglass Ultimate Casement Narrow Window Frame by Marvin
Bedroom Resources
Finishes:
Pure White by Sherwin-Williams | Treemont Stria Carpet in Linen by Stark Carpet
Lighting:
Potence Style Otis Light by One Forty Three
Furniture & Decor:
Bed by Thos. Moser | Side Table by CB2 | Ceramic Bowl by Ben Medansky | Vase by Sheldon Ceramics | Sherpa Chair by Target (coming soon) | Beads (vintage)
Bed Linens:
Duvet Cover by Target | Shams by Target | Sheets by Target | Velvet Quilt by Target (coming soon) | White Lumbar Pillow by Target (coming soon) | Pink Lumbar Pillow by Target (coming soon)
Windows & Doors:
White Oak Ultimate Casement Narrow Window Frame by Marvin | Window Treatments by Hunter Douglas through Decorview
Thanks again to my incredible design team—Julie, Velinda and Grace de Asis. These spaces were styled by me with Emily Bowser and Erik Staalberg. Our contractor was Jeff Malcolm and our architect (that we used at the beginning of the project) was John Lyles.
***Photography by Sara Ligorria-Tramp
The post Mountain House Reveal: The Upstairs Guest Bath That Use to Be a Closet (and a Peek Into the Bedroom) appeared first on Emily Henderson.
August 15, 2019
Mountain House Reveal: The Riskiest Bathroom I Designed—With a “How I’m Feeling Now” Update

We are back with another reveal, this time the hall bath (here is the in-depth process post from last year if you need a recap). We have at times called this the kids’ bath, but the kids only take baths in our huge micro bubble bathtub or our steam shower simply because they are more fun. So this bathroom basically just houses their toothbrushes and middle-of-the-night bathroom runs. Let’s show you around and at the end, I’ll tell you how it’s holding up.
But first, what it looked like before:


The bathroom “before” was dated and not our style (updated in the early 2000s) and generally needed to be started over and reworked. Originally, the bathtub shower combo was situated in the room length-wise, which limited the vanity space (and frankly, created wasted space). The vanity itself had decent storage, but a simple shift in the orientation of the tub and toilet area (and knocking down that partial wall) ended up opening up a ton more space.
The Goal:
This bathroom was supposed to be for the kids since their bedroom is across the hall. I wanted it to be slightly more playful, although I’m not sure that was achieved, but certainly bright and light. We wanted a full bath because we had room for it and a double vanity for storage. It mostly was another space for me to take a design risk as it wasn’t my bathroom. It’s modern mountain, in a bright Scandi vibe, leaning a bit more contemporary than classic.
Let’s start with the materials:
We found this emerald quartzite at the Bedrosians stone yard and fell in love with it polished. It was certainly a risk and one that Brian was doubtful of but since it wasn’t our bathroom (i.e. he wouldn’t have to look at it every day), he said go for it. Because polished green stone with brass-finished is more Liberace, less modern mountain, I knew we wanted it in a leathered finished, but we hit a snag. We transferred it all the way up to the mountains to find out that the stone fabricator no longer had the leathering machine, so we had to transport it all the way back to near the stone yard, and then yes, back up here. But it HAD to be leathered in order for us to love it like we do.
It was worth it and turned out to be INCREDIBLY stunning. It has a lot of gray undertones and is really subtle. We put it on the front and top of the tub, and it’s really our big moment.
The tile is the gray zellige from Clé. We had the brick leftover from our LA house that I’d been hoarding for 2 years and didn’t want to waste it so we used it here. But I didn’t want to combine it with another material so we chose the same tile in a 2×2 for the floor. It’s shiny so I was worried about it being slippery, but the grout lines are close enough that I think it’s fine. But to be honest, we’ve only used this tub like twice so I don’t actually know. Also, I wanted to call out something you don’t see but is just as nice as the beauty of those tiles: the NuHeat radiant heating under the floors. It’s equivalent to pulling a warm fluffy towel out of the dryer and wrapping it around your cold, wet body…except for your feet.

We laid out the brick in this alternating triple stack pattern on the vanity wall, which I think makes it feel really custom and unique. It’s SO BEAUTIFUL.

We worked with Kohler on all the faucets and fixtures and chose the Composed line in their vibrant polished brass (this is part of their Finish to Order program, which lets me personalize the fittings I want in the finish I want, which is then made to order. Be sure to head to your local Kohler Signature Store or Kohler Experience Center to find out more about the program). It’s by FAR the most contemporary and modern line, but we loved the straightness of the faucet, and again, this was a room that I was willing to take more of a risk in. The cross handles keep it classic, and it’s just so sleek and chic. Plus, that specific brass shade looks SO GOOD against the pale sage green.

The vanity (also Kohler and customizable) is huge and has so much storage that we even fit the waste bin in there. It’s classic, timeless and all in all great.

The countertop was kept simple (a honed white Thassos), with very little veining to compete with the quartzite of the tub surround.
Because the bathroom was starting to go more glam (more on that later) so we needed to bring in black and wood STAT. We chose those pretty straight modern wood handles and knobs, which helped and then, of course, the sconces that are ridiculous and really take this bathroom in a different direction, in a good way.

Let’s get into how I am feeling about it now…
…and how has the leathered stone held up.
Okay, so I love every single thing in this bathroom and will not change a thing. HOWEVER, this bathroom feels a bit like a different house because it went more glam, which was not my intention. I needed to choose the brass Composed line early on because there was a decent lead time, so that was locked down when I found the green stone. Then we decided to use the leftover zellige which isn’t glam, but it is shiny. the combination of those three things does just give it a different vibe than the other bathrooms.
If I could go back in time, I would have kept that insane stone, but used black faucet fixtures and not put a tile behind the vanity because I think the stone is the star and we didn’t need more texture. I want to be very clear here—everyone LOVES this bathroom, I LOVE this bathroom, despite having some design criticisms for myself. This blog is not just revealing, but teaching and I think a good lesson is to remember to use restraint, and to keep the overall theme in all of your choices. I could have just done a 4-inch Thassos backsplash and drywall and saved some money. One of the reasons I didn’t was because working with Kohler, I wanted to ENSURE that all of the work that I was doing highlighted their products beautifully and that every angle of the bathroom has interest and texture to really showcase their product.

As you can see in the shot above, the tile really enhanced and warmed up the space, so in itself that tile is AMAZING, it’s just A LOT of texture when mixed with the green stone slab. We could even have put the slab on the floor (cut into tiles) and kept it even simpler.
Again, I love this bathroom and certainly, nothing is changing, I just could have pulled it back a bit (and saved some money on tile labor).

Now onto the stone. A lot of you are curious about how the leathered quartzite or honed Thassos has held up. It’s very hard to say because of the minimal use. But I will say this: someone put a piece of cheese on the deck of the tub, as you do, and it has left a grease stain that’s a bit darker. Now, I haven’t tried to clean it beyond a spray bottle and rag, but that made me really glad that we didn’t use it in the kitchen. Again, in , our kitchen is a light marble that is leathered and it is aging beautifully and I have no regrets. Quartzite is meant to be extremely hard (we did a whole stone guide here if you want to learn more), so I’m not sure but it’s darker so maybe it’s going to show grease where a lighter stone doesn’t.
Lastly, the Thassos…this could have easily been an opportunity to use a composite, like the Cambria we used in the kitchen. So far it’s holding up fine but if the kids’ gross bubble gum pink toothpaste gets left on the counter, I have to do a bit of scrubbing. I think if you are going to do something so clean and white and it fits your style, then a white matte composite would be a bit smarter.
As a side note, the stone in the upstairs guest bath, master bath and the downstairs bath all are either honed or leathered and get far more use and are doing GREAT. I think it’s because they have more veining, and thus are busier so even if toothpaste did etch it a bit, you can’t see it.
So there you go, our slightly more glam hall bath that I still really love, that makes me so happy when I walk through the doors despite being able to be critical about my decisions.

I’d love to know if you guys secretly agree that I could have used more restraint. Or maybe wouldn’t have even noticed it until I pointed it out? Or do you think I’m NUTS because it’s SUCH a pretty bathroom???
Bathroom Resources
Finishes:
Pure White by Sherwin-Williams | Wall Tile by Clé Tile | Floor Tile by Clé Tile | Shower Surround in Honed Emerald Quartzite by Bedrosians Tile & Stone | Vanity Countertop in Honed Thassos by Bedrosians Tile & Stone | Heated Flooring by Nuheat
Lighting:
Sconces in Blackened Brass/Black Walnut/Opal by Allied Maker
Decor:
Rounded Rectangle Mirrors by Rejuvenation | Marble Tank Tray from CB2 | White Vase (similar) | Marble Soap Tray (similar) | Towels from Target | Shower Curtain from Target | Art (vintage) | Rug (vintage)
Fixtures by Kohler:
Vanity | Sink Faucet | Ceramic High-Flow Valve System | Sink | Adjustable P-trap | Toilet | Showerhead | Bath Spout | Bath | Hand Shower | Valve | Thermostatic Valve | Bath Drain
Hardware:
Switches and Outlets in Antique Bronze by Forbes and Lomax | Wood Drawer Pull from Etsy | Wood Cabinet Knob from Etsy | Shower Curtain Rod from Build.com | Toilet Paper Holder by Kohler | Robe Hook by Kohler | Towel Bar by Kohler | Towel Arm by Kohler | Door Hardware by Rejuvenation
Windows & Doors:
Matte Black Fiberglass Ultimate Casement Narrow Window Frame by Marvin | Reclaimed Beechwood Door by Ross Alan Reclaimed Lumber
Before we go, I wanted to give a great big thank you to my incredible team who made this house a possibility: Julie Rose, Velinda Hellen and Grace de Asis. Photos are by our own Sara Ligorria-Tramp, styled by me with help from Emily Bowser, Erik Staalberg and Veronica Crawford. Our contractor was Jeff Malcolm and our architect (that we used at the beginning of the project) was John Lyles.
The post Mountain House Reveal: The Riskiest Bathroom I Designed—With a “How I’m Feeling Now” Update appeared first on Emily Henderson.
August 14, 2019
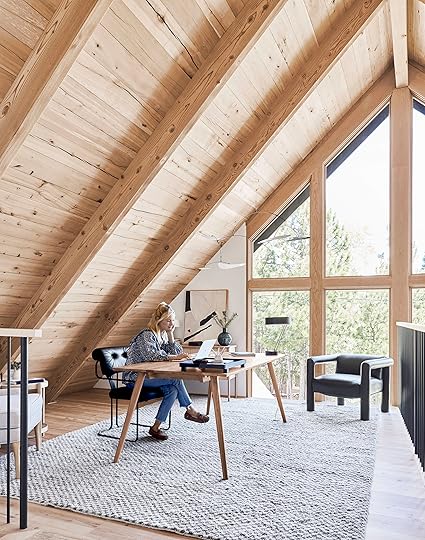
Mountain House Reveal: How I Transformed an Awkward Space Into My Dream Work Loft


MOUNTAIN HOUSE REVEAL WEEK, DAY 3! (Quick catchup: So far, we’ve revealed the living room and entry, as well as the downstairs guest bed and bath suite.) If you want to know where I’ve been many weeks of this summer, it’s here, in the loft writing these posts and attempting to write my next book, due VERY SOON (check out the living room, and guest bed and bath reveal if you missed it). Despite being distracted by five groups of friends visiting over the summer, I’ve gotten a decent amount of writing done because this space is honestly inspiring. I wake up at 6 am (on a good day, the night before determines the exact hour) and write/work until 11 am which isn’t a full workday, nay, but for someone who is trying to enjoy the fruits of my labor (I’m turning 40, it’s about time) I feel like 5 hours while on “vacation” is pretty darn good. Welcome to the loft reveal. You get it. It’s my writing space and it’s everything I’ve ever wanted.
For anyone who’s been along on this journey the last year and a half, you’ll likely remember this “before”…orange wood ceilings and all:

The light was always so great up here, this lady just needed a makeover.

Our Goal for this Space:
I wanted to create a peaceful, calm room for me to write the blog and book, while being able to take breaks and stare at some trees, all while engulfed in beautiful wood. It’s a space that is free of clutter, with beautiful light and oh so cozy.
It’s quiet in every way, that is until those two children wake up, realize I’m working and then I have to make the following choice: let them manipulate me into putting on Wild Kratts (but mom, just until you are done working or daddy wakes) or they ask that I play princess/kitty/ninja with them (which I can’t say no to). By the way, isn’t life hilarious/ironic/cruel that there seems to be a few hours a day where you seem to be best at everything? For me, from 6 am to 11 am is when I’m the best mom, the best writer, the best leader, the best housekeeper, the best athlete…it’s the only time I like to work out and it’s definitely when I’m most creative. My brain often shuts down at 4 pm (only to wake back up at 9 pm) but at 6 am, I’m on point. So when they wake up at 6 am, it’s a real reckoning of choices. Workouts go out the window. Writing is disrupted. Parenting is hard.
But hey, I have a gorgeous writing space for hopefully one hour a day.
How We Accomplished It:
1. A neutral color palette. You walk up the stairs, turn the corner and ahhh. It’s so lovely and quiet. Most of this is due to the light and trees, so we didn’t want to distract from that and add a ton of color or pattern. It’s why we called this the yoga loft for months. I did approximately 12 minutes of yoga here one day, and thus birthed the name, but there is something that feels so peaceful about this space so it needed a neutral color palette to let the trees sing.
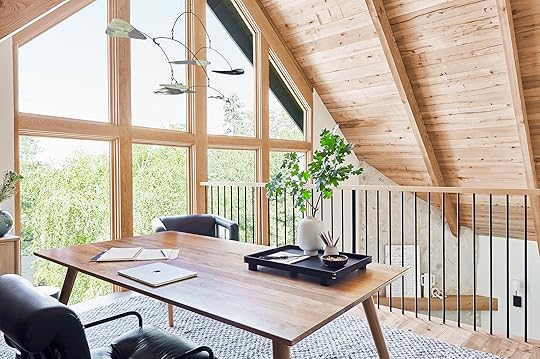
2. The desk is huge. I have a condition that I’ve historically referred to as “clutter body.” It stems from growing up driving in a car with six kids and so much stuff in every corner of the car, and you think you are fine. you think that all the stuff at your feet won’t bother you. But the longer you drive, the more your feet move and you kick things, and they shift, and you just want to stretch out SO BLOODY BAD but you can’t because you have so much stuff surrounding you, engulfing you. I called this clutter foot. Not sure if other people have this syndrome or if I invented the name. But it has grown into a much large problem—CLUTTER BODY. My team knows it well. While I create chaos, I also am allergic to it. It’s a form of claustrophobia. That’s all to say I need a big desk so I can spread out, and this one (from Article) is perfect. It’s actually a dining table, but if you are like me and like a big desk, IT’S GREAT. I LOVE it.

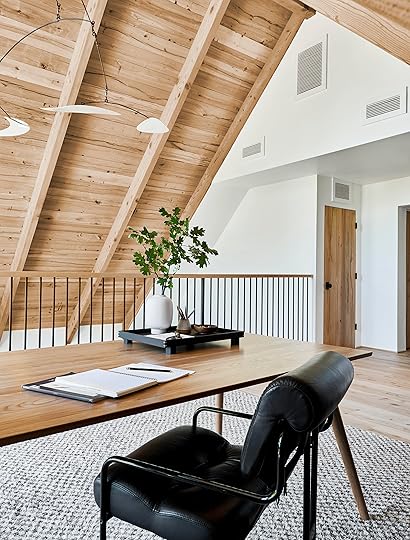
3. Seating. While technically I won’t be joined by many people up here, I like looking at that black vintage chair (previously seen in the living room but we realized it was PERFECT for this corner so we moved it up). In the other corner, we have my Target wingback (released last fall and it’s SO so good) and just creates a cozy vibe.
4. A cozy rug. This area would be far too echo-y without a rug, and this rug is one of my favorites that I’ve used many times (here in Portland, and also Jess picked it for her living room). We shipped it down after the Portland project because I loved the way it looked in the living room there. I didn’t know what we would use it for, but alas it’s found a home.
5. Storage. I need somewhere to house all of my parenting and self-improvement books. That cabinet from Skagerak does it. Plus, it’s so pretty and has gorgeous hardware.
The Challenges:
The wood. This space was pretty easy to decorate, the biggest problem was the tone of the wood. The original wood was so dark orange and after a year of trying to come up with a solution (remember when we walnut blasted it and then it created a super deep texture and became pink AND orange?). Brian Henderson was the one who figured it out. We recladded the tongue and groove (the horizontal wood pieces in between the rafters) and just sanded down the texture of the rafters (or beams). We used the same reclaimed beech wood as the flooring and cabinets throughout the house, from Ross Alan Reclaimed Lumber. I think this ended up costing about $7k in labor—or at least that is how we were quoted, but since we paid “time and material,” it might have taken more time and thus cost more. If it were on a normal ceiling, it wouldn’t have cost nearly as much, but because it’s so high, it required scaffolding which means you have to hire a company to bring it in, and then doing any work over your head just takes so much more time than say, recladding walls. But I’m SO glad we did it.
I love how the floor and ceiling meet now; it’s just so seamless. And the light in this space is south facing, and just incredibly dreamy all day every day. It never gets blasted.

The windows up here are obviously the star, and if you are just tuning in, they were replaced by Marvin, in their white oak. Obviously, they are stunning.
HOT TIP: Know the direction of your windows before you buy a house. There are so many houses on the lake that we drive by in our pontoon that get blasted by the sun all day every day so they have to keep blackout shades down all day. It’s not something you really think about when you are shopping for houses at 10 am, but especially in these houses with massive windows, it can be a real bummer to have to close off the house during the most beautiful times of the day.
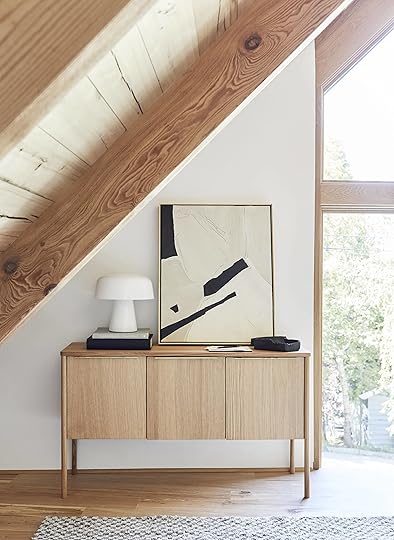
I have been following the artist Joelle Somero for a while on Instagram and love her work, and after we featured her, she offered to make a piece for the house, which I LOVE. It’s pretty perfect up here on this quietly stunning Skagerak cabinet.

I snagged the mobile from the Atlanta project, and boy do I love it. The desk chair is vintage, from Midcentury LA and the lamp I’ve had for a while. If you are wondering where we plug it in, we snake it down the leg and we snipped the rug and fed it through to the outlet that we had placed below. You can’t tell at all.
I write mainly on a laptop so no need for a monitor up here, so while we did take it out for a few shots, you can see it above.

One of my favorite things about the house is the railing. It’s not something that most people notice, but I just think it’s so beautiful. My team, this time led by Velinda Hellen, helped execute the design and we had to find our own fabricators for it which was a challenge. It was installed directly into the wood flooring, and due to code (and safety which we were big on), it is as minimal as possible while still being safe. We put supports every few feet, and topped it off with maple (which was the same tone as the beech flooring).
Lastly, that Allied Maker sconce is so simple, modern and yet warm. Again, warm minimalism, modern mountain. That’s what we did here.
Where We Saved:
Most of the pieces up here are high end; I’m not going to pretend it’s a budget room, but the Target wingback chair and the IKEA side table are elevated by the rest of the pieces, and affordable. In this house, we tried to find a place for a lot of leftover furniture and rugs from other projects, so the rug, and vintage mobile and vintage lamp made their way into another space (this one).

How We Live In It/Has Anything Changed?
It’s pretty much exactly as you see it here. I might swap the lamps because the white mushroom lamp (from West Elm) I think is a better contrast with the mobile than the black vintage one, plus it gives off better ambient light. Otherwise, it’s EXACTLY the same. I love this space very very much.
Now, time for some side-by-side before and afters:


If you are into anything that we used to design it, here are all the resources:
Finishes:
White Oak Contemporary Windows by Marvin | Beechwood Flooring and Tongue and Groove Ceiling Cladding by Ross Alan Reclaimed Lumber | Antique Bronze Light Switches by Forbes & Lomax | Wall Mounts by Alpine Metal Design (no longer available) | Beechwood Hand Rails by 3D Stairs & Wood Works | Balusters by 3D Stairs & Wood Works | Beechwood Stair Treads by Ross Alan Reclaimed Lumber
Furniture:
Jut Cabinet by Thomas Jenkins from Skagerak | Seno Dining Table (Desk) by Article | Guido Faleschini Desk Chair from Midcentury LA | Wingback Chair by Target | Side Table by IKEA
Art & Decor:
Citra Rug by Dash and Albert | Mobile from Antique Factory in Atlanta | Emily Abstract by Joelle Somero | Vase by Rejuvenation (no longer available) | Black Footed Tray from Lawson Fenning (no longer available) | Tall White Vase (on desk) from Lawson Fenning (no longer available) | Printed Throw Pillow by Target (coming soon) | Faux Fur Throw by Target (coming soon)
Lighting:
Bella Table Lamp by West Elm | Concentric 10″ Sconces by Allied Maker | Black Task Light (vintage)
Of course, I wanted to give a great big thank you to my incredible team who made this house a possibility: Julie Rose, Velinda Hellen and Grace de Asis. Photos are by our own Sara Ligorria-Tramp, styled by me with help from Emily Bowser, Erik Staalberg and Veronica Crawford. Our contractor was Jeff Malcolm and our architect (that we used at the beginning of the project) was John Lyles.
The post Mountain House Reveal: How I Transformed an Awkward Space Into My Dream Work Loft appeared first on Emily Henderson.
August 13, 2019
Mountain House Reveal: Our Soft Yet Secretly Sultry Downstairs Guest Bed + Bath

Welcome to the downstairs guest suite—one of two that my friends fight over, understandably. In not-so-shocking news, I like a calm bedroom and at this point, have really specialized in how to do this. So here’s what to expect from this post/reveal: I’m going to break down the goal of the room, how we executed that goal design-wise, the challenges we had to overcome (with solutions), where we saved money, and how we have lived in it since (aka has anything changed due to real life?). If you missed yesterday’s post with the living room reveal, make sure to head over there at some point because I break down my general thoughts on this home’s style as a whole, but if you’re up to speed, let’s keep going.
As a reminder, here was the before:

It was a decent room, with no closet and attached to a full bath. It wasn’t super bright as it’s an interior bedroom. It had a half-exposed ceiling and half not, which was awkward and made my stomach feel uncomfortable.
So let’s get into how we changed that…

My Goal With This Room:
I really wanted our guests to feel cozy, calm and comfortable. Pampered, even. I wanted them to feel like they had their own retreat (thus the adjoining bathroom) and feel like they were on a mountain vacation away from any stress and chaos. Perhaps I was projecting a bit. Nobody ever wants to leave this house, and I think one of the main reasons is that the bedrooms are incredibly comfortable and livable.
How did we do this? Well, we pretended that this was our room. If WE were staying here, what would we want? Here is what we came up with:
1. A color palette that is neutral and calm. We also added in “nature-inspired” with hits of darker green to ground the room and give it some color and interest, without a lot of busy-ness.
2. A king upholstered bed. We like big beds and having that velvet-soft yet modern and low bed feels so inviting. The color is earthy, not too bright but gives the room a focal point.
3. Great natural light. ALL neutrals in a room without great light can feel dead. You need that light bouncing around. So we wanted lots of windows and doors (these, like the rest of the home, are by Marvin) to bring that in.
3. Blackout shades. We loved these in so we used them again. You easily pull them up and down and they take up way less space when up than Roman shades, and felt more modern for this house.
4. Really cozy bedding for obvious reasons. We layered four king pillows, with two long lumbars and layered a duvet with two quilts. As I’m writing that I realize that it sounds like A LOT, but it’s pretty darn cozy and beautiful (but no, you don’t need all of those if you are sleeping in their daily and especially if you don’t like taking them off at night).
5. Art that is simple and quiet but textured. We mixed an MQuan sculptural piece with two simple yet more graphic Jane Dentons, some smaller pieces by Addie Juell and then, of course, a mirror. It’s a variety of mediums, sizes, and frames all in our color palette and all in the same quiet but special vibe.
6. A super cozy rug. We believe strongly in comfortable rugs in a bedroom and I loved that this one from Annie Selke felt kinda mountain-y. I’ve used it before and LOVE it because it has movement without a bold pattern, and is a tone that hides dirt while still feeling light, therefore, making the space feel bigger.
7. Nightstands with storage. While this isn’t necessary in a guest room, I generally opt for at least one drawer for nightstands.
8. Good and convenient ambient lighting. This seems obvious but I appreciate when a lamp has a nice fabric shade and is easy to turn on and off.
9. A pretty sculptural chair. Even if it’s just for throwing stuff on.


The Challenges:
1. The ceiling had to be addressed. Would we bust up the half that was dropped? We explored and what was above it didn’t match, meaning that we would have to actually demo out the ceiling (and thus floor of the above bedroom) and install the wood ceiling to match. My contractor didn’t really know how much it would cost but thought around $5k. Making the decision to just have it be sheetrock made so much sense even if we were losing some character.
2. Early on we decided to put french doors in here to give these guests access to outside and potentially a hut tub room someday. This meant that the bed would need to go on the wall where it is, making the sides of the bed non-symmetrical. This isn’t a huge challenge but meant that yes, a lamp would go in front of the window, which is not a big deal. So to balance out the window, we put a vintage articulating sconce on the other side. Problem solved.
3. No closet. This seemed unacceptable to us because the room was certainly BIG enough, so we put in a closet by bumping out the wall, thus creating a little entry into the room. The original intent was to have the closet go floor to ceiling, but we didn’t catch it before it was framed out. Then we said, ugh, this is where we’ll save some money and just put in simple white, readymade closet doors. But then we decided to do all the doors in the Ross Alan beech which matched the floors and I knew that ultimately I would be bummed that we missed a design opportunity, especially since it’s really the only “feature” of one wall. So we could have demoed out the framing to do the original floor-to-ceiling, wall-to-wall intent, but we didn’t because of time and cost.

Where We Saved Money:
1. The nightstands. You are going to kill me but those nightstands I got on Overstock for $60 each two years ago. They came assembled, even, and are suspiciously high quality (but sadly no longer available). I bought four of them and sent the link to all of my friends. None of them felt they “needed” them at the time but all have regretted it. Currently, we are storing the other two, but I can’t let go of them because they are so good for that crazy price.
2. The sherpa Target chair (which comes out August 25th). Yes, this is part of our partnership, sure, but it’s SO GREAT for the price.
3. Bedding. I don’t mind spending more on our master bedding, especially sheets and duvet cover, but as far as pillows and quilts? There are so many affordable options like these out there.
How We Live In It—What Has Changed?
It’s pretty darn great. The only thing that we’ve changed is that we moved that tree down to LA because I knew that I couldn’t keep it alive up here and ultimately didn’t want the guilt, but I really wanted that sculptural natural element to break up the space. Instead, I’m going to put a tall dresser there (I already have it, it’s this one) for storage. It just makes more sense.
Otherwise, as I said, no one wants to leave. Maybe by next winter, we’ll have our hot tub room/deck outside those doors…
Onto the bathroom!


The Before:

It was a decent size, but we were able to make it even bigger by stealing from the adjacent full bathroom and turning that one into the powder room. It was a 2000s remodel of mostly IKEA which we salvaged and donated.
The Goal Of This Room:
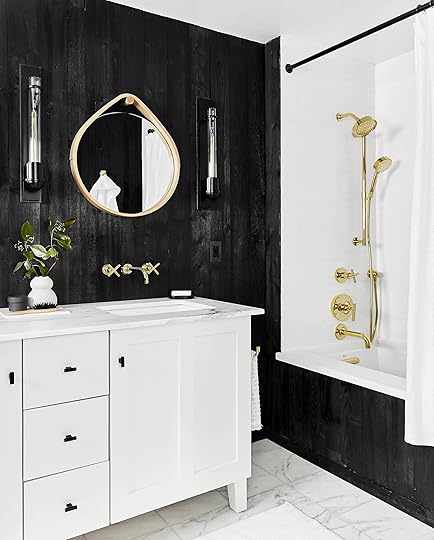
I wanted to create a bolder, darker, moodier and edgier bathroom while still fitting in the modern mountain/Scandi vibe. This is a guest bath thus a great place to create an experience and excitement. Due to its vibe, we might call this internally “the sexy bathroom.” It’s undeniably very exciting.
Here’s how we did it:

1. The black reclaimed wood walls. These are stained, not painted. We got the wood from Ross Alan Reclaimed Lumber, with whom we partnered on the entire house, and it was far more rustic and worn than our flooring. So when it’s stained you still see a TON of the grain. It’s awesome. If this were a bathroom that was going to get a ton of use, we would likely not have done it. But since this is a guest bathroom, we just created a ledge on top of the tub to protect it from water damage.
2. We chose lantern style lighting that is still modern and linear. This one from The Urban Electric Co. works with the rest of the house, but still with a cabin-y vibe.
3. The stone on the floor was cut into tiles. Rather than using stone tiles, we picked out a slab from Bedrosians and had it custom cut into 12″x12″ tiles so that the veins match and the small grout lines give more of a slab effect. I’m not totally convinced this was worth the extra cost, but I sure do love it. We used the same Calacatta Oro slab for the vanity countertop and it’s gorgeous.


5. Handmade tile. The Pratt & Larson tiles in the shower surround are handmade but so simple not stealing attention from the black wood walls or the polished brass fixtures. We had our tiler install them as close together as possible, not the typical 1/8″, but instead stacked really tight with bright white grout so it looks seamless and more of a beautiful quiet texture.

6. We contrasted the walls with wood mirrors and polished brass fixtures to warm up the space. The brass faucets are so modern using the wall mount/undermount sink formula (remember this post where we debated if this could be a thing?). You can see that it created a really clean and still minimal aesthetic. A vessel sink would have added another level, but we really wanted it to be as minimal and simple as possible letting the texture of the walls and stone be the focus.
7. We kept with our simple and linear theme, not just through the lighting. but also with all the plumbing fixtures and the simple hardware from Schoolhouse.

8. We used a large vanity that has a ton of storage, but chose one with feet so you could see underneath it, thus making the bathroom look and feel bigger. This means that it’s a bit harder to clean underneath, but we love the look and it’s a guest bath that doesn’t get as much use.
9. We chose an undermount tub that is ergonomic and big. It has nice sloping back for a spa-like experience. We put a Thassos slab on top that went over the wood so the wood wouldn’t get touched with water (ideally). I wouldn’t have done this in a bath that got a ton of use because water can damage the wood, but felt that it was ok with a less-used space (there are maybe 1-2 baths a month). The wood is all sealed to withstand moisture, don’t worry.

The Challenges:
This bathroom had a pretty small and low window, which is never great so we put in a bigger pretty window that is higher up for privacy and to allow more natural light into the space. Outside the window is greenery thus giving privacy, but we could always put a window treatment if we decide that our guests want more privacy.
Savings Tip:
After much debate, we decided to not do glass enclosures, opting for a shower curtain. We felt that this was a great place to save and also the curtain softens up the harshness of the space, making it feel more inviting, less cold.


All in all, it’s a suite that is fought over and honestly this bathroom is a showstopper. It’s so dramatic and such an experience to be in. The whole suite is just so inviting and comfortable, with all a guest needs. That’s if our guests need total comfort and luxury.
August 12, 2019
Mountain House Reveal: Our Light-Filled Neutral & Textural Living Room


IT’S MOUNTAIN HOUSE REVEAL WEEK!!!!!!!! In case you’ve missed the countdown to it on social media (we are treating it like “shark week,” for obvious reasons(??)), we are revealing the entire house (almost), area by area, day by day this week. The house is featured in House Beautiful and on newsstands tomorrow! Please go buy it where there is an exclusive story I wrote for it as well as photos of the master bed and bath, which we can’t reveal for a couple of weeks here (magazines get what’s called “exclusivity” to give readers something unique to see in print instead of seeing everything online). But back to the reveals…
Today, we are featuring the living room and entry. She is a BIG post, but full of beautiful images and lots of words by me.
But let’s back up a bit. This week marks the two year anniversary that we closed on this house, which gives you some perspective on how long it takes to plan (5 months), design, renovate (1 year), decorate, style, shoot (4 months) and publish (2 months) a house. And I have so much help. We went 2-3 times over budget (I still can’t bring myself to calculate) and it took twice as long as we predicted, but “renovation amnesia” is a real thing, and can be forgotten because our family (and friends) are IN LOVE with this home. It has this very special positive, calming energy and feels so easy to live here.
Here are the facts if you’re just joining us: it’s a 3,200 square foot house, an hour and a half outside of LA in Lake Arrowhead. It was built in the 1960s with additions and some renovations done in the ’90s and 2000s. We documented the entire process here, and yes even let you choose many of the design elements or room plans via this I Design, You Decide contest. I have learned more this year about design than all years combined. We changed E.V.E.R.Y.T.H.I.N.G. in this house, to really create a dream house full of comfort, light and calmness for my family. And I have to make sure that you understand that I didn’t or couldn’t have done this by myself. I had an incredible design team who helped me make every decision; thank you Julie Rose, Velinda Hellen and Grace De Asis (and our contractor Jeff Malcolm).
Let’s take a peek at what it looked like before to remind you where we came from and why.


The living room was always great. The light was amazing and it felt really open and calm. The house has a GREAT layout so we didn’t end up doing too much structural.
We opened up this room to the kitchen, but otherwise, it was just changing all the finishes, though when you are talking fireplace, ceiling, smooth coating walls, flooring, railings, stairs, doors and windows, the finishes were a lot. We even took off all the window and door moldings and of course replaced all the lighting.
As a reminder, the style that we were going for was warm minimalism, modern mountain, in a rustic yet refined Scandinavian chalet vibe…but family-friendly obviously. We wanted LESS stuff, less contrast, and a LOT of comfort and calm.
Here she is, the living room where we spend so many happy hours as a family.
Let me walk you through the process and more importantly the intentions that we had while designing the house. This house is so cohesive, happy and yet full of comfort without sacrificing too much style. Here is why:
We minimized the number of finishes throughout.
This feels really cohesive, calm and is really easy for your eye to understand. There isn’t a lot of high contrast or patterns or colors, with mostly that beautiful beech wood (all from Ross Alan Reclaimed Lumber in LA), white/light gray and hits of black. I can’t stress this enough: our #1 goal was for it to feel calm here, therefore we chose less contrasting finishes and colors which means less busy-ness. A good example of this is choosing stools (this are from Article) that actually blended into the wood island, which is something that I wouldn’t do in every house but is perfect here. Also, the window frames (we sourced from Marvin) match the wood on the floors/ceiling, again hoping that your eye rests instead of bounces. The sofa and rug are the same tones which keep it really seamless and so calm (although there are some days I wish I had done the sofa in a green or blue). But by bringing in hits of black everywhere it grounds it and adds some excitement.

We maximized the light, focusing on the nature outside.
Natural light is your #1 design element. We made the windows the focus (all white oak contemporary from Marvin) and chose finishes that bounce the light around, and yet are quiet enough that the green trees outside become part of the design. We also added skylights from Velux wherever possible. The light in this room is amazing all day every day, even when it’s cloudy.

We splurged on doors and windows.
Years ago, I asked an architect what he would spend his money on in a house renovation, and he said “doors and windows” and now I understand why. In , we made sure that those elements were original or mimicked the original and it makes a difference, it does…so we did the same with this one. You can’t tell that much in this room because there is only one door, but all the doors are the beautiful reclaimed wood, made by Ross Alan. They are solid and feel so high quality.
As mentioned, we worked with Marvin on all the windows, choosing their white oak contemporary frames and boy are they stunning. The huge A-frame windows were in bad shape and redoing them wasn’t an easy feat (stay tuned for a full post about the how and why we chose our new windows) but the new ones are nothing short of stunning. We chose to have the new door to the garage (which wasn’t there before) as a simple white flat panel, so it “went away” but now I regret not having that be in the wood as well (see below).
We focused on the architecture.
Again, the wood, windows, and open space and light are really the feature of this house, so why clutter it up with a ton of stuff to distract from it?

We went SIMPLE.
We chose the most minimal version of everything. For example, the fireplace—by schmearing over it with plaster (German schmear—see this post for the hows/whys), you still get the stone look, but way less busy and with less contrast. And the stair railing—it’s still black iron, but we designed it to be so simple and sleek with no decorative detailing except the wood on top which matches our wood on the floor. Every single choice went through the lens of “could this be simpler?” We didn’t even use moldings around doors and just a tiny quarter round on the floor to even it out. This mostly works in a midcentury or contemporary house.
We mixed high, low, vintage, new, big-box or one-of-a-kind throughout the house.
This ensured that our house looked personal, collected, unique and had a lot of soul. I LOVE that vintage side table with the three legs and while it’s kinda oversized and we thought there was no way it would work in the space, it really does. There is a ton of Target’s new fall collection mixed throughout the house (not available just yet, I got some early releases for the shoot, but everything will be on sale August 25) like textiles, bedding, lighting and accessories, and a few splurgy vintage pieces (mostly chairs because I love a statement chair) that I got either at local stores (Pop Up Home, Midcentury LA) or online via Chairish and 1stdibs. The leather strapping rocking chair was my 40th birthday present.

We prioritized comfort and livability.
Every piece of furniture is kid-friendly, with any lighter upholstered pieces (like the sofa) being in Crypton fabric, and the light rug is a performance rug (meant to be easy to clean) from Ben Soleimani. Nothing is precious and there are not a lot of accessories (even pillows!) for them to move around which I then have to put back. Sometimes, I look at that coffee table (ours from LA we got from Lulu and Georgia years ago) and think why didn’t I put some books on the bottom shelf?? I do think it would have looked better, but we don’t NEED books there and likely the kids would just take them off and throw them around the house. The wood log holder (again from Target’s new fall collection coming soon) with porcelain logs is decorative as the fireplace is gas so I suppose I contradicted myself there (but it’s sooo good).

We stayed neutral.
All the major pieces are neutral because I wanted calmness and flexibility. I really loved how we had a neutral sofa and rug in here prior to the renovation so we stuck with that, but there are days when I wish I had done the sofa in a darker green or blue. I literally go back and forth on it daily, some days LOVING that everything is tonal and calm. The good thing is that with this color palette I can easily add more color and pattern and change it with the seasons (which I will).

The sofa is pretty darn incredible and even looks great from the back—it’s a vintage piece that I found on Chairish, bought through Gallery L7 in LA and had reupholstered in family-friendly Crypton (in their Calico Maxwell fabric in Pewter). The curve in the corner really makes it special.
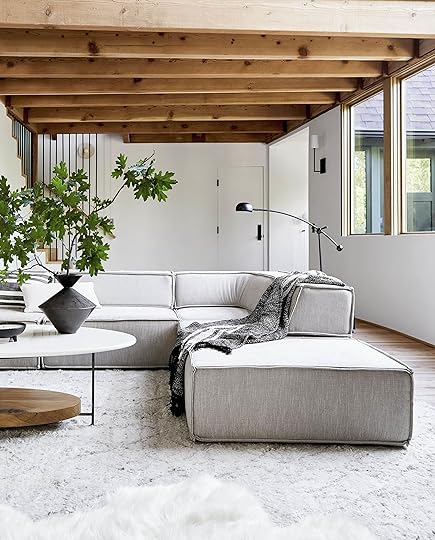
Sitting in that corner, above, is so dreamy and cozy. We felt that it was a sofa that didn’t want a lot of pillows, because the back is so ergonomic, tapering back. I could have styled it with more pillows and maybe it would have looked better, but I was trying to keep it as livable and true to the minimal aesthetic as possible. But of course, NOW I want more pillows.
August 11, 2019
The Link Up: The Pants 4 Of Us Bought This Week, The Hotel Julie Can’t Wait To See IRL & Caitlin’s Go-To Horoscope App
 image via Architectural Digest | design by Elizabeth Roberts and Peter Marino
Happy Sunday, folks and welcome back to one of our favorite series: The Link Up. Before we begin, we must talk about today’s featured home tour, which is the home of fashion designer Ulla Johnson. If you are a fan of our Saturday fashion posts, you probably know that Ulla Johnson is one of Emily’s absolute favorite fashion brands, and it is no surprise that her home is as stunning, and shall we say, “Uptown Prairie,” as her clothing designs are. We highly encourage you to stop what you are doing, check it out, then come RIGHT back.
…Okay, are you back? Great. Now, without further ado, let’s get to those team EHD links and recommendations:
First up, some more design goodness: The Freehand Hotel in LA opened just a few months ago and Julie is dying to go take a look not only because Jess and she stayed at the one in NYC this past Easter but also because House Inhabit made THE cutest promo video and you all need to take a look.
Emily Bowser just got these bamboo makeup remover pads. She prefers using makeup rounds for toner application and for wiping off mascara but wanted to cut down on waste. These are new, but so far so good. They wash out well and come with a little baggy so they don’t get lost in your washer/dryer BUT if you want to cut back on the micro-plastic problem, we highly recommend Guppyfriend!
If you are looking for something to really brighten your day, (who isn’t?) Target is doing something very cool that we would love to see more companies do. From Arlyn: “My oldest brother had cerebral palsy and was confined to a wheelchair his entire life, so seeing Fast Company’s article about how Target is launching adaptive Halloween costumes for kids with mobility challenges honestly makes me want to cry of happiness and gratitude. Bravo Target for bringing joy to ALL kids.”
Caitlin has been using Co-Star for the past year and knows it’s sort of like, a cultural phenomenon right now, but she wants this to serve as the final push for everyone who hasn’t downloaded it yet. Stop what you’re doing, figure out your birth time, download the app, and join the legion of people sharing screenshots of those incredibly specific one-liner horoscopes every day. Even if you’re not totally sold on astrology, it’ll give you a lot to think about!
Sara really enjoyed this article and thinks it could be the solution for the seemingly never-ending millennial-hustle-and-burn-out epidemic.
Here’s something that has completely transformed Carolina’s skin: Summer Friday’s Jet Lag Mask. She’s been using it for over a year. It’s super hydrating, great for all skin types and multi-use (she likes to add an extra layer under her eyes as an eye cream). She loves IT.
Velinda gave her wife a monthly candle subscription to Vellabox as a Christmas gift two years ago. The gift was supposed to have an end date, but their scents are so consistently good and the random, monthly treat so enjoyable, Santa just couldn’t say “no”!
While Jess is not currently in a relationship, she does consider herself a traditional monogamist—however, she found this article SUPER interesting. It definitely got her thinking about how she may examine and handle her future relationship…Could she possibly stray from the ‘norm’ and have a more open mind????
Mallory is an avid coffee drinker and also loves a good body scrub. These two things seem so random and far from each other that they would likely never go together…right? Wrong. She’s been using this Coffee Body Scrub from Frank Body twice a week for the last month and it’s every coffee-lover’s dream (plus it’s only $9.95 and lasts forever).
Chandler loves these pants from Target and so does everyone else on the EHD team (no really, three more people ordered them this week). The white stitching and wide leg make them really versatile with boots, sneakers or sandals for a year-round pant that is also super comfortable.
And you know what will go GREAT with those pants? This crop tee Veronica bought from Urban Outfitters a few weeks ago. She says it’s super comfy, simple, but cute and pairs very well with high waist shorts/jeans. It comes in nine different colors (she has it in green), but she will probably buy more colors very soon because she loves it so much.
Finally, after last weekend’s back-to-back mass shootings, Ryann’s (and we are sure many others’) heart broke once again for the families who lost loved ones to insensible acts of violence. She seriously wonders when both sides of the debate will work together and start making real changes to protect people. She thinks this article hits the nail on the head and found this and this article very informative regarding gun laws and mental illness. For information on how you can help the Dayton, Ohio and El Paso, Texas victims, head here.
Okay, that is all we have for you today. See you tomorrow for the first day of MOUNTAIN HOUSE REVEAL WEEK. xx
The post The Link Up: The Pants 4 Of Us Bought This Week, The Hotel Julie Can’t Wait To See IRL & Caitlin’s Go-To Horoscope App appeared first on Emily Henderson.
August 10, 2019
How Sara Saved Her Skin & (Finally) Cured Her Adult Acne

We’re usually pretty into design over here at EHD, but one of our favorite non-design topics in the office? Skincare. Skin—we all have it, we all need it, and most of us have a very complicated relationship with our own flesh wrapping (ew). If there’s one thing I love talking about, it’s skiiiiiin. Almost as much as the rest of the EHD team loves talking about color trends. Skin is the largest organ of our body! IT’S AN ORGAN ON THE OUTSIDE, GUYS! How is that not fascinating? So since today is Saturday, we’re taking a quick departure from the design world to talk skincare (but if skin is not something you’re interested in, stay tuned because come Monday we’re going to have some pretty beautiful design content here on the blog).
Since the age of 13, I’ve been at war with my skin…

Here is a list of the things I did not have from ages 13 – 21:
popularity
good taste
clear skin
But I had great friends to endure it all with, and to be honest high school is awkward for pretty much everyone, right? I figured college would be a new, fresh start. College would be where I blossomed from awkward teenagehood to full-blown adult. I was wrong. College had just as much acne in store for me as high school. But whatever, I didn’t let it hold me back. I knew clear skin was just around the corner, because adults don’t have acne. Acne is a puberty thing. And it was!
I graduated, turned 21, and my skin calmed down. And I thought “THIS. This is where it starts…my new life as a clear-skinned adult…” Which made sense, college isn’t adulthood. POST COLLEGE IS REAL ADULTHOOD. That’s why my skin hadn’t been cooperating. But the wait was over, and I spent the next four years blissfully thinking my skin would be clear forever. Thinking I had finally acquired “adult skin.”
And then I turned 25 and my acne came back, bigger and badder than ever. WORSE THAN WHEN I HAD BEEN 13. I didn’t think it was possible, but the evidence was right there on my face.

Wow, that last picture is way too close and gross for anyone to see. So happy I’ve put it in large format on the very public internet.
Now, listen, I know I’m not the first person in the world to find themselves battling acne. But at least when you’re a teenager most of your friends are right there, going through it with you. On the other hand, when you’re an adult? When you’re in meetings with your coworkers, and you’re just sitting there feeling like a 7th grader going through puberty. You feel like you’re the only adult in the world with acne (this is not true). And beyond the face forward appearances, there’s the fact that this acne HURT. And honestly, that was the worst part. If you have acne, it can make you self conscious because society is so hell-bent on having clear skin. But acne happens to most of us, and I know from experience that we always think our acne stands out way more than it really does. I rarely notice acne on anyone. But painful cystic acne is no joke, and when you’re face feels like a minefield ready to explode, you’re willing to try a lot.
And over the past two years, I have. Which is what I’m about to share with all of you. In fact, it blew my mind a few weeks ago when Em told me she had just recently started a skin routine for the first time in her life. I’ve had one since I was 14! (Who else had the classic Clinique department store visit with their mom when they were around that age?) But Em said acne just wasn’t one of her issues growing up. *Teen angst eye roll*
But let’s get a few things clear (skin not included): I’m not a dermatologist, I’m not a doctor, I’m not even an esthetician. I’m just an enthusiast who’s spent serious time dedicated to researching skincare in the quest for pain-free, well cared for skin (which just happens to involve a lot of selfie taking, and weekly skin updates between my best friend Nafeesa and myself). There is a lot of information out there, and a lot of it contradictory. What works really well for one person’s skin might wreak havoc on another’s. So what I’ve read/experienced might be different from what you’ve read/experienced. I’ve put together my skin regime based on recommendations from skincare experts that I trust, experimenting, and giving the products I’m trying the patience and time to work.
There’s a joke in the skincare forums that companies will make an all-in-one shampoo/conditioner/body wash/mouthwash/hair gel for men, while they’ll create a lotion specifically for a woman’s left elbow. And it’s all because of a vicious cycle where “the media” tells women that clear skin is a key to confidence, so we’ll pay anything for a product that will give us that result. Men just don’t seem to care as much. That’s not to say that there aren’t men who experience acne and who do care. But in my experience, men as a whole don’t worry so much about the other aspects of skincare that women obsess over: sun spots, wrinkles, smoothness, dewiness, etc. And that’s probably because society hasn’t told them that their worth is dependent on how young and beautiful they look. WOW IT’S SO FRUSTRATING, RIGHT?! At the same time, I do want to take care of this tiny swath of organ wrapped around my skull. I don’t want to feed into unhealthy cycles perpetuated by corporations and advertising, but I also want to look in the mirror and feel happy and comfortable with what I see. And is it so bad that I want to look like a young 67 when I’m actually 70? IS IT?!
It turns out I have a lot of complicated emotions about this topic.
Which is all to say: You don’t need to spend a lot of money on your skincare if you don’t want to. I really do think the beauty and skincare industries have oversold women on how many products they NEED in their routines. I just happen to be really interested in skincare (almost as a hobby of sorts), which is why I spend my disposable income on it. Just like someone else might on clothing or expanding their collection of *archaic* DVDs (I’m looking straight at my boyfriend when I type this; we watch everything on Netflix these days and do you really need the collectors’ edition AND the Criterion edition?).
In fact, let’s start with a few things I did in my general life that really helped my skin without even spending a dime:
Change your pillowcases regularly: Turns out that pillowcase you’re rubbing your face on all night gets COVERED with dirt, grime, sweat, oils, and dead skin pretty fast. An acne-causing bacteria buffet. This sounds like a no brainer, but when someone suggested this to me a few years ago it actually hadn’t occurred to me. So simple, SO EFFECTIVE. I try and switch my pillowcase at least once a week, if not every 4-5 days. It sounds excessive, but I’ve found it makes a huge difference.
Drink more water. Wow, water is so good for us. Have you heard the joke “I used to think alcohol was the adult drink, then I thought it was coffee, and now I realize water is the most adult drink”? Well, it’s true. I could down eight mimosas no problem, but trying to get myself to drink 8 glasses of water a day is a feat of willpower so impressive I rarely accomplish it. But I do notice my best skin when I’ve been in office consistently for a period of time because that’s when I drink the most water on a daily basis.
Try avoiding dairy. I’ve cut out a lot of dairy from my diet, and it’s done wonders for my hormonal acne. I’ve read this is because dairy products contain proteins that are supposed to stimulate growth hormones in baby calves. When we digest those proteins, they release an insulin-like hormone that disrupts our own hormone production. This can cause our skin to produce more oil, which traps more dead skin and sebum in our pores, which acne-causing bacteria feed on. Acne is the result.
Make sure you’re not using too many products. Maybe you’re a skincare devotee, like me. And maybe you’ve been trying all the products, all out once, and your skin is freaking the f*&k out (also like me). I was at a point where I was doing some sort of crazy 25 step skin routine overnight with four different kinds of acid, multiple toners, etc. And wondering why my skin was still breaking out. I was using all the good, expensive things! The first time I went to my favorite esthetician for a facial she casually asked me what I was using and it then took me about 10 minutes to summarize it all. She took a beat to process what I’d told her and then said something along the lines of “you might want to cut that back, your skin can’t possibly be benefitting from all of those different combinations, and you’re likely doing more harm than good (therefore wasting your money).” So now I’ve simplified and my skin is happier for it.
I’ve tried a lot of different things in the past—Proactive, diaper cream, toothpaste, straight rubbing alcohol…ouch. But now I’m in a pretty happy place with my skin, and am using some products I really feel are helping me keep my skin clear, hydrated, and happy.
There is one big change I’ve made for my skin that required a doctors visit. I’m currently taking a low dose of a medication called spironolactone. This article from Into The Gloss has a lot of great information about using spironolactone to treat acne. It’s an androgen blocker that has been wildly beneficial in reducing my hormonal cystic acne. I’ve been taking it daily for about a year and half now (it took about 3 months to kick in), and it’s made a huge difference. If you’re a female and are suffering from hormonal acne, it’s totally worth a trip to the doctor to see if spironolactone could be an option for you.
But as far as everyday skincare goes, I really do believe that everyone could benefit from at least least washing their faces, applying moisturizer, and slathering on SPF. If you’re like “ugh skincare, no thank you” then I think a three step process (only two steps at night!) is all you need. ESPECIALLY THE SPF. It’s 2019, let’s move past our egos and just accept the fact that we’re not tougher than the sun. Not only will SPF help keep your skin looking younger longer as it avoids sun damage, it’s also just a good thing to do in order to help minimize your exposure to melanoma causing UV rays. I’ve read multiple times that SPF is the single most important skincare step. I even have Mac wearing daily SPF on his gorgeous face.
But let’s say you’re into skincare, you want to kick things up a notch. Or five. Well then, step into my office (bathroom). Evenings are when I do the heavy lifting of my skincare routine. That way I can allow products to soak into my skin overnight, without the hindrance of make-up.

Cleanse: Green Clean Makeup Removing Cleansing Balm (I’ve used and love this) | The Balance pH Balancing Gel Cleanser (great for sensitive skin) | Versed Day Dissolve Cleansing Balm (I’m currently using this) | BPO 5 Percent Cleanser (also currently using this) | Tone: Pixi by Petra Glow Tonic (this has a cult following) | Nip + Fab Glycolic Fix Night Pads Extreme (currently using these) | Serum: ExLinea Peptide Smoothing Serum (currently using this) | Total Strength Serum (and this) | Treat: Salicylic Acid 2% Solution (great budget option) | Curology Custom Skin Kit (what I’m currently trying out) | Moisturize: Coco Rose Coconut Oil Lip Conditioner | Ultra Repair® Cream Intense Hydration (currently in use)
Sara’s Nightime Skincare Routine
Step 1: Cleanse
Right when I get home, the first thing I do is wash my face using a “double cleanse” method, which means I basically wash my face twice. Think of it like a dishwasher. The first rinse gets rid of all the big chunks and makes sure food doesn’t dry impossibly onto your dish, and the second wash makes sure your dish is truly clean. For the record, I don’t have a dish washer and do all my dishes by hand. As for my face, first I use an oil cleanser (right now I’m using Versed’s Cleansing Balm) to break down all the makeup and SPF that’s been on my face all day. Then I use a second cleanser to make sure I haven’t left any make-up or SPF on my face (currently I’m using PCA’s BPO cleanser – the benzoyl peroxide helps remove sebum and dead skin cells from my face, which acne causing bacteria would otherwise feast on). I like this combination because it leaves my face feeling clean and fresh, but not stripped or “tight” (your face’s natural oils are GOOD, you don’t want to completely remove them).
Step 2: Tone
Next, I tone with Nip & Fab’s Night Pads. These are pre-wet pads, which have a 5% glycolic acid solution. Glycolic acid is an alpha hydraulic acid, and acts as a chemical exfoliant. That means it helps exfoliate your skin (gets rid of dead skin cells) without the use of physical abrasives, like tiny grains or beads. I prefer to use a chemical exfoliant because physical exfoliants tend to be too rough on my skin, causing microscopic tears that just allow more surface area for bacteria to settle in.
Step 3: “Correct” (Serums)
I then mix together one pump of PCA’s ExLinea Serum and one pump of PCA’s Total Strength Serum in the palm of my hand and apply all over my face in a thin layer. PCA is a skincare line that Emily started using a while back because it was recommended by an esthetician, and I actually noticed a difference in her skin appearance.
The ExLinea is my attempt to be preventative about wrinkles, with ingredients like acetyl hexapeptide-8 (argireline) which “minimizes the appearance of fine lines and wrinkles” and sodium hyaluronate, which “has the ability to hold 1,000 times its weight in water and plays an important role in skin hydration.” The Total Strength Serum has ingredients like almitoyl tripeptide-38, which “stimulates collagen, and helps reduce the appearance of fine lines and wrinkles.” I let this soak in for at least 10 minutes before moving onto my next step.
Both of these serums are pricey, and definitely a luxury item for me. But these bottles last me a long time, and I really enjoy using them, but there are good products out there with similar ingredients for much more affordable prices. Serums are one of those steps that are interesting and exciting to me, and I feel like they have made a difference in my overall skin health, but they aren’t MANDATORY. If you’re interested in skincare, they are fun accessory products to experiment with.
Step 4: Treat (Medication)
Once I feel like my serums have settled in for the night I’ll apply a thin layer of topical acne-fighting ingredients. Right now I’m on month 4 of trying out Curology’s custom topical acne medication. I used to see this all the time on my Instagram feed, and finally caved to the hype (my skincare curiosity got the best of me). But surprisingly I’ve been pretty happy with it. It’s one of those “take a quiz and we’ll create a custom blend for you” companies that I think will be a period marker for this era. And yet… I’ve found success with the product. My medication contains a low dose blend of clindamyacin (“antibiotic and anti-inflammatory with powerful effects against acne-causing bacteria”), zinc pyrithione (“fights acne via its antibacterial and antifungal effects), and niacinamide (“a form of vitamin B3 that acts as an antioxidant, reducing inflammation, hyperpigmentation and fine lines”—I think this has been helping fade my acne scars!). Again, there are other topical options out there that can help, but this is the product I’m using right now and feel pretty happy with for the time being. I let this soak in, and usually go make dinner/watch TV/hang out.
Step 5: Moisturize
About 20 minutes before bed, I’ll apply my moisturizer. I use First Aid Beauty’s Ultra Repair Cream because it’s super basic, gentle, unscented, uncomplicated, and works great. It also comes in a huge tub that will last me at least another 2 years. My eye area and eyelids are sensitive to just about everything (I don’t apply any of the above products anywhere near them), but they don’t mind this moisturizer. I also apply some lip balm with a heavy hand (whatever I have on hand) to keep my mouth breathing lips hydrated overnight.
And that’s it! I do all of these steps with enough time before bed that the serums and medication actually have a chance to be absorbed by my skin, rather than soak right into my pillowcase. And then I wake up.

Cleanse: Versed Wash It Out Gel Cleanser (great budget option) | BPO 5 Percent Cleanser (currently sitting on my counter) | Tone: Pixi by Petra Vitamin-C Tonic (budget-friendly) | PCA Skin Nutrient pHaze 5 Toner (smells so good) | Serum: The Ordinary “Buffet” (good budget option) | Vitamin C Suspension 30% in Silicone (another budget option) | C-Quench Antioxidant Serum (what I’m using right now) | Total Strength Serum (currently using) | Moisturize: Hyaluronic Acid 2% + B5 (budget option) | Ultra Repair® Cream Intense Hydration (currently wearing) | Hyaluronic Acid Boosting Serum (on my face right now) | Protect: Emerald CBD + Adaptogens Deep Moisture Glow Oil (helps with my redness) | CC+ Cream with SPF 50+ (the only make-up I wear) | Throughout The Day: Pixi by Petra Glow Mist (in my bag all the time)
Sara’s Morning Skincare Routine
Step 1: Cleanse
Not everyone washes their face in the morning. Some people just rinse with some cool water, and I think that’s totally fine. Personally, I like to wash my face (just once this time), to get rid of any residual nighttime products as well as any sweat from the night. I just use one of the same face cleansers from my nighttime routine, based on my mood. Science.
Step 2: Tone
Next up, I tone with PCA’s Nutrient Toner. It’s my favorite smelling thing in my line up, but it also has some great benefits. The pumpkin wine base (produced by fermenting whole pumpkins) “offers the nutritional benefits, including vitamin A and vitamin C” as well as lactic acid, another AHA, which helps with skin moisturizing. It also just makes my skin feel happy, bright, and glowy for whatever that’s worth (which to me is a lot).
Step 3: “Correct” (Serums)
For daytime, I’ll mix one pump of my Total Strength serum with one pump of PCA’s C-Quench Antioxidant serum – one of Em’s recommendations. Topical vitamin C has been recommended as a great skincare step to include by several skincare aficionados, including Velinda’s facialist. Here’s a little snippet from an Allure article all about topical vitamin C: “As far as your skin is concerned, vitamin C is ‘a potent antioxidant that can neutralize free radicals,’ explains board-certified dermatologist Patricia Wexler. ‘Because of its antioxidant properties, vitamin C aids in your skin’s natural regeneration process, which helps your body repair damaged skin cells.'”
Step 5: Moisturize
Before I apply any sort of make-up (which I really don’t wear much of), I gotta make my face as moisturized as possible so it stays flexible and doesn’t flake (I have dry skin). I start with two pumps of PCA’s Hyaluronic Acid Boosting Serum. Hyaluronic acid is a buzz ingredient in the beauty industry, but for good reason. Hyaluronic acid is a humectant—”a substance used to reduce the loss of moisture.” Its molecules are able to retain 1,000 times their weight in water content, and the added ceramides in this serum “supports the renewal of the skin’s natural protective layer and forms an effective barrier against moisture loss.”
But then you need to apply a moisturizer…from what I understand, hyaluronic acid itself is not a moisturizer. It will just help your moisturizer work better, and aid your skin in retaining the moisture you’re applying. So next I apply a thin layer of my First Aid Beauty moisturizer. Then, as an added moisturizer, I’ll mix in two drops of Herbivore’s CBD + Adaptogens Glow Oil to my It Cosmetics CC cream (which has SPF). CBD is another trendy ingredient in beauty products, but I’ve found this oil to really help combat the redness in my skin. It also helps loosen up my CC cream so it doesn’t go on so thick as I like a more sheer coverage, and keeps the cream from getting cake-y. If I’m not headed to work (like on the weekends), I generally avoid makeup to give my skin a breather, and just apply the CBD oil and some Supergoop! Unseen SPF.
That’s it. That’s the whole thing, morning and night. My skin has come a long way since I turned 25 and cystic hormonal acne took up residence on my jawline. After about 6 months of this skincare routine, here’s how we’re looking (I knew all my selfies would come in handy one day):

I still get the occasional pimple, but they’re often surface level and not the deep rooted, painful cystic acne I used to get. My redness still stops me from wearing certain shades of pink-toned lipsticks (lest the area surrounding my lips just look like a continuation of my lipstick), but between being moisturized/non-irritated skin and my light coverage CC cream I no longer look like I’ve just run a marathon all the time. Plus, the scars left over from my cystic acne are beginning to fade away. And most importantly my face skin doesn’t HURT anymore.
I stopped plucking my eyebrows years ago, I let my mustache fuzz be, and I don’t mind the occasional zit. I’m even growing kind of attached to the very light crow’s feet that I see developing. But I also have fun caring for my skin, and going on this journey with it. Seeing what makes it glow or learning what dries it out. I’m just doing my best to care for it, because it’s the only face skin I have.
Thank you for reading my novel. I surprised myself with how much I had to say, seeing as how I have no official credentials with which to preach. But maybe your skin is similar to mine, and you’ve been able to glean a new tip to try. Or maybe you are an expert and have some valuable knowledge to share in the comments! Maybe you’re just as interested in other peoples personal habits – same. Whatever the reason you found yourself reading all the way through, I thank you for sticking with me. I have a lot of feelings about skin. And I’m excited to read what your feelings (and skin types, and solutions) are below.
xx

1. Versed Day Dissolve Cleansing Balm | 2. Nip + Fab Glycolic Fix Night Pads Extreme | 3. Pixi by Petra Glow Mist | 4. Vitamin C Suspension 30% in Silicone | 5. Pixi by Petra Vitamin-C Tonic | 6. BPO 5 Percent Cleanser | 7. C-Quench Antioxidant Serum | 8. Salicylic Acid 2% Solution | 9. Green Clean Makeup Removing Cleansing Balm | 10. Pixi by Petra Glow Tonic | 11. The Balance pH Balancing Gel Cleanser | 12. Total Strength Serum 13. The Ordinary “Buffet” | 14. Ultra Repair® Cream Intense Hydration | 15. Coco Rose Coconut Oil Lip Conditioner | 16. PCA Skin Nutrient pHaze 5 Toner | 17. CC+ Cream with SPF 50+ | 18. Emerald CBD + Adaptogens Deep Moisture Glow Oil | 19. ExLinea Peptide Smoothing Serum | 20. Versed Wash It Out Gel Cleanser | 21. Curology Custom Skin Kit | 22. Hyaluronic Acid Boosting Serum | 23. Hyaluronic Acid 2% + B5
The post How Sara Saved Her Skin & (Finally) Cured Her Adult Acne appeared first on Emily Henderson.
Emily Henderson's Blog

- Emily Henderson's profile
- 10 followers

