
Emily Henderson's Blog, page 134
March 23, 2022
How To Lay Out An Awkward Living Room + Ajai’s Hack That Will Save You A Lot Of Agony
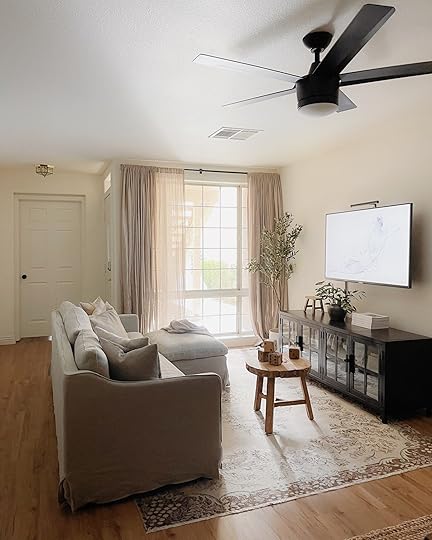
One of the things I love most about design is having to problem-solve. You know, the sort of situation you find yourself in when you have an awkward entryway, a tiny space, no storage, or a unique room layout. In my case, I’ve got all of the previous happening in my living room area. It’s also a very open space. Contrary to popular opinion, I quite enjoy spaces that aren’t completely open, because walls help to define a space’s intent and serve as a reminder of how I should be designing the space. For instance, I grew up with a den – for playing in and watching movies with my family. A closed-off kitchen, that had just enough room for a dining table and chairs. When it was time for dinner, we all knew it was time to disconnect from all of our devices, go into the kitchen, sit down as a family, while we ate and shared about our day. Our living room area was a small space where my mom would sit and have a phone chat with my grandmother, or with a friend who stopped by briefly to share some news. This was her “woman cave.” We didn’t go in there too much so that my mom had a place to disconnect, read, and nap (I totally get it now). That said, I love how purposeful walls can make a room feel, but I will knock one down if it helps the overall function of a space – that’s a post for another day.

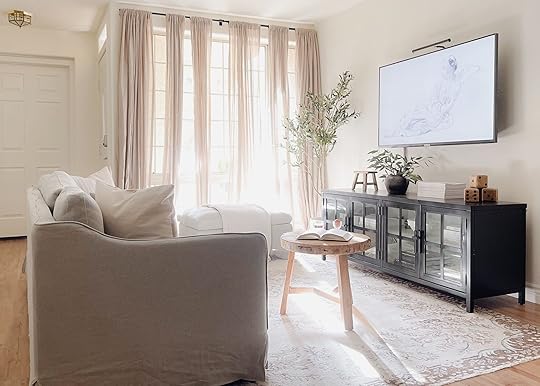
Sofa | Ottoman | Curtains | Rug (vintage from etsy) | Coffee Table (vintage) | Throw Pillows (no longer available from etsy)
This living room layout is one of the reasons I enjoy areas that are not completely open. If we plan to have movie nights in this living room, there are really only two ways we can lay out furniture: with the sofa protruding into the hallway area, or with the sofa up against the wall, leaving us to mount the television in the hallway on the wall. This left me strongly contemplating not having a television in the living room and putting it in the bedroom instead, but that would go against my beliefs of the bedroom being a place where we find our peace, let our minds disconnect from everything, and rest. So TV in the living room it was. In addition to the unique layout of the space, it’s a bit on the small side, which I’m typically used to, growing up in a city where space is a unicorn. But with the unique layout and being limited on space, I had to be intentional about sourcing pieces that were to scale and would allow for storage.
Visual Research
On the left is what we are looking at if we choose to mount the TV in the hallway. This was a common setup for the majority of my neighbors. A couple of my neighbors were nice enough to let me in their homes to scope out their layouts. This can save a lot of time and of course, money since it’s free. In addition, I scoured the internet looking for condos in my community that were recently remodeled and sold. I like to look at the staging in these spaces. I love doing this sort of visual research when I’m working with condos or single-family homes in a neighborhood that all share similar-to-identical interior and exterior architecture. Moreover, I should also mention that the nursery lies behind this hallway wall, so hanging the television on this wall would more than likely interrupt naps and bedtime sleep (my little guy is an extremely light sleeper – like his momma). This means we were down to one layout – the one where the sofa protrudes into the walkway. Which isn’t the end of the world I suppose, as I was still able to allow for three feet in the walkway behind the sofa.
Scale For Space And Furniture Layout
A fun little app I like to use when laying out my own spaces and furniture is magicplan. It’s very simple to use, and you don’t have to be a CAD expert. Though I spent countless hours in school learning programs like AutoCAD and Revit, I tend to outsource this work, as I’m not thrilled with spending so much time drafting 2D and 3D renderings. I’m still getting the hang of momming for goodness sake. Nonetheless, magicplan is good for personal projects, as you can take measurements with your phone by just walking around a space and guiding your phone along the walls. Doing this helps you get measurements, and a visual idea of how to lay out furniture, this counters having to make numerous returns because furniture pieces do not fit. It truly helps to make sure everything is to scale in a room.
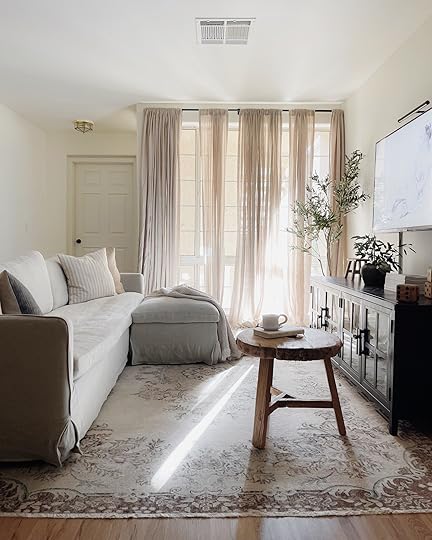

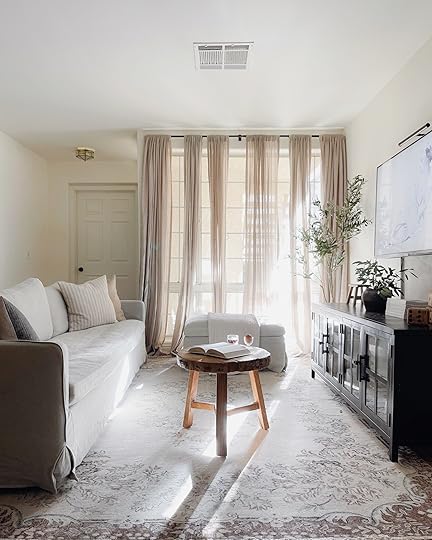
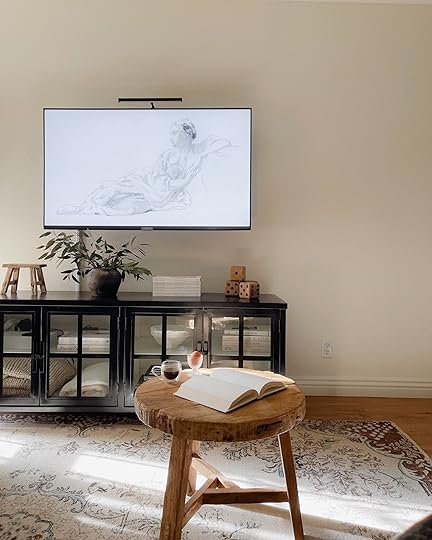
I felt like it would be beneficial to the space to have a smaller sofa in place of the sectional I had in our last place. However, we are a family that enjoys plopping down and kicking up our feet for movie night, so it was important that I source an ottoman to complement the sofa. I’ve learned that having a sofa and separate ottoman provides a bit more flexibility in terms of laying out a space. In our case, our Sixpenny Amelia Sofa can stand alone and our Amelia Ottoman can create a sort of chaise that can be left-facing, or right-facing, or put in front of our window as additional seating (as you can see above). We can even use it as a coffee table (we just add a tray and sit our beverages on top of it). I’ve also learned that for our little family, a polyfill works best, as our little one loves to climb up and down the furniture daily – this fill keeps its form much more than down. I also grew tired of sinking into our old sofa while trying to nurse – this was a constant battle. In addition, one side of the sofa kept a completely different shape, as my husband favored sitting in that spot. Because we are in Las Vegas now, we opted for a medium-weight linen fabric, in the color Jasmine Rice. I sourced a small round wooden stool for our coffee table so that it could be moved around as needed, and an antiqued wooden stool small enough to be used as a side table on either side of the sofa.
Create Storage
Faux Olive Tree | Media Console | Picture Light | Small Wooden Stool (vintage) | Vessel (vintage) | Wooden Dice (vintage)

When I have a client that is concerned about storage in a small living room space, I almost always advise having a console with two-tiered shelves inside, and to mount the TV on the wall over the media console, to allow for shelf space on top. I also suggest having an ottoman with a removable top that can house items like blankets, trays for beverages, games, etc., but in our household this can get a bit scary, as we are more on the minimalist side of things and believe in Fumio Sasaki’s version of the Concorde Fallacy. This is basically the place some of us find ourselves in, where we are too overwhelmed with options, and this eventually leads to radical decision-making as it pertains to ongoing purchases, which leads to decisions we typically regret later on.
All that to say, I have to be careful about just how much storage I give myself, because I tend to want to fill it up even though I don’t need anything. I took an inventory of the living room items we do have and use on a regular basis and specified the perfect media console for our blankets, books, and my husband’s game system and controls (which I’m very appreciative of now design-wise as it relates to aesthetics… if you have a gamer-partner you know exactly what I mean by this). Moreover, I’d like to end this section by stating: there are a variety of ways to design a home, keeping in mind the people living in it. None of them are wrong or right. They are simply the way we choose to live, with our values in mind, while making ourselves comfortable at home. Minimalism isn’t for everyone, but it makes me happy in my home.
Create Boundaries

Here’s the thing about not having walls… you’ve got to define the space using other items, like area rugs, colors, floor lamps, or some sort of divider. In my case, I’ve used an area rug to do so. I also like that the space feels cozier when I apply the ottoman left-facing to the sofa, which further divides the space from the dining area. I moved the sofa away from the window so that it feels a bit more separate from the front door and exactly 36” from the walkway wall, to give the walkway a feel of its own. This way, we don’t have to worry about bumping or brushing up against any furniture during our truck to the kitchen.


Voila! This is the living room layout I’ve come up with, given how we function as a family. I’ll admit, it was a bit tricky and in the beginning and I felt like it was also a bit wonky But having lived in it for some months, it’s quite enjoyable. I am curious to know what you would have done differently. I love hearing different design perspectives, and welcome your design ideas! That said, how would you have laid out my living room space?
*Design and Photos by Ajai Guyot
The post How To Lay Out An Awkward Living Room + Ajai’s Hack That Will Save You A Lot Of Agony appeared first on Emily Henderson.


Ajai’s Small Living Room Layout Agony (+ A Pretty Genius And FREE Hack That Will Save You A Lot Of Well, Agony)
One of the things I love most about design is having to problem-solve. You know, the sort of situation you find yourself in when you have an awkward entryway, a tiny space, no storage, or a unique room layout. In my case, I’ve got all of the previous happening in my living room area. It’s also a very open space. Contrary to popular opinion, I quite enjoy spaces that aren’t completely open, because walls help to define a space’s intent and serve as a reminder of how I should be designing the space. For instance, I grew up with a den – for playing in and watching movies with my family. A closed-off kitchen, that had just enough room for a dining table and chairs. When it was time for dinner, we all knew it was time to disconnect from all of our devices, go into the kitchen, sit down as a family, while we ate and shared about our day. Our living room area was a small space where my mom would sit and have a phone chat with my grandmother, or with a friend who stopped by briefly to share some news. This was her “woman cave.” We didn’t go in there too much so that my mom had a place to disconnect, read, and nap (I totally get it now). That said, I love how purposeful walls can make a room feel, but I will knock one down if it helps the overall function of a space – that’s a post for another day.
Sofa | Ottoman | Curtains | Rug (vintage from etsy) | Coffee Table (vintage) | Throw Pillows (no longer available from etsy)
This living room layout is one of the reasons I enjoy areas that are not completely open. If we plan to have movie nights in this living room, there are really only two ways we can lay out furniture: with the sofa protruding into the hallway area, or with the sofa up against the wall, leaving us to mount the television in the hallway on the wall. This left me strongly contemplating not having a television in the living room and putting it in the bedroom instead, but that would go against my beliefs of the bedroom being a place where we find our peace, let our minds disconnect from everything, and rest. So TV in the living room it was. In addition to the unique layout of the space, it’s a bit on the small side, which I’m typically used to, growing up in a city where space is a unicorn. But with the unique layout and being limited on space, I had to be intentional about sourcing pieces that were to scale and would allow for storage.
Visual ResearchOn the left is what we are looking at if we choose to mount the TV in the hallway. This was a common setup for the majority of my neighbors. A couple of my neighbors were nice enough to let me in their homes to scope out their layouts. This can save a lot of time and of course, money since it’s free. In addition, I scoured the internet looking for condos in my community that were recently remodeled and sold. I like to look at the staging in these spaces. I love doing this sort of visual research when I’m working with condos or single-family homes in a neighborhood that all share similar-to-identical interior and exterior architecture. Moreover, I should also mention that the nursery lies behind this hallway wall, so hanging the television on this wall would more than likely interrupt naps and bedtime sleep (my little guy is an extremely light sleeper – like his momma). This means we were down to one layout – the one where the sofa protrudes into the walkway. Which isn’t the end of the world I suppose, as I was still able to allow for three feet in the walkway behind the sofa.
Scale For Space And Furniture LayoutA fun little app I like to use when laying out my own spaces and furniture is magicplan. It’s very simple to use, and you don’t have to be a CAD expert. Though I spent countless hours in school learning programs like AutoCAD and Revit, I tend to outsource this work, as I’m not thrilled with spending so much time drafting 2D and 3D renderings. I’m still getting the hang of momming for goodness sake. Nonetheless, magicplan is good for personal projects, as you can take measurements with your phone by just walking around a space and guiding your phone along the walls. Doing this helps you get measurements, and a visual idea of how to lay out furniture, this counters having to make numerous returns because furniture pieces do not fit. It truly helps to make sure everything is to scale in a room.
I felt like it would be beneficial to the space to have a smaller sofa in place of the sectional I had in our last place. However, we are a family that enjoys plopping down and kicking up our feet for movie night, so it was important that I source an ottoman to complement the sofa. I’ve learned that having a sofa and separate ottoman provides a bit more flexibility in terms of laying out a space. In our case, our Sixpenny Amelia Sofa can stand alone and our Amelia Ottoman can create a sort of chaise that can be left-facing, or right-facing, or put in front of our window as additional seating (as you can see above). We can even use it as a coffee table (we just add a tray and sit our beverages on top of it). I’ve also learned that for our little family, a polyfill works best, as our little one loves to climb up and down the furniture daily – this fill keeps its form much more than down. I also grew tired of sinking into our old sofa while trying to nurse – this was a constant battle. In addition, one side of the sofa kept a completely different shape, as my husband favored sitting in that spot. Because we are in Las Vegas now, we opted for a medium-weight linen fabric, in the color Jasmine Rice. I sourced a small round wooden stool for our coffee table so that it could be moved around as needed, and an antiqued wooden stool small enough to be used as a side table on either side of the sofa.
Create StorageFaux Olive Tree | Media Console | Picture Light | Small Wooden Stool (vintage) | Vessel (vintage) | Wooden Dice (vintage)
When I have a client that is concerned about storage in a small living room space, I almost always advise having a console with two-tiered shelves inside, and to mount the TV on the wall over the media console, to allow for shelf space on top. I also suggest having an ottoman with a removable top that can house items like blankets, trays for beverages, games, etc., but in our household this can get a bit scary, as we are more on the minimalist side of things and believe in Fumio Sasaki’s version of the Concorde Fallacy. This is basically the place some of us find ourselves in, where we are too overwhelmed with options, and this eventually leads to radical decision-making as it pertains to ongoing purchases, which leads to decisions we typically regret later on.
All that to say, I have to be careful about just how much storage I give myself, because I tend to want to fill it up even though I don’t need anything. I took an inventory of the living room items we do have and use on a regular basis and specified the perfect media console for our blankets, books, and my husband’s game system and controls (which I’m very appreciative of now design-wise as it relates to aesthetics… if you have a gamer-partner you know exactly what I mean by this). Moreover, I’d like to end this section by stating: there are a variety of ways to design a home, keeping in mind the people living in it. None of them are wrong or right. They are simply the way we choose to live, with our values in mind, while making ourselves comfortable at home. Minimalism isn’t for everyone, but it makes me happy in my home.
Create BoundariesHere’s the thing about not having walls… you’ve got to define the space using other items, like area rugs, colors, floor lamps, or some sort of divider. In my case, I’ve used an area rug to do so. I also like that the space feels cozier when I apply the ottoman left-facing to the sofa, which further divides the space from the dining area. I moved the sofa away from the window so that it feels a bit more separate from the front door and exactly 36” from the walkway wall, to give the walkway a feel of its own. This way, we don’t have to worry about bumping or brushing up against any furniture during our truck to the kitchen.
Voila! This is the living room layout I’ve come up with, given how we function as a family. I’ll admit, it was a bit tricky and in the beginning and I felt like it was also a bit wonky But having lived in it for some months, it’s quite enjoyable. I am curious to know what you would have done differently. I love hearing different design perspectives, and welcome your design ideas! That said, how would you have laid out my living room space?
*Design and Photos by Ajai Guyot
The post Ajai’s Small Living Room Layout Agony (+ A Pretty Genius And FREE Hack That Will Save You A Lot Of Well, Agony) appeared first on Emily Henderson.
March 22, 2022
Do Beautiful Yet Comfortable Office Chairs Exist?? Jess Takes You On Wild Ride To Find Out The Answer

In my last apartment, my biggest furniture design agony was my coffee table (needed to be small, not too visually heavy, and taller than my beloved navy velvet pouf so they could “nest” with each other. Then for my balcony, it was a dining set (also needed to be small, I wanted it to be vintage, not too expensive, and have a modern french, wrought iron frame haha). Now? Now, it’s my office chair/living room chair and I might be fully going out of my previously semi-sane mind. I have looked at so many chairs that I feel like I’m going crossed-eyed. Much like my feelings towards coffee tables and outdoor bistro sets, I may never want to look at an office or desk-compatible chair again. But jokes on me because guess who still needs a coffee table… Anyway, in the spirit of fun mental downward design spirals, let me take you on my chair journey – the styles I like, the functions I want, and some desperate wild options I was considering.
Oh, here are photos of the coffee table and the outdoor bistro set to jog your memory…
 left: the perfect coffee table | right: the perfect outdoor bistro set (endless thanks to caitlin who found it)
Is this another dramatic design post that only proves I need to chill out? Probably. You might be saying to yourself, “Jess, honey, there are a lot of perfectly nice-looking office chairs out there. What is the issue???” Well, there are a couple. The first and most acceptable reason is that my office is also my living room. So I really want something that makes me happy to sit in but also look at when the workday is done. The second, and far more obnoxious reason, is that I want something “different”. I really like to teeter on the edge of being comfortable and visually inspiring. Those things are not necessarily mutually exclusive and they do usually tend to come with a very large price tag unless you are super handy or know someone who is and can give you a slammin deal (like how I “pay” my dad in Mexican cokes and undying flattery). I also don’t have kids or animals which I think is important to always mention. So to nail down this point, Emily always says good design can only really be two of these three things – good, fast, or, cheap.
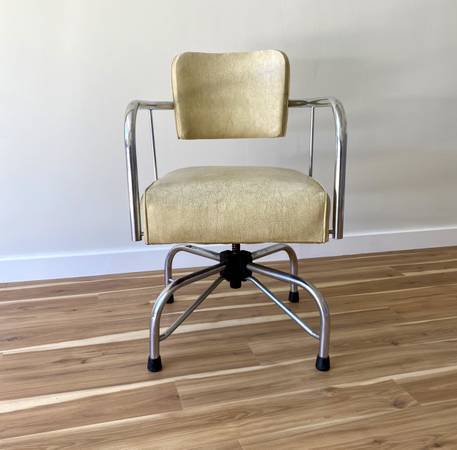
“Cheap” is obviously relative but let me tell you that the majority of beautiful office chairs are NOT CHEAP. Furniture designers of the world please figure this out!! If you’re wondering what I’ve been sitting on for the past 2 years, I was lucky enough to get to use my desk chair from our old studio(s). It’s been a great support since actually 2016 but this baby is falling apart. Let me show you a little side by side:

 left: when the chairs were new | right: 6 years later
So ya, wear and tear-wise it’s not great and the rose gold metal reallllly takes my apartment’s style into a glam zone that doesn’t feel like me. I want earthy, darker-toned, and modern to contrast the pink curtains and light beige color of the desk. Gimme that tension! Lastly, I’d be lying if I said I didn’t want something that looked unique, that hasn’t been all over the internet yet. It’s the chronic design lover in me that just wants to keep reaching and searching for something weird yet undeniably cool. And remember this is a key piece of furniture that is on display in my home during and outside of work hours. I really want to love it hard.
I could try to justify my insufferable pickiness all day but let me just show you what my journey has been like in nearly chronological order. But before we hit the timeline, let me remind you what we are working with…
 from: a jess’ living room moto update: we’ve got a lot to talk about – successes and a possible mistake
Stunning pink curtains from Decorview, the desk that I am pretty sure was made for me and my window in mind from Crate and Barrel, and in the bottom right corner, a sneak peek at my dream sofa from Lulu and Georgia (design my EHD alum, Ginny Macdonald). This puppy is shaping right on up:)
So while a lot of you may know me for my non-kid having “form over function” mentality, I haven’t totally lost it. I want my desk chair to be comfortable. If possible I would love some wheels but that’s not necessary. Of course, my definition of comfort may be different from yours so know that as I walk you through these, K??
When I started searching, I decided that I would start at some of my favorite big box stores to see what was out there.
The Crate And Barrel Options


Libby Natural Cane Desk Chair | Caterina Natural Upholstered Office Chair with Brass Base | Diversey Office Chair
Naturally, I started at Crate and Barrel. Normally I like to shop from a bunch of different stores so the room I’m designing is naturally more eclectic-looking but I trust their design and quality. Those are two things that are super important to me and extra important in an office chair. The one on the far left is great. I love the canning and the color contrast to my desk but ultimately it’s just not the right style. The one in the middle is so pretty but I’m trying to stay away from warm metallics (it comes in silver and gray too but that’s also not right for the corner). The last one on the right is a showstopper. The entire back is wood. But this one paired with my desk is just too neutral for what I want.
The CB2 Options


Court Pearl Office Chair | Bowtie Cream Boucle Office Chai Model 3002 | Martos Chocolate Faux Mohair Office Chair
All three of these are beautiful. The beige one on the left has just a cool frame but again, the color is too similar to the desk. The middle one’s shape, designed by Paul McCobb, IS SPECIAL! And this might be one of maybe a couple that I would have actually really considered. But I’m not not clumsy and I can just see me dropping avocado or taco insides right on that heavenly boucle fabric. It would’ve been so sad. Lastly, there’s that insanely cool 70s inspired velvet tubular chair designed by Mermelada Estudio. So while it’s the coolest to look at, I’m not sure if this is a “sit on for 8 hours” kinda office chair. Also, the brown velvet would compete with my brown velvet sofa and there is NO FIGHTING in this home.
The West Elm Options


Deacon Swivel Office Chair | Leather Upholstered Swivel Desk Chair | Crescent Office Chair
Ok, the one on the far right is pretty simple but the shape is lovely. Also for $159, it’s a steal. But too light-toned and generic. The brown leather chair in the middle has a cool vintage vibe but I thought I could do better. For the one on the far right, I really like the slightly more interesting arm shape and that color but for both the first one and this one, I don’t love the black base.
The Prettiest West Elm Option

The colors being so light broke my heart! But bravo, West Elm for designing this super beautiful chair. The shape, the material mixing. the base. the black straps?! Are you kidding me? It’s definitely not cheap but if you love it, need a desk chair, and have the means to get it, YOU SHOULD. Also, don’t spill:)
The Vintage Desk Chair Options


Gispen Executive Office Chair | Rare Ahrend De Cirkel Burgundy Corduroy Rolling Office Chair | Ahrend De Cirkel Rolling Office Chair
I then went to the next best place I could think of for cool vintage furniture, Amsterdam Modern. These three options were super cool but none were right. All three colors were a no for me and I wasn’t convinced those bases were going to work with my overall vision.

1930s Swivel Desk Chair By Royalchrome | Antique Chairs with Wheels
Then not sure if you’ve heard of Craigslist but that’s where I went next:) The chair on your left is super cool and apparently super rare but ultimately I didn’t love it. And for $300 I better love it. Then for those three very pretty canned chairs on wheels, they are 3 for $110 but much like the one I bought for $15 (go to this post for reference), I would still need to do a fair amount of DIY and reupholstering AND they were also too short. Pass.
The First One That Stole My Heart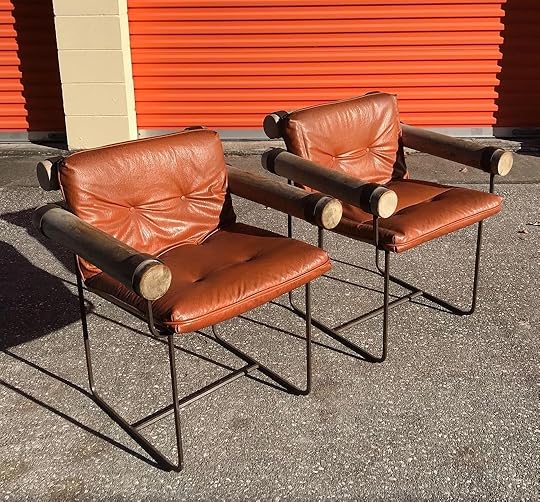
via peridot antiques
The jaw to the floor moment when I saw this photo on Instagram could have been seen for miles. The hot rush of adrenaline coursed through my body as I frantically tried to find a similar chair but then I read the caption:
“Dillard Ramsey Harwell 1933-2019 San Diego Ca. Mystery Solved!!! These chairs have been in storage forever. I need help identifying who the designer or manufacturer is. They are in the manner of Cleo Baldon. But I cannot find that exact example by Cleo. The seat cushion does have a California upholstery label underneath the cushion”
I knew the style was Cleo Baldon but I hadn’t seen those extra-thick arms before. I know it’s dumb but I was noticeably sad after nothing useful came up. So naturally, I went on a hunt for other Cleo Baldon-style chairs.
The Cleo Baldon Chair Phase via matter & bone
When I searched “Cleo Baldon” on Instagram, this incredible pair came up. I love the iron, I love the leather and wood accents, and I love the olive green cushion. Unfortunately, this post was from 2014 so not “available” but also probably soooo expensive.

 left: via mid century sacramento | right: via archive 20th century
Here are a couple more stunning options I found on Instagram that I wouldn’t change one bit. But let’s get into more realistic options.
The Ones I Could Maybe Afford
Mid-Century Cleo Baldon Style Fumed Wood & Iron Arm Campaign Chair
I was “this close” to buying this chair a couple of months ago. They were $150 each and local pickup. However, I was not a fan of the “fabric”. I honestly thought I could find something that wouldn’t require me to also search for fabric and get it reupholstered. But then…

Cleo Baldon Wrought Iron Arm Chairs for Terra 1966
I was still on the hunt for a chair month later! So I came across these. They were $640 for the pair (local, so no shipping). More expensive and a greater need for a makeover. It didn’t make sense for me.
The Lounge Chair Phase design by transition state design | photo by olivia pierce
But then the desperation started. I was looking at chairs that were definitely beautiful but definitely not suitable for long hours at the desk. I saw this chair above at Amsterdam Modern last year and was both heartbroken it wasn’t mine but happy that one of my favorite design firms used it. I remember asking Em if she thought this could work and a “not really” sentiment was expressed.


Here’s a new version but the issues are the same… it leans like a lounge chair. Great for relaxing, not great for working.

This was a Facebook Marketplace find that I loved the shape of at first sight. But then reality set in. It was too short and too loungy to work in and look good in your house. FYI average seat height is between 17″ to 18″.

1970s Mid-Century Modern Sergio Rodrigues Style Club Chair
It was the same story with this one but I also really dug this weird leather patchwork. But guess what the seat height is… 14″. TOOO LOOOOW.
The “I Don’t Need A Cushioned Seat” Phase
Mid-Century Dining Chair | Ebony Gilbert Marklund Style Brutalist Side Chair
This. This is the most comical (to me) and likely unrelatable part. The fact that my search was taking so long, I thought, “well maybe for the shoot I’ll just get something pretty, maybe even rent, so I can keep searching and not waste any money or gifting opportunities”. Whether it was gifted or not, the phrase that Caitlin said to me when it was looking like I was about to compromise was, “Buy right, buy once.” It was the reminder I needed. But I still want to show off my finds. The chair on the left is from Dims who I LOVE. The set of two was $325 on Craigslist while, this Dims chair alone (but new) costs $465, It was a steal. Then the chair on the right really intrigued me. It’s simple, modern, but all the clean details make it so special (but sadly not “8-hour” comfort)


These two were right up my new design vision alley. I wanted a warm, not a too beat-up leather chair. The one on the left is from Craiglist. But the one on the right is part of a set of four that costs $11k. I am sure they are completely properly priced but now that I’ve slightly inquired about rentals, I know there is a decent rental fee (had no real idea before all this). I’ve heard 20% to 25% of the retail price. TOO MUCH % for a RENTAL when it’s $11K!!


Pair of Cane Oak Cantilevered Chairs | Revival Side Chair
On the left, was from my only in-person day trip attempt to find a chair. It’s stunning but as you know canning isn’t really the look I’m going for. But I took a pic, asked for the rental price, and it was 25% of the total. So it would have come out to $350 to rent for the week. Again, so pretty but too much for something I will only admire in photos. I did really like this one on the right. A few of you commented in this post, about the stool version in the opening photo. This one is a knock off and as Caitlin also said, “if you’re gonna go Cesca I feel like you gotta go vintage”. I passed.


Lastly, I was so so so tempted to get this Thonet chair since it’s only $10. But it wouldn’t be a great desk chair and sadly I can’t keep hoarding things I may or may not ever use.
The Very Desperate, Anything Goes Phase

Are you feeling tired because that is how I felt at this stage of the process? Why wasn’t my chair showing itself?! Did I need to go in a crazy direction?? Enter the oversized plush leather chair part of this phase. These would have offered no support and looked way too chunky. Buuut the only one the left was $50 (now sold) and the cream one was free (but in rough condition). It was a weird moment.

Then entered this $200 chair (but was $400 for shipping). I honestly think it’s pretty cool but the height of this chair is shorter than my desk by two inches. It wasn’t a fit… clearly.


Set of Vintage Accent Chairs | 1960s Mid-Century Retro Side Accent Chair
We just kept moving along. I actually really liked those wood and yellow chairs but passed before I asked the seat and back height (mainly because that fabric wasn’t right). The set is $275 and that’s not terrible. Then the one on the right is only $35 but I don’t know the labor quite to strip and de-ruffle. I also really want something more modern looking but couldn’t help myself from considering it because of those front legs/arms!

Vintage Leather and Stainless Steel Pair of Lounge Chairs
These actually look really comfortable and that leather buckle detail is good. But for $950 (for both) I just wasn’t convinced. I don’t hate the vibe though, I just wish there was a medium to dark wood accent.
The One Em Recommended If I Wanted To Go Simple
Lexi Soft Pad Modern Office Chair with Aluminum Arms
Hahaha Me? Keeping It Simple?? Impossible. BUT the chair above (in a different color) is the one Em got for her best friend’s son’s desk and they all love it. She’s actually thinking of getting one for Brian. And if my chair wasn’t on display all day every day I would probably consider it. It’s not cheap but it’s under $400 which for a new, attractive office chair is pretty great.
The I Think I Found The One Moment…To Be ContinuedSo as I pitched this blog post idea, the chair gods were working some magic and I think I found her!!! I don’t want to give it away because that’s who I am, but you will be seeing the office area revealed on the blog the first week in April so I promise this isn’t too bad of a tease. Just ironing out the details but keep your fingers crossed!!
Thank you for coming along on this crazy journey with me, hope it was fun, and if you have an available, beautiful, and comfortable office chair share the deets with us all! Now onto the coffee table part 2…
Love you, mean it.
Opening Image Credits: Photo by Sara Ligorria-Tramp | From: Mountain House Reveal: How I Transformed an Awkward Space Into My Dream Work Loft
The post Do Beautiful Yet Comfortable Office Chairs Exist?? Jess Takes You On Wild Ride To Find Out The Answer appeared first on Emily Henderson.
March 21, 2022
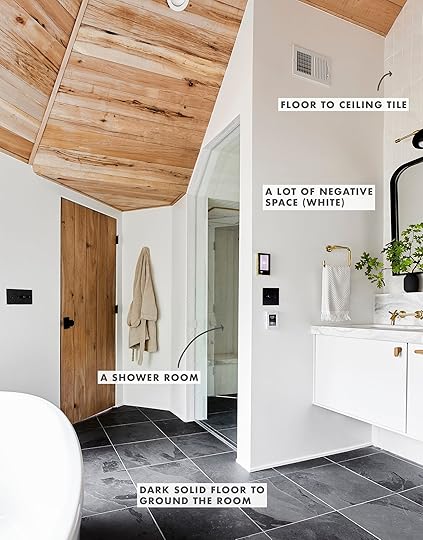
Our Primary Bath Debates, Priorities, Layout Choices, And Storage Solutions…

Today you are going to go deep into our life and hear about the debates we went through and the thought process that helped us come to decisions. This reminds me of a funny anecdote – while documenting the mountain house design process at a certain point (during the hyper-realistic SketchUp rendering reveals) a reader wrote, “WE ARE DONE SEEING HOW THE SAUSAGE IS MADE JUST SHOW US THE SAUSAGE”, and it was thumbed up a lot by others. We laughed a LOT about this in the office (Julie might not have laughed as much) because we were busting our butts to create these hyper-realistic renderings for the blog when many of you just wanted some sneak peeks and to wait to see the room IRL. And I get that. So this time around we aren’t doing SketchUp at all (which saves so much time and money), and I’m showing you less process. But this post is more for you “sausage maker” lovers… Turn away if you want to be surprised in 4 months with the reveal. 
 photo by sara ligorria-tramp | from: the final mountain house reveal (for now): all the details of my master bathroom
Like my patio at our former LA home, I am once again trying to recreate the vibe of my favorite room/s of all time – our primary mountain house bedroom and bathroom. Neither rooms are perfect, but our experience in them for a full year (and continuing) was/is wonderful. So after much analyzing why I loved being in them so much I’ve painstakingly included them here with a heavy farmhouse vibe.

 photos by sara ligorria-tramp | from: the final mountain house reveal (for now): all the details of my master bathroom
Then we listed our priorities for the layout and I rambled this off real quick:
1. A relaxing spa-like tub area…
2. away from others/aka a sense of retreat…
3. in front of a big window (which now seems totally contradictory with #2)…
4. not facing west to avoid any afternoon harsh light…
5. visually very quiet…
6. with pretty elements that make it look and feel special, but not overly designed.
When we asked Brian what he wanted in this bathroom he agreed with the above and added: “a door on the toilet room” (we didn’t have one at the mountain house) and he 1/2 jokingly mentioned that he would like a tray table in said WC – like in an airplane. He suggested a cup holder would do. I actually think there is a hole in the market when it comes to what guys want in a bathroom (my brother is begging for a urinal in his). He wanted it simple and spa-like too, but otherwise, he put it in our hands.
We wanted this one to lean more traditional and add some color (since outside might be gray, whereas it was blue skies 300 days a year in Lake Arrowhead). Beyond that, we had to make some decisions. Over the years I have gleaned so much from you guys, being able to really crowdsource decisions based on people who are further into living than I am (especially in regards to kids). But now that we’ve lived life as an adult for a while, we feel more dialed into our needs both stylistically and functionally. So most of our layout and permanent design choices reflect that, and they might be so different than yours. Let’s get into it – the main bath.
THE EVOLUTIONWhat you are about to see is a billion iterations (ok a handful) of the design, none of which were flushed through or ready for public viewing. But I think it shows you the process and how we got to the final design:
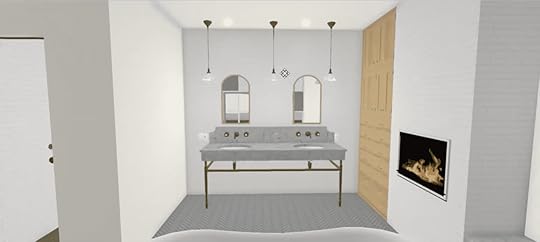 version one
Anne took a stab at placing things before we jumped on a zoom, where we told her almost immediately that we are “storage vanity” people (not open consoles – I don’t understand how those people live). I also totally forgot that at one point there was a fireplace in the bathroom – as requested by me which is SO DUMB. This is before I knew how bad unnecessary fireplaces are for the planet. I would be literally in a hot tub of water!!! Silly, “past Emily”.
 version two
This iteration didn’t really go far, once we told Anne we like shower rooms instead of open/glass showers (privacy, coziness, warmth). We would have customized the vanity so it looked actually good, but it’s fun to see the different iterations. Oh, and this was when Anne was in in the “let’s make it look like one flew over the cuckoo’s nest bathroom” phase (all white tile everywhere) which I almost got on board with but we shifted from it.
 version three
Here is where we experimented with a niche which we liked the idea of, but this arch didn’t make as much sense (remember when I wrote a post about how arches won’t make sense in everyone’s homes?)
 version four
This is getting closer to the final design. We added a storage cabinet on the right, which connected to and a bench under the window. We actually just cut the bench a few weeks ago for budget reasons (which I already regret). But that vertical cabinet is staying, just simplified. Originally I wanted to tile the entire ceiling, you know QUIET IMPACT, when we realized that it was going to be at least an additional $5k in labor alone. So this was our compromise – just the inside of the niche, but stopping there (Hot Tip – anything on the ceiling is wildly more labor/expensive).
The Final Design Plan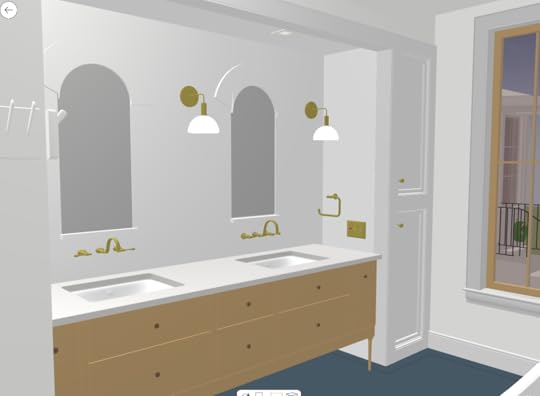 version five
Here’s what we have going on here as you can see:
1. A double custom vanity (made by Unique Kitchens and Baths with a custom base of special joinery by a local carpenter)- It’s designed more like a piece of furniture (which means you lose storage space, which we are fine with). If you think it looks like a lot of storage know that the top drop under the sinks are dummy drawers (not usable due to plumbing) and the bottom drawer has a cutout for the plumbing. So we have the two on the ends and the middle.
2. Undermount sinks – Again we are a fan of the wall mount faucet with the undermount sink because its a really clean look (but can only really be done when renovating, not if you have to match deck mount rough plumbing).
3. Arched mirrors with different tile coursing along the top – I have too much to say about it to drop right here so stay tuned on what our thought process was and why I’m still ambivalent about it. Can you integrate a medicine cabinet here to look awesome? Yes. But we fear it will cost a lot in troubleshooting time in order for it to look perfect. It’s a whole thing, super hard to understand unless I really get into it. Just trust me that there are like 7 experts working on the situation and it’s not an easy solve. So we might lose the look we want or lose the function we want unless we spend $2k in the time and custom materials. I’m so sick of trying to troubleshoot this though… I might not have the energy to walk you through why an arched custom medicine cabinet inset into an arched brick backsplash, with soldier coursing around the top and how it might not work. Anything is possible but at a certain point, when you are paying hourly, you need to look into the future and ask yourself if it’s going to be worth it.
4. I also have the cabinet to the right for what Brian calls my “hair appliances” (aka tools) and my a basket of spa stuff for my nightly bath sessions (which takes up the bulk of my beauty supplies). We had a whole bench under the window with drawers but had to cut it for budget purposes so we’ll find something freestanding if we need it. There is also a possibly too big walk-in closet nearby for overflow so it will all be fine. See below.

My brother saw our shower and was dumbfounded why we chose not to have a massive open shower. I don’t love the exposure of a big glass shower and it also takes a while to heat up, but TBH I mostly bathe so we prioritized the space there. I wanted it in front of the window mostly because that’s how we had it in Lake Arrowhead and I love it so much. Cozy shower, airy/exposed bathtub – I understand the confusion but it’s just how we like it and mostly has to do with the experience you want in both. I think it’s also what you are “used to” and if you are used to a big shower, then a normal-sized one in a remodel feels small all of a sudden.

Here are some more angles so you get the whole picture.


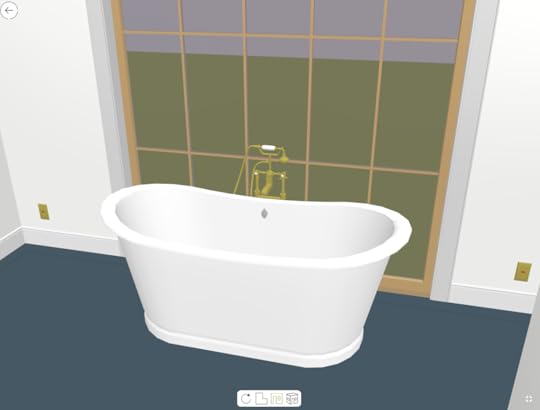
If you are concerned about my privacy just know that I plan on a sweet little cafe curtain, shoulder height. Something I can easily open and close while in the bath. Hopefully, a fabric that just filters the light, and adds privacy without making it dark.

Here’s a messy little mood board for those of you tracking inspiration and some of the products we are using (note the tile coursing in the lower-left inspiration shot – that’s what we are going for). And note how Jessica Helgerson floated a furniture style vanity in that nook? That was a great inspiration for us. We loved how it looked traditional/classic in an interesting way.
So that’s where we are at as of now. Every order has been placed (months ago).
The post Our Primary Bath Debates, Priorities, Layout Choices, And Storage Solutions… appeared first on Emily Henderson.
March 20, 2022
The Link Up: Em’s New Under $100 Cute Jeans, Jess’ Modest But Flattering Swim Top, And A Great Le Labo Candle Dupe

Y’all we made it to spring. The time of floral dresses, cleaning, and if you can, a warm-weather holiday. So while we are all looking forward to warmer days, this year is already flying by. So take a minute today to slow down. It is Sunday after all:) Here are this week’s links…
This week’s house tour is so good! Jennifer Bunsa did such an incredible job creating a calming space that is still full of pattern and color. It’s all about negative space:) Please go enjoy all of the happy patterns, very special kitchen hardware, and a lot more.
From Emily: I forgot how much I love jeans with big utility pockets (I think it does this illusion that is very flattering). So I finally ordered these because I wore my pair this week also from the same brand, which I loved. I’m excited to try them.
From Emily: First, there was Lego Masters. Then Blown Away. Then The Great Pottery Thrown Down, then Making It, then Magic For Humans BUT THE BEST ALL FAMILY-FRIENDLY CREATIVE COMPETITION SHOW HAS JUST BEEN INVENTED. And when I say “all family-friendly” I mean Brian AND I, Charlie AND Elliot. We all are obsessed with it. It’s called Making Fun and it’s HILARIOUS and so impressive. The premise is four macho builders have a wacky invention for whatever kid who gets selected (from the audience). The guys are legit hilarious (and they “hate” kids), they are crazy skilled/talented, and the producers are having the best time behind the scenes. It’s by far the best-produced reality competition show Brian and I have watched in this genre. We laugh hard and we just LOVE IT.
From Jess: I just discovered this black-owned athleisure brand from TikTok creator, Cindy Noir. I’ve really been wanting bright red leggings and these look so cute. Plus they are size inclusive and the red ones, in particular, are on sale!
Also From Jess: I’m on the hunt for a black bathing suit because I need one for a bachelorette weekend. It’s required. Naturally, I went to Target and found this one. I’m don’t think it’s the right vibe for the trip but I really liked it! It’s full coverage (the girls aren’t going anywhere), supportive, but is still a little sexy.
Also Also From Jess: Has anyone else started watching Minx on HBOMax?! Here’s the very short overview: “In 1970s Los Angeles, an earnest young feminist joins forces with a low-rent publisher to create the first erotic magazine for women.” It’s funny, heartfelt, and Jake Johnson and Lennon Parham are in it! If you loved Nick in New Girl, this is a very happy TV return. FYI there is A LOT of full-frontal nudity so if that’s not your thing then this may not be for you. But it’s seriously great and I can’t wait for more episodes.
From: Mallory: My favorite blue jeans are 25% off right now (use code SHOPSPRING). I love wearing them with a striped turtle neck or they would look SO cute with a sweater like this (that blue color omg).
Also from Mallory: I found a Le Labo Santal candle dupe and it’s honestly pretty good. Urban Outfitters is selling “Santal Supreme’’ now and honestly for $14 it’s super similar and is a really great deal. I highly recommend if you’re wanting to be boujee on a budget
From Caitlin: OMG. Is anyone else listening to the Twin Flames podcast? It follows how far some folks will go for true love – with the help of two YouTube-famous gurus, of course – and it’s ASTOUNDING. Prison time! Cease and desist letters! Complete transformation of identity! Each episode is ~30 minutes and the final one comes out tomorrow – I can’t wait. (Levity-wise, it’s like an Investigation Discovery show. It’s serious but easy to listen to.)
Also From Caitlin: Calling all folks who want the Reformation look on a budget – this long-sleeved linen dress from J. Crew is lightweight AND breathable AND perfect for spring AND available in everything from an XXS to a 3XL. The slit is even better IRL, too. Highly recommended (especially in the French blue).
From Ryann: I did it. I found the most comfortable sweats. I know I know, hold for applause. But honestly, these sweats are the ones I will dig through my laundry basket for every time. They have the softest inside but also have a wide leg and waistband that is not constricting whatsoever. And they are cute! Definitely cute enough to wear out and about and not feel frumpy. Now that I am thinking about it, I might buy another pair just in case Target is ever are foolish enough to stop selling them.
Ok, see y’all tomorrow xx
Opening Image Credits: Design by Jennifer Bunsa | Photo by Nicole Franzen | via Clever
The post The Link Up: Em’s New Under $100 Cute Jeans, Jess’ Modest But Flattering Swim Top, And A Great Le Labo Candle Dupe appeared first on Emily Henderson.
March 19, 2022
Ryann Got A Perm (!!) Wanna See The 2022 Version?? Let’s Just Say She May Never Go Back

Here’s the thing I know will be true. Some of you with naturally curly hair will want to shake me and scream why would you want to change your perfectly straight hair?? Those with straight hair will be super intrigued and eager to see how this turns out. We all want we can’t have. When I showed family my new perm my aunt with gorgeous naturally curly hair was like, “It looks good! But I want straight hair!” It’s just the way it goes.
All of us straight-haired gals dream about curly hair at one time or another. Because I have always had straight hair, I have always envied people with bouncy, exciting curls. I am talking Carrie Bradshaw in Sex and the City or Julia Roberts in Pretty Woman vibes. So a couple of years ago when I heard perms are back, I immediately hopped on board. My mom grew up in the eighties so I have heard perm horror stories but I wouldn’t let that deter me. But then a pandemic happened and lots of things became more pressing than getting a perm. But as fate would have it, a few months ago the opportunity to get a perm landed in my lap. Just as all hero journeys go, the stars aligned and I was chosen for the quest.


This is me and my naturally straight hair. And I love my hair, I really do. I am very lucky to have healthy, thick, long hair, but the look you see here is the one thing my hair does. What I mean is, I am not capable of any type of hairstyling so hair down is the only hair “look” I have in my arsenal. I was beyond ready to switch it up and try something very new.
Enter Curl Cult founded by Emily’s friend and hairstylist Janine. Janine spent four years in Italy creating this new perm technology so I felt extremely safe and comfortable in her hands. I am famously super trusting with hairstylists so I was ready for her to give me the most intense, voluminous curls possible. You know what they say. When in Rome.


Emily was pretty nervous for me and volunteered to be my mom/hair advocate. But I am fairly gutsy when it comes to my hair. I have chopped off all my hair multiple times including getting a pixie cut when I was 16. I guess I have never had a haircut bad enough to make me fearful. *KNOCKS ON WOOD*
I think the above photo depicts Emily, a curly-haired gal explaining to me, a straight-haired gal, that I will have CURLS by the end of this. HA. I think we both would like to swap hair (hence Emily’s blowout and my eagerness to get a perm) so she was trying her best to prep me for curly hair life. Her biggest fear was that I wouldn’t like it. My biggest fear was that my hair would be a few inches shorter. But other than that I was ready and excited.


I showed Janine the level of curl I wanted, while Emily held all the nerves for me. I knew I wanted a layered, voluminous look and was willing to go extremely curly. I really wanted a brand new look, so the curlier the better.

HERE WE GO!

First, Lauren gave me a trim and layered my hair so the curls wouldn’t be too uniform. If I wasn’t getting married this year, I would have done a full 70s shag perm with bangs. But I had to keep it tame for the wedding, and getting bangs is always a risk.

This is the last photo of me with straight hair. Now the party’s about to begin.


Once my hair was washed and conditioned, Janine got to work rolling individual, approximately 1 inch sized strands of my hair. I am no mathematician but I think she had to put in around 100 rolls in my hair. This process probably took the longest and by the time this step was complete, it felt like my head weighed an extra 15 pounds from all the rollers.

The next step is putting a liberal amount of perm solution on each strand. If you ever have gotten a perm, you might remember the smell. It’s not pleasant and the sulfur stink would linger in your hair for days. I didn’t know this but luckily I didn’t have to experience it. Janine spent 4 years working with a chemist in Italy to remove the stinky smells of perms. Her perm reduced the caustic odor adding a fresh berry scent and it WORKED. So this isn’t a smelly American perm, it’s a refined berry-infused ~Italian perm~


Once the solution was applied, I sat in a chair under a heat lamp and waited for about 30 minutes.


Once the perm goddesses (Janine and Lauren) declared the solution was set, they applied a neutralizer. This is another way Janine eliminated steps in the perm process. Their neutralizer is applied over their perm solution, so there is no more messy rinsing and blotting at the bowl. Seriously, Janine’s process is magic.


Once the rollers were removed we rinsed and conditioned my hair once more. You know the famous Legally Blonde quote?
“Isn’t it the first cardinal rule of perm maintenance that you are forbidden to wet your hair for at least 24 hours after getting a perm at the risk of deactivating the ammonium thioglycolate” Well more accurately, you are forbidden to shampoo your hair for 48 hours. If you do, it will reverse the perm so if you have full regret, it’s an option. But luckily that was not my experience at all.

The next step feels the longest because you just want to see what the result is. But you must wait for it to air dry so the curls can fully activate. My hair is very thick so this took about an hour (with the help of a heat lamp). As I was letting it air dry I could see the curls were forming and becoming more alive by the minute as I was anxiously awaiting the final reveal.

SHE HAS CURLS. Honestly, we were all shocked at how good it looked. You really never know what a hairstyle change will do to your face and your whole look but luckily I was immediately in love. I think I said “I feel like Julia Roberts ala Pretty Woman” far too many times.


You can almost tell through photos how soft and touchable this perm is. Perms back in the day were crunchy but this perm feels and looks natural. People have assumed that I’ve always had curly hair and that I am just now starting to wear it naturally. *flips hair* No big deal.


The texture is so gorgeous and soft. I couldn’t stop flipping my hair back and forth – it was so fun. That day was windy so you can really see the frizz but as someone with straight hair, I found the big frizzy hair extremely charming. You can come for me in the comments if you want, but I feel powerful having voluminous hair that can not be tamed.

So this concludes my hero’s journey. It was the best experience and I would 100% do it all over again. Next time, I might even go shoulder-length and even curlier. I am all in.
If you want this perm (and you should) I have great news. You do not need to be based in LA to get it. Your stylist can be Curl Cult Certified and join the movement in just 45 minutes. Just have them start here. You can also find a Curl Cult Certified stylist near you here.

And there’s us – just 3 curly-haired gals out on the town! Thank you, thank you, thank you, Janine for giving me the curls I have always wanted. It’s so fun being a curly-haired gal and I think everyone should try it. Here is a video of the whole process if you are interested (just wait for the add to play):
And in case you are curious, here is what it looks like now, one month after the perm:

This is another difference between the Curl Cult perm and the perms of the past. The grow-out process is much easier because the perm softens over time. My perm has already softened so I get effortless, beach curls with no heat or styling tools. I just use the Curl Cult Shampoo and Conditioner, Magic Spell (this stuff is bottled GOLD), and Curl Cream and let it air dry (you can get the whole kit here). I am famously very lazy with my hair so it’s incredible I get this look with the tiniest bit of effort.
Again, THANK YOU JANINE. I could not have enjoyed this experience or the results more. If you have any questions, fire them down below. xx
*Photos by Sara Ligorria-Tramp
The post Ryann Got A Perm (!!) Wanna See The 2022 Version?? Let’s Just Say She May Never Go Back appeared first on Emily Henderson.
March 18, 2022
Our 21 MOST LOVED Cleaning And Organization Products Because That Spring Cleaning Itch Is Already Here

When it gets down to brass tacks, I’ve always been a “company is coming” cleaner. If you’re like me, maybe you’ve struggled with finding some deep intrinsic motivation to really spend some time deep cleaning since the pandemic started – if I’m the only person staring at my baseboards, does it really matter if they look a little worse for the wear? If I haven’t turned on my fan in months, do I really need to break out a ladder to dust the blades in the wintertime? Basically, my spring cleaning dilemma is this: Will I get it done? Yes! In a timely manner? That’s questionable!
Enter the Astrological New Year, AKA the kick in the butt I need. This Sunday, March 20th, marks the spring equinox – the first day of spring! – and I’m really excited about it for two reasons:
The EHD team can testify that I looooove a good New Year’s resolution, and the Astrological New Year gives you a chance to check in on your progress. I like to think of the first two months of the year as a trial period – what works? What doesn’t? – so I can reframe some of my goals accordingly. (Like, in my case, I’m reducing my water intake aspirations. Maybe one day I’ll get to 8 glasses a day. For the rest of 2022, we’re shooting for and celebrating 3 glasses of water per day, THANK YOU.) It’s nice to knock out spring cleaning this weekend because it’ll start your “new year” on the right foot, you know?I want to clarify that I’m not an astrology expert – I know my birth time (11:58 PM on 10/14/91 in Newark, DE, baby!!!) and have a general idea of how my chart works, but I’m totally lost when it comes to day-to-day interpretations. (People who understand planet positions and new moons and and transits are way smarter than me. Knowledge-wise, I’m like an astrological sixth grader.) That said, experts suggest that there’s value in preparing your home for a fresh start before Sunday will set the stage for the year ahead. And, well, I don’t know – there’s just something kind of nice about tying tedious chores to the possibility of something nice happening over the next 12 months, you know? It makes scrubbing my (wholly unused and yet still somehow grimy) oven feel less annoying. I’m into it. photos by sara ligorria-tramp | from: a bedroom & closet reveal with target’s made by design line
SO. Here we are. In the spirit of helping others conquer their most annoying spring cleaning and organizing tasks, I’ve pulled a few products that I own, love, and actually enjoy using. They’ll help you tackle those forgotten-about nooks, neglected crannies, and maybe you’ll even be able to set up some organizational systems that you keep your home running smoothly year-round. (Look at that! You really WILL set the stage for the year ahead! Literally!) LET’S BEGIN?

1. Electronics Cleaning Brush: A microfiber cloth cannot hold a candle to this double-ended tool. The rubber side can still get gunk out of the cleanest keyboards.
2. Electronic Telescopic Waterproof Scrubber and Polisher: STOP SCRUBBING WITH SPONGES. This is my 2022 discovery – it’s an electric scrubber with a telescoping rod. You’ll never have to squat next to the toilet and scrub those little crevices again (and there are 5 different heads, so you can clean all kinds of surfaces). If you have any mobility issues, this thing is AWESOME.
3. Pumice Stone Toilet Bowl Cleaner with Extra Long Handle: Because sometimes a brush and your cleaning agent of choice can’t cut it. (Especially handy if you live in a city that’s notorious for its hard water. #LA)
4. Broom and Dustpan Set: I will never stop singing the praises of the Disney broom/lobby broom/movie broom. It makes sweeping fun. (I hate that I said that, but I mean it. Wrangling in that last strip of dirt/dust/debris is SO much quicker with a standing broom.)
5. Fresh Wave Odor Removing Gel: I don’t know what’s in this, but it’s miraculous. They last for ~60 days and I cry when my Target doesn’t have them in stock – I keep one in my kitchen (read: the litter box room) and it makes a huge difference.
6. Power Scrubber: It’s like an electric toothbrush for your grout. I’ve had mine for a year and it cuts cleaning time in half.
7. Deep Clean Brush Set: For all other nooks and crannies in your house, these are a life-saver. I use the smaller one to get gunk out of the strip where my linoleum meets my cabinets in the kitchen. Great for polishing up drains, too.
8. 32pk Felt Pads: While you’re doing all this cleaning, you might as well take 20 minutes to protect your floors. (This is an open letter to myself, from myself.)
9. Pot & Pan Brush: I don’t have a dishwasher, so I take my scrubbing tools VERY SERIOUSLY. While I am loyal to Scrub Daddy for washing my utensils, cups, bowls, and plates…nothing tops scrubbing burnt stuff out of a pan with this brush, guys. (Maybe you don’t need this if you’re better at cooking than I am.)
 photos by sara ligorria-tramp | from: sara’s kitchen – an updated sneak peek (it’s functional, but still not “finished”…)
1. Ribbed Shelf Liner: If you’re going through your drawers, give them a quick clean after everything’s been removed. Then, take a second to line each drawer before filling it back up. (If your drawers are already lined, you’ve already got it all together. Go you!!!)
2. White Cabinet-Sized Pull-Out Drawer Solutions: Before you demo your kitchen cabinets, consider grabbing a few of these – they’ll make all of your shelves function like drawers. No more crouching and hunting for the one pot at the back of the cabinet – just pull out the drawer and grab it! GAME-CHANGING.
3. Weathertight Portable File Box With Handle: Everyone should have a dumping ground for their important documents. It doesn’t have to be organized, but it’s nice to know where you can find a medical record or your birth certificate, or your car’s title.
4. 4-Sort Wire Dividers: I don’t know if anything makes me as irrationally angry as the sound of a baking sheet being pulled out from the middle of a stack of baking sheets. (So cacophonous! So unnecessary! Harsh and metallic! BLEH!) If you have space in your cabinet, these are great for organizing sheets, small pans, and lids.
5. Corner Double Tool Rack: So many configurations, so little time. I think this is the best and most utilitarian space-saving garage storage item on the market. Rakes, shovels, brooms – they all fit. Keep it in a demilune shape or separate into two pieces to make use of some corner space.
6. Hangmate Belt & Tie Rack: As someone who’s always been like, “um, excuse me? Do I…roll these? Put them in a box? Hang them over a hanger?”, this is the best solution for keeping them all visible in one place. Big fan.
7. Large Expand-A-Shelf: If you cook a lot, you owe it to yourself to create a multi-tiered cabinet where all of your contents are readily visible. I love this shelf because it expands to fit larger cabinets, but you can always DIY a solution that fits for your space.
8. Polytherm Undershelf Baskets: Adding a few of these will double your shelving capacity. They’re AWESOME. If you don’t have a ton of cabinet space, these can open up some breathing room so you’re not just balancing all your plates and bowls and cups on top of each other.
9. White Mesh 2-Drawer Unit: If I had participated in our closet organization challenge, I would have hyped these up SO HARD. I love their construction – a little more elevated and sturdy than their plastic drawer cousins – and they come in a ton of different configurations, so you can find a piece that fits your spatial needs.

 photos by sara ligorria-tramp | from: see how ehd brings fall into our homes (and yes, there are *chic* pumpkins involved … target does it again)
1. Large Pet Hair Roller: INCREDIBLE. I’m not sure how many times I’ve linked this up over the past 2.5 years, but I can’t recommend it highly enough. Great for lint rolling upholstery. Even better for lint rolling yourself when you’re running late and don’t have time to lint roll your sweater in seemingly-minuscule increments.
2. Pet Food Containers: Especially handy if you buy pet food in bulk. I also love these because they keep food fresh when my cat comes back to the East Coast with me – it’s nice to not worry about her food going stale while we’re gone.
3. Wiper Blade Squeegee: Squeegees are the best, second-most underrated pet removal hair tool – especially on velvets and microsuedes. (The most underrated tool is a latex glove.) Run it along the surface and hair will start to clump together. DREAMY.
If you, too, have been fully motivated to knock out your spring cleaning ASAP, all of these products shoooould also be available in-store at a retailer near you. Here’s to all of us powering through our annoying tasks (fan blades, I’m coming for you) so we can settle into our comfy, freshly-laundered beds on Sunday night. WE GOT THIS, RIGHT? (Anything else I forgot?) xx
Opening Image Credits: Art Direction by Emily Henderson | Photo by Sara Ligorria-Tramp | Styled by Emily Bowser
The post Our 21 MOST LOVED Cleaning And Organization Products Because That Spring Cleaning Itch Is Already Here appeared first on Emily Henderson.
March 17, 2022
Our 2022 Outdoor Furniture Picks To Get You And Your Outdoor Space Ready For Spring/Summer
Every year around this time I become giddy about the possibility of totally revamping my backyard with new outdoor furniture. It’s not a futile pursuit by any means (a new dining table and chairs would do wonders) but I am dragging my feet. Just as my living and dining room makeover took me almost two years to complete, I am sure my backyard will l follow a similar timeline. But I can’t help but wonder, is this is the year I finally transform my backyard for real?? Only time will tell. One thing I do know for sure is that the new outdoor furniture drops from our favorite retailers have me drooling. If window shopping has me this excited, I can’t imagine what the real thing will be like. If you are also in the market, the EHD team and I rounded up our favorite 2022 outdoor furniture picks, and folks they are GOOD. Almost too good.
And as a friendly reminder, we always encourage scouring Facebook Marketplace and Craigslist for second-hand options. You can often find “lightly used” furniture in your area and if you search the product name and retailer, you could find exactly what you are looking for. Alright, let’s get to shopping.
Dining Tables design by jess bunge for ehd| styling by emily bowser | photo by sara ligorria-tramp | from: jess’s communal patio reveal
On Sunday morning I was cursing daylight savings, but at least the days are longer which means we can enjoy our outdoor spaces more. One of the best ways to do so is to create an outdoor dining space so you can savor meals and enjoy company in the great outdoors. Not sure where to start? We have you covered with these top picks:

1. Calliope | 2. Fernhill 4-Person Rectangle Patio Dining Table | 3. Eucalyptus Segovia Dining Table | 4. Sarno Outdoor Table | 5. Salterini-Style Patio Table | 6. Johnston Dining Table | 7. 57″ Eucalyptus Dining Table | 8. Railay Dining Table | 9. Britanna 4 Person Round Patio Dining Table | 10. Meadow Dining Table | 11. Midway Round Metal Patio Bistro Table | 12. Neuhove
Our friends at Lulu and Georgia are currently having their friends and family sale (use code FAMILY25 for 25% off) so if you are looking at #10, now’s the time to snag her. I do in fact need a large 6-8 person table for our weekly Sunday dinners so I am contemplating #3 or #4. But if I was looking for a bistro table, #11 would be it. I love the sleek legs and knob detail (and that it’s only $200!). Oh, and for those who were sad about Jess’ outdoor dining table (#1), IT’S BACK (plus they now have an oval option too).
Dining Chairs design by jess bunge for ehd| styling by emily bowser | photo by sara ligorria-tramp | from: jess’s long and skinny balcony reveal
What’s a dining table without dining chairs?? Here are our favorites on the market right now:

1. 6 Piece Dining Chair Set | 2. Cypress Dining Chairs | 3. Fallon Stacking Dining Chair | 4. All-Weather Stackable Chair | 5. Briva Wicker Dining Chair | 6. French Bistro Stacking Chair | 7. Boomerang Rattan Tub Chair | 8. Anner Patio Dining Chair | 9. Vintage Wrought Iron Chairs | 10. 4 Riviera-Style Dining Chairs | 11. Morocco Stackable Dining Chair | 12. Manila Dining Chair
I love Target’s version of the French bistro chair (#6), especially at that price. I am a big fan of mixing dining chairs to create more visual interest, so I love the idea of mixing #7 with #4 or #11 with #12. And did you think I would move on without mentioning #9? Not a chance. The iron detail is very charming and the upholstery is even holding up so you wouldn’t have reupholstered.
Sofas, Sectionals, & Loveseats styling by emily bowser | photo by sara ligorria-tramp | from: after three years we can actually use our upper deck
If space allows, creating a full-on outdoor living space will have you soaking up the outdoors any chance you get. Here at EHD, we even like to style our outdoor spaces how we do the indoor ones, but perhaps that is a whole other post for another day:) For now, here are our sofa picks:

1. Murrel Sectional Set | 2. Neighbor Haven Outdoor Sofa | 3. Studio McGee Metal Loveseat | 4. Rosen Sofa |5. Timo Patio Loveseat | 6. Jurgen 5-Person Sectional | 7. Onya Loveseat | 8. Havsten Sofa | 9. Perth Large Sofa | 10. Cana 3-Piece Sectional | 11. Eucalyptus Segoiva Bench | 12. Cerca Striped 4-Piece Sectional
I think cabana stripes are always in style (and perfect for outdoor spaces) so of course I am very attracted to #12. However, #3 or #5 are definitely more my speed. BUT if we are talking dream outdoor furniture, I would have to go with #9. Which one is your favorite?
Lounge Chairs photo by sara ligorria-tramp | styling by velinda hellen and erik staalberg | from: 5 outdoor ideas & hacks that’ll instantly add style
If you are serious about your outdoor lounging game, do not skip a lounge chair or two. They can be arranged around your outdoor sofa or around a different area (like a fire pit) to create another conversational space.

1. Salt Creek Lounge Chair | 2. Marbella Single-Seat Sofa | 3. Pavilion Metal Lounge Chair | 4. Grotta Wicker Lounge Chair | 5. Novel Lounge Chair | 6. 1960s Tiki Bamboo Lounge | 7. Seychelles Hand-Woven Chair | 8. Gray Rope Swivel Chair | 9. Aeri Chair | 10. Nunelle Indoor/Outdoor Chair | 11. Southport Patio Egg Chair | 12. Southport Patio Egg Chair
Can we talk about #7? The handwoven curved legs are so whimsical, yet it’s still neutral and not too loud. I love it. I am also very attracted to that vintage 1960s Tiki Bamboo chair for obvious reasons. We’ve also used #5 and #12 and love them both.
Coffee Tables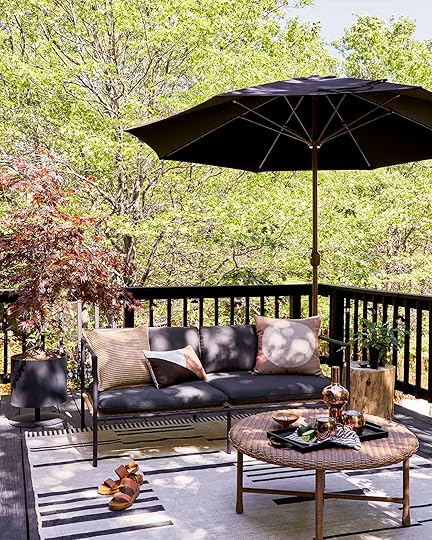 styling by emily henderson and emily bowser | photos by sara ligorria-tramp | from: after three years we can actually use our upper deck (because we finally have the right outdoor furniture…and fabric)
An EHD rule of thumb is to style and arrange your outdoor areas similar to how you would your indoor spaces. An indoor living space consists of a sofa, coffee table, and maybe an accent chair or two and the same should go for your outdoor lounge area. That said, the perfect companion for an outdoor sofa is an outdoor coffee table like any one of these:
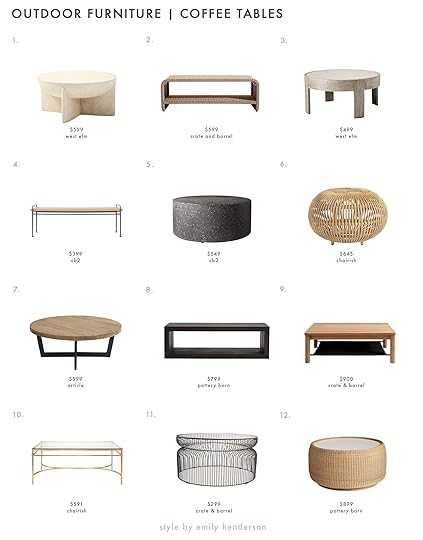
1. Monti Lava Stone Coffee Table | 2. Grotta Outdoor Wicker Coffee Table | 3. Portside Outdoor Round Concrete Coffee Table | 4. Faux Rattan Outdoor Coffee Table | 5. Terrazzo Black Outdoor Coffee Table | 6. Shoreline Small Rattan Scatter Table | 7. Toba Table | 8. Folsom Coffee Table | 9. Haven Outdoor Coffee Table | 10. Agata Glass Cocktail Table in Gold | 11. Spoke Glass Graphite Metal Coffee Table | 12. Hampton Indoor/Outdoor All-Weather Wicker Drum Coffee Table
Jess used #4 for her communal patio makeover and I have been coveting it ever since. I love the sleek metal legs and the woven texture. #5 would be an easy low maintenance option, and #6 could be used as a coffee table or ottoman.
Chaise Lounge Chairs photo by sara ligorria-tramp | from: the portland outdoor living spaces and a lot of styling tips
If you are into sunbathing even a little, I know I won’t have to convince you to invest in a chaise lounge chair. And folks, they aren’t just for pools! You can set up a chaise lounge in any outdoor space to create the ultimate relaxation station.

1. Long Reclining Acacia Single Chaise with Cushions | 2. Chaise With Sunbrella Cushion | 3. Idle Patio Sun Lounger | 4. Palmetto All-Weather Wicker Chaise | 5. Porto Chaise Lounger | 6. Natural Wood Capari Chaise | 7. Leroy Chaise | 8. Bizerte Chaise Lounge | 9. Telluride Chaise Lounger
Technically #8 is more of a daybed than a chaise lounge but I won’t tell if you don’t. #5 has a woven detail around the base that is very special, but I do love a simple option like #1 or even #3.
Side Tables design and photo by malcolm simmons | from: malcolm’s deck reveal
I think side tables are often overlooked in the outdoor furniture arena. I drink a lot of drinks (I love coffee, iced tea, sparkling water, wine, YOU NAME IT). At any time of day, I have a drink or two within 2 feet of my person so if I am to enjoy an outdoor space, a side table (or two) is a necessity. Here are some top picks:

1. Short Tiled Side Table | 2. Tulle Side Table | 3. 12″ Round Metal Table | 4. Profile Ceramic Table | 5. Seadrift Side Table | 6. Aalto Metal Accent Table | 7. Drew Stool | 8. Eyelet Tray Table | 9. Serengeti Side Table | 10. Tray Top Accent Table | 11. Labadi Natural Wood Table | 12. Round Water Hyacinth Table
I am extremely drawn to #2. Those legs are so dreamy and perfect for a French cafe-style outdoor space. For a more modern space, I love #8 or #10 that could act as a plant stand or accent table.
And that my friends, concludes our 2022 outdoor furniture roundup. If you are in the market, I hope this post helped you find what you are looking for. If you have any other furniture roundup requests, drop them below. xx
Opener Image Credit: Design by Jess Bunge for EHD| Styling by Emily Bowser | Photo by Sara Ligorria-Tramp | From: Jess’s Communal Patio Reveal
The post Our 2022 Outdoor Furniture Picks To Get You And Your Outdoor Space Ready For Spring/Summer appeared first on Emily Henderson.
March 16, 2022
How Sara Course Corrected Her Initial “Clean, Modern, And Very Neutral” Primary Bath Design Plan Into The Actual Design She Wanted – It’s A Suprise Reveal!

I’m back with another reveal. And this one’s been even longer in the making. Unlike our kitchen renovation, which came after a year and a half of us using the kitchen in its “bought as” state, we never got the chance to even use our primary bathroom.
When we bought the house, the primary bathroom looked like this:
 the before!
It was covered in pink and teal tile, had a seemingly 50-year-old jacuzzi bathtub, and no shower. I think I peed in here maybe twice. Because pretty quickly after we got the keys, we went straight into demo.


There were so many things happening all at once during those early months, and designing the primary bathroom wasn’t one of them. But we did need to lift up all the flooring, level all the joists, remove all the damaged wall wood (from termites and mold), and run new electrical throughout the whole back of the house. And since we had a fully functional bathroom in the front of the house, it just made sense to tear out the bathroom at the same time as the rest of the back of the house. Even if that meant it was just going to sit as an empty box of subflooring and drywall for…two years and 4 months.
And sit it did. We used the front bathroom exclusively, until July 2021. That’s when the toilet was installed in the primary, and we finally didn’t have to walk all the way from our bedroom in the back of the house to the bathroom in the front of the house to pee at 2 am.
As a reminder, here’s how the floorplan of our house has evolved:

We started our renovation efforts in the front of the house – the office (which was our bedroom for the first year and a half), living room, and dining room. Then we worked on the primary bedroom (my next project), and TV room. The Primary closet came next. And then, as most of you know, we decided to pull the trigger on renovating the kitchen. Meanwhile, the primary bathroom simmered on the back burner – slowly being designed, but waiting for its moment.
What I’m about to show you may be disturbing…

This was my first ever bathroom design plan. It was basic and got the point across. Shower at the back, toilet in the bottom left corner, sink against the right wall. We had torn out the whole thing, so plumbing could go anywhere. We had design carte blanche. Also, hire me to draw your floor plans. I only work in the sophisticated program called “IG stories” and I’m very expensive.
When I first started thinking about the bathroom vibe, I went in a cleaner, more modern direction. Simple black and white with clean lines. I think I was feeling overwhelmed by the overall chaos of renovating a house, and felt like creating a more modern space would appeal to Macauley.

 left: design by green apple interiors & design, photo by anson smart | right: design by elizabeth roberts architects, photo by dustin aksland
I really felt I was on the right path. So naturally, before my design plans were finalized, I went ahead and ordered tile, hardware, and plumbing fixtures during this “clean and modern” phase. As is typical, I was trigger happy, and we weren’t anywhere close to actually installing the bathroom. So the tiles and fixtures sat in the garage for a year, awaiting their time.
During this *time* away from the design process, I really started to find the design groove our home through working on the other space. And I found myself being pulled back into the direction of cozy traditional. Bathrooms that looked more like this:

 left: design by blanc marine intérieurs, photo by sylvie li, via house and home | right: design by sabbe interior design, photo by paige rumore
JUST LIKE I SHOULD HAVE KNOWN I WOULD. What was a girl, with so many beautiful modern pieces already waiting in her garage, to do? I started frantically searching for inspiration that blended the two styles. Which bathrooms had black and white tile, clean black fixtures, but still felt warm and inviting?
Luckily, craftsman homes are kind of perfect for this type of mixed design. So, I started pinning images like these, which had a few key elements to counteract the starkness of the black and whites: cozy woods, warm brass, additions of color through details, and vintage decor:

 left: design by anna bode | right: design by andy and candis meredith, via simple stylings
These images slowed my panicking heart and soothed my anxiety. I had wiggle room in my design plans, and everything could work together if I made some strategic next steps.
First, it was bringing in a warm wood element, and I knew the vanity would be the easiest place to do this. If I went with something too light, the bathroom would skew Scandi, so we had to go walnut-toned. I’d always loved the look of vintage dressers turned vanity, but finding the exact right piece for that sort of thing seemed like Mission Impossible. So I did the next best thing and had a vanity custom made by Ross Alan Reclaimed Wood.

Here’s the drawing I sent – I wanted LOTS of storage and some cute legs. Ross and his team use all reclaimed wood, so it’d also be a nice way to bring in one more vintage element. And because our bathroom is so tight on space, by going custom I knew we were going to get a piece that would fit perfectly. AND IT DOES. The vanity set us back $2500, but handmade craftsmanship is always worth the cost if where can afford it. Once I had the vanity in the mix, the re-design process started in earnest, and I mocked up this:
Everything was feeling better, including me.
Next, I wanted to add something special to the design. Something that would feel a little old world. I had a dream of building a small arched inset into the wall above the toilet, like you see in the hallways of old estate homes or churches. A little reliquary for more tiny vintage things. I really NEEDED this element, and my contractor (dad) delivered. You can see it built out in the image below.
Now there were only two steps left in the un-modernization of the bathroom.


Originally, the bathroom was going to stay bright and white. But at this point I felt I needed a tone on the walls, to bring in the warmth I was so desperate for. I proceeded to mildly lose my mind during this phase of the design process.
I think I spent about $200+ on paint samples. When I thought I had the right color, my dad painted the whole space. Only for me to realize it was the very wrong color. TYPICAL. More paint samples, more $$$. Turned out the right color was my first choice from the mock-up all along. Listen to your stomach organs people, they collectively know you better than your head organ does.
The final step in this entire process was bringing in vintage elements to add back in some soul.
Here’s how it looks all put together…

It’s still modern, but with a HEAVY dose of #somethingelsekindaold.
Being a room in the middle of the house, the bathroom originally had zero natural light. We amended this issue by installing a Velux skylight right in the middle of the space. And more than anything, I think the natural light has changed the space. There’s something about waking up and getting ready in a space that has natural sunlight streaming in that just makes my brain happier. And there’s nothing better than taking a hot shower, while a gentle breeze wafts in from an open skylight overhead.

Vanity |
Our vanity turned out exactly like my drawing, and is really beautiful. It’s got a modern shape, but the color and texture of the wood keep it feeling warm and almost soft in a way. I wanted to compliment the wood with a natural stone countertop. Something with a traditional edge cut to keep the whole piece from going too midcentury modern.
Finding the right stone was an ordeal. Stone yards just don’t sell slabs small enough for a vanity of this size. So I ended up having to drive around to all the different fabricators in the Valley, looking through their “remnant slabs.” These are pieces of larger slabs that are left over after the fabricators cut out all the counter pieces people need for their homes. The fabricators get to keep the offcuts (similar to when you have cookie dough left over after cutting out shapes), and they’ll sell them to people like them (have crazed, desperate 30 year olds who know nothing about stone, but everything about why that piece they keep telling me is really good just isn’t THE VIBE). I finally found this piece of quartz at the 5th fabricator, and they cut and installed the top for about $1200.
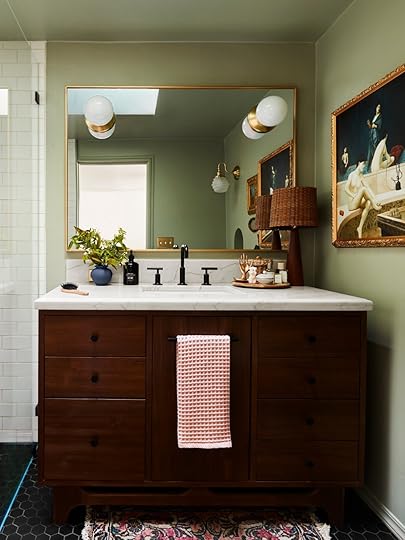
The mirror was the next big hurdle, because finding something that was the exact right size was hard. Admittedly I assumed we could just have a custom one made, that would easily have the holes cut out for the light fixtures, just like I imagined in my head. But, as mentioned above, anything custom is going to cost a custom price (as it should be). And after creating the vanity of my dreams, a custom mirror was just not in our budget. So I scoured the internet for a vintage or ready-made mirror that would fit size-wise (it was harder than it sounds).
The mirror itself was $200. Once it was delivered, I took it to a glass shop in Highland Park, where they took it to a special guy who sandblasted the light fixtures holes in the glass, exactly where they needed to go so our Rejuvenation sconces could sit ON the mirror. It was a whole thing and cost another $242, but the end result fits the space perfectly.

Bathroom Faucet | Sink | Rain Shower Head | Hand Shower | Shower Handle | Toilet | Toilet Seat
In the end, I’m really happy with our plumbing fixtures and think the modernness of them gives the bathroom a little bit of an edge. All of our plumbing (including the toilet and sink) were provided by Kohler. They’re absolutely beautiful, and the softest, smoothest matte black fixtures you could imagine.


The rain shower head is great for Macauley. Crouching under a shower head isn’t a favorite pastime of his, but at 6’1” it happens a lot. Not in our house though, because he can stand all the way up in our shower with room to spare. And I gotta say, having a hand shower is a luxury that I luxuriate in. Cleaning my shower has never been easier, and I love using it on days that I don’t feel like getting my hair wet.

Subway Tile (with the Portland Edge in color UWM) | Floor Tile (with the Portland Edge in color P4)
Both the floor tiles and wall tiles are from Pratt & Larson, a really lovely tile company up in Oregon. I went with Emily to visit their factory a few years ago and fell in love with both the company and the tiles. Even though I ordered the tiles during the modern phase, I still had the sense of mind to go with their organic Portland edge on both tiles, which give them a bit of a rougher, more undone look. The floor tiles are a matte finish as well, making them less slippery for safety, and less shiny for aesthetics.
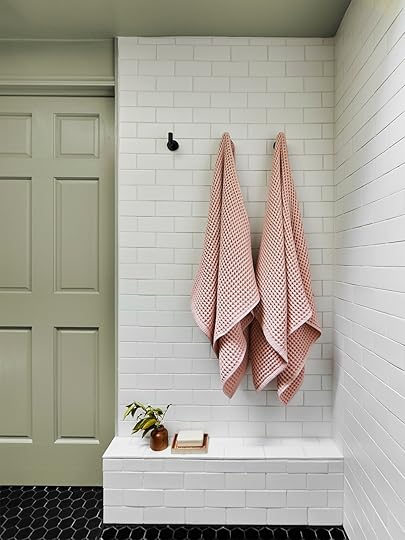
I had my dad build this little ledge at the back of the shower, even though we had a nook built in over the shower faucet. I thought it would make the towel area feel more intentional, and also be the perfect place to put more things – I have a lot of them.

Blue Vase | Hand Soap (similar) | Knobs and Pulls | Hand Towel
I decided I was going to mix metals in this space. All the Kohler plumbing I had ordered was black, and I had gotten really excited when I had found these black hex knobs and pulls at West Elm that would match the floor and plumbing. But when I got all weird about the design plan, I wanted to bring in more warm tones. Adding brass to the mix felt like a good way to do that.
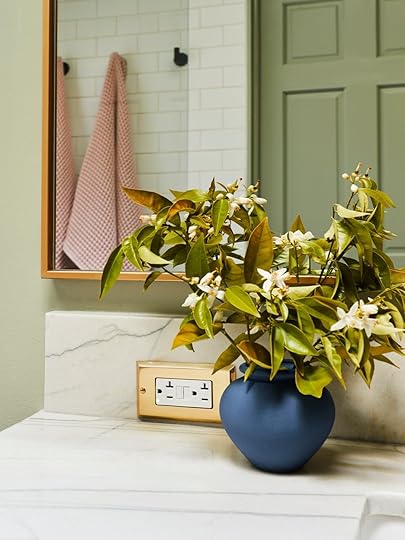

Outlet and Switchplate Covers | Bee Sconce
So while our plumbing and hardware are black, our electrical components and mirror frame are brass. I choose these very traditional brass switchplates from Rejuvenation that are just too pretty to photoshop out. And I found this tiny brass bumblebee sconce that really added the touch of whimsy to the space that I needed.
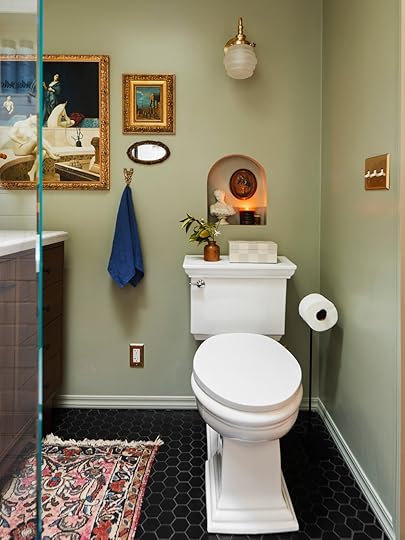
Rug (vintage) | Toilet | Toilet Seat | Toliet Paper Holder
The last piece of the puzzle was bringing in warm soulful details through vintage and unique pieces. I stuffed as many of them as I could into this small space. The rug is a piece that’s been with me since my first apartment bedroom with Macauley, back in 2017. It used to live in our vanity nook, but has found a new permanent home here to bring in some hits of pink and blue. The vanity nook was the first clue to what my real design style was going to be, and I would 100% not change a thing about it.
I also love the traditional and elegant shape that our toilet has. The edge of the toilet lid is so beautiful. I never thought I would say that about a toilet. You also need to know that our toilet seat is heated, so I never again have to cringe sitting down on a cold seat first thing in the morning. It’s the small things, folks.
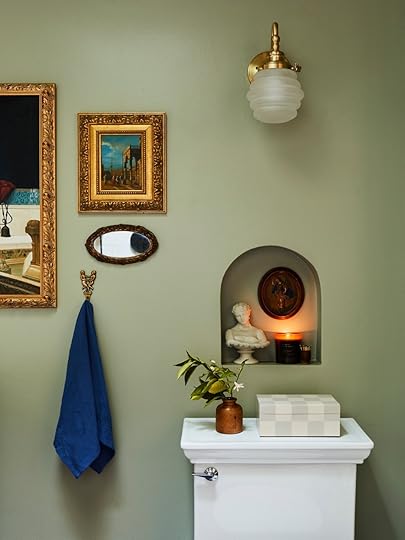
All Art (vintage) | Candle | Box
My little nook idea turned out better than I could have imagined, and I found the perfect beehive-shaped sconce to live above it. Hilariously the first sconce we got had a defective screw, and we went through TWO lampshades before we realized what the issue was. This is sconce shade #3, and hopefully will survive much longer.

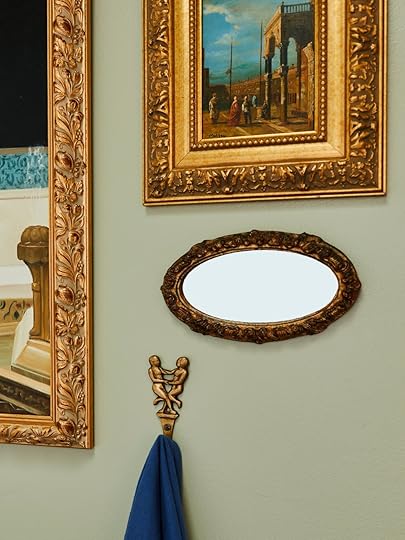
I found that tiny Angel Gabriel painting for $45 the very same morning I was going to shoot this space, at the Rose Bowl Flea. It was a last-minute find, but feels like it was always meant to go there. And my porcelain bust finally has a worthy home. All the orange blossoms are clippings from my front yard tree and is one of my favorite scents in the whole world.
The oval mirror I something I picked up at an antique store in North Carolina, and the painting above it is something I picked up at a vintage store in Atlanta (the same place I got my painted dog tray I have in the kitchen). The antique shopping outside of California is insane and so good. I think the mirror was like $20, and the painting (FRAMED!) was $15. It’s such a beautiful painting too! And I’m obsessed with my tiny, brass, dancing people towel hook.
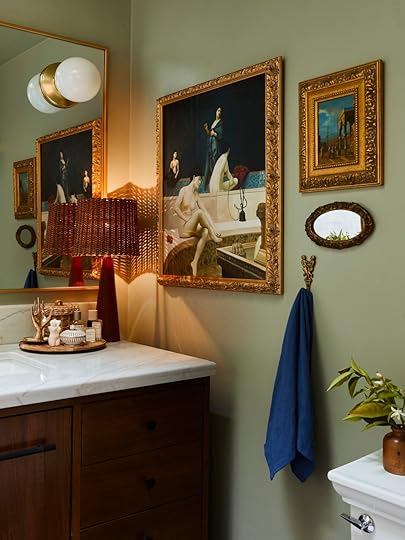
The large bathing ladies painting was another Rose Bowl find from a few weeks ago, and I nabbed it for $50 (but then spent $160 getting it framed). I love the hits of blues, pinks, and reds that it brings, and the tiny floral details throughout. And that wood and rattan lamp is made up of two different vintage pieces I put together (previously living on our bar cart in the dining room). We have a lot of different lighting options in this space, and I like having the table lamp option for a moody shower vibe or a late-night restroom trip, so I don’t wake Macauley up.
Oh, and the paint color we ended up going with? It’s called Road To Todos Santos, by Backdrop. A creamy, warm, sage green that reminds me of Victorian parlor rooms and lazy summer days. In a brighter, more open space it’s going to look more like a muted sage. But in our tiny bathroom, with all the brass and wood it goes a bit yellower.

There you have it – My modern bathroom, turned traditional, with a dash of vintage whimsy. A true meeting of the minds between Macauley (graphic, modern, and clean) and me (whimsical, traditional, and stuffed with lots of things).
And if you’re curious what our bathroom looks like on a normal, non-shoot styled day, pop over to Em’s stories on Instagram for a peek 
*Design and Photos by Sara Ligorria-Tramp
**Styled by Emily Bowser
The post How Sara Course Corrected Her Initial “Clean, Modern, And Very Neutral” Primary Bath Design Plan Into The Actual Design She Wanted – It’s A Suprise Reveal! appeared first on Emily Henderson.
March 15, 2022
Lulu & Georgia Is Offering 25% Off (!!!) Right Now – Here Are Our Expert-Approved Picks

If you’ve been around these EHD parts for even a few minutes you know that we have a deep love for Lulu and Georgia. It’s been a long love affair. I was chatting with Em about when she started working with them and said she was pretty sure she had just had Charlie. Yes, Charlie Henderson himself who looks basically like a teenager these days! Just kidding but still, the love has been brewing for a while now.
So when they reached out asking if we wanted to write about their Friends and Family sale it was a resounding “YES!”. Aren’t we kind of family?? I mean getting 25% off (code: FAMILY 25) of most of their incredible stock is kinda a big deal, especially if you are already in the market for say, Ginny’s Belmont Sofa that I own and may have very comfortably slept on most of last night because I couldn’t bare the idea of getting up and moving to my bed. But maybe you need a little more inspiration beyond our makeovers. Maybe seeing some of our favorite products styled in other homes is helpful and will make you more confident hitting that purchase button with the added bonus of 25% OFF. So let me show you just that…
Tulca Mirror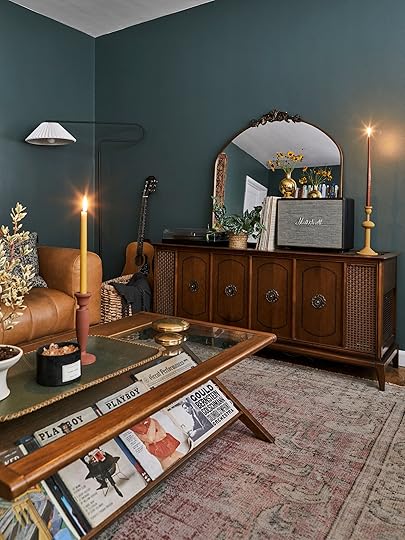
design by ryann miller | styling by emily bowser |photo by sara ligorria-tramp | from: ryann’s moto reveal: a moody multi-functional living and dining room with a lot of soul
If you haven’t had the pleasure of seeing Ryann’s apartment you should absolutely go do that after reading this post. It’s incredible. But let’s take a moment to admire that mirror. It’s simple yet ornate and adds the perfect amount of romance to the room. As you’ll see below, it’s truly the most versatile mirror.

 left: design via @ashita_loves_design | right: design via @raeannlangas
These two designs are both are stunning, neutral (unlike Ryann’s), but one is far more modern than the other. For the room on the left, the mirror slightly contrasts all the clean lines with the small detail at the top while in the room on the right, the mirror gently complements the more traditional, romantic style that’s also echoed in the sconces and mantle.

 left: design via @akuzko | right: design via @littlelatteblush
But it can also go more Scandi as proven in the room on the left and perfectly fits into a modern traditional vibe as shown on the right. What can’t this mirror do?!
Lockwood Bed design by julie rose for ehd | photo by sara ligorria-tramp | from: one of emily’s best friends gets the cozy yet sophisticated bedroom makeover she really deserves
We all LOVE this bed and while are very happy for Suzanne (room owner and Emily’s best friend), we were also all pretty jealous. We are big upholstered bed fans over here and this one looks both elegant, modern, but still so welcoming. That all makes a lot of sense since EHD alum, Ginny Macdonald designed it as a part of her collection.
 via lulu and georgia | from: ginny macdonald (the original ehd alum) has just launched her first furniture line and it’s everything we want
So above is a more Scandi/modern way to use/style this bed and here is a more traditional bent that they shot for the campaign. It’s just so good and also comes in a bunch of different colors!
Deva Platform Bed design by erik kenneth staalberg | photo by sara ligorria-tramp | from: erik’s moto bedroom reveal – love is in the air
Another incredible and versatile upholstered bed that comes in a bunch of different fabrics! Erik was the most recent to get this bed (and naturally in a bold fabric) for his bedroom makeover and it looks so good. I love love love the simple and more modern shape of it.

 left: photo by sara ligorria-tramp, from: mountain house reveal: our soft yet secretly sultry downstairs guest bed + bath | right: design by ginny macdonald
If you aren’t as bold as our dear Erik then above are two other ways we and Ginny used it. On the left is Emily’s downstairs guest room at the mountain house. It’s sultry, it’s Scandi, it’s beautiful. Then on the right, Ginny when a little more eclectic, patterned, and colorful. Again, both look great and prove this bed can do it all.
Belmont Sofa
 from: a jess’ living room moto update: we’ve got a lot to talk about – successes and a possible mistake
Not to be biased but this sofa is my all-time favorite piece since it’s in my living room and I’ve never loved a sofa more. I know these photos are ummm, kinda bare but fear not because my MOTO is full steam head. The color and that back curve had my heart from the moment I laid eyes on it. Plus as someone who got to work with Ginny, having a piece she designed in my home adds a whole thick extra layer of special to me. But I am obviously not the only one that feels this way.
 design by erin fetherston | photo by mia baxter | via architectural digest
Designer, Erin Fetherston, and actress, Jamie Lynn Sigler, also agree given Jamie has TWO of them. This sofa can also go super modern or…
 design by ali henrie | architecture by steve tiek | build by grove homes utah | photo by lindsay salazar photography
traditional as shown in Ali Henri’s beautiful design. I also had to show off that back curve again because it’s perfect. Cognac is not the only color it comes in but it’s clearly my favorite:)
Thomas Bina Olivia Coffee Table photo by sara ligorria-tramp | from: mountain house reveal: our light-filled neutral & textural living room
Aside from her live edge coffee table, this is THE Emily Henderson coffee table. It’s beautiful, organic but modern, heavy so it’s hard to tip over, and zero sharp edges. Perfect for people who want a beautiful coffee table but also have kids or are maybe clumsy like me. You may have also guessed that this puppy is a style shapeshifter. It worked beautifully in Em’s super Scandi mountain house but let’s look at some other examples.

 left: styled by emily bowser, photo by bethany nauert, from: all your living room styling questions answered (plus some furniture & decor reviews) | right: photo by sara ligorria-tramp, from: my living room update
On the left we have it styled in Bower’s living room that’s wonderfully neutral but definitely more eclectic than Em’s mountain house. Then on the right, Em used it in one of her updated living room versions that’s a lot more modern traditional. They both totally work (duh:)).
 design by hailey lauren
Designer Hailey Lauren used it in one of her traditional designs and it really brings so much life to an already pretty room!

 left: design via @sherricalnanhome | right: design lively haus, photo by nick sorensen
Here are two other great examples because I just couldn’t stop myself:)
Charleston Sectional Sofa styled by emily bowser | photo by bethany nauert | from: all your living room styling questions answered (plus some furniture & decor reviews)
Looking for a beautiful white sectional that isn’t boring? This is your guy. Again, Bowser’s used it in our last Lulu and Georgia shoot and it looked so good. You honestly can’t go wrong with it. The modern frame, curved arms, small wood base detail. Oh, and there are only two seat cushions! So no need to worry about falling into a bunch of cracks:)
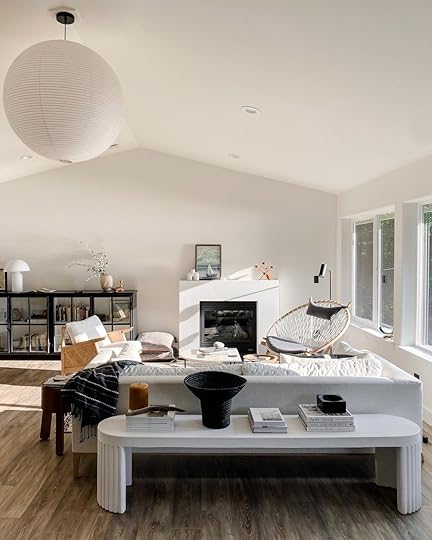 design by erin hiemstra
EHD favorite, Erin Hiemstra of Apartment 34, used the sofa version in what we believe is her beach house and again it’s just perfect. Well, this whole room is perfect:)
More Favorites!What, did you think that was it? Like we could only contain ourselves to SIX products? Not a chance. But I promise I did restrain myself and didn’t round up their entire inventory. But please go and check it all out because there is truly so much more if you are looking for really special pieces at a wonderful 25% off discount.
 design via @hothouse.jungle
1. Kyra Media Console | 2. Akila Swivel Chair | 3. Clementine Platform Bed | 4. Marla Dining Chair | 5. Aldora Stool | 6. Verruca Dresser | 7. Kono Nightstand | 8. Aliyah Bed | 9. Celeste Accent Chair
 styled by emily bowser | photo by bethany nauert | from: all your living room styling questions answered (plus some furniture & decor reviews)
1. Albayzin Vase | 2. Lylah Round Tray | 3. Lemieux Et Cie Mouren Sculpture | 4. Sabine Velvet Bolster Pillow | 5. Deliliah Vase | 6. Tamra Pillow

 left: photo by sara ligorria-tramp, from: the ultimate family-friendly media room + wet bar | right: design by virginia cheek, photo by rustic white, atlanta magazine
1. Otti Rug | 2. Scalamandre Raphael Wallpaper | 3. Earth Maze Moroccan Shag Rug | 4. Bequia Wallpaper
Well, that’s it from us today! Hope you are as excited as we are about this sale and happy shopping!
Again the code is FAMILY25 at checkout!!!Opening Image Credits: Photo by Sara Ligorria-Tramp | From: Mountain House Reveal: Our Light-Filled Neutral & Textural Living Room
The post Lulu & Georgia Is Offering 25% Off (!!!) Right Now – Here Are Our Expert-Approved Picks appeared first on Emily Henderson.
Emily Henderson's Blog

- Emily Henderson's profile
- 10 followers

