
Emily Henderson's Blog, page 137
February 25, 2022
It’s About To Get Very Chic In Here: Our Top 11 CB2 New Collection Picks

I’m back! Well at least for today:) The other girls have (like Mal yesterday) and will be giving their two cents on some other collections but this one? This one is mine. CB2 has been truly nailing it for years now. Every collection there’s a least a handful of things that I would buy in a second if I had the space (and money). This one is no different. Except this one is less decorative but bolder in shape, focusing on texture and simplicity. That all sounds very ominous but I promise it will make sense as I take you through…
Andora 2 Drawer Wood Nightstand + Andora Tall Wood Chest

I just…I just love both of these pieces so much. I was originally only going to choose one but how could I? As I dream up my bedroom (the next room after my living room) I am always looking out for dressers and nightstands. And while I wouldn’t personally have my nightstand and dresser come from the same collection (ie look identical), these would maybe be an exception. I love the richness of the dark wood, the tiny knobs (which are customizable), and the postmodern chunky shape.
Totora Oak Table Lamp
My obsession with table lamps continues. I love the angles, the softness/interest of the texture, and yet the simplicity of it. Plus it’s this neutral color palette makes it perfect for almost any style.
Otto Ivory Concrete Desk

Ok, so this table (when it only came in gray) was a top contender for my living room “desk” until I found my desk soulmate (you can also read about it here). Anyway, I LOVE it in white and still think it is so freaking cool. To be fair, I love most anything checkered or large circled… let’s pretend that’s a real term.
Court Black Office Chair
My search for a pretty desk chair with wheels has been a challenge. But seriously where are they?! Well, I guess CB2 because this one is a beaut. It was designed by Barcelona-based Mermelada Estudio and is vintage-inspired. Those two factors were clearly going to produce a very special piece.
Kahlo Silk Table Lamp
We LOVE a soft diffused light and this one is stunning. It reminds me of the one Emily had in Charlie’s old room and the last rendition of the LA living room. And while not cheap, it’s also not totally cost-prohibitive! I would get this in a heartbeat… and might.
Babylon Black Marble Dining Table
“Dining table” might be an exaggeration but it is an almost too beautiful bistro table. Just look at that movement? Small space living doesn’t mean you can’t go for it with special furniture pieces. If you are looking for and have the budget for this kind of table, I 1000% support you and would like a dinner invitation:)
Camerano Chocolate Velvet Upholstered Bed
Beds have been another piece that I’ve been keeping an eye out for and it’s not easy to find a really special and simple bed. I love the shape and fabric of this one so much. It’s curvy without being too chunky and just looks luxurious. That feeling of luxury as you are about to hit the pillow is pretty special and what I think we all want. Oh, and I am here for that brown:)
Onyx Framed Wall Mirror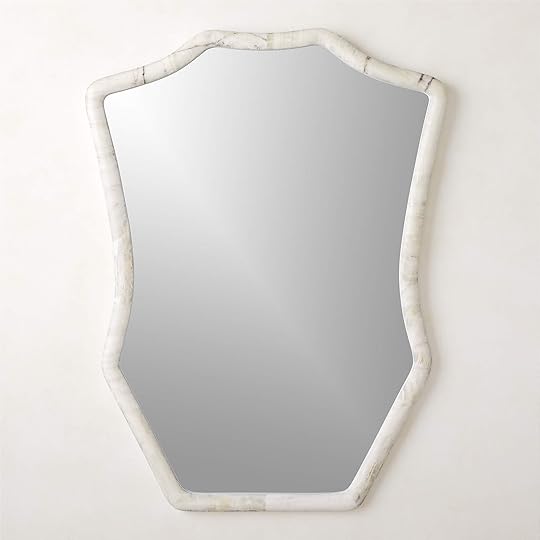
Onyx for the win, amirite?! I think this mirror is so elegant but modern and the more I look at it the more I think it belongs in my apartment. It’s also pretty big coming in hot at 36″ x 48″. This gal is a showpiece!
Spazio Brown Marble Side Table
A really easy way to make a cool unexpected design choice is to get a really cool accent table. This one would easily get that job done. Business on the top, party on the bottom but still neutral enough to not distract from the rest of the room. So while $250 isn’t cheap, it’s definitely a more affordable/safer design risk to take than say a sofa.
Accra Carved Wood Wall Art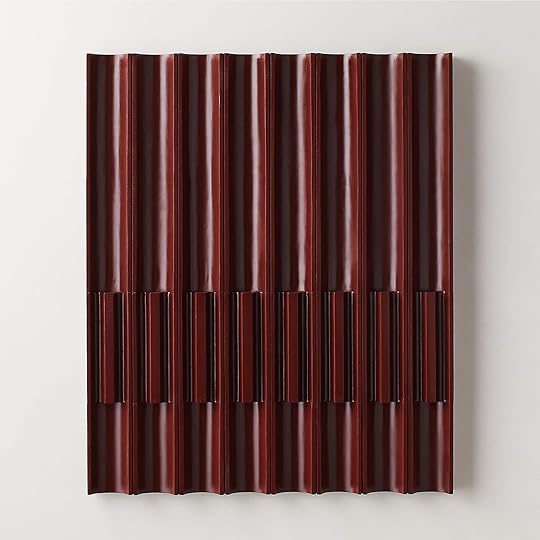
I LOVE THIS PIECE OF ART SO MUCH. I love the curves, THAT COLOR, and the sheer size (40″x48″). Three-dimensional art is such a great way to bring your walls to life and this one would be a slam dunk (this is another one of my favorites). Studio Anansi is the design genius behind this work and I also would freak out if this was in my apartment.
Terre Olive Velvet Sphere Pillow
Y’all sphere pillows aren’t new but they now seem to be everywhere (as in the big box stores). The trend has officially hit and we love it. You know how important we think it is to play with pillow shapes so getting to add in another is ideal in our book. Plus this one is super chic with that olive velvet fabric and might end up on my sofa.
That does it for this week of new collection picks (more next week so keep an eye out!). I know that this CB2 collection is on the modern minimal side but what do y’all think? O and don’t worry, we will cover their new outdoor furniture in a different post because WOAH. Favorite pieces??
Love you, mean it.
Opening Image Credit: via CB2
The post It’s About To Get Very Chic In Here: Our Top 11 CB2 New Collection Picks appeared first on Emily Henderson.


The Easiest Post You’ll Ever Read: 15 SUPER Satisfying “Before And After” TikToks (Pressure Washing, Painting, And More)

At this point, TikTok knows everything about me. My For You Page – that’s how they refer to their feed, if you’re not also addicted to the app – is filled with all of my favorite things: goats (inside AND outside)! Dogs with fun names at daycares in remote places! People joking about Philadelphia accents! Ducks running on hardwood floors! Pasta recipes with lemon-based sauces! People dancing to Abba in a really aggressive way! Polite toddlers who talk like adults! Planet Money explanations of complicated economic topics!
But more than anything, I’m addicted to these oddly-satisfying, home-centric TikToks (shocker). Cleaning rugs, refinishing floors, pressure washing exteriors – that kind of thing. I almost think there’s something poignant about watching people breathe new life into old things. It makes me feel like maybe I can fix stuff, too.  So today, I wanted to share a few of my all-time favorites so we can all enjoy a few moments of zen together. PREPARE TO FEEL RELAXED (and impressed, and maybe even envious, but in a good way).
PS. A few of the songs included on these TikToks have swear words in them, so I’ve noted each below in case you’re sensitive towards that kind of thing. (Or like, maybe you just don’t want to hear the word “bitch” coming out of your speakers at 7 AM? Either way. They’re just as satisfying without sound, I swear!)
Power Washing@gotdatpressure Repost of my most viral video in 2020. I am so thankful for everything! #pressurewashing #powerwashing #satisfying #oddlysatisfying #art #fyp ♬ Lalala – Y2K & bbno$
Audio: NSFW
The Gist: INCREDIBLE. Look at the transformation! Look at all the soap swirling! Why is it so beautiful AND gross?
@lawncarejuggernaut I SAW THIS AND SPEND & SPENT 2 DAYS CLEANING AT THIS PROPERTY FOR FREE #powerwashing #powerwashingarttimelapse #payitforward ♬ original sound – Lawn Care Juggernaut
Audio: WHOLESOME. Turn it up.
The Gist: You thought this was just bricks being cleaned? WRONG. The guy behind this account uses all of his pressure washing equipment to help others for free – in this clip, he saw that this house was up for sale and he wanted to spruce up the exterior a bit. HOW NICE IS THAT?
@revivadrive Too satisfying#satisfying #satisfaction #powerwashing #powerwasher #pressurewashing #pressurewasher ♬ Whenimpostersus – Yeti
Audio: NSFW
The Gist: Jaw-dropping. I am literally still picking my jaw up from the floor. I want to pressure wash everything.
@rugworx So gross#fyp #oddlysatisfying #gross #cleaning #cleans #az ♬ Monkeys Spinning Monkeys – Kevin MacLeod & Kevin The Monkey
Audio: All clear! (And great cleaning ASMR sounds, if you’re into that.)
The Gist: I think that every tenth video on my TikTok feed is a rug cleaning clip. This one is a favorite of mine because it’s thorough, relaxing, and the payoff is worth it.
@satisfyingol Crazy filth coming out of this rug. Creator credit to LCC. #cleaning #asmr #rugcleaning #satisfaction #satisfyingvideo #dirty #scrape #satisfying ♬ Meditation with natural sounds and music that closes your eyes – Red Blue Studio
Audio: Spa-meets-dog washing station. Safe!
The Gist: You know how some people are like, REALLY into pimple popping? That stuff makes me nauseous, but I think that this is my version of pimple popping. Watching all that gunk start to leak out on the first pass with the scrub brush is ::chef’s kiss:: to me. And that slo-mo? I LOVE.
@maddetailing Satisfying Rug Cleaning! #maddetailing #satisfying #fyp #tiktok #fy #foryou #detailing #youtube #trending #pressurewashing ♬ original sound – M.A.D.DETAILING
Audio: All cleaning sounds.
The Gist: So many fun soaps in this one. Also, it actually looks like fun work (you know, in the way that like, stomping grapes is fun work. You’re accomplishing something AND you get a treat at the end!).
@thomaspainting always bet on yourelf #thomashousepainting ♬ original sound – Athletequotez
Audio: Nice little f-bomb dropped in the first few seconds, so maybe mute this one if you’re around kids, or your boss, or anyone who’s not in the mood to hear a weird speech about “doing it yourself, bro.”
The Gist: First, this is actually SUCH. a good house color – does anyone have something similar on their home right now? Second, SO SPEEDY. So clean. SWOON.
@thegeibtribe Best painting hack
Audio: All clear (albeit not groundbreaking).
The Gist: As someone who HATES taping (I’m more of a “let it dry and peel it off the trim” gal) I’m kind of embarrassed that I’d never heard of these. They’re called paint edgers and you can grab them literally everywhere, apparently. THANKS, TIKTOK.
@thehouseofsequins WAITBefore you start that DIY
project #diy #diyhacks #lifehacks #lifehack #handmasker #painting #renterfriendly #rentershack #homeimprovement #homeinspo #home #homeproject ♬ The Home Depot Beat – The Home Depot
Audio: LOVE a smart woman explaining DIY projects. 10/10 and safe for work.
The Gist: Another extraordinary invention that was not on my radar til, uh, right now. It’s $35 and worth every penny (and yes, I will be buying one before my next paint project).
@qualitycleaners4u #CinderellaMovie #satisfy #cleaningtok #cleantok #cleantok #asmr #LetsGetBackOnTrack #foryou #oddlysatisfying #detailing #fypシ #asmrsounds #cleaning ♬ Ice Ice Baby (as heard in the movie Step Brothers) – Re-Recorded – Vanilla Ice
Audio: ICE ICE BABY. (Safe for work.)
The Gist: I don’t understand what’s happening and I cannot imagine how powerful that machine is. I want to watch this all day.
@qsdryerventcleaning 17 years of dryer lint build up.. Don’t risk a fire in your home
Audio: A lil’ Bohemian Rhapsody moment for you!
The Gist: IT JUST KEEPS GOING. However much lint you think there is…well, there’s more than that.
@aurikatariina The filthiest house in EuropeCLEANING FOR FREE! #cleantok #cleaning #oddlysatisfying #unbelievable ♬ Epic Emotional – AShamaluevMusic
Audio: A VERY dramatic instrumental.
The Gist: This woman offers free home cleanings for folks suffering from loss, illness, and more. We’re talking Hoarders-level transformations in under a minute here – it’s satisfying to watch, but it’s also kind of inspirational to know that there are still helpers out there, you know?
@gionahardwood Bowen island
#refinishingwoodfloors #fypシ #renovation #ClearlyTransform #profesional #hardwoodfloor #perfectionist ♬ This Is How We Do It (Album Version) – Montell Jordan

Audio: Is Montell Jordan having a moment right now, or is it just me? Family-friendly audio for all!
The Gist: MY OLD HOUSE LOVIN’ HEART CANNOT HANDLE THIS. Nothing compares to breathing new life into some sturdy floors.
@gionahardwood a quick change🪚
#refinishingwoodfloors #WeAllPlayforCanada #profesional #fypシ #ClearlyTransform #word #hardwoodfloor ♬ Mission Impossible (Funny Theme Remix) – Funny Minions Guys
Audio: It’s minions themed and it’s just the word “banana” over and over, so like…just keep it off. It’s a lot.
The Gist: So clean and precise from start to finish. Watching this (on silent!!!) feels like meditating.
@gionahardwood Do you don’t like the color form Brazielian cherry
Np
#refinishingwoodfloors #color #hardwoodfloor #profesional #inovation #stain ♬ Spongebob Tomfoolery – Dante9k Remix – David Snell


Audio: Seemingly good, but then a surprise NSFW moment towards the end. (I was bamboozled.)
The Gist: Would I ever go this dark on my own floors? Probably not. But does watching this machine go back and forth trigger something in my big, smooth, dumb brain and leave me slack-jawed? YUP.
Life can’t ALWAYS be about cleaning and refreshing. I pulled three extras from my likes, just for this specific audience. I hope they make you smile!!!
@therealkatiewaldow She is all of us at @target no? #target #targetrun #targetlovers #babiesoftiktok #girlmom ♬ Target – heykatie
Audio: SO SAFE FOR WORK. TURN IT UP. Loud.
The Gist: This is what we all sound like when we go to Target!!!
@neontacocat He won’t let me make the bed #ragdoll #catsoftiktok #cute #cat #ragdollcat #meow ♬ original sound – Albus Dumblepaw
Audio: Keep it unmuted.
The Gist: I love a cat doing a spooky shuffle!!! (Does anyone have a pet who ISN’T a total wacko when it’s time to make the bed?)
@themummeys Our sweatshirts match.. kinda ic: @From Haus To Home #marriage #couplegoals #TeamofTomorrow #comedy #fyp #foryou ♬ original sound – From Haus To Home
Audio: Final one is ALL CLEAR, boss.
The Gist: As someone who struggles with asking for help and therefore once singlehandedly maneuvered an IKEA Kivik sofa from my second-floor apartment to the curb at the entrance of my building, this whole thing speaks to me.
If anyone else has a link to a great TikTok or account that they’ve enjoyed, feel free to drop it in the comments below. I hope that these brightened your day, or lowered your blood pressure, or gave you some inspiration to take on that project you’ve been putting off for a while. We’ll see you back here tomorrow for a fun one. xx
Opening Image Credits: Design by Malcolm Simmons | Photo by Keyanna Bowen | From: Malcolm’s Bedroom Reveal Is Here… How He Found Healing Through Design + The Incredible DIYs That Transformed The Space
The post The Easiest Post You’ll Ever Read: 15 SUPER Satisfying “Before And After” TikToks (Pressure Washing, Painting, And More) appeared first on Emily Henderson.
February 24, 2022
The New Lulu And Georgia x Sarah Sherman Samuel Collection Will Give You Butterflies
5 years. That’s how long the new Sarah Sherman Samuel x Lulu and Georgia collection has been in the works and BOY was it worth the wait. I’ve always wondered how long it takes to develop lines like this –– the answer is that there’s a massive range of time (especially if you’re doing furniture vs textiles vs decor…obviously furniture takes the longest) but a collection this big also has to have massive thought put into it and how it all flows together.
After reading the interview Lulu and Georgia did with Sarah about the collection, it’s VERY clear that this was thoroughly thought out. Sarah describes the collection as being “collected” but not “matchy-matchy.” So, a lot of the pieces will have similar frames but different finishes. Things to make your space feel cohesive, but not like a store-bought set (love that). Also, something Sarah is known for that you can expect to see in the collection: curves and lots of ’em. There’s something that’s always so fun and eye-catching about Sarah’s designs and this line is truly no different. Alright enough jabber, we’ve picked 10 of our favorites so you can see for yourself:
Rise Daybed

It’s already getting hot and heavy. Look at the lines on this beauty! That pretty scalloped detail paired with those skinny iron legs tied together (almost literally) with that smokeshow pillow & strap detail. I mean, I’m turned on. I love the scallop furniture trend that’s happening SO much, and this piece totally reminds me of this UO sofa I’ve had my eye on for an eternity (only reason I haven’t bought either of these is because I have nowhere to put them).
Hyvaa Bed

This bed made me question everything I’ve ever known. THOSE BONES. I’m weirdly specific with how I like a bed. It’s gotta be upholstered (check), it must have legs to store stuff under it (check), and it also must have a headboard tall enough where if you sit up in bed your back has enough room to rest on the headboard and not the cold wall (also check). So it’s perfect? Yup. Plus I love a chubby upholstered leg and this one has FOUR.
James Accent Chair

I mean this is basically design porn at this point!! If you didn’t feel your heart pound by looking at this photo then I don’t know how we could be friends anymore (I’m just kidding, obviously, I know people have varying design styles but this one is exactly my taste). Look how chunky, fun but still comfy!! This collection is giving us the best of every single world and universe and I’m about ready to sell everything I own and refurnish with exclusively this!!!
Cloud Coffee Table

Now for a baby chunky-legged coffee table. IMHO you can never have too many chunky legs on furniture pieces. Plus look at the texture on this boy. If I could fit a coffee table, you would be mine.
Checkerboard Bolster Pillow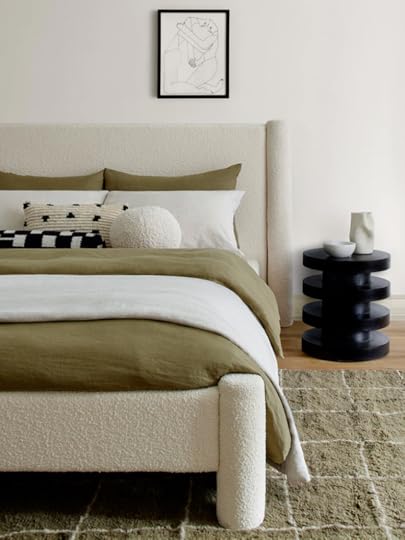

Checkerboard is back and better than ever in this collection (well according to gen-z design trends it’s been back for a hot minute) but think of this as your cool mom’s checkerboard. The irregularity in the pattern makes it more elevated plus the color choices are so sophisticated.
Ripple Accent Chair

Ah, the chair everyone has been asking about since Sarah’s guest bathroom makeover came out…now it can finally be ours! I love how little and cute it is, plus more fun scallop detail! Yay!
Merrit Sideboard

Okay, I just wrote a post about how everyone is trying to get the fluted trend for cheaper by using this weird DIY product, but if you are ready to commit to buying a dope piece that won’t go out of style (in my opinion) then here is your gal. The quality on Lulu and Georgia pieces is so good and will truly last, so going for a neutral but textured piece like this is a longevity piece! Plus the curved sides and that hardware is making my heart pound it’s SO pretty.
Irregular Checkerboard Rug
More fun checkered patterns!!! There’s also a cool wallpaper version of this pattern that I’m in love with (and would look so cool with the sideboard above). A note Em once wrote in a post that I think about constantly is that she likes having pattern on the floor because when it’s at eye level (ie: a wallpaper) it can often get too loud & you can get sick of it faster. After she said that, I constantly think about how it’s fun to put pattern and color into a rug because you’ll probably be able to live with it longer & bring your space to life without going pattern overboard (if you’re worried about too much pattern like me).
Lena Sofa

Four MORE upholstered chunky legs!! This collection makes me so giddy. Plus I LOVE velvet in almost anything (here’s a case for it being the best and most durable material for your sofa that made me think the fabric in a new way too). I never ever want velvet to go out of style and I have a good feeling it won’t go anywhere anytime soon


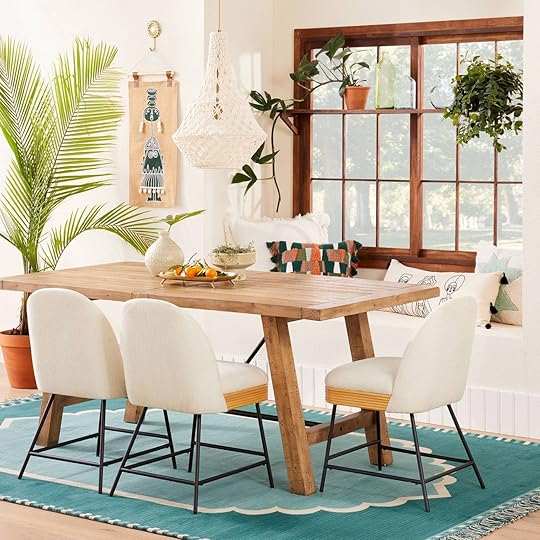
Oh, do I love a sculptural dining chair. I think dining chairs are the most underrated pieces of furniture and people usually opt for more traditional/boring ones because of three reasons: cost, comfort, and availability. While these are certainly a splurge (so no, they don’t check the ‘cost’ box), they do have an upholstered seat and what seems like comfortable dimensions (I haven’t sat in it but from the looks of it, I bet these seats are very comfortable). Lastly, they’re not hard to find because if you’re reading this now they are right here! I always have a difficult time finding a stand-out dining chair that starts a conversation and isn’t generic, so if you have this problem too, take a gander at these. And lastly, you can mix and match dining chairs! Put these at the ends of your table and fill in the middle with some more cost-effective chairs if that’s an option for you. Just things to think about when sprucing up your dining space
So whaddya think? Do you like this collection as much as we do? Would love to chat about your favorite pieces in the comments. See ya down there! xx
Opening Image Credit: Design by Sarah Sherman Samuel and Lulu and Georgia | via Lulu and Georgia
The post The New Lulu And Georgia x Sarah Sherman Samuel Collection Will Give You Butterflies appeared first on Emily Henderson.
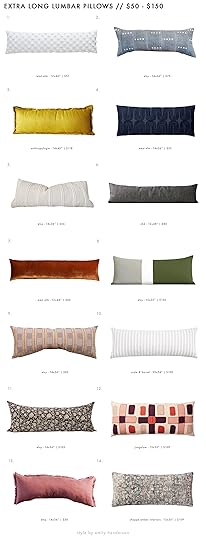
Our Extra Long Lumbar Pillow Roundup (Our Easiest Bed Making Hack)
Yesterday’s international news is devastating. We are watching with the rest of the world. This scheduled design post will be published but know that we are also concerned and not oblivious to the situation. Hoping for swift peace and minimal lives lost. I’m a mom. We are caring compassionate women. Watching destruction, close or far away is simply hard and terrifying.
In case you haven’t noticed, there’s been a pillow trend happening right now in the bedroom and we are very into it over here at EHD (as you will soon see). Although we covered it a few years back on the blog here, it still remains just as relevant, functional, and stylish which is why we wanted to introduce it to any new readers or any of you out there that are still trying to perfect the “how do I style 12 decorative throw pillows on my bed every single morning” routine, which may or may not be working for you. Plus there are a lot more out there now (perhaps they read the blog?).
 photo by tessa neustadt | from: 1 bedroom 4 ways with the citizenry
Bed styling is tough, and something that I wouldn’t wish upon my worst enemy. And although the Pinterest-worthy beds floating around on the internet may seem like they have simply tossed the duvet perfectly across the bed and draped a blanket casually on top in one swift easy go, said process can sometimes take rounds and rounds of revisions to get that “effortless casual” look that we all want. And because no one has the time or the mental capacity to spend more than a few minutes making their bed every morning, for you we introduce the “extra long lumbar pillow” to help simplify the process.
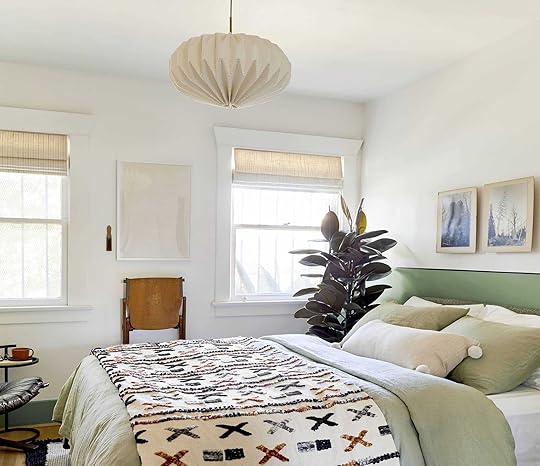 photo by sara ligorria-tramp | from: makeover takeover: julie’s huge (and diy packed) bedroom upgrade
Forget the three, six, nine, twelve…. decorative pillows and just throw on one of these long decorative rectangular pillows IF you want a decorative pillow at all. You may lean more simple and not even want to add a decorative pillow at all to your current bed setup, but if you are looking to add something decorative without the complications of all those extra pillows, then the pillows that we have pulled together for you below can help you out. We have one currently on our bed and lay it in front of our two sleeping pillows when we make the bed in the morning, and at the end of the night we can just grab it off super quick. Which is much easier to deal with than a handful of decorative pillows on the floor. Actually most every bed I’ve (or my team) have styled has been with the single extra long lumbar. Example A. is Julie’s bedroom with that cute pom/tassel guy.
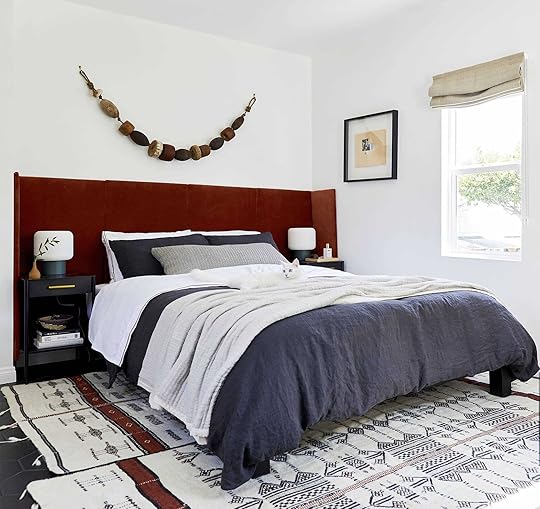 photo by sara ligorria-tramp | from: moto reveal: emily bowser’s bedroom “after” is unrecognizable from the “before”
Then for Emily Bowser’s primary bedroom she chose to contrast her darker bedding and shams with that gray extra-long pillow. It’s modern but still super inviting.
 photo by sara ligorria-tramp | from: the feel-good modern romantic bedroom makeover jess did for her dear friend (all thanks to the company store)
Then most recently, Jess picked out this lumbar pillow (that Emily Bowser styled) for her friend’s bedroom makeover. The pillow is actually velvet so it adds another fabric and texture to this romantic traditional bed look.
It really is just so easy, looks awesome, and frees up more time doing well, anything other than making your bed.
 photo by veronica crawford | from: our bedroom update (also how i feel about having a tv in the bedroom)
All of the pillows we’ve pulled together below are at least 30″ long which means that they are large enough to use for either a queen or king-sized bed, and although we can’t promise a better night’s sleep with them, we can promise a far easier bed-making routine in the morning. So, here are a few of our favorites divided up by price.

1. Cotton Canvas Oversized Lumbar Pillow Cover | 2. Lumbar Faux Leather Channel Stitch Decorative Throw Pillow | 3. Oversized Bolster Woven Uneven Stripe Decorative Throw Pillow | 4. Oversized Oblong Tufted Diamond Throw Pillow | 5. Sage Green Oversized Lumbar Throw Pillow Cover | 6. Manifold Glyphs Pillow Cover | 7. Lumbar Heavyweight Linen Blend Throw Pillow | 8. Paloma Cotton Velvet Decorative Pillow Cover | 9. Beige Brown Cream Flax Large Stripe Extra Long Lumbar Pillow Cover | 10. Dash Stripe Oversized Lumbar Bed Pillow | 11. Oversized Oblong Embroidered Decorative Throw Pillow | 12. Soft Corded Pillow Cover | 13. Lumbar Modern Stripe Decorative Throw Pillow | 14. Ticking White Long Linen Lumbar Pillow Cover
Target really has the monopoly on affordable extra long lumbar pillows but we aren’t mad about it. Look at how great all of these are?! #2 is an EHD go-to. It works with nearly every style and looks so good in person. Then to stay on the Target train, #3, #7, and #13 are also simple yet very special:) But Target isn’t the only one, Etsy and West Elm have incredible options too. I mean #1 and #12? Each of those also comes in a bunch of other colors. Then for Etsy, #5, #9, #14 are good. The other great thing about Etsy is that most of the pillows sold have a ton of size options so don’t be discouraged if the size on the graphic doesn’t work for you.
1. Candlewick Oversized Lumbar Pillow Cover | 2. Extra Long Lumbar Pillow | 3. Luxe Linen Blend Pillow | 4. Corded Zigzag Pillow Cover | 5. Long Lumbar Pillow | 6. Stonewash Grey Linen Pillow | 7. Lush Velvet Oversized Lumbar Pillow Cover | 8. Olive Colorblock Pillow Cover | 9. Handwoven Thai Pillow No.14 | 10. Marilla Stripe Body Pillow Cover | 11. Floral Long Lumbar Pillow Cover | 12. Pink Stitched Lumbar Pillow | 13. Montara Pillow | 14. Salmon Pink Lumbar Pillow Cover
Now we are moving up the budget needle. We’ve used #1 before and it adds so much fun texture. Then I’ve used Jillian Rene Pillows (#8) for years and they never disappoint. Some of these other Etsy ones are really doing it for me. I’m looking at you, #5, #9, and #11.
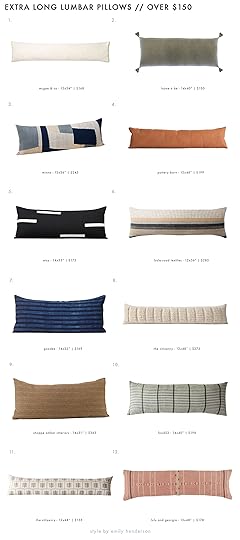
1. Shepard Pillow Cover | 2. Gigi Pillow | 3. Alcove Pillow Dusk | 4. Garrit Leather Lumbar Pillow | 5. Black and Cream Dash Pillow Cover | 6. Suri Lumbar Pillow | 7. Long Cushion in Kapok | 8. Sueno Lumbar Pillow | 9. Manolo Pillow | 10. Hand-Blocked Artisan Lumbar Pillows | 11. Chand Lumbar Pillow | 12. Vadala Long Lumbar Pillow
While spending over $150 on a singular pillow is not for everyone (except remember this one is in lieu of say, maybe five). It’s 100% understandable. However, these pillows are pretty special if you can/want to. I love the simplicity, size, texture of #1. The patterns of #3 and #6 are right up my alley. But just like the other roundups, I love them all.
If you are into this, then your life and bed just got easier/better. Which ones are your favorites? Have you already been doing this?
Opening Image Credits: Photo by Sara Ligorria-Tramp | From: Mountain House Reveal: Our Calm Scandinavian Master Bedroom
The post Our Extra Long Lumbar Pillow Roundup (Our Easiest Bed Making Hack) appeared first on Emily Henderson.
February 23, 2022
The 13 EHD Opalhouse x Jungalow Collection Picks (Spoiler: A Trend Prediction Is Confirmed)
You might already know, but the one and only Justina Blakeney has just launched another Jungalow collection with Target’s Opalhouse. Needless to say, it’s fantastic. Every time I look at one of her collections, I think “I need more color in my house” because joy is the only way to describe The Jungalow style. Now, this list was painfully curated (we’re trying to get better shorter lists) so I have chosen 13 of our favorites. But you need to go check out the whole collection. Justina said her inspiration was “Sacred Garden”. There are just too many gems and the inspo is wonderful clear in our first pick.
Maddalena Mushroom Stool

When I first saw this mushroom ottoman I gasped. Not only is it the cutest (and also comes in rust), mushroom decor was one of our 2022 decor trend predictions. It. Was. Validating. I think it would bring in the perfect amount of chic whimsy to any room.
Cinque Terre Primitive Stone Accent Table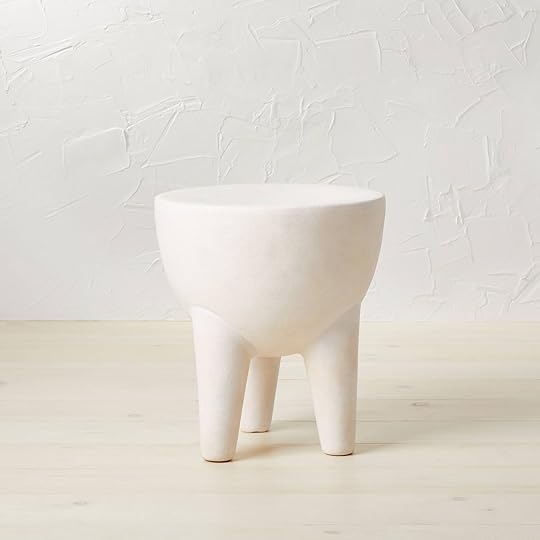
I love a unique side table and this one really fits the bill. I also think this one could work beautifully in almost any style of home because it’s simple enough but will add quiet texture and sculpture.
Paradise Leaf Embroidered Velvet Lumbar + Embroidered Floral Square Throw Pillow
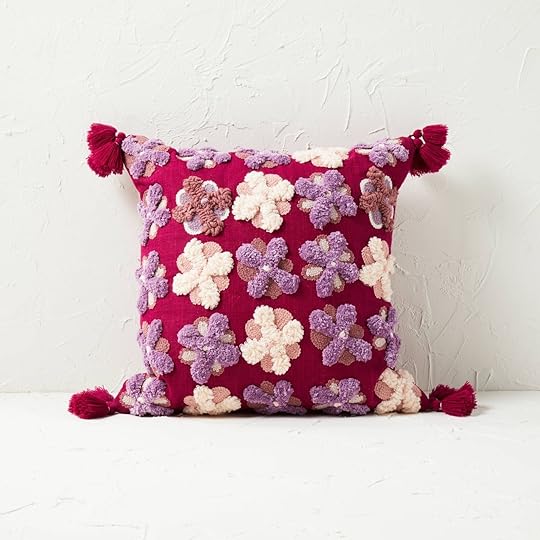
Justina knows textiles and I love so many from this collection. The richness of that green velvet has my eyes feeling very relaxed in the most luxurious fashion (plus you know how much we love lumbar pillows). Then that floral pillow just makes me happy. The colors, the flowers, texture are all so good. How cute would this be in a kid or teen room? To be fair it would also be great in an adult’s room.
PET Tufted Rug
Tell me this rug doesn’t make you smile. It’s impossible. A sun rug only makes sense as a circle and this is by far the best one I’ve seen. If you aren’t into the yellow but love the design then you are in luck because it also comes in black. This is another piece that would be so sweet in a kids’ room but doesn’t scream “kid”. That being said it could also happily live in an adult’s room or even office.
Sepulveda Mixed Material Dining Chairs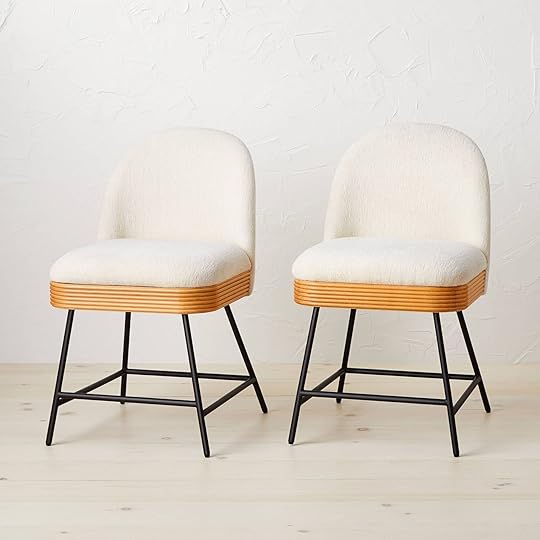
I meeeean… mixed material is right and we love it. That rattan accent is so good and while cream upholstery is a bold choice for a dining chair, I get why they chose that because it’s real pretty. Oh, and they come in counter height barstools too!
Palermo Desk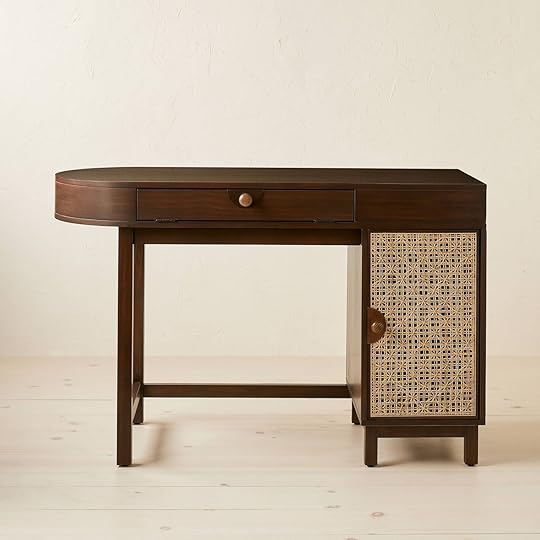
I love the dark wood, the rounded one side, the half-circle knob accent, and the TWO storage areas. It’s just a really great looking desk that is both simple and special (the EHD magic duo)
Pinboard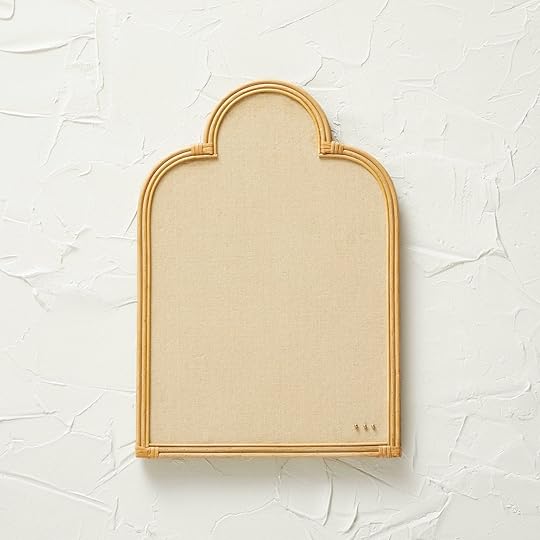
Real-life mood boards are coming back people. So why not get a really pretty one like this guy??
Burlap Petal Floor Lamp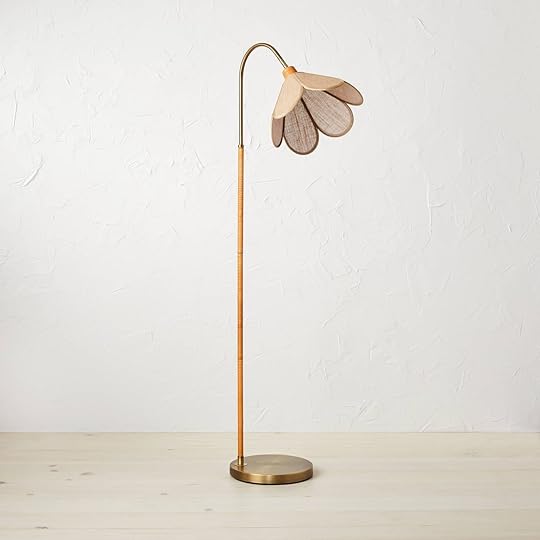
Now let’s talk lighting as Justina designs GREAT light fixtures. Petals as light shades are also becoming more popular so this is a slam dunk if you are into that look. Its got texture coming out of every inch (the pole is rattan-wrapped).
Rope Pendant
Now for this pendant. If you are a lover of organic, textured design then this rope pendant is right up your alley. It’s another simple but special piece that you don’t really notice until you do. It’s then you realize how it makes the room feel more special.
Acrylic Drinkware Set
I have to admit that outside of maybe the mushroom stool, these acrylic cups are my favorite. I love the colors (especially the blue), the shapes, and that they are practically unbreakable. Sadly I have almost too many outdoor-friendly so someone please enjoy them for me! (Only if you need them though:))
Melamine Dinner Plates
I just think these plates are so pretty. I also am of the belief that there is no same in the everyday melamine plate game. Sure, they are ideal for the outdoors but they can also be used every day. Especially when you have kids (or clumsy adults) in your house.
Tall Tapered Basket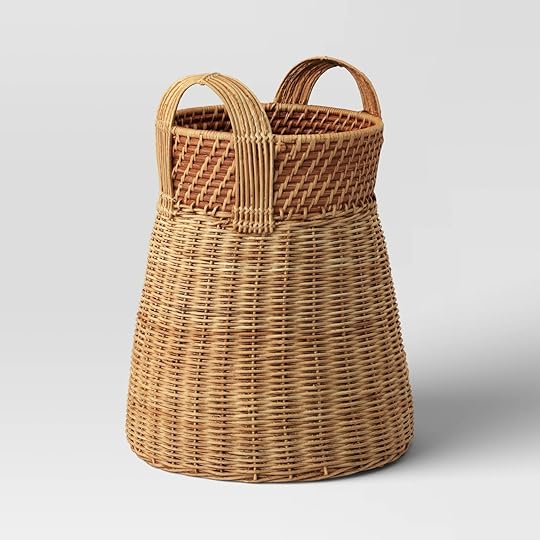
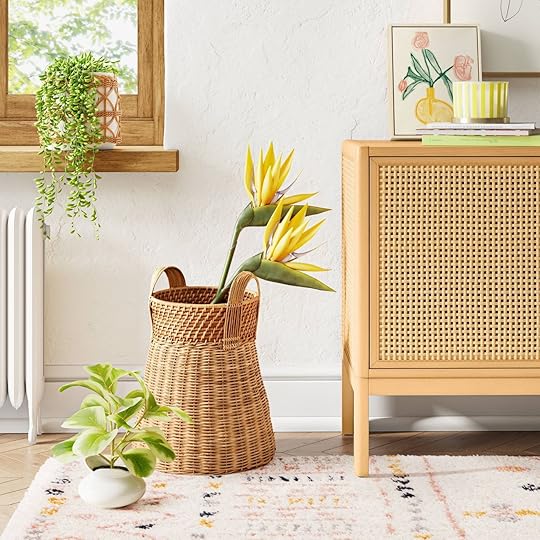
There was zero chance of getting through this post and NOT having a beautiful basket on the list. Look at that shape and detail?! That is a basket that was meant to be seen. I love the handles and the three different weave patterns. Form and function, baby!
Well, that’s it for this collection. What did you think? Buying a mushroom stool?? We decided it would be really fun for the next week or so to do short posts in the afternoon calling out our favorite products from the current Spring 2022 collections. We are design lovers after all and even if we don’t need anything, we love to window shop:) See you tomorrow.
Love you, mean it.
Opening Image Credit: via Target
The post The 13 EHD Opalhouse x Jungalow Collection Picks (Spoiler: A Trend Prediction Is Confirmed) appeared first on Emily Henderson.
The 6 Biggest Lessons On How To Be Your Own Project Manager + Some VERY Real Life Mistakes And Successes

When one of our readers, Lisa (remember this DIY project?), reached out to us after remodeling her home on a budget, we knew this would be a story all our readers would want to hear. She managed to save thousands of dollars during a large gut remodel while also added an additional 500 square feet. Today, she’s sharing all the mistakes and money-saving tips and tricks she learned. Take it away, Lisa…
If you asked me ten years ago what my life would look like today, I would’ve never imagined I’d be a working mom/Interior Stylist/Instagrammer and sharing remodeling tips on EHD! I’ve been a long time fan for over a decade and have always found the articles extremely resourceful and I refer to them time and time again.
After remodeling our first home, I found a new passion and decided to share my experience with others and start my own interior design business. I’m hoping to inspire people to always see the potential in a space and create a home they love. Hopefully the tips I share with you today can help you plan for a reno, avoid any unnecessary mistakes, and give you the confidence to tackle your own remodel.
I would like to preface by saying it was an incredible experience being my own project manager and building our dream home. However, taking on this role and a large remodel is not for the faint of heart. You never realize there are hundreds of measurements to think about until you try to be your own project manager/designer. There were many sleepless nights when I wanted to drive to our house with a measuring tape and double-check for the fifth time if the sconce in the bathroom was the correct height from the floor. Was it too high? Too low? Was the distance from the mirror far enough? Was it too close? Will this look goofy??!! What am I doooooiiiing??!! The million questions and doubts that ran through my mind likely contributed to all the new grey hairs that have sprouted on my head over the past year.
All that said, I wanted to share all the tools, tips, and tricks that helped me through this process. Even though it was the most stressful time of my life – building a home during a pandemic, with my spouse – while trying to be my own project manager – we managed to stay married and 1000% I’d do it all over again.
Helpful Apps And Software Programs
Let’s begin with the first stages of our remodel – the floor plan and 3D renderings. In the beginning, I hired someone on Fiverr app to make two 3D renderings for $550. While this is definitely cheaper than hiring an architect to do a rendering, I realized this wasn’t going to work for me since I was only given 1-2 revisions, before they began to charge for each change. I’m the type of person who likes to see multiple, multiple, different designs, and layouts. This helps me feel confident about my final decision once I feel like I’ve exhausted all my options. So going this route was definitely cost-prohibitive.

Later, I discovered two different apps that helped me tremendously. I can honestly say I couldn’t have done my project without them. ArcSite is a free app I used for all my floor plans, cabinet layouts, and measurements. Planner 5d helped me save hundreds of dollars making my own 3D renderings. Once I taught myself how to use these programs, I was able to make an unlimited amount of designs for FREE! They’re pretty user-friendly too since I’m not the most tech-savvy and was able to navigate them.

Another trick I like to use to visualize a space was to use painter’s tape and flooring paper. Since our kitchen and dining area are one open floor plan, we were having difficulty visualizing how wide to make each designated area. Using the brown paper helped immensely with figuring out the scale of the space. I was finally able to decide on the width of the cabinets and measurements for the dining and kitchen. So when in doubt – tape it out!
Here are a few examples of mistakes and cost savings I made:
Always buy samples of materials before making your final purchase. For tile selections, do not make your decision based on the one or two samples they give you from the store. To really get a sense of the design/color, it’s imperative you look at a large amount of the material all laid out. This method not only works for tile, but also wood floors and paint.
 the custom tile…
I wanted this really unique design in our entryway and I chose an Italian porcelain tile with a lot of variation. I ordered 4 pieces and thought I liked the design so I placed the final order for the entire room. Low and behold, when they began to lay the tile, I soon realized the variation looked like someone had smeared feces on top of the tile and I literally wanted to cry! Since this was imported from Italy, it was a custom order and non-returnable. I ended up wasting about $1,400.
For our wood flooring, we ran into the same issue. I learned my lesson from the tile incident and ordered one box of flooring material. I wasn’t happy with the selection and was able to return it with a small restocking fee. Even though the sample boards for wood floors can be large, wood has so much variation that you’re only seeing a tiny sample of the entire lot. You can’t get the true visual effect unless you lay 6-8 full-length boards – which will definitely help you finalize your decision. When processing a return you may lose a bit of money in restocking fees, but that’s significantly less than paying restocking fees on thousands of dollars worth of material.
Paint samples: When I painted swatches to choose the color for our interior walls, I used several 11”x17” pieces of paper. Even though this is significantly bigger than the tiny swatches you get from the store, I still had difficulty visualizing the color on the walls. I thought of the idea to paint a HUGE swatch on a piece of drywall. Since paint colors can reflect light differently from room to room, I moved the drywall around the house to help make my final decision.
How To Save Money On Cabinets
The majority of our kitchen is white oak and I allowed my contractor to select all the wood for my cabinets. After he finished building everything and installed the boxes, we came to realize the wood ended up looking like tiger stripes EVERYWHERE! I discovered he mixed red oak and white oak which have two completely different grain patterns and color! I realized this after I took a sample of wood to a lumber yard since I couldn’t figure out why the grains looked so different from one another. This also made sense why none of the twenty different stains I bought looked the same on each piece of wood – that was a fun day I’ll never forget!
As a result, my contractor repurposed ALL the wood for another project and I ended up picking every.single.piece of wood in my entire house during the height of the pandemic. The inventory was so low that I had to make six trips to the lumber yard over a two-week period. In the end, I spent about $5000 more dollars for a higher quality wood – all wood is not created equal! However, it was SO worth it! The kitchen is the heart of the home and it was worth the splurge! I LOVE how it turned out – aaaaaand it made for a fun story to tell.
 the cabinet wood i wanted!
Since the majority of the cabinets in our home are white oak, I was able to save thousands of dollars on custom cabinetry by mixing wood species (intentionally this time). I used hardwood white oak on the rails/stiles of the door and white oak plywood for the panels. On the outside, the cabinets have this beautiful harmonious grain movement and look like oak cabinets through and through. However, on the inside, I used maple plywood which helped keep the cost lower. Custom cabinetry can be SO expensive but by applying these tips I was able to achieve a high end look for less and no one’s the wiser – except for everyone reading this article now.
Since we had so many built-ins throughout our home, I also mixed inset and overlay cabinets between the various rooms. I used inset cabinets for the kitchen and dining – which are the main areas of our home. But for less traffic areas, such as our walk-in pantry and laundry room, I used overlay cabinets and saved around $1800 since the labor involved with making inset cabinets is significantly more difficult than making overlay cabinets.
Look For Dupes Or Knock-Offs
Always try to find a dupe for an expensive item. You never know when you’ll find an amazing deal! I found the dupe of a lifetime with my laundry room steel barn door. I was fixated on having a glass steel door until my dreams were crushed when I was quoted $2500 for one 36” door! I found this insanely gorgeous door at Home Depot for $349. It’s actually made of steel but for a fraction of the cost. I also wanted steel windows throughout our home, but this was WAY out of our budget. Who knew steel windows cost a fortune!! Instead, we saved $50,000 installing aluminum-clad windows with thicker grids – 7/8” wide – and I love them! We’ve even had people ask if we have steel windows because they look so similar.
Hardware can get quite costly especially when you have a large kitchen. I fell in love with these knurled cabinet pulls from Restoration Hardware until I saw the price – $52 for one 6” pull – ONE! I found an almost identical dupe on build.com for $14!!! They have a heavy weight to them, look expensive, and are the prettiest honey lacquered brass color.
Be Clear With Your Contractor On Where You Want Outlets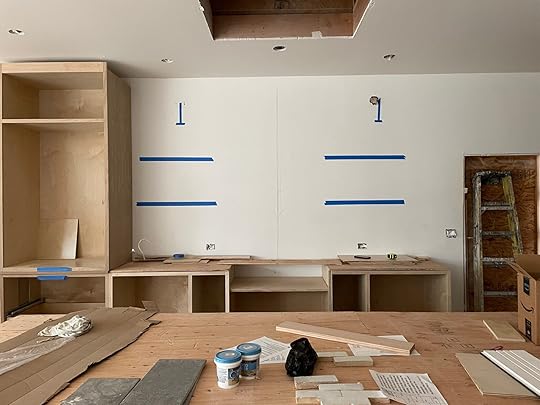 some of the outlet placements
ALWAYS review your electrical plan with your contractor. The majority of the time, contractors are not thinking about aesthetics and slap those suckers anywhere without consulting you. It’s all about the little details that really make a home look custom and well thought out. Place outlets and lights strategically and always discuss in great detail, exactly where they will be placed – everywhere! Here are some examples of mistakes and stellar placements I made:
I have a bit of an obsession with concealing electric outlets and switches. This was the first time I ever made a lighting and electrical plan and I accidentally ended up installing a light switch behind a door because I neglected to factor the direction the door swung. It was an easy fix to open up the drywall again, but it ended up costing me $400. However, I learned a very important lesson: regardless of the mistakes you make – inevitably there will be some – everything is fixable! Sure you’ll have to pay for a change order, but make all the changes while you’re still in construction, as opposed to kicking yourself after you finish your entire remodel because the thing that bothered you before, still bothers you – but now you can’t change it!
I designed a small appliance cabinet that houses all my small appliances. I installed electric outlets inside the cabinets and used my appliances in there so my countertops are clutter-free. On our porcelain waterfall island, I installed the outlets on the underside of the overhang as opposed to the side of the island which is the traditional placement. If I hadn’t discussed this with my contractor beforehand, I can only imagine him installing it into my stone and I would have to stare at it every day for the rest of my life. On the kitchen counters, I installed the outlets low and close to the countertop. I also turned them horizontally which allows the outlets to blend in better with the stone backsplash. Since my sink is in the island, I installed a garbage disposal switch under the sink cabinets. Traditionally a disposal button is installed on top of the countertop, but over time, the button can become a collection area for dirt and grime so I love the fact that it’s a simple switch inside my cabinet.
Task lighting: Don’t forget about task lighting. I installed open shelves in my kitchen and initially thought about installing task lights under the shelves. However, when I had upper cabinets in the past, I never used the lighting underneath, so I assumed they weren’t necessary. After they installed the shelves and turned on the lights, I realized I should have installed the lighting. $800 later, we changed the shelves and hard wired the lights. I can happily say they add such a nice ambiance to the kitchen and I use them daily.
Tips For Tile Installation:
Do a walk-through of the space and convey your exact vision of how you want the space to look. I made extensive notes using “Keynote” of how I wanted the tile to be installed in the bathrooms and taped them to the wall. This was helpful for the installer to reference during the installation. It also helps with any type of miscommunication that could possibly occur. If something is installed incorrectly, you can always reference your paper to see who, why, and where the mistake occurred. This can definitely help save you money in the long run since a lot of mistakes occur due to miscommunication. This may seem a bit obsessive to be this detail-oriented, but if you don’t give exact instructions, they’ll tend to fill in the blanks themselves and things like electrical sockets and light fixtures, tiles can end up in the worst/random places. I’ve learned from past experiences that for some reason the ugliest tile always ends up at eye level! So when I have a complicated install, or I want the pattern to look a certain way, I’ll label the tiles and tell the installer exactly where I want each piece laid out so I could hand-select all the pieces I want or hide the ugly ones in inconspicuous areas.
Choosing Grout Colors:
Never pick a grout color when the mix is still wet. I made this mistake in my son’s bathroom when they applied the grout. I forgot to test the color first and by the time I realized I disliked it, they had already spread too much on the wall and it was too late to change it. This actually ended up being a happy accident because when I came back the next day, the color dried significantly lighter and I loved it! Now before any grout application, I have my installer make 1/8” wide and deep cuts on top of an extra piece of tile and he smears several different grout colors on top. This allows me to see all the colors side by side and I can take my time making a decision as opposed to deciding minutes before he covers the entire area and you’re stuck with your choice forever.

During our home remodel, we also decided to remodel our backyard. We ended up hiring the cheapest contractor and quickly regretted our decision. He ended up doing a horrible job on our deck and he had to demo the concrete THREE times in several areas because the finish didn’t match in various areas. Note to self: be wary of hiring the cheapest contractor – especially if their bid is way under others. Always get at least three bids when you’re doing a remodel and compare costs.
In the end, needless to say, I learned an endless amount of valuable lessons. Throughout the entire build process, I doubted myself so many times and literally thought I was building the goofiest house of all time! But, my best advice is: always trust your gut! Everything turned out beautifully and I’m so happy we went this route. Now I’m suffering from withdrawal and need another home to remodel!
Design and Photos by Lisa Kanegae
The post The 6 Biggest Lessons On How To Be Your Own Project Manager + Some VERY Real Life Mistakes And Successes appeared first on Emily Henderson.
The 6 Biggest Lessons On How To Be Your Own Contractor + Some VERY Real Life Mistakes And Successes
When one of our readers, Lisa (remember this DIY project?), reached out to us after remodeling her home on a budget, we knew this would be a story all our readers would want to hear. She managed to save thousands of dollars during a large gut remodel while also added an additional 500 square feet. Today, she’s sharing all the mistakes and money-saving tips and tricks she learned. Take it away, Lisa…
I would like to preface by saying it was an incredible experience being my own contractor and building our dream home. However, taking on this role and a large remodel is not for the faint of heart. You never realize there are hundreds of measurements to think about until you try to be your own contractor/designer. There were many sleepless nights when I wanted to drive to our house with a measuring tape and double-check for the fifth time if the sconce in the bathroom was the correct height from the floor. Was it too high? Too low? Was the distance from the mirror far enough? Was it too close? Will this look goofy??!! What am I doooooiiiing??!! The million questions and doubts that ran through my mind likely contributed to all the new grey hairs that have sprouted on my head over the past year.
All that said, I wanted to share all the tools, tips, and tricks that helped me through this process. Even though it was the most stressful time of my life – building a home during a pandemic, with my spouse – while trying to be my own contractor – we managed to stay married and 1000% I’d do it all over again.
Helpful Apps And Software ProgramsLet’s begin with the first stages of our remodel – the floor plan and 3D renderings. In the beginning, I hired someone on Fiverr app to make two 3D renderings for $550. While this is definitely cheaper than hiring an architect to do a rendering, I realized this wasn’t going to work for me since I was only given 1-2 revisions, before they began to charge for each change. I’m the type of person who likes to see multiple, multiple, different designs, and layouts. This helps me feel confident about my final decision once I feel like I’ve exhausted all my options. So going this route was definitely cost-prohibitive.
Later, I discovered two different apps that helped me tremendously. I can honestly say I couldn’t have done my project without them. ArcSite is a free app I used for all my floor plans, cabinet layouts, and measurements. Planner 5d helped me save hundreds of dollars making my own 3D renderings. Once I taught myself how to use these programs, I was able to make an unlimited amount of designs for FREE! They’re pretty user-friendly too since I’m not the most tech-savvy and was able to navigate them.
Another trick I like to use to visualize a space was to use painter’s tape and flooring paper. Since our kitchen and dining area are one open floor plan, we were having difficulty visualizing how wide to make each designated area. Using the brown paper helped immensely with figuring out the scale of the space. I was finally able to decide on the width of the cabinets and measurements for the dining and kitchen. So when in doubt – tape it out!
Here are a few examples of mistakes and cost savings I made:
Always buy samples of materials before making your final purchase. For tile selections, do not make your decision based on the one or two samples they give you from the store. To really get a sense of the design/color, it’s imperative you look at a large amount of the material all laid out. This method not only works for tile, but also wood floors and paint.
I wanted this really unique design in our entryway and I chose an Italian porcelain tile with a lot of variation. I ordered 4 pieces and thought I liked the design so I placed the final order for the entire room. Low and behold, when they began to lay the tile, I soon realized the variation looked like someone had smeared feces on top of the tile and I literally wanted to cry! Since this was imported from Italy, it was a custom order and non-returnable. I ended up wasting about $1,400.
For our wood flooring, we ran into the same issue. I learned my lesson from the tile incident and ordered one box of flooring material. I wasn’t happy with the selection and was able to return it with a small restocking fee. Even though the sample boards for wood floors can be large, wood has so much variation that you’re only seeing a tiny sample of the entire lot. You can’t get the true visual effect unless you lay 6-8 full-length boards – which will definitely help you finalize your decision. When processing a return you may lose a bit of money in restocking fees, but that’s significantly less than paying restocking fees on thousands of dollars worth of material.
Paint samples: When I painted swatches to choose the color for our interior walls, I used several 11”x17” pieces of paper. Even though this is significantly bigger than the tiny swatches you get from the store, I still had difficulty visualizing the color on the walls. I thought of the idea to paint a HUGE swatch on a piece of drywall. Since paint colors can reflect light differently from room to room, I moved the drywall around the house to help make my final decision.
How To Save Money On CabinetsThe majority of our kitchen is white oak and I allowed my contractor to select all the wood for my cabinets. After he finished building everything and installed the boxes, we came to realize the wood ended up looking like tiger stripes EVERYWHERE! I discovered he mixed red oak and white oak which have two completely different grain patterns and color! I realized this after I took a sample of wood to a lumber yard since I couldn’t figure out why the grains looked so different from one another. This also made sense why none of the twenty different stains I bought looked the same on each piece of wood – that was a fun day I’ll never forget!
As a result, we discarded all the wood and I ended up picking every.single.piece of wood in my entire house during the height of the pandemic. The inventory was so low that I had to make six trips to the lumber yard over a two-week period. In the end, I spent about $5000 more dollars for a higher quality wood – all wood is not created equal! However, it was SO worth it! The kitchen is the heart of the home and it was worth the splurge! I LOVE how it turned out – aaaaaand it made for a fun story to tell.
Since the majority of the cabinets in our home are white oak, I was able to save thousands of dollars on custom cabinetry by mixing wood species (intentionally this time). I used hardwood white oak on the rails/stiles of the door and white oak plywood for the panels. On the outside, the cabinets have this beautiful harmonious grain movement and look like oak cabinets through and through. However, on the inside, I used maple plywood which helped keep the cost lower. Custom cabinetry can be SO expensive but by applying these tips I was able to achieve a high end look for less and no one’s the wiser – except for everyone reading this article now.
Since we had so many built-ins throughout our home, I also mixed inset and overlay cabinets between the various rooms. I used inset cabinets for the kitchen and dining – which are the main areas of our home. But for less traffic areas, such as our walk-in pantry and laundry room, I used overlay cabinets and saved around $1800 since the labor involved with making inset cabinets is significantly more difficult than making overlay cabinets.
Look For Dupes Or Knock-OffsAlways try to find a dupe for an expensive item. You never know when you’ll find an amazing deal! I found the dupe of a lifetime with my laundry room steel barn door. I was fixated on having a glass steel door until my dreams were crushed when I was quoted $2500 for one 36” door! I found this insanely gorgeous door at Home Depot for $349. It’s actually made of steel but for a fraction of the cost. I also wanted steel windows throughout our home, but this was WAY out of our budget. Who knew steel windows cost a fortune!! Instead, we saved $50,000 installing aluminum-clad windows with thicker grids – 7/8” wide – and I love them! We’ve even had people ask if we have steel windows because they look so similar.
Hardware can get quite costly especially when you have a large kitchen. I fell in love with these knurled cabinet pulls from Restoration Hardware until I saw the price – $52 for one 6” pull – ONE! I found an almost identical dupe on build.com for $14!!! They have a heavy weight to them, look expensive, and are the prettiest honey lacquered brass color.
Be Clear With Your Contractor On Where You Want OutletsALWAYS review your electrical plan with your contractor. The majority of the time, contractors are not thinking about aesthetics and slap those suckers anywhere without consulting you. It’s all about the little details that really make a home look custom and well thought out. Place outlets and lights strategically and always discuss in great detail, exactly where they will be placed – everywhere! Here are some examples of mistakes and stellar placements I made:
I have a bit of an obsession with concealing electric outlets and switches. This was the first time I ever made a lighting and electrical plan and I accidentally ended up installing a light switch behind a door because I neglected to factor the direction the door swung. It was an easy fix to open up the drywall again, but it ended up costing me $400. However, I learned a very important lesson: regardless of the mistakes you make – inevitably there will be some – everything is fixable! Sure you’ll have to pay for a change order, but make all the changes while you’re still in construction, as opposed to kicking yourself after you finish your entire remodel because the thing that bothered you before, still bothers you – but now you can’t change it!
I designed a small appliance cabinet that houses all my small appliances. I installed electric outlets inside the cabinets and used my appliances in there so my countertops are clutter-free. On our porcelain waterfall island, I installed the outlets on the underside of the overhang as opposed to the side of the island which is the traditional placement. If I hadn’t discussed this with my contractor beforehand, I can only imagine him installing it into my stone and I would have to stare at it every day for the rest of my life. On the kitchen counters, I installed the outlets low and close to the countertop. I also turned them horizontally which allows the outlets to blend in better with the stone backsplash. Since my sink is in the island, I installed a garbage disposal switch under the sink cabinets. Traditionally a disposal button is installed on top of the countertop, but over time, the button can become a collection area for dirt and grime so I love the fact that it’s a simple switch inside my cabinet.
Task lighting: Don’t forget about task lighting. I installed open shelves in my kitchen and initially thought about installing task lights under the shelves. However, when I had upper cabinets in the past, I never used the lighting underneath, so I assumed they weren’t necessary. After they installed the shelves and turned on the lights, I realized I should have installed the lighting. $800 later, we changed the shelves and hard wired the lights. I can happily say they add such a nice ambiance to the kitchen and I use them daily.
Tips For Tile Installation:Do a walk-through of the space and convey your exact vision of how you want the space to look. I made extensive notes using “Keynote” of how I wanted the tile to be installed in the bathrooms and taped them to the wall. This was helpful for the installer to reference during the installation. It also helps with any type of miscommunication that could possibly occur. If something is installed incorrectly, you can always reference your paper to see who, why, and where the mistake occurred. This can definitely help save you money in the long run since a lot of mistakes occur due to miscommunication. This may seem a bit obsessive to be this detail-oriented, but if you don’t give exact instructions, they’ll tend to fill in the blanks themselves and things like electrical sockets and light fixtures, tiles can end up in the worst/random places. I’ve learned from past experiences that for some reason the ugliest tile always ends up at eye level! So when I have a complicated install, or I want the pattern to look a certain way, I’ll label the tiles and tell the installer exactly where I want each piece laid out so I could hand-select all the pieces I want or hide the ugly ones in inconspicuous areas.
Choosing Grout Colors:Never pick a grout color when the mix is still wet. I made this mistake in my son’s bathroom when they applied the grout. I forgot to test the color first and by the time I realized I disliked it, they had already spread too much on the wall and it was too late to change it. This actually ended up being a happy accident because when I came back the next day, the color dried significantly lighter and I loved it! Now before any grout application, I have my installer make 1/8” wide and deep cuts on top of an extra piece of tile and he smears several different grout colors on top. This allows me to see all the colors side by side and I can take my time making a decision as opposed to deciding minutes before he covers the entire area and you’re stuck with your choice forever.
During our home remodel, we also decided to remodel our backyard. We ended up hiring the cheapest contractor and quickly regretted our decision. He ended up doing a horrible job on our deck and he had to demo the concrete THREE times in several areas because the finish didn’t match in various areas. Note to self: be wary of hiring the cheapest contractor – especially if their bid is way under others. Always get at least three bids when you’re doing a remodel and compare costs.
In the end, needless to say, I learned an endless amount of valuable lessons. Throughout the entire build process, I doubted myself so many times and literally thought I was building the goofiest house of all time! But, my best advice is: always trust your gut! Everything turned out beautifully and I’m so happy we went this route. Now I’m suffering from withdrawal and need another home to remodel!
Design and Photos by Lisa Kanegae
The post The 6 Biggest Lessons On How To Be Your Own Contractor + Some VERY Real Life Mistakes And Successes appeared first on Emily Henderson.
February 22, 2022
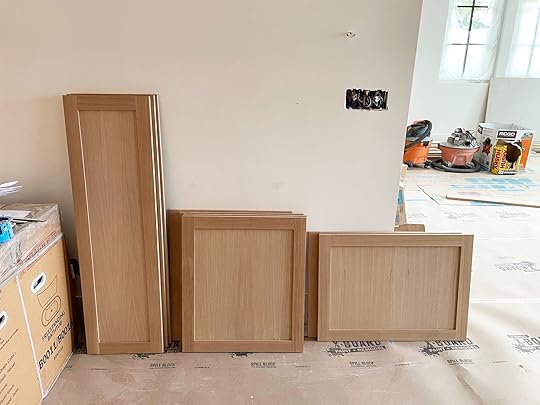
FARMHOUSE Check-In – A “What We Chose” Edition: Stained Wood Or Painted Cabinets…
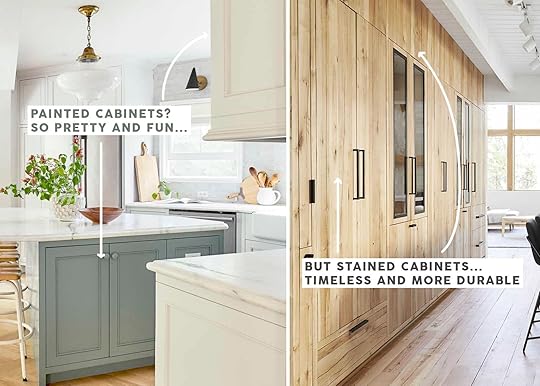
I can design a mediocre room pretty fast. But to design a great room, one that meets our practical needs, works with the architectural intent of the home but feels like “me” – until I die – is far more laborious. And I honestly love (almost) every second of it. I wish I could be more cavalier about each decision, throw them out willy nilly, but I can’t. And regardless of the choice, I will wish I had done some things differently. I obsess about each macro and the micro choice when it’s my house, even while not following all of my own formulas, and intentionally breaking some “rules”. But this can only be done with a certain level of obsessive planning and painstaking attention to what we want for this home. What sacrifices in the name of style will we make? What practicalities will we forego in order to have it represent our personalities? The pitfalls of being so obsessive are that once you change one thing, it’s a full domino effect. I don’t know if I’ll ever do client work again, but if I do I’ll likely feel so guilty about the time that I put into each decision – because folks, IT ADDS UP. So today we are discussing our choice between painted or stained wood kitchen cabinetry. Let us remind you where we started:

This lady. Knowing that we really loved vintage we found this soulful piece of furniture to use as the island. It’s red oak (!!) and absolutely stunning. Brian and I both said “yes to that dress” immediately upon viewing and haven’t had an ounce of regret since. We forewent practicality of “cabinetry” for functioning but old drawers and we feel pretty darn great about it (mostly because we have a large pantry for storage and we have way less stuff than we used to and want to keep it that way). But having this red oak piece made the decision to do the rest of the kitchen cabinets in natural wood even harder, prompting me to write the post about “can you have too much wood in your kitchen?“
Our answer is apparently NO, you can’t have too much wood. But to recap I’ll remind you of the pros and cons of paint versus stained cabinetry:

 photos by sara ligorria-tramp | left from: mountain house kitchen reveal | right from: styling to sell: how we staged our dining room and kitchenPainted cabinets can chip, revealing the primer or wood underneath. Many manufacturers or cabinet makers say that theirs don’t (and it has so much to do with the painting formula and techniques). But if a drawer hits another drawer when open (in corners), if you slam vacuums against the toe kick, or if you are just super rough in your kitchen (me), etc – it will chip or ding. Nothing you can’t touch up, of course. Stained wood (especially if it’s naturally stained) will not chip – it can still get dinged but it’s hardly noticeable. Painted cabinets can be more fun and colorful. You have a billion options in both color and finish (flat, semi, high gloss). You can go dark and moody, light and airy, or bold and bright. You can choose colors that represent you, stylistically and those colors can wildly change and dictate the look and vibe of the space. Stained cabinets are more expensive (for nice wood). And cheap wood will date your house (eventually) but that’s because cheap anything will date your house (especially if the craftmanship is cheap, too). So you want to pay attention to the quality of the wood (veneer clad or 100% wood), and love the grain pattern (because the grain will be the “pattern”). While you absolutely can stain a cheap wood to look darker, never once in my life have I thought that doug fir stained with a walnut stain actually looks like walnut. People will argue with me on this, they’ll protest and say that they have made fir look like walnut, but in my experience, it just looks like darker doug fir (WHICH IS FINE).
 That being said my instinct was to go with painted cabinets to offset the island, not compete with it and deal with the risk of having too much wood. Two competing woods with different undertones in one room is absolutely doable, but not without a lot of careful considerations, intentions, and willingness to risk take. Not to scare you but if you are new/nervous to design you can stick to the “one natural wood + painted wood” formula unless you are trying to work in heirloom pieces that you already have – it’s simply less risk.
 design by arciform
As a reminder, the floor is ALSO white oak. I was captain of “team painted cabinetry’ thinking I’d go for a medium powder blue or a darker green or blue, etc, meanwhile, Anne and Brian were chanting “DOUBLE WOOD! FOR! PRESIDENT!”. Anne was so adamant that this house/kitchen specifically wanted wood cabinets that I started really believing her. Honestly, I prefer wood for practical purposes (no chips ever) and I LOVE wood in general, but I love color, too! And can three different woods in the same room look intentional and not too heavy?? She showed me some photos of rooms where she mixed different woods with different undertones and it just clicked into place. While I wouldn’t recommend this for all styles of homes, for this farmhouse – she was right. The kitchen wanted to be wood. Of course, once we decided on double wood then I had to change the stone and the tile I had in mind (it was white, it is no longer), but these are fun problems to have (if you have time to solve them which we did).
 via unique kitchens & baths
We are working with Unique Kitchens & Baths on the kitchen cabinets so they sent me all their wood samples early on. While I’m trying to not recreate a farmhouse version of the mountain house kitchen, I also really love living in that warm minimal kitchen so maybe I am. That kitchen has gotten a LOT of wear and tear (between parties and living there full time during lockdown) and the cabinets look perfect still (they aren’t, you just can’t see the dings or scratches). We immediately gravitated towards the white oak, in a natural finish.
 via unique kitchens & baths
 via unique kitchens & baths
It’s so pretty. So high quality. Just solid, pretty wood made by Mennonites (women-owned) in the US and arrives pre-assembled as boxes (in blankets – no plastic wrap!). The question became – do we do both the sink/range walls in the white oak as well as the fridge/freezer/bar wall? We went back and forth for WEEKS. We stood in the space with paint samples, we changed it over and over in the renderings. The debate was between keeping them all white oak, or doing the fridge/freezer/bar in a light neutral white-ish tone (to disappear into the wall/ceiling. In the renderings, the white all of a sudden popped out too much and called more attention to it. So after so much back and forth we decided to be safe and have it in white oak which is more expensive. However, if we end up wishing they were white then it’s paintable, whereas getting it already studio painted and wishing it were different would be way harder to change. I’m not sure we made the right decision, but it’s the one we made as of now
So that’s where we are at – a calm, warm, kitchen full of multiple tones of wood… Up next I’ll show you the tile, the stone, the hood design (not done yet), the ceiling treatment, and the controversial hardware decision (spoiler – Brian chose it and I’m not convinced it’s what we should do but no holes are drilled yet). It’s all coming together, folks
Opening Image Credits: Photos by Sara Ligorria-Tramp | Right From: Mountain House Kitchen Reveal | Left From: Styling to Sell: How We Staged Our Dining Room and Kitchen
The post FARMHOUSE Check-In – A “What We Chose” Edition: Stained Wood Or Painted Cabinets… appeared first on Emily Henderson.
February 21, 2022
Our Most Curated President’s Day Sale List (So Just The Really Good Ones)

HELLO, HELLO. Happy President’s Day. Today, I’m shaking things up a little in an attempt to streamline the format of our big holiday sale roundups. Below, you’ll find a more limited selection of the creme de la creme – you know, the sales that lead to actual big savings for you, instead of everyday discounts that have been rebranded with a festive red/white/blue graphic – and I’m excited to hear your thoughts. (A fun caveat: If your favorite retailer isn’t included here, you may find that waiting a few months till Memorial Day – if you can! – will lead to even bigger deals.) Let’s jump in with the best that President’s Day has to offer, yeah?
Home & Decor photo by tessa neustadt | from: mel’s MOTO reveal – it’s the breath of minimalist, uncluttered air we all needAllModern
Deal: 20% off select items
Code: GET20
Our Picks: A chic entry table with reasonable lead times | This on-trend curved sofa | A nightstand with some special cane details
Deal: 20% off in-stock items plus free shipping
Our Picks: A sweet diamond-pattern rug | This quiet, cozy, works-anywhere rug | An indoor-outdoor rug that’s a little elevated
Deal: Up to 30% off in-stock items plus free shipping
Our Picks: You already know what this is | Some agate coasters to spruce up your coffee table | These highly-rated linen-blend curtain panels | And honestly, the curation for the entirety of this sale page is top-notch
Deal: 15% off site-wide; 20% off orders over $2,999; 25% off orders over $3,999
Our Picks: This sleeper sofa that you’ll see in a 2022 reveal | A huge swivel sherpa chair that’s perfect for snuggling | Albie’s dreamy pull-out sofa
Deal: 25% off site-wide
Code: PRESIDENTSDAY2022
Our Picks: This moody, perfectly desaturated bouquet print | A still life of several vessels (what more could EHD ask for)? | These fully-designed gallery walls that take the stress out of space planning
Deal: Up to 20% off select items
Our Picks: The sheepskin from Erik’s recent reveal | Our go-to affordable office chair | A spindle bed that looks like a million bucks
Deal: 15% off site-wide
Our Picks: The best bath robe I’ve ever owned (or gifted) | The comfiest sheet set | Our new favorite waffle pink bath towels
Deal: Up to 40% off select items
Our Picks: A classic (and in-stock) farmhouse sink | A great wine fridge for under $700 | A rare Bertazzoni package deal
Deal: Up to 20% off select items, plus up to 60% off February markdowns
Our Picks: A super chic, modern take on the timeless roll-arm sofa | This minimalist statement floor lamp | A lumbar pillow that’ll be the perfect finishing touch for your bedroom
Deal: 20% off site-wide
Code: PRESIDENT20
Our Picks: The sideboard you’ll see in Mal’s MOTO LATER THIS YEAR | This refined overstuffed lounge chair, featured in an EHD makeover | A comfy cane chaise with striking angular lines
Deal: 15% off site-wide
Our Picks: All of their new bench designs are incredible | A great “goes-with-any-style” sofa | Our favorite elevated sectional
Deal: $25 off orders over $250; $100 off orders over $750; $250 off orders over $1500
Our Picks: A splurge-worthy sculptural bar stool | A burl coffee table with waterfall edges | This on-trend trompe l’oeil wicker table
Deal: 20% off site-wide
Code: PRESDAY20
Our Picks: The chandelier that Jess used in her friend’s makeover | This modern vintage-inspired table lamp | Ajai’s modern chic chandelier
Deal: 20% off site-wide
Our Picks: A super chic navy raffia nightstand with tons of storage | This relatively affordable, ready-to-ship wingback bed frame | One of my all-time favorite single-cushion sofas
Deal: Up to 60% off select items
Our Picks: The big, bold mirror from Erik’s MOTO | An uber-durable, simple, graphic wool and jute rug | The light fixture that makes me wish I had a kitchen island to hang it above
Deal: 20% off orders over $1,000
Code: WINTERGLOW20
Our Picks: Our never-fail relaxed linen sofa | This sectional with drop-dead gorgeous arms | A funky chair with a boxy, fluted oak frame
Deal: 20% off select items
Our Picks: A Studio McGee console that’s 40% off | An organic modern TV stand with a cane front | A textured pouf to pair with your favorite armchair
Deal: 25% off decorating and entertaining essentials
Code: FRESHSTART25
Our Picks: A sophisticated teak outdoor chair with beautiful fretwork | A copper (!!!) fire pit | Or this full outdoor fireplace for just over $1,000
Deal: 20% off mattresses; 10% off bedtime basics
Our Picks: EHD’s go-to mattress | The best mattress topper for upgrading your current setup | A mattress protector with nearly 3,000 5-star reviews
Deal: An extra 30% off sale items, plus 50% off select items
Our Picks: A tufted duvet for $70 (and the matching shams for under $5)!!! | A super sweet waffle-knit tea towel | A serving board that’ll take your next charcuterie snack to the next level
Deal: Up to 70% off select items
Our Picks: A striped indoor-outdoor rug that reminds me of classic Em | The bed I’m eyeing for my own bedroom makeover | An oversized cocktail ottoman for all your flex space needs
Deal: Up to 60% off select items
Our Picks: These awesome California cool dining chairs | Some dynamic, show-stopping, geometric planters | These light, airy, glam nightstands
 photo by sara ligorria-tramp | from: my summer basics – it’s a circus of white and chambrayGap
Deal: Up to 50% off select items
Our Picks: A perfect lightweight dress for spring dates | This elevated t-shirt with puffed sleeves (it’s cute, I promise) | The perfect $12 white t-shirt with a U-neck that looks great on everyone
Deal: An extra 60% off sale styles
Code: WARMUP
Our Picks: This sweet, versatile chambray dress | A great quarter-zip if you’re looking to grab the Alex Mill look for less | This cocoon sweater-blazer to take you through spring
Deal: 20% off orders over $100
Code: SPREETIME
Our Picks: My go-to white button up (I have two!) | These leather sneakers for the days you want to dress down, but still want to look put together | My favorite leather belt (I own it in black and pecan!)
Deal: Up to 60% off select items
Our Picks: A textured, wool and leather floppy-ish hat (you know, in case you want to try out being a “hat person”) | These slouchy jeans by The Great | These “work-to-weekend” paper bag pants by Ulla Johnson
Deal: Up to 50% off select items
Our Picks: This unreal high-coverage concealer | This now-$3 lip tint (it’s awesome – I’m stocking up!) | A Fenty Beauty bronzing duo
Deal: 20% off select items, plus BOGO 50% off on women’s swimsuits
Our Picks: This best-selling one-piece suit with a great back | Some super cute seamless underwear with scalloped edges | These comfortable, tailore,d vintage-inspired joggers
Deal: An extra 30% off sale items, plus 50% off select items
Our Picks: Some baggy, high-waisted corduroy pants when you’re ready to channel some Gen Z trends | These on-trend checkered tights | This linen romper/shorterall that has me dreaming of summer
OKAY. Thoughts? Less photos, less copy – just the biggest hits, you know? Wanted to give this slightly-adjusted format a whirl before our big Memorial Day roundup, but I’d love to know what you think. Did you find yourself missing anyone? Is it still fun to read about all the sales available, even if they aren’t particularly special? I make these for y’all, so I’m here to serve. Let me help you!!!
In any case, I hope you have a great Monday (or day off, if you’re not working today!). We’ll see you back here tomorrow for a VERY fun farm update. xx
Opening Image Credits: Design by Jess Bunge | Styled by Emily Bowser | Photos by Sara Ligorria-Tramp | From: Jess’ Communal Patio Reveal – Beautiful Outdoor Furniture, Some Great Flea Finds, And Of Course… A DIY Dad Project
The post Our Most Curated President’s Day Sale List (So Just The Really Good Ones) appeared first on Emily Henderson.
February 20, 2022
The Link Up: Em’s All-Time Favorite Swimsuit Is BACK, Caitlin’s Most Recent MOTO Buy, And A Wildly Special Kid’s Room

Happy Sunday to all!! We’re here to say two quick things before we get going: 1. As a mostly LA-based team we’re happy the rams won the Superbowl (sorry Bengals fans) and 2. We probably won’t bring up football again until the next Superbowl (maybe). We’ve got a lot of fun links for you so let’s hop on in:
This week’s home tour is an insanely warm and cozy Melbourne treehouse-esque home. Em sent it to our team earlier this week and her exact comment was “Woah. This house tour.” There’s not much more to say beyond that because we are speechless. Okay, you twisted our arm, The WARMTH of this place. If you ever thought you could have too much wood the answer is you can’t. And this is proof.
My favorite swimsuit of all time is BACK. She is supportive, she is forgiving, she is a fun pattern that doesn’t show everything underneath if you know what I mean. It’s 1/2 one piece and 1/2 bikini. I might even get another one just in case I lose my first one – IT’S THAT GOOD. I know that every body is different but if you like a supportive bra + have tummy sensitivities I can attest that this one is great.
Framebridge created a Black Artist Shop that lets you shop awesome prints & support Black artists simultaneously. What’s not to love!?
From Mallory: This is the best vintage floor lamp dupe I’ve probably ever seen. I’m obsessed with the gentle curve of her spine, her pleated shade, and that gorgeous natural wood…the best part is she’s only $279 which is a great deal when compared to a lot of the vintage versions I’ve seen on Etsy/Chairish/1st Dibs that are $500 and up.
Also from Mallory: Do you like having flowers in your home but hate that they’re constantly dying?? For a more “everyday” floral, try these. I noticed Em had them in her house a while back so I bought some and they make me so happy every day. I hate having empty vases where flowers should be, but I hate dead flowers more, so these are great because you don’t have to deal with either problem!! Plus they look fun and whimsical and yellow happens to be my favorite color
From Ryann: I am on a quest to find leggings that don’t slip down when I do even the slightest amount of active movement. I haven’t had much luck yet except for these that I bought almost two years ago. They are pretty affordable at $50, extremely high-waisted which helps but they are also very comfortable, stretchy, yet hold their integrity well. I will probably buy a few more because I know I like them, but am open to other brand suggestions!
From Caitlin: I just ordered this tiny little glass lamp for my kitchen reveal (coming this year!) and I’m so excited that I finally found something that’s petite enough to fit on my countertop! I’ve been hunting forever for something that’s sub-11″ (my upper cabinets are enormous and weirdly close to my counters), easy to clean (wanted something that I could just dust with a wet towel!), and fairly minimal (to no one’s surprise, there’s a lot going on in the kitchen already). Can’t believe it was under $40 and pretty universally highly rated, too. It’s fun to find a great deal!!
From Jess: The time has come for my first bachelorette weekend since the before times. While I’m still a bit nervous, I’m also unbelievably excited to get my butt next to a pool, frozen cocktail in hand. Last year, I luckily got my swimsuit options dialed in (expect my god do I want this suit). So now I need to get a good cover-up. I want cool and chic. This one from Madewell and this one from Revolve seem like it fits the bill (and if I were rich, this one). Has anyone tried these or have any other recs? I’m all ears.
Also From Jess: You need to see how unbelievable this kids room is by Forbes Masters.
That’s all for this week! See y’all tomorrow! xx
Opening Image Credit: Design by Murray Barker | Photo by Caitlin Mills | via The Design Files
The post The Link Up: Em’s All-Time Favorite Swimsuit Is BACK, Caitlin’s Most Recent MOTO Buy, And A Wildly Special Kid’s Room appeared first on Emily Henderson.
Emily Henderson's Blog

- Emily Henderson's profile
- 10 followers

