
Emily Henderson's Blog, page 121
July 27, 2022
Is Organic Brutalism The Next Big Design Trend?? We Think So – Here’s The Deep Dive


The first time I heard the term “brutalist” by way of interior design was the first year I started at EHD (2016). I thought to myself “Ooo intense and very cool.” And I was right. The expressions and examples I saw back then were primarily bold, dark, raw, and lots of concrete and metals. If that’s your exact style, that’s great. At the time, it mostly wasn’t for me. But I’ve since changed my tune because now what I’ve been seeing develop and come into the mainstream are still those raw, bold chunky, geometric shapes but in warm, inviting materials…mainly natural woods with texture that really draws you in. It’s no surprise to me that it’s now a trend because while it’s not for everyone, it’s undeniably awesome. I also think that adding some kind of brutalist piece into your home makes it feel intentionally designed and honestly a little aspirational. “But Jess, I want to feel cozy in my home. I don’t need to feel ‘inspired’ while I’m hanging on my sofa.” True! However, I think having a piece…or two…or three that bring some bold visual tension can give a room that spark a lot of us are searching for. So let’s dive into a BUNCH of really cool examples, talk about why they are awesome, and then end with a little lite shopping. Sound like a plan? Great.
 via lulu and georgia
Let’s start with what actually inspired this post…this masterpiece of a dresser from the new arrivals at Lulu and Georgia. I was stopped in my tracks when I saw it and was immediately figuring out if there’s a way it could work in my bedroom (but also I’m not allowed to start designing that yet…one room at a time, Bunge). Actually, if you read my DIY cabinet post you’re probably realizing that I have a cabinet type:) But truly, after seeing this photo it hit me that this style was now a trend.
 design by vince skelly | via sightunseen
After doing some light research and talking to some design pals, brutalist architecture primarily started after WWII and focused on blocky geometric, monolithic-like shapes. And as I said before, raw concrete was maybe the biggest material used. Now in 2022, artists are taking an inspired approach, like Vince Skelly. As you can see in some of his recent work above they are indeed “blocky geometric, monolithic-like shapes” but in the most organic-looking form. They make you feel something when you look at them. Imagine the impact even one of these pieces could have in your home. For me, it would be an instant feeling of happiness.
 design by hauvette & madani | photo by cerruti draime | via sightunseen
So “organic” doesn’t always have to mean without refinement or uniform. Take these incredible stools. They meet all the “brutalism” criteria in shape but the beautiful, near joyful celebration of the natural grain feels wonderfully organic, right? I guess even the term “organic brutalism” has tension in and of itself. Yikes, those stools are cool.
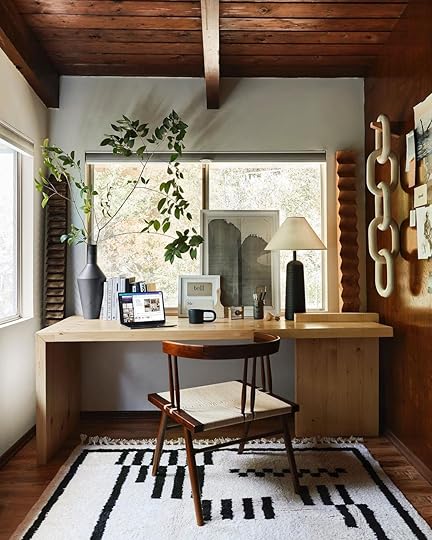 design by brady tolbert
I would be remiss if I didn’t talk about the organic brutalist himself, Brady Tolbert (EHD alum for those who started reading after his time). My love for this style is directly due to being introduced to it by him. Brady loves a neutral color palette and a bold shape. His office is a perfect example of that. Take the desk he designed, the shapes and textures of the vase and lamp, and of course those wooden wall pieces. In another material, they might feel cold and harsh all in the same space. It would still look cool, but maybe not be somewhere you would feel comfortable hanging in all day. But because they are almost all in different types of wood, it’s a very chic “welcome in”:)
 via bradley duncan studio
Now, I need to talk more about those wall art pieces. When I saw them on Brady’s Instagram I thought, “WHERE DID HE GET THOSE AND WHAT PERFECT HUMAN MADE THEM?!” That perfect human (and artist) is Bradley Duncan. His pieces are both visually simple but so so impactful. I truly could stare at them for days. He does play with color and non-wood materials but they are all incredible and still perfectly fit this style.

 design by andrés gutiérrez | via sightunseen
Now let me introduce you to another incredible artist (if you don’t know them already) that brings his culture into this style, Andrés Gutiérrez. When I went to Mexico City this past April, my friend and I happened to stumble upon Originario, a design store and were blown away. The whole space is amazing, featuring many other Mexican designers, but his work really took my breath away. As you can see above, his pieces are bold and geometric but also playful and deeply represent who he is. It goes to show you that there is always room to make something your own. I hope one day to have that table in my home!
 design by piedrafuego
Speaking of making something your own, Piedrafuego also embodies that. While working with wood, they also work with stone (a classic brutalist material). Their bold shapes and perfectly imperfect patterns, give me the same organic brutalist energy. I love all three of these pieces.
design by simone bodmer-turner | photo by annie schlechter | via curbedOk now let’s look at some pretty rooms, huh? This living/dining room belongs to artist, Simone Bodmer-Turner. Her work most definitely falls into the organic brutalist category but far more on the organic side. See for yourself:

 right photo: pieces by simone bodmer-turner, photo by jonathan hökklo | left photo: design by simone bodmer-turner, photo by elevine
But what I want to talk about right now is the subtle organic brutalism shown in the benches pictured above and below. They both feature these medium chunky slats and very simple yet geometric legs. I know it doesn’t scream “brutalism” and you may think they look like something you’ve seen before, but take a closer look. The top slats in Simone’s home sit flush with the base frame. It just has a different feel to it and doesn’t look comfortable without some kind of cushion. I think that’s another element of brutalism that I haven’t touched on. This style, which visually stunning and welcoming via the material’s character, isn’t meant to look comfortable. It’s in the name…brutal!

 left: awkward photo by me | right: photo by stephen kent johnson, via vogue
Then there’s this bench, sitting in the lobby of the new Nine Orchard I visited in NY a couple of weeks ago. I’m so bummed I didn’t get a better picture of it because it was so special in person and awesomely contrasted the elegant, almost antique style of the hotel. With this piece, the slats have varied widths and a metal base. Then adding that thick, happy yellow cushion on top connects the whole piece together with the rest of the space. That cool floor lamp also has some brutalist vibes, no?
 left: design by paradowski studio, photo by pion studio, via dezeen | right: design by kelly wearstler, photo by the ingalls, via clever
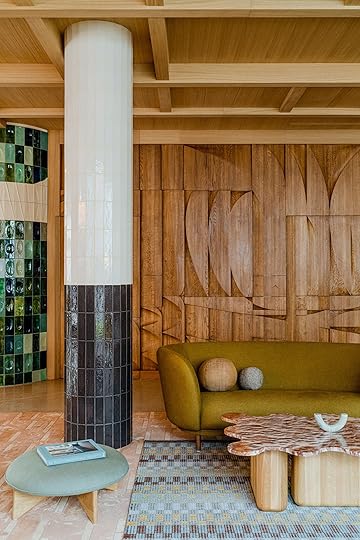
Now, it’s not just about furniture. Look at these incredible hotels. As you can see on the left, it’s not a surprise that this style originated in the 1950s. This beautiful wooden wall is very much “new mid-century modern”. There’s just enough randomness in the pattern to make it feel fresh and not a copycat of something you would have seen in a Mad Men episode. Actually, Rashida might be cooking something in this world up so stay tuned for that:)
Then to your right, you have a staircase by the post-modern, brutalist-loving gal herself, Kelly Wearstler. Notice the mix of the stacking blocks on the left side of the stairs and the exposed rise and run on the right. Both are super geometric and together look so unexpected and grand.
 design by kelly wearstler | photo by the ingalls | via design milk
Let’s now go on a furniture adventure because I couldn’t stop pinning and these aren’t even all of them. This first one is also by Kelly Wearstler. It’s not wood, but the color is strikingly happy and the shape is bold yet soft. I think it’s very cool and if you have a chance to visit The Proper Hotel in DTLA, do it.
 design by kelly wearstler | photo by the ingalls | via design milk
Here is a room at that same hotel. I wanted to point out that sweet, sorry, I mean “brutal” nightstand. It looks like fairly simple until you see the inner angle of the legs. That detail! It doesn’t have to be visually dominating to still nod to the trend. Dipping your toe if you will.
 via city furniture
With this cabinet, we are getting a little louder. Love the blackened raw wood and LOVE the concave squares with circles. 10/10.

 left: design agnes studio, via interior notes | right: via 1stdibs
A little bit louder now (shout). Ha. But seriously, these credenzas are bold and textured and actually might lean a little classic brutalism if that’s more your style.
 design by l.a. studio | via 1stdibs
This stunner really does it for me visually! Look at those angles, look at that wood grain and medium tone! I might personally prefer it without the glass top but regardless it’s awesome.
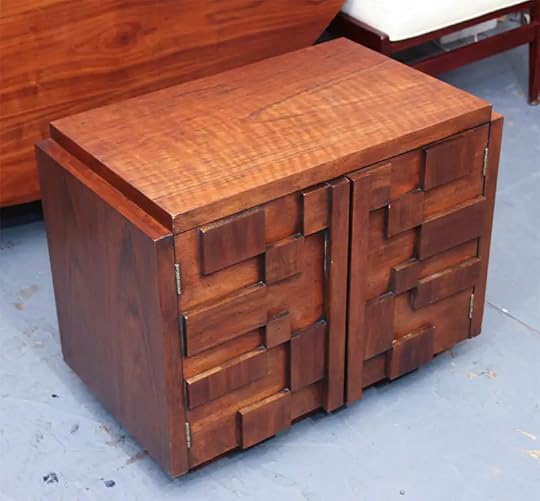
 left: via 1stdibs | right: design by modshop, via 1stdibs
Geometric patterns for days. On the left is a vintage piece and on the right is a modern version. I have a soft spot for the vintage piece and the more pronounced negative space in the pattern. If you are handy you could probably DIY something in the same world.

 right: design by laura gonzalez, photo by stephan julliard, via 1stdibs | left: design by laura gonzalez, via 1stdibs
Here’s another subtle version but those legs and dot detail are incredible.

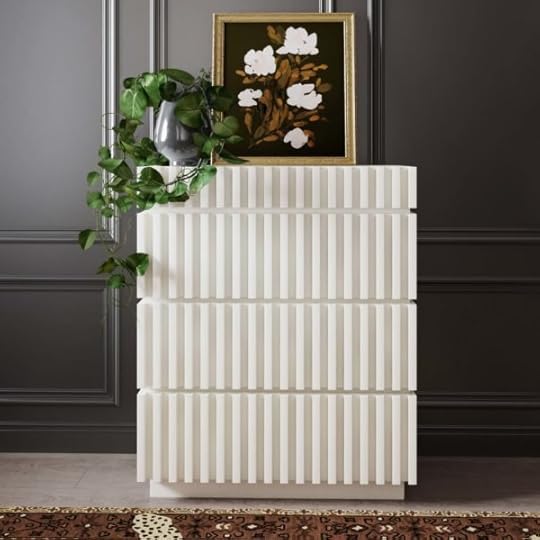
 design by carmeon hamilton | photos via tov furniture
For a more affordable but equally as stylish option, may I remind you of Carmeon Hamilton’s line from Tov Furniture. I love that it toes the line between postmodern and organic brutalism. That white dresser could work with any style and add a perfectly bold moment.
 design by loïc bard | via radnor
I just couldn’t not add this masterpiece. “To me, you are perfect”. All shape, all material, all emotional (me, not the credenza).
So while a lot of these pieces I just talked about are available for purchase, here are some more options I found:

1. Ventura Notched Tall OakBookshelf (not totally organic brutalism but great for a little taste) | 2. Plinth Wood Legs Buffet (a hint of MCM in the most organic version) | 3. TriAngle Stool (very simple, very modern, very cute) | 4. Albie Oak Wood Console Table (the definition of organic brutalism and I love how the two pieces fit together) | 5. Huron Nightstand (love that shape and wood tone) | 6. Knot Rustic Sideboard (another subtle option that’s super versatile)
Ok, so I know those weren’t the most affordable. Honestly, you will likely need to hit the flea markets, thrift shops, and online secondhand options for budget-friendly options. BUT don’t forget about decor! Smaller, less financial commitment, and more affordable. I wish this style/trend was cheaper!

1. Willa Black Woven Leather Baskets (love the unexpected black leather and woven pattern) | 2. Marble Dish (I’ve almost hit add to cart 4 times! this is SO good) | 3. Cassius Compotes (cool, earthy, and chic) | 4. Floor Lamp (subtle but so pretty) | 5. Racco Wall Decor (Set of 2) (love the 3-D dimension and these would add so much character to a wall) | 6. Cyril Decorative Sconce (very cool and sexy).
So. Whadda think? Again, I know this will not be for everyone and by no means do we think everyone must incorporate this style/trend into their home. BUT if it doesn’t intrigue you go for it! Talking about/being introduced to new designs is fun and that’s what we are here for.
Love you, mean it.
Opening Image Credit: Design by Simone Bodmer-Turner | Photo by Annie Schlechter | via Curbed
The post Is Organic Brutalism The Next Big Design Trend?? We Think So – Here’s The Deep Dive appeared first on Emily Henderson.


July 26, 2022
How I’m Designing Our Kid’s Rooms Differently This Time (Things Have Changed…)

One of the occupational hazards of my job is that our kids have gotten spoiled with stupidly cute Pinterest-perfect rooms since the day they were born. They just popped into the world with animals wallpapered all over their rooms and carefully curated gallery walls. So easy! We are all EXTREMELY lucky and privileged, and while it’s not their fault, our kids have NO idea how much work, time, and money it takes to pull together a room. Before the pandemic it was different. I was so busy and had a team of designers that helped me with my own house. Emily Bowser and Julie Rose created the tent bed at the mountain house. Shade installed the rock climbing wall. Julie drew and executed the blue and white canopy in their last shared room. I remember crying in the shower, reaching a breaking point thinking “I don’t have time to even decorate my own kids’ rooms”. And yet there was immense pressure both internally and externally to have their rooms done, perfect, styled, shot, published, and praised. I was so embarrassed that they were both sleeping on mattresses on the floor for a couple of years that I stopped inviting anyone over that wasn’t a very, very, very close friend. I was so sick of apologizing. I actually didn’t mind showing you all on the internet, but if friends of friends came over I would have anxiety due to the expectation. The pressure was real and just so dumb (and trust me, people did judge and I don’t blame them). Even if it had been just me designing their rooms they were young, in school, and never really saw the hard work that it took to make a room beautiful. They were 3 and 5 then and now they are close to 7 and 9. Things are different. And I’m in such a different place physically and mentally.
 photo by tessa neustadt | from: elliot’s nursery update
Recently we watched the show Get Out Of My Room where siblings design each other’s rooms with the help of a team, and surprise! A new totally dialed-in room. It’s pretty darn fun for the whole family and the designs were super cute – if not totally far out. Afterward, they both had a massive list of ideas and design elements that they wanted for their rooms. Once again TV has made things look so easy and attainable. “Oh really??!!!,” I said. “And who is going to do all of this, and how are we going to pay for it?!!!” I think we all know how they would have answered, “Uh, you” but they were smart enough to not answer. As a mom who grew up not financially privileged, knowing that I’m responsible for their entitlement is a real bummer and has forced a change in how we do life.
I honestly haven’t really thought about their rooms at the farmhouse until now because I was too swamped with the renovation to think about decoration. We weren’t sure if they were sharing or not and still aren’t. During the day they both want their own rooms, but at bedtime, they say “we aren’t ready”. Right now they want to start with two full beds in one room, knowing that within the year once they get used to the house (and get over the fact that our room is so far away) they’ll separate. Another reason that I haven’t started their rooms is because I want to take my time and enjoy the process with them. Imagine that! And now that we are getting closer to moving in, our kids are talking about their rooms more which is what I needed to get excited. So here is how we are going to do it this time:
Find A Jumping-Off Point We BOTH Love photo by tessa neustadt | from: a baby girl’s blush and green nursery
 Now you don’t always have to have a “Jumping-Off Point” but with kids (and those of us who are ADHD), they can be all over the place and change their minds constantly with the newest shiny thing. I get it. Finding one thing, whether it’s a piece of furniture, a pattern, or a theme and then trying to keep everyone aligned with what we originally all loved I think helps. For Birdie, it was her wallpaper (which you’ll see this week) full of tons of colors for us to pull from. Such a relief. For Charlie, it was his vintage “net” chair, again full of colors and a vibe that gave us both good ideas for his 80s concept. I’m not going to be strict about it or anything, but knowing that they love these two design elements a lot gives me a sense of where we are headed, and then I can show them how to pull colors for the rest of the room to work with what they have chosen. Almost like the now restricted color palette was their idea.
Ask Them Their Opinions And Ideas Away From The Internet
 photos by david stay | from: charlie’s circus themed nursery
 I’ll write about it later this week but because of how ads have taken over every. single. platform, if you put in any theme for a room, even on Pinterest, it’s all product or moving videos. So guess what they want? New stuff and to watch annoying ad videos. So yes, I’m asking them all the questions and getting answers like “glow in the dark”, “boom box tech”, “disco sparkles”, etc. But then I’m going to find the good versions of those ideas and pitch them back to them. Otherwise, they see a lot of garbage and want it.
Curate Before You Show And Tell photo by tessa neustadt | from: charlie’s big boy room reveal
I’ve made this mistake so many times thinking somehow we are aligned in our likes and dislikes. WE ARE NOT. Their ideas aren’t bad, but I’ve found that naturally, they choose the loudest versions of them, which I don’t think have longevity. When I gave them the whole paint deck to choose colors they somehow both found the colors that hurt my eyes. I’m not a monster and want them to have those colors, but there is a “good” version of every color, even neon green and bright purple (I hope, dear God, I hope). So now I show them curated chips instead of the whole fan deck – especially when we are talking about painting Birdie’s bed. Kids are the opposite of refined – as they should be! And I don’t want them to dislike something in a year as they grow. I think it’s ok to think about longevity and not dive too deep into colors, themes, or characters they may not love in a few years. Finding that balance between fostering and forcing is hard 🙂 Also, I’m not going to show them every option – I found this dope vintage architectural white metal lamp on Etsy the other day and showed Charlie, and he loved it. If I had shown him all the vintage lamps on Etsy he might have liked other ones more, and frankly, until it’s their money I’m only buying things that I know will go in our house well and for a long time. He’s happy and I’m happy.
My Secret Strategy For Family “Treasure Hunting” (Thrifting)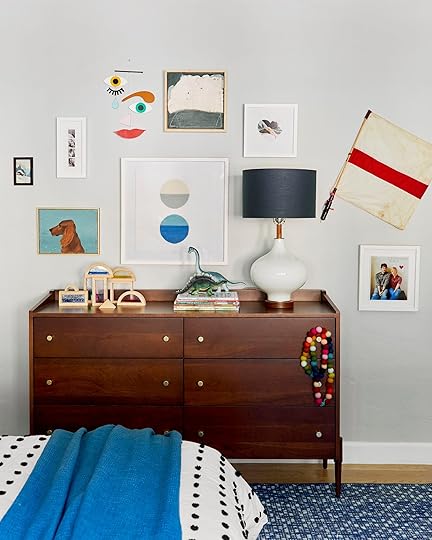 photo by tessa neustadt | from: our boy/girl, 2-twin bed shared kids room
Ok. I know I started this post talking about how I have spoiled them but here’s my rationale for this: Kids don’t like the act of “shopping” without buying and I get that. But thrifting/vintage shopping is my favorite thing to do and I really, really want to do it with them. I tried telling them to bring their own money but understandably they don’t want to use their car wash dough on “old stuff”. So, for my birthday last year, I took Birdie to Aurora to go shopping for her dollhouse (Kinder wasn’t in school yet, Charlie was), offering to buy her antique dollhouse furniture. Once she knew that she was going to be able to walk away with something, she LOVED going in and shopping. It’s just getting them in the door that is hard. In order to cultivate shared interest they need to feel the whole experience and at least have the potential to walk away with something. Brian buys them tickets to professional soccer games and Dodgers games, spoiling them with cotton candy and soda because he wants to have that experience with his kids. He wants them to love sports so he can do that with them. This is the same thing. The whole experience basically serves as a bribe for them to enjoy it. And gosh darn it, it’s working. So yes now I either give them $5 or $10 (depending if we are at a thrift store, garage sale, or antique shop) so they actually have fun. Or if we are talking about their room then they know that if there is a lamp, pillow, or furniture that I also like and is a good deal (which is hard to explain), I’ll buy it for them. I am planning a future dream Paris flea market trip with Birdie – I need her to LOVE antiquing. Charlie was harder because he picked up Brian’s not-so-subtle opinion of antiquing, thinking that it’s a “lady mom” thing. But Brian shifted his outward opinion, I rebranded it as “treasure hunting” and it’s been much more fun ever since. Charlie has found old binoculars, pocket knives, and that cool basketball net chair I was talking about earlier. He’s still not as into it as Birdie is, but he doesn’t mind going. I also give them my phone and tell them to take pictures of everything they love, knowing that we likely won’t buy any of it but it gives me a good idea of what they like. This keeps them VERY engaged and feeling seen/heard and part of the design process.
Buy Used When Possible So They Start Getting Into That Habit And Understanding Waste + Budget photo by tessa neustadt | from: elliot’s nursery update
We mostly go to antique malls in Oregon because the thrift stores are honestly so overpriced and picked over. Recently we went garage sale-ing, which was SO FUN but as you can imagine they came home with 10 pretty disgusting stuffies each (people were just giving them away but I didn’t want to say “no” because we were having so much fun). Not everything can be “used” (like bedding and towels) but we are shopping vintage and second-hand first for this house and I’m just not really showing them anything new unless we can’t find it vintage. Also, if you try this, lower your expectations. It’s not perfect, they won’t last long shopping and there still might be arguments. But to me, it’s absolutely worth it to share my favorite hobby with my favorite people. Plus we are teaching about how much better it is for the planet, how much further our dollar goes.
Have Them Help DIY Their Own Art, Textiles, & Accessories photo by sara ligorria-tramp | from: our boy/girl, 2-twin bed shared kids room
I have a whole post planned on what I want to DIY with them because I figure the only way for them to understand how much goes into making things is for them to start making things themselves. Their concept of money is hilarious and understandably they think we can just spend anything on anything. Again, I know this is my fault. So my hope is to engage them in a lot of DIY projects together (upholstering headboards, making art) and obviously that will be SO fun for me. I also totally recognize that most moms don’t have this kind of time, but I can set it aside because it’s still “work” and of course, I’ll be documenting them. So please don’t feel bad if you don’t have time to do these DIYs with your kids.
They’ll Help Paint Used Furniture In Their Bold Colors photo by sara ligorria-tramp | from: our boy/girl, 2-twin bed shared kids room
They both want super bright bold colors which I think is VERY fun. I was Charlie’s age when I started 4-H and refinished my first piece of furniture. So if they are interested in using crazy bright colors that I don’t know if they’ll love in 5 years then they’ll help paint used pieces of furniture. I’m definitely not paying someone to paint neon dressers. That we will do ourselves. I have no idea if they are ready for the patience and hard work that comes with refinishing, and this plan might totally fail, but I think I can get them to engage enough to help (even if I might finish). I also know I am being super naive here and things aren’t going to always go well. But this is my intention 🙂
Foster Their Creativity, Not My Ego from: our kids attic playroom update
I let go of the idea that their bedrooms would be in my “Scandinavian shaker farmhouse” concept months ago. Their bedrooms aren’t “mine”, and it’s so exciting to see them engaged in wanting their personality in their room. I really, really want that for them. While I love how our mountain house has a really cohesive concept, they just don’t want it. They want loud, bright, and messy and I get that! I did, too!!! This is why the DIY part of it will be important because even if it doesn’t turn out well, at least there was some learning and bonding along the way. So I’m literally just trying to say “yes” as much as possible and then tweak and supplement where needed.
I’m Keeping My Expectations Low And Flexibility High photo by sara ligorria-tramp | from: our boy/girl, 2-twin bed shared kids room
This is likely not going to turn out as well as I want it to – not the rooms. The rooms will likely be great, but this whole experiment of heavily involving them won’t be easy. I’m sure there will be some battles. I’m not naive to that. We’ll both have to be flexible and compromise. They understand that this is my job and my job pays for everything in their life, so if they want to buy a $9 Frozen Elsa lamp, they will have to spend their own money on it. But it’s hard! I want them to express themselves creatively without battling with me, and not creating waste. That might sound harsh if you don’t have kids but if you do, you know that between their concept of money (zero. zip.) and what they like (everything branded and tacky), you have to edit them a bit in order to not contribute to waste in money and landfill. That’s why not giving them the option of the internet or new stores so at least it curbs that a bit. For now. But also y’all, this is my first rodeo doing this with them and I’m going to make a million mistakes. My goals go in this order: A. Have fun together, B. Foster their creativity, C. Create rooms full of good ideas that might help you, and D. Subtly teach them the value of hard work, longevity in design and money. I think I can say what you are all thinking real quick: GOOD LUCK, EMILY!!!!
Opener Image Credit: Photo by Sara Ligorria-Tramp | From: Mountain House: The Kids’ Room Reveal!!
The post How I’m Designing Our Kid’s Rooms Differently This Time (Things Have Changed…) appeared first on Emily Henderson.
July 25, 2022
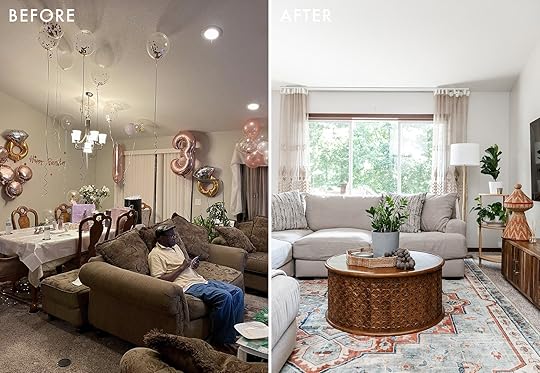
How Lea Created A Warm & Inviting Living Room For Her Neighbor’s Multi-Generational Home

What does multi-generational living mean? By definition, it refers to several generations of a family living in or on the same property while sharing responsibilities such as cooking, bills, tending to children, and other household responsibilities.
As someone who comes from a very small family (ahem, only child here), I’ve always romanticized being surrounded by a large family and often envied families who have a strong family dynamic. Our next-door neighbors being one of them. After years of friendship and a giant multi-household water fight one summer that included everyone running through each other’s homes, ducking and dodging water balloons, we’ve formed a beautiful bond and a beautiful mess. Some of you have probably seen our neighbor’s children on my Instagram feed because they have become our extended family and it’s been a joy to watch them grow from the babies they were when we first met them. Our neighbors immigrated from Ethiopia with their children (now adults) and now also include their grandchildren (first generation). Their household consists of Mom and Dad (or aka Grandma and Grandpa), their daughter, whom we’ll call “H” here, her husband and their two children, H’s sister, as well as their Aunt and Uncle with their children).
After the pandemic, I was so ready to get out of my own four walls and work on a creative project but one that felt sentimental to me too. That’s when my neighbor “H” and I were chatting about their own home and how SHE was ready for a change. Simultaneously, Slumberland Furniture also reached out to me to work together and the timing couldn’t have been more aligned! I’ve worked with Slumberland Furniture before on a couple of projects, I love that they’re a family-owned business, and thought to myself this would be a perfect collaboration since this project is all about family.
“H” was ready, like so many of us, to freshen up their home after over a year of isolation and was looking ways to modernize their living space. My challenge? How to create a comfortable and beautiful space for everyone while also remaining functional for their large family needs and also not just tossing out Mom and Dad’s existing pieces.
Here’s what the space looked like before we got started:
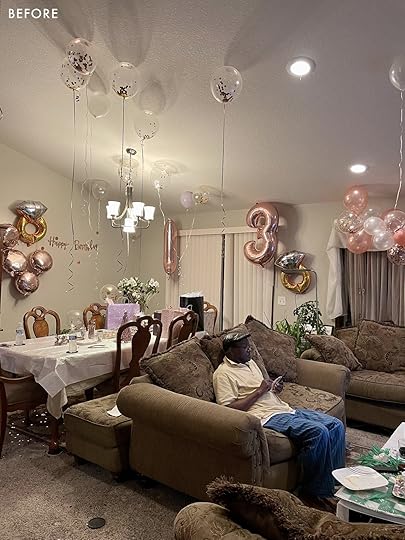
Even sans a 13-year-old birthday party filled with balloons, the space felt crowded and the large rolled arm furniture didn’t allow for the best furniture placement and flow. So I began by putting together a mood board to envision how we could make the most of this shared space.
Moodboard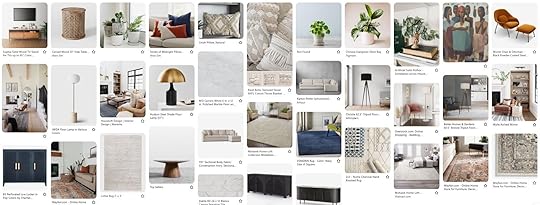
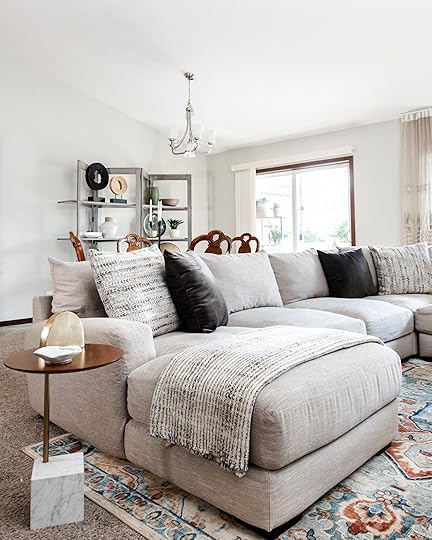
When I spoke with “H”, she shared her main priority was to figure out a better seating arrangement. After measuring, together we selected a sectional sofa for its comfortability for Dad (aka Grandpa) and also for large family gatherings and lounging. It instantly brightened the space and created a solid dimension and flow. We also selected a rug because their previous rug was really tiny and “H” felt it was important to bring in a fresh color. Oftentimes, family or the kids are playing on the floor so we really wanted the rug to feel comfortable as well. I really love how it added some blues and terracotta colors to this room. Designing a space with multiple people and generations in mind as the primary focus also meant that Mom (aka Grandma) needed to feel like it was still their home and not just a space we flipped upside down on her. Bringing in her love of warm wood tones helped create their aesthetic balance and when Mom first saw the pieces coming together she fell in love so my heart was truly full.

Sectional | Rug | Coffee Table

Coffee Table | Lamp | Rug
Side note: This coffee table was also selected for easy maneuverability when larger floor space is needed, as you’ll see later.

Media Cabinet | Sectional | Diffuser | Ceramic Candle | Gold Candle
Having a large-scale TV in the space was also important but to keep it from feeling like it was the focus on this wall and floating aimlessly, we selected this media cabinet that would pull double duty – it provides surface space, anchors the TV from “floating away”, conceals tech and kids toys/games while also keeping the warm wood tones that Mom loves so much. This media cabinet worked great since the TV above it was so large, the length was the right proportion and its modern scale also didn’t take up too much real estate. Previously the only light source in this room was the canned lighting in the ceiling so popping in a brass floor lamp just felt right for not only some visual height in the corner but also some nice reading light in the evening. The curtains were custom made in Ethiopia and they are GORGEOUS, previously hung a little too low on the window (a common design mistake but one that is easy to fix) “H” installed a track on the ceiling as a great way to raise them right up to the ceiling.

Bookcase | Ceramic Bowls | Mojave Candle
For styling, I kept pieces more minimal here but I have no doubt this shelf will hold many lovely botanicals in the future. I also love that it added a focal point to this wall (where there wasn’t any previously). It also adds functionality and a display space for H’s growing plants and artisan-made home goods from Ethiopia like this woven basket.
While onsite installing/styling and shooting their home, Auntie “Z” offered us their traditional coffee, and let’s just say this was not out of a Keurig. Later informed by “H” that it is customary to offer coffee, tea, fruit, or homemade bread to guests in their home. Ethiopia is also known for its spectacular coffees and Auntie “Z” was ready to share with us the traditional way of making Ethiopian coffee.


You start with roasting the beans on the stove over a flame, which creates a little bit of smoke. Once fully roasted or close to being done she will walk around the room to the guests or people sitting around the room waiting for the coffee and splash just a little bit of water in the pan to create a lot more smoke. This is done so that people can enjoy the aroma of the coffee, she will even waft it towards guests to really get a good experience and it shows appreciation for the person making the coffee. The beans are roasted at different levels which can really dictate the taste.

The beans are then ground and put with water into a coffee pot known as a Jebena and boiled over a low flame.

Once settled, the pourer (there is only one) will start prepping people’s coffee, milk, sugar, and sometimes a fresh Rue (herb) as a garnish in the coffee.

Only one person pours and you do not touch or pour that person’s coffee.

What I loved most about this tradition is not just the experience they shared but that this is used as a form of what is referred to now as “self-care”. A moment to relax and continue to become a community or a tighter family unit. Family and community are very important in the Ethiopian culture and although everyday lives are busy, ensuring this tradition of connecting remains a top priority on the weekend. I loved that. Maybe that’s what we all need in our lives, prioritizing building family and community bonds. There’s a lot to be said about this in today’s world and much to be learned, I think.
So how do you design a living room for multi-generational living? I truly don’t have a definitive answer to that question because every family structure is unique. The best answer I can give is to prioritize shared space that each family member can enjoy individually and together. Thinking back on my own family and the financial struggles and stresses of balancing work with babies/children I would have LOVED having the support of a multi-generational household. There are so many positives to this family dynamic that I am surprised it hasn’t become more of the norm here in America. (I see you, rising costs and inflation). Maybe it should be? Unintentionally, I’ve been communicating (fine, maybe drilling into their heads) this sentiment to my own two children, now young adults (23 and 24), and how I don’t ever want them to leave. I want them to bring their families to live here in our home and allow me to help raise children should they choose to have any. Anyone who knows me knows I’m in no hurry whatsoever to be an “empty nester”. In fact to me, that sounds quite depressing. What is the point of having a beautiful home with no one to share it with or to enjoy and live in it? To create those beautiful messes that (speaking from my 40-something-year-old self) disappear in the blink of an eye.
I cannot thank “H” and family enough for allowing us into their home and sharing such a beautiful tradition with us. And also a huge thank you to Slumberland Furniture for helping us create a beautiful living room fit for multi-generational living and for supporting our story.
*Design by Lea Johnson of Creekwood Hill
**Photos by Sage E Imagery
The post How Lea Created A Warm & Inviting Living Room For Her Neighbor’s Multi-Generational Home appeared first on Emily Henderson.
July 24, 2022
The Link Up: Emily’s Most Loved And Healthy App, Jess’ Renewed Love For A 90s Hair Tool, And Possibly The Coolest Mop Of All Time

Happy Sunday and welcome to this week’s Link Up! We hope you had a great week. How are you all liking the farmhouse content?! This week Emily talked about her bedroom and pantry updates in case you missed them. Don’t worry we have more farmhouse fun coming up but before then let’s get into these links:)
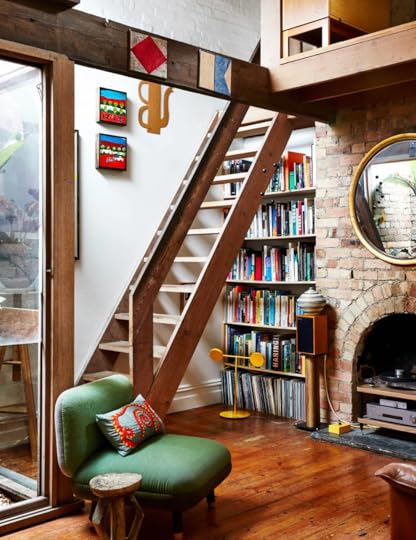
 design by jordy van den nieuwendijk and kate isobel scott | styled by annie portelli | photos by caitlin mills | via the design files
This week’s house tour is an awesome rental of two colorful and bold artists via The Design Files. We love the contrast of the rustic, more organic permanent features with all of the colorful, trend-forward decor. There is just so much to feast your eyes on and is another example that just because you live in a rental doesn’t mean you can’t make it yours.
From Emily: I just want to shout out Apptiv – The workout app that I’ve now been using for 4 years and continue to sing its praises. Y’all this app is so good because it’s all levels, all durations, all different types of music (or your own), and all styles of workout with excellent teachers that are SO FUN. I’m on a big workout kick-up here (I do it on a dock and then jump in and start the day feeling GLORIOUS). I’ve had tons of friends/guests come to visit and many of them aren’t into a huge workout on their weekend away, which I get. So somedays I’ll do a 45-minute hard HIIT or strength training (Akeem is my guy), other times 24-minute yoga (with Jade or Jenny), or really challenging but simple Pilates. It’s audio but there are photos or videos of the move on the app if you are confused (they generally explain it VERY well). Sometimes I’ll just do a 17-minute yoga that totally resets me in the middle of the day. They even have walking, running, spinning, and meditation (that I haven’t tried yet but should). The reason I’m linking it up again is all my friends/family who I’ve forced on my morning ritual have asked about it because they love it. I think it’s the sheer variety and ease that keeps me coming back (and I’ve tried so many workout apps or programs).
From Jess: While I was getting a drink with my friend last week, she casually mentioned that she and her two friends started a woven bag company, All Hand Woven. NBD! I got to see their lilac zig-zag crossbody pouch in person and it’s so cute. It’s the perfect small cool person bag and would be an awesome gift for well, anyone but absolutely the younger people in your life. Here’s a little more about them: “We are a group of 3 friends working in the home industry, who were inspired by our global travels together and work with artisans and hand-crafters. Our first few items are modern & colorful phone pouches all handwoven using sustainable raffia in Madagascar by our women-owned factory. We are also proudly a women, Asian, and Black-owned brand ourselves!” As a fun add on here is a great discount code: AHW25 for $25 off.


Also From Jess: We still are going to do a post about The Meridian Experience (just waiting on photos) but I have a fun story and hair hack I want to share with you from it. It was on the last day of the conference and I asked a woman who I had yet to meet about her STUNNING ponytail. I am unfortunately someone who does very little with her hair but am never not intrigued by cool styles! Anyway, Ellie was incredibly sweet and gave me the rundown on how she achieved this hairstyle. The real twist was that she uses a TopsyTail! Yes, you read that right. The other gals and I begged her to do an online hair tutorial. To my absolute surprise and delight, she made it and posted it last week! So if you have long hair and want a really pretty style option here you go🙂 Thanks again, Ellie!!
From Mallory: I needed a new mop desperately (my $5 CVS one from 3 years ago just wasn’t cutting it anymore). So when I stumbled upon this I HAD to try it out for myself. It’s a 10-in-1 which is hilariously functional but basically can steam clean anything from your clothes to your bed to your shower doors to your floor. I’m obsessed.

From Caitlin: AH. I’m going to recommend my new favorite thing (with the caveat that you should absolutely try to find a used version before purchasing a new one): last month I bought this $11 shirt folding board and it is EXTRAORDINARY. I’ve literally never been so excited to do laundry in my life – there’s something SO relaxing and exciting about getting a uniform fold size EVERY TIME. It’s exponentially increased the amount of storage in my dresser when combined with my drawer dividers (I swear by these in particular – just slide them in, adjust as needed, and you’re done). It’s so fun to use that I like, actually WANT to haul my stuff down the street to the laundromat even when it’s a million degrees outside. I’m including a photo of my current “ice skating tops” drawer (very specific, but it’s definitely the bulkiest/most packed part of my dresser!) which is by NO means Kondo-perfect but IS waaaaaay more functional than it’s ever been in the past. I LOVE IT A LOT. (Also, if anyone in your family struggles with hand dexterity, this may be an awesome tool to keep them feeling independent!!)
From Ryann: I often forget how much I love a body scrub until one weasels its way back into my life. And by “weasel” I, of course, mean when one catches my eye online so I purchased it impulsively. So as I was browsing online and saw an influencer recommend this one, I felt trapped and forced to buy it. It came in the mail yesterday so I finally tried it and OH BOY is my skin softer and more glowy than ever. My skin is dry and I often forget to apply moisturizer on my arms and legs so because this scrub has lychee and almond oil, my skin is also getting the hydration it desperately needs. Oh, and it doesn’t have a strong scent which I prefer, and instead has a very subtle fresh scent.
That about does it for today. Have a great rest of your Sunday and see y’all tomorrow!
Opening Image Credits: Design by Jordy van den Nieuwendijk and Kate Isobel Scott | Styled by Annie Portelli | Photo by Caitlin Mills | via The Design Files
The post The Link Up: Emily’s Most Loved And Healthy App, Jess’ Renewed Love For A 90s Hair Tool, And Possibly The Coolest Mop Of All Time appeared first on Emily Henderson.
July 23, 2022
I Asked 5 Moms With Older Kids What “Back To School” Stuff Their Kids Love/Use And Here’s What They Said

Our kids are still young, going into 1st and 3rd grade at a public school where everything is provided for them (besides a backpack) so I felt like I had zero authority on what “school supplies” or “back to school” stuff kids really love, need, or use. So I asked my three best friends with older pairs of kids and two of my sisters (9 kids amongst those two), and it didn’t stop there – they asked their kids. So this is a real crowdsourced post coming from not just moms, but directly from the kids. We wanted to feature useful, practical stuff, of course, but also what makes kids really excited to go back to school. What are the things that they’ll look forward to using or showing off? When I was in junior high I would have sold my brother’s left sausage pinky for a pair of authentic Keds (the blue sharpie on the back of the Payless white shoe was fooling no one), but what is it now? This isn’t a fashion post though – yet 🙂 Although I’m guessing it’s literally what we wore in the ’90s 🙂 Today is more supplies, necessities, tech, and decor. Let’s go!
Actual School Supplies
1. Pencil Case: These come strangely well reviewed. Kinda makes me want to try one 🙂
2. The Best Pencils: From my friend Megan (and the entire internet) “You just can’t have too many pencils at home and at school. Presharpened is key. These ones are the best and the erasers actually work”.

1. Gingham Notebooks: I mean this is a CUTE notebook and I’m sure Birdie would squeal if she saw it.
2. G2 pens: Two solid recommendations for these boring-looking pens because of how well they flow. I’m listening.
3. Double Ended Highlighter: There are a lot of highlighters on the market these days (including the three below), and I’m a big highlighter person myself so we found more that we loved for you.

1. Mini Highlighter Set: Mini, adorable, looks like you can attach them to a highlighter keychain?
2. Yoobi Highlighters: Also mini but more variety and better if your kid isn’t into cute animals on their highlighters.
3. Flower Highlighter: So cute, a great message for a daily reminder, and you have all your colors in one place.

1. Elliot would LOVE this stacking crayon set (and for $4 I feel like its a sweet little gift)
2. Highlighters: Pastel? I have not tried these but I love the idea of them.
3. Le Pen: Hands down my favorite pen to look at, hold, and write with. It’s not a “fast flower” per se but teens like how they look/feel, too.

Last year we bought monogrammed from Pottery Barn for both of them and plan on using the same ones. I do appreciate how PB has many different sizes. Birdie has and loves this one (#1) and Charlie loves this one (#2) (both on clearance, by the way)

1. Backpack for Laptop: It looks cool, just utilitarian enough, fits a laptop, and comes in A TON of color options – our friend’s daughter has the pink version.
2. Classic Backpack: Who doesn’t love a good ole JanSport backpack? Big enough for big binders and laptops

For sporty kids, getting a backpack that fits their ball is helpful. They can keep track of all their stuff when they go to practice.
1. Nike Elite Pro Basketball Backpack: This fits a basketball and looks super cool.
2. Wunderlust Backpack: A little pricey but does a ton. Has a padded pocket for a large laptop, interior pockets for sweaty clothes, side pockets for water and other accessories, and adjustable straps for a yoga mat. Overall a backpack that will be useful for a long time.
3. Athletico National Soccer Bag: So awesome that their cleats fit in the bottom. This is probably normal but new to me and I’m into it.

1. Hydroflask Water Bottles: I think this year we’ll splurge on these. We have the grownup ones and they are our favorite.
2. Stanley IceFlow: SO MANY people recommended these. I think they just influenced me into getting one myself.

1. Hydro Flask Lunch Box: A splurge that will last years and years. Two moms recommended it to me.
2. 4 Pack Bento Lunch Box: We have one similar to this – awesome for separating fruits/veggies in lunches.
3. Thermos Food Jar: Soup lunches here we come 🙂
Oh man, would I love to go back in time and decorate my locker again. I would do temporary wallpaper (contact paper), tons of photos of my friends and then a ton of paper or silk flowers and butterflies (below). Also, all the stickers are great for water bottles and gets them excited to mark their own. Besides clothes, I think that the stickers are what is going to get our kids excited this year.

1. Glam Locker Kit: All magnetic and all cute! Just a fun way to keep their locker organized.
2. Checker Peel and Stick Wallpaper: Trendy but classic so I think it’s a great option (especially if you throw some stickers on it:))
3. Locker Oval Mirror: Yes. A mirror is never not helpful for a last-minute face check. Also, this one is pretty stylish if you ask me.

1. Magnetic Rainbow Cork Board: This would absolutely make me smile every time I opened my locker.
2. Hanging Locker Organizer: This is seriously cool and every locker should come with one. To think I could have been so organized back then.
3. Flower-Shaped Cork Board: These crack me up (hey 90s!) but they are also very cute on VERY on-trend.

1. Vinyl Transparent Reusable Flower Stickers: I love these realistic-looking flower stickers that you can reuse. So fun!
2. Peel and Stick Butterflies: I would bet a lot of money that if Birdie had a locker these would be first in.
3. Flower Vinyl Stickers: This pack comes with 200 stickers! Your kid could cover everything they own in these which in my opinion, the more flowers the better:)

1. Fun Stickers: Ha so this is a thing I didn’t know about but OF COURSE it gets them excited. Vinyl stickers (that don’t get ruin things I presume) to decorate lunch boxes, water bottles, and lockers.
2. Motivational Vinyl Stickers: My dad’s motivational posters throughout our ENTIRE HOUSE surely left a mark on my adult love for good versions of these. You can never start too young.
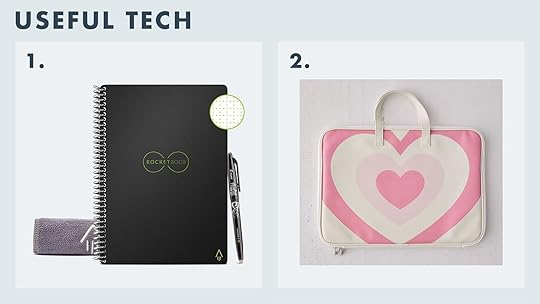
1. RocketBook: Seems high tech but everyone is talking about it. Digital notetaking. Less wasteful, super easy, and automatically uploads and stores. Also comes in a bunch of colors and is only $20.
2. Laptop Case: I can’t imagine having a laptop as a teen, but if I did I would surely need a case to protect it.

1. Gizmo: We are wondering if this is the year we get these. We are waiting till the very very last second to get a phone (hopefully 8th grade) but many of my like-minded mom friends have Gizmos for their kids. A great alternative to phones that provide texting and calling to a handful of restricted numbers, GPS, and that’s it. No social media. No games. Just location and some communication. Not sure we need it yet but I’m into it.
2. Sports Watch: Before you have kids you don’t understand why families have clocks everywhere. This is why. We might try the watch this year to give them more responsibility in a fun more grown up techy kind of way (y’all opt away from the watches with games, they are garbage and just suck time, trust me).
3. Apple Watch as a Phone Alternative: For older kids, Apple now has a feature where you pay for a phone service through the watch, but no iPhone. So they can call/text from their own number with their friends without getting a phone. Seems like a lot of junior high kids and even high school are opting for this (and by opting, I mean parents are opting).

1. Portable photo printer (For High School): These can be splurgy but I think it’s a great gift for a tween or teen to be able to print out photos for locker or binders from their phone is pretty darn fun. Two of my mom friends said their teen girls loved these.
2. Portable Power Bank: For the teens who, ahem, forget to charge overnight? Not sure they can even use their phone at school but I was told it’s a good thing to have so we included it here.
Sound off in the comments with recommendations PLEASE. I feel like you can do online research til you want to cry, but really other moms (and kids) give the best advice.
SIX WEEKS LEFT 🙂 (Oregon starts late so we can enjoy a long and well deserved summer :))
xx E
Opening Images Credits: Design by Pricilla Frost and Emily Henderson | Styled by Emily Henderson | Photo by Sara Ligorria-Tramp | From: A Teen Bedroom Reveal! + 7 Budget-Friendly Ideas Gen-Z Loves
The post I Asked 5 Moms With Older Kids What “Back To School” Stuff Their Kids Love/Use And Here’s What They Said appeared first on Emily Henderson.
July 22, 2022
17 Incredibly Cool DIYs And IKEA HACKS That Will Make Your Home Feel Extra Special (All Levels Welcome)

The internet and the people on it continue to blow my mind when it comes to design DIYs. Every time I attempt a DIY project I am overcome with admiration for the people that do the all of the time (I tend to bite off too much each time, ha)! But I also get it. The feeling you have when you are looking at your completed project is unbelievably satisfying. And honestly, we are all far more capable than we give ourselves credit for. So if you’ve been in the mood to DIY we have 17 awesome ideas for literally every level of DIYer, I pinky promise. I will say that most of these ideas are neutral-toned and trend forward. However, if white and beige aren’t your thing, you can mix it up! There’s no law that says you can’t pick the colors that work for your home, right? Okay, let’s dive in with one of my personal favorite DIYers, Luke Arthur Wells.
IKEA Vertical Cabinet By Luke Arthur Wells
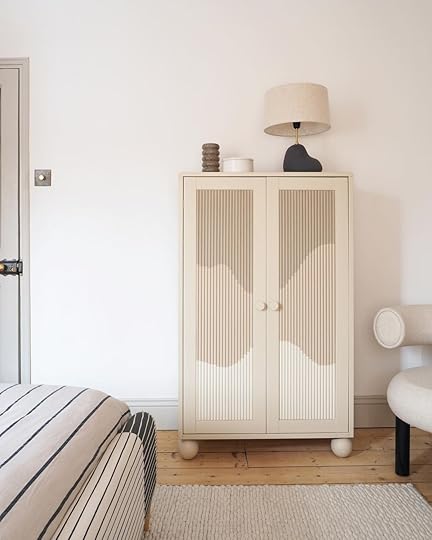
As I just said, Luke is one of my favorites. Every project is so freaking chic and beautiful and this IKEA vertical cabinet is yet another example. I love the beige tone, the ball feet, and the textured doors. Now if you love this idea but want a green cabinet, go for it! Maybe you prefer a different door pattern or no pattern at all? The world is your DIY oyster. So while this project may require a little time (especially if you want to paint a pattern:)), this is a super cute DIY IKEA hack. Here is his step-by-step process.
DIY Faux Floating Shelves By Jaclyn Quinones Of Crazy Life with Littles


NO MORE WIRE SHELVES!! Juuuust kidding. But what I am not kidding about are these wood covers. They are so simple but SO transformative! I have seen these wire shelves in homes about 1 million times. And while they are perfectly fine as is, sometimes a solid surface is more ideal. It’s a 10/10 for me:) Go here for all of the instructions.
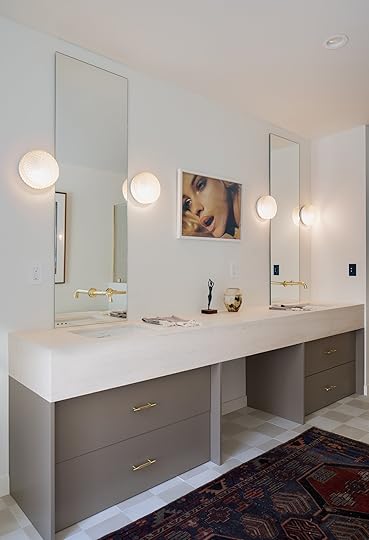
Added Storage To Nightstand By Anne Sage

Hopefully, by now you’ve seen Anne’s beautiful office she just completed for a client. So while Anne is an incredible designer, this woman loves a practical DIY. This particular project is a dream for those who are afraid of the term “DIY”. I told you there was something for everyone! This project only requires you to measure and shop. So if you have or find an affordable side table with an X base, measure, then find a fun tray to put on top of the X. Easy peasy. For added storage, she suggests getting a cute box. Now you have a totally unique side table or nightstand.
Boucle Side Table By LC Of All The Peaches Please


This side table is a bit more involved since it requires building the entire thing. But look how cool it is? I love the white boucle fabric since it’s so beautifully textured but it could also be awesome in a colorful patterned fabric. You’d just want to be careful with how to strategically place the pattern. Here’s the step-by-step (and a guide to boucle fabric)!
Stair Renovation by Amanda Walker of Dwellaware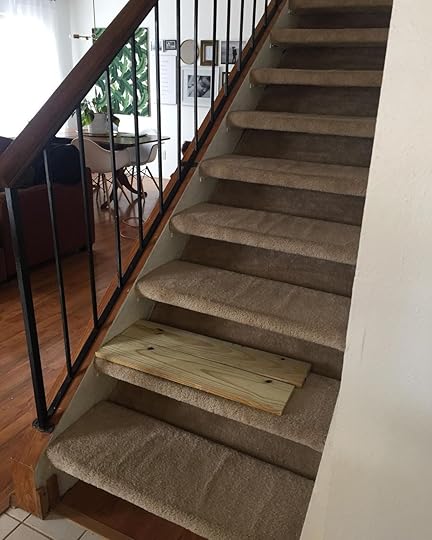
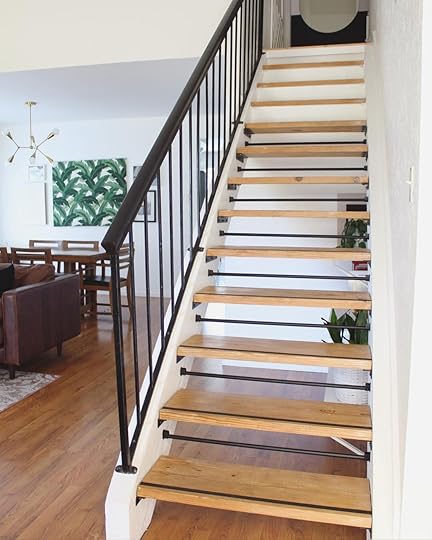
Y’all this project only cost $75!!!!! I almost fell off of my chair when I read that. Now, this is an older DIY but I was just recently introduced to the talented Amanda Walker at The Meridian Experience and did a dive headfirst into her content. While she has many amazing projects she’s shared over the years, I just loved this wild transformation. It completely changes the house! So do yourself a favor, if you don’t know her already and go check her out. As for the stairs, here is the blog post and here is her YouTube video on it too.
Painted Outdoor Cushions By Ashley Basnight Of Handmade Haven


I feel silly saying this but I didn’t know there was such a thing as outdoor fabric paint. Did you? Well, after seeing it in action on Ashley’s Instagram, I am a fan. What an easy and accessible way to freshen up your older patio cushions! Anyone can do this and there are a lot of color options. Here is Ashley’s step-by-step.
Two Tiered Tray by Maria Mendez Reed Of Moving With The Military

Another IKEA hack, but this time it’s not a cabinet, it’s a round box! I think this is another easy and fun DIY project that would make a great design statement in your bathroom or kitchen. Also if raw wood isn’t your thing, this is easily spray painted. Make it yours, baby! Here are Maria’s instructions.
Plaster Floor Lamp By Geneva Vanderzeil


Looks like I’m keeping any 2L soda bottles I come across. Y’all, she made the coolest lamp base out of literal trash. So cool and looks very expensive. So if you are into the plaster look, get yourself some all-purpose joint compound and get started. One man’s trash, amirite?!
Arched Kids Craft Desk By Geneva Vanderzeil
So as I was looking through Geneva’s site, I came across this incredible adorable kid’s arched craft desk. Can you get over how cute it is? Those stripes! This is perfect if you need to give your kid a designated craft area that’s contained and that you won’t mind in your living room if need be. If I had a kid I would 100% be building this. Here are the instructions and if you make it please email me!
Plexiglass Table By Wakemi

Funnily enough, this is actually a DIY project via All The Peaches Please (the creator who did the cute boucle side table! But Wakemi did an incredible job with it and here is her process video. These types of tables are definitely on trend but I think they are super cool and would be awesomely unexpected in a more traditional home.
Canvas Art By Wakemi

I just thought this piece looked super cool and I’m always a fan of finding ways to make large-scale art for a small-scale budget. The video doesn’t give detailed info but it looks fairly straightforward. I think you just need a canvas, a variety of different-sized wooden beads, super glue, and the paint of your choice. This looks like a lime wash to me but I could be wrong (I do think it would work though!). You can really make this your own.
Wood Vases By Krystle Perkins Of Perkins On Parkway

Oh baby I love these and they look so simple! Again, if you want color these are easily painted or stained but I do love the natural wood tone. I think these are simple enough to stand the test of time but trendy enough to feel fresh. Big fan and a great way to use unused glasses or vases.
DIY Coral Bowl By Nell Of Creative.By.Diy


This coral bowl is awesome and would be SO expensive in a store. I love the organic feel and you bet I love the use of joint compound again. Watch her reel for more details but this is a great day project and could live almost anywhere in your home.
Wireless DIY Basket Light By Nicole Neissany

I know that Mallory wrote a great post about what to do if you don’t have overhead lighting…but here is another option that’s WIRELESS! Nicole uses an unused ceiling box cover to mount the basket but if you don’t have one I’m pretty sure you can just screw those hooks right into your ceiling (then just spackle and paint when you move out). Anyway, this is a GREAT renter’s hack or if you just want more overhead lighting but are lacking a junction box:)
DIY Sculptural Console Table By Jaharn Quinn Of Smor Home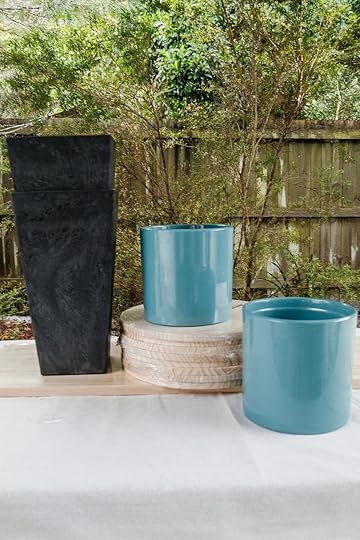

This was another mind-blowing project that I still can’t get over. This console table would easily cost over $1000 if you bought it in a store. According to Jaharn, this is a beginner-level project that took her two hours (not including drying time) and cost a total of $250. Ummm not bad!
DIY Wax Sheet Decorated Candles By Jaharn Quinn Of Smor Home


I had to end on probably the sweetest project…these candles. What a wonderful and simple project to help make something really unique and special. She outlines everything here and this is one I will absolutely be doing with friends.
That’s it for today. Hope you feel inspired, hope you have a wonderful weekend, and if you have any other awesome DIY tutorials, stick them in the comments!
Love you, meant it.
The post 17 Incredibly Cool DIYs And IKEA HACKS That Will Make Your Home Feel Extra Special (All Levels Welcome) appeared first on Emily Henderson.
July 21, 2022
The Best Affordable Faucets For Your Bathroom Sink

Around here we often call fixtures the “jewelry” of a room. Much like an outfit without complementary jewelry, a room without the proper fixtures can feel less pulled together. Picture this: you are designing your dream bathroom. You’ve chosen your perfect paint color, your vanity has been carefully picked out with storage and counter space in mind, and your shower and floor tile are both on trend and timeless (goals). Now imagine with all that thoughtful consideration, your sink faucet wasn’t the right finish? Or worse, what if the faucet style was screaming farmhouse chic when the aesthetic you are going for is modern traditional?? That simply cannot do. On the other hand, if you are a renter like me and you have a bathroom that sparks little-to-no joy, a simple faucet swap can make a HUGE difference. In any case, if you are facing either obstacle, it may be time to consider your faucet options.
The main considerations for choosing a faucet are A. the faucet type (centerset, single-hole, widespread, or wall mount) B. the finish and C. the overall style. The faucet type depends on the spread that’s already in your vanity unless you are renovating in which case you can choose any spread that best fits your needs. As for finishes, you should keep the faucet finish consistent with the other metals present in your bathroom design. We suggest sticking with the same finish or if you want to mix and match, make sure to spread the different finishes evenly throughout the space. When it comes to style, consider the look you are going for in your bathroom. If you want a modern feel, go for a faucet shape that aligns with clean lines. For a traditional style bathroom, a high arched faucet with traditional handles may be your best option.
Okay now, let’s get to the best affordable faucets out there right now by spread type:
Centerset photo by sara ligorria-tramp | from: budget basement bathroom reveal
A centerset faucet includes a deckplate that contains the handles and spout in one plate and can work with both single-hole and 3-hole basins. These are often the most affordable faucet options and are compatible with vanities and sinks that have a flat surface behind the basin.
HOT TIP: If you are renovating and trying to figure out what size the spread should be, it’s best to go with the standard size (either 4″ or 8″) so if you need or want to switch the faucet down the line, you can easily find a replacement.

1. Kingston Brass KB602B 4-Inch Centerset Lavatory Faucet | 2. American Classic 4 in. Centerset Bathroom Faucet | 3. Melina 4 in. Centerset 2-Handle High-Arc Bathroom Faucet | 4. Lindo Centerset Bathroom Faucet | 5. Kingston Brass KB1606PL Heritage 4-inch Centerset Lavatory Faucet | 6. Provincetown 1.2 GPM Centerset Bathroom Faucet | 7. Bowery 1.2 GPM Centerset Bathroom Faucet | 8. Teapot Centerset Bathroom Faucet with Metal Lever Handles | 9. 4″ 2 Handle Low Arc Lavatory Faucet
#1 is a beautiful affordable vintage style option and #2 is a similar style and finish as the basement bathroom above from Emily’s LA home. I really love the elegant brushed nickel look of #8 (it also comes in chrome) and if you are looking for a classic matte black option #9 is a great choice.
Wall Mounted photo by tessa neustadt | from: guest bathroom reveal
Wall-mounted faucets are perfect for smaller areas where you need to save counter space. They are also a great modern option and can have circular knobs instead of lever handles if you prefer that look. Now if you are looking to replace an existing wall-mounted faucet, they are definitely the hardest to install without rudimentary plumbing knowledge. I almost attempted this recently when my wall-mounted kitchen faucet broke and began leaking (oh the joys of being a renter) until I realized A. I would have to dig into the wall to find valves and B. I have no business messing with any plumbing fixtures. It was then I decided to leave this trick to the professionals. But if you are gutsier or more experienced than I am, there are a ton of in-depth tutorials all over YouTube.
 design by asom home | photo by corey gibbo
ns
| from: tour this house flip in the hills
design by asom home | photo by corey gibbo
ns
| from: tour this house flip in the hills If you have any hint of a rule breaker in you, an exciting (albeit pricier) option is to mount the faucet through your vanity mirror. Design duo Annie and Marieke of ASOM home executed this in the above bathroom and it’s a subtle yet really impactful design moment. They installed it by cutting holes in the mirrors (this is what adds labor costs) which is precarious and requires extremely accurate measuring but the result is really special.
HOT TIP: Be sure to consider the height of your faucet before installation. A faucet placed too high up may cause unnecessary (and messy) splashing and a faucet too low can make it hard to wash your hands or your face.
Here are some of our favorite affordable options:

1. Modern 2-Handle Wall Mount Bathroom Faucet in Matte Black | 2. Tenet 1.2 GPM Wall Mounted Widespread Bathroom Faucet | 3. Wall Mounted Bathroom Sink Faucet – 8.7 inches x 3.5 inches | 4. Gold Bathroom Faucet, Double Handle Wall Mount Bathroom Sink Faucet | 5. Modern 2-Handle Wall Mount Bathroom Faucet | 6. Brushed Brass Single Lever Wall Mounted Bathroom Faucet Swivel Sink Faucet Brass | 7. Wall Mounted Bathroom Faucet | 8. Single Lever Wall Mounted Faucet | 9. Millennium Wall Mounted Bathroom Faucet
For smaller bathrooms, a single handle option like #6 and #8 would take up less precious wall space. For a minimalist style bathroom, I love #7, and something like #3 or #4 could work with almost any style.
Single-Hole design by emily bowser | photo by sara ligorria-tramp | from: emily bowser’s 32-square-foot bathroom is packed with small space hacks
Single hole faucets are used (you guessed it) when you have a single hole on the back of the sink or vanity. They most often have a single handle, lever, or knob that controls the water flow and temperature as well. These are great for small bathrooms as they take up the least amount of counter space.
HOT TIP: If you want a more affordable yet longer-lasting finish, opt for matte black. Polished brass will wear out faster so you might end up replacing your faucet sooner than you’d hoped.

1. Delta Trinsic 1.2 GPM Single Hole Bathroom Faucet – Includes Metal | 2. Bath Faucet | 3. Avallon 1.2 GPM Single Handle Sleek Single Hole Bathroom Faucet | 4. Ruth Industrial Gold Single Hole Bathroom Sink Faucet Single Handle Solid Brass | 5. JAT-C-302BLA Single Hole Bathroom Faucet | 6. Parma 1.2 GPM Single Hole Bathroom Faucet with High-Rise Spout | 7. Taut 0.5 GPM Single Hole Bathroom Faucet | 8. Nicoli 1.2 GPM Single Hole Bathroom Faucet with Pop-Up Drain Assembly | 9. Nicoli 1.2 GPM Single Hole Bathroom Faucet with Pop-Up Drain Assembly

If you like the look of a single, matte black faucet like the one Emily Bowser installed in her bathroom above, #9 is a similar affordable option. For a more modern traditional look, I love #3 and it comes in a variety of finishes. If you are looking for a cool modern faucet, I also love #4 which has an industrial-style circular knob handle.
Widespread photo by tessa neustadt | from: our classic modern bathroom reveal
 Widespread faucets have separate hot and cold handles that are independent of the spout and can be mounted on the countertop or on the sink itself. They are often mounted on sinks with three holes that fit 8 inches to 16 inches from one side to the other. If you are renovating and have the choice, widespread faucets are more popular than centerset because they have a more built-in look, you can space the handles however you want, and they are easier to clean. Emily chose widespread faucets in the above primary bathroom and I love how they accent the modern traditional double sink vanity. But as is the case with much of the design process, it’s all about YOUR personal preference.
If you are looking for some widespread options, here are some we love:

1. Nicoli 1.2 GPM Widespread Bathroom Faucet with Pop-Up Drain Assembly | 2. Metropolitan Widespread Bathroom Faucet with Drain Assembly | 3. 2 Handle Waterfall Widespread Bathroom Sink Faucet with Pop Up | 4. Widespread Bathroom Faucet with Drain Assembly | 5. 8 in. Widespread Three Hole 2-Handle Bathroom Faucet in Black | 6. Nicoli 1.2 GPM Widespread Bathroom Faucet with Pop-Up Drain Assembly | 7. Heritage 8 in. Widespread Bathroom Faucet | 8. Setra 8 in. Widespread Double Handle Bathroom Faucet in Vibrant Moderne Brushed Brass | 9. Three Hole 8 Inch Bathroom Sink Faucet
Because I love a vintage-style faucet, #4 and #7 are my favorites (and both come in a range of finishes). If you prefer a waterfall type of water pressure, #3 and #5 are your guys (and they both have a sleek shape and finish). If you want a tall arched faucet shape, look no further than #9.
Alright my friends, this is where I leave you. If you were looking for an affordable faucet I hope this post helped and if you have any recommendations, please sound off in the comments below. Happy Thursday! xx
Opener Image Credit: Photo by Sara Ligorria-Tramp | From: Budget Basement Bathroom Reveal
The post The Best Affordable Faucets For Your Bathroom Sink appeared first on Emily Henderson.
July 20, 2022
Pantry Update: Paneling, Restored Vintage Windows, And A HOT Debate

OKEE DOKEYYY NOW WE ARE IN BUSINESS!!! Oh geez. If that shot doesn’t do it for you then I don’t know what you are into, because those windows, with that paneling flanking the entry into the pantry, are what my fantasies are made of. Today you are going to get a pantry update post – where we landed with the stone, the paneling, and the windows and let you into the debate Brian and I are having about paint color. BUCKLE UP BUTTERCUP!!!
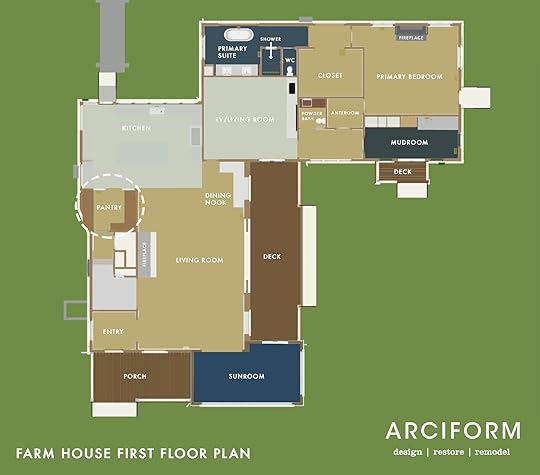
In case you don’t know where we are in the house, the pantry is conveniently off the kitchen, which shares a space with the living room. It’s an odd shape due to the exterior wall cutting in but we are in love with her as if she were the 3rd child that Brian wouldn’t let me have (jk).
Vintage Windows Are Back!!!
For those of you who’ve been following since the beginning of this farmhouse “adventure” (click here for all of the posts), you might remember the OG vintage windows in the living room. The reason we didn’t keep the OG windows where they originally were was three-fold:
We wanted to lighten up this room a lot and open it to the incredible backyard. We could have done this by putting french doors in between these windows (and seriously considered it) but we didn’t. The 1st floor had three, 100-year-old shaky/rotting windows (like the two you see) but they were mostly aluminum and vinyl windows from different add-ons and remodels. We restored all the windows on the second floor but decided to make all the windows on the first floor new. Which left us with three vintage windows to somehow use in the house.
So we took the upper sashes from the two windows in the living room, with the diamond pattern and flipped them vertically to frame the doorway into the pantry. It’s a magical moment that brings me an unspeakable amount of joy. Not sure if any of you can relate, but after being in this field for 15 years you’ve seen and been around a lot. So in order for that jolt of serotonin to flow from your brain into your limbs, something really has to do it for you. This is it. It’s not that it is this crazy standout architectural moment (fine, it is for me), it’s the sentiment, and how hard my team and I worked to make sure that these original and now interior windows really WORK again in our home. Thank you, Jamie and ARCIFORM for making these work!!!!!!!!
But What Are We going To Paint The Windows?
They will get painted the same as the paneling – a satin white. But the main question, and why I brought you all here today, is to help me decide what color we should paint the inside of the pantry. My original design (which I spoke about in this post) was to paint it the same color as the lower cabinets. So it would be just one dark moody blue, including the ceiling, paneling, and shelving. In the photo below you can see the large paint sticker (Slate Tile by Sherwin-Williams). Here are my thoughts in ascending order:
Moody is super cool. Dark is chic and risky. I know this intellectually. Also… A pantry is a storage room, and shouldn’t feel like the kitchen (this is Brian’s main argument). But…Will the dark color make it feel like a dark cave that doesn’t pop? We have that vintage window in there that is currently covered on the exterior so you can’t get the sense of light in there (and neither can I). Brian thinks this window will bring in a lot of light and it might! I’m worried that the color we chose is so dark (without enough light) that it will just suck all light and the room won’t be inviting or pop. It might just look dead. So my thoughts are to paint the paneling and ceiling a lighter shade of blue. Not a crazy two-tone, but just lighter so that there is some contrast in there and your eye doesn’t read it as dead space. Brian doesn’t agree. He loves my original design and the thoughts around it and he keeps just saying “this is a pantry, not an extension of a kitchen”. I agree! In theory. I mean it was my idea after all. But when I went to find any photos of a super dark pantry nothing was inspiring. The original inspiration photos were all just close-up vignettes of shelving NOT full rooms. Brian is also so done with me questioning my own decisions that were made MONTHS ago. And believe me, Brian, me, too!!! Imagine how annoying I am to myself! However, we have made some decisions that I already regret (not big deals, but yes) which is all very very normal in this process. And you know what else is normal?? Rethinking your choices up until you make the FINAL decision. Now that I’m writing this I’m realizing how important and normal it is. It’s the final edit before you turn in the book – you might have thought some sentences were PERFECT, but upon the last look, you think “could they be slightly better???” AND THAT’S OK. And if you are worried about my marriage don’t 🙂 If this renovation was actually causing fights then I wouldn’t be writing about them to a million strangers. It’s a healthy level of debating that I frankly need from my partner and I’m grateful he’s engaged enough to have serious and firm opinions.
So imagine (as I am right now) that room being as dark as the bottom cabinets, with the kitchen and the vintage window wall all being white. Again, with that vintage exterior window in there being blocked, it’s so hard to tell!!!
The Paneling…
Throughout the house (where appropriate) we designed and installed this awesome paneling. It’s a custom run from a company in Portland called Creative Woodworking and they are 10″ boards with a 1/2″ bead. So basically a REALLY large beadboard, I’ll talk about it more later but it’s one of the more “unnecessary” things that we felt was extremely important to the home. Jamie, Taylor, Tourin, Steve, and the rest of the team have spent WEEKS installing it. If you are a real renovation/design geek these types of things are special, and if you are on a budget there are so many affordable V-grooves or beadboards out there.
Let’s Talk Hardware…
Real quick…again, picture that all dark blue! It would look so good (in theory, with the right light). Now for this room, we were doing the same unlacquered brass hardware as the kitchen, but after seeing the stone in there and the dark paint I realized I wanted it to be black. So we are getting the same styles but in the Oil Rubbed Bronze (which at Rejuvenation is almost black). More on that later. And for those of you worried about the damage on the base of the cabinets, we always intended and designed it to have a baseboard. So Unique Kitchens and Baths provided a trim piece that we have yet to install.
The Stone!
We chose this honed granite that is really pretty in dark but has some movement in it. It’s an extremely hardworking stone that will not markup or chip easily. We had leftover Carrera from our kitchen that we could have used but knew that A. Carrera is easily stained and our coffee bar is in here, and B. that would have been a lot lighter and looked like a kitchen counter rather than a pantry. I haven’t seen it in person but…

We bought it from Bedrosian, and thanks to Alpha StoneWorks for the fabrication. It’s simple, durable, and well-executed. Oh and yes, that door is getting painted (it goes to the basement where I’m going to store all my survivalist foods and canned tuna once I embrace my Mormon roots and actually start doing it again!!). My house is going to smell like tuna for weeks every year just like it did when I was a small child!!! Barrels of wheat here we come!! Y2K any day!! My kids are so lucky!!??!!).
Sneak Peek Into The Kitchen…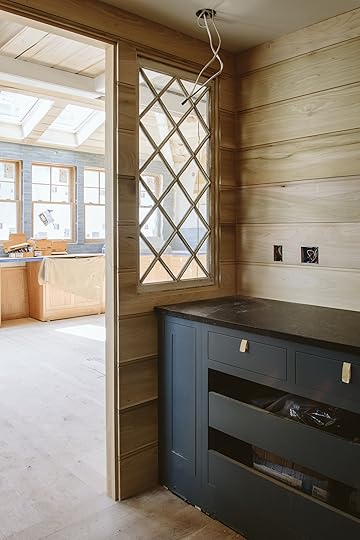
Y’all, I’m seeing this with YOU. Of course, I see it a few days ahead, but I haven’t seen any of this in person yet so these photos excite me beyond belief. More on the kitchen soon. But back to the pantry: the stone looks awesome. The paneling is so pretty. The cabinets are so lovely. The vintage interior windows are incredible but again…. LOOK AT THAT KITCHEN!!!!!
We are getting close. I feel extremely lucky, happy, grateful, and mostly relieved that I love it all SO MUCH. Thanks for reading 🙂 xx
*Photos by Kaitlin Green
The post Pantry Update: Paneling, Restored Vintage Windows, And A HOT Debate appeared first on Emily Henderson.
July 19, 2022
The Office Reveal With A Really Unexpected And Clever Accent Wall (That You Can DIY)
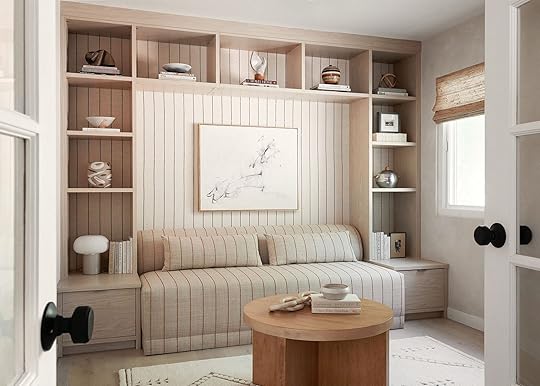
When Anne Sage sent me her client’s office space I immediately leaned in and asked, “this that a fabric accent wall?! Oooh, that’s sick!” Then as I continued to pour over the photos, I kept finding special details and great ideas. Not surprising though given how thoughtful Anne is with her designs. But naturally, I had about a billion questions which we will get to in a minute. But one question we always ask designers of their projects is if there were any fun surprises and/or challenges. What I absolutely loved was that Anne said her client really gave her free reign – “Probably the most fun surprise I had was a client who loved all my ideas and gave me the freedom to run with them—how often does that happen? So many of the special details in this space were ideas that I’d been keeping in my back pocket for a really long time, just waiting for a client who was bold and open-minded enough to try them!” That’s so true! While I’ve only had one “client” myself, watching Em/EHD team’s past client projects and talking to my designer friends, it’s rare that ALL presented ideas will be given the green light. In my opinion, it really paid off (and is why hiring a designer is worth it if you can budget for one). BUT for those who don’t have the budget, some of Anne’s ideas are DIY-friendly!
 design by anne sage | photo by elizabeth messina | from: the two month (yes two) kitchen reno that’s sporting an unexpected trend
Why is this beautiful kitchen in a blog post about an office you ask? It’s because they are in the same home! You may remember this kitchen Anne designed and renovated in just TWO MONTHS last year. It’s extremely cool to get to see more of this home’s spaces and how they work together. Here’s a little backstory about the family and the new office:
“The client is a screenwriter with a young family, she and her husband had recently purchased her first house and we undertook a complete renovation of the whole home. (You guys actually featured the kitchen I did for them too!) This room is on the home’s first floor, just off the entryway, and the previous owner had used it as a kind of den/TV room (hence the wine storage cubby).”

What did your client ask for when y’all started?
“My client planned to use this as her home office — her first ‘real’ office after years of working from home in her bedroom! — and in honor of the big step up, we knew we needed to make it EXTRA special. I asked her a lot of questions about how she works, what her dream setup would look like, etc. and this space was born!
Some of her callouts included a spot above her desk for doing storyboarding, a place to relax and take breaks without having to leave the room and go into the rest of the house, and lots of storage. In terms of aesthetic, she’d long loved the warmth and textural aspects of boho style but wanted the office to feel more like the modern evolution of the boho style she’d gone for in the past, to reflect the evolution that was happening in her career.”

Lime Wash (custom color but this) | Table Lamp | Flushmount | Coffee Table (similar) | Rug
I love how this office was meant to reflect the evolution of her client’s career! I can absolutely understand the need for that physical/visual representation. I mean that’s exactly how I wanted to feel in my office area too. But what I sadly don’t have are fabric accent walls. Of course, I needed ALL of the information from Anne. So the idea for the fabric wall behind the sofa came after the idea for the wall above the desk on the other side of the room. From Anne: “The really cool thing about that wall above the desk is that it has a MAGNETIC pinboard behind it and was where the seed of the idea for the fabric wall was actually born.”
– How did the idea first come up? “The idea for fabric on the wall above the desk was born as described above. But the idea for a fabric wall with a couch that seemed to “pop out” of the wall was born the year before when Crypton Home came out with some really stunning striped fabrics that I was dying to use. There were two in particular that felt like they were meant to be used in the space — the black stripe and the burnt sienna stripe, which are two of my fave hues together. When my client told me she wanted a nap couch, and then when the magnetic wall idea popped into my head, it seemed like the perfect opportunity to marry all those little threads together into one epic space! One special thing about this fabric — it’s a bit hard to see unless you’re really close-up to it, but the stripes are slightly raised against the background, almost as though they’ve been embroidered. It’s truly such a special fabric and the end result is a tactile dream!”
– What was the install like? “In a word, stressful! Everything had to be done in a really specific order to get all the lines right, and I was juggling the scheduling needs of many different parties — California Closets, the fabric installer/lime washer, who couldn’t install everything at once but rather had to work in stages, and of course, my client who wanted to be able to start working in her office ASAP! And of course, it had to be done very exactingly, since any errors in the install would have resulted in the stripes being off and the whole concept going down in flames.”
– Is that a lime wash paint on the wall? Do you have any tips for people who want to but have never used it before? “It is indeed lime wash! Since we were doing two of the walls with the fabric, I was concerned that a normal paint finish on the other two walls would be too stark a contrast—I wanted to keep the feeling of warmth and coziness going! Lime wash was the perfect solution, since it brings its own earthy depth to the texture party. The good news about lime wash is that it is pretty easy to work with and get a good result, even if you’re a first-timer. It’s quite forgiving and can be built up or diluted down as you go along. One thing to keep in mind, though, is that you can’t tell what your final result will look like until it’s completely dry—so leave yourself lots of time (i.e. a few days) to take the process slowly. It’s one that can’t be rushed. As well, it’s very drippy and messy, so be sure to protect floors, furniture, etc. In terms of technique—as always, YouTube has some good videos to get you started. But also, don’t be surprised if you develop your own technique as you go along and get the feel for what works best for you!”

Wall Fabric (fabric: dharma, color: oreo) | Sofa (custom design commissioned by Kim Salmela) | Sofa Fabric (fabric: dharma, Color: sienna) | Custom Cabinets (finish: wood grain collection in natural)
– How hard was it to match up the lines on the wall to the lines on the sofa? “Honestly, it wasn’t as hard as I thought it would be — it just required working with vendors who take accuracy of execution as seriously as I do. Since the wall and sofa fabrics were of the same pattern, just a different colorway, I knew that so long as I gave specific instructions to my wall installer and sofa upholsterer, we’d be okay. We used the middle point of the wall as our reference point, meaning that we’d have a black stripe at the exact center of the wall, and a sienna stripe at the exact center of the sofa. And then, of course, the sofa needed to tuck perfectly into the opening created by the bookshelves—but I wasn’t worried about that at all, because the team at California Closets are SO spot-on with their measurements and manufacturing. They’re incredible at taking a custom idea like this, adding all their own special touches, and then executing it to perfection. But one thing I will say, is that I checked and double-checked and triple-checked my measurements more on this project than any other I’ve ever done, ahha!”

– Would you say it’s DIYable and if so what are your tips/warnings? “A fabric wall is definitely DIY’able! A fabric wall with stripes that line up perfectly — not only with a striped sofa but with the grid of a built-in bookshelf? Well, let’s just say that’s an ADVANCED DIY, ha! One of the biggest challenges in the install was actually my fault—when choosing the striped fabric, I didn’t think through the complication that would be posed by the fact that the stripes run width-wise on the fabric, not length-wise. What this meant in practice was that my installer couldn’t just unroll the fabric and put it on the wall vertically as I’d envisioned the stripes. Rather, she had to sew several pieces of horizontally striped fabric together to create the look of vertical stripes—but she had to do it in a way that the seams didn’t show. This is actually where the bookshelves came in handy, since she was able to hide the seams behind the shelves. (Thank goodness this project was in LA, where I was able to find a former set decorator + scenic painter who had transitioned into doing home decor work but had tons of experience troubleshooting weird requests like this!)
In terms of tips/warnings for anyone who wants to do this at home: Definitely choose a fabric whose pattern runs the LENGTH of the fabric so that you don’t find yourself in a similar situation. As well, I’d suggest starting small with any type of fabric work—like maybe try your hand at covering a folding screen first, to get the feel for it. There are some good tutorials on YouTube that detail the tools and techniques you need—they’re pretty simple, just fabric starch is the most commonly used adhesive, and then of course all the precise cutting and measuring tools you’d expect for something like this!
As for the reason you might choose to do fabric instead of say, wallpaper? Fabric does add a really elevated textural touch, since it does have that woven feel that most wallpaper doesn’t (grasscloth wallpaper being the exception of course). It’s a really warm and cozy vibe that gets created. And in our case, because of that piece of sheet metal above the desk — wallpaper wasn’t really an option, since the ridges caused by the edge metal would have shown through wallpaper, whereas the fabric is more forgiving and hides those ridges better.”
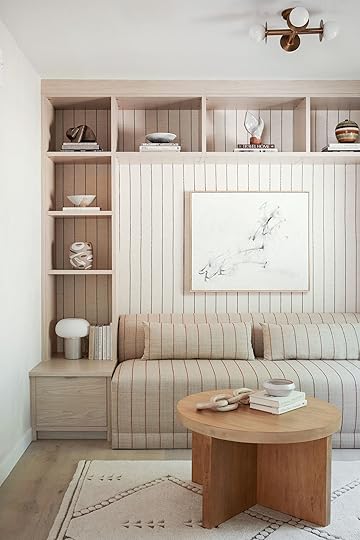

How is the large art piece hung on top of the fabric? “It’s a very light float framed canvas with the backing torn off, so we were able to just use two very small picture hanging nails to hang it — right into the fabric, and then the holes actually kind of disappear when the nails are removed, in the same way that the hole from a tailor’s pin disappears after its removed from a piece of clothing.”
The wall shelving unit is also awesome! What was that process of designing it like? If you can share what was the cost of it? “The cost of the whole unit, bookshelves/drawers + then the desk/undercabinets, was $7,500 through California Closets. The shelf over the desk was another $1000, that had to be done by my carpenter as California Closets didn’t offer a floating shelf in the shallow depth that I wanted (this one is 6” deep as I recall).
It was a real pleasure to design this custom build-out with California Closets. I came in with the initial sketches and functional requests (drawers to hide a printer and office papers, for example), and then they used their expertise to help me nail down the details. For example, one of my favorite little easter eggs in this design is the way the toe kick under the drawers that flank the sofa is the exact same height as the seam at the bottom of the sofa. There isn’t a single aspect of this space that wasn’t thought through really carefully by both me and the CA Closets team, and I love working with them for that reason!”

Is there a story behind the silver pot? “A lot of the accessories here, that one included, are vintage finds from my personal collection. That one, in particular, was a midcentury ice bucket I found at the Pasadena City College flea market years ago!”
Jess here! Man, I love the sweetness and whimsy of those penguins in this room!
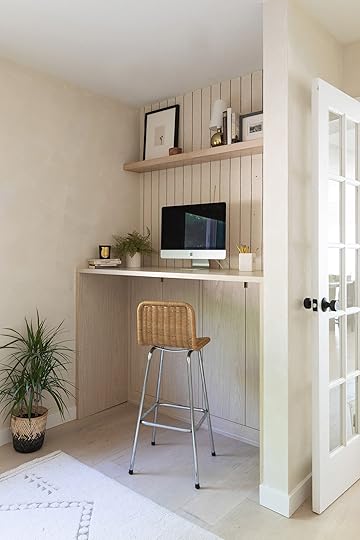
Brass Lamp (DIY) | Lamp Base | Stool | Custom Cabinets (Finish: Wood Grain Collection in Natural)
What was the discussion between doing a standing desk vs a sitting one? “Throughout the whole home renovation with my client, ergonomics was a major topic of conversation as she’s quite tall and has back issues. She knew she wanted a standing desk—she’s at her desk a lot, in her job—but we both agreed that all the adjustable sit/stand desks on the market weren’t up to the style standards we were looking to set in this space. So building a standing-height work surface, and then giving her a counter height stool for sitting when she desired, seemed like the perfect compromise.”
Was part of the purpose to add the fabric on the desk wall to be an awesome inspiration board to pin photos? “My client had said one of her ‘need to haves’ was a place for storyboarding with index cards over her desk. And of course, we could have done something like a corkboard, or linen pinboard – but I wanted the overall space to feel really sleek and streamlined, and those types of solutions felt clunky to me. So the idea to do a piece of sheet metal on the wall, and then cover it with fabric so you couldn’t even tell it was there, was born! If you look closely, you can see that the pictures over the desk are held up with little brass magnets. We affixed the sheet metal to the wall with liquid nails (aka super strong glue), and it spans the entire height and width of the wall above the desk, up to where the small shelf is.”


I LOVE how sleek those cabinets are! Was that a solution to the original nook being a bit too deep? “The original nook was just a regular counter depth, actually — and those cabinets under the desk are one of California Closets’ signature offerings for home offices. They hide shallow shelves that are perfect for keeping cords, power strips + other tech eyesores hidden. There’s a grommet hole in the desk surface above, and then you can run cables from your devices on the desk down the hole + plug them into the outlet that’s hidden behind the cabinet doors. We had one in my old home office too and it’s truly a GENIUS solution! (There’s a similar outlet/hole situation in the drawers that flank the sofa, too!)”
So before we get into the costs let’s take a look at these awesome before and afters!


Anyone else ready to happily nap on that sofa in this serene and cozy space? But before we doze off let’s talk money, shall we?
If you are able to share, what was the budget? “We didn’t have a set budget at the outset, more of a goal for ‘let’s do this right but not go too crazy’. I came up with the design, we priced it out, the client felt it was worth it, so we went for it! It definitely helped that this wasn’t a HUGE room, only about 10’ x 12’, so we were able to pack it with custom features and still keep our overall costs in a doable range for the client.”
Costs were as below:
Shelves + desk: $8,500
Custom 77” sofa: $1,900
Wall fabric: $450
Lime wash + stripe fabric labor to install: $2,700
Remaining decor accents: $1,500
TOTAL: $15,050
Jess again. I know this isn’t a small number but considering all the custom pieces and labor this is a solid total cost! But if this is out of your budget remember that if you are handy (or are open to learning), a lot of these ideas can be doable DIYS (ie the fabric walls, lime wash walls, built-in cabinets). Take the inspiration if it speaks to you and make it your own. Congrats to Anne for yet another beautiful space completed and see y’all tomorrow!
Love you, mean it.
*Design by Anne Sage
The post The Office Reveal With A Really Unexpected And Clever Accent Wall (That You Can DIY) appeared first on Emily Henderson.
July 18, 2022
Farmhouse Update: The Current State Of Our Bedroom

A week ago I hired Kaitlin to shoot the farmhouse so I could see what it looked like while in California. She went in on a Saturday without any workers and “covered the house”. I’m so endlessly grateful as I’ve spent hours staring at them while on my “working vacation” (is that a thing now?) and I figured why keep these updates to myself or confine them to Insta-story any longer? So today you are going to see the current state of our bedroom, about a month away from being finished.
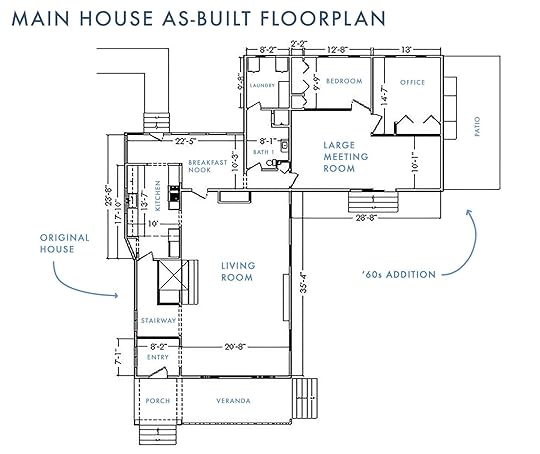
In case you don’t remember, this room was an addition from the 60s that was in pretty rundown condition (it was owned briefly by a community organization who used it as a meeting room with not a huge budget for remodeling). So the walls were thin, the floors were laminate or cheap carpeting and let’s just say demo-ing was fast because it wasn’t built great. So ARCIFORM had to completely rebuild this wing. And when rebuilding something, it’s wise to consider if it’s right in the first place. So we reconfigured the hell out of this wing to make sure that by investing so much in this renovation, we were getting what really would serve our family the best long term. This thought process is both greedy and totally sensible, and I feel both guilty and yet excited. As a reminder, this renovation is not normal. I have partnerships that help pay for it and have commodified my life (for good and bad) to the point where I get to/have to invest in this home both for work and my family. It’s not normal. More on this later, but if you are wondering how we are doing all of this you aren’t alone and know that I’m extremely grateful.

We tried to stay within the footprint and maybe we could have, but Brian and I really really wanted a great bedroom suite for us (the mountain house has permanently spoiled us), as well as that all-important dog/mudroom and cozy family room. So we ended up adding an additional 8′ onto the 60s addition, pushing west into the yard (with the same north to south footprint). Easy, right? Just 8 feet! But of course, that means extending the foundation, more roofing (and whoops while we are at it, the roofer says the entire roof needs to be replaced) and we would need more engineering, mechanical, electrical, and plumbing to support the square footage (aka, HVAC, another electrical panel, additional electric heat pump, water heaters, etc). All of this takes so much time to plan and execute, and I’m SO GRATEFUL to have Jamie, Adam, and his team there to manage it all. So much so that we left the state for a month 🙂 It’s a lot to do and so much behind the scenes has happened without my knowledge (for the good), so thank you. And on to what it looks like now!
First up, here’s a little video of the fireplace + a current update if you wanna see it!! (Just wait for the ad to play)
The Current State Of Our Bedroom
So here’s where we are at. The flooring is in (and currently being sanded and sealed). Windows are in and are staying white oak with matching white casings. Yes, the poplar wood casing and ceiling in natural wood is very very pretty, but it wasn’t ever meant to be left wood and poplar isn’t stain grade. Do we love the look of wood? YOU BET. Do we wish we had chosen white oak instead of poplar? Kinda. Here’s what we know:
The white paint will be so pretty and will highlight the custom 12″ wide tongue and groove with a sweet bead that we splurged on. We know that the white beadboard is more farmhouse and charming than raw wood which is more “cabin”.By going white on the ceiling, the floor will be this wonderful warm white oak that will pop and be the star.White oak is far more expensive than poplar and it’s harder to install (because it’s heavier and literally harder to cut and maneuver). Staining the poplar is an option but as you can see there is a lot of green in it so we would have to go pretty dark in order to even it out and we definitely don’t want to do that. And lastly, as much as we want to recreate the mountain house bedroom (and we do) we don’t actually want to copy my own previous design. 🙂
I love every single thing in this bedroom for its simplicity and how high-quality ARCIFORM executed it. The Velux skylights (that have room darkening shades of course) bring in the most beautiful light. Kaitlin shot this in the middle of the day on a sunny day (what?? the sun came out in June finally??) but typically it’s just this soft light that makes the whole room feel ethereal. The white oak windows from Sierra Pacific are so warm and pretty (again, the sashes and jams are staying white oak, while the casing is getting painted white). And the white oak Oregon-grown flooring from Zena Forest Products is going to be just so pretty. When it’s sealed the flooring will be slightly darker and richer (it’s really dusty here).
The Fireplace
We tried to mimic the brick fireplace in the living room with this one – just a simple painted brick set back for a TV. While we haven’t historically been “TV in the bedroom people” (because we both tend to read a lot – and I’m not being pretentious when I say that, I mostly read rom-coms or regency novels) many times in the last two years we have wished we had two TVs in the house for those Saturday nights where Brian and I, and the kids aren’t exactly aligned. During lockdown, we would give them a laptop in a guest room which was fine, but a little bit depressing. We might put an additional TV in the living room over the fireplace, but as of now, we have one in the family room and one here. And yes, I’m excited about the prospect of sitting on a cozy chair and pinning fantasy furniture from 1stDibs that I’ll never buy, watching my own rom-coms while Brian and the kids watch a Marvel movie…
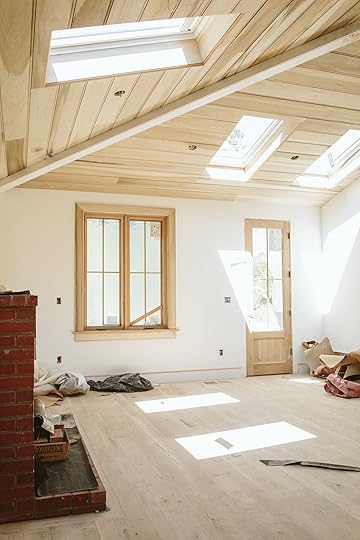
What you can’t see, because we didn’t get shots of it, is the bed wall and the east wall. Here’s the floorplan again so you can understand the space, but as of now there is nothing on these walls except primer 🙂
Now that we are this far into the renovation, I’m starting to think about furniture. I think we’ve locked down our bed, I’m shopping for rugs (but might use what’s in our current living room if it will fit), and not sure if our old leather nightstands will feel too small, but if they don’t work they’ll go up in the guest room. This room will be minimal, for sure, but with not a lot of drama. I haven’t been able to find much of an inspiration for the look and feel – but if you picture the furniture from our LA bedroom and the vibe of the mountain house bedroom I think it will land somewhere in between.

 left: photo by sara ligorria-tramp, from: mountain house primary bedroom | right: photo by tessa neustadt, from: la tudor primary bedroom
 One of the things that has helped me a lot (mentally in life) is not having a dresser in our bedroom, which is a true privilege I know. We are both unfortunately messy and we “don’t put things away” often, so that is why the closet is rather enormous (hilariously bigger than our bathroom we think). All clothes, shoes, and mess will be in there (and likely my Pelaton) and the bedroom will have either a little loveseat at the foot of the bed or on the east wall, possibly a little desk by the fireplace for Brian, nightstands, some art/mirror, a big cozy bed and that’s it. Also, it will have a sign on the door that says “no kids allowed”, which I might need to custom made 🙂 Stay tuned on that. xx
*Photos by Kaitlin Green
The post Farmhouse Update: The Current State Of Our Bedroom appeared first on Emily Henderson.
Emily Henderson's Blog

- Emily Henderson's profile
- 10 followers

