
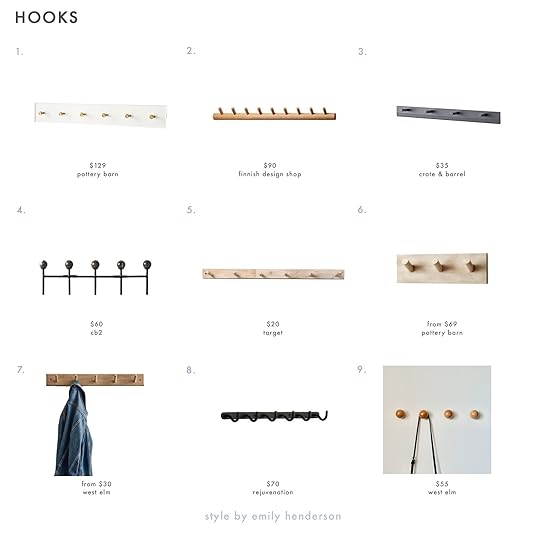
Emily Henderson's Blog, page 119
August 14, 2022
The Link Up: Emily’s Famous Live Edge Coffee Is FINALLY BACK, Jess’ $25 Fun Yet Practical Bag, And Our Current Favorite Comfortable Shoes

Happy Sunday everyone! Did you catch Emily’s episode on The Better Buy podcast from Better Homes & Gardens? She doesn’t do a ton of podcasts so it’s always really fun to listen when she does. Check it out! Aside from that, it’s been a busy week up at the farmhouse (per usual) and down here in LA for the blog. How was your week? Hopefully good! Ready for some links? Us too.


 design by avery cox | photos by lindsay brown | via clever
This week’s house tour is 768 square feet little slice of moody-colored heaven. Originally meant for a “bonafide bachelor,” this one bedroom, one bath bungalow got a lady of the house. With three people’s design styles in the mix (Charlie, Leanne, and designer, Avery), this house is soulful, layered, and cozy. Read about the whole process here!

 there it is in both of my old homes
From Emily: Once upon a time I bought a beautiful sculptural live edge coffee table, then it sold out, then I gave it to my friend because I didn’t “need it,” then I stole it back because I realized I DO NEED IT. Well, it’s back after 4 years of being “unavailable” and if you are in the market I HIGHLY recommend it. It’s heavy. Solid. It’s not a casual hoard, but it’s an INCREDIBLE price for this wonder. And not to be a car salesman but it won’t be around for long. After I gave it away (to a friend) I lamented it daily, thinking I could find something similar. I couldn’t/didn’t. It does the job of a square, rectangle, and an oval at the same time. It visually fills more space than its dimensions. It’s just so good and while it’s already back-ordered maybe if you hit the “add to cart” button you’ll get one before the whole tree is gone.


Also From Emily: Long-time reader (and now friend) Katy Aselton directed a movie – yes a woman, that comes out this weekend with Diane Keaton (remember when I met her at the Pinterest event in 2018?) and we all should go see it.
A note from Katy (the director): “Friends! As you may know, the movie I directed (MACK & RITA, starring legend Diane Keaton) is opening on over 2,000 screens this weekend (8/12) and I can not emphasize enough how important it is for movies like this—women-led, starring women of a certain age, directed by a woman—to perform well on opening weekend. The better they do, the better chance we have of getting to tell more stories like this and more opportunities for directors like me. Let’s do this! Let’s show them movies like this can not only work but hit.”
Sounds like a girl’s night is in order. If you need an excuse to have one with your friends/sisters/moms go see MACK & RITA this weekend (and a huge thanks from Katy).
From Mallory: My favorite sandals ever are on sale! It’s balls hot out here these days so I wanted to share the sandals I wear every day with ya. They’re super comfy and I find myself exclusively gravitating towards these because they’re velcro but not ugly (I’m too lazy for any sort of buckle or lace these days). If you’re in the market for a nude everyday sandal snag these while they’re discounted! Emily has them too in the leopard colorway (sadly unavailable) and loves them too.

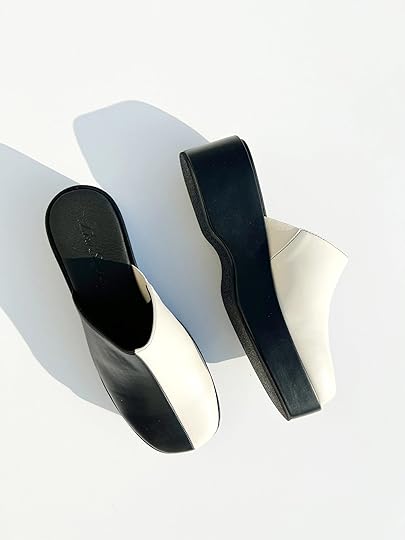
From Ryann: I just snagged these clogs from the Lisa Says Gah sample sale where everything is 50% off! I have been looking for a simple brown shoe that I can wear with anything and I am betting these will be it. It was between these brown ones and the colorblock white and black pair and it was a real tough choice, but I went with these because I think they will go with more pieces in my wardrobe. I am VERY excited to get them and will report back.

From Jess: As I said last week, I went to my cousin’s bachelorette in Valle de Guadalupe, Mexico last weekend and it was the best. Aside from eating endless delicious food, our big adventure was an ATV tour (highly recommend). I realized that I wanted to get a cute sling fanny pack for it and guess who delivered…Target. This $25 cutie was perfect.

 left: via landuum | right: via jess (wishes she got a better photo but promises it’s UNREAL)
Also from Jess: If you are wanting a getaway, I cannot recommend staying at Encuentro in Valle de Guadalupe more. Not only is it stunning (see above) but the service was beyond incredible. While you should go and explore the area, you won’t want to leave this property. I want to say a special thank you to Tania who went above and beyond helping make sure our stay and ventures outside the hotel were perfect. But honestly everyone there was wonderful. Oh and not that you were thinking this but this is most definitely not sponsored (I wish it could have been!)
From Caitlin: Stop what you’re doing and take 15 seconds to watch these goats eating tomatoes. (Whatever you’re expecting, IT’S BETTER.)
This is where we will leave you for today! See you tomorrow and have a beautiful rest of your Sunday. xx
Opening Image Credits: Design by Avery Cox | Photo by Lindsay Brown | via Clever
The post The Link Up: Emily’s Famous Live Edge Coffee Is FINALLY BACK, Jess’ $25 Fun Yet Practical Bag, And Our Current Favorite Comfortable Shoes appeared first on Emily Henderson.


August 13, 2022
BOOT TREND! 3 Ways We Are Excited To Wear Cowboy Boots This Summer And Fall

Well folks, I am pleased to say this is a fashion trend that comes around often, so in fact, I am a little wary of even calling it a trend. It is very likely you already own a pair of cowboy boots and just haven’t pulled them out of your closet since the last time you went to a line dancing bar. Or, maybe you are like me and have always had an affinity toward western flair. In any case, we are seeing people rock cowboy boots EVERYWHERE and the outfits are making us swoon. Even in this summer heat, cowboy boots are an unexpected staple that makes a simple outfit feel bold and exciting. But don’t just take my word for it. Let’s explore:

 left: image via purewow | right: image via glamour
The first outfit formula is long denim shorts, a t-shirt, blazer, and tall cowboy boots. Okay, my interest is piqued!! I love the mix of high and low that makes the outfit feel fresh and exciting. The above photos make such a strong case for this outfit but I have to say I want to see this look on a different body type. I am a size 12/14 so it would be nice to see it on a similar size. What can I say, I am high maintainence! But since I am the one making the case here, I decided to try this on myself to see if it checks out on a size 12/14:


Shorts | Shirt | Blazer (similar) | Boots (similar) | Purse
Okay I am not mad about this! The blazer definitely helps elevate the look and essentially creates a look that’s an easy step above the classic cowboy boots paired with cutoff shorts (which is still a great look IMO). If I were to perfect this outfit, I would probably go for a more oversized jacket but I think the outfit formula itself is a winner. This is an outfit I can see wearing to dinner and feeling pulled together yet comfortable.
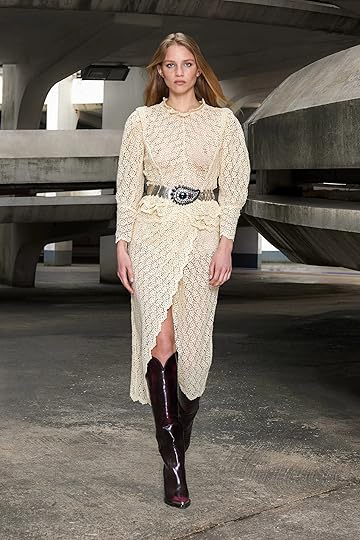
 left: image via vogue | right: image via style report
Prairie dresses and cowboy boots are a match made in chic western heaven! The photo on the left has been on my mind since January 2022 when I wrote this post about the tall boot trend. There is something magic about a hyper feminine dress paired with rustic cowboy boots. In the same vein, a dress with dramatic puff sleeves contrasts with rugged cowboy boots in a really cool way.
 image via jessica torres
Fashion influencer Jessica Torres further proves that a dress and cowboy boots is simply killer. I love how she paired a patterned dress with boots and kept the whole outfit black and white. So cute.
 image via visual therapy
Are you telling me that I, a woman living in 2022, am extremely into this maxi denim skirt outfit?? Because, wow, I really want to be galavanting around NYC in this outfit (even if it is 100 degrees and humid). I think the long skirt with a small tank top works so well with cowboy boots because it’s extremely simple so the boots really make a statement. The belt also adds to the western flair and really pulls the outfit together. I’ll call this a 10/10.
If you need a little more convincing, here are three more outfits we love:


 left: image via who what wear | midde and right: images via haper’s bazaar
Now if you are in the market, here are some of our favorite cowboy boots:

1. Otto Mini Western Boot | 2. Mezcalero Maye White Israel Boot | 3. New Frontier Western Boot | 4. Buffalo Silver | 5. Leena Faux Leather Cowboy Boot | 6. Women’s Shana Cowboy Boots | 7. Otto Mini Western Boot | 8. Public Desire Wide Fit Howdy | 9. Vegan Ranch Boot
Reformation just dropped their new line of cowboy boots and I’ll bet they are even better looking in person. I personally love #5 for the color, style, and price, and #4 is also a top pick for me because the silver toe box adds such a fun bit of flair.

1. Lasso Lessons Western Boots | 2. Estrella Boot | 3. We The Free Montage Tall Boots | 4. Hayward Boot | 5. Mount Suede Desert Taupe | 6. Solei Boots | 7. Steve Madden Lasso Cowboy Boot | 8. Olive Western Boot | 9. Brayden Tall Boots | 10. Mount Dallas Black White | 11. Mermaid Doodle Boots | 12. UO Sierra Cowboy Boot
Lucchese is an iconic brand that has been making cowboy boots since 1883 and they have soo many classic styles, but I am drooling over #2. Those star decals are so cool. Speaking of cool, this pair by Brother Vellies has my jaw on the floor. They are handmade and hand-painted so if you are looking for a pair that is SPECIAL, these are your guy. If you are looking to dip your toes into this trend and want something classic, you can’t go wrong with #4.
Alright y’all, that’s all for now. Let me know if you are already pulling out your cowboy boots to try out any of these looks. Happy Saturday! xx
The post BOOT TREND! 3 Ways We Are Excited To Wear Cowboy Boots This Summer And Fall appeared first on Emily Henderson.
August 12, 2022
Caitlin’s Living Room Update + A Burning Question: What Are You Supposed To Put in A Corner?

Nobody puts Baby in a corner – except me, because I AM A GIANT BABY and I’m literally stuck in a corner. Two months ago, your comments and feedback helped me figure out the layout for my pass-through dining room (THANK YOU), so today, I’m coming in hot with a similar, seemingly simple-to-answer question: WHAT THE HECK DO YOU PUT IN YOUR CORNERS? Or, more specifically, what the heck should I put in the corners of my living room?
As a chronic over-thinker who has spent too much time staring at these walls (literally, in a “I did not leave my apartment for months at a time during quarantine” way, but also figuratively, in a “all I do is copy and paste furniture into Keynote to see how it looks together in an attempt to imagine it in this space” way), I could use another set of eyes. Or like, hundreds of thousands of sets of eyes. EVERY EYE HELPS. But first, let me get you acquainted with the “before”…

 left: view from the dining room, including the front door | right: view from the front door
WELCOME TO MY LIVING ROOM. These are the original Craigslist listing photos, but I think it’s helpful to see an empty space so you can really imagine where the pieces I’ve sourced so far will be going. (I also thought this apartment was a total scam when I first saw the ad, BTW – it was below market rate, had been sitting on Craigslist for over a month, and the copy was filled with things like “***LARGE PRIVATE GARAGE***” – asterisk emphasis theirs, for the record – along with a single sentence that read “Cedar Closets and Loads of Kitchen Cabinets.” I still can’t believe it’s real and that I was the only person who wanted to live here – I lucked out, right?!)
Architecturally, the space is kind of a dream – it’s 14′ wide by 20′ long (!!!), with a 5′ window to the front, a beautiful fireplace (wait til y’all get a closeup in the reveal) flanked by two great-sized windows, stunning old-school molding, PLUS a huuuuge walk-in closet. So far, my only problems have been things like, “it’s too big for me to decorate quickly without declaring bankruptcy” and “the windows are huge,” which are pretty freakin’ great problems to have.

 left: view from the back corner, including the closet | right: view from the dining room
You can see a bit more into the dining room here, and that door on the left is the aforementioned walk-in closet – it’s actually almost structurally identical to Erik’s, except mine is “ugly” and “filled with junk” and “not anywhere close to being as beautiful as Erik’s, why would you even force that comparison on yourself?” But because this whole space is fairly open concept (for the 1930s, at least), I’ve really been trying to dial in the design so both rooms can exist harmoniously. Last year, I landed on a descriptor that’s been a great north star, though: DISCO DECO.
My goal here is ’30s-meets-’70s – think glam lucite and leopard-meets-classic brass and leather. I want to embrace the deco roots of my building (like those original sconces above the fireplace – SO GOOD, right?), but I also want to balance and modernize some of the busier deco elements with clean, simple, geometric lines. It’s been a total labor of love – I’ve been saving for and slowly gathering these pieces since August of 2019! – but I’m excited to show you what I’ve gotten so far. READY???

Paint Color | Vinyl Storage | Bookshelves | Swivel Chairs | Rug
WHERE DO WE EVEN START? The bookshelves were the first thing I bought after moving in – I wanted to fill up the wall between the front door and the closet, and I’d also always dreamed about having my own wall of books. (Plus, I had to use that CB2 coupon that you get when you change your address with USPS – the savings are TOO good, you know? They’re also over $100 off right now, just as an FYI.) The metal valet was a lucky $100 find from Luxe Midcentury (the NICEST guy in the biz!); the tubular lucite coffee table was a late-2019 score from AES of LA (you can read more about them, and my other favorite secret vintage sources, right here!); the 1960s spring floor lamp was a quarantine find from Lackluster Co. (incredible selection with fair prices!).
My design progress stalled for a while (or, uh, a year – was busy trying and failing to buy a house ad nauseam, remember? Here is where we left off on that) until I found this 1980s leather sofa on Instagram in March of 2021. It was way out of my price range and I begged Blair, the man behind Modtiques, to hold it for me while I saved up…and in October of 2021, after 7 months of scrimping, it was finally delivered to my house. I have forgotten and/or blocked out how much it cost (probably the latter, TBH), but I thiiiiink that it was a little over $4k including shipping – it’s by far the most expensive thing I’ve ever bought myself and I’m still proud of myself for figuring out how to make it happen!!! (I love it even though all of my friends call it the “hot dog sofa.” It’s a nice place to rest my buns, at least :))
Progress picked up again this year when I found those Mitchell Gold + Bob Williams swivel chairs. I knew I wanted upholstered chairs in here and was on the hunt for something in Sunbrella (I know people usually think of it as an outdoor-only option, but it’s the only upholstery fabric I’ve found that can hold up to my cat’s claws) and BOY, these chairs fit the bill. The scale is great (these are a little petite – I have a weird and unexplainable thing about huge chairs), the lines are clean and special, and I love the 70s feel of the wooden bases (I went with “natural,” but there are a ton of finishes available). The Room & Board media cabinet was my most recent find and it’s going to house my vinyl collection – the height is PHENOMENAL (guys, it slides in perfectly below my super low window!!!!), it’s absolutely heirloom quality, and I love how the white oak talks to the chairs. I’M SO EXCITED. Let’s talk about that paint selection real quick, yeah?

I tested five pink swatches from Sherwin-Williams – Alyssum, Innocence, Charming Pink, Intimate White, and Romance. (I used my ColorReader and my wallpaper to help me narrow it down – it’s AWESOME.) Romance is currently the front-runner – it reads a little cooler in my eastern-facing space than it does on the internet, which I love. That said, I’m planning to paint last after I see how everything looks together – I’m still figuring out my rug and curtain situation, so I don’t want to totally lock myself into pink walls in the event that I’d rather opt for a pink rug or pink curtains. (I’m about 80% sure that I’ll be opting for the faux hide above, though.) In any case, I am really excited about combining these super “feminine” elements (pink, lucite, curves) with more “masculine” touches (natural wood, clean storage, leather) – it’s going to be a ~Disco Deco~ CELEBRATION in here. 🙂
Now that you’ve gotten the full update, let’s talk layout – this is where I need your help the most (I think, at least!). Here’s what I’m planning on right now – I’m feeling a little stumped as I’ve never had a space big enough to float furniture before, and now I’m not, uh, totally sure…like, what’s supposed to go around the floating furniture?

First, some scale references (if you care – if not, skip ahead!!!): the bookcases extend 12″ off the wall, there’s a ~3′ walkway between the shelving and the seating area, the sofa is about 7′ long, and there’s a little over 2′ between the fireplace and the sofa. The 3.5′ round coffee table will be fairly centered with the fireplace, and both chairs will have a nice amount of breathing room (because again, I have a weird thing about chairs with breathing room for reasons I do not understand). I’m also planning to grab a cute vintage coatrack for the space behind the front door – there’s about 21″ to play with back there, so I hope to find something sweet and interesting (like with all things vintage, I’ll know it once I see it :)).
My problems, though, are the two corners – both have about 3’x4′ of wall space that I’d like to use for, well, something. I don’t necessarily need more storage, but it also feels awkward to place more seating behind the main seating area (unless that isn’t weird?). Here are all the things I’ve considered:
A Work Setup: This is actually still my frontrunner and it’s something I still really want to move into this space. I’m hoping that the dining room – and its new layout, thanks to your advice! – will now be a space for nighttime relaxing and spending time with friends, and not a place for me to be making Zoom calls and writing blog posts in at three in the morning (I have the weirdest internal clock, y’all…and like, what else is there to do when you’re up that early?).Something Sculptural: I have a lead on one of these wicker motorcycles (and it’s in my price range!), but it’s also a ~ 4-hour drive away. My concerns here: I almost feel like I need to be looking for something taller – does everything on this side of the room feel a bit low to you, too? I also worry about too much wood – I feel like a need a hit of black. Something Big and Sculptural (That You Seem to Not Love): Yeah, I’m talking about that huge pencil reed wine bottle cabinet from my last post. It’s been removed from Chairish (tragic) but it’s still available on Instagram (#blessed). I know it’s weird and I don’t have enough saved up to buy it right now, but it would technically fit in a corner…A Game Table + Small Chairs: I don’t know when this started, but I am newly OBSESSED with the idea of game tables. I don’t think they’re a trend yet, but I think they’re about to be. I’d want one that’s a little less fussy, though – trying to keep it clean and simple in here!Plants: Here’s the thing – I love plants and I used to be a biiiiiig plant gal, but I travel too much to keep them alive and I’d rather not pay for a plant sitter at this point in my life. Maybe someday, though?A Storage Cabinet: I’m still in love with this piece that Julie chose for the Velux project, but I think it’d be a little scene-stealing in this space with the black AND the wood AND the glass AND the brass…but maybe something with a similar shape and a more uniform finish would be nice? ???: What would you put here? I think the reason I feel so stuck is because I don’t even know what I want or what I’m looking for – it’d be a lot easier to figure out if I had some direction, you know?
 left: the shelves and valet | right: the teak hutch has always been a little too wide, so it’s finally going to a great home!
Here’s where I’ll leave you – 2020 photos of my apartment that were, uh, not really supposed to go on the internet (though maybe the stuff on the floor and cleaning supplies really gave that away, huh?). This facelift is currently in progress – it’s looking a lot different in here these days – and the reveal is coming THIS YEAR…once I figure out these freakin’ corners, at least!!! Any thoughts? Comments? Suggestions? New ideas? I’M ALL EARS (because I need the help – and maybe you have some great advice for other people struggling with this design conundrum, too). Happy weekend, LET’S CHAT? xx
Opening Image Credits: Design by Barrie Benson | Photo by Anna Routh Barzin | via ISUWANNEE
The post Caitlin’s Living Room Update + A Burning Question: What Are You Supposed To Put in A Corner? appeared first on Emily Henderson.
August 11, 2022
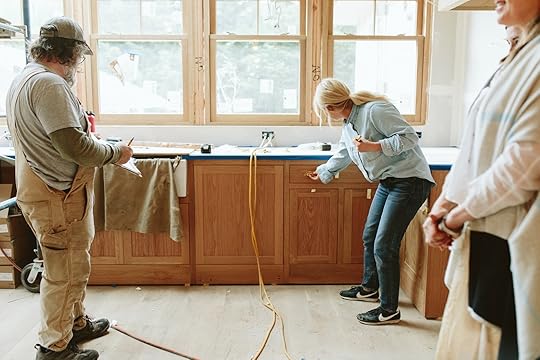
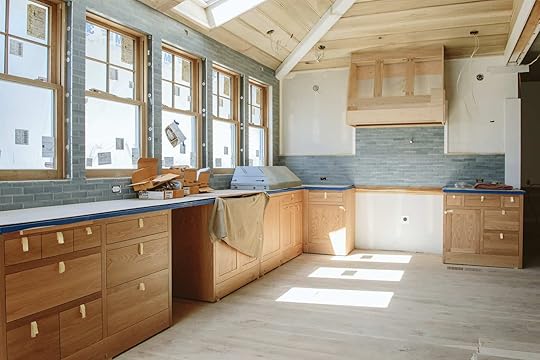
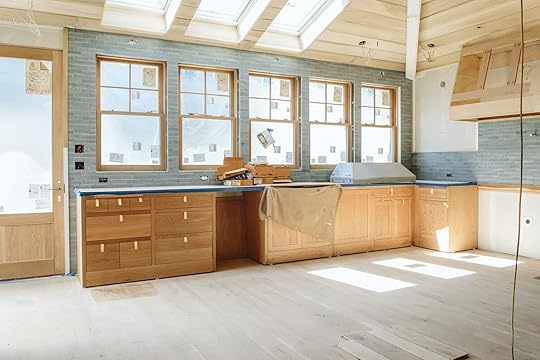
The Farmhouse Kitchen Design Post – A Classic + Stylish Plan For This Hardworking Room (Wish Us Luck)

There is a real irony in today’s post: designing this kitchen to be “simple,” “timeless”, “casual,” and yet “special” took a very very very long time. When you spend so much time creating a tile color to match your favorite Levi’s, or searching for the perfect furniture piece that will double as an island, then well, it’s so. much. fun. I’m extremely happy with the design of this and while it’s not fully executed, I really think all the fun/fussing will have produced exactly what we wanted. We tried extremely hard to choose materials that were timeless, hardworking, high quality, and felt very “us” but appropriate for a farmhouse. It feels really pared back and casual, with some utilitarian elements against simply beautiful materials. Nothing too glam, nothing too traditional, nothing too unexpected or hyper-modern, and hopefully beautiful enough to never need changing (GOOD GOD I HOPE). It really does feel very, very “me” and while it’s not this crazy mix of patterns and trends, I hope that you can see how appropriate it is for our family and this property.
 Where We Started:
The original kitchen was actually nice, but the location of it and its size weren’t as great for our family. We played around with location, which we went deep into in this post. For those of you just showing up (hi) here are some of the iterations we went through.
The Different Designs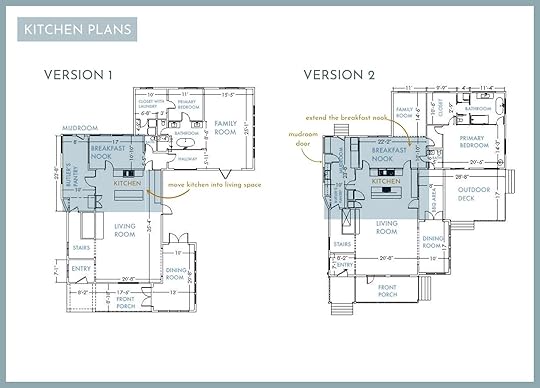 The Final Plan…Or is it?
 But Then…
We realized we were sacrificing the best natural light in the house to a mudroom and pantry…not okay when you LIVE for the natural light in the winter months in the PNW. So thanks to your suggestions, we scrapped all the designs and started over, reclaiming the best spot in the house filled with natural light for our dream kitchen. It meant quite a bit of reconfiguring and a bit of sacrificing (sorry breakfast nook) but it looks and FEELS amazing and we will be in here all the time. We hope.
The FINAL final Kitchen Layout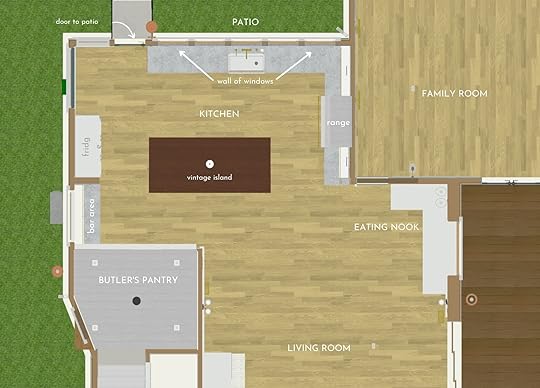
When we walk in there, that wall of south-facing windows and Velux Skylights makes the entire room finally light and bright (the living room was so dark before).
As you can see we ended up putting it in the corner with the best southern light, sacrificing the location of the mudroom (but still getting a mudroom that I literally have dreams about). It’s open to the living room, creating more of a grand room that at times feels almost too big, but don’t you worry – she’s got plans.
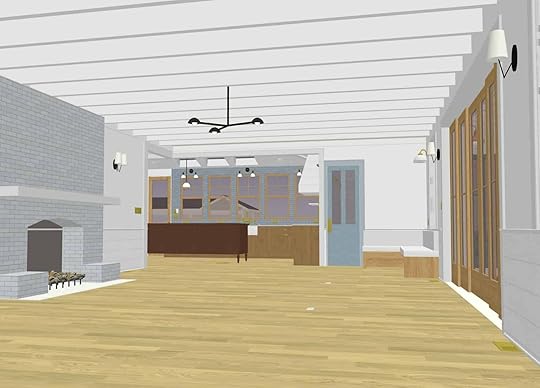
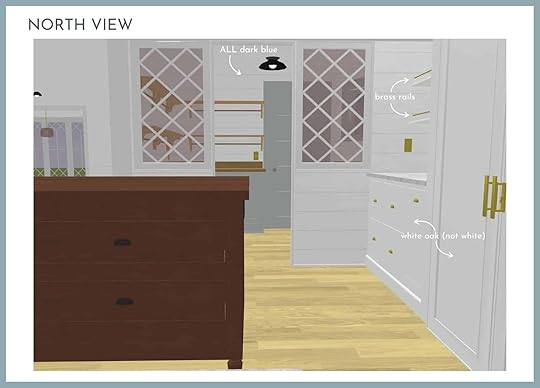
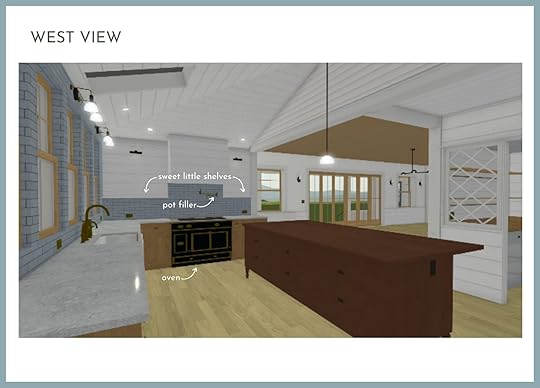
 The Kitchen Design Plan (With A Huge Peek Into The Final!)
That photo brings me SO MUCH JOY. The main wall, as you can see, has a gorgeous bank of Unique Kitchens & Baths white oak cabinets. They are absolutely stunning and function like a dream. UKB is giving you all a discount if you are looking for kitchen cabinets! This includes the design reach out. Just drop my name for 10% off. We walked you through exactly what is going where in this post. But as you can see, they are very simple, with some shaker panels on the larger cupboards, flat panels on the smaller drawers, all inset. This is also the main tile wall (that Pratt + Larson tile is perfection), where the Velux Skylights and Sierra Pacific Windows create the dreamiest light and really just screams EMILY HENDERSON LIVES HERE. And we haven’t even layered any of my accessories that you know I’m collecting to go in here. I truly could not love this tile any more than I do. It’s absolutely perfect (more on that later).


If you are sad about the wood getting painted as a reminder: the wood on the ceiling is poplar and is not stain grade. Do I love the look of real wood? YES. Is it too late to stain it? YES. Besides, as you can see in the renders, we have a lot of wood in here – floor, cabinets, windows, door, and island. The white paneling is the right choice, it’s just hard to see wood first. If you haven’t gotten caught up on the vintage island check out this post.
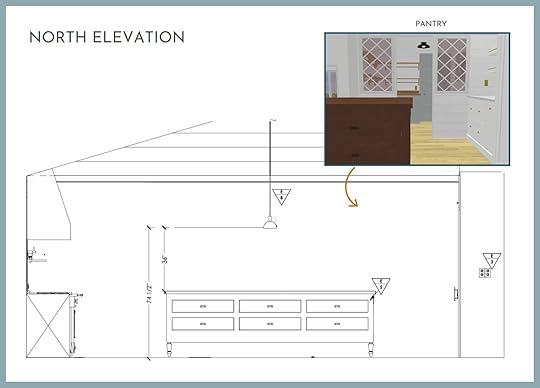
This elevation is a little old as we have three pendants now (and they are higher than 36″, make sure it clears the sight line of whoever is standing and chopping).
 Bar And Integrated Fridge/Freezer – EAST Elevation
As you know we love our drawer fridges and pebble ice machine, so this will be the bar wall over here…And the vent holes are custom for us (and resemble an “H” 🙂 and are just decorative – we don’t really need to vent that storage up there.

The fridge/freezer is now in white oak (these are old renderings) which was a last-minute change that I’m SO HAPPY we did. I can’t get enough of those pretty wood cabinets.

 MATERIALS AND SURFACES
 The Stone: Going against extreme practicality here since we chose this real Carerra marble – but it has a ton of negative space (not a lot of grey veining). Brian doesn’t like veining, I do, but I understand him not wanting that look (he feels like it’s too fancy, which might be just a holdover from the 80s opulence era). So this is a real stone, but super quiet and pretty (honed). We bought from Bedrosian and chose a simple mitered edge (no bull nose, mostly to save money – although honestly, it’s probably nominal at this point). If we had a more contemporary (post-1960s) style home we would have done a quartz, but for an older home, I just couldn’t bring myself to do anything but real stone. This is absolutely a personal choice that only you can make and there is no judgment if you want to do faux marble quartz or porcelain in your older home. The Tile: I think this might be my favorite tile in the world. And while I keep saying that I customized it to my favorite jeans, I did and didn’t. I brought my jeans into the Portland showroom to color match, but we found an exact color match in their inventory already, and honestly, I didn’t want to go through a wasteful exercise of trying to get a color that is “different” enough from an existing color when the existing color is perfect. It’s #P146 from the Pratt + Larson Parchment line, Portland finish in a 2×6 staggered pattern. We tiled the window jams with bullnose edges and it’s absolutely gorgeous.
The White Oak Double-Hung Windows
from Sierra Pacific are STUNNING. We’ll seal them with matte oil and that’s it. So pretty, well made, warm, and beautiful.
The White Oak Cabinets
from Unique Kitchen & Baths are just so beautiful. I can’t wait to show you all of them. They are so high quality, are perfectly executed, and are super timeless. And working with them has been a dream. They came easy to assemble in blankets! (not packaging) which we really appreciated. And the toe kick has yet to be installed, so that’s still to come. The Vintage Furniture Piece doubles as the island of my dreams. We bought it from Aurora Mills, which is a fantastic antique store/warehouse in Aurora. I can’t wait to see it in the actual kitchen.
The Zena Flooring
could not be any prettier. I love that I know it was sustainably grown in Oregon and milled down the street. Read this post to learn about their company (it’s also not as expensive as you’d think it would be…for now).
Our Counter
S
tools
from Fernweh. Read all about why we chose them, here. They are solid, beautiful, sculptural, and made locally by the most talented team of craftspeople. The Hardware
The Stone: Going against extreme practicality here since we chose this real Carerra marble – but it has a ton of negative space (not a lot of grey veining). Brian doesn’t like veining, I do, but I understand him not wanting that look (he feels like it’s too fancy, which might be just a holdover from the 80s opulence era). So this is a real stone, but super quiet and pretty (honed). We bought from Bedrosian and chose a simple mitered edge (no bull nose, mostly to save money – although honestly, it’s probably nominal at this point). If we had a more contemporary (post-1960s) style home we would have done a quartz, but for an older home, I just couldn’t bring myself to do anything but real stone. This is absolutely a personal choice that only you can make and there is no judgment if you want to do faux marble quartz or porcelain in your older home. The Tile: I think this might be my favorite tile in the world. And while I keep saying that I customized it to my favorite jeans, I did and didn’t. I brought my jeans into the Portland showroom to color match, but we found an exact color match in their inventory already, and honestly, I didn’t want to go through a wasteful exercise of trying to get a color that is “different” enough from an existing color when the existing color is perfect. It’s #P146 from the Pratt + Larson Parchment line, Portland finish in a 2×6 staggered pattern. We tiled the window jams with bullnose edges and it’s absolutely gorgeous.
The White Oak Double-Hung Windows
from Sierra Pacific are STUNNING. We’ll seal them with matte oil and that’s it. So pretty, well made, warm, and beautiful.
The White Oak Cabinets
from Unique Kitchen & Baths are just so beautiful. I can’t wait to show you all of them. They are so high quality, are perfectly executed, and are super timeless. And working with them has been a dream. They came easy to assemble in blankets! (not packaging) which we really appreciated. And the toe kick has yet to be installed, so that’s still to come. The Vintage Furniture Piece doubles as the island of my dreams. We bought it from Aurora Mills, which is a fantastic antique store/warehouse in Aurora. I can’t wait to see it in the actual kitchen.
The Zena Flooring
could not be any prettier. I love that I know it was sustainably grown in Oregon and milled down the street. Read this post to learn about their company (it’s also not as expensive as you’d think it would be…for now).
Our Counter
S
tools
from Fernweh. Read all about why we chose them, here. They are solid, beautiful, sculptural, and made locally by the most talented team of craftspeople. The Hardware We mixed black (oil-rubbed bronze, which reads as black) and unlacquered brass awaiting that gorgeous patina.

1. Traditional Brass Gallery Rail | 2. Ball Cabinet Knob | 3. Small Oval Cupboard Latch | 4. Vernon Bin Pull | 5. Mission Appliance Pull
We found this brass gallery rail (for the top of the shelves) from a small family-run company called Pepe and Carols, and it’s perfect for our shelves (there and for the bar).
The hardware is a mix of cute little knobs, drawer pulls, and latches. But it’s MOSTLY drawer pulls, per Brian’s extreme request. I’ll be honest that I wanted to mix it up more, but he really felt strongly about having it look like a library. I’ve never done brass on wood before and I’ve never done so many of one style before. I’m going to do a whole post about why and where we are putting them. It’s a thing. So stay tuned…

 The Lighting
1. Clyde Picture Light | 2. Crawford Flush Mount | 3. Carson Cord Pendant | 4. Fairview Traditional 2 Light Sconce | 5. Clyde Picture Light
As you know we are so happy to be working with Rejuvenation on all our lighting, produced locally in Portland and the customization options are endless (see this post about the process). We mixed my favorite Fairview sconce with those white enamel shades (with the black rim). I LOVE THEM. The scale feels really whimsical and elegant. Flanking the range, we have two art lights (one big, one small) which will illuminate a rotating collection of kitchen-appropriate art (still life oil paintings of vegetables, and I’m even eyeing some chicken art – that’s right! Chicken art trend post coming soon!). Over the island, we have three Carson pendants (not shown in the renderings), then the cute little semi-flush over the bar.
PLUMBING + FIXTURES + THE OVEN!Where we chose to lean in on the old-world vibe a bit.

1. deVOL Aged Brass Ionian Tap | 2. deVOL Aged Brass Filter Tap | 3. deVOL Basket Waste Strainer & Overflow Kit in Brass | 4. deVOL Aged Brass Pot Filler Tap | 5. Fireclay Kitchen Sink with Rim | 6. Aga Range
I went for unlacquered brass on the faucets (the only place in the house for plumbing fixtures) and that Aga range from Build with Ferguson has arrived (unopened, and I’m so excited). I can’t wait to try my hand at induction (nervous but we’ll learn together). We ordered brass for the knobs so it’s a mixed metal range, which I’m so excited about (no photos of the mixed metal yet). The farmhouse sink is big and pretty, and the apron is so classic but has some special interest with the ribbing.
THE WHOLE KITCHEN STORY
Carrera Marble | PRATT + LARSON 2×6 tile | Sierra Pacific Windows | Unique Kitchen & Baths White Oak Cabinets | Zena Forest White Oak Flooring | Fernweh Woodworking Stools
This mood board is hard to show you because so many of the things are vintage or custom so it’s not the typical product board we do. I think that the renders and updated photos show you better than anything (see below).
IT IS GOING TO BE JUST BEAUTIFUL!


We get closer every day to moving in (hopefully the week of August 22nd) with progress every time we stop by. It’s extremely rewarding to see all the work that myself and ARCIFORM have put into the design and execution of this kitchen. Really sitting here full of gratitude and excitement right now, so thank you all for making it through this post and reading along on this long farmhouse journey. We are so close!!!!
*Opener and Progress Photos by Kaitlin Green
The post The Farmhouse Kitchen Design Post – A Classic + Stylish Plan For This Hardworking Room (Wish Us Luck) appeared first on Emily Henderson.
August 10, 2022
Don’t Be Scared! This New Tile Trend Is Both Classic And Surprisingly Fresh

“Jess…A trend? For a permanent finish??!” I know, I know. It sounds like a gut job in 10 years but hear me out. This isn’t a trend that feels or looks like “a trend” per se. I mean a stripe pattern is one of the most classic patterns of all time, right? So if you were to take a risk on a pattern, this would be it. Even Emily was HIGHLY considering using it for the farmhouse guest bath. What’s also pretty (read: extremely) great is that there are a ton of different ways to go about designing with it. Need some visual aid? Well, let me show you…

 design by studiowta and ash nyc | via dezeen
These bathrooms and the yellow bathroom above are the ones that were Em’s biggest inspiration for what she was thinking for the farmhouse house guest bath and I can see why. The hand-painted tiles in moody jewel tones are incredible and look almost vintage…perfect for the farmhouse. Plus they played around with the pattern. For the yellow bathroom, they played with orientation and did a variation of the stripe with that staggered border. Then for the green and red showers, the tiles are actually diamond-shaped but painted in a way that creates stripes when layed all together. It’s so visually interesting and yet wildly simple. Emily ultimately felt that this pattern was for a different style of home, not her minimal shaker farmhouse. Secretly she kinda regrets not going for it…would you have made the same decision??
 design by david bentheim | photo by ngoc minh ngo | via house and garden
Here is another play on stripes because the pattern is also a herringbone! How cool does this look and how appropriate but fresh for a modern vintage bathroom design? There’s so much movement with the bolder color variation in the gold stripes but then the white stripes help to ground the design so it doesn’t look too busy.
Something super important to consider with this type of tile install is that unless the tile magical comes in sheets, the labor to individually place each of these tiles will cost you. I don’t want that to be a surprise! Talk to your tile installer before you get your heart too set on this design. Or maybe install it yourself!
 design by barlow and barlow | photos by jonathan bond
I mean give me a break! How sweet is this bathroom?! The contrast between that floral wallpaper and the geometric stripes is so good. Plus that pencil trim tile really finishes it off beautifully. Oh and 10/10 for that tonal-colored baseboard. This bathroom is just FULL of personality but doesn’t look trendy. See what I’m talking about with this pattern? No need to worry about it going out of style.
 design by elizabeth roberts | photo by matthew williams
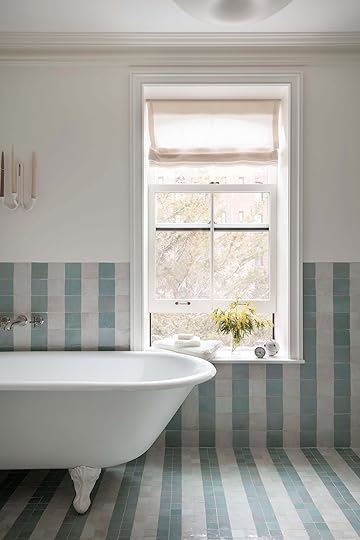
If you’re someone who wants the best of worlds, a fun AND calming bathroom, may I suggest a pastel-colored stripe tile pattern? This bathroom is exactly that. The colors are soft and inviting but the pattern says “hey baby, I’ve got some personality too!” It also helps that the tile only goes up half of the wall. If it was the whole wall this would still have been an awesome bathroom but would have had a completely different look and feel. Keep that in mind along with pattern scale. Note that the square tiles on the floor are half the size of the ones on the wall. It’s a small detail that adds visual interest. Plus it’s just cool.
 design by barlow and barlow | photo by kristin perers
This tile and pattern application feels a bit more modern than the ones above. Despite the vintage-inspired floral wallpaper, console sink vanity, and fixtures, the horizontal stripes in that skinny tile feel modern to me. It’s a fun play on mixing styles without going too hard. Can we also note the genius idea to put the shower knobs on the outside of the shower?? Not even a chance of getting wet before you want to. I love it so much.
 design by india mahdavi | photo by vincent leroux | via architectural digest france
These next few rooms are more modern but with a ton of soul. Clearly, this is a very cool bathroom that leans o n modern side but has so much depth. The handmade tiles that are slightly imperfectly laid is what does it for me. They are a wonderful contrast to the other modern elements in the room. This could have easily been a neutral-toned, modern organic bathroom but instead, has all of those elements with a very fun twist. I think what we are seeing is the importance of color tone and texture. You can still add a fun pattern to your calm room if you choose the right color. This olive green is both vibrant and soothing.

 design by jean-philippe demeyer | photos by miguel flores-vianna | via architectural digest
I know I’ve already shown this kitchen in my plate post but how could I not include it?! It’s so fun and shows that stripes aren’t just for bathrooms. This is definitely a statement. But if you want something bold and fun that has lasting power this is an incredible option. Also, can we note that perfect archway and the accent pattern? Same tiles, just a slight twist!
 design by jean-philippe demeyer | photo by miguel flores-vianna | via architectural digest
Same house, different room, different color, also amazing. Check out that tiles detail amount the window. So good!

 left: design by tamsin johnson, photo by anson smart, via the local project | right: design by robert mckinley, photo by sarah elliott, via design milk
Now we are only to the purely modern bathrooms. Get those tumbled tiled outta here! These two bathrooms are muted in tone and lovely. The tricolored stripes on the left would be so fun in a kid’s or guest bath. Then notice the play with tile scale on the wall and how the striped are spaced. There are only two kinds of tiles but the overall application is so fun.

 design and photos by don cantillo | via domino
Let the fun continue. I love that saturated green and black color mix! Oh and I also love how the grout lines don’t match up. I think that adds to the playfulness…the vaulted ceiling doesn’t hurt either. This is another great example of choosing to not tile from floor to ceiling around the entire room. They choose the perfect moment to do it. It makes that wall/ceiling moment feel special and avoids making the whole room feel too overwhelming.

 design by michael malapert | via travelocity
Maybe you just want a striped accent? This is a bathroom in a hotel room so pattern risks like these are encouraged:) But honestly, I love it. All of the other design elements are super classic so the pop of color with the tile (and the blue wall) is such a small but impactful choice.

 design by natalie papier | photos by easterday creative
I think we all remember this bathroom by Natalie Papier from last year’s ORC. I mean what a stunner! Aside from choosing the most joyous yellow color maybe ever, the tile’s super large scale is what makes it fun and modern and even “cabana”. I’m sure because Natalie also only did stripes going from wall to wall in one direction, that it helps to visually elongate the room. A little visual trick if you will. This bathroom will always make me happy.
 design by skout | photo by ryan garvin | via domino reno
Same idea but skinnier stripes! You really can’t go wrong with black and white tile and this pattern just makes the combo that much better. Also, I can’t get over how cool having lockers in a family home bathroom is.
So what are your thoughts? Do you think this is a “safe” pattern for longevity? Which is your favorite room? See you in the comments!
Love you, mean it.
Opening Image Credits: via Splendido Mare
The post Don’t Be Scared! This New Tile Trend Is Both Classic And Surprisingly Fresh appeared first on Emily Henderson.
Don’t Be Scared! This New Tile Trend Is Both Classic And Surprising Fresh
“Jess…A trend? For a permanent finish??!” I know, I know. It sounds like a gut job in 10 years but hear me out. This isn’t a trend that feels or looks like “a trend” per se. I mean a stripe pattern is one of the most classic patterns of all time, right? So if you were to take a risk on a pattern, this would be it. Even Emily was HIGHLY considering using it for the farmhouse guest bath. What’s also pretty (read: extremely) great is that there are a ton of different ways to go about designing with it. Need some visual aid? Well, let me show you…
design by studiowta and ash nyc | via dezeenThese bathrooms and the yellow bathroom above are the ones that were Em’s biggest inspiration for what she was thinking for the farmhouse house guest bath and I can see why. The hand-painted tiles in moody jewel tones are incredible and look almost vintage…perfect for the farmhouse. Plus they played around with the pattern. For the yellow bathroom, they played with orientation and did a variation of the stripe with that staggered border. Then for the green and red showers, the tiles are actually diamond-shaped but painted in a way that creates stripes when layed all together. It’s so visually interesting and yet wildly simple. Emily ultimately felt that this pattern was for a different style of home, not her minimal shaker farmhouse. Secretly she kinda regrets not going for it…would you have made the same decision??
design by david bentheim | photo by ngoc minh ngo | via house and gardenHere is another play on stripes because the pattern is also a herringbone! How cool does this look and how appropriate but fresh for a modern vintage bathroom design? There’s so much movement with the bolder color variation in the gold stripes but then the white stripes help to ground the design so it doesn’t look too busy.
Something super important to consider with this type of tile install is that unless the tile magical comes in sheets, the labor to individually place each of these tiles will cost you. I don’t want that to be a surprise! Talk to your tile installer before you get your heart too set on this design. Or maybe install it yourself!
design by barlow and barlow | photos by jonathan bondI mean give me a break! How sweet is this bathroom?! The contrast between that floral wallpaper and the geometric stripes is so good. Plus that pencil trim tile really finishes it off beautifully. Oh and 10/10 for that tonal-colored baseboard. This bathroom is just FULL of personality but doesn’t look trendy. See what I’m talking about with this pattern? No need to worry about it going out of style.
design by elizabeth roberts | photo by matthew williamsIf you’re someone who wants the best of worlds, a fun AND calming bathroom, may I suggest a pastel-colored stripe tile pattern? This bathroom is exactly that. The colors are soft and inviting but the pattern says “hey baby, I’ve got some personality too!” It also helps that the tile only goes up half of the wall. If it was the whole wall this would still have been an awesome bathroom but would have had a completely different look and feel. Keep that in mind along with pattern scale. Note that the square tiles on the floor are half the size of the ones on the wall. It’s a small detail that adds visual interest. Plus it’s just cool.
design by barlow and barlow | photo by kristin perersThis tile and pattern application feels a bit more modern than the ones above. Despite the vintage-inspired floral wallpaper, console sink vanity, and fixtures, the horizontal stripes in that skinny tile feel modern to me. It’s a fun play on mixing styles without going too hard. Can we also note the genius idea to put the shower knobs on the outside of the shower?? Not even a chance of getting wet before you want to. I love it so much.
design by india mahdavi | photo by vincent leroux | via architectural digest franceThese next few rooms are more modern but with a ton of soul. Clearly, this is a very cool bathroom that leans o n modern side but has so much depth. The handmade tiles that are slightly imperfectly laid is what does it for me. They are a wonderful contrast to the other modern elements in the room. This could have easily been a neutral-toned, modern organic bathroom but instead, has all of those elements with a very fun twist. I think what we are seeing is the importance of color tone and texture. You can still add a fun pattern to your calm room if you choose the right color. This olive green is both vibrant and soothing.
design by jean-philippe demeyer | photos by miguel flores-vianna | via architectural digestI know I’ve already shown this kitchen in my plate post but how could I not include it?! It’s so fun and shows that stripes aren’t just for bathrooms. This is definitely a statement. But if you want something bold and fun that has lasting power this is an incredible option. Also, can we note that perfect archway and the accent pattern? Same tiles, just a slight twist!
design by jean-philippe demeyer | photo by miguel flores-vianna | via architectural digestSame house, different room, different color, also amazing. Check out that tiles detail amount the window. So good!
left: design by tamsin johnson, photo by anson smart, via the local project | right: design by robert mckinley, photo by sarah elliott, via design milkNow we are only to the purely modern bathrooms. Get those tumbled tiled outta here! These two bathrooms are muted in tone and lovely. The tricolored stripes on the left would be so fun in a kid’s or guest bath. Then notice the play with tile scale on the wall and how the striped are spaced. There are only two kinds of tiles but the overall application is so fun.
design and photos by don cantillo | via dominoLet the fun continue. I love that saturated green and black color mix! Oh and I also love how the grout lines don’t match up. I think that adds to the playfulness…the vaulted ceiling doesn’t hurt either. This is another great example of choosing to not tile from floor to ceiling around the entire room. They choose the perfect moment to do it. It makes that wall/ceiling moment feel special and avoids making the whole room feel too overwhelming.
design by michael malapert | via travelocityMaybe you just want a striped accent? This is a bathroom in a hotel room so pattern risks like these are encouraged:) But honestly, I love it. All of the other design elements are super classic so the pop of color with the tile (and the blue wall) is such a small but impactful choice.
design by natalie papier | photos by easterday creativeI think we all remember this bathroom by Natalie Papier from last year’s ORC. I mean what a stunner! Aside from choosing the most joyous yellow color maybe ever, the tile’s super large scale is what makes it fun and modern and even “cabana”. I’m sure because Natalie also only did stripes going from wall to wall in one direction, that it helps to visually elongate the room. A little visual trick if you will. This bathroom will always make me happy.
design by skout | photo by ryan garvin | via domino renoSame idea but skinnier stripes! You really can’t go wrong with black and white tile and this pattern just makes the combo that much better. Also, I can’t get over how cool having lockers in a family home bathroom is.
So what are your thoughts? Do you think this is a “safe” pattern for longevity? Which is your favorite room? See you in the comments!
Love you, mean it.
Opening Image Credits: via Splendido Mare
The post Don’t Be Scared! This New Tile Trend Is Both Classic And Surprising Fresh appeared first on Emily Henderson.
August 9, 2022
Do You Need A Family Organization Refresh? Here Are Six Small Ways You All Can Feel More Organized

I have always felt the month of August offers a great opportunity for renewal. It must be the back-to-school mentality that I never grew out of–the one that to this day makes it difficult for me to walk down a school supplies aisle without wanting every marker, pen, and notebook. “You have 100 unused notebooks at home!!” I tell myself, as I reach for a new planner that will CERTAINLY get my life on track. Whatever the impulse may be, I know I am not alone in wanting to refresh, renew, and re-organize this time of year. In particular, I know those of you with families and kids actually going back to school can relate. As this month catapults us into a new phase of the year, we here at EHD got to thinking about the systems that make us feel more organized. What are the pain points and how do we alleviate them? We all brainstormed some simple ideas that can be implemented easily so without further ado, let’s get organized:
Organize Sandwich Bags For Easier Lunch Prep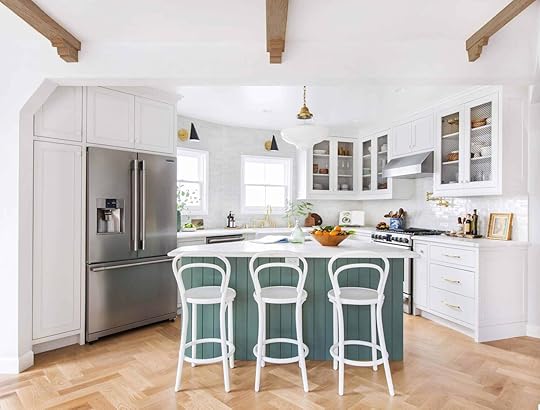 photo by tessa neustadt | from: our modern english country kitchen
Kitchen drawer organization feels (and looks) oh so good. We all want the peace of mind that comes with opening a drawer and seeing everything has a place. But drawers are often sneaky little monsters because you can have a designated utensil drawer but throwing lose utensils in a drawer isn’t going to feel organized at all. This is why we have utensil holders and drawer dividers. A drawer isn’t as useful or organized without a little help to keep all the little things in their rightful place.
Now if you feel like one drawer has been driving you a little mad, I think I might be able to guess which one. The dreaded sandwich bag drawer is one I battle with every day. The boxes don’t fit quite right, it’s a constant game of Tetris, and they make prying the drawer open an actual workout. If this is a situation you can relate to, it might be time to decant the bags and put them in one of these simple yet so effective organizers:

1. Silicone Ziplock Bag Organizer for Kitchen Drawer | 2. Acrylic Kitchen Drawer Zip Food Storage Bag Organizer | 3. Plastic Bag Organizer w/Sliding Cover and Engraved Labels | 4. Sandwich Bag Storage Organizer | 5. Bag Organizer Box Sets | 6. Bag Storage Organizer
I am already having fantasies about opening the drawer effortlessly and pulling out the exact size bag I am looking for with ease. I love #5 for its light wood shape and minimal labels, and a clear one like #2 is great so you can see when you are running low.
Disclaimer alert! I know most of us are trying to reduce single-use plastics, and these containers can absolutely work for reusable bags too. However, some of us on the team have tried both reusable and biodegradable options with no luck (so we don’t have any we can honestly recommend yet). Does anyone have any recommendations for reusable bags that don’t get disgusting or biodegradable plant-based ones that don’t make food taste funny? Let us know in the comments!
Use Clear Containers To Organize Your Pantry photo by sara ligorria-tramp | from: inside all our (super organized) drawers & cabinets in the mountain house kitchen
Growing up with two brothers, I can’t count how many times I would go grab a granola bar or pour myself a bowl of cereal, and find the box empty. This was endlessly frustrating and would lead to screaming matches, putting everyone in a bad mood. I now realize why decanting food is not only pleasing to the eyes but is so practical. It signals when you are running low on something and a pantry is always going to be more organized if the dry foods have a specific place. I started decanting dry foods this year and my pantry is 100x more clean and organized.
For kids, Emily suggests keeping their snacks in low drawers so they can access them easily. In the mountain house pantry above, they love using clear lazy susans for easy-to-grab snacks because they make everything visible.

1. Slanted Front Kitchen Pantry Storage Organizer Basket – 2 Pack | 2. Bamboo Wood Organizer Storage Bin | 3. YouCopia Kitchen Cabinet Pantry ShelfBin Packet & Snack Bin Organizer | 4. mDesign Bamboo Slotted Bins (Set of 3) | 5. mDesign Plastic Divided Kitchen Organizer Bin Container Box | 6. Crazy Susan® Turntable with 6 Bins in White | 7. Set of 4 Clear Pantry Organizer Bins | 8. Snack Turntable with Gray Liner and Non-Slip Base | 9. The Home Edit By IDesign Sand Open-Front Bins
For bulkier items, #4 is a good option (and comes in a set of 3). Like I said before, lazy susans like #6 are perfect for snacks for kids, and #5 is another nice option for granola bars or other easy-to-grab and go snacks.
Hang Up Shared Calendars & Chore Charts design and photo by keyanna bowen | from: blue walls be gone! key’s totally transformed office reveal
Earlier this year, my husband and I started using a physical calendar to keep track of our schedules and it is a complete game changer. Even though there are only two of us in our household, it helps us feel secure and more organized when we can see what the other has on their plate each day.
While we haven’t started using chore charts yet (everything is a friendly competition in my eyes and in this category, he would undoubtedly win), I can see how that would be incredibly useful for us adults too. For kids, Emily is a massive fan of having designated cleaning supplies in one place for her kids, so they feel like big kids and have more ownership over their cleaning tools. The chore charts can act as a reward system and using fun stickers or colorful markers to check off tasks is an inspiring visual way to keep kids engaged (at least this is what I have heard :)).

1. Acrylic Weekly Calendar and Wall Hanging Organizer Set of 4 | 2. 2023 Wall Calendar, 9.5 X 17.25, Wall Planner | 3. U Brands 8”x8” Chore Pad Bold | 4. Acrylic Wall Calendar with Translucent Background | 5. Leila Wall Calendar | 6. Personalized Acrylic Monthly Calendar with Weekly Planner | 7. Peel and Stick Whiteboard Chore Chart | 8. Dry Erase Calendar Decals | 9. Acrylic Wall Calendar with Translucent Background
Many of these are acrylic wall decals so you can use a dry erase marker and use them year after year. I am someone who prefers physical print copies so I am drawn to #2 and #3, but #4 is a really nice, minimal option.
Use Rolling Carts To Create Productivity Stations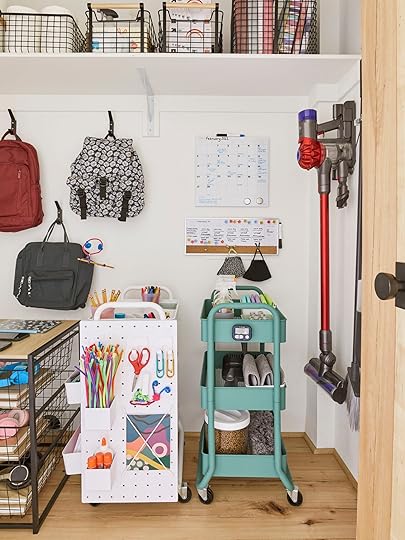 photo by sara ligorria-tramp | styled by emily bowser | from: kids organizational hacks – inspiring ways to get them to do more by themselves
I love this mantra that Emily says often: “without systems there’s chaos”. She mostly uses it in reference to her 7 and 9-year-old kids, but I feel it applies to my 28-year-old self too. Even though I am not the same routine everyday kind of gal, I still need systems in place so I set myself up to be productive and efficient throughout the day (not just at work but in life).
For little ones, creating “stations” can be a fun (and organized) way to encourage them to do the tasks they probably don’t want to do. You might remember this post from earlier this year, where Emily shared some clever kids’ organizational hacks, and in it, she shared the idea of creating chores, homework, and crafting carts (envisioned by Emily Bowser). The idea is to create zones for these tasks to help kids stay focused and more organized. You keep all supplies for that task in one drawer or cart, so everything they need is in one place thus making the task less chaotic and scary. I am a HUGE fan of this and think I might need a chore cart of my own to make my own chores more manageable and fun (I am 12 years old at best).

1. Pierro Bar Cart | 2. 3-Drawer Cart Storage Bin Organizer Rolling with Plastic Drawers | 3. Gold Wire Basket 3 Tier Antonia Rolling Cart | 4. 3 Tier Round Metal Utility Cart | 5. 3 Tier Metal Utility Cart | 6. Honey-Can-Do Slim Wire Cart
#2 is a playful option that would look really sweet in a playroom or kids room. #1 has a pretty, minimal wood tone that would be a nice accent in a neutral kitchen or laundry room (or really, any room). If you are looking for something small space friendly, #6 is a great narrow option.
Optimize Your Shoe Storage photo by sara ligorria-tramp | design by jess bunge for ehd | from: jess’ long awaited small space living room reveal
 A shoe rack, bin, or bench is a great way to start what we like to call a “command center”. It’s usually in the entryway (but doesn’t need to be) and is where all of your grab-and-go stuff should live. Shoes, bags, sunglasses, keys, backpacks, etc etc. This zone is super helpful to have on those rushed mornings. Here are some simple shoe storage options we love:
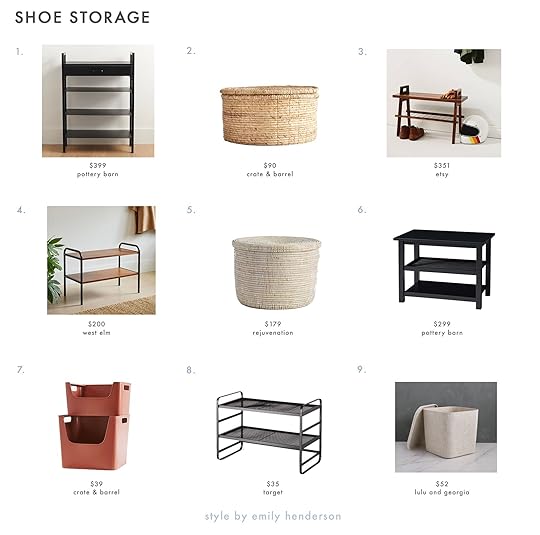
1. Temple Street Metal/Wooden Shoe Storage | 2. Seaton Large Round Woven Storage Basket with Lid | 3. 26″ Entryway/hallway Storage Bench With Shoe Rack | 4. Mid-Century Disk Entryway Collection | 5. Woven Hamper | 6. Aubrey Entry Shoe Rack | 7. Small Washed Red Metal Stacking Storage Bin | 8. 2 Tier Shoe Rack Metal Mesh | 9. The Sculpted Bin With Lid
#1 is a sleek and modern entryway option that would be great for a small space. If you like lidded baskets to eliminate visual clutter we love #2, #5, and #9. We used #7 in the brand new kid’s room reveal we did with Velux Skylights (if you haven’t checked it out yet, run don’t walk!).
Use Wall Hooks Near Your Entry For Backpacks & Coats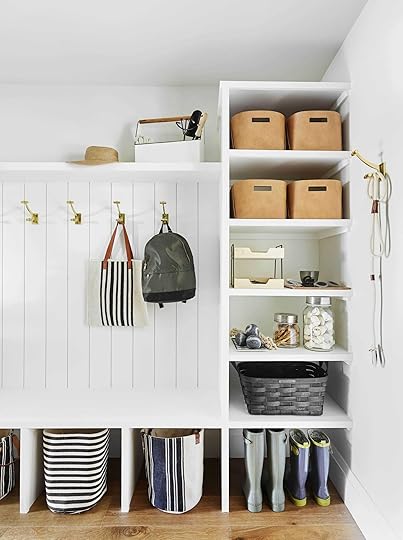 photo by sara ligorria-tramp | from: 8 steps to building a smart, organized pantry and mudroom
This isn’t a new idea but having an entryway hook system is so important for kids (and adults) on the go and is a great addition to the aforementioned “command center”. For kids going back to school, hooks create an easy drop zone for backpacks, coats, umbrellas, etc. If you don’t have a mudroom like the above one from the Portland project, Emily wrote a post on small entryway organization hacks here and it’s full of clever storage ideas.
1. Acrylic Row Of Hooks | 2. Peggy 9 coat rack | 3. Beaumont Grey Peg Rail | 4. Marble Wall Coat Rack | 5. Wood Peg Wall Hook | 6. Cayman Row Of Hooks | 7. Sadie Wall Hooks | 8. Utility Hook Rack | 9. Modern Home by Bellver Wooden Ball Wall Hooks – Set of 4
If you love a peg rail look, #2, #5, #6, and #7 are beautiful options. For a more industrial look, I love #8 but oh my, those wooden ball hooks are so playful and cool.
And that’s a wrap! I hope these simple hacks will help you and yours feel more organized for the rest of the year. Happy organizing! xx
Opener Image Credit: Photo by Sara Ligorria-Tramp | Styled by Emily Bowser | From: IT’S TIME TO ORGANIZE – Small Entry Organization Hacks For Those Of Us Who Are “Mudroom-Less”
The post Do You Need A Family Organization Refresh? Here Are Six Small Ways You All Can Feel More Organized appeared first on Emily Henderson.
August 8, 2022
Choosing The Cozy Paint Color For Our “Low-Light” Family Room… And Then Choosing Again

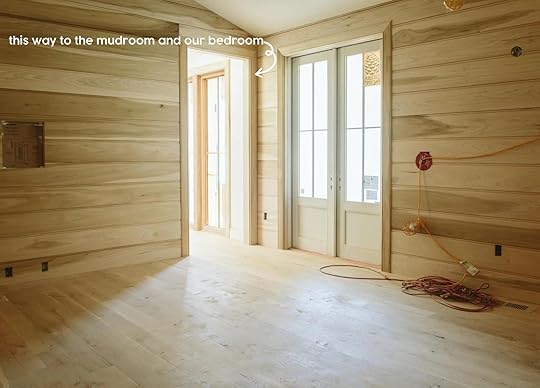
Thank goodness I’m not trying to bag new design clients right now. I really should blog more about all the design decisions that I’ve totally nailed and had zero hesitation on, but what’s the fun in that? Having to pretend to be great the first time at everything would just be exhausting so I’m glad we have this safe space to really go through the process. I have my strengths, but they lie more in instinct than bold fast decisions. But my instincts tend to be safe at this stage which both protects and annoys me. Luckily the permanence of paint is less threatening than say, tile or flooring, and over the years I have gotten much better at it so I’m trusting myself more. Plus the whole large paint sticker sample thing is extremely helpful. I’m trying HARD to go outside my “50 shades of blue” comfort zone and create a palette that is cohesive, vibe-y, and works with the overall art direction of the house (Scandinavian shaker farmhouse) while also creating the mood that we want in each room. This room is the most challenging – The media/TV/family room and here is what you need to know about it before we get into the color:
The only sources of natural light are few and indirect – the french doors to the covered back porch and the hallway with windows and skylights (and TBH I wish we had put a door there so when we are watching TV we wouldn’t have that light source – window treatments might be happening). We wanted this room to feel dark and cozy and put it in the interior of the house on purpose – with barely an external wall. We didn’t put skylights in here because the function of the room is movie watching and cuddling – we envision our winters being cozied up in here. But as I’m writing this I’m wondering…should we put skylights in here with room darkening shades so daytime can be more pleasant with nighttime feeling cozy? We vaulted the ceilings and I don’t think we have any HVAC up there…stay tuned… There will be a stove fireplace in the corner on a low hearth/storage bench underneath the TV.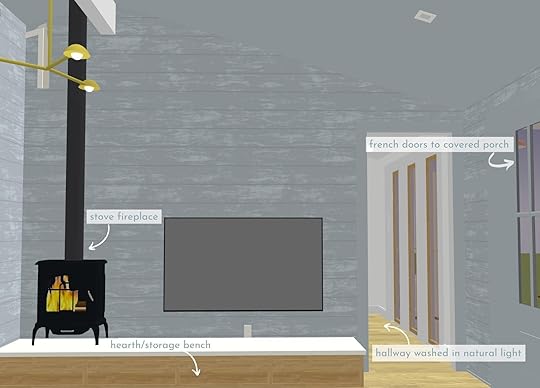 We will NOT keep the paneling natural wood no matter how pretty it looks here – the reasons are: 1. Poplar is paint grain and doesn’t stain well, 2. To stain it we’d have to go very dark to reduce the high contrast green tones in the grain, and 3. Dark stained wood would be more of a “cabin” vibe than a farmhouse one. If we could go back in time would we have chosen white oak for the walls? Maybe, but it would be much more expensive in material and in installation (it’s harder to work with, literally). Ultimately we think that the farmhouse vibe is better painted than stained, but it’s hard to see it as wood, I agree, then paint it (I wish we had used primed paneling but we couldn’t because it’s a custom run). This room is not a corner or self-contained media room – it is a pass-through room which makes it trickier, IMO. We want the feeling of it to be dark but do we really want to go from a light room, through a really dark room to get into another brightly lit room? Would that feel weird? I think so. I think dark rooms work better when they are more self-contained, or have a ton of natural light…but honestly, I’m NOT an expert in dark rooms so I feel hesitant to suggest anything.

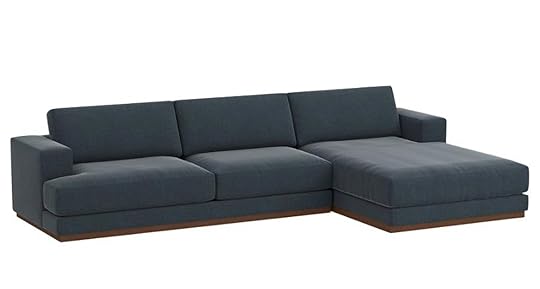
Other things you should know – We already have our cuddly sectional which we are obsessed with. Here she is:
We do not have a rug yet but I’m hoping to use the rug from our former living room since it’s not big enough for our new living room:
 photo by sara ligorria-tramp | from: a quick update: the changes i’ve made to my la living room
The Zena wood floors here won’t be this light – they are already sealed and covered but my goodness they are GORGEOUS and a lot richer than the dust-covered floor here.
So my first instinct was to do a warm pink/purple/mauve color. Something to contrast with the sofa, draw you in from the living room and feel so cozy. Brian nixed that pretty quickly but I think it’s because I didn’t show him the right tones. My bad. I now realize the colors I presented were either too pink or too brown.


 The Decision: Round 1 – Blues And Greens
A few days before we left for a month we had to make all the downstairs paint color decisions. Most of them I thought were “easy” but this one stumped me. So I called in Anne and Stephyn (ARCIFORM), and of course, Brian and Sarah. After staring at like 30 options we narrowed it down to these blue and green worlds. Of course, like a real pro, I had lost my fabric swatch of our sectional so as you can see below I held up the phone with the photo of the sectional to the swatch to see what worked.

We all decided that Privileged Green would be it (despite its name). It’s a medium-tone green that has some blue in it but is decidedly green (remember that we have blue tile in the kitchen so when staring at it from the living room you likely don’t want to see two different shades of blue).

I wasn’t fully on board with Privilege Green, but everyone else felt EXTREMELY strong about it. Fine. But also maybe they were just done choosing paint colors. Maybe they have a better gauge of “what’s important in life”. Maybe they were hot and hangry. My hesitations were that it went very dark without natural light and that most of our artwork, light in color and framed in glass, would really contrast and reflect, negating the cozy and calmness of it all. A wall of oil seascapes or mountainscapes? Sure! But that’s not what we have (but could if we weren’t so starved for wall space in this house). We have mostly modern art. I also feared that while I love green, I don’t know if an all blue/green room sounded as good to me in this otherwise really light/airy home with one “cozier” room. I don’t know…I just didn’t feel GREAT about that color in that room, despite really liking the color in a different home.
The paint prep work for the house is going into week three and therefore I had more time to decide and then question my decisions. When we got back in town I went immediately to the house and now primed I felt even more sure that a dark green in the middle of these two well-lit rooms would feel jarring and off. I immediately ordered a bunch of larger sticker samples of mauves, but this time less pink and more gray. We have been told over and over “no gray paint” in Portland because well, the PNW can be dreary enough during “the great long dark”, so I think originally I really strayed away from anything close to gray. But I found a few that were so warm and cozy in the gray/mauve worlds and I started to feel hopeful.
You see I LOVE a warm tone mixed with our cool blues. And I really didn’t want 50 shades of blue or gray. So I ordered the samples and headed over with a lot of hope that A. I was right and B. Brian would passionately agree.

I held up the paint sample and at first it was a fast but not hard “NO”. Brian kindly asked, “is it kinda gray and dreary”, which I had been expecting. I responded, relating to his fear, “I would think that too!” and then I gave him my pitch. It’s warm and cozy and actually pretty light, but when in a dark room it goes medium toned in such a good way. It contrasts so well with the blue of the sofa and the kitchen, and yet isn’t “pink” or “purple”. It’s a complex color with a lot of pigments so the color changes all day (I love this in a paint color while also unpredictable, FYI). It feels more like a Scandinavian pastel tone – a neutral that you can just float through. Sure enough within 5 minutes, he said “No. You’re right. That’s good!!” Just like that! I think he could tell that I had been thinking about it for months and felt really really strongly about this color. He was very ready to put it to bed. I of course brought some other options, too, but Ponder by Sherwin-Williams was the real winner.

It’s so hard for the colors to be properly represented here because it had no real natural light (Kaitlin, our photographer, does such a good job). The sofa fabric isn’t quite that dark (I think the velvet sucked the light a bit), and the gray is a bit darker.

We went around the room and took photos of it on every wall, trying to make sure it felt good. Again, it’s hard to understand but this room is void of a lot of natural light so the color looks light here, but check it out from the living room…

See? There you can see how it actually goes pretty darn dark in there. It draws you in but isn’t just this dark void.

Lastly, I wanted to see how it looked if we had the french doors open to the back porch. When we have the darker green paint swatch hanging there I thought it felt weird to have such an indoor/outdoor situation into a dark room. But let me be clear, this is a personal preference and can ABSOLUTELY look great and I’ve witnessed it myself. I just want the house to flow a bit more from room to room, whereas some people want each room to be its own experience (which I love, just not for me). It’s like how some boutique hotels really create a different vibe and color palette for each space so when you walk in and you really get a sense of excitement and wonder. I love that, but again just not for this house. It’s honestly starting to feel like we are getting there – we have 10 different paint colors that draw you into different rooms and help create a really good vibe, but they all as of now are really feeling good together. And if I’m wrong about this whole “light Scandinavian farmhouse in the PNW” thing, I can always add more paint and go darker.

*Photos unless otherwise noted by Kaitlin Green
The post Choosing The Cozy Paint Color For Our “Low-Light” Family Room… And Then Choosing Again appeared first on Emily Henderson.
August 7, 2022
The Link Up: Emily’s New Kitchen Tool That’s Changed Her Salads, Jess’ Picks For Cool Bachelorette Party Decorations, And Ryann’s Big Announcement

Happy August y’all and a happy one it is! Our very own Ryann Miller shall now be forever known as Ryann Trombetti. That’s right, our gal had the sweetest courthouse wedding with just their parents by their sides last weekend and we all could not be happier for her and her HUSBAND, Rocky. Even though it was just Ryann who got married, I think we are all riding high on this celebration of love. Congratulations Mr. and Mrs. Trombetti! Now that we are all in a good mood, let’s get into these links and what we can only assume is a very Ryann-approved home tour:)


 design by gaby dellal | styled by sara mathers | photos by simon upton | via architectural digest
This week’s house tour is not only EHD/Ryann-approved because Ryann and the owner share a maiden name, ha. But also that its charm and soul are almost overwhelming. This 16th-century thatched-roof cottage, that’s straight out of a storybook, was restored by Sienna Miller’s (the homeowner) friend and director, Gaby Dellal. Actually, Gaby gave Sienna her first acting job! The story is wonderful, the interiors are breathtaking yet completely welcoming, and there’s almost an infinite amount of vintage. Check the rest out here!
From Emily: After 4 years of heavy chopping for soups/salads and refusing to buy those weird “As Seen On TV” chopping tools with a ton of annoying accessories (no offense if you love those!), I finally bought myself a Mandolin and it’s EXCELLENT. This was spurred by my desire to prep out salad makings on Sunday for the week – I wanted those super thin radishes, carrots, and slightly thicker cucumber. I read a ton of reviews and watched videos before I settled on this one, which is very simple (only 2 parts), yet has enough variety in settings to make thicker slices if needed. So many mandolins that were recommended were beautiful french or Japanese and over $200 so I just put it off forever, not willing to spend that (and frankly intimidated by the amount of functionality). This one is $50 (still an investment for a KITCHEN TOOL, but not $200) and so far I’ve LOVED IT. Lunchtime salad assembly for Bri and I is an absolute breeze. I really should show you my chopped salad formula, it’s absolutely delicious and is something I look forward to eating all morning every day.
 mr. and mrs. trombetti<3
From Ryann: The secret is out! I got hitched last Friday!!! My now HUSBAND and I eloped at Beverly Hills City Hall and it was perfect. The plan wasn’t always to get married on a random Friday but when we were at city hall getting our marriage license, we sort of spontaneously decided to make an appointment for a civil ceremony (you can read this post if you are curious why we opted for a city hall wedding versus a more traditional one). ANYWAY, I only had a few days to get a dress and after ordering and returning a bunch of white dresses that didn’t fit right, I finally bought this one and fell in love. It has a beautiful pink and white floral pattern and fit like a glove. At first, I was sad I couldn’t find a white dress that I loved, but it ended up being the perfect vibe for our sweet and intimate city hall wedding. The brand is called Selkie and they make GORGEOUS whimsical dresses for brides and/or for any occasion and the price is extremely reasonable for the quality. The whole day felt like a dream and this dress was just the icing on the cake!
 design by tiffany howell | photo by frank frances | via architectural digest
 design by tiffany howell | photos by frank frances | via architectural digest
From Jess: I have been WAITING for this home tour! I am a big Elaine Welteroth fan. So when she and her husband moved to LA, bought a home, and were shopping for lots of vintage, I couldn’t wait to see what they would come up with. It’s calm, full of soft curved shapes, and so much love (especially now with their beautiful baby in tow). Still crossing my fingers that one day our paths with cross and we’ll become friends:) In the meantime go check it out!
Also From Jess: The last bachelorette party of the year is upon us (well, for me at least:)) But this one is for my cousin best friend (CBF) that I helped coordinate. We aren’t big penis-shaped everything/tons of matching things that we likely won’t use again. So I kept what I bought minimal, affordable, cute, and mostly from Etsy. This customizable banner (retro font), these biodegradable balloons (hopefully they actually are but better than the alternative, right?), these customizable wine bottle labels, and these woven visors (there are nicer ones out there but we needed to save $$$). Her other friend picked out this super cute veil headband and got fun custom temporary tattoos of my cousin’s fiance and dog’s face (here are some options: these and these). I can’t tell which one she’ll be more excited about… just kidding, it will be Barney (her pup). The last thing I did was buy extra polaroid film for my camera so that my cousin and all of us can have some physical photos to take home with us. If you are planning a bachelorette I hope this helps!
From Caitlin: I am OBSESSED with the fresh (and kind of like…flirty??) cut of these new Nisolo boots!!! I get more comments on my d’Orsay Oxfords than literally ANY other pair of shoes I own – they are VERY chic and timeless but also fun and easy to wear, which is a suuuuper hard balance to strike – and I love that I can continue to rock that silhouette in a more fall/winter-appropriate way. ADDED TO CART SO FAST. (I think I’m opting for black, but the bone is also calling to me. Thoughts???)
From Mallory: I have officially been wearing this sports bra for nearly 5 years now and it’s STILL my favorite. It’s such a classic, has the prettiest back, and has a great amount of support for the little ladies. I can’t recommend it enough – I have it in white and black so they go with all of my colorful workout pants and I still wear them every day. Also, size up…I wear a 6 in this and I’m usually a 4
Our Erik Staalberg is A STAR! Grab a martini and enjoy this video🙂
Congrats again to the Trombetti’s and see y’all tomorrow!!
Opening Image Credits: Design by Gaby Dellal | Styled by Sara Mathers | Photo by Simon Upton | via Architectural Digest
The post The Link Up: Emily’s New Kitchen Tool That’s Changed Her Salads, Jess’ Picks For Cool Bachelorette Party Decorations, And Ryann’s Big Announcement appeared first on Emily Henderson.
August 6, 2022
Stylish Purses That Fit A Laptop (+ One Accessory To Make Them Even Cuter)
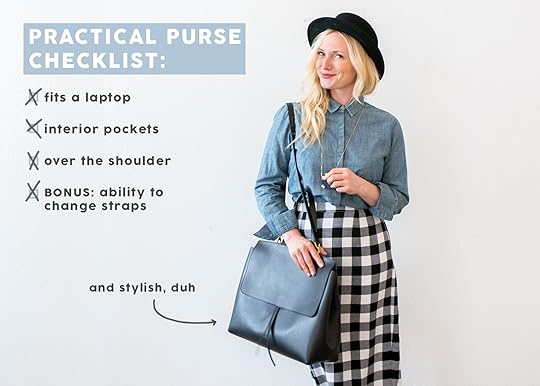
When I was traveling earlier this year, my laptop of 7 years was stolen. I think it happened at the airport but I honestly don’t know. The only “blessing” was that it wasn’t brand new and I had been toying with the idea of buying a new one anyway. My girl was slowing down. Sure I was planning to, you know, take some time to save up but the universe had other plans for me and my bank account. So to the Apple store I went and bought a BIG, big kid laptop. Why did I buy the biggest one? Well, since EHD is remote, I wanted a laptop that could handle all of my programs, files, and have a decent size screen if and when I want to work not in LA:) This 16″ babe is a thing of beauty. However, I don’t have a purse to support such a large device. So since I was on the hunt for a stylish, practical bag that can house one of my most expensive possessions, I thought maybe some of you are looking for something similar. Caitlin wants to also do an “event purse” post so if that’s more of what you need, let us know in the comments. But for now, let’s talk about those crucial everyday purses starting out with the more affordable options. Also how cute is Em in that outfit?!
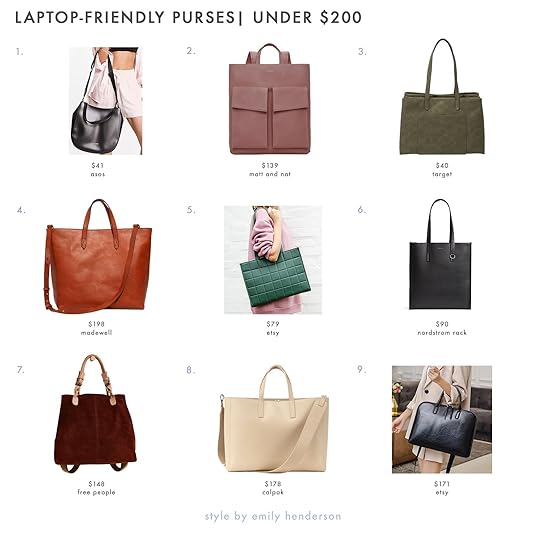
1. Claudia Canova Curved Shoulder Bag: I love the shape and sporty thick strap on this bag. That strap is really nice if you tend to stuff your purse full of things, making it a little heavy. Wouldn’t work for a 16″ laptop but is good for ones under 14″. Also, you can’t beat that sale price.
2. Myron Vegan Backpack: Matt & Nat was one of the first “cool” vegan leather brands I remember hearing about years ago. They are still killing it and I love this cute backpack that doesn’t really look like a backpack from the front. You can carry it two ways, it has a top zipper, and there’s another exterior pocket on the back! Oh, and it also comes in a bunch of other colors:)
3. Cayden Triple Compartment Tote Handbag: I actually just looked at this one in store and it’s cute! Like the name says it has a few compartments to keep things organized (what a concept!) and the color is great. It also comes in brown and black.
4. The Zip-Top Transport Carryall: I’ve had the smaller non-zipper version of this for four years and I have loved it. Now that I have the larger computer it’s a little small so this one is definitely a contender. I think I would opt for a cute thicker strap like the ones you’ll see in a minute.
5. Vegan Leather Laptop Bag: I really love the modern quilted pattern and color! It also has two compartments and a top zipper.
6. Canci Faux Leather Tote: Another Matt & Nat but for a steal! It’s got a laptop sleeve, multiple pockets, and just looks super chic.
7. Carson Convertible Backpack: Here’s another backpack/purse mix! I love the rich color of the suede and how it feels a bit more casual than the others.
8. Haven Laptop Tote Bag: This is truly the ultimate laptop tote for both work and travel. There are almost too many features to talk about here so hop on over to the site to see for yourself. Best of all there’s a one-year warranty:)
9. Luxury Sustainable Laptop Brief Case: Never have I wanted a briefcase so much. But sadly it only fits up to a 14″ laptop. Regardless, this is a sexy bag.
Now if you have a bigger budget, I have some other really awesome options for you…

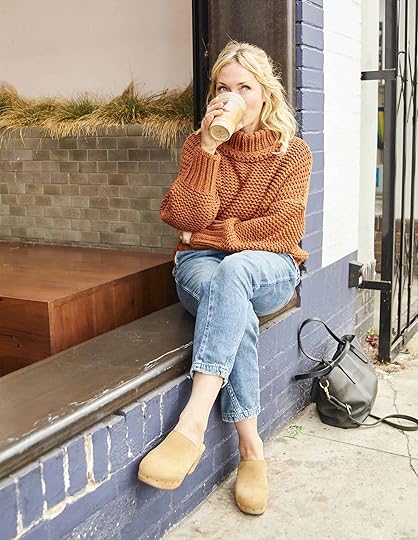 left: from: what i’m wearing (kinda) | right: photo by veronica crawford | from: six fall sweaters i’m loving (+ how to wear them)
1. Eden Carryall: I’m pretty sure Emily has owned and loved this bag for the entire time I’ve worked at EHD (almost 6 years) so I can confidently say that it’s EHD-approved (as you can also see in the photos above). It’s cute, fits a ton (including a laptop), and also comes in brown.
2. Messenger: We are all Clare V. fans over here so naturally I had to find a laptop-friendly bag on their site. This one is just a classic! If you love it but the price tag is a little too much I would check out a secondhand site like Poshmark. I saw a few there:)
3. Essential Leather Tote: I love the boxy shape and the ability to personalize. It’s also super roomy and has a little interior zipper pocket.
4. Voyage Large Work Tote: For something more classically feminine, you can’t go wrong with Kate Spade. This elegantly curved beaut has a few interior pockets and zips up for maximum security.
5. Le Zip Sac Tote: OOO I love a perforated leather bag and in navy, it’s even prettier. This bag would easily fit my laptop, zips up at the top, and I know it’s high quality because it’s Clare V. Guess I should start saving:)
6. All Day Large Zip-top Tote: Another sleek Kate Spade bag and look at the shape of those strap ends (I don’t think that’s the official term). So not only is it pretty but it has three interior slip pockets and a padded center divider. Basically a great work bag.
To finish us off, let’s talk about one of Em’s favorite ways to personalize and style up a purse…a bag strap.

 from: how i’m styling some comfortable fall basics/classics to look fresh in 2021 – my current fall uniform
A lot of large bags are either fairly simple and could use some personality or their straps are too thin for the weight of the bag contents, making them uncomfortable to carry. Enter these thicker bag straps that will only up your bag game in style and comfort.
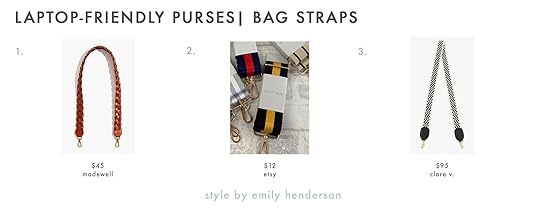
1. The Shoulder Bag Strap: Braided Leather Edition: This one is just pretty. Look at that braiding! It would add such a nice detail to a simple bag. Madewell has a lot of other options too.
2. Boutique Bag Strap: Affordable, simple, but graphic. Why not add a pop of pattern and color?
3. Black & Cream Checker Crossbody Strap: You know I love a checkered pattern so this one is tops for me. I also love the leather detail at the ends. This will make any bag look cooler but they have a lot more options on the site.
Did any catch your eye? Do you have any suggestions of bags you own and love? Let me know in the comments so hopefully, I can actually make a decision this year!
Love you, mean it.
Opening Image Credits: From: Styling Luxury Handbags with Trendlee
The post Stylish Purses That Fit A Laptop (+ One Accessory To Make Them Even Cuter) appeared first on Emily Henderson.
Emily Henderson's Blog

- Emily Henderson's profile
- 10 followers

