
Emily Henderson's Blog, page 118
August 23, 2022
How To Make Your Fridge Look Better (Inside And Out, Baby!)

It’s pretty stupid how instantly I feel like a superhuman adult when my fridge looks and is organized. Everything else in my life could be in total shambles but baby if my fridge is stocked and pretty, I can go to sleep feeling like I can make it through another day with mild success. Was that too sad to admit????
Now the fridge is just like any other area of the home, it needs an easy system so that you can actually keep up with your superhuman adult powers. And look, you likely don’t need a total fridge overhaul. Maybe just a couple of products to make things more organized and easy to access. No more piles of stacked produce that you can’t see and may end up going bad because of it. I think that most people tend to buy roughly the same or similar items each week, right? This makes it pretty simple to know what kind of bins or other organization items you might benefit most from. Let’s get to it…
Fridge DrawersExtra drawers are kinda a dream because they add so much storage! Not only do you get the storage of the drawer itself but you can place things on top too. Might as well maximize the vertical space too. Here are my three favorites:

1. Fridge Drawer Organizer: They hang from your shelves, leave space under for more storage, and look like they came with your fridge.
2. Fridge Organizer Tray: Same idea as #1 but in fun colors! Who says your fridge can’t be colorful too??
3. Divided Fridge Drawer: A classic and I LOVE that it comes with a divider inside. Perfect for smaller produce, meats, cheeses, you name it!
 photo by sara ligorria-tramp | from: inside all our (super organized) drawers & cabinets in the mountain house kitchen
Maybe you aren’t into drawers but love the idea of an easy-access bin that helps corral your favorite foods. It’s pretty wild what a visual difference corralling can make. These are great for cold snacks too (hello, string cheese)!

1. Stacking Fridge Bins (Set of 4): Simple and pretty with a nice little pull handle.
2. White Powder Coat Fridge Organization Bin Powder Coated Metal: When I get a full-sized fridge this is my dream bin. SO pretty and chic. Plus you can use it on the counter too it’s that pretty:)
3. Clear Fridge and Pantry Binz (Set of 4): Great price, super cute, and nice handle for easy pulling.
4. Deep Split Bin: Celery lovers rejoice! Perfect for those long veggies or stacked snacks.
5. 34pc Plastic Food Storage Container Set: Ok, I know this is not really a bin but I have them and love them. The color is so pretty and makes all of my prepped food look so good.
6. Divided Fridge Bin: Another favorite. Same as the drawer version above but without the top. Easy to just snag one of those tomatoes and pop them in your mouth:)
Where isn’t a lazy susan useful?? If your fridge door shelves are overflowing, a lazy susan is the perfect solution to keeping all of your condiments and jarred items without them getting lost in the back of your fridge. Just spin that puppy around and see everything all together.
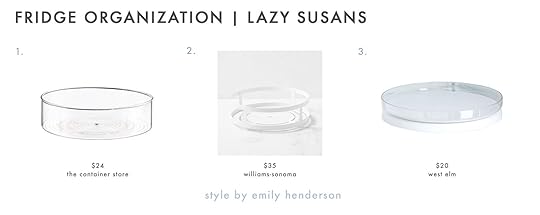
1. Large Deep Turntable: Love how deep it is!
2. Hold Everything Metal Powder Coat Lazy Susan: The prettiest out of the bunch;)
3. Fridgeview Fridge Turntable & Mat: Not as deep but has a nonslip mat to keep everything from sliding around.
I am a flavored sparkling water QUEEN. I actually have so many that my entire bottom fridge self is only cans. But again, if I had a normal-sized fridge, or wasn’t a crazy carbonated lady, I would absolutely own one of these. Easy access and a great use of vertical space.

1. Hold Everything Metal Powder Coat Soda Can Bin: No surprise this is my favorite aesthetically and love that they are stackable. MORE SPINDRIFT!
2. Can Dispenser: This one is pretty genius. Where the cans sit it’s angled at an incline so that you never have to worry about getting one too many at once. I also love that it filters into the bottom so that you only have to refill the top.
3. Can Holder Dispenser with Lid: I like that you can use the top for more storage.
 photo by sara ligorria-tramp | from: 8 steps to building a smart, organized pantry & mudroom
Is a berry basket necessary? No. But whenever I put my berries in a pretty bowl inside my fridge it makes me happy. Plus the “no lid” part makes it that much easier to grab a couple of pieces of fruit for a healthy snack:)

1. Farmhouse Pottery Windrow Berry Bowl: This one is extremely pretty so would look great inside your fridge or out on our counter:)
2. Reusable Berry Basket (Set of 2): So practical! You can easily wash and strain your fruit and then pop the red container into the clear one to make them last longer.
3. Cottage Berry Basket: A cute and more modern option.
This is another “aesthetic option” unless you actually have chickens so your eggs come straight from the source. Funny enough, I’m the only one in my family without chickens. My dad has four (Thelma, Louise, CeCe, and Iris and my brother has two (Cher and Barbara). Guess I didn’t get the farming gene. Aaaannnyways, displaying your eggs in a cute holder is a super easy way to make the inside of your fridge look very put together.

1. Wood Egg Holder: I think these are so pretty and would work with any kitchen style.
2. Ceramic One Dozen Egg Crate: A cute upgrade from the carton!
3. White Ceramic & Bamboo Egg Bin: The most modern option and I, of course, love the wood insert:)
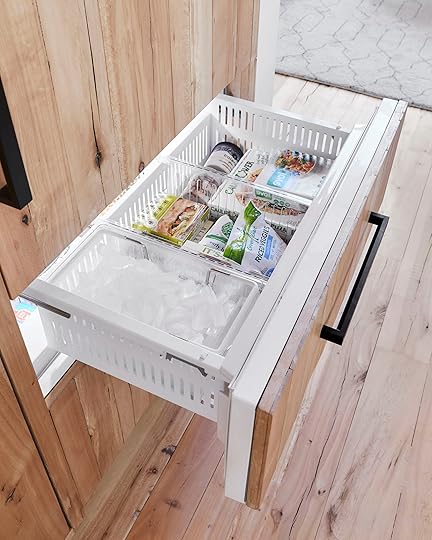 photo by sara ligorria-tramp | from: inside all our (super organized) drawers & cabinets in the mountain house kitchen
WHAT I WOULD GIVE FOR A NORMAL-SIZED FREEZER! My love of flavored sparkling water is only rivaled by my love of ice. And if you are like me and don’t have an ice machine here are some options.
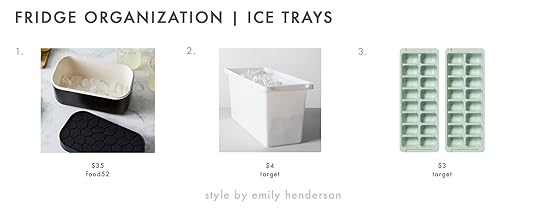
1. Lékué Ice Box with Reversible Lid: This is on my list to buy! It’s great for a smaller freezer because you make ice with the lid and then fill the bin once they are solid. This way you can have more than one tray’s worth and won’t run out as fast.
2. Ice Cube Bin: A very affordable bin to stock up with!
3. Plastic Ice Trays: The classic tray but in a very cute color. Plus you can’t beat that price.
 design by katie sarokhanian | photo by kelly christine | from: “the kitchen coronavirus built”: a jaw-dropping, diy kitchen that truly proves the sky’s the limit
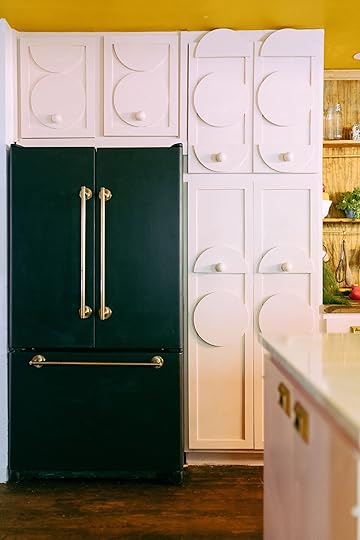
Now that we’ve got the inside covered let’s talk about the outside. Do you have a fridge that could use a bit of a facelift? Well, you have a couple of options. Let’s start with simply changing out the handles. Did you know you can do that? It looks pretty easy and Katie Sarokhanian has done it a couple of times! Here is an article where she explains how.

1. TraskAppliance Pull: A little pricey but pretty darn beautiful if you have the budget. Also, comes in other finishes.
2. Matte Black Hand Towel Bar: Yes, it’s actually a towel bar! A little hack I read about. Just make sure to measure correctly (follow Katie’s instructions) and you have a VERY budget-friendly hack.
3. Avignon Solid Brass Appliance Pull: I love the simplicity, it’s a decent price, and also comes in a bunch of other finishes.
 via homebeautiful
Painting is always an option but if you want that “fridge look” I would consider going the vinyl wrap route. One of my best friends did it to their old dingy white one (not the one pictured above) in a “stainless steel” vinyl and it turned out great! She said it was super easy and to get a smoothing tool and an Exacto knife.

1. Silver Brush Stainless Steel Wall Paper: A classic that will make an old fridge sparkle again:)
2. Brushed Metal Look Wall Paper Film Vinyl Self Adhesive: I’m surprised at how much I liked the copper example above. A fun and unexpected choice!
3. Self-Adhesive Vinyl Black Brushed Metal: Very modern and very cool.
Hope this was helpful and that your superhuman adult powers will be their strongest after a little fridge refresh:)
Love you, mean it.
Opening Image Credits: Photo by Sara Ligorria-Tramp | From: Inside All Our (Super Organized) Drawers & Cabinets in the Mountain House Kitchen
The post How To Make Your Fridge Look Better (Inside And Out, Baby!) appeared first on Emily Henderson.


August 22, 2022
Charlie’s “Pop Art And Funky” Moodboard + His First Round Of Vintage Finds

I think I may need more kids just to dabble in my other fantasy design styles. I suppose this is why I became a stylist and not a designer and why I loved doing my show so much (13 years ago!!). As a stylist, every day is different, every job requires a different style, it’s so much more about aesthetics than function and it’s just incredibly creatively stimulating. Kids don’t care about storage or practicality so yeah, IT’S SUPER FUN. Not to say that kids can’t be really challenging clients, but like I’ve said before and will til I die – there is a good way to do every style. Name a style and I’ll show you a good version. You just have to get down to the “whys.” Like why are they attracted to whatever weird/tacky garbage thing they saw on Amazon or a TV commercial? Then you gotta be creative and more intentional about how to bring that feeling into the room. My almost 9-year-old wasn’t really interested in even talking about “decorating” until we watched “Get Out Of My Room,” an adorable makeover show where siblings redesign each other’s rooms (with a lot of pro help), perfectly executed. In fact, the production designer commented on a recent post so I checked out her site and it’s seriously INCREDIBLE. Charlie immediately wanted all of the “boy” stuff, even though he didn’t like baseball, doesn’t need a loft bed, and isn’t into Minecraft (because he hasn’t played it yet). I think that show opened his eyes to the fact that decorating isn’t just for “girls” and that you can really do anything. He told me he doesn’t want to “decorate” it, he wants to “make it cool” and since I’m obviously a “cool” mom (as written about last week – my words, not his). We attempted to figure out what his version of “cool” is. So like last week I went back through the EHD portfolio to show him other projects we have done that I thought he’d like and his eyes got bigger and bigger and bigger.
 design by pricilla frost and emily henderson | styled by emily henderson | photo by sara ligorria-tramp | from: a teen bedroom reveal! + 7 budget-friendly ideas gen-z loves
This is 14-year-old Jameson’s room, basically his cousin, who Charlie has looked up to since he was a baby. He loved the smiley face pillow (with a Bluetooth speaking inside), and the wacky lamp. He also loved the art and pennant because they were “cool”.
 design by pricilla frost and emily henderson | styled by emily henderson | photo by sara ligorria-tramp | from: a teen bedroom reveal! + 7 budget-friendly ideas gen-z loves
Of course, he loved the displayed legos and blue safe, and I was happy to remind him that the red hoop chair is actually ours if he wants it (he does). Jay wanted something more comfortable to play guitar on so we swapped this chair out after the shoot. Charlie said the rug was “cool” too.
But then…I remembered the project that Brady and I did with artist Timothy Goodman for that big Frame TV campaign. HE FREAKED OUT.

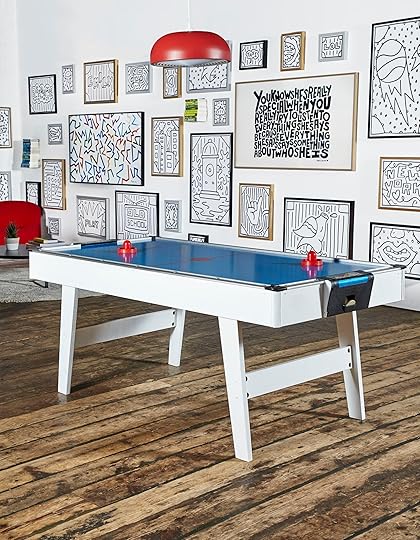 photos by genevieve garruppo | from: an epic gallery wall with ‘the frame’
He mostly loved Timothy’s art, and then the colors, and duh, the air hockey table. But honestly, it was just the playfulness and while he didn’t say this I got a sense that it felt irreverent to him, like design isn’t supposed to look like that? And I remember feeling that way. It’s why I bought and still love my wood hand chair. Especially when you are young, design should make you smile and tickle parts of your brain that a white-on-white room just never can. If you are wondering why people (like me) change and get more neutral and boring as they get older, I’d say that it’s not that we change fundamentally, its just that so many other things stimulate our brains or make us smile that being comfortable and at ease at home sometimes outweighs bringing in rebellious creativity. So I’m very lucky I get to flex this impractical muscle with my kids and do designs that are first and foremost creative.
What We Already Have To Work With…
 photos by sara ligorria-tramp | from: reveal: our boy/girl, 2-twin bed shared kids room
Ok, this is their old bedroom and he still loves a lot of this. He wants the art, that bookcase, the ship mobile, and the red lamp that he wants to use in his room (I’m pretty sure he doesn’t care about the framed photo of Brian and I from our wedding invitation 15 years ago). I’m calling dibs on the dresser and rug for now. He still likes all the red and blue. That boy likes a lot of bright colors and you know what he doesn’t like? Natural wood blocks:) No kid does. We prop stylists and magazine editors have really peddled them over the years because they are pretty, but Birdie has always been like, “Where is the paint…?”
Beyond that here are two images we found that we both loved. Of course, I’m not sure of how either of these would play out or if they are even possible, but they are cool and it got us excited even if the idea won’t go anywhere.

 design by creneau international, via behance | design by caryn owen
So after we went through that exercise we went back on Etsy and I plugged in “vintage pop art” and we found so many things he loved. To him, it felt wacky and funky and just irreverent, again like it was breaking the design rules. I started pulling together a board and here’s where we are now:

An awesome vintage plaid headboard with the basketball hoop chair that we both fell in love with. I’ve always secretly wanted the toucan lamp and the oversized lightbulb lamp (both plastic from the 80s but design icons).
It’s just a jumping-off point but I can see where it’s headed and I’m SO excited. It’s going to be full of fun weird stuff, mostly vintage or DIY’d (or what we already have), with a neutral backdrop and a lot of poppy colors. The one thing that he is begging for is a neon light so I want to figure out how to turn one of his drawings into one because that way it’s at least connected to his personality. More to come, but my client and I are very excited. xx
Opening Image Credits: Photo by Genevieve Garruppo | From: An Epic Gallery Wall With ‘The Frame’
The post Charlie’s “Pop Art And Funky” Moodboard + His First Round Of Vintage Finds appeared first on Emily Henderson.
How We Are Making Charlie’s Big-Kid Bedroom “COOL” – We’ve Started To Come Up With Some VERY Fun Ideas
I think I may need more kids just to dabble in my other fantasy design styles. I suppose this is why I became a stylist and not a designer and why I loved doing my show so much (13 years ago!!). As a stylist, every day is different, every job requires a different style, it’s so much more about aesthetics than function and it’s just incredibly creatively stimulating. Kids don’t care about storage or practicality so yeah, IT’S SUPER FUN. Not to say that kids can’t be really challenging clients, but like I’ve said before and will til I die – there is a good way to do every style. Name a style and I’ll show you a good version. You just have to get down to the “whys.” Like why are they attracted to whatever weird/tacky garbage thing they saw on Amazon or a TV commercial? Then you gotta be creative and more intentional about how to bring that feeling into the room. My almost 9-year-old wasn’t really interested in even talking about “decorating” until we watched “Get Out Of My Room,” an adorable makeover show where siblings redesign each other’s rooms (with a lot of pro help), perfectly executed. In fact, the production designer commented on a recent post so I checked out her site and it’s seriously INCREDIBLE. Charlie immediately wanted all of the “boy” stuff, even though he didn’t like baseball, doesn’t need a loft bed, and isn’t into Minecraft (because he hasn’t played it yet). I think that show opened his eyes to the fact that decorating isn’t just for “girls” and that you can really do anything. He told me he doesn’t want to “decorate” it, he wants to “make it cool” and since I’m obviously a “cool” mom (as written about last week – my words, not his). We attempted to figure out what his version of “cool” is. So like last week I went back through the EHD portfolio to show him other projects we have done that I thought he’d like and his eyes got bigger and bigger and bigger.
design by pricilla frost and emily henderson | styled by emily henderson | photo by sara ligorria-tramp | from: a teen bedroom reveal! + 7 budget-friendly ideas gen-z lovesThis is 14-year-old Jameson’s room, basically his cousin, who Charlie has looked up to since he was a baby. He loved the smiley face pillow (with a Bluetooth speaking inside), and the wacky lamp. He also loved the art and pennant because they were “cool”.
design by pricilla frost and emily henderson | styled by emily henderson | photo by sara ligorria-tramp | from: a teen bedroom reveal! + 7 budget-friendly ideas gen-z lovesOf course, he loved the displayed legos and blue safe, and I was happy to remind him that the red hoop chair is actually ours if he wants it (he does). Jay wanted something more comfortable to play guitar on so we swapped this chair out after the shoot. Charlie said the rug was “cool” too.
But then…I remembered the project that Brady and I did with artist Timothy Goodman for that big Frame TV campaign. HE FREAKED OUT.
photos by genevieve garruppo | from: an epic gallery wall with ‘the frame’He mostly loved Timothy’s art, and then the colors, and duh, the air hockey table. But honestly, it was just the playfulness and while he didn’t say this I got a sense that it felt irreverent to him, like design isn’t supposed to look like that? And I remember feeling that way. It’s why I bought and still love my wood hand chair. Especially when you are young, design should make you smile and tickle parts of your brain that a white-on-white room just never can. If you are wondering why people (like me) change and get more neutral and boring as they get older, I’d say that it’s not that we change fundamentally, its just that so many other things stimulate our brains or make us smile that being comfortable and at ease at home sometimes outweighs bringing in rebellious creativity. So I’m very lucky I get to flex this impractical muscle with my kids and do designs that are first and foremost creative.
What We Already Have To Work With…photos by sara ligorria-tramp | from: reveal: our boy/girl, 2-twin bed shared kids roomOk, this is their old bedroom and he still loves a lot of this. He wants the art, that bookcase, the ship mobile, and the red lamp that he wants to use in his room (I’m pretty sure he doesn’t care about the framed photo of Brian and I from our wedding invitation 15 years ago). I’m calling dibs on the dresser and rug for now. He still likes all the red and blue. That boy likes a lot of bright colors and you know what he doesn’t like? Natural wood blocks:) No kid does. We prop stylists and magazine editors have really peddled them over the years because they are pretty, but Birdie has always been like, “Where is the paint…?”
Beyond that here are two images we found that we both loved. Of course, I’m not sure of how either of these would play out or if they are even possible, but they are cool and it got us excited even if the idea won’t go anywhere.
design by creneau international, via behance | design by caryn owenSo after we went through that exercise we went back on Etsy and I plugged in “vintage pop art” and we found so many things he loved. To him, it felt wacky and funky and just irreverent, again like it was breaking the design rules. I started pulling together a board and here’s where we are now:
An awesome vintage plaid headboard with the basketball hoop chair that we both fell in love with. I’ve always secretly wanted the toucan lamp and the oversized lightbulb lamp (both plastic from the 80s but design icons).
It’s just a jumping-off point but I can see where it’s headed and I’m SO excited. It’s going to be full of fun weird stuff, mostly vintage or DIY’d (or what we already have), with a neutral backdrop and a lot of poppy colors. The one thing that he is begging for is a neon light so I want to figure out how to turn one of his drawings into one because that way it’s at least connected to his personality. More to come, but my client and I are very excited. xx
Opening Image Credits: Photo by Genevieve Garruppo | From: An Epic Gallery Wall With ‘The Frame’
The post How We Are Making Charlie’s Big-Kid Bedroom “COOL” – We’ve Started To Come Up With Some VERY Fun Ideas appeared first on Emily Henderson.
August 21, 2022
The Link Up: Emily’s Latest “Can’t Put Down” Romance Novel, Ryann’s Helpful Sleep/Focus Aid, And A Great Nude Heel That Comes In A Variety Of Shades

Welcome to the last Sunday before the Henderson’s move into…THE FARMHOUSE! Even though it’s just the family moving in (duh), it feels pretty surreal that this day is almost here. Not sure how much Em is going to be able to share given that moving is never not stressful and VERY time-consuming, but we would suggest keeping your eye on social for any and all updates:) Until then let’s get into the links!
 design by carrie hicks and paul lamb | photo by douglas friedman | via architectural digest
This week’s house tour is a real love story between the old and the new. Designer Carrie Hicks fell in love with a 1926 Tudor-inspired house in Austin, Texas for her and her family. The only issue was that it needed a lot of love. So with the help of architect Paul Lamb, he restored the original structure while adding on a modern addition that was inspired by Carrie’s favorite architect, Mies van der Rohe. Paul said it was definitely a challenge to have the two styles work together, but that’s the kind of thing he loves. Check it all out here.
 design by carrie hicks and paul lamb | photo by douglas friedman | via architectural digest
From Emily: It’s a joke amongst my friends that I like movies with a lot of “almost kissing” (chemistry-induced tension with so many butterflies – i.e Felicity and Ben). So I found this end-of-summer coming-of-age beach read so sweet, nostalgic, and romantic. I read a LOT of these summer beach reads to varying degrees of approval, but really really enjoyed this one (I find that in this genre many times their first book is my favorite because they’ve spent years on it, then once its a hit they have to force out one a year if not more). Anyway, Every Summer After by former editor, Carley Fortune (local and Kindle), is hard to put down and a lovely little escape. Is it predictable? Sure. It’s why I love the “happy ever after” genre – I have zero anxiety reading them and it’s 100% “feel good”. Anyway, congrats Carley on the shift from editor to author (another rom-com trope I love).
From Caitlin: I was on the hunt for an investment-worthy pair of wedding heels (the Steve Madden sandals with the ankle straps that literally every basic woman in her early 30s owns are no longer cutting it, y’all) when I stumbled upon Rebecca Allen, an awesome brand that makes nude shoes in AN ACTUAL VARIETY OF NUDES! (I’m Nude IV, in case you were wondering.) I fell in love with these and while I wasn’t able to get my size in time, I can’t recommend them more highly – if you’re ever on the market for a high-quality and simple pair of shoes, CHECK THEM OUT. (Added bonus: they’re a Black-owned brand!)
Also From Caitlin: I know that at least one of you HAS to work on the business side of TV, so I’m putting a very selfish plea out there: can someone please pick up Joe Pera Talks With You? It got canceled a few weeks back after the three sweetest seasons of all time (like, you thought Ted Lasso was earnest and kind? This is way better!!!) and it’s such a loss. If you’re not familiar, this is my all-time favorite bit (who hasn’t been this excited about a song? The bells at 2:24 make me cry/laugh every time) and this video will put you STRAIGHT to sleep (in a nice and intentional way – the Bengal tiger bit is SO FREAKIN’ SWEET, too). I pay for way too many streaming services but would happily add another into the fold in exchange for more Joe Pera:)
From Ryann: One of my most shameful habits is that I HAVE to watch TV in order to go to bed. It’s awful and I know it’s not good for my sleep hygiene but anytime I try and break the cycle I toss and turn for hours as my brain refuses to shut off. My husband does not approve of this habit at all and this week he learned about an app called Endel and suggested we try it out. This app is supposed to have the best sleep/relaxation sounds backed up by science (whatever that means!!) so we tried it out. It definitely helped me relax as I read in bed and eventually I did fall asleep to it! Huge win. I will report back if it ends up curing my unhealthy habit but I also will say that there are focus sounds that I use for work and LOVE. So if anything, I am getting good use out of this app daily to help me stay focused throughout the day 🙂
Did y’all see Rashida’s backyard refresh yet??
From Mallory: I HAD to share my favorite new glassware I’m very much obsessed with. I love them so much because they’re double-walled so they don’t have a lot of condensation & are easy on furniture if you’re not using a coaster, plus they’re insanely beautiful and fun to drink out of (I have them in amber). I posted a tiktok video about them the other day and everyone over there agrees with me.
From Jess: Space space dwellers this one is for you! I had been wanting a medium-sized cooler for a minute and finally decided to just get one. How else was I supposed to transport three wine bottles to my cousin’s bachelorette weekend for immediate consumption upon arrival?? The one I found is $30, holds 30 cans (soda, beer, hard seltzer – dealer’s choice) with ice, and is collapsible for minimal needed storage space. I also love that it has a comfortable shoulder strap as opposed to a lot of the hard plastic ones. It’s just a solid practical buy for those picnic and beach days. 10/10.
Thanks for another great week and see y’all tomorrow! xx
Opening Image Credits: Design by Carrie Hicks Paul Lamb | Photo by Douglas Friedman | via Architectural Digest
The post The Link Up: Emily’s Latest “Can’t Put Down” Romance Novel, Ryann’s Helpful Sleep/Focus Aid, And A Great Nude Heel That Comes In A Variety Of Shades appeared first on Emily Henderson.
August 20, 2022
Coastal Grandmother Is The 2022 Fashion Trend For Everyone: Here’s How To Get It

Unbuttoned button-ups and preppy casual are the oxymorons that are taking over the fashion scene right now and it’s all thanks to the “coastal grandmother” aesthetic. Yup, the Nancy Meyers movie look has officially become a fashion trend and it’s everything we want it to be and more. We’re focusing on fashion today but some would say “coastal grandmother” is more than just a fashion trend, it’s a lifestyle. There’s even a playlist to prove it and an AD article on how to get the look in your home. The “coastal grandmother” is fashion’s newest IT girl and her look is easier to achieve than you might think (plus you probably already have the pieces in your closet). And no, you don’t have to be a grandmother to achieve this look, but it also doesn’t hurt if you are 🙂 Let’s explore WHAT the look actually entails:
INSPIRATION
So you get the vibe: it’s basically the grandmother who retired in Nantucket and spends her days at the beach picnicking with lobster rolls, white wine, and a good book. Her home is filled with collected vintage, seashells, and hydrangeas. You know her style is preppy, but loose, flowy and of course, a little beachy. Here are the staples you need to get the look:
Relaxed White Pants

 images from left to right: image via pinterest | image via the wall street journal | image via rochelle johnson
The classic white pant. It’s probably in your wardrobe already – bonus points if you have linen or flowy white pants. It’s time to bust them out y’all OR if you’re in the market for some new white pants here are some of our favorites:

1. J Crew Seaside Pant | 2. Banana Republic Flowy Pant | 3. Cigarette Jeans | 4. Linen Blend Pant | 5. Wide Leg Pant | 6. Barrel Pant
The Loose Button Down

 images from left to right: image via women in revolt (from ‘it’s complicated‘) | image via banana republic | image via pinterest
Next, you’re gonna need a button-down. Typically the coastal grandmothers wear plain white or blue and white striped –– it can be layered under a sweater if it’s chilly, or worn on its own with a few buttons unbuttoned. OR for the risk takers: you can wear it completely unbuttoned and add it to your outfit as an additional layer.
This particular one is Emily’s latest favorite because it drapes great, is made of lightweight linen, and is super breathable. Those are three boxes I want all my shirts & it’s made our “what you bought last month” top seller list 2 months in a row (it’s that good).

Or for some other options, here are some more of our picks below!!

1. Target Button Down | 2. Cotton Button Down | 3. Target Relaxed Button Down | 4. Old Navy Pinstripe Button Down | 5. Light Blue Target Button Down | 6. Everlane Button Down
The Fisherman Sweater Or Cardigan

 images left to right: image via pinterest | image via worthy born | image via girlmeetsgold
The fisherman sweater is a classic one, I know I have a ton that totally scream “coastal grandmother” so shop your closet because you probably do too! These sweaters are great to wear on their own, layered with a button-down (like in the last section), OR my personal favorite: draped over your shoulders and tied in a loose knot (so preppy and fun). Here are some of our picks:

1. Blue and White Stripe Sweater | 2. Collared Sweater | 3. Ruffle Turtleneck Sweater | 4. Clubhouse Sweater | 5. Fisherman Sweater | 6. Grandpa Cardigan
The Tonal Sandal
 images left to right: image via walmart | image via madewell
Grandma goes to the beach all the time (because she probably lives just steps from the water), so you’ll rarely catch her in a closed-toe shoe. She loves slides because they’re the easiest and most comfortable and they’re probably a woven espadrille material or a brown leather. Here’s what she’s wearing (if she’s wearing shoes at all):

1. Ralph Lauren Slides | 2. Bloomingdales Slides | 3. Veronica Beard Raffia Slides | 4. Steve Madden Cognac Slides | 5. Madewell Boardwalk Slides | 6. Madewell Gumsole Slides
The Woven Bag

 images left to right: image via elena handbags | image via stick and ball | image via who what wear
Now having beach energy means you’re gonna pair your outfit with a fun beach bag of course! To match the sandals, grandma is gonna have a brown woven beach bag that’s big and not too structured. Here are some of the totes we picked for the “coastal grandma” look:

1. J Crew Woven Tote | 2. Relaxed Knit Tote | 3. Circle Handle Bag
So that’s it on the coastal grandma trend – let me know if you’re gonna try it out!! See ya in the comments 🙂
The post Coastal Grandmother Is The 2022 Fashion Trend For Everyone: Here’s How To Get It appeared first on Emily Henderson.
August 19, 2022
Want To See Your ENTIRE Outfit?? The Best Full-Length Floor Mirrors And How To Style Them

We love styling with mirrors because they famously brighten a room and make it appear more open and airy. They are reflective (duh) so they help bounce light around and can make even the darkest rooms look brighter. Suffice to say, there is nothing but love for mirrors over here. But there is something that has been bothering me lately. Why is it that full-length floor mirrors are harder to style than wall mirrors? I see wall mirrors in rooms all day long but there isn’t as much to show for floor mirrors. Is it the vanity aspect that tricks us into thinking that they have no creative styling merit in a room? I know I personally need a full-length mirror because I want to see my entire outfit head to toe before I go on with my day. And if that’s wrong then I don’t want to be right! But I have to admit that the classic mirror hung over a closet door isn’t the most ideal or ~sexy~ styling moment. So this had me thinking…what are the cool ways to style full-length floor mirrors that feel intentional and fresh? SURELY these mirrors can’t be all for naught, right? As I am contemplating procuring a new floor mirror for my own home, I decided to do some research on how I can style one in a way that feels intentional and cool. Wanna see what I came up with? Well then, follow me!
1. LEAN AN OVERSIZED MIRROR design by julie rose | photo by sara ligorria-tramp | from: one of emily’s best friends gets a cozy sophisticated bedroom makeover
Whenever something is oversized in a room, it is DEFINITELY going to come across as intentional. If space permits, an oversized mirror can be an excellent way to take up empty wall space and it easily packs a huge design punch. Mirrors of this scale are much more affordable than large sale art and they do double duty as they’ll help brighten the room (and I’m not mad that they are great for mirror selfies, too). In Suzanne’s bedroom above, Julie Rose used this oversized mirror to take up space on an awkward wall and it completely brightened the space. Adding that cute little side table and plant also helps to make the space feel put together. In Julie’s own words, “There are no ceiling or wall lights in this room. So it all comes down to lamps at night and reflecting the natural light as much as possible during the day which this amazing arched floor mirror does that job very well.”
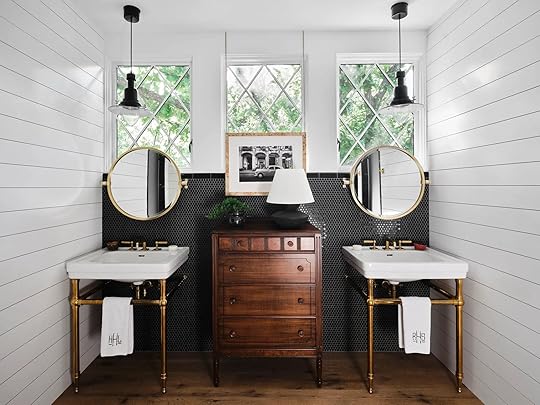
 design by harlotte de tonnac and hugo sauzay | photo by helenio barbetta |via vouge
 If you really want your mirror to be a focal point in your room, you can’t go wrong opting for an oversized ornate mirror. In my living room, I have this one (they also have it in full-length size) and it brings in just the right amount of vintage Victorian charm. And bonus! These massive mirrors are built to be leaned because of their size and weight, so you usually don’t need to drill thousands of holes into the wall. Partners of design enthusiasts all over, rejoice! There is no need to pull out the power drill for these babies. But also safely first so just make sure:)

1. Modern Glam Large Full-length Floor Wall Mirror | 2. Gleaming Primrose Mirror | 3. Emmy Black Floor Mirror | 4. Estelle Floor Mirror | 5. Selene Extra Large Floor Mirror | 6. Arched Metal Mirror Full-length Floor Mirror
An ornate mirror like #2 will bring in charm and make a significant impact in any room. I love the simple lines of #5 and #6. The subtle curve of #3 is also making me swoon.
2. USE IT TO FILL A NARROW WALL SPACE design by julie rose | photo by sara ligorria-tramp | from: julie’s huge (and diy packed) bedroom upgrade
Any long, narrow wall space in between two doors can be difficult to style, so why not hang a long mirror?
For Julie’s bedroom makeover, she mounted a long and narrow mirror from Rejuvenation on the wall between her closet and bedroom door. This helps break up an otherwise blank wall in a very simple but impactful way. Also, since this mirror directly faces a wall with a window, the natural light bounces off of it effortlessly which is always a good thing in a smaller bedroom. I also have to note how she chose a matte black framed mirror so it really pops against her light walls and complements the black accents she has sprinkled throughout the room.

1. Metal Frame Narrow Floor Mirror | 2. Adorn Full Size Mirror | 3. Bourdon Full Length Mirror | 4. Umbra Hub Mirror with Rubber Frame | 5. Cassie Leaning Floor Mirror | 6. Hinoki Wood Floor Mirror
For extremely tight spaces, #1 is a great option (it is only 14″ wide!). #2 and #6 are simple and versatile because they can be either leaned or mounted. If you are looking for one that’s a little more unexpected, #5 will definitely turn heads.
3. CREATE MOVEMENT WITH AN ARCH design and photos by keyanna bowen | from: blue walls be done! key’s totally transformed office reveal
If your home doesn’t have a ton of architectural interest (I can relate) and you want to create some movement to contrast 90-degree angles everywhere, an arched mirror is an effective way to do so. In Keyanna’s office above, she leaned a simple arched floor mirror on a small wall cutout and it instantly added movement to the space. It’s a classic shape that easily creates visual interest.
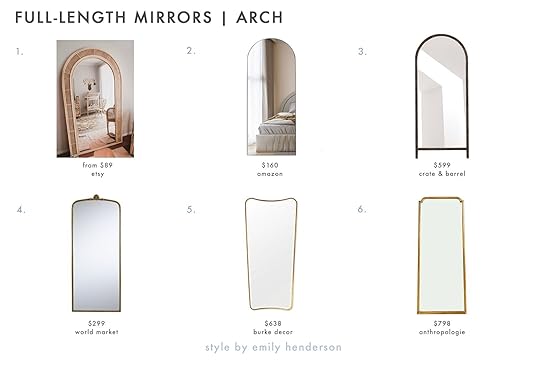
1. Handmade Rattan Mirror | 2. Coquille Mirror | 3. Natia Ebonized Oak Arch Floor Mirror | 4. Metal Vintage Style Leaning Full Length Mirror | 5. Sonnet Dressing Room Mirror | 6. Large Curvy Dressing Mirror for Bedroom | 7. Curvy Floor Mirror | 8. Aperture Floor Mirror | 9. Manocorro Arched Full Length Mirror
#3 has an ebonized finish that is really divine and I love the two stand-alone legs, too. #5 has a sort of inverse arch which is equally cool and interesting. #1 is a lovely handmade option and would be perfect in a boho-style room.
4. KEEP IT HIDDEN design by malcolm simmons | photo by keyanna bowen | from: maloclm’s bedroom reveal is here
Beloved EHD contributor Malcolm Simmons is always surprising us with his unexpected and refined designs. In his bedroom reveal, he created a curtain wall so he can choose to hide his full-length mirror if needed. Now I know I am making a case for showing off these bad boys, but this genius hack offers the best of both worlds (cue Miley Cyrus). You can unveil the mirror to check yourself out or simply open up the space, or close the curtains to make the space more quiet and relaxing. SO GOOD. If you want to try this out, here are some of our favorite wall-mounted mirrors:

1. Oversized Metal Framed Mirror | 2. Floating White Lacquer Floor Mirror | 3. HOVET Mirror | 4. Infinity Mirror | 5. Kate and Laurel Rollo Capsule Framed Wall Mirror | 6. Metal Framed Full Length Mirror
For an affordable option, #3 is great and has tons of raving reviews. #2 also has a very thin frame, so it could almost blend into walls effortlessly. Because I love a more round shape, my eye is one #5 and #6.
5. EXPLORE A DIFFERENT HUE photo by david tsay
One thing we often take for granted when it comes to mirrors is color. We are used to mirrors being traditionally “clear”, but in fact, a mirror can have any color hue. Now, bold colors like blue or green might be out of most of our comfort zones, but an amber or rose-colored mirror is interesting and will create a layer of warmth. In the above living room, the oversized amber-colored floor mirror is super unexpected, it complements the neutral tones throughout the room, and adds a contemporary flair. This hack might be a small design risk but when done right it’s SO GOOD.

1. Framed Mirror | 2. Umbra Misto Decorative Wall Mirror for Entryway | 3. Contemporary Mirror ‘Tafla Q1’, Aurum Collection
There aren’t a ton of readymade options on the market (which makes them even more special) but I really love the shape and color of #1. #2 on the other hand has a gradient that is subtle and inviting. Although an investment for sure, #3 is clearly special, has a really interesting shape, and would look awesome in a contemporary home.
So which styling trick is your favorite? Are you team full-length mirrors or do you think of them as a design faux pas? Tell me everything. xx
Opener Image Credit: Design by Malcolm Simmons | Photo by Keyanna Bowen | From: Maloclm’s Bedroom Reveal Is Here
The post Want To See Your ENTIRE Outfit?? The Best Full-Length Floor Mirrors And How To Style Them appeared first on Emily Henderson.
August 18, 2022
Jess’ Living Room MOTO Rug/Coffee Table Agony
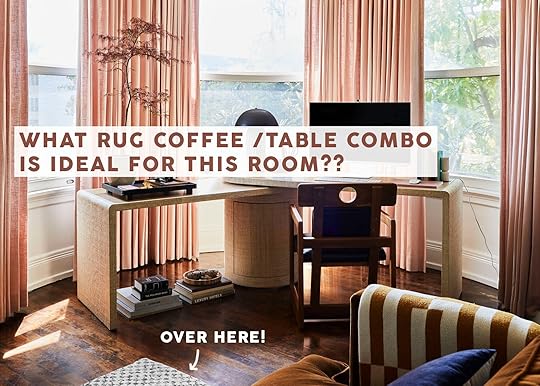
Was I inspired to get my act together after reading Caitlin’s post last week? Yes, yes I was. So here we are. Things are getting almost done in my head! That honestly is the longest part. The lead time of my “idea brain” is long and the client (me) is annoyed. But today I’m taking you on a journey to find the perfect rug/coffee table combo. To be clear I LOVE the rug I have. It’s kinda become the “EHD rug” since it’s so versatile and has been in so many projects. And it was perfect in my last apartment. But for this place, it’s just not “the one”.
OK, LET’S TALK RUGSAs you may remember, I have already made one mishap in my quest to find this room’s perfect rug…

Was the intention good? Sure. I thought, “Ah! What if I brought in A TON of texture to help balance the formalness that’s inherent in the apartment’s architecture/ how I’ve already decorated?” So off to Etsy I went and bought this long pile flokati rug for just under $400. I thought, “what a deal for a large rug!” But as you can see…it wasn’t right. As of now it’s in my bedroom and looks pretty great. Very cloud-like but TBD on it staying long term.
What I actually wanted from the jump was a Moroccan Berber Rug with a large abstract design. My issue with the checkered one I have is that the pattern feels too small scale for this space and how I want it to feel. So not only would a Moroccan Berber solve my need for texture, since they are typically plush, the large-scale pattern/design want would be solved as well. Below are my top contenders. I only want black and white or black and “natural” colors so that the art/decor I get can be the colorful moments. Plus don’t forget I already have beautiful pink curtains and while I love color, I don’t want too much;)

1. Handmade Wool Berber Carpet | 2. Balance | 3. Berber White and Black Rug
Hubba Hubba! Gimme big and gimme bold. I love the simple statement these options make. Still interesting but not too busy. I think that’s what I want so that there’s more “visual room” for decor and art. I don’t want the room to look too busy. While the design is different, I still want that same calming feeling I got every time I walked into my last apartment. Having my larger pieces be simple and less patterned is my go-to way to achieve that.
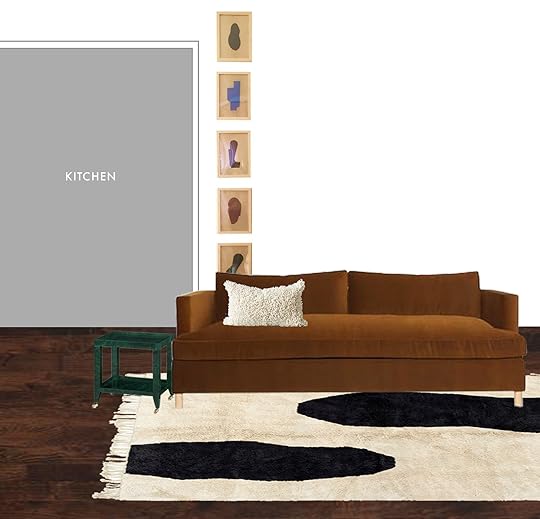
I definitely love this rug. And while those shapes are similar to the art behind it, it doesn’t bother me. It’s simple and bold…but maybe it is too similar to the art and one of the other ones would contrast slightly better.
Buuuuuut since I’m choosing black and white, maybe I could go a little “wilder” with a larger scale pattern…

1. Trio | 2. Berber White And Black Rug | 3. Nomad | 4. Simple Object 18 | 5. Moroccan Berber Checkered Rug | 6. Berber Groove Rug
Don’t laugh. I know these aren’t wildly patterned but they are “the most” I want to go IF I choose this route. I’m actually pretty into #2 and #5. They are the “busiest” of the bunch but I think they are fun and cool. Of course, I don’t want anything too trendy but I honestly don’t think these are. #3, on the other hand, is extremely fun but I do worry about its longevity with my ever-changing style evolution. But for the right person, it’s so freaking cool. As a fun exercise, I decided to do a little mood board photoshopping.


I am a check gal through and through so, OF COURSE, I love how this looks on the left. But do I really want to switch a small-scale check for a medium-scale check? Do I not want to try something else? Then on the right, I do love that rug. Lea has it in her basement now too! But I don’t think it’s right and is also matchy-matchy with the art, like the option in the first category.
An option that I’m highly considering, per Emily Bowser’s suggestion, is designing my own rug. I don’t plan to reinvent the wheel but it is a way to potentially get exactly what I want and feel even more connected to it. I’ll keep you posted.
Ok enough about rugs, it’s time to bring in the coffee tables.
THE COFFEE TABLE OPTIONS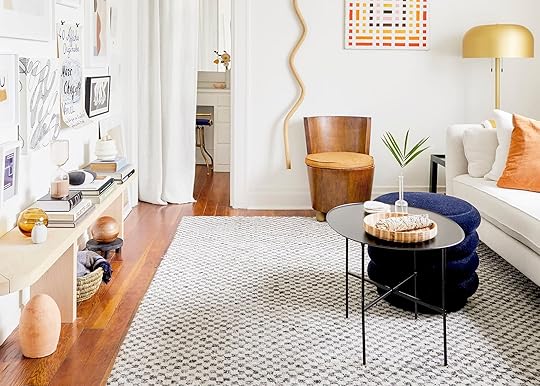 photo by sara ligorria-tramp | from: moto reveal: jess’ living room
You likely don’t remember the coffee table saga of my last apartment. Honestly, I’ve tried to block it out. I just remember thinking, if I never have to look at another coffee table again I will live a happy life. Luckily, I found the perfect duo to work both size-wise and functionally for my itty bitty living room (please see above). Now, these more or less work in my new space but they don’t feel totally right either. So I’ve been toying between a handful of options. Let’s talk about them.

1. Plinth Table Low in Various Colors | 2. Alvar Coffee Table | 3. Hera Coffee Table
All three of these are modern, chic, and have a bigger surface area than my old ones. They would also look great with everything I have (and plan to get). Let’s see them on the mood board:


I really love the two-level, sleek design of the one on the left. It’s simple but still interesting. Plus who doesn’t love marble??? What I love about the black one on the right is that it’s sneakily a two-level coffee table but has that VERY cool shape. Both modern. Both very pretty.

This one lacks a second level but the contrast and movement of that marble are stunning! It even has some pink in there to tie in with my pink curtains:) The main bummer with this one is it’s only 10″ high (very low) and $$$$.
So again, these are all beautiful but I really want my home to feel welcoming, not precious, and have a hefty amount of warm natural materials. I don’t want my home to feel like a museum and I’m afraid going this route would push me more in that direction. Naturally, I then went on the hunt for wood coffee tables…
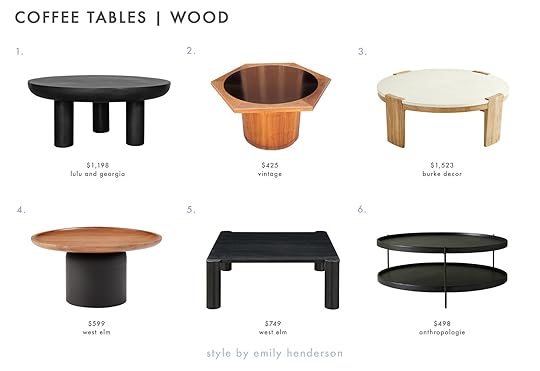
1. Peagan Indoor / Outdoor Round Coffee Table | 2. Vintage Brown and Saltman Coffee Table | 3. Spezza Coffee Table | 4. Miri Coffee Table | 5. Column Legs Coffee Table | 6. Noir Tiered Coffee Table
Don’t these just have a slightly friendlier vibe because of the wood material?? At first, I thought that I wanted to go all black to help contrast the pink curtains and light-toned desk. Then I thought, maybe a white one like #3 would actually help tie in the light desk area with my dark sofa area. BUT then I really liked the idea of a darker two-toned option that would “talk” to my desk chair (the one below I refuse to never let go of:))
 photo by sara ligorria-tramp | from: moto reveal: jess’ home office
Here is how the light and a dark coffee table would look:


They both look great, right? I like the white and oak one but I really want the space to feel earthier and grounded and this says, “light and airy” to me. I actually really love that square beauty (and might be good for kids since there aren’t sharp corners). However, ultimately my heart was with the two-toned look so earlier this week I decided to just go for it!
SURPRISE! I BOUGHT ONE OF THOSE COFFEE TABLES
I had been looking at this little cutie on Craigslist for months but at the time it was out of my price range (then they finally were willing to come down to $375 so I was thrilled). Look that’s still not cheap but it had been on my mind for a long time and for the same table in a larger size on 1stDibs it goes for over $1k. I just loved the interesting shape, the two-toned colors and materials, and that little line detail on the bottom. Also, I realized that I don’t have any vintage furniture in my living room yet. That’s really what was truly missing…SOME SOUL! But buying vintage is very nerve wreaking since there isn’t a return policy. Happy and relieved that I love it. It’s not only going to tie in my chair but also my cabinet/bench design plan🙂
Here are some real shots of my picking it up and thanks to Caitlin who came with me to make sure it was worth the money and that I didn’t get murdered. The buddy system is the only system! Also the guys I bought it from were extremely nice.

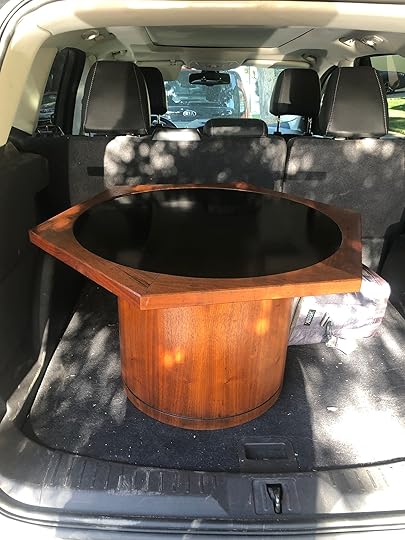
Here it is pre-oiled in the warehouse (on the left) and post-oiled in my car (on the right). The guy was sweet enough to make it sparkle before I left and told me to oil it every couple of months with this brand of conditioner. Now, as you might have noticed it’s not huge. It’s about 25″x15″. My sofa is 84″ which means this little pumpkin needs a friend or two to help make her longer (coffee table rules here). Basically, I will need to do the same idea as my nesting table and pouf in my last place. If you are wondering if I can use one of the old pieces I might. The black table is the only one that fits with it since it’s taller but I’m not sure if I love the look. My other idea was to get a couple of floor cushions made to stack and nest under the new table. This way I can add a couple more comfortable seats, color, and pattern. Win-win-win, right?
TIME TO BRING IN COLOR (AND MORE SEATING)
1. Thalassa | 2. Commune Malmo Check | 3. Oyo | 4. Janas | 5. Cintamani | 6. Noos | 7. Cintamani | 8. Zuri | 9. Ephesus
Above are the fabrics I am currently thinking about. I’m pretty sure I want two different colors (maybe a third to put in the corner). Most of these are from Zak + Fox because I love love their selection for the style I’m going for and I know their quality because I saw it first hand in the canopy Emily had made for their kid’s bedroom in LA. Let’s take a look at some combos, shall we?
OPTION 1 AND 2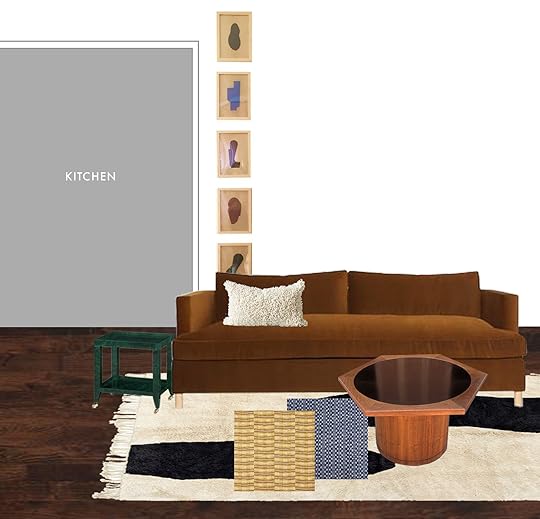

For option one, I like the happy medium tone of the colors and the slight scale difference between them. I also love that the yellow fabric has some pink in it to tie in with the pink curtains. Then for option two, I love the moodiness of these colors and the pattern of the blue fabric A LOT. Just not sure either of these combos are right though.
OPTION 3 AND 4

Here we are on the left with that blue fabric again but with a much lighter (and colorful) option as the second pillow fabric. The blue might be too dark. Thoughts? Then on the right, we have the same pattern as the blue but in a different color. I honestly kind of like this but again it doesn’t feel perfect yet. I would love y’alls thoughts on that too! Let me know in the comments:)
So that’s where I am at! Moving forward and feeling very inspired which is A RELIEF!!!!!!
Love you, mean it.
Opening Image Credits: Design by Jess Bunge | Styled by Emily Bowser | Photo by Sara Ligorria-Tramp | From: Moto Reveal: Jess’ Home Office
The post Jess’ Living Room MOTO Rug/Coffee Table Agony appeared first on Emily Henderson.
August 17, 2022
On Convincing My Kids I Am Still “Fun and Cool” And Some Affordable DIY Ideas For Kids Rooms that We Are All Excited By

Last month we deep dove into the design of the kids’ rooms with them and it was so inspiring (I wrote about that process here). But at first, it was met with hesitation, skepticism, and dare I say even distrust. OF ME. They didn’t think I could really do their cool style. Birdie sweetly informed me that “my colors aren’t really your colors, mama” with the “evidence” being the neutral-ness of the mountain house (which I love, them not so much). I’m only 42, them 6 and 8, so if they already don’t think I’m “cool” or that I don’t “get it” then how bad will it be in 10 years?? I know that it’s inevitable but should it start so early? NO. Instead of trying to tell them how cool I am (which we all know is like telling them how privileged they are – it doesn’t exactly work) I woke up and was like, “WAIT… CHECK THIS OUT”. I proceeded to take them down memory lane, specifically 6-10 years ago when A. I had more time/bandwidth to be creative/ random ideas, B. Had some clients that really wanted bright everything, C. Bright colors were more “in” because D. Modern farmhouse hadn’t quite whitewashed the world (a style I both love but can also find redundant – I say this while designing a modern farmhouse). And also, the kids aren’t totally wrong, I wasn’t a mom of two yet, so there was a youthfulness that you have and lose during that kid-bearing and rearing process (at least I have). In the name of ease and practicality I did and do choose wood, neutrals, and simplicity now for us. Less neon. More “slate” and “denim” tones. So I get their hesitation. I was also more “time rich” and “money-poor,” which meant more DIYs and rehabbing of vintage pieces in order to make a space look awesome. But I’m hoping this year will be different. I’ve written about how I’ve scaled back my life to be much simpler with the intention of having more time and space for creativity, working with my hands more, and spending time with my kids before they are grown. So today I’m going to show you (and my kids) how I can do “color and fun” as well as what affordable DIYs I want to employ that are easy and high impact for kids’ rooms. I’ve done it before. I can DO IT AGAIN 🙂 (I’m pretty sure there is an SNL skit in here somewhere).
DIY Colorblock “Stained Glass” Window Film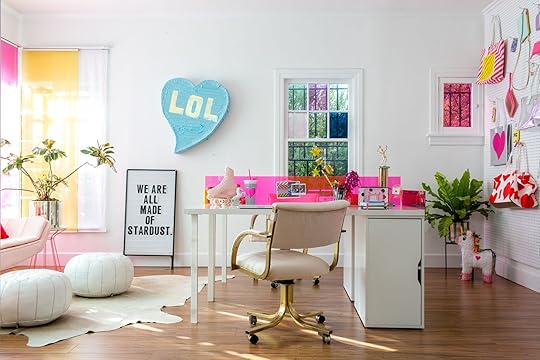 photo by tessa neustadt | from: ban.do the front room + shop the look
Quite possibly the easiest and most affordable way to decorate a room without doing anything to your walls. We bought these at a photo supply store in LA, but there is also this source online. It’s definitely not as cheap as I remember ($22 per running foot, 48″ wide), but it’s super easy to apply, especially cute on divided lites (picture our diamond windows!) and if you just stick to three colors you could keep it under $100 if you don’t do all the panes.

 photos by tessa neustadt | from: how we transformed our studio windows in one hour
We also put them in our old first studio (remember that?). They were SO FUN and created privacy which we needed in that office. Also, look at those different colored sheers! Birdie also loved those.
Malcolm actually just added a clear, reeded version to one of his glass doors in his dining room. It’s for everyone:)
Easy Ways To Add Sparkle And Sequins photo by by tessa neustadt | from: ban.do the front room + shop the look
I totally forgot how we literally went to a party decor store and bought that iridescent fringe – what a fun easy thing to do. I’m thinking we might make something instead (preferably not out of cheap non-compostable plastic) but the idea is there. What you can’t tell in that photo is that the ceiling is a shimmery lavender wallpaper. It was SO PRETTY in person. Now that’s quite the commitment and our home is a farmhouse for Pete’s sake, but my goodness how fun would that be?? Birdie agrees. The last thing to point out is that all three chairs (the hot pink velvet and the tufted sparkly linen office chair) were vintage that we upholstered. It takes far more time than buying new (sourcing awesome vintage chairs in Portland will be harder than LA) but, y’all, I’ll just have to prioritize vintage shopping more into my days 🙂
Upholstering Vintage Furniture With Multiple Fabrics photo by zeke ruelas | from: oh joy’s studio
For Joy’s studio, we found these 8 vintage office chairs and chose 16 different fabrics to have them reupholstered in. They were SO FUN and quite the commitment but curious if we could do a version of this ourselves. I’m not sure what piece this would even be besides some mushroom stools I have my eye on (where the tops would be different than the bottoms). Birdie is DESPERATE to have a canopy, so I’m wondering if we do that here – mix different sheer fabrics with ribbons into a version that she loves (tbh there are so many good readymade options out there). But point being – this is something that would scare me to do for a living space until I was reminded of this…

 photos by mike kelley | from: the fig house lounge before and after
….I did it again for the Fig House! Those vintage lounge chairs were reupholstered in two different colors and I still love them. I long to be risky again so this is getting my juices flowing for sure.
Playing With Window Treatments – String, Beads, And Pom Poms photo by david tsay
I showed the kids this Nike Schroeder piece that I commissioned to go into our first home’s living room and they both loved it. Of course, they did – it’s so tactile, fun, visually stimulating, and wreaks of creativity. Sadly, I sold that piece to the family who bought the house because at the time I had literally nowhere to put it in our next house (it’s 8′ long) and didn’t want it to be stored for a decade, but sure wish I had it now. I’m curious what version of this I could do on our own…it’s just so fun. Maybe some sort of beaded curtain?
I just found this gif in my photos from 2013 and was so nostalgic. This is when I was a DIY contributor for Redbook (that sounds hilarious now) and we did a story about how to upgrade basic white curtains. For their rooms we already have simple blackout shades being installed (by Decorview, we loved what we had at mountain house so we are doing similar ones for room darkening purposes). I’m not sure if we will add curtains or not. They would be more decorative since we already have the shades, but these sweet little DIY ideas are making a case for curtains…
DIY Painted Patterned Walls And Ceiling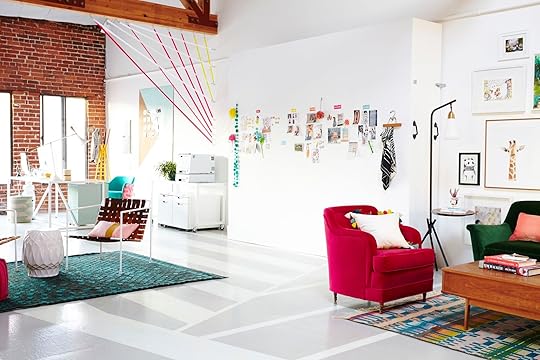 photo by zeke ruelas | from: oh joy’s studio
The kids pointed this out without me even “seeing” this – but for both Joy’s and Ban.do’s projects we painted patterns with tape on the floors and walls. Now, this is super laborious but incredibly impactful (and not hard, just time-consuming).
 photo by tessa neustadt | from: ban.do the front room + shop the look
Would this be super fun on the ceiling? YES! But my goodness so much work. I have some other ideas that might be easier, but still super impactful. I love this due to its temporary and low-cost nature – in 10 years they might not want such playfulness but the risk is just a gallon of paint, some tape, and I’m sure a lot of frustration 🙂 Maybe stencils? Inside the closets? Closet doors?
In Search Of Hot Pink Hanging Lamps!!! photo by laure joliet | from: my bedroom
Ugh. I showed this to Birdie and she screamed – both by seeing Bearcat again (they still cry about her) and those hot pink hanging lamps. We would both DESPERATELY love these for her room. If anyone knows where I can track some down let me know – I’ll pay handsomely. I know that I gave one to this studio’s project – I think the other one was in bad shape. If anyone knows of two of these in good condition let me know. Otherwise, we are going to attempt to cover some victorian wire shades with fabric (I did this in 4-H as a child and it’s hard but so fun).
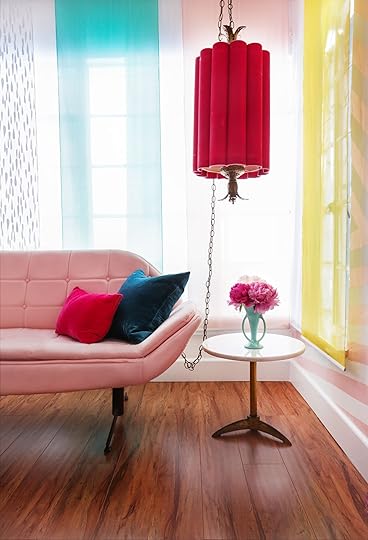 photo by tessa neustadt | from: ban.do the front room + shop the lookDIY Washi Tape Patterns
 photo by zeke ruelas | from: oh joy’s studio
For Joy’s office, we put gold contact paper and washi tape at the bottoms of the kitchen cabinets and the IKEA storage cabinets. SO easy. SO fun. So impactful. Very curious where we could add these in their rooms assuming they are easy to take off.
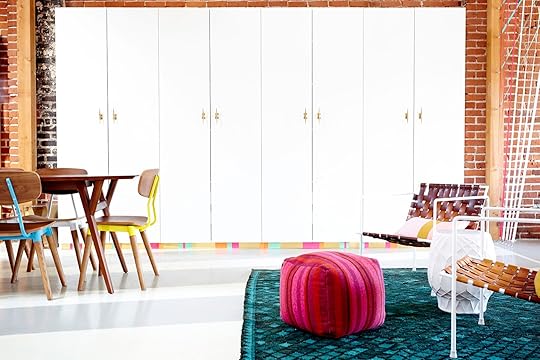 photo by zeke ruelas | from: oh joy’s studio
I love that this is absolutely something they can help with and have a lot of control over the colors since it’s not a long-term risk.
Painting Dressers/Nightstands Fun Colors
 photo by sara ligorria-tramp | from: our painted entry console + an ‘ask the audience’ …
I wrote about this a couple of weeks ago but I’m excited to get back to refinishing furniture and have been collecting thrift store pieces to let the kids help me paint.
 photo by sara ligorria-tramp | from: how we shoot, edit and hang family photos with framebridge
Yes, I do still wish that I had that piece (however I love that it went towards a Pen and Napkin Makeover here) but the idea is pretty simple – I help choose a good shape and they get to weigh in on color if they help execute. I did this one years ago…
 photo by kelsey tucker | from: a modern glam nursery makeover
Now I didn’t actually paint that one, I had it lacquered but that got Birdie very excited. I showed her these two below that I did myself (with a team for shoots) and she was less impressed due to the lack of color.

 left: photo by geneieve garruppo, from: 120 year old barn makeover with the frame tv | right: photo by tessa neustadt, from: staging my dream parisian hotel suite with sotheby’sDisco Balls. They Mostly Want Disco Balls and Neon Lights
 photo by tessa neustadt | from: ban.do the front room + shop the look
And I get it. So yes, there will be disco balls (rainbow and pink might be employed) and Charlie wants a neon light (I’ve already found a local artist who I might work with). And then in a hilariously unexpected twist, one of the ARCIFORM team members that I’ve been working with, Marty, knows how to make pinatas!!! Now I’m not sure how long-term a decorative pinata can last (doesn’t it just beg to be beaten and destroyed?) but she reached out and I’m very intrigued.
The whole “pitch” to them worked and I haven’t been so excited to design something in so long. We move in next week and I haven’t unpacked their boxes from LA yet so I’m curious what we’ll find, how and where we’ll use everything, and then we’ll get to work on some of these DIYs, assuming that I have the time and space for it 🙂
Opener Image Credits: Photo by Tessa Neustadt | From: Ban.do The Front Room + Shop The Look
The post On Convincing My Kids I Am Still “Fun and Cool” And Some Affordable DIY Ideas For Kids Rooms that We Are All Excited By appeared first on Emily Henderson.
August 16, 2022
Malcolm’s Dining Room Reveal Is Here (You Have To See His DIY Non-Permanent Wallpaper Solution)

As I write this article, a team of movers packs up my house ahead of my new adventure in the UK. A bittersweet moment, to be sure… watching meaningful memories made over the last two years be packed into boxes and hauled out of my front door. Furniture is splayed across the house as the movers debate the packing puzzle that is my weird collection of things. Most walls are bare. Much of my personality has been removed. A vase of flowers in a corner catches warm sunlight streaming through a window—looking out the window as if it’s reflecting fondly on the memories made in this house.
Strangely enough, though, my dining room remains intact. The furniture in this space is being transferred in a different shipment later this week, so this room is the only one that looks vaguely “normal” amidst the pre-move chaos. This is the last room I designed in this house, so it feels satisfyingly poetic that it’s the last room to be emptied. The stillness of the dining room at this moment reflects the timelessness of my design intentions for it—vintage furniture, secondhand pieces, and classic patterns are suspended in time as if they were always meant to be here. I sit in a vintage Broyhill chair across from the dining room—proud of what I’ve accomplished but sad I won’t get to enjoy it beyond this week (until I return stateside in a few years, that is).
At any rate, I could wax poetic for ages, but you probably didn’t come here for my incessant rambling! You probablyyyyy came for the reveal of this space—which I enjoyed designing before my move—and I’m happy to oblige!
When I set out to redesign this room, I already knew my departure was forthcoming and that a renter would be taking over my house imminently. As such, I decided to make changes that weren’t tremendously labor intensive, collecting vintage items to use in the space (that I’d be able to either take with me or enjoy when I move back to the US), and making changes so the dining room feels well-incorporated with the rest of my house for a fully-realized design experience for my incoming renter. In addition, I was challenging myself to explore interesting and complex projects under a limited time constraint…with the added hurdle of avoiding any easily irreversible design decisions…in the middle of a life-changing move across the world. Am I a glutton for punishment? Perhapppssss. However, am I proud of what I’ve accomplished here? Absolutely.
QUICK CHANGES
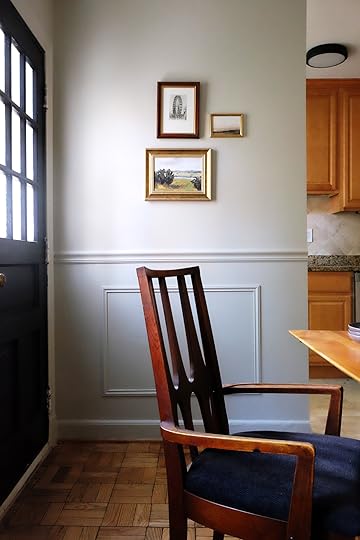
I think the name of the game in this space is simplicity—from the singular paint color used in the space to the timeless appeal of the wainscoting applied throughout. I’ve always enjoyed custom millwork in a space. It adds a tailored touch to a room in a reasonably uncomplicated way (depending on how much detail there is), and it’s relatively easy to design and implement over a weekend. For my purposes in the dining room, I had pieces of trim cut down at a local hardware store, and used my miter saw to cut the corners of each piece to length to make eight boxes around the room of various sizes. I also installed a chair rail around the room to help ground the millwork. I used a nail gun to secure each piece into the wall, caulked the edges, primed the wood, and painted it all in the same, dusty gray tone.


The paint color I used in this dining room is “Hazy Skies” by Benjamin Moore, and it has quickly become a favorite of mine. It has a green undertone that appears and disappears depending on the time of day, but its overall tonality feels neutral enough to play well with a wide variety of textures, styles, and patterns (all of which I’ve explored in this space). I’ve used a “pearl” finish on the wainscoting and below, and a “flat” finish on the upper portion of the walls.

On the door, I used “Black Magic” by Sherwin Williams, but the star of the show here is the DIY reeded glass treatment I’ve applied to its windows!
I struggled to determine how to create privacy through the windows on this door. I didn’t like the blinds that were installed there previously, but they did provide some necessary privacy, and I certainly wanted to maintain that privacy for my renters. I’ve always loved the look of reeded glass, so I jumped online to see if I could find a quick and simple way to create that effect here. That search led me to these stickers on Amazon. They were super easy to install (and will be super easy to remove, whenever necessary), and add privacy without sacrificing style.

Reeded Glass Window Film | Light Plates

Wallpaper | Vintage Chairs | Vintage Dining Table | Vintage Light Fixture
Let’s talk about this GORGEOUS wallpaper by William Morris and Rejuvenation! William Morris is a pretty renowned print and textile designer from the 1800s. He hailed from the UK, so it felt appropriate and meaningful to use one of his prints before my move across the pond. I love the line movement in this print. It’s quintessentially Victorian in style, but somehow still feels relevant amidst some of the more contemporary and modern aspects of this room.

From the moment I had the idea to use this wallpaper, I knew I wanted it to be BIG and carry a lot of visual weight, but I also knew that I didn’t want to apply something directly to the wall that might deter renters who don’t like wallpaper. To that end, I ordered a 4’x10’ piece of drywall from Lowe’s, painted it with an oil-based primer, and applied the wallpaper to it with wallpaper-specific adhesive just as I would’ve if it was going directly on the wall. It was pretty easy—largely in part because I was doing all of the work on the floor. Once the wallpaper adhesive was all set, I hoisted up the piece of drywall (it was very heavy) and positioned it atop brackets that I drilled directly into studs. And, voila! A relatively easy way to use wallpaper in a fairly non-permanent way.

The quality of this wallpaper is a 10 out of 10. The texture is soft to the touch, it has a beautiful sheen to it, and it was ridiculously easy to apply to the drywall after I watched a tutorial. The pattern brings a subtle energy to the room that is meaningful but not at all overbearing. The style of the print fits in well with the rest of the house, which is something that I strived to do heavily in this room.
INTENTIONAL DESIGN CONSISTENCY
Along with being intentional about the “quick changes” I made in the dining room, I wanted to incorporate elements I’ve used throughout the rest of my house to create a thoroughly cohesive experience. I’ve used the same wall plates from Rejuvenation around the home, which is a fairly easy way to create that cohesion. Additionally, I painted the walls in the dining room similarly to how I painted them in the office by extending the paint to the baseboards, door/window trim, and crown molding throughout the space.

Roman Shade | Curtains | Curtain Rod
Additionally, because I’ve used drapery on every other window in the house (mostly from Everhem), I wanted to follow suit in the dining room as well. I didn’t have the time or resources to have custom drapery created in this space, so I opted for off-the-shelf panels from CB2 and a black curtain rod from Target to adorn the window in this room. I also picked up a wooden shade from Lowe’s to finish out the window treatment for a more custom look. I’ve used the same wooden shade in an adjacent window in the kitchen to create some consistency. Ultimately, I decided to remove the curtain panels throughout the house before the renters arrive, since most of them are fairly expensive and I was a little nervous about someone ruining them… but I did leave the curtain rods installed so that anyone can easily hang their own drapery.

Another feature you’ll find throughout my home—as you’ve seen in my primary bedroom, bathroom, and office remodels—is brass lighting. The fixture I chose for the dining room is no different. Its metallic tone, linear form, and positioning in the space all work together to add a lightness to the room that balances out some of the heavier elements used lower in the room. I added little baby shades from Lowe’s to customize and soften the fixture a bit.
I also switched out an old fixture in the kitchen with a new beaut from Rejuvenation, which speaks to some of the elements in the dining room in a way that helps create some design unity. I’ve loved using Rejuvenation as a lighting resource throughout my home (they also made an appearance in the office and the bathroom), but I’m really loving that the chandelier in the dining room is a secondhand find, along with all of the furniture in the room.
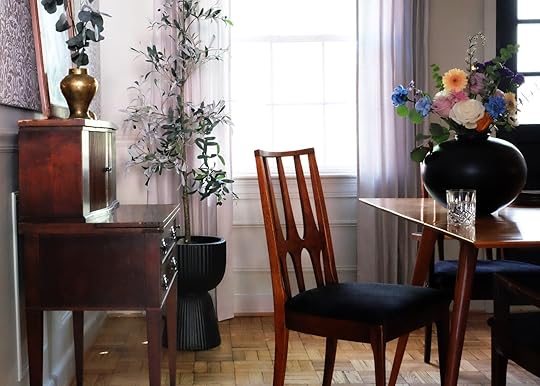
UTILIZING SECONDHAND FINDS
As I mentioned in my introductory article about this space, my vintage Broyhill chairs hold a soft spot in my heart. I lived in Brazil for a few years when I was a kid, and the lines of these chairs are so reminiscent of architecture and art in Brasilia (the nation’s capital). The Cathedral of Brasilia and Alvorada Palace are two architectural gems that embody the style these chairs were inspired by. I vividly remember seeing these buildings and having a curious fascination with them, but I couldn’t quite pinpoint the reason at the time. Now, I can understand that the energy of this style captures a youthfulness and novelty that we don’t often see in contemporary design. That’s likely because when this style was popular in the 1960s, it was inspired by the architecture of Brasilia…which was—at the time—a brand new city. It was all new, interesting, and exciting. There’s a lot to explore here about the novelty of trends and what they’re inspired by—and a question of whether or not anything has been new enough in today’s era to be globally inspirational—but I’ve talked about it enough, I think. Let’s move on!

I reupholstered the Broyhill Brasilia chairs in a black fabric, which also helps to ground the space and create a “constant” in coordination with the color of the back door (Black Magic by Sherwin-Williams) and accessories I used throughout the space. In a weird way, I often think about old-school science fair projects when I’m creating a space (stick with me for a minute). For some reason, the idea of a “constant”—which most of us learned about in middle school science class—has always stuck with me. We learned that a “constant” is the part of a science experiment that doesn’t change. It allows us to implement “variables” that consequently allow us to test hypotheses and other scientific mumbo jumbo. For our purposes here…black is the constant, and varying wood tones and interesting patterns are the variables—all of which combine to create an interesting design experiment.
Ha. I really milked that metaphor for all its worth, didn’t I?

Another aspect of this room I appreciate is the exploration of the various wood tones I’ve incorporated in the furniture pieces and how they speak to the color of the parquet flooring. The table is a light walnut, the chairs and mirror frame are a medium brown, and the secretary desk grounds the room with a deep, cool brown. The different tones create balance in the space in a slightly unconventional way. The conventional wisdom would be to use a similar tone of wood throughout the room, but the vintage of the various pieces of furniture and the intention behind utilizing three distinctly different colors brings a “designer” edge to the room that feels uniquely authentic. From my perspective, anyway. 🙂
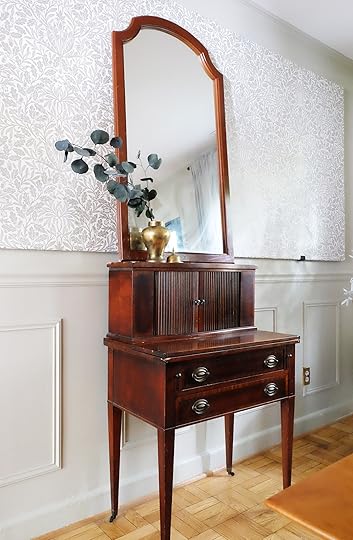
Vintage Secretary Desk
At any rate, the secretary’s desk and the mirror above it (along with the chandelier above the table) were procured from Community Forklift, which is an architectural salvage warehouse close to DC (as a side note, Community Forklift is looking for a new location for its warehouse! If you live in the area and are able to spare a donation to help them with this major move, you can hit this link to support them.) This room has really been an exercise in using existing objects to create a uniquely collected space, and as a result, I think I’ve found a new love for collecting vintage furniture.

I’d be remiss if I didn’t mention that some of the decor items pictured in these shots will be available for sale on my online shop soon! I’ll be selling collections of vintage and handmade goods—most of which will be coming from the UK—so keep an eye out over the next few months if you’re in the market for some one-of-a-kind objects. You can follow me on Instagram for updates on that front!
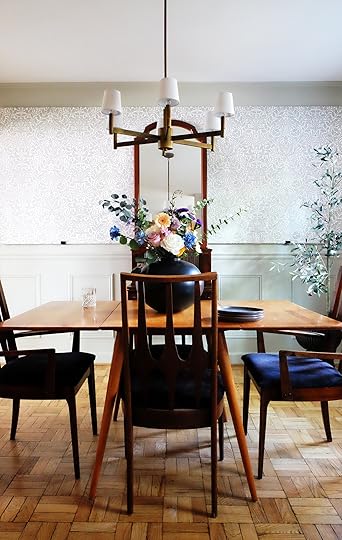
I was so happy to find this Paul McCobb dining table on Facebook Marketplace while I was finishing out this room. The finish of the table works tremendously well with the tone of my parquet floors, and the modernity of its form fits right in with the age of the Broyhill dining chairs. Synergy!
…I think I’ve said “Synergy!” in every reveal article I’ve had here on Emily’s blog. I’m not mad at it.
I poured my heart into this room, and I’m hoping I’ve created something that inspires you to try something new in your home or inspires you to be more thoughtful and intentional about the design decisions you make for yourself. I’m a firm believer that our spaces should be reflective of our authentic selves and experiences, more so than a direct reflection of whichever trend is currently populating the Pinterest-sphere (even though there’s absolutely nothing wrong with using those tools to help us understand design and identify what we like and don’t like).

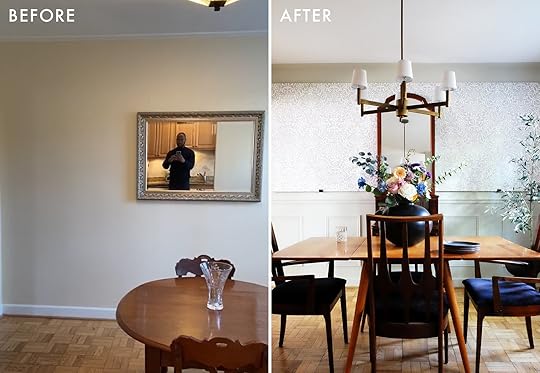
Incidentally, as Emily and her team post this article, I’ll be landing in the UK to start the next chapter of my life as a London resident for the next few years. However, I’ll still be showing up here on the blog as long as she lets me! You can expect some European inspiration, rental-friendly makeovers, and other inspiring design ideas the UK will be sure to reveal to me. And, I’ll be back in this house in a few years to redesign the kitchen with newfound insights and inspiration. If you’ve been following along with my home renovation journey here on Emily’s blog, what has been your favorite room? I have a soft spot for my bedroom makeover, but I’m curious to know what you think!
As they say across the pond… Cheers! See you soon!
*Design and Photos by Malcolm Simmons
The post Malcolm’s Dining Room Reveal Is Here (You Have To See His DIY Non-Permanent Wallpaper Solution) appeared first on Emily Henderson.
August 15, 2022
The Farmhouse Entryway – A Peek Into My Pinboard And Process

My Saturday morning online shopping tradition has been stunted by my internal common sense screaming, “you only have two weeks until you move in…live there before you buy one more thing.” But that doesn’t mean I don’t pin, narrow down, think, mentally decorate, etc. Besides, you can put a good bench or console in so many places so if I found a great one on FB marketplace I think it would still be a sound purchase (not sure if that is the vintage shopping addict talking or my common sense – Who knows?)
The Entry: When We Bought The House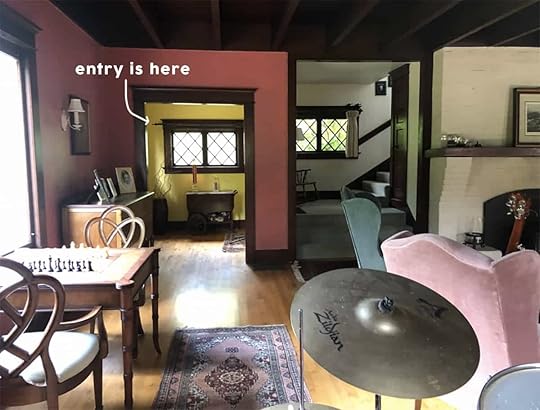
I don’t think I’ve had a self-contained entry before and I like how clear its purpose is. This room will greet you (which is why I want it to be really beautiful, not just a bunch of shoe bins) and needs to be a good coat zone for guests but otherwise, very little time is spent in here before you immediately go right into the living room. So it needs to make an impact, set the tone, and function with some storage.


It’s a nice little space that will likely serve as a drop zone. My fear is that the kids are going to use the back kitchen door as their drop zone unless I use my hard-core parenting manipulation/bribery skills to change their patterns. And if you live in CA you might think, what’s the big deal with going through the kitchen door? But what you’ll quickly learn is that kids here are trained to take off shoes and coats almost immediately upon entering and if there isn’t a system, they will literally just DROP everything. And that is not acceptable in that dreamy kitchen corner (don’t worry, I’m designing it to withstand some dropping but no, I do not want it to be our dedicated drop zone). Anyway, my plan is to lock the kitchen door with a sign that says, “head to the mudroom, put shoes/coat away, and earn yourself a jelly bean.” Maybe after a few weeks, they’ll just automatically do it? Pavlov’s dog? I think I should write a parenting book.

Then recently I realized that the front door (where we are today) is actually pretty close to the back entrance (the closest from their school path) so maybe this is the daily drop zone? And oddly I’m fine with that because at least it’s a contained space and really only needs to look super styled out for guests. That’s all to say we aren’t sure how much of a drop zone this area needs to be. I’m hoping it’s just a coat rack, a boot tray outside where it’s covered, then a bench or a table for potential purse/keys. But I don’t really know…
Entry Mid-Renovation
So as you can see we installed the most beautiful window ever, custom designed with Sierra Pacific. It’s just so pretty. So whatever we have we need it to be pretty shallow – 18″ is the total depth of the nook and for the length we have a total of 84″ I’m thinking somewhere between 55″-72″ for whatever piece of furniture we choose (but maybe even smaller, again I need to try a piece and see how it feels).

I really don’t want anything to obstruct this view – no bench arm or table edge to be seen from the living room. Instead, I want it tucked inside that nook (again this is just my current opinion that can change). I’m thinking of a coat rack or hook on the left and/or a beautiful airy tree that climbs over the window. In this house, I’m really trying to keep sight lines pretty clean (something we’ve really enjoyed at the mountain house). The window is the focal point from the living room so I don’t want to distract from it. BTW I’m just now noticing that the sconce isn’t centered on the wall between the entry and the stairs but Jamie has already moved it, don’t worry.

If you are wondering why the baseboard and casing are blue here it’s because we thought we wanted them all to be before we realized that well, we didn’t like it AT ALL (so yes, we wasted a 1/2 day of painting labor and some gallons). It’s a great color, (Upward by Sherwin-Williams) but too twee for down here and ultimately we just want white and wood and color in the furniture/decor. I actually really like it in this shot, but once you get into the living room it’s just too much and really detracted from what we love – the wood flooring, wood windows, natural light, and sense of openness and space.

So here, below, are all the benches that I have pinned, none of which have been purchased yet. What you’ll notice is that most of these have a very minimal arm – i.e. not sticking too far into the room’s view. Not all of these would work size-wise, but I really like them all for different reasons.

1. Dexter Outdoor 60 in Bench | 2. Millbrook Bench | 3. Pali Black Wood Dining Bench | 4. Windsor Bench | 5. Marissa Bench | 6. Lanae Bench | 7. Chrissy 57″ Indoor/Outdoor Teak Dining Bench | 8. Eastward Bench | 9. Continuous Arm Bench
#8 was my pick from this group (it’s just so pretty) and if it doesn’t go here it might work somewhere else. But then I thought that if we do a bench here maybe a rounded back (like #9) could work…
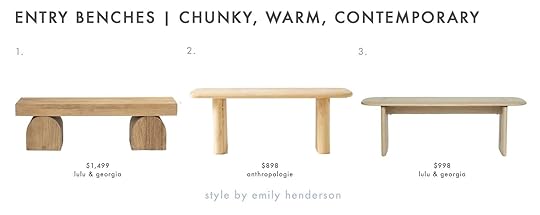
1. Laney Bench | 2. Kalle Sculptural Oak Dining Bench | 3. Henrik Bench
I love #1 even though I know it’s super trendy. It just feels so solid and grounding. I might put this in my kitchen window (by the back door).

1. Nickey Kehoe Swiss Back Bench | 2. Eunice Bench | 3. Edo Bench | 4. Sienna Leather Bench | 5. Kyoto Bench | 6. Oxbend Bench
Originally I was going to get #6 (and still might), but we bought the counter stools from Fernweh already so I want to live with them before we commit to adding another one of their pieces in the next room (we’d get it in walnut, not black like our stools). Real big fan of #1 but it comes with a hefty price tag. So instead I searched for antique versions on 1stDibs (which also came with a big price tag and found a few).

1. Italian High Back Bench | 2. Mid Century Style Wing Settee by Lost City Arts | 3. Italian Style Settee by Lost City Arts
For a hot second, I entertained the idea of a very slim upholstered high back bench – almost like a statement settee. Not totally sure why, but I do really love these – all armless and super shallow so technically they fit the dimensions, and boy would they be a statement walking in, but they don’t ultimately feel right (I also wouldn’t order these as they are a fortune, instead using them for inspiration to custom make something).
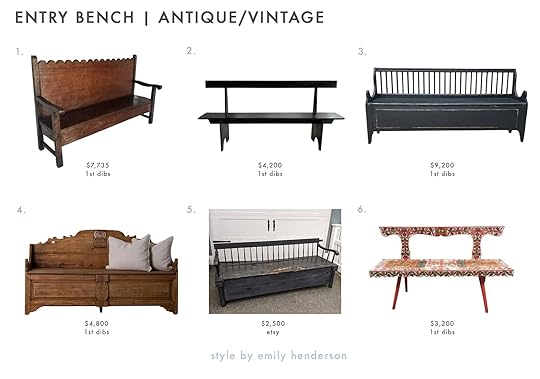
1. Rustic Chajul Bench With Tall Scalloped Back | 2. Pair of American Modernist Shaker-Inspired Benches | 3. 19th Century Black Swedish Gustavian FÅLLBÄNK, Antique Pinewood Fall Bench | 4. Bench Swedish 19th Century Bench | 5. Antique American Pine Deacon’s Bench | 6. Hand Painted European Bench
Not going to lie, #6 gets me so excited. I LOVE an old folk art painted piece. I like all of these for different reasons and yet none of them feel quite right, but figured it would be fun to show you what was on my pinboard.
Right before I published this post I showed Brian all the options (I left this one off because it’s $8,200 but if I could have any bench this would be it – see below). Brian’s reaction to my pinboard was like, “Sure I like them, but maybe you’ll want a console instead?” I was like immediately defensive until I realized he’s probably right. I think what happened is that I fell in love with the O&G bench, it’s such a beautiful statement. Feast your eyes on this:

I pictured a piece of art above it and was like, “Boom. There, the entry has been nailed.” The joy I would feel daily by seeing that piece of art (the bench, not the actual art above) checked so many mental boxes. But due to its price, we knew that it wasn’t where we’d spend money. So I searched long and hard to find a more affordable version and definitely found some great ones, but I think I forgot to explore other pieces of furniture altogether because I just had “bench” in my brain. I’ve done this before. I fall in love with something unattainable, and try to find more affordable options instead of thinking about all the other possibilities. It’s a good lesson to be reminded of and ultimately I’m so grateful that this isn’t something we NEED to live in the house and we have time to live there and see what we’ll use the most (bench or console, storage or sculptural?) and then take my time to shop.
*Progress photos by Kaitlin Green
The post The Farmhouse Entryway – A Peek Into My Pinboard And Process appeared first on Emily Henderson.
Emily Henderson's Blog

- Emily Henderson's profile
- 10 followers

