
Nik Sharma's Blog, page 8
March 3, 2021
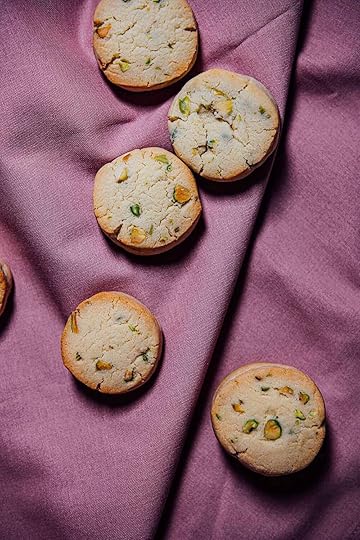
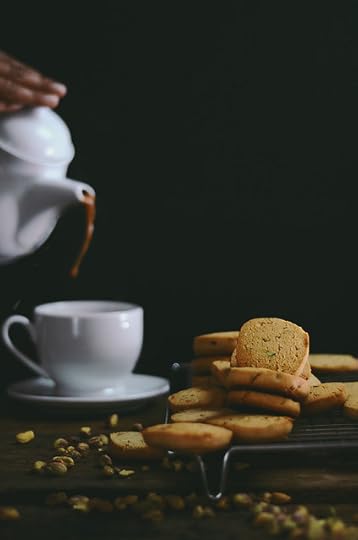
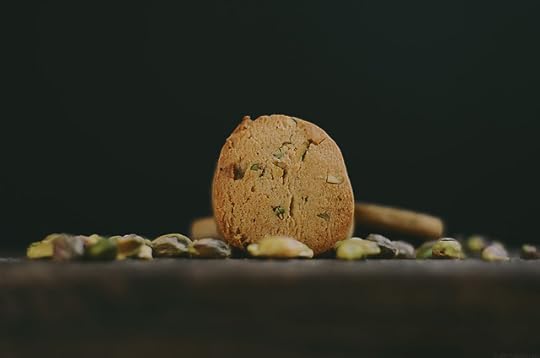
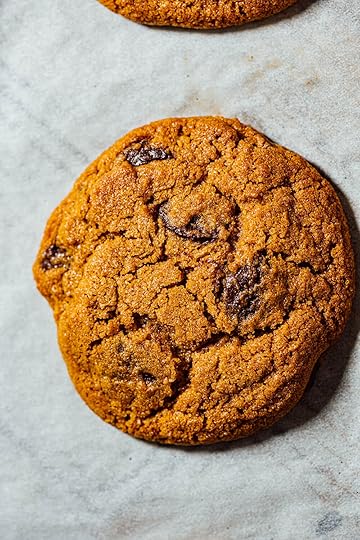
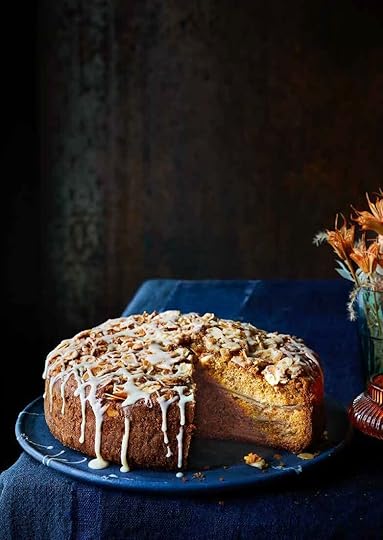
milk and pistachio cookies
[This is an older recipe from 2015, that I’ve updated.]
These delightful cookies are perfect with hot tea or coffee. In India, pistachios and milk are a common combination in many desserts like pedas (a type of milk fudge) and and to play off that theme, I’ve created these cookies that use milk powder and bright green pistachios. The cookies aren’t completely soft, they’re crisp on the edges and tender in the center, combined with the texture of the baked pistachios, it feels much nicer on the palette.
Here are some of my tips when making these cookies;
Blanching Pistachios: Should you skin the pistachios ? That is entirely up to you. I like them either way in these cookies but some people find them bitter or slightly astringent. If you do decide to proceed with removing the skins off. Soak the pistachios for about 5 minutes in enough boiling hot water to cover them and let them sit on the kitchen counter. After 5 minutes, the outer pinkish skin will turn soft and will easily slough off when rubbed. I use my fingers to clean the skin. Leave the cleaned pistachios on a dry absorbent towel to get rid of any excess water.
Crush pistachios using a rolling pin in a small ziplock bag, less mess and it's easy.
Don’t worry if you can’t find a good pistachio extract, almond extract works in a pinch. I use the pistachio extract by LorAnn.


milk and pistachio cookies
yields: approximately 30 cookies
ingredients
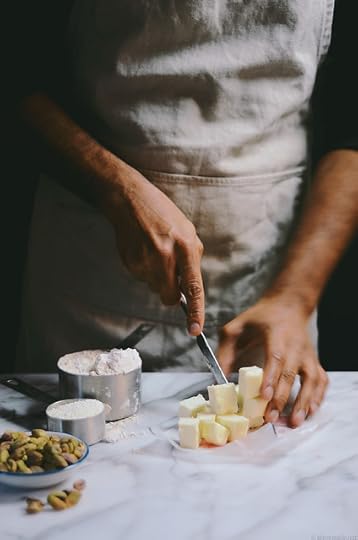
1 stick/4 oz [110 g] unsalted butter, chilled and cubed
3/4 cup [150 g] sugar
1 large egg, chilled
1/2 teaspoon pistachio extract or almond extract
2 cups [280g] all-purpose flour
1/4 cup [21g] non-fat dry milk powder
1/2 teaspoon baking soda
1/4 teaspoon kosher sea salt
1/2 cup [60g] unsalted pistachios, coarsely crushed (See note above on Blanching)
Place the butter and sugar in the bowl of a stand mixer. Using the paddle attachment cream the butter and sugar on medium-low speed for about 4 to 5 minutes. Stop the mixer and scrape the sides of the bowl using a silicone spatula. Then add the egg and continue to mix for about 1 minutes, till combined. Scrape the sides of the bowl down. Add the pistachio extract and mix for 10 seconds. The mixture will be light and fluffy. Scrape the sides of the bowl down.
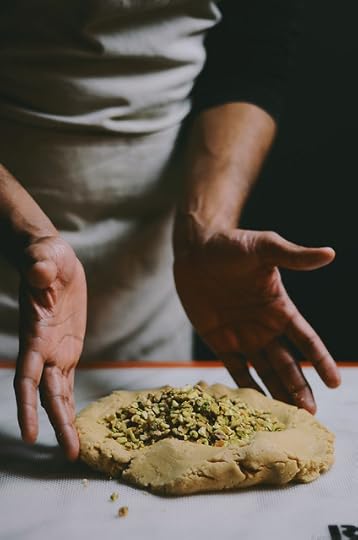
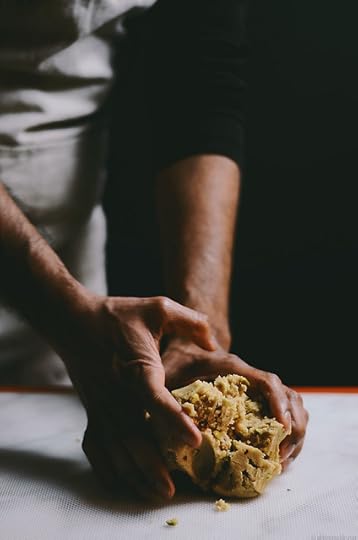
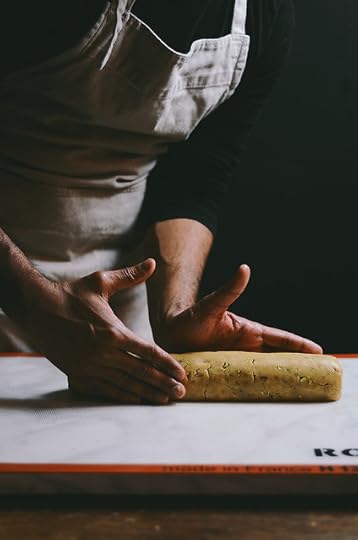
In a mixing bowl dry whisk all the flour, milk powder, baking soda, and salt. Add half of this mixture to the wet ingredients in the mixing bowl and mix on medium-low speed until almost combined. Then add the remaining flour mix and mix until combined. Remove the dough and transfer the dough onto a cool surface such as a marble pastry board or a non-stick silicone pastry work surface or parchment paper. Flatten the dough with your hands and place the pistachios in the center. Fold the dough gently to combine the pistachios.
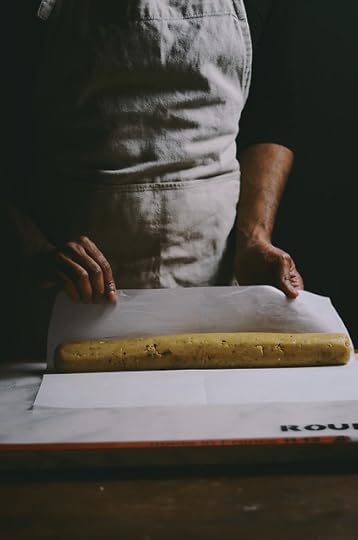
Take a sheet of 12 inch by 16 inch [30.5 cm by 40.5 cm] parchment paper. Shape the dough into a log that is about 12 inches [30.5 cm] long. Wrap the roll with the parchment paper starting from one end by using the paper. Wrap the roll with clingfilm, place it on a baking sheet and refrigerate for at least 4 hours to overnight.
To bake, place two wire racks at the mid level in the oven. Preheat the oven to 350F [180C].
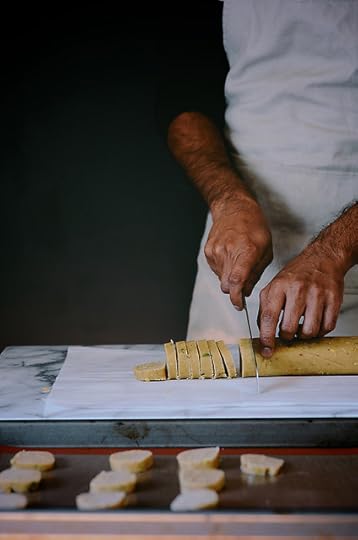
Remove the cookie dough roll from the refrigerator and using a sharp knife cut the dough into about 3/8 inch [1 cm] thick individual cookies. Line two baking sheets with parchment paper. Place about 10 cookies on a lined baking sheet lined, each about 1 inch [2.5 cm] apart from each other. The cookies won’t spread too much during baking. Bake two sheets of cookie at a time for 10 minutes, swap the sheets halfway through during cooking and rotate the sheets by 180 degrees to let them bake evenly. The cookies should be lightly golden brown on the edges when done. Remove the baking sheets from the oven and let the cookies cool on the tray for 5 minutes, then transfer to a wire rack to cool completely. The cookies will be slightly soft when they’re hot but they will firm up on cooling. Cool the cookies to room temperature completely before storing them in an airtight container and store for up to 1 week.


February 25, 2021
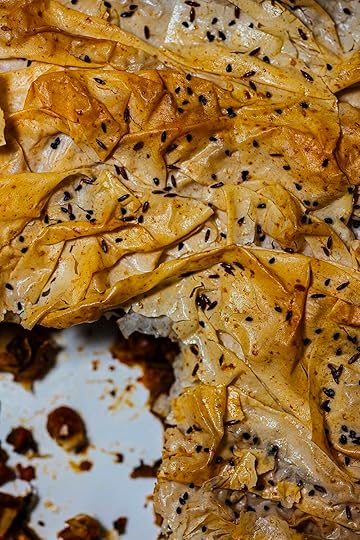
chilli crisp cream cheese stuffed rose buns
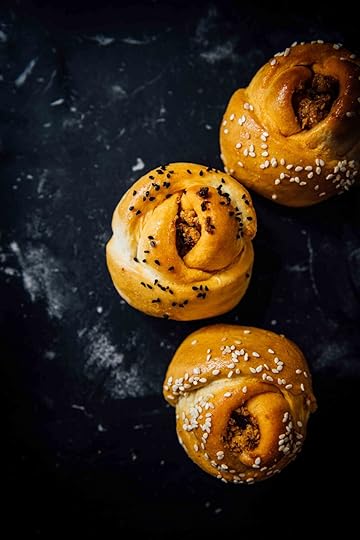
I am always excited to bake and eat savory pastries and breads, if I could wake up to savory pastries every weekend, well let’s just say this, it would be pretty close to perfection. This recipe is a combination of techniques and flavors from different cultures. I’ve used the technique for the rose shaped breads/pastries from Turkey called Gül Poğaça, filled it with a paste made from the delicious chilli crisp oil from Lao Gan Ma and cream cheese, and used the tangzhong technique that originally started out in Japan in the form of the yukone (aka yudane) that later became popular over Asia by Taiwanese cookbook author Yvonne Chen in her book The 65 degree Celsius Bread Doctor Book (Note: this book is in Traditional Chinese and I could not find an English version) to make my dough soft and pillowy.
Eat these for breakfast or as a snack, they’re delicious when they come out warm straight out of the oven.
Making the roses are easy. I used the technique I learned from the Soframiz book by Anna Sortun but my dough recipe is different. The rose is created by making 4 flaps that transform into petals. It’s one of the simplest techniques that I’ve learned and that gives spectacular results.
Some Notes:
Do not sub all-purpose flour for bread flour here.
Use whole milk or 2% milk but never fat-free milk
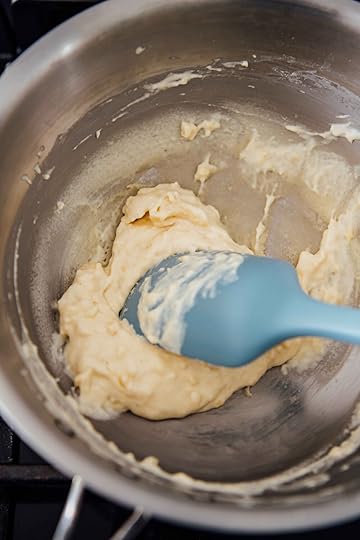
The tangzhong method is a way to help retain the moisture in the dough as it bakes and produce a very light and pillowy bread. Milk (and sometimes water) is heated with a small quantity of flour to form a thick paste. At about 149F[65C] the starch present in the flour thickens on heating and binds the water to form a gel that is incorporated into the dough (This process is called Gelatinzation - In The Flavor Equation there is a table at the end of the book on Page 339 that lists the gelatinization temperatures of different starches and I discuss it in more depth in the book). Once the dough bakes, the water trapped in the gel is released to create a very puffy texture. Read more about the history of the Tangzhong method at King Arthur Flour and do make their Cinnamon Rolls (it might just be the best version of cinnamon buns that I’ve ever made). Do you need to use a thermometer to measure the temperature of the roux? My short and quick answer is, no. You can easily tell when the paste forms visually but there is no harm in using a thermometer.
In the recipe, I ask you to cool the roux down to 110F [43C]. If the roux is too hot when added, it will kill the yeast.
My preference is for the Lao Gan Ma brand of chilli crisp. I’ve tried a few other brands and they don’t taste as good (I’m probably biased) in comparison to Lao Gan Ma. Stir the contents of the jar well before you scoop the sauce out, I also recommend draining some of the excess oil out, it’s tasty but it can leak out of the buns. You will love reading Cathy Erway’s fascinating piece on The Cult of The Spicy Chile Crisp is Real for Taste.
If you own a pizza stone or baking steel, this is a good place to use it when baking. I bake one sheet at a time but you can do both simultaneously, just remember to swap the sheets on the wire rack and then rotate them halfway through during baking, so they cook evenly.
Use a damp kitchen towel to cover the dough at every rising stage to avoid the formation of dry skin on the surface and reduce moisture loss. I baked one batch that wasn’t covered with a damp cloth and not only did they form a skin but they also were drier in comparison to those that were covered with a damp kitchen towel.
For the folding of the buns, the final fold is very important. Wet the flap of the dough with a little water to help it glue firmly and remember to tuck the tips firmly underneath the pastry or they can pop out during rising and baking. It is also not the end of the world if they do pop out a little.


chilli crisp stuffed rose buns
makes 12 individual buns
For the dough
3 cups [420g] bread flour plus a little extra for rolling out the dough
1 cup [240ml] whole milk or 2% milk
1/4 cup [55g] unsalted butter, cubed and softened to room temperature plus a little extra to grease the bowl
2 Tbsp sugar
1 tsp sea salt
1 large egg lightly whisked
1 1/2 tsp active dried yeast
For the filling
6 oz [170g] cream cheese, softened to room temperature
2 generous Tbsp of Lao Gan Ma chilli crisp sauce
2 to 3 scallions, ends trimmed and discarded, thinly sliced
For the Topping
1 large egg, lightly whisked
3 to 4 Tbsp sesame or nigella seeds
Whisk 1/2 cup [120ml] milk with 1/2 cup[70g] flour in a medium saucepan until smooth. Using a whisk stir the mixture continuously over low heat till it thickens to form a paste or roux at about 149F [65C], about 2 minutes. Remove from the heat and let cool till the mixture is no warmer than 110F [43C].
Add the remaining 2 1/2 cups [350g] flour and yeast to the bowl of a stand mixer. Attach the dough blade and set the mixer to the lowest speed. Add the remaining 1/2 cup [120ml] milk, butter, sugar, and salt, and the whisked egg. Using a silicone spatula scrape out and transfer the roux to the bowl and mix over low speed for about 10 minutes till the dough comes together and takes on a smooth and supple texture. The dough will be elastic and will spring back to shape when gently pressed with a finger. Transfer the dough to a lightly floured surface and knead for 30 seconds to shape the dough into a large ball. Grease a large bowl with a little butter. Place the dough in the bowl and cover the top with a lid or a damp clean kitchen towel and leave to rise and double in size, about 2 hours in warm spot away from direct sunlight.
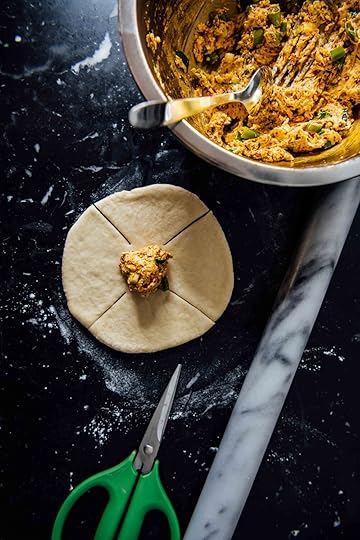
Towards the last 10 minutes of the dough rising, prepare the cream cheese filling. In a small bowl, mix the cream cheese, chilli crisp sauce, and scallions together with a fork until combined.
Line two baking sheets with parchment paper.
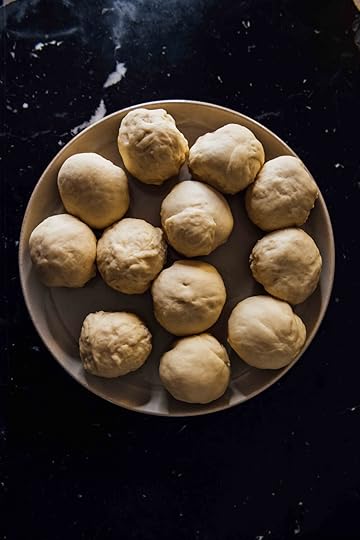
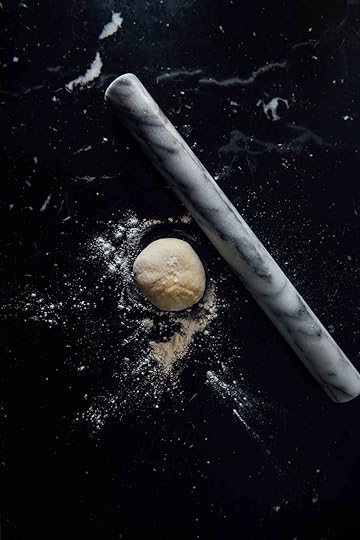
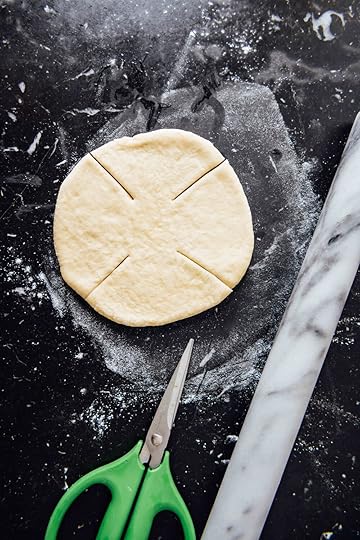
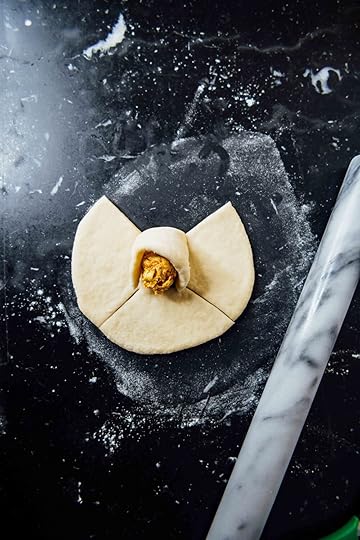
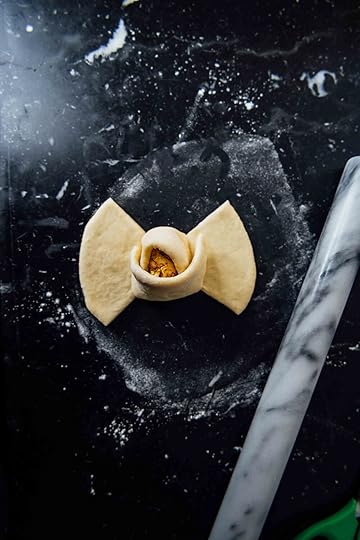
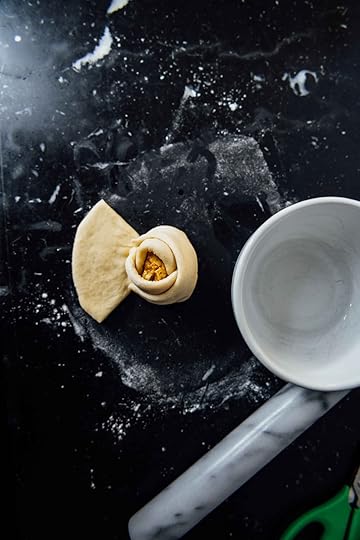
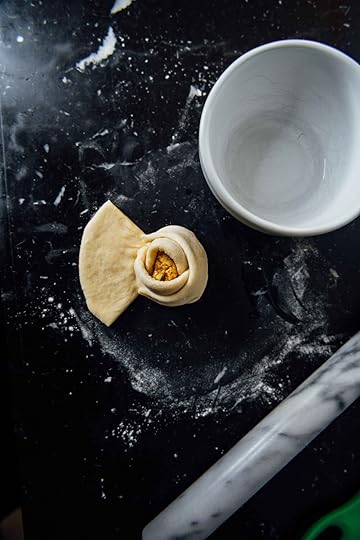
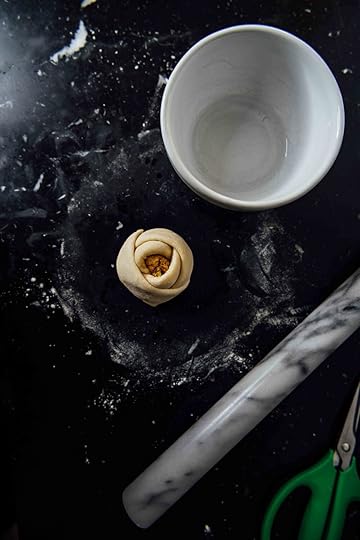
Divide the dough into 12 equal parts by weight and shape each into a small ball. Set the balls of dough out on a clean and dry, lightly floured spot of the kitchen counter and cover with a clean and damp kitchen towel. Work with one ball of dough at a time. Roll the ball of dough out on a lightly floured surface to form a 5 inch [12.7cm] disc. With a pair of kitchen scissors or a sharp paring knife, make 4 diagonal cuts each about 1 1/2 inches [3.81cm] , one in the North, one in the South, one in the West, and one in the East direction, towards the center of the circle. The cuts should not meet each other (see photos) and will create a small circular space in the center surrounded by the 4 flaps. Fill a bowl with a small amount of tap water. Scoop 1 generous Tbsp of the cream cheese filling and place it in the space at the center of the pastry. Lift one flap and fold it to partially encase the cream cheese filling, the top and opposite corner of the filling will be exposed. Now repeat with the opposite flap of dough, followed by the third flap. Dampen the surface of the fourth flap, fold it over, and tuck the tips under the base of the dough, and press gently to seal the tips. The pastry will look like a rose. Transfer to the prepared baking sheets. Keep the prepared dough about 2 inches [5cm] apart from each other. Cover with a clean damp kitchen towel and let rise for 30 minutes. If you do end up with a little extra filling, drop it through the opening of the rose carefully without staining the exposed part of the pastry.
While the dough rises, preheat the oven to 350F [180C]. When the dough is ready to be baked, brush the surface of each bread with the whisked egg and then sprinkle the top with a generous pinch of nigella or sesame seeds. Place the sheet in the oven and bake for about 20 minutes, turning the sheet halfway through during baking. If you decide to bake two trays at a time, keep two wire racks at mid-level, swap the sheets on the wire rack and then rotate them halfway through during baking, so they cook evenly. The bread will be done when the internal temperature reaches 200F[93C] and the tops are golden brown. Remove the sheet and transfer the buns to a wire rack to cool for 10 minutes. These buns are best eaten warm straight out of the oven but can be wrapped and stored in an airtight container for up to 3 days in the refrigerator. To warm, reheat them in an oven at 250F[120C].
February 14, 2021
chocolate chip cookies
Chocolate chip cookies are one of those recipes just like meatballs or mac and cheese, they’re highly personal, we all have opinions on what characteristics makes them special. I like my cookies to be crispy at the exterior and chewy in the center. The chocolate must be a little bitter but not too sweet as the rest of the cookie batter is sweet enough, that chocolate must stand out! I also prefer earthier sweetness in chocolate chip cookies, the darker the brown sugar the better.
Some notes:
In this recipe, the types of chocolate cacao percentages are recommendations, feel free to play around with them - I like variation in the type of chocolate used (a milder one and a darker one). The chocolate I used here is from Guittard and the 72% cacao is called Sante which is made with coconut sugar.
I tried a bunch of different temperatures and time conditions, expect a little variation in results based on your oven. The ideal sweet spot for the cookies was 20mins at 350F[180C].
Since these cookies can be baked directly from dough to the oven, the degree by which they spread during baking starts to increase over time. This is because the baking soda and powder get weaker as time proceeds. If you think you won’t be able to bake all the cookies in one sitting, I recommend portioning them all out on lined baking sheets, wrapping the sheet with plastic wrap, and then freezing them. This will help reduce some of the loss in the activity of the rising agent. You can bake the cookies directly from the freezer just expect to add 2 to 3 minutes to the bake time (check them at the 10 minute mark).
The instant coffee is optional but it helps enhance the aroma of the chocolate.
Fermented dairy (kefir, buttermilk, yogurt) gives a pleasant mild tanginess to the cookie but also helps with the cookie rising. Do not use Greek yogurt here.
I recommend you use the weights for this recipe (I’ve listed cup measurements wherever possible) - in some places like the butter, 1 cup is about 220g so it becomes needlessly complex to say 1 cup minus “x” amount. Chocolate chips are better weighed than measure by cups - different types and brands of chocolates come in different sizes. If you decided to chop a chocolate bar and use it here, you will run into the same issue, a cup measure will not be very helpful.
If you don’t own three baking sheets, just wait for the baked cookies to cool, transfer them to the wire rack, and then cool the sheet (run cold tap water on the underside) and then reuse it to make the next batch. Just don’t add cookie dough to a warm sheet!
How long do cookies last? This is a controversial question, in my house one or two days but if stored in an airtight container you can store them for a 4 days or unto 7 days if you have a container that can be sealed by vacuum at room temperature.
I baked my cookies on the baking sheet with a pizza stone that was left in while the oven preheated. You don’t need to do this but I found the base of the cookies to crisp much nicer in comparison to the batch that didn’t use the stone.
Chocolate Chip cookies
Makes 18 cookies (each about 3.6 inches [9 cm] in diameter
7oz [200g] unsalted butter, chilled and cut into cubes
1 2/3 cups + 1 Tbsp/12oz [340g] dark brown sugar
1 tsp vanilla extract
1 large egg, chilled
2 Tbsp plain unsweetened kefir, buttermilk, or plain yogurt (do not use Greek yogurt)
1/4 tsp instant coffee powder
2 cups + 2 Tbsp/10 1/2 oz [300g] all-purpose flour
1/4 tsp baking powder
1/4 tsp baking soda
1/8 tsp fine sea salt
5 1/4 oz [150g] 42% semisweet chocolate
5 1/4 oz [150g] 72% semisweet chocolate
Preheat the oven to 350F [180C]. Line 3 baking sheets with parchment paper.
Place the butter and sugar in the bowl of a stand mixer and beat on medium-high speed for about 5 minutes using the paddle attachment, until combined. Add the vanilla, egg, kefir, and coffee and beat over medium-high speed for 1 minute till combined. Stop the mixer and scrape down the bowl. Dry whisk the flour, baking powder, baking soda, and salt and add it to the bowl. Mix over low speed for about 2 minutes until combined. Scrape down the sides of the bowl. Add both chocolates and mix over medium speed for 30 seconds, just enough to distribute the chips evenly.
Using an ice cream scooper or a tablespoon, take 2 1/2 to 3 Tbsp of the dough and scoop it out out on the prepared baking sheets. Place 6 scoops of cookie dough per sheet keeping each scoop about 2 inches [5cm] apart. Bake the cookies in the preheated oven for 20 mins till they start to turn golden brown, turning them halfway through at the 10 minute mark. If you bake two sheets of cookie at a time, place two wire racks at the 1/2 and 1/3 rd positions, swap the sheets at 10 minutes and rotate them by 180 degrees. Remove the baking sheets from the oven and let the cookies cool on the tray for 5 minutes, then transfer to a wire rack to cool completely. These cookies can be eaten warm or at room temperature (if you decide to eat them straight out of the hot pan be careful, the chocolate will burn your mouth (I know from experience)).
February 1, 2021
kefir neapolitan cake
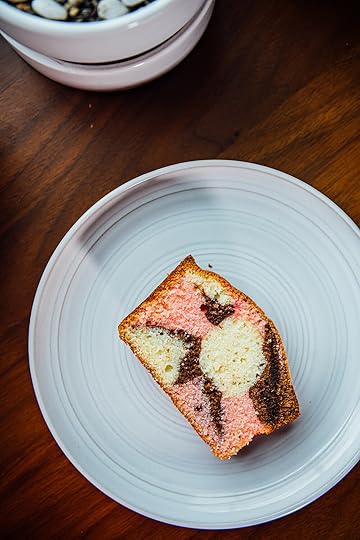
The classic Neapolitan cake is a source of much joy to me. As a kid, I’d often sift through my mother’s binder of neatly typed sheets of white paper marked by the black ink of her Brother typewriter in which lay several cake recipes and one of these included a Neapolitan cake - a tricolored cake, marbled with splashes of pink, yellow, and dark brown colors. These days, Neapolitan cakes might be out of fashion but I still think it holds a remarkable captivating feature, for me it’s that tricolored, marbled texture. You never know what to expect when cut you through the slice. For the history buff, here is a site with a lot of interesting information on Neapolitan cakes !
New Recipes: If you’re looking for other sweet recipes, I’ve got a no-bake-mango-lime-cheesecake at the New York Times and gulab jamuns at Serious Eats. For something savory, you can check out my latest bean recipe collection (a soup and a salad) for The Guardian’s Feast.
Now back to this cake, a couple of tips that you might find useful;
I use the Lifeway brand of kefir in all my recipes. It’s honestly the best in terms of how thick the liquid is, some of the other brands are so viscous that the texture starts to make a difference when you use it to cook with. I find the ideal consistency to be that of a custard, not too thick. Buttermilk is also a good substitute here. Remember to shake the bottle of kefir well before you measure.
Make sure all your ingredients are warmed to room temperature, even the kefir. If you add cold kefir to the cake batter, it will stiffen the fat and it will affect the final texture.
Scrape the bowl down with a bowl scrapper or spatula each and every time you’re done at the end of every step of mixing. This will ensure everything is incorporated at every stage and nothing is left sticking to the bottom. Flour is notorious for staying at the bottom during mixing.
I bake all my cakes on a baking/pizza stone or baking steel to ensure they get heated evenly from the bottom. All ovens fluctuate during cooking. To briefly explain why and what’s happening — Once the oven reaches the desired temperature, the oven stops heating up and then the temperature will again drop after some point. The oven kicks on again to bring the temperature back to what it is supposed to be. Every time the oven door closes and shuts, there is a shift towards a lower air temperature inside the oven. This affects how the cake bakes and rises. To avoid some of these issues, I leave a baking stone in the oven during preheating. The air temperature might fluctuate but the pizza stone will still hold its temperature so the base of the cake will continue to heat evenly. This is a good method to apply especially, if you don’t trust your oven too much. An oven thermometer is also very useful.
Bake your cakes till they reach 200F/93C in the center, that’s when a skewer/knife will come out clean when inserted through the middle. It’s a fool-proof way to ensure even baking.
Use superfine sugar, it dissolves quickly and gives a better crumb, it is sometimes labeled as “Baker’s” or “Baking Sugar”. It is also called caster sugar in the U.K. and other parts of the world.
Once you divide the cake batter to make the three flavors, move quickly. The longer the batter waits, the amount of gas tends to decrease and some of the baking soda inside the baking powder loses its activity. Luckily, baking powder is double-acting so that gives you a backup for carbon dioxide.
The offset spatula is washed in warm water before it is used to level the top of the cake batter. This will prevent the batter from dragging too much with the spatula.
Kefir Neapolitan Cake
Makes one 8.5 inch/22 cm or 9 inch/23 cm loaf
1 cup plus 2/3 cup + [230g] all-purpose flour
1/2 tsp baking powder
1/4 tsp fine sea salt
180g unsalted butter, at room temperature plus extra to grease the baking pan
1 cup plus 2/3 cup [325g] superfine sugar
3 large eggs, at room temperature
1/2 cup [120g] kefir, at room temperature
1 tsp [5ml] vanilla extract
4 Tbsp [60ml] warm milk
3 Tbsp [15g] usweetened Dutch-processed cocoa powder
1/2 tsp instant coffee granules
1 tsp [5ml] raspberry extract
1/2 tsp red beet food color extract or any type of red food coloring
Place a pizza stone or baking steel on a wire rack at the 1/3rd height of your oven and preheat to 325F[165C].
Grease a 8.5 inch[22 cm] or 9 inch[23 cm] loaf pan with a little unsalted butter and then line with parchment paper leaving a 3 inch [7.5cm] overhang on each of the longer ends of the pan. This overhang will help you lift the baked cake out of the pan with ease once it is ready.
In a mixing bowl, dry whisk the flour, baking powder, and salt.
Place the butter and the sugar in the bowl of a stand mixer and cream using the paddle attachment them over medium speed until light, fluffy and it turns pale white, about 5 minutes. Scrape down the sides of the bowl. Beat in one egg at a time over medium speed till incorporated, about 30 seconds. Scrape the bowl down after each addition. Add half of the flour mixture and incorporate over low speed. Add the kefir followed by the remaining flour mixture, and mix over low speed until there are no longer any visible flecks of flour in the cake batter. Scrape down the sides of the bowl, if you notice any unincorporated flour, whisk till combined. Divide the cake batter into 3 equal parts by weight between 3 mixing bowls.
To one bowl fold in the vanilla with a silicone spatula.
Mix 2 Tbsp [30ml] of the warmed milk with the cocoa and coffee to form a smooth mixture, there should no visible lumps of cocoa. Fold this into the cake batter in the second bowl with a silicone spatula until completely incorporated.
Mix the remaining 2 Tbsp [30ml] of the warmed milk with the raspberry extract and red beet powder until smooth. Fold this mixture into the cake batter in the third bowl, until completely incorporated.
Spoon a generous tablespoon of each of the three cake batters at random into the prepared cake pan until all three batters are completely used up. Wash a small offset spatula under running hot water and then level the top of the batter. Bake the cake in the preheated oven on the pizza stone for 45 minutes, resist the urge to open the oven during this time. After 45 minutes, rotate the pan by 180 degrees and bake for another 20 minutes or so until the top of the cake is light and springy to touch, and golden brown. The internal temperature of the cake in the center should read 200F[93C] on a digital instant-read thermometer or a skewer should come out clean when inserted through the middle of the cake. Remove the baked cake from the oven and let cool in the pan for 10 minutes. After 10 minutes, run a knife around the edges of the cake to release and then lift the cake out with the parchment paper hanging off from the longer ends of the pan. Remove and discard the parchment paper and let the cake cool on a wire rack completely to room temperature before serving. This cake will stay good up to a 4 days if kept in an airtight container at room temperature or for a week in the refrigerator if wrapped tightly with plastic wrap.
December 15, 2020
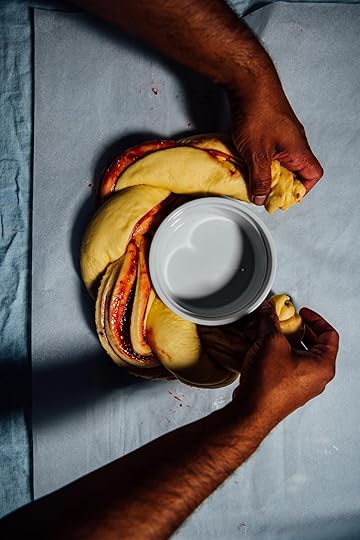
spiced Christmas bread wreath with raspberry jam

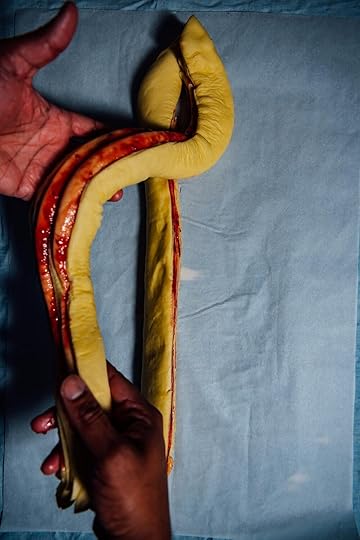
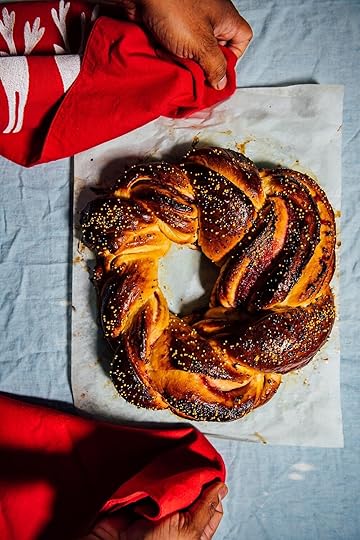
There is a clear positive relationship between the Christmas season and my baking activity. This year, I’ve been baking festive bread wreaths in all sorts of shapes and all sorts of fillings. Today with King Arthur Baking Company, I’m sharing my recipe for this easy bread wreath that’s spiced with a good dose of black pepper and cardamom and then filled with a layer of bright red raspberry and lime jam. I usually cut a big slice and then lather some cold butter on top.
Spiced Christmas Bread Wreath with Raspberry Jam
Notes:
If you prefer seedless raspberry jam and can’t find any, then strain 3/4 cup of raspberry jam through a fine mesh sieve set over a bowl to collect the jam. Discard the seeds left behind. You’re using a larger amount of jam here to account for the seeds and this gives you some extra wiggle room.
Resist the urge to add too much jam, the bread tends to become slippery and it will be trickier to braid.
Recipe:
Makes 12 servings
1 cup/240ml whole milk
½ cup/100g sugar
½ cup/110g unsalted butter, melted
2 large eggs, lightly whisked
1 ½ tsp active dried yeast
4 cups/560g King Arthur Baking Company all-purpose flour
1 tsp fine sea salt
1 tsp ground green cardamom
1 tsp ground black pepper
For the filling
2 Tbsp unsalted butter, softened to room temperature
½ cup raspberry jam
1 Tbsp fresh lime juice
1 Tbsp fresh lime zest
For the topping
1 large egg, lightly whisked
2 Tbsp edible gold pearls
2 Tbsp edible silver pearls
2 Tbsp honey or golden syrup
Warm the milk to 110F/43C. Stir in the sugar, butter, and eggs whisk till smooth and the sugar is completely dissolved. Add the yeast.
In a large bowl whisk the flour, salt, cardamom, and black pepper. Make a well in the center and pour the milk-yeast mixture. Stir with a wooden spoon till the dough comes together. Knead for 5 minutes, shape into a ball, place it in a large greased bowl, cover loosely with a lid, and let it double in size for about 2 hours in a warm spot.
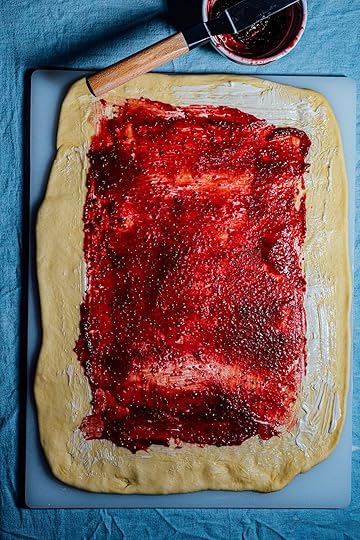
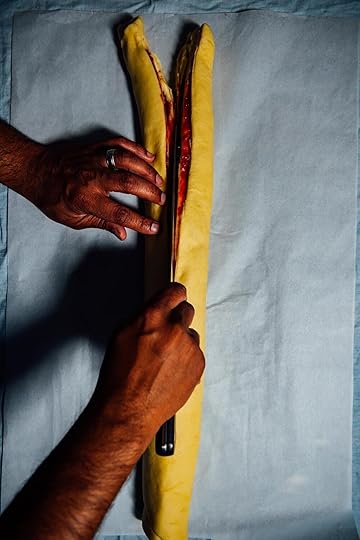
Once the dough has doubled, turn it out on a lightly floured sheet of parchment paper or large kitchen towel and roll it out into a 12 X 9 inch (30.5 X 23 cm) rectangle. Spread the 2 Tbsp of butter with an offset spatula leaving a 1 inch border at the outer ends of each side. Mix the jam with the lime juice and zest and spread it out with the offset spatula over the butter, again leaving a 1 inch border on each side. Carefully roll the dough into a log from the longer send and seal the open edge by brushing the dough with a little water to form a seal. Using a sharp knife cut the log into half. Braid the dough by twisting the two halves over each other. Line a baking sheet with parchment paper and place a 5 inch/13 cm ramekin bowl in the center. Wrap the braided dough around the ramekin and then seal the ends over each other using a little water and then pressing together. Cover the dough with a damp towel and let rise for 30 minutes. Preheat the oven to 350F/180C. After the dough rises, remove the ramekin. Brush the surface of the dough with the whisked egg. Sprinkle the edible pearls over the bread and bake for about 45 minutes, turning the dough halfway through during baking. Once the bread is baked and evenly golden brown, remove from the oven and dab the honey on top with a pastry brush. Let the bread cool for at least 30 minutes before serving.
Disclaimer: This post is sponsored by King Arthur Baking Company, all opinions expressed are entirely my own.
December 8, 2020
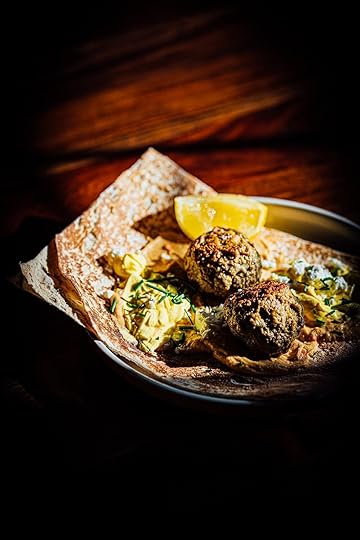
lamb kofta with saffron yogurt and feta
Disclaimer: This post was sponsored by the American Lamb Board . All opinions expressed are solely my own.
The holiday season is a busy time. Things are different this year. Smaller celebrations, a reason to cook smaller meals, and a lot of virtual calls with family and friends. This isn’t a bad thing. As someone who loves to entertain but dislikes the clean-up before and after a party, I’ve welcomed the opportunity to use this year as a bit of a breather. Of all the holidays in the year, Christmas is the big one for me and we usually spend Christmas with my family and either they visit us or we visit them. Our family Christmas meal is a big potluck with every family cooking one or two of their favorite dishes. We’ve got our staples like our family’s classic Shepherd’s Pie that my grandmother made every year and then some of the newer dishes we want to incorporate into our menu for a bit of fun. A couple of years ago, I made American lamb koftas and served it as an appetizer to our big family meal and this year, I plan to make them again but serve them as an early lunch just by themselves (there’s just two us this year).
When I cook with lamb at home, I make sure to use American lamb not only due to the stellar quality but because I also know the ranchers and farmers work very hard to ensure that the land, animals, and the community are well taken care of.
The great thing about these koftas, is that every part of the recipe can be made ahead of time which frees up a lot of time in the kitchen on the big day. You can make the saffron yogurt early and even cook the kofta ahead of time and refrigerate them. Just warm the koftas up in an oven at 350F for about 10 minutes and they will be ready to eat. For the bread, I use naan, parathas, lavash, and even pita - use what you can find or have it home.
I’ve got some exciting news to share with you. This year, the American Lamb Board is giving away a copy of my new cookbook, The Flavor Equation along with some special cookbooks and some delicious lamb as part of their special #TheLambChallenge - Holiday Edition that runs from November 3rd to Dec 31st, 2020. To enter a chance to win and for more details, visit The Lamb Challenge - Holiday Edition. Good luck!

lamb kofta with saffron yogurt
Makes 4 servings
1 lb [455 g] American ground lamb
1 [60g] shallot, peeled and minced
3 garlic cloves, peeled and minced
1 tsp fine sea salt
1 tsp ground cumin
1 tsp ground coriander
1 tsp dried dill
½ tsp ground cinnamon
½ tsp red chilli powder
½ tsp ground black pepper
1 large egg, lightly whisked
For the saffron yogurt
2 Tbsp warm milk
10 saffron strands
1 cup [240 g] plain unsweetened Greek yogurt
2 garlic cloves, peeled and grated
Fine sea salt
2 Tbsp minced chives
½ cup [60 g] crumbled feta or any sheep/goat’s cheese you like
4 flat breads, warm
1 lemon, cut into wedges
Preheat the oven to 400F. Line a baking sheet with parchment paper.
Prepare the koftas. In a large bowl, mix the American ground lamb, garlic, salt, cumin, coriander, dill, cinnamon, chilli, and black pepper together. Add the egg and fold the mixture. Divide and shape the mixture into 12 balls and place them on the lined baking sheet. Bake the lamb in the oven for at least 25 minutes, rotating the sheet halfway through during cooking. The lamb koftas will be golden brown when cooked. Remove the koftas with a slotted spoon and place them on a plate.
Make the saffron yogurt while the lamb kofta bake; mix the milk and saffron together in a small mixing bowl and let sit for 10 minutes. Fold in the yogurt and garlic. Taste and season with salt.
To serve the kofta, take a flatbread and spread 2 Tbsp of the saffron yogurt all over the surface. Place 3 warm koftas, sprinkle 1 to 2 Tbsp of the feta, and a generous pinch of chives. Serve with the lemon wedges on the side.
November 9, 2020
November Updates
Hi folks,
This week, I’ve got a bucketload of recipes for you that center around Thanksgiving and the holidays (Gosh, time really does fly fast!).
I am very excited that this November, The Flavor Equation is part of two cookbook clubs - The Salt and Spine Cookbook club and Chris Kimball’s 177 Milk Street, take your pick and participate with people like you who love to cook. You can send me questions and I will do my best to answer them. I’ve really enjoyed the rise of cookbook clubs over the past few years, it’s an amazing way to build community and friendships around food.
The wonderful Nigella Lawson wrote a review of The Flavor Equation and you can get my recipe for my Sweet potato honey beer pie. If you love sweet potato pies (like I do), I think you will like this one a lot. Nigella also has a new book out, Cook, Eat, Repeat which I highly recommend.
This Thanksgiving at The New York Times, I’ve got several new ways for you to play around with your favorite sides and I daresay, many of these can be eaten outside the holiday season - Brussels sprouts with pickled shallots and labneh, Blistered green beans with shallots and pistachios, and a Wild rice dressing with mushrooms and chile crisp.
I’ve also cooked up a special feast with easy recipes for the November print and digital issue of Waitrose and Partners (U.K.). If you live outside the U.K. you can access the recipes via their app on your smartphone devices. A collection of sweet and savory recipes that require minimal effort. (The photos shown here are all from The Waitrose & Partners magazine).
This weekend from November 14 to the 15th is the The Kitchn’s Thanksgiving Food Fest and I’ll be on their Instagram handle live on Sunday at 3:40pm EST talking with Faith Durand. Come say hi!
Post your photos from The Flavor Equation on Instagram in your feeds and stories and don’t forget to tag me in them along with #TheFlavorEquation, so I can see and share them. It’s always such a pleasure to see you cook my recipes and bring them into your homes
xx
Nik
October 19, 2020
The Flavor Equation : White Beans, Potatoes, and Smoked Salmon

We’re just a couple of days away from the release of The Flavor Equation (click the link to get details on the book, where to purchase, book tour events, and more) and I wanted to take a moment to thank everyone who has been a part of this book. The entire team at Chronicle Books, my agent Maria, my recipe testers, people who answered all my questions behind the scenes, and also everyone who participated in my “experiments” and my family and friends for their support.
Have fun with the book and I hope you enjoy cooking from it. And don’t forget to share your photos on Instagram and tag me in them with the #TheFlavorEquation
xx
Nik
Reprinted from The Flavor Equation by Nik Sharma with permission by Chronicle Books, 2020
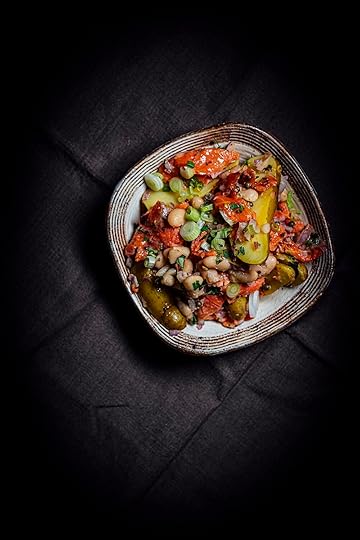
WHITE BEANS, POTATOES, AND SMOKED SALMON
This smoked salmon ensemble can fall into the category of a side dish or a salad; the exact classification, I leave to you. Either way, your guests will be fascinated by the glimmering flakes of soft, silky smoked salmon studded with briny green peppercorns, with their mellow tingle of heat enhancing their perception of the smokiness of the fish. I sometimes toss in a handful of fresh greens such as arugula, mustard greens, or leftover leaves from radishes to give it a bit more pepperiness.
THE FLAVOR APPROACH
To build on the salmon’s smoky flavor, smoked salted flakes (Maldon’s is excellent, but feel free to use your favorite variety) are a quick shortcut.
Salmon is a fatty fish because it contains unsaturated fatty acids which add a richer fuller taste and texture.
Brined green peppercorns take the place of the more classic capers and provide a concentrated spot of saltiness, but they also add a mild dose of pepperiness.
Fresh lemon zest adds to the citrus element from the lemon juice due to its aromatic essential oils.
Smoked salt flakes add a crunchy texture, saltiness, and a smoky aroma.
MAKES 4 SERVINGS
1 lb [455 g] fingerling potatoes
Fine sea salt
One 13.5 oz [385 g] can white beans, drained and rinsed
4 oz [115 g] smoked salmon, flaked
One [60 g] shallot, minced
2 scallions, both white and green parts, thinly sliced
2 tsp brined green peppercorns, drained
2 Tbsp chopped flat-leaf parsley or cilantro
2 Tbsp unsalted butter
1 tsp black or brown mustard seeds, lightly crushed
1 tsp coriander seeds, lightly crushed
1 tsp red chilli flakes, such as Aleppo, Maras, or Urfa
1 tsp lemon zest
2 Tbsp fresh lemon juice
Smoked salt flakes, as needed
Rinse the potatoes under running water and put them in a medium saucepan. Slice the potatoes in half lengthwise. Cover with enough water, about 1 in [2.5 cm] over the tops of the potatoes. Add fine sea salt and bring to a rolling boil over medium- high heat. Turn down the heat to low and let simmer until the potatoes are tender on the inside and a knife slides through the middle with ease, 20 to 30 minutes. Drain the potatoes in a fine mesh sieve or colander. Put them on a clean, dry kitchen towel to let dry and cool for 10 to 15 minutes. When the potatoes are cool, slice in half lengthwise and put them in a large mixing bowl.
Add the beans, salmon, shallots, scallions, brined peppercorns, and parsley to the potatoes. Fold carefully with a spatula or wooden spoon.
Melt the butter in a small skillet or saucepan over medium-low heat. Once the butter is warm, add the mustard and coriander seeds, swirl the saucepan and cook until the coriander seed turns light brown and fragrant, 30 to 45 seconds. Remove from the heat and stir in the red chilli flakes and lemon zest. Quickly pour the warm spiced mixture over the potatoes in the bowl. Add the lemon juice, season with the smoked salt, and fold gently with a spatula to coat evenly. Taste and season with salt if necessary. Serve immediately.
The Flavor Equation: An Emotional Journey
In the past few weeks, we’ve explored the various elements of The Flavor Equation : Sound, Sight, Aroma, Mouthfeel, Taste, and Emotion. The Flavor Equation will be published next week, October 27, and I’m so grateful to everyone who has shared their encouragement, support, and pictures of the dishes they are excited to cook.
This will be my last book related post before the publication of my book, and I wanted to take the opportunity to revisit one of the esoteric elements of the Flavor Equation, namely Emotion. Writing a cookbook is an incredibly emotional journey. It is also exciting and in many ways a privilege. It’s an opportunity to share my thoughts and my food with the world. It also comes with its own set of challenges.
Writing and recipe developing is fun, but trying to get the result you want to achieve with a dish can be a pain. Case in point: I tweaked the coconut cookie (bolinha) recipe at least 22 times until I got it right. I shared most of the cookie attempts with friends, but you can also imagine that after a while, I wanted nothing to do with coconut cookies. The final result though is one I’m very proud of (and I hope you’ll let me know what you think).
I control most of the visual direction with my books and thankfully, my editors at Chronicle Books let me have a say in that from start to finish. I cook, style, and photograph everything for the book, which I love but because I am picky and my own worst critic; I reshoot things a lot. The Flavor Equation also goes deep into the science behind flavors and how it relates to cooking. There was a lot of reading involved for that part, but that wasn’t the difficult part; it was getting access to all the right research papers. I missed the all-access that I used to have in academia. It required a bit of coordination and convincing former colleagues and friends in labs and academia to help me out (luckily everyone was generous with their support).
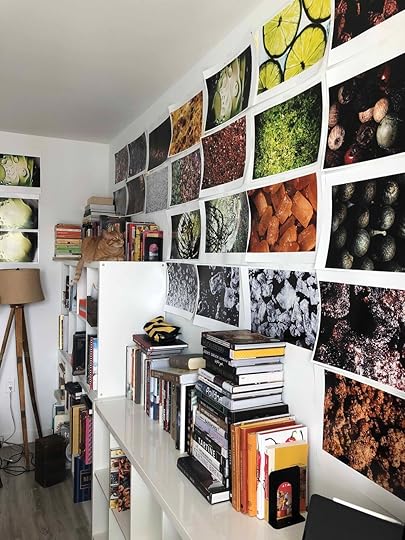
This book also has an illustrative component that my book designer, Lizzie Vaughn, and illustrator, Matteo Riva, worked on (you can read about that process here). I enjoyed this experience as, having never worked with an illustrator before, it was amazing seeing someone transform my rather unattractive flow-charts and sketches into something phenomenal.
The most emotional part of it all was finally receiving an advance, finished copy in the mail a few weeks ago. It was akin to unwrapping the final gift at Christmas and realizing it was the one thing you really, really wanted. It was simply magical holding the finished book in my hands, knowing how much work had gone into every last detail of producing it. I can’t wait for you to hold it, too.
Publishing a book during a pandemic is a unique experience unto itself. While most of you will have a favorite online retailer where you can purchase the book, I really hope you’ll consider supporting independent bookstores and specialty retail, especially during these challenging times. I’m donating all revenue from my affiliate link from Bookshop.org to Feeding America. Plus, I sent book plates to the following stores so you can even get a signed copy when you order from them:
Now Serving: is my local cookbook store in LA. Not only do they carry cookbooks but they also have an amazing collection of special kitchen tools for home cooks and chefs. I’m signing copies here since they are close.
Kitchen Arts and Letters (NY) is the place I go to often for rare cookbooks and even for help for books to refer to when I’m researching a topic--and their staff is incredibly friendly.
Book Larder in Seattle is a cookbook lover’s dream come to life. There’s a live kitchen where cookbook authors can demo recipes from their book.
Omnivore is where I celebrated the launch of my first book Season and it occupies a special spot in my heart because the Bay Area used to be my home. It also carries an impressive collection of vintage Indian cookbooks.
Powell’s is a Portland institution with a large collection of books including cookbooks to choose from. It’s one of my personal favorites to shop at.
Bookshop Santa Cruz: is a wonderful bookstore and the first time, I visited them was a few years ago (before my first book came out) on a drive from San Francisco to Los Angeles.
I'll also be doing a virtual tour starting next week. While it won’t be the same as meeting you in person, it’s going to be fun and informational. There’s still time to register, details below:
October 27: Now Serving LA with Samin Nosrat
October 29: Book Larder Seattle with Sohla El-Wally
November 13: Kitchen Rodeo Cooking Class (Signup Details Coming Soon)
November 21: Milk Street Cooking Class
I’m in awe of all the beautiful dishes you’ve been sharing on Instagram with #TheFlavorEquation. I want to see more and there’s still time to enter the fantastic giveaway with some of the amazing promotional partners, including California Olive Ranch, Spiceology, and Staub. Find more info here. You can take a picture of any recipe from the bonus recipes, any recipe I’ve shared over the last few weeks, or really any of my recipes anywhere that you’re excited about to qualify. To make it even easier, I’m sharing one more recipe with you tomorrow that I hope you’ll enjoy: White Beans, Potatoes, and Smoked Salmon
I hope you’ll enjoy the recipes in The Flavor Equation and the information I put in it. I hope they’ll inspire you to experiment with flavor and invent your own recipes. I love hearing from you so please don’t hesitate to reach out.


October 13, 2020
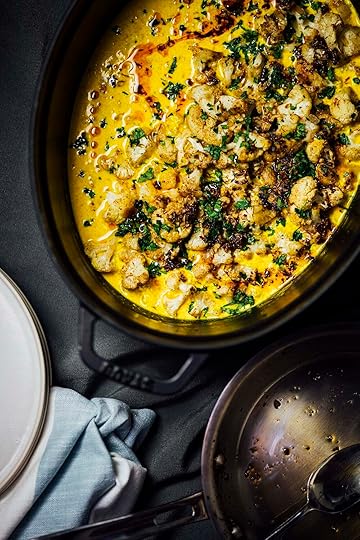
The Flavor Equation: Baked Sweet Potatoes with Maple Crème Fraîche
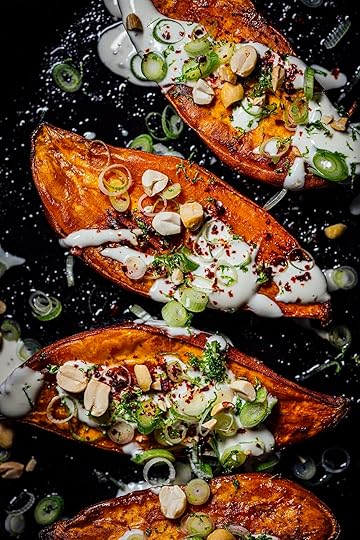
I love sweet potatoes put it in a savory or sweet situation, I’m game to eat it. This was one of the most popular recipes as scored by my recipe testers and also featured by Eater , and I think you will love it!
Note: There are vegan versions of fish sauce available in markets as well as online. They will add that hint of umami to the dish.
Reprinted from The Flavor Equation by Nik Sharma with permission by Chronicle Books, 2020
Baked Sweet Potatoes with Maple Crème Fraîche
We all adore certain pantry staples. Kefir and crème fraîche are two of my favorites. I’ve been testing new ways to improve on roasting sweet potatoes in the oven, and I found that a combination of steaming and roasting works great for a dish like this for both the texture and the extra set of aroma molecules that comes through. The first step, partial steaming, keeps the moisture inside the sweet potato while cooking, and the second step, uncovered roasting, helps create a robust flavor profile. I recommend using fragrant nuts. Toasted hazelnuts are a good substitute for the peanuts.
THE FLAVOR APPROACH
Butter works as the fat of choice here due to its higher smoke point. As the butter melts, it separates into its constituents—fat, water, sugars, and milk solids—which undergo caramelization and the Maillard reaction.
The sugars concentrate as the water evaporates during cooking. Fish sauce adds a spot of umami to the sauce, you can use vegan fish sauce as an alternative. The peanuts and scallions provide crunch against the softer textures of the potato and the dressing.
SERVES 4
For the sweet potatoes:
4 sweet potatoes (each 7 oz [200 g]), preferably a yellow-fleshed variety such as Garnet or Jewel
2 Tbsp unsalted butter, at room temperature
Fine sea salt
For the dressing:
½ cup [120 g] crème fraîche or sour cream
1 Tbsp maple syrup or honey
1 Tbsp fresh lime juice
2 tsp fish sauce (optional)
½ tsp ground black pepper
Fine sea salt
For garnish:
2 Tbsp thinly sliced scallions, both green and white parts
2 Tbsp roasted peanuts
1 tsp red chilli flakes, such as Aleppo, Maras, or Urfa
½ tsp lime zest
To prepare the sweet potatoes, preheat the oven to 400°F [204°C].
Rinse and scrub the sweet potatoes under running tap water. Slice them lengthwise and place them in a roasting pan, cut side facing up. Brush with the butter and season with salt. Cover the pan with a sheet of aluminum foil and press around the edges to seal snugly. Bake for 20 minutes. After 20 minutes, remove the foil, flip the sweet potatoes, and cook, uncovered, for 20 minutes more, until the sweet potatoes are cooked thoroughly and are tender; a knife inserted into the center of the sweet potato should slide through easily. Remove from the heat and let rest for 5 minutes.
To prepare the dressing, in a small bowl, combine the crème fraîche, maple syrup, lime juice, fish sauce, if using, and pepper. Taste and season with salt.
To serve, top the warm roasted potatoes with a few tablespoons of the maple crème fraîche dressing. Sprinkle with the scallions, peanuts, red chilli flakes, and lime zest. Serve with the extra dressing on the side.


