
Nik Sharma's Blog, page 12
April 21, 2020
exciting news and roasted carrots with garlic and lime
I am very happy to share some lovely news with you, I have a new cookbook coming out this October and it’s titled “The Flavor Equation: The Science of Great Cooking”.
Over the next few days, I’m going to share behind-the-scenes footage on Instagram and show you what went into making the book, I will also share some of the different cover choices we toyed around with, and reveal the cover for the first time exclusively via my newsletter on Monday, April 27th, 2020. If you haven’t signed up yet, you can do so here .
In this book, I get into every aspect of flavor that make up, what I refer to as The Flavor Equation. There will be a lot of science and cooking as we explore what flavor is made up of.
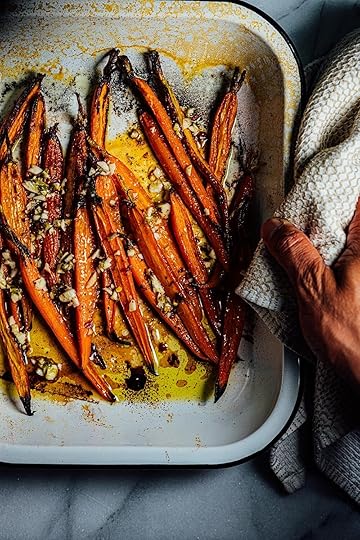
Today’s quick recipe is one for roasted carrots. It’s a quick side dish, I make during the week and also when I have guests over. I use young carrots which are not as wide as their adult counterparts so if you do swap carrots, just watch out for the cooking time and expect to add a few minutes to your roasting time.
What’s happening in the recipe: Simply put a carrot is a plant storage unit, loaded with starch as an energy bank. Usually, an enzyme called amylase present inside the cells of the carrot chop up the starch to release fuel for the plant to grow (a reason why a raw carrot will eventually start to taste sweeter over time). When the carrot is roasted, the starch breaks down and release sweet tasting sugar molecules. The sauce itself is quite simple, I like the taste of raw garlic so I don’t cook the garlic with the carrots. Instead, I dress the hot carrots with the flavored oil as soon as they come out of the oven, the heat helps release the aroma molecules from the garlic and lime zest and their fragrance bumps up. Fish sauce brings the umami game. If you don’t consume fish sauce, there are vegan versions available that you can try.
roasted young carrots with garlic and lime
makes 2 to 3 servings as a side
8 oz baby carrots
2 Tbsp extra-virgin olive oil , divided
fine sea salt
2 garlic cloves, peeled and minced
2 Tbsp fresh lime juice
zest of 1 lime
1 tsp fish sauce
1 tsp red pepper flakes such as Aleppo
1/2 tsp ground black pepper
Preheat the oven to 425F [218C].
Slice the carrots across their length. Toss the carrots with 1 Tbsp of the oil and season lightly with salt. Spread the the carrots out in a medium roasting pan or a baking sheet in a single layer and roast in the preheated oven for 25 to 30 minutes, till the tips turn crispy and they turn golden brown with a few charred spots. The carrots should be tender in the middle, a knife should be able to pierce through the center with ease.
While the carrots, cook prepare the sauce. Mix the garlic, lime juice, zest, fish sauce, red pepper flakes, and black pepper together in a small bowl. Taste and season with salt as needed. Pour the sauce over the roasted carrots as soon as they come out of the oven, and drizzle to coat well. Serve hot or warm as a side.


April 16, 2020
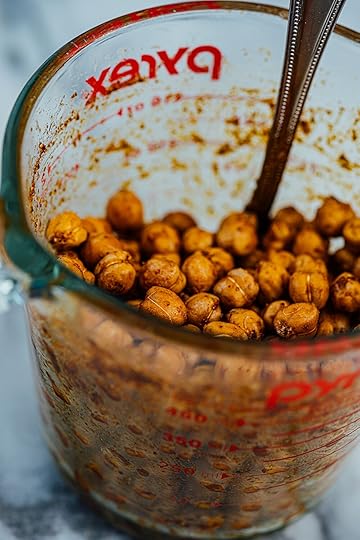
crispy chickpeas

I’m going to be honest with you, I’ve been a bit hesitant to write this as a recipe post for a few reasons (the big one being, I ran out of chickpeas, so I haven’t tested a few other parameters that I want to look at and write about) but a lot of you asked about my technique after seeing the video I posted. I’ll share what I’ve learned so far, feel free to experiment on your own, and if you tweak it let me know by sending me an email.
I will update this post over time, once I get some more dried chickpeas to work with, so please be patient. The pandemic has made many staples especially beans hard to find.
You’ll notice that this entire post is a bit unconventional from my usual method of writing but I’m going to lay this out as an experiment, in a problem/solution format. This is how I tackle most of my recipes and any cooking problems I want to try and solve plus I don’t think this needs to be written out too formally.
The Problem/s:
Making crispy chickpeas is an interesting puzzle.
The goal is to get water inside the seed to help soften fibers and hydrate starch so it gelatinizes/thickens during cooking but once that’s done, I need to get rid of all the water inside to make it crispy enough to shatter. Water in and water out.
If chickpeas over cook or undercook, the final texture will be off.
I also do not want excessive browning during cooking so I need to reduce the probability of caramelization and the Maillard reactions.
Humidity and softness in crisped chickpeas.
Chickpeas - I’m intentionally not using canned chickpeas because canned chickpeas are treated with different agents and depending on the brand I use these agents and treatments can be different. It’s not an accurate way to compare canned chickpeas to regular dried chickpeas that need presoaking. I need to limit my variables as much as possible to make any sense of any results and have valid comparisons.
Chickpeas are a hard-to-cook seed, what this means is that they need more time to soften and cook properly till they’re edible (black beans and lentils are easy-to-cook because they need less time). Chickpeas also contain starch which needs to hydrated by water to cook and gelatinize/thicken during heating to make it tender and palatable. The four dietary fibers in chickpeas are also a source of hardness and affect cooking - cellulose, lignin, hemicellulose, and pectin. These also need to soften to make the seed cook and become palatable.
How to overcome the chickpea fiber issue:
Presoak the seeds in water to soften the coat and help water enter the seed.
To cook the seeds to the texture I wanted, tender yet firm, I cook them in acidic water by adding lemon juice. You can use bottled lemon juice here, the acid here is not for taste but for improving texture. I also add a bit of salt to soften pectin. Do not use any acid other than citric acid - lemon or lime juice work effectively here. This method is great when I want a soft yet firm texture in a bean (if I added only baking soda and no acid like I do with my dals, the beans will fall apart and turn to mush very easily). I add baking soda here to create sodium citrate which is a chelating agent - what this means is that it binds metals like calcium and magnesium and locks them up.
A second benefit of this acidic pH is that it will reduce the probability of browning from caramelization and the Maillard reaction (alkaline pH promotes these two reactions) which I do not want here. They build flavor but can become problematic if things turn brown too quickly, you can end up with a bitter taste.
Pressure cooking or Instant pot - I avoided these on purpose - these devices are great when you want a very soft texture and have a more forgiving recipe like a dal but I don’t want that here and need a balance of softness and structural integrity in the chickpeas.
Chickpea Skin - this is a personal preference - skin or don’t skin, do what you want for this. I’m lazy, I don’t want to do it and I like chickpeas with their skin on. The chickpeas with their skin left-on might pop during heating as the steam tries to escape, so you might hear them blow, the frequency on this was about 3 to 4 per cup of chickpeas. You can remove the skin off by gently rubbing the boiled chickpeas between your palms.
Equipment:
I compared roasting chickpeas in my oven to air frying them in smart oven from Breville - the results were staggeringly different. Not surprisingly the oven takes a really longer time while the air fryer function uses super convection fans which not only work ridiculously fast in comparison but the final texture was much better and so was the taste. In my observation, the ones cooked in the oven also get stale faster when left outside when compared to the ones from the air fryer. You can use my method with a regular oven but it took me on average around 2 hours to get the same degree of crispiness but it was still never close to the air fryer texture.
Humidity and Storage:
Humidity is a problem with storage, so I cook the chickpeas twice - I first drive moisture out, then let it back in, and again kick it out. This second round of air frying makes them crispier and will drive out any atmospheric water that re-entered on cooling.
For storage, vacuum sealing chickpeas is the best method I’ve used so far. If you have one of those food-safe silica gel packets that are sometimes included with your dry food packaging you can drop one in a container or bag that contain the crisped chickpeas, they will help protect against atmospheric moisture and staleness. Glass jars and airtight storage containers are great too, make sure they’re sealed well.
You can rewarm the crisp chickpeas at 300F [149C] for about 8 to 10 minutes to dry them up a bit if the storage method doesn’t work as well vacuum sealing.
Flavorings: Do not add any flavoring spices or oil to the chickpeas before they go into oven or air fryer. Instead once the chickpeas are cooked after the second round of crisping, toss them with your seasoning of choice while they’re hot, straight out of the air fryer.
Note: I’m being extra detailed here to address any questions that might pop up just in case, you’re wondering why the heck is he writing so much about crispy chickpeas.
crispy chickpeas
While this method is designed around the air fryer you can use it with your oven. Expect a little bit of difference in texture and drying time. It can take up to 2 hours on average in my experience in an oven.
Makes around 2 cups [200 g] of crispy chickpeas
Day 1 :
1 cup [180 g] dried chickpeas
Rinse and soak the chickpeas in 4 cups [480 ml] water overnight.
Day 2:
4 cups [480ml] water
1/4 cup [120 ml] lemon juice (you can use bottled juice here)
1 tsp fine salt
1/8 tsp baking soda
Stir the water, lemon juice, salt, and baking soda together in a large saucepan. Stir the mixture, the liquid will foam.
Drain the presoaked chickpeas from day 1 and add them to the saucepan with the water and lemon juice mixture. Bring the contents of the saucepan over medium-high heat to a boil, reduce the heat to medium-low, cook till the chickpeas are tender yet hold their structure, about 30 minutes. You will notice a white predicate on the surface of the water, these are breakdown products of starch and pectin. The chickpeas are ready when you can easily press and smash a chickpea with ease using your fingers. Set a fine mesh sieve over the sink or a large bowl, pour the chickpeas over the sieve and discard the water.
Set the air fryer to 300F [149C]. Place the drained chickpeas in the wire basket provided (your manufacturer might provide another type of tray). You want a basket or tray that allows ventilation from both sides to get rid of the water inside the seeds. Set the timer on the air fryer to 45 minutes and let the chickpeas dry out till crisp. Take the tray out, cover the tray loosely with a sheet of foil or paper and leave on the counter overnight.
Day 3:
Return the tray with the chickpeas back to the air fryer and reheat them for another 30 minutes. Transfer the hot chickpeas to a bowl containing the flavoring mixture and toss to coat well. Adding the oil at this stage, adds a waterproof coat which if added earlier will reduce the efficiency of water loss.
my flavoring mixture for chickpeas
As far as seasonings go, this is very simple. But feel free to add other spices and seasonings you enjoy like chaat masala (see my recipe in Season/Food52), shichimi togarashi, etc.
An extra tip, if you add an acid for a brighter taste, use an acid like amchur or sumac, they’re dry powders and contain citric acid among other acids and won’t add moisture and soften the chickpea.
2 Tbsp extra virgin olive oil
2 tsp kala namak (Indian black salt) or salt
1 tsp red chilli powder (I’m using Kashmiri chilli which has low heat, use cayenne for a stronger kick of heat but adjust your amount according to your taste preference.)
2 tsp ground black pepper
2 tsp amchur (unripe mango powder)
Mix the oil, kala namak, pepper, and amchur together in a small bowl and then pour it over the hot crispy chickpeas and toss to coat well. Taste and add more kala namak or salt and amchur if needed.
Note: Kala namak, Kashmiri chilli, and amchur are available at most Indian stores as well as online.
April 12, 2020
sannas

The closest comparison to the Goan sannas, are the idlis served in the Southern states of India. Both involve the fermentation of rice and are steamed, however they taste remarkably different because of the ingredients used and the texture though similar is different. Sannas are typically eaten with sorpotel, their sweet taste and the cooling effect of the coconut helps tame some of the heat from this spicy pork dish. I eat them with other Goan dishes too like fish or shrimp curry, vindaloo, and even coconut chutney.
The method I share today takes a few shortcuts to cut back on the time needed to soak rice and ferment.
Principle: The main principle here is fermentation, similar to dosa and yogurt. Here, rice and coconut milk provide the source of carbohydrates, proteins, and fats among other nutrients that act as a food source for the yeast. Sugar helps to give the yeast a boost of energy but also leaves a sweet taste in the cooked bread. Once the fermented rice is steamed and cooked, the starch in rice will begin to gelatinize/thicken at about 140F [60C] and form bonds across the batter while the carbon dioxide bubbles will get trapped to reveal a light and airy sponge like network.
Rice Flour: Any type of short grain rice or rice flour will work. I’ve tried basmati and didn’t find any difference in taste or texture. If you don’t have any on hand, grind dry rice grains down to make the flour using a high speed blender like a Vitamix (use the same weight listed in the recipe). Pay attention to the amount of water you use, this batter is slightly runnier than the one I used in dosa.
Sugar: Here sugar not only helps to provide sucrose, a simple disaccharide for the yeast to utilize as an energy source but it also leaves a mild sweet taste in the bread.
Yeast:
In Goa, these breads are made with toddy, the liquid prepared from the sap of the coconut tree. Once the sap is collected, it is left to ferment on its own and an alcohol liquid is produced that contains wild yeast. Toddy also leaves a distinguishable taste in fermented foods that’s difficult to replicate. Toddy is hard to find outside India (and even difficult to find outside Goa unless you have a source), keeping that in mind, I’ve worked out this recipe using active dry yeast.
The optimal growth temperature its 86F [30C], at this temperature yeast (Saccharomyces cerevisae) will show a maximal exponential growth rate. As I wrote in the dosa post, my apartment stays cool so I use my sous vide (I own a Joule) and set a water bath to 86F [30C] and then stick the container with the batter in and leave it to ferment for at least 5 hours. If your apartment is warm, you can skip this.
Can I use an Instant pot? - this is a popular question for almost any recipe these days. I would not recommend using the yogurt setting on the Instant pot when yeast is involved, that temperature setting is a bit high (110F [ 43C]) for yeast to grow well and is geared towards lactobacilli growth which prefer warmer conditions.
Water: I live in an area with hard water so I use filtered water when I work with yeast. You can use hard water but it will slow down yeast growth and your fermentation time might increase.
Coconut Milk: I use full-fat coconut milk. Fat gives a nice mouthfeel and prevents dryness, and also makes it easier to get the steamed bread out of the bowl after cooking. Try to use a brand that’s free from preservatives. A general thumb of rule when using canned or packaged coconut milk, if there contain preservatives they might interfere with the ability of the yeast to grow.
Greasing the molds: Either ghee, unsalted butter, coconut oil, or a neutral oil like grapeseed will work great here. As you might expect the first three fats, I listed will leave a bit of a taste while grapeseed won’t. There’s also a slight difference in the texture on the surface of the sanna that comes into contact with the greased surface of the bowl with different fats.
Fermentation time: This does makes a difference. If fermented too long, the amount of acid increases while the amount of sweetness decreases. If the time of fermentation is overestimated, taste the batter (it is safe), if it’s too sour, stir in a little more sugar to give it a little sweetness, about 1 to 2 tsp.
Technique
Whisk: Whisk well. Scrape the sides of the bowl down to ensure that all the rice flour is wet and dispersed in the liquid phase.
Tools:
You can use an idli maker if you own one. I’m using ceramic ramekin bowls and stainless-steel bowls called katoras (Hindi). Stainless-steel being a good conductor of heat, allows for faster cooking while ceramic being much weaker at heat conductivity will take a bit more time to cook.
You will need a wire rack or some type of steamer that fits inside a large pot. This prevents direct contact of the bowl with the base of the pot and prevents overcooking.
How much batter to pour? I’m not going to give you an actual number of sannas because bowl sizes vary by diameter. I usually pour enough batter to reach a height of about 1 inch [2.5 cm] or a bit less than that. If the batter level is too high, then the cooking time increases and sometimes they’re not cooked properly all the way through the center. You can tell doneness of the sanna, by gently pressing the center, it should be firm yet spring back.
sannas
Sannas are steamed fermented rice cakes made with coconut milk and are typically eaten with sorpotel. These Goan breads are very similar to idlis but have a coconut flavor and taste slightly sweeter. In Goa, toddy - the fermented sap of the coconut tree is used as the source of yeast to ferment the rice. This is my shorter version. Sometimes, I throw in 3 to 4 Tbsp of fresh coconut (you can use frozen but remember to thaw it before adding it to the batter).
You will need a few small ramekins or metal bowls (like the Indian katora) to prepare these. You can also use an idli steamer if you own one.
Note: I am not giving you an estimate on the number of sannas this makes because your bowl sizes will most likely be different than the ones I use. The main thing is to pour the right amount of batter, about 1 inch [2.5 cm] of the height of the bowl is usually sufficient.
makes about 4 servings
ingredients
2 cups [300g] rice flour
2 Tbsp sugar
1 tsp active dry yeast
1 1/2 cups [355 ml] water (I used filtered)
1 cup [250 ml] full-fat coconut milk
fine sea salt
a little melted butter, ghee, coconut oil, or neutral tasting oil to grease the bowls
Dry whisk the rice flour, sugar, and yeast in a large bowl or food-safe container. Whisk in the water and coconut milk until there are no visible lumps or flecks of dry flour. Cover the bowl loosely with a lid. Place the container in a warm spot or ideally at 86F [30C] for at least 4 hours to ferment and double in volume. The mixture will be ready when it looks foamy like a volcano.
When ready to cook, grease the about eight stainless-steel or small ramekin bowls well with the melted ghee or oil. Set a wire rack inside a large wide pot with a lid. You can also make a thick ring of aluminum foil and sit a plate wide enough for the pot. Fill the pot with enough water to the height of the rack.
Stir the batter in the container with a ladle and mix in 2 tsp of fine sea salt. (You can taste to make sure the salt and sugar is right, add more salt or sugar as needed). Using the ladle pour enough batter in each of the greased bowls to a height of about 1 inch [2.5 cm] or less. Depending on the width of your pot, you will need to work in batches. Carefully place the bowls on the wire rack in the pot, cover loosely with a lid, and bring the water to a boil over medium heat, then reduce the heat to low and let cook for an additional 10 to 12 minutes, till the sannas are completely cooked, they should be firm and springy when pressed in the center and a knife or skewer comes out clean when inserted through the middle. Carefully remove the bowls with a pair of kitchen tongs and leave the bowls to cool till they are warm enough to be handled. If you attempt to release them while they’re hot, not only do you risk getting burned but the starch hasn’t yet set properly and the sannas will break. If the water levels drop while cooking, add a bit more water from the sides of the pot, it is important to watch the water level and not let the pot dry out. If water condenses on the surface of your sannas while they cook, open the lid a bit to let the water evaporate but make sure the pot doesn’t dry out during cooking. Cook the remaining sannas in the same manner
To release the sannas, run a small knife along the edges of each the bowls, flip the bowl over a plate or the palms of your hands and tap the bowl to release. Serve warm. You can also refrigerate the sannas in air-tight bags for uptown 3 to 4 days.
April 7, 2020
carrot and orange cake with sour cream glaze
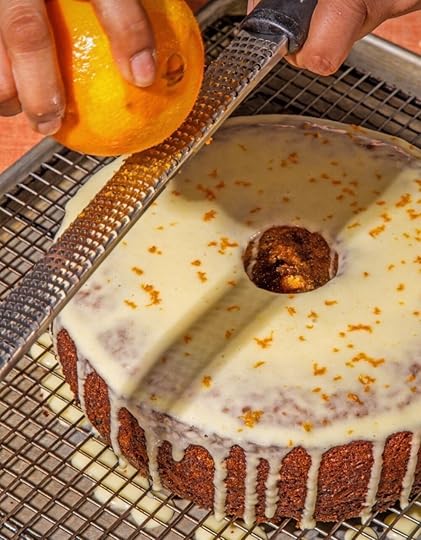
Photo by Food and Wine Magazine. - Styled by Rupa Bhattacharya and Photographed by Sarah E. Crowder.
Were it not for my mother reminding me, Easter would have passed me by. Each year, I usually host a small dinner for family and friends but with all this is going on with the pandemic it will be a dinner for two plus our two cats. Sometime late last year, Food and Wine magazine asked me to create a carrot cake for their magazine to celebrate the arrival of spring and Easter. The citrusy aroma of the orange in this carrot cake gives this carrot cake a burst of bright energy while the sour cream glaze gives a much needed tangy edge.
Grab the recipe here at Food and Wine Magazine Cooks: Carrot and Orange Cake with Sour Cream Glaze.
April 5, 2020
burnt honey and earl grey tea pound cake
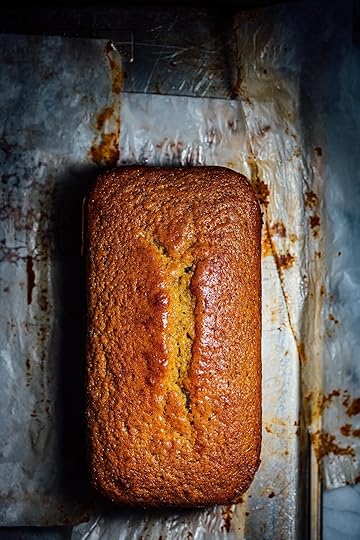
A few months ago, Samin Nosrat recipe for the famous Russian Honey Cake of the 20th Century Cafe in San Francisco. If there’s one thing I regret never eating all the years we lived in the SF Bay Area, it’s this cake. When I read Samin’s recipe, I noticed how she burned the honey and that was one of the ideas I wanted to incorporate in this cake. The second excuse to make this pound cake came from my pantry. I have a lot of random boxes of tea with 1 to 2 Tbsp of leftover tea leaves or rather the dust that sits inside after all the leaves are used, this is my way of using that up. Earl Grey tea which contains bergamot is perfect in this burnt honey combination but other fragrant teas will work just as great..
If you bake a lot of cakes, you’ll notice that I change things around in the formula of this recipe, especially when the butter and salt go into the batter preparation. I did this on purpose to get a better texture and prevent certain things from happening (see my Kitchen Notes below).
This recipe is the perfect example of the Caramelization reaction that occurs in sugars. When sugars are heated, they undergo a variety of changes and produce a whole new set of aroma, taste, and pigment molecules. I use baking soda to manipulate and hasten the caramelization reaction in the honey and then later when baking the cake reduce the temperature to reduce the browning from the sugar. Some of the cake’s browning also comes from another chemical reaction called the Maillard reaction which occurs between amino acids and sugars, this reaction produces a completely different set of flavor and pigment molecules that also appear brown in color.
Kitchen Notes:
Honey is the sweetener in this cake. Honey is acidic and also rich in fructose.
Runny honey - is honey that is clear and drips, do not used creamed honey or honey with bits of honey comb (especially honeycomb, it will alter the chemistry of the cake).
“Burning” the honey helps caramelize it. Fructose will start to caramelize at about 230F [110C].
Effect of alkali/high pH on Caramelization: I add a tiny amount of baking soda to the honey once it is hot. Baking soda provides an alkaline pH that promotes the caramelization of fructose and the other sugars in honey. On temperatures above 176F [80C], the baking soda changes into sodium carbonate which is also alkaline and promotes the caramelization reaction (not to be confused with the Maillard reaction). You will see some foaming, this is carbon dioxide gas released because of this change to sodium carbonate. As a consequence of caramelization, the honey takes on a bunch of new flavors and even colors, you’ll immediately pick up some new scents but watch how the honey goes from golden to a dark amber as it cooks. The three caramel family of pigments produced - caramelan, caramelin, and caramelen, all contribute to this color.
I add the butter to the honey as soon as it comes off the stove to prevent the honey from crystallizing or hardening.
Flour: I use cake flour for a very tender crumb. You can use all-purpose flour for a more dense texture (use the same weight). You can also use the cornstarch:flour conversion for cake flour - use this formula : [ 1 cup all-purpose flour - 2 Tbsp flour] + 2 Tbsp cornstarch (cornflour)]. (Note: that “-” is a minus sign) .The cornstarch substitution changes the ratio of protein and starch in the flour by reducing the amount of total protein present (by comparison, cake flour is a low protein flour than all-purpose flour).
Tea: Bergamot’s aroma pairs beautifully with the toffee flavor of burnt honey, hence my recommendation for the Earl Grey (I used Fortnum and Mason) but use what you have at home or can find. Citrus or floral aromas work best here. If you can’t find a tea like Earl Grey, add 1 tsp of fresh lemon zest to the cake batter along with ground black tea (like a Darjeeling).
Yogurt: I’ve tried this with full-fat and 5% fat yogurt, the fat-free stuff doesn’t leave as a good a mouthfeel. It feels a bit drier.
Oven Temperature: Honey contains fructose which can burn quite easily and the cake can darken pretty fast, so the baking temperature is a bit lower than what I normally use for a sucrose/table sugar sweetened cake.
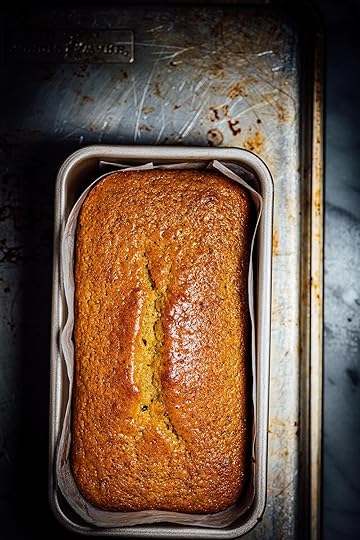
burnt honey and earl grey tea pound cake
The caramelized or burnt honey in the cake gives this cake a deep amber color and toffee like flavor. The ideal tea to complement this flavors in this honey cake is Early Grey because of its wondrous bergamot aroma, however you can use other black teas that have a fragrant citrusy or floral note. This cake’s sweetness comes from honey and I find that a dollop of plain (or lightly sweetened) and tangy creme fraiche, yogurt, or even sour cream on the side complement it best.
makes one 9 inch [23 cm] cake loaf
ingredients
[70 g] unsalted butter, cut into cubes and softened to room temperature plus a little extra butter to grease the baking pan.
1 1/2 cups [170 g] cake flour
1 1/4 tsp baking powder
3 to 4 Tbsp Earl Grey tea leaves (or use a fragrant dark black tea)
3/4 cup [177 ml] runny honey
1/8 tsp baking soda
3 large eggs
1/2 cup [120 ml] full-fat or 5% plain unsweetened Greek yogurt
1/2 tsp vanilla extract (optional)
1/4 tsp fine sea salt
Preheat the oven to 325F [163C]. Grease and line a 9 inch [23 cm] loaf pan with a little butter and line it with parchment paper.
Place the cake flour and baking powder in a medium bowl. Grind the tea leaves down to a fine powder using a mortar and pestle, and add it to the flour in the bowl. Dry whisk and keep aside.
Pour 1/2 cup [120 ml] honey in a small saucepan and heat over medium-high heat till the honey begins to bubble at about 230F [110C], as read on a candy thermometer or an instant-read digital thermometer. Reduce the heat to low and add the baking soda and stir with a stainless-steel or wooden spoon (use one with a long handle to avoid getting burned), the mixture will foam, continue to cook till the color of the honey changes to darker shade of amber, by about 270F [132C], watch this carefully because it can happen at a slightly lower temperature. Remove from heat and pour the honey into a large heat-proof bowl or stainless-steel bowl.
Stir in the remaining 1/4 cup [60 ml] honey. Whisk in the cubed butter. When the mixture cools to 150F [66C], whisk in the eggs one at a time until completely combined. Whisk in the yogurt and vanilla until completely combined. Add all the flour in the center of the honey mixture and whisk until there are no more visible flecks of flour or lumps present. Pour the batter into the prepared loaf pan, place on a baking sheet, and bake in the preheated oven for 45 minutes. Do not open the door at any point during this time. After 45 minutes, open the oven and rotate the pan and cook for another 10 to 15 minutes, till the top is golden brown and firm to touch, a skewer or knife when inserted through the center of the cake should come out clean. Remove the loaf pan from the oven and let the cake cool in the pan for 15 minutes. Run a knife around the edges of the pan to loosen the cake and then release and remove the cake. Peel off and discard the parchment paper. Transfer the cake to a wire rack to cool completely before serving.
This cake will stay good for up to 4 days, if wrapped and stored in the refrigerator. This cake can also be wrapped in foil or plastic wrap and then stored in an airtight container for up to 1 month in the freezer, remember to thaw it overnight in the refrigerator, a day before you want to serve it.
April 1, 2020
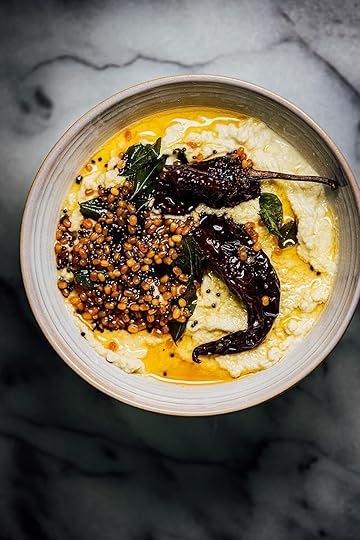
coconut chutney
Just like dosas, there are a variety of coconut chutneys (as well as other accompaniments and condiments) with a thousand variations that might differ in how they’re made and the ingredients. This is a version I make at home, called thengai chutney (I take a few liberties with it and traditionalists might scoff a little but it works well). You will need fresh or frozen unsweetened coconut (Indian stores carry them in the frozen section) to prepare it, desiccated coconut (even when reconstituted with hot water) never gives the same pleasant mouthfeel. I usually pick a few backs of frozen coconut and stick them in my freezer till needed.
Kitchen Notes
Warm water helps the fat in the coconut melt and aids with grinding. Of course the coconut is the major flavor and textural component here but in my opinion, the curry leaves, mustard seeds, and ginger are what give this coconut chutney its unique flavor.
There are two dals used in this recipe - the first one is the lentil called channa dal or split gram lentils. This is first toasted and then ground with the coconut to form a smooth paste. It adds flavor. I leave this out if I don’t have any at home and the chutney still tastes good.
The second dal is the urad/udad beans (dal) which can be skipped if you don’t want to use it. It adds a unique aroma when used to prepare the tadka while adding a crunchy texture. These were used to make the dosa batter. You can use skinned whole or split urad beans, my personal preference is for the whole which is what I’ve shown here. I use a lower heat for the tadka, this allows the urad seeds to cook thoroughly in the oil and lowers the risk of the spices burning.
Use fresh curry leaves and black or brown mustard seeds. Do not use yellow mustard seeds.
Rinse curry leaves under cold tap water, rub them gently with a clean kitchen towel to remove any debris and remove any water. This will help clean the leaves and reduce hot oil from flying out of the pan when the leaves get into the saucepan.
The fresh green chillies you can play with, use less or more or pick a hotter variety. You have lots of options to try - Serrano, jalapeño, Thai chillies, etc.
The dried red chillies are used to flavor the oil and also add a bit of color. Capsaicin the heat generating molecule in chillies is fat-soluble pigment which leaches into the hot oil, giving it flavor. You can use almost any kind of dried red chilli here, I use Kashmiri (Indian Store or online).
A high speed blender or food processor will get the job done well.
Coconut degrades quite rapidly, hence the shorter length of time for storage in the refrigerator. But this chutney can be frozen for up to one week in an airtight container.
To do the tadka, use a small saucepan. The high sides of the saucepan prevent things from flying all over the place, mustard seeds pop and some will inevitably jump out of the pan.
Sometimes, my mom will add 1 to 2 Tbsp of fresh lime juice.
thengai/coconut chutney
makes about 2 cups [480 ml]
ingredients
1 Tbsp split gram lentils (channa dal)
2 cups [ g] packed fresh or frozen unsweetened grated coconut (if using frozen, thaw before use)
1 Tbsp peeled and grated fresh ginger
2 fresh green chillies
1/2 [120 ml] lukewarm water (you might not use all of it or might you need a bit more, I recommend keeping a kettle filled with water on hand)
fine sea salt
1 dried red chilli (I used a whole Kashmiri)
1 Tbsp coconut oil
2 tsp black or brown mustard seeds
1 tsp skinned urad beans (aka urad/udad dal), split or whole (I used whole here)
10 to 12 fresh curry leaves
Heat a small dry saucepan over medium heat. Add the split gram lentils to the pan and toast the seeds until they start to release their aroma and start to toast a light brown, about 2 minutes.
Add the toasted split gram lentils with the coconut, ginger, and chilli to the blender. Pulse till you get a smooth purée, add a few Tbsp of warm water at a time to help grind the ingredients. Taste and add salt as needed. Transfer the coconut mixture to a serving bowl.
Using a knife or kitchen shears, cut the dried chilli in half across it’s length leaving the stalk end intact. Wipe down the saucepan used earlier, heat the oil over low heat. Keep a lid wide enough to cover the saucepan next to you. Once the oil is hot, add the mustard seeds, dried chilli, and urad beans and swirl the pan and cook till the seeds turn golden brown, about 1 1/2 to 2 minutes. Add the curry leaves, cover with a lid, and cook for an additional 30 seconds till the leaves crisp, all the while making sure the seeds don’t turn dark black or brown (that will leave a bitter taste, if that happens, discard the entire spiced oil mixture and repeat). Pour the hot seasoned oil mixture will all the spices and curry leaves over the coconut mixture in the bowl. Stir a little and serve with the dosas. This chutney is good for up to 2 to 3 days if stored in an airtight container in the refrigerator or in the freezer.
March 31, 2020
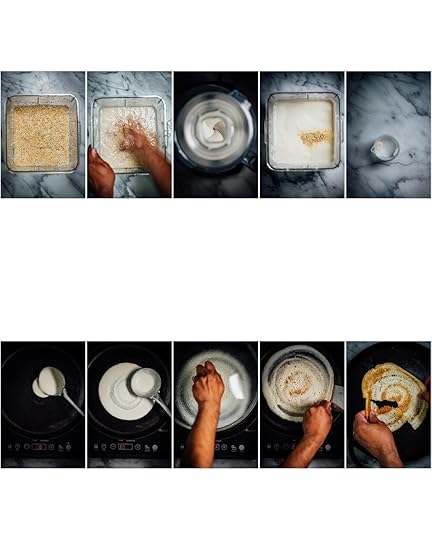
dosa (2020 version)
With flour being a hard to find commodity right now, this is rice’s moment. Dosas can be eaten traditionally with sambhar and condiments like coconut chutney, etc. I will update this post with recipes for them later this week but I want to make sure you don’t tie yourself to thinking it must be eaten with only these dishes. Dosas are versatile, they’re a vehicle and you can and should eat them as you would any savory bread, flatbread, or rice. (This is the updated version to my previous dosa posts, now that I have a lot more experience making it at home, I felt it was time to revisit and update. hence the dosa 2020 - see Chitra’s Dosa and Sambar).
While it does require some planning ahead and a bit of practice, I promise, you will feel the same level of elation once you conquer it like I did. This is one of the Indian dishes that I am particularly proud to learn since my mom couldn’t make them and we always had to go to restaurants to eat dosas, she now eats the dosas I make at home.
This is a bit of a lengthy post so I apologize in advance but dosa can be a bit daunting and I wanted to address everything possible that gave me problems as I learned to make them.
Please read the Tools and Kitchen Notes before you proceed with the recipe, to get a sense of what to expect and how to work your way through the recipe.
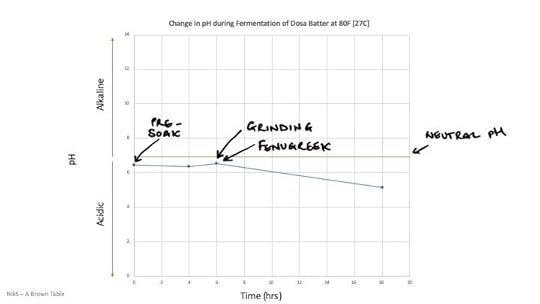
Principle: Dosa like sourdough relies on fermentation by a combination of bacteria and yeasts that are derived from the rice and urad beans. To optimize the fermentation and cut back on time (in the past I would soak the seeds on day 1 and then grind and ferment them on the second day), I’ve measured time, pH, and fermentation at different temperatures and 80F [27C] works best. The batter ferments within 16 to 18 hours. I add a little bit of sugar at the start to give the bacteria and yeast an easy source of energy (this is the same reason why some dosa recipes will call for the addition of a little bit of cooked rice to the batter), this will help jump start the fermentation. As the bacteria and yeast ferment the sugar and complex carbohydrates (from the seeds), acids and carbon dioxide are released, the batter will turn thick and foamy (and a spoonful will float on water). Fermentation of the starch in the seeds also helps with gelatinization (thickening) of the starch which affects texture. Besides fermentation, the rice and beans contain enzymes like amylase which will act on the starch, these enzymes from the seeds are high in activity at the start and will eventually decrease as fermentation starts to takes over.
Tools:
Dosa making requires a few tools.
Grinding - A question, I get often - “Do I need an Indian blender to grind dosa and idli batters?” No you do not and I do not recommend going out and getting one for the sole purpose of this recipe (less appliances is always better) them if you’re not living in India (some of them are quite heavy and getting parts replaced or fixed can be tricky). You can get the same quality of a high smooth batter with a high speed blender. I’ve been using my Vitamix for years and it gets the job done with excellent results.
Start out with a non-stick cooking pan. Once you get comfortable you can migrate to a cast-iron pan.
Cast-iron pan - I use a Staub Griddle pan . You want to use a flat surface pan with very low sides, a crepe pan will also work great. If the sides/walls of the pan on the edge are too tall, it will interfere with the pouring and spreading of the batter.
I use a ladle with a wide curved bottom, it should not have a flat base. I find this to work best with spreading the batter. In India, dosa experts will use a flat bottomed metal bowl (a katora), I find these a bit trick to work with, when you try to spread or lift the batter, there is a suction created between the batter that is spread and the batter attached to the bowl, and more often that not, it will leave a big gaping hole in the dosa. If you’re starting out go with the ladle. Indian and online stores sell them.
Turner - A metal flat turner with a thin edge is a good tool to flip the dosas. Insert the turner from the sides and then slowly make your way through. A wooden one will also work but they tend to be thicker and can damage the dosa.
Temperature -
Fermentation: I have an immersion circulator/sous vide (Joule) that I’ve been using more and more off late to maintain accurate water bath temperatures for fermentation because my apartment does not get enough sun, the kitchen is often too cold for fermentation. You can use a warm oven to keep things warm (my previous oven had a proof setting that went as low to 70F [21C] so I used to use that in Oakland). Keep in mind, the sous vide will maintain a constant accurate temperature while ovens and kitchen counters won’t, so your fermentation time will change a little. I don’t use an Instant Pot to ferment but it can work.
Cooking on Stoves:
The ideal temperature on my cast-iron pan for dosa making ranges between 260F to 320F [127C to 160C] as measured by a surface infrared thermometer.
Gas stoves and electric stoves (in that order of preference) seem to work best for dosa making. For the purposes of this recipe, I cooked the dosa on my gas stove and also on a portable induction stove. Every time I cooked the dosa on the induction stove, I noticed a few things - “the dosa cooks in a circle”. I suspect this is because of the magnets and how they rotate inside. The dosa would begin to brown in the 12 o’-clock position and then proceed in an anti-clockwise fashion every time. I didn’t notice this on my gas stove and the browning on gas was much more uniform and efficient. Induction also only heats the metal compatible surface it meets, so often the edges of my pan did not get as hot as the center did and my dosa would be softer on the edges and as you might expect my spreading was not the best in this outer edge. With electric stoves, controlling the amount of heat is a bit tricky, especially when you need to lower the amount of heat. Dosa needs low heat to cook and brown well and you need to be able to carefully adjust the heat to do this, I don’t get the same level of control with electric. Overall, gas is my favorite here.
Kitchen Notes:
Ingredients:
Rice to urad ratios usually vary depending on who you talk to but usually the amount of rice is greater than the amount of beans. You don’t need to soak the seeds separately, it makes no difference.
Basmati rice - I use basmati rice (Indian stores). Often, Indian stores might also carry bags of rice or rice flour labeled “dosa or idli rice” - you can use this, it’s a special type of short grain rice that is used traditionally to make fermented rice products like dosa, uttapam, and idli. Short grain rice will work. I thought the difference in the starch types of long grain and short grain rice would have an effect but it didn’t in my hands.
Urad beans - aka udad and will most often be sold as urad/udad dal. You can purchase this preskinned where they beans will look white after the blackish green skin is removed and discarded. This is recommended for dosa making. Indian stores will also sell this dal as a flour, you can use this. If you have beans with the skin on, soak them separate from the rice but you will need to soak them for a whole extra night to let the skins soften and then scrub the skins off gently with your hands, it’s a bit of extra time and work but doable.
Rice and Urad dal flours - if you come across these at the Indian store or online, you can use them. Weigh them by the amounts listed in the recipe below and then proceed. You don’t need to wash these flours (it will all get lost in the water), soak, blend and ferment. It’s a quick shortcut and is a good option, if you’re blender is not strong enough.
Fenugreek (Methi) seeds - this is available as whole seeds or ground powder (available online or in Indian stores). Which one to use? Neither makes a big difference in my opinion. Fenugreek adds a unique flavor but it also helps with digestion. If you use seeds, soak them with whole grains (or flour) for the 4 hour time period and then blend. If you use the powder, add the powder to the blender step or whisk it directly into the blended mixture and let it ferment. If you do the latter, whisk well to prevent the formation of lumps.
Water - I use filtered water. I live in a city where our water is hard and contains a lot of minerals and salts which can affect fermentation and texture.
Fat - Ghee works best, with cast-iron the dosas glide off the surface very nicely. Grapeseed oil or a neutral oil will also work well. Less fat is best for dosas. You just want the minimum amount to cover the surface of the pan.
Fermentation - Between 70 to 80 F [21C to 27C] is best. The batter will be ready when a spoonful floats on a cup filled with tap water. The fermented batter should smell yeasty and acidic. It will taste sour (the final pH is approximately 5.12) I have a graph below for my fellow curious nerds.
Dosa Batter and Water - It is better to work with a thick batter than one that is too thin. Dilute the batter with water as needed. If the batter is too thin, it will not spread well. The final batter should be like a thick pancake batter with no clumps or lumps. The lumps will be a deadly hazard to the smoothness of your final dosa.
Do not despair, the first one or two dosas are always a disaster in my kitchen. I suspect this is due to the pan getting reaseasoned as it heats and fats polymerize on the surface. I don’t wash my pan with soap, just hot water and leave it to dry. It also takes me a few minutes to reacquaint myself with how much pressure to apply when spreading the batter.
Leftover dosa batter can be used to jump start a fresh batch. Unused dosa batter can be stored for up to a week in the refrigerator. Bring it out to warm up on your kitchen counter before you use it. If the amount of gas feels a bit low, I will sometimes stir in a little sugar to help fermentation.
dosa
Dosa is not a quick recipe and it requires a bit of preplanning. Do read the kitchen notes and then proceed with the recipe. You do not need to eat dosa with chutney or sambhars all the time, use it like a flat bread, it goes well with so many different types of condiments and recipes. I often serve it at breakfast with a fried egg in the center.
I’m not giving you a serving size based on how many dosas you will get, this should feed about 4 people but will also depend on how wide and thick your dosas are.
makes about 1/2 gallon [2 L] batter
ingredients
1 1/4 cup [250 g] basmati rice or idli rice
3/4 cup [160 g] skinned urad (udad) beans/dal
2 cups [480 ml] filtered water
1 Tbsp fenugreek seeds or powder
1 Tbsp sugar
kosher salt
1/2 cup [120 ml] ghee or grapeseed oil or a neutral cooking oil for cooking the dosas
Clean the rice and urad dal for any debris. Place the rice and dal together in a food-safe container or a large bowl and rinse with cold water, three times. If you’re using fenugreek seeds, add them now (if you use fenugreek powder, add it in the blender step). Add the water and sugar, cover the bowl or container with a lid and let it sit in a warm spot for at 80F [27C] for 6 hours or use a sous vide immersion circulator water bath at the same temperature. After this time, the seeds will absorb water, a grain of rice or bean when broken will show a translucent interior while one that is not completely soaked will have an opaque center surrounded by a translucent ring.
Transfer the seeds with half the soaking water to a high speed blender. If you’re using fenugreek powder add it now. Start on low speed and then proceed to high, pulsing for a few seconds until you get a smooth consistency with no chunks. Add the remaining soaking water if needed. This ground batter should be very thick. Transfer the batter back into the container. Cover loosely with a lid and let it sit in a warm spot or a sous vide heated water bath at 80F [27C] for 16 to 18 hours to ferment.
At about 16 hours, check the batter, it should be extremely thick and foamy and a little sour to taste. If it’s not yet there, leave it for another two hours and check again. The exact time will vary depending on your incubation conditions. To check whether the batter is ready to use, take 1 Tbsp of the fermented batter and place it on the surface of a cup filled with tap water, the gas in the batter should keep it afloat.
To cook the dosa, take 1 cup [240 ml] of the batter in a medium bowl. Add 1 to 2 Tbsp of water to the batter with a few tiny pinches of salt to taste (about 1/4 tsp kosher salt to every 1 cup [240 ml] batter, this will depend on your taste - the batter is perfectly safe to taste). The batter should have the consistency of a thick pancake batter, if it is too thin it will not spread well, if too thick add a few more Tbsp of water.
Next prepare the pan. You will need a lid wide enough to cover the pan. Place the pan over the stove and heat over medium to low heat. Rub the surface with about 1/2 tsp ghee or oil. Take a small piece of a clean paper towel and using a pair of kitchen tongs, spread the ghee or oil all over the surface of the pan. The melted fat or oil should cover the pan in a thin layer. Fill the ladle with about 1/2 cup [120 ml] of this dosa batter and pour it over the center of the heated pan. It should sizzle very slightly, not too much. Using a circular motion, moving from the center to the outer edge, spread the batter to form a thin crepe (it doesn’t matter if it is clockwise or anticlockwise) using the ladle and by applying light pressure. Cover the pan with the lid and let it cook over low heat for about 1 to 1 1/2 minutes. Once the steam starts to condense and accumulate on the top of the lid, remove the lid and let the dosa cook uncovered. You can also leave the lid slightly open, to let the steam escape as it cooks. Too much water condensation can cause the edges of the dosa to cook slower than the rest of the dosa. Continue to cook the dosa till the base starts to turn golden brown and the edges start to release. Take a flat turner to release the dosa and carefully push through the space between the dosa and then pan to release the dosa. If your dosa is a bit thick, flip it and cook till it releases but if it is thin do not. Fold the dosa in half and transfer to a serving dish and serve immediately. Dosas are best eaten as soon as they come off the stove.
Note: A popular question on substitution comes up. The quick answer is no. Don’t sub anything beyond what I suggested here. I can’t guarantee if it will work since I haven’t tested the amounts. I worked things out specifically for this version of dosa.
March 23, 2020
dry channa masala
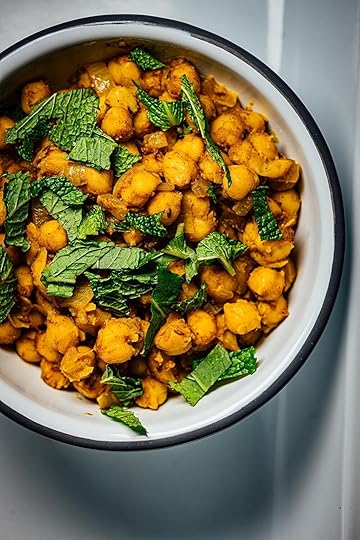
This is a very simple recipe that I use at home to make channa masala. There are no potatoes or tomatoes in this version. Unlike the more common version where chickpeas sit in a broth, this channa masala is served “dry”. Spices give this dish its character. I use an electric pressure cooker to cook the chickpeas quickly but you can do this without, it will take a little longer so keep any eye on the texture of the chickpea. Canned chickpeas can also be used here which will eliminate the cooking step. Plain yogurt is my favorite choice of accompaniment with this dish and parathas or plain rice.
A few kitchen notes;
The chickpeas should be tender and creamy yet hold their shape. I soak the beans overnight and then pressure cook them with a bit of salt and baking soda. Both of these ingredients change the pectin inside the seed which will then make the inside of the chickpea softer and quickens cooking time.
I’m using an electric pressure cooker to speed up cooking time. If you don’t own one, cook them on the stove. Bring the water to a boil and then reduce the heat and simmer till the chickpeas are completely tender. They should be soft and creamy on the inside but you don’t want them so soft that they to turn to mush.
Garam masala - you can use store-bought or use the one from my book, Season. I also have one here at Food52.
Asafoetida/Hing and Kashmiri chilli powder can be obtained at Indian grocery stores.
In my opinion, amchur (ground unripe dry mango powder) is what makes this dish. The fruity acidity of this ingredients brings out the flavor of the spices. This like garam masala is available at Indian stores. You can use fresh lemon or lime juice (I prefer lime) as a substitute.
Note: I add the chilli powder with the onions, rather than earlier because the water inside the onions will prevent the chilli from burning. It acts as an insurance policy of sorts.
dry channa masala
makes 4 servings
ingredients
1 cup [180 g] dry chickpeas
1 tsp kosher salt plus more
1/8 tsp baking soda
1 Tbsp ghee, extra-virgin olive oil, or neutral oil like grapeseed oil
1 tsp cumin seeds
a pinch of asafoetida (hing) (a little less than 1/8 tsp)
1 tsp garam masala, homemade or store-bought (see notes above)
1/2 cup diced white onion
1/2 tsp ground turmeric
1/2 tsp ground red chilli powder (I use a mild one like Kashmiri chilli)
1 Tbsp grated fresh ginger
1 to 2 tsp amchur powder or more as needed or 2 Tbsp fresh lime juice (also see notes above)
2 to 3 Tbsp fresh chopped mint or 1 Tbsp dried mint
Clean and rinse the chickpeas to remove any debris. Soak in 2 cups [480 ml] tap water overnight.
The next day, the chickpeas will absorb the water and swell. Discard the water. Cook the chickpeas in an electric pressure cooker in 1 quart [960 ml] of water with 1 tsp kosher salt and the baking soda for 30 mins at high pressure. Once the chickpeas are cooked, drain the chickpeas over a large fine mesh sieve placed over a large bowl. Reserve 1/2 cup [120 ml] of this liquid.
Once the chickpeas are cooked, prepare the masala or spice mixture. Heat the ghee or oil in a medium saucepan over medium-high heat. When the oil is hot add the cumin and asafoetida and cook for 30 to 45 seconds till the spices start to sizzle. Add the garam masala and cook for 30 seconds till the spices start to release their aroma. Quickly stir in the onions, turmeric, and chilli powder and sauté until the onions are translucent, about 4 to 5 minutes. Add the ginger and cook for 1 minute. Fold in the drained chickpeas taking care to prevent them from breaking. Add 1/2 cup [120 ml] of the reserved liquid and reduce the heat to medium-low. Cook until the liquid evaporates, about 3 to 4 minutes. Sprinkle the amchur over the chickpeas and fold gently, taste and add more if needed. Adjust the salt if necessary. Garnish the chickpeas with the chopped mint and serve hot with rice or flatbread.
March 20, 2020
homemade yogurt
I’ll be completely frank about this, I don’t make yogurt at home as often as I could or should but this week, I couldn’t find any at the store and decided to make a batch at home with some leftover yogurt. I usually make yogurt when I need a large quantity especially when I need to make a yogurt based marinade or a yogurt soup for a large group of people. This is my go-to-method that works fantastic every time. It’s a good basic recipe to have on hand when you need it.
Mechanism of Yogurt production:
Three main things are happening here: Fermentation of milk by lactobacilli (special microorganisms that eat the milk sugar lactose), milk proteins are denatured by heating but will eventually get denatured even further and coagulate by the lactic acid produced by the microorganisms.
Special bacteria called lactobacilli utilize the milk sugar, lactose as an energy source and produce lactic acid. The lactobacilli will also consume some of the milk proteins, amino acids, etc and will produce other flavor molecules in the yogurt. The lactic acid will change the pH of the milk making it acidic and the milk proteins will change their shape and even the electric charges on the milk proteins will change. As a result, the milk proteins will split into a solid white cake like structure and some will remain soluble in the greenish whey liquid. Whey gets its green color from one of the vitamins in the B family, called riboflavin. Heating the milk before the yogurt is added also helps to change protein structure through protein denaturation and will eventually lead to a better texture once the protein has coagulated.
Making yogurt at home is not intimidating. You just need to make sure you heat the milk to the right temperature. Read my notes before you start.
Yogurt Making Notes:
Use fresh milk. I prefer whole fat milk but you can use a low-fat milk too. The quality in texture will be different because fat adds a creamy mouthfeel to the milk proteins. Avoid milk that contains stabilizers and thickeners, these gives the whey a thick viscous consistency.
I’m using cow’s milk. In India, buffalo’s milk would be used. Depending on the type of milk used, you will notice some interesting taste and textural differences because there are different amounts of various components like protein, calcium, etc.
Technically, we’re not making yogurt from scratch. We’re not going to make a starter culture here, instead we’re going to inoculate (scientific word for adding microbes to anything) the milk with leftover yogurt from the store. The important thing to check and I can’t stress this enough, use yogurt that’s labeled LIVE CULTURES. If the yogurt is pasteurized or doesn’t have live bacteria, there are no lactobacilli present to work on your milk. I used a few tablespoons of a 5% fat Greek yogurt to inoculate my yogurt that contains Lactobacillus bulgaricus, S. thermophilus, L. acidophilus, Bifidus, and L. casei. Besides, Greek yogurt, regular plain yogurt will also work as the source of the microorganisms.
Temperatures: There are two main temperatures to pay attention to here;
185F [85C] - Do not boil the milk, I’m using pasteurized fresh milk, if it’s a brand new jug and you trust your source, there is no point in wasting energy on this. Instead, heat the milk to 185F [85C] and maintain it at the temperature for 3 minutes. The reason for this is, the heat at this temperature helps to change the shape of the milk proteins and will eventually produce the best texture. We’re denaturing the proteins shapes using heat.
110F [43C] - This is the temperature at which the lactobacilli will replicate the best and is called the optimal growth temperature conditions for yogurt making with milk.
Use clean and sterile containers to store the milk and yogurt. Make sure your thermometer is also cleaned before every use.
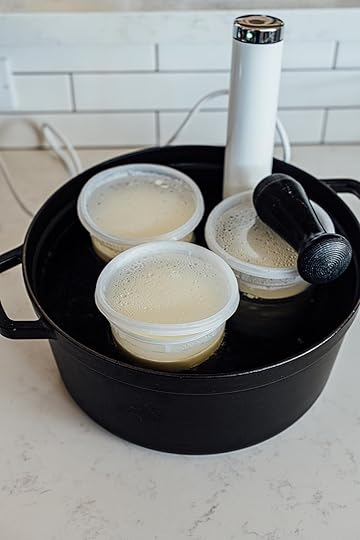
Sous vide - I like to use my sous vide when I really need a controlled temperature environment. In this particular case, the circulating water bath, provides even heating for a long period of time and better accuracy than air would. This will help achieve optimum fermentation and the best texture of yogurt. If you don’t own one that is fine, you can also just keep it in a warm spot of your kitchen covered and let it ferment. There are different ways, some folk also leave yogurt in an oven that was previously kept warm, others might use an Instant Pot. This is the method I find the best.
A bit of extra information, the pH of fresh yogurt should be about 4.5 at room temperature.
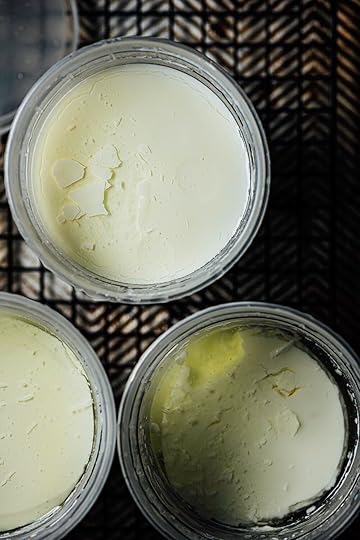
To make Greek yogurt and labneh, drain the yogurt in muslin or cheesecloth to get rid of the whey. For Greek yogurt, drain it for 36 to 48 hours in the refrigerator till you get the right thick and creamy texture. For labneh, you will need to drain it much longer for about 48 to 72 hours, till there is no longer any whey.
homemade yogurt
The final incubation period in the water bath is written specifically for use with a sous vide device. A sous vide/immersion circulator will offer a more controlled temperature with more specificity. However, if you don’t own one, it’s not the end of the world. Keep your container(s) of inoculated milk in a warm spot of your kitchen and leave it there for about the same length of time, till the milk is fermented to yogurt. It could take a few more hours if the room temperature is a bit cool, (it took 16 to 18 hours without a sous vide device during spring in Oakland). With regards to the temperatures listed here, a little bit of error is okay, the main thing to remember is not to add the yogurt to the milk if it is too hot, the optimal growth temperature for the lactobacilli in yogurt is 110F [43C], avoid anything above this. At this temperature the bacteria will replicate and ferment the milk to the best of their capabilities. This is a recipe, I recommend starting in the evening and let it sit overnight to ferment and turn to yogurt.
Makes about 1/2 gallon [1.9 L]
1/2 gallon [ 1.9 L] whole milk (see notes)
3 to 4 Tbsp of yogurt with LIVE cultures (see notes)
Heat the milk in a thick bottomed saucepan over medium high heat to 185F [85C] when measured by an instant-read digital thermometer, and maintain at this temperature for 3 minutes.
Remove the milk from the stove, cover with a lid, and let it sit outside on the kitchen counter till it cools to 110F [43C], when measured by an instant-read digital thermometer. The cooling time will depend on the ambient room temperature.
Once the milk is cooled to 110F [43C] when measured by an instant-read digital thermometer, whisk in the yogurt (the milk is now inoculated with the bacteria). Transfer the inoculated milk to a clean, sterile glass or plastic storage container with a lid. You can divide the inoculated milk into smaller containers. Partially seal the container (s) with its lid, to allow a little air to enter.
Place the container (s) with the inoculated milk into a large deep pot and fill it with enough water up to the height of the milk in the container to ensure the milk is exposed to the water. Set the cooking conditions on the sous vide device to 110F [43C] for 14 hours. Cover the top of the pot with a lid or plastic wrap to reduce the risk of water loss through evaporation. During this time avoid shaking the yogurt to see if the milk proteins have changed, shaking during fermentation will affect the texture of yogurt. Once the time is complete, remove the containers from the water bath. The translucent greenish whey liquid will separate from the solid milk proteins, the latter will look like a big soft while cake. Seal the container(s) tightly with a lid and refrigerate for up to 2 weeks. (NOTE: If you don’t own a sous vide device read the headnotes for suggestions).
March 18, 2020
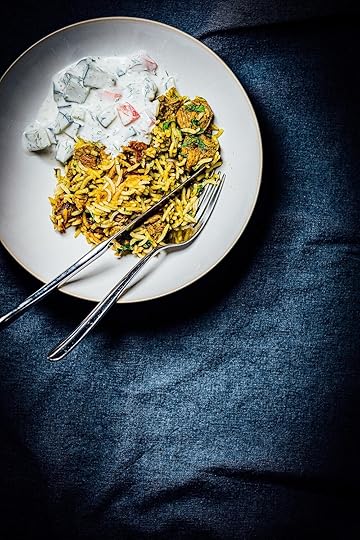
herbed lamb pilaf
Disclaimer: This post was sponsored by the American Lamb Board . All opinions expressed are solely my own.
Pilafs or pulaos, whatever you might refer to them as, are the best one-pot meals. You can serve this herbed lamb pilaf for a special occasion or as an everyday meal.
I’m borrowing the technique of layering cooked meat with rice, one that you might have come across when making the wonderfully aromatic biryanis. You might also note that I cut out marination, I’ve tried this recipe both ways (marinated and un-marinated) and didn’t find much difference in texture or flavor of the meat, so the recipe here skips marination and the meat cooks in the spiced yogurt liquid till it is completely tender. If you own a high pressure cooker, you can cut back your cooking time by cooking the meat separately but you will still need to reduce the liquid before it can be added to the rice. Cuts of American lamb that can be used for stew are ideal here but it is much easier to find a boneless leg at most grocery stores. Just buy a little over 2 lbs [900 g] and then trim off and discard the excess fat and then chop the meat into cubes before cooking them. For more on how to buy lamb check and cooking tips, visit the American Lamb Board.
The fresh herbs give this pilaf most of its flavor while the addition of the fresh chilli adds a note of heat with an herb like edge. If you want to reduce the amount of heat, remove the midrib and discard it along with the seeds, this is where most of the capsaicin (the heat molecule) resides. You can also swap in a fresh green chilli with lower heat.
You don’t need too many side dishes or condiments with this pilaf. Most often I serve this with plain yogurt or a raita and an aachar (Indian pickle).
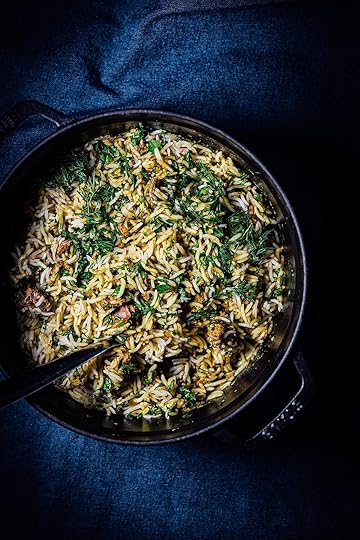
herbed lamb pilaf
This is an easy lamb pilaf that gets its flavor from fresh herbs and green chillies. You can also cook the meat separately in a pressure cooker to save on time but you will need to reduce the liquid volume to about 1/4 cup [60 ml] before it can be layered over the rice. Used aged basmati (about 1 to 2 years old) for a more robust aroma. You can also halve the amount of rice, just make sure to halve the amount of water used to soak and cook it.
Note: if you can’t find American lamb stew meat. Pick up some boneless lamb meat and ask your butcher (you can do this yourself too) and trim off the excess fat and cut it into 1 inch [2.5 cm] cubes. You should have about 2 lbs [ g] of lamb meat. Check out the American Lamb Board to learn more about lamb and different options available.
Makes 4 servings
1 cup [240 g] 5% or full-fat plain, unsweetened Greek yogurt
1 cup [240ml ] water
One small white onion, diced
1 bunch fresh cilantro, leaves and stem
4 garlic cloves, peeled
2 - inch [5 cm] piece fresh ginger, peeled
One whole Serrano or Thai chilli
2 Tbsp fresh lemon or lime juice
1 tsp whole black peppercorns
1/2 tsp ground turmeric
1 tsp fine sea salt, divided
1/4 cup [60ml] ghee , olive oil, or grapeseed oil
2 lb [900 g] American lamb stew meat cut into 1 inch [2.5 cm] cubes (see Headnotes above)
2 cups [400 g] basmati rice
1 tsp cumin seeds
1/2 tsp ground green cardamom
3 Tbsp chopped fresh cilantro leaves
3 Tbsp chopped fresh dill
Blend the yogurt, water, onion, cilantro, garlic, ginger, chilli, lemon juice, peppercorns, turmeric, and 1/2 tsp salt on high speed until smooth.
Heat 1 Tbsp of ghee or oil in a medium saucepan or Dutch oven over medium-high heat. When the oil is hot, add the lamb and sauté till they start to brown. Pour in the yogurt mixture, increase the heat to high and bring to a boil. Reduce heat to a simmer, cover with a lid and cook until the lamb is completely tender about 1 hour to 1 1/2 hours. Stir occasionally during cooking, to make sure the meat doesn’t stick to the bottom of the pan and burn. You can also do this in a pressure cooker and cook the meat on high pressure for 25 minutes. Once the meat is cooked, remove the lid, increase the heat to medium-high and cook until there is about 1/4 cup [60 ml] liquid left behind.
While the lamb cooks, prepare the rice. Clean the rice for any debris or stones, rinse under running tap water in a fine mesh strainer till the run off water is no longer cloudy. Transfer to a medium bowl and cover the rice with enough water, about 1 inch [2.5 cm] above the height of the rice. Keep aside to soak for 30 minutes.
Once the lamb is done, transfer the lamb with the liquids to a medium bowl. Rinse and wipe the saucepan down and return to the stove. Heat the saucepan over medium-high heat. Add the remaining ghee or oil. When the oil is hot, add the cumin and cook for 30 to 45 seconds till the seeds start to sizzle and turn brown. Stir in the cardamom. Drain the rice and discard the water. Add the rice to the hot oil and fry the grains till they no longer stick to each other, about 2 to 3 minutes. Add 4 cups [480 ml] water with the remaining 1/2 tsp salt, bring the water to a rolling boil over high heat and then reduce to a simmer. Cover the saucepan with a lid and let the rice cook till most of the water has almost evaporated (about 1/4 cup [60 ml] liquid should be left behind) and the rice is partially cooked, about 20 minutes. The grains should still be a bit firm, if it cooks all the way, that’s fine, the grains might be split a little on the ends but that is okay. Remove the saucepan from the stove and transfer half of the rice to a plate or bowl. Top the remaining rice in the saucepan with the cooked lamb and drizzle the cooked liquids all over. Layer the surface of the lamb with the rice kept aside in the bowl in an even layer. Cover the saucepan with a lid and cook over low heat for about 15 to 20 minutes, till all the liquid evaporates. Remove from heat and let the dish sit covered for 5 minutes. When ready to serve, fluff the rice and lamb with a fork, sprinkle in the chopped fresh cilantro and dill. Serve hot or warm with plain yogurt or a raita.


