
Nik Sharma's Blog, page 2
November 10, 2022
Spiced Pumpkin Flan
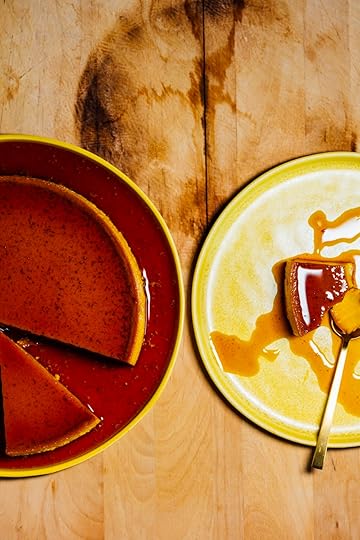
Spiced Pumpkin Flan
Flan or creme caramel is a childhood dessert that’s continued to remain a favorite no matter how old I get. This pumpkin flan is golden and carries a delicate warm scent of spices making it a favorite at home as well as a popular alternative to pumpkin pie at our Thanksgiving dinners. The flan can be made ahead of time making it a fantastic choice for a dinner party.

The Cook’s Notes
Cream of tartar prevents the caramel from crystallizing and hardening as it cooks, making the syrup easier to handle.
The cake pan I used here is 8 in/20 cm wide and 3 in/ cm tall, allowing me to use 2 in/5 cm of boiling water in the water bath. If your pan is shallower, use the lower limit of ½ in/ 12 mm listed in the instructions.
Be careful when working with the caramel; it’s very hot and can cause severe burns.
Both the caramel and milk mixture can be prepared a day ahead of time.
For a more robust flavor, leave the milk with the spices overnight in the refrigerator to infuse. There’s a second advantage to leaving the milk overnight, it helps degas the liquid, and consequently, there’s a lower chance of air bubbles in the flan. Warm the milk to room temperature before using it.
Makes one circular 8 in/20 cm flan
For the caramel
¼ cup/60 ml water
⅛ tsp cream of tartar
¾ cup/150 g sugar
For the Flan
One 14 oz/400 g can sweetened condensed milk
One 12 oz/340 g can unsweetened evaporated milk
1 cup/240 ml whole millk
One 2 in/5 cm piece cinnamon stick
4 green cardamom pods, cracked
1 tsp ground ginger
½ tsp ground turmeric
3 large eggs
7 ¼ oz/210 g pumpkin purée
First, prepare the caramel. Combine the water, and cream of tartar in a small saucepan. Pour the sugar into the center of the saucepan. Cook without stirring over medium heat until the sugar starts to caramelize and turn dark amber brown, 6 to 8 minutes. The caramel should start to turn color at 290F/143C. Pour the hot liquid into an 8 in/20 cm circular cake pan. The caramel cools fast and hot, so carefully and quickly rotate the pan to help the caramel coat the surface. Keep aside until ready to use. The caramel can be made a day ahead of time. Wrap the pan with cling film or a lid and leave it at room temperature.
Prepare the custard base. In a medium saucepan over medium-high heat, add the condensed milk, evaporated milk, and whole milk. Stir with a silicone spatula. Add the cinnamon, cardamom, and turmeric and cook until the milk reaches 180F/82C. Remove from the heat and let sit covered for 30 minutes or until cooled to room temperature. This mixture can be prepared a day ahead of time and stored in an airtight container in the refrigerator. There is no need to warm it before use. Remove and discard the spices.
Preheat the oven to 325F/165C.
While the oven preheats, crack the eggs into a large mixing bowl. Break the yolks using a silicone spatula. Slowly stir the eggs so they combine but avoid stirring aggressively, or air will get trapped. Stir in the pumpkin purée. Add 1 cup of the milk mixture and stir gently until combined. Pour the egg mixture into the milk and stir with the spatula until combined. Hold the flat end of the silicone spatula right over the layer of caramel in the prepared baking pan. Set a fine mesh strainer over the spatula and slowly pour the custard base into the pan.
Place a deep, wide baking dish that can easily fit the cake pan in the preheated oven. Place a circular wire rack inside the dish or make a thick, 8 in/20 cm ring with aluminum foil to prevent the pan from touching the base of the baking dish. Carefully place the baking dish over the rack or ring in the center of the larger dish. Pour boiling water from the kettle into the space between the baking pan and the large dish and fill it to at least 2 in/5 cm of boiling water. Bake for 45 to 50 minutes or until the sides of the flan are firm and the center is still slightly tender and jiggly; the internal temperature should read 170F/77C. Remove the cake pan from the baking dish. Transfer to a wire rack and let it cool to room temperature. Cover the cake pan with a plate or plastic wrap and leave it in the refrigerator for at least 6 hours, preferably overnight, to chill and set.
When ready to serve, run a small knife along the inside edges of the pan. Place a large serving plate over the baking pan. Holding them tightly, flip the pan and the plate, and tap gently to release the flan onto the plate. Pour any remaining caramel from the pan over the flan. Serve chilled or cold. Refrigerate any leftovers in an airtight container for up to 3 to 4 days.


November 7, 2022
Roast Lemon Garlic Chicken

Garlic and lemon with roast chicken is a classic for many reasons; the fragrance and taste capture my attention every time. This is one of my go-to methods for roasting chicken, and it replicates how steam ovens work. This method ensures that all the lemon and garlic flavors permeate through the basting liquid at the bottom, which helps flavor the chicken more uniformly. The liquid also protects the chicken from drying out during cooking and creates a juicier bird.

Roast Lemon Garlic Chicken

The Cook’s Notes
This method uses the steam released from the stock and the chicken to keep the chicken tender and moist.
Crushing the lemons during roasting releases their juices and essential oils to create a more robust lemon flavor.
You can also sear the lemons and garlic before cooking them.
Makes 4 servings
2 Tbsp extra-virgin olive oil
Fine sea salt
Freshly ground black pepper
1 tsp Aleppo, Maras, or Urfa pepper flakes
½ tsp dried oregano or thyme
One 3 ½ to 4 lb/1.6 to 1.8 kg whole roasting chicken
2 lemons, cut in half
2 garlic heads
1 large red onion, quartered
1 cup/240 ml low-sodium chicken stock, white wine, or water
Preheat the oven to 425F/220C.
Coat the surface of a 12 in/30.5 cm cast-iron skillet or 9 in by 12 in/23 cm by 30.5 cm roasting pan with the oil.
Prepare the spice mixture by mixing the salt, pepper, black pepper, Aleppo, and oregano in a small bowl.
Place the chicken on the skillet and rub the chicken all over with the spice mixture. Place the chicken breast side on top. Place the lemons, and garlic heads cut side down on the skillet. Add the onions. Pour the stock into the skillet and place the skillet in the preheated oven. After 30 minutes, open the oven and crush the lemons with a spoon to release their juices. Baste the chicken with the liquids in the pan every 15 minutes. Roast the chicken until the skin is golden-brown and crisp and the internal temperature reaches 165F/74C on an instant-read digital thermometer. Remove the skillet from the oven, loosely tent with foil, and let rest for at least 10 minutes before serving. Serve the chicken with the juices in the pan and the garlic. The chicken can be made a day in advance and reheated when ready to serve. Leftovers can be stored in an airtight container for up to 4 days in the refrigerator.
November 4, 2022
Citrusy Cranberry Chutney
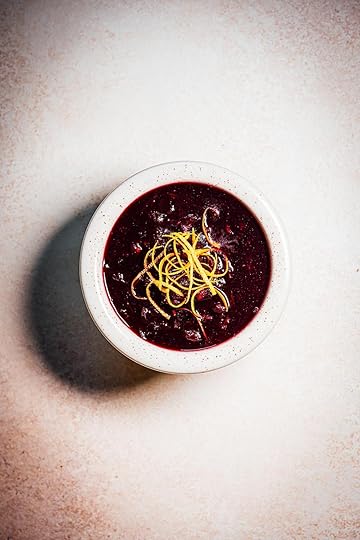
Citrusy Cranberry Chutney
Cranberry sauce - homemade or canned is another battle during Thanksgiving. and so is whether this is a chutney or is it a chunky sauce. I am not here to take sides around sides (pun alert!) instead if you make this fruity chutney, I want you to enjoy it, and save some for later to add in a sandwich with leftover turkey and stuffing.
Tip: Make the chutney 2 to 3 days ahead of time. It will taste much nicer and lose its bitterness, in fact, I insist.
The Cook’s Notes
By its very nature, cranberries are bitter and extremely tart. The bitterness comes from a class of bitter-tasting substances called flavonoids while their sour taste comes from citric acid. Their taste improves with the addition of a sweetener that masks the bitter-tasting substances.
Don’t try to swap in cranberry juice for the pomegranate, it makes things very bitter, and you will end up having to add a lot of sugar to mask the bitter taste.
I don’t add the orange zest during cooking but at the end after cooking. This reduces the risk of losing the essential oils during simmering and the final chutney is very fragrant.
The chutney will thicken due to the pectin from the cranberries, stir carefully to avoid burning. If you find it too thick, stir in 1 to 2 Tbsp of water.
If you want to make it look pretty, garnish with a little bit more orange zest (like I did in the photo) before serving. Oh and get this citrus zester, I love it, it makes my food photos and dinner tables look very fancy that I think might Martha Stewart proud (I'm very clumsy)!
Makes about 2 ½ cups/600ml
12 oz/340 g fresh or frozen cranberries (no need to thaw))
2 cup/480 ml unsweetened pomegranate juice
¾ cup/150 g packed light or dark brown sugar
1 tsp ground coriander
1 tsp red pepper flakes such as Aleppo, Maras, or Urfa
¼ cup/60 ml fresh orange juice
Zest of 1 large orange
Fine sea salt
Bring the cranberries, pomegranate juice, brown sugar, coriander, and red pepper flakes to a boil in a medium saucepan over medium-high heat to a boil. Reduce the heat to a simmer and cook uncovered until the cranberries burst open, the mixture begins to thicken, 25 to 30 minutes. Stir occasionally with a silicone spatula to prevent burning. Remove from the heat, transfer to a heat-proof air-tight container and stir in the orange juice and zest. Taste and adjust sweetness or salt if needed. Cover with a lid and let sit in the refrigerator for at least 1 day preferably 2 days. Serve warm or at room temperature.
November 3, 2022
Golden Garlic Roast Turkey with Golden Turkey Gravy

Golden Garlic Roast Turkey
Tip: You don't need a special roasting pan, I rigged a sturdy high-sided baking pan with 4 ramekin bowls to support the weight of the turkey while it sat on the wire rack and it worked lovely. (My regular roasting pan is wrapped up in a box sitting in the garage as we're currently undergoing a home renovation). To learn how wet brining works read all about it in The Science of Wet Brining Poultry.
This is my easy version of a roast turkey that's highly unfussy. The turkey is brined in a mixture of kefir that contains lots of garlic and turmeric, which gives it a wonderful fragrance and color. The brined turkey is then brushed with olive oil, coriander, and pepper before being roasted slowly at a very low temperature in the oven. The result is a juicy, tender, and flavorful bird.

Place foil "socks" over your turkey's leg and wing tips to prevent them from burning out during roasting.
The Cook's Notes
I've used a turkey that's large enough to feed 8 people. However, for smaller families and groups of people, you'll have enough leftover turkey for a second meal during the week.
I like to spatchcock/butterfly the turkey after brining rather than before. I find it makes the bird easier to handle and also fits in the brining bag. If prefer to spatchcock first and then brine, you can. If you'd rather roast the bird whole and not spatchcock that will work too, just adjust your cooking time accordingly.
You can use either kefir or buttermilk to prepare the brine. My favorite brands for kefir are Lifeway and Green Valley Creamery, their consistency is not excessively thick unlike some of the other brands.
I've roasted turkeys that were brined for 24, 36, and 48 hours brining times. The turkey brined for 48 hours produced the best results in terms of juiciness and texture.
I cover the wingtips and the exposed bone of each leg with a small piece of foil (like a pair of socks). There's little to no meat at these ends and they easily burn. Covering them in foil reduces the risk of burning, it's similar to the trick that pie makers do when baking pie crusts (they cover the edge of the pie crust with foil to avoid them from burning).
The water in the pan helps provide humidity in the oven just like a steam oven.
The low cooking temperature and water in the pan eliminate the need to baste the turkey as it cooks.
Makes 6 to 8 servings
3 qt/2.8 L plain unsweetened kefir or buttermilk
¼ cup + 2 Tbsp fine sea salt
12 garlic cloves (about 1 whole head of garlic)
4 Tbsp ground turmeric
One 9 to 10 lb/4 to 4.5 kg turkey
¼ cup/60 ml extra-virgin olive oil
2 Tbsp ground coriander
½ Tbsp ground black pepper
2 cups/480 ml water
Pat the turkey dry with clean paper towels, remove the gizzard and giblets (I’m going to refer to these as turkey parts), reserve in a ziptop bag, and freeze them to make the gravy (recipe follows).
Place 1 qt/960 ml of the kefir in a blender along with the salt, garlic cloves, and turmeric. Pulse on high speed for a few seconds until the garlic is completely obliterated, the mixture is smooth, and the salt is dissolved. Pour the liquid into a large brining bag (aka turkey-size oven bag), pour in the remaining kefir, and stir to combine. Place the turkey in the bag, squeeze out as much air as possible, and tie the bag up (a food vacuum sealing device and a large vacuum bag are great for this). Gently shake the bag to coat the turkey in the brine and leave it on a large plate or tray in the refrigerator to brine for at least 24 hours, preferably 48 hours. Shake the contents of the bag and flip it over every 6 to 8 hours. Some of the turmeric will settle as the brine sits, this helps redistribute the brine and the turmeric.
When ready to roast the turkey, preheat the oven to 200F/95C.
Use a roasting pan with a wire rack or a rectangular 13 in by 18 in by 2 in/33 cm by 46 cm by 5cm baking pan. If using the rectangular baking pan, place 4 small ramekin bowls near the four corners of the pan. Place a wire rack on top of the ramekin bowls.
Drain and discard the brine in the bag. Place the turkey in a large bowl and drain and brush off as much liquid as you can get off the turkey, there’s no need to overdo this. Place the turkey breast-side down on a cutting board and using a pair of kitchen shears cut the turkey across the length of the backbone and continue until the turkey is cut all the way from the tail end to the neck. Flip the bird over the cutting board to splay out the legs. Take both your hands and place them on top of the breastbone and press down till you hear the bones crack and the bird lays out flat. Oddly enough it feels like performing CPR. Place the flattened bird cut-side down on the wire rack. Cut out the backbone and add it to the ziptop bag with the turkey parts.
In a small mixing bowl, mix the olive oil, coriander, and black pepper. Brush the mixture all over the bird either with your hands or a brush (a silicone brush is much more efficient).
Cover the tips of the wings and the exposed bones at the end of the legs with a layer of foil. This reduces the risk of charring.
Pour the water into the pan and place the pan in the preheated oven. Cook until the skin turns golden brown and crisp, the internal temperature of the breasts reaches 150/65C and the thighs reach 165F/74C, for 4 to 4 ½ hours. Rotate the pan halfway through every hour to ensure even browning.
Once the bird is roasted, remove the pan from the oven, tent, cover with foil, and let rest for 10 minutes before cutting and serving. Transfer the turkey to a cutting board. Cut the turkey and serve with gravy (recipe follows) and my extra citrusy cranberry sauce.
NOTE FOR PAN DRIPPINGS: To collect the drippings in the pan for gravy, pour 1 cup/240 ml of boiling water on the pan and scrape the pan with a wooden spoon or silicone spatula to extract as much of the solids as possible. Transfer the liquid with any solids to a bowl or measuring cup.
View this post on InstagramA post shared by Nik Sharma (@abrowntable)
Golden Turkey Gravy
This recipe is originally based on the method by Kenji López-Alt's recipe at Serious Eats. I've been using it for a long time to make chicken and turkey gravies.
The Cook’s Notes
This is a question that comes up often, are the pan drippings too salty to make a gravy. The short answer is no. Almost all the brine is discarded and rubbed off before the turkey goes into the oven.
See the roast turkey recipe (recipe above) to collect the pan drippings. You can also deglaze the pan with a dry white wine such as Chardonnay, Pinot Gris, or Sauvignon Blanc. It’s best to do that while the pan is still very hot. You can warm the wine up in a saucepan to deglaze the pan if the pan cools off quickly. The heat helps extract as much fat as well as any solids stuck to the pan.
I really love the taste of Better Than Bouillon’s Reduced Sodium Roasted Chicken Base here; it’s much more flavorful and circumvents the need to add any other ingredients to build the savoriness of the stock.
Makes approximately 4 ½ cups/1 L
2 Tbsp extra-virgin olive oil
1 large/about 300 g white or yellow onion, diced
2 large/150 g carrots, diced
2 medium/about 100 g celery sticks, diced
4 large sprigs of thyme
½ tsp ground turmeric
½ tsp ground black pepper
Turkey gizzard and other parts
1 cup/240 ml pan drippings (see the recipe above)
6 cups/1.4 L low-sodium chicken stock or [6 cups/1.4 L water + 2 Tbsp Better Than Bouillon’s Reduced Sodium Roasted Chicken Base] (See The Cook’s Notes)
2 Tbsp unsalted butter
¼ cup/35g all-purpose flour
Fine sea salt
Heat the olive oil in a large saucepan over medium-high heat. Add the onions and sauté until translucent, 4 to 5 minutes. Add the carrots and celery and sauté until tender, 5 to 6 minutes. Add the thyme, turmeric, and pepper, and sauté until fragrant, 30 to 45 seconds. Add the gizzard and turkey parts, stir in the pan drippings and stock, bring to a boil over high heat, reduce heat to low, and simmer until the liquid reduces to 5 cups/1.2 L, 30 to 40 minutes. Remove from the heat and carefully strain the broth through a fine-mesh sieve (for a clearer-looking gravy, strain through a sieve lined with cheesecloth) held over a large heatproof bowl or jug. Don’t press the solids left behind in the sieve, instead shake the sieve to drain and collect as much liquid as possible and discard the solids. Skim and discard the fat that accumulates at the surface.
Wash and wipe the saucepan down. Heat the saucepan over medium heat and add the butter; cook until the butter melts completely. Stir in the flour and cook until the flour turns a light golden brown, 1 ½ to 2 minutes. Pour in 1 cup/240 ml of the strained broth and whisk until smooth. Whisk in the second cup of broth and whisk until smooth and free from lumps. Whisk in the remaining broth and cook the liquid over medium-high heat until thickened; the final volume of the gravy will be approximately 4 ½ cups/1 L. Taste and season with salt if needed. Serve warm.
October 31, 2022
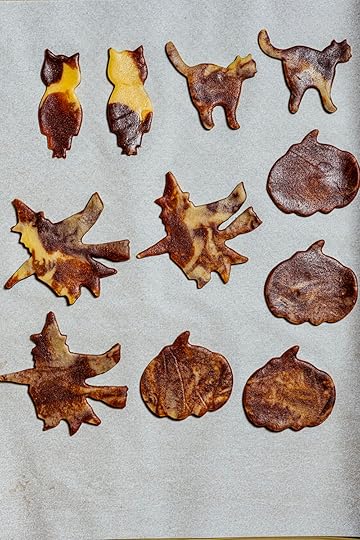
Halloween Marble Cutout Cookies


Halloween Marble Cut-Out Cookies
The child in the adult me still loves cut-out cookies for any holiday, and at Halloween, cut-out cookies are a must in this home. What I love about these cookies is that the marbling pattern removes the need for any frosting, but if you feel you must, a drizzle of chocolate is all that’s needed.

The Cook’s Notes
There are many ways to create a marbled appearance. This method of splitting the dough into pieces and then bringing them together is the easiest.
Try to get as many cookies as possible out of the dough in the first two rounds. The more the leftover cookie dough scraps are brought together, the greater the loss in marbling. I found that the distinct marbling pattern is lost after the first two rounds. See the photos of the two baking sheets to see how the marbling changes after each round.
The recipe yields approximately 30 cookies; however, that number will vary depending on the size of your cookie cutters.

Makes approximately 30 cookies
4 oz/110 g unsalted butter, at room temperature
¾ cup/150 g sugar
1 tsp vanilla extract
1 ¾ cups/280 g all-purpose flour
1 large egg
2 Tbsp milk
2 Tbsp unsweetened cocoa powder (70% cacao)
Preheat the oven to 350F/180C. Line two baking sheets with parchment paper.
Add the butter, sugar, and vanilla to the bowl of a stand mixer. Using the paddle attachment, beat over medium speed until light and fluffy, 2 to 3 minutes. Scrape the bottom of the bowl using a bowl scraper. Add the egg and beat until pale yellow and fluffy, 1 to 1 ½ minutes. Scrape the bottom of the bowl using a bowl scraper. Add the flour and whisk over low speed until there are no visible dry flecks of flour, 1 to 2 minutes. Add 1 Tbsp of milk and mix over low speed until the mixture resembles a dough. The dough will be pale yellow in color.
Divide the dough in half by weight. Remove one-half of the dough and keep aside. Add the cocoa powder and one tablespoon of milk and mix over low speed until the dough turns completely chocolate brown, 1 to 2 minutes.
Take a sheet of parchment paper and lay it on a cool surface like a stone kitchen counter. Break small pieces of the cocoa-flavored dough and place them randomly over the parchment paper, leaving 1 in to 2 in/2.5 cm to 5 cm gaps in between. Take the pale yellow vanilla-flavored dough, break it into small pieces, and place them in the gaps between the pieces of cocoa dough. Lift the parchment paper from the longer side and roll the pieces of dough to form a log. Squeeze the paper tightly when shaping the log; this will get rid of any gaps and bring the pieces of dough together. Place the second sheet of parchment paper over the dough and roll the dough out into a rough 1/8 in/4 mm thick sheet. The dough will take on a marbled appearance with yellow and chocolate brown streaks. Transfer the dough to the freezer for 10 minutes if it gets too soft to handle.
Using cookie cutters, press and cut out the dough into desired shapes and carefully place them on the lined baking sheets, about ½ in/12 mm apart. If the dough turns too soft, freeze them for 10 minutes. Bake the cookies in the preheated oven for 20 to 25 minutes, until they turn golden brown on the edges, rotating the baking sheets halfway through during cooking. Transfer the baked cookies to a wire rack to cool completely before storing them.
Press the leftover cookie dough scraps together, roll it out again into 1/8 in/4 mm thick sheet, repeat with the cookie cutters, and bake.
These cookies will stay good for up to 1 week if stored in an airtight container.
October 28, 2022
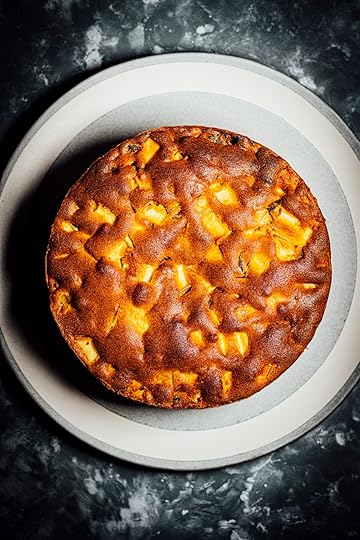
Apple Date Cake

The other day I came across a meme that said “If you want to keep a clean kitchen, don’t cook.” It made me chuckle because I try really hard to avoid spilling things when I work but it doesn’t always work out. Every time I use cocoa or flour, I make a mess (or maybe they make a mess). It’s not for a lack of trying but either some of the powdery mix falls off onto the kitchen counter rather than into the very wide bowl of a stand mixer (It is similar to basketball where the hole is wide enough to shoot the ball in but I still miss) or more commonly, I bump into something and spill some flour. Cocoa is the worst! When I worked at the patisserie in Sunnyvale, we dreaded cocoa more than we did flour because it was lighter and “flew with ease”. At some point, our aprons, chef hats, and shoes would get covered with cocoa and if you were in charge of refiling the huge cocoa container, you’d expect some of it to grab onto your apron. At home, I’m a bit more paranoid about cocoa because of my pets. Wait, I almost forgot about confectioners’ sugar, that’s another one that falls into the messy dust creators of the kitchen. If you’ve eaten a beignet at Morning Call or Café du Monde in NOLA, you know what I mean. You need to roll out a paper napkin or two, carefully hold your breath while you try to eat the beignet and avoid any areas with heavy wind traffic, and never wear black clothes (as one of my dearest friends Meghana who grew up in NOLA trained me in the art of eating a beignet). I am a clumsy person by nature and despite my best efforts, there’s still a mess when I cook but it’s not worth giving up cooking. The mess in essence like the splatters on cookbooks makes it special.
🍎🍏🍎🍏 Since this is an Applegram, I’ve got a few interesting things to share with you
Apples belong to the rose family of plants
Apple seeds or pips naturally contain a form of cyanide, so do not eat the seeds.
Apples turn brown because when they get pressed or bruised, the fruit’s cells break and release an enzyme called polyphenol oxidase that causes the fruit to turn brown. When cooking apples, add a cooking acid like lemon or lime juice to prevent browning. Another option is to cook the apples quickly, the heat destroys the browning enzyme. A third option is to completely seal off access to air; vacuum storage, a layer of oil, or storing in water and even carbonated water will help.
Apples ripen quickly and release ethylene gas, a natural hormone that hastens ripening in fruits and vegetables. Store apples away from fruit and vegetables.
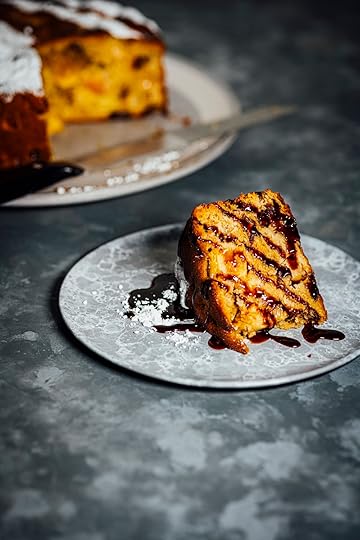
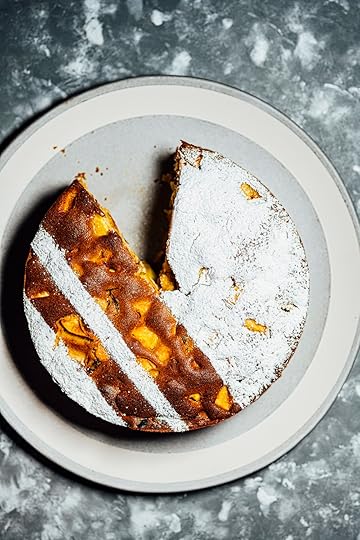
Apple and Date Cake
This week’s apple and date cake is more fruit than it is cake. I considered giving you a recipe for caramel but date syrup complements this cake much better, plus date syrup also carries a nice mild bittersweet caramel note, and it saves you an extra step in the kitchen. This is a cake you must eat soon due to its high fresh fruit content. Apples are rich in water and will release their liquid over time making the cake wet, so eat it soon. Another consequence of a lot of fruit, the cake takes on a nice tall height. Who doesn’t love a nice thick/thicc slice?
The Cook’s Notes
You can use either an 8 in/20cm or a 9 in/23cm circular springform cake pan to bake this cake. The height and diameter will change and so will your cooking time.
Wash your apples with lukewarm water and scrub them gently with a brush, apples and some other fruits like citrus are dipped in a natural wax to protect them for storage (the thin coat of natural wax protects the fruit from moisture loss and ensures crispness). Not all organic apples are sold unwaxed, this is something you need to check and ask the seller when you purchase. I leave the choice of peeled or unpeeled apples in the cake up to you, I like the skin.
Because apples and lemon juice are acidic, I prefer to toss them in the flour mix (the flour mix prevents the fruits from sinking) just before they go into the batter. The acids might reduce the effectiveness of the leaveners and the fruit might sink if for some reason you had to stop or slow down during preparation.
Apples tend to release a lot of liquid and there are a lot of apples in this cake, so eat this cake within 2 to 3 days. You can also toast slices of leftover cake in a little melted butter over the stove to drive out some of the moisture.
I prefer using dried dates that are slightly firm in this cake, the ones that are too mushy can’t hold their own against the other textures of this cake.
Why add the cinnamon with the vanilla to the creamed butter and oil? Cinnamon gets its aroma from fat-soluble essential oils so instead of adding it to the flour mix, I incorporate it into the butter mix, so the cake holds on to those flavor molecules much better.
I know it is a pain when I ask you to scrape the bowl of the stand mixer after each addition, but it is crucial for even mixing. When making cake batters in a stand mixer, ALWAYS scrape down the sides and the bottom of the bowl. It helps bring any unincorporated bits that might stick to the sides and anything sunk to the bottom back up into the batter. I highly recommend investing in a silicone bowl scraper or spatula.
Makes one 8 in/20cm round cake (you can also make a 9 in/23cm)
2 lb/910 g baking apples such as Granny Smith, Golden Crisp, etc. peeled or unpeeled, cored, and cut into ½ inch/12 mm cubes
2 tsp fresh lemon juice
½ cup/110g unsalted butter, cubed and at room temperature plus a little extra to grease the baking dish
2 cups/280g all-purpose flour
2 tsp baking powder
¼ tsp baking soda
¼ tsp fine sea salt
¼ cup/60ml extra-virgin olive oil
1 cup packed/200g light brown sugar
4 large eggs, at room temperature
1 ½ tsp ground cinnamon
1 tsp vanilla extract
10 to 12/125 g pitted dried dates such as Medjool, chopped
2 Tbsp confectioners' sugar for dusting (optional)
Date syrup to serve (optional)
Preheat the oven to 350F/180C.
In a large mixing bowl, toss the apples with 1 tsp of lemon juice to prevent them from browning. If you start to notice them browning, add the extra 1 tsp.
Line and grease an 8 in/20cm circular springform cake pan (See The Cook’s Notes) with parchment paper and a little butter.
In a medium mixing bowl, dry whisk the flour, baking powder, baking soda, and salt. Reserve ½ cup of the mixture in a small bowl.
In the bowl of a stand mixer over medium speed, cream the butter, olive oil, and sugar using the paddle attachment until creamy and a light pale brown, 3 to 4 minutes. Stop and scrape the sides and bottom of the bowl down. Beat in one egg at a time over medium-low speed until combined, 30 seconds for each egg. Scrape the sides and bottom of the bowl down after each addition. Add the cinnamon and vanilla and beat over low speed until combined. Scrape the sides and bottom of the bowl down.
Add the dates to the apples and toss with the reserved ½ cup flour mix. Coat well to prevent the fruit from sinking to the bottom of the cake.
Add the remaining dry flour mixture in one shot to the batter in the mixing bowl and combine over low speed (so it doesn’t fly in your face and onto your kitchen counter), 1 to 2 minutes. Scrape down the sides and bottom of the bowl to ensure there are no visible flecks of flour. Fold in the apples and dates using a silicone spatula, using a circular motion, starting from the inside and moving towards the outside of the bowl. Transfer the cake batter to the prepared cake pan and press gently down to get rid of any large, trapped air bubbles (there is a lot of fruit in the cake that can trap air). Level the top with an offset spatula. Bake the cake in the preheated oven for 60 to 75 minutes, rotating the cake after the first 45 minutes of baking; the top should be golden brown, firm to the touch, and springs back when gently pressed. A knife or skewer should come out clean when inserted through the center, and the internal temperature of the cake should register 200F/95C when done. Remove the baked cake from the oven and cool for 5 minutes in the pan. To release the cake, run a knife along the edges of the pan, release the mechanism of the springform pan, and transfer the cake to a wire rack to cool completely.
To serve, dust the cake with confectioners' sugar and serve slices of the cake with a generous drizzle of date syrup. This cake can be eaten warm, but I prefer it at room temperature. The cake will stay good for up to 2 to 3 days at room temperature in an airtight container depending on the humidity of your room.
October 27, 2022
Lentil and Potato Croquettes with Yogurt Tartar Sauce

Lentil and Potato Croquettes with Yogurt Tartar Sauce
This is a vegetarian version of my grandmother’s ground beef croquettes. I’ve used a combination of mashed potatoes and lentils to build the body of the croquette and then made it extra crispy by tossing it twice in a breading mixture of panko breadcrumbs, chia seeds, and sesame seeds. I prefer tangier dips to go along with crispy and fried foods, and the tanginess of this yogurt-based tartar sauce is a fantastic partner to the croquettes!
When developing recipes, I try to look for ways to save time, shortcuts make all our lives easy, and I'm all for them. I know boiling and mashing the potatoes the night before could save a good 30 minutes in the kitchen but when I tested the recipe, I noticed that mashed potatoes when cooled showed very poor binding capacity - the croquettes wouldn't hold together nicely. When I used warm mashed potatoes (freshly boiled) or reheated cold mashed potatoes (by steaming them over a boiling water bath), the croquettes were again easy to shape. Clearly heat had something to do here.
Why was the temperature so influential in shaping these potato-based croquettes? I got a clue from pommes aligot, a dish where warm boiled potatoes are mixed quickly with cheese and dairy to form a viscous mass that is easily stretched with a spoon. The shaping of the croquettes benefits from the same principle. As potatoes cook in the boiling water, the temperature rises, and the hydration of the starch increases (aka starch gelatinization) and the starch molecules are way better at binding and holding the croquettes together.
Be gentle when shaping the croquettes, watch my Reel to get a sense of how much pressure to apply. If you press too hard, the croquette will fall apart easily.
View this post on InstagramA post shared by Nik Sharma (@abrowntable)
Enjoy the crispiliciousness of the croquettes and if you're like me, it is okay to turn the "Do Not Disturb Me While I Eat" sign on.

Lentil and Potato Croquettes with Yogurt Tartar Sauce
The Cook’s Notes
Russet potatoes are a safe bet for many potato recipes. If you can’t find them look for high starch/aka starchy/floury potatoes to make the croquettes. The higher percentage of starch and low moisture content in them makes these potatoes denser, and when they cook you won’t end up with empty hollow spaces that would otherwise show up with the waxy type of potatoes (they have less starch, are less dense, and contain more water, as a result when they cook, the water evaporates leaving large “heartbreaking” gaps).
Salted Water – Every cook uses a different ratio of salt to water when boiling vegetables (and pasta). I add 1 Tbsp of fine sea salt to every 4 ½ cups/1 L of water. To make the water boil faster, put a lid on top, it will help you reach the boiling point quickly.
If you decide to use pre-cooked lentils to save time, you will need about 3 ½oz/100g
You can use labneh instead of Greek yogurt but keep an eye out for saltiness. You might also need to cut back on the amount of lemon juice (start with 1 tsp).
If the dip is too sour due to the age of the yogurt (older yogurt will taste sourer), add less lemon juice or add a little sugar to offset the sourness
Remember to rinse the preserved lemon peels with running tap water before you use them to get rid of the excess salt from the brine.
Makes 16 croquettes/4 servings
For the Croquettes
1 ¼ lb/570g Russet potatoes
Fine sea salt
¼ cup/50g black (Beluga) or green (Le Puy lentils) lentils
1 fresh green chilli such as Bird’s eye, jalapeno or serrano (optional)
2 Tbsp chopped cilantro, leaves and tender stems
1 garlic clove, grated
1 tsp garam masala
1 tsp red pepper flakes such as Aleppo, Maras, or Urfa
1 ½ cups/90g panko breadcrumbs
¼ cup/45g chia seeds
2 Tbsp sesame seeds
1 tsp ground black pepper
2 large eggs
Enough extra grapeseed or extra-virgin olive oil for shallow frying (I used less than ½ cup/120ml)
Place the potatoes in a large saucepan filled with enough salted water to cover them by at least 1 inch/2.5cm. Place a lid over the saucepan and bring the water to a boil over high heat, reduce to a simmer and let cook until the potatoes are completely tender but not mushy, 20 to 30 minutes. Remove the potatoes with a slotted spoon and let sit until cool enough to handle. Avoid cooling them all the way to room temperature, they should be warm. Peel the potatoes and discard the skin. Mash the warm potatoes in a large mixing bowl with a fork or masher to remove any lumps.
While the potatoes cook, prepare the lentils. Add the lentils to a medium saucepan filled with enough salted water to cover them by at least 1 inch/2.5cm. Place a lid over the saucepan and bring the water to a boil over high heat, reduce to a simmer and let cook until the lentils are completely tender but not mushy, 30 to 60 minutes. Lentil cooking time will vary depending on the age of the lentils. Drain the lentils through a fine-mesh sieve, rinse under running tap water, and add the lentils to the potatoes.
Add the green chilli, cilantro, garlic, garam masala, and red pepper flakes. Season with salt and fold to combine. Divide the mixture by weight into 16 equal parts/about 3 Tbsp of the mixture and shape it into a 3 inch/7.5cm wide cigar-shaped log. Place the logs on a plate or cutting board.
In a separate large bowl, dry whisk the panko, chia seeds, sesame seeds, black pepper, and ½ tsp salt.
In a medium bowl, lightly whisk the eggs.
Work with one log at a time. Toss one log gently in the dry mixture to coat well. Dip the log into whisked eggs and roll carefully with a fork to coat well, tapping gently on the sides to get rid of any excess egg. Transfer the log back to the dry mix and toss to coat well. Gently shake to remove any excess of the panko mixture and place on a tray or plate. Prepare all the remaining logs in the same manner.
Preheat the oven to 200F/95C.
Line a baking sheet or plate with a wire rack.
Heat 2 Tbsp of the oil in a 12 inch/ cm cast-iron skillet over medium-low heat. Fry 4 to 6 breaded logs at a time until they turn golden brown and crisp, turning them over with a fork or spatula, for a total of 6 to 8 minutes. If at any moment, the oil gets too hot, lower the heat. Transfer the cooked logs (aka croquettes) to the baking sheet and keep warm in the oven. Cook the remaining logs in the same manner. Serve hot or warm with the sauce (recipe follows)
For the Yogurt Tartar Sauce
1 cup/240g plain unsweetened Greek Yogurt or labneh (See The Cook’s Notes)
4 cornichons, drained and minced
1 Tbsp chopped preserved lemon peel (See The Cook’s Notes)
1 tsp drained capers
2 Tbsp chopped chives
2 Tbsp chopped dill
2 Tbsp chopped flat-leaf parsley
1 Tbsp lemon juice
½ tsp ground black pepper
Fine sea salt
Mix the yogurt, cornichons, preserved lemon, capers, garlic, chives, dill, parsley, lemon juice, and black pepper together in a small bowl. Taste and season with salt. You can make this a day ahead of time, just store it in an airtight container in the refrigerator until ready to serve.
October 26, 2022
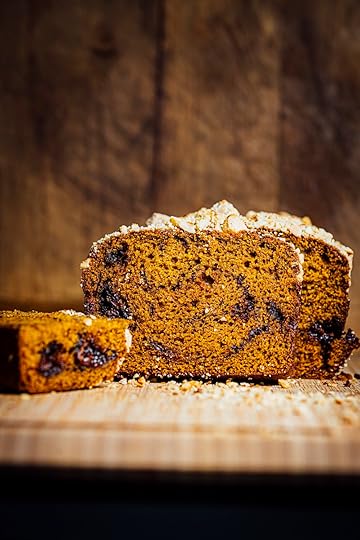
Pumpkin Nutella Swirl Cake

Pumpkin Nutella Swirl Bread
This pumpkin cake is an ode to one of my favorite childhood treats, Nutella. That rich, creamy paste of chocolate and hazelnuts spread on toast was a snack that I looked forward to at tea.
Every slice of this cake reveals a gorgeous marbled pattern created by alternating swirls of bright orange pumpkin and dark brown chocolate-hazelnut mixture if you make your gianduja feel free to use that here.

The Cook’s Notes
Don’t overdo the zigzagging, or the marbling pattern won’t be as prominent in the cake.
Because this cake contains Nutella, it can be tricky to determine when it is baked properly, as the skewer can come out sticky if it passes through the Nutella. Measuring the cake's temperature is a better indicator of doneness.
You don’t need to use Nutella; you can use your own homemade version or gianduja.
Pumpkin Nutella Swirl Cake
Makes one 9 in/ 23 cm loaf
⅓ cup/80 ml extra-virgin olive oil plus extra for greasing the pan
1 ½ cups/210 g all-purpose flour
1 tsp baking powder
½ tsp baking soda
½ tsp ground cinnamon (optional)
7.5 oz/212 g pumpkin purée
1 ½ cups/250 g packed brown sugar
2 large eggs
1 cup/240 ml Nutella
½ cup/60 g whole hazelnuts, coarsely ground
Preheat the oven to 350F/180C.
Line a 9 in/23 cm loaf pan with parchment paper and grease lightly with olive oil.
In a medium mixing bowl, dry whisk the flour, baking powder, baking soda, and cinnamon.
In a large mixing bowl, whisk the pumpkin, sugar, eggs, and ⅓ cup/80 ml of olive oil until smooth. Dump the flour mix in and whisk until combined and no flecks of dry flour are visible.
Divide the cake batter into three parts by volume. Now begin layering the cake batter and Nutella. Pour one portion into the bottom of the prepared pan. Using a teaspoon, drop half of the Nutella at random spots over the cake batter. Cover with another part of the cake batter, repeat with the Nutella and then top with the remaining third of the cake batter. Run a skewer through the cake batter, swirling the cake batter and Nutella in a zigzag manner three times. Don’t overdo the mixing. Sprinkle the ground hazelnuts all over the top. Bake the cake in the preheated oven for 1 hour and 15 minutes, rotating the pan halfway through baking. The nuts should be golden brown and toasted, the cake should spring back readily when gently pressed, and a skewer should come out clean when inserted through the center. If you use a thermometer, the internal temperature of the cake should read 212F. Remove the baked cake from the oven and leave in the pan to cool for 10 minutes. Remove the cake from the pan and transfer to a wire rack to cool completely before serving. The cake will stay good for up to 4 days if stored in an airtight container at room temperature.
October 25, 2022
Soft Roti
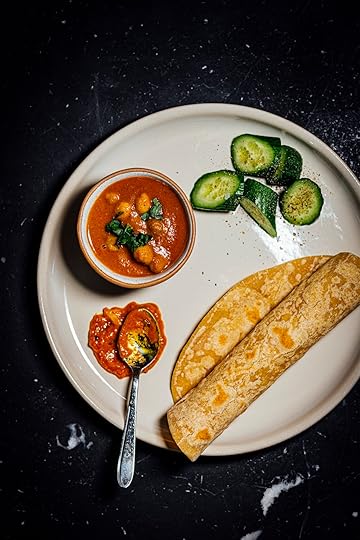
Soft Roti
For once, I couldn’t come up with a good name for this roti – egg and yogurt roti sounded terrible. Rotis are Indian flatbreads, they contain no leaveners, and are usually made from some type of flour, water, and salt. My mother often adds milk or yogurt to make the roti even softer. Yogurt along with eggs and yeast are used to make naan and it contributes to a soft, airy, and lighter texture. How do dairy and eggs make softer breads? The proteins, fats, and lipids from the dairy and yogurt coat the proteins in the flour and in turn make the texture of the flatbread tender and soft. Building on that idea, I’ve made an extremely soft roti that uses a combination of eggs and yogurt to achieve that texture. These are great for everyday eating, and I love using them to make kathi rolls.
The Cook’s Notes
You can use full-fat to 2% Greek yogurt. I don’t recommend using fat-free because the rotis don’t come out as nice. If you decide to use plain yogurt, the dough will be sticky and won’t contain enough protein
I prefer rolling out the rotis to 12 in/30.5 cm in diameter, but you can roll them out smaller if you prefer a thicker roti.


Makes 8 rotis
1 ½ cups/210 g all-purpose flour plus extra to roll out the dough
½ cup/70 g whole-wheat flour
½ cup/120 g plain unsweetened Greek yogurt
1 large egg
2 Tbsp vegetable oil
1 tsp fine sea salt
½ cup/120 ml water at 160F/71C
Dry whisk the 1 ½ cups/210 g of all-purpose flour and ½ cup/70 g of wheat flour together in the bowl of a stand mixer using the paddle attachment.
In a small mixing bowl whisk the yogurt, egg, oil, and salt until smooth. Pour the mixture into the flour and ¼ cup/60 ml of the water and mix over low speed until combined, 3 to 4 minutes. If the dough is too dry and has trouble coming together, add 1 to 2 Tbsp of water at a time. Once the dough comes together and there are no visible dry flecks of flour, knead over medium speed until soft and pliable, about 8 minutes. Remove from the stand mixer, cover the bowl with a lid or a damp cloth, and let rest for 30 minutes.
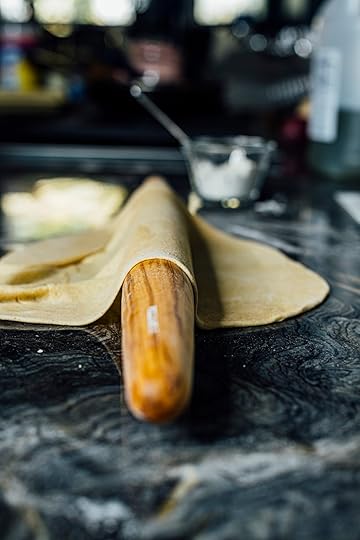
Once rested, divide the dough by weight into 8 equal parts. Shape each piece into a ball and keep the rest covered with a damp cloth. Work with one ball of dough at a time. Roll out each ball on a clean dry surface lightly dusted with flour into a 12 in/30.5 cm circle to about 0.1 in/0.25 cm thickness.
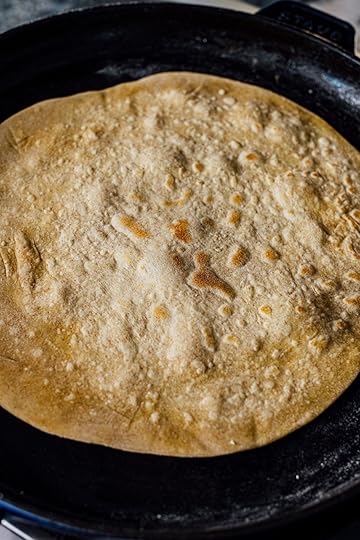
To cook the rotis, heat a large dry stainless-steel skillet over low heat. Take a clean lint-free kitchen towel, wet it in running tap water, and wring it tightly to get rid of any excess water. Place one rolled-out piece of dough on the hot skillet. Once the dough starts to turn firm and develop air bubbles, press it down gently with the damp cloth on the edges, this will help the roti cook more evenly and prevent it from drying out, about 1 ½ to 2 minutes. Flip the roti and repeat to cook on the other side. The roti should develop light golden-brown blisters on each side. Place the cooked roti wrapped between clean kitchen towels to keep them warm. Prepare the remaining rotis. Serve the rotis hot or warm. The cooked rotis can be stored in an airtight container in the refrigerator for up to 1 week.
October 20, 2022
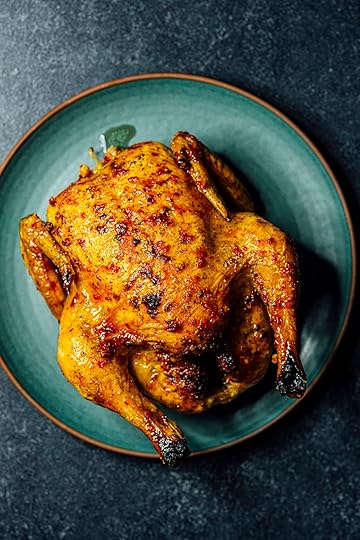
Sweet and Sticky Sambal Chicken
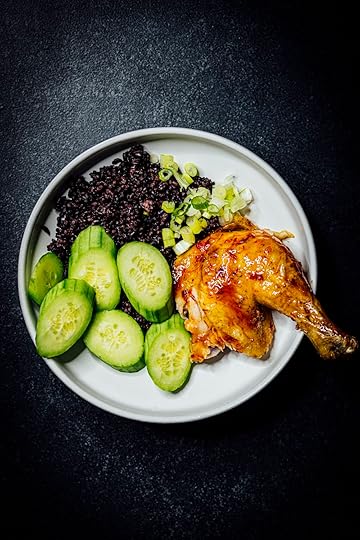
A roast chicken is rewarding, in that it can feed several at once. Leftovers can find alternate lives and bones can make stocks but today, I don’t really don’t want to focus on what might happen down the road but rather on what is on hand. What I do want to chat about is this glistening roast chicken slathered with several strokes of a chilli sauce made from the Indonesian fermented chilli paste, sambal oelek. Honey, vinegar, and soy sauce form the glue that holds it all together.
It’s true that under most circumstances, I would tell you to let the hot roasted chicken rest before you did anything else to it but this time, I stray away from my own rules. It is and I stress on this, imperative that you paint the hot bird with the chilli sauce as soon as it comes out of the oven. The hot skin takes to the sauce like a magnet to an iron nail. There will come a point when you might feel like you're painting the chicken like a wall and you're right, paint-dry-paint-dry till that final coat of perfection is achieved. The drippings in the pan are always a bonus!
Forbidden rice and a quick cucumber salad are the light fixtures and furniture of this painted room of a chicken. (Okay, I'll stop with the metaphors now.)
The Cook’s Tips
You don’t need to own a roasting pan, a rimmed baking sheet with a wire rack set on top will work just as well. Remember to keep the wire rack at an angle or perpendicular so that you have enough space to access the liquids in the pan. Of course, make sure your oven door shuts easily.
I don’t use a turkey baster; a ladle or large spoon will get the job done.
The pan should always have at least ½ cup/120ml of water or liquid at the bottom. This provides the necessary humidity in the oven and prevents the chicken from drying out.
Get a Thermapen or a thermometer with a long probe, they are game changers. They’re also fantastic for pastry and dessert work.
As soon as the chicken comes out of the oven, it’s immediately brushed with the sauce. This helps with the absorption and the heat from the chicken helps the sauce thicken.
Forbidden or black rice does not need to be washed or soaked or a large portion of the beautiful purplish-black color will be lost to the water. Rinse very briefly and cook.

Sweet and Sticky Sambal Chicken
Makes 4 to 6 servings
For the chicken
One 4 lb/1.8 kg whole roasting chicken
Fine sea salt
1 tsp ground black pepper
¼ tsp baking soda
1 Tbsp extra-virgin olive oil
2 cups/480 ml water
¼ cup/60 ml apple cider vinegar or black vinegar
¼ cup/60 ml runny honey
¼ cup/60 g sambal oelek
1 tsp low-sodium soy sauce
1 whole star anise
For the rice
2 ½ cups/600 ml water
1 cup/100 g of black/forbidden rice, rinsed and drained
fine sea salt
For the cucumber salad
1 large/about 300 g English cucumber, peeled and sliced
2 tsp fresh lime or lemon juice
Fine sea salt
4 scallions, both white and green parts thinly sliced
Preheat the oven to 400F/200C.
Pat the chicken dry with clean absorbent paper towels and place the chicken over a wire rack set over a rimmed baking sheet or roasting pan. If using a wire rack, place the wire rack perpendicular to the baking sheet to allow easy access to the liquids in the pan during basting.
In a small bowl mix together, 1 tsp salt, black pepper, and baking soda. Rub the mixture all over the skin of the chicken. Drizzle the oil over the chicken. Transfer the baking sheet with the chicken to the preheated oven. Fill the pan with water and let the chicken roast in the oven. After 20 minutes, rotate the tray and begin to baste the chicken with juices in the pan, every 10 minutes. The chicken will be done when the skin turns golden brown and crisp, and the internal temperature reaches 165F/74C, total cooking time 45 minutes to 1 hour. During roasting, if the water in the pan begins to dry out, add ½ cup/120ml more water. Remove from the oven.
While the chicken roasts, prepare the sauce. In a small saucepan bring the vinegar, honey, sambal oelek, soy sauce, and star anise to a rolling boil. Remove from the heat, cover, and let sit for at least 30 minutes, not more than 1 hour. Discard the star anise.
As soon as the chicken comes out of the oven, brush it with the sauce and let rest for 1 minute. Get into all the nooks and crannies when you brush it. Repeat and brush until there is no more sauce left behind in the saucepan.
While the chicken cooks, prepare the rice. Add the water, rice, and salt to a medium saucepan and bring to a boil over high heat. Reduce the heat to low and let simmer covered until all the water is absorbed by the grains and they turn tender, 25 to 30 minutes. Keep covered and warm.
Toss the cucumber in a medium mixing bowl with the lime juice. Taste and season with salt.
Serve the hot or warm chicken with the cooked rice and the cucumber salad. Garnish with the scallions.


