
Nik Sharma's Blog, page 6
September 13, 2022
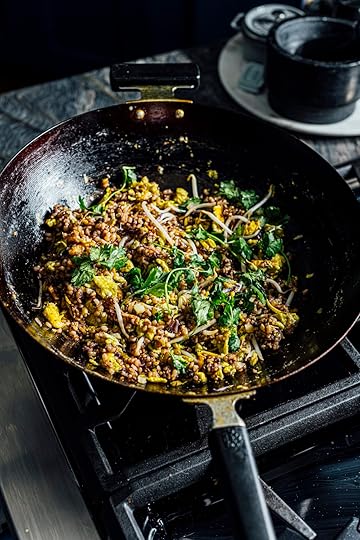
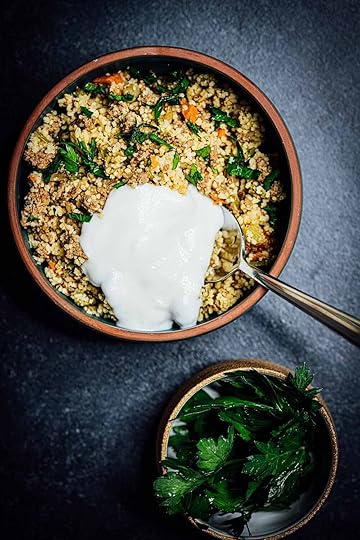
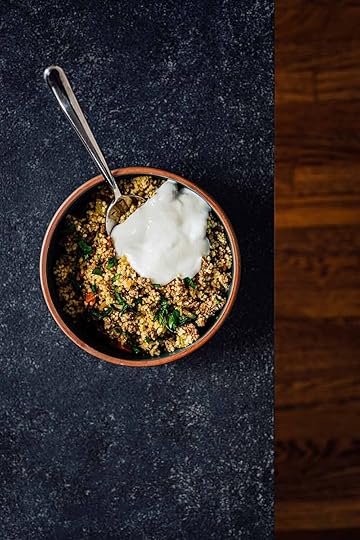
Fried Rice with Pickles
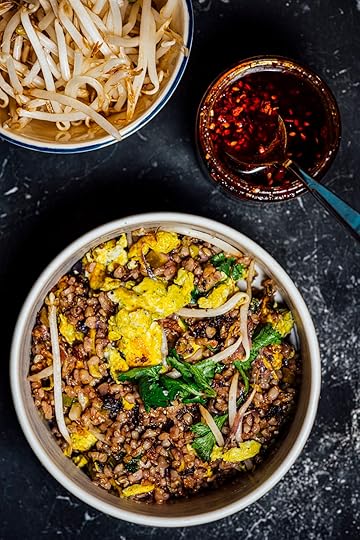
Officially we’re a few days away from the start of fall. I don’t think of a hard cutoff for seasonal food and cooking; I like to transition just like the weather slowly. Come in with a few small steps before taking the full deep dive. Give me a few days to cherish the last bit of summer produce before I move it to the side and fully immerse myself in pumpkins. I’ve got my mind on ice creams and outdoor grilling, but we’re not making any of those things today. Today, it’s all about fried rice. This fried rice is loaded with tiny bits of chopped pickles and a generous sprinkling of crispy fried onions. I think you will enjoy it as much as I do.
This recipe is very straightforward and doesn’t require too much effort. That’s what I love about fried rice, it’s adaptable, and you can take full advantage of it using ingredients in your kitchen.
The most important tip when making fried rice is to use day-old boiled rice. The starch in the rice needs to get a chance to change its molecular structure to produce that crispy delicious fried rice texture that we’ve all come to love. That change in structure happens on cooling. Even if you don’t have time and boil some rice just for this recipe, make sure you cool it completely. I sometimes take the rice and then spread it out in a flat metal dish set over an ice bath. The cool water helps the hot rice cool off faster, making it suitable for fried rice.
For the folks that don’t like cilantro, use minced chives.
Fried Rice with Pickles
Fried rice is one of those dishes that I love because it is so satisfying. This version of fried rice uses minced pickles to give it a tangy pop, and the rice is cooked in the wok until it turns golden brown and crispy for that extra crunch. Of course, I top my bowl of fried rice with a heaping spoonful of chilli crisp, but you’re welcome to use whatever rocks your bowl of fried rice (sorry for the bad pun).
The Cook’s Notes
You can use any rice here. Basmati or short grain, brown or white. What’s more important is to make sure it’s plain, boiled, and at least a day old.
To get the rice crisp during stir-frying, I give it “short breaks” during cooking. I spread it out over the wok's surface and let it sit for a minute or two before stirring it during stir-frying. This helps the rice develop its crust.
For a more robust pickle flavor, double the quantity of chopped pickles.
Salt the fried rice carefully; both soy and pickles carry salt.
Makes 4 servings
¼ cup/60 ml neutral oil with a high smoke point, such as grapeseed
4 garlic cloves, minced
2 Tbsp fresh ginger, peeled and cut into 1 in/2.5 cm matchsticks
4 scallions, both white and green parts, thinly sliced
1 tsp red pepper flakes
ground black pepper
1 cup/100 g shredded cabbage
4 cups/800 g day-old cooked plain rice
1 Tbsp low sodium soy sauce
4 large eggs, lightly whisked
¾ cup/85 g bean sprouts
¼ cup/18 g crispy fried onions
½ cup/90 g pickles, drained and minced
Fine sea salt
2 Tbsp cilantro leaves
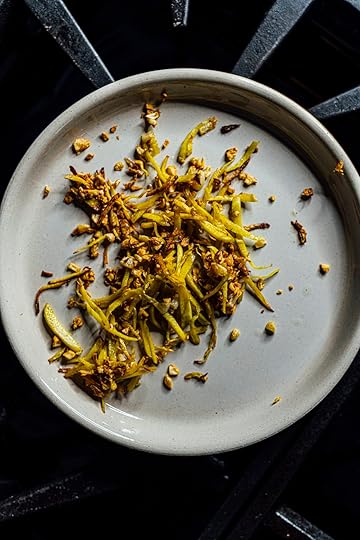
Heat 1 Tbsp oil over medium-high heat in a wok. Add the garlic and ginger, and stir-fry for 2 to 3 minutes, until the garlic and ginger turn golden brown and crisp. If the garlic begins to burn, reduce the heat or remove it from the heat. Remove with a slotted spoon and transfer to a plate.
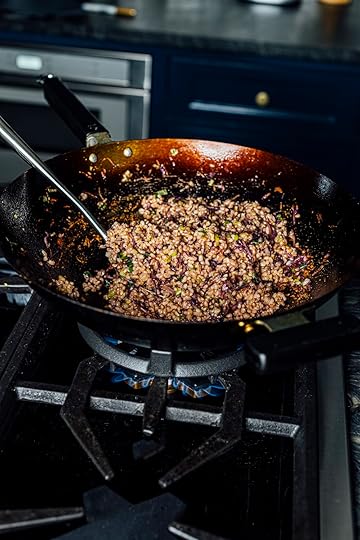
Heat 2 Tbsp of oil over medium-high heat in the wok. Add and stir-fry the scallions until they start to sear, for 2 to 3 minutes. Add the red pepper flakes, ½ tsp black pepper, cabbage, rice, and soy sauce, in this order. Stir fry until the rice turns brown and crisp, for 10 to 12 minutes. Remove and transfer to a bowl and keep warm. Wipe the wok clean.
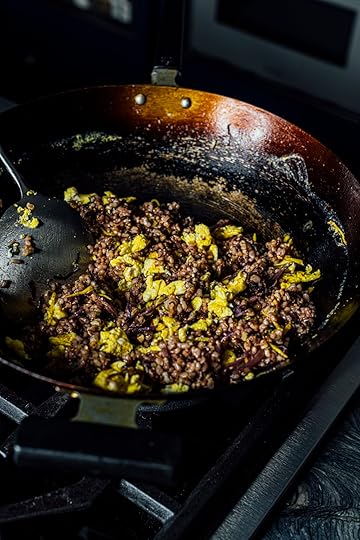
Heat the remaining 1 Tbsp of oil in the wok over medium-high heat. Add the eggs and cook until scrambled, 2 to 3 minutes. Fold in the crisped garlic, ginger, rice mixture, bean sprouts, crispy fried onions, and pickles. Taste and season with salt and pepper if needed. Remove from the heat, garnish with the cilantro and serve immediately. Leftovers will be good for up to 3 to 4 days if stored in an airtight container in the refrigerator.


September 6, 2022
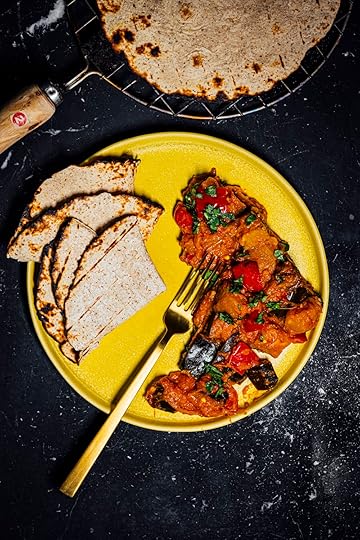
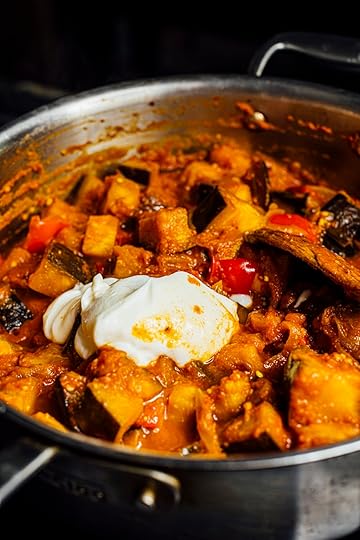
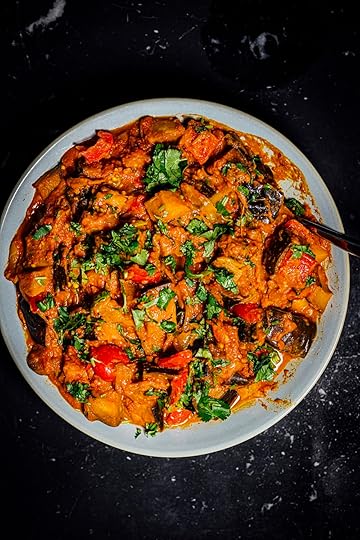
kadai eggplant
What’s a kadai? It’s an Indian cooking utensil that looks like a wok with two handles on the sides. Depending on whom you speak to, it also goes by karahi, kadhai, or cheenachatti. You’ve probably seen the fancier brass and copper ones used to serve food in Indian restaurants.
While this eggplant dish is made in a kadai, you certainly don’t need one. You can prepare this eggplant dish in a wok or a large saucepan. I’ve got my mom’s old kadai that I brought back several years ago on a trip to India. It’s one of those items I can vividly remember so many meals prepared in that it is very special to me. Funny enough, I was able to get it because my mom was ready to toss it out as it was too old. I love the patina that the kadai developed from years of use. Unlike me, my mother does not like to collect things.
Kadai eggplant is a quick and simple, satisfying vegetarian dish. The eggplant is cooked in a tomato-based gravy, and it takes on a wonderful ethereal aroma from coriander and cardamom and lightly caramelized onions. I serve it with warm rice or some flatbread like roti, paratha, or tortillas (yeah, if I don’t have any Indian flatbreads at home, I’ll opt for flour tortillas). Kadai eggplant can also be made with the baby or Japanese eggplant varieties, slice them across their length before using.
To start, sauté the onions till they begin to brown. Avoid browning them too much, or they will overpower the dish's flavor. I also add a tiny pinch of salt to help soften the onions as they cook and help them cook faster. Salt softens pectin, a structural carbohydrate that is present inside vegetables. Sauté the onions with the bell pepper, the color of the bell pepper doesn’t matter, but I find the color of red and green bell peppers stand out nicely in this dish.

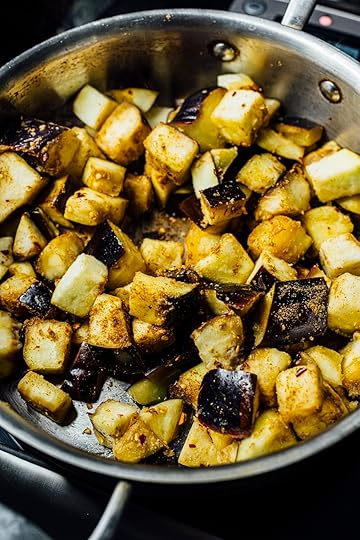
Once the vegetables are cooked, remove them, leaving the excess oil in the saucepan behind. This will be used to cook the eggplant. The eggplant also gets a tiny pinch of salt to help soften those tough structural carbohydrates and allow it to cook faster. Take a moment to appreciate the aroma of the spices added at this stage.
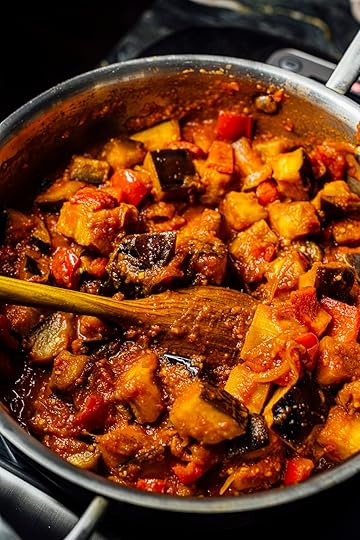
Typically, people use fresh tomatoes to make the sauce for this dish, but I love the taste of canned tomatoes here. Using canned tomatoes also shortens the cooking time needed for the tomatoes to fall apart.
Once the eggplant is tender, add the yogurt and lemon juice. I don’t add salt to the dish except for the tiny amounts used when cooking the onions and the eggplant because tomatoes are naturally rich in salt. The recipe also uses fresh lemon juice (plus the acid from the tomatoes), and sour ingredients reduce the need to add salt to taste in food.
Kadai Eggplant
The Cook’s Notes
I salt this dish minimally as I cook because tomatoes are naturally rich in salt. I add tiny pinches of salt to the onion and eggplant during cooking because it hastens their softening and reduces the cooking time.
If the eggplant is cut and not used quickly, it can brown naturally due to the polyphenol oxidase enzyme. This won’t affect taste or texture. Drizzle and toss the pieces with 2 Tbsp of fresh lemon juice if you want to avoid this.
Indian stores sell readymade jars of ginger-garlic paste. If you decide to use that, then use 4 Tbsp.
If you aren’t a fan of cilantro, use flat-leaf parsley, mint, chives, or scallions for the garnish.
Makes 4 to 6 servings
¼ cup/60 ml ghee or neutral oil like grapeseed
1 large onion/about 300 g, cut in half and thinly sliced
Fine sea salt
1 large bell pepper/about 200 g, cored and diced
1 large globe eggplant/about 680 g, diced into 1 in/2.5 cm cubes
2 Tbsp grated garlic
2 Tbsp grated ginger
1 Tbsp ground coriander
1 tsp crushed red pepper flakes
½ tsp ground turmeric
¼ tsp ground green cardamom
28 oz/795 g can crushed tomatoes
2 Tbsp plain unsweetened Greek yogurt
2 Tbsp fresh lemon juice
2 Tbsp chopped cilantro, tender stems and leaves
Heat the ghee or oil over medium-high heat in a large saucepan, kadai, or wok. Add the onion with a tiny pinch of salt, and sauté until it just starts to brown; the cooking time will vary. Add the bell pepper and sauté until it begins to brown, 3 to 4 minutes. Transfer the onions and bell pepper to a plate using a slotted spoon, leaving the oil behind in the saucepan.
Add the eggplant with a tiny pinch of salt to the saucepan, and sauté over medium-high until the eggplant skin starts to brown, 6 to 8 minutes. Add the garlic, ginger, coriander, red pepper flakes, turmeric, and cardamom, and fold to coat well. Fold in the tomatoes, the sautéed onion, and bell pepper mixture, and cook covered with a lid over low heat until the eggplant is completely tender, often stirring to prevent sticking. Fold the yogurt and lemon juice, taste, and season with salt. Remove from the heat, and garnish with the cilantro. This dish will stay good for up to 4 days if stored in an airtight container in the refrigerator. Serve hot or warm with rice or flatbread.
September 5, 2022
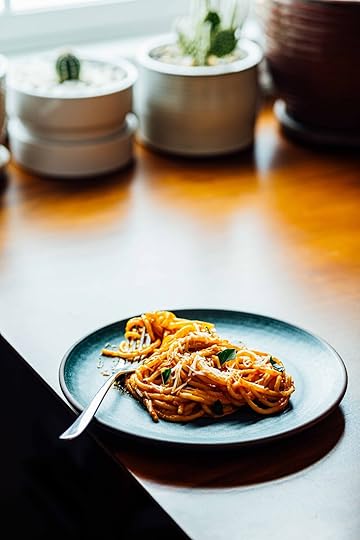
Preserved Lemon, Za'atar Pasta

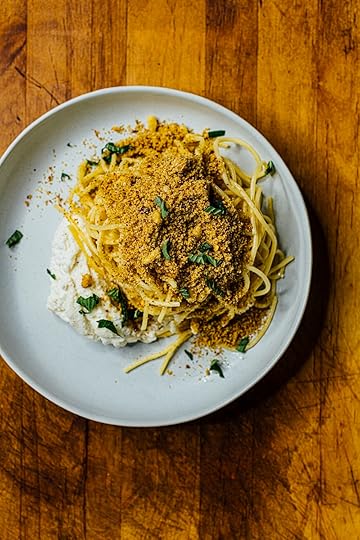
My pantry is like a treasure chest, a collection of ingredients waiting to be used. This Preserved Lemon Za’atar Pasta is one of the best ways to use up pantry ingredients, and it is inspired by the flavors of the Mediterranean and the Middle East. The pasta is fragrant with the aroma of tangy fresh and preserved lemons, za’atar, and plenty of garlic. Soft creamy ricotta and crunchy toasted breadcrumbs compliment the pasta. This is an easy dinner to make on a busy day, and one everyone loves. This is also an excuse to use the lemons growing in my garden.
One of the best parts of this pasta is how quickly it comes together. I use either panko or regular breadcrumbs to make the za’atar topping for the pasta, but panko always gives the crispier topping.
I’ve got a Meyer lemon tree in my backyard, and honestly, 90% of those lemons go straight into making jars of preserved lemons. Their aroma is beautiful, and their refreshing scent fills the room as soon you begin handling them. The soft and creamy texture of ricotta that’s whipped along with the zest and juice from fresh lemons. It ties all the elements of the pasta together.
Start by toasting the breadcrumbs and cooking the pasta at the same time. Taste the breadcrumbs to ensure the flavor of the za’atar comes through, I find some brands of za’atar to be different in intensity than others. This will help save much time in the kitchen. Next, whip the ricotta and then put it all together. I like to garnish the pasta with either basil or oregano but don’t use both; I find that when used together, they compete. If you want to add some protein to this, crispy fillets of pan-fried salmon or grilled or sautéed chicken breast would be perfect.
Preserved Lemon, Za’atar Pasta
The Cook’s Notes
When working with preserved lemons, remember to rinse them well to remove the excess salt and discard the soft inner flesh. Use the peel in the recipe.
If you have an allergy to nuts, pumpkin or sunflower seeds will also work.
Adjust the amount of za’atar in the breadcrumb mixture according to your taste preferences.
Makes 4 servings
¼ cup/60 ml extra-virgin olive oil plus extra to drizzle
4 garlic cloves, grated
2 Tbsp pine nuts or sliced almonds
1 tsp crushed red pepper flakes
1 cup/140 g Italian or panko breadcrumbs
2 Tbsp za’atar or more as needed
ground black pepper
fine sea salt
1 lb/455 g dried spaghetti or angel hair pasta
1 whole preserved lemon, rinsed and minced
8 oz/230 g ricotta cheese
Zest of 1 lemon
Fresh basil or oregano leaves, torn to garnish
Heat a medium saucepan over medium-high heat. Add 2 Tbsp of the olive oil and sauté 2 grated cloves of garlic, pine nuts, and red pepper flakes until fragrant, 30 to 45 seconds. Fold in the breadcrumbs and cook until they are toasted all over and turn golden brown, 3 to 4 minutes. Fold in the za’atar and ½ tsp ground black pepper. Taste and season with more za’atar and salt. Remove from the heat and transfer to a bowl. Wipe the saucepan clean and return to the stove.
While the breadcrumbs cook, prepare the pasta. Follow the manufacturer’s instructions. Set a large pot of salted boiling water on the stove and cook the spaghetti until it turns al dente. Drain the cooked pasta and transfer to a large bowl.
Heat the remaining 2 Tbsp of olive oil in the same saucepan, add and sauté 2 grated cloves of garlic until fragrant, 30 to 45 seconds. Fold in the preserved lemons and cooked spaghetti.
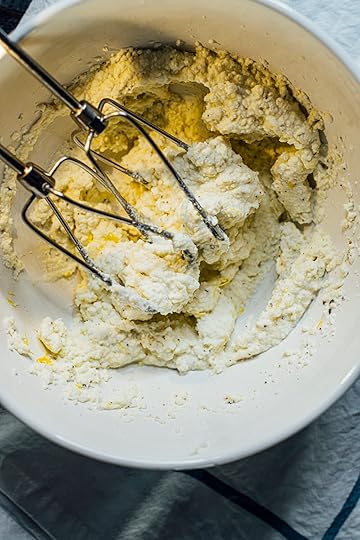
Place the ricotta, lemon juice, and zest in a medium mixing bowl, add and whip using a hand mixer or food processor. Taste and season with salt and black pepper.
Divide the ricotta and pasta between 4 serving bowls. Top with 2 to 3 generous tablespoons of the breadcrumb mixture and garnish with fresh basil. Drizzle with extra-virgin olive oil, if desired. Serve immediately. Leftovers can be stored in an airtight container for up to 4 days.
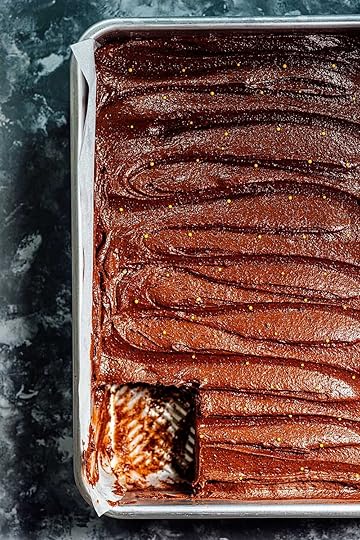
August 28, 2022
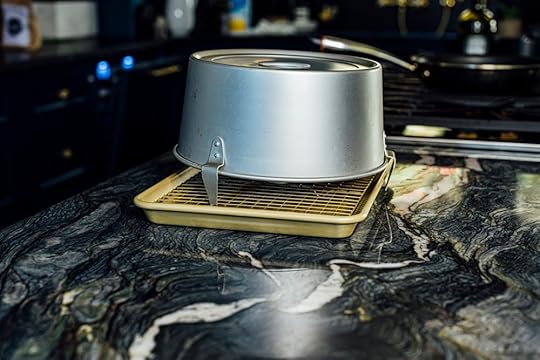
How to Make The Perfect Angel Food Cake

A classic American cake invented in the 1880s in St. Louis, Missouri, the angel food cake is one of the lightest sponge cakes created. The cake differs from other sponge cakes because it uses no fat and relies solely on egg whites and sugar to build its characteristic soft and cloudy texture. The cake can be flavored and served in many ways; I love to eat it with fresh fruit, fruit preserves, yogurt, sweetened whipped cream, or crème fraîche.
The Cook’s Notes
I use this Angel Food Cake Pan. It has three “legs,” which help provide enough space for air to circulate and cool the cake.
The egg whites must be warmed to room temperature. Either place whole eggs in their shells in a water bath with room temperature water or place the extracted egg whites in the metal bowl of a stand mixer and place it in the water bath for at least 30 minutes. The egg whites should be at 70 to 75F/21 to 24C.
The sugar must be superfine, aka caster sugar. This helps it dissolve rapidly in the egg whites.
You must use cake flour for its lower protein content. Another option is to use 1 cup/120 g all-purpose flour and 1 tsp cornstarch.
Do not use lemon juice in place of cream of tartar. Fresh lemon juice adds liquid which affects the ratios. Also, lemon juice contains ascorbic acid. While ascorbic acid does help prevent fruits and vegetables from browning at room temperature, during the high temperatures of baking, it does the opposite and can increase browning. Cream of tartar gives a much cleaner result and more efficient result.
Sifting the dry ingredients over the whipped egg whites helps reduce the probability of finding dry chunks of flour in the baked cake. It is also a much gentler way to add the flour to the eggs, if it was directly dunked over the egg whites, the weight of the flour would deflate the egg foam.
There are two ways to fold the dry ingredient into the egg whites. You can fold it like it is done with a genoise cake using a silicone spatula or a balloon whisk. The two essential things to remember here, use an outward to inward circular motion, going from the top to the bottom of the bowl, so all the flour gets incorporated into the egg whites.
This is one place where I’m not particularly eager to use a knife or skewer to check for doneness. It can be very misleading. Even if a skewer comes out clean, the cake might not be finished. If you feel unsure about the springy texture, use a thermometer. The internal temperature of the cake should be 212F/100C.
Angel food cakes are “dry”; no fat is used to make them. It contains sugar and egg white, which absorb and bind water easily. As a result, they can absorb moisture from the air quickly. Eating the cake, the day it’s made provides the best experience.


Makes one 9 in/23 cm cake
Special Equipment: Angel Food Cake Pan
1 ½ cups/300 g superfine sugar
1 cup/120 g cake flour
12 large egg whites warmed to room temperature
1 tsp ground green cardamom, almond, or vanilla extract
1 ½ tsp cream of tartar
1/8 tsp fine sea salt
Cooking spray oil
Preheat the oven to 325F/165C. Set the angel food cake pan over a wire rack over a baking sheet.
Dry whisk half the sugar /150 g and cake flour in a medium bowl.
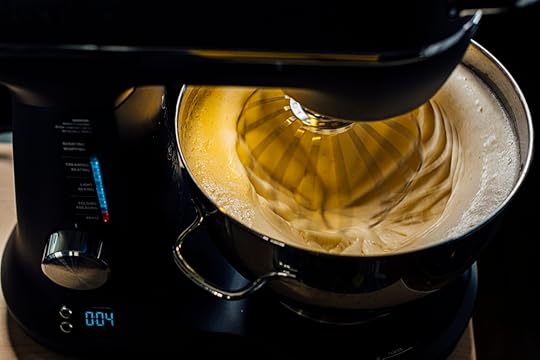
Place the egg whites and the remaining half of the sugar/150 g in the bowl of a stand mixer. Whisk for 1 minute using the whisk attachment over medium-high speed until the egg whites turn frothy. Stop the mixer. Add the cardamom, cream of tartar, and salt and whisk over medium-high speed until it forms soft white peaks (the peaks of the egg whites will lose their shape quickly) and almost quadruples in volume, 2 to 3 minutes. Stop the mixer. Remove the bowl from the mixer.
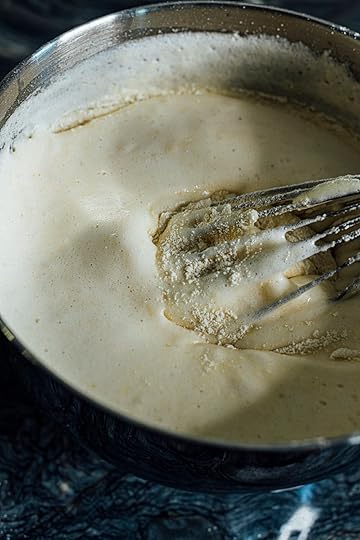
Sift half of the dry whisked sugar-flour mix over the whipped egg whites. Using a balloon whisk, fold the dry ingredients into the egg whites using an outward to inwards motion, turning the mixture over. You can also do this using a silicone spatula. Make sure to go to the bottom of the bowl to ensure that all the dry ingredients get incorporated. Once there are no visible flecks of dry flour, add and fold the remaining sugar-flour mix in the same manner.
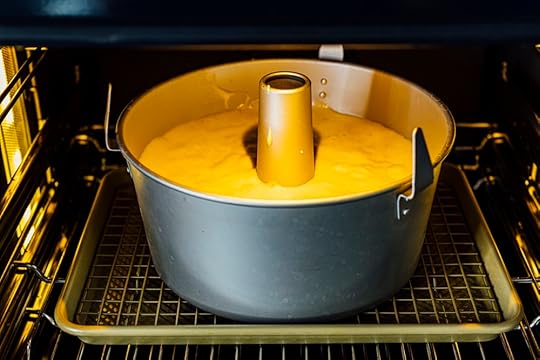
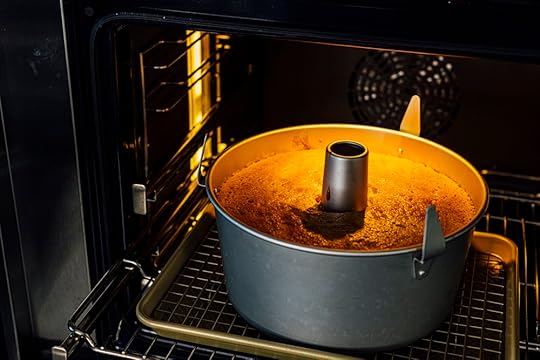
Transfer the cake batter into the angel food cake pan. Using a silicone spatula or spoon, gently level the top. Bake the pan in the preheated oven for 45 minutes to 1 hour until the cake rises to the top, turns golden brown, and the top springs back quickly. Remove the pan from the oven. Spray the wire rack of the baking pan with a little oil. Immediately flip the pan with the cake over the wire rack so the pan stands on its legs, and let it sit undisturbed to cool for at least 1 hour. Once cooled, turn the pan over, and release the cake by running a knife along the edges. Remove the cake. The cake tastes best the day it’s made but will be good for up to 3 days if stored in the refrigerator wrapped with plastic wrap.
October 14, 2021
one-pot lamb with couscous
Disclaimer: This post was sponsored by the American Lamb Board . All opinions expressed are solely my own.
You could label this as a type of pilaf or you could call this lamb couscous, what really matters is that it’s quick and easy. A single pot and minimal clean up (I’m really not a big fan of washing dishes) to make life easy and during a busy week, this is a wonderful dish to put together.
What makes this recipe quick is the use of ground American lamb and couscous. Neither require a lot of time to prepare. A second advantage to using ground lamb, you don’t need to marinate the meat and wait, just add and cook and the meat absorbs the flavors from the ingredients and the spices. Just like the lamb, the couscous will cook quickly and it comes together in no time. I’ll sometimes bulk this up with chickpeas, beans, or even dried fruit to make it more celebratory when we’ve got company over. It’s a dish that’s got the framework that you can easily build off and make your own.
I’ve used American lamb because of the strong commitment of the farmers to ethically and humanely raise their animals. In addition, the farmers have been doing their utmost to support their local communities and if anything this past year has demonstrated the importance of supportive networks.
The Cook’s Notes
Couscous cooking directions can vary depending on the manufacturer. While this recipe lists quantities that will work, I still recommend reading the instructions on the box and adjusting the time or the amount of broth needed.
If you want to take this dish a step further, add toasted pine nuts (or any type of nut or seed you love) and a large helping of caramelized onions.
You can also add dried fruit like chopped apricots, cherries, cranberries, or figs and sauté them with the onion.
One-Pot Ginger Lamb and Couscous
This is an easy one-pot dish to prepare and while it doesn’t need any sides, a generous spoonful of plain unsweetened yogurt or a small salad of cucumbers, onions, and tomatoes works fantastic.
Makes 4 to 6 servings
2 Tbsp/30ml extra-virgin olive oil
1 cup/140g diced white or yellow onion
1 cup/120g diced celery
1 cup/140g diced carrots
2 inch/5cm piece fresh ginger, peeled and cut into thin matchsticks
1 tsp ground cumin
1 tsp red pepper flakes
1 tsp ground smoked sweet paprika
¼ tsp ground cayenne
1 lb/455g ground American lamb
1 cup/160g couscous
Fine sea salt
1 ¼ cup/300ml low-sodium vegetable, beef broth or water
Fine sea salt
1 Tbsp/15ml fresh lemon juice
¼ cup/10g chopped flat-leaf parsley, leaves and tender stems
Heat the oil over medium-high heat in a large stainless-steel saucepan or a Dutch oven. Add the onion, celery, and carrots and sauté until they just start to soften and turn brown, 4 to 5 minutes. Stir in the ginger, cumin, red pepper flakes, paprika, and cayenne and cook until fragrant, 30 to 45 seconds.
Break the ground lamb into small chunks and add it to the saucepan, sauté until the meat turns brown, 3 to 4 minutes and is completely cooked.
Stir in the couscous and broth, season with salt, and bring to a boil over high heat. Remove from the heat and cover with a lid, and let stand for 5 minutes. Remove the lid and fluff with a fork. Drizzle with lemon juice and garnish with the parsley. Serve hot or warm.
Note: The USDA recommends cooking ground lamb to 160 degrees.
September 11, 2021
The Launch of This is A Cook-Letter

I’ve got some exciting news to share with you this week. I’ve been working on a new weekly newsletter that launches with Facebook’s new Bulletin called This is A Cook-Letter. Of course, it’s going to be about cooking tasty things at home and updates about my books and related things but it will be extremely casual and fun. My favorite restaurants, books, movies, and snippets of things that I enjoy and look forward to every week.
View this post on InstagramA post shared by Nik Sharma (@abrowntable)
The current sampling of recipes already available in my newsletter include Crispy Cauliflower with a sweet and sour Gochujang Sauce, an easy chocolate cake that you can make when you have a craving, and for those of you that are looking for a vegan tomato sauce for your pasta, I’ve got you covered with a simple miso-based roasted tomato sauce. You can access all the recipes at This is A Cook-Letter and please don’t forget to subscribe by clicking the button. I’d be thrilled if you share it with your families and friends. Subscribers don’t need to have a Facebook account to sign up but the advantage of being a subscriber is not missing out as it not only delivers the newsletter directly to your inbox each week but it also gives you the ability to comment and participate in any discussions with others plus extra special perks that will be announced as time progresses.
Any updates from here (my blog), A Brown Table as well as links to my recipes published at Serious Eats, Food52, etc. will also eventually start coming through my newsletter, and over time, my goal is to merge it all into one letter, so it’s easy on you and easy on me. Please be patient as some of these changes unfold.
That’s it for this week and don’t forget to Subscribe and share the newsletter with your families and friends.
Stay safe and well,
xx
Nik
The Launch of This is A Cook Letter

I’ve got some exciting news to share with you this week. I’ve been working on a new weekly newsletter that launches with Facebook’s new Bulletin called This is A Cook Letter. Of course, it’s going to be about cooking tasty things at home and updates about my books and related things but it will be extremely casual and fun. My favorite restaurants, books, movies, and snippets of things that I enjoy and look forward to every week.
View this post on InstagramA post shared by Nik Sharma (@abrowntable)
The current sampling of recipes already available in my newsletter include Crispy Cauliflower with a sweet and sour Gochujang Sauce, an easy chocolate cake that you can make when you have a craving, and for those of you that are looking for a vegan tomato sauce for your pasta, I’ve got you covered with a simple miso based roasted tomato sauce. You can access all the recipes at This is A Cook Letter and please don’t forget to subscribe by clicking the button. I’d be thrilled if you share it with your families and friends. Subscribers don’t need to have a Facebook account to sign up but the advantage of being a subscriber is not missing out as it not only delivers the newsletter directly to your inbox each week but it also gives you the ability to comment and participate in any discussions with others plus extra special perks that will be announced as time progresses.
Any updates from here (my blog), A Brown Table as well as links to my recipes published at Serious Eats, Food52, etc. will also eventually start coming through my newsletter and over time, my goal is to merge it all into one letter, so it’s easy on you and easy on me. Please be patient as some of these changes unfold.
That’s it for this week and don’t forget to Subscribe and share the newsletter with your families and friends.
Stay safe and well,
xx
Nik
August 24, 2021
honey almond lemon cake (gluten-free)
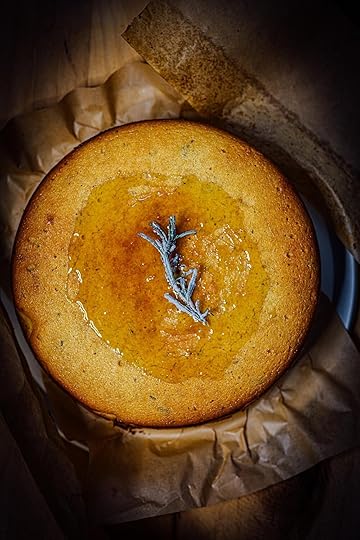
Quite a few of you asked asked for this recipe after seeing it in my Instagram stories last weekend, so here is the almond cake recipe that infused with the delicious refreshing aroma of lemons and rosemary. I got this recipe a few years ago from a friend’s mom who can’t consume foods with gluten. It use baking powder and eggs for leavening and the result is a lovely spongy cake. I’ve thrown in a bit of very finely chopped rosemary leaves in the cake batter and topped it with a sprig of sugared rosemary.
The Cook’s Notes
You can also make the cake in a 9 inch/23cm round springform pan if that’s what you have on hand. Adjust the cooking time accordingly.
Since this cake is gluten-free and use almond flour for the base, it is dense but moist.
When serving the cake, I usually just serve it with a generous scoop of plain, unsweetened crème fraîche or Greek yogurt. The taste and texture provides a nice counterpoint to the honey and almond cake in this recipe.
Play with the choice of honey, I use orange blossom honey but clover and lavender based ones also work great here.
I used Meyer lemons this time round but you can use regular lemons too.
honey almond lemon cake
makes one 8 inch/20cm round cake
Preheat the oven to 325F/160C.
Grease and line a round 8 inch/20cm round springform cake pan with a little olive oil and parchment paper.
In a large bowl whisk together,
4 large eggs
3/4 cup/ 255g runny honey
1/4 cup/60ml extra-virgin olive oil or a neutral oil like grapeseed
until smooth.
Whisk in
1 1/2 Tbsp fresh rosemary leaves, chopped EXTREMELY fine
1/4 cup/60ml fresh lemon juice
zest of 2 lemons
Fold in
3 cups/360g blanched almond flour
1 tsp baking powder
until there are no visible flecks of dry flour. Pour the mixture into the prepared cake pan and bake in the preheated oven until the top is golden brown, rotating halfway through during baking, 45 to 50 minutes. The cake will be done when a skewer inserted through the center comes out clean and the internal temperature reaches 200F/95C.
Remove from the oven and let cool for 15 minutes in the pan. Release the spring mechanism and transfer the cake to a serving plate. Drizzle with
extra honey
and serve with
a sugared sprig of rosemary (recipe follows).
A scoop of whipped crème fraîche or Greek yogurt on the side works well with a slice of this cake. The cake will stay good for up to a week if stored in an airtight container in the refrigerator. Warm to room temperature before serving.
Sugared Rosemary Sprig
Dip
1 sprig of fresh rosemary
in
1 cup/240 ml of boiling water for a minute.
Remove and transfer to a plate containing
1/4 cup/50g superfine sugar
Flip to coat well and let dry on a paper towel for 1 hour at room temperature.
Note: If it doesn’t bother you, stick the wet sprig directly into a jar of sugar, shake it and remove it out and let dry. This way you don’t need to bother with a plate, etc.
August 19, 2021
spinach miso mozzarella naan
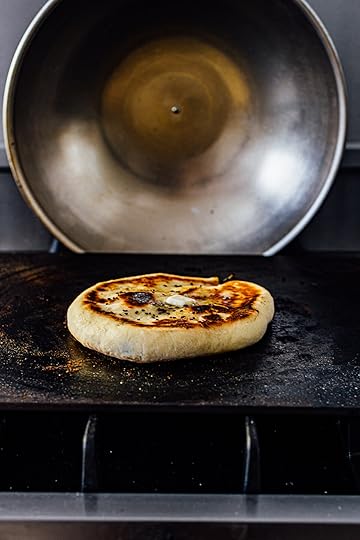
I’ve always wanted to try out my baking steel at making naans at home. For those of you who are familiar with my naan recipe in Season, I use a stainless-steel skillet and cover the skillet with a lid to replicate the environmental conditions inside a tandoor. It’s an approximation but gets the job done very well. I was thrilled with the results, not only does the baking steel make a regular naan beautifully but it also brings a beautiful stuffed naan to life.
You will need an additional tool to create that “oven” atmosphere and seal some of the steam that emanates from the bread as it cooks and I found my aluminum wok lid to be perfect for this. You just need something heat-proof and wide to encase the dough as it cooks.
View this post on InstagramA post shared by Nik Sharma (@abrowntable)
The Cook’s Notes
The amount of yeast - 1 Tbsp is not a typo (I often get this question). To create those signature big bubbles of air in naan quickly, a higher amount of yeast gets the job done in a shorter period of time.
The rising time - this varies anywhere between 1 to 4 hours. In winter and in cold kitchens, it could take 4 hours while during summer, it can take about an hour.
It is absolutely essential that the spinach filling has almost all the water driven out of it and it is completely cooled before it is stuffed into the dough. If it is too wet, the naan might not cook evenly inside and also end up soggy, if too hot, not only will the cheese melt but it will kill some of the bacteria and yeast.
Once the dough is stuffed, avoid stretching it too thin, I find it’s better to stay on the thicker side than on the thinner side of things with stuffed naans. You can shape them in circles or also pull them in the “tear drop” shape with one side
This method is a little different than the one I used in Season, but the principle is the same. I’m using a Baking Steel and a wok lid to recreate the environment of a tandoor.
My favorite condiment to serve these naans with is my friend Chitra’s tomato aachar and/or a bowl of plain, unsweetened and lightly salted Greek yogurt.
Finally, this week, some exciting news: I am so happy to see the Dutch edition of The Flavor Equation come to life - De Smaak Vergelijking , more details on how to get a copy in the link.
spinach, miso, mozzarella naan
Makes 4 servings/4 naans
Start by preparing the filling.
In a medium skillet or saucepan, heat
2 Tbsp/30ml extra-virgin olive oil
over medium heat.
To the hot oil, add
1 garlic clove, minced
1 Tbsp/10g yellow miso
1 tsp red pepper flakes such as Aleppo, Urfa, or Maras
and sauté until fragrant, 30 to 45 seconds.
Add and sauté
10oz/280g baby spinach
over low heat, until most of the liquid has evaporated and the spinach shrinks down. Taste and season with salt if needed. Transfer the spinach to a bowl and cool completely to room temperature. Once cooled fold in
2/3 cup/50g shredded mozzarella
Store in an airtight container in the refrigerator until ready to use.
Prepare the dough for the naan. In a small bowl whisk together,
1/2 cup/120 ml whole milk, warmed to 105F to 115F/41 C to 46C
1 large egg
2 Tbsp/30g plain full-fat unsweetened Greek yogurt
1 Tbsp/15 ml melted unsalted butter or ghee
1 Tbsp/15g sugar
1 tsp fine sea salt
1 Tbsp active dry yeast
Let it sit for 5 minutes at room temperature, until frothy.
Add
2 cups/280g all-purpose flour
to the bowl of a stand mixer. Fix the dough blade attachment. Pour the milk mixture in and mix over low speed until combined to form a sticky dough. Once combined knead for an additional 4 to 6 minutes, over medium-low speed. The dough might be slightly sticky. Shape the dough into a ball and place it a lightly greased bowl, cover with a lid and let double in size, anywhere between 1 to 4 hours (rising time varies by ambient room temperature and how the strength of the yeast. At 80F/27C it takes about 1 hour).
Transfer the risen dough to a lightly floured surface and divide the dough into 4 equal parts by weight. Shape each piece of dough into a ball and pinch it at the seams. Cover the dough with a clean lint-free kitchen towel and work with the first piece of dough.
Divide the filling into 4 equal parts by weight and shape each into a ball.
Lay one ball of dough out onto a lightly floured surface and roll it out into 5 inch/12cm wide circle. Place one ball of the filling in the center. Dip the tip of your finger in a little water and dampen the outer edge of the dough (about 1/2 inch/2.5 cm) , grab the sides of the circle, and press to seal. This will remind you of stuffing a wonton. Flatten the dough by hand to form a rough circle and then roll it out gently to form a 6 inch/15cm circle, using a little flour as needed to prevent sticking. You can also stretch the naan out with your fingers just like a circle of pizza dough by pressing gently at thicker edges. Place the naan on a lightly floured surface and cover with lint-free kitchen towel. Prepare the remaining naans.
While the naans are stuffed, heat the baking steel over medium high heat on the gas stove till it reaches 500F/260C. Keep a wok lid or a large heat-proof dome shaped lid ready.
Once the baking steel is hot, gently dust or brush off any excess flour off the naan add the naan and cover with the lid. Reduce the heat to medium-high and cook the naan covered for 3 to 4 minutes, till it starts to rise and the base starts to turn a dark brown and get blistered. Top with
1 tsp/5g of unsalted butter
and sprinkle
1 tsp of nigella.
Flip the naan and cook on the second side for 2 1/2 to 3 minutes, until lightly blistered and golden brown. Transfer to a serving plate, cover with a clean lint-free kitchen towel. Wipe the baking steel down with a dry clean paper towel to get rid off any residual flour, prepare the remaining naans. Serve warm and top with additional butter if desired.
August 10, 2021
lychee lime popsicles

In India and in many countries in Asia, lychees (aka litchi) are a beloved fruit. The fruit has an outer pink shell that is easily peeled off to reveal a translucent white jelly like fruit. Inside the fruit is a large brown seed that is discarded. Often during the blazing hot months of summer in Bombay , we’d eat lychees by the dozen but one of my favorite frozen treats was a lychee sorbet that this recipe is inspired by. These popsicles are sweet, and full of tropical fruit flavors of lychees mingled with the distinct citrusy flavors of fresh limes. One is not enough.
The Cook’s Notes
You can use one or two popsicle molds. Two molds of course, offers the convenience of making them all at the same time. Otherwise work in batches, freeze one set first, store the other liquid covered in the refrigerator. Unmold the first set of popsicles and store them, then freeze the second batch.
I used canned lychees because that’s easier to find. You could fresh lychees if you have access to them but you will need to account for the sugar syrup and the sugar concentration since this recipe utilizes the syrup from the can.
Honey serves as a source of fructose here to help reduce the size and amount of ice crystals formed. Maple syrup is not a source of fructose so it will not produce the same effect. You can use it as a substitute if you decided to make this vegan but the crystals will be slightly bigger.
For a smoother texture (I usually don’t do this with popsicles), you can churn the liquid in an ice cream maker like you would a sorbet and then pack your popsicle molds with the mixture. Packing the mixture can be a bit tricky and it also gives the popsicle a “milkier” look which I don’t care for that much. I like popsicles to be somewhat transparent.
View this post on InstagramA post shared by Nik Sharma (@abrowntable)
lychee lime popsicles
Makes 20 popsicles
Blend
2 cans of lychees (each can weighs1 lb 4 oz/565g ) in syrup
1/4 cup/50g sugar
1/4 cup/60ml fresh lime juice
2 Tbsp/30ml runny honey
zest of 2 limes
1/8 tsp fine sea salt
over high speed until smooth. Skim and discard the froth. You can strain the liquid through a fine mesh cheesecloth held over a bowl to remove any solids, I don’t do this because I like the grainy texture of the crushed fruit.
Stir the liquid well and divide the liquid between 20 popsicle molds (see The Cooks Notes), leaving a minimum of 1/4 inch/6mm dead space at the top. This will give the liquid space to expand as it freezes. Place the lid on top of the mold, insert the popsicle sticks, and freeze until firm, at least 4 hours.
When ready to eat, run the mold under warm water to loosen the popsicle and unmold. Serve immediately. Popsicles can be stored in the mold or unmold the popsicles, and place them between sheets of parchment paper or clingfilm, and store in an airtight, freezer-safe container. The popsicles will stay good for up to 1 week in the freezer.


