
Nik Sharma's Blog, page 3
October 19, 2022
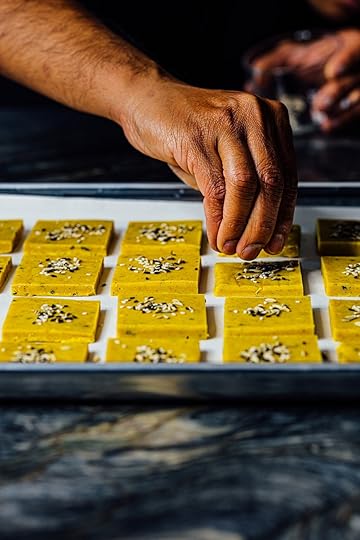
kaju katli/cashew fudge
Kaju Katli/Kaju Burfi/Cashew Fudge
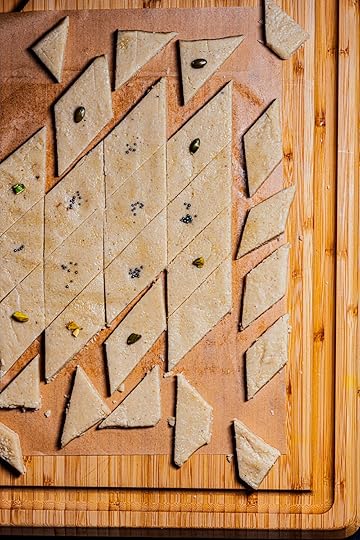
One of my favorite Indian sweets is kaju katli or cashew fudge which carries a mild sweet scent of rose water and cardamom. This is a dessert that is served on special occasions at Hindu festivals like Diwali. Cashews are ground to fine grainy powder very similar to the texture of fine-grade semolina and then cooked in sugar syrup and a little ghee.

The Cook’s Notes
Using parchment paper to line the base of the pan will make it easier to lift the fudge out. But parchment paper can slip easily while the fudge is hot. If you decide to skip the parchment paper, grease the bottom of the pan very well. Once cooled, dip the base of the pan in hot water to loosen the butter, which will help the fudge come out.
Instead of using the square pan, another easy alternative is to roll the cooked cashew mixture between sheets of parchment paper till it is about ¼ in/6 mm thick.
The sugar syrup is heated to 230F/110C, the thread stage. If a drop of the hot syrup is pressed between the tips of your fingers and then pulled, it will form a thin sticky thread, and this helps the cashew take on its characteristic soft grainy fudge texture.
Traditionally, this dessert is covered with a sheet of edible silver, but you can garnish it with nuts and even edible gold or silver pearls. If you decorate with varak, do this immediately after the cashew fudge is rolled out. If using nuts, add those after the cashew fudge is cut.
The serving sizes are a little loose here because they will vary depending on how you decided to lay the fudge out and how big you cut them. My suggested serving size is an estimate.
Makes about 24 servings
2 Tbsp ghee or unsalted butter plus extra to grease the dish
2 cups/280 g raw whole cashews
1 cup/240 ml water
1 cup/200 g sugar
¼ tsp ground green cardamom
½ tsp rosewater
For the garnish
Varak (sheet of edible silver), Crushed roasted pistachios, pumpkin seeds, edible silver or gold pearls
Grease and line a 9 in/23 cm square baking dish with butter and line it with parchment paper.
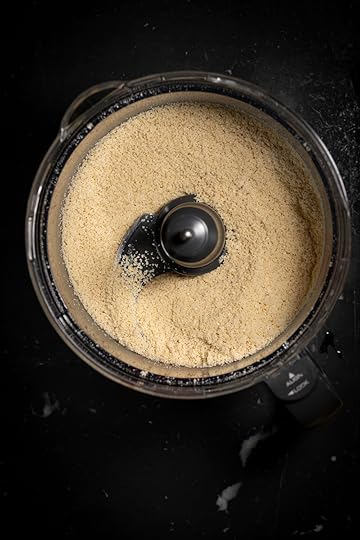
Grind the cashews to a fine grainy powder in a food processor. Pulse at short intervals to prevent the cashews from heating up and releasing their oils, or they will turn into cashew butter. Sift the ground cashews to remove any large bits. Return the large bits to the food processor and grind them down. Combine the ground cashews.
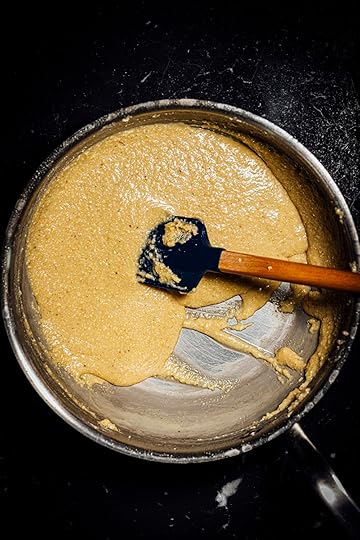
Heat the water, sugar, and cardamom in a medium saucier or saucepan over medium heat until it reaches 230F/110C. Reduce the heat to medium-low, stir in the ground cashews with a silicone spatula and cook until the mixture starts to thicken, about 5 to 6 minutes, and starts to come off the sides. Add the 2 Tbsp of ghee; the mixture should resemble a thick paste that quickly leaves the saucier's sides. Fold in the rosewater and remove the saucier from the stove. Pour the mixture into the greased pan and level with an offset spatula. To prevent the cashew mixture from sticking to the surface of the spatula, dip it in hot water. Leave it out at room temperature to cool and firm up. If using varak, layer the cashew fudge with the silver sheet now. If nuts or edible pearls are used for the garnish, top after the cashew fudge is cut. Once firm, run a knife along the edges of the pan to help release the cashew fudge. Cut into 1 in/2 cm or 2 in/5 cm squares or diamonds. Store in an airtight container wrapped with parchment paper to prevent the slices from sticking in the refrigerator for up to 1 week.


October 18, 2022
Goan Lamb Curry
Goan Lamb Curry
If there’s one ingredient that stirs up strong feelings for home and my childhood, it must be coconut. I grew up on the West coast of India in Bombay, where coconut trees were plenty. When we’d visit my grandparents' home in Goa, coconut trees were again a big part of the landscape and our lives. Every part of the tree was used. The leaves were used to weave baskets; the young tender coconuts were used for their sweet water and tender flesh; the mature coconuts were used to prepare rich, thick gravies, stews, and curries, while the oil formed the base of flavor for many sweet and savory dishes. This Goan lamb curry relies on coconut for its velvety texture and aroma.
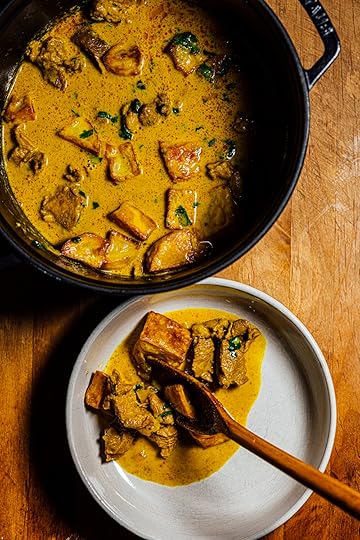
I’ve used American Lamb in this coconut curry to complement the spices and coconut flavor. Once cooked, the lamb turns tender and falls apart quickly under the pressure of a fork. This is comfort food to me. It reminds me of home and those simple meals that satisfied me. There are three parts to this recipe. I first prepare the lamb and cook it with the spices until the meat is tender; once cooked, I stir in the coconut curry and malt vinegar. You can use lemon or lime juice in place of vinegar. This reduces the risk of coconut milk curdling during cooking. Finally, instead of frying the potatoes as my mother and grandmother did, I roast them in the oven until they were tender but crispy.
My favorite way to eat this lamb curry is with bread like dinner rolls or plain rice. It’s one of those dishes you need to use your fingers to sop up that gorgeous golden liquid and enjoy. It’s part of that wonderful experience.

Goan Lamb Curry
A simple yet soothing lamb curry from Goa that is rich with the aroma of coconut and spices. Oven-roasted potatoes and tender, succulent pieces of lamb are put together in this luscious coconut-based stew. I prefer to eat it with plain rice or bread to enjoy every drop of that flavorful liquid.
The Cook’s Notes
If you can’t find boneless stew lamb, use a boneless shoulder cut and either get the butcher to trim the fat off and chop it or do it at home. I prefer to use American Lamb in my cooking because of the high quality of the meat that produces the best flavor and texture in this curry.
I prefer a Dutch oven to make this curry because the lid is heavy and holds steam well. This, in turn, helps the lamb cook faster and turn more tender.
Makes 4 servings
3 Tbsp/45 ml neutral oil, such as grapeseed
1 ½ tsp garam masala, homemade or store-bought
1 tsp ground black pepper
½ tsp ground Kashmiri chilli
½ tsp ground turmeric
½ tsp ground cardamom
1 large/300 g white or yellow onion, diced
2 Tbsp grated garlic
2 Tbsp grated ginger
1 ½ lb/ g boneless American lamb shoulder, excess fat trimmed and discarded, cut into 1 in/2.5 cm pieces
Fine sea salt
½ cup/120 ml water
1 large/400 g Russett potato, peeled and cut into 1 in/2.5 cm cubes
1 cup/240 ml plain unsweetened coconut milk
2 Tbsp fresh lemon or lime juice
2 Tbsp chopped cilantro, tender stems and leaves
Heat 2 Tbsp of the oil in a medium Dutch oven or saucepan with a heavy lid over medium heat. Add the garam masala, black pepper, Kashmiri chilli, turmeric, cardamon, and sauté until fragrant, 30 to 45 seconds. Add the onion and sauté until translucent and soft, 4 to 5 minutes. Stir in the garlic and ginger and cook for 1 minute. Fold in the lamb. Sauté the lamb until the meat starts to brown, 8 to 10 minutes. Add the water and ½ tsp salt. Bring to a boil over medium-high heat. Reduce to a simmer, cover, and cook until the lamb is tender about 1 hour. USDA recommends lamb reach an internal temp of 145F/63C with a 3-minute rest.
While the lamb cooks, preheat the oven to 400F/200C. Spread the potatoes out onto a rimmed baking sheet. Toss the potatoes with 1 Tbsp oil and ½ tsp salt, spread in a single layer, and roast in the oven until the outside is golden brown and crisp while the insides are soft and easily pierced with a knife, 25 to 30 minutes. Remove from the oven.
Once the lamb is cooked, stir in the coconut milk and lemon juice. Taste and season with salt. Add the potatoes and garnish with the cilantro. Serve hot or warm. Leftovers will stay good for up to 3 days if stored in an airtight container in the refrigerator.
Disclaimer: This post was sponsored by the American Lamb Board. All opinions expressed are solely my own.
October 17, 2022
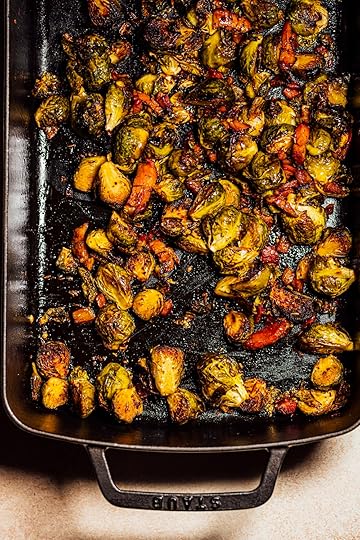
Roasted Maple Brussels Sprouts with Pancetta
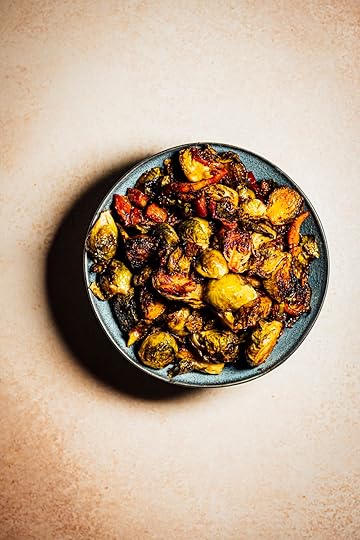
Roasted Maple Brussels Sprouts with Pancetta
Brussels sprouts shine marvelously when charred because they take on a smoky flavor and, combined with the savory salty flavor of pancetta, fragrant spices, fresh lime, and maple syrup, give it a whole new depth of flavor. This is a good dish that can be prepped a day ahead of time; toss all the ingredients together in the roasting dish, wrap with clingfilm tightly, leave in the refrigerator overnight, and cook it when you’re ready to roast.
The Cook’s Notes
Pancetta is salty by nature, so add minimal flaky salt.
Use bacon or ½ tsp liquid smoke for a more robust smoked flavor. If you don’t consume pork, use liquid smoke and smoked salt.
Makes 4 servings as a side
½ tsp whole cumin
½ tsp whole coriander
½ tsp whole fennel
1.5 lb/680 g Brussels sprouts, stalk trimmed and discarded, cut in half lengthwise
5 oz/ g diced pancetta
½ tsp ground black pepper
½ tsp red pepper flakes such as Aleppo, Maras, or Urfa
2 Tbsp extra-virgin olive oil
flaky sea salt, preferably smoked
2 Tbsp fresh lime juice
2 to 3 Tbsp maple syrup or honey
Preheat the oven to 425F/220C.
Crush the cumin, coriander, and fennel with a mortar and pestle.
Add the Brussels sprouts, pancetta, crushed spices, black pepper, red pepper flakes, and olive oil in a 9 in by 12 in/23 cm by 30.5 cm roasting pan or baking sheet. Season lightly with flaked salt and toss to coat well. Transfer to the oven and roast. After the first 15 minutes of cooking, stir the Brussels sprouts and pancetta; this will help the fat rendered from the pancetta coat the Brussels sprouts; repeat every 12 to 15 minutes. Roast until the Brussels sprouts turn crisper and slightly charred and the pancetta crispy, 45 to 60 minutes. Remove from the oven, sprinkle the lime juice and maple syrup over the Brussels sprouts, and fold to coat well. Taste and season with salt if needed. Serve hot or warm.
October 15, 2022
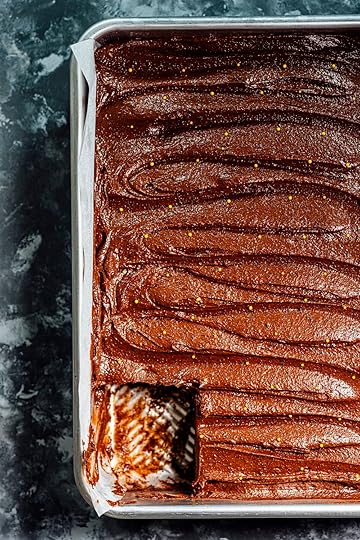
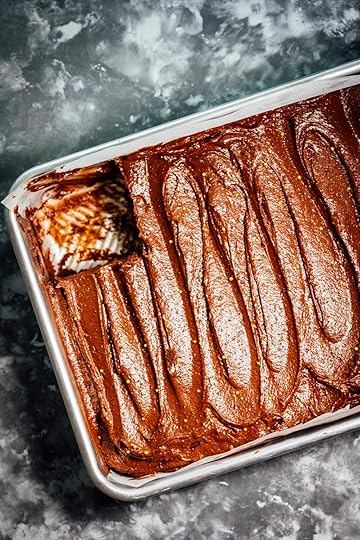
Chocolate Cake with Chocolate Buttercream Frosting
No, it is not my birthday. It is neither my half, nor my quarter birthday!
I’ve simply had chocolate cake on my mind for a while and I wanted one that felt a bit more festive or birthdaylike (frostings and cake decor makes things fancier).
Here’s my thought on birthday cakes, a birthday cake can be any cake you love, it should be whatever cake that will make you happy on your day. Maybe next year on my actual birthday, I’ll skip chocolate entirely and make myself a fresh fruit cake with lots of ripe and sweet slices of mangoes or colorful berries.
Today, it's all about chocolate.
It is always good to look for shortcuts and if I can find a way to use fewer dishes (less dishwashing), it’s a bonus. And this is where the blender steps in and why the admittedly unattractive name “Blender Cake” sits atop of this newsletter today. A few years ago, when I started to play around with oil-based cake batters (ee sponge cake in Season), I noticed that if the liquid part of the cake batter is first emulsified in a high-performance blender (one of those blenders with a bit of extra horsepower), the cake develops a much nicer crumb texture. The extra bonus here is “one appliance to rule them all”. Don’t attempt to blitz the dry ingredients with the liquid ingredients in the blender, speaking from experience, it won’t work well. Now, if only I could make good buttercream in a blender quickly!
As for the buttercream frosting that accompanies this cake, it’s got a hint of bourbon to go along with the dark rich notes of chocolate. To keep the frosting smooth, I like to add a little bit of honey or Lyle’s Golden Syrup, both of these contain fructose that will prevent sugar from crystallizing in the frosting, keep it silky, and avoid that gritty texture that can sometimes form.
And for the final part, I like a little shimmer on cakes, gold sugar pearls get the job done here. If you like funfetti, use it. Make it YOUR cake!
Chocolate Cake with Chocolate Buttercream Frosting
A rich chocolate cake painted with a layer of silky velvety chocolate buttercream that would fit the bill for a celebration or on those days you need a slice of cake.

Print This Recipe
The Cook's Notes
You can make the cake and frosting separately ahead of time and then put the cake together on the day it's needed.
You do not need to use grapeseed oil; canola is also a good option. You can use olive oil but I find that the flavor of good olive oil gets masked by the chocolate in this cake, for that reason, I recommend reserving that olive oil for another purpose where it can shine.
The bourbon flavor in the frosting is very subtle, you can leave it out.
On a related side note, there are multiple ways to line a cake tin, here's how I line my cake pans. Pictured here is a loaf pan but the same idea applies to any rectangular, square, or circular pan. Check out my video here to see how I line my pans.
Chocolate Cake with Chocolate Buttercream Frosting
Makes one rectangular 9 inch by 13 inch/23cm by 33cm cake and about 4 cups/1.2kg frosting
For the Chocolate Cake
1 cup/240ml neutral oil such as grapeseed plus a little oil to grease the baking pan
2 ½ cups/350g all-purpose flour
½ cup/50g unsweetened Dutch-processed cocoa
1 Tbsp baking powder
½ tsp fine sea salt
3 Tbsp+ 1 tsp/50ml boiling water
3 ½ oz/100g semisweet chocolate chips (70% cacao or greater)
1 ½ cups/300g packed light or dark brown sugar
4 large eggs, at room temperature
½ cup/120g sour cream
2 tsp instant coffee or espresso powder
2 tsp vanilla extract
Preheat the oven to 325F/165C.
Lightly grease a 9 inch by 13 inch /23cm by 33cm (the pan should be at least 2 inch/5cm deep) rectangular baking pan with a little oil and line with parchment paper.
In a large bowl, dry whisk the flour, cocoa, baking powder, and salt. Make a well in the center.
Pour the boiling water over the chocolate chips in a small bowl and stir with a silicone spatula or whisk till the chocolate melts and is smooth and silky. Pour the melted chocolate into a blender, add the sugar, eggs, sour cream, coffee, and vanilla. Pulse at high speed for a few seconds at intervals till the mixture is combined and emulsified. Don't overdo the blending or your cake might turn dry.
Pour all the liquid from the blender into the well you made earlier in the flour. Stir the mixture with a wooden spoon, a spatula, or a whisk until combined and smooth, and there are no visible flecks of dry flour. Pour the mixture into the prepared baking pan, level the surface with an offset spatula, and bake in the preheated oven till a skewer or knife when inserted through the center of the cake comes out clean, 45 to 50 minutes. Let the cake cool in the pan for 5 mins, then run a knife along the edges to help release the cake and transfer to a wire rack to cool completely. Keep the pan aside while the cake cools, once cooled return the cake to the pan. I find this makes it easy to store and transport the cake (if you were planning on sharing it).
You can also make the cake a day ahead of time, cool it, and then wrap it tightly with cling film and chill it.
For the chocolate buttercream frosting
1 ½ cups/330g unsalted butter, softened to room temperature
1 ½ cups/180g confectioner's sugar
2 Tbsp runny honey or golden syrup
½ cup/50g unsweetened Dutch-processed cocoa
¼ cup/60ml boiling water
8oz/255g semisweet chocolate chips (70% cacao or greater)
¼ cup/60g sour cream
1 Tbsp bourbon (optional)
1 ½ tsp vanilla extract
1 Tbsp gold sugar pearls (optional)
Place the butter in the bowl of a stand mixer and whisk on medium-high speed using the paddle attachment, until the mixture turns pale yellow, 3 to 4 minutes.
Add the confectioner's sugar and honey and whisk over low speed (or it will fly out). Once the white "dusty" sugar is no longer visible, increase the speed to medium-high, and beat till the mixture turns light and fluffy and pale white, 4 to 5 minutes.
Stop the mixer and scrape the sides of the bowl down with a spatula. Add the cocoa and mix on low speed till combined, 2 to 3 minutes
Fill a saucepan with about an inch/2.5cm of water and bring it to a simmer. Place a medium, non-reactive stainless-steel bowl over the saucepan, the water should not touch the bottom of the bowl. Add the boiling water and chocolate and stir with a silicone spatula till the chocolate completely melts. Remove from the bowl from the saucepan, fold in the sour cream, bourbon, and vanilla. Pour this mixture into the creamed butter mixture and whisk on medium speed till the mixture is completely combined, scrape the sides of the bowl down to ensure there are no unincorporated bits. Whisk on high speed till the mixture is fluffy. It might fall apart but it will eventually come together. Transfer the mixture to an airtight container, cover the surface with a sheet of clingfilm or parchment paper pressing down gently, refrigerate until ready to use.
When ready to frost the cake, FIRST make sure the cake is completely cooled or chilled or by the buttercream frosting will melt. SECOND, warm the chilled frosting for at least 30 minutes to room temperature before applying it to the cake. Use an offset spatula to top the cake with the frosting.
Decorate however you want to with the gold sugar pearls. You can use silver or skip it entirely (and yes, even use funfetti).
This cake will be good for up to 3 days if storing in the refrigerator. You can also freeze it but remember to wrap it tightly with clingfilm ad keep it in an airtight container or it will dry out.
October 14, 2022
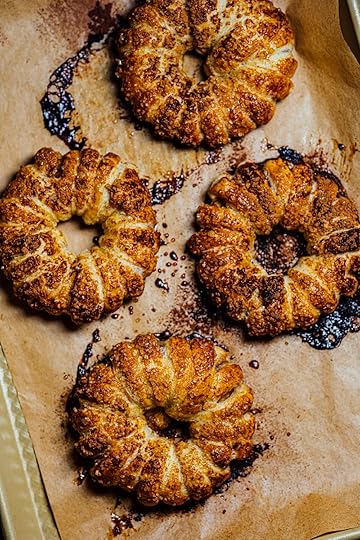
Apple Cinnamon Turnover Wreaths
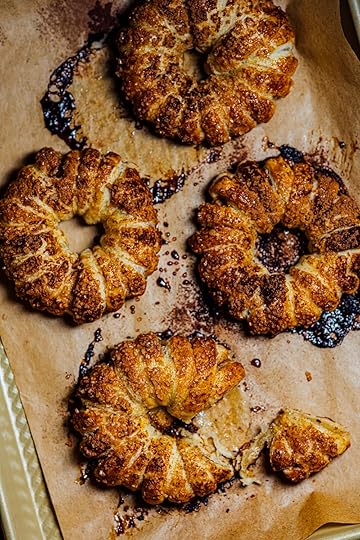
Apple Cinnamon Turnover Wreaths
If you love apple turnovers with a strong sweet cinnamon aroma, then you will love this simple yet fun version. These apple turnover wreaths were inspired by the way mummies are wrapped in cloth, and I don’t mean my mother but those in horror movies. Weaving the pastry into the apple rings might remind you of making a pom pom. Eat these warm because that’s when they taste their best.
The Cook’s Notes
Instead of coring the apple before slicing, I find it easier to cut a ring in the center.
The cornstarch helps absorbs any juices that leak from the apple.
You might use all the puff pastry, or you might not, depending on how well it's woven.
Most store-bought puff pastry sheets are about 9 in/23 cm long. If you have a longer sheet, cut the strips parallel to the longer side.
If the room is warm, place the cut pastry strips in the refrigerator. The strips need to be pliable so they don’t break during shaping but are not too soft, or they will lose their ability to puff up.
Makes 4 pastries
1 large/about 300 g baking apple, peeled
½ cup/100 g superfine sugar
2 tsp ground cinnamon plus additional for dusting
¾ tsp cornstarch
2 sheets puff pastry, homemade or store-bought, thawed
A little all-purpose flour for dusting the pastry
1 large egg
1 Tbsp water
demerara sugar for dusting
Preheat the oven to 350F/180C. Line a baking sheet with parchment paper.
Trim the ends of the apple and cut the apple into four ¼ in/6 mm thick circles. Using a paring knife or a 2 in/5 cm circular cookie cutter, cut a circle in the center of the apple and discard the core with the seeds.
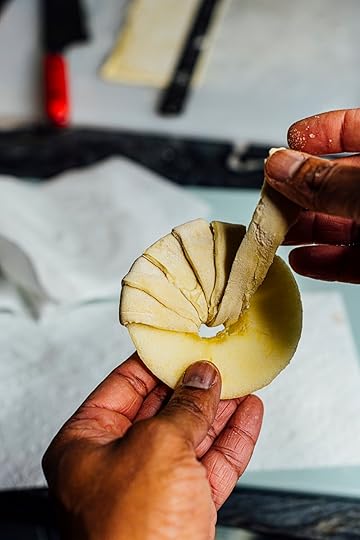
On a small plate, mix the sugar, 2 tsp cinnamon, and cornstarch. Coat the apple slices on each side with the sugar-cinnamon mixture. Don’t leave them in the sugar mixture for more than 2 minutes, or the apples will start to release their liquids. Roll the puff pastry out with minimal flour to flatten the creases. Cut the pastry into 9 in/23 cm by ¼ in/6 mm strips. Get a small bowl of tap water ready. Work with one apple ring at a time. Start by passing one end of the pastry strip through the center of the apple ring. Continue to wrap the entire apple ring with the pastry to cover it completely; it will resemble a wreath/mummy in a horror movie. When starting with a new pastry strip, dab the end with a bit of water to help it stick to the pastry on the apple. Place the wrapped apple ring on the baking sheet. Prepare the remaining apple rings and place them on the baking sheet at least 2 in/5 cm apart.
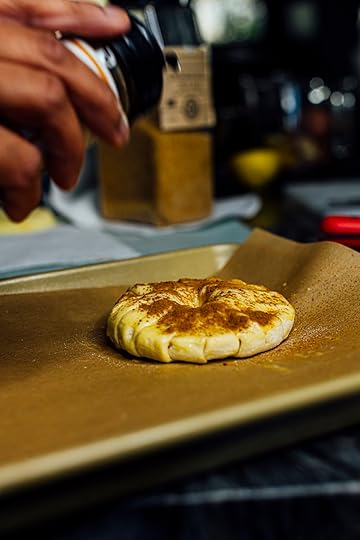
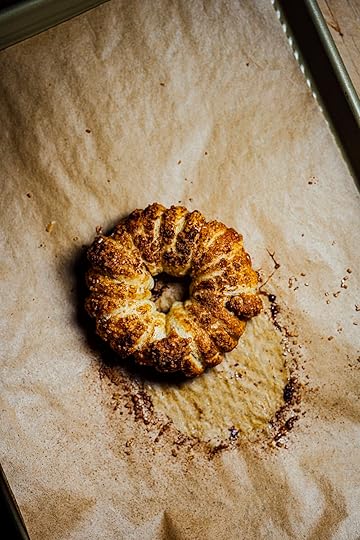
Prepare the egg wash. In a small bowl, whisk the egg and water. Brush the surface of the pastry of each apple ring with the egg wash. Generously sprinkle the top of the pastry with demerara sugar and dust with ground cinnamon. Bake in the preheated oven until the pastry puffs up and turns golden brown, about 30 minutes, rotating the baking sheet halfway through during baking. Remove from the oven and let the apple rings rest on the baking sheet for 5 minutes before eating. The pastries taste the best the day they’re made. Leftovers can be stored for up to 1 day in an airtight container at room temperature and rewarmed at 300F
October 13, 2022
Spiced Golden Shortbread Cookies
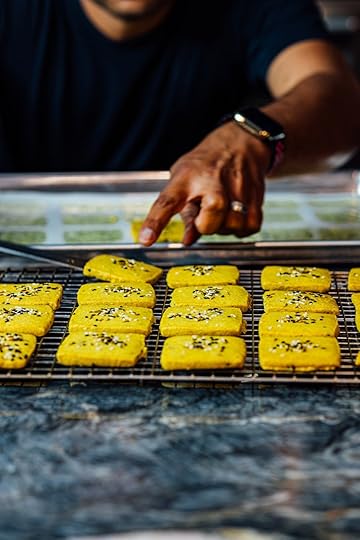
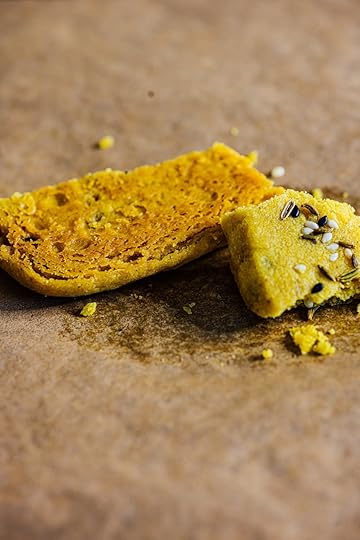
I am a sucker for teatime because it’s the perfect excuse to eat cakes and cookies. I’ve been reminiscing over the days when I would visit my grandparents in Bombay, India, and wait for the “biscuit man” to drop by in the afternoon with his tin boxes filled with cookies/biscuits. The cookies would come in various shapes, sizes, and flavors, and my favorites were then ones gently kissed with spices or the cookies sandwiched with a thick layer of fruit jam. Sometimes we’d walk through the neighborhood bazaar and visit the bakery to pick up fresh sweet buns stuffed with dried fruit or grab a cream horn. Teatime was a treat. As an adult, I don’t treat myself often with teatime, and perhaps if we had kids, I would repeat this tradition that was an integral part of my life. (I might be setting myself up for a dangerous situation here, my husband will probably read this and ask me to make him tea and cookies every evening.)
This shortbread is inspired by those sweet memories of those evening teas and delightful treats. There’s a hint of turmeric for color and a dash of warm spices for aroma. I’ve also thrown in a few sesame and fennel seeds that bring a crunchy bite and flavor. These also make a lovely gift to share with family and friends.
The Basics of Shortbread Making According to Science
Butter
Butter is an emulsified fat where water droplets are trapped inside the fat. The fat helps coat the gluten-forming proteins in the flour and prevents them from coming together. Any water from the butter that might encounter those proteins gets absorbed by the cornstarch (see below for how that works).
Hardboiled Yolk
Uncooked fresh egg yolk is about 50% water; during boiling, this water participates in the chemical and physical changes inside the egg and yolk proteins and phospholipids and is no longer readily available. As the egg and yolk proteins denature and solidify, they form a mesh and squeeze their water out.
Why does this matter? Water is an essential component of the gluten-forming reactions when dough is prepared from flour. If a raw egg yolk were used in this recipe, there would be greater gluten formation because the water from the yolk is much more readily available. In a hardboiled yolk, that water is lost. The cooked yolk provides the necessary fat for the cookie structure without the water.
Confectioners’ Sugar
When it comes to sugar and texture, the size of the sugar crystals matters; larger crystals take a longer time to dissolve and produce crunchier textures. For cakes and desserts, bakers often rely on superfine sugar’s/caster sugar’s tiny-sized crystals to dissolve faster and make tender and more delicate crumbs. Confectioners’ sugar/icing sugar is ground down to a tiny size (smaller than superfine sugar), and if you look at the crystal sizes below, you’ll see what I mean.
Sugar Crystal Size Comparisons
Coarse Sugar 700 to 1400 µM
Granulated Sugar 450 to 650 µM
Superfine Sugar/Caster Sugar 150 to 450 µM
Confectioners’ Sugar/Icing Sugar 10 to 40 µM
Cornstarch
Cornstarch is pure starch, and when added to flour, it again reduces the amount of gluten formed by sitting in between the gluten-forming proteins. During the mixing of the batter, cornstarch hydrates by binding water and makes it unavailable for gluten production. This is also why cornstarch makes a quick cake flour substitute; it helps create a more tender crumb.
Temperature
Cooler temperatures slow down the formation of gluten, which helps us achieve a better shortbread texture. Freezing and refrigerating the dough often during the prep steps will give us another backup in your quest to reduce gluten formation.
Now it's time to bake!
Sources Consulted
Karl F. Tiefenbacher, Chapter Ten - Glossary of Terms in Wafers, Waffles and Adjuncts, Editor(s): Karl F. Tiefenbacher, The Technology of Wafers and Waffles II, Academic Press, 2019, Pages 325-411,
Spiced Golden Shortbread Cookies
These shortbread cookies are buttery and crisp, they will melt in your mouth, and they’re inspired by the different spiced cookies baked and served in India during teatime. Turmeric gives them a burst of golden sunshinelike tint while the addition of spices gives them an irresistible fragrance. I’ve also added sesame and fennel seeds for a little crunch and nutty flavor.
The Cook’s Tips
Confectioner’s sugar and cornstarch are light, can blow with the wind and sudden movements, and make a mess. When weighing, adding, and mixing them, execute caution; mix them slowly. This will save you from cleaning a giant dust cloud later.
Scrape the sides and the bottom of the bowl as often as possible to ensure the ingredients mix evenly. Invest in a bowl scraper, if you don’t own one. Because of their curved design, bowl scrapers do a much better job than silicone spatulas at reaching the deeper curved sides of the bowl.
To grate a hardboiled egg yolk, sift it.
Refrigerate the uncooked dough as often as possible to help create a crispier shortbread cookie.
If you have a ravioli roller on hand, use that to get a fancier edge on the cookies, but a sharp knife and a cookie cutter also work. I prefer keeping it simple because cookie cutters come in odd shapes and tend to create extra work (you’ll have to collect the dough scraps and roll it out again, increasing the amount of gluten, and the second batch might not be as crispy).
These cookies are sweet enough for most people. However, dust them lightly with confectioner’s sugar if you like them sweeter.
Makes twenty- four 1 in/2.5 cm square shortbread cookies
1 Tbsp black sesame seeds
1 Tbsp white sesame seeds
1 Tbsp fennel seeds
1 ¼ cups/210 g all-purpose flour
¼ cup/35 g cornstarch
½ tsp ground black pepper
½ tsp ground ginger
½ tsp ground green cardamom
½ tsp ground cinnamon
½ tsp ground turmeric
8 oz/230 g unsalted butter, softened to room temperature
⅔ cup/80 g confectioner’s sugar
1 yolk from a large hardboiled egg
⅛ tsp fine sea salt
In a small bowl, mix the sesame and fennel seeds.
In a medium bowl, dry whisk the flour, cornstarch, black pepper, ginger, cardamom, cinnamon, and turmeric.
Using the paddle attachment, beat the butter and sugar over low speed until pale and fluffy, 5 to 6 minutes. Scrape down the sides and bottom of the bowl using a bowl scraper. Place the yolk in a fine-mesh strainer held over the bowl of the mixer and press the yolk with a spoon until it completely passes through and transforms into fine shavings. Add the salt and beat over medium speed until combined, 1 minute. Scrape down the sides and bottom of the bowl using a bowl scraper. Add the dry whisked flour mixture to the creamed ingredients in the bowl, and mix over medium-low speed until combined, 2 to 3 minutes. Scrape down the sides and bottom of the bowl using a bowl scraper. Add ½ of the seed mixture to the shortbread dough and mix over low speed for 1 minute, until evenly dispersed. Reserve the remaining seeds in the bowl for the shortbread topping.
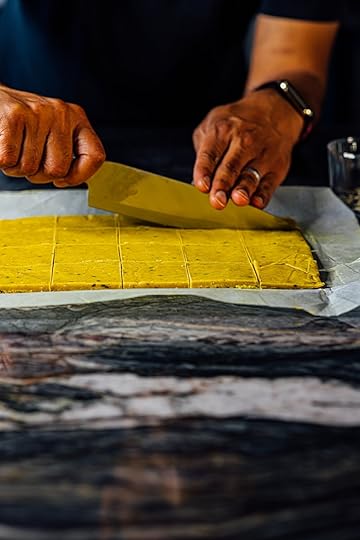
Transfer the shortbread dough to a sheet of parchment paper. Roll and shape into an 8 in by 12 in/20 cm by 30.5 cm rectangle. Transfer the rolled-out dough with the parchment paper onto a baking sheet, top with a second sheet of parchment paper or cling wrap, and freeze for 1 hour or up to 2 hours.
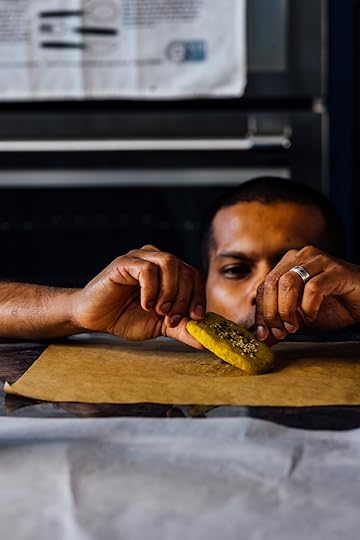
Bring the baking sheet with the rolled-out dough and transfer the parchment paper with the cookie dough onto the kitchen counter. Unwrap and reserve one sheet of parchment paper. Using a sharp knife trim the edges (you can skip this and leave the edges untrimmed), score the rolled-out dough, and cut into 1 in/2.5 cm squares. Line the same baking sheet with a sheet of parchment paper. Transfer the cut squares of dough to the parchment paper, spacing them out evenly using an offset spatula (I left a ⅜ in/1 cm space). If the dough warms up and softens and makes it tricky to transfer them to the baking sheet, stick them in the freezer uncovered for 15 minutes to firm up. Sprinkle the reserved sesame and fennel seeds on top of the cookies. Take one of the reserved sheets of parchment paper, place it over the cookies, and gently press the seeds down to stick to the cookie dough's surface. Unwrap and return the sheet to the freezer for 15 minutes to firm up.
When ready to bake, preheat the oven to 300°F/150°C.
Once the cookies firm up, bake them on the baking sheet in the preheated oven, rotating the pan halfway through during baking, until the edges just start to turn golden brown, 30 to 40 minutes. Remove from the oven and let the cookies rest on the baking sheet for 5 minutes, transfer to a wire rack and let cool completely. Store the cookies in an airtight container for up to 1 week.
October 12, 2022
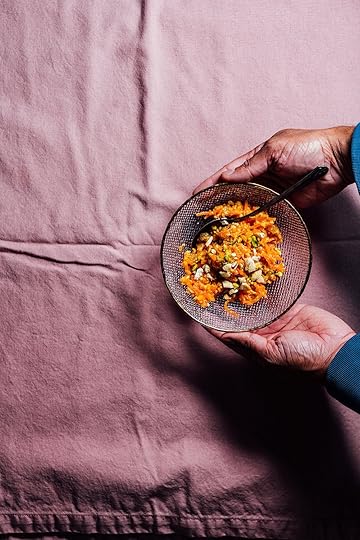
carrot halwa/gajjar ka halwa
What is Halwa/Halva?
Halwa/Halva is an Indian sweet that originates from the Arab word "hulw" and came by way of Persia (read more about the history of Indian halwa here). In India, halwa can be made from anything sweetened, semolina to fruits, sweet vegetables like carrots, eggs, nuts, beans, and even chickpeas. I’ve made a few halwas in my lifetime and the last one I wrote about was in my column at Serious Eats - Semolina Halwa that you must try (I even eat it for breakfast). Halwa can be eaten on festive occasions and on a regular day too.
Generally speaking, when making most halwas, a fragrant fat like ghee or coconut oil along with milk, spices, and sugar are added to the main halwa ingredient and then cooked. The halwa is then served garnished with thin sheets of edible silver called varak and dried fruits and nuts. Now nothing is set in stone, these garnishes change with the recipe and also with our personal preferences.
Carrot Halva
Carrots occupy an interesting position in cooking, they work in both savory and sweet recipes rather nicely, and it’s all due to their sweet nature.
Carrot roots are storage organs for starch (the starch provides energy to the plant as it grows), and starch (starch is a polymer of sugar). These sugars inside the carrot play an essential role in how we decide to cook and eat carrots.
Have you ever left carrots on the countertop and forgotten about them? They’ll turn limp and, oddly enough, start to taste much sweeter. As carrots age, an enzyme called amylase jumps in and cuts the starch into individual sucrose molecules (aka table sugar); sucrose tastes sweet and makes the carrot taste sweeter. Carrots are stored at cold temperatures in the refrigerator to reduce the risk of this happening. Now, I certainly don’t want you using old carrots, and I don’t want you to age them on your kitchen countertops to make them taste sweeter. There’s another way by which you can make carrots taste sweeter, and that’s through heating. When carrots are heated (in this recipe, the carrots are braised), the combination of heat and water helps break the starch, and the carrots turn tender and taste sweeter.
There are several different ways to make carrot halwa or gajjar ka halwa (in Hindi); some involve using condensed milk or khoya (a type of dairy solid obtained from cooking milk). This recipe is straightforward; you start with milk and braise the carrots until the liquid completely evaporates. It also isn't as sweet as some of the store-bought ones.
I often think that carrot halva is an exercise in building food color and aroma; there’s a lot of wisdom in how it artfully plays with just two spices (cardamom and saffron). Carrots are rich in the carotenoid pigment, beta carotene. This orange-colored pigment is fat-soluble, which means that they dissolve in fat, so the use of ghee and whole milk helps draw out those pigments, and you’ll see it in action as you cook. The ghee will start to turn bright orange; on the other hand, the milk will be a slightly lighter shade of orange color because comparatively, there’s less fat, and that fat is dispersed in the milk (milk is an emulsion of oil-in-water). Eventually, the dish is cooked until the water from the milk evaporates and what’s left behind are milk solids and fat.
The second source of color in this dish comes from saffron, the dried stigmas collected from the crocus flower. Saffron contains the yellowish-red pigment crocetin that gives it its distinctive color, and one of the players behind its unique fragrance is safranal. Too much saffron can be an intense sensory experience, which is good because it’s an expensive spice; a little bit goes a long way. Cardamom (green cardamom and not black) is the final ingredient in this sweet, adding its cool sweet scent. The result is a cloud of absolute pure heavenly sweetness.
When I make carrot halva, I prefer a coarse over a fine grate, I like the bite, but you can choose whatever suits you. What’s more critical is cooking the carrots slowly, so they turn tender and don’t burn. At no point should the carrots turn golden brown; we’re not looking to build any deep bittersweet flavors in the carrots. Once the milk is added, the carrots will absorb the liquid and turn even more tender, don’t be surprised if the milk eventually curdles; carrots are acidic in nature (acids curdle the milk). This will not affect the taste since the milk needs to be evaporated entirely, and the milk solids will form a crumbly texture around the carrot shreds. Carrot halwa can be eaten warm or at room temperature; I avoid eating it cold since the ghee starts to firm up (but you can eat it cold if you want to). For the garnish, I usually opt for almonds, cashews, and pistachios either by themselves or in a combination. Shelled melon seeds are also used as a garnish, you can find them at an Indian store or online, the one that I pick up is called char-magaz (it contains 4 types of melon seeds).
Carrot halwa is undoubtedly one of the more spectacular and famous Indian sweets, and I think, it deserves its own National or International holiday (and eventually should get one). For now, it can bask in the spotlight on Diwali and National Carrot Day!
Carrot Halwa/Gajjar Ka Halwa
Not only is it one of the most popular sweets served at Indian holidays like Diwali and festive occasions, but carrot halwa or gajjar ka halwa is also one of the simplest treats to make at home. It’s one of those desserts that I consider comfort food, and yeah, on occasion, I’ve eaten it for breakfast too.

The Cook’s Tips
In most instances, I recommend unsalted butter as an alternative to ghee. This is one place you’re better off using ghee due to its nutty aroma. If you do end up using butter, you will need to cook it till the water evaporates and the milk solids turn light brown. You must then remove the melted fat and discard all the solids. You will simply end up making ghee, so just save yourself a few extra steps and start with ghee.
The nuts can be salted but they should be roasted. Typically, the nuts are fried in ghee, but I don’t like to do that here, I like the aroma of roasted nuts. If you prefer the nuts fried, fry them in the ghee before you cook the carrots. Remove the nuts and transfer them to a bowl.
There is no need to add salt. The carrots and milk have enough sodium on their own. If you’re still unconvinced, taste the halwa once the milk evaporates to determine if it really needs salt.
Avoid serving this cold as ghee solidifies when cold.
Makes 4 to 6 servings
¼ cup/60 ml ghee
1 ½ lb/680 g coarse or finely grated carrots
4 ½ cups/1 L whole milk
½ cup/100 g sugar
¾ tsp ground green cardamom
15 to 20 strands of saffron
½ cup/35 g golden raisins
2 Tbsp whole or broken roasted cashews
2 Tbsp chopped roasted pistachios
Melt the ghee over low heat in a large heavy-bottomed saucepan or stockpot (I prefer a stockpot for this because it is deep and won’t let the milk boil over). Stir in the carrots, cover with a lid, and cook until the carrots turn tender, 25 to 30 minutes. Stir often to prevent the carrots from sticking to the bottom of the saucepan and burning.
Pour in the milk and stir in the sugar. Cook over low heat, until all the liquid evaporates, stirring often to prevent the carrots from sticking to the bottom of the saucepan and burning, 1 to 1 ½ hours. At the 45-minute mark, stir in the cardamom and saffron along with the raisins. Once the liquid evaporates, remove from the heat and transfer to a serving dish. Garnish with the chopped nuts. Serve warm or at room temperature. This halwa will be good for up to a week if stored in an airtight container in the refrigerator, but it won’t last that long.
October 11, 2022
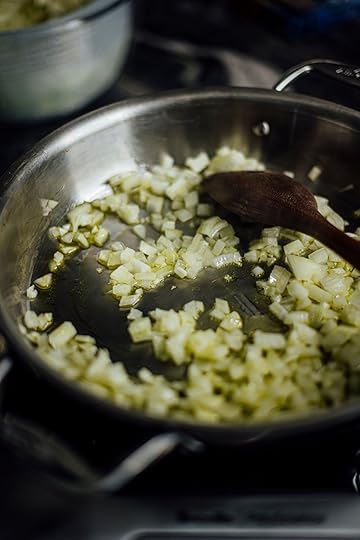
Braised Cabbage Bucatini
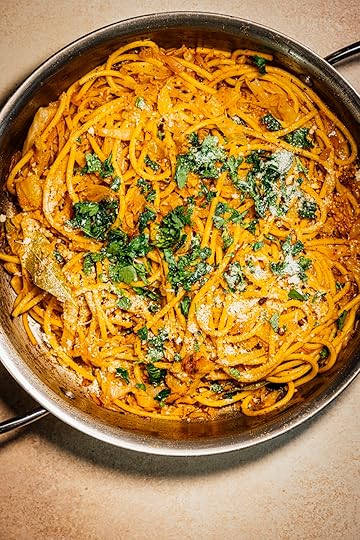
Cabbage is my comfort vegetable. It’s been my BFF, and we’ve had a strong relationship. It’s one of the most delicious vegetables, and I’m always looking for new ways to use it in my kitchen. This week, I’ve got a simple, yet mighty pasta dish composed of bucatini and braised cabbage. Dried spices, garlic, tomato paste, stock, miso, and parmesan help the pasta's savory profile and make this a dish you’ll want to eat on repeat.
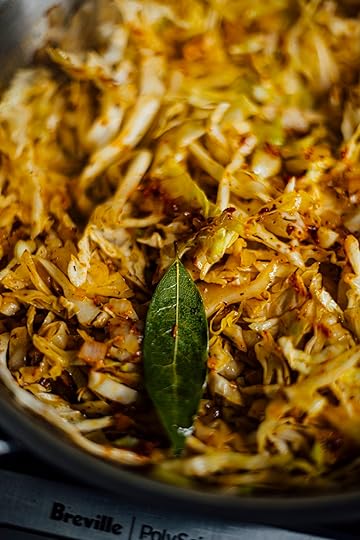
I know some people ponder on the usefulness of bay leaves. Does it do anything in cooking? I think they’re pretty remarkable, and not only do they add a unique fragrance, but they also excite the receptors in your mouth. The next time you cook with bay leaves and eat the dish, pay attention to the tingling sensation on your lips and mouth. The nerves get irritated, and we evolved to find this irritation an exciting and pleasurable experience. This is the same response we have to the sensation of heat produced by chillies. Bay leaves contain a chemical called eugenol that is also present in cinnamon, cloves, and nutmeg. The aroma of bay leaves becomes intense when the leaves are sautéed in oil, and to be honest, it reminds me of a cross between cinnamon and nutmeg without the intensely sweet aroma of cinnamon. I prefer to use Mediterranean bay leaves in this recipe over the Indian ones, though it’s not a big deal if I do end up using the Indian ones. The flavor differences IMO are minor.
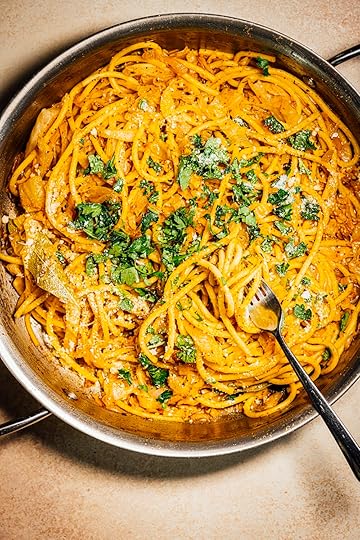
Braised Cabbage Bucatini
Tender shredded cabbage leaves with a fragrant dose of dried Mediterranean herbs are braised together in this comforting and simple pasta dish. Vegetable stock and miso bring the umami.
The Cook’s Notes
Crumble the dried rosemary leaves to help extract their flavor more efficiently. I crush the leaves between the palms of my hands directly over the saucepan.
Besides parmesan, fontina also works great here.
Use white or yellow miso over red because they contain less salt and give you better control over flavoring the dish.
To veganize this dish, skip the parmesan or use vegan cheese or nutritional yeast.
Makes 4 servings
1 lb/455 g bucatini or spaghetti
2 Tbsp extra-virgin olive oil
1 large onion, diced
4 garlic cloves, grated
2 bay leaves
1 tsp dried rosemary leaves, crushed
1 tsp ground black pepper
1 tsp red pepper flakes such as Aleppo, Maras, or Urfa
1 tsp dried thyme
1/8 tsp ground nutmeg
1 Tbsp tomato paste
1 lb/455 g green cabbage, shredded
Fine sea salt
1 cup/240 ml low-sodium vegetable or chicken stock
1 tsp white or yellow miso
2 Tbsp chopped parsley
¼ cup/8 g grated Parmesan
Cook the pasta as per the manufacturer’s instructions.
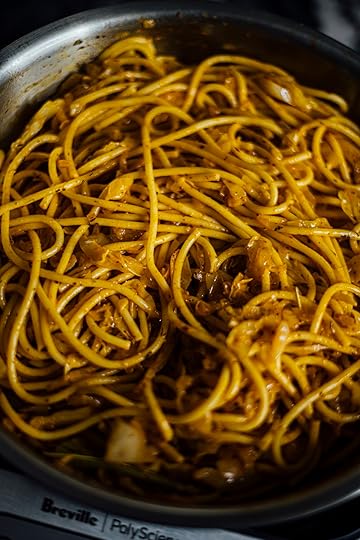
While the pasta cooks, prepare the cabbage. Heat the oil over medium heat in a large saucepan or skillet. Add the onion and sauté until translucent, 4 to 5 minutes. Add and sauté the garlic, bay leaves, rosemary, black pepper, red pepper, thyme, and nutmeg until fragrant, 30 to 45 seconds. Stir in the tomato paste and cook until the tomato paste begins to brown, 3 to 4 minutes. Fold in the cabbage, add a pinch of salt, and sauté until the cabbage turns tender, 4 to 5 minutes. In a small bowl, whisk the stock and miso until smooth, pour over the cabbage, cover with a lid, reduce the heat to low, and simmer until all the liquid evaporates, 5 to 6 minutes. Taste and season with salt if needed; don’t overdo it because parmesan is salty. Add the cooked pasta and fold to coat well. Top with parsley and parmesan. Serve immediately. Leftovers will stay good for up to 4 days if stored in an airtight container in the refrigerator.
October 10, 2022
Palak Paneer/Saag Paneer And A Guide to Paneer

One of the most popular recipe requests on Facebook was for palak paneer, and I knew I couldn't end the year without sharing my recipe with you.
Palak Paneer
Before we begin, let's get to know paneer a little better.
What Is Paneer?
One of the issues that often come up in food writing, especially for some of us writers who work with non-European ingredients, is that we need to describe them using a more familiar counterpart even if there isn’t one. Take paneer, for example; it’s often called “Indian cottage cheese” or “Indian cheese”. While paneer is a form of cheese, that description is misleading. People who make paneer for the first time and aren't familiar with it expect it to be salty. Almost all European cheeses are salted, but paneer is not. Paneer isn’t the only example; kulfi, a frozen Indian dessert, is described as an Indian ice cream. This description conjures up images of soft scoops of ice cream, and kulfi most certainly doesn’t qualify. Kulfi contains ice crystals and is firm enough that it can be cut with a knife. Kulfi’s texture lies between a milky ice cream and a sorbet, but is firm. While I've used these descriptions when I write recipes to introduce ingredients and provide some kind of comparison, I often wonder if I’m setting the stage up for misconceptions.
To understand why paneer is made without salt, let’s first see how paneer is prepared. Paneer is obtained by curdling boiling milk using an acid like lemon or lime juice, the whey is drained and discarded, and the curdled milk solids are collected. The milk solids are then rinsed well and then pressed to form a cake which gives the paneer its characteristic block-like structure. Salt is never added at any point, whether you make it at home or buy it from a grocery store or an Indian market.
Paneer is a firm product and is not a spreadable cheese. It also doesn’t melt when heated, making it amenable to frying and other heat-based applications as it holds its structure. For this reason, paneer is added to dishes like today’s palak paneer and grilled on skewers to make kebabs.
Homemade Paneer Is Often Too Soft Some of you who’ve made paneer at home might wonder why the paneer you’ve made isn’t as firm as the one you’ve bought from stores. There is a reason for this, and it lies in the chemistry of milk. In India, buffalo's milk is more common than cow's milk and is often the source for paneer making (Cow's milk is more prevalent in the West). Homemade paneer made from cow's milk usually ends up like ricotta; it’s difficult to press it into a block and cut it into cubes that hold its shape. The calcium content of milk from cows and buffalos (cow’s milk has significantly lower calcium than buffalo) is very different, affecting the degree of firmness. When I was working on The Flavor Equation cookbook (learning how to make paneer using the recipe from the book), I tested cow's milk with different types of cooking acids. After multiple rounds of paneer making, I found that adding calcium chloride (an ingredient used in cheese making) along with lemon juice to cow’s milk helped produce firm paneer just like the one sold in stores, it was also easier to press and shape, and then cut the cubes of paneer held on to their shape. Adding calcium chloride increased the calcium content of cow’s milk and helped with the curdling of the milk (calcium chloride is an acidic salt and, when dissolved in water, lowers the pH and changes the electrical charges on the amino acids in the milk proteins). You can also read more about it at Serious Eats.
Paneer takes on the flavors of whatever it is exposed to (like tofu) and is high in protein, making it extremely popular in Indian cooking.
Palak Paneer Palak paneer is sometimes called saag paneer. Saag is the Hindi word for green leaves, and you can make this dish with mustard greens (the most common choice, especially in the Indian state of Punjab where mustard is grown) or spinach (the Hindi word for spinach is palak), but you can use any type of green leaves. If you think of a Venn diagram, saag paneer is the big circle, and palak paneer is the smaller circle inside it.
Some of the saag and palak paneer recipes will call for the addition of kasoori methi, aka sun-dried fenugreek leaves. You can buy this online or find it in an Indian grocery store. A little bit of this goes a long way; some people discover the flavor of fenugreek a bit potent, so use it accordingly or skip it.
To Fry Or Not To Fry As a child, I would only eat paneer fried if it wasn't; it felt like my world collapsed (I was a dramatic child, and I think as an adult, I've mellowed somewhat, but my family and friends might disagree). For no particular reason, I now prefer paneer in stews unfried, the texture feels so much more tender and delicate, and I love that. If you want to fry the paneer, do so by all means.
A couple of pointers before you make this dish. First of all, I am not convinced that 8 oz/230 g of paneer is enough to feed four people even as a side. Luckily because this recipe makes plenty of gravy, I’ve provided the option to double the paneer (so it can actually feed 4 people as a side or main), but I will leave this up to you. Some people prefer less paneer and more gravy. READ THE COOK'S NOTES.
Where To Buy Paneer - Indian Grocery Stores, Whole Foods, and many other grocery stores now sell paneer in the dairy aisle. You can buy a couple of blocks and freeze them. Thaw a block the night before you plan to use it.
Now, let’s make this pot of palak paneer.

Palak/Saag Paneer
A bowl of warm Palak Paneer over rice or served with warm buttery naan or roti is Indian comfort at its best. I prefer the paneer straight up but if you like it fried, pan-fry them in a little oil and toss them in the sauce.
The Cook’s Notes
You can use frozen spinach, but I've found fresh spinach always gives a bright shade of brilliant green. Remember to thaw it and adjust the water accordingly.
When it comes to preparing dishes like palak paneer, I’ve noticed spinach behaves just like potatoes. It sucks up flavors and for that reason, you might need to add a bit more salt and cayenne when flavoring the dish.
Kasoori methi or dried fenugreek leaves are classically used to make this dish. You will find this at Indian grocery stores or online. If you can’t get your hands on some, it’s fine, I skip it sometimes too since I don’t always keep it in stock. A tiny amount goes a long way.
You might be wondering why I’ve listed 8 oz/230g and 1 lb/455g options for paneer in this recipe. If you’re serving this as a side for 4 people, 8 oz/230g of paneer will be enough but if this is meant to be a main dish or the only dish you make, then I recommend using 1 lb/455g of paneer for 4 people The amount of gravy here is enough for both purposes. Some people tend to like it with more paneer (me) and others with more gravy. This recipe gives you enough room for adjustment.
Be careful, when adding the yogurt to the gravy. Yogurt can curdle easily, and fat-free yogurt falls apart very easily on heating. To avoid this, use full-fat or at least 5% fat Greek yogurt, and add it after removing the pot from the stove.
You can pan-fry the paneer cubes instead of adding them directly to the gravy. To do this, fry the paneer in batches in ¼ cup/60 ml of a neutral oil like grapeseed (olive oil will also work) till golden brown all over. Drain on kitchen paper towels and then add them to the gravy.
Makes 4 servings
1 lb/455 g fresh baby spinach leaves
2 Tbsp water
1 medium onion, diced /150 g
1 Tbsp fresh ginger, peeled and chopped
4 garlic cloves, chopped
3 Tbsp/45 ml ghee, unsalted butter, or extra-virgin olive oil
One 2 in/5 cm piece cinnamon stick
1 Tbsp ground coriander
1 ½ tsp garam masala homemade or store-bought
1 tsp whole cumin seeds
¼ to ½ tsp ground cayenne
1 tsp kasoori methi (optional)
¼ cup/60 g plain, unsweetened Greek yogurt
Fine sea salt
8 oz or 1 lb/230 g or 455 g paneer, cut into 1 in/2.5 cm cubes (See The Cook’s Notes)
Place the spinach leaves with the water in a medium Dutch oven or saucepan over low heat. Cover with a lid and let cook until the leaves wilt completely and release their liquid, stirring occasionally to prevent the leaves from sticking and burning to the bottom of the pot, 10 to 12 minutes. Remove from the heat and carefully transfer the spinach with the liquid to a blender or food processor. Wipe the Dutch oven clean.
Add the onion, ginger, and garlic and pulse over high speed until silky smooth.
Heat 2 Tbsp of the ghee in the Dutch oven over medium heat. Add the cinnamon, coriander, and cumin and sauté until the spices turn fragrant, 30 to 45 seconds. Add the puréed spinach mixture and kasoori methi, and bring to a boil over medium-high heat, reduce to low, and simmer for 5 minutes, stirring occasionally. Remove from the heat. Fold in or whisk in the yogurt, return to the stove and simmer over low heat. Taste and season with salt. The consistency of the gravy should be thick, if you prefer it thinner add a little water, a Tbsp at a time.
Fold in the paneer and simmer until the paneer turns soft, 1 to 2 minutes. Taste one piece of paneer with the sauce, and season with salt if needed. Top with the remaining 1 Tbsp of ghee (I prefer butter here) and serve hot or warm with rice or flatbread like naan.
October 9, 2022
Crispy Parmesan Garlic Yuzu Potatoes

Crispy Parmesan Garlic Yuzu Potatoes
The classic dish of crispy parmesan potatoes is one of my favorites to serve at Thanksgiving but truth be told, I make it any fall or winter dinner. It's a crowd-pleaser and the splash of yuzu gives the potatoes a wonderful citrusy aroma. These are best eaten as soon as they're cooked.
Tip: These are best eaten within an hour after cooking because they will lose crispness over time.
The Cook's Notes
The sugar and proteins in the butter melt and turn reddish-brown giving a hint of caramel flavor to these potatoes.
By cooking the potatoes covered, the potatoes cook in the water released from their cells and that helps create a creamy interior and eventually a beautiful crispy coat.
Yuzu gives the potatoes its characteristic refreshing and floral lemony scent but if you can't find yuzu (search in the International Aisle or Asian markets), a Meyer or Eureka Lemon will also work. If using a lemon, use 1 tsp of the zest to build up the fragrance.
Be careful not to oversalt during cooking as the cheese carries salt too.
Makes 4 to 6 servings as a side
2 Tbsp unsalted butter, cubed
2 Tbsp extra-virgin olive oil
1 ½ lb/910 g new potatoes, sliced in half lengthwise
Fine sea salt
4 garlic cloves, grated
½ tsp ground black pepper
¼ cup/8g grated parmesan
3 Tbsp chopped chives
2 Tbsp yuzu or lemon juice
Melt the butter in a 12 in/30.5 cm stainless-steel or cast-iron skillet over medium-low heat. Once the butter stops crackling (the water has completely evaporated), the milk solids should be light golden brown, add the olive oil. If you add the oil before the water evaporates, the water will start to spurt in the hot oil. Add the potatoes and ¼ tsp fine sea salt, cover the skillet with a lid and shake the pan well to coat the potatoes. Increase the heat to medium and cook the potatoes, shaking the skillet occasionally, until the potatoes are tender enough to be pierced with a fork or knife and golden brown and crisp, 12 to 15 minutes. If the potatoes are undercooked or start to burn add 2 Tbsp of water and continue to cook until the flesh is tender. Add the garlic and pepper and cook for 1 minute, until fragrant, shaking the potatoes in the skillet to coat well. Remove from the heat, add the parmesan, chives, and yuzu, and shake to coat well. Taste and season with fine sea salt if needed. Transfer to a bowl and serve immediately (because just like French fries, cold crispy potatoes are just not nice).


