
Nik Sharma's Blog, page 5
September 30, 2022
Black Rice Coconut Milk Pudding

I love rice in any form, sweet or savory. Amongst the sweet avatars of rice, rice puddings remain a favorite that started as kheer from my childhood in India to the different forms of rice pudding that I learned over time. This rice pudding is based on the flavors of the delightful Thai-style rice puddings where sticky rice is used, but I haven’t used sticky rice….
I’ve found it easier to come across black rice (aka Forbidden Rice) than I have black sticky rice in my store, and I wanted to find a way to use it in rice pudding. I’ve worked out a simple way to recreate the same creamy texture in this recipe. I got a clue from the bean and lentil dishes like dals, stews, and soups, where often part of the stew is blended to help thicken it. Blending destroys the physical structure of the cooked seeds, but it also helps the starch inside the sources do its job of thickening the liquid. This technique works great in this rice pudding, and it creates a thick and creamier finish to the pudding.

Thai-style rice puddings also use coconut cream or milk, and pandan leaves to build on flavor. I love the scent of coconuts, so I took a little liberty and used coconut milk and toasted coconut. Instead of pandan, I used green cardamom, which is lovely in this combination. To sweeten the pudding, I love the earthy flavor of jaggery (look for it online or at your local Indian grocery store), but dark brown sugar or muscovado are wonderful options too. The final finish involves topping the pudding with a fresh lime zest, which IMO really makes the pudding shine.
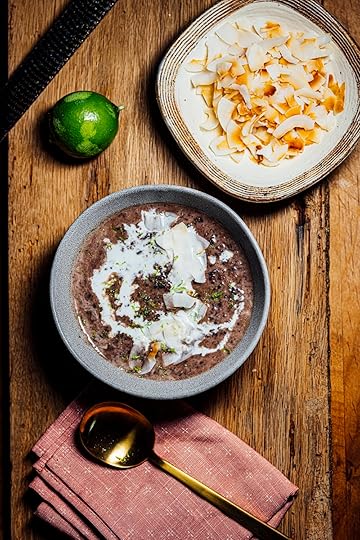
Black Rice Coconut Milk Pudding
Rice puddings are my comfort (and sometimes breakfast) food. This rice pudding is based on the traditional Thai sticky rice pudding with a few differences. It doesn’t use sticky rice or pandan/kewra. Instead, I use black/forbidden rice along with sushi rice. To achieve a similar creamy and thick texture from the starch, a portion of the rice is blended with water to create a smooth liquid that forms the base of the pudding. Coconut milk and cardamom add a wonderful scent, along with a dash of fresh lime zest and toasted coconut.
The Cook’s Notes
Both types of rice can be soaked together or separately; it won’t make a difference.
My favorite brand of coconut milk is Aroy-D, the smell is heavenly. For a richer texture, reduce the volume of coconut milk to ½ cup/120 ml and add 1 cup/240 ml of coconut cream.
Makes 4 to 6 servings
1 cup/200 g black rice, cleaned
¼ cup/50 g sushi rice, cleaned
4 ½ cups/1 L water
¾ cup/150 g packed brown sugar or jaggery
1 tsp ground green cardamom
1 ½ cups/360 ml unsweetened coconut milk
Zest of 1 lime
½ cup/50 g unsweetened toasted coconut
Rinse the rice and soak them in a large bowl with enough water to cover them by 2 in/5 cm. Soak overnight. The next day, discard the soaking water.
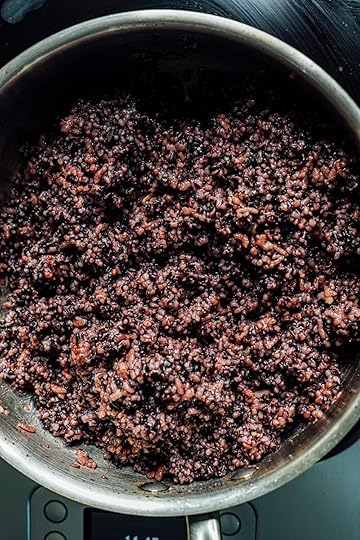
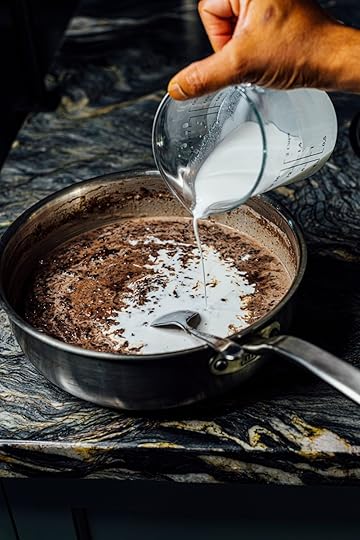
Add the rice and 4 cups/960 ml of water to a large saucepan and bring to a boil over medium-high heat. Reduce to a simmer, cover the pan loosely with a lid, stir often to prevent the rice from sticking and burning, and cook until the rice is tender, 25 to 30 minutes. Remove from the heat. Transfer 2 cups of the cooked rice and ½ cup/120 ml water to a blender or food processor, and pulse until smooth and velvety. If it needs help to move, stop the blender, stir in a few more tablespoons of water, and blend. Pour the liquid back into the rice. Add the brown sugar and cardamom to the rice mixture. Cook over low heat until the sugar is dissolved, occasionally stirring to prevent scorching. Remove the saucepan from the stove and mix half the coconut milk. Taste and add more sugar if needed. Remove the saucepan from the stove and pour in 1 cup/240 ml of coconut milk. Taste and add more sugar if needed.
Serve the rice pudding warm or cool, topped with fresh lime zest and toasted coconut, and with the remaining ½ cup/120 ml coconut milk on the side.


Black Rice Pudding
I love rice in any form, sweet or savory. Amongst the sweet avatars of rice, rice puddings remain a favorite that started as kheer from my childhood in India to the different forms of rice pudding that I learned over time. This rice pudding is based on the flavors of the delightful Thai-style rice puddings where sticky rice is used, but I haven’t used sticky rice….
I’ve found it easier to come across black rice (aka Forbidden Rice) than I have black sticky rice in my store, and I wanted to find a way to use it in rice pudding. I’ve worked out a simple way to recreate the same creamy texture in this recipe. I got a clue from the bean and lentil dishes like dals, stews, and soups, where often part of the stew is blended to help thicken it. Blending destroys the physical structure of the cooked seeds, but it also helps the starch inside the sources do its job of thickening the liquid. This technique works great in this rice pudding, and it creates a thick and creamier finish to the pudding.
Thai-style rice puddings also use coconut cream or milk, and pandan leaves to build on flavor. I love the scent of coconuts, so I took a little liberty and used coconut milk and toasted coconut. Instead of pandan, I used green cardamom, which is lovely in this combination. To sweeten the pudding, I love the earthy flavor of jaggery (look for it online or at your local Indian grocery store), but dark brown sugar or muscovado are wonderful options too. The final finish involves topping the pudding with a fresh lime zest, which IMO really makes the pudding shine.
Black Rice Coconut Milk Pudding
Rice puddings are my comfort (and sometimes breakfast) food. This rice pudding is based on the traditional Thai sticky rice pudding with a few differences. It doesn’t use sticky rice or pandan/kewra. Instead, I use black/forbidden rice along with sushi rice. To achieve a similar creamy and thick texture from the starch, a portion of the rice is blended with water to create a smooth liquid that forms the base of the pudding. Coconut milk and cardamom add a wonderful scent, along with a dash of fresh lime zest and toasted coconut.
The Cook’s Notes
Both types of rice can be soaked together or separately; it won’t make a difference.
My favorite brand of coconut milk is Aroy-D, the smell is heavenly. For a richer texture, reduce the volume of coconut milk to ½ cup/120 ml and add 1 cup/240 ml of coconut cream.
Makes 4 to 6 servings
1 cup/200 g black rice, cleaned
¼ cup/50 g sushi rice, cleaned
4 ½ cups/1 L water
¾ cup/150 g packed brown sugar or jaggery
1 tsp ground green cardamom
1 ½ cups/360 ml unsweetened coconut milk
Zest of 1 lime
½ cup/50 g unsweetened toasted coconut
Rinse the rice and soak them in a large bowl with enough water to cover them by 2 in/5 cm. Soak overnight. The next day, discard the soaking water.
Add the rice and 4 cups/960 ml of water to a large saucepan and bring to a boil over medium-high heat. Reduce to a simmer, cover the pan loosely with a lid, stir often to prevent the rice from sticking and burning, and cook until the rice is tender, 25 to 30 minutes. Remove from the heat. Transfer 2 cups of the cooked rice and ½ cup/120 ml water to a blender or food processor, and pulse until smooth and velvety. If it needs help to move, stop the blender, stir in a few more tablespoons of water, and blend. Pour the liquid back into the rice. Add the brown sugar and cardamom to the rice mixture. Cook over low heat until the sugar is dissolved, occasionally stirring to prevent scorching. Remove the saucepan from the stove and mix half the coconut milk. Taste and add more sugar if needed. Remove the saucepan from the stove and pour in 1 cup/240 ml of coconut milk. Taste and add more sugar if needed.
Serve the rice pudding warm or cool, topped with fresh lime zest and toasted coconut, and with the remaining ½ cup/120 ml coconut milk on the side.
September 29, 2022
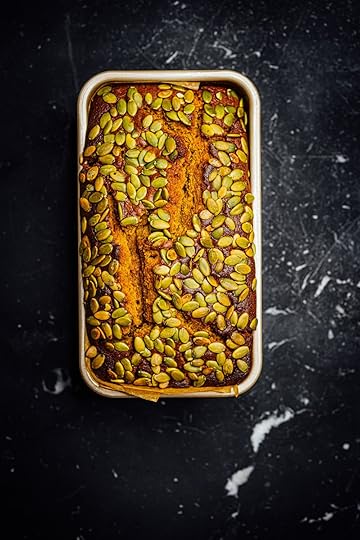
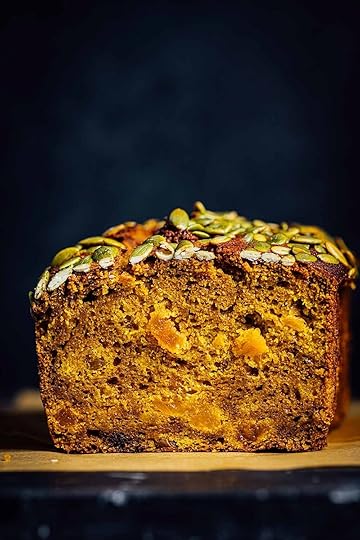
Pumpkin Apricot Bread
A few weeks ago, I asked what you'd like me to cook, and overwhelmingly, squash recipes were one of your most popular requested items. Today we’re making pumpkin bread (we'll tackle squash again soon, I promise!). What I love about these kinds of breads (or cakes if you want to call them that) is the ease by which it comes together and as much as I like frostings there are many times when I do not want to go through the entire process of making it.
I’ve topped this pumpkin bread with a generous sprinkling of pumpkin seeds. Once baked, they transform into a delicious toasty crunchy bite, and paired with the bits of the sweet tangy flavor of the tiny bits of apricot, it tastes like the proper seasonal transition. A sweet little hint of summer goodness moving into the radiant display of fall.
Pumpkin Apricot Bread
(This recipe first appeared in This Is A Cook-Letter)
A pumpkin loaf with a soft and tender crumb, this sweet bread contains bits of dried apricot and is topped with a layer of bright green pumpkin seeds. A slice of this loaf is lovely with a cup of hot coffee or tea. Lightly sweetened crème fraîche goes along with this pumpkin loaf.
The Cook’s Notes:
With sweet breads like these, the oil leaves a much nicer and more moist cake. You can use the blender method to make the liquid portion of the batter just like I did in the chocolate cake recipe.
Besides extra-virgin olive oil, grapeseed oil also works well in this bread.
There are a few different ways to determine when breads and cakes are done. One way that most of us are familiar with is to insert a skewer or knife through the center of the bread and cake and see if it comes out clean. You can also press the top gently and see if it springs back, if it remains depressed then it still needs more time (don’t press too hard or you’ll end up with a permanent crater). A method that I use all the time and I learned this while I worked at the patisserie, is to get a thermometer and stick the probe into the center of the bread or cake, if it reads 200F/95C then it’s done.
Don’t use pre-toasted pumpkin seeds, as they will toast on top of the cake as it cooks. In the past, when I’ve swapped in pre-toasted pumpkin seeds (and this holds true for nuts and other seeds), the oils inside the seeds turn rancid and start to smell funky quickly.
Here’s a trick that's often used in commercial baking: if you think the color of your batter is not a brilliantly yellowish-orange from the pumpkin, whisk in ¼ tsp to ½ tsp of ground turmeric to the batter. It will help amplify the color but don’t use more than this or it runs the risk of making things taste like turmeric (that taste won’t work here).
Makes one 9 in/23 cm loaf
cooking spray oil or olive oil
1 ½ cups/210 g all-purpose flour
1 tsp baking powder
½ tsp baking soda
½ tsp ground green cardamom
¼ tsp ground allspice
15 to 20/about 150 g dried apricots, chopped
One 15 oz/430 g can of pumpkin puree
1 cup/200 g packed light brown sugar
½ cup/120 ml maple syrup
½ cup/120 ml extra-virgin olive oil
2 large eggs, cold
1 tsp vanilla extract
¼ cup/35 g raw pumpkin seeds
Preheat the oven to 350F/180C.
Grease and line a 9 in/23 cm loaf cake pan with parchment paper and a little cooking spray oil. In a medium mixing bowl dry whisk, the flour, baking powder, baking soda, green cardamom, and allspice.
In a small mixing bowl toss, the apricots and 2 Tbsp of the dry flour mix to coat well. They really need to be coated very well or they will sink like a boat hit by an iceberg during baking.
In a large mixing bowl whisk, the pumpkin purée, brown sugar, maple syrup, olive oil, eggs, and vanilla until smooth.
Add the flour mixture to the large bowl with the wet ingredients and whisk until combined and there are no visible flecks of flour. Add the apricots, fold, and transfer to the prepared pan. Level the top with an offset spatula.
Top the surface of the batter with the pumpkin seeds.
Bake in the preheated oven for 1 hour to 1 hour 15 minutes, until the cake is firm, springs back when gently pressed, and a skewer or knife when inserted through the center comes out clean. Rotate the pan halfway through during baking.
Let the bread cool in the pan for 5 minutes. Run a knife along the edges to release the bread, unwrap, and let cool to room temperature before serving. The bread will stay good for 4 days if stored in an airtight container at room temperature. It can also be frozen for up to 1 month if wrapped tightly with clingfilm and kept in an airtight ziptop bag.
September 28, 2022
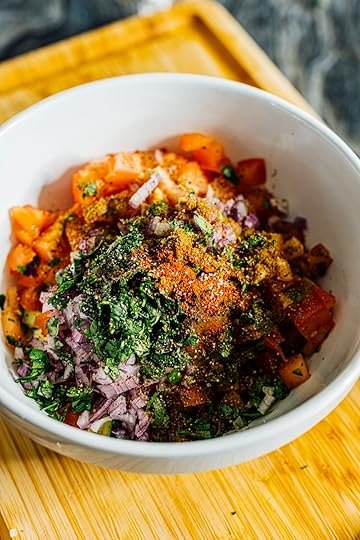
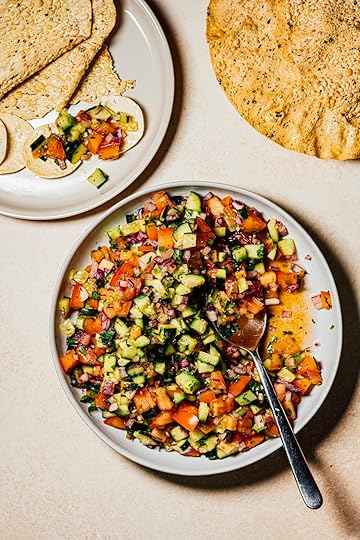
Kachumber Salad

Traditionally, salads occupy the position of an accompaniment or side as part of a larger meal in Indian cuisine. There are some noticeable differences too. Indian salads, unlike their Western counterparts, rarely use oil in the dressings, and the seasonings are kept very simple. I strongly suspect the salad serves as a counterpoint to the stronger flavors in the accompanying meat and vegetable dishes. Kachumber salad is one of the most famous salads associated with Indian cuisine, and it is also one of the easiest dishes to put together.

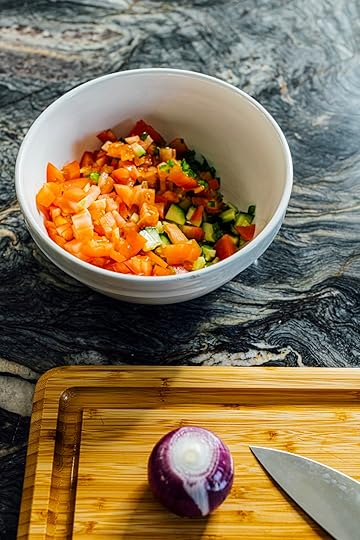
While cucumbers, tomatoes, and shallots or red onions are the three standard ingredients of a kachumber salad, the salad is flexible. I throw in radishes and radish greens, lettuce, cooked beans, and more. I like to think of it as the mother salad from which all other Indian salads originate.
Kachumber salad can be eaten with rice, flatbread, curries, dals, etc., but they are SO GOOD with fried or roasted papad/pappadums. On weekends, I’ll make a big bowl along with some papads and dip away, or if I feel like sharing, then I serve it as an appetizer.
Kachumber Salad
One of the most iconic salads served at Indian restaurants and made in homes; this salad is served as an accompaniment to a large meal. When in season, I toss in diced chunks of crisp pink radishes. If you don’t like cilantro, fresh dill or mint is delicious here. In addition to eating it as a side, I also love it with fried or roasted discs of papad/poppadum, just like tortilla chips and salsa.
The Cook’s Notes
Skip the green chilli or use how much you want to.
Due to osmosis, the vegetables will release a lot of liquid once they’re tossed together. Eating this salad within a few hours after it's prepared is best.
Kashmiri chlli powder is a dried mild red chilli powder that is used for its aroma and bright red color. Find it online or in Indian grocery stores.
Makes 4 servings as a side
1 medium/300 g English cucumber, diced
1 large/200 g tomato, diced
1/60 g shallot or red onion, diced
1 green chilli such as jalapeno, serrano, or Bird’s eye, diced
2 Tbsp fresh cilantro, dill, or mint, chopped
2 Tbsp fresh lemon or lime juice
½ tsp ground red chilli powder like Kashmiri
½ tsp ground black pepper
¼ tsp ground toasted cumin
Fine sea salt
Fold the cucumber, tomato, shallot, green chilli, and cilantro in a medium mixing bowl. Add the lemon juice, red chilli powder, black pepper, toasted cumin, and salt. Taste and season if needed. Serve immediately. This salad tastes best the day it’s prepared but can be stored for up to 1 day in an airtight container in the refrigerator.
September 27, 2022
Roasted Pumpkin Barley Burrata Salad
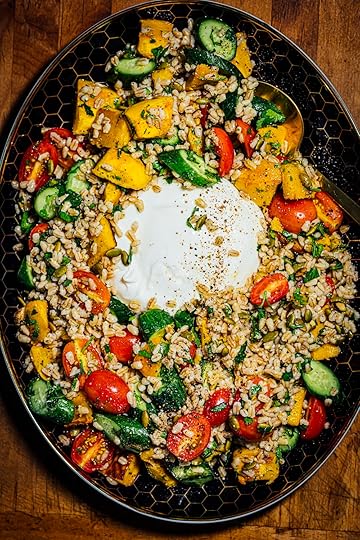
I love grain salads with lots of fresh crunchy vegetables. Now that fall is upon us; I get an excuse to roast and caramelize sweet chunks of pumpkin and serve you this delightful barley salad.
The incredible feature of this salad is that you can toss in any fall or winter squash and use whatever type of grain you have on hand (I love farro and wild rice here). In addition, it is an accessible brunch menu item that I’ve pulled together to feed friends on weekends.
Before putting this salad together, you must roast the pumpkin and cook the barley. However, you can make them a day ahead of time. If you must cook them on the day off, you can rapidly cool the hot pumpkin and barley by spreading them out in a thin layer on a plate or baking sheet and sticking it in the freezer until cool.
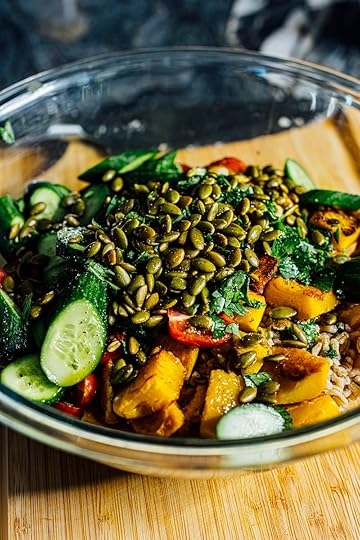
While I serve this salad on its own, I am known to occasionally serve this salad with a jar of chilli crisp oil on the side for my heat-loving friends. The heat and savory profile of chilli crisp play well with the creamy nature of the burrata. Enjoy!

Roasted Pumpkin Barley Burrata Salad
Warm pumpkin, crunchy cucumbers, sweet tomatoes, roasted pepitas, creamy burrata with nutty pearl barley, and a refreshing lemon salad dressing with lots of black pepper. This is the salad I turn to every fall. It’s a meal on its own and doesn’t need anything else to go along with it.
The Cook’s Notes
Besides pumpkin, butternut and delicata squash is also fantastic here.
Farro and wild rice are fantastic alternatives to barley.
This applies to both the pumpkin and barley. If you want to cool them quickly, spread them out on a large plate and stick the plate in the freezer for 10 minutes or until cool.
Sometimes, I skip the burrata and use ciliegine mozzarella in this salad which works very well.
Makes 4 servings
1 lb/455 g sugar pie pumpkin, peeled and diced into 1 in/2.5 cm cubes
1 Tbsp + ¼ cup/60 ml extra-virgin olive oil
Fine sea salt
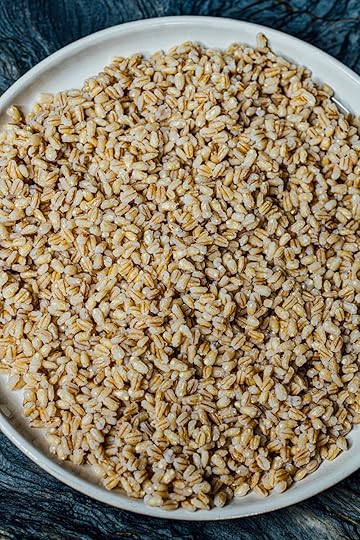
¾ cup/150 g pearl barley
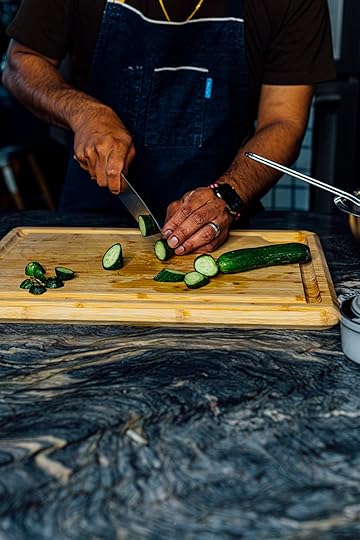
4 (total weight about 200 g) Persian cucumbers, ends trimmed and discarded, cut into ½ inch/12 mm thick slices
1 dry pint/275 g cherry tomatoes, cut in half lengthwise
2 Tbsp flat-leaf parsley, chopped
2 Tbsp roasted salted pepitas
¼ cup/60 ml fresh lemon juice
1 Tbsp honey or maple syrup
1 to 2 garlic cloves, grated
½ tsp ground black pepper
8 oz/230 g burrata
Preheat the oven to 400F/200C. Toss the pumpkin with 1 Tbsp olive oil and fine sea salt on a rimmed baking sheet. Roast in the oven until the pumpkin is tender enough to be pierced by a fork and golden brown, 25 to 30 minutes. Remove from the oven and cool until warm or at room temperature before using.
While the pumpkin roasts, bring the barley and 4 cups/960 ml of water, and ½ tsp of fine sea salt to a rolling boil over medium-high heat. Reduce to a simmer and let cook until the barley is tender and plump, about 30 minutes. Drain and discard the cooking water. Cool the barley to room temperature.
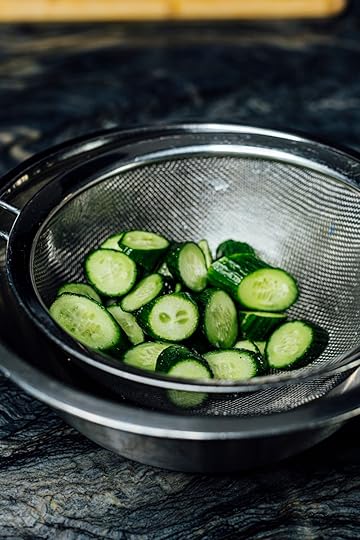
While the barley and pumpkin cook, place the cucumber in a fine mesh sieve over a medium bowl. Sprinkle ½ tsp fine sea salt over the cucumber, toss, and let sit for 30 minutes to drain. Discard the liquid.
In a large mixing bowl, toss the pumpkin, barley, cucumber, tomatoes, parsley, and pepitas. In a small bowl or jar, whisk or shake the ¼ cup/60 ml olive oil, lemon juice, honey, garlic, and black pepper until emulsified and creamy. Pour the mixture over the barley and vegetables in the mixing bowl, and fold to coat well. Taste and season with more salt and pepper as needed.
To serve, place the burrata in the center of a serving plate. Place the barley and vegetables around the burrata. Serve immediately. This salad will stay good for up to 3 days if stored in an airtight container in the refrigerator.
September 23, 2022
Chinese 5-Spice Pineapple Bundt Cake
Before the programming here switches to fall, I thought it would be more appropriate to bake a transition cake that helps us move from summer into fall. Pineapples were the immediate fruit that came to mind. Pineapples remind me of my trips to Hawaii – the warm summer breezes and the ocean. If we’re going to leave summer, we’ll leave it with a big bang or, in this case, a big, bold bundt cake.


Because this cake is supposed to mark our entry into fall, I added warm spices to the cake batter and the stewed pineapples in the form of Chinese 5-spice and ground cinnamon. These spices carry sweet fragrant notes that make the pineapple flavor more robust, and if aromas could sing, then this would be the pineapple song.


Instead of introducing pineapples into the cake batter, they are stewed gently in their juices along with a mixture of Chinese 5-spice and cinnamon; this combination, along with a splash of lime juice, brings out the flavors of the fruit. This pineapple topping is sweetened with jaggery or brown sugar to give it a more earthy taste and then poured on top of the baked cake. As soon as that’s done, I give the cake an excellent generous dose of lime zest; this makes the cake smell remarkably refreshing and tropical. When you cut into that cake, that lovely, sweet fruity pineapple syrup runs through, and this cake will play with your senses in the most beautiful way possible. This spiced pineapple cake is the perfect ode to summer and fall.
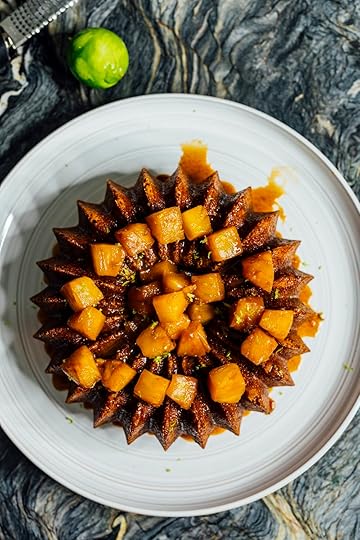

Chinese 5-Spice Pineapple Cake
This is a fragrant cake ripe with the scent of ripe pineapples, refreshing limes, and the warm, sweet notes of Chinese 5-spice and cinnamon. A stewed concoction of chunks of spiced pineapples is topped over a yogurt-based spiced bundt cake. Serve it warm or at room temperature.
The Cook’s Notes
I used the Elegant Nordic Ware bundt pan for this recipe, and its capacity is 10 cups/2.4 L
I don’t coat my bundt cake pans with flour because I don’t like the taste of pure flour on my cake. Instead, I use a mixture of melted unsalted butter and sugar, which always gives me perfect results. Sugar also leaves behind a coating of caramel on the outer surface of the cake.
Use either full-fat Greek yogurt or go as low as 2% but avoid fat-free.
Either fresh or canned pineapple will work in this recipe.
Makes one 10 in/25 cm bundt cake/6 to 8 servings
For the cake
1 Tbsp melted unsalted butter
1 cup/200 g sugar plus 1 Tbsp
2 cups/280 g all-purpose flour
2 tsp baking powder
1 tsp Chinese 5-spice powder
½ tsp baking soda
1/8 tsp fine sea salt
¾ cup/180 ml olive oil or neutral oil such as grapeseed
2 large eggs
1 cup/240 g plain unsweetened Greek yogurt
For the pineapple topping
1 cup/240 ml pineapple juice
10 oz/280 g ripe pineapple, diced into 1 in/2.5 cm cubes
¾ cup/150 g ground jaggery or dark brown sugar
1 tsp Chinese 5-spice powder
½ tsp ground cinnamon
1 Tbsp fresh lime juice
Zest of one lime
Preheat the oven to 350F/180C.
Brush the inside of a 10 cup/2.4 L bundt pan with melted butter. Sprinkle 1 Tbsp of sugar over the buttered pan, shake, and rotate the pan to coat evenly.
In a medium mixing bowl, dry whisk the flour, baking powder, Chinese 5-spice powder, baking soda, and salt.
In a large mixing bowl, whisk the 1 cup/200 g sugar, oil, eggs, and yogurt until smooth. Add the flour mixture and whisk until combined and there are no visible flecks of dry flour. Transfer the batter into the prepared bundt pan, tap gently to remove any trapped large bubbles, level the top with a spatula, and bake in the preheated oven for 45 to 60 minutes, rotating the pan halfway through during baking. The cake will be done when the cake springs back when touched, and the skewer comes out clean when inserted through the middle of the cake. The interior temperature of the cake should reach 210F/100C. Remove the pan from the oven and let rest for 5 minutes. Invert the cake carefully over a plate lined with a wire rack and tap gently to release. If the cake doesn’t release, run a knife along the edges and then invert. Cool the cake to room temperature and transfer to a serving plate.
While the cake bakes, prepare the pineapple topping. Bring the pineapple juice, pineapple, jaggery, Chinese 5-spice powder, cinnamon, and lime juice to a boil over medium heat. Boil for 1 minute, then reduce to a simmer and remove and transfer the pineapple pieces to a heat-proof bowl using a slotted spoon. Continue to simmer the liquid until it reduces in volume by half. Remove from the heat and fold in the pineapple.
Top the cooled cake with the pineapple and drizzle the warm syrup all over the cake. Let the cake rest for 10 minutes, then top with the lime zest. Serve warm or at room temperature. Leftovers can be stored for up to 4 days in an airtight container in the refrigerator.
September 21, 2022
Aloo Gobi
I once asked a friend what immediately came to mind when they thought of home-cooked Indian food. It was aloo gobi. Over the years, I’ve received numerous requests to share a recipe for this classic Indian vegetable dish, and I finally have a version that I’m thrilled to share with you.

This dish has all my favorite vegetables (except cabbage), potatoes, cauliflowers, and tomatoes, and as a kid, one that I often requested at home. I love eating aloo gobi (the literal translation in Hindi is potato and cauliflower) with warm plain rice or some flatbread like a roti or paratha.

To prepare aloo gobi, besides the potatoes and cauliflower, you will also need tomatoes and onions to form the base of the “dry” sauce that coats the vegetables. As for the spices, you won’t need much except for garam masala, cumin, and turmeric. I prefer making aloo gobi in my cast iron Dutch oven because the lid is heavy and holds the steam inside much better than stainless steel. As a result, the vegetables tenderize during braising more efficiently and quickly.

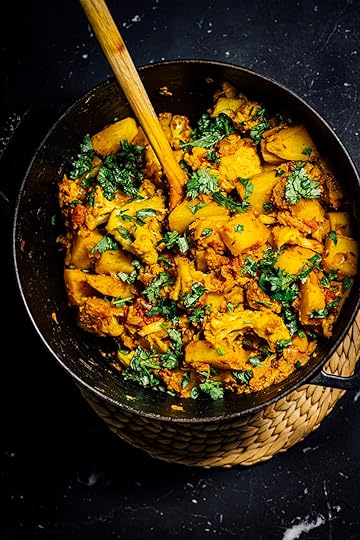
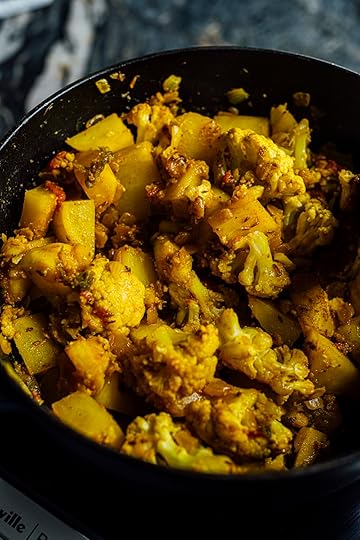
Aloo Gobi
Aloo gobi remains one of the most popular vegetable recipes in Indian kitchens. The tender texture of potatoes and cauliflower is achieved via braising with tomatoes and a mild dose of spices. If you’re making this for kids, leave the green chilli out. Serve warm with plain rice or flatbread like roti or parathas.
The Cook’s Notes
I find more success braising these vegetables in a Dutch oven than in a saucepan. The heavy lid of a Dutch oven traps the steam much more nicely than a stainless-steel saucepan; the vegetables don’t dry out as quickly, cook faster, and don’t burn.
Both lemon juice and amchur work well here, but I prefer the fruity sourness of amchur in this recipe.
Makes 4 servings
3 Tbsp/45 ml neutral oil such as grapeseed
1 tsp cumin seeds
½ tsp ground turmeric
1 large/300 g white or yellow onion, diced
1 green chilli such as jalapeno, serrano, or bird’s eye, thinly sliced
2 Tbsp garlic, grated
2 Tbsp fresh ginger, peeled and grated
2 small/each about 140 g tomatoes, diced
2 large/each about 320 g Russet potatoes, peeled and diced, 1 in/2.5 cm cubes
10 oz/280 g cauliflower florets, broken into bite-sized pieces
Fine sea salt
1 Tbsp fresh lemon juice or 2 tsp amchur (unripe dry mango powder)
½ tsp garam masala, homemade or store-bought
2 Tbsp chopped fresh cilantro, tender stems and leaves
Heat the oil over medium-high heat in a medium saucepan or Dutch oven. Add the cumin and turmeric, and sauté until fragrant and sizzling for 30 to 45 seconds. Add the onion and sauté until translucent, 4 to 5 minutes. Add the green chilli, and sauté for 30 seconds. Add the garlic and ginger and sauté, until fragrant, about 1 minute.
Fold in the tomatoes, potatoes, and cauliflower, season with salt, cover with a lid, and cook until the potatoes and cauliflower are tender enough to be easily pierced by a fork or knife, occasionally stir to prevent burning, 30 to 45 minutes. If the vegetables start to burn, add 1 to 2 Tbsp of water as needed. Drizzle the lemon juice and garam masala over the vegetables, remove from the heat and taste, and season with salt if needed. Serve hot or warm, garnished with cilantro. Leftovers can be stored in the refrigerator for up to 4 days in an airtight container.
September 20, 2022
Double Onion Barbecue Sheet Pan Pizza
Unlike my husband, who loves watching sports, I do not. The only thing I love about sports and live games is the food. Game food is its genre of cooking, and the cuisine sports intense flavors (pun intended). For example, barbecue pizza is sweet, tangy, and hot and topped with hot melty cheese. This sheet pan pizza might be designed for game day, but you can also make it for dinner or the weekend.
This barbecue pizza contains two types of onions, first, a layer of sweet, caramelized onions, and second, a topping of thinly sliced red onions. I’ve also added a sprinkling of nigella seeds because that is one of my favorite spices with onions and cheese; it is the perfect pairing. If you count scallions as onions and you decide to use them as the topping for this pizza, then you can call this a triple onion barbecue pizza. I’ve used leftover chicken in the pizza but feel free to leave it out or use shredded pork or chunks of tofu or tempeh.
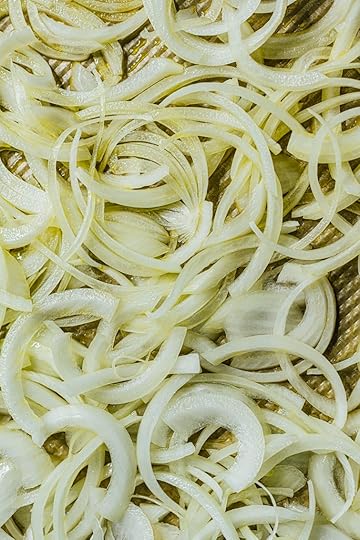

I love caramelized onions, crispy or jammy; please pass the entire plate over! Caramelized onions go great with barbecue because their sweetness compliments the sweet, spicy, and tangy notes of barbecue sauce. All I needed was an excuse to use them, and I knew when I was writing the recipe for this pizza, caramelized onions would make an appearance. A couple of points to remember when making caramelized onions, use white or yellow onions and DO NOT USE baking soda to accelerate the caramelization process. It will destroy the onions by breaking down the pectin and releasing much water; this causes many problems in the quality of the caramelized onions. I prefer making caramelized onions in the oven because it's easier to make a large batch and walk away. You can double the recipe to make more caramelized onions and then freeze the extra to use when you need them.


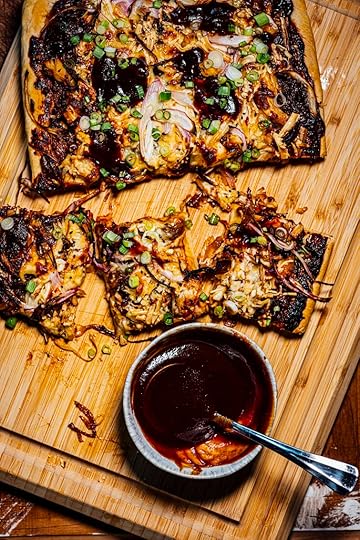
Double Onion Barbecue Sheet Pan Pizza
This unfussy double-onion barbecue chicken pizza has a luscious layer of barbecue sauce and two layers of onions. Sweet, caramelized onions and a topping of thinly sliced red onions that get roasted over the mixture of gouda and mozzarella as the pizza bakes. Make it for game night or a weekend party; either way, it’s a crowd pleaser.
The Cook’s Notes
I prefer making caramelized onions in the oven over the stove. The heating is more uniform in an oven, and I find it takes less time than on a stove which can be very unpredictable. The onions are first steamed covered in the method shared to help soften them. In the second step, the onions are cooked in a clump in the center of the baking sheet; this prevents them from drying out and turning crisp, making the result jammy. I will spread them in a single layer over the baking sheet if I want them crispy.
For a thicker crust, use 1 lb/455 g pizza dough.
You can also use cilantro with or without scallions for the garnish.
Makes 4 servings
1 lb/455 g white or yellow onion, halved and thinly sliced
2 Tbsp extra-virgin olive oil
Fine sea salt
½ lb/230 g pizza dough, homemade or store-bought
1 Tbsp coarsely ground cornmeal or semolina
½ cup/120 ml barbecue sauce plus extra to serve, homemade or store-bought
1 cup/200 g diced or shredded grilled or rotisserie chicken
½ cup/50 g shredded gouda
½ cup/40 g shredded mozzarella
½ cup/50 g red onion, halve and thinly sliced
1 tsp nigella seeds
2 scallions, both white and green parts, ends trimmed and discarded, thinly sliced
Preheat the oven to 350F/180C.
Mix the onions with 1 Tbsp of oil and a tiny pinch of salt on a baking sheet. Wrap the sheet tightly with a layer of foil, crimping the edges to seal. Place in the oven and cook for 30 minutes, remove from the oven, and unwrap. The onions will be slightly tender and shrink slightly, move them in a clump towards the center, return the baking sheet to the oven, and roast uncovered for an additional 30 minutes, occasionally stirring with a spatula until the onions turn golden brown and soft. The cooking time might vary. Remove the baking sheet from the oven and keep aside. This should yield about 1 cup of caramelized onions.
When ready to cook the pizza, preheat the oven to 500F/260C.
Brush the surface of a 9 in by 12 in/23 cm by 30.5 cm baking sheet with 1 Tbsp of oil. Sprinkle the cornmeal all over the surface. Roll out the pizza dough and spread it using your fingers to cover the baking sheet's surface. Cover with a damp towel and let rest for 30 minutes in a warm spot in the kitchen, away from sunlight. The dough will relax and rise a little.
Brush the surface of the pizza with the barbecue sauce. Top with the chicken, gouda, mozzarella, and red onion. Sprinkle the nigella seeds on the top and bake the pizza in the oven until the edges start to brown and the cheese melts and turns brown in some spots, 10 to 12 minutes. Rotate the baking sheet and bake for 4 to 5 minutes until the crust is crisp and turns a dark shade of golden brown. Remove from the oven, transfer to a cutting board, sprinkle the sliced scallions over the top, and serve immediately with extra barbecue sauce on the side. Leftovers can be stored wrapped in foil or cling film in the refrigerator for up to 4 days. Preheat leftovers in an oven at 350F/180C.
September 16, 2022
S'mores Ice Cream

While amongst family and friends, I’m famous for not being too fond of hiking or camping, I love campfires for two things: heat and s’more making. S’mores are the simplest yet one of the most delightful treats that are beloved by most adults and kids.


So, what in the world does “S’mores” stand for? It has nothing to do with the ingredients used to make it. Instead, “s’mores” is a contraction of “some more.” There is some debate about where the original s’mores recipe originated – it might be The Girl Scouts or A Book of 150 Recipes Prepared with Campfire, the Original Food Marshmallows. The last book simply refers to them as Campfire Graham Cracker Sandwiches.

We don’t have a fire pit at home, so I usually make s’mores by toasting marshmallows with my kitchen torch or in the oven (the torch gives better flavor) and then sandwich the marshmallows with melted chocolate between graham crackers. This is the ice cream version of s’mores, and it’s quick and easy. Okay, the longest part is waiting for the recipe to firm up once it’s all put together, but if you’re like me, a person that loves ice cream, then you’ll find an excuse to open the freezer every 30 minutes “to check.”

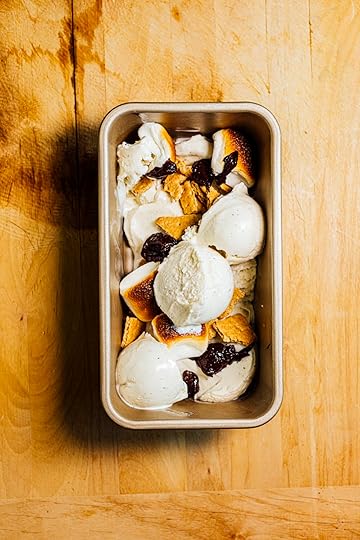 S’mores Ice Cream
This combines two of my favorite things, ice cream, and s’mores. It’s a quick fix and a huge hit with the kids and adults.
Makes 6 to 8 servings
12/85 g marshmallows
¼ cup/60 ml heavy cream
3 ½ oz/100 g semisweet dark chocolate chips (I used 75% cacao)
8/125 g graham crackers
2 qt/2 L vanilla ice cream, softened till pliable
Toast the marshmallows. Lay the marshmallows on a baking sheet and broil them in the oven at Hi/500F/260C until the tops turn golden brown and slightly charred for 45 to 60 seconds. If using a torch, carefully toast the tops of the marshmallows. Transfer to the refrigerator or freezer and chill thoroughly.
Prepare the ganache. In a small saucepan, heat the heavy cream over medium-high heat until it just starts to bubble, 2 to 3 minutes. Remove from the heat. Stir in the chocolate chips using a silicone spatula and mix until the chocolate dissolves and the mixture turns smooth and silky. Refrigerate until chilled.
Once the marshmallows and chocolate ganache are chilled, break the graham crackers into bite-sized pieces.
Take a 9 in/23 cm metal loaf pan or freezer-safe container. Layer the pan with ice cream, marshmallows, chocolate ganache, and graham crackers until they are all used up. Gently press the top and smoothen with a spoon or an offset spatula. Cover tightly with plastic wrap and press to the surface to ensure no trapped air. Freeze for at least 4 hours or until firm. When ready to serve, scoop. This ice cream will be good for up to a week if stored in an airtight freezer-safe container for up to a week or 3 days if left in the metal loaf pan wrapped with plastic wrap.
September 14, 2022
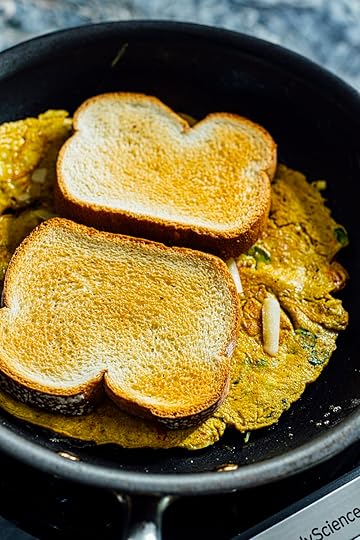
Indian Omelet Sandwich

My memory is clear, and I remember it like yesterday. Wrapped in either a sheet of newspaper or the packaging from the late Wib’s or Britannia bread, this omelet sandwich is one of the iconic street foods of India. Served with a generous dollop of ketchup and topped with melted salted butter, it makes a fine breakfast or meal.

Unlike a French-style omelet, whose eggs are fluffy and not cooked all the way, the Indian omelet is the opposite. The edges are slightly golden and crispy. Even the vegetables aren’t sautéed prior. Instead, they’re cooked simultaneously with the eggs. Some experts might scoff, but I urge you to be patient. It’s simply a different way people from another part of the world approach an omelet (we even spell omelets differently – omelet v/s omelette). What about taste? It is still mighty fine!
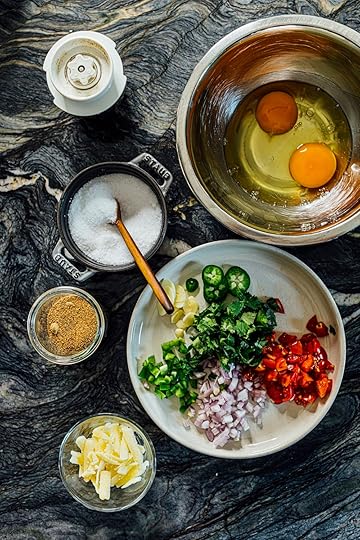

The eggs are whisked with turmeric to help brighten their yellow color. There are two options for the spice blend: chaat masala or garam masala; I prefer the former for its smokier flavor.
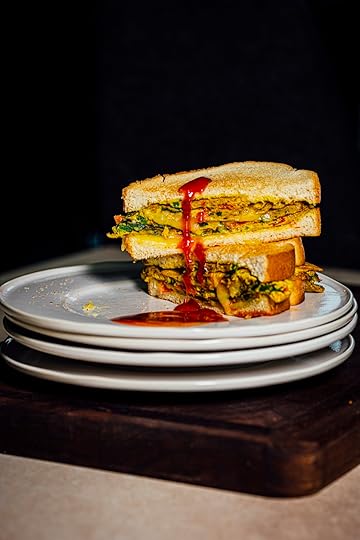
Indian Omelet Sandwich
While this omelet sandwich might be considered Indian street food, it makes a beautiful breakfast that can be made on any day of the week. It’s also a good option for dinner when you don’t have the time and want to put something together quickly. I lean towards Maggi Hot and Sweet Ketchup, but you’re welcome to use whatever ketchup you love.
The Cook’s Notes
This sandwich is usually made with either garam masala or chaat masala; I prefer the latter.
If using chaat masala, use your judgment if adding salt. Chaat masala, especially the store versions, already contains Indian black salt (kala namak). Check the box or taste a tiny pinch before using. Good Indian brands of chaat masala include Badshah, Everest, and MDH. You can also make your own. My Recipe is here.
Some might prefer buttering the toast on both sides before serving. I find that unnecessary, but you can do that if you like.
Makes 1 serving
2 large eggs
¼ tsp ground turmeric
½ tsp ground black pepper
¼ tsp chaat masala homemade (recipe follows) or store-bought
Fine sea salt (optional, see The Cook’s Notes)
2 Tbsp minced shallot or red onion
2 Tbsp chopped tomatoes
2 Tbsp minced bell pepper
1 garlic clove, thinly sliced
1 tsp green chilli, thinly sliced
1 Tbsp minced cilantro or flat-leaf parsley
1 Tbsp unsalted butter or extra-virgin olive oil
2 Tbsp shredded cheddar or 1 slice cheddar
2 slices of sandwich bread, lightly toasted
Ketchup to serve
In a medium bowl, whisk together eggs, turmeric, black pepper, chaat masala, salt, shallot, tomatoes, bell pepper, garlic, green chilli, and cilantro.
Melt the butter over medium heat in a 12 in/30.5 cm non-stick or cast-iron skillet. Pour the egg mixture over and swirl the skillet to let the eggs cover the entire surface. Cook undisturbed until the base of the eggs and edges starts to firm up, 2 to 3 minutes. Using a spatula, flip the egg carefully. Top the eggs with the cheese. Place the two slices of toasted bread on the eggs and gently press. The heat will help the cheese melt and glue the bread to the eggs. Once the bottom of the eggs is set, for about 1 minute, use the two slices of toast to fold the eggs between the toast slices and make a sandwich. Remove from the skillet and serve immediately with ketchup.
Chaat Masala
Makes about ¼ cup/25 g
2 tsp whole carom
2 tsp whole cumin
2 tsp whole coriander
4 dried whole Kashmiri chillies
4 whole cloves
1 tsp dried mint
1 tsp ground ginger
1 tsp amchur (ground unripe mango powder)
A pinch of asafoetida/hing
1 tsp whole black peppercorns
Ground kala namak/Indian black salt
Heat a small dry stainless-steel skillet or saucepan over medium-high heat. Add the carom, cumin, and coriander and toast until they turn fragrant and light brown, 30 to 45 seconds. Remove from the heat and transfer to a plate to cool completely. Once cooled, add the spices to a coffee grinder or spice mill along with the chillies, cloves, mint, ginger, amchur, and black peppercorns. Grind to a fine powder. Transfer to an airtight container and store in a cool dark place for up to 6 months. When ready to use, add ¼ tsp ground kala namak to every 1 tsp of chaat masala.


