
Nik Sharma's Blog, page 13
March 16, 2020
pantry essentials
The most important of any kitchen and even cookbook, is the pantry. If you have a couple of items stocked, you can give the main ingredients in your dish a bunch of different makeovers, so they don’t feel boring. I mean’t to write this at some point later this year but the coronavirus made this an apt time to share what I keep in my kitchen pantry. These are some of the most useful ingredients I keep, many will be familiar and some will be new. These are some of the ways I stretch out the life of my ingredients for work and you might find some of them useful. This by no means is an exhaustive list but things I think you might find helpful.
Potatoes and Onions - store them in paper bags in a cool, dark place of your kitchen to prevent them from sprouting. If they do start to grow shoots, I’ll sometimes stick them in a pot and let them grow. Potatoes are best grown in pots so they don’t take over the entire garden.
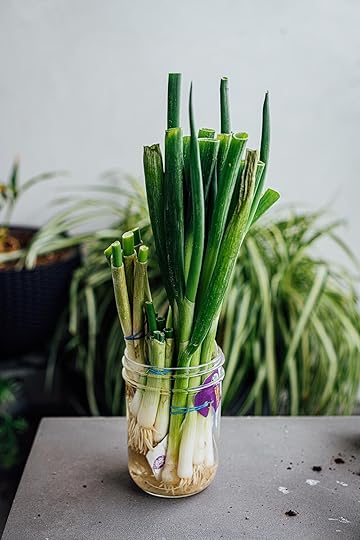
Alliums - garlic, onions, scallions, etc. Any extra unused garlic that starts to bolt goes into the garden. I trim the green leaves for garnishes, they’re essentially chives. With scallions, stick the white ends where the bulb and roots are located into a jar of water to keep them going. You can do this with scallions that have been used, they have the amazing potential to keep growing as long as they get the right conditions. If you have a pot of soil or some garden space, grow them there. I keep trimming the green ends as long as the scallions keep growing. The root end of the onion (and even carrot tops) is totipotent - they carry all the information needed to produce a whole new plant, this takes a bit more time to reap its benefits but is a great way to keep getting the most out of vegetable ends that would otherwise be scraped. Just place the root side of the onion on the surface of a small jar of water, so the roots can meet it. For a carrot, make sure the exposed cut side of the top touches the surface of water and leave it aside on your kitchen counter till roots begin to develop, then plant it into soil and water regularly.
Tomatoes I like canned diced tomatoes but for all purpose tomatoes, I keep tubes of tomato paste at home. I find tubes to be more convenient that cans of tomato paste because they store well and take up less space. Cans of tomato paste come with an additional problem, you need to transfer whatever you don’t use into a container to store or freeze - if left in the can, the can will oxidize and turn black.
Many herbs like mint are also weeds which works to your advantage. They can grow anywhere, mint and the various types of mint do very well in jars of water and soil. They prefer to stay away from direct sunlight. and like shade.
Condiments - Ingredients that carry heat - Sambal Oelek, Chilli Crisp Oil, Chow Chiu Style Oil etc, all contain a lot of heat and you can use these as a substitute for fresh chillies in some recipes, where their taste won’t overpower a dish. Dried chillies can be used in almost any recipe. Fresh Indian chutneys can be frozen and so can sauces like pesto and used when needed. Just freeze them in small batches and use when needed.
Stock - Fresh stock can be frozen but I assume like me right now, you might have some issues with freezer space. Stock cubes are a great option that will add flavor in a pinch and you won’t need to worry about space and shelf-life.
Oils and Vinegar - most of you might already be well stocked on these. Keep them away from sunlight and heat.
Lemon and Lime juice - for cooking needs where you don’t need the fresh flavor of a lemon or lime - use food grade citric acid or the bottles of preextracted juice you see in stores and typically avoid. For example: If you make paneer (see my recipe in Season) you don’t need to waste a fresh lemon to make it, use bottled lemon juice since all you need is the low pH/acidity of the juice to denature the milk proteins.
Garlic and Ginger In Indian cooking, these two ingredients are often used. I do not buy the jars of ginger-garlic paste (this is a combination of both ingredients together in one jar) sold in Indian stores because I never know which one I will need. Instead, opt for the jars of garlic and ginger pastes that are sold individually, that way you have the freedom to use either garlic or ginger based on your recipe needs. Hing/Asafoetida is a good substitute for garlic/allium flavor. Add a tiny pinch to hot oil when cooking. The powder will foam slightly and release its aroma.
Dried and canned beans and lentils if working with dried beans, clean, rinse, and soak them in 4 times their volume of tap water overnight. Not all lentils and beans need to be soaked overnight. Red lentils need only 20 to 30 minutes. For a softer texture, add 1/8 tsp baking soda to the water when boiling 1 cup of dried beans that were presoaked in water, baking soda affects the pectin inside the beans and makes fibers more soluble. If you live in a location with hard water, soak the beans in filtered water, hardwater is rich in calcium and magnesium salts that will keep the beans hard (the skin and even the pectin of beans is rich in metals like calcium and magnesium which will keep beans hard). Even though pressure cooking can cook beans quite quickly, I still prefer to presoak and cook because soaking makes nutrients easily available. Here are some RECIPES FOR BEANS AND LENTILS : Lamb and Lentil Dal Curry No. 1, Dal with greens, Dal Makhani, Rajma. Season also has a bunch of recipes with lentils and beans - from a lamb chop dish with red lentils to my cocoa spiced mixed bean and lentil soup. Another tip to save time, cook a large batch of your beans in water till they’re soft, divide and freeze them in ziptop bags, thaw them when ready to use. I freeze them in their liquid.
Grains Rice, wheat, millet. etc. If you can’t find them at your regular grocery store, your local Indian or International markets in your neighborhood will carry them. The golden rule is to store flours in the freezer for long-term storage, however, my freezer is small and I don’t have the space especially right now to fill it up. Keep them in a cool, dark place away from moisture. Airtight bags or containers work best.
Canned milks like evaporated and sweetened condensed milk, coconut milk, coconut cream, etc. are great options right now. They’re often kept in the baking aisle of stores, Indian and International markets will also carry them.
Seafood - Canned/tinned sardines, anchovies, tubes of anchovy paste.
Dried Shiitake - are rich in umami molecules, soak them in hot water and use them as umami flavoring agents.
Frozen herb pastes, frozen vegetables are also wonderful options to have on hand. Not all vegetables freeze well especially some of the ones rich in starch like potatoes (waxy potatoes will freeze and thaw better than starchy ones) Bread can be frozen and used when needed.
Stay safe folks!


March 15, 2020
Working from Home

For the most part, I work from home. There are advantages that I’ve learned to appreciate: I like the benefit of setting my own time schedule and staying locked away while I write . While this does sound quite dreamy, it comes with its own challenges and if you’re not used to it, it can make you feel cooped up. [Sometimes your pets will get angry and throw your stuff or whine when you don't play or massage them (my pets need a lot of attention, demand it, and get it)]. These challenges felt a bit terrifying when I first transitioned from large spaces with a lot of people at work to my own little matchbox that included just myself. Once I got acclimated to my new work surroundings and developed my own routine, I started to appreciate the freedom of working from home.
While we’re in the midst of the coronavirus pandemic and many of us are now working from home, I thought I’d share a few things I’ve found that helped me not feel cooped up and isolated. This is what worked for me and you will have your methods that work better for you, do what makes you function best and makes you happy!
Wherever you set your office space up, make sure you’re comfortable in it.
Make a schedule and stick to it as far as possible. It will help build a regular routine and quickly become habitual. I keep a note book both digital and in print, just to tick things off my list. Ticking things off a list is very rewarding.
I’ve noticed if my computer faces away from the window, I’m less distracted. Depending on the light situation, the constant fluctuation of brightness can act as a source of distraction.
I stay off social media when I’m lost in writing. However, when I’m cooking, I like to jump on and interact with people so I can share not only what I’m cooking but also answer questions, etc. I don’t feel isolated that way. But I do make time to call my friends up and chat with them whenever possible.
Once every 2 hours, I get off my chair and take a stretch. When I’m photographing or cooking, it’s a bit different, I’m on my feet constantly, I’ll stretch and take a short power nap for 10 minutes to recharge.
Now that I live in LA, I don’t have an outdoor space to garden, my balcony is my new garden space. I’ve been experimenting with container gardening, I have a few vegetables and fruits planted but they haven’t bloomed or turned into fruit yet. Gardening is a great way to unwind.
Read a book, I will often take a break from reading cookbooks and read something on science (food related) or my magazine subscriptions. Read something other than your work, I find it refreshing.
Radio and Podcast: There are several and I’m not listing them all but here are some of my favorite podcasts: BBC The Food Programme, BBC The Food Chain, Olive Magazine’s Cook, Eat, Explore, The Splendid Table, Chris Kimball’s Milk Street, Bon Appetit’s Foodcast, Bite, Honey and Co’s The Food Talks, Serious Eats’ Special Sauce with Ed Levine, The Delicious Magazine Podcast, Good Food with Evan Kleiman, Carbface.
This is the oddest little trait about me that you might learn: I need white noise when I work or I struggle to focus. I grew up in a very tiny apartment in India and as a kid, I had to learn how to deal with noise when I studied, as a result, I find concentrating when things are too quiet, very distracting. I either listen to music or keep a tv show running in the background. I watch a lot of crime shows on Netflix and Amazon Prime TV. Pluto TV is another great app to check out, they’re free and stream a lot of tv shows 24/7. I watch a lot of British tv - Pluto is great for that (other options that require paid subscriptions are Acorn TV and BritBox and are available on Prime TV) The shows with language translations and subtitles need a bit more of my attention, so I watch these at night or when I’m editing my photos (photo editing is a bit more relaxed).
A lot of you asked me on Instagram to share some of my tv shows as I cook or work. Here are some of my current tv obsessions, I avoided a lot of the ones, I think you might already know of. Disclaimer: Some of these shows might vary in their level of intellectual stimulation, proceed at your own risk. Some are honestly listed for pure eye candy (like Toy Boy), which I really don’t need to explain.
Some of the English Language Shows
Gardner’s World (Britbox) - if you like to garden, this is the show for you. Monty Don has a soothing voice but the show is full of ideas for every skill level. I used a lot of these when we lived in Oakland.
Grand Designs (IMDB TV on Amazon Prime) - a nice look into what it is to renovate a home all by yourself. It can at times, make you worried for the people on the show. Often the results are outstanding.
I’m currently trying to get into Beecham House on PBS Masterpiece. Still haven’t made my mind up about it.
Antiques Roadshow (Britbox and Pluto TV) - gives me some intellectual stimulation and a bit of envy.
Call the Midwife (Netflix) - Very interesting look into UK’s NHS system through the lives of midwifes.
Sabrina (Netflix) - this is a fun show.
The Witcher (Netflix) - pure eye candy, that is it.
Marcella (Netflix) - I love Anna Friel, her performance in this crime show is stellar.
Out of all the CW shows - I like Supergirl and The Flash
Abstract - The Art of Design (Netflix) - I’ve watched this series 4 times, the episode with Neri Oxman on Bio Architecture is my favorite and I would LOVE to do a stint in her lab.
The World’s Most Extraordinary Homes (Netflix) - first reaction, OMG who are these people, how are they living like this, can I come and live there.
All the Harlan Coben crime tv shows on Netflix : The Five, Safe, The Stranger, etc.
Doctor Foster (Netflix) - Suranne Jones is phenomenal.
Broadchurch (Netflix/Britbox)
MI-5 (Britbox) - don't get attached to any character in this show, it has a Game of Thrones fate for some of their characters.
Silent Witness (Britbox) - if you like medical detective shows, this one is good.
Ackley Bridge (Acorn TV) - I like this show, it’s funny and refreshing. It deals with a lot of issues faced by South Asian immigrant kids (in this case in the U.K.)
The Good Karma Hospital (Acorn TV) - medical soapy drama shot based in Kerala.
Line of Duty (Acorn TV) - Crime show based on corruption inside the police.
Keeping Faith (Acorn TV) - Another crime/mystery show.
Loch Ness (Acorn TV) - Crime/Mystery.
Poldark (PBS) - Strong storyline with eye candy.
Amazon Prime TV has made some good Indian TV shows: Breathe, Made in Heaven, Inside Edge (I’m not a cricket fan much to the vexation and disappointment of my dad but this show is interesting). These are all in English when Hindi is spoken there are subtitles.
Some other staples for crime - anything by Agatha Christie on tv (Poirot/Miss Marple, etc.), Midsomer Murders, Inspector Lewis, Vera. (I really got into these as a kid because my grandmother loved them).
A Few non-English Language TV shows
Toy Boy (Spanish/Netflix) - there is some crime and mystery here but with a name like Toy Boy, you’re not really looking for a deep story here.
This show made by Salma Hayek is brilliant, I hope a season 2 comes out soon - watch Monarca (Spanish). Other good Spanish shows are Elite, Unauthorized Living, The House of Flowers,
All my friends know of my obsession with Turkish TV shows, here are some good ones on Netflix - Gonul, The Protector, Black Money Love, The Gift, Winter Sun. One thing I love about Turkish TV shows, they always show what people eat and you get to see a lot of local foods (that I now want to learn and cook - the pepper bread is quite a popular topic that keeps coming up in Black Money Love). Eye candy alert!
Nordic Shows (Netflix): Occupied, The Valhalla Murders, Rita (comedy), Ragnarok (This is the one that confused me about people who bathe in milk - do they wash with soap after? Milk fat will turn rancid on your skin, also this is too ridiculous of a beauty habit)
French (Netflix): Black Spot (crime), The Break (crime, season 2 was not my favorite),
PBS Masterpiece has a lot of good European crime shows (Lots of Nordic Crime shows in this list): Beck, Cover Story, Modus, Night and Day, Vanished by the Lake, Thou Shalt Not Kill, Innocent, The Lawyer, Thicker than Water, All the Sin, 35 Diwrnod (Welsh crime show, this is produced in a very interesting way, everything starts from the end).
Italian TV shows (Acorn TV) - Sisters (the landscapes are gorgeous and so is the food that some times is shown and discussed but without giving too much away, the though process of the characters in this show got me annoyed at times), From Father to Daughter, Back Home.
French TV Shows (Acorn TV) - Balthazar (eye candy crime show).
Tomorrow, I will go into my pantry and share some tips on Instagram as well as here that will hopefully make your life easier while we’re working from home.
February 7, 2020
marmalades: seville and bergamot
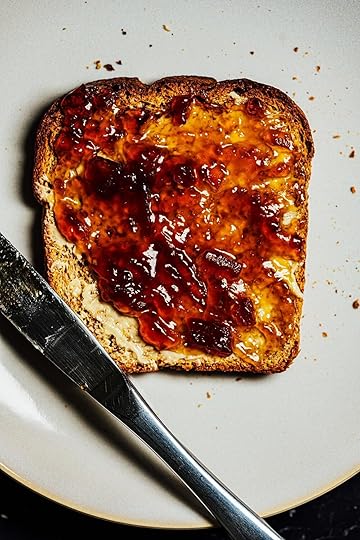
Marmalade truly celebrates an orange in all its glory. The sweet, the sour, the bitter, and that final tingle that your mouth experiences due to chemesthesis from the nerves lining your lips and mouth. Seville orange marmalade sometimes simply referred to as bitter orange marmalade is my favorite is perhaps the most famous of marmalades and I like it lathered on top of buttered warm toast with its embedded soft candied peels. The juice of this particular orange is sour with no noticeable sweetness and the aroma of the orange peel is very fragrant which is why it is highly valued among marmalade makers. Unlike other sweeter oranges these have a short season in winter when they show up in farmer’s markets and some grocery stores which in California is usually sometime between December to February. The citrus farmer at my market insisted I try out Bergamot sour oranges to make jams for their special aroma (Bergamot is dried and used in black tea to give a beautiful floral scent). David Lebovitz has an excellent bergamot marmalade recipe that I made and if you can get your hands on the fruit, I most certainly recommend using his recipe, its delicious. The recipe I use for my Seville orange marmalade is from my friend, Felicity Cloake’s book, Completely Perfect (Penguin Books, 2018), one that I strongly recommend you keep at home, I turn to it often. It is a fantastic book to learn how to cook and makes a great gift for someone going to college or who is curious to cook.
There is a bit of science involved in this entire process and I’ve tried to summarize most of it below in my notes. Before, I forget, marmalade including jam and jellies making all require a bit of patience, so plan ahead.
Notes
Jam, jelly, and marmalades; all rely on acid, sugar, and pectin in the presence of heat to create a gel like texture.
Acid (from the orange and lemons) and sugar help pectin gel and prevent the growth of bacteria by making the conditions inside the marmalade inhospitable to microbes.
Acid does another thing, it “inverts” sugar on heating which prevents the sugar from crystallizing out which would otherwise leave a gritty appearance. When table sugar (sucrose - a molecule made up of two sugars attached together - glucose and fructose) is heated in the presence of an acid, some of it splits and releases it constituents - glucose and fructose (hence the name inversion). Fructose prevents sugar from recrystallizing. This is why I sometimes add cream of tartar (an acid) to sugar when making caramel.
I like my jams and marmalades slightly runny but if you prefer it a little firmer, you can add it a little bit of commercial fruit pectin powder to the jam when heating. Check the manufacturers instructions on how much to add (the ratios are listed on the instruction sheet that it came with).
The peels : wash the oranges well with water and especially at the spot where the stalk is attached to the fruit, I often find this place holds a lot of dirt when the stalk is removed.
Bitterness in most oranges comes from the white pith and the seeds. A second source of bitterness comes from certain enzymes that are present in the juice (the level of these enzymes varies by the type of orange).
If you want to reduce the bitterness in the jam, use half the quantity of peel listed in the recipe. Alternatively, take a large metal spoon and scrape out some of the white pith. I prefer a lot of peel in every bite.
This is not something I usually like to write but pectin in fruit can be a finicky creature to work with. Even within the same type of fruit, the amount of pectin can vary and the quality and type will also be different. This is why most often with marmalades and jams when waiting for the pectin to gel or “set”, the time varies quite a bit so I’m going to list a very large time range below but in my experience it is better to use the wrinkle test. In addition, pectin is affected by many things including acids, sugars, and even the salts present in your water, for this reason I recommend using filtered water if possible and stay away from hard water.
The Wrinkle test is used to determine when the pectin is ready to set and tells you when to remove the jam off the heat.
Take a few small plates and leave them in the freezer to chill.
When you’re ready to test the jam, take a teaspoon of the jam and drop it in the center of one of the chilled plates and freeze for about 1 minute. The jam will be ready to set if the surface of the jam wrinkles when you run your finger through it and a clean trail is left behind.
Canning: I prefer to use either 8.45 fl oz [250ml] or 17 fl oz [500ml ]canning jars for marmalades and jams. I’m going to tell you what I do when I can versus travel the entire long route of canning for everything possible:
Set your oven to the lowest temperature possible, in my oven I set the heat to 170F [77C].
Wash the jars, lids, rings and whatever comes with it (varies by brand, I use Weck jars) with soap and hot water. Place the jars, lids, rings on a baking sheet lined with a wire rack. Leave the jars in the oven to dry and stay sterile. When you’re ready to can bring the tray out and ladle the hot jam into the hot jars.
You will need to prepare a canning water bath. You can buy a special canning pot or do what I do. Take a stockpot, the deeper the better since you will need to add enough water to cover the jars completely and account for another 1 inch [2.5 cm] of water to help create pressure on the lids of the jars. A circular wire rack that can fit inside the pot is very helpful because it will prevent the base of the jars from overheating if left in direct contract with the base of the saucepan.
A pair of tongs that can grab the jars out of the stock pot will be necessary. There are several inexpensive canning kits available online and in stores. I use the Ball (brand) kit with my Weck Jars. A big soup ladle and a funnel are also helpful in transferring the jam to the jars.
How long to sterilize varies by what you are canning and also on your location. Because there is less air at high altitudes than there is at sea level, the air pressure begins to drop which affects many cooking techniques and canning is one of them. Water will begin to bubble and boil much earlier when heated and the cooking conditions need to adjusted to account for this. Here’s is a more detailed explanation of this and how to adjust your canning time (Page 5 has the information on canning). For where I live, I bring the water to a rolling boil with the jars and then let them boil for an additional 5 minutes (more details here).
Skimming the surface for froth: I rarely do this. Most of this is air bubbles which quickly dissipates on cooling. If at all it doesn’t go away, skim off the froth at the very end when you’re ready to ladle the marmalade into jars.
seville orange marmalade (adapted from Felicity Cloake’s Completely Perfect (Penguin Books, 2018))
makes about 3 1/2 lb/700g
2.2 lb [1 kg] seville oranges
1/4 cup [60 ml] fresh lemon juice
5.28 pints [2.5 L] filtered water, preferably
2.2 lb [1 kg] sugar
2.2 lb [1 kg] dark brown sugar
Remove any stems from the oranges and wash the oranges well under running tap water to remove any dirt.
Place a fine mesh sieve over a large deep non-reactive stainless steel saucepan. Cut the oranges in half and squeeze the juice out over the sieve. Do not discard the pulp and the seeds left behind in the sieve.
Scrape out any extra pulp and pith from the orange peels and add to the pulp and seeds in the sieve. Chop or slice the peels to the thickness you prefer and add the peel to the juice in the saucepan.
Cut a piece of cheese or muslin cloth large enough to hold the orange pulp and seeds that remain behind in the sieve. Scoop out the pulp and seeds and place them in the center of the cheese cloth and tie the ends together to form a tight bag. Place the bag in the saucepan with the juice. Stir in the lemon juice and water. Heat the saucepan over medium-high heat to a rolling boil, reduce the heat to a simmer and cook for 2 hours till the peel is cooked and is tender and appears translucent, remove the saucepan from the heat, cover with a lid, and leave overnight in the refrigerator.
The next day, remove the saucepan from the refrigerator. Tightly squeeze out the liquid from the cheese cloth bag over the saucepan. Discard the bag with the pulp and seeds. Add the sugars.
Get your canning jars ready (see Notes above). Place a few saucers in the freezer to chill.
Return the saucepan to the stove and heat over medium-high heat till it comes to a rolling boil at 212F [100C] stirring till the sugars dissolve and to prevent burning. A candy thermometer that can clip to the sides of the saucepan will be helpful to monitor the temperature. Once it starts to boil, the pectin might start to set. Take a teaspoonful of the hot marmalade and place it in the center of one the chilled saucers, and freeze for about 1 minute. Remove the saucer and run your finger through the center of the marmalade, if it wrinkles on the surface and the clear train left behind holds, then your marmalade is ready. If not continue to heat and test after 15 minutes. The time taken for pectin to set can vary, sometimes even taking up to 2 hours, so be patient. Once the marmalade is ready, switch off the heat and ladle the jam in your jars. Seal tight and can the jars. The jam should be good for up to a year if left unsealed. Store sealed canned jars in a cool dark place and any opened jars in the refrigerator.
February 4, 2020
tomato vinaigrette
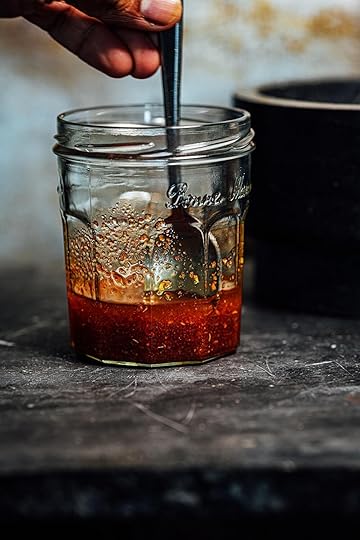
This recipe carries a bit of an experimental approach. Instead of using fresh tomatoes, I first dehydrate tomatoes to concentrate their flavors to create a stronger vinaigrette with a more powerful kick.
Tomatoes are rich several important flavor molecules, most noticeably the sugar which gives sweetness, the acids which give a bright acidity, the glutamate which gives savoriness, and salt that gives saltiness. Lycopenes are the red pigments in tomatoes which give this vinaigrette a rich red color. In addition, tomatoes also contain pectin which helps act as an emulsifier and thickens the vinaigrette.
There is another source of umami that arises when vegetables such as tomatoes are dried.
When vegetables such as tomatoes are dried, the nucleic acid RNA breaks down to produce the nucleotide AMP which then changes to inosine and a molecule that also has an umami taste. When used with food that is rich in glutamates, inosine enhances the taste of umami and gives a richer taste of savoriness via a phenomenon called synergism.
ATP (adenosine triphosphate)-> AMP (adenosine monophosphate) -> 5'-inosinate (IMP)
In the past when I’ve made tomato vinaigrettes, the flavor is largely a function of the quality of the tomato. The quality varies quite a bit depending on the type of tomato, the season, etc. Dehydration removes a lot of these variables by helping to concentrate flavor molecules by kicking the water out and gives you better control over the flavor of the vinaigrette.
While you don’t need to dehydrate your own tomatoes to make this, I recommend using a good quality tomato powder (available at spice stores and speciality markets). Tomato powder can also be used to add savoriness to stews, soups, stocks, and as a seasoning and I keep a jar always on hand. I recently got a smart oven from Breville to explore dehydrating food and flavor and it comes with a dehydration wire basket (allows for even heating, air circulation, and helps steam escape). See my notes below for details on how I did this in the smart oven.
Notes
Dehydrating tomatoes
I used the Breville smartoven to dehydrate my tomatoes. I cut tomatoes into 1/4 inch thick slices and then salted one set of tomatoes on both sides with salt. The other half I left untreated. The salted tomato slices were then sandwiched between dry sheets of kitchen paper towels to wick away any liquid released by the osmotic action of salt. The salt treated tomatoes are then rinsed after 30 minutes to remove the excess salt and patted dry with clean paper towels before they enter the dehydrator. However, after dehydrating at 152F/52C for 12 hours (the dehydrating setting on the Breville Smart Oven has a built-in feature which I used), there was no difference in taste, texture, and weight between tomatoes that were salted and those that were not. So I don’t think this is necessary if you stick with the built-in setting. Salt treated tomatoes do begin to shrivel and dehydrate much earlier.
In terms of yield, there will be variations depending on the type of tomato you use. On average, 2 medium tomatoes give about 0.35 oz [10 g] of dried slices.
Once dehydrated, store the slices in airtight bags or containers. A vacuum seal device would be a good option for longterm storage. I grind the tomato slice just before using.
Toasting Spices
For a small quantity of spices, I toast whole spices over medium heat in a dry stainless-steel skillet till the spices just start to brown and release their aroma, 30 to 45 seconds. Remove from heat and transfer to a plate to cool. Grind the whole spices down with a mortar and pestle or for a finer grind use a coffee grinder/mill.
In this recipe, I prefer a coarser grind.
tomato vinaigrette
Since tomatoes can vary in taste depending on type, season, and quality, I recommend starting with 1 Tbsp of vinegar and if you feel you need more acidity, then add more if needed. Olive oil can leave a bitter taste when emulsified, if you want to skip the bitterness use a neutral tasting oil like grapeseed. I prefer sherry vinegar for its sweeter milder flavor but balsamic or a good red wine vinegar will work great here.
Makes a little over 1/4 cup [60 ml]
0.35 oz [10 g] ground tomato powder (see Notes above)
1/4 cup [60 ml] extra-virgin olive oil or grapeseed oil
1 to 2 Tbsp sherry vinegar
1/2 tsp ground toasted cumin (see Notes above)
1/2 tsp ground toasted coriander (see Notes above)
1/4 tsp ground black pepper
fine sea salt (try smoked salt for a smoky flavor)
Mix the tomato powder, olive oil, vinegar, cumin, coriander, and pepper in a small mixing bowl. Taste and season with salt. Let sit covered for at least 15 minutes before using.
January 27, 2020
baked branzino in mustard oil
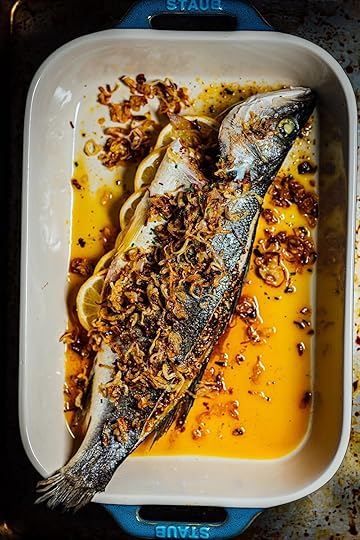
Mustard oil is a rich golden colored oil that is extracted from crushed black mustard seeds and carries a the characteristic flavor profile of horseradish. It’s often used in North Indian cooking especially in the state of West Bengal but also in the country of Bangladesh. Similar to the way in which some Europeans in the Nordic countries pair horseradish with seafood and the Japanese pair wasabi with the sushi, mustard oil is a popular choice of oil when cooking seafood (and also vegetables) due to its flavor, a characteristic of plants in the Brassica family. This seasoning will work with almost any type of white fish.
Notes:
When you buy a whole fish, make sure the eye is clear and the skin isn’t slimy. This helps give you an indication of the freshness of the fish.
Ask your fisherman/fishmonger to clean the scales off your fish.
I prefer to cut whole fish along the dorsal side so the flesh is exposed and gets an opportunity to meet any seasonings and permeate with the flavors.
The body cavity of the fish, I rarely stuff and if I do, like I’ve done here, it’s mostly for visual appeal rather than for flavor.
Mustard oil can be obtained from Indian grocery stores or you can get Yandilla, a brand of mustard oil that can be obtained from Market Hall Foods in Oakland, California as well as online.
Heating mustard oil reduces some of the intensity of flavor, so I sometimes dress the fish with an extra tsp or two of mustard oil just before serving.
Amchur is a powder obtained by grinding down dried unripe mangoes. Since the mango used is unripe, it contains a large amount of acid and provides the sourness in this recipe. Amchur is sold at Indian grocery stores, speciality spice markets and is also available online.
You can cook the fish and shallots at the same time in the oven. Place your racks at the middle position, use the top rack for the fish and the lower rack for the shallots.
branzino in mustard oil
makes 2 servings
One 1.3 lb [590 g] whole branzino
2 Tbsp mustard oil (I use the Yandilla brand but see my notes above) plus a little extra to grease the pan
2 garlic cloves, peeled and grated
1 Tbsp black and brown mustard seeds
2 tsp amchur
2 tsp fine sea salt plus extra salt
1 tsp Aleppo flakes
1 tsp ground black pepper
1 lemon cut into thin slices, seeds removed and discarded
Garnish
3 [180 g] shallots, peeled and cut into thin rings
2 Tbsp extra-virgin olive oil
fine sea salt
1 Tbsp minced chives
1 tsp amchur
Place the wire racks at midlevel in the oven and preheat the oven to 300F [149C]. Grease a roasting pan that’s large enough to fit the fish with a little mustard oil.
Pat the fish dry with kitchen paper towels. Run a sharp paring knife along the dorsal (upper) side of the fish to create a deep pocket between the flesh and the spine, starting at about 1 inch [2.5 cm] from the tail and stopping about 1 inch [2.5 cm] before you reach the head. Flip the fish and repeat. Place the fish in the roasting pan.
Mix the mustard oil, garlic, mustard seeds, amchur, salt, Aleppo, and pepper together in a small bowl. Spread the mixture evenly inside the pockets on both sides of the fish. Arrange the lemon slices in a layer inside the cavity of the fish. Sprinkle both sides of the fish with a little salt. Roast the fish in the preheated oven on the top rack for 30 to 45 minutes, till the flesh turns white and the skin starts to shrivel and curl on the edges. Remove from the oven.
While the fish cooks, prepare the shallots. Line a baking sheet with a layer of parchment paper. Mix the shallots with the oil and salt in a medium bowl and spread them out on a thin layer on the lined baking sheet, place it in the oven at 300F [149C] on the lower rack and cook till the shallots turn golden brown and crispy, about 30 to 45 minutes. You will need to stir and redistribute the shallots halfway through during cooking to let them cook evenly. Remove from the oven.
To serve the fish, garnish the fish with the crispy shallots and chives. Sprinkle with amchur and serve the fish immediately with bread or rice and a salad. (see notes)
January 20, 2020
passion fruit curd
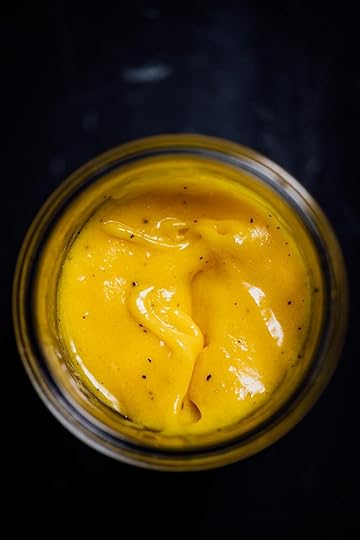
A lot has happened in the past few months. I’ve moved to LA and turned in my manuscript for my new cookbook (which will be out later this fall). I also moved with all the passion fruit I grew back in my backyard in Oakland because there was no way, I would leave that behind. Honestly, if I could I would move all my fruit plants here.
I’ve made passion fruit curd before but this is the basic recipe I use and I’ve been meaning to revisit it to explain what exactly is happening in the bowl as it cooks.
Notes:
To extract passion fruit juice from the fruit, collect the pulp with the seeds by scooping it out with a spoon. Place the pulp with the seeds in a blender and pulse on high speed for a few seconds. Then strain the liquid over a medium bowl using a fine mesh sieve and press to squeeze all the juice out. Discard the pulp in the strainer and use the juice as needed. The black specks of the broken seeds do not bother me in the final curd but if you don’t care for them, strain the mixture through a fine mesh sieve lined with cheese cloth. You can also perform this at the end once the curd is done cooking when removing any lumps.
The rate at which the curd thickens will be affected by the type of bowl. A glass bowl will take longer to heat than a stainless-steel one.
Fruit curds are usually made by applying physical and chemical conditions to denature egg proteins. The heat from the hot water bath and mechanically whisking the mixture provide the physical conditions to denature the egg proteins. The acid from the passion fruit pulp provides a low pH which provides the chemical conditions for the proteins in the egg to change their shape and denature. At 151F [66C] egg yolks start to thicken and egg whites are tender. On further heating to about 165 to 170F [74 to 77C] the mixture will begin to visibly thicken and the curd will be ready. This temperature is also when mixed eggs thicken when heated and your curd will be ready. If you heat it above this temperature, you risk the chance of the egg proteins coagulating and clumping.
When heating the mixture, it is important to constantly stir it to ensure even heating and prevent coagulation of the egg proteins.
Sometimes starch is added as a second insurance to thicken egg-based custards (and even curds). I don’t use it in this recipe but if I did, I would need to heat the liquid to 185F [85C] to inactivate the enzyme lysozyme that is present in egg yolks. This enzyme cuts starch up and will prevent the starch from thickening the liquid.
passion fruit curd
Makes approximately 2 1/2 cups [520 g]
2 large eggs plus 2 yolks
1 cup [200 g] sugar
1 cup [240 ml] passion fruit extract (juice from about 8 to 12 passion fruits)* see the note above
1/2 cup [113 g] unsalted butter, cubed and softened to room temperature
1/4 tsp fine sea salt
Fill an electric kettle with water and keep ready to boil when needed.
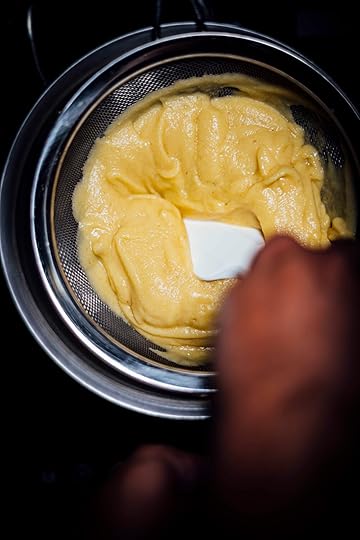
Fill a medium saucepan with about an inch [2.5 cm] of water and bring to a simmer over low heat. Place a large heat-proof bowl over the saucepan. The water should not touch the base of the bowl. Place the eggs and sugar in the bowl and whisk using an electric whisk till the mixture thickens and turns pale yellow at about 151F [66C], around 6 to 8 minutes.
Whisk in the passion fruit juice, butter, and salt on low speed while continuing to heat the mixture. If at any time, the water in the saucepan gets low, you can add a bit of hot water from the kettle. Whisk the mixture till combined, then switch to a silicone spatula and stir the mixture constantly while cooking. Cook till the mixture thickens at about 165F to 170F [74C to 77C], about 10 to 12 minutes, scraping the sides of the bowl with the spatula. The liquid curd should be very thick like a custard. Coat the back of a spoon with the custard, draw a line with your finger, the line should stay. Remove and transfer the curd to a container. You can also strain the curd through a fine mesh sieve lined with cheesecloth to remove any bits. Press a piece of plastic film on the surface and refrigerate for at least 4 hours until chilled. This curd can be prepared and refrigerated for up to 1 week.
October 17, 2019
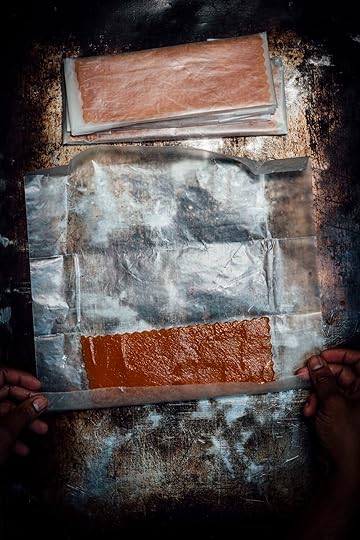
quince paste
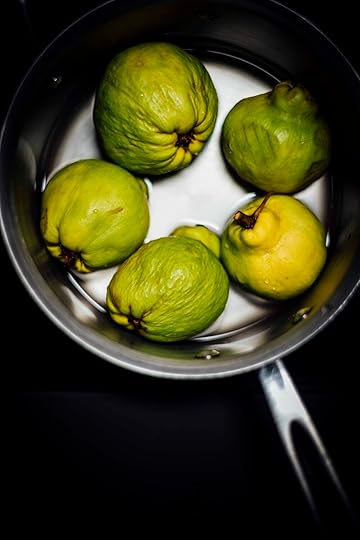
Last December, I picked up a small quince tree from my nursery in Berkley and put it in a large pot in my backyard. The one warning, I did receive from the seller, it might not fruit in year one. But a few months later in spring, big bright white flowers popped up and eventually turned into large, hard pear shaped fruit. And about a week ago they started to fall off the tree and turn fragrant, a sign that they were ready. But unlike other fruit that turn soft and/or sweet, a quince doesn’t do that when ripe. When raw, they’re too firm, tart, and astringent to enjoy, so they must be cooked. Quince are also rich in pectin (it’s in the group of fruit such as apples that contain a high amount of pectin) so it makes an excellent choice for jams, jellies, and paste.
Here’s a version of legendary writer Claudia Roden’s quince paste which resembles my mom’s guava cheese in texture (same chemistry principle). You can leave the skin on the fruit but remember to get rid of the fuzz.
Pectin is a carbohydrate naturally present in plants in varying amounts. It helps give plants structure by acting like a cement. Pectin is also sensitive to pH
a low pH from an acid such as vinegar or lemon juice helps it form gels. If you want to slow cook beans for several hours (such as baked beans) and need a firmer texture, add a little vinegar.
an alkaline pH from an ingredient such as baking soda will destroy pectin. When you want to cook beans and get a softer texture quickly without using a pressure cooker, add a tiny pinch of baking soda.
In this instance, the pectin present in quince (and in general in almost all fruits and plants) is called HM (High Methoxyl). When an acid (in the case from the acid naturally present in the fruit and lime juice) is added with sugar to the blended quince purée, the acid helps extract the HM pectin which then starts to increase the thickness and viscosity of the fruit purée. At this stage the sugar and water get trapped in the pectin mesh that begins to form and you get a gel on cooling, in this case the paste that is soft enough to be sliced.

quince paste (adapted from Claudia Roden’s A Book of Middle Eastern Food, 1968, Knopf)
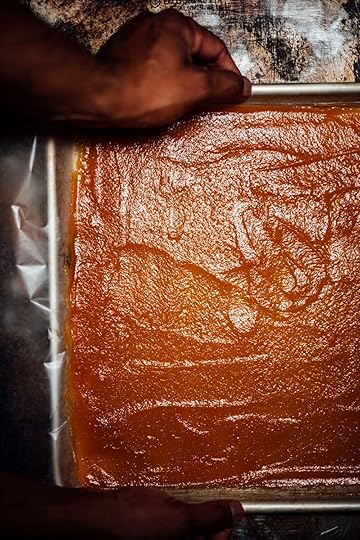
This is an easy way to preserve quince, this paste can be cut into thick slices and served with various cheeses as an appetizer or spread onto sandwiches. As the fruit cooks, it releases its distinct floral perfume (which reminds me of an apple and a rose) and the high amount of pectin present in the quince reacts with the sugar, acid from the fruit and lime juice to produce a gel that sets to form a slab that can be easily cut through. I use a pastry or pasta roller to trim the edges and cut the paste into slices.
Makes one baker’s half sheet pan [about 17.88 inches x 12.88 inches x 1.06 inches]
2 lb [907g] quince
2 cups [480ml] water
2 cups [400g] sugar
juice of 2 limes
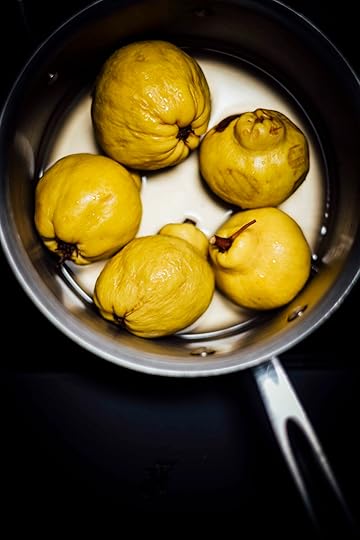
Rinse the quince under running tap water and rub the skin to remove the fuzz. Place the whole fruit in a large saucepan and add enough water to half their height. Cover with a lid and let steam on medium-low heat for 30 to 45 minutes until complete tender but not falling apart. Carefully remove the fruit with a slotted spoon and leave them on a plate to cool. Discard the water in the saucepan.
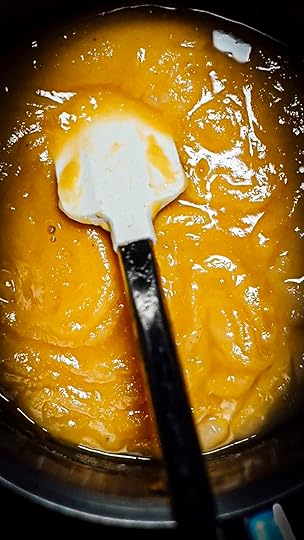
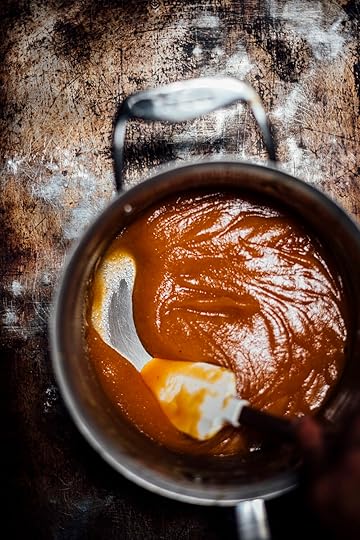
When the fruit is cool enough to handle, cut the fruit in half, discard the core with the seeds and the stalks if present. Place all the fruit in a blender with the water and pulse on high speed until smooth. Strain the mixture though a fine mesh sieve placed over a medium saucepan. Add the sugar and lemon juice, and cook on low heat for about 1 1/2 to 2 hours, stirring occasionally to prevent burning. The mixture will be done with the fruit paste thickens, turns a light reddish brown, and starts to come away from the saucepan.
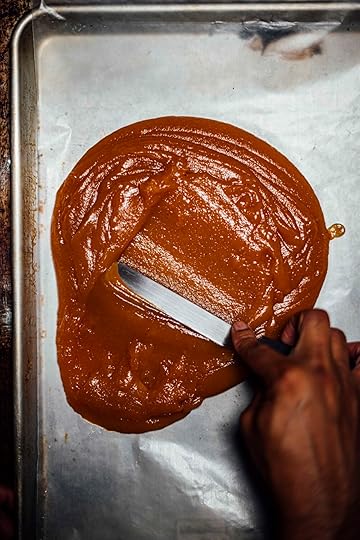
Line a baker’s half sheet pan [about 17.88 inches x 12.88 inches x 1.06 inches] with wax paper. Pour the hot paste over the paper and spread it out with an offset spatula. Let it dry at room temperature for a several hours or leave it in an oven at the lowest temperature setting. The paste will be ready when it cools and sets to form a gel and the surface will be smooth and not sticky to touch. Cut into slices and wrap in parchment or wax paper and store in the refrigerator in an airtight container for up to 3 months.
August 2, 2019
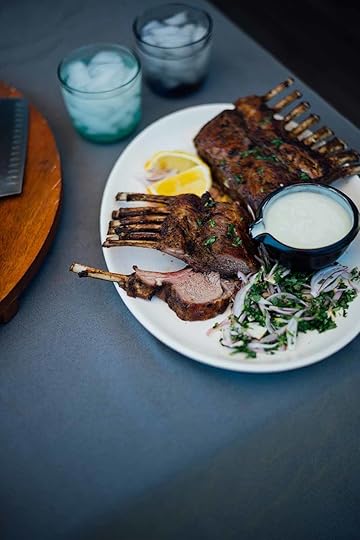
spiced rack of lamb

This year summer feels short. I’ve been locked away for the most part writing and testing new recipes for my book which explains why I feel this way. There were a few important house projects that we kept putting off and it was finally time to tackle them head on. A few gardening projects were also completed - the passion fruit vine is now attached to a proper trellis and it’s taking over the fence beautifully like a big green curtain.
As a way to remedy some of these shortcomings this summer, we invited a few close friends over for a small cookout. I cooked a rack of lamb from the American Lamb Board and drizzled it with toum (the delicious garlic lemon sauce served in the Middle East) and threw together a very quick salad of couscous and summer produce. My friends brought dessert and appetizers.
A rack of lamb looks fancy but is very easy to prepare. For one, you don’t need to marinate them too long and two, the cooking time is short. As for preparing the rack, my butcher does most of the work but I do trim some of the fat off, not too much because that’s what will give the meat it’s endearing crust when the meat is seared in the pan. An important but understated tip, save those pan juices to drizzle over the lamb when you serve.
The American Lamb Board is also holding a contest and you get to vote for your favorite summe lambventure grill-off, to enter simply visit the link and good luck!


Spiced rack of lamb
This rack of lamb is great with toum. I usually pick some up at my local Middle Eastern market.
Serves 4 to 6
2 lbs rack of American Lamb, fat trimmed and discarded
2 Tbsp olive oil
1 tsp garam masala
1 tsp dried mint
1 tsp fine sea salt
Lemon wedges to serve
Preheat the oven to 400F.
While the oven is warming, mix 1 Tbsp of olive oil with the garam masala, mint, and salt. Massage this mixture over the lamb and let it rest covered for 30 minutes.
Heat a large skillet on medium-high heat. Heat the olive oil in the pan. Once the oil is hot, sear the lamb till golden brown for about 3 to 4 minutes on each side. Using a pair of tongs, transfer the lamb with a pair of tongs to a baking sheet or roasting pan and roast in the preheated oven for 15 to 10 minutes, until the lamb is cooked to the desired degree of doneness. For a crispier crust on the lamb, turn the oven to a medium broil and broil for about 2 to 3 minutes, until the crust is golden brown.
Remove the lamb from the oven, cover loosely with a foil tent for about 5 minutes to rest. Drizzle with the pan juices and serve immediately.
Disclaimer: This post was sponsored by the American Lamb Board. All opinions expressed are solely my own.
June 16, 2019
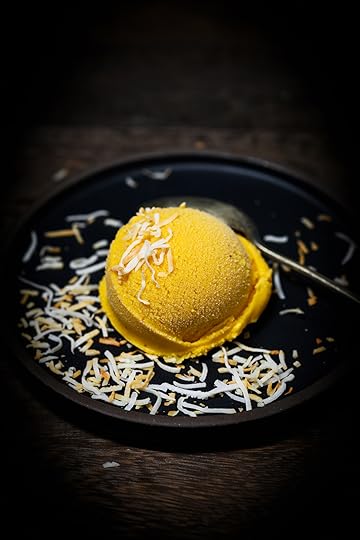
mango, coconut, and star anise ice cream
Every summer involves a ritual of luscious mangoes dazzling in their sweetness and and tropical fruity aroma. After more than 5 years, I got the chance to taste Indian mangoes all the way in London on a vacation and there were so many varieties to choose from; the Kesar, the Alphonso, the Langara, and so many more that I’m now certain that if I can’t visit India in May, I might need to just take a trip back to the land of the Queen.
This ice cream is very simple and you will need a good high-speed blender to break the star anise. Otherwise, pre-grind it before and then add it.. The star anise sweet spiciness intensifies the sweetness of the mango. I lean heavily towards coconut flavors, so I add a bit more here because it reminds me of Goa, the mango and coconut trees lining the streets.
A note on canned mangoes: I buy the Organic 24 Mantra brand (Alponso variety) which I like since it has no added sugar so I can control the sweetness. This is available at Indian grocery stores and online. Else, go for a ripe, aromatic mango and blend that in.
mango, coconut, and star anise ice cream
Makes approximately 1 generous quart
2 cups [480 ml] canned Alphonoso mango pulp or a good ripe mango puree
4oz [115g] cream cheese, softened and cut into cubes
3/4 cup [150g] sugar
1 whole star anise pod
1 cup [240 ml] half and half
1 Tbsp [15 ml] good quality coconut extract
1/4 cup [18g] sweetened or unsweetened desiccated shredded coconut
Place the mango pulp with the cream cheese, sugar, and star anise pod in a blender. Pulse for a few seconds until the cheese and star anise are completed integrated. Add the half and half with the coconut extract and pulse for a couple of seconds. Strain the ice cream base over a fine mesh strainer directly into the bowl of your ice cream maker. Discard the solids and prepare the ice cream as per the instructions of your ice cream maker’s manufacturer. Once the ice cream is done, transfer it to a freezer-safe container, line the surface with parchment paper and press down to remove any air bubbles. Freeze for at least 2 hours to firm up completely.
Before serving, prepare the topping. Heat a medium skillet on medium high heat. Once the pan is hot, add the coconut and toast until they turn into a mix of golden brown and white shreds. This happens rather quickly in a 1 to 2 minutes, so watch them carefully so as not to burn them. Transfer the toasted coconut to a bowl. Before scooping the ice cream to serve, garnish with a teaspoon of toasted coconut.
Note: If your ice cream is very firm, let it sit out at room temperature for about 5 to 8 minutes to soften and then serve.
April 1, 2019
madras beef curry

I recently cooked this recipe and shared it in my Instagram stories and some of you emailed asking for the recipe. It’s an old recipe that I’ve tweaked quite a bit over the years and is loosely based on Julie Sahni’s Savoring India (Time Life Books). This version has a stronger coconut flavor, for those of you that have access to fresh coconuts and make your own, use that.
I like it best with dosa or rice but flatbread works great. A small salad on the side is all you need with this.
madras beef curry (adapted from Julie Sahni’s Savoring India - Time Life Books)
makes 4 servings
ingredients
2 Tbsp poppy seeds
2 Tbsp coriander seeds
1 tsp anise seeds
1/2 tsp ground turmeric
3 Tbsp coconut oil
2.5 lb stew beef, fat trimmed and cut into 1/2 -inch chunks
2 whole Kashmiri chiles (you can use another red chile that is not too hot)
one 2-inch whole cinnamon stick
2 green cardamom pods, crushed once *
6 whole cloves
8 shallots, thinly sliced into rings
1 tsp minced garlic
1 tsp grated ginger root
two 13.5 oz coconut milk
1 tsp fine sea salt
juice of one lime
2 Tbsp whole cilantro leaves for garnish (optional)
Heat a small dry skillet on medium heat. Add the poppy, coriander and anise seeds and toast for about 45 seconds until they just start to release their aroma and start to brown. Immediately remove it from the stove and grind the seeds to a fine powder in a blender or spice mill or coffee grinder.
Heat the oil in a medium heavy Dutch oven or a saucepan on medium-high heat. Add the chiles, cinnamon, cardamom, and cloves and cook until fragrant, about 45 seconds. Add the shallots and cook for 8 minutes until they start to brown. Add the garlic and ginger and cook for 30 seconds with constant stirring. Add the ground spice mixture and cook with constant stirring for another 1 minute. Add the beef pieces with the salt and cook for 4 minutes. Lower the heat to low and stir in the coconut milk. Cover the pan with a lid and let it cook for about 90 to 120 minutes until the beef is completely tender. Stir in the lime juice. Taste and adjust the salt if necessary. Garnish with cilantro if using. Serve hot or warm with rice or dosa or idli or flat bread like roti or paratha.
* Cardamom - you will leave the whole cardamom pods in the curry. If you want to fish them out at the end before serving by all means do so.


