
Nik Sharma's Blog, page 11
May 26, 2020
the chemistry of a vegetable stock
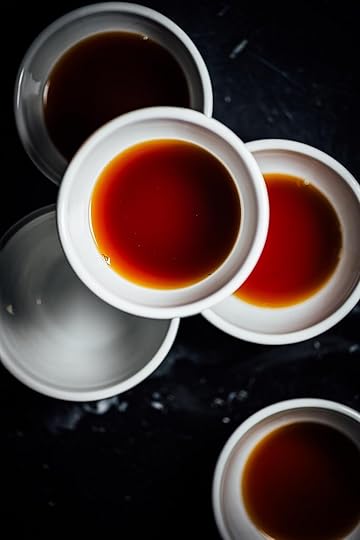
Stocks are marvelous tools in the kitchen, they can exist by themselves or support building flavors in other dishes. I recently wrote about the chemistry of vegetable stock making for The Washington Post. From how delicious savory notes are built from the ingredients we incorporate into our stocks and how we play with our techniques to layer on and build flavor at each stage, this recipe will explain it all. This recipe will give you the basics and the backbone of vegetarian stock making that you can then manipulate to your advantage in the kitchen for your recipes.


May 15, 2020
bhaturas
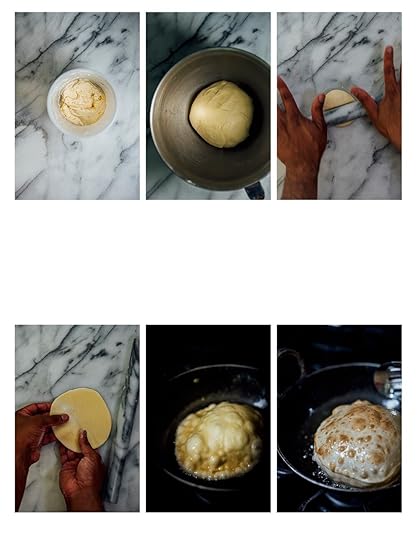
As promised here is my recipe for bhaturas that must be eaten with the chole. Bhaturas are a type of leavened deep-fried bread that are made using baking powder and yogurt. The yogurt not only helps with the softer texture and fermentation but it also leaves a delicious tangy edge which makes this bread a pure delight to eat.
A few kitchen notes;
Do not use a spider when maneuvering the bhaturas in the hot oil, the spiky edges as I learned will rip the puffy tops of the bread. A smooth rounded slotted spoon is your friend here.
For a crispier texture, substitute 1/2 cup [70g] of the all-purpose flour used in the starter with 1/2 cup [80g] semolina.
I’m using a temperature of 110F[43C] because this is the best temperature at which lactobacilli in yogurt grow (see Homemade Yogurt).
The combined action of heat, baking powder, and carbon dioxide produced by the lactobacilli fermentation will help the bread turn puffy.
Keeping the bread submerged by applying gentle pressure using the slotted spoon will help increase the puffiness of the bread. If the puffiness is uneven on the surface, press the sides that are puffy, this will help the flat sides puff up. Sifting the dry ingredients before they meet the wet ingredients helps to mix the baking powder all through to help with puffiness.
The ideal color for a bhatura is light golden-brown. If you look at my last photo above in the panel, you could go a shade lighter (I like that little speckled look on my bhaturas).
bhaturas
You will need to plan ahead of time to prepare the starter. I recommend setting the starter and the chickpeas the night before so you can cook them and eat them the day they’re prepared. The amount of oil you need to fry the bhaturas will depend on the width of your pot or saucepan. I usually find 2 cups [480ml] to be sufficient. but you might need more. These breads are best eaten as soon as they come off the stove or at least within an hour while they remain warm.
makes 14
for the starter
1/2 cup [70g] all-purpose flour
1/2 cup [120g] plain yogurt
1 Tbsp sugar
For the dough
1 3/4 cups [245g] all-purpose flour
1/2 tsp fine sea salt
1/2 tsp baking powder
2 Tbsp neutral oil such as grapeseed oil
1/4 cup [60 ml] water at 110F[43C]
neutral oil such as grapeseed for frying
Prepare the starter by mixing the 1/2 cup [70g] all-purpose flour, yogurt, and sugar to form a smooth mixture with a fork until there are no lumps in a small container. Cover with a lid and leave aside to ferment in a warm spot (preferably at 110F [43C]) for at least 16 hours, maximum 24 hours. The starter will smell pleasantly sour like fresh yogurt.
The next day, when ready to prepare the dough, sift the 1 3/4 cups [245g] all-purpose flour, salt and baking powder over the bowl of a stand mixer. Dry whisk the mixture with the paddle attachment using low speed just to mix the ingredients. Add the starter to the flour and set the speed to low, add the 2 Tbsp oil, then slowly start to add the water 1 Tbsp at a time, till the dough starts to come together. Removed the paddle attachment and switch to the dough hook. Continue to knead the dough for 8 minutes on low speed, till it turns smooth and pliable. Stop the mixer, scrape the dough out of the bowl and transfer to a lightly floured surface. Shape the dough into a large ball, cover with a bowl or with a damp kitchen towel, and let the dough rest for 3 hours.
Once the dough is rested, divide the dough into 14 equal parts by weight and shape each into a small ball. Roll each ball of dough into a flat 5 inch [12 cm] circle.
While the bread is rolled out, heat the oil in a medium saucepan, kadai or wok over medium-high heat. Set a tray or large plate lined with a wire rack or absorbent paper or kitchen towels. When the oil reaches 350F[180C] as read on an instant-read digital thermometer, add one piece of rolled out circle of dough into the hot oil, the bread will rise to the top and start to turn puffy. As the bread cooks, use a slotted spoon to apply gentle pressure and keep the bread submerged under the oil, this will force the air inside the bread to expand and puff the bread up. Once the bread puffs up, about 1 minute, flip the bread and cook on the second side till it bread puffs up like a big balloon, about 45 seconds. Remove the fried bread and transfer to the tray. The bread should have a light golden brown color. Serve immediately or keep warm until ready to eat.
May 11, 2020
chole
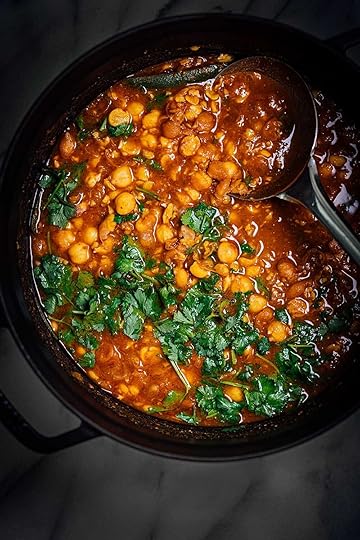
Chole or Punjabi chole (this dish is from the Northern State of Punjab in India) is comfort food - the texture, the temperature, and the flavors. Breakfast, lunch, brunch, or dinner, the time of the day has never dictated my consumption of this delicious chickpea stew/curry served with freshly fried bread called bhaturas (recipe coming later this week). My mother learned to make this dish from a family friend (who are Punjabi) and as one can expect over time this recipe’s been tweaked to suit our tastes.
Here are some of my kitchen notes;
Spices and tea form the base of the stock in which the chickpeas cook and acquire their flavor.
Tea does not make the stock bitter as one might expect, instead it imparts an interesting note of savoriness and color to the dish. Just to show you the difference between color of using tea and not tea when making chole - the photo above with the bright red color contains no tea, while the video where I add the amchur used tea and the color is noticeably darker). The one made with tea is my favorite and the way this dish should be made. Use Assam or Darjeeling black tea, tea bags are a good option here because you can dump it in and then tosss it out. If you use loose tea add it to the spices in the tea infuser or muslin cloth.
I use tomato paste instead of fresh tomatoes which shortens cooking time but also adds a much more concentrated dose of flavor and color to the dish.
Kashmiri chilli powder gives a smoky edge in addition to its bright red color and a mild dose of chilli heat. However, if you don’t have that hand use smoked sweet paprika and cayenne.
Note how I do not use any alliums - no onions or garlic. This recipe is a good example of when to use asafetida (hing). I wrote about this in my last book Season but will get into the science of this in more detail in my new book, The Flavor Equation. But in short, because asafetida contains the same aromatic chemicals that are present in alliums, they’re used as a substitute for those flavors in Indian cooking especially by several Indian communities that do not consume onions and garlic.
I started with 2 cups [360 g] of dried chickpeas which almost doubles in volumes, so use two 14 oz [400 g] cans of chickpeas if that’s what you have on hand. If you use canned chickpeas, salt the water as instructed but skip the baking soda. You will reduce your cooking time to about half since canned chickpeas are already cooked. I throw the soaking water because I’m not fan of the smell and while this is not a
If you want this less hot, remove the seeds and midrib from the green chilli or skip it. Add less cayenne for less heat.
While cilantro is my favorite option, you can also garnish this with thin slices of red onion rings or even pickled red onions for an extra edge of tanginess.
Chole
This classic chickpea stew from the North Indian state of Punjab relies on spices for its rich flavorful broth. You can make this a day in advance but garnish it right before serving. Serve with fresh warm bhaturas (recipe coming later this week).
Makes 4 servings
2 cups [360g] dried chickpeas (see my notes above for using canned chickpeas)
1 tsp fine sea salt
1/4 tsp baking soda
2 black tea bags such Assam or Darjeeling (see notes above on using loose tea)
4 cloves
4 green cardamom pods
2-inch [5 cm] piece cinnamon stick
1 black cardamom
3 Tbsp neutral oil like grapeseed or ghee
1 Tbsp cumin seeds
a pinch of asafetida (hing)
2 tsp Kashmiri chilli powder or (2 tsp smoked sweet paprika + 1/2 tsp ground cayenne)
1/2 tsp ground turmeric
1 Tbsp grated ginger
3 Tbsp tomato paste
1 green chilli like Serrano, cut into strips or minced
2 Tbsp amchur (unripe dried mango powder) or 2 Tbsp lime juice
2 to 3 Tbsp chopped cilantro
Rinse the chickpeas under running water and then soak and cover them overnight in 4 cups [960 ml] water.
The next day, discard the soaking water and rinse the chickpeas under tap water. Add 4 cups [960 ml] water to a medium saucepan or Dutch-oven. Stir in 1 tsp salt and baking soda. Add the soaked chickpeas. Toss in the tea bags. Gently crack the cloves, green cardamom, cinnamon, and black cardamom using a mortar and pestle. Place the spices in a tea infuser or a piece of muslin or cheese cloth, seal the infuser or tie the ends of the cloth if using muslin. Place the infuser in the saucepan with the chickpeas. Bring the contents of the saucepan to a rolling boil over medium-high heat, then reduce the heat to a simmer, and cover the pot with a lid. After 30 to 45 minutes, the chickpeas will be tender and soft enough that they will fall apart. Remove the saucepan from the stove. Remove and discard the tea bags and the spices inside the tea infuser.
Place a small dry saucepan over medium-high heat. Add the oil to the saucepan. Add one or two cumin seeds to determine how hot the oil is, if the oil is hot, the seeds will sizzle (and dance). Once the oil is hot, add the cumin followed by the asafetida. The seeds will sizzle while the asafetida will foam and turn fragrant. Add the Kashmiri chilli powder and turmeric. Swirl the contents of the saucepan and cook for 30 to 45 seconds, till the spices start to get fragrant. Add the ginger and tomato paste and sauté till the fat starts to separate from the mixture, 2 to 3 minutes. Add the green chilli and sauté for 1 minute. Remove from heat and add this spice mixture into the chickpeas. To extract all the spice mixture from the small saucepan that might get stuck to the sides, add 1/4 cup [60 ml] of the chickpea cooking liquid to the small saucepan to wipe the sides down and return the liquid back to the chickpeas. Stir in the amchur. Taste and add salt if needed. Garnish with the cilantro before serving. Serve warm or hot.
May 8, 2020
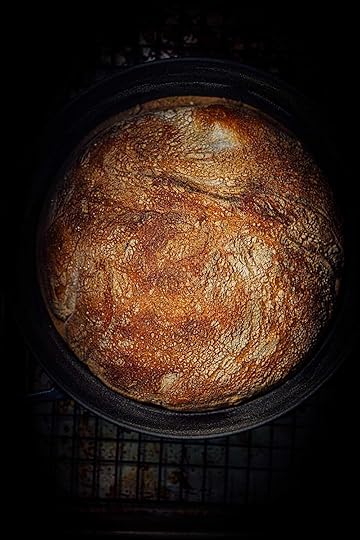
no-knead bread

Bread baking is a very different set of skills than making cakes and master bread bakers devote their lives to making the perfect bread. I’m not a master bread baker by any means but the way flour transforms from a powder to a completely different ordered structure is fascinating.
This bread recipe makes me feel confident, it’s originally a Jim Lahey recipe (which is very famous) that’s been adapted by David Leite of Leite’s Culinaria and works superb (there are lots of version’s of this no-knead bread on the internet that I tried and this is the one that gave me success and explained what to watch out for)
No-knead breads as the name suggests, removes the need to knead bread which saves some time. This particular dough contains a large amount of water and is called a high-hydration dough which makes it sticky. The dough requires very little yeast to start with, this is because the bulk fermentation is long (and I doubled mine from the time listed in the recipe), because yeast replicate exponentially. If you start with too much yeast all the nutrients that yeast need to survive and grow will be eaten up very fast and your bread will rise fast and fall, the end result will not be good.
When working with high-hydration doughs, knowing how to shape them is important. Watch this video from the San Francisco Baking Institute before you shape. It does an excellent job of showing how to handle the dough and shape it. Before I watched this video, I had a lot of problems shaping it and my bread didn’t rise properly once baked because I didn’t work it enough.
Follow the recipe on David’s site but these are the changes I made.
Add 3 Tbsp of whey from an active culture yogurt when you add the yeast. This is to build up some more lactic acid and other flavor molecules.
Bulk ferment for a long time - 24 to 26 hours is perfect in my experience. I do this in a food-safe plastic container with a lid.
Use a cocotte or Dutch-oven of the right size. Too wide and the bread has more room to spread as it bakes. My 5.5 quart [ 5.2L] cocotte (Staub) is 10.24 inches [26 cm] wide and worked fantastic for this amount of dough.
Make sure you coat the towel with plenty of flour, semolina, or cornmeal. This is a high-hydration dough and there’s also water being produced by the bacteria and yeast due to their metabolism. If you don't coat the towel well, the dough has a strong tendency to stick to the cloth and it will be a pain when you peel the cloth away.
May 7, 2020
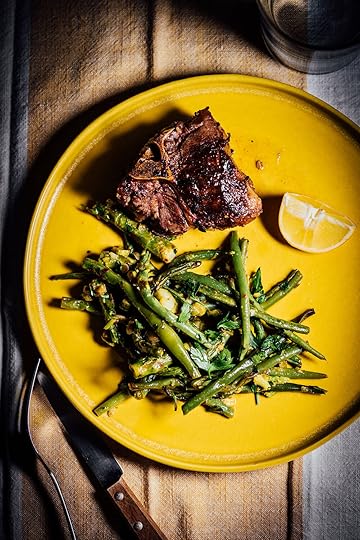
grilled lamb chops with asparagus and green beans
Disclaimer: This post was sponsored by the American Lamb Board . All opinions expressed are solely my own.
American lamb chops are a quick and easy cut of meat to season and cook. Typically, I’ll season the meat in a marinade for a short time and then cook them over heat till they develop a nice crust to the desired degree of doneness and then serve it with a salad or some sort of vegetable. I’m taking advantage of spring produce - asparagus and green beans. Try to use young asparagus and green beans, so the final texture is tender and not chewy. The older these vegetables, their more fibrous and chewy their texture. The addition of pumpkin seeds adds a pop of crunchiness to the vegetables while the lemon juice helps pop the flavors out and the fish sauce adds a note of savoriness.
I like to use a generous amount of garlic when I cook lamb, I’ve toned it down a little bit here but for those of you that are garlic lovers, bump it up! You can also make it hotter by adding a minced green chilli like a Serrano or Thai pepper or even some cayenne. If you own an outdoor grill or grill pan with grates, you can get those nice char marks but a regular skillet will work wonderfully too. If you have fresh aromatic herbs like mint on hand, you can add them for a beautiful hint of coolness to the vegetables.
Right now there are more than 80,000 family farmers and ranchers across our country that raise lamb for our food. If possible, try to support your local farmers markets and stores by purchasing lamb from them, this helps the families and farms who are growing our food and also strengthens the community as a whole.
grilled lamb with asparagus and green beans
This is a lamb dish that needs no accompaniments, serve it for a light lunch or dinner. Sometimes, I chop up a few tablespoons of fresh mint and add it to the cooked vegetables just before serving.
Check out the American Lamb Board to learn more about lamb and different options available. In addition, due to the COVID-19 pandemic crisis, the American Lamb Board is running a campaign to help support America’s farmers and ranchers, please take a moment to check out fanoflamb's #TheLambChallenge campaign to help raise money for Feeding America, and the opportunity to win some great prizes!
makes 4 servings
For the lamb chops
4 American lamb loin chops (about 1 to 1 1/2 lbs [455 g to 680 g] total weight)
3 Tbsp extra-virgin olive oil plus a little extra to brush the pan
2 garlic cloves, peeled and minced
2 tsp ground black pepper
1 tsp fine sea salt (if you have a smoked infused salt on hand, use that for a kick of smoky aroma)
For the asparagus and grilled beans
1 lb [455 g] asparagus spears, bottom tough end trimmed and discarded
1 lb [455 g] green beans, ends trimmed and discarded
3 Tbsp raw pumpkin seeds
2 garlic cloves, peeled and minced
2 Tbsp extra-virgin olive oil
fine sea salt
2 Tbsp lemon or lime juice
2 Tbsp wet mustard
2 tsp honey
1 tsp fish sauce
extra lemon wedges to serve
First prepare the marinade for lamb chops. Pat the lamb chops dry and place them in a resealable food-safe bag. In a small bowl, mix the olive oil, garlic cloves, black pepper , and salt. Pour this over the lamb chops in the bag. Seal the bag and shake to coat well. Let this sit in the refrigerator for at least 1 hour, preferably 2 hours. When ready to cook, leave the bag out on the kitchen counter to warm up to room temperature for about 30 minutes. Heat a grill pan or cast-iron skillet over medium high heat and brush the pan with a little oil. Cook the lamb chops till they are well browned on each side and their internal temperature reaches 135F [57C]. Remove the chops from the pan and place them in a serving dish and cover with foil.
About 30 minutes before you’re ready to cook, prepare the vegetables. Preheat the oven to 450F [232C]. Line a baking sheet with aluminum foil or use a large baking dish. Cut the asparagus into roughly 1 inch [2.5 cm] pieces and place them in a large bowl with the green beans, pumpkin seeds, and garlic. Drizzle the olive oil all over the vegetables, season with salt, and toss to coat well. Spread the vegetables out in the prepared baking sheet and roast the vegetables in the preheated oven for 8 to 10 minutes. The asparagus stems and beans should be tender, pull one out after 8 minutes of cooking to test and determine how tender they taste. The vegetables should be slightly browned. If you want to give them a deeper char, move the baking sheet to the upper 1/3rd portion of the oven and turn the broil function on and set to high, cook for 2 to 3 minutes till the vegetables char. Once cooked, removed the baking sheet from the oven. In a small bowl, whisk the lemon juice, mustard, honey, and fish sauce. Taste and adjust taste with salt if needed. Pour the liquid over the roasted vegetables and toss to coat well. Serve warm alongside the grilled lamb loin chops with extra wedges of lemons.
May 5, 2020
instant pot hardboiled eggs

When I need hardboiled eggs for a recipe photoshoot, I usually turn to my Instant pot. It’s simple and easy and because it uses steam under high pressure, the membrane between the egg and the shell separates well. This in turn makes peeling the eggs very easy, which in my opinion is the main advantage of this method.
There’s one thing to watch out for and this is an aesthetic peeve, the greenish ring formed due to sulfur from the egg proteins at about 80F [27C], that is a toss up. Sometimes, the green ring shows up and then other times it won’t, it won’t affect the taste of the egg.
instant pot hardboiled eggs
Makes 6 eggs
ingredients
1 cup [240 ml] water
6 large eggs (you can use more eggs depending on the model of your instant pot)
ice-cold water
Fill the Instant pot with the the 1 cup [240ml] water. Place the wire rack insert for eggs inside the pot and place the eggs on the rack in their slots. Seal the lid, set the pressure to high, and time for 3 minutes. Fill a large bowl with ice-cold water. Once the timer goes off, press the cancel button, and carefully release the steam from the valve. Once the steam is completely released, open the Instant pot. Remove the eggs with a slotted spoon and submerge them in the prepared ice water bath and let cool until they can be handled. Gently tap the shell of the egg to break it. Peel and discard the shell.
Note on temperature and serving and storage: To serve the eggs warm, peel them once they’re cool enough to be handled, otherwise store them in their shell in a container or bag in the refrigerator. For long-term storage, you can leave the unpeeled eggs in their shell and refrigerate in an airtight container for up to 1 week.
April 28, 2020
roast chicken with cilantro-mint chutney
If you’re looking for an easy chicken recipe, you can make my roast chicken with cilantro and mint chutney that I cooked up for Food and Wine. Make a batch and freeze extras for later during the week to save time.
Get the recipe at Food and Wine and watch the video for tips and substitutions.
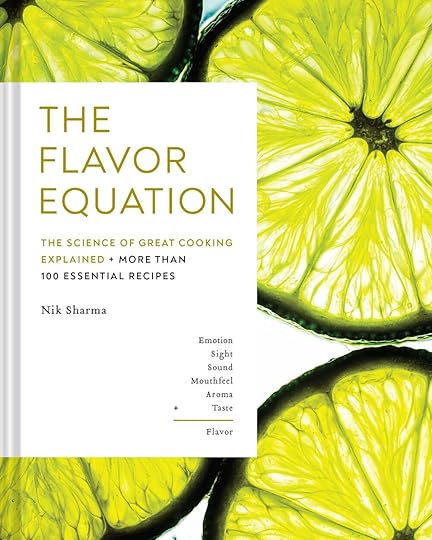
Also, if you haven’t had a chance to check out my new book, The Flavor Equation, it’s now available for preorder and will be out this October, worldwide. This book focuses on how we interact with flavor and how flavor interacts us, there’s biology, cooking, and so much more including gorgeous illustrations by artist Matteo Riva.
Thank you for your support,
xx

April 27, 2020
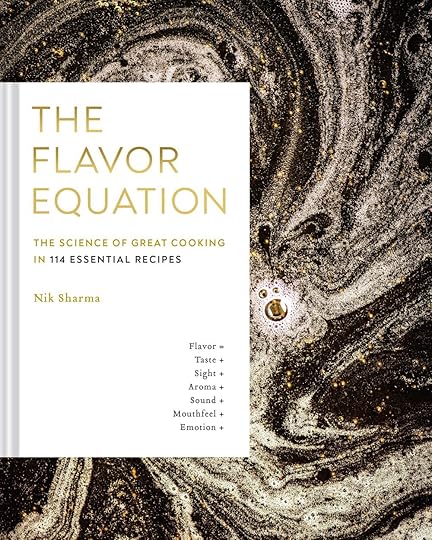
the flavor equation - cover reveal
Today, I finally get to reveal the cover for my new book, The Flavor Equation: The Science of Great Cooking with you.
A few days ago, I took you behind the scenes and showed you the two other book cover options that were in the running and why they got dropped. Now, it’s time to show you what the cover that we all immediately fell in love with.
You’ll also hear from my editor Sarah Billingsley and designer, Lizzie Vaughn and their thoughts on the cover.
When I saw the options for my book cover, this one immediately stood out. It’s simple and straightforward, limes are also my favorite choice of citrus (most of my recipes feature limes in some capacity or the other). When I photographed the limes, I wanted to get as close as possible to the fruit so you could almost imagine the fresh perfume of the limes, the bright taste of the citric acid, the texture of the fruit’s flesh, the cool and calming green color, and perhaps you might even think about the sound that is made when a lime is squeezed. So here it is folks, the cover to my new book, The Flavor Equation: The Science of Great Cooking
What’s truly special about this cookbook and what we needed to convey in the cover is how Nik presets science through beauty,” explains my editor, Sarah Billingsley, who is the Editorial Director at Chronicle Books. “In this book, Nik has really pushed himself to show something beyond the beauty of finished or in-process dishes—he has captured flavor sensations as expressed in food. The cover needed something that conveyed all of this in a single recognizable picture, and bright, juicy limes said “flavor”.
Our biggest design challenge was selecting the perfect photograph,” explains Lizzie Vaughan, Senior Designer at Chronicle Books. “Nik shot so much gorgeous imagery for The Flavor Equation, that we had plenty to work with. There are many levels of approval before a cover can go to print, and from presentations early on, we realized that the hook would be to use a photo that nodded to science and cooking. We ran the gamut. Almost 100 variations! Not surprisingly, the limes were one of the first photos we tried (sometimes when ya know, ya know). Nik’s macro abstract images are one of the most unique features of the book and the limes in particular have such colorful personality. They are friendly, not intimating, top-notch positive energy. They really echo the concept of the book.
We wanted an elegant title solution that wouldn’t distract from the photo. We landed on a lockup with an authoritative feel – left aligned, no-frills typography, within a white band. It gestures to an encyclopedia, but paired with the bright and graphic photo, it doesn’t feel too academic. The contrast works.
Nik’s first book was a wonderful framework to build from. Here too, you’ll find more beautiful photographs and other elements carried over (like a typeface ironically called Tribute), but we’ve gone full-throttle including illustrations too. The finished package will be refreshing. You’ll want to sit down and experience the book as an object, as well as to cook from it!
Learn more about the Flavor equation
April 26, 2020
the flavor equation - what goes into making a book cover
All week I’ve been sharing the various elements that make up the concept of my upcoming cookbook, the various pieces that literally make up The Flavor Equation. Today I will do something a little different, and take you behind the scenes to walk you through the thought process that went into selecting the cover for the book, and share some covers that we ultimately passed on.
I will reveal the final cover with you tomorrow Monday, April 27, 2020 via my newsletter, if you haven’t signed up yet, you can do so here. I’ll also share it here on my blog and on my social media, so be sure to follow me on Instagram.
Today, I get to take you behind the scenes and show you some of the different cover choices and the thought process that went into selecting the cover for my newest (and second) cookbook, The Flavor Equation: The Science of Great Cooking.
I shared my personal story on how I started cooking in my first cookbook, Season, but in The Flavor Equation I go deeper into everything I find fascinating and exciting about food and cooking. The Flavor Equation is a science-based cookbook in which I tie together science with food and cooking using recipes.
The Flavor Equation = Emotion + Sight + Sound + Mouthfeel + Aroma + Taste
But how would I be able to translate all these elements in the equation to photos, and choose one that captured it all to make it the cover?
Luckily I have a great team at Chronicle Books that worked closely with me through the entire process of book and cover design. I had photographed the book in stages and delivered the images to my team early on, so we had ample time to play around with ideas. “Our biggest design challenge was selecting the perfect photograph,” explains my designer, Lizzie Vaughan. “We had plenty of gorgeous imagery to work with. There are many levels of approval before a cover can go to print, and from presentations early on, we realized that the hook would be to use a photo that nodded to science and cooking. We ran the gamut. Almost 100 variations!”
Lizzie is a talented designer and also a very patient person. She was able to take whatever I attempted to communicate and translated that onto paper. Book designers are truly underappreciated heroes in the book world; I might come up with the ideas and visuals, but Lizzie made all of what you see come together in one package.
Lizzie sent me eight different versions using various photographs from the book. The marketing team and other departments at Chronicle Books also weighed in. While the first eight covers were gorgeous, I still wanted a cover that I felt effectively communicated what this book is all about. We weren’t there yet.
We went back to the drawing board and looked again at all the different photos in the book. Lizzie created another set of potential cover design and together we culled them down to our favorite three. I even sought the help of a few friends whose artistic opinions I value and trust.
The first one we considered, the golden beer foam photo you see below. It almost reminds me of the cosmos (my agent Maria Ribas, also described it as interplanetary) and I can immediately think about the crackling sounds and toasty aroma emanating from the foam, but this could also come across as too abstract.
Option 1
Another option was the sweet potato photo you see below (I should tell you this is a very easy and tasty recipe that I think you will love in the new book!). But for The Flavor Equation, I did not want a hero shot of a recipe on the cover. I really wanted to connect the abstract beauty of food and science in some sort of geeky way. While you can imagine the different textures and tastes and even the aroma straight up with a single glance, this one felt a bit too literal to me
The final choice was the one that was a perfect balance of abstract, geek, and literal, and I think it truly conveys every aspect of this book and the concept of The Flavor Equation I wanted to share with you.
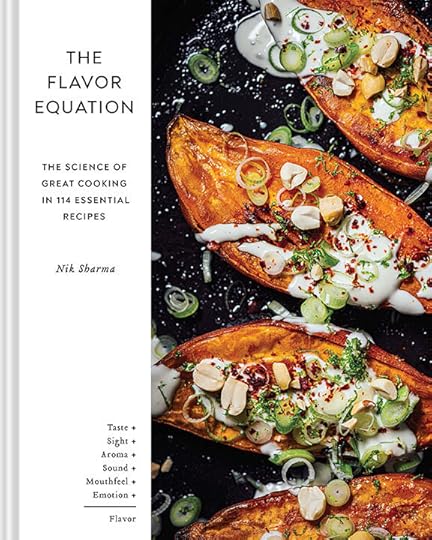
Option 2
I can’t wait to share it with you. Watch your inboxes tomorrow as you get to the be the first to see the cover of my new book, The Flavor Equation: The Science of Great Cooking.
xx
Nik
April 24, 2020
sourdough starter soup
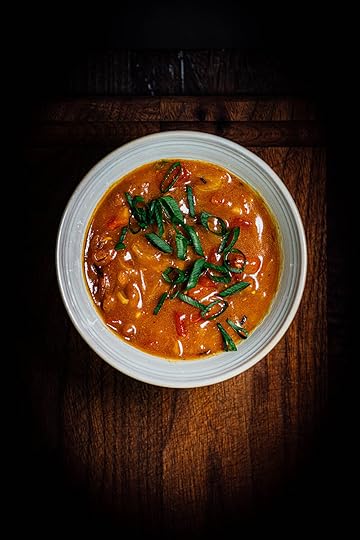
I have a new recipe up at my column at the San Francisco Chronicle this week and it’s a way for you to use up your sourdough starter to make soup. The acid in the starter will act as a souring agent and the starch in the flour will help the thicken the base of your soup, so its 2 for 1 but an easy way to reduce waste. The recipe for the soup is quite simple and easy and I've given options for you to manipulate and make it your own.
Another fun way to utilize some pantry staples is this quick and easy, flavorful hazelnut-cucumber salad that is dressed with mustard oil that I wrote for Serious Eats.
Stay safe and don’t forget to check in on Sunday, when I reveal some of the different cover options that went into making my new cookbook.


